1
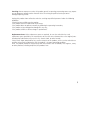
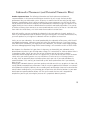
Classico CLS-10 / 12 Subwoofer
Owner’s Manual
www.roundsound.com
Anthony Gallo Acoustics, 20841 Prairie Street, Chatsworth, CA 91311 USA
Phone (818) 341-4488 • Fax (818) 341-2188
WARNING
WARNING: TO REDUCE THE RISK OF ELECTRIC SHOCK, DO NOT REMOVE COVER (OR BACK). NO
USER-SERVICEABLE PARTS INSIDE. REFER SERVICING TO QUALIFIED SERVICE PERSONNEL.
WARNING: TO REDUCE THE RISK OF FIRE OR ELECTRIC SHOCK, DO NOT EXPOSE THIS APPARATUS
TO RAIN OR MOISTURE. OBJECTS FILLED WITH LIQUIDS, SUCH AS VASES, SHOULD NOT BE PLACED
ON THIS APPARATUS.
WARNING: DURING OPERATION, UNIT MAY BECOME HOT. ALWAYS PROVIDE ADEQUATE
VENTILATION TO ALLOW FOR COOLING. DO NOT PLACE NEAR A HEAT SOURCE, OR IN SPACES
THAT CAN RESTRICT VENTILATION.
CAUTION
CAUTION: TO PREVENT ELECTRIC SHOCK, MATCH WIDE BLADE OF THE PLUG TO THE WIDE SLOT
IN THE RECEPTACLE AND FULLY INSERT.
CAUTION: FOR CONTINUED PROTECTION AGAINST FIRE, REPLACE THE FUSE ONLY WITH THE
SAME AMPERAGE AND VOLTAGE TYPE ORIGINALLY INSTALLED. REFER REPLACEMENT TO
QUALIFIED SERVICE PERSONNEL.
This symbol warns user that uninsulated voltage within the unit may have sufficient magnitude to cause
electric shockl. Therefor, it is dangerous to make any kind of contact with any part inside this unit.
This symbol alerts the userthat important literature concerning the operation and maintenance of this unit has
been included. Therefore, it should be read carefully in order to avoid any problems.
Contents
Introduction
Welcome to the Anthony Gallo Acoustics family! ...............................1
Important Safety Instructions ..........................................................2-3
Proprietary AGA Technology ..............................................................4
CLC-10 / 12 Subwoofer Highlight Features.........................................5
Installation
Unpacking and Inspection.................................................................6
Control Settings and Connecting Your Classico CLS10/12 .............7-12
Subwoofer Placement (and Potential Domestic Bliss)
Another Important Note...................................................................13
General Subwoofwer Placement Recommendations.....................14-17
CLS-10/12 Specifications
CLS-10/12 Specifications .............................................................18-19
Warranty and Extended Service Agreement ......................................20
Service ...................................................................................................21
i
Copyright Information
Copyright © 2012 Anthony Gallo Acoustics. All rights reserved.
This material may not be reproduced or copied, in whole or in part, without the written
permission of Anthony Gallo Acoustics.
ii
Introduction
Welcome! We’ve worked hard to fill this manual with useful information. Take a few
minutes to read through it for easier system setup and better in-room sonic performance. The manual
also will acquaint you with several unique features Anthony Gallo Acoustics Classico subwoofers offer
that typical subs don’t. After you’re done reading, if you have any questions about your new
Classico CLS-10 / 12, don’t hesitate to contact us directly at 1-800-459-4183, or e-mail
[email protected].
Welcome to Anthony Gallo Acoustics
Thank you for purchasing an Anthony Gallo Acoustics (AGA) subwoofer. Since we first started designing
speakers in 1994, we have continually invested in advanced engineering, modeling, and testing to
ensure that AGA products deliver outstanding performance and value
throughout the range. We hope you—like so many industry reviewers—will be thrilled with the quality
of bass response and system integration that your new AGA subwoofer delivers.
This manual is for the Classico CLS-10 / 12 subwoofer. The full Classico line includes two compact
bookshelf systems, (CL-1 and CL-2); two floor-standing models, (CL-3 and CL-4); a dedicated center
channel (CL-C); and two matching subwoofers, (CLS-10 and CLS-12). Therefore, you can set up
anything from a pure stereo system to various multi-channel,
surround sound systems using voice-matched Classico models. Whether you’re setting up an
audiocentric stereo listening room or a surround-sound media system, AGA’s Classico Series will
enhance
your listening and viewing experience.
1
Important Safety Precautions
Important Safety Instructions
Read and Retain These Instructions: All the safety instructions should be read before the product is
operated. Keep them for later reference.
Follow These Instructions: All operating and use instructions should be followed.
Water and Moisture: Do not use this product near water: for example, near a bathtub, wash bowl,
kitchen sink, laundry tub, wet basement, swimming pool, and the like.
Accessories: Do not place this product on an unstable cart, stand, tripod, bracket, or table. The product
may fall, causing serious injury to a child or adult, and serious damage to the product.
Ventilation: There may or may not be slots and openings in the cabinet provided for ventilation. These
openings ensure reliable operation of the product and protect it from overheating. They must not be
blocked or covered. The openings should never be blocked by placing the product on a bed, sofa, rug,
or similar surface. Even if there are no slots or openings, this product should not be placed in a built-in
installation such as a bookcase or rack unless proper ventilation is provided and the manufacturer’s
instructions have been adhered to.
Power Sources: This product should be operated only from the type of power source indicated on the
product label. If you are not sure of the type of power supplied to your home, consult your product
dealer or local power company.
Grounding and Polarization: This product may be equipped with a polarized alternating current line
plug (a plug having one blade wider than the other). This plug will fit into the power outlet only one
way. This is a safety feature. If you are unable to insert the plug fully into the outlet, try reversing the
plug. If the plug still doesn’t fit, contact your electrician to replace your obsolete outlet. Do not defeat
the safety purpose of the polarized plug by using an adaptor unless the adaptor is grounded safely.
Power-Cord Protection: Power-supply cords should be routed so they won’t be walked on or pinched
by items placed upon or against them. Pay particular attention to cords at plugs, convenience
receptacles, and the point at which they enter the product.
Lightning: For added protection for this product during a lightning storm, or when it is left unattended
and unused for long periods of time, unplug it from the wall outlet. This will prevent damage to the
product due to lightning and power-line surges. It is beneficial to use a surge suppressor for this
product as well as the entire system, if possible.
Overloading: Do not overload wall outlets, extension cords, or integral convenience receptacles as this
can result in a risk of fire or electric shock.
Object and Liquid Entry: Never push objects of any kind into this product through openings. They may
touch dangerous voltage points or short circuit parts that could result in a fire or electric shock. Do not
expose this apparatus to dripping or splashing, and ensure that no objects filled with water, such as
vases, are placed on it.
2
Servicing: Do not attempt to service this product yourself as opening or removing covers may expose
you to dangerous voltage or other hazards. Refer all servicing to qualified service personnel.
Damage Requiring Service:
Unplug this product from wall outlet and refer servicing to qualified personnel under the following
conditions:
if liquid has been spilled onto the product;
if the product has been exposed to rain or water;
if the product does not operate normally by following the operating instructions;
if the product as been dropped or damaged in any way;
if the product exhibits a distinct change in performance.
Replacement Parts: When replacement parts are required, be sure the technician has used
replacement parts specified by the manufacturer or have the same characteristics as the original parts.
Unauthorized substitutions may result in fire, electric shock, or other hazards.
Safety Check: Upon completion of any service or repairs to this product, ask the service technician to
perform safety checks to determine that the product is in proper operating condition.
Heat: The product should be situated away from heat sources such as radiators, heat registers, stoves,
or other products (including amplifiers) that produce heat.
3
Proprietary AGA Technology
The Classico Series was designed from the outset to deliver the exceptional performance for which AGA
has become famous, yet to present a more traditional look. This makes it easy to incorporate our
Classico series in practically any environment.
The unique technology used in these AGA products was specifically developed by Anthony Gallo and
cannot be found in any other subwoofers. This technology contributes to an enhanced level of bass
output, precision bass reproduction, and dynamic range not found in other subwoofers anywhere near
the CLS-10 / 12’s price.
Backwave Linearization and Synchronization Technology (BLAST)
AGA’s newest technology is the implementation of the BLAST System. Benefits of the BLAST system
include an improved acoustic impedance match between the woofer and the air within the enclosure.
This allows the CLS-10 / 12 to play louder while delivering exceptional bass and performing like a
subwoofer considerably larger than its actual size. The BLAST system incorporates an enhanced version
of our S2™ internal damping technology that is strategically placed within a modified transmission line
enclosure design.
Enhanced S2 with a Modified Transmission Line AGA’s patented S2 technology is a simple, yet
powerful, approach to solving various problems inherent in the internal acoustics of any loudspeaker.
S2 is a material that acts to neutralize the effects of internal resonances within the enclosure while
simultaneously damping internal reflections (echoes). A further benefit of S2 is the enhancement of
the woofer’s low-frequency extension. Unlike typical enclosure damping materials (fiberglass, Dacron,
etc.), S2 mechanically “couples” with the rear pressure waves within the enclosure at low frequencies.
The result is that it not only “tricks” the driver into behaving as if it were in a larger enclosure, it
actually lowers the resonant frequency of the driver/enclosure combination. This enables it to produce
deeper and more powerful bass than it ordinarily would. In fact, this is precisely the innovation that
made the original Gallo Micro and other compact Gallo speakers deliver surprisingly full-range sound
from very compact enclosures.
The combination of BLAST, S2 technology, and our modified transmission line creates a subwoofer that
sounds much larger than its actual size and delivers real-life impact without ever sounding muddy.
For more information on Gallo Acoustics design and technology, please go to www.roundsound.com
4
CLS-10 / 12 Subwoofer Highlight Features
Internal Crossover Bypass: Lets you set the crossover for your satellite speakers in your preamplifier,
surround sound receiver, or processor while bypassing the internal crossover in the CLS-10 / 12. This
method, detailed further in the manual, is ideal if you’re using compact speakers in your system. There
can also be benefit to this method even if you’re using larger speakers, as we’ll detail below. The result
is improved integration between the smaller speakers and subwoofer with dramatically improved bass
performance at and around the crossover point.
Note: For our purposes in this manual, when we say “satellite speaker,” we’re not only talking about
small speakers, we’re referring to any size speaker used as the left or right in a stereo system or in any
of the L/C/R or surround positions in a surround sound system.
Bass EQ: Provides the ability to maximize the CLS-10 / 12’s performance in your room by giving you the
option of adding 3 or 6dB more bass. Remember, more bass isn’t always the goal with a high-quality
audio system. When properly set up, your Classico subwoofer should effectively add significant deep
bass impact to music or movie special effects without calling undue attention to itself. It will simply
blend in with the output of the satellite speakers and not sound like a separate entity.
As often happens with someone who wants accurate music reproduction, you may find that 3 or 6dB
of bass boost is great for movie special effects but less or no bass boost works best for music. We
suggest that you experiment with the Bass Boost control to find your preferred setting(s). To some
extent this will depend on the placement of the subwoofer in the room, and your personal preferences
as to what sounds right to you.
Enclosure Design: AGA has built an enviable reputation using innovative speaker enclosures to
eliminate the typical problems inherent in traditional speaker-box designs. The Classico series continues
this philosophy by incorporating thick enclosure walls with critically placed internal bracing and sloped
baffles to reduce internal reflections. The result is a continuation of AGA’s “boxless sound”
performance advantage, even though Classico speakers and subwoofers technically are in box-type
enclosures.
5
Installation
Unpacking and Inspection
Carefully inspect your new subwoofer immediately after unpacking. If you note any concerns or
shipping damage, please contact your dealer. Do not plug in, install, or use your CLS-10 / 12 if it
appears damaged.
Record the serial number found on the back of your AGA Subwoofer here: ________________________
Please go to http://www.roundsound.com/product-registration.php and use the serial number(s) above
to complete your warranty registration.
Note: We encourage you to retain all packaging from your product in case you need to transport or
ship it in the future. Many AGA products utilize packaging materials that are not available off the
shelf due to their unique and unconventional shapes.
Additional Items Required for Installation
The following additional items may be required when installing your Classico CLS-10 / 12 and
connecting it to your system:
Connecting Wire: If you are connecting through Line level, you will need at least one appropriatelength, high-quality, RCA-type unbalanced audio cable. If you wish, you can run two cables, one for
each channel to the CLS-10 / 12.
If you are connecting using High (speaker) level, AGA recommends high-quality, 18-ga. or larger
connecting wires.
There are many quality speaker and RCA wires available. You can discuss the possibilities with your
AGA dealer.
Adjustable Wrench: A small adjustable wrench can be used to carefully tighten the High level speaker
connections if you are using them.
Attaching the Grilles: The Classico Series grilles are held on to the speakers by magnets imbedded in
the baffle itself. Simply place the grille carefully in position, and it will “latch on” to the subwoofer.
6
Control Settings and Connecting Your Classico CLS-10 / 12
LEGEND
1
PHASE
180°
0°
2
1. PHASE TOGGLE
CAUTION
BYPASS
RISK OF ELECTRIC SHOCK
DO NOT OPEN
WARNING: SHOCK HAZARD-DO NOT OPEN
AVIS: RISQUE DE CHOC ELECTRIQUE-NE PAS OUVRIR
CAUTION:
CROSSOVER
3
LINE IN
4
LINE OUT
TO REDUCE THE RISK OF FIRE,REPLACE
WITH ONLY THE SAME TYPE AND RATING OF FUSE
MODEL NO: CLS-10
SN#
POWERED SUBWOOFER
CAUTION
BEFOREOPENING
PULL MAIN PLUG
L
R
VORSICHT
2. BYPASS/CROSSOVER TOGGLE
3. LINE IN
4. LINE OUT
LEVEL
VOR DEM ÖFFNEN
NETZSTECKER ZIEHEN
5
5. LEVEL
MAX
MIN
ON AUTO OFF
6. ON/AUTO/OFF TOGGLE
6
115V
230V
+6dB +0dB +3dB
Input voltage
7
BASS BOOST
11
CROSSOVER
L-
10
R-
L-
9
8
R50Hz
ANTHONY GALLO
ACOUSTICS
7.
BASS BOOST TOGGLE
8.
CROSSOVER DIAL
9.
HIGH LEVEL IN
200Hz
POWER
10. HIGH LEVEL OUT
Chatsworth.CA.USA
~100-120V/60Hz Fuse:T5.0AL/250V
~220-240V/50Hz Fuse:T2.5AL/250V
www.roundsound.com
11. PLUG RECEPTICAL & FUSE DRAWER
L+
R+
HIGH LEVEL OUT
L+
R+
HIGH LEVEL IN
Caution: Failure to turn off the receiver, surround sound processor/preamp or amplifier and unplug it
from the power outlet before connecting your subwoofer may result in damage to your system. You
should always turn off these components before making or changing any connections. Keep the
subwoofer unplugged from the AC source until you have made all connections as well.
Important Note: The recommendations here concerning crossover settings and using the high or low
level connections are based upon most typical satellite/subwoofer systems. Please check the
recommendations for these settings contained in the instructions for your satellite speakers and follow
those first. If there are no instructions, you can check on the satellite speaker manufacturers’ website
or contact the manufacturer directly. Certain Gallo satellite speakers have such recommendations in
the Owner’s Manual, and these should take precedence over the information here.
Note: Please refer to the above graphic for all issues regarding connections and controls.
7
CLS-10 / 12 Subwoofer Controls and Connections
Level Control - This knob matches the subwoofer’s output to that of the main speakers. Clockwise
rotation increases the subwoofer output, counter-clockwise decreases it. You should only need to set
this control once, after you’ve installed the CLS-10 / 12 in its final position (re-check the level after
break-in). Afterwards, the master volume control on your preamp, integrated amp, surround sound
processor, or receiver will adjust the volume of your main speakers and subwoofer in tandem. The
CLS-10 / 12s level control merely sets the relative balance between the sub and satellite speakers. Think
of it as a one-time balance adjustment between them. If you have access to a simple SPL meter, it can
help you set the levels more accurately, particularly in a surround sound system. It’s difficult to set these
levels precisely “by ear,” particularly the subwoofer level. See links to some test equipment below. Due
to our driver design and the “settling-in” characteristics of the S2 material, Gallo Acoustics subwoofers
tend to play significantly louder after they’ve played for a while. Please be sure to reset the sub level
after approximately 50 to 100 hours of use.
Crossover Frequency: This control is variable from 50Hz to 200Hz. In technical parlance, it’s really a
low-pass filter. A low-pass filter does exactly what its name implies. It determines the frequency below
which signal is passed. Set to 50Hz, the CLS-10 / 12 will reproduce bass below 50Hz. Set to 200Hz, it
will reproduce bass and lower midrange below 200Hz. Set this control based upon the frequency range
capabilities of the other speakers in your system as outlined below.
As a general guideline, compact speakers usually require a crossover in the range of 80 to 120 Hz.
Larger and/or more bass capable speakers can be crossed over lower, but in most systems the best
room location for producing good bass response throughout the listening area is generally not the
best location for the mid- and high-frequency-producing speakers.
One of the biggest benefits of adding a subwoofer to your system is that you can place the sub in an
optimum location for good bass reproduction without worrying about the rest of the frequency
spectrum that’s delivered by the other speakers. Therefore, there will likely be benefit from crossing over
even larger, bass-capable satellite speakers at 80 to 100Hz and spending the time to carefully locate the
subwoofer for optimum performance in your room. However, should you have very compact satellites
with 2-inch or smaller drivers running “full range,” you may need to set the crossover frequency higher.
Please check with the satellite manufactures’ literature to see if they offer any recommendations in this
regard. Please see “Subwoofer Placement” below and our website for further information.
8
CLS-10 / 12 Subwoofer Controls and Connections
Line-in/Line-out, Speaker-In/Speaker-Out (or Low-Level/High-Level Connections)
Line Level Connections: These are the most commonly used inputs. If you have a contemporary
surround sound receiver or processor, it will have outputs labeled “LFE” or “Subwoofer.” Often this is a
single RCA jack. You should run a cable with male RCA connectors on either end from this output to
the left or right Line In receptacle on the sub. If your electronics offer two subwoofer outputs or you
have a “Y” connector, you can feed signal to both the left and right subwoofer line inputs. This will
result in higher drive voltage delivered to the subwoofer and it will play louder with a lower setting of
its level control. Please note that the ultimate output capability of the subwoofer will not change; you’ll
just be getting more bass at a lower level setting on the subwoofer’s control panel. Also, please see the
crossover setting information below.
Bass Management: If your system includes a contemporary home-theater receiver or surround
processor with bass-management capability, use this feature. Enter the speaker setup menu in the
electronics and set the satellite speakers to Small as noted above. Then choose the crossover frequency
in the receiver/processor based upon the size of your speakers and the recommendations in this manual
(more detailed information is available on our website). Be sure to set the CLS-10 / 12’s crossover
bypass switch to Bypass, which eliminates the internal crossover in the subwoofer and makes your
electronics bass management settings the default mode. Set the electronics’ bass management to Yes
for subwoofer.
Once you’ve set the system speakers to Small and bypassed the subwoofer internal crossover, start with
an 80Hz crossover frequency in the electronics and check the overall bass impact and sound quality.
This recommendation is true for the Classico 1 through 4 models. However, the CL-3/4 (or other, large,
powerful speakers) warrant more experimentation because they should be capable of delivering substantial bass.
Further Bass Management Observations: You can experiment with other frequencies, of course, but
years of experience have shown that 80Hz is often the best compromise for most systems except those
with small satellite speakers (those with 3- or 4-inch woofers). For these systems, crossovers in the 100
to 120Hz range are generally best. You’re trying to get good bass extension and impact, yet you should
not be able to localize the subwoofer or hear it as a separate entity.
For AGA compact speakers such as the Nucleus® Micro or A’Diva®, we recommend the crossover
mode as described above. This minimizes the chances of overdriving them with movie special effects
9
CLS-10 / 12 Subwoofer Controls and Connections
which can be far more demanding than the vast majority of musical recordings. As noted above, enter
your receiver or surround processor setup menu and select Small for the speakers. Then enter the
bass-management section of the menu and set the crossover to between 100 and 120Hz for the
Nucleus® Micro or between 80 and 100Hz for the A’Diva®. These ranges reflect satellite variables of
wall-mounting (with bass reinforcement) and free-air placement (minimized bass extension). Be sure to
set the electronics bass management to Yes for subwoofer. Now connect the subwoofer using an
RCA-type cable from the Subwoofer/LFE output of your receiver or surround processor. Then set the
CLS-10 / 12’s crossover bypass switch to Bypass, which eliminates the internal crossover and makes your
electronics’ bass management settings the default mode.
WARNING: Running compact speakers contrary to these filtering instructions (i.e., full range) can cause
damage to satellite speakers made by us or other manufacturers and may not be covered under warranty.
In spite of our recommendation above, if you wish to have your satellite speakers reproduce full- range
bass—and they are capable of doing so—set your receiver or surround processor’s speaker size menu
choice to Large. Set the Subwoofer Yes/No to Yes in the electronics’ speaker settings menu. Next,
consult the Owner’s Manual of your speakers for their frequency response specification. This will be
given as two figures (for example, “55Hz to 20,000Hz +/-3dB”). The lower figure describes the
speaker’s bass extension. Because a subwoofer, by definition, reproduces bass below the main speaker,
set the CLS-10 / 12’s crossover frequency control to 55Hz in our example. Remember that a –3dB spec
already includes 3dB of rolloff. Use such a figure merely as a starting place for the crossover control.
Fine-tune by ear. You might end up at 70Hz or 40Hz depending on the real-world performance of the
satellite speakers and how they and the subwoofer interact with the room.
High-Level Inputs/Outputs: There’s a built-in 100Hz, 6dB / octave passive crossover between the
High-Level inputs and outputs of the CLS-10 / 12. It allows for limited bass management at speaker
level as detailed below. In systems in which you’d like to send a full-range signal to the satellite
speakers and still enjoy the subwoofer using the High-Level connections, connect TWO SETS of speaker
cables to the speaker output terminals of your receiver or amplifier. Run one set to the High Level In
terminals of your CLS-10 / 12 and the second set directly to your stereo speakers. In this manner, you’ll
bypass the CLS-10 / 12’s built-in High Pass 100Hz crossover. Use care in this instance because you’ll be
driving the satellite speakers full range, risking overdriving their woofers and/or clipping the amplifier.
10
CLS-10 / 12 Subwoofer Controls and Connections
The 100Hz filter mentioned above allows bass management at speaker level. The built-in filter subtracts
bass below 100Hz from your satellite speakers and should be used if your receiver or amplifier lacks
bass management and you don’t want to run the satellites full range. Running very small satellite
speakers at high levels, full range, risks damaging them. Since you now have a subwoofer take the burden of trying to reproduce deep bass off the satellites and let the sub handle it. (generally recommended).
In such a hookup, connect the speaker wires from your amplifier/receivers’ speaker output connectors
to the CLS-10 / 12 High Level In binding posts, then connect another set of speaker wires from the subwoofer’s corresponding channel High Level Out terminals to the input terminals of the appropriate
speaker. Remember to set the subwoofer Crossover control to 100Hz to match the internal variable
low-pass to the fixed high-pass.
Bass Equalization: This control selects between 0, +3dB and +6dB. Adjust for the best bass performance in your room keeping in mind that the primary goal should not just be more bass—quantity is not
always quality. Ideally, the transition between sub and main speakers should remain seamless and
inaudible. If you can identify the location and presence of the CLS-10 / 12, your subwoofer volume, the
crossover point, or the EQ is probably set too high (or some combination of the three).
Phase: This switch adjusts the relative phase between the subwoofer and main speakers. This is set
properly when the subwoofer plays most evenly and fully for any given setting of its level control with a
smooth crossover transition to the satellite speakers. The easiest way to test this is in the prime listening
seat while someone else alters the phase control setting. Use either a test-tone generator (there are free
software tone generators available online that let you use your computer to produce test tones; see
links below), test tones from a test CD/DVD, or music that has bass that runs up and down the scale
from deep bass to mid-bass. In particular, pay attention to the transition from the subwoofer to the
satellites with the Phase switch in both positions.
AC Line Cord: This supplies power to the CLS-10 / 12’s internal electronics. The CLS-10 / 12 must be
plugged in to the proper power 110/220 receptacle in order to operate properly.
Fuse: This fuse protects the CLS-10 / 12 from abnormal power conditions. It’s located under a small
cover as part of the AC line cord socket. Use only a T2.5A 250V fuse when operating on 115V. Use only
a T1.5A 250V fuse when operating on 230V. If replacement of the fuse does not solve the problem and
11
CLS-10 / 12 Subwoofer Controls and Connections
the fuse blows again, disconnect the power cord from the AC wall supply and contact your local Gallo
Acoustics dealer, or contact us directly.
Dual Subwoofer Connections
Connection Using High-Level (Speaker-Wire) Inputs: Instead of running Left and Right Channel speaker
cables from your receiver or amplifier to both subwoofers, you can run the Left Channel to one subwoofer and the Right Channel to the other. Take care to make Positive to Positive (Red / +) and
Negative to Negative (Black / -) terminal connections.
Note: When the High-Level Inputs are used, the speaker-level output terminals of the subwoofer have
available a 100Hz high-passed signal (deep bass removed) that can be used to drive the satellite
speakers. This gives you a limited form of Bass Management and can be used for the Main L/R, center,
or surround speakers, depending upon how many subwoofers are employed.
Connection Using Low-Level (RCA-Cable) Inputs: From your receiver or preamp, attach an RCA-type
“Y” connector to the Sub/LFE out (unless your receiver/processor already has two Sub/LFE outputs).
Connect an RCA-to-RCA interconnect cable from one leg of the Y connector or one of the two
receiver/processor Sub/LFE outputs to each subwoofer’s Low-Level/LFE input. In this setup, the satellite
speaker connections are made between your receiver or amplifier in a traditional manner. If you’re
connecting multiple Gallo subwoofers using the Line Level RCA connections you can “daisy chain”
from one to the next using the RCA In and RCA Out connectors on each sub.
12
Subwoofer Placement (and Potential Domestic Bliss)
Another Important Note: The following information and further placement and acoustic
recommendations in this manual are based upon our desire for you to enjoy the best possible
performance from your AGA audio system. Of course, we realize that there are other, possibly more
important, considerations when it comes to placing your system components, not the least of which
may be aesthetics and domestic tranquility. We’ve provided this information to give you options in this
regard should you have to choose a balance between aesthetics and audio performance. If we can be
of further assistance, please contact us at www.roundsound.com or call us toll free at 1-800-459-4183
from within the United States, or 818-341-4488 from outside the United States.
With AGA satellites, you can try placing the subwoofer in the same plane as the main speakers—in
front of you and equidistant with the satellites from your listening seat. The smaller and more bass-shy
your main speakers are, the higher the subwoofer will have to operate to meet them.
Unless you use two subwoofers, the sound reproduced by the subwoofer will be mono, which should
not degrade performance. It becomes stereo only where the satellites take over. If you listen to more
music than movie soundtracks, you might prefer two subwoofers. This extends stereo imaging through
the lower midrange/upper-bass range where human hearing is still somewhat sensitive to these effects.
Bass becomes less directional as it goes lower in frequency, so theoretically your subwoofer can be
located almost anywhere in your listening room as long as it is crossed over at 120Hz or below. When it
is crossed over above 120Hz, you may start to hear the deeper part of male voices and other
undesirable sounds coming from the sub. As a general rule, it’s best not to cross over to the sub above
180Hz unless your satellite speakers use very small drivers (2 inches or less) as full-range elements.
In reality, there are potentially better and worse places to put your sub. If you read and follow the
recommendations in this manual, you should end up with better performance than if you arbitrarily
place the sub.
Locating your subwoofer between your front speakers or beside one of them, up against the front wall,
usually provides acceptable bass performance. And this may be a good aesthetic location in an attempt
to keep domestic tranquility. However, due to standing wave considerations (more can be found on our
website about standing waves), we encourage you to experiment with different locations in your room
based upon our recommendations below, until the system sounds the best and is acceptable to
complement your lifestyle (assuming the presence of a sympathetic domestic partner).
13
Subwoofer Placement (and Potential Domestic Bliss)
General Subwoofer Placement Recommendations (Assuming a Rectangular Room):
1. Every boundary surface (wall, floor, etc.) directly next to which you put the sub results in more
apparent bass in the room. Corner placement (three boundary surfaces) provides maximum apparent
output from the sub. This effectively increases the subwoofer’s efficiency, which in turn increases your
system’s maximum output and improves the dynamic capability of the subwoofer. However, corner
placement frequently results in uneven bass response throughout the room with multiple “boomy”
areas and bass “suck outs.” It may be possible to improve corner placement performance somewhat by
moving the sub out, away from the corner and/or the moving the primary seating position. With corner
placement, it can be difficult to get multiple “good bass seats” in the room. This can be more of a
concern in home theaters, where several listeners may be involved.
2. While the CLS-10 / 12 has been designed to deliver an excellent listening experience by itself,
research has shown the use of two subwoofers has the potential to enhance your system’s performance
by providing smoother, more consistent, low-frequency in-room response. With two subs, you can try
locating the subwoofers on the same wall of the room as the main speakers, with each subwoofer
connected to the adjacent speakers’ channel. You can also try locating each subwoofer precisely 1/4 of
the way out from the corner, along the front wall with the main speakers. This results in less apparent
bass than corner placement but smoother in-room response. Because you’ve got two subs, you should
have adequate output.
3. The most consistent bass response throughout the room (generally resulting in several good bass
seats) is realized with a sub placed precisely at the center of the front and back or side walls. If this
isn’t possible, try the 1/4-way placement mentioned above. In either case, the subs are fed the
combined subwoofer output from the Sub/LFE output of the electronics. (See below, “Placing One or
Two Subwoofers in Your Listening Area.”)
4. Please note that frequency response and output level are greatly influenced by the subwoofer’s
placement. If you have not chosen to use the 1/2- or 1/4-way options above, movement of the sub by
only a foot or two can dramatically change your combined subwoofer and room bass response
characteristics. We recommend that you experiment with placement in your listening room in order to
achieve the best performance from your subwoofer while considering the décor and layout of the
room, too. If you are installing a home theater, remember to evaluate the sub’s performance at more
than just the primary seat.
14
Subwoofer Placement (and Potential Domestic Bliss)
5. As noted above, corner placement provides the most bass quantity, but generally at the expense of
bass quality. A subwoofer placed near a wall (especially as outlined above) can often provide a
reasonable balance of quantity and quality. Controls on the back panel of your subwoofer are provided
to help align your subwoofer’s output to the other speakers in your system.
6. Placement inside a cabinet or cavity: Since your AGA subwoofer utilizes our patented S2 bass loading
technology and is composed of an ultra-rigid enclosure, you can place it inside of a cabinet or cavity
and still achieve outstanding performance without the “muddy” or “boomy” bass that plague many
subwoofers when located this way. Be sure to allow for ventilation, as the subwoofer amplifier does
generate some heat. Also be sure that the shelves and doors of the cabinet are solidly installed to
minimize rattles. Finally, there must be an opening from the cabinet to the room for the bass pressure
waves to exit the cabinet. Do not place the subwoofer’s vent opening closer than 8 inches to a solid
surface.
The Advantage of Using Multiple Subwoofers
All Anthony Gallo Acoustics subwoofers were designed to be used singly or in multiples. With a single
subwoofer, both left and right signals are combined (either at the subwoofer input or at the
receiver/processor output). With stereo subwoofers, the left and right low-frequency signals can be
reproduced by their own individual subwoofers. Stepping up from a single subwoofer to a pair offers a
much higher level of performance and provides up to four times the output level, for both movies and
music. Note: If your primary focus is listening to music, then a stereo subwoofer configuration can be
truly outstanding!
In addition to the above-mentioned setup for front-located subwoofers, some advanced home-theater
installations have begun to use one subwoofer in the front and one in the rear or along the side walls
of the room as described above. Locating the subwoofers precisely (the woofer cone should effectively
“split” the center line or quarter line of the room) at the center of the front and back or side walls
results in more accurate bass performance, enhanced sonic integration, and several good bass seats. If
wall center placement is not possible, locating the subs 1/4 of the way out from the corner along the
front and rear or side walls in lieu of 1/2 of the way also results in more consistent bass throughout the
room.
If All Else Fails, Try This…
1. Temporarily turn off all speakers (either by turning off the amplifier or disconnecting them).
15
Subwoofer Placement (and Potential Domestic Bliss)
2. Connect and place one subwoofer by moving your primary listening chair aside and placing the
subwoofer exactly where you normally sit. (Follow directions for connection, as outlined above.)
3. At a moderately loud level, play music or a video soundtrack with extended bass that is repetitive or
continuous.
4. Walk around your room and note where the bass sounds good and where it sounds boomy or very
quiet. Note that “good” does not necessarily mean “loudest.” Good bass should be clear and have
well-defined notes, if you’re listening to music (which we recommend).
5. You should find more than one location that sounds good. Placing the subwoofer(s) precisely at
these locations generally results in good bass performance at the listening seat, assuming it is in an
aesthetically acceptable location.
6. Re-position the subwoofer(s) as described above and switch all speakers back on.
7. Follow “System Optimization” instructions after the “Subwoofer Connection” section to optimize
your system’s overall bass performance.
The preceding is only a guideline. You may want to use a bass test disc and SPL meter to more accurately determine the bass characteristics of your listening room (see your AGA dealer for more information). Remember that room acoustics vary, so it almost always takes some experimenting with placement to achieve best performance. The result will undoubtedly be better system performance and lots
more smiles per song and movie.
Below are some links to sources for free test tones and test-tone generators. If you can’t connect a
computer to your system as a source, you can record some of these test tones onto a CD or DVD using
your computer and then play them back in your system. Use extreme caution when playing these test
tones by always turning down the volume completely before you play them. Bring up the volume
gradually and within reason.
There are also links to a couple of inexpensive SPL meters that were available at the time of this writing
which can be used to set levels properly in your system. For more information on how to set levels
using an SPL meter, please see our website.
http://www.mediacollege.com/audio/tone/download/ (Individual test tones, 100Hz to 10kHz)
http://www.audiocheck.net/ (Test tones, test-tone generators, etc.)
http://www.ronelmm.com/tones/ (Individual test-tone files)
http://www.radioshack.com/product/index.jsp?productId=12680845 ($49.95 SPL meter)
http://www.zzounds.com/item--GXYCM130 ($59.95 SPL meter)
16
Subwoofer Placement (and Potential Domestic Bliss)
Stereo Review & Chesky Records: Gold Stereo and Surround Sound Set-Up Disc (ASIN: B000003GHE)
Also, some THX™ DVDs include test tones and other setup aids.
Operation Note: The Classico subwoofers are designed to be self cooling as the air that moves in and
out of the BLAST port passes over the amplifier’s heat sinks. The high-efficiency amplifier will actually
run warmer at idle than at full output. However, should the amplifier overheat, it will temporarily shut
down in order to protect itself. This protection feature can be reset by simply waiting a few minutes and
then cycling the power switch to Off and then Auto.
17
CLS-10 / 12 Specifications
CLS-10 Specifications
Frequency Response: 19Hz – 200Hz +/-3dB
Enclosure Type: BLAST Transmission Line using patented S2 bass loading
Power: 300 watts RMS, 600 watts maximum output
Amplifier Design: High efficiency Class D
Line Level Crossover In/Out: Bypass switch
Low Pass: 50Hz – 200Hz continuously variable
High Pass: 100Hz fixed, only on speaker level output
Phase: 0°, 180° switch
Bass EQ: 0, +3dB, +6dB, Center frequency - 25Hz
Woofer: 10-inch long-throw, ceramic anodized aluminum cone driver
Connections: line level - RCA jacks, speaker level - 5-way binding posts
Power: On / Auto / Off
Dimensions: 15.5” H x 12” W x 15.25” D, 39.37cm x 30.48cm x 38.74cm
Weight: 39.5 lbs., 17.92kg
Finishes: Real wood veneers, Dark Cherry or Black Ash finish
CLS12 Specifications
Frequency Response: 16Hz – 200Hz +/-3dB
Enclosure Type: BLAST Transmission Line using patented S2 bass loading
Power: 500 watts RMS, 1000 watts maximum output
Amplifier Design: High efficiency Class D
Line Level Crossover In/Out: Bypass switch
Low Pass: 50Hz – 200Hz continuously variable
High Pass: 100Hz fixed, only on speaker level output
Phase: 0°, 180° switch
Bass EQ: 0, +3dB, +6dB, Center frequency – 25Hz
Woofer: 12-inch long-throw, ceramic anodized aluminum cone driver
Connections: line level - RCA jacks, speaker level - 5-way binding posts
Power: On / Auto / Off
Dimensions: 20” H x 14” W x 16.75” D, 50.08cm x 35.56cm x 42.55cm
Weight: 63 lbs., 28.6kg
Finishes: Real wood veneers, Dark Cherry or Black Ash finish
18
CLS-10 / 12 Specifications
Warranty: 1 Year Parts and Labor (Extended to 2 Years Parts and Labor with registration through an
Extended Service Agreement)
Documentation is necessary for us to determine the purchase authenticity of all AGA products.
AGA does not authorize any online reseller of any type to sell our products, except our own site,
www.roundsound.com. If purchased from an unauthorized online reseller, there is no support or
warranty service provided for products purchased.
19
Warranty and Extended Service Agreement
Gallo subwoofers are covered by a one-year Limited Warranty against defects in workmanship and
manufacturing. In addition, we offer registered Gallo owners a free one-year Extended Service
Agreement. In order to qualify for the Extended Service Agreement you must fill out and return the
warranty card or register on our website:
https://www.roundsound.com/registration.php.
This will establish your ownership and activate the free Extended Service Agreement for your speakers.
When you enter the information, you will need the serial number of each subwoofer. The serial
numbers are located on the label at the rear of each sub.
The one-year warranty is valid for the original purchaser only and is not transferable or assignable. The
Extended Service Agreement also is only valid for the original registered purchaser.
Statement of Warranty: Anthony Gallo Acoustics Limited Warranty
You must purchase Anthony Gallo Acoustics products from an authorized AGA Dealer, GalloDirect.com,
or an authorized AGA Distributor in order to qualify for warranty service and to be eligible to receive
the one-year Extended Service Agreement. If you purchased your product from any other source, your
product(s) warranty is void, and you are not eligible for the Extended Service Agreement.
Anthony Gallo Acoustics warrants this product to be free from defects in materials and workmanship
under the specified terms stated above. Anthony Gallo Acoustics will, at its option, repair or replace
this product and/or any parts proven to be defective in materials or manufacture. The original sales
invoice must be presented along with the request for warranty repair by the original owner and the
product must be registered with Anthony Gallo Acoustics in order to verify ownership.
Terms of the Extended Service Agreement are the same as those within this warranty policy.
This warranty and the Extended Service Agreement will be void if:
1. The defect is a result of abuse, misuse, damage in transit, defective associated equipment, faulty
installation, the use of the unit with equipment for which it was not intended, or acts of God.
2. The unit has been operated contrary to instructions contained in this Owner’s Manual.
3. The unit has been serviced by unauthorized personnel.
20
Service
If your subwoofer requires repair:
1. In the United States, contact us at 1-800-459-4183 or e-mail [email protected]. If you
purchased your Classico subwoofer from an Authorized Gallo Acoustics dealer outside the United
States, please contact the dealer. It is necessary to have the original sales receipt available to confirm
warranty eligibility. Outside the United States, most AGA dealers should be able to help you with
problems and repairs of Classico products. If this is not the case, please contact us directly.
2. Outside the United States, if it is impractical or impossible to contact your original dealer, refer to the
Dealer Locator section found on www.roundsound.com. Locate your nearest authorized dealer and
contact the dealer to arrange for service.
3. If you purchased your AGA Classico product in the United States, you can send it to Anthony Gallo
Acoustics Factory Service. Carefully pack the product in its original carton, obtain a Return
Authorization as detailed below, and ship it to our service center. A copy of your receipt is necessary to
confirm ownership and warranty status. Please call the number listed above for an RA number. Have
available a description of the problem you are experiencing, your return address, and daytime phone
number. We suggest that you choose a carrier that provides shipment tracking and that you be sure to
insure the shipment for replacement value.
21