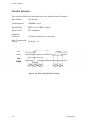
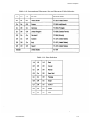
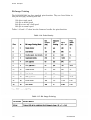
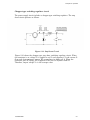
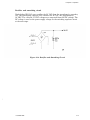
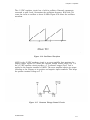
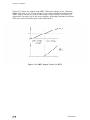
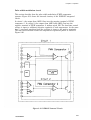
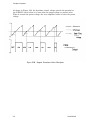
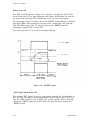
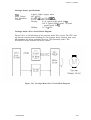
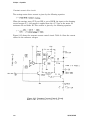
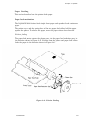
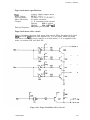
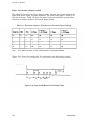
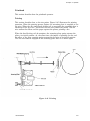
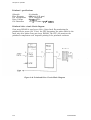
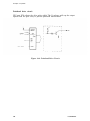
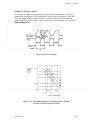
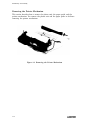
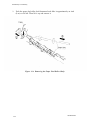
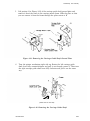
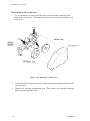
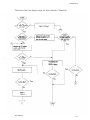
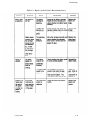
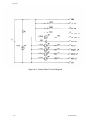
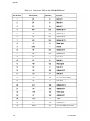
1
®
EPSON
LQ-200
TM
ActionPrinter 3000
Service Manual
Revision Level
I@ Printed on recycled paper.
FCC Compliance Statement
For American Users
This equipment has been tested and found to comply with limits for a Class B digital device,
pursuant to Part 15 of the FCC Rules. These limits are designed to provide reasonable protection
against harmful interference in a residential installation. This equipment generates, uses, and can
radiate radio frequency energy and, if not installed and used in accordance with the instructions,
may cause harmful interference to radio communications. However, there is no guarantee that
interference will not occur in a particular installation. If this equipment does cause harmful
interference to radio or television reception, which can be determined by turning the equipment off
and on, the user is encouraged to try to correct the interference by one or more of the following
measures:
l
Reorient or relocate the receiving antenna.
l
Increase the separation between the equipment and the receiver.
l
l
Connect the equipment to an outlet on a circuit different from that to which the receiver is
connected.
Consult the dealer or an experienced radio/TV technician for help.
CAUTION: The connection of a nonshielded equipment interface cable to this equipment
will invalidate the FCC Certification of this device and may cause interference levels that
exceed the limits established by the FCC for this equipment. It is the responsibility of the
user to obtain and use a shielded equipment interface cable with this device. If this
equipment has more than one interface connector, do not leave cables connected to unused
interfaces.
Changes or modifications not expressly approved by Epson America, Inc., could void the user’s
authority to operate this equipment.
For Canadian Users
This digital apparatus does not exceed the Class B limits for radio noise emissions from digital
apparatus as set out in the radio interference regulations of the Canadian Department of
Communications.
Le present appareil numérique n’èmet pas de bruits radioélectrique dépassant les limites
applicables aux appareils numériques de Classe B prescrites dans le règlement sur le brouillage
radioélectriques édicté par le Ministère des Communications du Canada.
LQ-2OO/AP3000
iii
Important Notice
Disclaimer of Warranty
Epson America makes no representations or warranties, either express or implied, by or with
respect to anything in this manual, and shall not be liable for any implied warranties of
merchantability and fitness for a particular purpose or for any indirect, special, or consequential
damages. Some states do not allow exclusion of incidental or consequential damages, of this
exclusion may not apply to you.
Copyright Notice
All rights reserved. No part of this publication may be reproduced, stored in a retrieval system, or
transmitted in any form or by any means, electronic, mechanical, photocopying, recording, or
otherwise, without the prior written permission of Epson America, Inc. No patent liability is
assumed with respect to use of the information contained herein. While every precaution has been
taken in the preparation of this publication, Epson America assumes no responsibility for errors or
omissions. Neither is any liability assumed for damages resulting from the use of the information
contained herein. Further, this publication and the features described herein are subject to change
without notice.
Trademarks
Epson and ESC/P are registered trademarks of Seiko Epson Corporation.
ActionPrinter is a trademark of Epson America, Inc.
General Notice: Other product names are used herein for identitication purposes only and may be
trademarks of their respective companies.
Copyright © 1991 by Epson America, Inc.
Torrance, CA 90509
iv
LQ-2OO/AP3000
Chapter 1
General Description
Features ........................................................................................... l-l
Specifications ................................................................................... 1-3
Hardware Specifications ............................................................ l-3
Firmware Specifications (ESCYP)............................................... l-9
Parallel Interface ............................................................................. 1-14
DIP Switches and Jumpers.............................................................. 1-18
DIP Switches.............................................................................. l-18
Jumpers ..................................................................................... l-20
Operating Instructions .................................................................... 1-21
SelecType ................................................................................... 1-21
Self Test ..................................................................................... 1-21
Demonstration ........................................................................... l-22
Hexadecimal Dump Function .................................................... l-23
Bit Image Printing .................................................................... l-24
Error Conditions ........................................................................ 1-25
Buzzer Operation ....................................................................... l-25
Printer Initialization ................................................................. 1-26
Default Values ........................................................................... l-27
Head Adjust Lever.. ................................................................... 1-28
Printhead Protection During Heavy Duty Printing.. ............... 1-29
Main Components............................................................................ l-29
CO64 MAIN PCB ....................................................................... l-30
Control Panel PCB .................................................................... l-30
PEBFIL-II PCB .......................................................................... 1-31
Transformer ............................................................................... 1-31
Model 5ClO Printer Mechanism................................................ 1-32
Housing ...................................................................................... 1-33
Chapter 2
Principles of Operation
Overview .......................................................................................... 2-l
Connector Summary .................................................................. 2-l
Overview of Printer Mechanism Operation .............................. 2-3
Circuit Overview........................................................................ 2-7
Firmware Overview ................................................................... 2-8
Principles of Operation .................................................................... 2-9
Power Supply Circuit ................................................................. 2-9
Reset Circuit .............................................................................. 2-25
Address Decoder and Bank Register ......................................... 2-29
Carriage Operation ................................................................... 2-30
Paper Feeding ........................................................................... 2-43
Printhead ................................................................................... 2-47
A/D Converter Circuit ............................................................... 2-52
Host Interface ............................................................................ 2-55
Ribbon Feed Mechanism............................................................ 2-56
LQ200/AP3000
V
Chapter 3
Disassembly and Assembly
General Repair Information ............................................................
Tools ...........................................................................................
Small Parts ................................................................................
Service Checklist .......................................................................
Disassembly and Assembly .............................................................
Removing the Printhead ...........................................................
Removing the Case.. ..................................................................
Removing the Circuit Boards.. ..................................................
Removing the Printer Mechanism ............................................
Disassembling the Printer Mechanism.. ...................................
Chapter 4
3-l
3-2
3-3
3-5
3-6
3-7
3-8
3-11
3-14
3-19
Adjustment
Adjustment Overview ...................................................................... 4-1
Adjusting the Platen Gap ................................................................ 4-1
Adjusting the Bidirectional Printing Alignment.. .......................... 4-4
VRl and VR2 Specifications ...................................................... 4-5
Adjustment Procedures ............................................................. 4-6
Chapter 5
Troubleshooting
Procedure for Troubleshooting the Printer ..................................... 5-1
Unit Replacement .......................................................................... 5-1
Repair of the Main Board.. .............................................................. 5-10
Repair of the Printer Mechanism .................................................... 5-17
Chapter 6
Maintenance
Preventive Maintenance . . . . . . . . . . . . . . . . . . . . . . . . . . . . . . . . . . . . . . . . . . . . . . . . . . . . . . . . . . . . . . . . . 6-1
Lubrication and Adhesive Application . . . . . . . . . . . . . . . . . . . . . . . . . . . . . . . . . . . . . . . . . . . . 6-1
LQ-2OO/AP3000
Appendix
A-1
Connector Summary........................................................................
Circuit Diagrams ............................................................................. A-3
Circuit Board Component Layout ................................................... A-7
Exploded Diagrams.......................................................................... A-8
A-12
Case Outline Drawings....................................................................
Subsequent product modifications will be brought to your attention via Service
Bulletins. Please revise the text as bulletins are received.
This document is subject to change without notice.
Note:
This manual uses minus signs (-) in front of signals to indicate that they
are active LOW signals.
LQ200/AP3000
vii
Chapter 1
General Description
Features ...........................................................................................
Specifications ...................................................................................
Hardware Specifications ............................................................
Firmware Specifications (ESCYP) ...............................................
Parallel Interface .............................................................................
DIP Switches and Jumpers..............................................................
DIP Switches..............................................................................
Jumpers .....................................................................................
Operating Instructions ....................................................................
SelecType ...................................................................................
Self Test .....................................................................................
Demonstration ...........................................................................
Hexadecimal Dump Function....................................................
Bit Image Printing ....................................................................
Error Conditions ........................................................................
Buzzer Operation.. .....................................................................
Printer Initialization .................................................................
Hardware initialization .......................................................
Software initialization .........................................................
Default Values ...........................................................................
Head Adjust Lever .....................................................................
Printhead Protection During Heavy Duty Printing.. ............
Main Components............................................................................
C064 MAIN PCB .......................................................................
Control Panel PCB ....................................................................
PEBFIL-II PCB ..........................................................................
Transformer ...............................................................................
Model 5C10 Printer Mechanism................................................
Housing..................................................................................
1-1
1-3
1-3
1-9
1-14
1-18
1-18
1-20
1-21
1-21
1-21
1-22
1-23
1-24
1-25
1-25
1-26
1-26
1-26
1-27
1-28
1-29
1-29
1-30
1-30
1-31
1-31
1-32
1-33
Figures
Figure l-l.
Figure 1-2.
Figure 1-3.
Figure 1-4.
Figure 1-5.
Figure 1-6.
Figure 1-7.
Figure 1-8.
Figure 1-9.
Figure 1-10.
Figure 1-11.
Figure 1-12.
Figure 1-13.
Figure 1-14.
LQ-200/AP3000
LQ-200/AP3000 .........................................................
Pin Configuration.....................................................
Printable Area for Single Sheet Paper ....................
Printable Area for Continuous Paper ......................
Character Matrix......................................................
Data Transmission Timing ......................................
Self Test ....................................................................
Demonstration ..........................................................
Hexadecimal Dump ..................................................
Head Adjust Lever....................................................
LQ-200/AP3000 Component Layout.. .......................
C064 MAIN PCB ......................................................
Control Panel PCB ...................................................
PEBFIL-II PCB.........................................................
1-2
1-3
1-5
1-6
1-13
1-14
1-21
1-22
1-23
1-28
1-29
1-30
1-30
1-31
1-31
Figure 1-15. Transformer ..............................................................
1-32
..............................
Model
5ClO
Printer
Mechanism
Figure 1-16.
Figure 1-17. Housing..................................................................... 1-33
Tables
Table
Table
Table
Table
Table
Table
Table
Table
1-1.
1-2.
1-3.
1-4.
1-5.
1-6.
1-7.
1-8.
Table
Table
Table
Table
1-9.
1-10.
1-11.
1-12.
Table
Table
Table
Table
Table
Table
1-13.
1-14.
1-15.
1-16.
1-17.
1-18.
1-2
Optional Units ..........................................................
1-4
......................
Specifications for Single Sheet Paper
1-4
......................
Specifications for Continuous Paper..
Specifications for Labels........................................... 1-4
1-9
Built-In Fonts ...........................................................
1-11
.........................................................
Printing Modes
Character Matrix and Character Size.. .................... 1-12
Connector Pin Assignments and
Signal Functions .................................................. 1-15
Handshaking (DCl/DC3) Protocol............................ 1-17
DIP Switch Set 1 ...................................................... 1-18
DIP Switch Set 2 ...................................................... 1-18
International Character Set and
Character Table Selection.. .................................. 1-19
1-19
Font Selection...........................................................
Page Length Selection .............................................. 1-20
Character Pitch Selection ........................................ 1-20
1-24
Print Density ............................................................
Bit Image Printing ................................................... 1-24
Head Adjust Lever.................................................... 1-28
LQ-200/AP3000
General Description
1
Features
®
TM
The Epson LQ-200/ActionPrinter 3000 (AP3000) is a small, light-weight, lowcost printer similar to the LQ-500. The printer’s main features are:
®
Epson ESC/P code printing, implemented as a standard feature
These printing speeds: 192 cps (draft, 12 cpi)
160 cps (draft, 10 cpi)
64 cps (letter quality, 12 cpi)
53 cps (letter quality, 10 cpi)
Clear, easy-to-read printing with standard Epson fonts
Seven built-in letter quality (LQ) fonts (Roman, Sans Serif, Courier, Prestige,
Script, OCR-B, and Orator)
Direct built-in font selection using control panel buttons
Automatic loading for single sheet paper
Two paper slots (rear and bottom)
Easy handling of single sheet paper with the optional cut sheet feeder (CSF)
Standard Epson 8-bit parallel interface.
LQ-200/AP3000
l-l
General Description
Table l-l lists the optional units available for the printer and Figure l-l shows the
printer.
Table 1-1. Optional Units
Model
Description
7341
Cut sheet feeder
(CSF)
Figure 1-1. LQ-200/AP300
1-2
LQ-2OO/AP3000
General Description
Specifications
This section provides the specifications for the LQ-200/AP3000.
Hardware Specifications
Printing Method
Serial, impact, dot matrix
Pin Configuration
24 wires; 12 x 2 staggered, diameter 0.008 inches (0.2 mm)
Figure 1-2. Pin Configuration
Feeding Methods
Friction feed, tractor feed
Line Spacing
1/6 inch or programmable in units of 1/180 inch
Paper Insertion
From rear or bottom
Paper Feed Speed
100 ms/line at 1/6-inch line feed
2.2 inches per second, continuous feed
Paper Specifications See Tables 1-2, 1-3, and 1-4.
LQ-200/AP3000
1-3
General Description
Table 1-2. Specifications for Single Sheet Paper
Table 1-3. Specifications for Continuous Paper
Table 1-4. Specifications for Labels
1-4
LQ-2OO/AP3O00
General Description
Printable Area
Figure 1-3. Printable Area for Single Sheet Paper
Notes:
1)
.
.
.
0.12 inches (3 mm) or more using 7.2 to 9.0 inch (182 to 229 mm) wide paper. 1.08 inches
(27 mm) or more using 10.1 inch (257 mm) wide paper.
The lowest print position (0.54 inches or 13.5 mm) is only for reference.
Printing is possible approximately 1.48 inches (37 mm) from the bottom edge of the paper when
you press the AUTO LOAD button to load a single sheet.
Paper feeding accuracy is not assured within 0.88 inches (22 mm) from the top edge of the
paper and 1.20 inches (30 mm) from the bottom edge of the paper.
LQ-200/AP3000
1-5
General Description
Figure 1-4. Printable Area for Continuous Paper
Notes:
*1)
0.52 inches (13 mm) or more using 4.0 to 9.5 inch (101 to 242 mm) wide paper.
1.04 inches (26 mm) or more using 10.0 inch (254 mm) wide paper.
‘2)
0.52 inches (13 mm) or more using 4.0 to 9.5 inch (101 to 242 mm) wide paper.
1.04 inches (26 mm) or more using 10.0 inch (254 mm) wide paper.
1-6
LQ-2OO/AP3000
General Description
Ink Ribbon
Type Black ribbon cartridge #7753
Film ribbon cartridge #7768
Color Black
Life
2 million characters at 48 dots/character
(black ribbon)
0.2 million characters using LQ characters
(film ribbon)
Dimensions
of Ribbon
Cartridge
11.72 inches (width) x 1.36 inches (height)
x 2.88 inches (depth)
(293 mm x 34 mm x 72 mm)
Reliability
Mean Cycles
Between
Failure
Printhead Life
(MCBF)
3 million lines (excluding printhead)
Mean Time
Between
Failure
(MTBF)
40000 power-on hours POH) at 25% duty
200 million strokes (black ribbon)
100 million strokes (film ribbon)
Safety Approvals
LQ-200/AP3000
Safety
standards
UL478
Radio
Frequency
Interference
(RFI)
FCC class B
1-7
General Description
Electrical Specifications
Power
Conditions
120 VAC * 10%
Frequency
Range
49.5 to 50.5 Hz (50 Hz model)
59.5 to 60.5 Hz (60 Hz model)
Current
Rating
1.8 A
Approximately 38 W (during self test in draft
Power
Consumption mode at 10 cpi)
Insulation
Resistance
10 megohms minimum between AC line and
chassis
Dielectric
Strength
1250 VAC (rms), 1 minute
between AC line and chassis
Environmental Conditions
Temperature 41° to 95’F (5O to 35OC), operating
-22O to 140°F (-30° to 60°C), in shipping
container
Humidity
10 to 80 % RH, operating
5 to 85 % RH, storage
Resistance
to Shock
1 G, within 1 ms, operating
2 G, within 1 ms, storage
0.25 G, 55 Hz maximum, operating
Resistance
to Vibration 0.50 G, 55 Hz maximum, storage
Physical Specifications
1-8
Weight
Approximately 14.1 lb (6.4 kg)
Dimensions
15.6 inches (width) x 12.8 inches (depth)
x 5.6 inches (height)
(390 mm x 320 ‘mm x 139 mm)
excluding knob and paper guide
LQ-200/AP3000
General Description
Firmware Specifications (ESC/P)
Control Codes
ESC/P level ESC/P 84 (Epson Standard Code for Printers)
Printing Direction
Bidirectional (text)
Bidirectional (bit image) when DIP switch 2-5 is on
Unidirectional (bit image) when DIP switch 2-5 is off
Input Data Buffer
8KB when DIP switch 2-4 is on
1KB when DIP switch 2-4 is off
(When DIP switch 2-4 is on, you cannot define user-defined
characters.)
Character Code
8 bits
Character Sets
96-character ASCII character set
14 international character sets
Legal character set
PC (character tables for the Personal Computer) 437, 850,
860,863,865
Built-In Fonts
See Table 1-5.
Table 1-5. Built-h Fonts
Notes:
l
l
l
o = resident, ‘I = proportional LQ font specified using ESC k, *2 = 15 cpi Courier
OCR-B and Orator are basically IO cpi fonts. However, you can select the typestyle and pitch for
these fonts.
You cannot select 15 cpi and condensed printing at the same time.
LQ-2OO/AP3000
1-9
General Description
Printing Modes
You can select and mix any of the following printing modes,
except you cannot select 15 cpi and condensed printing at the
same time.
l
l
l
l
l
l
l
l
l
l
l
l
l
l
Draft or letter quality printing
Character pitch (10 cpi, 12 cpi, 15 cpi, or proportional
printing)
Condensed
Double-width
Double-height
Emphasized
Double-strike
Italic
Underlined
Double-underlined
Overscore
Strike-through
Outline
Shadow
Printing Speed
See Table 1-6.
Printing Columns
See Table 1-6.
Character Matrix
See Table 1-7.
Character Size
See Table 1-7.
1-10
LQ-200/AP3000
General Description
Table 1-6. Printing Modes
Notes:
l
Max is the value appropriate for the maximum width character.
l
Min is the value appropriate for the minimum width character.
.
- means that the printer automatically selects LQ mode when you select proportional pitch.
LQ-200/AP3000
1-11
General Description
Table 1-7. Character Matrix and Character Size
Notes:
l
l
l
.
HDD is the horizontal dot density in dots per inch.
The face matrix and character size indicate the size of the maximum character. This value
depends on the paper, the ribbon, and other variables.
Unit ESC SP indicates the minimum length to be added to the right of the character specified using
ESC SP. You can also send Unit Esc SP followed by the character string CHR$ (&h20).
- indicates that printer firmware reshapes the character matrix. Character width is half of the
noncondensed character width.
1-12
LQ-2oo/AP3000
General Description
(Normal character)
Figure 1-5. Character Matrix
LG-200/AP3000
1-13
General Description
Parallel Interface
This section provides the specifications for the standard parallel interface.
Data Format
8-bit parallel
Synchronization
-STROBE signal
Handshaking
BUSY and -ACKNLG signal
Signal Level
TTL compatible
Adaptable
Connector
57-30360 (Amphenol) or equivalent
Data Transmission
Timing
See Figure 1-6.
Figure 1-6. Data Transmission Timing
1-14
LQ-200/AP3000
General Description
Table 1-8 shows the connector pin assignments and signal functions of the 8-bit
parallel interface.
Table 1-8. Connector Pin Assignments and Signal Functions
LQ-200/AP3000
1-15
General Description
Table 1-9. Connector Pin Assignments and Signal Functions (cont.)
Notes:
DIR refers to the direction of signal flow as viewed from the printer.
Return Pin No. denotes a twisted pair return line.
The cable must be shielded to prevent noise.
All interface conditions are based on TTL levels. The rise and fall times of all signals must be less
than 0.2 ,us.
You can set the -AUTO FEED-XT signal to LOW using DIP switch 2-4.
You can set the -SLCT-IN signal to LOW using jumper 6.
By setting the DATA 1 through 8 pins to the -STROBE signal, you can perform printing tests,
including interface circuit tests, without using external equipment.
Minus signs are used in front of signal names indicate active LOW signals.
1-16
LQ-200/AP3000
General
Description
Table 1-9 shows the handshaking (DC1/DC3) protocol.
Table 1-9. Handshaking (DC1/DC3) Protocol
Notes:
1. Table 1-9 assumes that no *ERROR status exists other than that due to off line mode.
2.
When the printer receives a DC3 code, it ignores input data. When the printer receives a DC1
code, data transmission continues.
3. The DC1 and DC3 codes are enabled only when the SLCT-IN signal (pin number 36) is HIGH and
the printer is initialized.
4. If the SLCT-IN signal is LOW when the printer is initialized, DC1/DC3 handshaking is invalidated
and the printer ignores the DC1/DC3 control codes.
5. If the SLCT-IN signal is HIGH when the printer is initialized, the printer starts from the selected
(DC1) state.
6. Minus signs are used in this table to indicate active LOW signals.
LQ-200/AP3000
1-17
DIP Switches and Jumpers
This section describes the functions of the DIP switches and jumpers.
DIP Switches
The LQ-200/AP3000 has two sets of DIP switches underneath the cartridge slot cover.
Tables 1-10 through 1-15 describe the functions of these DIP switches. The printer reads
the DIP switch settings only at power on or after receiving the -INIT signal.
Table 1-10. Dip Switch Set 1
Notes:
l
1. When DIP switch 2-4 is on, you cannot create user defined characters.
l
2. When DIP switch 2-5 is on, you can select bidirectional graphics printing using ESC UO.
1-18
General Description
Table 1-12. International Character Set and Character Table Selection
Table 1-13. Font Selection
LQ-200/AP3000
1-19
General Description
Table 1-14. Page Length Selection
Table 1-15. Character Pitch Selection
Jumpers
Jumper 6, located underneath the cartridge slot cover, is user selectable. If you
connect jumper 6, the -SLCT-IN signal is LOW and the printer ignores the
DC1/DC3 control codes.
1-20
LQ-200/AP3000
General Description
Operating Instructions
This section explains how to use SelecType, the self test, the demonstration, the
hexadecimal dump, and other functions.
SelecType
The SelecType function allows you to easily choose any of the seven built-in LQ
fonts when the printer is on line and not printing. To select a font, you press the
FORM FEED button until the two SelecType indicator lights match the desired
font.
Self Test
To run the self test in draft mode, turn on the printer while pressing the LINE
FEED button. To run the self test in letter quality (LQ) mode, turn on the printer
while pressing the FORM FEED button.
To stop or start the self test, press the ON LINE button. To end the self test, press
the ON LINE button and then turn off the printer.
The first line of the self test shows the firmware revision number. Next the self
test prints the current DIP switch settings.
Figure 1-7. Self Test
LQ-200/AP3000
1-21
General Description
Demonstration
To start the demonstration, turn on the printer while holding down the LINE
FEED and ON LINE buttons.
THE EPSON® LQ-200
The Epson LQ-200 is the affordable, versatile, narrow carriage 24pin dot matrix printer for home and small business combining
excellent high resolution printing, convenient paper handling, and
a new standard for economical printing.
LOOK AT WHAT THE LQ-200 CAN
n
DO FOR YOU!
Outstanding 24-pin print quality m Sharp180 x 360 DPI graphics.
w 192 CPS draft print
-” 1.0 Drint
SP'
+ional cut sheet feeder
‘;mitaA . ..-
Figure 1-8. Demonstration
1-22
LQ-200/AP3000
General Description
Hexadecimal Dump Function
You use the hexadecimal dump function to check the data the printer is receiving
from the host. To turn on hexadecimal dump mode, turn on the printer while
holding down the LINE FEED and FORM FEED buttons. In hexadecimal dump
mode, the printer prints the hexadecimal representation of the input data and the
corresponding ASCII characters. If input data is a control code instead of a
character code, the printer prints a period (.) in the ASCII column.
Figure 1-9. Hexadecimal Dump
LQ-200/AP3000
1-23
General Description
Bit Image Printing
The LQ-200/AP3000 has four standard print densities. They are listed below in
dots per inch (dpi), including half dots.
120 dpi at triple speed
180 dpi at double speed
240 dpi at one and a half speed
360 dpi at normal speed
Tables 1-16 and 1-17 show how the firmware handles the print densities.
Table 1-16. Print Density
Table 1-17. Bit Image Printing
1-24
LQ-2OO/AP3000
General Description
Error Conditions
If any of the following error conditions occurs, the printer goes off line.
The printer cannot detect the home position at printer mechanism
initialization.
The printer detects the home position during printing.
You press the ON LINE button when the printer is on line, and the printer
goes off line.
The printer detects a paper-out signal and form over-ride is finished.
A paper-out signal is detected after the printer performs a paper-loading
operation with the cut sheet feeder enabled.
The printer outputs the following interface signals to indicate the error and halt
data transmission:
The BUSY signal becomes HIGH.
The -ERROR signal becomes LOW.
The printer does not send an -ACKNLG pulse.
Buzzer Operation
The buzzer rings when any of the following occurs:
l
l
l
l
The printer receives the BEL code (0.5 second ring).
The printer detects a paper-out error (three 0.1 second rings with 0.1 second
intervals).
The printer detects abnormal carriage movement (five 0.6 second rings with
0.5 second intervals).
The printer accepts a control panel setting (0.1 second ring).
LQ-200/AP3000
1-25
General Description
Printer Initialization
There are two initialization methods: hardware initialization and software
initialization.
Hardware initialization
Hardware initialization takes place when you turn on the printer (and the AC
power cord is plugged in) or when the printer receives the -1NIT signal.
During hardware initialization, the printer:
0
Initializes the printer mechanism.
l
Clears the input data buffer.
l
Clears the downloaded character set.
l
Clears the print buffer.
a
Returns its settings to the default values described on the next page.
Software initialization
Software initialization takes place when the printer receives the software
initialization code. During software initialization, the printer:
l
Clears the print buffer.
l
Returns its settings to the default values described on the next page.
1-26
LQ-2OO/AP3000
General Description
Default Values
When the printer is initialized, the following default values take effect:
Page Position
The current paper position becomes the top-of-form position.
Left and Right
Margins
Released
Line Spacing
l/6 inch
Vertical Tabs
Cleared
Horizontal Tabs
Every 8 characters (relative)
VFU Channel
Channel 0
Typestyle
SelecType setting (software initialtiation)
DIP switch setting (hardware initialization)
User-Defined
Characters
Deselected (software initialization)
Cleared (hardware initialization)
Justification
Left justification
Character Spacing
10 cpi
Bit Image Mode
Assignment
ESCK=ESC*O,ESCL=ESC*l
ESCY=ESC*2,ESCZ=ESC*3
Printing Effects
Clears all effects except for condensed printing.
Condensed
Printing
DIP switch setting
LQ-2OOIAP3000
1-27
General Description
Head Adjust Lever
You must move the head adjust lever to the position appropriate for your paper’s
thickness. See Table 1-18 and Figure 1-10.
Table 1-18. Head Adjust Lever
Note: If the print density is light, move the head adjust lever one step lower.
Figure 1-10. Head Adjust Lever
1-28
LQ-200/AP3000
General Description
Printhead Protection During Heavy Duty Printing
The printhead is protected from overheating and voltage drops to the printhead
driver. If the printhead temperature exceeds the upper limit, printing stops
automatically until the printhead temperature drops to the required value.
If heavy duty printing causes the printhead driver voltage to drop below the lower
limit, printing stops. When the power supply voltage increases to the required
level, the printer prints the rest of the line. This protection occurs when half or
more of the wires are activated simultaneously and continuously.
Main Components
The main components are designed so that you can easily remove and replace
them when you maintain or repair the printer. The main components are:
0
C064 MAIN PCB main control board
0
Control Panel PCB control panel board
l
PEBFIL-II PCB filter circuit board
0
Transformer
l
Model 5C10 printer mechanism.
Figure 1-11. LQ-200/AP3000 Component Layout
LQ-200/AP3000
1-29
General Description
C064 MAIN PCB
The µPD7810HG CPU on the CO64 MAIN PCB simplifies the circuit design of the
main control board and controls all of the printer’s main functions.
Figure 1-12. C064 Main PCB
Control Panel PCB
The control panel PCB is the control panel. It includes the indicator LEDs, the
control panel buttons, and the buzzer.
Figure 1-13. Control Panel PCB
1-30
LQ-200/AP3000
General Description
PEBFIL-II PCB
The PEBFIL-II PCB filter board eliminates noise from the AC line to the printer
and from the printer to the outer line. The fuse on this board prevents
overheating.
Figure 1-14. PEBFiL-II PCB
Transformer
The transformer converts the input AC from the filter circuit into 28 VAC output
to supply the required voltage to the control circuit board.
Figure 1-15. Transformer
LQ-200/AP3000
1-31
General Description
Model 5Cl0 Printer Mechanism
The model X10 printer mechanism is designed specifically for the
LQ-200/AP3000. Its components include the carriage motor, carriage mechanism,
paper feed motor, paper feed mechanism, ribbon feed mechanism, printhead, and
sensors.
Figure 1-16. Model 5C10 Printer Mechanism
1-32
LQ-200/AP3000
General Description
Housing
The housing consists of the upper and lower cases. The upper case houses the
control panel. The lower case contains the printer mechanism and the main
control board.
Figure 1-17. Housing
LQ-200/AP3000
1-33
Chapter 2
Principles of Operation
Overview ......................................................................................... 2-1
2-1
Connector Summary ..................................................................
Overview of Printer Mechanism Operation .............................. 2-3
Sensors ................................................................................. 2-4
2-6
Motors ..................................................................................
2-6
Printhead .............................................................................
2-7
Circuit Overview........................................................................
2-8
Firmware Overview ...................................................................
2-9
Principles of Operation ....................................................................
2-9
Power Supply Circuit .................................................................
2-9
....................................
Power supply circuit block diagram
2-11
Chopper-type switching regulator circuit............................
2-13
Filter circuit .........................................................................
2-14
Transformer .........................................................................
Rectifier and smoothing circuit ........................................... 2-15
+5 VDC regulator circuit .................................................... 2-16
pulse width modulation circuit ........................................... 2-19
+24 VDC regulator circuit .................................................. 2-21
Vx voltage supply circuit ..................................................... 2-24
2-25
Reset Circuit ..............................................................................
2-26
Power on or off .....................................................................
-INIT signal input from CN1 .............................................. 2-26
ROM cartridge installation and removal ............................ 2-27
Address Decoder and Bank Register ......................................... 2-29
2-29
Address decoder....................................................................
Bank register ....................................................................... 2-29
2-30
Carriage Operation ...................................................................
2-30
Carriage mechanism ...........................................................
Carriage motor drive circuit block diagram ....................... 2-31
Gate array E0lA05 in the carriage motor
2-32
drive circuit ....................................................................
Carriage motor drive circuit ................................................ 2-33
Carriage motor software control.......................................... 2-38
2-43
Paper Feeding ...........................................................................
Paper feed mechanism ........................................................ 2-43
Paper feed motor drive circuit ............................................. 2-45
Paper feed motor software control ....................................... 2-46
Printhead ................................................................................... 2-47
Printing ............................................................................... 2-47
Printhead drive circuit block diagram................................. 2-48
Gate array E05A02 in the printhead
drive circuit .................................................................... 2-49
Printhead drive circuit ......................................................... 2-50
Printhead software control .................................................. 2-51
A/D Converter Circuit ............................................................... 2-52
Host Interface ............................................................................ 2-55
Ribbon Feed Mechanism............................................................ 2-56
LQ-200/AP3000
2-i
Figures
Figure 2-1.
Figure 2-2.
Figure 2-3.
Figure 2-4.
Figure 2-5.
Figure 2-6.
Figure 2-7.
Figure 2-8.
Figure 2-9.
Figure 2-10.
Figure 2-11.
Figure 2-12.
Figure 2-13.
Figure 2-14.
Figure 2-15.
Figure 2-16.
Figure 2-17.
Figure 2-18.
Figure 2-19.
Figure 2-20.
Figure 2-21.
Figure 2-22.
Figure 2-23.
Figure 2-24.
Figure 2-25.
Figure 2-26.
Figure 2-27.
Figure 2-28.
Figure 2-29.
Figure 2-30.
Figure 2-31.
Figure 2-32.
Figure 2-33.
Figure 2-34.
Figure 2-35.
Figure 2-36.
Figure 2-37.
Figure 2-38.
Figure 2-39.
Figure 2-40.
,Figure 2-41.
Figure 2-42.
Figure 2-43.
Figure 2-44.
Figure 2-45.
Figure 246.
Figure 2-47.
Figure 2-48.
Figure 2-49.
2-ii
Cable Connections .................................................... 2-2
Printer Mechanism Block Diagram.. ....................... 2-3
Paper End Sensor ..................................................... 2-4
Home Position Sensor .............................................. 2-5
Thermal Sensor.. ...................................................... 2-5
Printhead.. ................................................................ 2-6
Circuit Block Diagram ............................................. 2-7
Memory Map (64KB) ................................................ 2-8
Power Supply Circuit Block Diagram.. .................... 2-10
Step Down Circuit .................................................... 2-11
Step Down Timing.................................................... 2-12
PEBFIL-II Filter Circuit Board................................ 2-13
Transformer Circuit ................................................. 2-14
Rectifier and Smoothing Circuit .............................. 2-15
+5 VDC Regulator Circuit....................................... 2-16
Oscillator Waveform................................................. 2-17
Constant Voltage Control Circuit ............................ 2-17
AMP1 Output Control (+5 VDC) ............................. 2-18
NJM2355 Internal Circuit ....................................... 2-19
Output Transistor Drive Waveform.. ....................... 2-20
+24 VDC Regulator Circuit ..................................... 2-21
Constant Voltage Control (+24 VDC). ..................... 2-22
Over-Current Protection .......................................... 2-23
Vx Voltage Circuit ................................................... 2-24
2-25
Reset Circuit.............................................................
-RESET Output ...................................................... 2-26
-RESET Pulse Oscillation Process
After ROM Cartridge Installation ........................ 2-27
-RESET pulse Oscillation Process
After ROM Cartridge Removal ............................. 2-28
Carriage Mechanism.. .............................................. 2-30
Carriage Motor Drive Circuit Block Diagram ......... 2-31
Gate Array Operation, 2-2 Phase Excitation.. ......... 2-32
Carriage Motor Drive Circuit................................... 2-33
STK-6981B Circuit Diagram.................................... 2-34
Reference Voltage Generation Circuit.. ................... 2-35
Constant Current Control Circuit ........................... 2-36
Chopping Waveforms ............................................... 2-37
Schmitt Trigger Circuit............................................ 2-38
Chopping Current and Drive Speed......................... 2-40
Home Position Seek ................................................. 2-41
Printing Area and Print Timing .............................. 2-42
Friction Feeding ....................................................... 2-43
Sprocket Feeding ...................................................... 2-44
Paper Feed Motor Drive Circuit ............................... 2-45
Paper Feed Motor Drive Timing Chart.................... 2-46
Printing .................................................................... 2-47
Printhead Drive Circuit Block Diagram.. ................ 2-48
Gate Array E05A02 Block Diagram ........................ 2-49
Printhead Drive Circuit ........................................... 2-50
Print Timing............................................................. 2-51
LQ-200/AP3000
Figure 2-50.
Relationship Between the Head Driver Voltage
and the Print Driving Pulse Width.. .....................
Figure 2-51. A/D Converter Circuit ..............................................
Figure 2-52. Host Interface ...........................................................
Figure 2-53. Ribbon Feed Mechanism ..........................................
2-51
2-53
2-55
2-57
Tables
Table
Table
Table
Table
Table
Table
Table
Table
2-1.
2-2.
2-3.
2-4.
2-5.
2-6.
2-7.
2-8.
Table 2-9.
Table 2-10.
LQ-2OO/AP3000
Board Connector Summary ......................................
Power Supply Applications.......................................
Reference Voltages ...................................................
Current Values for Reference Voltages ...................
Phase Excitation.......................................................
Drive Sequence (2-2 Phase Excitation) ....................
Drive Sequence (1-2 Phase Excitation) ....................
Excitation Sequence (Clockwise for
Forward Paper Feeding) ........................................
Scan Lines and DIP Switches...................................
Ribbon Feed Gear Train ...........................................
2-1
2-10
2-35
2-37
2-38
2-39
2-39
2-46
2-54
2-56
2-iii
Principles of Operation
2
Overview
This chapter describes the signals at the connectors that link the printer’s primary
components, including the printer mechanism, the power supply circuits, and the
control circuits. This chapter also describes how the printer’s circuitry and the
printer mechanism operate.
Connector Summary
Figure 2-1 shows how the primary components are connected. Table 2-1 lists and
describes the connectors.
Table 2-1. Board Connector Summary
LQ-200/AP3000
2-1
Principles of Operation
Figure 2-1. Cable Connections
Note:
CR = carriage
PF = paper feed
HP = home position
2-2
LQ-200/AP3000
Principles of Operation
Overview of Printer Mechanism Operation
The model 5ClO printer mechanism is a serial, impact, dot matrix printer
mechanism that prints at 180 dots per inch (dpi) in both the horizontal and
vertical directions. Figure 2-2 is a block diagram of the printer mechanism.
Figure 2-2. Printer Mechanism Block Diagram
Note:
cw =
CCW
HP =
PE =
clockwise
= counterclockwise
home position
paper end
LQ-200/AP3000
2-3
Principles of Operation
Sensors
The printer mechanism contains the following sensors:
l
Paper end (PE) sensor
l
Home position (HP) sensor
l
Thermal sensor
Paper end sensor
The paper end sensor switch goes on when the paper runs out. One switch detects
when the paper is out for both the rear and bottom paper slots. Figure 2-3
illustrates the paper end sensor.
Paper out --t on + LOW level
Paper present -+ off + HIGH level
Figure 2-3. Pap End Sensor
2-4
LQ-200/AP3000
Principles of Operation
Home position sensor
The home position sensor switch is on when the carriage is at the home position.
This sensor determines the reference position for the carriage drive. Figure 2-4
illustrates the home position sensor.
Home position + on + LOW level
Other position + off + HIGH level
Figure 2-4. Home Position Sensor
Thermal sensor
The thermal sensor in the printhead monitors the printhead’s temperature. If the
temperature exceeds a predetermined upper limit, the printer stops printing until
the temperature drops to a predetermined value. ‘Then printing resumes. Figure
2-5 illustrates the thermal sensor circuit.
Figure 2-5. Thermal Sensor
LQ-200/AP3000
2-5
Motors
The LQ-200/AP3000 has the following motors:
l
Carriage motor (stepper motor)
l
Paper feed motor (stepper motor)
Carriage motor
The carriage motor moves the carriage right and left along the platen. It is a fourphase, 48-step motor that uses either 1-2 or 2-2 phase excitation. An open loop
system controls the carriage motor.
Paper feed motor
A four-phase, 48-step motor feeds paper. It advances the paper 1/180th of an inch
for each step (phase switch), using 2-2 phase excitation. The CPU controls the
paper feed motor under an open loop configuration.
Printhead
Figure 2-6 illustrates dot wire operation. The head driving coil energizes and this
drives the dot wire outward. The dot wire strikes the ribbon against the paper,
printing a dot.
Figure 2-6. Printhead
2-6
LQ-200/AP3000
Principles of Operation
Circuit Overview
Figure 2-7 is a block diagram of the printer’s circuitry.
Figure 2-7. Circuit Block Diagram
Note:
CG = character generator
GA = gate array
LQ-200/AP3000
2-7
Principles of Operation
Firmware Overview
The printer uses a µPD7810HG CPU with 64KB of address space. Figure 2-8
shows a memory map of the address space.
Figure 2-8. Memory Map (64 KB.)
Note:
CG = character generator
GA = gate array
2-8
LQ-200/AP3000
Principles of Operation
Principles of Operation
This section describes the operation of the printer’s components, including the
power supply circuit, the reset circuit, the carriage mechanism, the paper feed
mechanism, and the printhead.
Power Supply Circuit
This section describes how the power supply circuit operates.
Power supply circuit block diagram
120 VAC is applied through the filter circuit to the step down transformer, which
generates 26 VAC. The 26 VAC is input to the power supply circuit on the main
board.
The 26 VAC is converted into approximately 36 VDC via the full wave rectifier
and smoothing circuit. The 36 VDC is input to the regulator circuits, which
supply +24 and +5 VDC to the control circuit. The +24 and +5 VDC are also
supplied to the Vx voltage circuit. The Vx voltage circuit is applied to the control
circuit.
LQ-2OO/AP3000
2-9
Principles of Operation
Figure 2-9. Power Supply Circuit Block Diagram
Table 2-2. Power Supply Applications
2-10
LQ-2OO/AP3000
Principles of Operation
Chopper-type switching regulator circuit
The power supply circuit includes a chopper-type switching regulator. The step
down circuit operates as follows:
Figure 2-10. Step Down Circuit
Figure 2-10 shows the chopper-type step down switching regulator circuit. When
the transistor is on, voltage Vi is applied to coil L and capacitor C. Load current I1
flows and electromagnetic energy Wl accumulates in choke coil L. When the
transistor goes off, energy Wl is applied to the load via flywheel diode D.
Therefore, output voltage Vo is the average value:
LQ-200/AP3000
2-11
Principles of Operation
Thus, Vo can be held constant by controlling Ton. Figure 2-11 shows the step
down timing.
Figure 2-11. Step Down Timing
2-12
LQ2OO/AP3000
Principles of Operation
Filter circuit
The AC line voltage passes through the power switch and is input to the filter
circuit. The PEBFIL-II board includes a fuse, Fl. The filter circuit attenuates
external noise and inhibits the noise generated in the printer from propagating
through the AC line. Cl or C2 drains leakage current between the primary coil
and the case. Figure 2-12 shows the filter circuit.
Figure 2-12. PEBFIL-II Filter Circuit Board
2-13
Principles of Operation
Transformer
The 120 VAC that passes through the filter circuit is transformed into 26 VAC
and supplied to the main board. Figure 2-13 is a schematic drawing of the power
transformer.
2-14
LQ-200/AP3000
Principles of Operation
Rectifier and smoothing circuit
Diode bridge DB1 full wave rectifies the 26 VAC from the transformer’s secondary
coil. Then smoothing capacitor C40 converts the 26 VAC into approximately
36 VDC. The +24 and +5 VDC voltages are converted from this DC voltage. The
DC voltage is used as the power supply voltage for the switching regulator circuit
at the next stage.
Figure 2-14. Rectifier and Smoothing Circuit
LQ-200/AP3000
2-15
Principles of Operation
+5 VDC regulator circuit
An NJM2355 switching regulator circuit is used for constant-frequency pulse
width modulation. The rectifier and smoothing circuit employs an NJM2355
circuit configured as a chopper-type switching regulator circuit. Figure 2-15
illustrates the +5 VDC regulator circuit.
Figure2-15. +5 KDC Regulator Circuit
2-16
LQ200/AP3000
Principles of Operation
The +5 VDC regulator circuit has a built-in oscillator. External components
connected to pins 2 and 3 determine the oscillation frequency. R105 and C34
cause the circuit to oscillate at about 30 KHz. Figure 2-16 shows the oscillator
waveform.
Figure 2-16. Oscillator Waveform
AMP1 in the +5 VDC regulator circuit is an error amplifier that monitors the
output voltage. Figure 2-17 shows the constant voltage control circuit. Pin 1 of
the +5 VDC regulator circuit provides a 5 V reference output (Vref). Vref is
applied to the negative terminal of AMP1. The error amplifier adjusts its output
according to the voltages at its positive and negative input terminals. This keeps
the positive terminal voltage at 5 V.
Figure 2-17. Constant Voltage Control Circuit
LQ-200/AP3000
2-17
Principles of Operation
Figure 2-18 shows the output from AMP1. When the voltage at pin 4 becomes
higher than that at pin 5 (over-voltage), pulse width modulation modulates the
AMP1 output current and reduces the circuit’s output voltage. R108 and C35
compensate for phase lag in the error amplifier, preventing abnormal oscillation.
(The next section describes pulse width modulation.)
Figure 2-18. AMP1 Output Control (+5 KVC)
LQ-2OO/AP3OOO
Principles of Operation
Pulse width modulation circuit
This section describes how the pulse width modulation (PWM) comparator
operates. Figure 2-19 shows the internal circuitry of the NJM2355 integrated
circuit.
In circuit 1, the output from AMP1 flows into the negative terminal of PWM
comparator 1. In circuit 2, the outputs from AMP2 and AMP3 flow into the
negative terminal of PWM comparator 2 without wired OR. The dead-time control
voltage is input to additional negative terminals of both comparators. At the same
time, a saw-tooth waveform from the oscillator is input to the positive terminals.
The saw-tooth waveform causes the comparators to generate pulses as shown in
Figure 2-20.
Figure 2-19. NJM2355 Internal Circuit
LQ-200/AP3000
2-19
Principles of Operation
As shown in Figure 2-20, the dead-time control voltage controls the potential at
the NJM2355 circuit when it is lower than the preset voltage or current value.
When it exceeds the preset voltage, the error amplifier lowers it below the preset
voltage.
Figure 2-20. Output Transistor Drive Waveform
2-20
LQ-200/AP3000
Principles of Operation
+24 VDC regulator circuit
The +24 VDC regulator circuit has approximately the same function and employs
the same oscillation circuit as the +5 VDC regulator circuit. In the +24 VDC
regulator circuit, error amplifier AMP2 is used for over-current control and AMP3
is used for constant voltage control. Figure 2-21 shows the +24 VDC regulator
circuit.
Figure 2-21. +24 VDC Regulator Circuit
LQ-200/AP3000
2-21
Principles of Operation
Error amplifier AMP3 operates as follows. The negative terminal of AMP 3
receives Vref (5 V) and the voltage applied to the positive terminal is adjusted to
5 V. As shown in Figure 2-22, the output voltage is:
~(Rl14+R115) = 2 4z Jhms (9.1 K ohms + 2.4K ohms) = 23.96 V
Figure 2-22. Constant Voltage Control (+24 KDC)
AMP 2 controls over current as follows. +24 V is applied to the negative terminal.
The positive terminal receives an equal voltage when a negative current of the
following value flows:
OutPit ylltage R 124/Rl27 =
2-22
+24 ’ 560 ohms / 0.22 ohms =5.55 A
11K ohms
LQ-200/AP3000
Principles of Operation
If the current exceeds this value, over-current protection goes on to reduce the
output voltage. Figure 2-23 illustrates over-current protection. Because pin 3 of
IC1 is grounded, dead time does not apply in this case.
Figure 2-23. Over-Current Protection
LQ200/AP3000
2-23
Principles of Operation
Vx voltage supply circuit
When the +24 V power supply line reaches 18.6 V (18 V + 0.6 V), transistors Q25
and Q26 go on and Vx (+5 v) is output. If the +24 V power supply line drops
below 18.6 V, Q25 and Q26 go off and the Vx voltage is extinguished.
The Vx voltage prevents abnormal operation when you turn the printer on or off.
When you turn the printer on or off:
l
l
l
The Vx voltage circuitry is reset and does not drive the printer until the power
supply stabilizes.
Full-ups for the printhead signal lines prevent printhead malfunctions.
Pull-ups for the paper feed motor signal lines prevent paper feed motor
malfunctions.
Figure 2-24. Vx Voltage Circuit
2-24
LQ-200/AP3000
Principles of Operation
Reset Circuit
The reset circuit sends the -RESET signal to the -RESET terminal of CPU
µPD7810HG (4B). The -RESET signal acts as a hardware initialization signal.
Figure 2-25 shows the reset circuit.
The reset circuit outputs the -RESET signal when any of the following occur:
l
You turn the printer on or off.
0
The host interface or an optional interface inputs the -INIT signal.
Figure 2-25. Reset Circuit
LQ-200/AP3000
2-25
Principles of Operation
Power on or off
D14, R69, and C26, shown in Figure 2-25, comprise an on/off reset circuit. This
circuit causes the CPU to begin operation from address 0000H when you turn on
the, power and it prevents CPU malfunctions when you turn off the power.
The rising edge of the Vx voltage cancels the -RESET signal following a constanttime delay (R69 x C26) produced by the gate array, resistor R69, and capacitor
C26. The falling edge of the Vx voltage activates the -RESET signal by
discharging capacitor C26 via diode D14.
Gate array pins 49 to 51 are used for waveform shaping.
Figure 2-26. -RESET Output
-INIT signal input from CN1
The external -INIT signal (50 psec or more) passes through the low-pass filter by
R31 and C22. The signal is wave shaped within the gate array (pin 47, ICGC) so
that the -DISC terminal is set to LOW. This causes capacitor C26 to discharge,
setting the -THLD terminal to LOW. Then the -Rout terminal outputs the
-RESET signal.
2-26
LQ-2OO/AP3000
Principles of Operation
ROM cartridge installation and removal
Figure 2-27 shows the -RESET pulse generation process after you install a ROM
cartridge. A LOW signal flows into the -CAR terminal of the gate array (6C, the
-DISC terminal (1) outputs a LOW signal, and the -Rout terminal (2) outputs a
-RESET signal.
As the -DISC terminal goes LOW, capacitor C26 discharges at a time constant of
R70 x C26 (3). When the C26 discharge reduces the potential at the -THLD
terminal to the threshold voltage Vth, the -RESET signal is canceled (4) and the
-DISC terminal goes HIGH (5). After the -DISC terminal goes HIGH, the Vx
voltage again discharges C31 at a time constant of R69 x C26 (6).
Figure 2-27. -RESET Pulse Oscillation Process
After ROM Cartridge Installation
LQ-200/AP3000
2-27
Principles of Operation
Figure 2-28 shows the -RESET pulse oscillation process after you remove a ROM
cartridge. The -CAR terminal of the gate array (6C) receives a HIGH signal, the
-DISC terminal outputs a LOW signal (1), and the -Rout terminal outputs a
-RESET signal (2). The rest of the process is similar to what occurs after ROM
cartridge installation. See the description above.
Figure 2-28. -RESET Pulse Oscillation Process
After ROM Cartridge Removal
2-28
LQ-200/AP3000
Principles of Operation
Address Decoder and Bank Register
This section describes the address decoder and bank register.
Address decoder
The address decoder in gate array E01A05 (6C) outputs a chip select signal to the
internal PROM (3C), 4MCG (5C), 1MCG (2C), RAM (2C), and HEAD gate array
(7A) via address lines AB12 through AB15 and bank lines 7 and 6 in the gate
array.
The chip select for -CS is generated with the -RD signal and the chip select for
the RAM is generated with the -ALE signal.
Bank register
The printer has a bank register in gate array E0lA05 (6C). The bank lines are set
by writing to address F002H and can be checked by reading the same address.
LQ-200/AP3000
2-29
Principles of Operation
Carriage Operation
This section describes the carriage.
Carriage mechanism
The carriage mechanism includes the printhead, the carriage, the timing belt, the
carriage motor, and the platen. Figure 2-29 shows the carriage mechanism.
The timing belt is connected to the bottom of the carriage. It is driven by the
carriage motor and moved via the belt-driven pulley. The printhead is mounted on
the carriage. The entire unit moves right and left along the guide shaft and guide
plate.
Figure 2-29. Carriage Mechanism
2-30
LQ-200/AP3000
Principles of Operation
Carriage motor specifications
Drive Voltage
Coil Resistance
Current
4-phase, 48pole stepper motor
24 V f 10%
21 ohms f 7% at 77O F (25’ C)
0.34 A, maximum (rush current)
0.3 A, typical (triple speed, 24 VI
Driving:
0.23 A, typical (double speed, 1.5 speed,
normal speed, 24 VI
0.17 A f 20%
Holding:
Carriage motor drive circuit block diagram
Figure 2-30 is a block diagram of the carriage motor drive circuit. The CPU does
not directly execute phase switching for the carriage motor. Instead, gate array
6C generates the phase switching based on CPU-generated pulses. The
STK-6981B circuit stabilizes the drive current.
Figure 2-30. Carriage Motor Drive Circuit Block Diagram
LQ-200/AP3000
2-31
Principles of Operation
Gate array E0lA05 in the carriage motor drive circuit
Gate array E0lA05 (6C) implements phase switching for the carriage motor, which
is a stepper motor. The gate array first sets the excitation type (2-2 or 1-2 phase)
and rotation direction (clockwise or counterclockwise). When the CPU outputs a
pulse to the gate array’s TM terminal, the gate array executes auto phase
switching, which drives the stepper motor. Figure 2-31 shows this process.
Figure 2-31. Gate Array Operation, 2-2 Phase Excitation
2-32
LQ-2OO/AP3000
Principles of Operation
Carriage motor drive circuit
The LQ-200/AP3000 includes an STK-6981B, a hybrid integrated circuit used to
drive stepper motors. The STK-6981B (ICSC) circuit drives the stepper motor
under a constant current. An external voltage level determines the value of the
current. STK-6981B operation is divided into equivalent phases AB and CD. This
section describes phase CD. Figure 2-32 shows the carriage motor drive circuit.
Figure 2-33 shows the STK-6981B circuit diagram.
Figure 2-32.
LQ2OO/AP3000
Carriage Motor Drive Circuit
2-33
Principles of Operation
Figure 2-33. STK-6981B Circuit Diagram
Note:
Phase AB is equivalent to phase CD, which is shown in the figure above.
2-34
LQ-200/AP3000
Principles of Operation
Reference voltage generation circuit
Figure 2-34 shows the reference voltage generation circuit. Table 2-3 shows the
reference voltages.
Figure 2-34. Reference Voltage Generation Circuit
Table 2-3. Reference Voltages
1 L
LQ-200/AP3000
1
H
1
0.736
V
2-35
Principles of Operation
Constant current drive circuit
The carriage motor drive current is given by the following equation:
When the carriage stops, CPU port PB5 is set to HIGH, the input to the chopping
circuit becomes 0 V, and current is applied from the +5 V line to the motor via
resistance Rl and diode Dl. This current is given by the following equation:
Figure 2-35 shows the constant current control circuit. Table 2-4 lists the current
values for the reference voltages.
Figure 2-35. Constant Current Control Circuit
2-36
LQ-200/AP3000
Principles of Operation
Table 2-4. Current Values for Reference Voltages
Positive feedback through R9 generates a hysteresis in the comparator of ICl.
The upper limit of the hysteresis is the reference voltage. The comparator works
like a Schmitt trigger, sensing a difference when the inverse terminal feedback is
slightly larger or smaller than the hysteresis level. The comparator in ICl
compares reference voltage a! and the feedback voltage.
When reference voltage (Y is HIGH, TR6 goes on and applies approximately
25 VDC to the coil. The current rises linearly due to inductance. TR6 goes off
when the feedback voltage equals the reference voltage. In this way, an almost
constant current is applied to the coil.
Figure 2-36 shows the carriage motor’s drive current waveform (pin 12) and the
chopping waveform (pin 17) of the drive voltage (+24 v) at 960 pps. Figure 2-37
shows the Schmitt trigger circuit.
Figure 2-36. Chopping Waveforms
LQ200/AP3000
2-37
Principles of Operation
Figure 2-37. Schmitt Trigger Circuit
Carriage motor software control
This section describes the carriage motor software control.
Excitation type
Firmware determines the excitation. As shown in Table 2-5, the excitation is
executed according to the carriage speed. Tables 2-6 and 2-7 show the motor drive
sequence for each excitation system.
Table 2-5. Phase Excitation
2-38
LQ-200/AP3000
Principles of Operation
Table 2-6. Drive Sequence 2-2 Phase Excitation)
Table 2-7. Drive Sequence (l-2 Phase Excitation)
2-39
Principles of Operation
The stepper that controls the carriage can hold the carriage at any position and
freely switch its direction. An open loop system controls the carriage motor and
switches the phase according to the set speed.
The drive chopping current is switched at the carriage motor drive frequency.
Figure 2-38 shows the relationship between drive speeds and switching current
values.
Figure 2-38. Chopping Current and Drive Speed
2-40
LQ-200/AP3ooo
Principles of Operation
Home position seek
The home position seek function causes the carriage to move to the home position
when the power goes on. Figure 2-39 shows how the home position seek function
operates.
When power is first applied, the printer executes 2-2 phase excitation for 20 or 30
ms (regardless of the phase switch setting). Meanwhile, the printer checks the
-HOME signal to determine whether the starting position is 1 or 2.
The carriage enters the home position only once during the initialization.
Figure 2-39 Home Position Seek
LQ-200/AP3000
2-41
Principles of Operation
Printing area
The printing area starts 22 phase switches from the home position.
Figure 2-40. Printing Area and Print Timing
Abnormal carriage operation
The LQ-200/AP3000 does not have a print timing signal PTS) sensor and cannot
detect abnormal carriage operation. Therefore, an error does not occur if external
forces hinder carriage movement. An error occurs only if the printer receives the
-HOME signal in the printing area. If this occurs, the carriage stops.
2-42
LQ2OO/AP3000
Principles of Operation
Paper Feeding
This section describes how the printer feeds paper.
Paper feed mechanism
The LQ-200/AP3000 friction feeds single sheet paper and sprocket feeds continuous
paper.
The printer cover and the spring force of the two paper feed rollers hold the paper
against the platen. To release the paper, move the paper release lever forward.
Friction feeding
The paper feed motor rotates the platen gear, via the paper feed reduction gear, in
the direction shown in Figure 2-41. Friction from the platen and paper feed rollers
feeds the paper in the direction shown in Figure 2-41.
Figure 2-41. Friction Feeding
LQ-200/AP3000
2-43
Principles of Operation
Sprocket feeding
You place the holes in the paper over the sprocket pins on the sprocket wheel. The
paper feed motor rotates the gears, via the pinion on the shaft of the motor, in the
direction shown in Figure 2-42. The gear rotation causes the sprocket wheels to
rotate and advances the paper in the direction shown in Figure 2-42.
Figure 2-42. Sprocket Feeding
2-44
LQ-2OO/AP3000
Principles of Operation
Paper feed motor specifications
Drive Voltage
Coil Resistance
Phase Excitation
Current
Driving Frequency
4-phase, 48pole stepper motor
24 VDC + 10%
58 ohms f 7% at 77O F (25O C)
2-2 phase excitation
1.1 A, maximum (rush current)
0.30 A, typical
Driving:
0.06 A 5 20 mA
Holding:
400 pulses per second
Paper feed motor drive circuit
Figure 2-43 shows the paper feed motor drive circuit. When the paper feed signal
PB2 goes LOW, Q27 goes on and supplies +24 V to the motor. When the paper
feed motor is not being driven (when it is in hold status), +5 V is supplied to the
motor via resistor R36 and diode Dll.
Figure 2-43. Paper Feed Motor Drive Circuit
LC&200/AP3000
2-45
Principles of Operation
Paper feed motor software control
The paper feed motor is a 48-pole stepper motor. An open loop system controls the
paper feed motor under 2-2 phase excitation. The motor feeds paper 1/180th of an
inch for each step. Table 2-8 shows the paper feed motor excitation system when
the motor is driven clockwise for forward paper feeding.
Table 2-8. Excitation Sequence (Clockwise for Forward Paper Feeding)
Note:
If the paper feed motor is driven counterclockwise, it feeds paper backward.
Figure 2-44 shows the timing chart for acceleration and deceleration control.
figure 2-44. Paper Feed Motor Drive Timing Chart
2-46
LQ-200/AP3000
Principles of Operation
Printhead
This section describes how the printhead operates.
Printing
This section describes how a dot wire prints. Figure 2-45 illustrates the printing
operation. When the printing process begins, the actuating plate is engaged to the
dot wire. When the dot wire’s head driving coil is energized, the actuating plate is
attracted to the iron core. This drives the dot wire toward the platen. The dot
wire strikes the ribbon and the paper against the platen, printing a dot.
When the head driving coil de-energizes, the actuating plate spring returns the
plate to its initial position. At, the same time, the impact of printing the dot and
the effect, of the wire resetting spring returns the dot wire to its initial position.
The dot wire remains engaged to the actuating plate until it is driven again.
Figure 2-45. Printing
LQ-200/AP3000
2-47
Principles of Operation
Printhead specifications
Solenoids
Wire Diameter
Pin Arrangement
Drive Voltage
Coil Resistance
24 solenoids
0.008 inch (0.20 mm)
12 x 2, staggered
24 VDC f 10%
19.1 k 1.0 ohms at 77O F (25O C)
Printhead drive circuit block diagram
Gate array E05A02 is used as an 8-bit x 3 data latch. By monitoring the
printhead drive power (+24 V line), the CPU determines the pulse width for the
head wire drive pulses from gate array E05A02. The CPU also monitors the
printhead’s temperature and suspends printing.if the printhead overheats.
Figure 2-46. Printhead Drive Circuit Block Diagram
2-48
LQ-200/AP3000
Principles of Operation
Gate array E05A02 in the printhead drive circuit
The E05A02 gate array includes circuitry to interface the CPU and the printhead.
This general purpose gate array has special commands that lighten the CPU’s load
during printhead data output.
Figure 2-47 is a block diagram of gate array E05A02. Gate array operation centers
around the three 8-bit data latches. The gate array also supports functions
(commands) that can efficiently write data to any of the data latch bits.
Figure 2-47. Gate Array E05A02 Block Diagram
2-49
Principles of Operation
Printhead drive circuit
CPU port PC6 adjusts the drive pulse width. The Vx voltage pulls up the output
signals from the gate array to prevent printhead malfunctions.
Figure 2-48. Printhead Drive Circuit
2-50
LQ-200/AP3000
Principles of Operation
Printhead software control
At 960 pps, one print cycle is performed at each phase switch step to meet the
printhead’s specifications. (The printhead’s solenoid drive frequency is 960 Hz).
The drive pulse width is adjusted using an A/D converter to detect the drive
voltage. The drive pulse width is kept within the range indicated by the oblique
lines in Figure 2-50.
Figure 2-49. Print Timing
Drive Voltage(V)
Figure 2-50. Relationship Between the Head Driver Voltage
and the Print Driving Pulse Width
LQ-200/AP3000
2-51
Principles of Operation
A/D Converter Circuit
Figure 2-51 shows the A/D converter circuit. The converter has the following
functions:
l
Monitors the +24 V line to determine the drive pulse width for the printhead.
l
Monitors the temperature (the resistance) of the printhead.
l
Reads the initial DIP switch settings.
l
Reads the bidirectional adjustment setting.
Shunt regulator TL431CLPB and resistors R37 and R55 regulate reference voltage
Vref as follows:
Vref = g (R55+R37) = 4.5 V
Note: The shunt regulator’s reference voltage is 2.5 V.
Using this value as a reference, AN0 monitors the +24 V line, AN1 monitors the
printhead temperature, and AN2 through AN7 read the DIP switch and
bidirectional adjustment settings.
2-52
LQ-200/AP3000
Principles of Operation
Figure 2-51. A/D Converter Circuit
LQ200/AP3000
2-53
Principles of Operation
Table 2-9 shows the relationship between the scan lines and the DIP switches.
2-54
LQ-2OO/AP3000
Principles of Operation
Host Interface
Figure 2-52 shows the host interface circuit. -STROBE pulses from the host
computer pass through the low-pass filter formed by R32 and C21 and then flow
into the -STRB terminal. These pulses latch the parallel data and set the BUSY
signal HIGH, inhibiting subsequent data transfer. The -STROBE signal
automatically outputs the gate array’s -PINT terminal to request a CPU
interrupt. When the CPU receives the interrupt request, it reads the data latched
in the gate array.
Figure 2-52. Host Interface
LQ-200/AP3000
2-55
Principles of Operation
Ribbon Feed Mechanism
The ribbon feed mechanism consists of the ribbon cartridge and the ribbon feed
section. Table 2-10 describes the ribbon feed gear train. Regardless of the timing
belt direction, the gear train setup assures that the ribbon driving gear rotates
only counterclockwise.
Table 2-10. Ribbon Feed Gear Train
Figure 2-53 shows the ribbon feed mechanism. The ink ribbon is an endless loop
partly contained in the cartridge case. It is held between the ribbon feed and
ribbon pressure rollers mounted on the ribbon driving gear. The gear’s movement
drives these rollers, which in turn feed the ribbon.
To prevent ribbon slack, a ribbon braking spring is attached at the cartridge case
exit. A ribbon mask prevents the ribbon from staining the paper.
2-56
LQ-2OO/AP3000
Principles of Operation
Figure 2-53. Ribbon Feed Mechanism
LQ-200/AP3000
2-57
Chapter 3
Disassembly and Assembly
General Repair Information ................................................................. 3-1
Tools ........................................................................................... 3-2
Small Parts ................................................................................ 3-3
Service Checklist ................................................................................... 3-5
Disassembly and Assembly ................................................................. 3-6
Removing the Printhead .......................................................... 3-7
3-8
Removing the Case ....................................................................
Removing the upper case .............................................. 3-9
Removing the control panel ................................................. 3-10
Removing the Circuit Boards .................................................... 3-11
Removing the C064 MAIN board ........................................ 3-11
Removing the PEBFIL-II board........................................... 3-12
Removing the transformer ................................................... 3-13
Removing the Printer Mechanism ............................................ 3-14
Removing the platen unit and the paper guide.. ................. 3-15
Removing the printer mechanism ....................................... 3-17
Disassembling the Printer Mechanism ..................................... 3-19
Removing the paper feed mechanism.................................. 3-19
Removing the paper feed motor........................................... 3-23
Removing the paper end sensor........................................... 3-24
Disassembling the platen unit............................................. 3-24
Removing the carriage unit ................................................. 3-26
Removing the carriage motor .T ............................................ 3-30
Removing the home position sensor.. .................................. 3-32
Disassembling the ribbon feed mechanism......................... 3-33
Disassembling the tractor unit............................................ 3-34
Figures
Figure 3-1.
Figure 3-2.
Figure 3-3.
Figure 3-4.
Figure 3-5.
Figure 3-6.
Figure 3-7.
Figure 3-8.
Figure 3-9.
Figure 3-10.
Figure 3-11.
Figure 3-12.
Figure 3-13.
Figure 3-14.
Figure 3-15.
Figure 3-16.
Figure 3-17.
Figure 3-18.
LQ-2OO/AP3000
Removing the Printhead
................................ .........
3-7.
3-8
Removing the Upper Case -.................................
1
Removing the Upper Case - 2 ................................. 3-9
Removing the Control Panel .................................... 3-10
Removing the C064 MAIN Board ............................ 3-11
Removing the PEBFIL-II Board............................... 3-12
Removing the Transformer ...................................... 3-13
Removing the Printer Mechanism ........................... 3-14
Removing the Platen Unit ....................................... 3-15
Back of the Printer Mechanism ............................... 3-16
Paper End Sensor Arm............................................. 3-17
Removing the Printer Mechanism ........................... 3-18
Removing the Paper Release Lever.. ....................... 3-19
Removing the Paper Feed Roller Shaft.. .................. 3-20
Removing the Paper Guide Plate and Spacer.. ....... .3-21
Installing the Paper Guide Plate and Spacer.. ........ 3-22
Removing the Paper Feed Motor ............................. 3-23
Removing the Paper End Sensor ............................. 3-24
3-i
Figure 3-19.
Figure 3-20.
Figure 3-21.
Figure
Figure
Figure
Figure
Figure
Figure
Figure
Figure
Figure
Figure
Figure
3-22.
3-23.
3-24.
3-25.
3-26.
3-27.
3-28.
3-29.
3-30.
3-31.
3-32.
Assembling the Platen Unit.....................................
Bottom of the Printer Mechanism ...........................
Removing the Carriage Guide Shaft
Ground Plate .....................................................
Removing the Carriage Guide Shaft.. ......................
Removing the Carriage Guide Plate.. ......................
Carriage Guide Shaft and Head Adjust Lever.........
Removing the Carriage Motor Frame......................
Removing the Carriage Motor .................................
Removing the Home Position Sensor.......................
Removing the Ribbon Gear Cover............................
Removing a Side Cover ............................................
Removing the Sprocket Guide Shaft.. ......................
Removing the Paper Guide Roller ...........................
Installing the Sprocket Wheels................................
3-25
3-26
Repair Tools..............................................................
Measuring Instruments............................................
Abbreviations for Small Parts..................................
Screw Shapes and Names.........................................
LQ-200/AP3000 Service Checklist ...........................
3-2
3-3
3-3
3-4
3-5
3-27
3-27
3-28
3-29
3-30
3-31
3-32
3-33
3-34
3-35
3-36
3-37
Tables
Table
Table
Table
Table
Table
3-ii
3-1.
3-2.
3-3.
3-4.
3-5.
LQ-200/AP3000
Disassembly and Assembly 3
General Repair Information
This chapter describes how to disassemble and assemble the printer’s main
components.
WARNING
l
l
I
Always disconnect the AC power cord before you disassemble or assemble
the printer.
When you disassemble or assemble the printer, wear gloves so that you
do not cut your hands on the printer mechanism or the edge of a plate, such
as the ground plate.
CAUTION
The LQ-200/AP3000 uses plastic clips instead of screws to hold the printer
mechanism, some boards, and other parts in place. Be careful not to damage
the plastic clips when you remove these parts.
LQ-2OO/AP3000
Disassembly and Assembly
Tools
Tables 3-1 and 3-2 list tools and measuring instruments you need when you
disassemble, assemble, or repair the printer.
Table 3-1. Repair Tools
3-2
LQ-2OO/AP3000
Disassembly
and Assembly
Table 3-2. Measuring Instruments
For optimal printer performance, always perform the necessary lubrication,
adhesive application, cleaning, and maintenance procedures after you assemble
and adjust the printer. (Chapter 4 describes adjustment procedures and Chapter 6
provides maintenance instructions.)
Small Parts
Table 3-3 lists the abbreviations this manual uses for small parts.
LQ-200/AP3000
3-3
Disassembly and Assembly
Table 3-4 shows the screw shapes and names.
Table 3-4. Screw Shapes and Names
3-4
LQ-200/AP3000
Disassembly and Assembly
Service Checklist
Before you deliver the printer, check the table below to ensure that you repaired it
properly. The table is designed to help you maintain service quality standards.
Table 3-5. LQ-200/AP3000 Service Checklist
LQ-2OO/AP3000
3-5
Disassembly and Assembly
Disassembly and Assembly
This chapter describes how to disassemble the printer. To assemble the printer,
follow the disassembly steps in reverse. Special assembly notes describe any extra
information you need to assemble the printer. Adjustment required notes describe
any adjustments that are necessary.
WARNING
Before you disassemble the printer, read the section on general repair
information at the beginning of this chapter.
CAUTION
Remove the paper and the ribbon cartridge before you disassemble the printer.
This chapter divides printer disassembly into five main steps:
1.
Removing the printhead
2.
Removing the case
3.
Removing circuit boards
4.
Removing the printer mechanism
5.
Disassembling the printer mechanism.
For detailed exploded diagrams of the printer and the printer mechanism, see
Figures A-6, A-7, and A-8.
3-6
LQ2OO/AP3000
Disassembly and Assembly
Removing the Printhead
1.
Make sure that you have removed the paper and the ribbon cartridge. Then
remove the printer cover.
2.
Unlock (pull down) the two levers that secure the printhead to the carriage.
Then lift up and remove the printhead.
Figure 3-1. Removing the Printhead
3.
Disconnect the head cable from the connector on the printhead.
LQ-200/AP3000
3-7
Disassembly and Assembly
Removing the Case
This section describes how to remove the upper case and the control panel.
Removing the upper case
1.
Remove the printer cover and the paper guide.
2.
Remove the pull tractor assembly.
3.
Insert a standard screwdriver into each of the two holes at the front of the
lower case and push to unlock each notch. Then lift up the upper case.
Figure 3-2. Removing the Upper Case - 1
3-8
LQ2OO/AP3000
Disassembly and Assembly
4.
While lifting up the upper case, disconnect the control panel’s flexible flat
cable (FFC) from connector CN4 on the CO64 MAIN board. Then remove the
upper case.
Figure 3-3. Removing the Upper Case - 2
LQ-200/AP3000
3-9
Disassembly and Assembly
Removing the control panel
1.
Remove the upper case as described earlier in this chapter.
2.
Turn the upper case upside down and push in the two notches that secure the
control panel to the upper case. Then remove the control panel from the
upper case.
CAUTION
When you install and remove the control panel, be careful not to damage the
FFC on the control panel with the FFC guide on the upper case.
Figure 3-4. Removing the Control Panel
3-10
LQ-2OO/AP3000
Disassembly and Assembly
Removing the Circuit Boards
This section describes how to remove the C064 MAIN board, the PEBFIL-II board,
and the transformer.
Removing the C064 MAIN board
1.
Remove the upper case as described earlier in this chapter.
2.
Disconnect connectors CN5, CN6, CN7, CN8, CN9, and CN10 on the C064
MAIN board. (These connectors connect the printer’s main components to the
CO64 MAIN board.)
CAUTION
To disconnect the connectors, pull them out slowly and gently while holding the
board. Forcefully removing the connectors can damage the board.
Figure 3-5. Removing the C064 MAINBoard
3.
Remove the two CBB(P) screws (M3 x 10) that secure the C064 MAIN board
to the base plate.
4.
Remove the shield plate.
LQ-2OO/AP3000
3-11
Disassembly and Assembly
5.
Using a screwdriver, loosen the six bent tabs on the lower case. (These tabs
secure the board to the case.) Then remove the CO64 MAIN board.
CAUTION
When you remove the CO64 MAIN board from the lower case, do not bend the
tabs too much. When you push the tabs, be careful not to break them or
damage any of the board’s components.
Removing the PEBFIL-II board
1.
Remove the upper case as described earlier in this chapter.
2.
Disconnect connector CN1 on the PEBFIL-II board. (CN1 connects the
transformer to the PEBFIL-II board.)
3.
Remove the CB(0) (M4 x 8) screw that secures the PEBFIL-II board’s ground
terminal.
4.
Remove the CPS(0) (M3 x 6) screw that secures the PEBFIL-II board to the
base plate.
5.
Remove the PEBFIL-II board and the power cord.
Figure 3-6. Removing the PEBIL-II Board
3-12
LQ-200/AP3000
Disassembly and Assembly
Removing the transformer
1.
Remove the upper case as described earlier in this chapter.
2.
Disconnect connector CNl on the PEBFIL-II board. (CNl connects the
transformer to the PEBFIL-II board.)
3.
Disconnect connector CNlO on the CO64 MAIN board. (CNlO connects the
transformer to the CO64 MAIN board.)
4.
Remove the CB(0) (M4 x 8) screw that secures the transformer ground
terminal.
5.
Remove the four CBB (M4 x 12) screws and the CB(0) 0!I4 x 8) screw that
secure the transformer. Then remove the transformer.
Figure 3-7. Removing the Transformer
LQ-200/AP3000
3-13
Disassembly and Assembly
Removing the Printer Mechanism
This section describes how to remove the platen unit, the paper guide, and the
printer mechanism. You remove the platen unit and the paper guide to facilitate
removing the printer mechanism.
Figure 3-8. Removing the Printer Mechanism
3-14
Disassembly and Assembly
Removing the platen unit and the paper guide
1.
Remove the upper case as described earlier in this chapter.
2.
Remove the ground spring hook under the paper feed motor at the right side
of the platen unit. Then remove the spring from the platen unit.
3.
Turn the shaft holders at the left and right sides of the platen unit as shown
in Figure 3-9. Then lift the platen unit to remove it.
Figure 3-9. Removing the Platen Unit
4.
Disconnect the cable from connector CN9 on the C064 MAIN board.
LQ-2OO/AP3000
3-15
Disassembly and Assembly
5.
Facing the back of the printer mechanism, unlock the two paper guide notches
by pushing them toward the front of the printer. Then remove the paper
guide.
Notches
Figure 3-10. Back of the Printer Mechanism
Assembly Notes
l
l
3-16
Connect the end of the paper end sensor arm to the bottom paper end lever.
To install the ground spring, first attach it to the hook at the front and
insert it into the platen shaft. Then attach it to the hook near the paper feed
motor.
Disassembly and Assembly
Figure 3-11. Paper-End Sensor Arm
Adjustment Required
If any problems (such as non-uniform print density) occur after you install or
replace the platen unit, adjust the platen gap as described in Chapter 4.
Removing the printer mechanism
1.
Remove the platen unit and the paper guide as described in the preceding
section.
2.
Disconnect the cables from connectors CN5, CN6, CN7, and CN8 on the C064
MAIN board. (See Figure 3-5.)
3.
Remove the CBB (M3 x 6) screw on the right side of the printer mechanism
that secures the bent portion of the ground plate. Then remove the bent
portion of the ground plate.
4.
To loosen the six tabs on the lower case, push each one with a screwdriver.
Loosen the tabs as described in steps a, b, and c below. (The tabs secure the
printer mechanism to the lower case.)
LQ-200/AP3000
3-17
Disassembly and Assembly
CAUTION
When you loosen the tabs, push them gently to avoid damaging the lower case
or the printer mechanism.
a.
Loosen tabs 1 and 2. Then lift the left side of the frame about a half inch
(1 cm) up from the lower case.
b.
Loosen tab 3. Then lift the frame’s left side up another 2 inches (5 cm).
C.
Slide the printer mechanism in the direction indicated by the arrow in
Figure 3-12 and remove it from tabs 4 and 5. Use tab 6 as a fulcrum.
Figure 3-12. Removing the Printer Mechanism
3-18
LQ-200/AP3000
Disassembly and Assembly
Disassembling the Printer Mechanism
This section describes how to remove the components from the printer mechanism.
When you follow the instructions in this section, see Figure A-7, the exploded
diagram of the printer mechanism, and Table A-2, the component list.
Removing the paper feed mechanism
1.
Remove the printer mechanism as described earlier in this chapter.
2.
The paper release lever’s notch is inside the frame. Push the notch and
remove the paper release lever.
Figure 3-13. Removing the Paper Release Lever
LQ-200/AP3000
3-19
Disassembly and Assembly
3.
Push the paper feed roller shaft downward and slide it approximately an inch
(2 cm) to the left. Then lift it up and remove it.
Figure 3-14. Removing the Paper Feed Roller Shaft
3-20
LQ-200/AP3000
Disassembly and Assembly
4.
Use a screwdriver to loosen the two tabs that secure the paper guide plate and
the paper guide spacer to the frame. Push the tabs out from the frame.)
Then lift up and remove the paper guide plate and spacer.
Figure 3-15. Removing the Paper Guide Plate and Spacer
LQ-2OO/AP3000
3-21
Disassembly and Assembly
Assembly Note
Figure 3-16 shows the direction in which to install the paper guide plate and
spacer.
Figure 3-16. Installing the Paper Guide Plate and Spacer
3-22
LQ-200/AP3000
Disassembly and Assembly
Removing the paper feed motor
1.
Remove the printer mechanism as described earlier in this chapter.
2.
Disconnect the motor cable from the paper feed motor.
3.
Loosen the tab that secures the paper feed motor to the frame by pushing it in
with a screwdriver. To remove the paper feed motor, rotate it in the direction
shown by the arrow in Figure 3-17. Use point A as the fulcrum.
Figure 3-17. Removing the Paper Feed Motor
LQ-2OO/AP3000
3-23
Disassembly and Assembly
Removing the paper end sensor
1.
Remove the platen unit and the paper guide as described earlier in this
chapter.
2.
Loosen the tab that secures the paper end sensor to the paper guide. To
remove the paper end sensor, rotate it in the direction shown by the arrow in
Figure 3-18. Use point A as the fulcrum.
Notch
Figure 3-18. Removing the Paper End Sensor
Disassembling the platen unit
1.
Remove the platen unit as described earlier in this chapter.
2.
Remove the left shaft holder and the paper feed knob from the platen unit.
3.
Pull out the ground spring and the platen gear at the right side of the platen
unit.
4.
Remove the E-ring from the platen unit and pull out the right shaft holder
and the flat spring.
3-24
Disassembly and Assembly
Assembly Notes
l
l
When you assemble the platen unit, see Figure 3-19 to ensure that you
install the flat spring and the shaft holder properly and that the gap
between the platen and the platen gear is the correct size.
When you attach the ground spring to the platen unit, engage the long hook
first and then the short hook.
Figure 3-19. Assembling the Platen Unit
LQ-2OO/AP3000
3-25
Disassembly and Assembly
Removing the carriage unit
1.
Remove the printer mechanism as described earlier in this chapter.
2.
Remove the printhead as described earlier in this chapter.
3.
Turn the printer mechanism upside down. Then manually move the carriage
unit to the cutout in the carriage motor frame. (Move the carriage unit until
you see the carriage unit and the timing belt join through the cutout.)
Figure 3-20. Bottom of the Printer Mechanism
4.
3-26
Using round-nose pliers, detach the timing belt from the carriage unit. Be
careful not to damage the belt.
LQ-2OO/AP3000
Disassembly and Assembly
5.
Lift portion A (in Figure 3-21) of the carriage guide shaft ground plate and
remove it frorn the notch in the carriage motor frame. Slide the plate so that
you can remove it from the frame through the plate cutout at B.
Figure 3-21. Removing the Carriage Guide Shaft Ground Plate
6.
Turn the printer mechanism right side up. Rotate the left carriage guide
shaft lever fully counterclockwise and pull it out through cutout A. Then turn
the right carriage guide shaft lever fully clockwise and pull it out the same
way.
(Viewed from the Left Side)
Figure 3-22. Removing the Carriage Guide Shaft
LQ-200/AP3000
3-27
Disassembly and Assembly
7.
Push the notch that secures the carriage guide plate to the frame. Then slide
the carriage guide plate to the left and remove it.
Figure 3-23. Removing the Carriage Guide Plate
8.
3-28
Lift up and remove the carriage unit, the carriage guide shaft, and the head
adjust lever.
LQ2OO/AP3000
Disassembly and Assembly
Assembly Notes
l
Before you install the carriage guide shaft and the head adjust lever,
position them as shown in Figure 3-24.
Figure 3-24. Carriage Guide Shaft and Head Adjust Lever
l
l
The left carriage guide shaft lever is gray and the right one is black. For
each lever, slide the hole onto the corresponding shaft end.
When you connect the head cable, be sure to pass it through the FFC guide
at the frame correctly.
Adjustment Required
After you assemble the carriage unit, adjust the platen gap as described in
Chapter 4.
LQ-200/AP3000
3-29
Disassembly and Assembly
Removing the carriage motor
1.
Follow steps 1 through 5 of the preceding section on removing the carriage
unit.
2.
Disconnect the motor cable from the carriage motor. Disconnect the home
position sensor’s lead wire from the molded clip at the bottom of the frame.
(See Figure 3-25.)
3.
Loosen the four tabs that secure the carriage motor frame to the chassis
frame. Remove the carriage motor frame.
Figure 3-25. Removina the Carriage Motor Frame
3-30
LQ2OO/AP3000
Disassembly and Assembly
Remove the belt tension spring from the carriage motor frame. Remove the
0.092 inch (2.3 mm) E-type retaining ring on the carriage motor. Then remove
the plain washer, belt pulley flange, belt pulley shaft holder, belt pulley, and
timing belt.
4.
Figure 3-26. Removing the Carriage Motor
To remove the carriage motor, move it in the direction indicated by the arrow
in Figure 3-26.
5.
Assembly Notes
Attach the E-rings as follows:
l
l
When you attach the ring to the left pulley shaft, install it so that its
opening faces left.
When you attach the ring to the right pulley shaft, install it so that its
opening faces right.
After you attach the E-rings, use tweezers to check that they are fixed in place
and do not move.
LQ-200/AP3000
3-31
Disassembly and Assembly
Removing the home position sensor
1.
To remove the carriage motor Came, follow steps 1 through 3 of the preceding
section on removing the carriage motor.
2.
Push in the notch on the home position sensor and remove the sensor from the
carriage motor frame.
Figure 3-27. Removing the Home Position Sensor
3-32
LQ-200/AP3000
Disassembly and Assembly
Disassembling the ribbon feed mechanism
1.
2.
Remove
the printer mechanism as described earlier in this chapter.
Turn the printer mechanism upside down. Without removing the ribbon gear
cover, use a screwdriver to loosen the four bent tabs of the ribbon gear cover
slightly. (Do not remove the ribbon gear cover while the printer mechanism is
upside down, because the gears will scatter.>
Figure 3-28. Removing the Ribbon Gear Cover
3.
Turn the printer mechanism right side up, and remove the ribbon gear cover.
LQ-200/AP3000
3-33
Disassembly and Assembly
Disassembling the tractor unit
1.
Use a screwdriver to loosen the three tabs on the sprocket mounting plate.
Remove the side covers. (You can remove the left and right side covers at the
same time.)
Figure 3-29. Removing a Side Cover
2.
Push open the two sprocket gear tabs and remove the sprocket shaft from the
sprocket gear.
3.
Remove the sprocket transmission gear. Then remove the sprocket mounting
plate from the sprocket shaft.
3-34
LQ-200/AP3000
Disassembly and Assembly
4.
Use a screwdriver to loosen the sprocket mounting plate tab. Then pull out
the sprocket guide shaft.
Figure 3-30. Removing the Sprocket Guide Shaft
LQ-200/AP3000
3-35
Disassembly and Assembly
5.
Pull out the sprocket assembly and paper guide roller from the sprocket shaft
and the sprocket guide shaft. The T-shaped notch on the paper guide roller
indicates the direction in which to move it along the sprocket shaft.
Assembly Note
When you assemble the paper guide roller, insert the sprocket shaft from the
side with the T-shaped notch.
Figure 3-31. Removing the Paper Guide Roller
3-36
LQ200/AP3000
Disassembly and Assembly
Assembly Notes
When you attach the paper guide roller to the sprocket shaft, move the roller
in the same direction in which you removed it. (See Figure 3-32.)
Place the sprocket wheels on the sprocket shaft so that their markings are
on the left. Align the markings on the two wheels.
Figure 3-32. Installing the Sprocket Wheels
LQ-200/AP3000
3-37
Chapter 4
Adjustment
Adjustment Overview...................................................................... 4-1
Adjusting the Platen Gap ..................................................................... 4-1
Adjusting the Bidirectional Printing Alignment............................. 4-4
VR1 and VR2 Specifications ......................................................... 4-5
Adjustment Procedures ............................................................. 4-6
Draft mode .......................................................................... 4-7
LQ mode.. ............................................................................. 4-8
Figures
Figure
Figure
Figure
Figure
Figure
Figure
4-1.
4-2.
4-3.
4-4.
4-5.
4-6.
Removing the Ribbon Mask .....................................
Adjusting the Platen Gap.........................................
Moving the Carriage Guide Shaft Lever.. ................
Platen Gap Adjustment Positions ............................
Draft Mode Test Patterns.........................................
LQ Mode Test Patterns ............................................
4-2
4-3
4-3
4-4
4-7
4-9
Tables
Table 4-1.
Table 4-2.
Table 4-3.
LC-200/AP3000
VR1 Specifications.................................................... 4-5
VR2 Specifications.................................................... 4-6
Selecting the Best-Aligned Test Pattern.. ............... 4-8
4-i
Adjustment 4
Adjustment Overview
This chapter describes adjustment procedures. To ensure proper operation, you
need to adjust the printer after you repair or replace any parts.
Adjusting the Platen Gap
If you rotated or assembled the carriage guide shaft or shaft levers or if printing is
abnormal, you need to adjust the gap between the platen and the printhead.
Follow these steps:
1.
Remove the printer mechanism as described in Chapter 3.
2.
Install the paper guide and the platen unit on the printer mechanism.
LQ-200/AP3000
4-1
3.
Remove the printhead. To remove the ribbon mask, use tweezers to pull it
slightly toward the front of the printer and then lift it up.
Figure 4-1. Removing the Ribbon Mask
4.
Reinstall the printhead.
5.
Move the head adjust lever to the second position and move the paper release
lever to the tractor position.
6.
Manually move the carriage to column 10.
4-2
LQ-200/AP3000
Adjustment
7.
Place the gap gauge between the platen and printhead. Using the left and
right carriage guide shaft levers, adjust the gap so that the 0.017 inch
(0.42 mm) gauge can pass smoothly while the 0.018 inch (0.45 mm) gauge
cannot pass at all.
Rotate the left carriage guide shaft lever clockwise to widen the platen gap or
counterclockwise to close it. Rotate the right carriage guide shaft lever
counterclockwise to widen the platen gap or clockwise to close it.
Figure 4-2. Adjusting the Platen Gap
Figure 4-3. Moving the Carriage Guide Shaft Lever
LQ-200/AP3000
4-3
Adjustment
8.
Adjust the platen gap at the 10th and 70th column positions and at the middle
of the platen. When the gaps at all three positions match, the adjustment is
complete.
Figure 4. Platen Gap Adjustment Positions
Adjusting the Bidirectional Printing Alignment
If lines or characters are misaligned during bidirectional printing, perform this
adjustment. Also perform this adjustment whenever you replace the CO64 MAIN
board or the printer mechanism.
4-4
LQ-2OO/AP3000
Adjustment
VR1 and VR2 Specifications
Use variable resistors VR1 or VR2 on the C064 MAIN board to perform the
bidirectional printing alignment adjustment. Use VR1 in draft mode and VR2 in
LQ mode. Tables 4-1 and 4-2 show the specifications for VR1 and VR2.
Misalignment usually occurs when the carriage moves from right to left.
Table 4-1. VR1 Specifications
LQ-200/AP3000
4-5
Table 4-2. VR2 Specifications
Adjustment Procedures
To facilitate adjustment, VR1 and VR2 have standard positions. The standard
position is the point at which the variable resistor stops when you turn it
counterclockwise. To adjust the alignment, first move VR1 or VR2 to its standard
position. Then rotate VR1 or VR2 as described in the following sections.
l
Select tractor feeding, load continuous paper, and install the ink ribbon.
0
Move the head adjust lever to the second position.
4-6
LQ-2OO/AP3000
Adjustment
Draft mode
1.
Turn on the printer while holding down the ON LINE, FORM FEED, and
LINE FEED buttons.
2.
Press the ON LINE button.
3.
Press the LINE FEED button. The printer prints five test patterns. The
pattern corresponding to the current value of VR1 is the middle pattern. For
example, in Figure 4-5, VR1 equals -4 (pattern 3).
Figure 4-5. Draft Mode Test Patterns
4.
Select the best-aligned pattern as described here:
0
l
If the best-aligned pattern is just above the middle pattern, press the
FORM FEED button once. If it is the top pattern, press the FORM FEED
button twice. (See Table 4-3.)
If the best-aligned pattern is just below the middle pattern, press the
LINE FEED button once. If it is the bottom pattern, press the LINE
FEED button twice. (See Table 4-3.)
For example, if the best-aligned pattern is VR1 = -2 (pattern 5), press the
LINE FEED button twice.
LQ-200/AP3000
4-7
Adjustment
Table 4-3. Selecting the Best-Aligned Test Pattern
5.
Press the ON LINE button to print the pattern you select.
6.
Check the alignment of the printed pattern. If it is not satisfactory, return to
step 4.
7.
To set VR1 for the best-aligned pattern, turn VRl until the buzzer sounds.
8.
Turn off the printer.
LQ mode
The LQ mode adjustment is similar to the draft mode adjustment described above.
1.
Turn on the printer while holding down the ON LINE, FORM FEED, and
LINE FEED buttons.
2.
Press the ON LINE button.
4-8
LQ-2OO/AP3000
Adjustment
3.
Press the FORM FEED button. The printer prints five test patterns. The
pattern corresponding to the current value of VR2 is the middle pattern. For
example, in Figure 4-6, VR2 equals +4 (pattern 3).
Figure 4-6. LQ Mode Test Patterns
4.
Select the best-aligned pattern as described here:
a
If the best-aligned pattern is just above the middle pattern, press the
FORM FEED button once. If it is the top pattern, press the FORM FEED
button twice. (See Table 4-3.)
0
If the best-aligned pattern is just below the middle pattern, press the
LINE FEED button once. If it is the bottom pattern, press the LINE
FEED button twice. (See Table 4-3.)
For example, if the best-aligned pattern is VR2 = +5 (pattern 4), press the
LINE FEED button once.
5.
Press the ON LINE button to print the pattern you select.
6.
Check the alignment of the printed pattern. If it is not satisfactory, return to
step 4.
7.
To set VR2 for the best-aligned pattern, turn VR2 until the buzzer sounds.
8.
Turn off the printer.
LQ2OO/AP3000
4-9
Chapter 5
Troubleshooting
Procedure for Troubleshooting the Printer .....................................
Unit Replacement............................................................................
Repair of the Main Board ................................................................
Repair of the Printer Mechanism....................................................
5-1
5-1
5-10
5-17
Figures
Figure 5-1.
Figure 5-2.
Troubleshooting Procedure . . . . . . . . . . . . . . . . . . . . . . . . . . . . . . . . . . . . . . 5-1
Printhead Resistance. . . . . . . . . . . . . . . . . . . . . . . . . . . . . . . . . . . . . . . . . . . . . . . . 5-6
Tables
Table 5-1.
Table 5-2.
Table 5-3.
LQ-2OO/AP3000
Symptoms and Reference Pages............................... 5-2
Repair of the Main Board......................................... 5-10
Repair of the Printer Mechanism ............................. 5-17
5-i
Troubleshooting 5
Procedure for Troubleshooting the Printer
Printer problems may produce a variety of symptoms that complicate the task of
troubleshooting. However, you can simplify this process by following the
procedure outlined in the flowchart below.
Figure 5-1. Troubleshooting Procedure
Unit Replacement
For most problems, it is sufficient for you to determine the difficulty to the unit
level. Refer to Table 5-1; determine what the problem is; then follow the checks
provided in the corresponding flowchart.
LQ-2OO/AP3000
5-1
Table 5-1. Symptoms and Reference Pages
5-2
LQ-200/AP3000
Troubleshooting
The Printer Does Not Operate when the Power Switch is Turned On.
LQ-2OO/AP3000
5-3
Troubleshooting
Abnormal Carriage Operation
LQ-2OO/AP3000
Troubleshooting
Normal Carriage Operation but Incorrect Printing (During Self-Test)
LQ-2OO/AP3000
5-5
Troubleshooting
Figure 5-2. Printhead Resistance
5-6
LQ-200/AP3000
Abnormal Paper Feed (but Normal Printing)
LQ200/AP3000
5-7
Troubleshooting
Abnormal Operation of the Control Panel
5-8
LQ-200/AP3000
Troubleshooting
Incorrect Printing in On-line Mode
Note: It is assumed that the host computer is operating normally.
LQ-2OO/AP3000
59
Repair of the Main Board
This section provides instructions for repairing a defective main board. The
section describes various symptoms, likely causes, and checkpoints. Checkpoints
refer to proper waveforms, resistance values, and other values that should be
checked to evaluate the operation of any potentially bad component. Check these
values and take the appropriate action.
Table 5-2. Repair of the Main Board
5-10
LQ-2OO/AP3000
Table 5-2. Repair of the Main Board (cont.)
LQ-2OO/AP3000
5-11
Table 5-2. Repair of the Main Board (cont.)
5-12
LQ-200/AP3000
Table 5-2. Repair of the Main Board (cont.)
LQ-200/AP3000
5-13
Troubleshooting
Table 5-2. Repair of the Main Board (cont.)
5-14
LQ-200/P3000
Table 5-2. Repair of the Main Board (cont.)
LQ-200/AP3000
5-15
Troubleshooting
Table 5-2. Repair of the Main Board (cont.)
5-16
LQ-2OO/AP3000
Troubleshooting
Repair of the Printer Mechanism
For detailed procedures for replacing or adjusting parts, refer to Chapter 3,
Disassembly and Reassembly, and Chapter 4, Adjustment. If a problem or system
recurs after you have attempted to repair the printer, refer to the tables above to
find other potential causes.
Table 5-3. Repair of the Printer Mechanism
LQ-200/AP3000
5-17
Troubleshooting
Table 5-3. Repair of the Printer Mechanism (cont.)
5-18
LQ-2OO/AP3000
Troubleshooting
Table 5-3. Repair of the Printer Mechanism (cont.)
LQ-2OO/AP3000
5-19
Chapter 6
Maintenance
Preventive Maintenance ................................................................. 6-1
Lubrication and Adhesive Application............................................ 6-1
Figures
Figure 6-1.
Figure 6-2.
Correct Adhesive Application .................................. 6-3
LQ-200/AP3000 Lubrication Points ......................... 6-4
Tables
Table 6-1.
Table 6-2.
Table 6-3.
LQ-2OO/AP3000
Application of Lubricants and Adhesive.. ................ 6-2
Lubrication Points .................................................... 6-2
Adhesive Application Point...................................... 6-3
6-i
Maintenance
Maintenance
6
Proper maintenance is essential to assure optimal printer performance for the
longest possible period and to minimize malfunction frequency.
Preventive Maintenance
Preventive maintenance includes regular cleaning of the case exterior (using
denatured alcohol), as well as occasional vacuuming of the mechanism’s interior to
remove dust and paper debris.
After cleaning the unit, check that it is adequately lubricated (as described below).
Before returning the printer to the customer, inspect the springs, paper feed
rollers, and basic operation.
WARNING
Disconnect the printer from the power supply before performing maintenance.
Do not use thinner, trichloroethylene, or ketone-based solvents on the plastic
components of the printer.
Lubrication and Adhesive Application
Epson recommends that the printer be lubricated at the points illustrated in
Figure 6-2. Table 6-2 lists each point along with its recommended lubricant. The
three recommended lubricants are Epson O-2, G-20, and G-26, all of which have
been tested extensively and found to comply with the needs of this printer. (Table
6-1 provides product details about these lubricants.)
Before applying lubricant, be sure that the surface to be lubricated is clean. Do
not apply too much lubricant, as this may damage related parts.
The adhesive application indicated in Table 6-3 is necessary following disassembly
or replacement of the timing belt. Epson recommends that Neji lock #2 (G)
adhesive be applied to the point illustrated in Figure 6-1. Avoid overflow to
contiguous parts.
6-1
Maintenance
Table 6-1. Application of Lubricants and Adhesive
E: Epson-exclusive product
Table 6-2. Lubrication Points (Refer to Figure 6-2.)
Note: Lubrication must be applied during the reassembly process.
6-2
LQ-200/AP3000
Table 6-3. Adhesive Application Point (Refer to Figure 6-l.)
Figure 6-1. Correct Adhesive Application
LQ-200/AP3000
6-3
Maintenance
Figure 6-2. LQ-200/AP3000 Lubrication Points
6-4
LQ-200/AP3000
Appendix
Connector Summary........................................................................
Circuit Diagrams .............................................................................
Circuit Board Component Layout ...................................................
Exploded Diagrams..........................................................................
Case Outline Drawings....................................................................
A-1
A-3
A-7
A-8
A-12
Figures
Figure
Figure
Figure
Figure
Figure
Figure
Figure
Figure
Figure
Figure
A-1.
A-2.
A-3.
A-4.
A-5.
A-6.
A-7.
A-8.
A-9.
A-10.
Cable Connections ....................................................
C064 MAIN Board Circuit Diagram.. ......................
PEBFIL-II Board Circuit Diagram...........................
Control Panel Circuit Diagram................................
C064 MAIN Board Component Layout.. ..................
LQ-200/AP3000 Exploded Diagram .........................
M-X10 Printer Mechanism Exploded Diagram......
Tractor Exploded Diagram .......................................
LQ-200/AP3000 Case Outline Drawing ...................
LQ-200/AP3000 Case Outline Drawing
with Tractor Unit.. .................................................
A-1
A-3
A-5
A-6
A-7
A-8
A-9
A-10
A-12
Board Connector Summary.. ....................................
Part Number Reference Table .................................
Connector CN3 on the C064 MAIN Board...............
Connector CN4 on the C064 MAIN Board.. .............
Connector CN5 on the C064 MAIN Board.. .............
Connector CN6 on the C064 MAIN Board...............
Connector CN7 on the C064 MAIN Board.. .............
Connector CN8 on the C064 MAIN Board.. .............
Connector CN9 on the C064 MAIN Board.. .............
Connector CN10 on the C064 MAIN Board.. ...........
A-2
A-11
A-14
A-15
A-16
A-17
A-17
A-18
A-18
A-18
A-13
Tables
Table
Table
Table
Table
Table
Table
Table
Table
Table
Table
LQ-200/AP3000
A-1.
A-2.
A-3.
A-4.
A-5.
A-6.
A-7.
A-8.
A-9.
A-10.
A-i
Appendix
Appendix
Connector Summary
The figure below illustrates the interconnection of the primary components. Table
A-l describes the function and size of the connectors.
Figure A-l. Cable Connections
LQ-2OO/AP3000
A-l
Appendix
Table A-l. Board Connector Summary
A-2
LQ-200/AP3000
Circuit Diagrams
Figure A-2. C064 MAIN Board Circuit Diagram
LQ-200/AP3000
A-3
Appendix
Figure A-3. PEBFILL_II Board Circuit Diagram
LQ-2OO/AP3000
A-5
Appendix
Figure A-4. Control Panel Circuit Diagram
A-6
LQ-200/AP3000
LQ-200/AP3000
Figure A-5. C064 MAlN Board Component Layout
Circuit Board Component Layout
A-7
Appendix
Appendix
Exploded Diagrams
Figure A-6 LQ-200/AP3000 Exploded Diagram
LQ-200/AP3000
Appendix
Figure A-7. M-5C1O Printer Mechanism Exploded Diagram
LQ-200/AP3000
A-9
Appendix
A-10
Figure AS. Tractor Exploded Diagram
LQ-200/AP3000
Table A-2. Part Number Reference Table
Note: ESG = Epson standard gray
A-11
Appendix
Case Outline Drawings
Figure A-9 LQ-200/AP3000 Case Outline Drawing
A-12
LQ-2OO/AP3000
Appendix
Figure A-10. LQ-200/AP3000 Case Outline Drawing with Tractor Unit
LQ-200/AP3000
A-13
Appendix
Table A-3. Connector CN3 on the CM4 MAINBoard
A-14
LQ-2OO/AP3000
Appendix
Table A-3. Connector CN3 on the C064 MAIN Board (cont.)
Table A-4. Connector CN4 on the C064 MAlN Board
LQ-200/AP3000
A-15
Appendix
Table AS. Connector CN5 on the C064 MAINBoard
A-16
LQ-200/AP3000
Appendix
Table A-6 Connector CN6 on the C064 MAlN Board
Table A-7. Connector CN7 on the C064 MAINBoard
LQ-200/AP3000
A-17
Appendix
Table A-7. Connector CN7 on the C064 MAlN Board (cont.)
Table A-8. Connector CN8 on the C064 MAINBoard
Table A-9 Connector CN9 on the C064 MAIN Board
A-18
LQ-2OO/AP3000