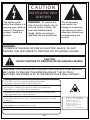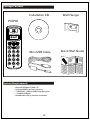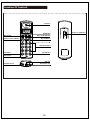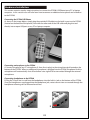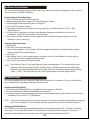
1
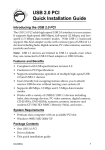
®
VISION BEYOND SOUND ®
INSTRUCTION MANUAL
PCIP06
USB PHONE
Photo is for reference only.
Printed in China
Table Of Contents
Caution / Warning..................................................................................................... 02
Package Contents / System Requirements...................................................... 03
Location Of Controls ................................................................................................ 04
Hardware Installation
Connecting The PCIP06.................................................................................... 05
Connecting A Mic To The PCIP06 ................................................................. 05
Connecting Headphones To The PCIP06 .................................................. 05
Software Installation
Downloading And Installing Skype™ ........................................................ 06
Creating A Skype Username .......................................................................... 06
PCIP06 Driver
Installing The PCIP06 Driver ........................................................................... 06
Updating The PCIP06 Driver .......................................................................... 06
Testing The PCIP06 ................................................................................................... 07
Basic PCIP06 Operations
Making A Skype-to-Skype Call........................................................................ 07
Making A SkypeOut Call .................................................................................. 07
Receiving A Skype Call ..................................................................................... 07
Ending A Skype Call........................................................................................... 07
Muting / Unmuting A Call ............................................................................... 07
Using The Menu Button ................................................................................... 07
Troubleshooting ........................................................................................................ 08
C A U T IO N
R IS K OF E L E C TR IC S HOC K
DO NOT OP E N
The lightning bolt
within the triangle is a
warning sign, alerting
users of "dangerous
voltage" inside the
product.
WARNING: To reduce the
risk of electric shock, do not
remove cover or back. No
user-serviceable parts
inside. Refer servicing to
qualified service personnel.
The exclamation
point within the
triangle is a warning
sign alerting users of
important instructions
accompanying the
product.
WARNING:
TO REDUCE THE RISK OF FIRE OR ELECTRIC SHOCK, DO NOT
EXPOSE THIS APPLIANCE TO DRIPPING OR SPLASHING LIQUIDS.
CAUTION
DO NOT EXPOSE TO DRIPPING OR SPLASHING LIQUIDS!
CAUTION: GROUNDING OR POLARIZATION PRECAUTIONS SHOULD
BE TAKEN TO ENSURE THE WIDER BLADE OF THE AC PLUG
MATCHES THE WIDER SLOT IN THE RECEPTACLE WALL SOCKET.
C A UT IO N: I NV IS IB L E L A S E R R A DIATI O N W HE N O P E N A ND
IN T E R L O C K S DE F E AT E D. AV O ID E X P O S UR E TO B E A M.
V O R S IC HT: U NS IC HT B A R E L A S E R S T R A HL UNG T R IT T A US ,
W E NN DE C K E L G E ÖF F NE T UND W E NN S IC HE R HE IT S V E R R IE G E L UNG
ÜB E R B R ÜC K T IS T. N IC HT DE M S T R A HL A US S E T ZE NI.
VA R NIN G : O S Y NL IG L A S E R S T R ÁL NIN G NÄR DE NNA D E L ÄR ÖP P NA D O C H
S P ÄR R ÄR UR K O P P L A ND. S T R ÁL E N ÄR FAR L IG .
A DVA R S E L : US Y NL IG L A S E R S T R ÁL IN G V E D ÁB NIN G . N ÁR
S IK K E R HE DS A F B RY DE R E E R UDE A F F UNK T IO N. U NDG Á UDS /E T T E L S E F O R
S T R ÁL IN G .
AT T NE NZIO NE : R A DIO NS L A S E R IN V IS ID IL E . N O N G UA R DA R E
DIR E T TA ME NT E NE L L A S O R G E NT E DE L L A S E R .
A C HT UNG : L A S E R L IN S E NIC HT B E R ÜHR E N UNS IC HT B A R E R L A S E R S T R A HL .
AV IS O : A L E NT E NUNC A D E V E S E R TO C A DA .
02
C L A S S 1 L A S E R P R O DU C T
K L A S S E 1 L A S E R P R O DU K T
L A S E R DE C L A S S E
L A S E R DI P R IMA C L A S S E
K LAS S E 1 LAS E R
L A S E R P R IME R A C L A S E
LAS E R CLAS S E 1
K L A S S E 1 L A S E R P R O DU K T
Package Contents
Installation CD
Wall Hanger
PCIP06
Mini USB Cable
System Requirements
•
•
•
•
•
Microsoft Windows® 2000 / XP
Pentium 400MHz or faster processor
128MB RAM / 16MB available hard disk space
1 available USB port
Broadband or dial-up Internet connection
03
Quick Start Guide
Location Of Controls
Earphone
Mute Button
Menu Button
Answer / Start Call Button
Menu Scroll Up Button
End Call Button
Menu Scroll Down Button
Numbered Keypad
Star Button
Pound Button
Microphone
USB Jack
Headphone Jack
Microphone Jack
04
Ringer On / Off Button
Hardware Installation
This section contains step-by-step instructions to connect the PCIP06 USB Phone to any PC or laptop
computer. In this section users will also learn how to connect an additional microphone and a headset
to the PCIP06.
Connecting the PCIP06 USB Phone
As shown in the image below, simply plug the provided USB cable into the built-in port on the PCIP06
(located on the bottom of the phone). Now take the other end of the USB cable and plug that end
directly into an open USB port on any PC or laptop computer.
Connecting a microphone to the PCIP06
A. Connect the plug of any PC microphone (3.5mm line-in plug) to the microphone jack located on the
bottom of the PCIP06. When an additional microphone is plugged into the PCIP06, the phone’s built-in
microphone will automatically shut off and allow voice signals to be transmitted through the external
microphone.
Connecting headphones to the PCIP06
B. Plug the 3.5mm line-in cord from the headphones into the built-in jack on the bottom of the PCIP06.
Once the headphones are plugged into the headphone jack, voice transmissions are routed through the
headphones allowing calls to become hands-free.
Need image of
headpiece jack (B)
from HK
A
B
05
Software Installation
This section demonstrates how to install the necessary software to begin making phone calls using the
Internet and Auvi’s PCIP06 USB Phone.
Downloading and Installing Skype
1. Access the web and go to www.skype.com.
2. When the page fully loads, click on the “Download Now” button.
3. Another page will open detailing the new Skype 2.5.
4. Click on the “Download” button.
5. Depending on what Internet browser is being used, the user will be asked to “Save” or “Run”
SkypeSetup.exe.
6. Once this step is complete, the Skype Setup Wizard will appear and provide instructions for
installation. Follow these instructions to install Skype.
7. Once Skype has been installed, it can be opened at any time by clicking the Skype icon on the
desktop or in the system tray.
Creating a Skype Username
1. Open Skype.
2. Click “Don’t Have A Skype Name”.
3. A new window appears. In this window, fill out the appropriate fields and check the box to agree
with the Skype Terms and Conditions.
4. Click “Next”.
5. After clicking “Next”, a new window appears asking for the user’s email address, country and city.
Fill in the forms with the appropriate information.
6. Click “Sign In” to create a new Skype account.
NOTE: After clicking “Sign-In”, the Skype Getting Started window appears. This tutorial will provide
information on how to make a Skype call, add contacts, call Skype contacts and call landlines.
If the user needs additional help using the Skype software, more help can be found by clicking,
“Help” > “Help”. This will guide the user to the Support page within the Skype website.
PCIP06 Driver
This section explains how to install the PCIP06 Driver onto the user’s computer. The user will also learn
how to keep the driver updated with the push of a button.
Installing the PCIP06 Driver
1. Make sure the PCIP06 USB Phone is plugged into the computer’s USB port.
2. Ensure all software has been downloaded to the computer.
3. Once the phone has been connected and Skype has been downloaded and installed, insert the (Driver
installation CD) into the PC’s CD-ROM drive.
NOTE: If the auto-run feature does not activate, open My Computer and double-click the drive containing
the Driver Installation CD. Then, double-click the setup.exe file to start the installation process.
Updating the PCIP06 Driver
The PCIP06 Driver needs to be updated periodically to maintain top quality calls. To do this, simply log
onto http//:www.auviworld.com and visit the downloads section to check for updates. If there is an
available update, double-click it and the driver will automatically be updated on the PC.
06
Testing the PCIP06
Now that the PCIP06 hardware, software and driver has been installed, it is time to test the PCIP06 by
making the first call. The following steps will explain how to check the PCIP06 for proper functioning.
1. Ensure that Skype is open and running on the PC.
2. Click on the “Add A Contact” icon located on the top of the Skype window and add “Echo123” to Skype
contacts.
3. Skype will scroll through the available contacts bearing that name. Double-click on the contact that
bears the full name “Echo / Sound Test Service”.
4. A pop-up window will appear. Click on “Add Contact”.
5. Another pop-up window will appear asking the user to “Say Hello”. Simply click “Ok” and “Echo123”
will be added to the Skype contact list displayed on the screen.
6. Start chatting with “Echo123” by clicking the “Chat” icon.
7. Input “Call Me” in the chat text area and press “Enter” on the keyboard.
8. Wait a moment for “Echo123” to call back. When the phone rings, simply answer it by pressing the
“Answer / Start Call” button on the phone’s handset.
Basic PCIP06 Operations
The basic operations section will teach the user all the “how-to’s” of the PCIP06. This section demonstrates
step-by-step instructions on how to make and receive Skype calls, how to end calls and how certain
functions of the PCIP06 work.
Making a Skype-to-Skype Call
1. Use the “Up” and “Down” buttons on the PCIP06 to select the desired Skype contact from the screen.
2. Once the appropriate contact is highlighted on the screen, press the “Answer / Start Call” button on the
handset to place the call.
Making a SkypeOut Call
1. Dial the number to be called from the handset using the following format:
“Country Code” + “City Code” + “7-digit Phone Number”
E.g. +1-909-555-1234 (”1” being the “Country Code” for the United States.)
2. Press the “Answer / Start Call” button on the handset to place the call.
Receiving a Skype Call
1. When the phone rings, simply press the “Answer / Start Call” button on the handset to receive
incoming calls.
Ending a Skype Call
1. When the call is over, simply end the call by pressing the “End Call” button on the PCIP06 USB Phone.
Muting / Unmuting a Call
1. To “Mute” a call, simply press the “Mute” button directly on the PCIP06 keypad. To “Unmute” the call,
simply press the “Mute” button a second time.
Using the Menu Button
1. The “Menu” button provides the option to scroll across the tabs on the Skype screen.
2. By pressing “Menu”, the “Contacts,” “Dial” or “History” tab can be selected.
3. Once the appropriate tab has been chosen, users can scroll though each tab using the PCIP06 handset.
07
Troubleshooting
This section describes the troubleshooting problems the computer might have with the PCIP06. This
section will answer the common Q&A’s any user might have.
Why did I see the icon ? rather than the B icon in the system tray?
1. Check to see whether Skype is running. If it is not running, open and run Skype.
2. Check to see whether you can see the icon
in the Skype window.
3. If you cannot see the icon, please follow the steps below:
Step A: Click “Tools” and then “Options”.
Step B: Click “Privacy”.
Choose “Manage Other Programs Access to Skype”.
Step C: Choose “Change”.
Step D: Choose “Allow This Program To Use Skype”.
After turning on the computer, I see this icon x. Why do I see this?
There are two possible reasons this icon may appear.
1. The PCIP06 failed to communicate with the computer. Check to see whether the USB port is in a
normal state.
2. The PCIP06 failed to work normally in Windows®. The device driver may need to be reinstalled.
Please follow the steps below:
Step A: Click “Start” > “Settings” > “Control Panel” > “System” > “Hardware” > “Device Manager”.
Step B: In the window that appears, check to see if the following items are in a “Normal State”:
USB Human Interface Device
USB Audio Device
USB Composite Device
Step C: If there is a Question Mark “?” or an Exclaimation Mark “!” next to any one of the listed
devices, the device needs to be fixed by following the PC’s instructions.
Step D: To Uninstall the PCIP06 Driver, right-click the PCIP06 device in the “Device Manager”
and choose “Uninstall”. To reinstall the PCIP06 Driver, go to page 06 and follow the
instructions under the “Installing The PCIP06 Driver”.
08
®
VISION BEYOND SOUND ®
Auvi Electronics N.A. & Auvi Electronics L.A.
Retail Divisions of Auvi Technologies
5988 Mid Rivers Mall Drive
St. Charles, MO 63304
www.auviworld.com
For customer service inquiries in the U.S. and Canada, please email [email protected].
For customer service inquiries in Latin and South America, please email [email protected].
© 2006 Auvi Technologies, LLC. All Rights Reserved. Auvi Electronics N.A., LLC and Auvi Electronics L.A., LLC are separate subsidiaries of Auvi
Technologies, LLC. All the mentioned trademarks or tradenames are the property of their respective owners. Specifications of product
features are subject to change without notice, which might alter the functionality described within this instruction manual.