1
LU940407
OWNERS MANUAL
MS-8
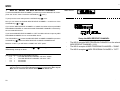
THE SWITCH-SWITCHER
No TAPDANCE anymore!
The MS-8 switches up to 17 units at the same time, conventional amps, effect-units, etc., whether if they understand MIDI or not.
The MS-8 is perfect on stage, for practicing and recording. Any self-created combination of switch settings can be recalled.
A musician can switch all components of his whole setup just by one stomp on one footswitch.
PROGRAMMABLE SWITCH CONTROLLER + MIDI
(C) 1991-1994 NOBELS A Nº1 -OF- HAMBURG CONCEPT
TM
6. Mai 1992 @ 12:49 Uhr
1
LU940407
Index
Index .................................................................................... 2
Introduction ........................................................................ 3
1 Front of the MS-8 .............................................................4
2 Rear of the MS-8 .............................................................. 5
3 Connections ..................................................................... 6
4 Controls ............................................................................7
2 F-AMP list......................................................................... 18
3 How to program the F-AMP .............................................. 19
MIDI...................................................................................... 20
1 MIDI IN - Select the MIDI RECEIVE CHANNEL .............. 20
2 MIDI MAPPING programming .......................................... 21
3 MIDI OUT - TRANSMIT CHANNELS ............................... 22
4 MIDI initialise - MIDI setup! .............................................. 22
Internal memory ................................................................. 8
1 Store programs................................................................. 8
2 Copy programs ................................................................. 8
3 Memory protection ........................................................... 9
F-AMP "Old generation" .................................................... 23
1 How to connect................................................................. 23
2 F-AMP list......................................................................... 23
Switches / Relays ............................................................... 10
1 The function ..................................................................... 10
2 Setup ................................................................................ 11
Overview for advanced users ............................................ 24
1 The local parameter / stored in the programs .................. 24
2 The global parameter / stored in the setup....................... 24
Footswitches / "SONGS" ...................................................12
1 The function ..................................................................... 12
2 Setup the footswitches ..................................................... 13
3 The "SONG" mode ........................................................... 14
4 How to program a "SONG"............................................... 15
Information .......................................................................... 26
1
Overview of the programmable data ............................ 26
1.1 List of the global data ................................................... 26
1.2 List of the the local data ............................................... 26
1.3 Overview of the function keys (F1 - F4)........................ 26
1.4 Factory setup / or erase all ........................................... 27
1.5 Technical data .............................................................. 27
Title / naming the programs ..............................................16
"HELLO" message / sign your MS-8 ................................ 17
F-AMP / new generation .................................................... 18
1 F-AMP setup .................................................................... 18
Copy pages ......................................................................... 28
1 MIDI mapping ................................................................... 28
2 Songs and Steps .............................................................. 28
3 Programs .......................................................................... 30
(C) Copyright 1990, 1991, 1992 MS MUSIC SERVICE GmbH
2
All rights reserved. Copying only after written authorisation. - Authors: Bernhard Kurzke, Kai Tachibana
6. Mai 1992 @ 12:49 Uhr
LU940407
Introduction
Index / Introduction
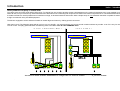
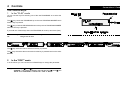
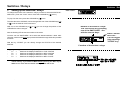
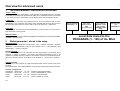
Some problems everybody is familar with:
You collect more and more small and big effect-units. To change from one sound to another means a wild tapdance on the various footswitches. As it is not possible (In time) to
switch all units, many musicians only use a small selection of their effect-units. Interesting and unique sounds could not be used in live performance. The MS-8 had been developed
to enable musicians to use all possible sound creations on stage, in rehearsal sessions and studios. With a simple stomp on one footswitch the MS-8 is capable of switching up
to eight conventional units, plus MIDI equipment.
The MS-8 is equipped to switch advanced models of several big brand names by offering special connectors.
How does it work? The following pages will tell you how you can simplify your setup and how you can use sound creations without any trouble - even if it is only for one note.
Time for music: Just play guitar and leave the switching work to the MS-8. Your Nº1-OF-HAMBURG team.
STO P TAPD AN C IN G !
M ID IEFFEC T
JU ST PLAY!
M ID IEFFEC T
N o be ls
N o be ls
zi
ck
ez
ac
k
zi
cke
zack
No be ls
N o be ls
N o be ls
N o be ls
Amp
MS-8
+1
YES
-1
NO
STORE
FUNCTI
O
NS
ANo
1.
OF
-HA
MB
UR
GCO
NC
EP
TT
M
1
2
3
4
5
6
7
8
MENUE
SELECT
MS 8 Sw
Hi,r u
tcher
i
ready
Pr
ogr
ammabl
e
AAAAAAAAAAAAAAAAAAAAAAAAAAAAAAAAAAAAAAAAAAAAA
BBBBBBBBBBBBBBBBBBBBBBBBBBBBBBBBBBBBBBBBBBBBB
AAAAAAAAAAAAAAAAAAAAAAAAAAAAAAAAAAAAAAAAAAAAA
BBBBBBBBBBBBBBBBBBBBBBBBBBBBBBBBBBBBBBBBBBBBB
AAAAAAAAAAAAAAAAAAAAAAAAAAAAAAAAAAAAAAAAAAAAA
BBBBBBBBBBBBBBBBBBBBBBBBBBBBBBBBBBBBBBBBBBBBB
AAAAAAAAAAAAAAAAAAAAAAAAAAAAAAAAAAAAAAAAAAAAA
BBBBBBBBBBBBBBBBBBBBBBBBBBBBBBBBBBBBBBBBBBBBB
AAAAAAAAAAAAAAAAAAAAAAAAAAAAAAAAAAAAAAAAAAAAA
BBBBBBBBBBBBBBBBBBBBBBBBBBBBBBBBBBBBBBBBBBBBB
AAAAAAAAAAAAAAAAAAAAAAAAAAAAAAAAAAAAAAAAAAAAA
BBBBBBBBBBBBBBBBBBBBBBBBBBBBBBBBBBBBBBBBBBBBB
AAAAAAAAAAAAAAAAAAAAAAAAAAAAAAAAAAAAAAAAAAAAA
BBBBBBBBBBBBBBBBBBBBBBBBBBBBBBBBBBBBBBBBBBBBB
AAAAAAAAAAAAAAAAAAAAAAAAAAAAAAAAAAAAAAAAAAAAA
BBBBBBBBBBBBBBBBBBBBBBBBBBBBBBBBBBBBBBBBBBBBB
AAAAAAAAAAAAAAAAAAAAAAAAAAAAAAAAAAAAAAAAAAAAA
BBBBBBBBBBBBBBBBBBBBBBBBBBBBBBBBBBBBBBBBBBBBB
AAAAAAAAAAAAAAAAAAAAAAAAAAAAAAAAAAAAAAAAAAAAA
BBBBBBBBBBBBBBBBBBBBBBBBBBBBBBBBBBBBBBBBBBBBB
AAAAAAAAAAAAAAAAAAAAAAAAAAAAAAAAAAAAAAAAAAAAA
BBBBBBBBBBBBBBBBBBBBBBBBBBBBBBBBBBBBBBBBBBBBB
AAAAAAAAAAAAAAAAAAAAAAAAAAAAAAAAAAAAAAAAAAAAA
BBBBBBBBBBBBBBBBBBBBBBBBBBBBBBBBBBBBBBBBBBBBB
BBBBBBBBBBBBBBBBBBBBBBBBBBBBBBBBBBBBBBBBBBBBB
AAAAAAAAAAAAAAAAAAAAAAAAAAAAAAAAAAAAAAAAAAAAA
E F F E C T- P E D A L S
CH A N NE L
Se l e ct
RE V E RB
TRE MO LO
UP
DO W N
2E
?
wit
S
chCont
rol
er+
F1
F3
F2
F4
EXI
T
Mi
di
SWITCHES
UP
DO W N
You have to switch all these footswitches to change from one sound to another.................or just one of these
6. Mai 1992 @ 12:49 Uhr
3
LU940407
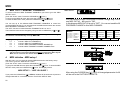
1
Front of the MS-8
1
2
3
5
4
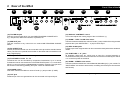
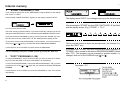
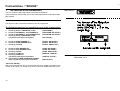
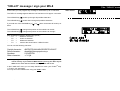
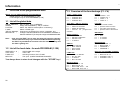
1 Front of the MS-8
(1) The LC-DISPLAY
To communicate with the MS-8 please follow the instructions of the LC-DISPLAY (1).
The data in each menu shows data which can be changed by pressing one of the
CURSOR keys (2) [ ], [ ][ ] and [ ], or the functionkeys (F1 - F4) (5). The viewing
angle of the LC-DISPLAY is adjustable, by using the DISPLAY CONTRAST control
(16), located on the rear. This is very helpful if the MS-8 is mounted high in a rack or
low on a small amp.
(2) The CURSOR keys
With the CURSOR keys [ ] and [ ] you can select the functions or parameters of
the MS-8, and with the CURSOR keys [ ] and [ ] you can change the values of
those parameters.
(3) The "STORE" key
With this key you can store or copy programs. In some menus the "STORE" key is
used for special functions, to make handling easier. (see corresponding chapters)
(4) The "EXIT" key
With this key you can interupt a store or copy function without changing anything. With
the CURSOR keys (2) you select a menu ("Go into" a menu) and with the "EXIT" key
(4) you leave it ("Go out" of a menu).
6
7
(5) The FUNCTION keys (F1 - F4)
These four keys have the same functions as the connected FOOTSWITCHES (F1-F4)
(13) at the rear of the MS-8. (If the MS-8 is in the "PLAY") In some menus these keys are
used for special functions, to make handling easier. (see corresponding chapters)
(6) The LED-lamps above key "SWITCHES 1 - 8"
show whether a connected unit is activated or is not activated. In non activated state the
LEDS are dimmed so that you still can see them in the dark. Flashing of one LED indicates
special functions. (see corresponding chapters)
(7) The key "SWITCHES 1 - 8"
These keys control the switches / relays. Also you can select special functions for these
keys in some menus.
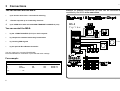
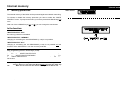
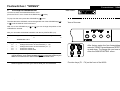
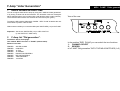
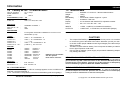
2 Rear of the MS-8
(8) The ON / OFF SWITCH
This key switches the MS-8 ON and OFF.
(9) The AC-IN jack
Connect the power supply unit (PSU) to this jack. You can use either a PSU with AC 7.5V
/ 1A or DC 10V / 1.2 A.
WARNING: Other PSU may not work properly or could damage the MS-8.
6. Mai 1992 @ 12:49 Uhr
4
LU940407
2
Rear of the MS-8
8
Front / Rear of the MS-8
10 11
9
13
14 15
12
(10) The MIDI IN jack
This jack connects units which can send MIDI PROGRAM CHANGE DATA.
E.g.: Sequencers, MIDI footcontrollers, keyboards, etc.
(11) MIDI OUT jack
This jack connects to any units which can receive MIDI PROGRAM CHANGE
DATA.
(12) RC-8 INPUT jack
The RC-8 remote controller can be connected to this jack with a standard stereo
cable. (The RC-8 is a optional footcontroller for the MS-8 with 8 footswitches and
a big 4 digit display).
NOTE: If you do not use a RC-8 controller you must use a standard mono cable!
(13) FOOTSWITCH Jacks F1 - F4
The MS-8 also can be controlled by inexpensive footswitches. Up to 4 remote
footswitches can be connected to the 4 FOOTSWITCHES jacks F1 - F4 on the back
panel. For correct functioning you must use momentary switches. The type which
has closed contact during pressing and open contact in released state.
17
16
19
20
19
18
(16) DISPLAY CONTRAST control
This control adjusts the viewing angle of the LC-DISPLAY (1).
(17) NORM. - RED / PLAIN slide switch
This switch matches the MS-8 to various Fender (*1) amp models of the old generation and
prepares the 2 jack SWITCHES 1 + 2 (18) for these amps.
(18) RED / PLAIN jacks
Fender amps of the old generation can be connected to these jacks with 2 standard stereo
cables.
(19) "SWITCHES 1 - 8" jacks
All amplifiers, effect-units, etc. which have an input for a remote footswitch can be
connected to these 8 jacks. All connected units can now be controlled by the "SWITCHES
1-8" on the front panel of the MS-8.
(20) NORM. - STEREO slide switch
This switch matches the MS-8 to various Marshall, Mesa Boogie (*1), etc. models. The jack
"SWITCHES 6" now works in stereo mode, controlling 2 functions (Like Channel switching
and Reverb)
(14) ASSIGN switch
This switch matches the MS-8 to various Fender (*1) amp models. (F-AMP)
(15) OUT jack
Fender amps of the new generations can be connected to this special jack.
(*1) Fender, Marshall and Mesa Boogie are registered trademarks.
6. Mai 1992 @ 12:49 Uhr
5
LU940407
3
Connections
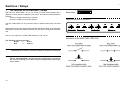
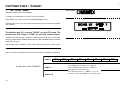
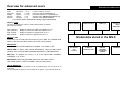
You can control with the MS-8:
Example for possible connections: All units can be connected and
controlled by the MS-8 at the same time.
-
up to 8 units which have conventional switching
+
1 Fender amp with up to 4 switching functions
+
up to 5 MIDI units with selectable MIDI TRANSMIT CHANNELS (1-16)
You can control the MS-8:
-
by the 4 FUNCTION KEYS (F1-F4) on the front panel
-
by inexpensive standard momentary footswitches
-
by incoming MIDI signals
-
by the optional RC-8 Remote Controller
MS-8
Top View
F-amp
FENDER OUT
F-am p
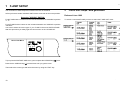
You can create up to 128 user PROGRAMS.
Each PROGRAM is a combination of pre-selected switch settings.
For example:
MS-8 PROGRAM Amp-channel
Distortion-pedal Reverb
Send MIDI
1
2
3
......
128
OFF
ON
OFF
PRG.Nº.: 30
PRG.Nº.: 92
PRG.Nº.: 12
Clean
Clean
Overdrive
ON
OFF
OFF
. . . . etc.
6. Mai 1992 @ 12:49 Uhr
6
LU940407
4
Controls
Connections / Controls
The CURSOR keys:
1
In the "PLAY" mode
you can use the keys for selecting one of the 128 PROGRAMS or to select the
menus.
The [ ] key counts the PROGRAMS up to the next PROGRAM NUMBER each
time the key is pressed.
The [ ] key counts the PROGRAMS down to the previous PROGRAM NUMBER
each time the key is pressed .
If you hold one of these keys down the PROGRAM will scroll up and down (fast!).
ATTENTION: If you are in the "EDIT" mode the changed data will not be stored and
the
changes will be lost!
The [
] key select the menus each time the key is pressed.
The [ ] key also select the menus each time the key is pressed but from the other
direction
2
In the "EDIT" mode
or in the menus you can use the four CURSOR keys to change the parameter.
Mainly:
With the keys [ ] and [ ] you select the POSITION of the CURSORS
(CURSOR = Line under the display) and with the keys [ ] and [ ] the
VALUE of the FUNCTION or confirm with: "YES" or "NO".
6. Mai 1992 @ 12:49 Uhr
7
LU940407
Internal memory
1
"STORE" PROGRAMS (1-128)
If you change anything on a "PLAY" PROGRAM (1-128) the DISPLAY will change
from "PLAY" to "EDIT".
If the message "WRITE PROTECT" appears on the display instead of "EDIT"
you can not overwrite the data.
The display shows "EDIT" if you change anything on the actual program!
After pressing the "STORE" key the LEDS "SWITCHES 1-8" are flashing
and the display shows: (E.g.) "STORE 1 TO 1"
This is the memory protection feature. If you want to make any changes you have to
change the "WRITE PROTECT" to OFF. See also chapter "MEMORY PROTECTION".
If you want to store a PROGRAM (1-128) you have to press the "STORE" key once.
Now the LED of the key "SWITCHES 1-8" are flashing and the display shows:
If you want to move the actual PROGRAM (1-128) to another, you have to press one
of the keys [ ] or [ ] until you reached the desired PROGRAM NUMBER.
This is your last chance to leave the store process. You interupt it if you
press the "EXIT" key!
A second press on the "STORE" key finally stores the PROGRAM.
You can immediately interupt the "STORE" process by pressing the "EXIT" key.
2
"COPY" PROGRAMS (1-128)
If you press the "STORE" key twice the actual program (Number after
"STORE") will be stored to the desired PROGRAM NUMBER (Number
after "TO"). This program can be changed to another location if you
change it with one of the CURSOR keys [ ] or [ ].
To copy a PROGRAM (1-128) to another location you have to press the "STORE"
key once. Now the LEDS of the keys "SWITCHES 1-8" are flashing.
To move the actual PROGRAM (1-128) to the desired PROGRAM (1-128), you have
to press the one of the [ ] or [ ] keys until you reached the desired PROGRAM
NUMBER.
A second press on the "STORE" key stores the PROGRAM (1-128). The LED are
stop flashing.
You can immediately stop the store process by pressing the "EXIT" key.
6. Mai 1992 @ 12:49 Uhr
8
LU940407
Internal memory
3
Internal memory
Memory protection
Main menu:
The internal memory of the MS-8 can be protected against accidental overwriting.
To activate or disable the memory protection you have to select the "WRITE
PROTECT" menu. To jump into this menu you have to press the CURSOR key [ ]
once.
With one of the CURSOR keys [
] or [
] you can change the actual state.
In the function:
"WRITE PROTECT OFF"
the memory protection is disabled.
"WRITE PROTECT MEMORY"
changing or overwriting the 128 PROGRAMS (1-128) is not possible.
"WRITE PROTECT ALL"
changing or overwriting the 128 PROGRAMS (1-128) is not possible and the
functions of the SWITCHES 1-8 on the front are protected.
Easy programming with the functionkeys (F1-F4) :
F1
=
WRITE PROTECTOFF
F2
=
WRITE PROTECTMEMORY
=
WRITE PROTECTALL
No function
Note:
the
-
F4
F3
=
Only using the"EXIT" key to leave the menu will store the changes into the
internal memory. If you switch the MS-8 off before pressing the "EXIT" key
MS-8 can not write into the internal memory and the data is lost.
6. Mai 1992 @ 12:49 Uhr
9
LU940407
Switches / Relays
1
The function of the Switches / Relays
With the keys "SWITCHES 1-8" you can create your own switch settings. But it
depends on which switch is needed for your device. There are four different kinds of
switches:
positive or negative latched type switches
positive or negative momentary switches.
Main menu:
LEDS on the front of the MS-8
The LED "SWITCHES 1-8" only show the active or passive state of the connected
unit.
Bright indicates the active state and dim indicates the passive state. (If the LEDS are
dimmed you can see them better in the dark!) So you have to configure the switches
first.
Also you can adjust the "PULSE TIME" between 1 and 100 ms.
Simulation of the SWITCHES / RELAYS:
The LEDS are showing the state:
Bright
=
Active
Dim
=
Passive
NOTE: If you change one or more switches in the "PLAY" mode the DISPLAY
immediately shows "EDIT" to indicate the difference between the stored data.
TIP:
Try to find out the shortest PULSE TIME. All momentary switches are set to 20ms
after the "FACTORY SETUP". If some units will not work properly increase the
time until the switching is save. Most computer equipped units needs longer
time to switch.
6. Mai 1992 @ 12:49 Uhr
10
LU940407
Switches / Relays
2
Switches / Relays
Setting up the Switches / Relays
Main menu:
To change the function of the switches / relays you have to select the SWITCH/FAMP menu. (From the "PLAY" menu: Press the CURSOR key [ ] twice.)
To jump into the menu press the CURSOR key [
] once.
The value above the CURSOR, can be changed with one of the CURSOR keys [
or [ ], until the desired mode is achieved.
With one of the CURSOR keys [
CURSORS to action changes.
]
] or [ ] you can change the position of the
Also the flashing LED shows the number of the relais.
Number of the switch / relays:
You can choose it by pressing
one of the SWITCHES 1 - 8 or
with the coursor keys
You also can use "SWITCHES 1-8" to select the desired switches / relais. After
choosing, each time the same key is pressed will switch through all the four possible
functions.
With the key "STORE" you can directly change the STATUS of the desired
SWITCH.
Status / switch
ON or OFF.
You can toggle
it by pressing the
"STORE" key
Function of the switch / relays
Easy programming with the functionkeys (F1-F4) :
-
F1
F2
F3
F4
=
=
=
=
Switches the displayed SWITCH to POS. SWITCH
Switches the displayed SWITCH to NEG. SWITCH
Switches the displayed SWITCH to POS. PULSE
Switches the displayed SWITCH to NEG. PULSE
Note: Only using the"EXIT" key to leave the menu will store the changes into the
internal memory. If you switch the MS-8 off before pressing the "EXIT" key the
MS-8 can not write into the internal memory and the data is lost.
6. Mai 1992 @ 12:49 Uhr
11
LU940407
Footswitches / "SONGS"
1
The function of the footswitches
Main menu:
You can control the MS-8 with simple momentary footswitches.
These momentary switches will give contact while depressed and will interupt again
after release.
NOTE: Other footswitches can not work proper.
The function of the connected footswitches can be programmed.
The following functions are possible for each of the footswitches:
1.
2.
3.
4.
5.
5.
7.
8.
9.
10.
11.
12.
Choosing direct a PROGRAM (1-128)
Counts a PROGRAM (1-128) NUMBER up
Counts a PROGRAM (1-128) NUMBER down
Choosing direct a PROGRAM (1-128)
only while pressing the footswitch
("PR-TOUCH")
Counts a SONG NUMBER up
Counts a SONG NUMBER down
Choosing a SONG
("SONG" RELATIVE")
("SONG" RELATIVE")
("SONG" ABSOLUTE")
Counts a STEP NUMBER up
Counts a STEP NUMBER down
Choosing a STEP.
Choosing a SWITCH.
Choosing a SWITCH
only while pressing the footswitch
13. Transmitting of MIDI PROGRAM CHANGE
data, only while pressing the footswitch
("PROGRAM")
("PROGRAM RELATIVE")
("PROGRAM RELATIVE")
("STEP RELATIVE")
("STEP RELATIVE")
("STEP ABSOLUTE")
("SWITCH TOGGLE")
("SWITCH TOUCH")
ATTENTION: If you do not use the optional RC-8 remote controller you can not use the
footswitches 5 to 8.
("MD-TOUCH")
"FACTORY SETUP":
After "FACTORY SETUP" the four footswitches are set to "SONG" up and down and
"STEP" up and down. To change it you have to enter the SONG/FOOTSW. menu.
6. Mai 1992 @ 12:49 Uhr
12
LU940407
Footswitches / "SONGS"
2
Footswitches / "SONGS"
To setup the footswitches
You have to enter the SONGS/FOOTSW. menu.
(From the "PLAY" menu: Press the CURSOR key [
To jump into the menu press the CURSOR key [
Main menu:
] twice.)
] once.
The value above the CURSOR, can be changed with one of the CURSOR keys [
or [ ], until the desired mode is achieved.
With one of the CURSOR keys [
CURSORS to activate.
]
View of the rear:
] or [ ] you can change the position of the
Also you can select the desired footswitch with the key SWITCHES (1-8).
ATTENTION: If you do not use the optional RC-8 remote controller you can not use
t
h
e
footswitches 5 to 8.
Easy programming with the function keys (F1-F4) :
-
F1
F2
F3
F4
=
=
=
=
Change the function of the footswitch (1 - 10)
Change the function of the footswitch (10 - 1)
Counts the values up
Counts the values down
After factory setup the four footswitches
are set to "SONG" up and down and "STEP"
up and down. To change this you have to
enter the SONG/FOOTSW. menu.
Note: Only using the"EXIT" key to leave the menu will store the changes into the
internal memory. If you switch the MS-8 off before pressing the "EXIT" key the
MS-8 can not write into the internal memory and the data is lost.
TIP:
The ground of the four footswitches is on the same wire, so that you can put
them on together one side if you want to build your own footswitch.
Function keys (F1 - F4) on the front of the MS-8
6. Mai 1992 @ 12:49 Uhr
13
LU940407
FOOTSWITCHES / "SONGS"
3
The "SONG" mode
Main menu:
The MS-8 contains up to 100 "SONGS"
A "SONG" is a combination or a chain of up to 8 "STEPS".
Each "STEP" can contain one of the 128 PROGRAMS (1-128)
In the first menu "PLAY" you can use the function keys (F1-F4) to select the "SONGS"
and "STEPS".
("FACTORY SETUP" - can be changed!)
The function key (F1) counts a "SONG" up, and (F2) down. The
function key (F3) counts a "STEP" up, and (F4) counts it down.
"STEPS" which are not used (—EMPTY—) will be ignored in the "PLAY" mode. After
reaching the last STEP NUMBER select the first STEP NUMBER with the selected
again and vice versa.
If all "STEPS" set to (—EMPTY—) the "SONG" will be ignored in the "PLAY" mode.
"FACTORY SETUP":
All "STEPS" and "SONGS" 11 - 100 are set to —EMPTY—.
You can control the "SONGS" and "STEPS" with simple momentary footswitches.
SON G 1
Construction of the "SONGS":
STEP 1
Program17
SONG 2
SON G 100
STEP 2
Program3
STEP 3
Program99
STEP 4
Program23
STEP 5
Program3.
STEP 6.
--EMPTY--
STEP 7
--EMPTY--
STEP 8
Program22
Each SON G can contain up to 8 STEPS.
Unused ST EPS can be set to "--EMPTY--" .
(J us t press the "STOR E" key!)
If al STEPS are set to "--EMPTY--" it is not
pos sible to recal the SONG in the PLAY m ode.
6. Mai 1992 @ 12:49 Uhr
14
LU940407
FOOTSWITCHES / "SONGS"
4
FOOTSWITCHES / "SONGS"
Main menu:
How to program a "SONG"
To program a "SONG" you have to enter the SONGS/FOOTSW. menu.
To jump into the menu, you have to press the CURSOR key [
] once.
The CURSOR key [ ] counts the PROGRAM NUMBER up,
the CURSOR key [ ] counts the PROGRAM NUMBER down.
"STEPS" which are not be used must be set to (—EMPTY—).
To do this simply press the "STORE" key. It toggles between the PROGRAM
NUMBER and (—EMPTY—).
If there are "STEPS" set to (—EMPTY— ) they will be ignored in the "PLAY" mode.
If all "STEPS" in a "SONG" are set to (—EMPTY—) the "SONG" will be ignored in
the "PLAY" mode.
How to program SONGS:
1 Choose a SONG
2 Choose a STEP
3 Choose a PROGRAM or
4 press the "STORE" key to set it to "--EMPTY--"!
Choose a SON G (+1)
Choose a PROGRAM
STORE
MENU
SELECT
Naturally it is possible that different "STEPS" contain the same PROGRAM
NUMBER
After selecting "STEPS" or "SONGS" the DISPLAY shows the actual "SONG" and
"STEP" number, together with the title of the relevant PROGRAM for approx. 1
second.
Then the DISPLAY will show the PROGRAM (1-128) number and TITLE once more.
("PLAY" mode).
Note:
the
FUNCTIONS
EXIT
If you select a "SONG" it will start with the first "STEP 1".
If the first "STEP" is set to (--EMPTY--) you will get the next possible "STEP" .
Choose a PROGRAM
Choose a STEP (+1)
F1
F3
F2
F4
Choose a SON G (-1)
Choose a STEP (-1)
View of the front:
Only using the"EXIT" key to leave the menu will store the changes into the
internal memory. If you switch the MS-8 off before pressing the "EXIT" key
MS-8 can not write into the internal memory and the data is lost.
1
2
3
4
5
6
7
8
In this menu it is possible to give all PROGRAMS (1-128) their own individual
names.
6. Mai 1992 @ 12:49 Uhr
15
LU940407
Title / naming the programs
You can use a maximum of eight characters.
Main menu:
The CURSOR key [
] scrolls up through all possible characters.
The CURSOR key [
] scrolls down through all possible characters.
If you hold one of the CURSOR key [
automatically up or down.
] or [
] the character changes will repeat
The CURSOR key [ ] changes the position of the underline to the left.
The CURSOR key [ ] changes the position of the underline to the right.
Easy programming with the functionkeys (F1-F4) :
-
F1
F2
F3
F4
=
=
=
=
deletes a character
inserts a character
deletes all character
restores the stored name / UNDO-function
You can use the following character:
Capital-character:
Small-character:
Numbers:
Other character:
ABCDEFGHIJKLMNOPQRSTUVWXYZ
abcdefghijklmnopqrstuvwxyz
0123456789
-+*/=!()#.
A change of the PROGRAM (1-128) name will change the actual PROGRAM (1-128).
You must store it to prevent loss of data.
6. Mai 1992 @ 12:49 Uhr
16
LU940407
"HELLO" message / sign your MS-8
In this menu you can program any message or information up to 16 character.
Title / "HELLO" message
Main menu:
The "HELLO" message appears after the unit has been on for approx. 2 seconds.
The CURSOR key [
] scrolls up through all possible characters.
The CURSOR key [
] scrolls down through all possible characters.
If you hold one of the CURSOR keys [
down.
] or [
] down characters will scroll up or
The CURSOR key [ ] changes the position of the underline to the left.
The CURSOR key [ ] changes the position of the underline to the right.
Easy programming with the function keys (F1-F4) :
-
F1
F2
F3
F4
=
=
=
=
deletes a character
inserts a character
deletes all character
restores the stored name / UNDO-function
You can use the following character:
Capital-character:
Small-character:
Numbers:
Other character:
ABCDEFGHIJKLMNOPQRSTUVWXYZ
abcdefghijklmnopqrstuvwxyz
0123456789
-+*/=!()#.
Note: Only using the"EXIT" key to leave the menu will store the changes into the
internal memory. If you switch the MS-8 off before pressing the "EXIT" key the
MS-8 can not write into the internal memory and the data is lost.
In the F-AMP OUT menu you can setup the MS-8 to match your FenderTM amp
(= F-amp), new generation.
You only can use F-AMPS which using one MONO cable.
6. Mai 1992 @ 12:49 Uhr
17
LU940407
1
F-AMP SETUP
The connection to these amps are located on the rear of the MS-8.
2
List of the F-Amps / New generation.
At first you have to set the "ASSIGN" SWITCH also on the rear to the correct position.
Released June 1992
Setup the "ASSIGN" SWITCH:
For all F-AMPS with 1 to 3 buttons on the included footswitch set "ASSIGN" to position
"1...3"
To switch a connected F-AMP you have to select the F-AMP OUT menu:
For all F-AMPS with 4 buttons on the included footswitch set "ASSIGN" to position
"4-Button".
You have to select the correct type of your F-AMP in the menu SWITCH/F-AMP
After this procedure you always get the correct menu on the LC-DISPLAY.
Rear of the MS-8
To jump into the SWITCH/F-AMP menu you must press the CURSOR key [
] once.
Press the the CURSOR key [ ] several times until you get the menu.
Then select the correct type and leave the menu by using the "EXIT" key.
6. Mai 1992 @ 12:49 Uhr
18
LU940407
3
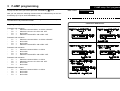
F-AMP programming
To jump into the menu you have to press the CURSOR key [
F-AMP setup / list / programming
] once.
Main menu:
Now you can select the switching functions with the CURSOR keys or the four
functionkeys (F1-F4) for each PROGRAM (1-128).
A change of the PROGRAM (1-128) name will change the actual PROGRAM (1-128).
You must store it to prevent lost of data.
Easy programming with the functionkeys (F1-F4) :
Footswitch
F1
F2
F3
F4
with 4 buttons:
=
Selects the channel CHN.1 or CHN.2 or BOOST
=
Selects the chorus: CH. ON or CH. OFF
=
No function
=
Selects the reverb REV. ON or REV. OFF
Footswitch
F1
F2
F3
F4
with 3 buttons:
=
Selects the channel CHN.1 or CHN.2 or BOOST
=
No function
=
No function
=
Selects the reverb REV. ON or REV. OFF
Footswitch
F1
F2
F3
F4
with 2 buttons:
=
Selects the channel CHN.1 or CHN.2
=
No function
=
No function
=
Selects the reverb REV. ON or REV. OFF
Footswitch
F1
F2
F3
F4
with 2 buttons:
=
Selects the channel CHN.1 or CHN.2
=
Selects the chorus: CH. ON or CH. OFF
=
No function
=
No function
Footswitch
F1
F2
F3
F4
with 1 button:
=
Selects the channel CHN.1 or CHN.2
=
No function
=
No function
=
No function
5 different F-AMP menus:
6. Mai 1992 @ 12:49 Uhr
19
LU940407
MIDI
1
MIDI IN - Select the MIDI RECEIVE CHANNEL
Main menu:
To select the MIDI RECEIVE CHANNEL you have to go to the "MIDI SETUP" menu.
(From the "PLAY" menu: Press the CURSOR key [ ] once.)
To jump into the menu also press the CURSOR key [
] once.
Now you can select the desired MIDI RECEIVE CHANNEL 1-16 with one of the
CURSOR keys [ ] or [ ].
If you set the MIDI RECEIVE CHANNEL to "OMNI" the MS-8 will accept all MIDI
PROGRAM CHANGES no matter which MIDI TRANSMIT CHANNEL is selected by
the conncted MIDI device.
If you set the MIDI RECEIVE CHANNEL to "OFF" the MS-8 will not accept any MIDI
PROGRAM CHANGES from a conncted MIDI device.
Setup the MIDI RECEIVE CHANNEL.
The CURSOR key [ ] counts the MIDI RECEIVE CHANNEL NUMBER up and the
CURSOR key [ ] counts the MIDI RECEIVE CHANNEL NUMBER down.
Between 16 and 1 you will find the "OMNI" and "OFF" option.
If you hold down one of the CURSOR key [
automatically scroll up or down.
] or [
] for a longer time the values will
-
The MS-8 accepts MIDI PROGRAM CHANGES on the selected
MIDI RECEIVE CHANNEL (1-16)
The MS-8 accepts all MIDI PROGRAM CHANGES = "OMNI".
The MS-8 accepts no MIDI PROGRAM CHANGES = "OFF".
Easy programming with the functionkeys (F1-F4) :
-
F1
F2
F3
F4
=
=
=
=
The MIDI RECEIVE CHANNEL will set to "OMNI"
The MIDI RECEIVE CHANNEL will set to "OFF"
No function
No function
Note: Only using the"EXIT" key to leave the menu will store the changes into the
internal memory. If you switch the MS-8 off before pressing the "EXIT" key the
MS-8 can not write into the internal memory and the data is lost.
6. Mai 1992 @ 12:49 Uhr
20
LU940407
MIDI
2
MIDI
MIDI MAPPING programming
Main menu:
To select the MIDI RECEIVE CHANNEL you have to go to the "MIDI SETUP" menu.
(From the "PLAY" menu: Press the CURSOR key [ ] once.)
To jump into the MIDI IN menu also press the CURSOR key [ ] once.
To enter the MIDI IN PRG. menu press the CURSOR key [ ] once.
With this table you can redirect MIDI PROGRAM CHANGE data.
E.g.: If any MIDI device sends out a MIDI PROGRAM CHANGE 12 the MS-8 will
change to any other PROGRAM (1-128) which is programmed instead of
PROGRAM 12.
Different MIDI PROGRAM CHANGES can use the same PROGRAMS!
The display above the CURSOR can be changed with the CURSOR keys [
[ ].
If you hold down one of the CURSOR key [ ] or [
(1-128) will automatically scroll up or down.
] and
] for a longer time the PROGRAMS
Easy programming with the functionkeys (F1-F4) :
-
F1
F2
F3
F4
=
=
=
=
Counts the MIDI IN PROGRAM CHANGE up
Counts the MIDI IN PROGRAM CHANGE down
Counts the PROGRAM (1-128) of the MS-8 up
Counts the PROGRAM (1-128) of the MS-8 down
Note: Only using the"EXIT" key to leave the menu will store the changes into the
internal memory. If you switch the MS-8 off before pressing the "EXIT" key the
MS-8 can not write into the internal memory and the data is lost.
Incoming MIDI
PROGRAM
CHANGES ....
.... will be
changed by the
MS-8 to the
desired
PROGRAMS
(1-128)
6. Mai 1992 @ 12:49 Uhr
21
LU940407
MIDI
3
MIDI OUT - TRANSMIT CHANNELS
To set the numbers of MIDI TRANSMIT CHANNELS you have to go to the "MIDI
SETUP" menu.
(From the "PLAY" menu: Press the CURSOR key [ ] once.)
To jump into the MIDI IN menu also press the CURSOR key [ ] once.
To enter the MIDI OUT menu press the CURSOR key [ ] three times.
You can use up to five different MIDI TRANSMIT CHANNELS to control the
connected MIDI devices. If you uses less than five MIDI devices switch the unused
MIDI TRANSMIT CHANNELS to "OFF".
The "OFF" function is located between TRANSMIT CHN. 16 and 1.
The underlined value can be changed by using one of the CURSOR keys [ ] or [ ].
If you hold down one of the CURSOR key [ ] or [ ] for a longer time the change of
the character will automatically scroll up or down.
Easy programming with the function keys (F1-F4) :
-
F1
F2
F3
F4
=
=
=
=
Main menu:
You can transmit a MIDI PROGRAM CHANGE change only if at least
one MIDI OUT #1 - #5 is set to "ON".
In this diagram MIDI OUT #3 is set to "OFF". You can not send the MIDI
PROGRAM CHANGE to this MIDI CHANNEL.
MS-8:
MIDI
MIDI
MIDI
MIDI
MIDI
16
OUT #1 = CHANNEL 1
OUT #2 = CHANNEL 2
OUT #3 = OFF
OUT #4 = CHANNEL 4
OUT #5 = CHANNEL
MIDI PRG.CHANGE 67
MIDI PRG.CHANGE 5
MIDI PRG.CHANGE 32
MIDI PRG.CHANGE 8
MIDI PRG.CHANGE 17
TRANSMIT
CHAN. = 1
TRANSMIT
CHAN. = 2
TRANSMIT
CHAN.=OFF
TRANSMIT
CHAN. = 4
TRANSMIT
CHAN. = 16
MIDI OUT
Counts a MIDI OUT NUMBER up
Counts a MIDI OUT NUMBER down
Counts a MIDI TRANSMITCHANNEL NUMBER up
Counts a MIDI TRANSMITCHANNEL NUMBER down
Note: Only using the"EXIT" key to leave the menu will store the changes into the
internal memory. If you switch the MS-8 off before pressing the "EXIT" key the
MS-8 can not write into the internal memory and the data is lost.
4
MIDI initialise - MIDI setup !
With this menu you can reset all changed MIDI data back to the factory setup.
You have to go to the "MIDI SETUP" menu.
(From the "PLAY" menu: Press the CURSOR key [ ] once.)
To jump into the MIDI IN menu press the CURSOR key [ ] once. To enter the MIDI
SETUP! menu press the CURSOR key [ ] once. The Display shows:
MIDI SETUP ! / ARE YOU SURE ?
If you press the CURSOR key [ ] / YES the initialise will be actioned. All previous
changed data will be overwritten with the "FACTORY SETUP" data.
After using the CURSOR key [ ] (YES) all changed parameter for MIDI
will be set to the FACTORY PRESETS.
6. Mai 1992 @ 12:49 Uhr
22
LU940407
F-Amp "older Generation"
1
MIDI / F-AMP "Older generation"
How to connect an older F-AMP
You can recognize these kind of amps by using the F-AMP list "Older generation"
or by having a closer look at the footswitch. The footswitch uses two rectangular
stereo standard plugs. One is marked with a red label the other is plain (chrome).
The footswitch itself contains two switches and two LEDS (red / green).
View of the rear
To setup the MS-8 set the slide switch "NORM. - RED PLAIN" located at the rear
of the MS-8 to position "RED PLAIN".
With two stereo cables you connect the MS-8 jack "SWITCHES (1+2) to the F-AMP.
Important: Set the two SWITCHES (1+2) to NEG. SWITCH.
(In the SWITCH/ F-AMP menu)
2
F-Amp list "Old generation".
Footswitch with 2 stereoplugs.
One marked "RED" the other is "PLAIN" (without mark).
Release June 1991.
FENDER
FENDER
FENDER
FENDER
FENDER
FENDER
FENDER
FENDER
SUPER CHAMP
CONCERT
75 TOP
75 COMBO
PRINCETON REVERB II
DELUXE REVERB II
TWIN REVERB II
140 HEAD
In the position "RED PLAIN" you can switch the two functions
1- CHANNEL SELECT
2- REVERB
of a F-AMP "Old generation" WITH THE MS-8 SWITCHES (1+2)
6. Mai 1992 @ 12:49 Uhr
23
LU940407
Overview for advanced users
1
The local parameter / stored in the PROGRAMS
"PLAY" / "EDIT" :
Switching one of the key "SWITCHES 1-8" will switch the corresponding RELAIS. The relays
are working as programmed in the SWITCH/F-AMP menu. (POS./NEG. SWITCH or PULSE)
If you change one of the "SWITCHES 1-8" the display shows "EDIT" instead of "PLAY"
F-AMP OUT:
In this menu you can select the switching functions of the connected F-AMP for each
PROGRAM (1-128). Check the right position of the "ASSIGN" slide switch on the rear of the
MS-8 and the correct selection of the F-AMP TYPE in the SWITCH / F-AMP menu.
TITLE EDIT:
In this menu you can name each of the PROGRAMS (1-128) one name. You can use up to
eight characters for this purpose.
MIDI OUT PROG.:
This menu assigns the count of the MIDI TRANSMIT CHANNELS and which MIDI TRANSMIT
CHANNEL should be used.
2
Global parameter / stored in the setup
State of the Relays
"SWITCHES 1 - 8"
State of the
Relays for the FAMP
(New generation)
Up to 5 different
MIDI PRG. CHANGES on 5 MIDI
TRANSMIT CHANNELS
The name / title of
each
PROGRAM (1-128)
Local data stored in the
PROGRAMS (1 - 128) of the MS-8
WRITE PROTECT:
menu to activate the MEMORY PROTECTION. "OFF" = "WRITE" PROTECT" disabled.
"MEMORY" = No PROGRAM (1-128) can be overwritten. "ALL" = Like "MEMORY" plus
"SWITCHES 1 - 8" have no function.
SONGS/FOOTSW.:
The menu, to configure up to 100 "SONGS" with up to eight "STEPS". The "STORE" key is
switching a "STEP" to (--EMPTY--) and back to the selected PROGRAM (1-128). If all
"STEPS" in a "SONG" are set to (--EMPTY--) the "SONG" In the "PLAY" mode will be ignored.
After the "FACTORY SETUP" all "STEPS" of the "SONGS" 11 - 100 are set to (--EMPTY-).
SONGS/FOOTSW.:
In this menu you can configure up to eight footswitches which can be connect to the rear of
the MS-8
The footswitches (5 - 8) are only available if you are using the optional RC-8 remote controller.
Possible configurations:
PROGRAM -ABSOLUTE 1 to 128
PROGRAM -RELATIVE -10 to +10
SONG
-ABSOLUTE 1 to 100
SONG
-RELATIVE -10 to +10
Recall the selected PROGRAM
Counts a PROGRAM up or down
Recall the selected SONG
Counts a SONG up or down
6. Mai 1992 @ 12:49 Uhr
24
LU940407
Overview for advanced users
STEP
STEP
PR(ogram)
M (I)D(I)
SWITCH
SWITCH
(*1)
Overview for advanced user
-ABSOLUTE 1 to 8
Recall the selected STEP
-RELATIVE -1 to +1
Counts a STEP up or down
-TOUCH
1 to 128
Recall the selected PROGRAM (*1)
-TOUCH
1 to 128
Recall the MIDI data of a PROGRAM(*1)
-TOUCH
1 to 8
Switches relays (Momentary function!) (*1)
-TOGGLE
1 to 8
Switches relays (Latch function!)
= (Touch means: works the time during a key will be pressed)
SWITCH/ F-AMP:
The menu to configure the relays to emulate different kinds of switches.
Each relay can emulate:
POS. SWITCH
NEG. SWITCH
POS. PULSE
NEG. PULSE
"HELLO" message
"WRITE PROTECT"
F-AMP type
Function of the
Relays
"SWITCHES 1 - 8"
Relays is closed if the LED of the SWITCH is on
Relays is open if the LED of the SWITCH is on
Relays is closed for a specific time (t=???).
Relays is open for a specific time (t=???).
SWITCH/ F-AMP:
Global data stored in the MS-8
In this menu you can select the correct menu of your F-AMP. The "ASSIGN" slide
switch on the rear of the MS-8 must be set to the correct position!
MIDI SETUP:
MIDI IN: To select the MIDI RECEIVE CHANNEL 1-16, OMNI, or OFF.
MIDI IN PRG.: To select which internal PROGRAM (1-128) of the MS-8 will be
selected, when it receives MIDI PROGRAM CHANGES. (= MIDI MAPPING!)
100 "SONGS"
with
8 "STEPS"
10 different
footswitch modes
MIDI OUT
TRANSMIT
and RECEIVE
CHANNEL
MIDI MAPPING
MIDI OUT: To configure the count (1 to 5) of the internal MIDI TRANSMIT
CHANNELS 1-16 or OFF.
MIDI SETUP: Resets the global MIDI data to the "FACTORY SETUP".
With safety question: "ARE YOU SURE?" (Are you really sure??)
HELLO MESSAGE:
In this menu you can give your MS-8 a name or something else. You can use up to 16
characters.
This message will be appear on the LC-DISPLAY for approx.. 2 seconds after power up.
6. Mai 1992 @ 12:49 Uhr
25
LU940407
Information
1
Overview of the programmable data
Mainly you can make two kinds of programming:
Global changes , for all PROGRAMS (1-128).
Local changes, only for each PROGRAMS (1-128)
1.1 List of the global data
WRITE PROTECT
SONGS
FOOTSW.
F-AMP
"HELLO" Message
MIDI SETUP
Note:
:
:
:
:
:
:
Set it to: OFF, ALL, or MEMORY.
Assign the PROGRAM (1-128) to "STEPS".
Select the SWITCH modes (latch / momentary).
Select a F-AMP type
Program any character (Your name, a message, etc.)
Configure the MIDI RECEIVE and TRANSMIT CHANNELS
Select the MIDI OUT (#1-#5) and configure the MIDIMAPPING
Only using the"EXIT" key to leave the menu will store the changes
into the internal memory. If you switches the MS-8 off before pressing
the "EXIT" key the MS-8 can not write it into the internal memory and
the data is getting lost.
1.2 List of the local data - for each PROGRAM (1-128)
SWITCHES 1 - 8
TITLE EDIT
F-AMP OUT
MIDI OUT
:
:
:
:
SWITCHING of the relays.
name / title
switching functions of the F-AMP.
The (max. 5) MIDI PROGRAM CHANGES
You always have to store local changes with the "STORE" key!
1.3 Overview of the functionkeys (F1 - F4)
"PLAY" / "EDIT" mode:
F1 = Footswitch Nº.1
F2 = Footswitch Nº.2
F3 = Footswitch Nº.3
F4 = Footswitch Nº.4
SONGS:
F1 = "SONG" 1- 100
F2 = "SONG" 100 - 1
F3 = "STEP" 1 - 8
F4 = "STEP" 8 - 1
TITLE EDIT / "HELLO" message:
F1 = deletes one left character
F2 = inserts one character
F3 = deletes all characters
F4 = restores all programmed
character
FOOTSW:
F1 = next FTSW. function
F2 = previous FTSW. function
F3 = next value of the function
F4 = previous value of the function
WRITE
F1 =
F2 =
F3 =
F4 =
PROTECT:
switches to OFF
switches to MEMORY
switches to ALL
no function
SWITCH:
F1 = POS. SWITCH
F2 = NEG. SWITCH
F3 = POS. PULSE
F4 = NEG. PULSE
F-AMP
F1 =
F2 =
F3 =
F4 =
OUT:
CHN.1 / 2 / BOOST
CH. ON / OFF
no function
REV. ON /OFF
MIDI SETUP:
F1 = OMNI
F2 = OFF
F3 = no function
F4 = no function
MIDI MAPPING:
F1 = MIDI IN PRG. +1
F2 = MIDI IN PRG. -1
F3 = PROGRAM +1
F4 = PROGRAM -1
MIDI OUT and TRANSMIT CHANNEL:
F1 = MIDI OUT #1 - #5
F2 = MIDI OUT #5 - #1
F3 = TRANSMIT CHN. +1
F4 = TRANSMIT CHN. -1
MIDI OUT PROG:
F1 = MIDI OUT #1 - #5
F2 = MIDI OUT #5 - #1
F3 = PRG.CHNG. OFF, 1 - 128
F4 = PRG.CHNG. OFF, 128 - 1
6. Mai 1992 @ 12:49 Uhr
26
LU940407
Information
Information
1.4 "Factory SETUP" / or erase all data...
1.5 Technical data
"HELLO" message :
WRITE PROTECT :
F-AMP
Dimension
Weight
RAM
BAK-Battery
Relays
Display
Power
:
:
:
:
:
:
:
INPUTS
OUTPUTS
: 1x PSU, 1x MIDI IN, 4x Standard footswitches
: 1x MIDI OUT, 1x F-AMP Out, 8x SWITCHES (Relays)
Hi, r u ready?
OFF
:
AMP 5
All PROGRAMS (1-128) 1 - 128
TITLE EDIT
:
*UNUSED*
F-AMP out
:
CHN.1, CH. OFF, REV. OFF
MIDI-SETUP
MIDI OUT #1
MIDI OUT #2 - #5
MIDI IN
:
:
:
TRANSMIT CHANNEL 1
OFF
OMNI
MIDI MAPPING
MIDI IN PRG.
:
Incoming MIDI PROGRAM CHANGES are the same as the
PROGRAMS (1-128).
"SONG"
"SONG" Nº.1
"SONG" Nº.2
"SONG" Nº.3
"SONG" Nº.10
"SONG" Nº.10 - 100
:
:
:
:
:
"STEP 1 - 8" = PROGRAM 1 - 8
"STEP 1 - 8" = PROGRAM 9 - 16
.......... u.s.w.
"STEP 1 - 8" = PROGRAM 73 - 80
(--EMPTY--) , are not in use
FOOTSW.
FTSW.1
FTSW.2
FTSW.3
FTSW.4
FTSW.5
FTSW.6
FTSW.7
FTSW.8
:
:
:
:
:
:
:
:
"SONG"
"SONG"
"STEP"
"STEP"
PROGRAM
PROGRAM
MIDI
SWITCH
SWITCHES
SWITCHES 1 - 4
SWITCHES 5 - 8
:
:
POS. SWITCH
POS. PULSE t= 20
Note: All contacts of the SWITCHES / RELAYS are isolated from each other and the unit!
CAUTIONS
1
2
Relative +1
Relative -1
Relative +1
Relative -1
Absolute 10
Touch 12
Touch 15
Touch 8
Standard 19" 1rack unit / 484mmx180mmx45mm
1575g
8Kbyte
3V CR 2032, Lifetime: approx.6-7 years.
9x 500mA / 10W max.
2x 16 character with backlit LED, adjustable contrast
AC 7.5V / 1A or DC 10V / 1.2A
3
FTSW.5 - 8 are only available
with the optional
RC-8 remote controller!
Do a "FACTORY SETUP":
Switch the MS-8 on. During the "HELLO" message appears on the LC-DISPLAY hit
SWITCH 4 and than SWITCH 2.
(= 42 - The answer of all questions, see also the hitchhikers guide to the galaxy!)
WARNING: This procedure is final. You cannot make it undo! Every self programmed
data will be overwritten!
The outputs SWITCHES (1-8) are only usable for low power. It is not allowed
to connect any jack of the MS-8 to the mains. Otherwise you risk your own life
or the life of other people. Never connect High Voltages (more than 40V) to
Switch Outputs!
The MS-8 contains a lithium battery. Due not expose the battery to extreme
heat or light. Explosion could result.
Use only the AC adaptor / power supply unit provided! Substituting adaptor
may damage the MS-8!
BESCHEINIGUNG DES HERSTELLERS / IMPORTEURS.
Hiermit wird bescheinigt, daß der / die / das MS-8 in Übereinstimmung mit den Bestimmungen des Amtsbl. Vfg 1046 / 1984 Funk entstört ist. Der Deutschen Bundespost wurde das
Inverkehrbringen dieses Gerätes angezeigt und die Berechtigung zur Überprüfung der
Serie auf Einhaltung eingeräumt. MUSE INC. KOREA / INCHEON.
RADIO AND TELEVISION INTERFERENCES
This unit has been verified to comply with the limits of a Class B computing device,
pursuant to Subpart 15 of FCC rules. Operation with non certified or non verified equipment
is likely to result in interferences to radio and TV reception.
(C) Copyright 1990 - 1994 MS MUSIC SERVICE GmbH. All rights reserved.
6. Mai 1992 @ 12:49 Uhr
27
LU940407
Copy pages
Footswitch configuration:
MIDI MAPPING:
1
2
3
4
5
6
7
8
9
10
11
12
13
14
15
16
FTSW 1
FTSW 2
17
18
19
20
21
22
23
24
25
26
27
28
29
30
31
32
FTSW 3
FTSW 4
33
34
35
36
37
38
39
40
41
42
43
44
45
46
47
48
FTSW 5
FTSW 6
49
50
51
52
53
54
55
56
57
58
59
60
61
62
63
64
FTSW 7
FTSW 8
65
66
67
68
69
70
71
72
73
74
75
76
77
78
79
80
MIDI OUT TRANSMIT CHANNEL
1
81
82
83
84
85
86
87
88
89
90
91
92
93
94
95
96
2
3
SWITCHES configuration
POS NEG SWITCH
4
5
PULSE
TIME
1
97
98
99
100
101
102
103
104
105
106
107
108
109
110
111
112
2
3
113
114
115
116
117
118
119
120
121
122
123
124
125
126
127
128
4
5
6
7
8
6. Mai 1992 @ 12:49 Uhr
28
LU940407
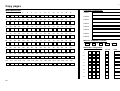
Copy pages / 2 "SONGS" and "STEPS"
Music title:
SONGNº STEP 1
STEP 2
Copy pages
STEP 3
STEP 4
STEP 5
STEP 6
STEP 7
STEP 8
6. Mai 1992 @ 12:49 Uhr
29
LU940407
Copy pages / 3 Programs
PROGRAM
Nº.:
Title:
F-AMP
CHN.:
CHO.:
REV.:
MIDI OUT
#1
#2
#3
#4
#5
Memo:
_________________________________
_________________________________
_________________________________
_________________________________
_________________________________
_________________________________
_________________________________
_________________________________
_________________________________
_________________________________
_________________________________
_________________________________
_________________________________
_________________________________
_________________________________
_________________________________
_________________________________
_________________________________
_________________________________
_________________________________
6. Mai 1992 @ 12:49 Uhr
30