1
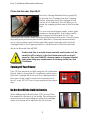
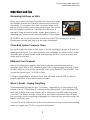
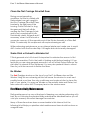
Maintenance Manual and Checklist
Fast T-Jet ® Blazer
TJB-1650
A Product of
October 2007 Version 1.3
Tempe, Arizona USA
Copyright Notices
©2004-2007 U.S. Screen Print & Inkjet Technology,
Tempe, Arizona. All Rights Reserved.
No part of this publication may be reproduced mechanically or electronically or in any
form without the prior written permission of U.S. Screen Print & Inkjet Technology (U.S.
Screen). The information in this Manual is for informational use only, is subject to change
without notice and should not be construed as a commitment by U.S. Screen.
U.S. Screen assumes no responsibility or liability for any errors or inaccuracies that may
appear in this document. T-Jet®, T-Jet® Blazer, Fast T-Jet® Blazer, FastINK™, FastRIP™,
FastARTIST™, FastBRIGHT™ and FastFILMS™ are trademarks, trade names or registered
trademarks of U.S. Screen Print & Inkjet Technology, Tempe, Arizona. All trademarks,
trade names and copyrights are acknowledged for software and sample shirt images.
PostScript®, Adobe® Photoshop® and Adobe® Illustrator® are registered trademarks
of Adobe Inc. Apple and Macintosh are trademarks of Apple Corp. CorelDRAW® is
a registered trademark of the Corel Corporation. Epson™ is a trademark of Epson
Corporation. Windows®, Windows XP, Windows Vista and Windows 2000 are trademarks
or registered trademarks of Microsoft Corporation.
Federal copyright laws permit you to make a backup of any Software included with
your Fast T-Jet Blazer for archival purposes only. Any other duplication of this Software,
including copies offered through sale, loan, rental or gift is a violation of law and
subject to both criminal and civil penalties.
We strive to continuously make improvements to our Inkjet-to-Garment printing system
and we reserve the right to make product changes and improvements. This manual
contains the latest and most accurate information as of its publication date. Some
product photos or descriptions within this Manual may vary slightly from the currently
shipping machine.
U.S. Screen Print & Inkjet Technology
Home of the U.S. Screen Printing Institute
a division of U. S. Graphic Arts, Inc.
1901 E. 5th Street
Tempe, AZ 85281 USA
Printed in the U.S.A.
Fast T-Jet Blazer
Preventative Maintenance
and Problem Solving
Your Fast T-Jet Blazer should work trouble free IF you take the time to understand
and perform the necessary maintenance. 95% of our Technical Support calls
come from people who have not maintained their machines properly. While it
may appear to be “just” an inkjet printer, it is a VERY SPECIAL inkjet printer. When
printing on garments, it must print A LOT more ink than when printing on paper.
This can, and will, cause excess ink to coat internal parts if the machine is not
maintained on a regular basis.
When printing onto Dark shirts with White ink, the use of a Pretreatment is
necessary. This Pretreatment is sticky and, if it’s sprayed near a machine, it can
coat the internal components of the printer. In addition, inkjet printers in general
do not like hot, dry room conditions or a dusty, dirty shop.
Be aware of the climate and conditions in which you use and store your
machine. You have made a substantial investment in your business when you
purchased your Fast T-Jet Blazer. In order to get the most out of it, please take
the time to learn the simple steps that will keep your printer happy and making
you money.
Keep Your Encoder Strip Clean
A main concern of many who call our Support Department
is when the printer gets “confused” while printing an
image. The way an inkjet printer tells the Print Head what
and where to print is by using a thin piece of film called an
Encoder Strip. A dirty Encoder Strip can cause everything
from images printing in the wrong location and large blocks
of ink spraying on the shirt to double-images, dark bands
across the print, thin horizontal lines and much more.
While in motion, the Print Head continually
receives data through this strip. Should the strip
become coated with lint from shirts or ink from
Overspray, it can confuse the printer.
Even very small amounts of dirt can interfere with the exchange of data
between the Print Head and the Encoder Strip. To avoid this situation, perform
daily and weekly maintenance on the unit as suggested in this section.
1
Fast T-Jet Blazer Maintenance Manual
Clean the Encoder Strip DAILY
Press the Carriage Release Button (page 25)
to free the Print Carriage from the Capping
Station. Manually move the carriage to the
center of the Assembly. This will allow you to
clean the capping station side of the Encoder
Strip.
You can use foam-tipped swabs, water, glass
cleaner or cleaning fluid, but for best results
use Isopropyl Alcohol pads. Do NOT use
Rubbing Alcohol pads. Wrap the alcohol pad around both sides of the Encoder
strip and gently move the pad in both directions. If the pad becomes black,
use a new pad and clean the Encoder Strip again. Manually return the Print
Carriage back to the Capping Station to clean the rest of the Encoder Strip.
Allow the Encoder Strip AIR DRY.
The Encoder Strip is actually translucent with small marks on it. Be
careful to NOT scratch it or the Print Head sensor will not read it
correctly. Only use FOAM TIP cleaning swabs or Isopropyl Alcohol
Pads when doing any maintenance or cleaning inside your Fast
T-Jet Blazer.
Turning Off Your Printer
Turn OFF the machine at night using the Circuit Breaker
Switch. Wait for the printer to completely power down
(the Print Carriage will dock onto the capping station),
then turn off the main Power Switch located next to
the AC cord. DO NOT turn off your printer at the power
strip.
Do Not Overfill the Bulk Ink Bottles
When refilling the bulk ink bottles, STOP at the 200ml
line marked on the front of the bottle. This will prevent
excess pressure from building up within the cartridge,
which can cause ink to drip from the Print Head.
2
Preventative Maintenance
and Problem Solving
Check Spit Tray Regularly/
Clean Capping Station and Print Head Daily
The Spit Tray/Flushing Box assembly collects ink very quickly. Check it regularly
and clean it throughout the day as necessary to prevent ink spills on printer
components and random ink drops on garments.
The Capping Station is the rectangular piece onto which the Print Head seats.
Ensure the outer rubber seal is free from dried ink and garment fibers. Ink residue
around the edge of the Capping Station may keep the Print Head from sealing
properly. This will cause Print Head clogs. Be aware that White ink will build up
faster and thicker than regular colors. Use a foam swab, water, glass cleaner,
cleaning fluid or Isopropyl Alcohol to keep this clean.
When cleaning the Capping Station, be careful NOT to move it
out of position or the Print Head will not seat properly. If you push
down on it too hard, it WILL move off of its mount. When cleaning
the Print Head, only clean the around the sides, DO NOT touch the
Nozzles.
Humidity and Environmental Control
Controlling the environment in which your Fast T-Jet Blazer “lives” is a must!
During the cold winter months, dry heat is often pumped into a room- This is not
a good thing for inkjet printers! They prefer humidity levels of 40% to 80%.
If your room is dry, place a humidifier in the room and buy an
inexpensive hygrometer from Radio Shack, Target, Wal Mart
etc. to measure the humidity level. In the summer months, if the
humidity is too high, use a dehumidifier. Try very hard NOT to
place this machine in a dusty, dirty or non-climate controlled
environment (like a Screen Printing shop or a garage). For best
results, place the printer in a dust free room with air-conditioning.
3
Fast T-Jet Blazer Maintenance Manual
In addition, DO NOT not allow fans to blow air across the Print Head. This will dry
the ink and cause a clog, seriously effecting your printer’s performance.
Print With the Lid Closed
Due to the airborne nature of the White ink Pretreatment, you should try to
pretreat shirts in a different room or far away from the machine. If pretreating
in a different room is not an option, then make sure the lid on the printer is
kept closed at all times, especially during the print process. Pretreatment will
immediately clog the Print Head if it comes in contact with any ink. We strongly
suggest creating a separate enclosed area, such as a large cardboard box as
an absolute minimum. This will help keep overspray away from Print Head and
the Encoder Strip as well.
Preparing your Fast T-Jet Blazer for Downtime
We recommend you schedule Automatic Head Cleanings every
6 to 8 hours using FastRIP. This will help prevent Print Head and
Capping Station issues caused by dried ink. This is especially
important if the printer will be idle longer than ONE day (24 hrs).
Refer to Chapter 7 of your FastARTIST User’s Manual for details on
configuring this feature.
In the event your Fast T-Jet Blazer is going to sit more than 30 days without use,
you MUST:
1. Remove all of the bulk ink cartridges and replace them with cleaning solution
cartridges.
Perform a minimum of 2-3 Power Cleanings to flush ink from the Ink Lines.
Perform as many Power Cleanings as needed until all of the Ink Lines are
Clear. Then execute one more Power Cleaning to thoroughly flush the
system. (Refer to Chapter 2 for instructions on executing Power Cleanings.)
2. Ensure the Print Head docks securely on the Capping Station with no visible
gaps.
3. Power OFF the printer from the UI, flip the Breaker Switch to the OFF position
and unplug the printer from its AC source.
DO NOT RUN A NOZZLE CHECK WITH CLEANING CARTRIDGES.
Cleaning solution will leak out into printer, causing serious
damage.
4
Preventative Maintenance
and Problem Solving
Other Hints and Tips
Eliminating Ink Drops on Shirts
When you perform a Head Cleaning, ink is forced through
the Nozzles and the Print Head is cleaned and wiped by
the printer. On occasion, this may not clean away small
pieces of shirt lint that collect around the base. This excess
lint can create ink build up, causing ink to drip onto a
garment. Using a foam tip swab, water, glass cleaner, or
cleaning fluid, clean any lint and ink residue off the edges.
BE CAREFUL not to rub the bottom of the Print Head. This is where the actual
Nozzles are located and they can be easily damaged.
Clean Bulk System Computer Chips
The small computer chips on the back of the ink cartridge can get dirty and not
make good contact. If you get sporadic error messages on certain colors, clean
the chips with a foam-tipped swab and Isopropyl Alcohol. A pencil eraser also
works well for this task.
RAM and Your Computer
RAM is the temporary memory that your computer uses when processing
complex data. RAM is NOT expensive and most computers ship with only 512mb
of RAM, which is not enough, especially when using FastARTIST and FastRIP. Your
computer should have 1 to 2 GB of RAM.
If using or upgrading to Windows Vista, you will need at least 2GB of RAM for
proper operation of your printer and software.
When in Doubt – Unplug Everything
Sometimes inkjet printers just get “confused,” especially if you stop them in the
middle of a run. If the printer is suddenly acting abnormally, turn everything OFF
and unplug the power cord. Make sure to disconnect the USB cable between
your Fast T-Jet Blazer and the computer to end data transmission that still may
be occurring. Leave everything unplugged for a few minutes and then plug it all
back in and start over.
You MUST cancel all print jobs for this to be effective or they may resume printing
when you again turn ON the computer and printer.
5
Fast T-Jet Blazer Maintenance Manual
Clean the Print Carriage Drive Belt Gear
During normal operating
conditions, lint that is coated with
Pretreatment can get caught in
the Print Carriage Drive Belt Gear,
located in the right rear of the
housing. This lint will start to clog
the gear and the belt will slip,
causing the Print Carriage to jerk
and/or not complete print jobs.
Print Carriage Drive Belt Roller and Gear
Periodically check this gear and if
necessary, clean it with a brush or
computer vacuum. At the opposite end of the Printer Assembly is a Drive Belt
Roller. Occasionally this component will require cleaning as well.
While performing maintenance on any internal printer part, make sure to avoid
ANY contact with the Encoder Strip. It is fragile and can be easily damaged!
Shake Shirts or Preheat to Minimize Lint
T-Shirts generate a lot of lint and it is important to minimize the amount of lint
inside your machine. Get in the habit of shaking a shirt before loading it. If you
feel shirts you are using generate excess lint, use a Pet Hair Pickup Roller on the
shirt after it is placed on the Shirtboard. You may also preheat them in a Heat
Press for just a few seconds to flatten the fibers.
No Windex
The Red Plexiglas window on the top of your Fast T-Jet Blazer does not like
Windex. Using this as a cleaning solution will cause the window to crack and
possibly break over time. Use only a mild soap and water solution to clean this
part of your printer. You may use Windex on the metallic sides and Platen, but
take care not to allow ANY Overspray land on the window area.
Five Minute Daily Maintenance
Daily maintenance is a very critical part of keeping your printer performing at its
best. By not following the required daily maintenance described below you will
void your warranty as well as damage the machine.
Many of these items have been covered earlier in this Manual, but the
following list will help you prioritize what maintenance items should be done on
a regular basis.
6
Preventative Maintenance
and Problem Solving
¾¾
Turn the Machine OFF at Night (if not using the Auto Head Cleaning function)
¾¾
Perform a Head Cleaning(s) Every Morning and End of Shift
¾¾
Clean the Capping Station
¾¾
Clean the Spit Tray/Flushing Box Assembly Regularly
¾¾
Clean the Print Head
¾¾
Clean the Encoder Strip
¾¾
Check your ink levels
Turning the machine OFF at night ensures the Print Head is capped properly on the Capping Station.
After turning ON the machine at the start of the day, perform 3 to 4 Head
Cleanings. Press and hold the Ink button for three seconds to initiate this
process. Perform Head Cleanings at the end of a large shirt run and
definitely at the end of each day.
The capping station is the rectangular piece into which the Print Head
seats. Make sure that the outer rubber seal is free from dried ink and
garment fibers. Use a foam swab and distilled water, cleaning fluid or
Isopropyl Alcohol to keep this clean.
The Spit Tray/Flushing Box assembly collects ink very quickly. Check it
regularly and clean it throughout the day as necessary to prevent ink spills on printer components and random ink drops on garments.
Clean any accumulated ink or garment fibers from around the sides and
on the bottom of the Print Head with a foam tip swab, water, glass
cleaner, or cleaning fluid. Clean only the sides of the Print Head, DO NOT touch the nozzles.
During printing and Head Cleanings, the clear plastic Encoder Strip through which the head receives printing data can get dirty. The Encoder Strip is essentially the “brains” of the printer and if the Print Head can’t
properly receive the data through the strip, it will get “confused” and print in the wrong location, laying ink where you don’t want any. Clean the
Encoder Strip with a swab and glass cleaner or Isopropyl Alcohol pad.
Visually check the ink levels of the bulk ink bottles for the following
conditions:
•
Ink levels that are past the Full Line - ink might start to drip from the Print Head
•
Ink levels are too low - the ink tubes will run dry.
7
Fast T-Jet Blazer Maintenace Manual
¾¾
Monitor Waste Tank Levels
When the Waste Tank is full, the LCD control panel display will read “Waste Tank Full.” Because the LCD display is located under the printer cover, you
will need to manually monitor Waste Tank levels throughout work day. If the Tank is full, it will be necessary to remove the Tank from the machine
and change the pad(s). You must then use the Chip Reset Module to
reset the Waste Tank chip. DO NOT reset the chip without checking the pad(s)! Failure to change the pad(s) when needed could result in severe
ink spills and extensive damage to your printer!
Weekly Maintenance
(depending on amount of production)
¾¾
Clean the Print Carriage Drive Belt Gear
Clean it with a brush or computer vacuum. Make sure to avoid any
contact with the encoder strip. It is fragile and can be easily damaged!
Monthly Maintenance
¾¾
Lube the Rail Guides and Rails
You will need to lubricate the Rails and Rail Guides on a Monthly basis to
facilitate the Print Assembly moving smoothly during image output. This procedure will help prevent banding as well as several other image quality concerns.
1. Use a Grease Gun to inject a Lithium-based soap grease (White Grease) through the four Zerk fittings, but DO NOT over-lube- only one
“squirt” per Guide is necessary.
A Grease Gun and
Lithium-based grease can
be purchased from most
major Auto Parts stores.
Connect the Grease Gun
to the Zerk fitting pictured
here to lube the Rail Guides.
There are 2 Rail Guides per
side, 4 total.
8
Preventative Maintenance
and Problem Solving
Lubricating the two Main Rails will
prevent oxidation (rust) and debris buildup, allowing the Printer Assembly to travel
freely. This will help prevent registration
issues that can occur in multiple pass
prints.
Main Rail- One per side
Two in Total
2. To correctly lubricate the Main Rails, apply a very THIN coat of the
same Lithium-based grease used for the Rail Guides. Spread the White
Grease along the ENTIRE length of both Rails using a clean, lint-free
cloth. DO NOT use any other lubricate, such as WD-40 or Machine Oil,
or you risk contamination of the Rail Guides.
Do Not Lubricate the Drive Screw
The Drive Screw MUST NEVER be lubricated or wiped off with a chemical solvent.
This is due to a special coating that has already been placed on the Drive Screw
to prevent dust buildup that could potentially hinder the fluid movement of the
Printer Assembly. Treating the Drive Screw will allow dust buildup, contaminating
the drive mechanism.
Drive Screw
9
Fast T-Jet Blazer Maintenance Manual
! PLEASE USE THIS AS A MASTER COPY TO MAKE COPIES FROM!
Daily and Weekly Maintenance
Schedule Checklist
NAME:
COMPANY:
ADDRESS:
This Checklist should be used asPHONE:
a guide to ensure critical
maintenance is
EMAIL:
performed on a regular basis. The
Checklist may also be downloaded from
SERIAL NUMBER:
www.screenprinters.net.
Maintenance Tracking Schedule
Daily Tasks Performed
Check Ink Levels
Clean Encoder Strip
Clean Print Head
* Perform a nozzle check before printing.
Clean Capping Station and Wiper
Head Cleanings (beginning & after shift)
Power Off at End of Day
Daily Tasks Performed
Check Ink Levels
Clean Encoder Strip
Clean Print Head
* Perform a nozzle check before printing.
Clean Capping Station and Wiper
Head Cleanings (beginning & after shift)
Power Off at End of Day
Daily Tasks Performed
Check Ink Levels
Clean Encoder Strip
Clean Print Head
* Perform a nozzle check before printing.
Clean Capping Station and Wiper
Head Cleanings (beginning & after shift)
Power Off at End of Day
Daily Tasks Performed
Check Ink Levels
Clean Encoder Strip
Clean Print Head
* Perform a nozzle check before printing.
Clean Capping Station and Wiper
Head Cleanings (beginning & after shift)
Power Off at End of Day
Daily Tasks Performed
Check Ink Levels
Clean Encoder Strip
Clean Print Head
* Perform a nozzle check before printing.
Clean Capping Station and Wiper
Head Cleanings (beginning & after shift)
Power Off at End of Day
Weekly Tasks Performed
Check and Clean Cap Assembly
Check Waste Ink Pad
Clean Drive Belt
/
/
Initials:
Date:
/
/
Initials:
/
Initials:
/
Initials:
/
Initials:
/
Initials:
/
Initials:
Comments / Notes
Date:
/
Comments / Notes
Date:
/
Comments / Notes
Date:
/
Comments / Notes
Date:
Monthly Tasks Performed
/
Comments / Notes
Date:
/
Comments / Notes
Lube Rail Guides
Lube Rails
U.S. Screen Print & Inkjet
MAIN: 480-929-0640
Date:
Comments / Notes
TECHNOLOGY
SUPPORT: 480-929-2937
10
FAX: 480-929-0766
EMAIL: [email protected]
Fast T-Jet Blazer
Utilities to Improve Print Quality
A typical print problem that can occur is when lines are missing in the final
image. This is called banding and it can happen for a variety of reasons. The
most common reasons for banding are a dirty or clogged Print Head, or one
that is misaligned.
If your prints are unexpectedly light, or dots or lines are missing, you may need to
clean the Print Head. If you allow one of the ink bottles on the bulk ink system to
run dry or if your printer has been sitting for a few days without use, you will need
to clean the Print Head.
U.S. Screen is not liable for any damage caused by ink to property
such as carpets, flooring or furniture . Please read and understand
all operating and maintenance procedures before using the Fast
T-Jet Blazer.
Head Cleanings
Turn the printer ON by setting the breaker switch to the UP position. Wait five
seconds for the Red indicator light and then press the Orange Power button on
the UI.
There are two types of Head Cleanings available for use on the Fast T-Jet
Blazer- a regular cleaning and a Power Cleaning. Both unclog the Nozzles so
they can deliver ink properly. However, depending upon the severity of your
problem, your only option may be the Power Cleaning. Be advised, a Power
Cleaning will consume a lot of ink.
To prevent having to do Power Cleanings, we recommend initiating at least
one regular head cleaning cycle each day. A Regular Head Cleaning cycle
will also use a fair amount of ink, but not nearly as much as a Power Cleaning.
Power Cleaning
Power Cleanings are executed from the LCD Control Panel with the virtual dial in
Manual on the Mode Select Screen of the UI:
11
Fast T-Jet Blazer Maintenance Manual
• Place the printer in Print status.
• Return the printer to “Ready” status by pressing the RIGHT arrow button
once.
• With the printer in Ready status, press the RIGHT arrow once.
• Press the UP arrow and scroll through the menu items until you come to “Maintenance.” Press the RIGHT arrow once.
• Press the DOWN arrow to scroll the menu items until you come to “Power Clean.” To execute a Power Cleaning, press the RIGHT arrow once.
• The LCD display will inform you of the Power Cleaning’s status in
percentages. At the 10% mark, the display will prompt you to move both
blue levers adjacent the ink cartridges into the UP position.
• At the 20% mark, you will be prompted to move both blue levers into the DOWN position. You will again be prompted to move both levers at the
30%, 40% and 50% marks. At the 50% point, both levers will be in the DOWN
position and you will not have to adjust them again during the power
cleaning cycle.
Once the Power Cleaning is complete, the LCD Display will read “Ready.”
Regular Head Cleaning
You can execute a regular head cleaning by simply holding down the RIGHT
arrow button on the LCD Control Panel for 3 seconds. In addition, you should
always turn your printer OFF when not in use to allow it to go through a regular
head cleaning cycle on start-up.
Auto Head Cleaning (Optional from FastRIP)
A new feature of FastRIP 9.0 is the ability to schedule an Auto Head Cleaning
session. One of the most common problems with printing white ink is the ink’s
tendency to clog the Print Heads. The ink must also be agitated on a regular
basis to keep its pigments from settling within the bottle. The Auto Head Cleaning
function tells the printer to perform a Head Cleaning during the night, helping to
prevent ink settling and head clogging- leaving your Fast T-Jet Blazer ready to
print first thing in the morning.
To utilize the Auto Head Cleaning function, you must set it up within the FastRIP
interface on your computer. For the scheduled session to take place, DO NOT
turn OFF your printer when you have completed your day.
12
Utilities to Improve Print Quality
Waste Tank Maintenance
When the Waste Tank is full, the LCD control
panel display will read “Waste Tank Full” and
you will be unable to start any more print runs. (It
will finish any images in progress.) Because the
LCD display is located under the printer cover,
you will need to manually monitor Waste Tank
Waste Tank
levels throughout the work day. If the Tank is full,
Level Indicator
it will be necessary to remove the Tank from the
machine and change the pad. You must then
use the Chip Reset Module to reset the Waste Tank chip. Detailed instructions
for performing these procedures are provided on a separate information sheet
included with the bulk ink system.
DO NOT get into the routine of just resetting the Waste Tank chip.
It is extremely important you visually check the state the Waste
Tank collection pads. If they look like they need replacing, replace
them. Failure to change the Waste Tank pads when necessary WILL
cause ink to overflow from the Tank and onto critical components
of your printer. In addition to having a large mess to clean up,
you may short the motherboard. This will be very costly in terms of
downtime and repair expense. Damage from this type of incident
is NOT covered by your warranty.
The Waste Tank is located below the bank of white ink cartridges and behind
a metal cowling. To remove the enclosure, you will need to remove the four
screws holding it in place- two on the side and two on the bottom.
Two side screws
Two bottom screws- On the
underside of the cowling
13
Fast T-Jet Blazer Maintenance Manual
After removing the four screws, gently slide the metal cowling free and the
Waste Tank will be easily accessible. To remove the Waste Tank, slide if from its
bin. To replace the Waste Tank after maintenance, slide it back into place and
reattach the metal enclosure.
Perform a Nozzle Check
A Nozzle Check is used to ensure the Print Head is performing properly. You may
use either paper or film for this test, but we recommend film such as FastPOSITIVE,
available from U.S. Screen. Otherwise it’s difficult to see White ink on White
paper. To initiate a Nozzle Check:
1. Take the printer from Print to “Ready (Sheet)” status by pressing the LEFT
arrow button twice. The LCD display will read “Ready” and you will see a
“sheet of paper” icon. Only when in “Ready (Sheet)” status can the Printer
Assembly be moved.
2. Using the “RIGHT hand” button, shuffle through the UI screens until you get to the Mode Select screen. Ensure the virtual dial is set to Manual.
3. Press the “RIGHT hand” button on the UI again until you reach the Manual Mechanism Movement Utility (MMMU) screen.
4. Place your sheet of film or paper on the first Shirtboard. The first position is
furthest from the UI and power cables. Take care to align the film or paper with the Shirtboard’s lower right hand corner (as you face the front of the printer.)
5. Under the heading Position, press the Index button. This will advance the Printer Assembly to the beginning of the Platen. Using the Rev button, position
the Printer Assembly over the medium onto which you will print.
6. You must now change the printer mode to “Ready (Roll).” Press the LEFT
arrow button on the LCD Control Panel twice. The display will read “Ready” with a “roll of paper” icon.
7. On Control Panel, press the RIGHT arrow once and the display will read
“Printer Setup.” Press the DOWN arrow once to see “Test Print.”
8. Press the RIGHT arrow button once to see “Nozzle Check.” Press the RIGHT
arrow again and “Print” will appear in the display.
9. To execute the Nozzle Check, press the RIGHT arrow button once.
If the Nozzle Check does not print correctly, perform a regular Head Cleaning.
This is done by holding down the RIGHT arrow button for 3 seconds. After the
Head Cleaning has been completed, execute another Nozzle Check.
14
Utilities to Improve Print Quality
If, AT ANY TIME, you have performed three Nozzle Checks without
rebooting your printer, you must power OFF your printer before
executing another one.
Once you have obtained a satisfactory Nozzle Check press the Power OFF
button on the UI. After the printer has completed its shutdown process, Power
ON at the UI and perform a Print Head Alignment.
Print Head Alignment
In addition to the initial setup requirements, it may be necessary to perform a
Print Head Alignment on other occasions such as:
• If the Print Head makes contact with any object- whether it’s a garment or a
Shirtboard
• If your prints contain vertical lines or misaligned parts of an image
• If you see banding of any kind
Please be aware, should the Print Head make contact with ANY solid surface, it
may be permanently damaged and require replacement.
Whether you are performing the Initial Setup, or correcting minor printing
concerns, the following steps are necessary to perform a Print Head alignment
for your Fast T-Jet Blazer.
Performing a Head Alignment on a Fast T-Jet Blazer will require
approximately 20-30 minutes. Before beginning this procedure
ensure you are familiar with all the required steps, as well as having
the necessary time to complete the process. Once you have
begun a Head Alignment you CANNOT exit the function without
shutting down the machine. In addition, early exit may result in
severe misalignment of the Print Head or other operational
concerns. Initial setup may require 2-3 alignment procedures to be
completed.
You CANNOT skip this process during setup or your prints may
suffer. Performing a precise and COMPLETE Head Alignment is
extremely crucial to creating great images with your Fast T-Jet
Blazer.
15
Fast T-Jet Blazer Maintenance Manual
1. To begin the Head Alignment process, place your printer in “Paper Out (Roll Cut)” mode. The LCD Display will read “Paper Out” and display the “roll” icon in addition to the “scissors” icon.
2. Press the LEFT arrow button twice to get the LCD Display to read “Ready.”
3. On the User Interface, cycle through the various screens until you reach the Mode Select Screen. Make sure the virtual dial is set to “Manual.”
4. Use the “Hand Arrows” to reach the MMMU Screen. Use the For button under
the heading Jog to move the Print Assembly forward approximately 4-6
inches.
5. On the LCD Control Panel, press the LEFT arrow once until it displays “Ready (Roll Cut).”
6. Prepare 1-2 sheets of film to cover an area 16” x 24” (41 cm x 61 cm) in size. You may also use paper to print the Head Alignment images, however it will be very difficult to see White ink on White paper. Align your paper or film with the upper left hand corner of Shirtboard #1.
7. From the UI MMMU screen press the Index button to move the Print Assembly to its Index Position (the front of Platen).
8. On the printer LCD Control Panel, hit the Enter Key/RIGHT Arrow button once. The LCD Display will read, “Printer Setup.”
9. Press the Down Arrow key 5x until the LCD Display reads, “Head Alignment.”
10.Press the Enter key once and the LCD will display, “Paper Thkns.”
11.Press the Down Arrow once to “Alignment.”
12.Press the Enter key once to see “Alignment Auto.”
13.Press the Down Arrow to see “Alignment Manual.”
14.Press the Enter key once and the LCD will display, “Alignment Manual Uni-D.”
15.Press the Down Arrow to select “Alignment Manual Bi-D All.”
16.Press the Enter key to begin printing.
17.The print process will take approximately 10 minutes. When it is complete, you will see two columns and three groups of lines (marked #1, #2 and #3) and color swatches. These groups will consist of:
• 12 vertical lines numbered 1-9
• 9 Swatches for each of the three colors Cyan (C), Magenta (M) and
Yellow (Y) numbered 1-9
16
Utilities to Improve Print Quality
• 12 additional vertical lines numbered 1-9
• 12 Swatches for the 4 White nozzles labeled (Lk), (Lc), (Lm) and (LLk) and numbered 1-9
These patterns will
be White when
using White ink
These patterns will
be White when
using White ink
Each group will be identified by a number (1-3) and the designation PK/
MK. You will notice that there are two columns of identical groups. The
first, or left hand column, will be used for calibration. The second column is
only a duplicate image of the first column.
The LCD Display will read “#1 PK *5.” This refers to the first set of vertical
lines (MK which refers to Black) numbered 1-9 in the first group. Carefully
examine the printed lines and determine the cleanest/straightest line.
Using the UP or DOWN arrow, cycle through the numbers 1-9 until it
corresponds to the best line you have selected. Press the Enter key.
An asterisk (*) will appear in front of the number you have selected and
then the LCD Display will read “#1 PK C *5.” The “C” in this next menu item
refers to the Cyan color swatch. Examine the Cyan swatches and select
the one closest to a perfect rectangle with no gaps or breaks in color. On
the LCD Display, use the UP or DOWN arrow to cycle through the numbers
1-9 until it corresponds with the best rectangle you have selected. Press
the Enter key.
An asterisk (*) will appear in front of the number you have selected and
then the LCD Display will read “#1 PK M *5.” You must repeat the process
of selecting the best line and rectangle for each set of colors and lines in
all three groups before you have completed the Head Alignment process.
18.When the process is complete, the LCD Display will return to the main
“Alignment Manual” menu or “Ready” status.
17
Fast T-Jet Blazer Maintenance Manual
At this point, you MUST turn OFF the printer. You CANNOT print or
perform any additional maintenance routines on your machine
without powering OFF your printer upon completion of a Head
Alignment. You do not need to perform a complete shut
down- turning OFF the power by using the UI is sufficient.
After your printer has completed its shutdown cycle, your may turn it back
ON and either begin printing or perform another Head Alignment to check
the results of your previous calibrations. Keep in mind, you may be required to
perform 2-3 Head Alignment procedures to initially calibrate your machine for
printing.
If you perform another Head Alignment, you will again be required
to choose and enter the best lines and color swatches from each
group. You CANNOT exit early from this routine. If you do no wish
to make any further changes, just accept the default values (by
pressing the Enter key) as they appear in the LCD Display until the
routine is complete.
For additional information on the UI Screens, using the Epson LFP
Remote Panel or Setting the Platen Height, please refer to your Fast
T-Jet Blazer User’s Manual.
Print Head Replacement
In the event that the Print Head strikes a garment, Shirtboard or other object, the
Print Head will probably need to be replaced. If you leave the printer
unattended for long periods of time, a serious clog may result and the Print
Head will probably need to be replaced.
Replacing the Print Head takes less than 30 minutes and there is an instructional
video available online at www.screenprinters.net. You can also download an
Installation Guide in PDF format for reference. Replacement Print Heads are
available from U.S. Screen Print and Inkjet Technology or possibly your dealer.
If you are dependent upon your Fast T-Jet Blazer and cannot afford to be down
for a few days, we recommend keeping a replacement Print Head in stock.
Print Heads are not covered by your Warranty except in case of
Manufacturer’s Defect. If your Print Head is damaged as the result
of a Head Strike or it becomes permanently clogged by ink due
to a lack of maintenance, you will be responsible for the cost of
replacement, to include shipping charges.
18