1
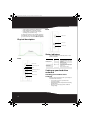
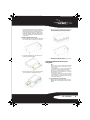
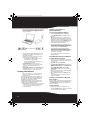
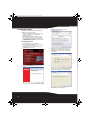
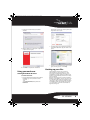
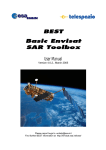
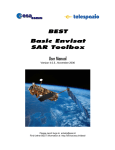
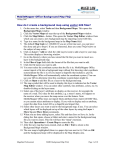
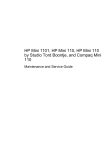
10-1087_RF-HD3035_MAN_ENG_V1.fm Page 1 Friday, October 29, 2010 1:25 PM
USB 3.0 3.5" SATA Hard Disk Drive Enclosure
RF-HD3035
User Guide
10-1087_RF-HD3035_MAN_ENG_V1.fm Page 2 Friday, October 29, 2010 1:25 PM
USB 3.0 3.5" SATA Hard Disk Drive Enclosure
Contents
Introduction ............................................................................................................3
Safety information ................................................................................................3
Important safety instructions .................................................................3
Features.....................................................................................................................3
Package contents ........................................................................................3
System requirements .................................................................................3
Setting up your hard drive enclosure ............................................................4
Installing your hard drive in the enclosure ........................................4
Connecting the enclosure to your computer....................................5
Installing the software...............................................................................8
Using your enclosure ...........................................................................................9
Backing up your files............................................................................................9
Starting Roxio Back On Track ..................................................................9
Selecting files to back up....................................................................... 10
Creating a new Backup Files project ................................................. 11
Using the Backup Files scheduler....................................................... 12
Backup Files options................................................................................ 13
Restoring files ............................................................................................ 14
Disconnecting the enclosure from your computer ............................... 14
Uninstalling the backup software ...................................................... 14
Troubleshooting ................................................................................................. 15
Specifications....................................................................................................... 15
Legal notices ........................................................................................................ 15
One-year limited warranty.............................................................................. 17
2
10-1087_RF-HD3035_MAN_ENG_V1.fm Page 3 Friday, October 29, 2010 1:25 PM
Introduction
Congratulations on the purchase of your new
Rocketfish RF-HD3035 external hard drive
enclosure kit.
The USB 3.0 Rocketfish 3.5" SATA hard drive
enclosure lets you install a high-speed SATA hard
drive and connect it to a computer via a USB 3.0
port. The enclosure has a built-in USB 2.0 hub and
a memory card reader.
SuperSpeed USB 3.0 transfers data at 5 gigabits
per second. That's up to 10 times faster than USB
2.0.
The performance may vary, based on your system
configuration.
Safety information
Warning: To reduce the risk of fire or electric shock, do
not expose this device to rain or moisture.
CAUTION
RISK OF ELECTRIC SHOCK
DO NOT OPEN
This symbol indicates that dangerous
voltage constituting a risk of electric
shock is present within your hard drive
enclosure.
This symbol indicates that there are
important operating and maintenance
instructions in the literature
accompanying your hard drive
enclosure.
Important safety instructions
• This device is to be used in temperatures of
41~95°F (5~35°C). Temperatures exceeding
these limits may damage your hard drive or the
enclosure. Avoid heat sources or direct
sunlight.
• This device can be stored in a humidity range
of between 10% and 90%, and can be operated
in a humidity range of between 5% and 80%.
• Do not connect the device to your computer
without taking precautions to avoid
electrostatic discharge or short circuits, which
could damage the device or your computer.
• Do not place this device close to a source of
strong magnetic fields (such as a computer
screen, TV, radio, or speaker). Strong magnetic
fields can affect the reliability of data transfer
to and from the device.
• Do not place anything heavy on top of the
device.
• Use only the accessories provided in the
accessory package.
• Before you install or use the device, read the
user manual and assemble the enclosure
carefully.
• To prevent short circuits, do not leave any
metal objects inside the enclosure when
installing the hard drive.
• To prevent short circuits, do not use the device
close to water, rain, or high humidity.
Features
• Multi-function storage solution for your
computer.
• Supports up to 2 TB 3.5" SATA interface hard
drive.
• Provides a two-slot USB 3.0 card reader that
supports SDXC, SDHC, SD, MMC, MS, MS PRO,
xD, Compact Flash (UDMA, Type I / II), and IBM
Microdrive.
• Provides two external USB 3.0 downstream
ports.
• Can stand up or lie down while operating.
• One-button backup to easily backup, restore,
and synchronize data between your Windows
PC and the enclosure.
• Has one power-on LED, with backup active
indicator.
• Metal design facilitates rapid heat dissipation.
• Supports Plug-and-Play and is hot-swappable.
Package contents
•
•
•
•
•
•
•
USB 3.0 3.5" SATA hard drive enclosure
USB 3.0 A-B cable
AC power adapter
Utility CD (User Guide and software)
Quick setup guide
Stand
Accessories
• Plastic brackets (2)
• Screws and screwdriver
• Rubber pads (4)
System requirements
• One formatted 3.5" SATA hard drive.
• PC or Macintosh computer with an available
USB 3.0 port. (You can connect to a USB 2.0
port, but it will only run at USB 2.0 speeds).
RF-HD3035
3
10-1087_RF-HD3035_MAN_ENG_V1.fm Page 4 Friday, October 29, 2010 1:25 PM
• Supports Microsoft Windows XP, Windows
Vista, and Windows 7 operating systems.
• Supports MAC OS X version 10.4 or higher
operating system (USB 2.0 only).
For highest performance and reliability, install the
latest updates and service pack (SP). For Windows,
go to the Start menu and select Windows Update.
Back
Power button
Physical description
USB 3.0 port
12V DC in port
Status indicators
The following table describes the power-on and
backup active LED.
Front
LED indicator
Backup button
LED status
Solid
Flashing
Card reader
Off
Solid
Flashing
Backup button
Card reader access LED
Off
Description
The hard drive is turned on.
Data is being transmitted between your computer
and the hard drive.
The hard drive is turned off.
A memory card is in the reader.
Data is being transmitted between your computer
and the memory card.
The memory card reader slot is empty.
CF/MD
SD/MMC/MS/MS PRO/xD
USB 3.0 hub port
USB 3.0 hub port
Setting up your hard drive
enclosure
Installing your hard drive in the
enclosure
Read the safety precautions before you install your
hard drive in the enclosure:
• Use only the accessories provided in the
accessory package.
• Always unplug the AC adapter before installing
the hard drive.
• Do not use a power supply with a different
voltage rating.
4
10-1087_RF-HD3035_MAN_ENG_V1.fm Page 5 Friday, October 29, 2010 1:25 PM
• Make sure that you first touch an unpainted,
grounded metal object to discharge any static
electricity stored on your clothing or body
before touching any electronic components.
• Handle the printed circuit board (PCB) edges
only. Avoid touching the onboard electronic
components.
4 Replace the top cover (make sure to place it in
the correct direction), then secure it with the
four screws that you previously removed.
To install your hard drive in the enclosure:
1 Remove the four (4) screws from the bottom of
the enclosure, then open the top cover plate.
2 Insert the plastic braces (2) into the holes on
both sides of the hard drive.
5 Attach the four rubber pads to the back of the
enclosure to protect the surface.
Connecting the enclosure to your
computer
3 Slide the drive into the enclosure, then firmly
connect the drive to the SATA connector.
Notes:
Make sure that you have already installed a hard drive
into the enclosure before you connect your enclosure
to your computer.
For new hard drives, you need to initialize and partition
your hard drive before it will appear in Windows
Explorer or on your Mac desktop. Refer to your hard
drive manufacturer's documentation or see “Creating
A New Partition” on page 6.
For optimal performance, make sure that your laptop
or PC has USB 3.0 ports. If your computer does not have
USB 3.0 capability, you can plug the USB 3.0 cable into
any available USB 2.0 port.
To connect the enclosure to your computer:
1 Plug the power cord into the enclosure, then
plug the AC power adapter into an AC power
outlet.
RF-HD3035
5
10-1087_RF-HD3035_MAN_ENG_V1.fm Page 6 Friday, October 29, 2010 1:25 PM
2 Plug the USB 3.0 B type connector into the USB
port on the enclosure, then plug the USB 3.0 A
type connector into an available USB 3.0 port
on your computer.
Creating a new partition in
Windows XP/Vista/7
To create a new partition in Windows XP/Vista/7:
1 Right click My Computer, then click Manage.
2 Select Disk Management under Storage on the
USB 3.0 A-type connector
USB 3.0 B-type connector
3 Press the Power button on the enclosure. The
operating system automatically detects and
sets up the new drive.
If the drive is correctly detected, a new drive
letter is assigned to the enclosure.
• For Macintosh computers, the new drive
letter appears on the desktop.
• For PCs, the Safely Remove Hardware icon
appears on your taskbar.
Note for Windows users: If you do not see an
additional drive in your system, you must format the
new drive. See Windows online help for more
information.
Notes for Macintosh users: Select Disk Utilities from
the Utilities folder, then select the external enclosure
and format the drive to meet your requirements.
left pane.
Windows should now give you the option to
initialize the disk. If not, locate the new drive,
right click on the new disk (where it says “New
Simple Volume”) and choose Initialize.(This step
may not be required for some hard drives)
3 Follow the prompts in the wizard.
4 Once complete, locate your hard drive in the
bottom right pane. Right-click on the area with
a status bar (to the right of the “New Simple
Volume” area) and click New Partition.
5 Continue following the directions of the
wizard. The recommended partition type is
“primary” and the recommended file system is
“NTFS.” Note that Windows XP limits FAT32
partitions to only 32 GB.
You should now be able to see the drive in
Windows Explorer.
Formatting the hard drive in Windows
To format the hard drive using Windows:
Note: Formatting is only required for a new hard drive.
Do not format a drive that contains valuable data that
you want to save.
1 Click Start, then click Control Panel.
2 Click Performance and Maintenance (in Windows 7
3
4
Creating A New Partition
Note: For new hard drives, you need to initialize and
partition your hard drive before it will appear in
Windows Explorer.
The best way to partition a new hard drive is by
using the manufacturer’s program. Most hard
drives should come with a CD that includes its
installation program. If not, visit the
manufacturer's website to see if a download is
available. If the manufacturer’s program is not
available, try the following instead:
Caution: Doing the following will erase any existing data
on the drive. If the drive is damaged and you wish to
recover the data, continuing may overwrite the
existing information!
5
6
click System and Security), then click Administrative
Tools.
Click Computer Management, then click Disk
Management from the menu on the left side of
the screen.
Click on the new drive, then click on the Action
tab at the top of the screen.
Go to All Tasks, then click on Format from the
menu.
Select the file system and other choices you
want, then click OK.
Creating a new partition in Mac OS X
10.4 or higher
If you are using a new hard drive, you may need to
initialize it first. Initialize your internal hard drive
using Drive Setup from the Mac OS CD that came
with your computer.
To initialize a Hard Drive:
1 Start your computer from the Mac OS CD.
2 Locate the Utilities folder on the Mac OS CD and
double-click it to open the folder.
6
10-1087_RF-HD3035_MAN_ENG_V1.fm Page 7 Friday, October 29, 2010 1:25 PM
3 Double-click Drive Setup.
4 In the list of drives, select the drive you want to
Using your memory card reader
The enclosure provides two USB 3.0 multimedia
memory card slots:
initialize, then click Initialize.
Formatting the hard drive on your Mac
To format your hard drive with Mac OS Extended format:
This method of formatting hard drives allows for
more efficient use of hard drive storage space.
1 Click Custom Setup.
2 Select the Type menu in the Volume Info area,
then choose Mac OS Extended Format.
3 Resize the volumes if desired.
4 When ready, click OK, then click Initialize.
If initialization fails, do the following:
1 Choose Initialization Options from the Functions
menu.
2 Click the checkbox next to Low level format, then
click OK. Choosing this option adds significant
time to the initialization process.
To format the hard drive:
1 Start the Disk Utility tool (under Applications).
2 Select the new hard drive you are trying to
install.
3 Click the Erase tab.
4 Choose a volume format and assign a name to
the new drive, then click Erase.
Using the USB hubs on the enclosure
The enclosure provides two USB 3.0 hubs, you can
plug any of the following low-powered USB
devices into these ports:
• Keyboard
• Mouse
• Keypad
• Floppy drive
• Network adapter
• Webcam
• Speakers
• Microphone
• Card reader
• Pen drive
• DVD/CD rewriteable
• Digital camera
• Low-capacity 2.5” external HD enclosure
Note: Most USB devices require that software drivers be
installed before connecting them to a computer. When
installing a USB device, always follow the USB
peripheral's installation instructions provided by the
manufacturer.
Memory card slots
Compatible memory cards
SD/MMC/MS/MS-PRO/xD
• Secure Digital card(SDXC, SDHC, SD)
• Multi Media card(MMC)
• Sony® Memory stick (MS, MS PRO)
• xD picture cards
Note: A memory card adapter is required
for Mini SD, RS MMC, MS DUO, MS PRO
DUO, and Micro SD.
• Accepts Compact Flash™ memory
cards (UDMA, type I/II)
• IBM™ Microdrive
CF/MD
To use the memory card reader with Windows:
1 Insert a memory card into the appropriate slot.
Caution: Make sure that the card is inserted into the
correct slot and in the correct direction. Failure to do so
may result in damage to the card or the slot.
2 Open My Computer or Windows Explorer, then
double-click the drive icon for the slot you are
using.
3 To access files and folders on the inserted card,
use the normal Windows procedures for
opening, copying, pasting, or deleting files and
folders.
4 When you have finished working with the files
on the memory card, right-click the memory
card icon, and click Eject.
5 Remove the memory card.
Caution: Do not remove a memory card while the card
reader LED is flashing or blinking.
Formatting a memory card
If your computer has trouble recognizing a new
memory card, format the memory card in your
camera or by using the following procedure on
your computer.
To format a memory card:
1 Click Start, then click My Computer.
2 Under “Removable Storage,” right-click the
3
4
5
6
memory card icon representing the card type
inserted, then click Format.
Type a label name into the label field if you
want to see the name of your memory card
appear under its memory card icon.
Click Start. The card is formatted.
When the formatting is completed, click OK on
the Format Complete window.
Click Close to finish.
RF-HD3035
7
10-1087_RF-HD3035_MAN_ENG_V1.fm Page 8 Friday, October 29, 2010 1:25 PM
Installing the software
The installation CD includes backup software to
enable you to back up your files.
4 Click Next. The Roxio End-User License
Agreement screen opens.
Note: This Roxio Back On Track software runs only on
Windows 7, Windows Vista, and Windows XP
computers using USB.
Important: Before installing the backup software,
make sure that your Windows operating system has
been updated to the latest service pack. To make sure
you have the latest service pack, run Windows Update.
No additional driver is required.
To install Roxio Back On Track:
1 Save all files and close all programs.
2 Insert the included CD into your optical drive.
The introductory screen opens.
Or, if the screen does not open, double-click
the Run.exe file on the CD.
5 Read the license agreement, then click on “I
accept the terms of the License Agreement.”
6 Click Next to proceed. The Choose Setup Type
screen opens.
3 Click Install Backup Software. The Welcome screen
opens.
7 Choose the setup type, then click Next to start
installation. The Ready to Install screen opens.
8 Click Install to install the software.
8
10-1087_RF-HD3035_MAN_ENG_V1.fm Page 9 Friday, October 29, 2010 1:25 PM
9 It may take several minutes to install the
software.
The first time you run the software, the Product
Registration screen opens.
2 Complete the product registration information
10 When installation is complete, the Setup Wizard
Completed screen opens.
as prompted (first time only). The main screen
opens.
3 To back up or restore files, follow the on-screen
guide. For help, press F1 or click Help.
11 Click Finish to complete the installation.
Using your enclosure
Starting Roxio Back On Track
To start Roxio Back On Track:
1 Press the backup button (the button with the
Rocketfish logo on it) on the front of the
enclosure.
-ORClick Start, BackOnTrack (folder), then click
BackOnTrack.
Backing up your files
The Backup Files project lets you back up
important files to a disc, hard drive, or other
storage device. A Backup Files project can be
scheduled to run daily, weekly, or monthly. Large
backups are automatically spread across as many
discs as required.
Begin by selecting the drive or folder containing
the files you would like to archive. You can choose
to archive all the files in the selected path or just
certain types of files. Several preset file categories
are available. Finally, schedule the project to run
on a regular basis, or click the action button to
begin recording now.
RF-HD3035
9
10-1087_RF-HD3035_MAN_ENG_V1.fm Page 10 Friday, October 29, 2010 1:25 PM
Selecting files to back up
You can back up all of the files in a selected path or
limit your project to certain file categories. The
following categories can be selected from the
project window: Email, Financial, Music, Photos,
Productivity, and Video and Recorded TV. You can
also create one custom category.
By default, files will be selected based on the
following criteria:
• All files in the selected path: All files on the drive or
folder you selected to archive.
• Email: All files with the following file name
extensions --- .dbx, .eml, .eudora, .mozilla, .msg,
.pbx, .pst, .wab, .mbx, .mim, .mime, .mlm, .wcm,
and .pfc.
• Financial: All files with the following file name
extensions ---.mbf, .mny, .ofc, .ptb, .ptdb, .q00,
.q01, .q02, .q03, .q04, .q05, .q06, .q07, .q08,
.q09, .q98, .qba, .qbb, .qbi, .qbw, .qbx, .qdb,
.qdf, .qdt, .qel, .qif, .qph, .sdb, .t01, .t02, .t03,
.t04, .t05, .t06, .ta0, .ta1, .ta2, .ta3, .ta4, .ta5, .ta8,
.ta9, .tax, .qmd, .mn4, .txf, .tax2008, .tax2009,
.tax2010, and .tax2011.
• Music: All files with the following file name
extensions --- .669, .aa, .aac, .aif, .aifc, .aiff, .amf,
.amr, .apl, .au, .bwf, .cda, .cdda, .dcm, .far, .flac,
.it, .itz, .kar, .m3u, .m3url, .m4a, .m4b, .m4p,
.mdz, .mid, .midi, .miz, .mp1, .mp2v, .mp3,
.mpga, .mpv2, .mtm, .nsa, .nst, .ogg, .okt, .pls,
.qcp, .ra, .rmi, .s3m, .s3z, .sd2, .shn, .snd, .stm,
.stz, .ult, .ulw, .voc, .wav, .wax, .wma, .wpl, .xm,
.xpl, .asx, and .m4u. Your entire My Music folder
(Windows XP) or Music folder (Windows Vista
and Windows 7) is included if it is located on
the drive or in the folder you selected to
archive.
• Photos: All files with the following file name
extensions --- .cam, .cr2, .crw, .dcr, .j2c, .j2k, .jfi,
.jfif, .jif, .jp2, .jpe, .jpeg, .jpg, .jpx, .k25, .kdc, .kqp,
.mrw, .nef, .orf, .pef, .pmp, .raf, .raw, .srf, .thm,
.3ds, .ai, .ait, .ani, .art, .b3d, .bmp, .can, .cdr, .cdt,
10
.cgm, .clp, .cmt, .cpt, .cur, .dcx, .dds, .dib, .djvu,
.drw, .drz, .dwg, .dxf, .emf, .eps, .epsf, .fax, .fi,
.fmf, .fpx, .fxo, .fxs, .g3, .g3n, .gif, .gmf, .grb, .gro,
.gsm, .gtif, .hpi, .icb, .icl, .ico, .ilbm, .img, .indd,
.indt, .iw44, .lbm, .lwi, .mac, .macp, .mix, .mng,
.mod, .mpnt, .msp, .ncr, .ngg, .nlm, .nol, .odg,
.paint, .pat, .pcd, .pct, .pcx, .pdl, .pdp, .pict,
.pmd, .pmg, .png, .pnm, .pnt, .pntg, .pp4, .pp5,
.ppm, .prm, .psd, .psp, .pspimage, .pub, .qti,
.qxd, .qxt, .rgb, .rle, .rppm, .sci, .sgi, .slddrw, .svg,
.svg2, .targa, .tcw, .tga, .tif, .tiff, .vda, .vdx, .vsd,
.vss, .vst, .vsx, .vtx, .wmf, .wmz, and .wpg. Your
entire My Pictures folder (Windows XP) or
Pictures folder (Windows Vista and Windows 7)
is included if it is located on the drive or in the
folder you selected to archive.
• Productivity: All files with the following file name
extensions --- .bk0, .bk1, .bk2, .bk3, .bk4, .bk5,
.bk6, .bk7, .bk8, .doc, .docm, .docx, .dot, .dotm,
.dotx, .lwp, .odt, .ott, .pdf, .ps, .rtf, .txt, .wpd,
.wps, .wpt, .wri, .123, .dif, .ods, .ots, .qpw, .wk1,
.wk3, .wk4, .wks, .xla, .xlam, .xlr, .xls, .xlsb, .xlsm,
.xlsx, .xlt, .xltm, .xltx, .odp, .otp, .pot, .potm,
.potx, .ppa, .ppam, .pps, .ppsm, .ppsx, .ppt,
.pptm, .pptx, .prz, .shw, .mpp, .wp, .wp6, .wmlx,
and .oft. In Windows XP, your my Documents
folder, with the exception of your My Pictures,
My Videos, My DVDs, and My Music folders, is
included if it is located on the drive or in the
folder you selected to archive. In Windows
Vista and Windows 7, your Documents folder
with the exception of your Pictures, Videos,
DVDs, and Music folders, is included if it is
located on the drive or in the folder you
selected to archive.
• Video and Recorded TV: All files with the following
file name extensions - .3g2, .3gp, .3gp2, .3gpp,
.amc, .asf, .avi, .cin, .dv, .flc, .ivf, .m15, .m1v,
.m2p, .m2v, .m4e, .m4v, .m75, .mov, .mp4, .mpe,
.mpeg, .mpg, .mpm, .mpv, .mswmm, .nsv, .ogm,
.qt, .qtl, .qts, .rm, .rmvb, .rp, .rt, .rts, .rtsp, .rv,
.sdv, .smi, .smil, .sml, .ssm, .swf, .vfw, .wm, .wmd,
.wmv, .wmx, .wvx, .xmz, .m1p, .mp2, .vbs, .xtl,
.dvr-ms, and .wtv. Your My Videos folder
(Windows XP) or Videos folder (Windows Vista
and Windows 7) is included if it is located on
the drive or in the folder you selected to
archive.
Tip: You can add to the list of file extensions included in
any file category by using the controls on the Backup
options panel. See “Backup Files options“ on page 13
for more information.
10-1087_RF-HD3035_MAN_ENG_V1.fm Page 11 Friday, October 29, 2010 1:25 PM
Creating a custom category
Most computer files are defined by the two-,
three-, or four-letter extension placed at the end of
their names. Plain text files, for example, can be
identified by their .txt file extension. When you
record a Backup Files project, the program is
simply searching your computer for files with
extensions that correspond to the categories you
selected. If you want to archive files that are not
included on any of the pre-defined lists, you could
choose to archive all files or edit one of the
existing categories (see “Backup Files options“ on
page 13 for more information), or you could create
your own custom list of file extensions that will
appear as the category called My Custom
Category.
To create a custom file category:
1 Click Options.
2 Click File Backup on the left side of the Options
3
4
5
6
7
window. The File Category options are
displayed on the right side of the window.
Click My Custom Category.
Type a file extension into the Extension text box.
It is not necessary to include the period.
Click Add. The file extension is added to the list
box on the right.
Continue adding file extensions one at a time
until you are finished.
To remove a file extension from your list, click
its name in the list box, then click Remove.
Click OK to save your list as My Custom
Category. This new category is added to the list
of file categories in the project window.
Creating a new Backup Files project
To create a new Backup Files project:
1 Click the FIle Backup tab in the project list. A list
of projects is displayed.
2 Click the Backup Files project.
3 Click Browse and use the Browse for Folder
window to select the drive or folder containing
the files you would like to archive.
Note: Files stored on different source drives cannot be
archived in the same Backup Files project.
4 Select the types of files you wish to archive.
Choose either All files in the selected path or Only
files in the following categories.
If you selected only files in the following
categories, select the file categories you would
like to archive. The choices are Email, Financial,
Music, Photos, Productivity, and Video and Recorded TV.
If you created a custom category, it will also be
available. See "Creating a custom category" on
page 11 for more information.
Note: Hold your mouse pointer over an icon to see the
category it represents.
5 If you want, place a check mark in the Only
archive files changed since checkbox to limit the
backup to files that have been modified since
the date you select. To change the date, click
the date box arrow to open the calendar. When
you click a date in the calendar, the date is
automatically entered into the date box.
6 Select a destination for your archived files from
the Destination Selection list. The destination can
be a hard drive, a disc recorder, or another type
of storage device.
7 To compress or encrypt your backup, click
Advanced and select the appropriate settings:
• Compression-Click the Compress check box if
you would like the back up files created for
this project to be compressed.
Compression reduces file size. The amount
of compression varies based on the types of
files you back up. Compressed files take
longer to restore than uncompressed files.
• Encryption-Click the Encrypt check box to
require a password to open or restore your
backup project. Type a password for this
project in the space provided and again in
the confirmation box.
Caution: If you forget or lose your password, you will not
be able to open or restore your backup project.
8 Click the action
button to run the project
now. To schedule your project, choose one of
the options in Step 3 on the project window.
For more information about scheduling a
project, see "Using the Backup Files scheduler"
on page 12.
-ORTo save your project, click Save. Enter a name for
the project, then click OK. If you decided to run
the project now, a progress screen will inform
you when the project has been completed.
9 Click Done to return to the project window.
Note: Scheduled projects must be saved before they can
be run.
RF-HD3035
11
10-1087_RF-HD3035_MAN_ENG_V1.fm Page 12 Friday, October 29, 2010 1:25 PM
To open and run a saved Backup Files project:
1 Click File. If the project is listed on the File
menu, select it. If the project is not listed, click
Open and use the dialog box to navigate to the
project file. By default, project files are saved in
your Windows Vista and Windows 7
Documents folder or Windows XP My
Documents folder. The settings for that project
are displayed in the project window.
2 Change the project settings as needed. Click
Save to save your changes. (If you save the
project without changing its name, the original
project is overwritten.)
3 If necessary, insert a blank or rewritable disc
into the selected destination drive.
4 Click the action
button to begin recording.
A progress screen informs you when the
project has been completed.
Using the Backup Files scheduler
Each time you create a Backup Files project, you
have the option of running it immediately or
scheduling the project to run at a regular interval
that you choose.
To schedule a Backup Files project:
1 Open the Backup Files project.
2 Set up a new project or select a saved project.
See "Creating a new Backup Files project" on
page 11 for more information on starting a
project.
3 Choose one of the scheduling options in the
project window:
• Run now-The project runs after you click the
action button.
• Daily-The project runs every day at the time
the project was created.
• Weekly-The project runs once a week at the
time and on the day of the week the project
was created.
• Monthly-The project runs once a month at
the time and on the day of the month the
project was created.
4 Save your project by clicking Save. A save
window appears.
5 Name the project, then click OK.
Note: If you schedule a monthly backup for the 31st day
of the month, your backup will be skipped during
months with fewer than 31 days. Backups scheduled
on the 29th or 30th day of the month will also be
skipped during some months.
12
Scheduler tips
The following tips will help you to better
understand the scheduler:
• Scheduled projects must be saved before they
can be run.
• Keep the following limitations in mind if you
want a scheduled project to be completed
successfully while you are away from your
computer:
• Backup Files will not overwrite files without
your permission. This usually involves
clicking on a series of message boxes. To
perform an unattended archive project,
you may need to change the hard drive
destination for your archived files or archive
your files to a disc.
• If you are archiving files onto a disc, a blank
disc must be inserted in your drive when
the project starts.
• Some of the energy conservation settings
available for your computer may keep a
scheduled project from starting even if the
project launcher is open.
• The Backup Files project uses a scheduler that
is part of the Windows operating system. A
system administrator has the ability to prevent
a computer user from using the scheduler or
running scheduled projects. If the Backup Files
scheduler does not work as expected, consult
your system administrator.
• You can use your Windows scheduling
software to customize when your saved
projects run. You can schedule a project to run
twice a week or once every hour. Save your
project, then edit the schedule using the
Windows Scheduler.
To run Windows Scheduler in Windows XP, click
Start, All Programs, Accessories, System Tools, Scheduled
Tasks.
To run Windows Scheduler in Windows Vista and
Windows 7, click Start, All Programs, Accessories, System
Tools, Task Scheduler.
Note: See Windows Help and Support for information
on using the Windows Scheduler. Remember that
scheduling changes made directly in the Windows
Scheduler are not displayed in the Backup Files project
window.
10-1087_RF-HD3035_MAN_ENG_V1.fm Page 13 Friday, October 29, 2010 1:25 PM
Backup tips
• All of the discs used in a Back Up Files project
must be the same general format.
• In a multi-disc Back Up Files project, files are
assigned based on the size of the first disc you
use. If your first disc has a capacity of 650 MB,
for example, no more than 650 MB will be
burned on any subsequent disc, even if it has a
larger capacity. This also means that no disc in
a project can have a smaller capacity than the
first disc used in a project.
• Discs used in a Back Up Files project are closed
once they are recorded. If you use write-once
discs, you will not be able to add additional
data.
• To view a list of the files on a Back Up Files disc,
open the .RFI file placed on the disc.
Backup Files options
Click Options on the control panel to open the
Options window. Here you find settings that can be
used to customize your application.
Each available group of options is displayed in the
left pane. Click the name of an options group, and
those option settings appear on the right.
Each panel includes a Restore Defaults button that
can be used to restore the default settings for the
options on that panel only.
Note: Not all options are available for all drives or
operating systems.
Backup options-FIle Backup panel
Use the Backup panel to customize the following
Backup Files settings:
• File category options-Use this option to create a
custom file selection category or to add
additional file types to any of the preset
categories.
• Launch Backup Files when my external hard drive is
re-connected-Select this option to easily back up
files to an external hard drive.
• Verify data written to the disc after burning-A check
mark in this box adds a verification step to
make sure that no errors occur during the
recording of your discs.
4 Continue adding file extensions one at a time
until you are finished.
To remove a file extension from your list, click
its name in the list box, then click Remove.
5 Click OK to save your list as My Custom
Category.
To add file extensions to one of the preset file selection
categories:
1 Select the file category you would like to
2
3
4
5
customize. The choices are Email, Financial, Music,
Photos, Productivity, and Video & Recorded TV.
Enter the file extension you would like to add
into the Extension text box.
Click Add. The file extension is added to the list
box on the right.
Continue adding file extensions one at a time
until you are finished.
Click OK.
Using one-touch backup
To use one-touch backup if you have set up a backup
project:
• Press the One-Touch button on the HDD
enclosure. The backup process begins.
To use one-touch backup if you have NOT set up a backup
project:
1 Press the One-Touch button on the HDD
enclosure. The Roxio BackOnTrack software
opens with the Backup Files page displayed.
2 Follow the on-screen instructions to set up a
backup project.
3 After a backup project is set up, push the
One-Touch button to backup your data.
4 To modify One-Touch backups in the future,
follow the instructions for setting up backup
projects.
To create a new custom category called My Custom
Category:
1 Select My Custom Category from the list of file
categories.
2 Type a file extension into the Extension text box.
3 Click Add. The file extension is added to the list
box on the right.
RF-HD3035
13
10-1087_RF-HD3035_MAN_ENG_V1.fm Page 14 Friday, October 29, 2010 1:25 PM
Restoring files
The Restore Files project restores individual files
and folders that you have protected using the
Backup Files project. With Restore Files, you select
a backup, search for the files or folder you would
like to restore, and then click the action button.
The files will be restored to the location you
choose.
8 Click the action
your files.
button to begin restoring
Restore files tips
• Restore Files can be used to restore as many
files or folders as you wish.
• Restore Files will not overwrite a file without
getting your permission.
• Backup files created with the Backup Files
project can be recognized by their .rfi file name
extension. If you double-click an .rfi file, the
project launcher opens.
• The Restore Files search box does not support
wildcard expressions.
• System files cannot be restored to their original
location if they are in use by your computer's
operating system.
Disconnecting the enclosure
from your computer
To restore a file:
1 Click the File Backup tab in the project list. A list
of projects is displayed.
2 Click the Restore Files project. The project
3
4
5
6
7
14
window opens.
If the backup file was saved on a disc, insert the
disc into a compatible disc drive.
Click Browse at the top of the Selective Restore
project window. A dialog box opens.
Use the dialog box to navigate to the backup
file that contains the files you would like to
restore. After you have found the backup file,
click it, then click OK. The content of the backup
file appears as a directory tree in the project
window.
Select the files and folders you would like to
restore using one of the following methods:
• Navigate through the directory tree in the
project window. When you find a file or
folder you want to restore, select it by
clicking on its name.
• Type all or part of a file or folder name into
the Search box to the right of the Browse
button. Click Search. The search results are
displayed in the project window. If the file
you want to restore appears in the search
results, select it by clicking once on its
name. If the file does not appear in the
search results, try using different search
terms or looking in a different backup file.
Choose Browse from the Destination Selection
menu and select the location where your
restored files will be saved.
You can disconnect the enclosure at any time
while the computer is turned off. If, however, you
want to disconnect it while the computer is on,
make sure that you do it correctly.
To disconnect the enclosure while Windows is running:
Note: If a drive window is open or the hard drive
enclosure is active, close any associated windows
before trying to remove the enclosure.
1 Right-click the Safely Remove Hardware icon
(located in the notification area of the taskbar
where you usually see the time displayed).
2 Click the device you want to unplug, then
click STOP.
3 When Windows notifies you that it is safe to do
so, unplug the enclosure from your computer.
To disconnect the enclosure while Mac OS X is running:
1 Drag the USB icon into the TRASH.
2 Unplug the enclosure.
Uninstalling the backup software
To uninstall the backup software in Windows:
1 Open the Control Panel.
2 Click Add or Remove Programs (Windows XP) or
Programs and Features (Windows Vista and
Windows 7).
3 Locate Roxio BackOnTrack on the list, then click
Change/Remove (Windows XP) or Uninstall
(Windows Vista and Windows 7).
4 Follow the on-screen instructions to remove
the software completely from your computer.
10-1087_RF-HD3035_MAN_ENG_V1.fm Page 15 Friday, October 29, 2010 1:25 PM
5 After the software is uninstalled, restart your
computer if prompted.
Troubleshooting
I do not see the
enclosure/additional drive in
my system
There is a USB icon in the
system tray, but I can't find
the hard disk in MY
COMPUTER.
My memory card does not
appear in My Computer or
Windows Explorer
My memory card appears in
My Computer but I get errors
when writing or reading
The data transfer between
computer and device is slow
The backup button doesn't
work.
• Make sure that the USB cable is connected firmly to
your enclosure and computer.
• Make sure that the USB cable is not broken.
• Open the enclosure and make sure that all of the
connections are securely fastened.
• Use the rear USB ports on the back of the computer
instead of the front USB ports.
• Check for motherboard compatibility issues.
• Check for hard drive compatibility issues.
• Windows users: Partition and format the new hard
drive by using Disk Management in Windows.
• Macintosh users: Partition and format the new
hard drive by clicking Disk Utilities in the Utilities
folder, then clicking your external enclosure.
• Make sure the HDD has been initialized and
partitioned before hardware installation. Refer to
"Creating A New Partition" on page 7.
• Try a different memory card of the same type in the
same slot. If the different memory card works,
replace the original memory card.
• Shine a flashlight into the empty card slots. Look to
see if any pin inside is bent. Straighten bent pins
with the end of a mechanical pencil or paper clip.
• Make sure that memory card is fully inserted into the
slot.
• Try a different memory card of the same type in the
same slot. If the different memory card works,
replace the original memory card.
• Some cards have a read/write security switch. Make
sure that security switch is set to Write Enabled.
• Make sure that the amount of data you tried to store
does not exceed the capacity of the card.
• Inspect the ends of the memory cards for dirt or
material closing a hole. Clean the contacts with a
lint-free cloth and small amounts of isopropyl
alcohol.
• If errors persist, replace the memory card.
• Your system may be operating at USB 2.0 speeds due
to an incorrect driver installation of the USB 3.0
adapter card or a system that does not support USB
3.0. If your system includes a PCIe slot, you can
achieve SuperSpeed USB transfer rates by installing a
USB 3.0 PCIe adapter card.
• Make sure you have installed the backup utility
program, if the utility program has been installed
successfully, it will show an icon in the toolbar when
Windows was booting.
Specifications
Hard drive type
3.5” SATA HDD, up to 2 TB
Dimensions
1.67 × 8.74 × 5.19 inches (42.5 × 222 × 132 mm)
Interface to device
SATA I/II
Interface to PC
USB 3.0
Backup button
Card reader slots
USB 3.0 ports (2)
Power button
External features (back) DC power jack
B-type USB 3.0 port (1)
External features
(front)
Memory cards
supported
Power supply
Indicator
Compatibility
• Secure Digital card(SDXC, SDHC, SD)
• Multi Media card(MMC)
• Sony® Memory stick (MS, MS PRO)
• xD picture cards
• Compact Flash™ memory cards (UDMA, type I/II)
• IBM™ Microdrive
Note: A memory card adapter is required for Mini SD,
RS MMC, MS DUO, MS PRO DUO, and Micro SD.
AC power adapter (12 V/3 A)
Power-on/backup active LED
Card reader active LED
Windows XP, Windows Vista, Windows 7, Mac 10.4 or higher
Operating temperature 32~104°F (0~40°C)
Operating humidity
Operating: 20 to 80% non-condensing
Certification
FCC Class B, ICES-003
Legal notices
FCC Part 15
This device complies with Part 15 of the FCC Rules.
Operation of this product is subject to the
following two conditions: (1) this device may not
cause harmful interference, and (2) this device
must accept any interference received, including
interference that may cause undesired operation.
This equipment has been tested and found to
comply within the limits for a class B digital device,
pursuant to Part 15 of the FCC Rules. These limits
are designed to provide reasonable protection
against harmful interference in a residential
installation. This equipment generates, uses, and
can radiate radio frequency energy and, if not
installed and used in accordance with the
instructions, may cause harmful interference to
radio communications. However, there is no
guarantee that interference will not occur in a
particular installation. If this equipment does
cause harmful interference to radio or television
reception, which can be determined by turning
the equipment off and on, the user is encouraged
to try to correct the interference by one or more of
the following measures:
• Reorient or relocate the receiving antenna.
RF-HD3035
15
10-1087_RF-HD3035_MAN_ENG_V1.fm Page 16 Friday, October 29, 2010 1:25 PM
• Increase the separation between the
equipment and receiver.
• Connect the equipment into an outlet on a
circuit different from that to which the receiver
is connected.
• Consult the dealer or an experienced
technician for help.
FCC warning
Changes or modifications not expressly approved
by the party responsible for compliance with the
FCC Rules could void the user’s authority to
operate this equipment.
Canada ICES-003 statement
This Class B digital apparatus complies with
Canadian ICES-003.
16
10-1087_RF-HD3035_MAN_ENG_V1.fm Page 17 Friday, October 29, 2010 1:25 PM
One-year limited warranty
Rocketfish Products (“Rocketfish”) warrants to you, the original
purchaser of this new RF-HD3035 (“Product”), that the Product
shall be free of defects in the original manufacture of the
material or workmanship for one (1) year from the purchase of
the Product (“Warranty Period”). This Product must be
purchased from an authorized dealer of Rocketfish brand
products and packaged with this warranty statement. This
warranty does not cover refurbished Product. If you notify
Rocketfish during the Warranty Period of a defect covered by
this warranty that requires service, terms of this warranty apply.
How long does the coverage last?
The Warranty Period lasts for one year (365 days), beginning on
the date you purchased the Product. The purchase date is
printed on the receipt you received with the product.
What does this warranty cover?
During the Warranty Period, if the original manufacture of the
material or workmanship of the Product is determined to be
defective by an authorized Rocketfish repair center or store
personnel, Rocketfish will (at its sole option): (1) repair the
Product with new or rebuilt parts; or (2) replace the Product at
no charge with new or rebuilt comparable products or parts.
Products and parts replaced under this warranty become the
property of Rocketfish and are not returned to you. If service of
Products and parts are required after the Warranty Period
expires, you must pay all labor and parts charges. This warranty
lasts as long as you own your Rocketfish Product during the
Warranty Period. Warranty coverage terminates if you sell or
otherwise transfer the Product.
How to obtain warranty service?
If you purchased the Product at a retail store location, take your
original receipt and the Product to the store you purchased it
from. Make sure that you place the Product in its original
packaging or packaging that provides the same amount of
protection as the original packaging. If you purchased the
Product from an online web site, mail your original receipt and
the Product to the address listed on the web site. Make sure
that you put the Product in its original packaging or packaging
that provides the same amount of protection as the original
packaging.
This warranty also does not cover:
• Damage due to incorrect operation or maintenance
• Connection to an incorrect voltage supply
• Attempted repair by anyone other than a facility
authorized by Rocketfish to service the Product
• Products sold as is or with all faults
• Consumables, such as fuses or batteries
• Products where the factory applied serial number has been
altered or removed
REPAIR REPLACEMENT AS PROVIDED UNDER THIS WARRANTY
IS YOUR EXCLUSIVE REMEDY. ROCKETFISH SHALL NOT BE
LIABLE FOR ANY INCIDENTAL OR CONSEQUENTIAL DAMAGES
FOR THE BREACH OF ANY EXPRESS OR IMPLIED WARRANTY ON
THIS PRODUCT, INCLUDING, BUT NOT LIMITED TO, LOST DATA,
LOSS OF USE OF YOUR PRODUCT, LOST BUSINESS OR LOST
PROFITS. ROCKETFISH PRODUCTS MAKES NO OTHER EXPRESS
WARRANTIES WITH RESPECT TO THE PRODUCT, ALL EXPRESS
AND IMPLIED WARRANTIES FOR THE PRODUCT, INCLUDING,
BUT NOT LIMITED TO, ANY IMPLIED WARRANTIES OF AND
CONDITIONS OF MERCHANTABILITY AND FITNESS FOR A
PARTICULAR PURPOSE, ARE LIMITED IN DURATION TO THE
WARRANTY PERIOD SET FORTH ABOVE AND NO WARRANTIES,
WHETHER EXPRESS OR IMPLIED, WILL APPLY AFTER THE
WARRANTY PERIOD. SOME STATES, PROVINCES AND
JURISDICTIONS DO NOT ALLOW LIMITATIONS ON HOW LONG
AN IMPLIED WARRANTY LASTS, SO THE ABOVE LIMITATION
MAY NOT APPLY TO YOU. THIS WARRANTY GIVES YOU SPECIFIC
LEGAL RIGHTS, AND YOU MAY ALSO HAVE OTHER RIGHTS,
WHICH VARY FROM STATE TO STATE OR PROVINCE TO
PROVINCE.
Contact Rocketfish:
For customer service please call 1-800-620-2790
www.rocketfishproducts.com
Distributed by Best Buy Purchasing, LLC
7601 Penn Avenue South, Richfield, Minnesota, U.S.A.
55423-3645
© 2010 BBY Solutions, Inc.
All rights reserved. ROCKETFISH is a trademark of BBY
Solutions, Inc. Registered in some countries. All other products
and brand names are trademarks of their respective owners.
Where is the warranty valid?
This warranty is valid only to the original purchaser of the
Product in the United States, Canada, and Mexico.
What does the warranty not cover?
This warranty does not cover:
• Customer instruction
• Installation
• Set up adjustments
• Cosmetic damage
• Damage due to acts of God, such as lightning strikes
• Accident
• Misuse
• Abuse
• Negligence
• Commercial use
• Modification of any part of the Product, including the
antenna
RF-HD3035
17
10-1087_RF-HD3035_MAN_ENG_V1.fm Page 20 Friday, October 29, 2010 1:25 PM
www.rocketfishproducts.com
(800) 620-2790
Distributed by Best Buy Purchasing, LLC
7601 Penn Avenue South, Richfield, MN 55423-3645 USA
© 2010 BBY Solutions, Inc.
All rights reserved. ROCKETFISH is a trademark of BBY Solutions, Inc.
All other products and brand names are trademarks of their respective owners.
10-1087
ENGLISH