1
Operating Instructions
Counter Top Coffee System
To prevent accidents and machine damage, read these instructions
before installation or use.
en - US, CA
M.-Nr. 09 924 540
Contents
IMPORTANT SAFETY INSTRUCTIONS. . . . . . . . . . . . . . . . . . . . . . . . . . . . . . . . . 5
Guide to the machine . . . . . . . . . . . . . . . . . . . . . . . . . . . . . . . . . . . . . . . . . . . . . 10
Controls and display . . . . . . . . . . . . . . . . . . . . . . . . . . . . . . . . . . . . . . . . . . . . . . 11
Accessories . . . . . . . . . . . . . . . . . . . . . . . . . . . . . . . . . . . . . . . . . . . . . . . . . . . . . 12
First use . . . . . . . . . . . . . . . . . . . . . . . . . . . . . . . . . . . . . . . . . . . . . . . . . . . . . . . . 13
Before using for the first time . . . . . . . . . . . . . . . . . . . . . . . . . . . . . . . . . . . . . . . . . 13
Turning on for the first time . . . . . . . . . . . . . . . . . . . . . . . . . . . . . . . . . . . . . . . . . . 13
Water hardness . . . . . . . . . . . . . . . . . . . . . . . . . . . . . . . . . . . . . . . . . . . . . . . . . . . 14
Operation . . . . . . . . . . . . . . . . . . . . . . . . . . . . . . . . . . . . . . . . . . . . . . . . . . . . . . . 15
Filling the water container . . . . . . . . . . . . . . . . . . . . . . . . . . . . . . . . . . . . . . . . . 16
Filling the coffee bean container . . . . . . . . . . . . . . . . . . . . . . . . . . . . . . . . . . . . 17
Turning the machine On / Off . . . . . . . . . . . . . . . . . . . . . . . . . . . . . . . . . . . . . . . 18
Cup heating . . . . . . . . . . . . . . . . . . . . . . . . . . . . . . . . . . . . . . . . . . . . . . . . . . . . . 19
Adjusting the coffee dispensers to the cup height. . . . . . . . . . . . . . . . . . . . . . 20
How to prepare beverages . . . . . . . . . . . . . . . . . . . . . . . . . . . . . . . . . . . . . . . . . 21
Coffee specialties . . . . . . . . . . . . . . . . . . . . . . . . . . . . . . . . . . . . . . . . . . . . . . . . . 21
Double portion . . . . . . . . . . . . . . . . . . . . . . . . . . . . . . . . . . . . . . . . . . . . . . . . . . . . 22
Canceling preparation . . . . . . . . . . . . . . . . . . . . . . . . . . . . . . . . . . . . . . . . . . . . . . 22
Making coffee with ground coffee . . . . . . . . . . . . . . . . . . . . . . . . . . . . . . . . . . . . . 23
Adding ground coffee. . . . . . . . . . . . . . . . . . . . . . . . . . . . . . . . . . . . . . . . . . . . 23
Making coffee with ready ground coffee . . . . . . . . . . . . . . . . . . . . . . . . . . . . . 24
Drinks with milk . . . . . . . . . . . . . . . . . . . . . . . . . . . . . . . . . . . . . . . . . . . . . . . . . . . 24
Preparing hot water . . . . . . . . . . . . . . . . . . . . . . . . . . . . . . . . . . . . . . . . . . . . . . . . 27
Preparing User profile drinks . . . . . . . . . . . . . . . . . . . . . . . . . . . . . . . . . . . . . . . . . 27
Coffee the way you like it . . . . . . . . . . . . . . . . . . . . . . . . . . . . . . . . . . . . . . . . . . 28
Grinder setting . . . . . . . . . . . . . . . . . . . . . . . . . . . . . . . . . . . . . . . . . . . . . . . . . . . . 28
Displaying and changing the parameters of a drink . . . . . . . . . . . . . . . . . . . . . . . 29
Amount of coffee . . . . . . . . . . . . . . . . . . . . . . . . . . . . . . . . . . . . . . . . . . . . . . . . . . 29
Brewing temperature . . . . . . . . . . . . . . . . . . . . . . . . . . . . . . . . . . . . . . . . . . . . . . . 30
Pre-brewing . . . . . . . . . . . . . . . . . . . . . . . . . . . . . . . . . . . . . . . . . . . . . . . . . . . . . . 30
Portion size. . . . . . . . . . . . . . . . . . . . . . . . . . . . . . . . . . . . . . . . . . . . . . . . . . . . . . 31
Changing the portion size during drink preparation . . . . . . . . . . . . . . . . . . . . . . . 31
Changing portion sizes in the "Parameters" menu ,. . . . . . . . . . . . . . . . . . . . . . . 33
Changing the portion size for different User profiles . . . . . . . . . . . . . . . . . . . . . . . 33
2
Contents
Profiles . . . . . . . . . . . . . . . . . . . . . . . . . . . . . . . . . . . . . . . . . . . . . . . . . . . . . . . . . 34
Accessing a profile . . . . . . . . . . . . . . . . . . . . . . . . . . . . . . . . . . . . . . . . . . . . . . . . 34
Creating a profile . . . . . . . . . . . . . . . . . . . . . . . . . . . . . . . . . . . . . . . . . . . . . . . . . . 34
Selecting a User profile . . . . . . . . . . . . . . . . . . . . . . . . . . . . . . . . . . . . . . . . . . . . . 35
Changing the name . . . . . . . . . . . . . . . . . . . . . . . . . . . . . . . . . . . . . . . . . . . . . . . . 35
Deleting a profile . . . . . . . . . . . . . . . . . . . . . . . . . . . . . . . . . . . . . . . . . . . . . . . . . . 35
Changing a profile . . . . . . . . . . . . . . . . . . . . . . . . . . . . . . . . . . . . . . . . . . . . . . . . . 36
Settings . . . . . . . . . . . . . . . . . . . . . . . . . . . . . . . . . . . . . . . . . . . . . . . . . . . . . . . . . 37
Accessing the "Settings" menu . . . . . . . . . . . . . . . . . . . . . . . . . . . . . . . . . . . . . . . 37
Changing and saving settings . . . . . . . . . . . . . . . . . . . . . . . . . . . . . . . . . . . . . . . . 37
Setting options . . . . . . . . . . . . . . . . . . . . . . . . . . . . . . . . . . . . . . . . . . . . . . . . . . . . 38
Language. . . . . . . . . . . . . . . . . . . . . . . . . . . . . . . . . . . . . . . . . . . . . . . . . . . . . . . . 39
Time of day . . . . . . . . . . . . . . . . . . . . . . . . . . . . . . . . . . . . . . . . . . . . . . . . . . . . . . 39
Timer . . . . . . . . . . . . . . . . . . . . . . . . . . . . . . . . . . . . . . . . . . . . . . . . . . . . . . . . . . . 39
Eco mode. . . . . . . . . . . . . . . . . . . . . . . . . . . . . . . . . . . . . . . . . . . . . . . . . . . . . . . . 40
Lighting . . . . . . . . . . . . . . . . . . . . . . . . . . . . . . . . . . . . . . . . . . . . . . . . . . . . . . . . . 40
Info (displaying information) . . . . . . . . . . . . . . . . . . . . . . . . . . . . . . . . . . . . . . . . . 41
Locking the coffee system (System lock 0) . . . . . . . . . . . . . . . . . . . . . . . . . . . . . 41
Water hardness . . . . . . . . . . . . . . . . . . . . . . . . . . . . . . . . . . . . . . . . . . . . . . . . . . . 41
Display brightness . . . . . . . . . . . . . . . . . . . . . . . . . . . . . . . . . . . . . . . . . . . . . . . . . 41
Volume . . . . . . . . . . . . . . . . . . . . . . . . . . . . . . . . . . . . . . . . . . . . . . . . . . . . . . . . . 41
Cup heating . . . . . . . . . . . . . . . . . . . . . . . . . . . . . . . . . . . . . . . . . . . . . . . . . . . . . . 41
Factory default . . . . . . . . . . . . . . . . . . . . . . . . . . . . . . . . . . . . . . . . . . . . . . . . . . . . 42
Showroom program (demo mode) . . . . . . . . . . . . . . . . . . . . . . . . . . . . . . . . . . . . 42
Cleaning and care . . . . . . . . . . . . . . . . . . . . . . . . . . . . . . . . . . . . . . . . . . . . . . . . 43
Quick guide . . . . . . . . . . . . . . . . . . . . . . . . . . . . . . . . . . . . . . . . . . . . . . . . . . . . . . 43
Rinsing the coffee system . . . . . . . . . . . . . . . . . . . . . . . . . . . . . . . . . . . . . . . . . . . 44
Milk pipework . . . . . . . . . . . . . . . . . . . . . . . . . . . . . . . . . . . . . . . . . . . . . . . . . . . . . 45
Main dispenser with cappuccinatore . . . . . . . . . . . . . . . . . . . . . . . . . . . . . . . . . . 47
Milk container. . . . . . . . . . . . . . . . . . . . . . . . . . . . . . . . . . . . . . . . . . . . . . . . . . . . . 48
Water container . . . . . . . . . . . . . . . . . . . . . . . . . . . . . . . . . . . . . . . . . . . . . . . . . . . 49
Drip tray cover . . . . . . . . . . . . . . . . . . . . . . . . . . . . . . . . . . . . . . . . . . . . . . . . . . . . 49
Drip tray and waste container . . . . . . . . . . . . . . . . . . . . . . . . . . . . . . . . . . . . . . . . 50
Bean container and ground coffee chute . . . . . . . . . . . . . . . . . . . . . . . . . . . . . . . 51
Brew unit . . . . . . . . . . . . . . . . . . . . . . . . . . . . . . . . . . . . . . . . . . . . . . . . . . . . . . . . 51
Remove the brew unit and wash by hand . . . . . . . . . . . . . . . . . . . . . . . . . . . . 51
Degreasing the brew unit . . . . . . . . . . . . . . . . . . . . . . . . . . . . . . . . . . . . . . . . . 53
Housing . . . . . . . . . . . . . . . . . . . . . . . . . . . . . . . . . . . . . . . . . . . . . . . . . . . . . . . . . 54
3
Contents
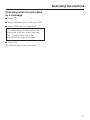
Descaling the machine . . . . . . . . . . . . . . . . . . . . . . . . . . . . . . . . . . . . . . . . . . . . 55
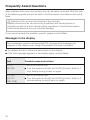
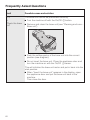
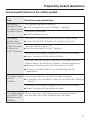
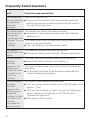
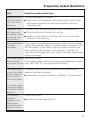
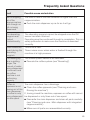
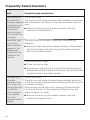
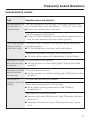
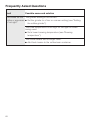
Frequently Asked Questions . . . . . . . . . . . . . . . . . . . . . . . . . . . . . . . . . . . . . . . 58
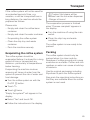
Transport . . . . . . . . . . . . . . . . . . . . . . . . . . . . . . . . . . . . . . . . . . . . . . . . . . . . . . . 69
Evaporating the coffee system . . . . . . . . . . . . . . . . . . . . . . . . . . . . . . . . . . . . . . . 69
Packing . . . . . . . . . . . . . . . . . . . . . . . . . . . . . . . . . . . . . . . . . . . . . . . . . . . . . . . . . 69
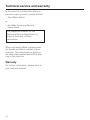
Technical service and warranty . . . . . . . . . . . . . . . . . . . . . . . . . . . . . . . . . . . . . 70
Saving energy . . . . . . . . . . . . . . . . . . . . . . . . . . . . . . . . . . . . . . . . . . . . . . . . . . . 71
Installation instructions . . . . . . . . . . . . . . . . . . . . . . . . . . . . . . . . . . . . . . . . . . . 73
Packaging material / Disposal of old machine . . . . . . . . . . . . . . . . . . . . . . . . . 74
Electrical connection . . . . . . . . . . . . . . . . . . . . . . . . . . . . . . . . . . . . . . . . . . . . . . 75
Installation . . . . . . . . . . . . . . . . . . . . . . . . . . . . . . . . . . . . . . . . . . . . . . . . . . . . . . 76
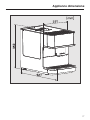
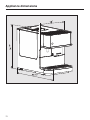
Appliance dimensions . . . . . . . . . . . . . . . . . . . . . . . . . . . . . . . . . . . . . . . . . . . . . 77
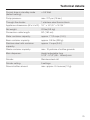
Technical details . . . . . . . . . . . . . . . . . . . . . . . . . . . . . . . . . . . . . . . . . . . . . . . . . 79
Contact details . . . . . . . . . . . . . . . . . . . . . . . . . . . . . . . . . . . . . . . . . . . . . . . . . . 83
4
IMPORTANT SAFETY INSTRUCTIONS
When using electrical appliances basic safety precautions should always be
followed, including the following:
Read all instructions before installation or use of the coffee system.
Intended use
Please read these instructions
carefully to prevent accidents and
machine damage.
This appliance complies with current
safety requirements. Improper use
of the appliance can cause personal
injury and material damage. Read
this safety information carefully
before operating the appliance.
They contain important information
on the safe installation, operation,
and care of your coffee system. To
avoid the risk of personal injury or
damage to the coffee system, it is
important that you carefully read the
instructions. Miele cannot be held
liable for damage caused by
non-compliance with these
IMPORTANT SAFETY
INSTRUCTIONS.
Keep these instructions in a safe
place and pass the on to any future
user.
~ This coffee system is not designed
for commercial use. It is intended for
household use and only, for the
preparation of coffee, cappuccino,
espresso, etc. Do not use appliance
other than for its intended use. Any
other use could be dangerous.
~ The coffee system is not suitable for
outdoor use.
~ The machine is intended only for the
preparation of coffee-based drinks
such as espresso, cappuccino, latte
macchiato, hot water, steam, frothed
milk, etc.
Any other usage is not supported.
~ Persons who are unable to safely
operate the appliance due to limited
physical, sensory or mental
capabilities, or because of a lack of
experience or knowledge, may only use
the appliance if they are supervised
while doing so.
5
IMPORTANT SAFETY INSTRUCTIONS
Safety with children
,The coffee and dispensers
present a danger of burning or
scaling.
Children's skin is far more sensitive
to high temperatures than that of
adults.
Ensure children do not touch hot
surfaces of the coffee system or
place parts of their body under the
dispensers.
~ Keep the coffee system out of reach
of children.
~ Keep children away from the
machine, the power cord and outlet.
~ Close supervision is necessary
when the coffee machine is used near
children.
~ Never let children play with the
coffee machine.
~ Remember that coffee and espresso
are not suitable drinks for children.
~ Danger of suffocation!
Keep children away from any packing
material.
Technical safety
~ Before installing the coffee system,
check for externally visible damage. If
the coffee system is damaged, it may
pose a safety hazard and must not be
used under any circumstances.
~ Before connecting the coffee
system, check the voltage and
frequency indicated on the data plate
against the voltage and frequency of
the household electrical supply.
This data must correspond in order to
prevent damage to the coffee system. If
in doubt, consult a qualified electrician.
~ Be certain your appliance is
properly installed. To guarantee the
electrical safety of this appliance,
continuity must exist between the
appliance and an effective grounding
system. It is imperative that this basic
safety requirement be met. If there is
any doubt, have the electrical system of
the house checked by a qualified
electrician.
~ Do not connect the machine to the
electrical supply using an extension
cord.
~ Unplug the machine from the power
supply immediately if you notice any
damage or smell.
~ Do not operate any appliance with a
damaged cord or plug or after the
appliance malfunctions, or has been
damaged in any manner. Return
appliance to the nearest authorized service facility for examination, repair or
adjustment.
6
IMPORTANT SAFETY INSTRUCTIONS
~ Ensure that the power cord will not
be pinched or damaged by any sharp
edges.
~ To disconnect, turn main switch to
~ Do not let cord hang over edge of
and before cleaning. Allow to cool
before putting on or taking off parts,
and before cleaning the appliance.
table or counter, or touch hot surfaces.
~ Do not place on or near a hot gas or
electric burner, or in a heated oven.
~ The coffee system may not be used
in mobile installations such as ships.
~ Only use the coffee system in rooms
where the ambient temperature is
between 50 °F / 10 °C and 100 °F /
38 °C.
~ Danger of overheating! Ensure that
there is sufficient ventilation around the
coffee system. Do not cover it with tea
towels etc. while it is in use.
"0", then remove plug from wall outlet.
~ Unplug from outlet when not in use
~ To protect against fire, electric
shock and injury to persons do not
immerse cord, plugs, or coffee machine
in water or other liquid.
~ Use only genuine original Miele
parts. If parts or accessories from other
manufacturers are used, the warranty
may become void.
The use of accessory attachements not
recommended by Miele may result in
fire, electric shock or injury to persons.
~ If the coffee system is installed
behind a cabinet door, it may only be
used with the cabinet door open. Do
not close the cabinet door while the
coffee system is in use.
~ Protect the coffee system from water
and water spray.
~ Installation, maintenance and
repairs may only be carried out by
qualified technicians.
~ Repairs must only be performed by
a trained technician in accordance with
national and local safety regulations.
Repairs and other work by
unauthorized persons could be
dangerous and may void the warranty.
~ Defective components should be
replaced by Miele original parts only.
Only with original Miele parts can the
manufacturer guarantee the safety of
the appliance.
7
IMPORTANT SAFETY INSTRUCTIONS
Proper use
,Danger of burning and scalding
from the spouts.
The liquids and steam dispensed
are very hot.
~ Please note:
– Keep away from the area underneath
the spouts when hot liquids and
steam are being dispensed.
– Do not touch hot surfaces. Use
handles or knobs.
– Hot liquid or steam could spatter
from the dispensers. Ensure that the
main dispenser is clean and fitted
correctly.
– Water in the drip tray can also be
very hot. Take care when emptying it.
~ Clean the coffee system thoroughly
before using for the first time (see
"Cleaning and care").
~ To avoid the risk of damage to the
machine, please note the following
regarding water:
– Fill the water container with fresh,
cold tap water only. Hot or warm
water or other liquids could damage
the coffee system.
– Change the water every day to
prevent a build-up of bacteria.
– Do not use mineral water. Mineral
water will cause lime scale deposits
to build up in your machine and
damage it.
– Do not use water from reverse
osmosis units.
8
~ Only fill the bean container with
roasted espresso or coffee beans. Do
not fill the bean container with coffee
beans that have been treated or with
ground coffee.
~ Do not use raw coffee beans (green,
unroasted coffee beans) or coffee
blends that include raw coffee. Raw
coffee beans are very hard and contain
mositure that will damage the grinder.
~ Do not use coffee beans that have
been treated with caramel, sugar or
other substances. Sugar will damage
the coffee system.
~ Only add ground coffee or cleaning
tablets to the ground coffee chute. The
cleaning tablets are used for
degreasing the brew unit.
~ Do not use flavored ground coffee in
the machine. The sugar content on
these grounds clogs the brew unit of
the machine. The cleaning tablet is not
enough to remove the residue.
~ Only use milk without additives.
Additives in milk usually contain sugar
and this will stick to the milk pipework.
~ If using dairy milk make sure that it
has been pasteurized.
~ Do not place flamed alcohol
mixtures underneath the main
dispenser. The flames could ignite
plastic components and cause them to
melt.
~ Do not place any open flame, e.g. a
candle, on or near the coffee system.
The coffee system could catch fire.
IMPORTANT SAFETY INSTRUCTIONS
~ Please note the following with
regard to cleaning the coffee system:
– Turn the coffee system off at the
main switch before cleaning.
– Clean the coffee system and milk
container daily (see "Cleaning and
care").
~ Do not use the coffee system to
clean objects.
SAVE THESE INSTRUCTIONS
AND REVIEW THEM
PERIODICALLY
– Make sure that the milk pipework is
cleaned regularly and thoroughly
Milk contains natural bacteria that will
multiply if the pipework is not
sufficiently clean. Contamination in
the coffee system can be a health
hazard.
– Do not use a steam cleaner to clean
this machine. Steam could reach
electrical components and cause a
short circuit.
~ Descale the coffee system regularly
depending on the water hardness level
in your area. Descale the machine more
frequently in areas with very hard water.
Miele cannot be held liable for damage
arising from insufficient descaling, the
use of incorrect descaling agent or the
use of descaling agent that is not of the
appropriate concentration.
~ Degrease the brew unit regularly
with Miele cleaning tablets. Depending
on the natural oil content of the coffee
used, the brew unit can become
blocked quite quickly.
~ Rinsing espresso/coffee grounds
down the drain can cause the sink to
clog. Instead, dispose of your
espresso/coffee grounds appropriately
as biodegradable waste (where
facilities exist) or by composting.
9
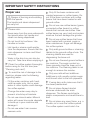
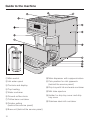
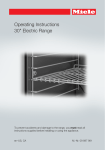
Guide to the machine
a Main switch
j Main dispenser with cappuccinatore
b Hot water spout
k Park position for milk pipework
(behind the service panel)
c Controls and display
d Cup heating
e Water container
f Ground coffee chute
g Coffee bean container
h Grinder setting
(behind the service panel)
i Brew unit (behind the service panel)
10
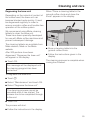
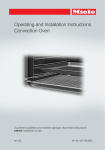
l Drip tray with lid and waste container
m Milk tube aperture
n Holder for drip tray cover and drip
tray cover
o Stainless steel milk container
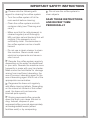
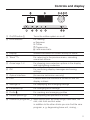
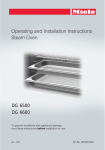
Controls and display
a On/Off button -
Turns the coffee system on or off
b Drink buttons
For making
. Espresso
/ Coffee
H Cappuccino
k Latte macchiato
c Display
Shows information on current activity or status
d "Back" #
For returning to the previous menu, canceling
unwanted actions
e Arrow keys Y X
For showing more selection options in the display
and highlighting a selection
f OK
For confirming display messages and saving
settings
g Optical interface
(for service technician use only)
h LED
Flashes when the machine is turned on and the
display is black
i Settings X
For displaying and changing settings
j Parameters ,
For changing drink settings
k Profile {
For creating and managing profiles
l Double portion °
For preparing two portions of a drink
m Additional programs x More drinks such as coffee lungo, caffè latte, hot
milk, milk froth and hot water
in addition to the other drinks you can find the care
program, e. g. degreasing brew unit, rinsing ,...
11
Accessories
The following accessories are included
depending on the model:
– Measuring scoop
for ground coffee
– Stainless steel milk container
MB-CM
For keeping milk cool
– Cleaning tablets
for degreasing the brew unit
(starter set)
– Descaling tablets
for descaling the water pipework
(starter set)
– Test strips
for determining the water hardness
level
– Cleaning brush
for cleaning the milk pipework
These products and other useful
accessories can be ordered via the
Miele website.
12
Miele also offers a range of optional
accessories, as well as cleaning and
conditioning products for your coffee
system.
– Cleaning agent for milk pipework
for cleaning the milk system
– Cleaning tablets
for degreasing the brew unit
– Descaling tablets
for descaling the water pipework
– Stainless steel milk container
MB-CM
For keeping milk cool for longer
(capacity approx. 16.9 oz. / 0.5 l)
First use
Please read the operating
instructions and take the time to
familiarize yourself with the coffee
system before using it for the first
time.
Please discard the first two cups of
coffee/espresso drinks when using
the machine for the first time.
When you turn the machine on for the
first time, the following message will
appear in the display: "Miele Willkommen".
Language
^ Use the arrow keys to highlight the
desired language. Then touch OK.
^ Use the arrow keys to highlight the
desired country. Then touch OK.
Before using for the first time
The setting is now saved.
^ Set up the coffee system and
remove any protective film (see
"Installation").
Time of day
Clean the machine thoroughly
before filling it with water and coffee
beans (see "Cleaning and care").
^ Plug in the coffee system (see
"Electrical connection").
Turning on for the first time
^ Touch the arrow keys until the current
hour appears.
Then touch OK.
^ Touch the arrow keys until the current
minutes appear.
Then touch OK.
The setting is now saved.
"Set up successfully completed" will
now appear in the display.
The message "Fill and replace the
water container" appears in the display.
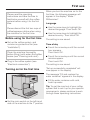
^ Fill the water container with cold,
fresh tap water.
Tip: To get the most out of your coffee
system and to set it up for your specific
requirements, please continue to work
through these operating instructions.
^ Set the main switch on the left-hand
side of the machine to the "I" position.
13
First use
Water hardness
Determining the water hardness
The water hardness level indicates how
much calcium is dissolved in the water.
The higher the calcium content, the
harder the water, and the harder the
water, the more often the coffee system
will need to be descaled.
You can measure the water hardness
yourself using the enclosed test strip.
Alternatively, your local water authority
will be able to tell you the hardness of
water in your area.
The coffee system measures the
amount of water used and steam made.
Depending on the level of water
hardness set, more or fewer drinks can
be dispensed before the appliance
needs to be descaled.
Program the coffee system to the water
hardness level of your area so that it
functions correctly and does not get
damaged. At the correct time a prompt
will then appear in the display to
descale the appliance.
You can program four hardness levels
on the machine:
Water
hardness
level in your
area
Setting
(water
hardness
level)
0 - 8.7 gr/gal
(0 - 8.4 °dH)
Soft
Soft 1
8.7 - 14.6 gr/gal
(8.4 - 14 °dH)
Medium
Medium 2
14.6 - 21.2 gr/gal
(14 - 21 °dH)
Hard
Hard 3
ö 21.2 gr/gal
(ö 21 °dH
Hard
Very hard 4
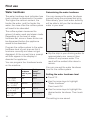
Water hardness
^ Dip the strip in your drinking water for
approximately one second, then
shake off any excess water. The
result will be evident after about a
minute.
You can now set the water hardness
level for the coffee system.
Setting the water hardness level
^ Touch X .
^ Use the arrow keys to highlight
"Water hardness".
Then touch OK.
^ Use the arrow keys to highlight the
desired water hardness. Then touch
OK.
The setting is now saved.
14
Operation
To operate the coffee system, touch the
keys with your finger.
When the following appears in the
display, you are in the drinks menu:
To select an option:
^ Touch the X and Y arrow keys until
the option you want is highlighted.
To confirm your choice:
^ Touch OK.
{ Miele
Select drink
Leaving the menu or canceling an
action
To exit the current menu:
To prepare a coffee drink, touch one of
the drink sensors.
You can find more drinks in the "More
programs" x menu.
^ Touch #.
If you do not touch a sensor for a
period of time, the machine returns to
the drinks menu.
Selecting a menu and
navigating within a menu
To select a menu, touch the relevant
button. You will then be able to start an
action or change settings in the menu.
Settings
Language J
Time of day
Timer
A scroll bar at the right of the display
shows that additional options or text are
available. Use the arrow keys to display
these.
You will be able to identify the current
active setting by the check (.
15
Filling the water container
The quality of the water and the quality
of the coffee beans play an important
part in the quality of the coffee or
espresso.
Important! Bacteria can cause
infection.
It is important to empty and fill the
container with fresh tap water every
day to avoid the risk of bacteria
building up.
^ Press the lid on the right-hand side.
Hot or warm water or other liquids
can damage the coffee system.
Do not use mineral water in the
water container. It will cause serious
lime scale deposits to build up in
your machine and damage it.
^ Pull the water container up by the lid
to remove it.
^ Fill the water container with fresh,
cold tap water up to the "max."
marker.
^ Replace the water container.
Tip: If the water container is a little high
or at a slant, check whether the surface
that the water container sits on is dirty.
If the water container is not sitting
correctly, the drain valve will not be
sealed.
Clean the surface if necessary.
16
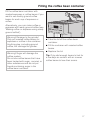
Filling the coffee bean container
Fill the coffee bean container with
roasted espresso or coffee beans if you
want to use freshly ground coffee
beans for each cup of espresso or
coffee.
Alternatively, you can make coffee or
espresso with ready ground coffee (see
"Making coffee or espresso using ready
ground coffee").
Warning! Damage to the grinder!
Only put roasted coffee beans for
espresso or coffee in the container.
Anything else, including ground
coffee, will damage the grinder.
^ Take the lid off the coffee bean
container.
^ Fill the container with roasted coffee
beans.
^ Replace the lid.
Warning! Sugar will damage the
coffee system.
Do not use coffee beans that have
been treated with sugar, caramel, or
other substances and do not put
liquids containing sugar in the
coffee bean container.
Tip: Only add enough beans to last for
a few days as contact with air causes
coffee beans to lose their aroma.
17
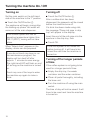
Turning the machine On / Off
Turning on
Turning off
Set the main switch on the left-hand
side of the machine to the "I" position.
^ Touch the On/Off button -.
^ Touch the On/Off button -.
The appliance will begin rinsing after
the heating-up phase. Hot water will
come out of the main dispenser.
If the coffee system still has an
operating temperature higher than
140 °F (60°C), rinsing will not take
place.
When "Select drink" appears in the
display, drinks can be prepared.
If you do not touch any keys or run
the maintenance program, the
display will turn itself off after
approx. 7 minutes to save energy.
The right-hand LED will flash on and
off as long as the machine is turned
on.
Touch any one of the keys to wake
the machine up again to make a
drink.
After a coffee drink has been
dispensed, the pipework will be rinsed
before the machine turns off.
If a drink has been made using milk,
the message "Place milk pipe in drip
tray" will appear in the display.
Insert the end of the milk pipe into the
aperture in the drip tray, then
^ Touch OK.
If the milk system is not rinsed out
before turning off, it will have to be
rinsed the next time the machine is
turned on.
Turning off for longer periods
of time
If the coffee system is not going to be
used for a longer period of time:
^ Empty the drip tray, the waste
container and the water container.
^ Clean all parts thoroughly, including
the brew unit.
^ Turn the machine off using the main
switch.
The time of day will not be saved. It will
have to be reset next time the machine
is turned on.
18
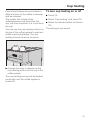
Cup heating
Cups should always be pre-heated to
allow the flavor of the coffee to develop
and be retained.
The smaller the volume of the
coffee/espresso and the thicker the
cup, the more important it is to pre-heat
the cup.
You can use the cup heating surface on
the top of the coffee system to pre-heat
coffee cups and glasses. The cup
heating function must be turned on.
To turn cup heating on or off
^ Touch X.
^ Select "Cup heating" and touch OK.
^ Select the desired option and touch
OK.
The setting is now saved.
^ Arrange the cups or glasses on the
cup heating surface on the top of the
coffee system.
The cup heating surface will be heated
continually until the coffee system is
turned off.
19
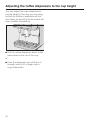
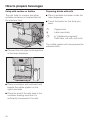
Adjusting the coffee dispensers to the cup height
You can adjust the main dispenser to
suit the height of the cup you are using
so that the coffee or espresso will not
cool down as quickly and the crema will
have a better consistency.
^ Pull the coffee dispenser down to the
same level as the rim of the cup.
or
^ Push the dispenser up until there is
enough room to fit a larger cup or
mug underneath.
20
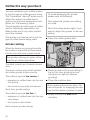
How to prepare beverages
You can choose from a variety of
specialty coffees:
Coffee specialties
Ristretto is a concentrated, strong
espresso. The same quantity of coffee
powder as for an espresso is prepared
with very little water.
Espresso is a strong, aromatic coffee
with a thick hazelnut-brown cream layer
– the crema – on top.
Use espresso-roasted coffee beans for
preparing espresso.
Coffee distinguishes itself from
espresso due to the greater water
quantity and the special roasting of the
coffee beans.
Coffee Lungo is a coffee with
significantly more water.
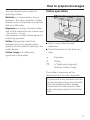
^ Place a cup under the main
dispenser.
^ Touch the button for the drink you
want:
.
Espresso
/
Coffee
x
in "Additional programs":
Ristretto, Coffee Lungo
The coffee or espresso will be
dispensed from the main dispenser.
To ensure that any residues from the
factory testing process are removed
from the brewing system, please
discard the first two cups of coffee
when using the machine for the first
time.
21
How to prepare beverages
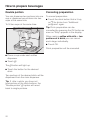
Double portion
Canceling preparation
You can dispense two portions into one
cup or dispense two portions into two
cups at the same time.
To cancel preparation:
To fill two cups at the same time:
^ Touch the drink button that is lit up,
or x for drinks from "Additional
programs" again.
Tip: Drink preparation can be
cancelled by pressing the OK button as
soon as "Stop" appears in the display.
When making coffee with milk or two
portions of a drink you can cancel
each stage individually.
^ Touch OK.
Drink preparation will be canceled.
^ Place a cup under each coffee
dispenser.
^ Touch °.
The ° button will light up.
^ Touch the button for the desired
drink.
Two portions of the desired drink will be
dispensed from the main dispenser.
Tip: If, after a while, you have not
touched one of the drink buttons, the
"Double portion" ° option will revert
back to single portions.
22
How to prepare beverages
Making coffee with ground
coffee
To make espresso or coffee using
ready ground coffee, add a portion of
ground coffee to the ground coffee
chute.
This allows you to prepare a
decaffeinated coffee, if the bean
container is already filled with regular
coffee beans for example.
The coffee system will automatically
recognize that ground coffee has been
placed in the chute.
Only one portion of coffee or espresso
can be prepared at a time when using
ready ground coffee.
^ Open the ground coffee chute.
^ Add one level scoop of ready ground
coffee to the chute.
^ Close the coffee chute.
"Use ground coffee?" appears in the
display.
Adding ground coffee
Use the scoop supplied with the
machine to ensure the correct amount
of ground coffee is used.
Do not add more than one level
scoop of ground coffee to the coffee
chute. If too much is added, the
brew unit will not be able to process
the coffee.
The coffee system will use all the
ground coffee that has been added
to the chute to make the next coffee.
23
How to prepare beverages
Making coffee with ready ground
coffee
If you want to make a drink with
pre-ground coffee:
^ Select "Yes" and touch OK.
You can now select which type of drink
you would like to make with ready
ground coffee.
^ Place a cup under the main
dispenser.
^ Select the desired drink.
The desired coffee drink is prepared.
If you do not want to make a drink with
ready ground coffee:
^ Select "No" and touch OK.
The ground coffee will be directed into
the waste container.
If you do not touch a drink button
within approx. 15 seconds, the
ground coffee will also be directed
into the waste container.
24
Drinks with milk
,Caution! Danger of burning and
scalding from the main dispenser.
Liquids and steam dispensed will
be very hot.
Do not use milk with additives. Most
additives contain sugar that will
adhere to the milk pipework and
damage the machine.
As soon as you select a drink
containing milk, the machine will start to
heat up. The milk will be drawn up into
the main dispenser where it is heated
by steam and also frothed for drinks
requiring milk froth.
If you have not made any milk drinks
for a while, rinse the milk system
thoroughly before making the first
drink to ensure any bacteria is
flushed out.
How to prepare beverages
The following drinks with milk can be
made:
Cappuccino consisting of approx. 2/3
milk froth and 1/3 espresso.
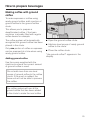
^ Connect the stainless steel angled
end of the milk tube to the top of the
lid until it clicks into place.
Latte macchiato consisting of 1/3 each
of hot milk, milk froth and espresso.
Caffè latte consists of hot milk and
coffee.
Hot milk or milk froth can also be
made.
Notes about the stainless steel milk
container
The stainless steel container keeps milk
cool for longer. Good milk froth can
only be made with cold milk
( 55°F/13 °C).
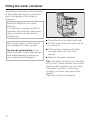
^ Place the milk container on the
right-hand side of the coffee system.
Connect the other end of the milk
tube to the main dispenser.
^ Connect the stainless steel suction
tube to the inside of the lid. Make
sure that the slanted end is pointing
downwards as shown.
^ Fill the milk container up to max.
3/4" (2 cm) below the rim with milk.
Seal the milk container with the lid.
25
How to prepare beverages
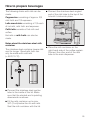
Using milk cartons or bottles
Preparing drinks with milk
The milk tube for cartons and other
suitable containers is located behind
the machine front.
^ Place a suitable container under the
main dispenser.
^ Touch the button for the drink you
want:
H
Cappuccino
k
Latte macchiato
x
In "Additional programs":
Caffè latte, hot milk, milk froth
The coffee system will now prepare the
selected drink.
^ Connect the milk pipe to the aperture
in the main dispenser.
^ Place a container with sufficient milk
beside the coffee system on the
right-hand side.
^ Place the end of the milk tube in the
container making sure that it is
sufficiently immersed in the milk.
26
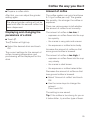
How to prepare beverages
Preparing hot water
,Caution! Danger of burning and
scalding. The water dispensed is
very hot.
Preparing User profile drinks
You can enter individual profiles to suit
different tastes and preferences (see
"Profiles").
If you have already created your own
profile, you can select this to make a
drink according to your own tastes.
^ Touch {.
^ Select the desired profile with the
arrow keys and touch OK.
The name of the profile will appear in
the display to show that a profile has
been selected.
You can now make the drink you want.
^ Place a suitable container under the
hot water spout.
^ Touch x.
^ Select "Hot water" and touch OK.
Hot water is dispensed into the
container under the spout.
To cancel preparation
^ Touch OK.
Drink preparation will be canceled.
27
Coffee the way you like it
You can customize your coffee system
to suit the type of coffee you are using.
The "Parameters" menu , allows you to
adjust the amount of coffee that is
ground, set the brew temperature and
select the "Pre-brewing" option.
The parameters for each type of coffee
can be individually specified in the
Miele profile and in any other profiles
you have created.
The grinder can also be set to suit the
type of coffee beans being used.
To avoid damaging the grinder,
please note the following:
Only adjust the grinder one setting
at a time.
Grind the coffee beans again if you
want to adjust the grinder to the next
setting.
^ Open the coffee system door.
Grinder setting
When the beans are ground correctly,
the coffee or espresso will flow evenly
into the cup and have a good crema.
The grinder setting you select will be
used for all coffee specialties.
The ideal crema has a hazelnut-brown
color.
There are various ways to tell whether
the coffee grinder is set correctly.
The coffee is ground too coarse, if
– espresso or coffee flows into the cup
too quickly.
– the crema is very pale and uneven.
Set a finer grinder setting.
The coffee is ground too fine, if
– espresso or coffee flows into the cup
very slowly.
– the crema is dark brown.
Set a coarser grinder setting.
28
^ Push the slide control one setting to
the left (for finer grinding) or one
setting to the right (for coarser
grinding).
^ Close the machine door.
When opening the service door, the
internal counter for emptying the drip
tray and the waste container is reset.
^ Empty the drip tray and waste
container.
Coffee the way you like it
^ Prepare a coffee drink.
Amount of coffee
After that, you can adjust the grinder
setting again.
The coffee system can grind and brew
6-14 g of coffee per cup. The greater
the quantity, the stronger the coffee or
espresso.
The altered grinder setting will not be
used until after the second coffee has
been dispensed.
Displaying and changing the
parameters of a drink
There are various ways to tell whether
the amount of coffee is set correctly:
The amount of coffee is too low, if
^ Touch ,.
– espresso or coffee flows into the cup
too quickly.
The , button will light up.
– the crema is very pale and uneven.
^ Select the desired drink and touch
OK.
– the espresso or coffee lacks body.
The current settings for the amount of
coffee, brewing temperature and
pre-brewing will be displayed for this
drink.
Increase the amount of coffee so that
more ground coffee is brewed.
The amount of coffee is too high, if
– espresso or coffee flows into the cup
very slowly.
– the crema is dark brown.
– the espresso or coffee tastes bitter.
Decrease the amount of coffee so that
less ground coffee is brewed.
^ Select "Amount of coffee" and touch
OK.
^ Use the arrow keys to change the
amount.
Then touch OK.
The setting is now saved.
Tip: If the coffee is too strong for you or
it tastes bitter, try another type of bean.
29
Coffee the way you like it
Brewing temperature
Pre-brewing
The ideal brewing temperature will
depend on:
When the pre-brewing function is
turned on, the freshly ground coffee is
first moistened with a little hot water.
Then the remaining water is forced
through the moistened coffee at high
pressure. This helps release the flavor
of the coffee.
– the type of coffee,
– whether an espresso or a coffee is
being prepared, and
– the altitude of the region.
If the coffee system is located at more
than 6562 ft. (2000 meters) above sea
level, the brewing temperature needs to
be set lower due to the change in
pressure. This is because the boiling
point for water at a high altitude above
sea level is lower than the boiling point
for water at sea level.
The coffee system has five brewing
temperatures.
Tip: Not all types of coffee can
withstand high temperatures. Certain
types are too delicate - the crema on
top would not be as good and the taste
would be impaired.
^ Select "Brew temperature" and touch
OK.
^ Select the desired temperature and
touch OK.
The setting is now saved.
30
You can set pre-brewing for a normal
length of time or an extra long length of
time. Alternatively, you can turn off the
"Pre-brewing" function.
The machine is supplied with the
"Pre-brewing" function turned off.
^ Select "Pre-brewing" and touch OK.
^ Select the setting you want and touch
OK.
The setting is now saved.
Portion size
The flavor of the coffee produced
depends not just on the type of coffee
used, but also on the amount of water
used.
You can program the amount of water
to suit the size of your cups and the
type of coffee you are using.
For coffee drinks that use milk you can
also set the amount of milk or milk froth
to be dispensed with these drinks.
Additionally, you can set the portion
sizes for hot milk and milk froth alone.
Each type of drink has a maximum
portion size that can be programmed
into the machine. The coffee machine
halts preparation of the coffee once this
portion size has been reached. The
maximum possible portion size for this
type of drink is then saved in the
machine.
The changed portion size is always
saved in the current User profile. The
name of the current profile appears in
the top left-hand side of the display.
Tip: To cancel changing the portion
size, touch the drinks sensor which is lit
up, or touch x for "Additional
programs".
Changing the portion size
during drink preparation
Portion sizes for Espresso . and
Coffee /
^ Place the desired cup under the main
dispenser.
^ Touch . or / until "Change" appears
in the display.
The coffee system will now prepare the
selected drink.
You can set the portion size as soon
as "Save" appears in the display.
^ When the cup is filled up to the
desired level, touch OK.
From now on the programmed portion
size will be dispensed for this drink.
There are two ways of initiating the
programming of the portion size:
– By touching the drink button when
you are preparing a coffee; or
– By selecting "Portion size" in the
"Parameters" , menu.
If the water container becomes
empty while making a drink, the
machine will stop programming the
portion size. The portion size will not
be saved.
31
Portion size
Portion sizes for cappuccino and
latte macchiato
^ Place a suitable container under the
main dispenser.
^ Touch H or k until the ingredients for
that drink are shown in the display.
Portion sizes for ristretto, coffee
lungo, caffé latte, hot milk and milk
froth
^ Place a suitable container under the
main dispenser.
^ Touch ,.
Cappuccino: milk froth, espresso
^ Select the desired drink.
Latte macchiato: hot milk, milk froth,
espresso
^ Select "Portion size" and touch OK.
^ Select all the components you want
to change with the arrow keys.
Confirm these individually with OK.
A check mark 9 placed in front of an
ingredient indicates that its quantity will
be changed.
^ Select "Start" and touch OK.
The coffee system will start dispensing.
You can now set the portion size for
each selected component as soon as
"Save" appears in the display.
^ When the quantity for each ingredient
reaches the desired level, touch OK.
^ Save the required portion size for the
selected components.
The programmed mix of ingredients
and portion sizes will now be
dispensed every time that particular
drink is selected.
32
You can change the amount of each
component for caffè latte (hot milk,
coffee) as described under "Portion
sizes for cappuccino and latte
macchiato".
For ristretto, coffee lungo, milk froth
and hot milk, proceed as described
under "Setting portion sizes for
espresso and coffee".
Portion size
Changing portion sizes in the
"Parameters" menu ,.
Changing the portion size for
different User profiles
^ Touch ,.
You can set the portion size for
individual drinks for each User profile.
^ Select the desired drink and touch
OK.
^ Touch {.
^ Select "Portion size" and touch OK.
^ Select the User profile you want.
From this point onwards the procedure
is identical to programming the portion
size during drink preparation.
The name of the current profile is
shown at the top left of the display.
Now you can either set the portion size
by selecting "Portion size" in the
"Parameters" , menu or set it during
the preparation of a drink.
33
Profiles
If the coffee system is used by several
people with different coffee
preferences, you can create individual
user profiles in addition to the Miele
profile.
In each profile, you can make settings
for individual drinks (portion size,
amount of ground coffee, brewing
temperature and pre-brewing).
The name of the current profile is
shown at the top left of the display.
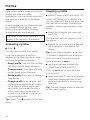
Accessing a profile
^ Touch {.
You can now create a User profile.
If you have allocated a profile in
addition to the Miele standard profile,
you have the following options:
Creating a profile
^ Select "Create profile" and touch OK.
Letters will appear in the display that
you can select with the arrow keys. You
can use the arrow keys to select from
numbers, upper case and lower case
letters.
^ Select the character you want and
touch OK.
The character will then appear in the
line above.
^ Repeat the process until the desired
name appears in the display line
above.
Tip: If you make a mistake, select the
# symbol to delete the last character.
When you have finished entering a
name and want to save it,
– Select profile from the User profiles
that have already been allocated.
^ use the arrow keys to select the
check mark ( and touch OK.
– Change name if the name of a User
profile needs to be changed.
If you do not want to save what you
have entered,
– Delete profile if you want to delete a
User profile.
^ press and hold # until all characters
have been deleted and the coffee
system jumps back to the previous
selection.
– Change profile to set whether the
coffee system automatically reverts
to the Miele standard profile after
each drink, the standard profile is
active every time the machine is
turned on, or whether it retains the
last selected profile.
Tip: Touch # or { to return to the main
menu.
34
Tip: The last created profile is selected
as the current profile.
Profiles
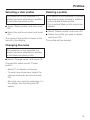
Selecting a User profile
This selection is only possible if a
profile has been allocated in addition
to the Miele standard profile.
^ Touch "Select profile" and then touch
OK.
^ Select the profile you want and touch
OK.
The name of the profile is shown in the
top left of the display.
Deleting a profile
This option is only possible if a profile
has already been created in addition
to the standard Miele profile.
The standard Miele profile cannot be
deleted.
^ Select "Delete profile" and touch OK.
^ Select the profile you wish to delete
and touch OK.
The profile will be deleted.
Changing the name
This selection is only possible if a
profile has been allocated in addition
to the Miele standard profile.
^ Select "Change name" and touch OK.
Proceed the same as with "Create
profile":
– Select # to delete a character.
– To enter new characters, select the
relevant character and confirm with
OK.
– Save the new name by selecting ( in
the display and touching the OK
sensor.
35
Profiles
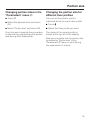
Changing a profile
You can program the coffee system so
that it changes back to the Miele standard profile automatically after each
drink is dispensed, so that the Miele
profile is always active when the
machine is turned on or so that it
retains the most recently selected
profile.
^ Select "Change profile" and touch
OK.
You now have the following options:
– Manually: The selected profile will
be retained until you select another
profile manually.
– After each use: The machine will
change back to the Miele standard
profile automatically after a drink is
dispensed.
– When turned on: Each time the
machine is turned on it will
automatically select the Miele standard profile regardless of which User
profile was set before the machine
was last turned off.
^ Select the required option and touch
OK.
36
Settings
You can use the "Settings" menu to
customize the coffee system to suit
your individual requirements.
Accessing the "Settings"
menu
Changing and saving settings
^ Touch X.
^ Select the desired setting with the
arrow keys and
touch OK.
^ Touch X.
^ Touch the arrow keys until the option
you want is highlighted.
Now you can check or change any
settings.
^ Touch OK.
The check mark ( next to the individual
entry shows you which setting is
currently active.
The setting is now saved.
Touch # if you want to access the
previous menu.
Touch X to return to the drinks
selection menu.
37
Settings
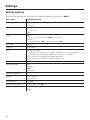
Setting options
The factory setting for the current relevant option is shown in bold.
Menu item
Available settings
Language
German, English, other languages
Country
Time of day
Clock Format
12 h / 24 h
Set
Timer
Set
Turn on at / Turn off after (0:30) / Turn off at
Activate
Turn on at (Yes / No) / Turn off at (Yes / No)
Eco mode
On / Off
Lighting
Brightness
Info
Number of drinks
Total portions / Espresso / Coffee / Cappuccino / Latte macchiato /
Coffee Lungo / Caffè latte / Milk froth / Hot milk / Hot water
No. of portions until appliance needs descaling
No. of portions until brew unit needs degreasing
System lock
On / Off
Water hardness
Soft
Medium
Hard
Very hard
Display brightness
–
Volume
Audio signals
Keypad tone
Cup heating
On / Off
Showroom program
Demo mode (On / Off)
Factory default
Do not reset
Reset
38
Settings
Language
Timer
You can select a language and country
for all display texts.
The timer offers the following options:
Tip: If you select the wrong language
by mistake, you can find the
"Language" option by following the flag
symbol J.
Time of day
You can set the clock display and the
time of day.
Clock Format
Available options are:
– 24-hour clock (24 hr)
the coffee system:
– turns on at a particular time, e.g. in
the morning for breakfast ("Turn on
at").
– turns off at a particular time ("Turn off
at").
– turns off after a particular length of
time if no keys have been pressed
("Turn off after").
For "Turn on at" and "Turn off at" to be
set, the timer must be activated.
Turn on at:
– 12-hour clock (12 hr)
Set
Use the arrow keys to set the hours and
minutes.
Please note that the coffee system
will not turn on at the time specified if
you have activated the system lock.
Use the arrow keys to set the hours and
minutes.
If the coffee system has turned itself on
three times via the "Turn on at" timer
function and no drinks have been
dispensed, the machine will not turn
itself on again automatically. This
prevents the coffee machine from
turning itself on unnecessarily, for
example, while you are away on
vacation.
39
Settings
The programmed times will, however,
remain in memory and will be
reactivated after manually turning the
machine on again.
Turn off at
Use the arrow keys to set the hours and
minutes.
If you have not used the coffee system
for a long time, the saved times will be
reactivated after manually switching the
machine on again (see "Turn on at").
Turn off after
If none of the keys have been pressed
or no drink has been prepared, the
coffee system will turn itself off after 30
minutes to save energy.
You can change this pre-setting using
the arrow keys to a time of between 15
minutes and 9 hours.
To activate and deactivate the timer
If the system lock has been
activated, the timer function "Turn on
at" cannot be selected.
^ Select the timer function you want.
The selected option will have a 9 next
to it.
^ Touch the X arrow key repeatedly
until "Accept" is highlighted.
Touch OK.
40
Eco mode
Eco mode is an energy-saving mode.
If Eco mode is turned on, the coffee
system heats up anew before each
drink preparation, making preparation
times longer.
If Eco mode is turned off, the coffee
system heats up for the first drink
preparation after switching on. After
that the steam system remains heated
up and much more energy is used.
The coffee system will indicate the
changed energy consumption.
Lighting
Change the brightness using the arrow
keys.
To turn off the lighting,
^ touch the X arrow key until all of the
segments are empty, and "Turned off"
appears.
If no keys are touched or maintenance
programs carried out, the lighting will
turn off after approximately 7 minutes
to save energy.
Settings
Info (displaying information)
Water hardness
In the "Info" option you can choose to
display the number of prepared
portions for each type of drink.
See "Setting up and using the coffee
system" for information about water
hardness.
You can also see whether more than 50
portions can be dispensed before the
machine needs to be descaled ("No. of
portions until descaling") or before the
brew unit needs to be degreased ("No.
of portions until degreasing").
To return to the previous display:
^ Touch OK.
Locking the coffee system
(System lock 0)
You can lock the coffee system to
prevent it being used without your
knowledge, by children, for example.
Activating and deactivating the
system lock 0
Display brightness
Change the display brightness using
the arrow keys.
Volume
You can set the volume of buzzer and
keypad tones using the arrow keys.
To turn off the tones,
^ touch the X arrow key until all of the
segments are empty, and "Turned off"
appears.
Cup heating
See "Pre-heating cups (cup heating)"
for more information.
When the system lock is activated,
the "Turn on at" option for the timer
will not work.
Overriding the system lock
temporarily
While the message "Touch OK for 6
seconds" is in the display,
^ touch OK for 6 seconds.
As soon as the coffee system is
turned off, the system is locked
again.
41
Settings
Factory default
You can restore the settings back to the
ones that were set when the coffee
system was delivered - the factory
default settings.
Please refer to the "Setting options"
chart for the factory settings that are
shown in bold.
The following settings will not be
reset:
- Language
- Time of day
- Number of drinks dispensed (Info)
- Profiles
- Portion size
42
Showroom program (demo
mode)
Do not activate this setting for
domestic use.
The coffee system can be presented in
Miele Centers of retail stores with the
"Showroom program." The lighting will
come on, but drinks cannot be
dispensed and other actions cannot be
carried out.
If you activate the Demo mode, you
cannot turn the appliance off with the
On/Off button -.
Cleaning and care
Quick guide
,The coffee system must be cleaned regularly to prevent a build-up of
bacteria.
Recommended frequency
What do I have to clean / maintain?
Daily
(before you turn the coffee system
off)
Water container
Waste container
Drip tray and drip tray cover
Stainless steel milk container
Once a week
(or more often for very heavy
soiling)
Main dispenser with cappuccinatore
Clean the exterior (especially right after descaling)
Remove the brew unit and wash by hand
Inside of the coffee system
Approx. every 200 portions
Degrease the brew unit (with cleaning tablets)
Depending on the water hardness
Descale the machine
When necessary
Coffee bean container
Ground coffee chute
Some components of the coffee system are dishwasher-safe. However,
cleaning these in the dishwasher frequently can cause them to become
discolored due to regular contact with food residues (e.g. tomatoes) in the
dishwasher. The surface of these components can also become damaged.
The following parts must only be cleaned by hand:
– Brew unit
– Main dispenser cover
– Water container lid
– Bean container lid
– Stainless steel milk container
– Holder for drip tray cover (on the drip tray)
43
Cleaning and care
,Danger of burning and scalding
on hot components or by hot liquids.
Always allow the coffee system to
cool down before cleaning it.
Caution: Water in the drip tray can
be very hot.
Do not use a steam cleaner to clean
the coffee machine. Steam could
reach the electrical components
and cause a short circuit.
To avoid damaging the surfaces
when cleaning, do not use any of the
following:
– cleaning products containing soda,
ammonia, acid or chloride,
– cleaners containing solvents,
– lime removers,
– stainless steel cleaners,
– dishwasher soap (powder),
– glass cleaning agents,
– oven cleaners,
– abrasive cleaning agents, e.g.
powder cleaners and cream
cleaners,
– scouring pads, such as pot
scrubbers and brushes, or used
sponges that still contain abrasive
cleanser residue,
– eraser sponges,
– metal scrapers.
44
Rinsing the coffee system
After a coffee has been dispensed, the
machine is rinsed before it turns off.
This removes any residual coffee
grounds.
You can also rinse the machine
manually.
^ Touch x.
^ Touch the Y arrow key repeatedly
until "Maintenance" is highlighted.
Then touch OK.
^ Select "Rinse appliance" and touch
OK.
The piping will now be rinsed through.
You may also be prompted to insert the
end of the milk pipe into the drip tray.
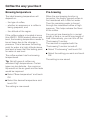
Cleaning and care
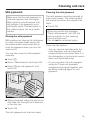
Milk pipework
Make sure that the milk pipework is
cleaned regularly and thoroughly
Milk contains natural bacteria that
will multiply if the pipework is not
sufficiently clean. Contamination in
the coffee system can be a health
hazard.
Rinsing the milk pipework
Milk residue can clog up the milk pipes.
If a drink has been made using milk,
the coffee system will prompt you to
rinse the pipework when you turn the
machine off.
You can also rinse the milk pipework
manually.
^ Touch x.
^ Select "Maintenance" and touch OK.
^ Select "Rinse milk pipework" and
touch OK.
Cleaning the milk pipework
The milk pipework must be cleaned at
least once a week. The coffee system
will prompt you when this needs to be
done.
^ Touch OK.
When you confirm the message
"Clean milk pipework" with OK, the
internal counter for the cleaning
interval will be reset.
You will not be reminded again.
There are two options:
– You can remove and dismantle the
main dispenser with its integrated
cappuccinatore and either wash it in
the dishwasher or by hand with warm
water and liquid dish soap.
– Or you can clean the milk pipework
using the "Clean milk pipework"
maintenance program together with
the Miele cleaning agent for milk
pipework.
^ When prompted, place the end of the
milk tube into the right-hand aperture
in the drip tray.
^ Touch OK.
The milk pipework will now be rinsed.
45
Cleaning and care
Cleaning the milk pipework with the
maintenance program
Carrying out the cleaning process:
The cleaning process cannot be
cancelled once it has started. The
process has to be completed through
to the end.
^ Touch x.
^ Select "Maintenance" and touch OK.
^ Select "Clean milk pipework" and
touch OK.
The process will start.
^ Follow the instructions in the display.
When the message "Place milk pipe in
cleaning agent" appears in the display,
dissolve the cleaning agent in water.
Making a cleaning solution:
We recommend using the Miele milk
pipework cleaning agent for cleaning
the milk pipework.
This has been specially developed for
use with Miele coffee machines and
prevents subsequent damage.
It is available from Miele dealers, Miele
or the Miele website.
^ Dissolve the powder in a container
with approx. 1 cup (200 ml) of
lukewarm water. Stir the solution with
a spoon until it has fully dissolved.
46
^ Place the container next to the
machine and hang the milk pipe in
the solution. Make sure it is placed
sufficiently far into the cleaning
solution.
^ Touch OK.
^ Follow the instructions given in the
display.
The cleaning process is complete when
rinsing has finished.
Cleaning and care
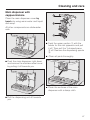
Main dispenser with
cappuccinatore
Clean the main dispenser cover by
hand only using warm water and liquid
dish soap.
All other components are dishwasher
safe.
^ Twist the upper section a with the
holder for the milk pipework and pull
it off. Then pull the Y-shaped piece
b off. Remove the dispensing spouts
c.
^ Clean all parts thoroughly.
^ Push the main dispenser right down
and remove the stainless steel cover
by pulling it off towards you.
^ Clean the surfaces of the main
dispenser with a damp cloth.
^ Pull the dispensing unit off towards
you.
47
Cleaning and care
If the milk pipe is blocked, clean it
under running water with the brush
supplied:
^ Insert the brush in the tube and move
it back and forth as far as it will go
until all milk residue has been
removed.
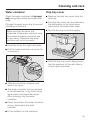
Milk container
The milk container should be taken
apart and cleaned every day.
^ Fit the dispensing unit back together.
^ Clean all parts by hand only using
warm water and liquid dish soap.
Use the cleaning brush supplied to
remove milk residue from the milk
pipework if necessary.
^ Push the dispensing unit back onto
the main dispenser. Press firmly to
ensure the spouts at the bottom
connect correctly with the edge of
the dispenser.
^ Rinse all parts carefully under
running water. Residual dish soap
can affect the taste of milk from the
machine and the quality of the milk
froth. Dry all parts afterwards.
^ Replace the stainless steel cover and
connect the milk pipe if applicable.
^ Reassemble the milk container.
48
Cleaning and care
Water container
Drip tray cover
Clean the water container lid by hand
only using warm water and liquid dish
soap.
^ Remove the drip tray cover from the
drip tray.
Change the water every day to prevent
a build-up of bacteria.
Make sure that the valve, the
underside of the water container and
the surface the water container sits
on are clean. Otherwise the water
container will not sit correctly.
^ The drip tray cover can be cleaned in
the dishwasher or by hand using
warm water and liquid dish soap.
^ Dry the drip tray cover thoroughly.
^ Press the lid on the right-hand side.
^ Pull the water container up by the lid
to remove it.
^ Refit the drip tray cover making sure
that the aperture for the milk tube is
on the right-hand side.
^ Take the lid off the container and
wash it by hand.
^ The water container can be cleaned
in the dishwasher, or by hand using
warm water and liquid dish soap.
After cleaning, dry the water
container.
^ Clean the surface the water container
sits on, particularly the slots,
carefully.
^ Fit the lid back on the container.
49
Cleaning and care
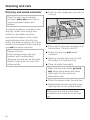
Drip tray and waste container
^ Push the main dispenser up as far as
it will go.
Clean the drip tray and waste
container every day every day to
avoid unpleasant smells and
mildew.
The waste container is located in the
drip tray. Water from rinsing also
collects in the waste container.
A prompt will appear in the coffee
system display when the drip tray
and/or the waste container is full and
needs to be emptied. Empty the drip
tray and the waste container.
Danger of burns.
If the rinsing process has just
finished, wait a while before
removing the drip tray as the water
used for rinsing will run out of the
coffee spouts.
^ Then pull the drip tray carefully out of
the machine. Take the lid off a.
^ Empty the drip tray and waste
container.
^ Remove the drip tray cover b and
the holder c for the drip tray.
^ Clean all parts thoroughly.
Clean the drip tray holder by hand
only using warm water and liquid
dish soap. All other parts are
dishwasher-safe.
^ Clean the space under the drip tray.
^ Reassemble all parts and place the
drip tray back in the coffee system.
Make sure the drip tray has been
pushed into its niche as far as it will
go.
50
Cleaning and care
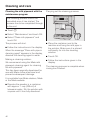
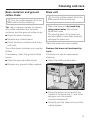
Bean container and ground
coffee chute
,Turn the coffee system off at the
Brew unit
,Turn the coffee system off at the
main switch before cleaning.
main switch before cleaning.
Tip: Use a vacuum cleaner to remove
any coffee residues from the bean
container and the ground coffee chute.
^ Open the bean container.
^ Remove any coffee beans.
Clean the brew unit by hand only
using warm water. Do not use
liquid dish soap.
The moving parts of the brew unit
are lubricated. Liquid dish soap will
damage the brew unit.
^ Clean the bean container with a dry,
soft cloth.
Clean the brew unit once a week.
The coffee bean container can now be
refilled.
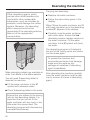
Remove the brew unit and wash by
hand
If necessary, clean the ground coffee
chute:
The brew unit can be removed for
cleaning.
^ Open the ground coffee chute.
^ Open the coffee system door.
^ Remove any ground coffee residue.
^ Press the button on the end of the
handle of the brew unit a and while
doing so turn the handle
counterclockwise b.
^ Carefully pull the brew unit out of the
coffee system.
51
Cleaning and care
If you cannot remove the brew unit or
can only do so with difficulty, the brew
unit is not in the correct position (See
"Frequently asked questions").
When the brew unit has been pulled
out, do not alter the position of the
brew unit handle.
This would displace the brew unit
and it would not fit back into the
coffee system.
Tip: Use your vacuum cleaner to
remove dry coffee grounds.
To replace the brew unit, repeat the
previous steps in the reverse order:
^ Push the brew unit back into the
coffee system, making sure it is
straight.
^ Clean the brew unit by hand under
hot running water without using
detergent or liquid dish soap.
^ Press the button on the end of the
handle of the brew unit a and while
doing so turn the handle clockwise
b.
^ Close the machine door.
^ Wipe any remaining coffee off the two
filters. One filter is located in the
funnel and the other to the left of the
funnel.
^ Dry the funnel to prevent ground
coffee sticking to it the next time a
coffee is prepared.
^ Clean the inside of the coffee system
carefully.
Make sure to remove moist ground
coffee remnants regularly to prevent
bacteria from forming.
52
^ Empty the drip tray and waste
container.
Cleaning and care
Degreasing the brew unit
Depending on the natural oil content of
the coffee used, the brew unit can
become blocked quite quickly. It must
be degreased regularly in order to
ensure aromatic coffee and trouble-free
operation of the coffee system.
When "Place a cleaning tablet in the
ground coffee chute and close the
chute" appears in the display:
We recommend using Miele cleaning
tablets to clean the brew unit.
These have been specially developed
for use with Miele coffee machines and
prevent subsequent damage.
The cleaning tablets are available from
Miele dealers, Miele or the Miele
website.
After 200 portions have been
dispensed, "Degrease the brew unit"
will appear in the display.
^ Touch OK.
^ Drop a cleaning tablet into the
ground coffee chute.
^ Follow the instructions given in the
display.
The cleaning process is complete when
rinsing has finished.
This message will be displayed until
the cleaning program has been
carried out.
To degrease the brew unit:
^ Touch x.
^ Select "Maintenance" and touch OK.
^ Select "Degrease the brew unit".
The cleaning process cannot be
cancelled once it has started. The
process has to be completed through
to the end.
^ Touch OK.
The process will start.
^ Follow the instructions in the display.
53
Cleaning and care
Housing
External surfaces may become
discolored or damaged if soiling is
left on them for too long. Remove
soiling immediately.
Make sure that water cannot get
behind the display.
All external surfaces are susceptible
to scratching and can suffer
discoloration if they come into
contact with unsuitable cleaning
agents.
Wipe up any spills or splashes of
descaling agent immediately.
^ Turn the coffee system off.
^ Clean the front of the machine with a
clean sponge and a solution of warm
water and liquid dish soap. Dry using
a soft cloth.
Tip: You can also clean the appliance
front with a microfiber cloth.
54
Descaling the machine
Caution! When descaling the
machine, cover delicate surfaces
and natural flooring to prevent
damage from
splashes of descaling solution.
Ensure that any splashes of
descaling solution are wiped up immediately.
Lime scale builds up in the coffee
system through use. How often the
machine needs to be descaled will
depend on the water hardness level in
your area. It should be descaled
regularly to ensure that it functions
correctly.
The machine will guide you through the
descaling process. Various messages
will appear in the display, e.g. you will
be prompted to empty the drip tray or
fill the water container.
Descaling must be carried out.
The coffee system prompts you when it
needs to be descaled. "No. of portions
until appliance needs descaling: 50"
appears in the display. Each time a
drink is prepared, the coffee machine
displays the number of portions
remaining until descaling must be
carried out.
^ Touch OK.
You can turn off the coffee system if
you do not want to descale it at this
time. However, you will be not be able
to make any more drinks until descaling
has been carried out.
Descaling following display
reminder
The descaling process cannot be
cancelled once you have touched
"OK." The process has to be
completed through to the end.
To start the descaling program right
away:
^ Touch OK.
The process will start.
^ Follow the instructions in the display.
When "Fill water container with
lukewarm water and descaling agent
up to the F symbol and replace it"
appears in the display, proceed as
follows:
Preparing the descaling solution
We recommend using Miele descaling
tablets to clean the brew unit.
These have been specially developed
for use with Miele coffee machines and
prevent subsequent damage.
When the number of remaining portions
reaches 0, the appliance will lock out.
Then "Descale appliance" will appear in
the display.
55
Descaling the machine
Carrying out descaling:
Other descaling agents, which
contain other acids besides citric
acid and/or other undesirable
substances, such as chlorides for
example, could damage the coffee
system. Moreover, the descaling
effect required could not be
guaranteed if the descaling solution
was not of the appropriate
concentration.
^ Replace the water container.
^ Follow the instructions given in the
display.
When "Rinse the water container and fill
with fresh tap water up to the descaling
symbol F" appears in the display:
^ Carefully rinse the water container
with clean water. Ensure that no
descaling solution residue remains in
the water container. Fill the water
container to the F symbol with fresh
tap water.
The descaling program is finished at
the end of the rinsing cycle and drinks
can be made again.
To protect the machine and
surrounding surfaces from damage,
make sure you wipe up any
spillages or splashes of descaling
agent immediately.
Miele descaling tablets are available to
order from Miele or the Miele website.
You will need 1 descaling tablet to
descale the machine.
^ Fill the water container to the F
symbol with lukewarm water.
^ Place 1 descaling tablet in the water.
Ensure that you adhere to the mixing
ratio for the descaling tablets. It is
important that you do not fill the
water container with too much or too
little water than prescribed. The
descaling program will otherwise be
cancelled prematurely.
56
After descaling the machine carefully,
rinse the water container and the drip
tray to remove all traces of descaling
agent.
Descaling the machine
Descaling when not prompted
by a message
^ Touch x.
^ Select "Maintenance" and touch OK.
^ Select "Descale the appliance".
The descaling process cannot be
cancelled once you have touched
"OK." The process has to be
completed through to the end.
^ Touch OK.
The descaling process will begin.
57
Frequently Asked Questions
Most problems that occur during daily use can be easily corrected. With the help
of the following guide, you will be able to find the causes of problems and rectify
them.
,Important! Do not open the housing of the machine.
Repairs should only be carried out by a qualified and trained person in
accordance with local and national safety regulations. Unauthorized repairs
could cause personal injury or machine damage.
If you cannot remedy the problem yourself, please contact Miele.
Messages in the display
Fault messages must be confirmed with OK, otherwise the message can
reappear in the display even though the problem has been remedied.
^ To address the fault, follow the instructions on the display.
^ If the fault message appears in the display again, contact Miele.
Fault
Possible cause and solution
F1, F2
F80, F82
There is an internal fault.
^ Turn the machine off with the On/Off - button. Wait for 1
hour before turning it back on again.
F41, F42
F74, F77
F235, F236
There is an internal fault.
^ Turn the machine off with the On/Off - button. Wait for 2
minutes before turning it back on again.
58
Frequently Asked Questions
Fault
Possible cause and solution
"Too much ground There is too much ready ground coffee in the ground coffee
coffee"
chute.
If more than one level scoop of ground coffee is added to the
coffee chute, the brew unit cannot process the coffee. The
ground coffee will be directed into the waste container and
the fault message will appear in the display.
^ Turn the machine off with the On/Off K button.
^ Remove and clean the brew unit (see "Cleaning and care –
Brew unit").
^ Remove the ground coffee inside the coffee system, e.g.
with a vacuum cleaner.
^ Use the coffee scoop supplied to add ground coffee to the
ground coffee chute. Add only one portion of ground
coffee to the chute.
59
Frequently Asked Questions
Fault
Possible cause and solution
F73
or
"Check the brew
unit"
The brew unit cannot be positioned correctly.
^ Turn the machine off with the On/Off K button.
^ Remove and clean the brew unit (see "Cleaning and care –
Brew unit").
^ Push the coffee ejector of the brew unit into the correct
position (see diagram).
^ Do not insert the brew unit. Close the appliance door and
turn the machine on with the On/Off - sensor.
This will initialize the brew unit motor and put in back into the
start position.
^ When "Insert the brew unit" appears in the display, open
the appliance door and put the brew unit back in the
machine.
Then close the door.
60
Frequently Asked Questions
Unusual performance of the coffee system
Fault
Possible cause and solution
The lighting
remains off after
the coffee system
has been turned
on.
The lighting has been turned off.
^ Turn the lighting on (see "Settings - Lighting").
The display
remains dark
when the coffee
system is turned
on using the
On/Off K button.
The On/Off K button was not touched for long enough.
^ Touch the On/Off K button for at least 3 seconds.
The lamp is defective.
^ Contact Miele Service.
The main switch is set to "0".
^ Set the main switch to the "I" position.
The plug is not properly plugged into the electrical outlet.
^ Insert the plug into the electrical outlet.
The main fuse has tripped because of a problem with the
coffee system, the electricity supply or another appliance.
^ Remove the power plug from the electrical outlet.
^ Contact a qualified electrician or Miele Service for
assistance.
The coffee system The programmed turn off time has been reached.
turns off
^ If required, you can select a new turn off time (see "Settings
suddenly.
- Timer").
The plug is not properly plugged into the electrical outlet.
^ Insert the plug into the electrical outlet.
The coffee system This is not a fault. The lighting turns off approximately 7
is turned on. The minutes after the coffee machine was last used.
lighting turns off
suddenly.
61
Frequently Asked Questions
Fault
Possible cause and solution
The buttons do
There is an internal fault.
not react to touch. ^ Disconnect the machine from the electricity supply by
The appliance
pulling the plug of the coffee machine from the outlet or
cannot be
turning off the mains fuse.
operated.
The coffee system
does not turn on
although the
programmed and
activated "Turn on
at" time is
activated.
The system lock feature has been activated.
^ You need to deactivate the system lock (see "Settings System lock").
The coffee system was not used after being turned on three
times in a row automatically.
^ Turn the machine on and dispense a drink.
The display is
The display brightness has been set too low.
hard to see or not ^ Change this setting (see "Settings - Display brightness").
legible.
"Fill and replace
the water
container"
appears in the
display even
though the water
container is full
and in the
machine.
The water tank is not sitting properly in the appliance.
^ Remove the water container and replace it.
"Fill and replace
the water
container"
appears after
turning on even
though the
container is filled
and fitted in the
machine.
The appliance
does not rinse.
The coffee system needs to be descaled.
^ Turn the coffee machine off with the On/Off - button. Wait
approx. 1 hour.
62
The water container was not correctly filled and refitted for
descaling.
^ Fill the water container to the descaling symbol F and
restart the descaling program.
^ Then turn the machine on again. As soon as "Heating-up
phase" appears in the display, touch x and select
"Descale the appliance".
^ Descale the coffee system.
Frequently Asked Questions
Fault
Possible cause and solution
Neither milk nor
milk froth comes
out of the main
dispenser.
The milk pipework is blocked.
^ Clean the main dispenser, taking particular care to clean
the cappuccinatore and milk pipes carefully with the
cleaning brush.
"Empty the drip
tray" appears in
the display, even
though the drip
tray is empty.
The drip tray is not positioned correctly in the machine.
^ Push the drip tray in as far as it will go.
^ Make sure the holder for the drip tray cover is correctly
located on the drip tray.
Drink preparation If the water container becomes empty while a drink is being
has been
made, the message "Water container empty. Continue? Yes /
cancelled.
No" will appear in the display after the water container has
been refilled and put back in the machine. If you do not
confirm this message with "Yes" within 5 minutes, preparation
will be cancelled.
The coffee system This is not a fault.
If the coffee system still has an operating temperature higher
does not rinse
itself when turned than 140 F (60 °C), rinsing will not take place.
on.
The display lights The demo setting of the coffee system for showrooms or
up but the coffee dealers has been activated.
system does not
^ Deactivate the Demo mode (see "Settings - Demo mode").
heat up and no
drinks are made.
The coffee system
cannot be turned
off with the On/Off
button -.
"Fill the bean
container"
appears in the
display even
though the bean
container is full.
This is not a fault.
^ Confirm the message with OK.
63
Frequently Asked Questions
Fault
Possible cause and solution
The preparation of
coffee drinks is
cancelled
repeatedly and
the message "Fill
bean container"
appears.
This is not a fault.
The brew unit does not sense the ground coffee.
With particular types of coffee, it can happen that too little
coffee is ground or the ground coffee is too fine. Usually the
grinding – fine and the ground coffee quantity – are set too
low.
^ Confirm the message with OK.
Tip: If the coffee is too strong for you or it tastes bitter, try
another type of bean.
If the message appears during the preparation of all coffee
specialties:
^ Set the grinder to a coarser setting (see "Setting the coffee
grinder").
^ Check the settings for the grinding quantity for all coffee
specialties (see "Setting the coffee grinder"). If necessary,
select a larger quantity to grind.
Also consider any changed drinks in "Profiles" {.
If the message only appears during the preparation of
selected coffee specialties:
^ Check the settings for the grinding quantity for this coffee
specialty (see "Setting the coffee grinder"). Select a larger
quantity to grind.
^ If necessary, you should also set the grinder to a coarser
setting.
Drink preparation Condensate may have built up on the control panel and
accidentally started the process.
begins even
though no button
^ Wipe any condensate off with a soft cloth.
was touched.
64
Frequently Asked Questions
Fault
Possible cause and solution
Milk is dripping
out of the
cappuccinatore
even though no
milk is being
dispensed.
The level of milk in the milk container is higher than the
cappuccinatore.
The descaling
program was
started
unintentionally.
The descaling program cannot be stopped once the OK
sensor has been touched.
Descaling must be continued through to completion. This is a
safety precaution to make sure the machine is descaled
correctly.
Loud noises are
heard during the
descaling
program.
This is not a fault.
These noises occur when water is flushed through the
machine at a high pressure.
The heating-up
time is getting
longer, the
amount of water
being dispensed
is incorrect and
the coffee
machine is not
performing
properly.
The coffee system needs to be descaled.
^ Descale the coffee system (see "Descaling").
Coffee or
espresso is not
flowing out of the
main dispenser,
or coffee is only
being dispensed
via one spout.
The main dispenser has a blockage.
^ Push the main dispenser up as far as it will go.
^ Clean the coffee pipework (see "Cleaning and care Rinsing the machine").
If, having rinsed the machine, espresso or coffee still cannot
be dispensed or only flows out of one spout:
^ Dismantle the main dispenser and clean all parts carefully
(see "Cleaning and care - Main dispenser with integrated
cappuccinatore").
^ Make sure all parts are reassembled correctly.
65
Frequently Asked Questions
Fault
Possible cause and solution
After turning on
the machine a
message appears
prompting you to
empty the drip
tray and the
waste container
even though they
are empty.
This is not a fault.
The drip tray and waste container was probably not emptied
after making the last coffee, or the internal counter was not
reset.
"Empty the drip
tray and the
waste container"
appears in the
display even
though both are
inserted in the
machine.
The drip tray is not correctly fitted and is therefore not
detected.
^ Remove the drip tray and waste container from the
machine and empty them.
^ Empty the drip tray and the waste container. Reassemble
all parts and place the drip tray and the waste container
back in the coffee system.
The service door is open.
^ Close the service door.
^ If necessary, empty the drip tray and the waste container.
Reassemble all parts and place the drip tray and the waste
container back in the coffee system.
The drip tray or
the waste
container is too
full or runs over
although the drip
tray and the
waste container
were emptied
after each
message on the
display.
66
This is not a fault.
The drip tray and waste container were probably pulled out
or the service door opened without emptying the drip try and
the waste container.
When pulling out the drip tray or opening the service door,
the internal counter for the emptying of the drip tray and
waste container are reset.
^ Remove the drip tray and waste container from the
machine and empty them.
Frequently Asked Questions
Unsatisfactory results
Fault
Possible cause and solution
The consistency of The milk temperature is too high. Good milk froth can only
the milk froth is
be achieved when cold milk (below 55°F/13 °C) is used.
unsatisfactory.
^ Check the temperature of the milk.
The milk pipework is blocked.
^ Clean the main dispenser with integrated cappuccinatore
and the milk pipework with the cleaning brush.
The coffee grinder The coffee bean container has become empty during the
makes a louder
grinding process.
noise than usual. ^ Fill the coffee bean container with fresh beans.
There may be stones in among the coffee beans.
^ Turn the coffee system off immediately. Contact Miele.
Espresso or coffee The grind level is too coarse.
flows into the cup ^ Set the grinder to a finer setting (see "Setting the coffee
too quickly.
grinder").
Espresso or coffee The grind level is too fine.
flows too slowly
^ Set the grinder to a coarser setting (see "Setting the coffee
into the cup.
grinder").
The cup has not been pre-heated.
The coffee or
espresso is not hot
The brewing temperature is set too low.
enough.
^ Set a higher brewing temperature (see "Brewing
temperature").
The brew unit filters are blocked.
^ Remove and clean the brew unit (see "Cleaning and care –
Brew unit").
^ Degrease the brew unit (see "Cleaning and care - Brew
unit").
67
Frequently Asked Questions
Fault
Possible cause and solution
The crema on the The grinder setting is not correct.
coffee or espresso ^ Set the grinder to a finer or coarser setting (see "Setting
is "not right".
the coffee grinder").
The brew temperature is too high for the type of coffee
being used.
^ Set a lower brewing temperature (see "Brewing
temperature").
The coffee beans are no longer fresh.
^ Add fresh beans to the coffee bean container.
68
Transport
If the coffee system will not be used for
an extended period of time, e.g.
vacation, or will be transported over a
long distance, the machine should be
prepared as follows.
Please note:
– Empty and clean the coffee bean
container
– Empty and clean the water container
– Evaporating the coffee system
– Clean the drip tray and waste
container
– Pack the machine securely
Evaporating the coffee system
The coffee system should be
evaporated before it is stored for a long
period of time or transported any
distance - particularly at temperatures
below freezing.
Evaporating the machine involves
removing all traces of water from the
system to prevent the risk of water and
frost damage.
^ Turn the coffee system on with the
On/Off K button.
,Caution! Hot steam will be
release from the hot water dispenser
- Danger of burns!
The evaporation process is finished
when "Process complete" appears in
the display.
^ Turn the machine off using the main
switch.
^ Clean the drip tray and waste
container.
The coffee system is now ready to be
packed.
Packing
The coffee system should only be
packed when it is clean and dry.
Residues of coffee grounds can cause
scratches on surfaces. Coffee and milk
residues or water can cause a build-up
of bacteria.
Use the original packaging including
Styrofoam to pack the coffee system.
Also pack the operating instructions so
that they are available when the coffee
system is next used.
^ Touch #.
^ Touch ° twice.
"Empty the system?" will appear in the
display.
^ Select "Yes" and touch OK.
^ Follow the instructions in the display.
69
Technical service and warranty
In the event of a malfunction that you
cannot correct yourself, please contact
– Your Miele dealer
or
– the Miele Technical Service
Department.
The telephone number for the
Technical Service Department is
listed at the back of these
instructions.
When contacting Miele, please quote
the model and serial number of your
machine. This information is given on
the data plate located behind the drip
tray in the machine.
Warranty
For further information, please refer to
your warranty booklet.
70
Saving energy
If the default settings for "Eco mode" or
the "Timer" have been altered, the
coffee system's energy consumption
will increase.
The message "This setting uses more
energy" will appear in the display.
Turning the coffee system off with
the main switch
If the coffee system is not going to be
used for a longer period of time, e.g.
during a vacation, turn it off with the
main switch.
Pre-heating cups with hot water
If you only want to pre-heat your cups
occasionally, you can turn the cup
heating surface off.
You can then use hot water to pre-heat
the cups.
71
72
Installation instructions
Information is subject to change. Please refer to our website to obtain the most
current product specification, technical & warranty information.
Leave these instructions with the appliance for the consumer/user.
Information is subject to change. Please refer to our website to obtain the most
current product specification, technical & warranty information.
Packaging material / Disposal of old machine
Packaging material
Disposal of your old appliance
The packing materials protect the
appliance during shipping.
Old electric and electronic appliances
may contain materials that can be
recycled.
The original box and polystyrene
pieces can be saved to transport the
machine in the future.
The original packaging should also be
kept in case the machine ever needs to
be returned to Miele for servicing.
74
Please contact your local recycling
authority about the possibility of
recycling these materials.
Please be sure that your old appliance
does not pose a danger to children
while being stored for disposal.
Electrical connection
All electrical work should be
performed by a qualified electrician
in strict accordance with national
and local safety regulations.
Installation, repairs and other work
by unqualified persons could be
dangerous.
Verify that the voltage, load and circuit
rating information found on the data
plate match the household electrical
supply. This data must match to
prevent damage to the coffee system. If
in doubt, consult a licensed electrician.
The data plate can be found behind the
drip tray inside the coffee system.
The appliance is supplied with a power
cable ready for connection to an AC
120 V 60 Hz supply.
Connect the coffee system only to a
properly installed outlet with grounding
contact.
Fuse rating must be at least 15 A.
The socket should be next to the
appliance and easily accessible.
To reduce the risk of injury, do not
drape cord over the counter top or
table top where it can be pulled on by
children or tripped over unintentionally.
Direct connection to such power
sources can cause power surges and
tripped breakers when the appliance is
turned on, and could damage the
appliance.
Do not connect the appliance to energy
saving plugs or outlets. The reduction
of power to the appliance caused by
these devices will cause the appliance
to run hot and may damage it and/or
shorten its usable life.
Do not operate any appliance with a
damaged cord or plug. Contact Miele
Technical Service.
h it up through the opening at the back
of the machine.
If there is any question concerning
the electrical connection of this
appliance to your power supply,
please consult a licensed electrician
or contact Miele’s Technical Service
Department.
WARNING:
THIS APPLIANCE MUST BE
GROUNDED
Do not connect the appliance to a
power inverter or directly to power
produced outside of the normal
electrical grid (i.e. direct solar or wind
power source).
75
Installation
Please observe the following installation
instructions:
Danger of overheating!
Please ensure that there is adequate
ventilation around the machine.
Do not cover the machine with tea
towels or similar objects while it is in
use.
Danger of overheating!
If the coffee system is installed
behind a kitchen furniture door, it
may only be used with the furniture
door open. Do not close the furniture
door while the coffee system is in
use.
– The location of the machine must be
dry and well ventilated.
– The ambient temperature of the room
in which the machine is used must
be between +50 °F / 10 °C and
+100 °F / 38 °C.
– The coffee system must be set up on
a level surface. The surface must be
water resistant.
76
If the coffee system is installed in a
niche, the niche must provide the
following minimum dimensions:
Height
20" (508 mm)
Width
17 11/16" (450 mm)
Depth
21 7/8" (555 mm)
When setting up the machine: make
sure that the front of the machine
can be fully opened so that the brew
unit can be removed with ease when
required.
^ The machine must be set up in the
niche such that it sits flush with the
front edge of the niche.
Appliance dimensions
77
Appliance dimensions
78
Technical details
Current draw in standby mode
(default setting):
0.5 Watt
Pump pressure:
max. 217 psi (15 bar)
Through-flow heater:
1 stainless steel thermo block
Appliance dimensions (W x H x D): 10 '' x 14 1/8 '' x 16 3/4 ''
Net weight:
22 lbs (9.9 kg)
Connection cable length:
55" (140 cm)
Water container capacity:
approx. 7 1/2 cups (1.8 l)
Bean container capacity:
approx. 0.6 lbs (300 g)
Stainless steel milk container
capacity:
approx. 2 cups (0.5 l)
Waste container capacity:
max. 10 portions of coffee grounds
Main dispenser:
Height adjustable from
3 1/4" - 5 1/2" (80 - 140mm) mm
Grinder:
Stainless steel mill
Grinder setting:
5 settings
Ground coffee amount:
max. approx. 0.4 ounces (12 g)
79
80
81
82
Please have the model and serial number
of your appliance available before
contacting Technical Service.
U.S.A.
Canada
Miele, Inc.
Importer
Miele Limited
National Headquarters
9 Independence Way
Princeton, NJ 08540
Phone: 800-843-7231
609-419-9898
609-419-4298
Fax:
www.mieleusa.com
Technical Service & Support
Nationwide
Phone: 800-999-1360
888-586-8056
Fax:
[email protected]
Headquarters and Miele Centre
161 Four Valley Drive
Vaughan, ON L4K 4V8
www.miele.ca
Customer Care Centre
Phone: 800-565-6435
905-532-2272
[email protected]
Germany
Manufacturer
Miele & Cie. KG
Carl-Miele-Straße 29
33332 Gütersloh
83
CM 6110, CM 6310
en - US, CA
M.-Nr. 09 924 540 / 01