1
Instructions for use
mvox
3135 015 10742
Once your PHILIPS MAGNA VOX purchase is registered, you're eligible to receive all the privileges of
owning a PHILIPS MAGNAVOX
product. So complete and return the Warranty Registration Card
enclosed with your purchase at once. And take advantage of these important benefits.
Congratulationson your purchase,
and welcome to the "familyY'
PHILIPS
Dear PHILIPS MAGNAVOX product owner:
Thank you for your confidencein PHILIPS MAGNAVOX. You've selected one of the best-built, bestbacked productsavailable today.And we'll do everythingin our power to keep you happy with your
purchasefor many years to come.
As a member of the PHILIPS MAGNAVOX "family," you're entitledto protectionby one of the most
comprehensive warrantiesand outstandingservicenetworks in the industry.
What's more, your purchaseguarantees you'llreceiveall the informationand special offersfor which
you qualify,plus easy access to accessories from our convenienthome shopping network.
And most importantlyyou can count on our uncompromisingcommitmentto your total satisfaction.
All of this is our way of saying welcome-and thanks for investingin a PHILIPS MAGNAVOX product.
Sincerely,
P.S. Remember, to get the most from your PHILIPS
MAGNAVOX product, you must return your
Warranty Registration Card within 10 days. So
please mail it to us right now!
Robert Minkhorst
President and Chief Executive Officer
Know these
safetysymbo/s
A
This 'bolt of lightning" indicates uninsulated
material within your unit may cause an electrical
shock. For the safety of everyone in your household, please do not remove product covering.
,_The
"exclamation
point" calls attention to features for which you should read the enclosed lit-
erature closely to prevent operating and maintenance
WARNING: TO PREVENT
TO RAIN OR MOISTURE.
problems.
FIRE OR SHOCK HAZARD,
DO NOT EXPOSE THIS EQUIPMENT
CAUTION: To prevent electric shock, match wide blade of plug to wide slot, and fully insert.
ATTENTION: Pour 6viter les chocs _lectriques, introduire la lame la plus large de la fiche dens la
borne correspondante de la prise et pousser jusqu'au fond.
SAFETYINSTRUCTIONS
- Readbefore operatingequipment
This productwas designed
and manufactured
to meetstrict qualityand
safetystandards.
Thereare,however,
someinstallation
andoperation
procautions
whichyoushouldbeparticularly
awareof.
1.
2.
3.
4.
5.
6.
6A.
66.
?.
8.
9.
10.
ReadInstructions
- Allthe safetyandoperating
instructions
should
bereadbeforetheappliance
is operated.
RetainInstructions
- The safetyand operatinginstructions
should
be retained
for future reference.
HeedWarnings- All warningson theappliance
andintheoperating
instructions
shouldbeadheredto.
FollowInstructions
- Alloperatingand useinstructions
shouldbe
followed.
WaterandMoisture- Theapplianceshouldnotbe usednearwater
- for example,neara bathtub,washbowl,
kitchensink,laundrytub,
in a wetbasementor neara swimmingpool,etc.
CartsandStands- Theappliance
shouldbeusedonlywitha cartor
standthatisrecommended
bythemanufacturer.
_
An applianceand cart combination
shouldbe moved
withcare.Quickstops,excessiveforce,andunevensurfacesmay causetheappliance
and cartcombination
to
overture.
Tilt/Stability - All televisions
mustcomplywithrecommendedinternational
globalsafety standardsfor tilt and stabilityproperties
of its
cabinetdesign.
Donotcompromise
thesedesignstandardsbyapplyingexcessivepull force to thefront, ortop,ofthecabinetwhichcould
ultimately
overturntheproduct.
Also, do not endanger
yourself,
or children,by placingelectronic equipment/toys
on thetopof thecabinet.Suchitems
couldunsuspectingly
fall from thetopofthesetandcause
productdamageand/orpersonalinjury.
Wall or CeilingMounting- Theappliance
shouldbe mountedto a
wallor ceilingonly as recommended
bythemanufacturer.
Ventilation- Theapplianceshouldbe situatedso thatitslocationor
positiondoesnot interferewith itsproper ventilation.Forexample,
theapplianceshouldnotbe situatedon a bed,sofa, rug,or similar
surfacethatmayblocktheventilation
openings;
or,placedina builtin installation,
suchas a bookcase
or cabinetthatmay impedethe
flowofair throughtheventilation
openings.
Real - The applianceshouldbe situatedawayfrom heatsources
suchas radiators,
heatregisters,
stoves,orotherappliances(includingamplifiers)
thatproduceheat.
PowerSources- Theappliance
shouldbe connected
toa powersupply onlyof the type describedin the operatinginstructions
or as
markedon theappliance.
11. Power-CordProtection- Powersupply cordsshould be routed so
thattheyarenot likelyto be walkedon or pinchedby itemsplaced
uponor against
them,payingparticular
attention
to cordsandplugs,
conveniencereceptacles,and the pointwheretheyexit from the
appliance.
12. Cleaning- Theappliance
shouldbe cleanedonlyas recommended
bythemanufacturer.
13. PowerLines - An outdoor antennashouldbe locatedawayfrom
powerlines.
14. OutdoorAntennaGrounding
- If anoutsideantennaisconnected
to
thereceiver,besuretheantennasystemis groundedsoas to provide some protection againstvoltagesurgesand built up static
charges.
Section810 of the NationalElectricCode,ANSI/NFPA
No. 70-1984,
providesinformation
withrespectto propergrounding
of themats
and supporting
structuregrounding
of thelead-inwireto an antennadischarge
unit,sizeofgrounding
connectors,
location
ofantennadischargeunit, connection
to groundingelectrodesand requirementsfor thegrounding
electrode.
SeeFig.below.
15. Non-use Periods - The powercord of the applianceshouldbe
unplugged
from theoutletwhenleft unusedfor a longperiodoftime.
16. Obect andLiquidEntry-Careshouldbetakensothatob ectsdo not
fall andI quidsarenotspilledintotheenclosure
throughopenings.
17. DamageRequiringService- Theappliance
should be servicedby
qualifiedservicepersonnel
when:
A. Thepowersupplycordor theplug hasbeendamaged;or
B. Objectshavefallen,orliquid hasbeenspilledintotheappliance;
or
C. Theappliance
hasbeenexposed
to rain;or
D. Theappliancedoesnotappearto operatenormally
or exhibitsa
markedchangein performance;
or
E. Theappliance
hasbeendropped,ortheenclosuredamaged.
18. Servicing- The usershould not attemptto servicethe appliance
beyondthatdescribed
in theoperating
instructions.
Allotherservicingshouldbereferredto qualified
servicepersonnel.
Notetothe CATVsysteminstaller:Thisreminderis providedto callthe
GATVsysteminstaller's
attentionto Article820-40of theNEC thatprovidesguidelines
for propergrounding
and,in particular,
specifies
thatthe
cablegroundshallbeconnected
tothegroundingsystemofthebuilding,
as closetothepointofcableentryaspractical.
Exampleof AntennaGrounding
as per NEC- National ElectricCode
GROUND
CLAMP
ANTENNA
LEAD
ANTENNA
DISCHARGE
Z
GROUNDING
IN WIRE
UNIT
CONDUCTORS
(NF_ S
(NF_
S FX.'TION
F;I.'TION |1o-2i)
rio-2 I)
GROUND
ELECTRIC
SERVICE
_'_ _
EQUIPMENT
POWER
SERVICE
(Nyzz ABT/$0. p&RT HI
3
CLAMPS
GROUNDING
ELECTRODE
SYSTEM
Introduction
Welcome/Registration of Your TV ............................ 2
Safety/Precautions .....................................................
3
Table of Contents .......................................................
4
Features ......................................................................
4
Basic Cable TV Hookups ..........................................
5
Basic Antenna Hookups .............................................
Basic TV to VCR Hookup .........................................
6
7
Basic TV and Remote Operations .............. :.............. 8
TV Remote Buttons ................................................... 9
_" Setting the Language Control ................. 10
¢" Using the Tuner Control ................................... 11
¢, Using the Auto Program Control ..................... 12
"_"How to Add and Delete Channels .................... 13
<_ Using the External (Input Naming) Control....14
_" Adjusting the TV Picture .................................
15
,_Activating Contrast Plus (Black Stretch) Control 16
_'Activating Noise Reduction (Picture) Control.17
_"Setting the TV's Clock ...................................... 18
_'Activating the Timer Control ............................ 18
<>Activating the Start-Up Channel ...................... 19
Setting the TV's Start Time Control ................. 19
4Setting
the TV for Closed Caption ................... 20
•_.Using the Sleep Timer Control ......................... 21
'_Using the Volume Bar Control ......................... 22
I_
SmartLockTM
_. Understanding
the SmartLock Feature ....... 23
_, Setting the SmartLock Access Code ................ 24
•ff Setting the SmartLock to Block Channels ....... 25
_" Setting SmartLock's Blocking Options ........... 26
_" Blocking Using the Movie/TV Ratings .....27-28
_"Using the SmartLock Review Screen ............... 29
N'+tl
Soun
_- Setting the Treble Boost and
Bass Boost Controls .........................................
30
_- Setting the TV for Stereo Programs ................ 31
_" Using the Input control with the Audio/Video
Input Jacks .......................................................
32
Here are a few of the special features built into this
new Color Television:
SmartLock TM feature allows you to block the viewing of certain channel or external audio/video connections were you might not want your children
viewing inappropriate material.
Infrared Remote Control works your TV set.
Standard broadcast (VHF/UHF)
(CATV) channel capability.
or Cable TV
Stereo TV with built-in audio amplifier and twin
speaker system for receiving TV programs broadcast
in stereo sound. This TV can actually detect if the
signal being received is Stereo and adjust for it.
Closed Captioning allows the viewer to read TV
9rogram dialogue or voice conversations as onscreen
text.
Automatic Programming of Channels for quick
and easy selection of favorite stations available in
your area.
Onscreen Features (in either English, French, or
Spanish) show helpful messages for setting of TV
controls.
Audio/Video Jackpanel for direct connections with
VCRs (or other video accessories) providing quality
TV picture and sound playback.
On Timer automatically tams the TV ON at a preset
time, and channel.
Sleeptimer
times.
automatically turns the TV OFF at preset
SmartPicture TM allows you to set the picture color,
tint, contrast, etc. for various types of programming
such as Personal (picture controls the way you set
them), Sports, Movies, or Weak Signals with the push
of one button.
SmartSound TM controls allow you to set the sound
! controls for various types of listening programs such
as Personal (sound controls the way you set them),
I Theater, Music, or Voice with the push of one button.
Using
r_ Control ............... 33
Remotethe SmartPictur(
Control
Operation
Using the SmartSound TM (AVL) Control.....34
Using SmartSurf rm (Alternate Channel) ................. 35
_ll
General
Information
Tips if Something Isn't Working ................ 36
Glossary of TV Terms .............................................. 37
Index ........................................................................
37
Factory Service Locations .................................. 38-39
Warranty...................................................................
40
SmartPicture TM, SmartSound TM, SmartSarf TM, and SmartLock TM are all
registered trademarks of Philips Consumer Electronics Company.
Copyright © 1999 Philips Consumer Electronics Company. All rights reserved.
4
yhur
Cable TV input into your
ome may be a single (75
ohm) cable, or a Converter Box
installation. In either case the
Remember:
!
Set the TV for the
type signal you've
just connected (see
the "Tuner" section
on page 11 of this
manual.)
connection to the TV is very easy.
Just put the threaded end of the
cable signal to the TV's antenna
plug and screw it down tight.
<_
To select only the
channel numbers on
If your Cable TV signal is a single round cable (75 ohm) then
you're ready to connect to the TV.
If you have a Cable Converter
Box:
you_,Cable system
see Auto Program"
(page 12). If you use
a Cable Converter
box, set the TV to the
same channel as the
converter's CH 3/4
switch (on the rear of
the converter.)
Connect the Cable TV signal to the
Cable Signal IN(put) plug on the
Converter..
<_
Connect the Cable TV cable to the
75_2 plug on the TV.
If you have a Cable Converter Box:
Connect the OUT(put) plug from the
Converter to the 7592plug on the TV.
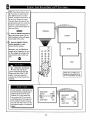
O
Cable TV Company
@
@
@
VIDEO
Back of TV
L/MONO
AUDIO
Round Cable
75_ Ohm
Cable TV Converter
Box Connection
R
in
[]
combination antenna receives
Lnormal broadcast channels
(VHF 2-13 and UHF 14-69).
Your connection is easy since
there is only one 75_2 (ohm)
antenna plug on the back of your
TV - and that's where the antenna
Note: For homes with separate UHF and VHF antennas
you will need an optionalcombiner
to connect to the TV.
U/V
Combiner
goes.
<_
<_
If your antenna has a round
cable (75 ohm) on the end, then
•
you're ready to connect it to the TV.
If your antenna has flat twin-lead
wire (300 ohm), you first need to
attach the antenna wires to the screws
on a 300 to 75 ohm adapter.
To set the TV to
select only the channel numbers in your
area see how to
"Program" or "Add"
channels in the TV's
memory on page 12
(Auto Program section).
Back of TV
75-300 Ohm Adapter
Push the round end of the
adapter (or antenna) onto the 75£2
plug on the rear of the TV. If the
round end of the antenna wire is
To order any optional accessory contact
your dealer or the
Philips Parts Center
at 1-800-851-8885.
threaded, screw it down tight.
Combination
Remember:
!
Be sure to set the
TV for the type signal you've connected (see the "Tuner"
section on page I I
of this manual.)
VHF/UHF
Antenna
(Outdoor
or Indoor)
Twin Lead
Wire
(_
VIDEO
IJMONO
AUOIO
Round Cable
75[)
in
TTE,he basic Antenna, or Cable
to VCR to TV connection
is shown to the right. For more
information on other hookups
(possible when Cable
Converter/Descrambler
boxes are
included) refer to your accessory
VCR and Cable Converter
Owner's
<_
Manual for details.
Connect
your Antenna
or Cable
TV signal to the IN FROM
ANT(enna)
<_
plug on the VCR.
Connect the OUT TO TV plug
on the VCR to the 75£_ plug on the
TV (connecting cable supplied with
the VCR.)
Outdoor
VHF/UHF
Antenna
300 to 75f)
Ohm Adapter
Back of TV
_
VIDEO
Cable TV signal
UDIO
VCR
_i
Round Cable
75_ Supplied with VCR
ONO
in
E2
_
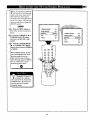
Press the POWER button to
I turn the TV ON.
<_
Press the VOLUME + button
increase the sound level or the
VOLUME - button to lower the
sound level.
to
STEREO
Pressing both buttons at the same
time will display the onscreen menu.
Once in the menu, use these button
to make adjustments or selections.
<_
Press the CHANNEL UP • or
DOWN • button to select TV
channels.
REMOTE
SENSOR
WINDOW
O
Z.o
load the supplied
nto the remote."
batteries
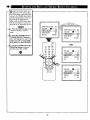
1. Remove the battery compartment lid on the back of the remote.
2. Place the batteries (2-AA) in
the remote. Be sure the (+) and (-)
ends of the batteries line up correctly
(inside of case is marked.)
Point the remote control toward I
the remote sensor window on the I
TV when operating the TV with
the remote.
3. Reattach the battery lid.
Remember,
il You can press
any button on the front
of the TV to turn the
TV ON.
The tuned channel
number will always
briefly appear when the
TV is first turned ON
(and with channel
changes.)
You can also press the
STATUS/EXIT button
(on the remote) to see
what channel the TV is
ON.
Press to turn the TV ON and OFF.
Sleen Button
Press to set the TV to automatically
turn itself OFF.
cc Button
Press to select Closed Caption options within the menu.
Press for direct entry of the TIMER (Clock) features were you can set
the TV's clock, the Start Time, and the Start Channel Controls.
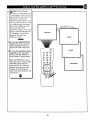
Press the number buttons to select TV channels. For single digit entries,
press the number of the channel you desire. The TV will pause for a few
seconds, then change to the selected channel. For channels 100 and
above, press "1" then the next two numbers. (Example, Press "1", then
"2", then "5" for channel 125.)
@ @ @
®
@ ® ®
Press to toggle between the currently viewed channel and the previously
viewed channel.
STATUS
Press to select previously viewed channels. You can place up to 8 channels
in memory. Then by pressing the SURF button you can quickly view the
select channels. See the "Surf" section to see how to select a series of
channels using the Surf button.
Press for the onscreen menu to appear. Pressing the menu button after
menu selections are made _ill eliminate the menu from the display.
Press to see the current channel number on the TV screen. Also press to
clear the TV screen after control adjustments.
Cursor Buttons
Use these button to select and adjust the TV i s onscreen menu.
VOL
Press to adjust the TV sound level.
SMART
Press to turn the sound OFF on the TV. Press again to return the
sound to its previous level.
Smart
Sound
Button
Press to select from a list of Smart Sound controls. (Factory preset
sound control levels set for different types of listening sources and
_rograms.)
Smart
Picture
Button
Press to select from a list of Smart Picture controls. (Factory preset
_icture control levels set for different types of viewing sources and
irograms.)
Channel (+L (-_ Buttons
Press to change the tuned channel.
For
our Spanish and French speak°
ng TV owners an onscreen LANGUAGE option is present. With the
LANGUAGE
control you can set the
TV's onscreen menu to be shown in
either English,
<_
Press the MENU
I remote
<_
Spanish,
or French.
button
to show the onscreen
Press the CURSOR
on the
menu.
UP •
or
DOWN • buttons to scroll through
the onscreen menu until the word
SETUP
<_
•
O2
OFF
Imp
•1
ScnartLock REVEVV
•
BRIGH3]klESS_.,..,..
30
s h gh ghted.
Press the CURSOR
button
CLOCK
to display
RIGHT
the SETUP
•
menu
features.
<_
Press
CURSOR
UP •
or
or
DOWN • buttons to scroll the
Setup features until the word LANGUAGE
<_
Press
s high
ghted.
the CURSOR
button repeatedly
LISH, ESPANOL
FRANCAIS
IL NC-U
RIGHT
•
to select ENG(Spanish), or
(Fr_).
only makes
the TV's
onscreen MENU items appear in
English, Spanish, or French text.
It does not change the other onscreen
text features such as Closed Caption
(CC) TV shows.
The onscreen menu will time out and
disappear from the screen when you
finish, or you can press the STATUS/EXIT button to clear thd_menu
from the screen.
10
ESP O.I
Tche
TUNER feature allows you to
hange the TV s signal input to
either CABLE, AUTO or ANTENNA
mode. It's important for the TV to
know what type of signal to look for.
(From a Cable TV signal or a normal Antenna signal.) In the AUTO
mode, when the AUTO PROGRAM
feature is activated, the TV will automatically choose the correct mode.
<_
Press the MENU button on the
I remote to show the onscreen menu.
';_
:__<_i iiiiiiiiiiiiiiiiiiiiiiiiiiiiiiiiiiiiiiiiiiiiiiiiiiiiiiii
....
131_13121<
CC
•
....iiiiiiii:ii:i:ii:iiiii_iiiiiii:iii:iiiiiiiiiii
::::::
:::::::::::::::
: :;::_:_:
• I
Smart_k FEVEW
B_
I,.......
Press the CURSOR UP • or
•
_3
LANGUAGE
ENGLISH
IrU R
ALto]I::_:_OGRAM
CHANNELEDIT
DOWN • buttons to scroll through
the onscreen menu until the word
•
•
SETUP s high ighted.
<_
<_
Press the CURSOR RIGHT •
button to display the SETUP menu
features.
trUNED
Press CURSOR UP • or
DOWN • buttons to scroll the
Setup features until the word
TUNER
_
s h ghl ghted.
Press the CURSOR RIGHT •
button to select either CABLE,
AUTO or ANTENNA mode.
When CABLE is selected,
i channels 1-125 are available.
When ANTENNA is selected, channels 2-69 are available.
When AUTO is selected, the TV will
automatically set itself to the correct
mode based on the type of signal it
detects when the AUTO PROGRAM
feature is activated.
The onscreen menu will time out and
disappear from the screen when you
finish, or you can press the STATUS/EXIT button to clear the menu
from the screen.
11
ANTENNA
I
i Vour
TV can automatically
set itself
!1 for local area (or Cable TV) chaninels. This makes it easy for you to
select only the TV stations in your
area when the CHANNEL (+), (-) buttons are pressed.
Note." Make sure the antenna
signal connection
before AUTO PROGRAM
<_
or cable
has been completed
is activated.
Press the MENU button on the
I remote to show the onscreen menu.
<_
CLOCK
CC
•
t3q:
[S_Up
SmartLockREVIEW
BRIGHTNESS
_,,,.,..
• ]
•
3Q
Press the CURSOR UP • or
DOWN • buttons to scroll through
the onscreen menu until the word
SETUP
<_
s h gh ghted.
Press the CURSOR RIGHT •
button to display the SETUP menu
features.
_,,_
Press CURSOR UP • or
DOWN • buttons to scroll the
Setup features until the words AUTO
lAUraPrig
PROGRAM are h gh ghted.
_
Press the CURSOR RIGHT •
button to start the Auto Program
scanning of channels.
/
33[
Auto Program will scan for
all availablechannelswithin
the Antenna/Cable signal.
When
the TV menu.
will
go backfinished,
to the SETUP
_o
Try it out. Press the CHANg NEL (+), (-) buttons and see
which channels have been added to
the TV's memory.
If you want to delete any unwanted
channels from the TV's memory, see the
CHANNEL EDIT section on page 13.
disappear from the screen when you
finish, or you can press the STATUS/EXIT button to clear the menu
from the screen.
'12
_ae
to ADD or DELETE
from the list of channels
I
f"_hannelEdit
channels
stored in the
makes it easy fi_r you
TV's memory.u_i_
Press
I remote
_.)
the MENU
button
to show the onscreen
on the
menu.
Press the CURSOR
UP • or
DOWN • buttons
to scroll through
the onscreen menu until the word
SETUP
CLOCK
•
OFF
is highlighted.
SmartLockl%--MEW I_
_
<_
Press the CURSOR RIGHT
button to display the SETUP menu
features.
BRIGHTNESS In..,....
TUNER
CABLE
AUTOPROGRAM
•
30
EXTERNAL
•
Press the CURSOR UP • or
DOWN • buttons to scroll the
Setup features until the words
CHANNEL EDIT are highlighted.
_
CHANNEL
Press the CURSOR RIGHT •
button to display the CHANNEL
EDIT options.
Is v D
CHANNELADOED
With the CHANNEL EDIT
options displayed, and the word
CHANNEL highlighted; enter the
channel number (with the NUMBERED or the CH + or - buttons)
CHANNEL
2
Nol
CHANNELBELFTB]
you wish to ADD to, or DELETE
from the TV_s memory.
< _oSCroll
(using
down
the CURR UP • or DOWN • buttons)
to highlight the word SAVED,
Now use the CURSOR RIGHT •
button to toggle between YES or
NO.
If YES is selected the menu reads
"CHANNEL ADDED" and the
channel is added to the TV's memory. If NO is selected the menu reads
"CHANNEL DELETED" and the
channel is deleted from the TV's
memory.
2
ESl
@
18
--
rrVhe External feature allows you to
1. rename your input source selections. When the Input feature (refer to
Owner's Manual for details) is
accessed to change audio/video _. jacks,
your source selection will be called by
the name you choose. This name will
also appear onscreen
audio/video inputs.
when using the
CA_0CK
CC
Press the MENU button on the
SmartLockREVL%V •
remote to show the onscreen menu.
/2_
Press the CURSOR
•
OFF
BRIGI-ITNEI_S
HI'"""
30
UP • or
DOWN • buttons to scroll through
the onscreen menu until the word
SETUP is highlighted.
_
"6
Press the CURSOR RIGHT II_
button to display the SETUP menu
features.
®®@
®®®
@ ® ®.-, _,
)OWN
to scroll
_ Press •thebuttons
CURSOR
UP •theor
etup features until the word
;XTERNAL is highlighted.
IEX'rI
CAMI
_._ _
Press the CURSOR RIGHT •
button to activate the External feature.
_
With the External options menu
displayed, preSs the CURSOR
RIGHT • button to select a name
from the list: EXT, GAM, DVD,
VCD, VCR, LD, or SAT.
g-d
_D
_AE
0
Remember: This feature will
rename your external signal
source and appear onscreen with the
new name but does not limit you to
the type of accessory device that you
may use.
The onscreen menu will time out and
disappear from the screen when you
finish, or you can press the STA
TUS/EXIT button to clear the menu
from the screen.
I
14
F_EXrl
v_]
[EXT1
VCRi
[EXT"1
LD'J
IExrl
sArl
I
trois,
select
a channel
and follow
the steps shown
below.
To
adjust your TV picture
@
con-
Press the MENU button
on
the
I remote to display the onscreen menu.
<_
Press the CURSOR UP • or
DOWN • buttons until the word
_P
BRIGHTNESS is highlighted. (Or,
COLOR, PICTURE, SHARPNESS,
TINT,
COL.
adjustment
<_
TEMP
you
depending
want
on
_
•
IBRIGHT'IkESS Ill
the
make.)
to
•
_a_k
.......
301
COLOR
I_.
....... 30
PICTURE
i
....... 30
Press the CURSOR RIGHT •
tr _hceeCaURcS
OR LEeF_lh
e•lbb :_tt°n:s
:_'
_:_
_:_:_:_:_!
_ii_ ¸ :::_:_:::_:_:_:::_:::_:_:_:_'_:_:_:_:_:_i_::
_ : __¢ __:l_,_3i_ii'i_"
_
of the picture. @
O
d)®@
Press
or •
buttons
until darkest
PICTURE
until lighlest
the •
color,
Press
or •
parts of
®®
the •
buttons
or •
_
•
BRI_E_
i
.......
ICOLOR
_1_
i
.......
SHARPNESS!
.......
BRIGHTNESS
l
....... 30
COLQR
I
....... 30
PICTURE
i
....... 30
SHARPNESS
l
....... 30
TINT
....... _....... 0
®®®
the •
the picture are as bright as you prefer.
COLOR
Press
add or eliminate
_a_ck
COLOR
_.
....... 30
PCTU
!
.......30
to
LSHARPNESSl
.......
TINT
.......t ....... 0
buttons
COL TEMP
parts of the picture show
NORMAL
good detail.
Press
to improve
TINT
obtain
the •
or •
buttons
detail in the picture.
Press the • or •
natural skin tones.
Press
the •
tons to select NORMAL,
PICTUF_
buttons
to
or •
COOL,
The onscreen
.......30
....... 30
rnNT
but-
.......
,.......ol
COL _EMP
or
CO_
WARM picture preferences.
(NORMAL
will keep the whites, while; COOL will
make the whites, bluish; and WARM will
make the whites,
i
SHARPNESSi
NORMAL
PLUS
ON
reddish.)
SHAFI:)NESS_/'
menu will time out and dis-
appear from the screen
..............0
when you finish, or
you can press the STATUS/EXIT
clear the menu from the screen.
button
....... 3(3
ICObTEMP
to
CONTRAST
NORMAL
I
PLUS
NOISE REDUCTION
15
ON
ON
ICOLTEMP
WARMI
ICOLTEMP
COOq
Tfehe
Contrast Plus (Black Stretch)
ature helps to "sharpen'
the
picture quality. The black portions of
the picture become richer in darkness and the whites become brighter
t-a-g_rm
<_
Press the MENU button on the
I remote to display the onscreen menu.
<_
Press the CURSOR UP • or
CURSOR DOWN • buttons until
the words CONTRAST PLUS are
h gh ghted.
<_
Press the CURSOR RIGHT
_NT
.......
I.......
O
COL 7EMP
NORMAL
la:_-na_T
PL_
_-FI
I
....... 15
It_lt_ or CURSOR LEFT _l'4l buttons to activate or deactivate the
Contrast Plus feature.
©
"N
16
NORMAL
IC_m_AST PLUS
NOI_ PEOU_nON
VOLUME
@®@
®®®
.......! ....... 0
COLTEMP
NOISE _DU_ON
_/UME
TINT
I
ON I
ON
.......
15
--
_or
reasons such as poor cable
• " reception, the picture can sometime appear slightly "speckled"
(or
signal noise shown in the picture),
The NOISE REDUCTION
control can
help eliminate this type of interJOrence and improve the quality of the
_icture.
<_
Press the MENU button on the
remote to display the onscreen menu.
<,_
Press the CURSOR UP • or
CURSOR DOWN • button until
the words NOISE REDUCTION are
h gh ghted.
<_:_
COLTEMP
NORMAL
CONTRASTPLUS
ON
0EEl
VOLUME--' .......15
COL]EMP
NORMAL
CONTRASTPLUS
ON
TREBLEBOOST
INOISE
REDUCTION ONI
IN01SE
REDUCTION
OFF
VOLUME
: _Z:"::::::::::::::::::::::::" _"
Press the CURSOR RIGHT •
or CURSOR LEFT • buttons to
activate or deactivate the Noise
0
Reduction Featu_
®®@
®®®
Remember: The onscreen
menu will disappear in a few
seconds after you have finished your
adjustment.
"Noise" Reduction is a video adjustment feature that affects the picture
Iquality of the TV not the sound.
-d -(5
so_D
17
MGTUflE
_
TREBLEBOOST
....... 15
OFF
7-3
y;ur
television comes with an
nsereen clock. During normal
operation the clock appears on the
semen when the STATUS/EXIT button
is pressed or when channel changes
OCCH_.
o_mK
: AMI
TIMERACTIVE
<_re mote
Presstothe
CLOCK
button
display
the onscreen
CLOCK menu.
on
the
Remember: Be
sure to press "0"
first and then the hour
number for single digit
entries.
ON
CHANNEL
12
ISET CLOCK
1O:O0 AM I
TIMER ACTNE
ON
CHANNEL
12
<.,
Press the CURSOR UP • OR
CURSOR DOWN • buttons until
the words SET CLOCK arehighlighted.
Note: Ifa power failure eccurs, the
TV's CLOCK will have to be reset.
<_
If no time is set, the time will not
appear onscreen.
Enter the current time using the
NUMBERED buttons. If the first
numberis a single digit first enter a
zero then the digit (i.e., press "0", then
cess "8").
To clear the onscreen
menu press the STATUS/EXIT button or
wait a few seconds after
you have finished your
adjustment and the
menu will automatically
disappear from the
screen.
®
Note: The CLOCK onscreen menu can
also be accessed through the main menu
by pressing the MENU button; then
scrolling up/down with the CURSOR
UP • or CURSOR DOWN • buttons
until the word CLOCK is highlighted.
Press the CURSOR RIGHT • button
to activate the CLOCK menu and follow
the steps above to set the time.
_
Press the CURSOR RIGHT
or CURSOR LEFT • buttons to set
either AM or PM time.
@
Oo
lust like an alarm clock you can
q.I set the TV to turn itself on at the
same time ev_
SET CLOCK
<_
Press the CLOCK button to
display the Clock onscreen menu.
10:00
InMER
mr_
CHANNEL
12
ST/Wff TIME
<_
AM
OFF
I
-- : -
Press the CURSOR UP • or
CHANNEL
CURSOR DOWN • button until
the words TIMER ACTIVE are
STb_qT TIME
AM
ONI
12
- - : - - AM
The onscreen menu will
time out and disappear
from the screen when
Press the CURSOR RIGHT
• or CURSOR LEFT • button
I to select ON (if activating) or OFF
fou finish, or you can
)ress the
_,TATUS/EXIT button
to clear the menu from
the screen.
®
I(if deactivating_Timer
10:00
page.
h gh ghted..
<_
SET CLOCK
Ir_ERAcTNE
Remember: Be
sure to set the
clock to the current
time, then set the time
you want the television
to turn on using the
;TART TIME control
as described on the next
control.
18
U_ed
along with the Clock feaures, you can select a specific
channel that the television will tune
i
to when the Timer Active control is
turned ON.
<_
Press the CLOCK
button to
SETCLQCK
Remember: Be sure
g to set the Timer Active
control to ON.
10:QQ AM
3]MER ACTIVE
ON
LrJ, Na.
12L
START ]]ME
The onscreen menu will time
out and disappear from the
screen when you finish, or
you can press the
STATUS/EXIT button to clear
the menu from the screen.
- - : - - AM
display the Clock onscreen menu.
_
Press the CURSOR
CURSOR
DOWN
•
the word CHANNEL
Press the number
UP • or
button
until
s h gh ghted.
buttons
to
®
O
en'uerdtlhikStthltetUeP
eChi_norelt
yOtuart on.
U_ed
along with the Clock feaure, you can select a specific
time the television will turn on
when the Timer Active control is
turned ON.
]IMER ACTIVE
_
ON _;iiiiiiii!_!!!!ii_iiiii
_MERACqM_
Ct-IANNEL
Press the CLOCK button to
display the Clock onscreen menu.
<_
ISTARTTIIVlE
ON
12
08:30 AMI
Press the CURSOR UP • or
CURSOR DOWN • button until
the words START TIME are highghted.
12
<_
Enter the time to turn on the
TV using the NUMBERED buttons. If the first number is a single
digit first enter a zero then the digit
(i.e., press
_
0', then press "8 ).
TO CHANNEL 6
Press the CURSOR RIGHT •
or CURSOR LEFT • buttons to
set either AM or PM time.
/.t
to be activated,
the screen will
display
a warning
slaling
it's
going to change channels in 30 seconds¸ It will appear likc
the screen shown
below
and change
to the _,elecled s_all up
channel
bulton
on the r_mole
ll the rv Pressing
is in use _,lv
when
Ih¢ START
TIME
count
19
down ',_ill canoe J the cha_ge
withil_ this
conlr_l
is aboul
Closed
Captioning (CC) allows
ou to read the voict_content c_
television programs on the TV
screen. Designed to help the hear
ing impaired, this feature uses
onscreen "text boxes" to show dia-
I NOTE: Not all TV programs and product commercials are made for broadcast
with Closed Caption (CC) information included. Neither are all Closed Caption
modes (CC-I, or CC-2) necessarily being used by a broadcast station during the
transmission of a closed caption program. Refer to your area's TV program listings
for the stations and times of Closed Caption shows.
logue and conversations while the
TV program is in progress.
<_
Press the MENU button on the
remote to display the onscreen
menu.
_--_
Press the CURSOR UP • or
CURSOR DOWN • button until
the word CC (Closed Caption) is
SmartLock
•
CLOCK
•
Icc
OFFI
SETUP
•
SmartLock REVIEW •
Peess the CURSOR RIGHT
• button to select the CLOSED
CAPTION option you want (OFF, l,
2, or MUTE). Dialogue (and
descriptions) for the action on the
captioned TV program will appear
•
ICC
11
CLUCK
ICC
2]
SETUP
•
SmartLock REVIEW •
onscreen.
<_
•
CLOCK
SETUP
•
SmartLock REVIEW •
h gh ghted.
_
SmartLock
ULUL;F,
ICC
NOTE: You can also set the
Closed Caption by pressing the CC
button on the remote. When pressed
repeatedly the screen will display the
options: CC-OFF, CC-I, CC-2, or
CC-MUTE.
MUTEI
SETUP
SmartLock
•
REVlEMV
O
CAPTION mode
Example Display
NOTE: The CC-MUTE option
can be used to set the TV to
turn the Closed Caption mode
"ON" whenever the MUTE button on the remote is pressed.
This activates the CC-I option.
MUTE will appear smaller in
the upper center of the screen.
2O
•
m;l'e
you ever /_dlen asleep in
_ont q[the TV only to have it
wake you up at two in the morning
with a test pattern screeching in
your ears? Well, your TV earl save
you all that trouble by automatically turning itself qDi
12
15 MIN
12
Press the SLEEP button on the
remote control and the SLEEP timer
30 MIN
d sp ay will appear on the screen.
12
Press the SLEEP button
repeatedly to pick the amount of
time (In 15 minute increments up to
60 minutes; then 30 minute incre
ments up to 120 minutes; then 60
minute increments up to 240 minutes) before the TV will turn itself
45 MIN
12
60 MIN
12
90 MIN
off.
12
An onscreen count down will appear
during the last minute before the TV
shuts itself off.
120 MIN
12
180 MIN
12
240 MIN
Remember: The SLEEPIt TIMER control can also be set
within the TV's main menu
The onscreen menu will time out
and disappear from the screen when
you finish, or you can press the
STATUS/EXIT button to clear the
menu from the screen.
12
12
1OSEC
50 SEC
timer
down
setting,
will
an onscreen
be displayed.
F
count
III
Pressing
an_ butt()n during
the last minute
I During
the last minute of a SLEEP
will cancel Ihe SLE[!P
linler
J
21
uring
ispia_
_
S[ "l{[i[_
the !_LSlI() seconds
will
limt'r
read
setting'
GOOD
_)Ia
BYE
;Ill °n_cre_'n
V3
f Tse the Volume Bar control to see
t.J the TV s volume level settings
on the TV screen. The Volume Bar
will be seen each time the VOLUME
buttons (on the TV or remote)
pressed.
are
CONTRST PLUS
ON
NOISE REDUCTION
ON
IVOLUME
'_
Press
the MENU
I play the onscreen
'_
TREBLE BOOST
ON
BASS BOOST
ON
menu.
Press the CURSOR UP • or
CURSOR
DOWN • buttons until
the word VOLUME
<_
button to dis-
• ........... 151
is highlighted.
Press the CURSOR RIGHT lib
button to increase the TV's volume
or the CURSOR LEFI" "9 button to
decrease the sound.
OR
IVOLUME • ...........151
-d
®®®
®®®
®®®
Note: Pressing the VOL
(+) or (-) buttons will
also allow you to adjust
the sound level of the
TV. A Volume Bar
itAt_
adjustment will appear
onscreen. Press the (+)
to increase the volume
®-®
and the ( ) button to
decrease the volume.
©
_
22
J
inte-!
is
Tghe rated
SmartLock
feature
circuit that
receivesan and
processes data sent by broadcasters, or other program providers,
that contain program content advisories. When programmed
by the
vtewer, a TV with SmartLock
can
respond to the content advisories
and block program content that may
be found objectionable
(such as
offensive language, violence, sexual
situations, etc.). This is a great feature to censor the type of viewing
children may watch.
Pver the next few pages you'll
learn how to block channels and
certain rated programming.
Below
is a brief explanation
of some terms
and ratings you will find in the
SmartLock feature.
SmartLock
off[rs various
BLOCKING
OPTION controls
from which to choose:
MASTER DISABLE: This is what
might be called the "master switch"
for SmartLock. When in the ON
position, ALL blocking/censoring is
turned off (or disabled). When in the
OFF position, ALL blocking based
on specifically blocked settings will
take place.
BLOCK UNRATED: ALL unrated
programs based on the Movie
Ratings or Parental (TV) Guidelines
can be blocked if this feature is set
to ON and the MASTER DISABLE
feature is set to OFF.
BLOCK NO RATINGS: ALL programming with NO content advisory
data can be blocked if this feature is
set to ON and the MASTER DISABLE feature is set to OFF.
After an access code has been programmed, you can block up to 5
individual channels. But more than
just blocking channels, certain
blocking options exist which will
block programming based on ratings
patterned by the Motion Pictures
Association of America and TV
broadcasters. (See description of ratings on this page.)
G
OFF
TV-Y
OFF
PG
OFF
TV-Y7
•
PG-13
OFF
TV-G
OFF
IR
0NI
[TV-PG
_'[
NC-1 7
ON
TV-14
•
X
ON
TV-MA
•
G: General Audience - All ages admitted. Most parents would find this program suitable for all ages. This type of
programming contains little or no violence, no strong language, and little or no
sexual dialogue or situations.
PG: Parental Guidance Suggested - This
)rogramming contains material that parents
may find unsuitable for younger children.)
It may contain one or more of the following: Moderate violence, some sexual situations, infrequent coarse language, or some
suggestive dialogue.
PG-13: Parents Strongly Cautioned - This
programming contains material that parents
may find unsuitable for children under the
age of 13. It contains one or more of the
following: violence, sexual situations,
coarse language, or suggestive dialogue.
R: Restricted -This is programming is
specifically designed for adults. Anyone
under the age of 17 should only view this
programming with an accompanying parent
or adult guardian. It contains one or more
of the following: intense violence, intense
sexual situations, strong coarse language,
or intensely suggestive dialogue.
NC.I 7: No one under the age of 17 will
be admitted. - This type of programming
should be viewed by adults only. It contains graphic violence, explicit sex, or
crude indecent language.
X: Adults Only - This type of programming
contains one or more of the following: very
graphic violence, very graphic and explicit
or indecent sexual acts, very coarse and
intensely
suggestive
language.
_
V.Y-(Allchildren
--Thisprogram
is designed to be appropriate for all
children.) Designed for a very young
audience, including children ages 2-6. This
type of programming is not expected to
frighten younger children.
Children
-- This program
TV-Y7 - (Directed
to Olderis designed
for children age 7 and above.) It may
be more appropriate for children who have
acquired the development skills needed to
distinguish between make-believe and reality. This programming may include mild fanlasy and comic violence (FV).
[j_
TV-G - (General
Audience
--Most
parents would find this program suitable for all ages,) This type of programming contains little or no violence, no
strong language, and little or no sexual dialogue or situations.
_
TV.PG - (Parental
Guidance
Suggested -- This program contains
material that parents may find unsuitable for younger children. ) Th is type of programming contains one or more of the following: Moderate violence (V), some sexual
situations (S), infrequent coarse language
(L), or some suggestive dialogue (D).
_
TV.14 - (Parents
Strongly
Cautioned -- This program contains
some material that many parents
would find unsuitable for children under 14
years of age.) This type of programming
contains one or more of the following:
intense violence (V), intense sexual situations (S), strong coarse language (L), or
intensely suggestive dialogue (D).
This
program
is specifically
TV-MA
- (Mature
Audience designed
Only -to be viewed by adults and therefore
may be unsuitable for children under 17.)
This type of programming contains one or
more oftbe following: graphic violence (V),
explicit sexual situations (S), or crude indecent language (L).
23
Over
the next few pages you'll
learn how to block channels
and get a better understanding
of
the rating terms Jbr certain programming.
First, let's start by learning how to
set a personal access code."
/i_
Press the MENU button
on the
INPUT
SLEEPTIMER
•
OFF
ISmartbock
CLOCK
CC
•[
•
OFF
SmartLock
ACCESS CODE
menu.
remote to display the onscreen
Z_C
Press the CURSOR
UP • or
URSOR DOWN • buttons until
the words SmartLock
are highlighted.
_,_
Press the CURSOR
RIGHT
• button to display the
SmartLock Access Code screen.
<_
Using the NUMBERED
buttons, enter 0, 7, 1, 1. "XXXX"
appears on the Access Code screen
as you press the numbered buttons.
"INCORRECT
CODE" will
appear on the screen, and you will
need to enter
SmartLock
ACCESS CODE
XXXX
0, 7, 1, ! again.
<.,
,_b Press the CURSOR
utton until the words
CODE are highlighted.
SmartLock
DOWN •
CHANGE
ACCESS CODE
0 i_
Press the CURSOR RIGHT •
button to change your personal
Access Code.
/
<_
"Next enter a "new" 4 digit
code using the NUMBERED buttons. The screen will then ask you
to confirm the code you just
entered. Enter your new code
again. "XXXX" will appear when
¢ou enter your new code.
_t
INCORRECTCODE
/
BLOCK
ICHANGE CODE
[CHANGE CODE X X X X[
•1
/
OPte _a _h egeTnATY?ofX InT_bu t-
/
Ws memory.
[CONFIRM CODE X X X XI
Parents - it isn't possible for your child
to unblock a channel without knowing
your access code or changing it to a new
one. If your code changes, and you didn't change it, then you know it's been
altered by someone else and blocked
i channels
24
have been viewed.
After
yoar personal access code
Z"l.has been set (see previous
page), you, are now ready to select
the channels you want to block out
or
,_
INPUT
SLEEPTIMER
censor:
SmartLock
Press the MENU button on the
remote to show the onscreen menu.
[SmartLOCkcLoCK
CC
EI
OFF
.P_ Press the CURSOR UP • or
CURSOR DOWN • button until
the words SmartLock are highlighted.
_.
OF_FF
--
ACCESS CODE
SmartLock
_ Press the CURSOR RIGHT
• button to display the
SmartLock Access screen.
ACCEaS
CODE
<_
Enter the correct access code
number. "XXXX" shows on the
Access Code display as you press
the NUMBERED buttons.
(_)
XXXX
®
_1 --_ Press the CURSOR UP • or
DOWN • buttons until the word
BLOCK is highlighted. Press the
CURSOR RIGHT • button then
highlight CHANNELS
BLOCKED.
CHANGE
CODE
IBLOCR
BLOCKING OPTIONS
,,_ _ Press the CURSOR RIGHT •
button. Three options will be displayed; CHANNEL, LOCK or
CLEAR ALL.
<_
MOVIE RATINGS
Repeat steps 7 and 8 for any other
channels you wish to block from
viewing.
Press the CURSOR DOWN •
button until the words CLEAR
ALL are highlighted, then press the
CURSOR RIGHT • button.
The screen will read "ALL
JNBLOCKED" for a moment. At
previously
:Is will be unblocked.
•
PARENTAL GUIDELINE •
With CHANNEL highlighted,
use the NUMBERED buttons to
enter the channel number you wish
to b ock.
Use the CURSOR DOWN •
to highlight the word
LOCK, then press the CURSOR
RIGHT II_button to select YES
(block) or NO (do not block). The
channel chosen is now blocked from
viewing.
•
ICHANNELS BLOCKED •1
lr
CHANNEL 5 BLOCKED
BY CHANNEL BLOCKING
CHANNEL
51
[CHANNEL
LOCK
NO
ILOCK
5
EN]ER CODE TO VIEW
YESI
CLEAR ALL
•
CLEAR ALL
f
When
a blocked
channel
is viewed,
viewable unli[ the TV is powered
channelsply
enter will
the current
again be
access
blocked,
code.
CHANNEL
LOCK
ICLEAR
5
YES
ALL
•[
this is what
the screen
will display.
To view
the blocked
channel,
sim-
off. Once the set is turned off and then back on the previously
blocked
Note: Once the access code is entered ALL blocked channels
will be
CHANNEL
ALL
LOCK
IALL UNSLOCKED
I
Nolo: When
the CLEAR
ALL option
is selected,
the
CHANNEL
option will display ALL.
If at this point if you change
the LOCK oplion to YES,
AI,L channels
will be blocked
from viewing.
25
i
S_blartLock
offers the viewer other
ocking features as well. With
these Blocking Option features, the
censoring can be turned ON or
OFE
INPUT
SLEEPTIMER
m- mm
ISmartL°ck
<_
Press the MENU button on the
CLOCK
CC
remote to display the onscreen
•
OFF
SmartLock
•I
•
OFF
ACCESS CODE
menu.
<_
Press the CURSOR UP • or
CURSOR DOWN • buttons until
the words SMART LOCK are
SrnartLock
h ghlighted.
<_
Press the CURSOR RIGHT
AC_GECODE
• button to display the SmartLock
XXXX
Access Code screen.
Using the NUMBERED
but-
tons on the remote, enter your persona Access Code.
@With
IBLOCK
CHANGECODE
the word BLOCK high-
lighted, Press the CURSOR
•1
•
RIGHT • button.
@Scroll
the menu using the
CURSOR UP • or CURSOR
DOWN • buttons until the words
BLOCKING OPTIONS are highghted.
<_
•1
IBLOCKtNGOPTIONS
Press the CURSOR RIGHT •
button to display the Blocking
Options (MASTER DISABLE,
BLOCK UNRATED, or BLOCK
NO RATING). When highlighted,
each feature can be turned ON or
CHANNELS BLOCKED •
[MAS]ER DISABLE
BLOCK UNRA_EO
MOVIE RATINGS
BLOCK NO RATING
OFF using the CURSOR RIGHT
• or CURSOR LEFT al buttons
on the remote.
@
•
CHANNEL BO BLOCKED
BY COIXm-NT ADVISORY
CANNOT DECODE RATING
ENq_R CODE TO VIEW
ONI
ON
ON
on
IMASTERDtsABLE OFFI
BLOCKUNRAqED OFF
BLOCKNO BATING OFF
If the BLOCK UNRATED
controls
are turned
grams
containing
the screen shown
ON,
or BLOCK NO RATINGS
all unrated
programs
NO content
advisory
to the left. To watch
and pro-
data will display
the channel enter
your access code, or change the BLOCK UNRATED
and
BLOCK
NO RATINGS
back
to off.
BLOCKING OPTIONS:
MASTER DISABLE: This is what might be called the "master switch" for SmartLock. When in the ON position, ALL blocking/censoring is turned off (or disabled). When in the OFF position, ALL blocking based on specifically blocked settings will
take place.
BLOCK UNRATED:
ALL unrated programs based on the Movie Ratings or Parental
feature is set to ON and the MASTER DISABLE feature is set to OFF.
BLOCK NO RATINGS: ALL programming
MASTER DISABLE feature is set to OFF.
with NO content
advisory
2@
(TV) Guidelines
data can be blocked
can be blocked
if this
if this feature is set to ON and the
]
1
There
are two types of program
atings within the SmartLock
feature. One is based on the Movie
Industry ratings while the other is
based on the TV Industry ratings.
Both can be used to block or censor
_rogramming that has been rated in
!#her manner
5et'sfirst look at the Movie Rating
options of SmartLock:
Remember:
INPUT
Selecting to
block any rating
will cause all the
•
_MER
OFF
]_martLeck
•1
CLOCK
•
cc
SmartLock
higher ratings to
also be blocked
automatically.
OFF
ACCESS CODE
<_
Press the MENU button on the
I menu.
remote to display the onscreen
<_
Press the CURSOR UP • or
CURSOR DOWN • buttons until
the words SMART LOCK are
high ghted.
Press the CURSOR RIGHT
<_
SmartLock
60
®
®®®
® ®
ACCESS CODE
XXXX
Ii
• button to display the SmartLnck
IBLOCK
Access Code screen.
CHANGECODE
Using the NUMBERED buttons on the remote, enter your
Personal Access Code.
_._ _ With the word BLOCK highlighted, Press the CURSOR
RIGHT • button.
_C
•1
•
BLOCKINGOPTIONS •
CHANNELSBLOCKED•
IMOVlERATINGS
•1
PARENTAL
GUIDEI_INE•
Scroll the menu using the
URSOR UP • or CURSOR
DOWN • buttons until the words
MOVIE RATINGS are highlight-
I
I
led.
,_
CHANNEL 5 BLOCKED
Press the CURSOR RIGHT •
button to display the MOVIE
RATINGS (G, PG, PG-13, R,
NC17, or X).
When highlighted, all these options
can be turned ON (which will allow
blocking) or OFF (which will allow
viewing).
Use the CURSOR RIGHT • or
CURSOR LEFT _l buttons on the
remote to turn the rating option ON
or OFE
BY CONTENT ADVISORY
MOVIE RATING
R
ENTER CODE TO VI_N
PG
PG-13
OFF
OFF
IR
BNI
NC-17
x
ON
ON
i
blocked by the Movie Rating feature, To unblock, lurn
the Movie Rating OFF, or enter your personal access
code. Entering the code will unblo_k ALL blocked
I Screen
display
message
is I
Movie will
Ratings
until a the
TV is when
turn offprogramming
Then the
blocked ratings will be reset to ON
O
27
1
higher ratings will automatically be turned
ON. To turn them OFF, each witl have to be
individually.
(i.e., Risblocked
manually,
I set
NO'I_:
When a rating
turned ON,
all
I
NC-17 and X will be blocked automatically.)
Tjhis
portion
_atures
of the SmartLoek
cover
progrant
ratings
based on the TV Industry rating
system. This is know as Parental
Guideline within SmartLock.
Afler selecting
ture and
the SmartLoek
entering
your
!Oa-
]BLOCK
CHANGE CODE
personal
CHANNELS BLOCKED •
aceess code. the BLOCK/CHANGE
CODE screen appears;
With the word BLOCK
MQIVE RATINGS
•
O
button.
db o
®®@
®®®
Press the CURSOR
RIGHT •
button to display the Parental
(TV) Guidelines
(TV-Y, TV-Y7,
TV-G, TV-PG, TV-14, or TV-MA).
TV-Y7
•
TV-G
OFF
[TV-PG
• [
]_/-14
•
TV-MA
•
TV RATING
When highlighted,
the TV-Y and
TV-G can be turned ON (which will
allow blocking) or OFF (which will
allow viewing), of these rated prorams.
TV-Y
The ratings of TV-Y7, TV-PG,
TV-14, TV-MA can be customized to block V (violence), FV
(fantasy violence), S (sexual situations), L (coarse language), or D
(suggestive dialogue).
Use the CURSOR RIGHT • or
CURSOR LEFT • buttons on the
remote to turn the rating option ON
or OFE
ON[
FV
ON
PG
ON
OFF
D
ON
•1
IL
ONI
S
ON
V
ON
_ ]_/-G
TV-PG
OFF
•
_/-Y7
•
ITV-PG
TV-14
TV-Y7
It may be more
menl skills
- (General
appropriate
•
TV-PG
- (Parental
dialogue
ents may tirol unsui_ble
one or mote
{p_rellfs
par_,ms
programming
following¸
conlains
TV-MA
some
programming
ex plicil _xual
_uggestive
situations
program
ON
]TV14
•1
IL
ON]
' _/MA
•
S
ON
V
ON
•
MA
ON
TV-14
I1_
L
ON
rTV-MA
•1
_uitable for all
no slron_
fi_r children
sexual
_mtolln
language
mat_rtal
type of programming
dialogue
(n], infrequent
violence
. 7)lit pro_RInl
(11, intense
and thereJore
c_ntains
)l_is
I_), or moderale
un_uitahle
I_nguage
thi_ pn_gram
Th_ pmgrom
that par.
contains
coarse
lan-
(V)
TV-PG
i Otltatt_t _otnl, nltllcrtal
under
one _r more of Ihe fi)ll{_wing
(MalurcAudienceOnly
hy uduhs
fiml
liltle or no violence,
_hildren
Sffofl_ly Caulioncd
!l)), slrong coarse
viewed
fiJr younger
wmdd find
ON
D
or situations¸
Suggested
{I.), some _exual situation_
1"V-]4
n_ny
Bribe
14
•
(FV),
w.uld
conlains
tbe develop-
and reality¸ This
OFF
TV4_G
TV43
type of pro
who have acquired
violence
- Mo_t parents
Guidance
fiw all children.)
ages 2_5. This
make-believe
and comic
ages¸) This type o[ programming
and liltle or no sexual
for children
between
mild fantasy
Audience
to be approprmte
including children
_r children
lh_progmm_deslgnedjor_ildrenage7
needed to distinguish
ruing may include
guage
i_ de.ligned
audience,
(DirectedloOIderChildren
aml above¸!
TV-G
- Thi_ program
for a very young
MENUS:
IY7
• I
TV-G
SUB
OFF
ITV-Y7
@
All children
automatically.
high-
menu using the
iRSOR UP • or CURSOR
DOWN • buttons until the words
PARENTAL
GUIDELINE
are
highlighted.
Designed
•
IPARENTAL GUIDELINE I_1
lighted, Press the CURSOR
RIGHT
Remember:
Selecting to
block any rating
will cause all the
higher ratings to
also be blocked
lhat
14 y(,_t_ aj _ge I 'l_is lype of
inlensely
silualions
suggestive
(S) or inlenSc
diahlgue
violence
IV)
Diispmgromisspe_tf!_ally_h,xigm,dtobe
m_y be unsupallk'
fi_r chiMren
anc or more of the following:
(Sl, or graphic
violence
crude
under
ind_enl
! 7 ! "l_is lype of
language
(L),
IVI.
28
Is
ONI
v
ON
--
_Tow that you've learn how to
1 ¥ block channels or censor your
viewing using the Movie Ratings or
Parental (TV) Guidelines let's
review what you've done. The
_martLock Review feature allows
pou to see what has been blocked.
;fhenever the Menu button is
pressed the onscreen menu will be
displayed with the SmartLock
Review highlighted.
CC
SEIUP
•
MOVIE RATINGS
BRIGHTNESS i
....... 30
COLOR
....... 30
i
_
Press the MENU button on the
remote to show the onscreen menu.
SmartLock
REVIEW will be highlighted.
_
Press the CURSOR RIGHT
• button and the SmartLock
Review Menu will appear.
This menu will display what channels have been blocked; what
Movie Ratings have been blocked;
what Parental (TV Ratings)
Guidelines have been blocked. This
CHANNELS
PARENTAL
GUIDELINE
BLOCK
UNRATED
OFF
BLOCK
NO
OFF
RATING
_Em
©
®®@
®®®
®®®
SmartLock DISABLED
Smart Lock DISABLED will appear in the
SmanLock Review screen if the SmartLock
Disable feature is set to ON.
review screen will also display that
status of Unrated and No Rating
settings. If the Master Disable feature has been turned ON, the
SmartLock
Review screen will display "SmartLock
CHANNELS BLOCKED
DISABLED".
BLOCKED - Shows all blocked channels that where set with-
in the CHANNELS
one time.
BLOCKED feature. Up to 5 channels may be blocked at
- CHANNELS
5 10 12
MOVIE RATINGS - Shows all blocked Movie Ratings that were set within
the MOVIE RATINGS feature. All or some may he blocked at one time.
Note: If a lower rating is blocked; this will automaticatly cause the higher
ratings to he blocked also. (ie.; if R is set to be blocked, X will automatically
he blocked also.)
BLOCKED
32 45
MOVIE RATINGS
RX
PARENTAL GUIDELINE - Shows all blocked TV Ratings that were set
within the PARENTAL GUIDELINES feature. All or some may he blocked
at one time. Note: U a lower rating is blocked; this will automatically cause
the higher ratings to he blocked also. (ie.; il_TV-14 is set to be blocked. TVMA will automat icaily be blocked.) Parental Guidelines also have sub ratings
for Violence (V), Fantasy Violence (FV), Sexual Situations (S), Coarse
Language (LL and Suggestive Language (D). Iftbe main rating is turned off
but the sub rating is turned ON, the program will be blocked but the rating
will not appear within the SmariLock Review menu.
", PARENTAL GUIDELINE
14 MA
BLOCK UNRATED - Shows ON or OFF depending on the status of the
BLOCK UNRATED l_:ature Based on the Movie Ratings or Parental (TV)
Guidelines
BLOCK UNRATED
ON
BLOCK NO RATING - Shows ON or OFF depending on the status of the
BLOCK NO RAI'ING feature. Based on programming with NO content
advisor/data.
=-BLOCK NO RATING
ON
29
14, 1)
__
_
_esides
the normal volume level
l._ control, your TV also has Bass
and Treble Boost sound adjustment
controls. The TREBLE Boost effects
only the high frequency sound coming from the TV enhancing the
highs; while the BASS Boost effects
only the low frequency sound coming from the TV enhancing the lows.
Press the MENU
button
on
the
ITREBLE BOOST
BASS BOOST
remote to show the onscreen
menu.
_
Press the CURSOR
UP •
CURSOR DOWN • buttons
NOISE REDUCTION ON
VOLUME
II ........ 15
or
to
SOUND
OFFI
ON
STEREO
NOISE REDUCTION
VOLUME
ON
ID ........ 15
[TREBLE BOOST
BASS BOOST
ON [
ON
SOUND
STEREO
select and highlight the name of the
control you wish to change (TREBLE BOOST, or BASS BOOST).
_ Use the CURSOR LEFT •
RIGHT • buttons to turn the
selected control ON or OFF.
OR
or
VOLUME
I
TREBLE BOOST
IBASS BOOST
SOUND
ON
I
TREBLE BOOST
IB SSBOOs'r
SOUND
AVL
3O
ON
0FFI
STEREO
AVL
VOLUME
........ 15
........ 15
ON
ONI
STEREO
ON
your
TV can detect a stereo sigal and will set itself automatically so the stereo sound can be
heard. However, there may be
occasions when you might want to
set the TV to mono. The following
steps describe how to change the
SOUND control:
<_
Press the MENU button
on
I menu.
the remote to show the onscreen
,_
Press the CURSOR UP • or
CURSOR DOWN • button
TREBLE BOOST
ON
BASS BOOST
ON
ISOUNO
MONO]
AVL
ON
INPUT
•
until the word SOUND is highlighted.
<_
ON
BASS BOOST
ON
_BUND
AVL
INPUT
Press the CURSOR RIGHT
• or CURSOR LEFT "41buttons to choose between STEREO
or MONO.
With STEREO selected, the television will reproduce any stereo
broadcast signal it receives.
Please note that you can force a
stereo broadcast signal to MONO,
but you cannot force a mono
broadcast signal to stereo.
TREBLE BOOST
®®®
®®®
@ ®
@
s_u
31
v,r_
STERE_
ON
•
The TV's Audio/Video Input jacks
are for direct picture and sound
connections between the TV and
a VCR (or similar device) that
has Audio/Video Output jacks.
<_
<_
<_
Connect the VIDEO (yellow)
CABLE to the VIDEO IN jack
on the back of the TV. Then connect the AUDIO (red and white)
CABLES to the AUDIO (left and
right) IN jacks on the rear of the
TV.
VIDEO IN
(YELLOW)
BACK OF TV
IF YOU ARE USING A
MONO DEVICE, USE
ONLY THE AUDIO
L/MONO JACK. IF A
DUMMY JACK IS
PLUGGED INTO THE
AUDIO R, NO SOUND
WILL BE HEARD,
Connect the VIDEO (yellow)
CABLE to the VIDEO OUT jack
on the back of the VCR. Then
connect the AUDIO (red and
white) CABLES to the AUDIO
(left and right) OUT jacks on the
rear of the VCR.
VCR
(EQUIPPED WITH
VIDEO AND AUDIO
OUTPUT JACKS)
Turn the VCR and the TV
l ON.
SOUND
<_
Press the MENU button on
the remote to display the
onscreen menu.
<_
Press the CURSOR UP • or
CURSOR DOWN • buttons
until the word INPUT is highlighted.
<_
Press the CURSOR RIGHT
• or CURSOR LEVI" .,4 button
to display the picture/sound menu
(ANTENNA, EXT 1). Use the
CURSOR UP • or DOWN •
buttons to select.
S_REO
AVL
ON
1INPUT
SLEEPTIMER
OFF
SmartLock
-d
®@@
®®®
q
® ®
Now your ready to place a prerecorded video tape in the VCR and
press the PLAY • button.
O
32
!
Wmether
you're watching a
ovie or a video game, your
TV has automatic video control settings matched for your current program source or content. The
SmartPicture feature quickly resets
your TV's video controls for a number of different types of programs
and viewing conditions you may
have in your home. Each
SmartPicture setting is preset at the
factory to automatically adjust the
TV's Brightness, Color, Picture,
Sharpness, Tint, and Color
Temperature levels.
_
PERSONAL
MOVES
Press the SMARTPICTURE
button on the remote control. The
current SmartPicture setting will
appear in the middle of the screen.
_
Press the SmartPicture button
repeatedly to select either PERSONAL, MOVIES, SPORTS, or
WEAK SIGNAL picture settings,
Note: The PERSONAL setting is
the setting that you setup using the
PICTURE options within the
onscreen menu. This is the only
SmartPicture setting that can be
changed. All other settings are
setup at the factory during the time
of production.
@
33
!
--
rrfhe SmartSound feature allows
J[ the listener to select between
four different factory set sound
options. Personal (which can be set
by the user), Theater (for movie
viewing), Music (for musical type
programming) and Voice (when the
program is mainly dialogue). To
select any of the options follow the
directions below.
PERSONAL
_
Press the SMART SOUND button on the remote control. The current SmartSound setting will appear
THEATER
n the m dd e of the screen.
_
Press the SMART SOUND
button repeatedly to toggle
between the four settings.
MUSIC
Remember, only the PERSONAL
control can be changed by the viewer. This changes the settings in the
main onscreen menu's sound controis.
o
VOICE
Remember, SmartSound
g works only with the programs coming through the 75_
input on the rear of the TV (RF
audio), It will not control the
sound levels for the External connections.
<
NOTE: When the VOICE mode of
SmartSound is selected the AVL feature will be automatically turned ON.
d
In most cases the volume levels coming from broadcast programming or
commercials are never the same.
With the AVL control turned ON,
you can have the TV level out the
sound being heard. This makes for a
more consistent sound by reducing
'the peaks and valleys that occur durmg program changes or commercial
breaks.
BASS BOOST
SOUND
IAVL
ON
STEREO
OFFI
INPUT
SLEEPTIMER
EXT I
OFF
BASS BOOST
SOUND
IAVL
INPUT
SLEEPTIMER
34
ON
STEREO
ON[
EXT 1
OFF
S
A
"list" or series of previously
viewed channels can be select-
ed with the SURF button on your
remote control. With this feature
you can easily switch between different TV programs that currently
interest you. The SmartSurf control
allows you set up to eight channels
in its quick viewing "list",
<_
,
ll
5
ADDED
Press the CHANNEL (+) or (-)
buttons (or the NUMBER buttons)
to select a channel to add to the
SURF 1st,
I,
<_
Press the SURF button on the
remote while the channel number is
still displayed to ADD the channel to
the SURF
_
8
ADDtD
st.
Repeat steps 1 through 2 to add
additional channels (up to 8) to the
SURF list.
To remove a channel for the SURF
list, simply choose the channel with
the numbered buttons and press the
SURF button while the channel
number is still displayed and the
screen will read DELETED.
10
ADDED
O
I
\,\
SURF
.........
B
SURF
_'_\
10
sunf !
ousty selected channel.
Press the SURF button repeatedly to cycle or "loop"
through the channels saved in the SURF channel list.
35
please
make these simple
checks before calling for service. These tips can save you time
and money since charges for TV
installation
and adjustment of
customer controls are not covered under your
' CAUTION: A video source (such as a video game, Compact Disc Interactive + CD1, or
TV information channel) which shows a constant non-moving pattern on the TV screen,
' can cause picture tube damage. When your TV is continuously used with such a source
'the pattern of the non-moving portion of the game (CDI, etc.) could leave an image
permanently on the picture tube. When not m use, turn the video source OFF.
IRegularly alternate the use of such video sources with normal TV viewing.
warranty.
No Power
i outlet
Check and
the push
TV power
POWER
cord.button
Unplug
again.
the TV, wait 10 seconds, then reinsert plug into
|ql
Check that outlet is not on a wall switch. Be sure fuse is not blown on AC Power strip.I
TUNER
control forAre
CABLE
or ANTENNA
i Check
heck the
antenna
connections.
they properly
secured setting.
to the TV's 75_ plug?
Check Audio/Video Input jack connections if using a VCR or other external device.
No Sound
Check the MUTE button on the remote control.
I Check
VOLUME Input
buttons.
Check the
Audio/Video
jack connections if using a VCR or other external device.
Remote Does Not
Work
Channels Above 13
I
Check batteries. Replace with AA Heavy Duty (Zinc Chloride) or Alkaline batteries
if necessary.
Clean the remote and the remote sensor window on the TV.
Check the TV power cord. Unplug the TV, wait 10 seconds, then reinsert plug into
outlet and push POWER button again. Be sure fuse is not blown on AC Power strip.
Check to be sure TV outlet is not on a wall switch.
Add desired channel numbers (CHANNEL control) into TV memory.
I Check
epeat to
channel
be sureselection.
the TUNER control is set to the CABLE option.
Cleaning, and Care
• To avoid possible shock hazard be sure the TV is unplugged from the electrical outlet before cleaning.
• When cleaning the TV screen take care not to scratch or damage the screen surface (avoid wearing jewelry or using
anything abrasive). Wipe the front screen with a clean cloth dampened with water. Use even. easy, vertical strokes when
cleaning.
• Gently wipe the cabinet surfaces with a clean cloth or sponge dampened in a solution of cool clear water. Use a clean
dry cloth to dry the wiped surfaces.
• Never use thinners, insecticide sprays, or other chemicals on or near the cabinet, as they might cause permanent marring
of the cabinet finish.
36
i
Coaxial Cable • A single solid antenna wire normally matched
with a metal plug (F-type) end connector that screws (or pushes)
directly onto a 75 Ohm input found on the Television or VCR.
Programming • The procedure of adding or deleting channel
numbers into the Television's memory circuits. In this way the
Television "'remembers" only the locally available or desired
channel numbers and skips over any unwanted channel numbers.
Closed Caption • Broadcast standard which allows you to read
the voice content of television programs on the TV screen.
Designed to help the hearing impaired this feature uses onsereen
"text boxes" to show dialogue and conversations while the TV
program is in progress.
Remote Sensor Window • A window or opening found on the
Television control panel through which infrared remote control
command signals are received.
Direct Audio/Video Inputs • Located on the rear of the 'IV
these connectors (RCA phono type plug) are used for the input
of audio and video signals. Designed for use with VCRs (or other
accessories) in order to receive higher picture resolution and
offer sound connection options,
Setup Mode • Automatic feature control settings made by the
TV. Designed for first time setup and Use. Settings for signal
connections (antenna or cable TV), plus channel program memory are held in the TV's memory (even if the set is unplugged
and moved to a new location.)
Identify • Method by which a remote control searches and finds
an operating code for another product (such as a VCR or Cable
Converter),
Once the code has been "identified" then the TV
remote can operate and send commands
to the other product.
Status • Allows the user to quickly confirm what channel number is currently being viewed. Status can also be used to clear
the Television of on screen displays or information (rather than
waiting for the displays to "time out" or automatically disappear from the screen).
On Screen Displays (OSD) • Refers to the wording or messages
generated by the television (or VCR) to help the user with specific feature controls (color adjustment, programming, etc.).
Menu • An onscreen listing of feature controls shown on the
Television screen that are made available for user adjustments.
Multichannel Television Sound (MTS) • The broadcast standard that allows for stereo sound to be transmitted with the TV
picture.
Accessories/Optional
..............................
Adapter Connector ...............................
Add/Delete Channels ...............................
Alternate Channel .................................
Audio/Video Input Jacks ............................
Battery Installation .................................
Cable TV Connections/Settings
.....................
Channel Memory ..............................
Clock Set Time ...................................
Closed Captioning .................................
Contrast Plus (Black Stretch) .........................
ControlsiTV ......................................
Controls/Remote .................................
External Control ..................................
Features
.........................................
Glossary TV Terms ................................
Input Control .....................................
Language Option ..................................
Memory/Program Channels ......................
Menu Button ......................................
Minus(0/Plus (+) Buttons ............................
Picture Controls ..................................
Picture Noise Reduction ............................
Precautions/Safety
............................
5-7
6-7
13
35
Twin Lead Wire • The more commonly used name for the two
strand 300 Ohm antenna wire used with many indoor and outdoor antenna systems. In many cases this type of antenna wire
requires an additional adapter (or balun) in order to connect to
the 75 Ohm Input terminals designed into the more recent
Televisions and VCRs.
Progranlming Channels .............................
Remote Control ..................................
32
8
5, 11
12
8-9
Requesting Service ...........................
RF Coaxial Cable .................................
38-39, 40
5-7
Safety/Precautions ............................
Sensor Remote ....................................
3, 36, 40
8
Set Up/First Time Use .............................
12, 13
18
5-13
Sleep Timer ......................................
SmartLock Access Code Feature ......................
SmartLock Block Channel Feature ....................
20
16
8
2l
24
25
SmartLock Blocking Options ........................
SmartLock Blocking using the Movie/TV Ratings ......
SmartLock Review ................................
SmartPicture Control ...............................
8, 9
14
4
37
32
10
12, 13
9
9
15
17
SmartSound Control ...............................
SmartSuff .......................................
34
35
Start-up Channel Control ............................
Start-up Time Control ..............................
Status Button ......................................
Timer Control ....................................
19
19
9
18
Tips for Service ..........................
VCR/TV Connections ...............................
Volume Bar Control
3, 36, 40
Warranty
37
26
27-28
29
33
...............................
........................................
36, 38-39, 40
7
22
40
Philips Consumer Electronics Company
Factory Service Center Locations
"_ Indlcates In-Home Service Only
%800-242-9225
_
_
Beaumont/Austin
San Antonio
Tampa/W Florida
,/r Ft. MyersfSW Florida
_t_ Miaml/SE Florida
• Indicates In-Home/Carry-In Service
NOTE:If youresidein oneofourPhilipsFactory
ServiceBranchareas(seedirectoryonback),youcancontactthenearestServiceBranchto
obtainefficientandexpedientrepairfor yourproduct.If yourproductis In-Warranty,
you shouldhaveproof-of-purchase
to ensureNOCharge
Service.For0ut-of-Warranty
service,callthelocationnearestyou.
NOTA:Si vous rdsidezclansunedesrdgionsdesservies
parunesuccursale
de serviceaprbsventadufabricantPhiiips(voir listeci-dessoas),
vous pourrezcontactar
la branchede serviceapr_sventela plusprosde chezvous pour obtenirun serviceapr_sventerapideet efficace.Si le
produitest sous garantie,if suffiradepresenterone preuved'achatpour bdn_ficierd'un servicesansfrais. Poor lesproduitsnon couvertspar la
garantie,
contaetaz
le centrele plus prosdechezvoos.
NOTA:Si Ud.resideenunade nuestraszonasparasucursales
Philipsdeservicioal def_ibrica(ver directorio
m_isabajo),Ud.puedecomunicarse
conla sucursaldeserviciom_iscercana
paraobteneruna reparaciOn
oportunay eficazde su producto. Si su productoest_itodavfabajogarant[a,Ud.debe presentarcomprobante
de compraparano ocasionarningunoscargospor servicio. Paraserviciodespotsdel veneimientode la
garantfa,Ilameal lugar rodscercano
de los abajoindicados.
t_
Howyoucanobtainefficientandexpedient
carry-in,mail-in,or in-homeservicefor yourproduct
PleasecontactPhilipsat
1-800-661-6162(Frenchspeaking)
1-800-363-7278(Englishspeaking)
&LC_U=Ia
Commentobtenirleserviceapr_s-vente
pourlesproduitsapportdsou envoyds
parla postab notrecentredeserviceoule service_ domicile
Veuillez
contactar
philips;t:
1-800-661-6162(Francophone)
1-800-363-7278
E_
Cdmorecibirservicioefficiente
parasu producto,enpersona,pot correoo a domicillo
Favorde eomunicarsecon Philipsal:
1-800-661-6162(francdfono)
1-800-363-7278(angldfono)
MAC2929
EL4482-3 Rev. AA
3135 015 07541
1/99
38
OUALITY SERVICE IS AS CLOSEAS YOUR TELEPHONE!SIMPLY LOOK OVER THE LIST BELOW FOR THE NUMBER OF A
FACTORY
SERVICE CENTER
NEAR YOU. YOURPRODUCT WILL RECEIVEEFFICIENTAND EXPEDIENTCARRY-IN, MAIL-IN, OR IN-HOME SERVICE, AND YOU WILL RECEIVEPEACEOF MIND_
KNOWINGYOUR PRODUCTIS BEING GIVEN THE EXPERTA1TENTIONOF PHILIPS' FACTORY SERVICE. ANO,IF THE PHONE NUMBER LISTED FOR YOUR AREA
IS LONG DISTANCE, CALl. 1-800-242-9225 FOR FACTORY
SERVICE,
COMMENT
OBTENIR
NOTRESERVICE
APRILS
VENTE
RAPIDEETEFFICACE
SOITPARCOURRIER,/I
DOMICILE.
OUENSEPRI_SENTANT
A UNCENTRE
BESERVICE
PHILIPS.PLUSDE6GOCENTRES
DERI_CEPTJUN
OEPNUDUITS
A RI-_PARER
ATRAVERS
LEPAYS:CONTACTER
LECENTRE
DESERVICE
AUXCONSOMMATEURS
LEPLUSPROCHE
POURSAVOIRL'EMPLACEMENT
DECESDI_POTS
DANSONRAYONDE50_ 75MILES(SOKM_ 120KM)OUCENTRE
DESERVICE
LOCAL.
C_MO OBTENERON SERVICIOOPORTUNUY EFICIENTEPORCORREO,EN CASA0 EN PERSONAPARASO PROOUCTOA TRAVI_SDE UN CENTROPHILIPS DE SERVICIO. MAS DE 600 SITfOS POR
TODO ELPAlS PARALA RECEPCIONDE PROOUCTOSNECESITADOSDE REPARACIONES:
COMUNICARSECON ELCENTRODE SENVICIODE FADRICAMAS CERCANOPARAESTOSLUGkRESDENTDO
DE ON RADIODE SOA 120 KM (50 A 75 MILLAS) OEL CENTNODE SERVICIOLOCAL.
GEORGIA
Philips Factory Service of Georgia
200 N. Cobb Pkwy., Suite 120
Marietta, GA30062
(770) 795-0085
CENTRALU.S.A.
Philips Factory Service CentralUS
950 KeynoteCircle
Brooklyn Heights, OH44131
(216) 741-3334
ILLINOIS
Philips Factory Service of Illinois
1279 W. Hamilton Pkwy.
Itasca, IL 60143
(630) 775-0990
FLORIDA
Philips Factory Service of Florida
1911 US Highway301 North
Tampa,FL33619
(813) 621-8181
MICHIGAN
Philips Factory Service of Michigan
25173 Dequindre
Madison Heights, MI 48071
(248) 544-2110
TENNESSEE
Philips Factory Service of EastTennessee
6700 D Papermifl Rd.
Knoxville,TN 37919
(423) 584-6614
WESTERNU.S.A,
Philips FactoryService Western Region
681 East Brokaw Rd.
San Jose, CA 95112
(408) 436-8566
DALLASAREA
Philips Factory Service of Dallas
415 N. Main Street, #107
Euless,TX 76040
(713) 682-3990
MID-ATLANTIC
Philips Factory Service Mid-Atlantic
352 Dunks Ferry Rd.
Bensalem,PA 19020
(215) 638-7500
TEXAS
Phllips FactoryService of Texas
1110 N. Post Oak Rd., Suite 100
Houston, TX77055
(713) 682-3990
MAC_
39
1_9
COLOR
TELEVISION
90 Days Free Labor
One Year Free Replacement of Parts (Two Years Free Replacement on Color Picture Tube)
This product can be repaired in-home.
WHO IS COVERED?
Youmust haveproof of purchaseto receivewarranty service. A sales
receipt or other documentshowingthat youpurchasedthe product is
consideredproof of purchase.
MAKE
Also keep the original
return
WHAT
Warranty
SURE YOU
KEEP...
Please keep your sales receipt or other document showing proof of
purchase. Attach it to this owner's manual and keep both nearby.
box and packing material in case you need to
your product.
IS COVERED?
coverage begins the day you buy your product.
For 90 days
thereafter, all parts will be repaired or replaced free, and labor is free.
From 90 days to one year from the day of purchase, all parts will be
repaired or replaced free, but you pay for all labor charges. From one
BEFORE REQUESTING
SERVICE...
Pleasecheckyourowner's manualbeforerequestingservice.
Adjustmentsof the controlsdiscussed
theremay saveyou a service
call.
to two years from the day of purchase, you pay for the replacement or
repair of all parts except the picture tube, and for all labor charges.
After two years from she day of purchase, you pay for the replacement
or repair
of all parts, and for all labor charges.
All parts, including repaired
and replaced
the original warranty period.
WHAT
Contact
parts, are covered only for
When the warranty on the product
expires, the warranty on all replaced
and repaired
TO GET WARRANTY
SERVICE
PUERTO
RICO OR U.S. VIRGIN
parts also expires.
IN U.S.A.,
ISLANDS...
a Philips factory service center (see enclosed list) or autho-
rized service center to arrange repair.
(in U.S.A., Puerto Rico and U.S. Virgin islands, al} implied warranties,
including implied warranties of merchantability
and fitness for a partic-
ular purpose, are limited in duration to the duration of this express
IS EXCLUDED?
warranty.
Your warranty does not cover:
But, because some states do not allow limitations
on how
long an implied warranty may last, this limitation may not apply to
labor charges for installation or setup of the product, adjustment of
customer controls on the product, and installation or repair of
antenna systems outside of the product.
product repair and/or part replacement because of misuse, accident, unauthorized repair or other cause not within the control of
Philips Consumer Electronics Company.
you,)
TO GET WARRANTY
SERVICE
IN CANADA...
Please contact Philips at:
reception problems caused by signal conditions or cable or antenna
1-800-661-6162
(French Speaking)
1-800-363-7278
(English Speaking)
systems outside the unit_
•
a product that requires modification
or adaptation to enable it to
operate in any country other than the country for which it was
designed, manufactured, approved and/or authorized, or repair of
•
(In Canada, this warranty
is given in lieu of all other
warranties.
No
products damaged by these modifications.
other warranties are expressed or implied, including any implied warranties of merchantability
or fitness for a particular purpose. Philips is
incidental or consequential damages resulting from the product.
not liable under any circumstances
(Some states do not allow the exclusion of incidental or consequen-
dental or consequential damages, howsoever
of the possibility of such damages.)
tial damages, so the above exclusion may not apply to you. This
includes, but is not limited to, prerecorded material, whether copyrighted or not copyrighted.)
Warranty
IS SERVICE
or institutional purposes.
Pleaserecord the modelandserialnumbersfoundon the product
below. Also,pleasefillout andmailyourwarrantyregistrationcard
promptly. It willbe easierfor usto notify you if necessary.
AVAILABLE?
service is available in all countries where the product is offi-
cially distributed by Philips Consumer
tries where Philips Consumer
Electronics Company.
In coun-
Electronics Company does not distribute
MODEL #
SERIAL#
the product, the local Philips service organization will attempt to provide service (although there may be a delay if the appropriate
parts and technical manual(s) are not readily available).
Philips Service Company,
Printed i_ U.S.A.
incurred, even if notified
REMEMBER...
• a product used for commercial
WHERE
for any direct, indirect, special, inci-
spare
P.O. Box 2976, Longview, Texas 75606, (903) 242-4800