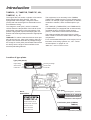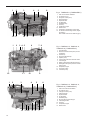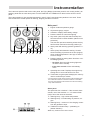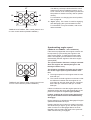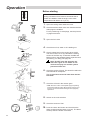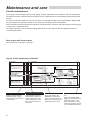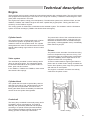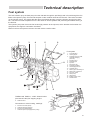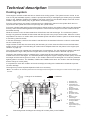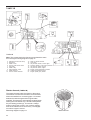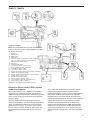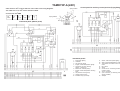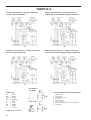
1
INSTRUCTION BOOK
TAMD63L/P, TAMD71B,
TAMD73P/WJ, TAMD74C/L/P
Structure of this Instruction Book
The first part of this Instruction Book contains important information on functions, fuel, oils and coolants.
The operating instructions are important even if you
know what you are doing. They may contain some
information which is different to what you are used
to. Read through the first part before you take your
boat out the first time.
The rest of the manual – “Technical description and
maintenance” – can be read once you have had time
to acquaint yourself with your boat. This section will
give you more information on the design and operation of your engine. Here you will also find a kind of
“Do-It-Yourself” description of many aspects of maintenance.
Contents
Safety Precautions .............................................
2
General Information ...........................................
Running-in ............................................................
Warranty ...............................................................
Certificated engines ..............................................
4
4
5
6
Introduction ........................................................
8
Instrumentation .................................................. 11
Key switch, starter keys ....................................... 16
Controls .............................................................. 16
Calibrating controls, (TAMD73P, -74C/L/P) ......... 18
Operation
Before starting ......................................................
Starting the engine ...............................................
Checks during operation .......................................
Maneuvering during operation ..............................
After operation ......................................................
Safety systems (TAMD73P, -74C/L/P) .................
Action when there is a risk of freezing ..................
22
23
25
25
28
29
32
Maintenance and care
Periodic care and maintenance ............................ 34
Maintenance schedule ....................................... 36
Technical description
Engine ..................................................................
Lubrication system ...............................................
Fuel system ..........................................................
Cooling system .....................................................
Electrical system ..................................................
43
47
51
56
65
Wiring Diagrams ................................................ 73
Inhibiting ............................................................. 94
Launching procedures .......................................... 94
Bringing out of storage ......................................... 95
Fuel, Oils, Coolant ............................................. 96
Fault-tracing ....................................................... 97
Technical Data .................................................... 106
Accessories ........................................................ 115
CALIFORNIA
Proposition 65 Warning
Diesel engine exhaust and some of its constituents are known to
the State of California to cause cancer, birth defects, and other
reproductive harm.
1
Safety Precautions
Introduction
This Instruction Book contains the information you
need to operate the engine correctly. Check that you
have the correct Instruction Book for your engine.
Read the book carefully before operating or servicing the engine. Incorrectly undertaken operations
could result in personal injury, or damage to property
or the engine.
If you do not understand or are uncertain about
any operation or information in this manual,
please contact your Volvo Penta dealer who will
be able to help you with an explanation or will
demonstrate the operation.
If the service operation requires that the engine
is operating let your Volvo Penta authorized
dealer carry out the work. If working in proximity of a running engine, careless movements or
a dropped tool can result in personal injury.
Immobilize the engine by turning off the power
supply to the engine at the main switches so it
is impossible to start, and lock them in the OFF
position before starting work. Set up a warning
notice at the engine control point or helm.
Never start the engine without installing the air
cleaner (ACL). The rotating compressor in the
Turbo can cause serious personal injury. Foreign objects entering the intake ducts can also
cause mechanical damage.
Important
In this book and on the engine you will find the following special warning symbols.
WARNING! Possible danger of personal injury, damage to property or mechanical malfunction if the instructions are not followed.
Read the Instruction Book.
Below is a summary of the risks and safety precautions you should always observe or carry out when
operating or servicing the engine.
Check that the warning or information decals
on the engine are always clearly visible. Replace decals that have been damaged or painted over.
Always turn the engine off before starting service procedures. Avoid burns. Take precautions to avoid hot surfaces and liquids in supply
lines and hoses when the engine has been
turned off immediately prior to starting work on
it and it is still hot.
2
Never use start spray or similar to start the engine. The start spray may cause an explosion
in the inlet manifold. Danger of personal injury.
Avoid opening the coolant filler cap when the
engine is hot. Steam or hot coolant can spray
out as system pressure is lost. Open the filler
cap slowly and release coolant system pressure, if the filler cap or a drain cock/venting
cock must be opened, or if a plug or engine
coolant line must be removed on a hot engine.
It is difficult to anticipate in which direction
steam or hot coolant can spray out.
Stop the engine and close the sea cock before
carrying out operations on the engine cooling
system.
Only start the engine in a well-ventilated area.
If operating the engine in an enclosed space,
ensure that exhaust gases and crankcase ventilation emissions are ventilated out of the working area.
Reinstall all protective parts removed during
service operations before starting the engine.
Make a point of familiarizing yourself with other
risk factors, such as rotating parts and hot surfaces (turbocharger, charge pipe, starter element, charge air cooler, intake pipe exhaust
pipe etc.).
Anti-corrosion agents are hazardous to health.
Read the instructions on the product packaging!
Approaching a running engine is dangerous.
Loose clothing or long hair can fasten in rotating parts and cause serious personal injury.
Antifreeze agents are hazardous to health.
Read the instructions on the product packaging!
Certain engine conservation oils are inflammable. Some of them are also dangerous if inhaled. Ensure that ventilation in the work place
is good. Use a protective mask when spraying.
engine (engine weight including reverse gear
and any extra equipment installed).
Hot oil can cause burns. Avoid skin contact
with hot oil. Ensure that the lubrication system
is not under pressure before commencing work
on it. Never start or operate the engine with the
oil filler cap removed, otherwise oil could be
ejected.
All chains and cables should run parallel to
each other and as perpendicular as possible
against the side of the engine.
Never allow an open flame or electric sparks
near the batteries. Never smoke in proximity to
the batteries. The batteries give off hydrogen
gas during charging which when mixed with air
can form an explosive gas – oxyhydrogen. This
gas is easily ignited and highly volatile. Incorrect connection of the battery can cause a single spark which is sufficient to cause an explosion with resulting damage. Do not shift the
connections when attempting to start the engine (spark risk) and do not lean over any of
the batteries. Refer to instructions in the Instruction Book.
Never carry out work on an engine which is
only supported on a hoist.
Never interfere with the terminals when the
engine is running. A high energy pulse may be
generated which will damage the electrical
system.
Never mix up the positive and negative battery
terminals when installing. Incorrect installation
can result in serious damage to electrical
equipment. Refer to wiring diagrams.
Always use protective goggles when charging
and handling batteries. The battery electrolyte
contains extremely corrosive sulfuric acid. If
this should come in contact with the skin, immediately wash with soap and plenty of water.
If battery acid comes in contact with the eyes,
immediately flush with plenty of water and obtain medical assistance without delay.
Turn the engine off and switch off power at the
main switches before carrying out work on the
electrical system.
Clutch adjustments, where a clutch is fitted,
must be carried out with the engine turned off.
Use the lifting eyes mounted on the engine/reverse gear when lifting the drive unit. Always
check that the lifting equipment used is in good
condition and has the load capacity to lift the
To ensure safe handling and to avoid damaging
engine components on top of the engine, use a
lifting beam to raise the engine.
If extra equipment is installed on the engine
which alters its center of gravity a special lifting
device is required to obtain the correct balance
for safe handling.
WARNING! The components in the electrical
system and in the fuel system on Volvo Penta
products are designed and manufactured to
minimize the risk of fire and explosion.
The engine must not be run in areas where
there are explosive materials.
Fuel filter replacement should be carried out on
a cold engine to avoid the risk of fire caused by
fuel spilling onto the exhaust manifold. Always
cover the generator (alternator), if it is located
under the fuel filters. The generator (alternator)
can be damaged by spilled fuel.
WARNING! TAMD63, TAMD73 and TAMD74
have pretensioned delivery pipes. These pipes
must under no circumstances be bent. Damaged pipes should be replaced.
Always use protective gloves when tracing
leaks. Liquids ejected under pressure can penetrate body tissue and cause serious injury.
There is a danger of blood poisoning.
Always use fuels recommended by Volvo
Penta. Refer to the Instruction Book. The use
of lower quality fuels can damage the engine.
On a diesel engine poor quality fuel can cause
the control rod to seize and the engine to overrev with the resulting risk of damage to the engine and personal injury. Poor fuel quality can
also lead to higher maintenance costs.
Observe the following rules when cleaning with
high-pressure water jets. Never direct the water
jet at seals, rubber hoses or electrical components. Never use a high pressure jet when
washing the engine.
3
General Information
Welcome aboard
Running-in
Thank you for choosing a Volvo Penta marine engine.
Volvo Penta have been building marine engines
since 1907. Quality, operating reliability and innovation have made Volvo Penta a world leader in the
marine engine industry.
When the engine is new it should be run normally.
Do not operate it at full load during the first 10 hours
of operation except for short periods. Unnecessary
idling of an unloaded engine should always be
avoided.
As owner of a Volvo Penta marine engine we would
also like to welcome you to a worldwide network of
dealers and service workshops to assist you with
technical advice, service requirements and replacement parts. Please contact your nearest authorized
Volvo Penta dealer for assistance.
We would like to wish you many pleasant voyages.
AB VOLVO PENTA
Technical Information
Check the instrumentation extra carefully during this
period so that any abnormal conditions may be discovered in good time.
Check also that there are no leaks.
NOTE! With a new or reconditioned engine, the
valve clearance should first be checked after 150
hours of operation.
The oil and oil filter* in the Twin Disc reverse gear
should first be changed after a maximum of 50 hours
operation. Remove and clean the reverse gear’s oil
screen at the same time. In the case of MPM reverse
gears, the oil screen should be cleaned after 10 and
50 hours of operation, and the first oil and filter
change* should be made after 50 hours of operation.
The disengageable clutch should be checked more
often during the first few days. It may be necessary
to adjust it to compensate for wear to the laminate.
Your new boat
Every new boat has it own special characteristics.
Even experienced boat owners are advised to note
carefully how the boat behaves at different speeds,
weather conditions and loads.
If your boat and engine combination permit highspeed use, we strongly recommend that a safety
breaker is fitted, regardless of the type of boat. If
your boat is not fitted with a safety breaker contact
your Volvo Penta dealer who can assist you in selecting one.
4
* Note. Only the TD MG507-1 and MG507A-1 with a trolling
valve, the TD MG5085A and the MPM IRM 301A and -302V
have an oil filter.
Fuel and lubricants
Only use lubricants and fuels recommended on page
96 or under “Technical Data”. Use of other grades
can cause malfunctions and reduced service life.
Spare parts
WARNING! The components in the electrical
system and in the fuel system on Volvo Penta
products are designed and manufactured to
minimize the risk of fire and explosion.
Using non-original Volvo Penta parts which do
not meet the above standards, can result in fire
or explosion on board. Any type of damage
which results from the use of non-original Volvo
Penta replacement parts for the product will not
be covered under any warranty provided by AB
Volvo Penta.
Joint responsibility
Volvo Penta continually commits a considerable part
of its development resources towards minimizing the
environmental impact of its products. Examples of areas where we are always looking for improvements
are exhaust emissions, noise levels and fuel consumption.
Regardless of whether your Volvo Penta engine is installed in a boat used for pleasure or commercial operation, incorrect operation or improper maintenance
of the engine will result in disturbance or damage to
the environment.
In this instruction book there are a number of service
procedures, which, if not followed will lead to an increase in the engine’s impact on the environment
and running costs and a reduction in service life. Always follow the recommended service intervals and
make a habit of checking that the engine is operating
normally every time you use it. One example is an
excessively smoky exhaust. Contact an authorized
Volvo Penta workshop if you cannot correct the fault
yourself.
Safety
Everyone wants to have a problem-free and pleasant
time when they take their boat out. To help you do
this we have provided a pre-journey check-list below,
of course extra items can be added to this list if you
want. Important areas are the engine and its equipment and the general maintenance of the boat.
Planning your trip
Bear in mind that most chemicals used on boats are
harmful to the environment if used incorrectly. Volvo
Penta recommends the use of bio-degradable degreasing agents for all cleaning. Always dispose of
engine and transmission oil waste, old paint, degreasing agents and cleaning residue etc. at proper
disposal areas so that they do not harm the environment.
Always operate the boat at a speed and distance
from the shore that take account of the swell and
noise which may cause harm to wildlife, moored
boats, floating jetties etc. Always leave any mooring
places and the areas you have been visiting as you
would wish to find them.
– Get out up-to-date charts for the route planned.
– Calculate distance and fuel consumption.
– Note places where you can refuel on your planned
course.
– Tell friends or relatives about your trip plans.
Boat equipment
– Rescue and emergency items such as life vests
and signal rockets. Does everyone know where
the equipment is stored on board?
– Spare parts on board, for example Kit with water
pump impeller etc.
– TAMD73P and TAMD74C/L/P with Twin Disc
reverse gear* with electronic gear shifting:
Check that the plug for emergency operation
(manual engagement) of the reverse gear is kept
in the bracket on the reverse gear. See page 31.
– The proper tools for the equipment.
– Fire extinguisher (checked and charged).
* Not TD MG5075A.
Warranty
A Service and Warranty book with conditions for
Volvo Penta’s International Limited Warranty is supplied with every engine. Contact your nearest Volvo
Penta dealer or importer for your copy if you have
not received one.
Some markets can have other warranty conditions
depending on national legislation and regulations.
These conditions are provided by the Volvo Penta
importer or distributor for the market in question. If
you wish to have a copy of the conditions please
contact your local Volvo Penta representative.
5
Warranty Registration Card
Volvo Penta Service
The Warranty Registration Form (North American
market) or Warranty Card (other markets) should always be filled out and sent in by the dealer. Make
sure that this has been done, if no proof of the delivery date can be provided the warranty undertakings
might not be honored.
Volvo Penta has a comprehensive dealer network
that offers both service and spare parts for Volvo
Penta engines. These dealers have been carefully
selected and trained to provide professional assistance for service and repairs.
They also have the special tools and testing equipment required for maintaining a high standard of service. Volvo Penta dealers and vendors must maintain
a stock of original spare parts and accessories to
cover most requirements of Volvo Penta owners.
When ordering a service or spare parts always quote
the engine and drive/reverse gear complete type
designation and serial number. You will find this information on the engine product plate and on a decal on
the front valve cover (see page 8).
Maintenance and care
– PDC (Pre-Delivery Commissioning) delivery undertaking for marine engines: The Pre-delivery Commissioning procedure ensures that Volvo Penta
products operate correctly after installation. It also
ensures that the new owner is given a proper introduction to the use and care of the product (refer to
the Warranty and Service Handbook for a Checklist). The delivery undertaking “PDC” is carried out
at the time of the delivery of the boat to the enduser. There is no charge for the work undertaken
which is covered by the Volvo Penta International
Limited Guarantee.
– First Service inspection: A first service inspection must be carried out after running the engine
for 100 hours (TAMD63, TAMD73 and TAMD74)
or 150–300 hours (TAMD71) or within 180 days
from the date of delivery or the end of the first season, whichever comes first. Labor and material
costs in connection with the First Service Inspection are not covered by the Volvo Penta International Limited Guarantee (for checklist see your
Warranty and Service book).
Regular maintenance should be carried out after the
First Service Inspection in accordance with the maintenance scheme in this book. Any work carried out in
addition to maintenance services should be documented (refer to the Warranty and Service book).
It is an absolute condition for the Volvo Penta International Limited Guarantee to apply that the Pre-Delivery Commissioning and First Service Inspection
have been carried out by an authorized Volvo Penta
service dealer.
6
Certificated engines
If you own an engine certificated for any area
where exhaust emissions are regulated by law,
the following is important:
Certification means that an engine type is inspected
and approved by the authorities. The engine manufacturer guarantees that all engines manufactured of
that type correspond to the certified engine.
This places special requirements for maintenance and service as follows:
●
The maintenance and service intervals recommended by Volvo Penta must be observed.
●
Only genuine Volvo Penta replacement parts may
be used.
●
The service of injection pumps and injectors or
pump settings must always be carried out by an
authorized Volvo Penta workshop.
●
The engine must not be modified in any way
except with accessories and service kits approved
by Volvo Penta.
●
No modifications to the exhaust pipes and air
supply ducts for the engine may be undertaken.
●
Seals may only be broken by authorized personnel.
Otherwise the general instructions contained in the
Instruction Book concerning operation, service and
maintenance must be followed.
IMPORTANT! Late or inadequate maintenance/service or the use of spare parts other
than Volvo Penta original spare parts will
invalidate AB Volvo Penta’s responsibility for
the engine specification being in accordance
with the certificated variant.
Volvo Penta accepts no responsibility or liability
for any damage or costs arising due to the
above.
Engine type ...............................................................
Serial No. ..................................................................
Dataset (EDC) No. ....................................................
Reverse gear type .....................................................
Serial No. ..................................................................
Propeller designation .................................................
Identification number
Boat, type designation ...............................................
Immediately after you have taken delivery of your
boat, make a note of the serial number and model
designation of the engine and reverse gear and the
dataset number (EDC)*. Refer to next page for location of type plates. Include the serial number and
model designation of the boat and any extra equipment. This information is necessary when you contact your Volvo Penta or boat sales representative for
service and spare parts. Take a copy of the information and keep it in a safe place so it is available
should the boat be stolen.
Serial No. ..................................................................
* Applies to TAMD73P and TAMD74C/L/P.
Serial No. ..................................................................
Disengageable clutch, type designation ....................
Serial No. ..................................................................
Other equipment ........................................................
© 1999 AB VOLVO PENTA
All rights to changes or modifications reserved. Printed on environmentally-friendly paper.
(Cover: Department of transport (shipping), license 9809095)
7
Introduction
TAMD63L, -P, TAMD71B, TAMD73P, -WJ,
TAMD74C, -L, -P
The engines are four-stroke, 6 cylinder in-line marine
diesel engines with direct injection. They are
equipped with turbochargers, charge air coolers
(CACs) and heat exchangers for thermostat-controlled freshwater cooling.
This equipment is not necessary in the TAMD63,
TAMD73 and TAMD74 as they have a different specification, for example, higher compression, a different
combustion chamber, and a modified injection system.
The charge air cooler (CAC), which is seawatercooled, lowers the temperature of the inlet air to the
engine after compression in the turbocharger. This
permits a high power output while keeping the combustion and exhaust gas temperatures to appropriate
levels.
The TAMD73P (“TAMD73 EDC”) and TAMD74C/L/P
(“TAMD74 EDC”) are equipped with an electronically
controlled governor, Electronic Diesel Control
(“EDC”).* This further reduces exhaust emissions.
TAMD71B: To reduce exhaust emissions when operating at low load, e.g. after (cold-) starting, there is a
by-pass valve which closes the air passage through
the charge air cooler (CAC) and instead channels the
air directly into the engine’s inlet manifold via the
electrical preheating element.
The exhaust manifold and turbocharger are freshwater-cooled to reduce the radiant heat to the engine
compartment.
For a more detailed description of the engine, its fuel,
lubrication, and cooling systems, etc., see “Technical descriptions” on pages 43– 70.
* Note. EDC = “Electronic Diesel Control”.
Location of type plates
Type plate (decal):
Reverse gear design.
Serial number
Product No.
ENGINE
Engine design.
TAMD74P-A
XXXXXXXXXX
868 821
TD MG 5075A-E
XXXXXXXXXX
3 828 492
Serial number
Product No.
Type plate,
reverse gear
Decal,
dataset EDC:
Type plate:
Engine designation Product No.
TAMD74P-A 868821
o
N.
TAMD74P-A
xxxxxxxxxx / xxxxx
Serial number
Basic engine No.
RATED POWER: 353 kW
RATED SPEED: 2600 RPM
Certification plate: (TAMD63,
TAMD73):
DATASET: 873 931
SPEC. NO: 868 821
EMISSION APPROVED IN ACCORDANCE TO THE
REQUIREMENTS OF SAV.
APPROVAL NO:
xxxxxxxxxx
ECU BATCH: 9810
Approval No. (Certifying)
8
1
2
3 4
5
6
7 8
Fig. 1. TAMD63L-A, TAMD63P-A
1.
2.
3.
4.
5.
6.
7.
8.
9.
10.
11.
12.
Fine fuel filters
Smoke limiter
Engine coolant filler cap
Injection pump
Oil filler cap
Terminal box with semi-automatic fuses
Turbocharger
Water-cooled exhaust bend (accessory)
Reverse gear MPM IRM 220A-1
TAMD63P: Wastegate valve (by-pass valve)
Oil dipstick, engine
Solenoid valve (fuel cut-off valve) for
stopping engine
13. Oil cooler, engine
14. Flexible engine mounting (accessory)
14
1
2
13
12
11
3
4
5
10
6
9
7
8
Fig. 2. TAMD63L-A, TAMD63P-A
1.
2.
3.
4.
5.
6.
7.
8.
9.
10.
11.
12.
13.
14.
14
1
13 12
2 3
4
11 10
5
Crankcase ventilation filter
Air Cleaner (ACL)
Charge air cooler (CAC)
Oil filler cap
Expansion tank
Engine coolant filler cap
Heat exchanger
AC generator
Seawater pump
By-pass filter for lubricating oil
Lubricating oil filter, engine
Starter motor
Oil dipstick, engine
Oil dipstick, reverse gear.
9
6
7
Fig. 3. TAMD71B (auxiliary engine variant)
1.
2.
3.
4.
5.
6.
7.
8.
9.
10.
11.
12.
13.
13 12
11
10
9
Terminal box with semi-automatic fuses
Engine coolant filler cap
Fine fuel filters, interchangeable
Oil filler cap
Injection pump
Turbocharger
Air Cleaner (ACL)
Oil sump
Alt. location of oil dipstick
Oil cooler, engine
Smoke limiter
Circulation pump
AC generator
8
9
1
2
3
4
5
6
Fig. 4. TAMD73P-A (“TAMD73 EDC”)
1.
2.
3.
4.
5.
6.
7.
8.
9.
10.
11.
12.
12 11
1
2
10
9
8
3 4 5
Filter for crankcase ventilation
Air Cleaner (ACL)
Charge air cooler (CAC)
Heat exchanger
Expansion tank
AC generator
Seawater pump
Oil sump
Oil dipstick, engine
Starter motor
Oil dipstick, TD MG507A reverse gear
Alt. location of lubricating oil filter, engine
(accessory)
Std. location same as for TAMD74 (fig. 6)
7
6
7 8
Fig. 5. TAMD74C-A, TAMD74L-A,
TAMD74P-A (“TAMD74 EDC”)
1. Fine fuel filters
2. Electronic Diesel Control (EDC) control
module box
3. Oil filler cap
4. Engine coolant filler cap
5. Injection pump
6. Terminal box with semi-automatic fuses
7. Turbocharger
8. Water-cooled exhaust bend (accessory)
9. Wastegate valve (boost pressure control
(BPC) valve)
10. Oil dipstick, engine
11. Oil cooler, engine
12. Circulation pump
12
1
11
2
10
3
9
4
5
6
Fig. 6. TAMD74C-A, TAMD74L-A,
TAMD74P-A (“TAMD74 EDC”)
1.
2.
3.
4.
5.
6.
7.
8.
9.
10.
11.
12.
12 11 10
10
9
8
7
Filters for crankcase ventilation
Air Cleaner (ACL)
Charge air cooler (CAC)
Heat exchanger
Expansion tank
AC generator
Seawater pump
By-pass filter for lubricating oil
Lubricating oil filter
Oil sump
Oil dipstick, engine
Starter motor
Instrumentation
The instrument panels used are the main panel, the Flying Bridge (instrument panel for alt. control position), an
auxiliary panel and an extra alarm panel. For the TAMD73P and TAMD74C/L/P there is also an EDC control
panel.
The instrumentation is also supplied separately in sets if Volvo Penta instrument panels are not used. These
sets include three smaller panels for starting, stopping and alarm functions.
1
2
3
Main panel
1. Engine coolant temperature gauge.
2. Oil pressure gauge, engine.
3. Voltmeter. Displays start battery voltage.
4. Pressure switch for instrument lighting.
5. Key switch (start lock) with start and stop functions and a built-in restart inhibitor (starter motor
protection).
The start lock prevents restarting unless the key
has first been returned to the stop position (S).
6. Alarm panel with warning symbols (positions 11–
14).
10
9
8
7
6
5
4
7. Alarm (siren) fault detection warning. Sounds
when lubricating oil pressure is too low (engine),
when coolant temperature is too high or there is
a loss of charge.
8. Pressure switch for testing alarm functions or acknowledging alarms.
– No alarm: Alarm test (all warning lights are
on and the siren sounds).
– If the alarm sounds: Alarm acknowledgment.*
9. Operating time meter. Displays the engine’s operating time in hours and tenths of an hour.
10. Tachometer, engine speed. Multiply this value by
100 for revolutions per minute
* The siren stops but the warning lamps continue flashing until
the malfunction has been corrected. If there is a new alarm
the siren sounds again at the same time as the next warning
lamp starts to flash etc.
Alarm panel
This panel has four “windows”. If the acoustic alarm
sounds, one of the windows “11–13” starts to flash
(red) to show the cause of the alarm.
11. Warning lamp – high coolant temperature.
12. Warning lamp – low lubricating oil pressure, engine.
13. Warning lamp – comes on if the charging current
from the generator stops.
14. TAMD71B: Indication lamp – preheating on
(starter element).*
* Note. Only TAMD71B has a starter element.
11
Note This lamp (14) also works as a bulb failure
warning sensor for the starter element.* The lamp
comes on even when the key switch is in the I position (operating position) if there is a fault in the starter element (break).
* Note. Only TAMD71B has a starter element.
Electronic Diesel Control (EDC) control panels
(TAMD73P and TAMD74)
There are two panels for the TAMD73P and TAMD74
engines for maneuvering and monitoring the functions of the EDC system. For single installations with
one or more control points the panel has three combined pressbuttons and indicating lights for each control position. For double installations with one or
more control points the panel has six buttons/lights.
15. “Neutral” (green). With the starter key in the operating position (I) the indicator light comes on
(text on the button) with a steady light when the
control is in the neutral position.
For safety reasons the engine can only be
started with the control in the neutral position.
15
NEUTRAL
DIAGNOSIS
ACTIVE
STATION
16
17
TAMD73P and TAMD74: EDC control panel –
Single engine, one or more control stations
Note. When used with the electronic Volvo
Penta control unit there is also a function for controlling the engine speed with the engine disengaged. (This function must not be operated during starting).
Press the button in and hold it down while moving the control lever to the shift position. The indicator light will flash when this function is engaged.
16. Diagnostics (yellow). The indicator lamp will start
flashing if the EDC system receives abnormal
signals, or if there are technical problems with
the EDC system.
Note. If the button is pressed when the light is
flashing a diagnostic readout is given to indicate
what is causing the malfunction (the light flashes
a two-digit Diagnostic Trouble Code (DTC).*
17. “Active station” (red). This button is used to update the EDC system on which control station is
to be connected.
* For Diagnostic Trouble Codes (DTC) refer to the section:
“Reading off Diagnostic Trouble Codes (DTC)” page 102.
12
17
16
15
DIAGNOSIS
NEUTRAL
ACTIVE
STATION
SYNC
DIAGNOSIS
NEUTRAL
16
15
18
The flashing red lamp indicates that the control
station has a fault (uncalibrated controls, a control or controls not in neutral position (neutral and
idle position for double controls), fault on potentiometer).
For information on changing the control position,
refer to page 26.
18. “Sync” (blue). This button is used for engaging
and disengaging the synchronization function.
For information on synchronization, refer to the
reference below.
TAMD73P and TAMD74: EDC control panel for one
or more control stations (double installation)
Synchronizing engine speed
(TAMD73P and TAMD74 – twin installation)
If the boat is equipped with twin engines comfort can
be improved by synchronizing the engines to the
same engine speed. To make this process easier
there is an integral synchronization function which
automatically sets the engines to the same engine
speed (RPM).
The synchronization function is always activated
when the engines are started (the light in the
blue Sync button is on).
SYNC
The following conditions must be met for operation of the engine speed synchronization function:
A. The engine speed on both engines must be more
than 800 rpm.
TAMD73P and TAMD74: EDC control panel for one
or more control stations (double installation)
B. The controls for both engines must be set so that
the difference between the two engines is not
more than 50–200 rpm when they are running at
800–1000 rpm or less than 200 rpm at 1000–
2500 rpm.
If these conditions are met the engine speed of the
starboard engine (the slave) will automatically be adjusted to the speed of the port engine (master).
If either condition A or B no longer applies then
the synchronization function will automatically
disengage.
Engine speed synch will also be disengaged if engine
speed exceeds 2500–2510 rpm.
Pressing the blue Sync button for at least 2 seconds
will cause the Sync light to go out, and the synchronization function to be disengaged after 5 seconds.
Repeating this procedure will result in the synchronization function being re-engaged.
13
18
Auxiliary panel
18. Oil pressure gauge for reverse gear.
19. Blank panel plugs. Space for extra switch etc.
20. Pressure gauge for turbocharger boost pressure.
19
Flying Bridge panel
21. Tachometer, engine speed. Multiply this value by
100 for revolutions per minute
20
22. Operating time meter. Displays the engine’s
operating time in hours and tenths of an hour.
23. Pressure switch for testing the alarm function.
21 22
24. Alarm for malfunctions, corresponding to alarm
on main panel.
23 24
25. Pressure switch for instrument lighting.
25
26
27
26. Key switch (start lock) with start and stop functions and a built-in restart inhibitor (starter motor
protection).
The start lock prevents restarting unless the key
has first been returned to the stop position (S).
27. Alarm panel with warning symbols corresponding
to main panel.
Extra alarm panel
This panel has four “windows”. If the acoustic alarm
comes on, one of the windows starts to flash (red) to
show the cause of the alarm.
28. Oil level too low.* Fill oil to correct level before
starting.
29. Engine coolant level low.* Top up engine coolant
to correct level before starting.
28 29 30 31
30. Water in extra fuel pre-filter. Drain off water in filter. See maintenance schedule on page 38 (item
12).
31. Extra alarm.
* Note. Alarms for low level with engine stopped and with starter
key in position I – (Operation position).
Instrument kits
Instruments are also available as individual items in
kits. There are also the following three smaller panels
for starting and stopping the engine and using the
alarm functions.
14
34
Control panel for pilot house (main
panel)
32. Key switch (start lock) with start and stop functions and a built-in restart inhibitor (starter motor
protection).
35
33
The start lock prevents restarting unless the key
has first been returned to the stop position (S).
33. Pressure switch for instrument lighting.
34. Alarm (siren) fault detection warning. Sounds
when lubricating oil pressure is too low (engine),
when coolant temperature is too high or there is
a loss of charge.
32
35. Pressure switch for testing alarm functions or acknowledging alarms.
– No alarm: Alarm test (all warning lights are
on and the siren sounds).
– If the alarm sounds: Alarm acknowledgment.*
* The siren stops but the warning lamps continue flashing until
the malfunction has been corrected. If there is a new alarm
the siren sounds again at the same time as the next warning
lamp starts to flash etc.
34
Control panel for alt. operating position
Position numbers refer partly to the equivalent functions in the pilot house panel above.
33
35
Note: The key switch in the pilot house control panel
must be in position I (operating position) for starting
to be carried out from the secondary operating position.
TAMD71: The starter element may be engaged only
via the key switch on the panel in the pilot house.
36
37
36. Starter button. The starter motor is engaged
when this button is pressed. Release the button
as soon as the engine has started.
37. Stop button. The stop valve (fuel cut-off valve) is
engaged when this button is pressed.
Alarm panel
The alarm panel has warning symbols corresponding
to those on the main panel (pos. 11–14).
11 12 13 14
15
Controls
Key switch
The key switch has five positions, including the 0 position:
Pos. 0 = The key can be inserted and removed.
S = Stop position (stop functions engaged).
The key springs back automatically to the
0 position after stopping.
I = Operating position. The key springs back
automatically to the operating position after pre-heating or start.
II = Pre-heating position (starter element engaged).*
III = Starting position (starter motor engaged).
See also instructions for starting.
* Note. The TAMD63 and TAMD73 have no starter element.
Starter keys
The starter keys are tagged with a key code. Use
this code when ordering new keys. Do not keep the
tag on your boat. The code must not be divulged to
unauthorized persons.
Controls
Volvo Penta uses two types of controls, single lever
and dual lever. With single lever controls, both acceleration and reverse gear maneuvers are controlled
using one lever, while the dual lever controls have a
separate lever for each function.
The TAMD73P, -74 also have an electric control.
Single lever control:
VP single lever control
Lever (1) for reversing maneuvers and controlling engine speed
Position N – Neutral
From N to F – reverse gear engaged for forward movement.
From N to R – reverse gear engaged for reverse movement
T – control of engine speed (rpm)
Disengaging the reverse gear from the control:
Push the button (2) when the lever is in neutral, then push the lever
forwards. The lever can then be used as a throttle control with disengaged reverse gear. Take care not to engage the reverse gear
unintentionally.
The shift function is engaged automatically when the lever is moved
to the Neutral position.
16
Volvo Penta single lever controls have functions for
acceleration and reverse gear maneuvers combined
in one lever. When starting, for example, the shift
function can be easily disengaged so that only the
engine speed (rpm) is affected by the lever. When
maneuvering the boat astern or ahead the control
mechanism in the unit ensures that the engine speed
drops to idle speed at the moment shifting occurs.
The control lever has an adjustable friction brake. A
neutral position switch which only permits the engine
to be started when the reverse gear is disengaged is
available as an accessory.
A double single-lever unit is available for use with
twin engine installations.
Single lever controls with a single function are suitable for controlling a trolling valve*, if fitted. One of
these is the type S control.
* The trolling valve is an accessory for the Twin Disc reverse
gear MG507(A)-1.
Type S controls for maneuvering trolling valve
Dual lever control
These controls have separate levers for acceleration
and shifting. A mechanical lock means you can shift
only when the acceleration lever is in the idling position. The controls have a neutral switch to prevent
starting with the reverse gear engaged. Both control
levers have separately adjustable friction brakes.
VP dual lever controls
1. Lever for reverse gear maneuvers (black handle)
Position N – Neutral
From N to F – reverse gear engaged for forward movement
From N to R – reverse gear engaged for reverse movement
2. Lever for controlling engine speed (rpm) (red handle)
Electronic controls (TAMD73P and TAMD74)
The Volvo Penta electronic, single-lever control combines the functions of a throttle and reverse gear operation in one control lever unit. When starting, for
example, the shift function can be easily disengaged
so that only the engine speed (rpm)* is affected by
the lever.
The Neutral Position switch built in to the control unit
only allows the engine to be started with the reverse
gear disengaged.
A double single-lever unit is available for use with
twin engine installations.
* Note. The engine speed is limited to max. 2000 rpm in this position.
Calibration
NB dual controls
1. Lever for reverse gear maneuvers (black handle)
Position N – Neutral
From N to F – reverse gear engaged for forward movement
From N to R – reverse gear engaged for reverse movement
2. Lever for controlling engine speed (rpm) (red handle)
One brake can be adjusted by turning this handle in order to
counteract the regulator power
Before the engine is started for the first time the control must be calibrated according to the instructions
on the next page.
NOTE! If the calibration is not carried out the engine cannot be started. (Diagnostic Trouble Code
(DTC) 1.6 or 1.7 will be flashed – “Control calibration
not done”).
17
Calibrating the controls
(TAMD73P and TAMD74)
NOTE! If calibration is not carried out after installation, the engine cannot be started.
Calibrate first at the Master Control Station and
only then at any secondary control position(s)
installed.
VP EDC control (electronic)
Lever (1) for reversing maneuvers and controlling engine speed
Position N – Neutral
From N to F – reverse gear engaged for forward movement
From N to R – reverse gear engaged for reverse movement
T – control of engine speed (rpm)
Disengaging the reverse gear from the control:
Press the green button (15 see page 12) marked “Neutral” on the
control panel with the lever in the Neutral position. Keep the button
pressed in and push the lever to the shift position. The lever can
then be used as a throttle with disengaged reverse gear. Take care
not to engage the reverse gear unintentionally.
The shift function is engaged automatically when the lever is moved
to the Neutral position.
TAMD73P and TAMD74: Activate the required
control position by pressing the red button
“Active Station” (indicator lamp comes on
together with indicator lamp in the green Neutral
button).
Preparations
Before the control is calibrated the EDC system must
be put into calibration mode as follows:
1. Position control lever in Neutral position (dual
lever control put levers to Neutral and Idling position respectively).
2. Turn the starter key to the stop position “S” and
release the key.
Press the yellow Diagnostics button and hold it
in while turning the starter key to position “I” (operating position).
3. Erase stored diagnostic trouble codes (DTCs) by
holding the button pressed for another 3 seconds.
Note. Diagnostic trouble code (DTC) 1.6 (Master
Control Station) or 1.7 (secondary control position) cannot be erased before the control is calibrated.
4. Turn the starter key to the stop position “S” and
release the key.
Press the green Neutral button. Keep the button
pressed and turn the key switch to position “I”
(operating position)*. Keep the button pressed in
until the yellow lamp goes off. Release the button.
The yellow lamp starts to flash to confirm that
the EDC system is in calibration mode.
* Note. Two persons are required for this operation, one to turn
the key switch key on the main panel while the other calibrates
the controls on a Flying Bridge position where the control panel does not have a key switch.
Calibrating electronic single lever control
NEUTRAL
NOTE! Calibrate first at the Master Control Station followed by the other control stations(s).
1. Set the EDC system to calibration mode according to instructions in “Preparations”.
2. Move the control lever to the position where forward gear should start. Hold lever in this position.
TAMD73P and TAMD74: EDC control panel –
Single engine
18
Acknowledge the position by pressing in the
green button (Neutral) for at least 3 seconds.
NEUTRAL
3. Move the lever to the wide open throttle (WOT)
position ahead (forward) movement. Hold the lever in this position.
Acknowledge the position by pressing in the
green button for at least three seconds.
4. Move the control lever to the position where
astern gear is engaged. Hold the lever in this
position.
TAMD73P and TAMD74: EDC control panel –
Single engine
Acknowledge the position by pressing in the
green button for at least three seconds.
5. Move the lever to the wide open throttle (WOT)
astern position. Hold lever in this position.
Acknowledge the position by pressing in the
green button for at least three seconds.
6. Return the lever to the Neutral position. Hold the
lever in this position.
Acknowledge the position by pressing in the
green button for at least three seconds.
7. Finish calibration by pressing down the green
button again (the yellow and green buttons then
stop flashing).
Calibrating mechanical single lever
control
NOTE! Certain other makes of control have been
shown to have greater travel (A) with full throttle
opening with the reverse gear disengaged than
with wide open throttle (WOT) with the reverse
gear engaged.
Measure the movement (A) at the potentiometer
bracket at wide open throttle (WOT) and with the
reverse gear engaged. Note the result.
Throttle potentiometer bracket when using
mechanical control
A. Control cable movement (throw)
NOTE! Calibrate first at the Master Control Station followed by the other control stations(s).
1. Set the EDC system to calibration mode according to instructions in “Preparations” (see page 18).
2. Press in the button (2) on the control unit (to disengage gearshift function – see illustration on
page 16). At the same time move the lever forward to wide open throttle (WOT) position. Hold
the lever in this position.
Acknowledge the position by pressing in the
green button (Neutral) for at least 3 seconds.
NEUTRAL
Single lever control from other manufacturers: Disengage the shift function and at the same
time move the lever forward to WOT position.
Hold the lever in this position.
NOTE! Check that the control cable movement
does not exceed the value noted earlier.
TAMD73P and TAMD74: EDC control panel –
Single engine
Acknowledge the position by pressing in the
green button for at least three seconds.
19
3. Move the lever to neutral position. Hold the lever
in this position.
Acknowledge the position by pressing in the
green button for at least three seconds.
4. Move the control lever to the position where
throttle ahead (forward) movement is to start.
Hold the lever in this position.
Acknowledge the position by pressing in the
green button for at least three seconds.
5. Move the control lever to the position where
throttle astern (rearward) movement is to start.
Hold the lever in this position.
Acknowledge the position by pressing in the
green button for at least three seconds.
6. Return the lever to the Neutral position.
Acknowledge the position by pressing in the
green button for at least three seconds.
7. Finish calibration by pressing down the green
button (the yellow and green buttons then stop
flashing).
Calibrating electronic/mechanical dual
lever controls
NEUTRAL
NOTE! Ensure that the levers are parallel with
each other. This is to avoid faults when calibrating.
NOTE! Calibrate first at the Master Control Station followed by the other control stations(s).
TAMD73P and TAMD74: EDC control panel –
Single engine
1. Set the EDC system to calibration mode according to instructions in “Preparations” (see page
18).
2. Move the throttle lever to wide open throttle
(WOT) position. Hold the lever in this position.
Acknowledge the position by pressing in the
green button (Neutral) for at least three seconds.
3. Move the lever to idling position. Hold the lever in
this position.
Acknowledge the position by pressing the green
button. Hold for at least 3 seconds.
4. Move the shift function lever to the position at
which the reverse gear is engaged for Ahead
(forward) movement. Hold the lever in this position.
Acknowledge the position by pressing the green
button. Hold for at least 3 seconds.
5. Move the shift function lever to the position
where the reverse gear is engaged for Astern
(rearward) movement. Hold the lever in this position.
1
NEUTRAL
NEUTRAL
2
Acknowledge the position by pressing the green
button. Hold for at least 3 seconds.
6. Return the levers to neutral respectively idling position. Hold the levers in this position.
TAMD73P and TAMD74: EDC control panel for
one or more control stations (double installation)
1. Port engine
2. Starboard engine
20
Acknowledge the position by pressing the green
button. Hold for at least 3 seconds.
7. Finish calibration by pressing the green button
(the green and the yellow lamps stop flashing).
Reverse gear with electronic shifting
Note If Ahead/Astern (Forward/Reverse) on the control unit do not correspond to Ahead/Astern on the
boat swap the “P”/ “S” (Primary/Secondary) connectors between the reverse gear solenoids.
MPM
Twin Disc
TAMD73P and TAMD74: Cable connections to
solenoids on the reverse gear with electronically
controlled shifting
Engine idling speed (rpm) adjustment
(TAMD73P and TAMD74 engines)
The engine idle speed is adjusted at the factory to
600 rpm. If required the idle speed can be adjusted
within the range 550 –700 rpm.
Note! Adjustments to engine idle speed can only
be made from the Master control station.*
Adjust idle speed with engine at normal operating temperature.**
1. Set all controls to Neutral/Idle.
2. Turn the starter key to the stop position “S” and
release the key.
NEUTRAL
TAMD73P and TAMD74: EDC control panel –
Single engine
3. Press the green Neutral button on the EDC system control panel. Keep the button pressed and
turn the starter key to position “I” (operating position). Keep the button pressed in (at least 3 seconds) until the yellow indicator lamp goes off.
Release the button.
The yellow Diagnostics lamps will flash, indicating that the EDC system is in calibration mode.
NOTE! With electrical shift the green lamp flashes to confirm that gear shift function is not activated. With mechanical shift the green lamp will
not flash.
4. Start the engine.*** The engine idle speed can
now be adjusted using the control lever (throttle
lever) within the range 550–700 rpm (equivalent
to the movement of the lever).
Mechanical single lever control: Disengage
the reverse gear function before moving the control lever.
5. Set the engine idle speed required and press in
the green Neutral button on the EDC control
panel at least 3 seconds.
1
NEUTRAL
NEUTRAL
2
TAMD73P and TAMD74: EDC control panel for
one or more control stations (double installation)
1. Port engine
2. Starboard engine
6. Return the lever to the Neutral position (idle). The
green and yellow lamp will stop flashing. This will
reengage gear shift function.
* The active control position when the power is turned on (indicator lamp in the green button comes on).
** At engine coolant temperatures below 15°C (59°F) the idle
speed increases to 800 rpm for a maximum of 2 minutes.
*** NOTE! The engine cannot be started until the control
unit has been calibrated. Refer to the instructions on
Page 18.
21
Operation
20
15
Before starting
10
41
+5
±0
–5
°F
°C
Note: To reduce exhaust emissions to a minimum
during cold starts Volvo Penta recommends that a
heater is installed to heat the engine room when
temperatures fall below +5°C (41°F).
1.
Open the cooling water intake sea cock.
2.
Check that all the drain cocks are closed and all the
drain plugs are installed.
For the positioning of cocks/plugs, see the pictures
on pages 32 and 33.
3.
Open the fuel cocks
4.
Check that no fuel, water or oil is leaking out.
5.
Check coolant level on the engine when COLD.
The level must be 5 cm (2") beneath the sealing
surface of the filler cap, or between the MIN and
MAX marks on the separate plastic expansion tank
(accessory). For filling, see page 59.
Note. Do NOT open the pressure cap
when the engine is hot. Steam or hot
coolant can spray out and the system
pressure will be lost.
6.
Check the engine oil level. This should be within the
area marked on the dipstick.
The oil level must never be lower than the bottom mark.
7.
Check the oil level in the reverse gear.*
* Note. Since the marks on the dipstick apply at operating
temperature (with the engine idling and the control in neutral), the correct level before starting must be judged by
experience.
8.
Switch on the main switches
9.
Check the amount of fuel.
10.
22
Push the “Alarm test” button and check that the
alarm sounds (warning lamps come on). The alarm
will stop when the button is released.
Starting the engine
To keep smoke on starting to a minimum, the TAMD71B is fitted with air preheating (a starter element). This
starter element is found in the inlet pipe, and its activation time is controlled by a timer relay. On the TAMD63,
TAMD73 and TAMD74, which all have higher compression, different combustion chambers and a modified injection system, a starter element is not required.
The starter element should be on for approx. 50 s for preheating the inlet air before cold-starting. After starting,
the element is switched on automatically for a further 50 s to reduce exhaust smoke during warming up and to
make the engine run evenly.
Note: On the TAMD73P and TAMD74 the electronic diesel control (EDC) system minimizes exhaust emissions
during starting. To raise the combustion temperature before starting the starter motor turns over the engine approx. 1– 4 revolutions (temperature dependent) before fuel is injected.
To ensure smoother running on a cold engine the idle rpm is increased to 800 rpm for a maximum of 2 minutes
when the engine coolant temperature is below +15°C (59°F). When the coolant temperature rises above 15°C
(59°F) the idle rpm is gradually reduced to normal idle speed.
Warning! Never use start spray or similar to start the engine. There may be an explosion in the inlet manifold. Danger of personal injury.
1.
Single lever control: Check that the lever is in
neutral “N”. This means that the throttle control is
set to idling and the reverse gear is disengaged.
Dual lever control: Move the forward/reverse
lever into neutral in order to start. Pull the throttle
lever right back (idling position).
2.
Insert the key in the key switch. Turn it to the “I”
position (operating position). All warning lights
will come on. (The high coolant temperature
warning light will go off after 20 seconds).
3.
TAMD73P and TAMD74:
Activate the control position to be used by
pressing the red “Active Station” button.
The red and green buttons (“Active Station” and
“Neutral” respectively) light up to confirm that
the control position is active.
ACTIVE
STATION
NOTE! If the red button is flashing, the control lever is not in neutral.
ACTIVE
STATION
NOTE! For safety reasons, the control position can only be activated when the control lever is in the Neutral position.
(The engine cannot be started until the
control position is activated).
4.
TAMD71B:
Cold engine: Turn the key to position “II” (preheating). Release the key when the “starter element on” indicator lamp comes on. Activation
time is approx. 50 secs. (timer relay). Do not attempt to start the engine until the indicator light
has gone out.
Hot engine: Turn the key directly to position “III”
to start.
23
5.
Turn the key to position “III” to start* the engine
(after the indicator lamp has gone out in the case
of engines with a starter element). Release the
key as soon as the engine starts.
* NOTE! The key switch has a restart inhibitor.
Always start repeated start attempts from position “S”
(TAMD63 and TAMD71) or position “0” (TAMD73 and
TAMD74).
TAMD73P: The control position must always be activated
from the beginning according to point 3 before a new start
attempt can be made.
TAMD74: If the key has been turned to position “S“, the
control position must be activated from the beginning
according to point 3 before a new start attempt can be
made.
TAMD71B: After starting, the “Starter element on” indicator light will remain on for approx. 50 secs. (afterheating).
Warm up the engine at low speed and low load. Do
not race the engine while it is cold.
When warming up the engine, check that the instruments display normal values.
The needle on the temperature gauge should rise
slowly to operating temperature, 75–95°C (167–
203°F).
At operating speed, the engine’s oil pressure gauge
should show at least approx.:
300 kPa (43 psi) – TAMD63.
420 kPa (61 psi) – TAMD71, -73, -74
System voltage should be approximately 14V or 28V
depending on whether the engine is equipped with a
12V or 24V system.
The warning lights should be off* and the alarm off.
* TAMD71B: The preheating indicator light goes off approx. 50
secs. after starting.
Check the oil level in the reverse gear when it has
reached operating temperature (with the engine
idling and the control in neutral). The oil level should
reach the upper mark on the dipstick.
NOTE! Never break the circuit with the main
switches while the engine is running. The
voltage regulator and generator may be seriously
damaged.
Checking oil level in the reverse gear
WARNING! Approaching a running engine is dangerous.
Loose clothing or long hair can fasten in rotating parts and
cause serious personal injury. Avoid burns. Take precautions to avoid hot surfaces.
24
TAMD63, TAMD71: The starter motor must never be engaged while the engine is running*. The
starter motor and starter gear on the flywheel
may be seriously damaged.
* Not possible on TAMD73P and TAMD74.
Checks during operation
Check instruments. Normal operating values are:
Engine coolant temperature
75–95°C
(167–203°F)
Oil pressure, engine
TAMD63: 300–550 kPa
TAMD71, -73, -74: 420–650 kPa
System voltage
approx. 14V (12V) or
28V (24V)
If the oil pressure drops, the temperature rises above the permitted values or there is a loss of charge, the
alarm will sound and one of the warning lamps will start to flash to indicate the source of the malfunction.
If the alarm sounds:
– Engine coolant temperature too high. Reduce the speed to idling (in neutral) until the temperature
drops. Investigate the cause of the alarm (e.g. blocked engine water intake). Stop the engine if the
temperature does not drop.
– Engine oil pressure low. Stop the engine immediately and investigate the cause of the alarm.
If an extra alarm panel is fitted, the alarm will also sound if the lubricating oil or coolant levels are too low before
starting or if there is water in the extra fuel pre-filter. An extra alarm function may also be connected.
Note! When running the engine for long periods the engine oil level must be checked at least every 8 hours with
the engine stopped (check after the engine has been stopped for approx. 3 minutes).
Maneuvering during operation
For economic running it is necessary to select an optimal cruising speed. The recommended cruising speed
is the maximum speed which can be achieved at any given time minus 200 rpm.
For information on synchronization (twin engines) see page 13.
All forward/reverse maneuvering should be done at idling speed. Maneuvering at higher speeds may damage
the reverse gear and will also be uncomfortable for those on board. Maneuver as follows:
Reverse gear
1.
Reduce engine speed to idling and, if possible,
let the boat lose most of its speed.
2.
Move the reverse gear control lever quickly and
firmly into the neutral position, then wait for a
moment.
25
3.
Move the control lever quickly and firmly into
reverse, then increase the speed.
Note! If the boat has two engines, it is vital that both
engines are running, particularly when maneuvering
forwards and backwards. If one engine has not been
started and the other is used to reverse, water may
enter the stopped engine via the exhaust port and
cause serious damage.
Changing the control position
(TAMD73P and TAMD74 engines)
NOTE! For safety reasons it is only possible to
change the control point with the control in the
Neutral/Idle position.
NEUTRAL
ACTIVE
STATION
●
Leave the control position with the control lever(s)
in Neutral (the green button “Neutral” comes on).
●
Check that the control lever(s) are also in Neutral
in the new control position.
●
Turn the key switch to operating position (I) and
press the red button (“Active Station”) in the new
control position.
For a second control station with push-buttons: Turn the key switch on the Main control
station to operating position (I) and press the red
button (“Active Station”) in the new control position.
The indicator lamps in both the red and green
buttons light to confirm that the new control position is active.
NOTE! If the red button is flashing, the control lever is not in neutral.
Twin installation
WARNING! Never leave the control position
before the indicator lamps in the green buttons
“Neutral” light.
If the control position is left with the control lever for
the port engine, for example, in neutral, the port engine can be driven from the second control position
when it has been activated (the indicator lamp in the
green button “Neutral” lights).
Note. The red button (“Active Station”) flashes because the control position for both engines has not
moved.
26
Note. The following equipment shown can be
obtained only for propulsion engines in working
boats.
Trolling valve
(Twin Disc MG507-1 and MG507A-1)
If the reverse gear has a trolling valve (accessory),
this should be used when the boat is to move very
slowly.
Type S controls for trolling valve operation
Engage the trolling valve to max. slip when the reverse gear control is in neutral. After selecting “Forward” or “Reverse”, the trolling valve can then be set
in the required trolling position within the permitted
speed range.
The engine speed must never exceed 1100
rpm when using the trolling valve.
Note! For full propeller power during operation, the
trolling valve control lever should always be in the
“Disengaged” position when the valve is not in use.
Disengageable clutch (accessory, TAMD71)
Disengageable clutch
The clutches have two positions on the control lever.
Lever towards engine for engagement, away from it
for neutral. When engaging and disengaging the
clutch, the engine speed must not exceed 800
rpm.
F = Engaged
N = Neutral
Disengageable scavenging/bilge pump
(accessory, TAMD71, 24V)
Bilge pump
1. Vacuum circuit breaker
2. Actuating lever
These pumps are engaged and disengaged via electromagnetic connections and switches on the instrument panel. The bilge pump has a vacuum switch
which automatically disengages it when the level is
so low that no water is being sucked into the pump.
The vacuum switch also has a lever for manually engaging the pump.
The lever must be held down for approx. 20 seconds
when engaging the pump.
27
After operation
1. Let the engine idle for a few minutes with the reverse gear in neutral after landing. This will even
out the engine temperature and prevent local
overheating which may cause the coolant to
boil.
2.
Turn the key to stop position “S”. Release the
key when the engine has stopped (key will
spring back automatically into the 0 position).
The key can then be taken out.
Safety precautions:
3.
Close the cooling water intake sea cock and the
fuel cocks. For anti-freeze protection, see section “Precautions against freezing” on page 32.
4.
Switch off the main switches if the boat is not to
be used for some time.
5.
Inspect the engine and engine compartment for
any leaks.
Emergency stop
Pull the stop lever on the governor to the rear for
manual stop (emergency stop).
28
Safety systems (TAMD73P and TAMD74)
Emergency operation of the engine
IMPORTANT!
The engines are equipped with an emergency operation function (“Limp-home”). The function engages automatically and makes it possible to
continue running the engine and reach harbour if
communication between the control and the engine is broken.
When the Limp-home function is connected:
●
DIAGNOSIS
ACTIVE
STATION
The red lamp (“Active Station”) and the yellow
lamp (“Diagnosis”) flash in the control panel
(EDC).
●
WARNING! The control(s) for the affected engine do not function.
●
The engine speed is set to 1000 rpm and the reverse gear is set in Neutral for safety.
Contact an authorised workshop for corrective
action as soon as possible.
If movement ahead (forward) is required –
proceed as follows:
1. Stop the engine.
2. Engage reverse gear manually for Ahead movement. See the next section “Reverse gear emergency operation”.
3. Start the engine (propulsion engages immediately).
WARNING! In order to interrupt propulsion the engine must be stopped
using the key switch or stop button, if
applicable.
The control(s) for the affected engine
do not function.
29
Reverse gear emergency operation
On MPM and Twin Disc reverse gears with electronically operated shifting there is a safety feature for
manual engagement of Ahead (forward movement)
should a malfunction occur on the reverse gear solenoid valve.
MPM – Engagement
1. Stop engine and remove the key from the key
switch.
2. Note to which solenoid valve (P or S) the wiring
marked “Primary” is connected. Detach the connector from both solenoids.
MPM: Manual engagement of reverse gear
(safety system)
A. Pushbutton
P. Solenoid switch (Primary). Used normally for Ahead (forward)
movement
S. Solenoid valve (Secondary). Used normally for Astern (backward) movement
3. Press in button (A) on the solenoid where the
“Primary” cable was installed. Turn button half a
turn counter-clockwise to locked position.
WARNING! After engagement the reverse
gear is locked for use Ahead and cannot
be disengaged with the control.
Twin Disc MG5075 – Engagement
1. Stop engine and remove the key from the key
switch.
2. Note to which solenoid valve (P or S) the wiring
marked “Primary” is connected. Detach the connector from both solenoids.
3. Remove the covering nut on top of the solenoid
valve where the “Primary” cable was installed.
Twin Disc MG5075: Manual engagement
of reverse gear (safety system)
4. Press in button (A) on the solenoid and turn the
button half a turn clockwise until the catch point.
A. Pushbutton
P. Solenoid switch (Primary). Used normally for Ahead (forward)
movement
S. Solenoid valve (Secondary). Used normally for Astern (backward) movement
30
WARNING! After engagement the reverse
gear is locked for use Ahead and cannot
be disengaged with the control.
Other Twin Disc – Engagement
1. Stop engine and remove the key from the key
switch.
2. Note to which solenoid valve (P or S) the wiring
marked “Primary” is connected. Detach the connector from both solenoids.
3. Remove the solenoid and the valve body (V) on
the valve where the “Primary” cable was installed.
4. Unscrew plug (A) from its holder on the reverse
gear. Install the plug in the valve body hole as illustrated.
Tightening torque: Max. 27 Nm (2.7 kpm = 19.9
lbf.ft).
Other Twin Disc: Manual engagement of
reverse gear (safety system)
A. Plug*
WARNING! After engagement the reverse
gear is locked for use Ahead and cannot
be disengaged with the control.
P. Solenoid valve (Primary). Used normally for Ahead (forward)
movement
S. Solenoid valve (Secondary). Used normally for Astern (backward) movement
V. Valve body
* Tightening torque: Max. 27 Nm (2.7 kpm = 19.9 lbf.ft).
Back-up power supply
If the battery voltage should for any reason drop below normal during operation (generator not charging
or discharged batteries) the engine will stop.
A back-up system is required to start the engine. On
pages 79, 81, 85 and 87 can be found a suggestion
for installing a back-up starting system for 12V and
24V respectively.
The back-up system is activated by switching in using the main switch (“2 B” in the wiring diagram) which
brings the emergency/extra batteries on line with the
starter batteries.
NOTE! The back-up system batteries must be in a
charging circuit from the generator on the engine, for
example, although this is not included in the engine
wiring diagrams.
Note. This system is not factory installed from Volvo
Penta, it must be installed during the engine installation.
Check in the Instruction Book for the boat if there
is some other type of back-up system supplied.
NOTE! If there is a short-circuit in the electrical system, one or more of the semi-automatic fuses will trip
and the engine will stop.* The fault must be corrected
before the engine can be re-started.
* Note. Refer to page 69 for resetting the fuses.
Propeller shaft brake
Under certain operating conditions, the propeller may
make the propeller shaft rotate when the engine is
stopped. This rotation may damage the reverse gear
since its oil pump, which is driven by the integral
shaft, stops when the engine stops.
The propeller shaft can be permitted to rotate with
the engine stopped for up to 6–8 hours. After this
time the engine must be started for at least 5 minutes to ensure the reverse gear is lubricated and
cooled.
If the shaft is likely to rotate more quickly than during
normal operation, e.g. during sailing, a temperature
gauge should be fitted which monitors the temperature of the oil.
The max. permitted temperatures are 110°C (230°F)
for Twin Disc and 95°C (203°F) for MPM reverse
gears.
If the above conditions cannot be met a brake must
be installed. A temporary solution is to lock the propeller carrier mechanically instead.
31
Precautions against freezing
Check the antifreeze in the freshwater system after the engine has stopped if there is a risk of freezing. See
under the heading. “Coolant” on page 94.
Drain the water from the seawater system as described below. Check that all the water has drained out.
Check batteries in accordance with instructions on page 72. A poorly charged battery can burst if it freezes.
Draining coolant
Before draining the coolant, the engine should be stopped, the filler cap unscrewed and the boat’s sea
cock closed. Then open the drain cocks or remove the drain plugs of the engine’s freshwater and seawater
systems. See the illustrations below and on the next page.
Check that all the water runs out. There may be deposits by the cock/plug which must be removed. Otherwise
there is a risk that water may remain in the system and cause serious damage.
Check whether the installation has any more cocks or plugs on the cooling water and exhaust pipes’ lowest
points.
NOTE! To protect the environment please dispose of used coolant at a properly designated disposal site.
Remove the cover from the seawater pump and the cover on any extra pump.
Close the cocks, fit the plugs and put the cover on the seawater pump (and any extra pump fitted). Pump out
the boat if required. Ensure that there are no leaks before you leave the boat.
See the instructions on page 59 for topping up the coolant.
TAMD71
F = Freshwater cocks/plugs
32
S = Seawater cocks/plugs
V = Venting cock
TAMD63, TAMD73, TAMD74
Note: Remove the cover on the seawater pump. Also remove the hose between the heat exchanger and the
reverse gear’s oil cooler, then drain off the water while draining the seawater system.
F = Freshwater cocks/plugs
S = Seawater cocks/plugs
V = Venting cocks
F V
TAMD63
F
F
S
TAMD63
S
S
F
S
V V
TAMD73,
TAMD74
F
F
F
TAMD73, TAMD74
F
F
V
S
S
S
F
S
S
33
Maintenance and care
Periodic maintenance
If your engine and its fittings are to function reliably, periodic maintenance in accordance with the maintenance
schedule is required. Several of the points below cover the replacement of consumables such as oil and fuel filters etc.
To ensure continued trouble-free use of your engine, it is important always to use original spares. Always state
the type designation and serial number of your engine and its fittings when ordering parts.
Some operations require professional experience and special tools. Therefore, get authorized service personnel
to carry out more extensive work.
For further information, see under the heading “Maintenance” in accordance with the respective section in
“Technical Description”.
New engine with reverse gear
See instructions. “Running-in” on page 4.
1.
2000 Hrs
1000 Hrs
500 Hrs
250 Hrs
100 Hrs
No. Operation
50 Hrs
Layout of the maintenance schedule
Instructions
Info.
pge.
Engine oil VDS or CD or CE as per API system. Drain or pump out oil while
engine is hot.
Changing the Engine oil.
Note. Refer to table on page 35 for information on oil grade/intervals between changes
49
Warning! Hot oil can cause burns.
1) 2)
1) For TAMD63, TAMD73 and TAMD74.
2) For TAMD71 engines.
2.
Replace oil filter (1) and
by-pass filter if fitted (2)
at every other oil
ch
. Check/adjust disengageable clutch (if fitted).
1234
1234
1234
1234
1234
1234
1234
1234
1234
1234
1234
Lubricate gasket and screw on new filter by hand. Tighten by 3/4 turn once
gasket is tight. Top up oil, start, check for leaks. Stop engine and ch
p with oil. Quality: Use
refer to Te
Rockford/BW
11. Replace filter(s) for
crankcase ventilation.
49
arings, disengaging
TAMD63, TA
TAMD71B
inspection cover. Release the catc
g (B) counterclockwise (Rockford/BW), or clockwi
he catch. The clutch plates must not slip after engagement.
–
A. P.
Screw on new filter by hand. Note: Replace filter earlier if air and oil mixture
begins to come out of the valve (1).
TAMD71: Check the drain hose (2) is not clogged.
45
* Note. Special recommendations apply for new or reconditioned
engines. See instructions. “Running-in” on page 4.
12345678901234567890123456789012123
12345678901234567890123456789012123
12345678901234567890123456789012123
Shading denotes simpler
operations which can be
carried out by the boat owner personally.
34
Lines indicate operations
which require experience
and/or special tools. This
work should therefore be
left to authorized service
personnel.
Under the heading “Instruction” is a brief summary of what should be rectified when carrying out the
maintenance job in ques-
tion.
Under the heading “Info.
page” are references to the
information pages at the
back of this book. In most
cases, these pages provide
a more detailed description
VDS or VDS-2*
VDS or VDS-2*
API: CD or CE
API: CD or CE
TAMD71B
TAMD63, TAMD73, -74
TAMD71B
TAMD63, TAMD73, -74
A B
C
L
K
I H
E D F
* VDS = “Volvo Drain Specification”
Oil grade
Engine
G
250
100
Hours
500
200
B N
M B
125
50
Hours
250
100
Fuel sulfur content, % by weight
< 0.5
0.5–1.0
Note. However, the oil should always be changed at least once a year even if the
operating times in the table are not achieved.
Dependent on the fuel’s sulfur content and the quality of the lubricating oil.
Engine, oil change intervals
A
C
A.
B.
C.
D.
E.
F.
G.
H.
I.
L
F
E
K
O
Filter(s) for crankcase ventilation.
Air Cleaner (ACL).
Charge air cooler (CAC)
Engine oil. Cap for filling.
Coolant. Cap for checking and topping up.
Heat exchanger.
Generator.
Seawater pump.
By-pass filter for lubricating oil.
DE
L
P
K. Lubricating oil filter, engine (alt. located at the
back of the engine)
L. Oil dipstick, engine.
M. Lubricating oil, reverse gear. Cap for filling.
N. Oil dipstick, reverse gear. (Alt. locat. on left or
right side, depending on type of reverse
gear).
O. Fine fuel filters.
P. Terminal box with semi-automatic fuses.
Press button in if a fuse has tripped.
A maintenance program well carried out gives better operating economy and fewer
unplanned periods of non-operation.
Preventive Maintenance
To achieve maximum operating safety and service life, it is vital to maintain the engine and its fittings in accordance with the maintenance schedule. This gives instructions on when and how to carry out maintenance. Always consult an authorized Volvo
Penta service dealer, who will have the equipment and trained staff to help you.
35
Maintenance schedule
The description applies generally for all engines unless otherwise stated.
If longer intervals are required than those stated below the oil’s condition must be tested
regularly by the oil manufacturer.
2000 Hrs
1000 Hrs
500 Hrs
250 Hrs
100 Hrs
No. Operation
50 Hrs
The time intervals are guides which apply to normal operating conditions. For new or
reconditioned engines see under the heading. “Running-in” on page 4.
All operations below with the exception of points 17, 21 and 32 must be carried out at least
once per year even if the operating time in the schedule has not been reached. Operations
17, 21 and 32 must be carried out at least once every other year.
NOTE! Always turn the engine off before starting service procedures (except operation 16)!
Instructions
1. Changing the Engine oil.
Note. Refer to table on page 35 for information on oil grade/intervals between
changes.
1)
Info.
pge.
Engine oil VDS or CD or CE as per API system. Drain or pump out oil while engine
is hot.
Warning! Hot oil can cause burns.
2)
49
1) For TAMD63, TAMD73 and TAMD74.
2) For TAMD71 engines.
2. Replace oil filter (1) and
by-pass filter if fitted (2)
at every other oil change.
Lubricate gasket and screw on new filter by hand. Tighten by 3/4 turn once
gasket is tight. Top up oil, start, check for leaks. Stop engine and check oil
level.
49
TAMD63, TAMD73, TAMD74
3. Change oil in reverse
gear.
3)
* *
3) MPM (ZF).
4) Twin Disc.
4. MPM reverse gear:
Remove and clean reverse gear oil screen.
*
5. Replace oil filter on MPM
IRM 301A and 302V reverse gears.
* Note. Special recommendations apply for new or reconditioned
engines. See instructions “Running-in” on page 4.
4)
TAMD71
Fill up with oil. Quality: Use CD, CE or CC engine oil, but not multigrade oil. For
viscosity refer to Technical Data. Check the oil level. Note: The markings on the
dipstick refer to levels at operating temperature (with the engine idling and the
control in neutral).
50
Remove plug and oil screen. Clean screen and reinstall components removed.
Start engine (after filling with oil) and check for leaks.
Lubricate gasket and screw on new filter by hand. Tighten by 3/4 turn once gasket
is tight. Top up with oil. Start engine, check for leaks. Check oil level (point 3
above).
50
–
12 months
2000 Hrs
1000 Hrs
500 Hrs
250 Hrs
50 Hrs
No. Operation
Instructions
Info.
pge.
Remove plug and oil screen. Clean screen and reinstall components removed.
Start engine (after filling with oil) and check for leaks.
6. Twin Disc reverse gear:
Remove and clean reverse gear oil screen.
*
7. Replace oil filter in reverse gear Twin Disc
MG 507(A)-1 with trolling
valve and MG 5085.
*
Remove clamp (1). Remove cover and take out filter. Clean filter holder and install
new filter. Check oil level (point 3 above).
1
0
98
76
54
32
10
98
76
54
32
1
1
0
1
09
98
87
76
65
54
43
32
21
10
09
98
87
76
65
54
43
32
21
1
1
10
09
98
87
76
65
54
43
32
21
10
09
98
87
76
65
54
43
32
21
1
9. Lubricate disengageable
clutch (if fitted).
10. Check/adjust disengageable clutch (if fitted).
*
Rockford / BW
11. Replace filter(s) for
crankcase ventilation.
* Note. Special recommendations apply for new or reconditioned
engines. See instructions “Running-in” on page 4.
–
Note. Every 50 hours, applies when clutch operations per day exceed 15–20 operations. Otherwise every 500 hours. Use grease sparingly so that it is not
pressed out. Use lithium-based lubricating grease: Mobilux EP2, Statoil Uniway
EP2N, Texaco Multifak EP2, Q8 Rembrandt EP2.
8. Lubricate release bearing on disengageable
clutch (if fitted).
50
–
Lubricate inner support bearing (when a grease nipple is fitted), main bearings,
disengaging shaft and moving parts of clutch. Lubricate sparingly (20–30 g for
main bearings). Quality: see point 8 above. A few drops of oil on inner link arms.
–
WARNING! Engine must be stopped when adjustment is carried out.
Remove the inspection cover. Release the catch (A) and turn the adjuster ring (B)
counterclockwise (Rockford/BW), or clockwise (A.P.). Engage the catch. The
clutch plates must not slip after engagement.
–
A. P.
Screw on new filter(s) by hand. Note: Replace filter(s) earlier if air and oil mixture
begins to come out of the valve (1).
TAMD71: Check the drain hose (2) is not clogged.
45
12 months
2000 Hrs
1000 Hrs
500 Hrs
250 Hrs
50 Hrs
No. Operation
Instructions
Info.
pge.
A few hours after stopping engine: Drain off water or contaminants through cock/
plug (1).
53
12. Check/drain extra fuel
filter.
13. Replace insert(s) in extra
coarse fuel filter.
14. Replace fine fuel filters.
15. Vent fuel system.
Close the fuel cocks at the tank before dismantling the single filter or replacing
the inserts of the double filter with the engine off. See also instructions on page
53.
53
Screw on new filters by hand. Tighten by 1/2 turn once gasket is tight. Cleanliness! The fuel in the system must not become contaminated. Vent system – see
point 15 below.
54
Open vent screw (1). Pump with hand pump (2) until fuel containing no air flows
out. Close screw while fuel is flowing out. Then pump a further 10–20 times.
Check for leaks.
54
Lever (2) on right – replace left filter. Lever up – vent left filter. Venting nipple (1).
Replace the right side filter in the same way. For filter installation refer to point 14
above.
16. Replace adjustable fuel
filters.
54
17. Have authorized service
personnel check injectors.
1
0
98
76
54
32
10
98
76
54
32
1
1
0
1
09
98
87
76
65
54
43
32
21
10
09
98
87
76
65
54
43
32
21
1
1
10
09
98
87
76
65
54
43
32
21
10
09
98
87
76
65
54
43
32
21
1
(For TAMD71 auxiliary engine)
Hand in injectors to authorized service dealer (or replace with adjusted injectors).
Tightening torques: Injectors 50 Nm (5 kpm/37 lbf.ft.), pressure pipes 15–25 Nm,
(1.5–2.5 kpm/11.1–18.5 lbf.ft.). NOTE! Pressure pipes on TAMD63, TAMD73
and TAMD74 must NOT be bent. Replace damaged pressure pipes.
55
12 months
2000 Hrs
1000 Hrs
500 Hrs
250 Hrs
50 Hrs
No. Operation
Instructions
Info.
pge.
Close the sea cock. Remove cover (1) and lift up insert. Clean insert and housing (2). Reinstall components. Open the sea cock and check for leaks.
18. Check/clean seawater
filter.
60
Note. The time must be judged by experience after running the engine for a while.
19. Check batteries.
Use protective goggles! Battery fluid approx. 10 mm (0.39") over cell plates.
Warning! The batteries contain oxyhydrogen gas and extremely corrosive
sulfuric acid. Naked flames/sparks close to batteries may cause an explosion.
Add 1/2 liter anti-corrosion agent to the freshwater system (P/N 1141526-2).
NOTE! Only when glycol is not used in the cooling system.
20. Top up anti-corrosive
agent in freshwater
system.
21. Clean cooling system.
Change coolant.
72
*
96
Close sea cock and drain the water from the seawater and freshwater systems.
Flush via holes for drain cocks and plugs until clean water runs out.
22. Check/clean heat exchanger, charge air cooler (CAC), and reverse
gear oil cooler.
23. Check/replace pump impeller in seawater pump
and extra bilge pump (if
installed).
1
0
87
65
43
21
09
87
65
43
21
1
09
9
1
98
87
76
65
54
43
32
21
10
09
98
87
76
65
54
43
32
21
1
10
0
1
09
98
87
76
65
54
43
32
21
10
09
98
87
76
65
54
43
32
21
1
* Note! At least once every other year.
Close sea cock and drain the water from the seawater and freshwater systems.
See also instructions on pages 60–63.
Close the sea cock and drain the water from the seawater system. See also
instructions on page 64.
32,
59
32,
60
32,
64
24. Inspect/replace zinc
anode(s)
2000 Hrs
12 months
1000 Hrs
500 Hrs
250 Hrs
50 Hrs
No. Operation
Instructions
Close sea cock before starting work. Drain the water from the seawater system. Replace the anode if more than 50% of it has been used. When fitting, ensure that there is good metallic contact between the anode and the material.
25. Check for oil, fuel or
water leaks.
28. Check electrical connections.
29. TAMD63: Clean air
cleaner (ACL).
32,
63
Check all connections and check for leaks. The rubber hoses should not be
cracked or damaged, and all hose clips and connections should be tightened
properly.
Check the batteries’ charge condition using a hydrometer. At an ambient temperature of approx. +25°C (77°F) the battery electrolyte density should be 1.28 g/cm3
(1.24 g/cm3 with tropical acid). Charge the batteries if the density has dropped by
0.04 g/cm3.
26. Check the batteries’
charge condition.
27. Check/tension drive
belt(s).
Info.
pge.
Check for wear. Belts which work in pairs should be replaced at the same time.
Undo screws (A) before tensioning the belt(s).
TAMD63, -73, -74: Tension belt to 60 ±3 Nm (6 ±0.3 kpm/44 ±2 lbf.ft.).
TAMD71: It should be possible to depress the belts 10 mm (0.4") between the
pulleys.
–
72
45
TAMD63, TAMD73, -74
TAMD71
Clean the batteries’ terminal posts and cable clips, lubricate them with Vaseline
and tighten them. Also check that all other connections are properly tightened and
have good contact. If necessary, spray these connections with a moisture-repellent spray.
72
Wash the insert in clean diesel. Squeeze it out and place it in the filter housing. Fix
the insert by pushing the O-ring down into the groove around the outer edge of the
insert.
NOTE! Replace the filter insert if it is damaged.
–
2000 Hrs
12 months
1000 Hrs
500 Hrs
250 Hrs
50 Hrs
No. Operation
Instructions
Undo the clamps (x 6) for the covers (1). Remove the covers and replace the filter
inserts. Check that the rubber hose against the turbocharger is undamaged and
that the new filters are scrupulously clean. Reinstall components.
30. TAMD71: Replace air
cleaner (ACL) filter inserts.
31. TAMD73, TAMD74:
Replace air cleaner
(ACL).
Lift out and remove the filter for disposal. Take care that no contaminants enter
the engine. Install new air cleaner (ACL) – (TAMD73WJ: together with rubber ring
“A”) and tighten the hose clamps.
1
0
9
8
7
6
5
4
3
2
1
0
9
8
7
6
5
4
3
2
1
1
0
9
8
7
6
5
4
3
2
1
0
9
8
7
6
5
4
3
2
1
1
0
9
8
7
6
5
4
3
2
1
0
9
8
7
6
5
4
3
2
1
1
0
9
8
7
6
5
4
3
2
1
0
9
8
7
6
5
4
3
2
109876543210987654321
1
46
*
33. TAMD63, TAMD73, -74:
Get authorized personnel to check turbo charging pressure.
34. TAMD63P, TAMD73P,
-74P: Get authorized personnel to check function
of wastegate valve.
35. Get authorized personnel to carry out a general
check of engine and fittings.
* Note. Special recommendations apply for new or reconditioned
engines. See instructions “Running-in” on page 4.
–
–
Get authorized service personnel to check/adjust the valve clearance. This should
be done with the engine off, cold or at operating temperature!
9
8
65
43
21
09
87
65
43
21
09
87
65
43
21
21
09
87
65
43
21
09
87
65
43
21
09
87
65
43
21
9
87
7
9
76
65
54
43
32
21
10
09
98
87
76
65
54
43
32
21
10
09
98
87
76
65
54
43
32
21
12
21
10
09
98
87
76
65
54
43
32
21
10
09
98
87
76
65
54
43
32
21
10
09
98
87
76
65
54
43
32
21
1
98
8
9
87
76
65
54
43
32
21
10
09
98
87
76
65
54
43
32
21
10
09
98
87
76
65
54
43
32
21
12
21
10
09
98
87
76
65
54
43
32
21
10
09
98
87
76
65
54
43
32
21
10
09
98
87
76
65
54
43
32
21
1
32. Have authorized personnel check valve clearance.
Info.
pge.
Get authorized service personnel to check the turbocharger’s charging pressure.
–
Get authorized service personnel to check the function of the wastegate valve.
–
Get authorized service personnel to check the condition of the turbocharger and
carry out a general check of the engine and its fittings.
–
2000 Hrs
1
0
87
6554433221100998877665544332211
1
09
9
1
98
87
76
6554433221100998877665544332211 12 months
10
0
1
09
98
87
76
6543210987654321
1000 Hrs
500 Hrs
250 Hrs
50 Hrs
No. Operation
Instructions
Info.
pge.
Have authorized service personnel check the EDC system using a diagnostic
tool.
36. TAMD73P and TAMD74:
Check the EDC system.
37. Check surface finish of
engine and reverse gear.
–
Improve external corrosion protection by painting over any abraded parts with
original paint.
WARNING! Never use high-pressure jets when washing the engine. Never
point the water jet at seals, rubber hoses or electrical components.
–
Technical description
Engine
These engines are four-stroke, straight six marine diesel engines with overhead valves. They are fluid-cooled
and equipped with turbochargers. The inlet air to the engine is cooled by a seawater-cooled charge air cooler
(CAC) after compression in the turbo.
The engines have piston cooling (oil-cooled pistons). The lubrication system has a full flow oil filter, and the
TAMD63, TAMD73 and TAMD74 engines also have a partial flow (by-pass) filter. This by-pass filter is an
accessory on the TAMD71 engines.
The cooling system is divided into a freshwater and a seawater system. The seawater cools the freshwater
system via a heat exchanger (TAMD71 has double heat exchangers).
Cylinder heads
The engines have two cylinder heads, each of which
covers three cylinders. A special alloy cast iron
material is used for the cylinder heads. The cylinder
head gaskets are made of solid sheet steel and have
special rubber sealing rings inside for oil and coolant
channels.
The journal at the front of the crankshaft has been
ground to a polygonal shape. A polygon joint can
withstand the stresses from the vibration damper
(extra pulley or disengageable clutch) considerably
better than a keyed joint.
Pistons
Valve system
The pistons, which are made of an aluminum alloy,
have two compression rings and one oil ring. The
compression rings are coated (upper compression
ring in the TAMD63), which helps reduce oil consumption and the risk of ring seizing.
The camshaft is journalled in seven bearings and is
driven by the timing gears. The camshaft actuates
the inlet and outlet valves in the cylinder heads via
lifters, push rods and rockers.
To reduce carbonization at high engine loads the
pistons are oil cooled. Piston cooling increases the
service life of pistons, piston rings and cylinder liners
and reduces oil consumption.
In the TAMD71, TAMD73 and TAMD74, these valves
have double valve springs.
The engine’s combustion chambers are entirely
confined to the piston crowns.
Cylinder block
The cylinder block is made of special alloy cast iron
and cast in one piece. The cylinder liners are of the
wet type and are replaceable. The liners have a
flame guard bevel which considerably increases the
service life of the cylinder head gaskets.
Crankshaft
The heavy-duty crankshaft is extremely strong and is
journalled in seven main bearings. This shaft is
statically and dynamically balanced and tempered
according to a special method (nitrocarburization).
This increases the fatigue strength and gives the
bearing journals an extremely hard surface.
Piston cooling
43
Timing gears
The camshaft, oil pump, injection pump, circulation
pump (TAMD71), seawater pump and hydraulic
pump (if fitted) are driven by the crankshaft via
helical spur gears.
Helical spur gear wheels are used in order to keep
engine noise to a minimum.
Crankcase ventilation
The engines have ventilation devices to prevent
overpressure and to run off diesel fumes, steam and
other gaseous products of combustion. These are
fitted on the rear of the engine in connection to the
air cleaner (ACL).
Crankcase gases are passed through a replaceable
filter cartridge which removes any oil mist before the
gases are led out. Any oil is returned to the oil sump
(by a drainage hose on TAMD71). On the filter
casing is also a relief valve which opens if the pressure in the crankcase becomes too high due to a
blocked filter.
Timing gears
1.
2.
3.
4.
5.
Crankshaft drive gear
6. TAMD71: Drive gear for
Intermediate gear for oil pump
coolant pump
Drive gear for oil pump
7. Drive gear for camshaft
Intermediate drive gear
8. Drive gear for seawater
Drive gear for fuel injection
pump/power take-off/
pump
power servo pump
Air Cleaner (ACL)
The air cleaner prevents harmful particles from being
sucked into the engine.
TAMD63 engines have a washable filter insert.
TAMD71, TAMD73 and TAMD74 engines however
have a dry filter with a disposable filter element of
folded paper.
It is important that filter replacement/cleaning is
carried out according to the recommended maintenance schedule. A blocked filter causes smoke in the
exhaust gases and reduced engine power.
2
3
4
5
1
Turbocharger
The engines are fitted with a turbo charger driven by
the exhaust gases which ensures a flow of air to the
engine under pressure and thereby increases the
amount of oxygen to the engine. The compressor,
which is fitted to the exhaust manifold at the rear of
the engine, is lubricated and cooled by the engine’s
lubricating oil.
44
Turbocharger
1. Compressor wheel
2. Compressor housing
3. Bearing housing
4. Turbine housing (freshwater
cooled)
5. Turbine and shaft
Maintenance – Engine
TAMD63P, TAMD73P and TAMD74 also have a
wastegate valve (boost pressure control (by-pass)
valve) installed in the turbine housing.
The wastegate valve means that the turbocharger is
optimized for high charging pressure even at low
engine speeds. The engine’s low-speed torque is
thereby improved greatly, while it also reacts more
quickly to load changes.
Replacing crankcase ventilation filter(s)
1. Remove the old filter by unscrewing it counterclockwise. Note! TAMD73 and TAMD74 have
two filters.
2. Check the rubber gasket in the mounting, replace
if necessary. Screw on the new filter by hand.
3. TAMD71: Check the drain hose is not clogged.
At higher engine loads, the wastegate valve opens
and forces some of the exhaust gases past the turbo
and directly out into the exhaust pipe.
The turbocharger is freshwater cooled to reduced
radiant heat in the engine room.
TAMD73, TAMD74: Crankcase ventilation filters
1. Filter
TAMD63P, TAMD73P and TAMD74: Basic
diagram of turbocharger with wastegate valve
1.
2.
3.
4.
5.
Air from air filter
Compressed air to engine
Compressor housing
Turbine housing
Exhaust gases outlet
6. Exhaust gas flow past turbine
via wastegate valve at high
engine loads
7. Exhaust gases from engine
2. Relief valve
Checking/tensioning drive belt(s)
Check the belt(s) for wear. Replace belt(s) when
necessary. Belts which work in pairs should be
replaced at the same time.
Undo screws (A) before tensioning the belt(s).
TAMD63, TAMD73 and TAMD74: Place the stud of
a torque wrench in the square hole in the tensioning
pulley bracket. Tension belt to 60 ±3 Nm (6 ±0.3
kpm/44 ±2 lbf.ft.).
Tighten screws (A).
Charge air cooler (CAC)
The inlet air passes through the charge air cooler(s)
after compression in the turbocharger. The charge
air cooler lowers the temperature of the air and
thereby considerably improves the output ratio as the
volume of the air is reduced. More air (oxygen) can
therefore be forced into the engine’s cylinders and
burn more fuel per compression stroke; thus increasing output. Charge air cooling also helps reduce the
thermal load on the engine.
See also under the heading “Heat exchanger and
charge air cooler” on page 58.
TAMD63, TAMD73, TAMD74: Tensioning drive belt
A. Locking screws
45
Valve location
❍ Intake
● Exhaust
TAMD71: Tensioning drive belts
A. Locking screws
TAMD71: It should be possible to depress the belts
10 mm (0.4") between the pulleys at the correct
tension.
Tighten screws (A).
Checking the Turbocharger (TC)
This check should be left to authorized service
personnel.
However, a quick check of the turbocharger when
cleaning/replacing the air cleaner may be carried out
as follows:
1. Remove air cleaner (ACL).
2.
Warning! Check that the turbocharger’s
impeller is stationary before checking.
3. Check if the shaft is stiff or if the turbine or
compressor wheels are touching their housings.
Turn the shaft using light pressure, followed by
pulling it gently in the axial plane.
Checking valve clearance
This check should be left to authorized service
personnel.
Note! The clearance must never be checked with
the engine running – the engine must be stopped
– cold or at operating temperature.
46
If the rotor is difficult to turn, the turbocharger
must be replaced or reconditioned as soon as
possible.
Note. If the turbocharger unit is to function satisfactorily, it is vital that the engine’s lubrication system be
maintained according to the maintenance schedule
and that the correct type of lubricating oil be used in
the engine.
Technical description
Lubrication system
These engines have a forced lubrication system and piston cooling (see “Pistons” on page 43). The oil pump is
of the gear-wheel type and is located at the front of the oil sump. This pump is driven by the engine’s timing
gears.
The oil pump sucks oil up from the oil sump and then forces it out into two main channels in the cylinder block
(see basic diagram on next page). The oil passes through the lubricating oil filter and then on into the engine’s
oil channels for the forced lubrication of the engine, injection pump and turbocharger. The oil also passes
through via the piston cooling valve. From here a small amount of oil is channelled off, which then passes
through a by-pass filter (in the TAMD63, TAMD73 and TAMD74 – accessory in the TAMD71) before being
returned to the oil sump. The rest of the oil continues through the oil cooler and out to the piston cooling jets.
Lubrication TAMD71
1.
2.
3.
4.
5.
6.
7.
8.
9.
10.
11.
12.
13.
14.
Main oil channel (lubricating oil)
Pressure line to turbocharger
Main oil channel (piston-cooling oil)
Rocker mechanism
Oil channel to rocker mechanism
Main bearings.
Big-end bearings
Oil pump
Oil to oil cooler and piston cooling
Lubricating oil filter (full flow type)
Camshaft bearings
Overflow valve
Piston cooling valve
Relief valve
15. Filtered oil (pressure) to lubrication system
16. Oil (pressure) from oil pump
17. Return oil to oil sump via relief
valve
18. Oil (pressure) via piston cooling valve to oil cooler and piston
cooling
19. Return oil to oil sump (via bypass filter, if fitted)
20. Filtered oil returning from lubricating oil filter
21. Unfiltered oil to lubricating oil
filter
47
Lubrication system (sectioned, filter housing) TAMD63
TAMD73 and TAMD74
2.
10.
12.
13.
14.
15.
Pressure line to turbocharger
Lubricating oil filter
Overflow valve
Piston cooling valve
Relief valve
Filtered press. oil to lubrication system
16. Oil (pressure) from oil pump
17. Return oil to oil sump via relief
valve
18. Oil (pressure) via piston cooling
valve to oil cooler and piston
19. Return oil to oil sump (via bypass filter)
22. By-pass filter
Basic diagram, lubrication system
8.
10.
12.
13.
14.
15.
22.
23.
24.
25.
Oil pump
Lubricating oil filter
Overflow valve
Piston cooling valve
Relief valve
Filtered oil (pressure) to lubrication
system
By-pass filter*
Oil cooler
Oil under pressure for piston cooling
By-pass valve
* Note. By-pass filter is an accessory on
the TAMD71 engines.
Valves in the lubrication system
The oil flow in the engine is controlled by four springloaded valves. Three of these are located in a
mounting on the right of the engine and one at the
lower edge of the cylinder block on the left of the
engine.
– The relief valve (14) limits system oil pressure in
the engine. This valve opens if the pressure is too
high and allows oil back to the oil pan at high
speeds or if the engine is cold and the lubricating
oil is more viscous.
– The overflow valve (12) opens and allows oil past
the lubricating oil filter if the resistance through the
filter is too great. This way oil can flow into the
engine lubrication system even if the filter is
clogged. But the oil entering the system is unfiltered. So it is important that the filter is replaced
according to the intervals recommended in the
maintenance schedule.
– The piston cooling valve (13) regulates the flow of
oil through the oil cooler and on to piston cooling.
– The by-pass valve (25) permits increased oil flow
through the oil cooler. The valve opens and
returns excess oil not required for piston cooling
back to the oil sump.
48
TAMD63, TAMD73, TAMD74
TAMD71
Valves in the lubrication system
12. Overflow valve
13. Piston cooling valve
14. Relief valve
Maintenance – Lubrication System
Oil cooler
Oil Change – Engine
See the description in the “Cooling system” section
on pages 58–59 for information on the oil cooler.
The oil should be changed when the engine is
hot.
Warning! Hot oil can cause burns.
Engines with oil scavenging pump (accessory):
Remove the oil dipstick and connect the suction pipe
to the dipstick tube. Start the pump and collect the oil
in a container.
Alternatively, the oil can be drained after removing
the oil sump drain plug.*
Oil filter
The oil filter filters contaminants from the oil. The
engine oil filter is of full flow type, which means that
all the oil is filtered before it enters the lubrication
system. The filter element is made of folded filter
paper.
Fill oil through the filler on the front valve cover or the
filler tube at the front of the engine (accessory on
TAMD71 engines). Oil quality: refer to page 96.
Quality and capacity, refer to “Technical Data” on
page 108.
The oil level should be within the area marked on the
dipstick. The level must never be allowed to drop
beneath the lower mark.
In the TAMD63, TAMD73 and TAMD74, the filter is
located in front of the starter motor on the right of the
engine. TAMD71* engines have the filter located at
the front of the engine.
The scavenging pump can also be used to add oil
(the + and – cables are swapped on the electrical
scavenging pump). Refer to the Wiring Diagrams on
pages 75, 77 or 83.
On all marine propulsion engines the filter can
alternatively be located at the rear of the engine
(accessory).
NOTE! Collect up the old oil and deposit at a
proper site for disposal. Never dump oil overboard into the water.
The TAMD63, TAMD73 and TAMD74 engines also
have a by-pass (partial flow) lubricating oil filter
located above the engine oil filter. A by-pass filter
can be obtained as an accessory for TAMD71
engines. This filter is located behind the lubricating
oil filter at the front of the engine.
* Note. The TAMD63 has no drain plug.
As only a small amount of oil passes through the bypass filter, the flow rate is relatively low. The filter is
therefore able to separate even very small particles
from the oil. The filter element is made of folded filter
paper.
* Note. In the TAMD71 classifiable auxiliary engine, the filter is
located in front of the starter motor on the right of the engine.
Draining oil from the engine
Replacing the engine oil/by-pass filter
Note: Place a container beneath the filter when
removing to avoid spillage.
1. Unscrew the oil filter (1) or by-pass filter (2) using
special tool. Discard the old filters.
Warning! Hot oil can cause burns.
Lubricating oil filter
By-pass filter
2. Lightly oil the new filter’s rubber gasket and
check its mating surface on the mounting.
49
Draining oil from the reverse gear
TAMD63, TAMD73 and TAMD74
1. Lubricating oil filter
2. By-pass filter
2. Start the engine and run it until the reverse gear
reaches operating temperature.
3. Check the oil level with the engine idling and with
the neutral position selected.
The oil level should reach the upper mark on the
dipstick. Top up if required.
TAMD71
1.
2.
Lubricating oil filter
By-pass filter (accessory)
Cleaning the reverse gear’s oil screen
3. Screw on the new filter by hand until the gasket
is in contact with the sealing surface. Then
tighten the filter a further 3/4 of a turn.
4. Fill with oil, start the engine and check for leaks.
Stop engine and check the oil level.
MPM IRM 220, -280
MPM IRM 301, -302V
Oil Change – Reverse Gear
Connect a hose from the oil scavenger pump to the
dipstick tube on the reverse gear. Or the oil can also
be drained after removing the drain plug.
See also instructions under. “Oil Change – Engine”.
1. Fill with oil through the filler opening on the top of
the reverse gear. For Oil quality and capacity
refer to “Technical data” on pages 110–113.
50
TD MG5061, MG5062V,
MG5075A, MG5085
TD MG507(A)-1
Technical description
Fuel system
The fuel is drawn up by the feed pump from the fuel tank through the pre-filter(s) and is forced through the fine
filters to the injection pump. Excess fuel escapes via the overflow valve back to the tank. This valve is located
on the injection pump. This means that the return fuel flushes through (cools) the injection pump’s fuel chamber. This evens out fuel temperature so it is the same for all the cylinders and prevents gas bubbles forming in
the fuel line.
The injection pump then forces the fuel under high pressure to the injectors, which atomize the fuel when it is
sprayed into the engine’s combustion chambers.
Return fuel from the injectors returns to the tank via the overflow valve.
2
3
4
5
6
Fuel system
7
1
8
17
16
15
13
14
1. Fine fuel filters
2. Venting nipple
3. Pressure pipe from inlet
manifold (charging
pressure)
4. Injection pump
5. Pressure pipe
6. Injectors
7. Fuel return line
8. Pressure equalizer
9. Centrifugal governor
10. Overflow valve
11. Return pipe, lubricating oil
12. Return line to fuel tank
13. Fuel line, intake
14. Feed pump
15. Hand pump
16. Engine oil pipe, inlet
17. Smoke limiter
11
12
10
9
TAMD63 and TAMD71, -73WJ: Solenoid valve
(fuel shut-off valve) for stopping engine
A. Solenoid valve
Connections in valve housing, markings:
T.
P.
F.
I.
Inlet from fuel tank (Tank)
Outlet to feed pump (Pump)
Inlet from fuel filters (Filter)
Outlet to injection pump (Injection pump)
51
The fuel system has two fine fuel filters connected in
parallel have the same cover. These filters are
disposable, and the filter insert is made of a spirally
wound paper filter.
A single or double (connected in parallel) waterseparating pre-filter is also available as an accessory. The inserts of the double pre-filter can be replaced while the engine is running if necessary.
It is important that the fuel filters are replaced according to the maintenance schedule. Blocked filters
make the engine difficult to start and contribute to
loss in engine output.
Pressure-dependent full load stop (smoke limiter)*
TAMD63, TAMD71, TAMD73WJ
The injection pump has a pressure-dependent full
load stop (smoke limiter) which is located at the front
of the pump. Its job is to reduce sooty exhaust gases
during hard acceleration from low speeds when the
flow of exhaust gases through the turbocharger is too
small to provide the full amount of air to amounts of
fuel injected by the injection pump. The smoke limiter
is connected to the inlet manifold via a plastic tube.
* Note. TAMD73P and TAMD74P engines are not equipped
with a smoke limiter. The equivalent function is integrated in
the Electronic Diesel Control (EDC) system.
Fine fuel filters
Feed pump
Extra pre-filter
(single)
If the injection pump is to work, it requires a supply of
fuel at pressure. This is provided by the feed pump,
which is of piston type. The feed pump is located on
the injection pump and is driven by the injection
pump’s camshaft.
The feed pressure is determined by an overflow
valve located on the injection pump. This valve both
limits the feed pump pressure and ensures continuous venting of the fuel system.
Injection pump
The feed pump’s hand pump can be used on a
stopped engine to pump fuel to the filters and injection pump when venting the fuel system, for example
after replacing the fuel filters.
The injection pump is of the piston type and located
on the left of the engine. It is driven by the timing
gears.
On TAMD63, TAMD71 and TAMD73WJ engines the
pump is equipped with a centrifugal governor. The
governor controls both fuel supply to the engine to
maintain the engine speed set at the throttle control
and also limits the engines maximum speed if the
load at high throttle openings suddenly should
reduce.
On TAMD73P and TAMD74 engines the mechanical
centrifugal governor is replaced by an electromagnetic actuator. The actuator is controlled by a control
module which receives information from a number of
sensors on the engine and throttle control.
52
Feed pump
Maintenance – Fuel system
Fuel pre-filter. Checking/draining
Injectors
The job of the injectors is to atomize and spray the
fuel, metered precisely by the injection pump, into
the engine’s combustion chambers. This injection
takes place under extremely high pressure so that
atomization and combustion of the fuel takes place
as effectively as possible.
Each injector basically comprises a nozzle holder
and a nozzle (jet). When the fuel pressure increases
to a set value (opening pressure), the nozzle needle
(7), which is pressed in its seat by the pressure
spring (4), is raised, and atomized fuel is sprayed
into the engine through carefully calibrated holes in
the nozzle body. The tension of the pressure spring
determines the opening pressure of the injector.
The injectors should be checked regularly by authorized personnel, refer to maintenance schedule. An
incorrect opening pressure or faulty nozzle will result
in smoky exhaust gases and lower engine output.
Check the fuel filter and drain off any water and
contaminants through the drain plug(s) (5). See
illustration on next page.
The engine should be off and allowed to stand for a
few hours before carrying out this check. Reinstall
the plugs.
Fuel pre-filter. Installing new insert(s)
Double filter: As a rule, the filter inserts should be
replaced when the pressure gauge indicates a
vacuum of 6–10 in. Hg* (idle) or 16–20 in. Hg
respectively, (max. rpm, loaded engine). However,
filters must be replaced after every 1000 operating
hours.
Close the fuel cocks at the tank before dismantling
the single filter or replacing the inserts of the double
filter with the engine off.
Injectors
1. Pressure line connection
2. Connection for fuel leak-off pipe
3. Shims for setting the opening
pressure
4. Thrust spring
5. Thrust pin
6. Jet
7. Nozzle needle
Double filter: If inserts are to be replaced when the
engine is running, shut off the filter unit with the insert
to be replaced by turning the valve handle (1) to the
horizontal position. See illustration on next page.
* Note: In. Hg = Inches of mercury.
Positions of the valve knob
Up: Normal operating position. Both filters are
on-line.
Right: Left-hand filter insert can be replaced.
Left: Right-hand filter insert can be replaced.
Down: Both filters are off line.
1. Position a container under the fuel filter. Remove
the cover (4) and lift out the insert by rotating it.
See illustration on next page.
2. Drain off any water or contaminants through the
drain plug (5).
3. Install new filter insert and fill container with clean
diesel oil. Install the cover with a new gasket and
tighten by hand.
Note. Moisten the gasket with diesel oil before
installation. Cleanliness! The fuel in the system
must not become contaminated.
4. Double filter: Replace the other filter insert in
the same way.
5. Dry off any diesel fuel spilt on the heat shield.
6. Double filter: Both filter units on-line (turn the
knob (1) up to the vertical position).
7. Open the fuel cocks and check that there are no
leaks.
53
1
2
3
4
5
Double pre-filters
1. Valve knob (both filters
on-line in this position)
2. Pressure gauge
3. Retaining screw
4. Cover
5. Drain plug
The inserts can be cleaned and replaced while the
engine is running.
Replacing the switchable fine fuel filters
1.
2.
Vent screw for left and right filters
Valve knob (normal operating position)
Switchable fine fuel filters*
(replacement while engine is running)
1. Place a container beneath the fuel filters. Clean
the filter mounting carefully.
2. Turn lever (2) for the valve in the filter cover in its
right end position.
Fine fuel filters. Replace
1. Clean the filter mounting carefully.
Note. Place a plastic bag around the filter to
prevent fuel spills in the boat.
2. Unscrew the old fuel filters and discard. Use
special tool to remove filter if necessary.
3. Check that the new filters are absolutely clean
and that the gaskets are undamaged. Lightly
moisten the gaskets with oil.
4. Screw on the new filters by hand until the gaskets come into contact with the filter mounting.
Then tighten a further half turn by hand.
3. Unscrew the left fuel filter and discard it. Use
special tool to remove filter if necessary.
4. Screw on the new filter by hand until the gasket
comes into contact with the filter mounting. Then
tighten it a further half turn by hand.
5. Open left vent screw (1) on the filter mounting.
Move lever (2) vertically (operating position).
Close the vent screw when no more air bubbles
are visible in the fuel.
6. Lever in its left end position and replace the
right fuel filter in the same way.
* Accessory for TAMD71 as an auxiliary engine.
5. Vent the fuel system according to the instructions
on this page. Start the engine and check for
leakage around the filters.
Venting the fuel system
The fuel system must be vented after the fuel
filters have been replaced or after refilling the
fuel tank after it has been run dry.
1. Place a container beneath the fuel filters. Open
vent screw (1) on the filter mounting.
Replacing the fine fuel filters
54
2. Pump up fuel using the feeder pump hand pump
(2) until the fuel is free from air bubbles. Retighten the screw while the fuel is flowing out.
Venting the fuel system
1. Venting screw on
filter mounting
2. Hand pump
3. Overflow valve
4. Pressure equalizer
3. Pump a further 10–20 strokes with the vent
screw closed so that sufficient feed pressure is
obtained. Further venting is not normally
required.
If the injection pump still needs venting, unscrew
the connection for the overflow valve (3) at the
pump and continue hand pumping until no more
air bubbles are visible in the fuel flowing out.
Tighten the connection while the fuel is flowing
out. Pump a further 10–20 strokes so that
sufficient feed pressure is obtained.
4. Check for leaks.
Injectors
1. Guard ring (rubber)
2. Fuel leak-off line
3. Pressure line connection
4. Mounting yoke
1. Clean around the injectors.
2. Remove the delivery line and the return fuel line.
Remove the mounting yoke on the injectors.
3. Turn the injector carefully backwards and forwards using a wrench (size 15 mm), pulling it up
at the same time.
Note: If the injector is stuck, you must use a
special tool to remove it. The copper sleeve
around the injector may otherwise be pulled out
as well, with water in the engine as a consequence.
The coolant in the freshwater system can be
drained as an extra safety measure before
removing the injectors.
4. Hand in the injectors to a an authorized service
workshop for checking.
5. Install protective ring on the injectors (1). Tightening torque 50 Nm (5 kpm/36 lbf.ft.).
Injectors. Check
NOTE! TAMD63, TAMD73 and TAMD74 have
pretensioned delivery pipes. These pipes
must under no circumstances be bent.
Damaged pipes should be replaced.
6. Reinstall the fuel leak-off line. Install pressure
line. Check they are straight, then tighten the
nuts. Tightening torque 15–25 Nm (1.5–2.5 kpm/
11–18 lbf.ft.).
7. Refill the engine with coolant if system was
drained. Start the engine and check for leaks.
55
Technical description
Cooling system
These engines are fluid-cooled and have a closed circuit cooling system. The system has two circuits. In the
inner circuit (the freshwater system), coolant is pumped around by a centrifugal-type coolant pump (circulation
pump). In the TAMD63, TAMD73 and TAMD74, this pump is driven by the vibration damper via a belt. On the
TAMD71 engines, the coolant pump is gear driven via the timing gears.
From the coolant pump, the coolant is pumped out into a distribution channel in the cylinder block and conveyed around the cylinder liners and on up through the cylinder heads.
From each cylinder head and from the turbocharger’s turbine housing, the coolant is fed back to the thermostat
housing, where a thermostat regulates its temperature. Coolant from the engine’s oil cooler is also fed to the
thermostat housing.
While the coolant is cold, the thermostat shuts off the flow to the heat exchanger. The coolant then passes
through a by-pass line beneath the thermostat and directly back to the pump’s suction side. When the coolant
temperature has risen to a certain value, the thermostat opens and allows coolant to pass to the heat exchanger and the by-pass line closes.
In the heat exchanger, heat from the coolant is transferred to the seawater before the coolant is sucked back
into the coolant pump.
Large amounts of heat are also removed by the lubricating oil, which channels off the heat to the freshwater
system via the oil cooler. The lubricating oil is also used to dissipate heat from the pistons in the engine (see
“Pistons” on page 43).
The cooling system may operate with a small amount of overpressure. The risk of boiling is thereby reduced if
the temperature is high. If the pressure is higher than normal, a pressure valve in the filler cap opens.
The flow in the seawater system is maintained by a gear-wheel driven impeller (blade-type) pump which is
located at the front of the engine. The seawater passes through the engine’s charge air cooler (CAC)* and heat
exchanger and the reverse gear’s oil cooler. A zinc anode is fitted in the reverse gear’s oil cooler as protection
against galvanic corrosion. The TAMD63, TAMD73 and TAMD74 also has a zinc anode in the heat exchanger
and the charge air cooler (CAC).
It is important to check the condition of the zinc anode(s) according to the maintenance schedule to prevent
corrosion damage.
The engine may have a separate expansion tank as an accessory.
* Note. In the TAMD71 the seawater passes the heat exchangers before being fed to the charge air coolers and the reverse gear’s
oil cooler.
= Charge air or freshwater
5
= Seawater
4
3
6
2
1
7
8
9
10
Flow through heat exchangers and charge air coolers (CAC) in the TAMD71
56
1. Seawater inlet
2. Seawater pump
3. Freshwater from
engine’s thermostat
housing
4. Heat exchangers
5. Charge air coolers
(CAC)
6. Seawater outlet
7. Oil cooler, reverse
gear
8. Charge air from
turbocharger
9. Cooled charge air to
the engine intake
manifold
10. Freshwater to the
engine coolant pump,
suction side
= Charge air or freshwater
= Seawater
3
2
1
2
3
5
4
1
TAMD63, TAMD73, TAMD74: Flow through charge
air cooler (CAC)
1. Charge air cooler (CAC)
4. Seawater inlet (from sea
2. Heated charge air from
water pump)
turbocharger
5. Seawater outlet (to heat
3. Cooled charge air to the
exchanger)
engine’s combustion chambers
4
5
6
TAMD63, TAMD73, TAMD74: Flow through heat
exchanger
1. Expansion tank
2. Hot coolant from
engine’s thermostat housing
3. Coolant to coolant
pump suction side
TAMD71: Engine coolant pump (circulation
pump) and thermostat housing
4. Heat exchanger
5. Seawater inlet (from charge
air cooler)
6. Seawater outlet (to reverse
gear oil cooler)
Thermostat function, cold engine
1. Piston thermostat
Thermostat
The engines have a piston thermostat which has a
bulb filled with wax. When the engine is cold, the
thermostat keeps the route to the heat exchanger
completely closed. The coolant is then fed directly
back to the engine through a by-pass line. After the
engine has warmed up, the volume of the wax
increases and the thermostat subsequently opens
the route to the heat exchanger, while the by-pass
line is closed.
Thermostat function at operating temperature
57
Seawater pump
The seawater pump is fitted to the timing gear cover
at the front of the engine. This pump is driven via the
timing gears. The pump impeller is made of rubber
and can be replaced.
Note: The impeller may be damaged if the pump is
run dry.
TAMD71: Heat exchangers (A) and charge air
coolers (B)
Oil cooler, engine
Seawater pump
The lubricating oil transports heat from the high
temperature parts in the engine and equalizes the
temperature differences within the engine. Heat is
removed from the lubricating oil in the oil cooler. This
keeps the oil temperature lower at high load and
speeds. This reduces engine wear as the oil’s
lubricating properties are impaired if the oil temperature gets too high. Lubricating oils of lower quality
are most sensitive to high temperatures.
The engine’s oil cooler is on the left side, below the
injection pump. The engine oil circulates inside the
cooler assembly while the coolant passes between
the cell plates. The cooler is connected to the freshwater system.
Heat exchanger and charge air cooler
(CAC)
TAMD63, TAMD73 and TAMD74 are equipped with
single whileTAMD71 has double series connected
heat exchangers and charge air coolers. The coolers
are installed on the right of the engine with the heat
exchanger(s) furthest forward.
In the heat exchanger, heat is transferred from the
engine’s inner cooling circuit (the freshwater system)
to its outer circuit (the seawater system). In the CAC
heat is transferred from the charge air from the
turbocharger to the seawater. See also under
“Charge air cooler” on page 45.
The cooler units are an aluminum housing with a
tubular cooling insert.
The seawater passes through the pipes, while the
freshwater (heat exchanger) or charge air (for CAC)
passes between the pipes.
Note. On TAMD71 engines the heat exchanger and
charge air cooler are identical, so the cooling inserts,
for example, are interchangeable.
58
Engine oil cooler
1.
2.
3.
4.
Coolant inlet
Coolant outlet
Oil inlet
Outlet, oil
5. Oil to piston cooling
6. By-pass valve
7. Excess oil return
to oil sump
Maintenance – Cooling System
Antifreeze and anti-corrosion, cleaning
Oil cooler, reverse gear
The reverse gear’s oil cooler is mounted on a bracket
above the flywheel casing at the rear of the engine.
The cooler is connected to the seawater system. The
seawater passes through the pipes in the cooling
core and draws heat off from the oil which passes
between the pipes.
Close sea cock before working on cooling
system.
To avoid loss of cooling performance caused by
deposits in the cooling system the coolant must be
changed at least once a year. Another reason for
changing the coolant is the risk of damage from
corrosion in freshwater systems due to corrosion
inhibitor additives losing their effect over time.
The system should be flushed carefully with tap
water when changing the coolant. Flush until the
water which runs out of the draining holes is clean.
NOTE! Certain parts of the coolant system in the
engine are of aluminum. Chemical agents must
not be used for cleaning the system.
Oil cooler, reverse gear
For information on draining the coolant, refer to:
“Draining coolant”, on page 32. For frost protection,
see “Coolant” on page 96.
Filling with coolant
Note. Do NOT open the pressure cap or the
venting nipples on a hot engine. Steam or
hot coolant can spray out and the system
pressure will be lost.
Filling should be carried out with the engine
stopped. Do not fill so quickly that air locks form in
the system. Allow the air to flow out via the filling
opening or vent cock(s).
TAMD63, TAMD73, TAMD74
TAMD71
Venting cock in cooling system
When filling an empty system, or if the coolant level
for some reason has dropped so low that it cannot be
seen through the filling opening, open the vent
cock(s) during filling.
The TAMD73 and TAMD74 have two venting cocks
on the flange at the front of the heat exchanger. All
engines also have a venting cock at the turbocharger.
The engine must not be started until the system
has been vented and completely filled.
If a heater system is connected to the engine’s
cooling system, the heater control valve should be
opened and the unit vented during filling.
Fill with coolant* to 5 cm (2") beneath the sealing
surface of the filler cap or to between the MIN and
MAX marks on the separate plastic expansion tank
(accessory).
TAMD73, TAMD74: Venting cocks in cooling system
* Note. Cooling system capacity, approx.:
TAMD63: 27 liters (7.1 US gals)
TAMD71: 35 liters (9.3 US gals)
TAMD73, TAMD74: 34 liter (9.1 US gals)
59
For information about coolants refer to “Coolant” on
page 96. When topping up, use the same coolant
mixture as that already in the cooling system.
Allow engine to stand 1 hour after filling. Then top up
the coolant if required, start the engine and warm it
up. Check the coolant level.
Cleaning the heat exchanger and charge
air cooler (CAC)
TAMD63, TAMD73 and TAMD74
Close the sea cock and drain the water from
the seawater and freshwater systems
before working on the cooling system.
1. Remove both battery leads.
2. Remove the oil pressure sender and oil pressure
switch complete with mounting bracket.
Seawater filter. Checking/cleaning
Volvo Penta offers two types of seawater filter. One
is a smaller filter with a transparent perspex cover,
and the other is larger and has a metal cover.
How often the filter is cleaned is dependent on the
operating conditions. The interval can be decided
based on experience after running the engine for a
time. If necessary, clean the filter more often than
specified in the maintenance schedule.
It is vital that the flow of seawater is never restricted in any way.
Close sea cock before working on cooling
system.
Bracket with oil pressure sender and switch
3. Remove the plastic pipe from the thermostat
housing at the heat exchanger.
4. TAMD73, TAMD74: Remove wiring from the
charge air cooler temperature sender to avoid
damage.
1. Remove cover (1) and lift up insert.
2. Clean insert and housing (2).
3. Reinstall the parts as shown in the figures below.
Check gaskets or O ring. Replace if required.
4. Open the sea cock and check for leaks.
Seawater filter
60
TAMD63: Heat exchanger and insert
TAMD63: Charge air cooler (CAC) and insert
1. Screw with drainage hole
2. Plugs over guide balls for CAC insert
5. Remove the cooling water hoses to and from the
heat exchanger/charge air cooler (CAC).
6. TAMD73 and TAMD74: Remove coolant pipe
between seawater pump and charge air cooler
(CAC).
7. TAMD73 and TAMD74: Undo brace at the heat
exchanger front.
8. Remove the heat exchanger from the engine (6
screws).
TAMD73, TAMD74: Heat exchanger and insert
9. Remove the end covers from the heat exchanger
or CAC (6 mm Allen screw). Remove the O-rings
and intermediate rings.
10. TAMD63: Unscrew plugs (2) over the two guide
balls for the charge air cooler’s insert a few turns
(10 mm Allen screw).
11. Push out the inserts.
Note. The inserts can only be pushed out backwards as they have a flange at the rear.
12. Flush and clean them internally and externally.
Use suitable brushes. Also clean the housings
and covers.
Note. Ensure that no contaminants enter the
engine’s inlet manifold via the charge air cooler.
Check that the drainage hole in screw (1) at the
back of the charge air cooler is not blocked.
13. Install the inserts in the housings. Use new
sealing rings.
TAMD73, TAMD74: Charge air cooler (CAC)
and insert
Note. The intermediate rings should be fitted
with the hole down. Inserts and intermediate
rings can be fitted in only one position due to the
distribution of holes.
61
14. Fit the end covers using new sealing rings.
TAMD63: Tighten plugs (2) on the CAC.
15. Fit the heat exchanger on the engine and tighten
it.
16. TAMD73 and TAMD74: Tighten the brace in
place between the heat exchanger and the
timing cover.
17. TAMD73 and TAMD74: Lubricate O-rings and
install coolant pipe between seawater pump and
charge air cooler (CAC).
18. Connect the cooling water hoses to the heat
exchanger and charge air cooler (CAC). Tighten
the hose clips.
19. Connect the plastic pipe from the thermostat
housing to the heat exchanger.
20. TAMD73 and TAMD74: Reconnect wiring to
charge air temperature sender.
21. Reinstall the oil pressure sender and oil pressure
switch.
22. Reconnect the battery leads.
23. Fill the engine with coolant and vent the system
as described on page 59.
24. Open the sea cock and start the engine. Check
for leaks.
6. Install the inserts in the housings. NOTE! Ensure that the inserts are installed in the
correct position. The locating lugs beneath the
inserts’ upper flange should face outwards (from
the engine) and fit corresponding notches in the
housings, see illustration.
7. Locate the sealing strips on the inserts’ baffle
plate and reinstall the covers together with the
connecting pipes between the covers. Use new
sealing rings.
Note. The covers must be installed with the
recess on the cover’s flange facing forwards, see
illustration.
8. Install the O-rings and clamping rings beneath
the housings. Reinstall the coolant pipe between
the seawater pump and the heat exchanger, or
between the charge air cooler and the reverse
gear’s oil cooler. Use new sealing rings.
Reinstall the cover plate over the heat exchanger
and CAC.
9. Fill the engine with coolant and vent the system
as described on page 59.
10. Open the sea cock and start the engine. Check
for leaks.
TAMD71
Close the sea cock and drain the water from
the seawater and freshwater systems
before working on the cooling system.
1. Remove the cover plate over the heat exchanger
and charge air cooler (CAC).
2. Remove the pipes between the seawater pump
and the heat exchanger or between the charge
air cooler (CAC) and the reverse gear’s oil
cooler.
3. Remove the covers over the heat exchangers
and the charge air coolers (CAC). Remove the
connecting pipes between the covers.
4. Remove the clamping rings beneath the housings. Remove the O-rings at the lower seal.
5. Lift the inserts. Flush and clean them internally
and externally. Use suitable brushes. Clean the
housings too.
Note. Ensure that no contaminants enter the
engine’s inlet manifold via the charge air cooler.
62
TAMD71: Heat exchanger/charge air cooler (CAC)
Cleaning oil cooler, reverse gear
Close sea cock before working on cooling
system.
1. Open the drain cock on the oil cooler. Remove
the cooling water pipes to and from the oil cooler.
2. Remove both end covers and push out the insert.
(The insert can only be pulled out to the left as it
has a flange on this side.)
3. Wash the insert in (e.g.) white spirit and blow it
dry using compressed air (or let it stand and dry).
Clean the tubes internally and the ends of the
core using suitable brushes. Clean the housing
too.
4. Reinstall all parts in the opposite order. Use new
sealing rings.
TAMD63, TAMD73 and TAMD74: Zinc anode in
heat exchanger’s front end cover
5. Close the drain cock and open the sea cock.
Start the engine and check for leaks.
Oil cooler, reverse gear
Z. Zinc anode
TAMD63, TAMD73 and TAMD74: Zinc anode in
CAC rear end cover
Checking/replacing zinc anode(s)
Close sea cock before working on cooling
system.
1. Open the drain cock on the reverse gear’s oil
cooler.
2. Unscrew the zinc anode (Z) on the oil cooler’s
right end cover.
3. TAMD63, TAMD73 and TAMD74: Unscrew the
zinc anode in the heat exchanger’s front end
cover, or in the charge air cooler’s rear end
cover.
Note. The seawater in the heat exchanger or
charge air cooler should be drained at the same
time.
4. Replace the anode if more than 50% of it has
been consumed. Otherwise clean the anode with
an emery cloth to remove the oxide layer.
NOTE! Do not use a wire brush or other steel
tools when cleaning, as these may damage the
galvanic protection.
5. Install the zinc anode(s). Ensure that there is
good metallic contact between the anode and the
material.
6. Close the drain cock. Open the sea cock before
starting the engine. Check for leaks.
63
Replacing the seawater pump impeller
Close sea cock before working on cooling
system.
Removing the seawater pump
Close sea cock before working on cooling
system.
1. Remove the pump’s end cover. Pull and twist out
the pump impeller using pliers.*
1. Drain the water from the seawater system.
2. Clean inside the housing. Lubricate the pump
housing and the inside of the cover with a small
amount of natural soap.
3. TAMD73 and TAMD74: Remove the brace
between the heat exchanger and the timing
cover (seawater pump).
3. Push in the new impeller with a rotating movement:
4. Remove the pump from the timing cover.
2. Release the coolant pipes to and from the pump.
TAMD63, TAMD73 and TAMD74 – clockwise.
TAMD71 – counterclockwise.
4. Reinstall the cover together with a new gasket.
Always keep a spare pump impeller and
gasket on board.
5. Open sea cock. Start the engine and check for
leaks.
* Note. In certain installations it is easier to first remove the
pump from the engine (see next section) and then replace the
impeller.
TAMD73 and TAMD74: Removing the seawater
pump
Installing the seawater pump
1. Check that the O-ring is not damaged and that it
is in place on the pump.
2. Install pump and tighten in position.
Removing the seawater pump impeller
3. TAMD73 and TAMD74: Install brace between
the heat exchanger and the timing cover (seawater pump).
4. Lubricate sealing rings and install coolant pipes
to and from the pump.
TAMD73 and TAMD74: Check for leakage at the
sealing against the charge air cooler (CAC).
64
Technical description
Electrical system
These engines have an electrical system with a generous generator capacity for a normal-sized boat. When a
more powerful power supply is required, we recommend that you fit an extra generator or install a separate generator unit.
These engines have a two-pole electrical system with an AC generator. The system voltage is 12V or 24V. The
TAMD71 has an electrical starter element (air preheating) fitted as standard. In these engines, the starter element
facilitates starting a cold engine and reduces exhaust smoke when starting in cold weather. In the TAMD63,
TAMD73 and TAMD74, which all have higher compression, different combustion chambers and a modified injection system, a starter element is not required.
The electrical system also includes senders for
monitoring the engine’s coolant temperature and oil
pressure.
Positions of electrical components in
engine and reverse gear:
TAMD63
The electrical system is shown in two ways. The
wiring diagrams (pages 73– 93) shows the wiring,
cable areas and cable colors. The positions of the
respective parts in the engine/reverse gear are shown
in the figures on pages 65– 67.
TAMD63
Note. The components in the figures
are numbered the same as in the
engine’s wiring diagram on page 75.
3.
4.
5.
6.
7.
8.
9.
10.
11.
12.
13.
14.
Starter motor
Generator
Starter relay
Semi-automatic fuses
Oil pressure sender, reverse gear
Pressure sender, Turbo boost pressure
Solenoid valve (fuel cut off valve)
Coolant temperature switch
Engine coolant temperature sender
Oil pressure switch, engine
Oil pressure sender, engine
Engine speed (rpm) sender
65
TAMD71B
TAMD71B
Note. The components in the figures are numbered the same
as in the engine’s wiring diagram on page 77.
3.
4.
5.
6.
7.
8.
9.
11.
12.
Solenoid (fuel shut-off valve)
Generator
Starter motor
Fuse for fuel shut-off valve
Stop relay
Starter relay
Semi-automatic fuses
Starter element
Fuse for starter element
13.
14.
15.
16.
17.
18.
19.
20.
21.
Relay for starter element
Time relay
Oil pressure sender, reverse gear
Pressure sender, Turbo boost pressure
Oil pressure sender, engine
Oil pressure switch, engine
Engine coolant temperature sender
Coolant temperature switch
Engine speed (rpm) sender
Starter element (TAMD71B)
The starter element heats the inlet air to the engine.
The element consists of three series connected wire
elements installed in a connecting pipe. It is located
between the turbocharger and the engine intake
manifold. The element is automatically engaged when
starting when the starter key is turned to and passes
the pre-heating position (II). This sends a voltage
pulse to a time relay, which in turn controls engagement of the element via a control relay. The engagement time is approx. 50 sec.
See wiring diagram on page 77.
66
Starter element
TAMD73, TAMD74
TAMD73, TAMD74
Note. The components in the figures are numbered
the same as in the engine’s wiring diagram on pages
79, 81, 83, 85 and 87.
3.
4.
5.
6.
7.
8.
9.
10.
11.
12.
13.
14.
19.
20.
21.
22.
23.
24.
25.
Generator
Starter motor
Starter relay
Main relay
Electronic Diesel Control (EDC) control module
box* (incl. fuel temperature sender, EDC and
turbo pressure sender, EDC)
Stop relay
Semi-automatic fuses
Oil pressure sender, reverse gear
Boost pressure sender, (instrument)
Oil pressure switch, engine
Oil pressure sender, engine
Engine coolant temperature (ECT) sender, instrument
Charge air temperature sender*
Engine coolant temperature (ECT) sender (EDC)*
Position sensor, control rod*
Engine speed (RPM) sender*
Electro-magnetic actuator, EDC*
2-pin connector, data link connector (DLC)*
Fuse for EDC system (TAMD74)
* Note. Apply to TAMD73P and TAMD74 engines.
Electronic Diesel Control (EDC) system
(TAMD73P and TAMD74)
The injection pump on the TAMD73P and TAMD74
engines has an electronic governor. The governor
contains an electro-magnet which effects the injection
pump control rod and so the amount of fuel injected
(engine output).
The EDC system measures boost pressure and
charge air temperature and calculates the available air
mass. This determines the amount of fuel injected
(smoke limiter function). To achieve minimal emissions at start the system measures the engine coolant temperature and adapts the amount of fuel required.
The system also determines the maximum torque
available at the engine speed registered without
risking damaging the engine. To protect the engine at
high engine coolant temperatures, high charge air
temperatures or excessive charge air pressure the
EDC temporarily reduces the amount of fuel (reduced
engine output) until the current values normalize.
The EDC control module also has a diagnostics
system (On-board diagnostics OBD) which assists
users/service technicians to quickly determine the
cause of any malfunctions on the system using the
diagnostic lamp or a diagnostic scan tool (“Diagnostic
Key”).
67
Starter motor
The starter motor is mounted on the flywheel casing
on the right of the engine.
When the starter motor is engaged, a drive on the
starter motor’s rotor shaft is moved in an axial direction so that it engages with a spur ring on the engine’s
flywheel. The drive’s axial movement and the engagement of the starter motor are controlled by a control
solenoid on the starter motor.
The starter motor’s control solenoid is engaged in turn
via the starter relay* when the starter key is held in
position III.
* Pos. 5 on the overview illustration on pages 65 and 67 or pos. 8
on the illustration on page 66.
Connecting the sensor system
Turn the engine off and switch off power at
the main switches before carrying out work
on the electrical system.
1. Disconnect the yellow sensor cable from the B+
connection on the generator.
2. Splice the cable (yellow, 1.5 mm2) and route it to
the batteries. Connect the cable to the batteries’
positive (+) pole.
Charging control lamp (extra generator)
A separate charging control lamp (3W) can be connected to the extra 28V/100A generator.
A resistor (3) P/N 863400-8 (47Ω/25W) must also be
connected as shown in a separate wiring diagram on
page 73.
AC generator
The generator is belt driven and located at the front of
the engine.
The engine’s standard generator can be fitted with a
charge distributor as an accessory. Two independent
battery circuits can then be charged simultaneously.
The charge distributor separates the two groups from
one another so that the engine’s storage batteries are
kept fully charged even if the “accessory batteries”
are weak or almost discharged.
Note. The charging voltage from the 28V/60A generator is thermally compensated. The voltage increases
at low temperatures and is reduced at higher temperatures.
Voltage regulator with sensor system
Fuel shut-off valve
TAMD63, TAMD71B and TAMD73WJ engines are
stopped via a solenoid valve (fuel shut-off valve)
which is activated during stopping. The valve changes
the direction of the fuel flow to and from the feed
pump so that a vacuum is created in the fuel chamber
of the injection pump. This makes it impossible for the
pump element to fill up and the engine stops.
This valve is located on a bracket beneath the injection pump.
The voltage regulator for the standard generator (14V/
60A, or 28V/40A* or 28V/60A) has a sensor system.
This sensor system compares the charging voltage
between the generator’s B+ and B– connections with
the charging voltage between the batteries’ positive
and negative poles. The voltage regulator then compensates any drop in voltage in the leads between the
generator and the batteries by increasing the charging
voltage from the generator, if necessary.
Fuses
When supplied by Volvo Penta, the sensor system is
not activated. However, it is likely that it was connected when the engine was installed.
These engines have two semi-automatic fuses of
approx. 8A. These fuses break the current in the
event of overloading.*
* Note. The 28V/40A generator is for the TAMD63 engine.
* TAMD73P, TAMD74: If a fuse blows the engine stops.
68
In the TAMD71B the fuses are located in the front of
the junction box on the left end of the expansion tank.
The electrical starter element is also protected by a
strip fuse (150A) between the element and the high
tension relay.
The main switches should break the current to all
parts consuming electricity. Electrical leads should be
routed so that they are not exposed to moisture and
there is no risk of them being exposed to bilgewater in
the keelson.
The TAMD63, TAMD73 and TAMD74 have the junction box on the exhaust manifold at the rear left of the
engine. The fuses are at the back of the box.
If there are several battery circuits, there must be
separate switches for the extra equipment. There
must also be a main switch between the extra battery’s positive (+) pole and the fuse block for the
boat’s electrical equipment. The main switch for the
extra battery circuit should break the current to all
power consuming equipment connected to this circuit
and be switched off when there is no requirement for
extra current. The main switches to the engine must
be switched off when the boat is not in use.
In the junction box there is also a replaceable safety
fuse (8A) for the fuel shut-off valve on the TAMD71B
and a replaceable safety fuse* (7.5A) for the EDC
power supply on the TAMD74.
See instructions on page 71 for resetting/replacing
fuses.
Make sure that you always have spare fuses on
board.
* TAMD74: If the fuse blows the engine stops.
Relays
The relays are located in the junction box. This is
located at the rear of the exhaust manifold on the left
side of the engine (TAMD63, TAMD73 and TAMD74)
and on the left end of the expansion tank (TAMD71B).
The start and stop* functions are controlled via two
change-over relays. These relays are identical and are
therefore interchangeable if necessary.
On TAMD71B engines there is also a timer relay in
the junction box which controls the starter element’s
engagement time via a high tension relay (approx. 50
seconds). This high tension relay is located in front of
the air cleaner (ACL) adjacent to the starter element.
* Not TAMD63 and TAMD73WJ engines.
The propulsion unit must not be electrically connected
with other equipment such as trim tabs, steps, etc.
Neither may it be used as ground points for radio or
navigation installations or other electrical equipment
with separate ground cables. All separate ground
connections should be collected together to form a
joint ground connection which is separate from the
propulsion package.
If shore power is connected, protector ground should
not be connected to the engine or to any other ground
on the boat.
Transformers connected to shore power must be
installed so that the protective ground on the input
side (120/220V) and the negative connection on the
output side (12/24V) are not connected.
Warning! Electrolytic corrosion as a consequence of leakage currents may cause serious
and expensive damage to your boat’s equipment
within a short time. Work on the boat’s low
tension circuit should only be carried out by
qualified or experienced persons. Installation or
work on the shore power equipment must only
be carried out by electricians authorized to work
with high-voltage installations.
Electrical system – Important!
General Information
Electrolytic corrosion
Your boat and its engine/reverse gear have sacrificial
anodes made of zinc as protection against galvanic
corrosion. This protection may be rendered ineffective
if there are any leakage currents from the electrical
system due to faulty equipment or incorrectly connecting electrical components on the negative side
(grounding, protector ground). The following should
always be observed:
The main engine switches should be mounted on both
the positive (+) and the negative (–) battery leads.
Turn the engine off and switch off power at
the main switches before carrying out work
on the electrical system.
1. Main ON/OFF power switches
Never break the circuit between the generator and
batteries while the engine is running. In other
words, the main switches must never be disconnected before the engine has stopped. If the
circuit is broken while the engine is running, the
voltage regulator may be destroyed and the
generator seriously damaged.
Charging circuits must not be switched over while
the engine is running, for the same reason.
69
To simultaneously charge two independent battery
circuits, fit a Volvo Penta charge distributor to the
regular generator (accessory).
2. Batteries
Never mix up the positive and negative battery
terminals when installing. Incorrect installation can
result in serious damage to electrical equipment.
Refer to wiring diagrams. The battery terminal
posts should always be well cleaned and the
cable terminals well tightened and greased to
prevent open circuits.
Avoid boost charging the batteries. If the battery
must be booster charged, first remove both
battery leads.
NOTE! Follow relevant safety regulations when
charging batteries. When charging, unscrew filler
plugs but leave them in their holes. Ventilation
should be good, particularly if the batteries are
being charged in an enclosed area. Always switch
off the charging circuit before removing the
battery charger connectors.
Warning! Never allow an open flame or
electric sparks near the batteries. Never
smoke in proximity to the batteries. The
batteries give off hydrogen gas during
charging which when mixed with air can
form an explosive gas – oxyhydrogen. This
gas is easily ignited and highly volatile.
TAMD73P and TAMD74: Removing the connector
from the control module
A. Locking catch
Always connect the weld clamp to the component to
be welded and as close to the welding point as possible. The clamp should never be connected to the
engine or in such a manner that the current is able to
pass over any bearings.
When welding is complete:
TAMD73P and TAMD74: Press the connector into the
control module for the EDC system while pushing the
locking catch (A) upwards.
Always connect the leads to the generator
before replacing the battery leads.
Always use protective goggles when
charging and handling batteries.
The battery electrolyte contains extremely
corrosive sulfuric acid. If this should come
in contact with the skin, immediately wash
with soap and plenty of water. If battery acid
comes in contact with the eyes, immediately flush with plenty of water and obtain
medical assistance without delay.
3. See separate instructions on this page for how
to start using auxiliary batteries.
4. Connecting accessories and extra equipment
All extra equipment should be connected to a
separate junction box and fused. Extra outlets
directly from the instrument panels should be
avoided. Permitted extra power take-off is however maximum 5A* (for all instrument panels together).
Starting using auxiliary batteries
Warning!
The batteries (auxiliary batteries in particular) contain
extremely explosive oxyhydrogen gas. One spark,
which may be formed if the auxiliary batteries are
connected incorrectly, is sufficient to explode a
battery and cause damage and injury.
1.
Check that the auxiliary batteries are connected
(in series or in parallel) so that their rated voltage
is the same as the engine’s system voltage.
2.
First connect the red jump lead (+) to the auxiliary
battery, then to the discharged battery. Then
connect the black jump lead (–) to the auxiliary
battery, then to a spot a short distance from the
discharged batteries, for example at the main
switch on the negative cable or at the negative
cable’s connection to the starter motor.
3.
Start the engine. NOTE! Do not shift the connections when attempting to start the engine
(spark risk) and do not lean over any of the
batteries.
4.
Remove the jump leads in exactly the opposite
order to which you put them on. NOTE! The
normal leads to the standard batteries should
under no circumstances be moved.
* Note. For the TAMD73P and TAMD74 max. 2A apply.
Arc welding
Remove the positive and negative leads from the
batteries. Then remove all leads to the generator.
TAMD73P and TAMD74: Remove the connector from
the EDC system control module (located behind the
fine fuel filters). Pull down the red locking catch (A)
below the connector while pulling the connector out at
the same time.
70
Maintenance – Electrical System
NOTE! Always stop the engine and break the
current using the main switches before
working on the electrical system.
Also read the section entitled “Electrical
system – Important” on pages 69–70.
Strip fuse for electrical starter element*
Note. This work should be left to authorized
service personnel.
1. Stop the engine and break the circuit using the
main switches.
2. Remove the cover plate over the high power relay.
* Note. For TAMD71B engines.
Resetting/replacing fuses
Ensure that you use the correct rating for the fuse
you are replacing. Never fit a more powerful fuse.
Make sure that you always have spare fuses on
board.
Note. If the same fuse often trips or needs to be
replaced, consult authorized service personnel so that
they can investigate the cause of the overload.
Semi-automatic fuses
The semi-automatic fuses are reset by pressing the
button on the fuse.
TAMD71B: Blade fuse (1) with support (2) for
electrical starter element
3. Remove the old fuse (1) complete with holder (2).
Fuse for the EDC system*
The fuse (7.5A) can be replaced after removing the
cover of the terminal box.
* Note. For TAMD74 engines.
Note! When removing and tightening the nuts* on
the terminals on the starter element, these terminals must always be held tightly (see figure).
Otherwise, the wire element may twist inside the
starter element and cause a short circuit.
4. Fit the new fuse and support as shown in the
illustration. Reinstall the cover plate over the
relay.
* Tightening torque for terminal nuts = 11–14 Nm (1.1–1.4 kpm/
8–10 lbf.ft.).
TAMD63, TAMD73, -74
TAMD71B
Terminal box with fuses
A. Fuse for the EDC system (TAMD74)
TAMD71B: Removal/tightening terminal nuts on
starter element terminals
71
Fuel shut-off valve fuse*
Check that the batteries are connected properly.
1. Stop the engine and break the circuit using the
main switches.
Also check that all other electrical connections are dry
and free of oxidation and that there are no loose
connections. If necessary, spray these connections
with a water-repellent spray (Volvo Penta Universal
oil).
2. Detach the terminal box and pull it out.
3. Dismantle the fuse holder and replace the fuse
with a new one (8A). See illustration.
4. Reinstall the terminal box.
* Note. For TAMD71B engines.
Charge condition
Check the batteries’ charge condition using a hydrometer. The battery electrolytic density should be 1.28 g/
cm3.* Charge battery if reading has dropped to 1.24 g/
cm3* (approximately 75% charge).
TAMD71B: Fuel shut-off valve fuse
Note. If an aerometer-type hydrometer (see illustration) is used, the value read off applies at a temperature of approx. +25°C (77°F). At other temperatures
the reading must be compensated as follows:
at –20°C (–4°F)
at –5°C (23°F)
at +10°C (50°F)
at +40°C (104°F)
Checking batteries and electrical
connections
Read the section entitled “Electrical system –
Important” on pages 69–70.
The service life of your batteries depends largely on
how they are maintained. Keep batteries dry and
clean. Dirt on the batteries may cause tracking and
discharge them, particularly in damp weather.
Clean the battery terminals and connections using
suitable wire brushes. Poor contact may cause
unnecessary voltage drops. Tighten the cable terminals well and spray the battery terminals and connections with anti-corrosive agent or coat them with
Vaseline.
compensate by –0.03
compensate by –0.02
compensate by –0.01
compensate by +0.01
Example: A value of 1.24 measured at –5°C (23°F)
should be corrected to 1.22 which requires extra
charging.
Note. An optical-type hydrometer is temperature
compensated.
The various battery cells should display relatively
even values. Uneven results may mean that the
battery is more or less ready for replacement.
3
* Note. For batteries with tropical acid substitute 1.24 g/cm , and
3
1.20 g/cm .
Aerometer-type
Cleaning the battery terminals
72
Optical-type
Hydrometers
Wiring Diagrams
Connecting the charge indicator lamp
Extra generator 28V/100A
1. Key switch
2. Charge indicator light
3. Resistor (47Ω/25W),
P/N 863400-8
4. Generator 28V/100A
Connection of sensor system to standard generator,
principle diagram
1.
2.
3.
4.
5.
2
Sensor cable (yellow, 1.5 mm )
Charge distributor (accessory)
Voltage regulator
Generator
Fuse panel (accessory)
6. Starter motor
7. Main ON/OFF power switch
8. Accessory batteries (for
accessories)
9. Start batteries (engine)
Block diagram
A.
B.
C.
Main panel
Auxiliary panel
Flying Bridge panel*
* Main panel (A) may also be installed on the
flying bridge control position.
D.
E.
F.
Alarm panel. (Used only when there is no main
panel A)
Y connection
Junction box** with fuses
** Note. The picture shows the TAMD63, TAMD73
and TAMD74.
73
TAMD63L-A, TAMD63P-A
Control panel for auxiliary control position (Flying Bridge)
Cable areas in mm2 are given after the color codes in the wiring diagrams.
The cable area is 1.0 mm2 unless otherwise stated.
Instrument panel, (Master panel)
Instrument panels
1.
2.
3.
4.
5.
Spring loaded
Spring loaded
6.
7.
8.
9.
10.
11.
12.
13.
14.
15.
16.
17.
18.
Instrument lighting
Voltmeter
Oil pressure gauge
Engine coolant temperature gauge
Connector for extra
warning display (accessory)
Electronics module (alarm)
Engine coolant temperature warning lamp
Oil pressure warning lamp
Charge warning lamp
Indicator lamp (not used)
Switch, instrument panel lighting
Alarm test/acknowledgement switch
Tachometer with built-in hours run meter
Key switch
Alarm
Connector for connecting neutral
position switch, if fitted (accessory)
16-pin connector
2-pin connector (for auxiliary panel,
where installed)
=
=
=
=
=
=
Blue
Light-blue
Brown
Light-brown
Green
Gray
mm2
AWG
0.75
18
1.0
16 (17)
* American Wiring Gauge
Conversions mm2/AWG*
BL
LBL
BN
LBN
GN
GR
OR
PU
R
SB
W
Y
Orange
Purple
Red
Black
White
Yellow
1.5
15 (16)
=
=
=
=
=
=
2.5
13
Instrument lighting
Oil pressure gauge, reverse gear
Turbo charging pressure gauge
Connection to instr. light. on main panel
Connection to printed circuit card on main panel
Connection to connector (18) on main panel
Cable color
1.
2.
3.
4.
5.
6.
Auxiliary panel
10
7
16
5
Cable area 1.5 mm .
A. Fuse (8A/24V, or 15A/12V)
A broken line indicates a non-Volvo Penta cable.
2
Suggested connection of oil scavenging pump (pumping and filling)
The cable area is 0.75 mm2 unless otherwise stated.
the wiring diagrams.
Cable areas in mm2 are given after the color codes in
Battery
Main ON/OFF power switch
Starter motor
Generator
Starter relay*
Semi-automatic fuses (8A) *
Oil pressure sender, reverse gear
(0 – 30 bar)
Turbo pressure sender (0 – 3 bar)
Solenoid valve (fuel cut off valve)
Engine coolant temperature (ECT)
switch (97°C normally open –
closes if fault occurs)
Engine coolant temperature (ECT)
sender (40 – 120°C/104–248°F)
Oil pressure switch, engine (0.7
bar, normally open – closes if fault
occurs)
Oil pressure sender, engine (0 –
10 bar)
Engine speed (rpm) sender
16-pin connector
* Located in the junction box
14.
15.
13.
12.
11.
8.
9.
10.
1.
2.
3.
4.
5.
6.
7.
Note. The components in the wiring
diagram have the same numbers as
shown in the key diagrams on page 65.
Engine
TAMD71B
Control panel for auxiliary control position (Flying Bridge)
Cable areas in mm2 are given after the color codes in the wiring diagrams.
The cable area is 1.5 mm2 unless otherwise stated.
Instrument panel, (Master panel)
Instrument panels
1.
2.
3.
4.
5.
Spring loaded
Spring loaded
6.
7.
8.
9.
10.
11.
12.
13.
14.
15.
16.
17.
18.
Instrument lighting
Voltmeter
Oil pressure gauge
Engine coolant temperature gauge
Connector for extra
warning display (accessory)
Electronics module (alarm)
Engine coolant temperature warning lamp
Oil pressure warning lamp
Charge warning lamp
Control lamp, pre-heating
Switch, instrument panel lighting
Alarm test/acknowledgement switch
Tachometer with built-in hours run
meter
Key switch
Alarm
Connector for connecting neutral
position switch, if fitted (accessory)
16-pin connector
2-pin connector (for auxiliary panel
where installed)
Engine
Note. The components in the wiring diagram
have the same numbers as shown in the
key diagrams on page 66.
1.
2.
3.
4.
5.
6.
7.
8.
9.
10.
11.
12.
13.
14.
15.
16.
17.
18.
19.
20.
21.
22.
Auxiliary panel
1. Instrument lighting
2. Oil pressure gauge, reverse
gear
3. Turbo charging pressure
gauge
4. Connection to instr. light. on
main panel
5. Connection to printed circuit
card on main panel
6. Connection to connector (18)
on main panel
Battery
Main ON/OFF power switch
Fuel shut-off valve
Generator
Starter motor
Fuel shut-off valve fuse (8A)
Stop relay*
Starter relay*
Semi-automatic fuses (8A) *
Ground terminal*
Starter element
Fuse (150A) for starter element
Relay for starter element
Time relay for starter element*
Oil pressure sender, reverse gear
Pressure sender, Turbo boost pressure
Oil pressure sender, engine
Oil pressure switch, engine
Engine coolant temperature sender
Coolant temperature switch
Engine speed (rpm) sender
16-pin connector*
* Located in the junction box
NO = Normally open during operation
A broken line indicates a non-Volvo Penta cable.
Cable color
Conversions mm2/AWG*
* American Wiring Gauge
mm2
AWG
1.0
16 (17)
1.5
15 (16)
2.5
13
10
7
16
5
BL
LBL
BN
LBN
GN
GR
OR
=
=
=
=
=
=
=
Blue
Light-blue
Brown
Light-brown
Green
Gray
Orange
R
SB
TP
=
=
=
VO =
W =
Y
=
Red
Black
Transparent
(colorless)
Violet
White
Yellow
Suggested connection of oil scavenging pump (pumping and filling)
2
Cable area 1.5 mm .
A. Fuse (8A/24V, or 15A/12V)
TAMD73P-A (12V)
Cable areas in mm2 are given after the color codes in the wiring diagrams.
Spring loaded
Control panel for auxiliary control position (Flying Bridge)
The cable area is 1.0 mm2 unless otherwise stated.
Conversions mm2/AWG
mm2
AWG
0.5
20
1.0
1.5
16 (17) 15 (16)
2.5
13
6
9 (10)
10
7
Spring loaded
Instrument panel, (Master panel)
Instrument panels
1.
2.
3.
4.
5.
6.
7.
8.
9.
10.
Instrument lighting
Voltmeter
Oil pressure gauge
Engine coolant temperature gauge
Connector for extra warning
display (accessory)
Electronics module (alarm)
Engine coolant temperature warning
lamp
Oil pressure warning lamp
Charge warning lamp
Indicator lamp (not used)
11. Switch, instrument panel lighting
12. Alarm test/acknowledgement switch
13. Tachometer with built-in hours run
meter
14. Key switch
15. Alarm
16. Connector for connecting neutral
position switch
17. 16-pin connector
18. 2-pin connector (for auxiliary panel
where installed)
19. Adapter
Engine (12V system voltage)
Note. The components in the wiring diagram
have the same numbers as shown in the
key diagrams on page 67.
1 A.
1 B.
2 A.
2 B.
3.
4.
5.
6.
7.
8.
9.
10.
11.
12.
13.
14.
15.
16.
17.
18.
19.
20.
21.
22.
23.
24.
25.
26.
27.
Starter battery
Emergency/auxiliary battery
Main ON/OFF power switch
Main ON/OFF power switch for backup system
Generator
Starter motor
Starter relay*
Main relay*
EDC control module box
Stop relay*
Semi-automatic fuses (8A)*
Oil pressure sender, reverse gear
Pressure sender, Turbo boost pressure
Oil pressure switch, engine
Oil pressure sender, engine
Engine coolant temperature sender
Joint splice
16-pin connector * (instrument cable
harness)
4-pin connector (reverse gear)
Solenoid (reverse gear with electronic
shifting)
Charge air temperature sender
Engine coolant temperature (ECT)
sender (EDC)
Position sensor, ** control rod
Engine speed (rpm) sender**
Electro-magnetic actuator, EDC**
2-pin connector, data link connector
16-pin connector (control unit)
Connector
Main power switch (control-/instrument
panels)
* Located in the junction box
** Located on the injection pump
NO = Normally open during operation
Cable color
Cable areas in mm2 are given after
the color codes in the wiring diagrams.
The cable area is 0.5 mm2 unless
otherwise stated.
A broken line indicates a non-Volvo
Penta cable.
BL
LBL
BN
LBN
GN
GR
OR
=
=
=
=
=
=
=
Blue
P
Light-blue R
Brown
SB
Light-brown VO
Green
W
Gray
Y
Orange
=
=
=
=
=
=
Pink
Red
Black
Violet
White
Yellow
TAMD73P-A (24V)
Cable areas in mm2 are given after the color codes in the wiring diagrams.
Spring loaded
Control panel for auxiliary control position (Flying Bridge)
The cable area is 1,0 mm2 unless otherwise stated.
Conversions mm2/AWG
mm2
AWG
0.5
20
1.0
1.5
16 (17) 15 (16)
2.5
13
10
7
Spring loaded
Instrument panel, (Master panel)
Instrument panels
1.
2.
3.
4.
5.
6.
7.
8.
9.
10.
Instrument lighting
Voltmeter
Oil pressure gauge
Engine coolant temperature gauge
Connector for extra warning
display (accessory)
Electronics module (alarm)
Engine coolant temperature warning
lamp
Oil pressure warning lamp
Charge warning lamp
Indicator lamp (not used)
11. Switch, instrument panel lighting
12. Alarm test/acknowledgement switch
13. Tachometer with built-in hours run
meter
14. Key switch
15. Alarm
16. Connector for connecting neutral
position switch
17. 16-pin connector
18. 2-pin connector (for auxiliary panel
where installed)
19. Adapter
Engine (24V system voltage)
Note. The components in the wiring diagram
have the same numbers as shown in the
key diagrams on page 67.
1 A.
1 B.
2 A.
2 B.
3.
4.
5.
6.
7.
8.
9.
10.
11.
12.
13.
14.
15.
16.
17.
18.
19.
20.
21.
22.
23.
24.
25.
Starter battery
Emergency/auxiliary battery
Main ON/OFF power switch
Main ON/OFF power switch for backup system
Generator
Starter motor
Starter relay*
Main relay*
EDC control module box
Stop relay*
Semi-automatic fuses (8A)*
Oil pressure sender, reverse gear
Pressure sender, Turbo boost pressure
Oil pressure switch, engine
Oil pressure sender, engine
Engine coolant temperature sender
Joint splice
16-pin connector * (instrument cable
harness)
4-pin connector (reverse gear)
Solenoid (reverse gear with electronic
shifting)
Charge air temperature sender
Engine coolant temperature (ECT)
sender (EDC)
Position sensor, ** control rod
Engine speed (rpm) sender**
Electro-magnetic actuator, EDC**
2-pin connector, data link connector
(DLC)
16-pin connector (control unit)
* Located in the junction box
** Located on the injection pump
NO = Normally open during operation
Cable color
Cable areas in mm2 are given after
the color codes in the wiring diagrams.
The cable area is 0.5 mm2 unless
otherwise stated.
A broken line indicates a non-Volvo
Penta cable.
BL
LBL
BN
LBN
GN
GR
OR
=
=
=
=
=
=
=
Blue
P
Light-blue R
Brown
SB
Light-brown VO
Green
W
Gray
Y
Orange
=
=
=
=
=
=
Pink
Red
Black
Violet
White
Yellow
TAMD73WJ-A
Control panel for auxiliary control position (Flying Bridge)
Cable areas in mm2 are given after the color codes in the wiring diagrams.
The cable area is 1.5 mm2 unless otherwise stated.
Instrument panel, (Master panel)
Instrument panels
1.
2.
3.
4.
5.
Spring loaded
Spring loaded
6.
7.
8.
9.
10.
11.
12.
13.
14.
15.
16.
17.
18.
Instrument lighting
Voltmeter
Oil pressure gauge
Engine coolant temperature gauge
Connector for extra warning display
(accessory)
Electronics module (alarm)
Engine coolant temperature warning lamp
Oil pressure warning lamp
Charge warning lamp
Control lamp (not used)
Switch, instrument panel lighting
Alarm test/acknowledgement switch
Tachometer with built-in hours run meter
Key switch
Alarm
Connector for connecting neutral
position switch, if fitted (accessory)
16-pin connector
2-pin connector (for auxiliary panel
where installed)
Engine
Note. The components in the wiring diagram
have the same numbers as shown in the
key diagrams on page 67.
1.
2.
3.
4.
5.
9.
10.
11.
12.
13.
14.
15.
16.
17.
18.
22.
Battery
Main ON/OFF power switch
Generator
Starter motor
Starter relay*
Semi-automatic fuses (8A) *
Oil pressure sender, reverse gear
Pressure sender, Turbo boost pressure
Oil pressure switch, engine
Oil pressure sender, engine
Engine coolant temperature sender
Ground terminal*
Fuel shut-off valve
Coolant temperature switch
16-pin connector*
Engine speed (rpm) sender
* Located in the junction box
Auxiliary panel
NO = Normally open during operation
1.
2.
3.
4.
Instrument lighting
Oil pressure gauge, reverse gear
Turbo charging pressure gauge
Connection to instr. light. on main
panel
5. Connection to printed circuit card
on main panel
6. Connection to connector (18) on
main panel
A broken line indicates a non-Volvo
Penta cable.
Cable color
Conversions mm2/AWG*
* American Wiring Gauge
mm2
AWG
1.0
16 (17)
1.5
15 (16)
2.5
13
10
7
16
5
BL
LBL
BN
LBN
GN
GR
OR
P
R
SB
VO
W
Y
=
=
=
=
=
=
=
=
=
=
=
=
=
Blue
Light-blue
Brown
Light-brown
Green
Gray
Orange
Pink
Red
Black
Violet
White
Yellow
Suggested connection of oil scavenging pump (pumping and filling)
2
Cable area 1.5 mm .
A. Fuse (8A/24V, or 15A/12V)
TAMD74C-A, TAMD74L-A, TAMD74P-A (12V)
Cable areas in mm2 are given after the color codes in the wiring diagrams.
Spring loaded
Control panel for auxiliary control position (Flying Bridge)
The cable area is 1.0 mm2 unless otherwise stated.
Conversions mm2/AWG
mm2
AWG
0.5
20
1.0
1.5
16 (17) 15 (16)
2.5
13
10
7
Spring loaded
Instrument panel, (Master panel)
Instrument panels
1.
2.
3.
4.
5.
6.
7.
8.
9.
10.
Instrument lighting
Voltmeter
Oil pressure gauge
Engine coolant temperature gauge
Connector for extra warning
display (accessory)
Electronics module (alarm)
Engine coolant temperature warning
lamp
Oil pressure warning lamp
Charge warning lamp
Indicator lamp (not used)
11. Switch, instrument panel lighting
12. Alarm test/acknowledgement switch
13. Tachometer with built-in hours run
meter
14. Key switch
15. Alarm
16. Connector for connecting neutral
position switch
17. 16-pin connector
18. 2-pin connector (for auxiliary panel
where installed)
19. Adapter
Engine (12V system voltage)
Note. The components in the wiring diagram
have the same numbers as shown in the
key diagrams on page 67.
1 A.
1 B.
2 A.
2 B.
3.
4.
5.
6.
7.
8.
9.
10.
11.
12.
13.
14.
15.
16.
17.
18.
19.
20.
21.
22.
23.
24.
25.
26.
27.
28.
29.
Starter battery
Emergency/auxiliary battery
Main ON/OFF power switch
Main ON/OFF power switch for backup system
Generator
Starter motor
Starter relay*
Main relay*
EDC control module box
Stop relay*
Semi-automatic fuses (8A)*
Oil pressure sender, reverse gear
Pressure sender, Turbo boost pressure
Oil pressure switch, engine
Oil pressure sender, engine
Engine coolant temperature sender
Joint splice
16-pin connector, male* (instrument
cable harness)
4-pin connector (reverse gear)
Solenoid (reverse gear with electronic
shifting)
Charge air temperature sender
Engine coolant temperature (ECT)
sender (EDC)
Position sensor, ** control rod
Engine speed (rpm) sender**
Electro-magnetic actuator, EDC**
2-pin connector, data link connector
16-pin connector, male (control unit)
16-pin connector, female (control unit)
Fuse (7.5 A)
Connector
Main power switch (control-/instrument
panels)
* Located in the junction box
** Located on the injection pump
Cable areas in mm2 are given after
the color codes in the wiring diagrams.
The cable area is 0.5 mm2 unless
otherwise stated.
A broken line indicates a non-Volvo
Penta cable.
NO = Normally open during operation
Cable color
Refer to page 81.
TAMD74C-A, TAMD74L-A, TAMD74P-A (24V)
Cable areas in mm2 are given after the color codes in the wiring diagrams.
Spring loaded
Control panel for auxiliary control position (Flying Bridge)
The cable area is 1.0 mm2 unless otherwise stated.
Conversions mm2/AWG
mm2
AWG
0.5
20
1.0
1.5
16 (17) 15 (16)
2.5
13
10
7
Spring loaded
Instrument panel, (Master panel)
Instrument panels
1.
2.
3.
4.
5.
6.
7.
8.
9.
10.
Instrument lighting
Voltmeter
Oil pressure gauge
Engine coolant temperature gauge
Connector for extra warning display
(accessory)
Electronics module (alarm)
Engine coolant temperature warning
lamp
Oil pressure warning lamp
Charge warning lamp
Control lamp (not used)
11. Switch, instrument panel lighting
12. Alarm test/acknowledgement switch
13. Tachometer with built-in hours run
meter
14. Key switch
15. Alarm
16. Connector for connecting neutral
position switch, if fitted (accessory)
17. 16-pin connector
18. 2-pin connector (for auxiliary panel
where installed)
19. Adapter
Engine (24V system voltage)
Note. The components in the wiring diagram
have the same numbers as shown in the
key diagrams on page 67.
1 A.
1 B.
2 A.
2 B.
3.
4.
5.
6.
7.
8.
9.
10.
11.
12.
13.
14.
15.
16.
17.
18.
19.
20.
21.
22.
23.
24.
25.
26.
27.
Starter battery
Emergency/auxiliary battery
Main ON/OFF power switch
Main ON/OFF power switch for backup system
Generator
Starter motor
Starter relay*
Main relay*
EDC control module box
Stop relay*
Semi-automatic fuses (8A)*
Oil pressure sender, reverse gear
Pressure sender, Turbo boost pressure
Oil pressure switch, engine
Oil pressure sender, engine
Engine coolant temperature sender
Joint splice
16-pin connector, male* (instrument
cable harness)
4-pin connector (reverse gear)
Solenoid (reverse gear with electronic
shifting)
Charge air temperature sender
Engine coolant temperature (ECT)
sender (EDC)
Position sensor, ** control rod
Engine speed (rpm) sender**
Electro-magnetic actuator, EDC**
2-pin connector, data link connector
16-pin connector, male (control unit)
16-pin connector, female (control unit)
Fuse (7.5 A)
* Located in the junction box
** Located on the injection pump
Cable areas in mm2 are given after
the color codes in the wiring diagrams.
The cable area is 0.5 mm2 unless
otherwise stated.
A broken line indicates a non-Volvo
Penta cable.
NO = Normally open during operation
Cable color
Refer to page 81.
88
Extra instrument kit for wheel house
TAMD63, TAMD71, TAMD73, TAMD74
Spring loaded
Electronics module (alarm)
Engine coolant temperature warning lamp
Oil pressure warning lamp
Charge warning lamp
Control lamp, pre-heating (TAMD71B)
Connector for extra warning display
(accessory)
Instrument lighting
Connector (cannot be opened)
Engine coolant temperature gauge
Oil pressure gauge
Voltmeter
Turbo charging pressure gauge
Oil pressure gauge, reverse gear
Alarm
Alarm test/acknowledgement switch
Switch, instrument panel lighting
Key switch
Connector for connecting neutral position
switch, if fitted (accessory)
Tachometer with built-in hours run meter
16-pin connector
Spring loaded
19.
20.
7.
8.
9.
10.
11.
12.
13.
14.
15.
16.
17.
18.
1.
2.
3.
4.
5.
6.
Flying Bridge instrument kit
1. Electronics module (alarm)
2. Connector for extra warning display
(accessory)
3. Engine coolant temperature warning lamp
4. Oil pressure warning lamp
5. Charge warning lamp
6. Control lamp, pre-heating (TAMD71B)
7. Alarm
8. Alarm test/acknowledgement switch
9. Switch, instrument panel lighting
10. Connector (cannot be opened)
11. Instrument lighting
12. Tachometer with built-in hours run meter
13. Starter button
14. Stop button
15. Connector for connecting neutral position
switch, if fitted (accessory)
16. 16-pin connector
Cable color
BL
LBL
BN
LBN
GN
GR
OR
P
R
SB
VO
W
Y
=
=
=
=
=
=
=
=
=
=
=
=
=
Blue
Light-blue
Brown
Light-brown
Green
Gray
Orange
Pink
Red
Black
Violet
White
Yellow
89
Cable areas in mm2 are given after the
color codes in the wiring diagrams.
TAMD73P-A
Single control position – Single or dual lever
control (single installation)
Single control position – Single or dual lever
control with control adapters (single installation)
Multiple control positions – Single or dual lever
controls (single installation)
Multiple control positions – Single or dual lever
controls with control adapters (single installation)
VP controls:
Late model
NEUTRAL
Cable color
Location diagram (all wiring diagrams)
BL
BN
GN
OR
P
R
SB
W
Y
1.
2.
3.
4.
5.
6.
7.
8.
=
=
=
=
=
=
=
=
=
Blue
Brown
Green
Orange
Pink
Red
Black
White
Yellow
Early model
2
Cable areas = 0.75 mm .
90
NEUTRAL
Indicator light
1-pin switch
Position limiter switch
Connector
Potentiometer
16-pin connector
2-pin connector, data link connector (DLC)
Joint splice
TAMD73P-A
Multiple control positions – Single or dual lever controls (twin engine installation)
Multiple control positions – Single or dual lever controls with control adapters (twin engine installation)
VP controls:
Late model
NEUTRAL
Cable color
Location diagram (both wiring diagrams)
BL
BN
GN
OR
P
R
SB
W
Y
1.
2.
3.
4.
5.
6.
7.
8.
9.
10.
=
=
=
=
=
=
=
=
=
Blue
Brown
Green
Orange
Pink
Red
Black
White
Yellow
Early model
NEUTRAL
Indicator light
Switch
Connector
Relay
Position limiter switch
Potentiometer
Connector, Port – Starboard cable harness
2-pin connector, data link connector (DLC)
16-pin connector, Port engine
16-pin connector, Starboard engine
2
Cable areas = 0.75 mm .
91
TAMD74
Electronic control
Single engine installation.
Single or dual control lever unit
Cable colors
Location diagram
BL
BN
GN
OR
P
R
SB
W
Y
1.
2.
3.
4.
5.
5a.
5b.
6.
7.
8.
9.
=
=
=
=
=
=
=
=
=
Blue
Brown
Green
Orange
Pink
Red
Black
White
Yellow
2
Cable areas = 0.75 mm .
92
Mechanical control
Single engine installation. Single or dual control
lever unit with control unit adapters
Push button with indicator light, neutral – green
Push button with indicator light, diagnostic – yellow
Push button with indicator light, active station – red
Connector
Potentiometer, throttle/shifting
Control unit adapter, throttle
Control unit adapter, shifting
Neutral switch
8-pin connector (male)
8-pin connector (female)
Joint splice
TAMD74
Electronic control
Twin engine installation. Single lever twin control
Mechanical control
Twin engine installation. Single or dual lever twin control with control unit adapter
Cable colors
Location diagram (both wiring diagrams)
BL
BN
GN
OR
P
R
SB
W
Y
1. Push button with indicator
Neutral – green
2. Push button with indicator
Diagnostic – yellow
3. Push button with indicator
Active station – red
4. Push button with indicator
Synchro – blue
5. Push button with indicator
Neutral – green
6. Push button with indicator
Diagnostic – yellow
=
=
=
=
=
=
=
=
=
Blue
Brown
Green
Orange
Pink
Red
Black
White
Yellow
2
Cable areas = 0.75 mm .
light,
light,
light,
light,
light,
7.
8.
9.
10.
10a.
10b.
11.
12.
Connector
Connector, Port – Starboard cable harness
Relay
Potentiometer, throttle/shifting
Control unit adapter, throttle
Control unit adapter, shifting
8-pin connector (male) – port engine
8-pin connector (female) – starboard
engine
13. Neutral switch
light,
93
Inhibiting
WARNING! Observe the following rules when
cleaning with high-pressure water jets. Never
direct the water jet at seals, rubber hoses or
electrical components. Never use a high pressure jet when washing the engine.
Boat unused for up to two months
If the boat is not expected to be used for up to two
months, it is sufficient to start the engine and warm it
up once a fortnight.
If there is a danger of freezing, the cooling system’s
seawater circuit should be drained after stopping.
Check/top up the freshwater system’s antifreeze to
prevent damage. Drain the freshwater tank if installed.
Remove the drain plug (if fitted) on the exhaust pipe
condensed water collector. Drain the water from any
low-lying parts on the exhaust pipe.
Check the batteries’ charge condition. A discharged
battery may easily burst.
Vent the fuel system according to the instructions
on page 54. Start the engine and run on fast idle
until approx. 2 liters (0.5 US gals) have been used
from the can.
Stop the engine and drain or pump the lubricating
oil from the oil sump. Connect the regular fuel
lines.
6. Check that the coolant in the freshwater system
has sufficient antifreeze and top up if required. Or
drain the coolant. Close the sea cock and drain
the water from the seawater system. See pages
32–33.
Remove the seawater pump impeller.
7. Check that the batteries are kept well charged. A
discharged battery may easily burst.
Batteries always have a certain amount of selfdischarge which increases the higher the temperature. Batteries in storage should therefore be kept
as cool as possible. They should be stored dry
and clean and normally charged when the electrolyte density drops below 1.24 g/cm3 (1.20 g/cm3
for batteries with tropical acid).
You should preferably remove the batteries and
hand them in for maintenance charging as instructed by the manufacturer.
See also point 2 under the heading “Electrical
System – Important” on page 70.
8. When necessary, improve the external rust
protection by brushing on anti-corrosion oil. The
surfaces should be clean and dry before being
treated.
Boat unused for more than two months
1. Warm the engine up to normal operating temperature.
2. Check that the lubricating oil level in the reverse
gear reaches the upper mark (“FULL”) on the
dipstick. Check the level with the engine idling
and the control in neutral.
3. Stop the engine and drain or pump the lubricating
oil from the oil sump.
NOTE! Certain engine conservation oils are
inflammable. Some of them are also dangerous if
inhaled. Ensure that ventilation in the work place
is good. Use a protective mask when spraying.
9. Stick a label on the engine stating the date of
inhibition, type of inhibition and the inhibiting oil
used.
10. Cover the engine’s air intake, exhaust port and
the engine itself if so required.
4. Boat unused for up to max. 8 months: Replace
the lubricating oil filter and fill with Volvo Penta
lubricating oil to the normal level. Warm the
engine up after changing the oil.
5. Boat unused for more than 8 months: Fill the
engine with inhibiting oil to just above the lower
part of the mark on the dipstick. The oil companies sell inhibiting oil.
Connect the fuel lines (suction and return) to a
can filled with 1/3 inhibiting oil and 2/3 diesel.
Some oil companies sell a ready-mixed oil for this
purpose.
94
Launching procedures
Check the condition of the propeller(s). Damaged
propellers should be reconditioned or replaced.
Bringing out of storage
1. Remove any protective cover over the engine, air
intake and exhaust pipe.
2. Remove any external inhibitors using white spirit.
3. Close the drain cocks and fit the drain plugs. Fit
the seawater pump impeller using a rotating
movement:
TAMD63, TAMD73 and TAMD74 – clockwise.
TAMD71 – counterclockwise.
Fill the freshwater system if the coolant has been
drained. See “Filling coolant” on page 59. For
coolant information, refer to page 96.
4. If necessary, fill the engine with lubricating oil of
the correct quality. Fit a new oil filter if this has
not been done when changing the oil during
inhibiting. Check the oil level in the reverse gear.
5. Check the batteries as described on page 72.
Reconnect batteries.
6. Fit new fuel filters and vent the fuel system as
described on pages 53–55.
7. Open sea cock. Start the engine (see “Operation”)
and warm the engine up at a fast idle before
loading the engine.
8. Check for any leaks of oil, fuel or cooling water.
95
Fuel, Oils, Coolant
Diesel fuels
Oil for servo unit system, hydraulic pump
The composition of the fuel is vital for operation of the
engine, its service life, and emissions. To meet the
performance specified and to run your boat cleanly
and quietly, it is vital that you use fuel as recommended below.
(accessory)
ATF oil* should be used in the servo unit system.
* ATF = Automatic Transmission Fluid (oil for automatic gearboxes).
Fuel specification
Fuel must meet national and international standards.
For example:
– EN 590 (with national environmental and cold
weather standards)
– ASTM-D975 No. 1-D, 2-D
– JIS KK 2204
Sulfur content: According to statutory requirements.
Note. Large variations occur in merchant fuel specifications which have influence on engine power output
and fuel consumption.
Declared power is measured with fuel acc. to ISO
3046 with a lower calorific value of 42.700 kJ/kg and a
density of 840 g/liter at +15oC (59oF).
Lubricating oil, engine
A lubricating oil of a quality as shown in the table
below should be used:
Coolant
The engine’s internal cooling system (freshwater
system) is filled with a mixture of freshwater and
additives. NOTE! Never use freshwater without
additives. The following recommendations should be
followed to prevent frost and corrosion damage to your
engine:
If there is a risk of freezing
Use a mixture of 50% Volvo Penta antifreeze (glycol)
and 50% pure water (as neutral as possible). This
mixture will protect against freezing to a temperature of approx. – 40°C (– 40°F) and should be used
all year round.
Note. There should be at least 40% antifreeze in the
system for complete protection against corrosion.
NOTE! Glycol is harmful to health (dangerous if ingested).
Designation
Standard
If there is no risk of freezing
VDS, VDS-2*
Volvo Drain Specification
CD, CE
API (American Petroleum Institute)
MIL-L-2104D
US Government’s Military Spec.
When there is no risk of freezing water with added
Volvo Penta anti-corrosion agent* (P/N 1141526-2)
may be used unless an anti-freeze mixture is used all
year round. Mixture ratio = 1:30.
* Note. A VDS oil must be used if there is to be a long period
between oil changes. See also the maintenance schedule and
“Technical Data”.
We do not advise that you run on an oil of a quality
which does not meet the above requirements. This is
a poor solution with respect to both economy and
operating safety.
For viscosity and capacities, see “Technical Data” on
page 108.
See instructions on page 59 for topping up engine
coolant. Run the engine once the coolant has been
topped up to allow the additives to work.
NOTE! Anti-corrosive agents are harmful to
health (danger if ingested).
* Note. Never mix antifreeze (glycol) and anti-corrosive agents.
The two combined can produce foam and drastically reduce the
coolant’s effectiveness.
Replacing the coolant
Lubricating oil, reverse gear
The coolant should be replaced and the system
flushed at least once a year. See maintenance schedule.
For the reverse gear, a single grade oil of quality
CC, CD or CE according to the API system should be
used. Oil according to the MIL-L-2104D standard may
also be used.
Volvo Penta products
For quality and capacities, see “Technical Data” on
pages 110–113.
See also under the heading “Accessories” on page
115.
96
Fault-tracing
1. Engine does not start
Starter motor does not turn engine over
REMEDY
CAUSE
The reverse gear is not disengaged (applies to
control with neutral position switch)
Put the reverse gear control lever into neutral
TAMD73P and TAMD74: The controls have not
been calibrated
Calibrate controls as per instructions on pages 18–20
●
Discharged batteries
Charge/replace the batteries (or connect up auxiliary
batteries as shown on page 70)
●
Main switches off
Switch on the main switches
One of the semi-automatic fuses in the terminal
box has tripped (see page 71 for instructions on
resetting fuses)
Reset the fuse by pressing in the button.
●
Poor contact/open-circuit in wiring
Rectify any open-circuits/loose connections. Check
for oxidation on the contacts. If required, clean and
spray connection with damp-inhibitor spray. See the
wiring diagrams on pages 74–89.
●
Key switch malfunction
Replace key switch
●
Faulty starter relay
Replace start relay (or swap temporarily with stop
relay*)
●
TAMD73P and TAMD74: Faulty main relay
Replace main relay (or swap temporarily with stop
relay)
Starter motor/solenoid (control solenoid) malfunction
Contact an authorized Volvo Penta service mechanic
Water in the engine
Contact an authorized Volvo Penta service mechanic.
Do not make repeated attempts to start the engine if
you suspect water in the engine.
●
●
●
●
●
* Note. TAMD63 and TAMD73WJ have no stop relay.
Starter motor turns over slowly
CAUSE
REMEDY
●
Discharged batteries
Charge/replace the batteries (or connect up auxiliary
batteries as shown on page 70)
●
Poor contact, electrical cables
Rectify any loose connections. Check for oxidation on
the contacts. If required, clean them and spray
connections with damp-inhibitor spray.
97
Starter motor turns over but the engine does
not start
REMEDY
CAUSE
●
Air in fuel lines
●
Lack of fuel
●
●
Vent the fuel system as shown on page 54
– fuel taps closed
Open the fuel cocks
– fuel tank empty/wrong tank on line
Fill with fuel/connect the correct fuel tank
– fuel filters clogged (due to contaminants/paraffin
precipitation in the fuel as a result of low outside
temperature)
Fit new fuel filters (pre-filter and/or fine filters). Vent
the system as shown on page 54
TAMD63, TAMD71, TAMD73WJ: Solenoid valve
(fuel shut-off valve) incorrectly connected
Check solenoid valve has not been switched on
unintentionally
TAMD71B: Preheating insufficient
– incorrect starting method
Try to start engine again according to instructions on
page 23
– starter element not in circuit
Check that none of the semi-automatic fuses in the
terminal box has tripped (see page 71 for instructions
on resetting fuses)
Check the electrical leads and key switch, starter
relay and high power relay (swap the starter relay
temporarily with stop relay if required). Contact authorized service mechanic if the starter element needs to
be replaced
●
●
●
98
TAMD73P and TAMD74: Faulty position sensor in
the governor
Check for electronic diesel control (EDC) diagnostic
trouble code (DTC) – refer to pages 102– 105. Contact
an authorized Volvo Penta service mechanic
TAMD73P and TAMD74: Faulty rpm sensor in the
governor
Check for electronic diesel control (EDC) diagnostic
trouble code (DTC) – refer to pages 102– 105. Contact
an authorized Volvo Penta service mechanic
TAMD73P and TAMD74: Faulty actuator in the
governor
Check for electronic diesel control (EDC) diagnostic
trouble code (DTC) – refer to pages 102– 105. Contact
an authorized Volvo Penta service mechanic
2. Engine starts but stops again/runs
unevenly
REMEDY
CAUSE
●
Air in fuel lines
●
Lack of fuel
●
Vent the fuel system as shown on page 54
– fuel taps closed
Open the fuel cocks
– fuel tank empty/wrong tank on line
Fill with fuel/connect the correct fuel tank
– fuel filters clogged (due to contaminants/paraffin
precipitation in the fuel as a result of low outside
temp.)
Fit new fuel filters (pre-filter and/or fine filters). Vent
the system as shown on page 54
TAMD71B: Preheating insufficient
– incorrect starting method
Try starting again as shown on page 23
Check that none of the semi-automatic fuses in the
terminal box has tripped (see page 71 for instructions
on resetting fuses)
– starter element not in circuit
●
●
Check the electrical leads and key switch, starter
relay and hihg power relay (swap the starter relay
temporarily with stop relay if required). Contact authorized service mechanic if the starter element needs to
be replaced
Insufficient air supply to engine
– air cleaner filter clogged
Fit a new air cleaner filter/clean air cleaner filter,
check ventilation to engine compartment
Pressure line rupture
Install new delivery pipe(s)
3. Engine coolant temperature too high
CAUSE
REMEDY
●
Coolant level in engine too low (air in system)
Fill the engine with coolant and vent the system as
described on pages 59– 60
●
Thermostat malfunction
Install a new thermostat
●
Faulty seawater pump (pump impeller)
Replace the seawater pump impeller as shown on
page 64
●
Sea cock closed
Open the boat’s sea cock
●
Seawater intake blocked
Clean the seawater intake
●
Seawater filter blocked
Clean the seawater filter as shown on page 60
●
Heat exchanger core clogged
Clean the insert(s) as shown on pages 60– 62
●
Faulty circulation pump
Contact an authorized Volvo Penta service mechanic
99
4. Coolant temperature too low
REMEDY
CAUSE
●
Thermostat malfunction
Install a new thermostat
5. Engine does not reach correct speed
at wide open throttle (WOT)
CAUSE
REMEDY
●
Boat abnormally loaded
If possible, reduce/redistribute the load
●
Fouling on underwater hull
Clean the bottom of the boat and treat it with antifouling paint
●
Faulty/damaged propeller
Replace the propeller
●
Insufficient fuel flow
– fuel filters clogged (due to contaminants/paraffin
precipitation in the fuel as a result of low outside
temperature)
Fit new fuel filters (pre-filter and/or fine filters). Vent
the system as shown on page 54
●
Water in fuel
Clean fuel tank. Drain water from pre-filter if installed
●
Insufficient air supply to engine
– air cleaner filter clogged
Fit new air cleaner filter(s)/clean air cleaner filter
– air leak between turbo and engine’s inlet manifold
Check the rubber hose between the turbo and the
connecting pipe, plus other connections. Tighten the
hose clips
– dirt in turbocharger compressor
Contact authorized service personnel
– faulty turbocharger
Contact authorized service personnel
– poor engine compartment ventilation
Check that the ventilating ducts to the engine compartment are not blocked
●
Throttle controls incorrectly adjusted
Adjust the throttle controls
●
Charge air cooler (CAC) clogged
Clean the insert(s) as shown on pages 60– 62
●
TAMD71B: Faulty by-pass valve
Contact an authorized Volvo Penta service mechanic
●
High back pressure in exhaust system
Check that the exhaust pipe is not restricted in any
way
●
Injector malfunction
Get authorized service personnel to check the injectors
TAMD73P and TAMD74: EDC system has temporarily reduced engine output due to alarm limit
being exceeded.
Check any diagnostic trouble codes (DTC) set, see
page 102. Correct malfunction cause
●
Faulty setting of injection pump
Contact an authorized Volvo Penta service mechanic
●
Fault in smoke limiter*
●
– smoke limiter seizing
Contact an authorized Volvo Penta service mechanic
– pressure pipe between inlet manifold and smoke
limiter leaking
Fit a new pressure line
– faulty diaphragm in smoke limiter
Contact an authorized Volvo Penta service mechanic
– faulty setting
Contact an authorized Volvo Penta service mechanic
* TAMD73P and TAMD74 engines are not equipped with a
smoke limiter.
100
6. Engine will not stop
REMEDY
CAUSE
TAMD71B: Fuel shut-off valve fuse defective (see
page 72 for changing fuse)
Replace fuse (8A)
One of the semi-automatic fuses in the terminal
box has tripped (see page 71 for instructions on
resetting fuses)
Reset the fuse by pressing in the button
Poor contact/open-circuit in wiring (loose connections, oxidation)
Rectify any open-circuits/loose connections. Check
for oxidation on the contacts. If required, clean and
spray connection with damp-inhibitor spray. See the
wiring diagrams on pages 74– 89.
●
Key switch malfunction
Replace key switch
●
Faulty stop relay*
Replace stop relay (or swap temporarily with start
relay)
●
Faulty solenoid valve (fuel shut-off valve)**
Contact an authorized Volvo Penta service mechanic
●
●
●
* TAMD63 and TAMD73WJ have no stop relay.
** TAMD73P and TAMD74 have no fuel shut-off valve.
101
Diagnostic functions – OBD system
(TAMD73P and TAMD74)
The indicator lamp in the yellow Diagnostics button
on the EDC system control panel starts to flash if the
system receives abnormal signals or if there is a
malfunction in the EDC system.
Press the button* for at least one second in order to
read off the Diagnostic Trouble Code (DTC) and to
acknowledge the alarm. A DTC message is flashed as
a two-stage code.
* Note. When the engine is stopped the diagnostic trouble code
(DTC) is flashed only after the EDC system is activated. To
activate the EDC system turn the starter key to position “I”
(operating position).
If there are several diagnostic trouble codes (DTCs)
stored the next code is flashed when the button is
pushed again. When the first DTC is repeated, all the
codes have been read off.
Diagnostic Trouble Code(s) (DTCs) are stored until
erased. This should be done after the malfunction or
source of the DTC has been identified and repaired.
NOTE! If the On-board Diagnostics (OBD) system
has triggered an event (for example stopped the
engine) you must erase the DTC before the engine
can be restarted. Refer to Erasing Diagnostic
Trouble Codes (DTC) below.
Reading off Diagnostic Trouble Codes (DTC)
To get a read-out from the system of what the nature
of the fault is that is causing the diagnostic trouble
code (DTC), press the yellow Diagnostics button when
the light is flashing. This results in the system flashing a two-part code.* The first number of flashes are
units of ten, followed by a short pause, then a series
of new flashes (single units).
DIAGNOSIS
TAMD73P and TAMD74: EDC control panel –
Single engine
After the alarm has been acknowledged (DTCs have
been read off) the light will go out. Stored DTCs can
be read off again by pressing the yellow button.
Refer to the section EDC Diagnostic Trouble Codes
(DTC) on pages 103– 105 for an explanation of the
flashed code sequences.
Note. Service technicians can obtain a more comprehensive DTC read-out in plain language using the
diagnostics Scan Tool (Diagnostic Key).
* Example: 2 flashes – pause – 6 flashes = DTC 2.6 Fault on
the control unit potentiometer.
Erasing stored Diagnostic Trouble Codes (DTC)
Warning! Diagnostic trouble codes must not
be erased when the boat is in operation.
1. Turn the starter key to the stop position “S” and
release the key.
1
DIAGNOSIS
DIAGNOSIS
2
2. Press the yellow Diagnostics button and hold it
in while turning the starter key to the I (operating)
position.
Erase the diagnostic trouble codes (DTCs) by
keeping the button pressed down for another 3
seconds.
TAMD73P and TAMD74: EDC control panel for
one or more control stations (double installation)
1. Port engine
2. Starboard engine
102
Note. If the diagnostics button is pressed again
after clearing the diagnostic trouble codes (DTCs)
code 1.1 (No DTC stored) will be flashed out by
the system.
EDC diagnostic Trouble Codes (DTC)
DTC Explanation
Cause
Reaction
Action
1.1
No fault
On-board diagnostic (OBD) function
activated.
–
–
1.2
Control calibration
(neutral position switch)
Neutral position switch open or
closed at wrong point in relation to
potentiometer value.
–
Check operation of neutral position switch (closed
in neutral position). Erase DTC.
Recalibrate control.
1.3
Control calibration
(difference too small)
Angle between start of throttle
opening and full throttle too small.
–
Check potentiometer mounting.
Erase DTC. Recalibrate control.
1.4
Control calibration
(neutral position too short)
Neutral position switch closes within
too short a range on the control.
–
Adjust neutral position switch. Erase DTC.
Recalibrate control.
1.5
Control calibration
(shift solenoid faulty)
Shift solenoid faulty, reverse gear
(open-circuit, short-circuit).
No current from main relay.
System does not enter calibration mode.
Check solenoid connections. Check solenoids for
short/open circuit. Erase DTC. Recalibrate control.
Check there is current from the main relay.
1.6
Control calibration, master
control station
(calibration not carried out)
New installation.
Starter motor cannot be activated.
Calibrate controls. DTC erased automatically.
1.7
Control calibration, secondary
control position
(calibration not carried out)
New installation.
Starter motor cannot be activated.
Calibrate controls. DTC erased automatically.
2.2
Control rod sensor
Control rod position sensor transmits
abnormal values to the control
module.
Engine stopped by system.
Check injection pump and control module connections. Erase DTC. Start the engine.
Contact authorized workshop if fault persists.
2.3
Control rod actuator
Control rod actuator takes too much
or little current.
Open-circuit, connection 42.
Main relay opens (engine stops).
Check injection pump and control module connections. Erase DTC. Start the engine.
Contact authorized workshop if fault persists.
2.4/
2.5
Engine speed (rpm) sender
Engine speed (RPM) sensor transmits
abnormal values to control module.
Engine stopped by system.
Check injection pump and control module connections. Erase DTC. Start the engine.
Contact authorized workshop if fault persists.
103
104
DTC Explanation
Cause
Reaction
Action
2.6/
2.7
Control potentiometer
System receiving no signals from
control potentiometer.
Engine runs at constant 1000 rpm.
Check control potentiometer wiring and connections and connections to control position. Erase
DTC. Start the engine.
If the fault persists shifting can be carried out
directly on the reverse gear solenoids.
3.1
Shift control potentiometer
System receiving no signals from shift
control potentiometer.
–
Check wiring/connections on shift control potentiometer and connections to control position. Erase
DTC. Start the engine.
If the fault persists shifting can be carried out
directly on the reverse gear solenoids.
4.6
Starter motor relay
Short-circuit or open-circuit in wiring/
starter motor relay.
–
Check cabling and connections to starter relay in
terminal box. Check starter relay. Position 5 on the
location diagram, page 67. Erase DTC.
5.1
Main relay
Short-circuit or open-circuit in wiring/
main relay.
–
Check cabling and connections to main relay in
terminal box. Check main relay. Position 6 on the
location diagram, page 67. Erase DTC.
5.2
Neutral indication
Short-circuit or open-circuit in Neutral
indication cabling. Bulb malfunction.
–
Check bulb in “Neutral” button. Check cabling and
connections to control position. Erase DTC.
5.4/
5.5
Shift – Forward/Reverse
Open or short-circuit in cabling or in
reverse gear solenoid (actuator).
–
Check reverse gear cabling and solenoids (actuators). Erase DTC.
5.6
Boost pressure
The system receives too high or too low
a boost pressure signal.
If the pressure is too high the system
will reduce the volume of fuel injected
until pressure has normalized (turbo
protection).
Check air cleaner. Check the pressure line from
the inlet manifold to the control module. Erase
DTC. Contact authorized workshop for inspection
of turbocharger (TC).
6.4
Fault in MS module
(MS = “Multi-Station”)
Faulty values from potentiometers,
controls not calibrated, communication
faults.
–
Check potentiometers, wiring and connections to
buttons on flying bridge panel. Recalibrate control
if necessary. Erase DTC.
8.1
Control module
Faults in internal voltages in control
module.
–
Erase DTC. Contact authorized workshop.
8.3
Read/write fault in control
calibration
Internal fault in control module.
–
Erase DTC. Recalibrate control.
Contact authorized workshop if recalibration
cannot be carried out.
DTC Explanation
Cause
Reaction
Action
9.9
Fatal error on control module
Internal fault in program memory.
System does not start.
Turn off power completely and wait 3 minutes
before reconnecting. Contact authorized workshop
if fault persists.
Warning lamp – high engine
coolant temperature
(in instrument panel)
Engine coolant temperature too high.
If the engine coolant temperature is too
high the system will reduce the volume
of fuel injected until temperature has
normalized.
Check the engine coolant system.
105
Technical Data
General
No. of cylinders .....................................................
Swept volume .......................................................
Low idle .................................................................
Valve clearance, stopped engine, cold or at
operating temperature:
intake .................................................................
exhaust ..............................................................
Compression pressure at starter motor speed
(300 rpm) ...............................................................
Weight, engine with heat exchanger, without
reverse gear or clutch, approx. ............................
No. of cylinders ....................................................
Swept volume .......................................................
Low idle .................................................................
Valve clearance, stopped engine, cold or at
operating temperature:
intake .................................................................
exhaust ..............................................................
Compression pressure at starter motor speed
(300 rpm) ...............................................................
Weight, engine with heat exchanger, without
reverse gear or clutch, approx. ............................
TAMD63L-A,
TAMD63P-A
TAMD71B
6
5.48 dm3 (liters), (334 in3)
600 ±20 rpm
6
6.73 dm3 (liters), (411 in3)
600 ±30 rpm
0.50 mm (0.0197")
0.65 mm (0.0256")
0.40 mm (0.0157")
0.55 mm (0.0217")
2.2 MPa, (22 kp/cm2 = 313 psi) 2.2 MPa, (22 kp/cm2 = 313 psi)
745 kg (1643 lbs)
880 kg (1940 lbs)
TAMD73P-A,
TAMD73WJ-A
TAMD74C-A,
TAMD74L-A,
TAMD74P-A
6
6.73 dm3 (liters), (411 in3)
600 ±10 rpm*
6
7.28 dm3 (liters), (444 in3)
600 ±10 rpm*
0.50 mm (0.0197")
0.65 mm (0.0256")
0.50 mm (0.0197")
0.65 mm (0.0256")
2.2 MPa, (22 kp/cm2 = 313 psi)
880 kg (1940 lbs)
860 kg (1896 lbs)
* Note! For TAMD73WJ 600 ±50 rpm applies.
At delivery, the idling speed for the TAMD73P and
TAMD74 is adjusted to 600 rpm. If needed, the speed can
be adjusted within the range 550–700 rpm (refer to page
21).
Furthermore, the speed is increased to 800 rpm during
max. 2 minutes at coolant temperatures below +15°C
(59°F) on these engine.
Cooling system
TAMD63L-A,
TAMD63P-A
Freshwater system capacity incl. heat exchanger,
approx. .................................................................. 27 liters,
(7.1 US gals)
Thermostat starts to open at (all engines) ...........
fully open at (all engines) ..................
106
TAMD71B
TAMD73P-A,
TAMD73WJ-A,
TAMD74C-A,
TAMD74L-A,
TAMD74P-A
35 liters,
34 liters,
(9.3 US gals)
(9.1 US gals)
73–77°C (163–171°F)
86–90°C (187–194°F)
Fuel system
Injection pump, settings,
TAMD63L and TAMD71B .....................................
TAMD63P .............................................................
Injectors, opening pressure,
TAMD63L and TAMD71B .....................................
TAMD63P .............................................................
Injectors, adjustment pressure (new spring):
TAMD63L and TAMD71B ....................................
TAMD63P .............................................................
Injection pump, settings,
TAMD73P and TAMD74 ......................................
TAMD73WJ ...........................................................
Injectors, opening pressure ...................................
Injectors, adjustment pressure (new spring) .......
TAMD63L-A,
TAMD63P-A
TAMD71B
16° ±0.5° BTDC
15° ±0.5° BTDC
22° ±0.5° BTDC
–
29 (+0.8) MPa,
(295 (+8) kp/cm2 = 4206 psi)
30 (+0.8) MPa,
(306 (+8) kp/cm2 = 4351 psi)
30 (+0.8) MPa,
(306 (+8) kp/cm2 = 4351 psi)
–
29.5 (+0.8) MPa,
(300 (+8) kp/cm2 = 4279 psi)
30.5 (+0.8) MPa,
(311 (+8) kp/cm2 = 4424 psi)
30.5 (+0.8) MPa,
(311 (+8) kp/cm2 = 4424 psi)
–
TAMD73P-A,
TAMD73WJ-A
TAMD74C-A
TAMD74L-A
TAMD74P-A
15° ±0.5° BTDC
18° ±0.5° BTDC
29.5 (+0.8) MPa,
(300 (+8) kp/cm2 = 4279 psi)
29.5 (+0.8) MPa,
(300 (+8) kp/cm2 = 4279 psi)
11° ±0.5° BTDC
–
29 MPa,
(295 kp/cm2 = 4206 psi)
29.5 (+0.8) MPa,
(300 (+8) kp/cm2 = 4279 psi)
Turbocharger
Charging pressure, min. values (measured in the engine’s inlet manifold at 100% load and wide open throttle
(WOT), air temperature approx. +25°C (77°F). When measuring at a different temperature, the charging pressure
measured must be corrected (see Workshop Manual).
If full power cannot be achieved, the pressure is considerably lower.
Rating 5:
2400 rpm ............................................................
2600 rpm ............................................................
2800 rpm ............................................................
Rating 4:
2500 rpm ............................................................
2600 rpm ............................................................
Rating 3:
2500 rpm ............................................................
Rating 2:
2500 rpm ............................................................
Rating 5:
2600 rpm ............................................................
Rating 4:
2500 rpm ............................................................
2600 rpm ............................................................
Rating 5:
2500 rpm ............................................................
Rating 4:
2600 rpm ............................................................
Rating 3:
2500 rpm (316 kW) ............................................
2500 rpm (294 kW) ............................................
TAMD63L-A
TAMD63P-A
TAMD71B
–
–
180 kPa
200 kPa
215 kPa
225 kPa
–
188 kPa
–
–
–
–
–
188 kPa
188 kPa
180 kPa
–
–
120 kPa
–
–
TAMD73P-A
TAMD73WJ-A
TAMD74P-A
230 kPa
175 kPa
215 kPa
230 kPa
230 kPa
–
175 kPa
–
–
TAMD74C-A
TAMD74L-A
–
205 kPa
210 kPa
–
205 kPa
195 kPa
–
–
107
Lubrication system
TAMD63L-A,
TAMD63P-A
Oil pressure, hot engine at normal running rpm ....
at idling rpm .....................................
Max. engine inclination when running ...................
Oil capacity at oil change, without oil filter(s)*,
approx.:
no engine inclination, Max. ................................
Min. .................................
engine inclination 5°, Max. .................................
Min. .................................
engine inclination 10°, Max. ...............................
Min. ................................
TAMD71B
TAMD73P-A,
TAMD73WJ-A,
TAMD74C-A,
TAMD74L-A,
TAMD74P-A
300–550 kPa (3.0–
5.5 kp/cm2 = 43–80 psi)
min. 150 kPa (1.5 kp/cm2 =
21 psi)
15°
450–650 kPa (4.5–6.5 kp/cm2 =
61–94 psi)
min. 150 kPa (1.5 kp/cm2 =
21 psi)
15°
TAMD63L-A,
TAMD63P-A
TAMD71B
20 liters (5.3 US gals)
13 liters (3.4 US gals)
16 liters (4.2 US gals)
10 liters (2.6 US gals)
12 liters (3.2 US gals)
7 liters (1.9 US gals)
27 liters (7.1 US gals)
18 liters (4.8 US gals)
23 liters (6.1 US gals)
15 liters (4.0 US gals)
17 liters (4.5 US gals)**
12 liters (3.2 US gals)**
TAMD73P-A,
TAMD73WJ-A
TAMD74C-A,
TAMD74L-A,
TAMD74P-A
28 liters (7.4 US gals)
19 liters (5.0 US gals)
24 liters (6.3 US gals)
16 liters (4.2 US gals)
18 liters (4.8 US gals)**
16 liters (4.2 US gals)**
25 liters (6.6 US gals)
18 liters (4.8 US gals)
20 liters (5.3 US gals)
14 liters (3.7 US gals)
17 liters (4.5 US gals)**
12 liters (3.2 US gals)**
* Engine oil filter and by-pass filter have a
capacity of approx. 0.5 liter (0.5 quart).
** At a rearward engine tilt of >5° oil dipstick part No.
863166-5 should be used.
Oil capacity at oil change, without oil filters*,
approx.:
no engine inclination, Max. ................................
Min. .................................
engine inclination 5°, Max. .................................
Min. .................................
engine inclination 10°, Max. ...............................
Min. ................................
* Engine oil filter and by-pass filter have a
capacity of approx. 0.5 liter (0.5 quart).
** At a rearward engine tilt of >5° the following oil
dipsticks should be used:
– TAMD73, part No. 863166-5.
– TAMD74, part No. 3827313-2.
Oil quality (all engines) ..........................................
VDS (Volvo Drain Specification), or
CD or CE in acc. with API system.
Viscosity at different ambient air temperatures .....
(Temperature based on constant ambient air
temperature).
−30
−20
−10
±0
40
o
C
SAE 5W/30
−10oC
SAE 20W/30
SAE 30
±0oC
o
+10 C
−22
108
30
SAE 10W/30
−25oC
✱
20
SAE 15W/40
−15oC
* Refers to synthetic or semi-synthetic oil.
NOTE! Only SAE 5W/30 may be used.
+10
−4
+14
SAE 40
o
32
50
68
86
104
F
Electrical system
System voltage .....................................................
AC generator, voltage/max. amperage .................
AC generator, output approx. ................................
Alternative generator equipment (accessory):
for 12V system, voltage/max. amperage ..........
output approx. .........................
for 24V system, voltage/max. amperage ..........
output approx. .........................
Battery capacity:
for 12V system ...................................................
for 24V system ...................................................
Battery electrolyte density at +25°C (77°F):
fully charged battery ...........................................
charge battery at ................................................
TAMD63L-A,
TAMD63P-A
TAMD71B
TAMD73P-A,
TAMD73WJ-A,
TAMD74C-A,
TAMD74L-A,
TAMD74P-A
12V (or 24V)
14V/60A (or 28V/40A)
840W (or 1120W)
24V (or 12V)
28V/60A (or 14V/60A)
1700W (or 840W)
14V/130A
1800 W
28V/100A
2800W
14V/130A
1800W
28V/100A
2800W
2 x 12 V connected in parallel,
max. 110 Ah, (total max. 220 Ah)
2 x 12 V connected in series,
max. 143 Ah
2 x 12 V connected in parallel,
max. 110 Ah, (tot. max. 220 Ah)
2 x 12 V connected in series,
max. 143 Ah
1,28 g/cm3 (1,24 g/cm3 )*
1,24 g/cm3 (1,20 g/cm3 )*
1,28 g/cm3 (1,24 g/cm3 )*
1,24 g/cm3 (1,20 g/cm3 )*
* Note: Applies to batteries with tropical acid.
109
Reverse gear
TAMD63L-A,
TAMD63P-A
TAMD71B
TAMD73P-A,
TAMD74C-A,
TAMD74L-A,
TAMD74P-A
IRM 220A-1
1.53:1; 1.75:1; 2.04:1
10°
4 liters (1.05 US gals)
CC, CD, CE
SAE30*
SAE 40*
2.0–2.2 MPa,
(20.4–22.4 kp/cm2=
290–319 psi)
53 kg (117 lbs)
IRM 301 A-2
–
1.516:1; 2.006:1
–
10o
–
7.5 liters (2.0 US gals) –
CC, CD, CE
–
SAE30*
–
SAE40*
–
2.1–2.3 MPa,
–
(21.4–23.5 kp/cm2=
305–334 psi)
155 kg (342 lbs)
–
Type designation ..................................................
Gear ratios ............................................................
IRM 220PL-E
1.40:1
–
Angle (output shaft) ...............................................
Oil capacity, approx. .............................................
0°
5.3 liters,
(1.4 US gals)
CC, CD, CE
SAE30**
SAE40**
2.5 MPa,
(25.5 kp/cm2 =
362 psi)
70 kg (154 lbs)
MPM
Type designation ..................................................
Gear ratios ............................................................
Angle (output shaft) ...............................................
Oil capacity, approx. .............................................
Oil quality (as per API system) ............................
Viscosity ..............................................................
alternative for hot countries ...................
Operating oil pressure ...........................................
Approx. weight ......................................................
* Note! Only single grade lubricating oil (only one
viscosity number) may be used in the reverse gears.
Oil quality (as per API system) ............................
Viscosity ..............................................................
alternative for hot countries ...................
Operating oil pressure ...........................................
Approx. weight ......................................................
–
–
–
–
–
–
IRM 280A2-E*
1.48:1; 1.77:1;
2.00:1
7°
4.8 liters,
(1.27 US gals)
CC, CD, CE
SAE30**
SAE40**
2.5 MPa,
(25.5 kp/cm2=
362 psi)
82 kg (181 lbs)
* For TAMD74 engines.
** Note! Only single grade lubricating oil (only one
viscosity number) may be used in the reverse gears.
Type designation ..................................................
Gear ratios ............................................................
Angle (output shaft) ...............................................
Oil capacity, approx. .............................................
Oil quality (as per API system) ............................
Viscosity ..............................................................
alternative for hot countries ...................
Operating oil pressure ...........................................
Approx. weight ......................................................
* Note! Only single grade lubricating oil (only one
viscosity number) may be used in the reverse gears.
110
IRM 220V-LD
1.53:1; 1.88:1
12°
5.5 liters,
(1.45 US gals)
CC, CD, CE
SAE 30*
SAE 40*
2.3–2.4 MPa,
(23.4–24.5 kp/cm2=
334–348 psi)
86 kg (190 lbs)
–
–
–
–
–
–
–
–
–
IRM 301A-EB
1.516:1; 2.005:1
10°
7.5 liters,
(2.0 US gals)
CC, CD, CE
SAE30*
SAE40*
2.1–2.3 MPa,
(21.4–23.5 kp/cm2=
305–334 psi)
155 kg (342 lbs)
TAMD63L-A,
TAMD63P-A
TAMD71B
TAMD73P-A,
TAMD74C-A,
TAMD74L-A,
TAMD74P-A
Type designation ..................................................
Gear ratios ............................................................
Angle (output shaft) ..............................................
Oil capacity, approx. ............................................
–
–
–
–
–
–
–
–
Oil quality (as per API system) ..........................
Viscosity ..............................................................
alternative for hot countries .................
Operating oil pressure ..........................................
–
–
–
–
–
–
–
–
Approx. weight ......................................................
–
–
IRM 302V-LD-EB*
1.651:1; 2.184:1
15°
8.5 liters,
(2.25 US gals)
CC, CD, CE
SAE 30**
SAE 40**
2.05–2.15 MPa,
(20.9–21.9 kp/cm2=
297–312 psi)
127 kg (280 lbs)
Type designation ..................................................
Gear ratios ............................................................
MG5061A
2.00:1
Angle (output shaft) ..............................................
Oil capacity, approx. ............................................
7°
3.2 liters,
(0.85 US gals)
CC, CD, CE
SAE30**
MG5061A
1.75:1; 2.00:1;
2.47:1
7°
3.2 liters,
(0.85 US gals)
CC, CD, CE
SAE30**
MG5061A-E*
1.54:1; 1.75:1;
2.00:1
7°
3.2 liters,
(0.85 US gals)
CC, CD, CE
SAE30**
SAE40**
SAE40**
SAE40**
2.3 MPa,
(23.5 kp/cm²
=334 psi)
2.07 MPa,
(21.1 kp/cm²
=300 psi)
113 kg (249 lbs)
2.3 MPa,
(23.5 kp/cm²
=334 psi)
2.07 MPa,
(21.1 kp/cm²
=300 psi)
113 kg (249 lbs)
2.3 MPa,
(23.5 kp/cm²
=334 psi)
2.07 MPa,
(21.1 kp/cm²
=300 psi)
113 kg (249 lbs)
* Reverse gear (V-drive) with electronically operated
shifting.
** Note! Only single grade lubricating oil (only one
viscosity number) may be used in the reverse gears.
Twin Disc
Oil quality (as per API system) ..........................
Viscosity at oil temp. of 66–85°C (151–185°F) ...
at oil temperature 85–100°C
(185–212°F) .........................................
Working oil pressure at oil temperature of 82°C
(180°F):
engaged, 1800 rpm ...........................................
at cruising speed, lowest ..................................
Approx. weight ......................................................
* For TAMD73P-A engines.
** Note! Only single grade lubricating oil (only one
viscosity number) may be used in the reverse
gears.
111
TAMD63L-A,
TAMD63P-A
TAMD71B
TAMD73P-A,
TAMD74C-A,
TAMD74L-A,
TAMD74P-A
Type designation ..................................................
Gear ratios ............................................................
MG 5062 V
1.83:1; 2.07:1
–
Angle (output shaft) ..............................................
Oil capacity, approx. ............................................
15°
5.6 liters,
(1.5 US gals)
CC, CD, CE
SAE30**
–
–
–
–
MG 5062V-E*
1.53:1; 1.77:1;
2.05:1
15°
5.6 liters,
(1.5 US gals)
CC, CD, CE
SAE30**
SAE40**
–
SAE40**
2.05–2.2 MPa,
(20.9–22.4 kp/cm²=
–
2.05–2.2 MPa,
(20.9–22.4 kp/
Oil quality (as per API system) ..........................
Viscosity at oil temp. of 66–85°C (151–185°F) ..
at oil temperature 80–99°C
(176–210°F) .........................................
Working oil pressure at oil temperature of 82°C
(180°F):
engaged, 1800 rpm ...........................................
cm²=
at cruising speed, lowest ..................................
Approx. weight ......................................................
297–319 psi)
1.9 MPa (19.3
kp/cm² = 276 psi)
142 kg (313 lbs)
–
–
297–319 psi)
1.9 MPa (19.3
kp/cm² = 276 psi)
142 kg (313 lbs)
* Reverse gear (V-drive) with electronically operated
shifting.
** Note! Only single grade lubricating oil (only one
viscosity number) may be used in the reverse
gears.
Type designation ..................................................
Gear ratios ............................................................
–
–
Angle (output shaft) ..............................................
Oil capacity, approx. ............................................
–
–
Oil quality (as per API system) ..........................
Viscosity at oil temp. of 66–85°C (151–185°F) ..
at oil temperature 80–99°C
(176–210°F) .........................................
Viscosity ..............................................................
Working oil pressure at oil temperature of 82°C
(180°F):
engaged, 1800 rpm ...........................................
at cruising speed, lowest ..................................
–
Approx. weight ......................................................
–
* Reverse gear with electronically operated shifting.
** Note! Only single grade lubricating oil (only one
viscosity number) may be used in the reverse
gears.
112
–
–
MG507-1
1.10:1; 1.51:1;
1.77:1; 1.98:1;
2.54:1; 2.99:1
0°
6.7 liters,
(1.8 US gals)
CC, CD, CE
SAE30**
MG5075A-E*
1.53:1; 1.77:1;
2.05:1
7°
5.9 liters,
(1.6 US gals)
CC, CD, CE
–
–
–
SAE40**
–
–
SAE40**
–
2.05–2.2 MPa,
2.28 MPa,
(20.9–22.4 kp/cm² = (23.2 kp/cm² =
297–319 psi)
331 psi)
1.9 MPa (19.3 kp/cm² –
= 276 psi)
178 kg (392 lbs)
140 kg (309 lbs)
TAMD63L-A,
TAMD63P-A
TAMD71B
TAMD73P-A,
TAMD74C-A,
TAMD74L-A,
TAMD74P-A
Type designation ..................................................
Gear ratios ............................................................
–
–
Angle (output shaft) ..............................................
Oil capacity, approx. ............................................
–
–
Oil quality (as per API system) ..........................
Viscosity at oil temp. of 66–85°C (151–185°F) ..
at oil temperature 80–99°C
(176–210°F) .........................................
Working oil pressure at oil temperature of 82°C
(180°F):
engaged, 1800 rpm ...........................................
–
–
MG507A-1
1.51:1; 1.77:1;
1.98:1
7°
6.7 liters,
(1.8 US gals)
CC, CD, CE
SAE30**
MG5085A-E*
1.47:1; 1.72:1;
2.04:1
7°
4.4 liters,
(1.2 US gals)
CC, CD, CE
SAE30**
–
SAE40**
SAE40**
–
at cruising speed, lowest ..................................
–
Approx. weight ......................................................
–
2.05–2.2 MPa,
2.25 MPa,
(20.9–22.4 kp/cm² = (22.9 kp/cm² =
297–319 psi)
326 psi)
1.9 MPa (19.3 kp/cm² = –
276 psi)
178 kg (392 lbs)
140 kg (309 lbs)
Type designation ..................................................
Gear ratios ............................................................
Angle (output shaft) ..............................................
Oil capacity, approx. ............................................
–
–
–
–
–
–
–
–
Oil quality (as per API system) ..........................
Viscosity at oil temp. of 66–85°C (151–185°F) ..
at oil temperature 80–99°C
(176–210°F) .........................................
Working oil pressure at oil temperature of 82°C
(180°F):
engaged, 1800 rpm ...........................................
–
–
–
–
MG5085PL*
1.2:1
0°
4.4 liters,
(1.2 US gals)
CC, CD, CE
SAE30**
–
–
SAE40**
–
–
Approx. weight ......................................................
–
–
2.25 MPa,
(22.9 kp/cm² =
326 psi)
130 kg (287 lbs)
* Reverse gear with electronically operated shifting.
** Note! Only single grade lubricating oil (only one
viscosity number) may be used in the reverse gears.
* Reverse gear with electronically operated shifting.
** Note! Only single grade lubricating oil (only one
viscosity number) may be used in the reverse gears.
113
Clutch
Disengageable clutches at front of engine
(accessory TAMD71B)
TAMD71B
Rockford/Borg Warner
Type ......................................................................
Gear ratio ..............................................................
Size .......................................................................
Permitted engine speed, power take-off engaged
Approx. weight ......................................................
Single plate clutch
(“over-center” type)
1:1
203 mm (8"), or
254 mm (10")
900 –1800 rpm
65 kg (143 lbs)
Disengageable clutch at rear of engine
(accessory, TAMD71B auxiliary engine)
Automotive Products
Type ......................................................................
Gear ratio ..............................................................
Size .......................................................................
Approx. weight ......................................................
114
Double plate clutch
(“over-center” type)
1:1
292 mm (11 1/2")
83 kg (183 lbs)
Accessories
Volvo Penta accessories
Below is a range of products which can be purchased
as accessories
Note: Not all accessories can be fitted to all engines. Ask your Volvo Penta service dealer for advice.
●
Volvo Penta lubricating oils:
– VDS-2*, SAE 15W/40
●
Volvo Penta antifreeze (glycol) for the freshwater
system
●
Volvo Penta anti-corrosive agent** for the freshwater system
●
Extra instrument panels:
– Auxiliary panel
– Panel for Flying Bridge (alternative operating position)
– Extra alarm panel
●
Extra generator incl. regulator to be fitted at the
front of the engine:
– 14V/130A (1800W)
– 28V/100A (2800W)
●
Extra fuel pre-filter with water separator:
– Single or double
●
Oil filter kit (alt. location of engine oil filters)
●
TAMD71: By-pass filter for engine lubricating oil
(standard on TAMD63, TAMD73 and TAMD74)
●
Electric oil scavenging pump (12V or 24V).
●
TAMD71 (Auxiliary engine variant): Manual oil
scavenging pump
●
Seawater filter
●
Separate expansion tank
●
Hot water outlet
* VDS-2 oil allows longer intervals between oil changes (see
“Engine, oil change intervals” on page 35).
** Must not be used together with antifreeze (glycol).
Volvo Penta VDS-2 oil
TAMD73, -74: Alt. location of engine oil filters
(accessory)
TAMD71: Connecting the supplementary expansion tank
115
Hot water outlet:
Location of angle nipples with cock (Thread: 1/2"–14
NPTF)
TAMD63, TAMD73, -74
●
Exhaust riser
●
Muffler
●
●
Hydraulic pump (only for engine with seawater
pump)
●
Trolling valve for Twin Disc reverse gears MG507–1
and MG507A–1
116
Extra power take-off at the front of the engine
(TAMD71B engines in commercial operation):
Pulley, mounted on crankshaft. Max. output 7.35
kW. Outer diameter Ø 158 mm (6.220").
Bilge/scavenging pumps, 24V (TAMD71 in commercial operation). Capacity at 1800 rpm and 3 m
(9.8 ft) suction height:
– 1 1/4" – 230 l/min.
– 2"
– 300 l/min.
●
TAMD71
A. Angle nipple and cock (inlet)
A. Angle nipple and cock (outlet)
Disengageable clutches, gear ratio 1:1.
– Rockford BW 203 mm (8"). Max. output at 1800
rpm. 58 hp. Max. torque 226 Nm (23 kpm/166.7
lbf.ft.).
– Rockford BW 254 mm (10"). Max. output at 1800
rpm. 80 hp. Max. torque 314 Nm (32 kpm/231.6
lbf.ft.).
●
Toolkit
Maintenance – Equipment,
Accessories
Dual lever control
Controls (mechanical)
The brake is for the engine speed control.
The control lever on Volvo Penta controls has an adjustable friction brake. This allows the lever weighting
to be adapted to the personal needs of the owner.
Adjust the friction by turning the screw (see figure).
Dual lever controls have individually adjustable friction
brakes for each lever.
Turning the screw clockwise (+) makes the lever
movement stiffer, while turning counterclockwise (–)
consequently makes it easier to move the lever.
Adjusting the friction brake
Single lever control
This brake is intended for controlling speed and is adjusted at half throttle with the reverse gear engaged. The brake does not affect shifting.
1. Remove the cover over the control.
2. Adjust the friction by turning the screw (see figure).
Turning the screw clockwise (+) makes the lever
movement stiffer, while turning counterclockwise
(–) consequently makes it easier to move the lever.
3. Reinstall the cover over the control.
Adjusting the friction brake on dual lever controls
Adjusting the friction brake on single lever controls
(single or dual)
Adjusting the friction brake on NB dual controls
A brake can be adjusted by turning the red handle in order
to counteract the regulator power.
117
Notes
.....................................................................................................................................................................
.....................................................................................................................................................................
.....................................................................................................................................................................
.....................................................................................................................................................................
.....................................................................................................................................................................
.....................................................................................................................................................................
.....................................................................................................................................................................
.....................................................................................................................................................................
.....................................................................................................................................................................
.....................................................................................................................................................................
.....................................................................................................................................................................
.....................................................................................................................................................................
.....................................................................................................................................................................
.....................................................................................................................................................................
.....................................................................................................................................................................
.....................................................................................................................................................................
.....................................................................................................................................................................
.....................................................................................................................................................................
.....................................................................................................................................................................
.....................................................................................................................................................................
.....................................................................................................................................................................
.....................................................................................................................................................................
.....................................................................................................................................................................
.....................................................................................................................................................................
.....................................................................................................................................................................
.....................................................................................................................................................................
118
Notes
.....................................................................................................................................................................
.....................................................................................................................................................................
.....................................................................................................................................................................
.....................................................................................................................................................................
.....................................................................................................................................................................
.....................................................................................................................................................................
.....................................................................................................................................................................
.....................................................................................................................................................................
.....................................................................................................................................................................
.....................................................................................................................................................................
.....................................................................................................................................................................
.....................................................................................................................................................................
.....................................................................................................................................................................
.....................................................................................................................................................................
.....................................................................................................................................................................
.....................................................................................................................................................................
.....................................................................................................................................................................
.....................................................................................................................................................................
.....................................................................................................................................................................
.....................................................................................................................................................................
.....................................................................................................................................................................
.....................................................................................................................................................................
.....................................................................................................................................................................
.....................................................................................................................................................................
.....................................................................................................................................................................
.....................................................................................................................................................................
119
Owner
Name: ................................................................................
Tel.: ...................................
Address: ............................................................................................................................
Nearest Volvo Penta Service Dealer
Name: ................................................................................
Tel.: ...................................
Address: ............................................................................................................................
Engine information
Engine type: ......................................................................................................................
Serial No. ...........................................................................................................................
Reverse gear type/No. ......................................................................................................
Disengageable clutch type/No. .........................................................................................
120
7740156-0 English 6–2000