1
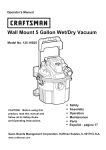
Owner's Manual
Manual del Propietario
Vacuum Cleaner
Aspiradora
Model,
Modelo
721.35820500
721.35821500
CAUTION: Read and follow all safety
and operating instructions before first
use of this product.
CUIDADO: Lea y sigue todas las
instrucciones de operaci6n y seguridad
antes del uso de este producto.
Directions for Use
It is a violation of Federal law to use this
product in a manner inconsistent with its
labeling.
Direcciones de uso
Es una violaci6n a la ley Federal utilizar
este producto de una manera contraria
con su etiquetado.
8ears, Roebuck and Co., Hoffman Estates, IL 60179 U.8.A
www.sears.com
PART No.: 3828Fi3858A
BeforeUsingYour New Vacuum.......................2
KenmoreVacuum CleanerWarranty ................2
ImportantSafety Instructions............................3
Parts and Features.............................................
4
TelescopicHandleRelease................................5
Cord Release.......................................................
5
Switch Operation................................................
6
Body Releaseand Positions..............................6
RecommendedPile HeightSettings.................6
AttachmentUse Chart........................................7
VacuumingTips..................................................
7
Attachments........................................................
7
PerformanceFeatures........................................9
Vacuum Cleaner Care .......................................
10
Vacuum Storage .............................................
10
Dust bin assembly .......................................... 10
Dust bin cleaning ............................................ 11
Filters cleaning / changing .............................. 11
Replacing headlight bulb ................................ 12
Belt Changing and Agitator Cleaning .............. 13
Cleaning exterior .............................................
Removing clogs ..............................................
Troubleshooting
15
15
...............................................
Master Protection Agreements
Service ................................................
Back Cover
Please read this guide. It will help you assemble and operate your new Kenmore vacuum in the safest
and most effective way.
For more information about the care and operation, call your nearest Sears store.
You will need the complete model and serial numbers when requesting information.
Your vacuum's model and serial numbers are located on the Model and Serial Number Plate.
Use the space below to record the model number and serial number of your new Kenmore vacuum.
Model No.
Serial No.
Date of Purchase
Keep this book and your sales check (receipt) in a safe place for future reference.
LIMITED
ONE YEAR WARRANTY
ON KENMORE
VACUUM
CLEANER
This warranty is for one year from the date of purchase, and includes only private household
vacuum cleaner use. During the warranty year, when this vacuum cleaner is operated and
maintained according to the owner's manual instructions, Sears will repair any defects in material
or workmanship free of charge.
This warranty excludes vacuum belts, light bulbs, and filters, which are expendable
become worn during normal use.
parts and
For warranty service, return this vacuum cleaner to the nearest Sears Parts and Repair
Center in the United States.
This warranty applies only while this product is in use in the United States.
This warranty gives you specific legal rights, and you may also have other rights which vary from
state to state.
Sears, Roebuck
and Co., D/817WA,
Hoffman Estates,
-2-
IL 60179
16
........................ 17
WARNING-To
reduce the risk of fire, electric
shock,
or injury:
Your safety is important
to us. To reduce the risk of fire, electric shock, injury to
persons or damage when using your vacuum cleaner, follow basic safety precautions
including
the following:
Read this manuat before assembling or using
your vacuum cleaner.
Do not put any object into openings.
Do not use with any opening bIocked; keep
free of dust, lint, hair and anything that may
reduce air flow.
Use your cleaner only as described in this
manual. Use only with supplied attachments.
To reduce the risk of electric shock - Do not
Keep hair, loose clothing, fingers, and all parts
of body away from openings and moving parts.
Do not use cteaner without dust bin and/or
use outdoors or on wet surfaces.
Disconnect
electrical suppIy before servicing
filters in place.
Always clean dust bin after vacuuming carpet
cleaners or freshener, powders and fine dust.
These products clog the fiIter, reduce airflow
and can cause damage to the cleaner. Faiture
to cIean the dust bin couId cause permanent
damage to the cleaner.
Do not use the cleaner to pick up sharp hard
objects, smatI toys, pins, paper cIips, etc. They
may damage the cleaner or dust bin.
Do not pick up anything that is burning or smoking,
such as cigarettes, matches, or hot ashes.
Do not use vacuum cleaner
or cIeaning out brush area. FaiIure to do so
could result in etectric shock or brush suddenly
starting.
Always turn cteaner off before connecting or
disconnecting the hose.
Always turn cIeaner off before unplugging.
Do not unplug by pulling on cord. To unpIug,
grasp the plug, not the cord.
Do not use with damaged cord or pIug. If
cleaner is not working as it should, has been
dropped, damaged, left outdoors, or dropped into
water, return it to a Sears Parts & Retair Center.
Do not pull or carry by cord, use cord as a
to pick up flammable or combustible liquids
(gasoline, cleaning fluids, perfumes, etc.), or use
in areas where they may be present. The fumes
from these substances can create a fire hazard
handle, close door on cord, or pull cord around
sharp edges or corners. Do not run cleaner over
cord. Keep cord away from heated surfaces.
Do not leave cleaner when plugged in. Unplug
or explosion.
Use extra care when cteaning on stairs. Do not
put on chairs, tabIes, etc. Keep on floor.
You are responsible for making sure that your
vacuum cleaner is not used by anyone unabte
to operate it properly.
from outlet when not in use and before servicing.
Do not allow to be used as a toy. Close attention
is necessary when used by or near children.
Do not handle ptug or cleaner with wet hands.
SAVE THESE INSTRUCTIONS
Proper assembly and safe use of your vacuum cleaner are your responsibilities. Your cleaner is
intended onIy for household use. Read this Owner' s Manual carefully far important use and
safety information. This guide contains safety statements under warning and caution symbols.
Please pay special attention to these boxes and fallow any instructions given. WARNING
statements alert you to such hazards as fire, electric shock, burns and serious personal injury.
CAUTION statements atert you to such hazards as moderate personal injury and/or property
damage.
-3-
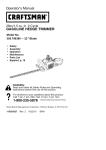
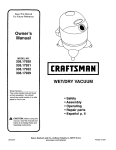
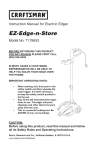
It is important to knowyour vacuum cleaner'sparts andfeatures to assure its properand safe
use. Reviewthese before usingyour cleaner.
Filters
Part No,
In U.S.A
85880
Bulb
5240
Belt
5282
Item
Telescopic
handle
Switch
Carry handle
Dust bin
release lever
Dust bin
Telescopic
release lever
Quick release
cord hanger
l
Nozzle
Headlk
Reset button
(Agitator motor)
brush
d.
Cord hook
itator
Motor protector
Body release pedal
-4-
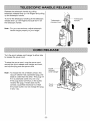
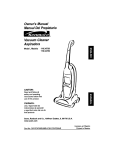
Release the telescopic handle by pulling
telescopic release lever up with fingers and pulling
up the telescopic handle.
To lower the telescopic handle pull the telescopic
release lever up with fingers and push down on
the telescopic handle.
pic
Telesco "
release lever
handle
I
Note : For your convenience,adjusttelescopic
handle height properlyto your height,
Turn the quick release cord hanger to either side
to release the power cord.
To store the power cord, wrap the power cord
around the quick release cord hanger and hook,
and clip the plug onto the power cord
01
release
cord hanger
Note : To reduce the risk of electric shock, this
vacuum cleaner has a polarized plug, one
blade is wider than the other. This plug will
fit in a polarized outlet only one way.
if the plug does not fit fully in the outlet,
reverse the plug. If it still does not fit,
contact a qualified electrician to install
the proper outlet. Do not change the plug
in any way.
Hook
-5-
Switch operation
• Off
• Floor: Agitator off
• Carpet: Agitator on
WARNING
Personal injury hazard
To avoid personalinjury, do not turn switch
On/Off if the vacuum or your hand is wet.
Release the vacuum body by pressing down on
the body release pedal with your foot and
pulling back and down.
Body release pedal
To select a pile height setting :
Turn off cleaner first. Select a pile height setting
by using height adjustment knob. Slide the
adjustment knob to the correct setting position.
Do not position the body when you are setting.
Suggested pile height settings :
You may need to raise the height to make some
jobs easier, such as scatter rugs and longer pile
carpets.
Suggested settings are :
High: shag carpet, long pile, plush, scatter rugs
Med: medium to long pile
Low: short to medium pile
Ex-low: very low pile, bare floor
Height adjustment knob
Attention: Special care is required when
vacuuming certain types of carpet or floor
covering. Always check the carpet or floor
covering manufacturer's recommended
cleaning instructions before vacuuming.
-6-
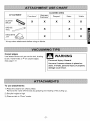
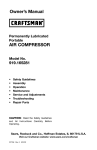
CLEANING AREA
ATTACHMENT
Furniture*
DUSTING
BRUSH
_
Between
Cushions*
X
TOOL
CREVICE_
Drapes*
Stairs
Walls
X
X
X
X
X
X
X
X
X
X
HANDI-MATE_
Jr.®
_
* Always clean attachments before using on fabrics.
Carpet edges
WARNING
Use attachments such as crevice tool, dusting
brush, Handi-mate Jr.® on carpet edges.
Personal Injury Hazard
See page 7, 8
Use care if vacuum cleaner is placed on
stairs. If it falls, personalinjury or property
damagecould result.
To use attachments
1 ) Place the cleaner on a ftat surface,
Remove the wand off the body by grasping and rotating while pulling up.
2) Set pile height to high
3) Place switch in "Floor" mode.
-7-
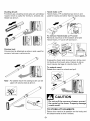
Handi-mate Jr.®:
Handi-mate Jr.® is attached as shown and
Dusting brush:
Functions as a dusting brush,also an upholstery
nozzle which is useful for furniture, shelves etc.
Attach as shown.
used for stairs and other hard to reach places.
To remove Handi-mate Jr,® cover:
Remove 2 screws on the bottom and take
Handi-mate Jr.® cover off as shown.
Crevice tool:
Crevice tool is attached
as shown and used for
corners, between cushions
etc.
Frequently check and remove hair, string, and
lint build-up the brush area. Failure to do so
could cause damage to Handi-mate Jr.®.
To extend wand:
Rotate the wand to unlock and pull.
Note : For added reach the dusting brush can be
used with crevice tool as shown.
Pull
CAUTION
Do not pull the vacuum cleaner
the room by the hose, Property
could result.
around
damage
TO 8TORE ATTACHMENT8
Return the wand to its position on the body and
the attachments to their holders.
-8-
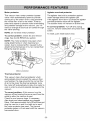
Motor protector
Agitator overload
This vacuum has a motor protector bypass
valve which automatically opens to provide
cooling air to the motor when a clog prevents
the normal flow of air to the motor. If the bypass valve opens to prevent motor overheating
and possible damage to the vacuum, you will
notice a change of sound as air rushes through
the valve opening.
The agitator has built-in protection against
motor damage should the agitator jam.
If the agitator slows down or stops the agitator
overload protector shuts off the agitator.
The suction motor will remain on at this time.
To correct problem: Turn off and unplug
vacuum, remove obstruction and press reset
button.
NOTE: Do not block motor protector.
To correct problem:
protector
To reset, push reset button once.
Check for and remove
clogs. See CLOG REMOVAL
section.
NOTE: The motor protector may open when
using attachments or when cleaning new
carpet, due to reduced airflow caused by the
attachments themselves or by new carpet fuzz
filling the dust bin quickly.
Reset button
Motor protector
Thermal protector
This vacuum has a thermal protector which
automatically trips to protect the vacuum from
overheating. If a clog prevents the normaI flow
of air to the motor the thermal protector turns
the motor off automatically to allow the motor to
cool in order to prevent possible damage to the
vacuum.
To correct problem: If this occurs, turn the
vacuum off and unplug the power cord from the
outlet to allow the vacuum to cool.
Check for and remove clogs, if necessary.
Also check and clean/replace any clogged
filters. Wait approximately thirty(30)minutes
and
plug the vacuum in and turn back on to see if
the motor protector has reset. The thermal
protector system will not reset untiII the vacuum
has cooled down.
-9-
VACUUM CLEANER CARE
Always follow all safety precautions when cleaning and servicing the vacuum cleaner.
WARNING
Electrical shock and personal injury hazard.
Disconnect electrical supply before servicing or cleaning the unit. Failure to do so
could result in electrical shock or personal injury from cleaner suddenly starting.
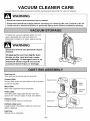
To store the vacuum cleaner when it is not
used, assemble its cord and return its
telescopic handle to its lower space saving
position.
WARNING
Electrical shock and personal injury
hazard.
Wrapping the cord too tightly puts
stress on the cord and can cause
cord damage. A damaged cord is an
electrical shock hazard and could
cause personal injury or damage.
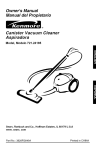
Dust bin lid:
The dust bin lid covers up the dust bin.
Screen filter:
Screen filter traps dirt and debris that is picked
up by the suction.
Main filter:
Main filter captures micro-particles.
Dust bin
Filter plate:
The filter plate separates the bin into two
spaces for various types of dust and debris.
Bottom plate:
Used to throw dust out of the bin.
Dust bin
Bottom plate lever:
Used to open the bottom plate for dust and
debris disposal.
plate lever
Dust bin:
Where dirt is collected.
-10-
For best perfornance always empty the dust bin
when the dirt levei reaches the "MAX" line.
TO EMPTY DUST BIN, press the bottom plate
lever as shown.
WARNING
Electrical shock and personal injury
hazard.
Bottom
)late lever
Always unplug power cord from
electrical outlet before performing
any service on vacuum.
TO REMOVE DUST BIN, press the dust bin
release lever until it snaps, and slide the bin
out of cleaner.
Note : When replacing the dust bin in the vacuum
you need to slide and snap it. Make sure
that dust bin is fully engaged otherwise
suction power could be tow.
C .rryCAUTION
Release lever
the dust bin by the handle as shown,
9
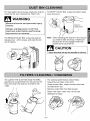
TO CLEAN THE DUST BIN AND FILTERS,
For optional performance
separate all components from the dust bin lid
first, and clean the dust bin and filters with
water.
frequently
check filters
and clean when dirty.
Grasp screen filter, rotate counter-clockwise
and take them out.
Remove main filter from filter screen.
Rinse with clean water only, do not use
detergent or soap.
-11-
Allow main and screen filter to dry 24 hours
TO CHANGE
before putting them back. Make sure that the
out of cleaner and replace it with new one.
DO NOT CLEAN WITH WATER OR LIQUID.
This filter can not be cleaned and must be
filters dry completely.
When cleaning the main filter no longer restores
vacuum suction to full power, you need to
THE EXHAUST FILTER, take it
replaced for proper performance.
replace the main filter.
CAUTION
Wet filter can cause permanent
damage to cleaner.
Ensure that all filters dry completely.
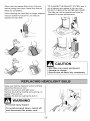
Make sure that the cleaner's switch is off and
disconnect the power cord.
Remove two screws and light cover.
Remove the bulb by twisting and pushing it in
slightly; Then pull out.
Replace the bulb by pushing the bulb in.
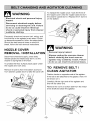
WARNING
Personal injury hazard
To avoid personal injury, switch off
and disconnect the power cord.
-12-
WARNING
Electrical shock and personal injury
hazard.
To replace the nozzle cover, hook the front of
the nozzle cover onto the nozzle base and turn
the cleaner upside down. Replace the 4 screws
on the bottom.
Disconnect electrical supply before
servicing or cleaning the unit. Failure
to do so could result in electrical
shock or personal injury from cleaner
suddenly starting.
Frequently check and remove hair, string, and
lint build-up in the agitator brush area. If buildup becomes excessive, follow the steps below.
Should the belt become loose or should it
break, follow the belt removal instructions.
WARNING
NOZZLE COVER
REMOVAL / INSTALLATION
Personal
Always
Disconnect electrical supply, press body
release pedal and rotate body down, so the
cleaner is laying flat on the floor.
To protect the floor surface place paper under
the nozzle and work area.
Remove 4 screws from the bottom as shown.
Turn cleaner upside down to take the cover off.
before
agitator
injury
unplug
cleaning
hazard
the vacuum
the brush
may suddenly
to do so can result
cleaner
area
as
restart.
Failure
in personal
injury.
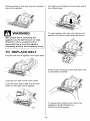
TO REMOVE BELT /
CLEAN AGITATOR
Position hands on opposite ends of the agitator.
If the belt is still attached to the agitator, there will
be tension on it.
Carefully Iift the right end of the agitator and
then lift the other end.
Remove the worn or broken belt from the motor
drive shaft and clean the agitator.
Belt
-13-
Remove string or hair that may be wrapped
around the agitator.
Pull right end of agitator
into nozzle base.
WARNING
Be careful
agitator
Failure
when
To seat agitator
agitator
removing
forward
and seat it
right end, put right end of
into slot in nozzle base as shown.
the
as the belt tension
is high.
to do so could result in
personal
injury
releasing
quickly
from
and
the agitator
snapping
TO REPLACE
Seat the left end of agitator
away.
BELT
into nozzle base.
Press firmly,
is completely
Loop the new belt on the motor
checking to see that each end
inserted.
shaft.
Loop the other end of belt onto the belt
pulley on the right end of agitator.
To replace the nozzle cover, follow the
NOZZLE COVER REMOVAL /
INSTALLATION
section.
Belt
-14-
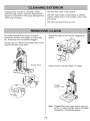
Unplug power cord from wall outlet. Clean
exterior using a clean, soft cloth that has been
dipped in a solution of mild liquid detergent and
water and wrung dry.
DO NOT drip water in the cleaner.
DO NOT clean tools in dishwasher
or clothes
washer. Wash tools in warm soapy water, rinse
and air dry.
DO NOT use tools if they are wet.
The hose located on the vacuum cleaner
Check the base of the hose for clogging as
shown.
carries the dirt from the nozzle up to the dust
bin. If the hose should become clogged :
Unplug vacuum. Remove the assembled
nozzie hose and check them.
wand,
Putl(I
_
Nozzle hose
Check suction inlet and filters for clogs.
Check
suction inlet.
Note : Clogged filters can cause suction power to
be low. To clean the filter, refer to FILTERS
CLEANING / CHANGING section.
-15-
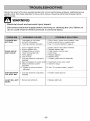
Review
this chart to find do-it-yourself
needed, other than those
Repair Center.
described
solutions
for a minor
in this owner's
manual,
performance
should
problems.
be performed
Additional
at Sears
service
Parts &
WARNING
Electrical
shock
and
Disconnect
electrical
do so could
result
CLEANER
wILL
NOT RUN
POOR JOB OF
DIRT PICKUP
personal
injury
supply
before
in electrical
1} Unplugged
shock
hazard.
servicing
or cleaning
or personal
at wail 0uilet.
the
unit.
Failure
injury.
1. Plug in firmly, check circuit breaker/fuse.
2. Switch in off position.
3. Thermal protector activated
2. Push switch to floor or carpet mode.
3. See "To correct problem", page 9.
1.
2.
3.
4.
5.
6.
1.
2.
3.
4.
Full or clogged dust bin.
Broken agitator belt.
Clogged hose or nozzle.
Hose not inserted fully
Worn agitator.
Hole in hose
7. Dust bin assembly improperly
installed.
8. Belt not installed on motor shaft.
9. Motor protection
activated.
system
Empty dust bin and clean the filters
Replace agitator belt.
Clean hose or nozzte area.
Insert hose
5. Replace agitator.
6. Replace hose.
7. Properly install dust bin assembly
8. Install belt on the motor shaft
9. Check for clogs
10. Agitator overload
activated
protector
1O.See "To correct problem",
DUST ESCAPES
THE DUST BIN
1. Dust bin assembly
installed.
improperly
1. Properly install dust bin
LIGHT WILL NOT
WORK
1. Burned out light bulb.
1. Replace light bulb.
-16-
page 9.
to
Master Protection Agreements
Congratulations on making a smart purchase.
Your new Kenmore® product is designed and
manufactured for years of dependable operation.
But like all products, it may require preventive
maintenance or repair from time to time.
That's when having a Master Protection Agreement
can save you money and aggravation.
Purchase a Master Protection Agreement now and
protect yourself from unexpected hassle and
expense.
Once you purchase the Agreement, a simple phone
catl is all that it takes for you to schedule service.
You can call anytime day or night, or schedule a
service appointment online.
The Master Protection Agreement also helps extend
the life of your new product. Here's what's included in
the Agreement:
Some limitations and exclusions apply.
For prices and additional information call
1-800-827-6655.
[] Expert service by our 12,000 professional repair
specialists
Sears Installation Service
[] Unlimited service and no charge for parts and
labor on all covered repairs
[] "No-lemon" guarantee - replacement of your
covered product if four or more product failures
occur within twelve months
Sears has over 12,000 professional repair specialists,
who have access to over 4.5 million quality parts and
accessories. That's the kind of professionalism you
can count on to help prolong the life of your new
purchase for years to come. Purchase your Master
Protection Agreement today!
For Sears professional installation of home
appliances, garage door openers, water heaters, and
other major home items, in the USA. call
1-800-4-MY-HOME _'_
[] Product replacement if your covered product
can't be fixed
[] Annual Preventive Maintenance Check at your
request- no extra charge
[] Fast help by phone - phone support from a
Sears technician on products requiring in-home
repair, plus convenient repair scheduling
[] Power surge protection against electrical
damage due to power fluctuations
[] Rental reimbursement if repair of your covered
product takes longer than promised
-17-
Antes de utilice su nueva aspiradora ............... 1
Cuidado de su aspiradora .................................. 9
Garantia de la aspiradora Kenmore .................. 1
Almacenamiento de la aspiradora .................... 9
Instrucciones importantes de seguridad ......... 2
Montaje det dep6sito de polvo .......................... 9
Limpieza det deposito de polvo ....................... 10
Limpieza/cambio de filtros .............................. 10
Sustituir ta bombilta principal .......................... 11
Cambiode correay limpiezadelmezclador.............. 12
Piezas y caracteristicas ..................................... 3
Soltar el mango telesc6pico .............................. 4
Salida del cable ..................................................
4
Funcionamiento del interruptor ........................ 5
Limpieza exterior ............................................. 14
Eliminar obstrucciones .................................... 14
Soltar el cuerpo principal y posiciones ............ 5
Par_metros de altura recomendados ............... 5
Soluci6n
Gr_fico de uso de los accesorios ..................... 6
Acuerdos de protecci6n original ..................... 16
Consejos de aspiracibn ..................................... 6
Servicio. ...................................... cubierta posterior
Accesorios ..........................................................
de averias ..........................................
15
6
Caracteristicas de rendimiento ......................... 8
Per favor, lea esta guia. Le ayudara a montar y a poner en funcionamiento su nueva aspiradora Kenmore
de la forma mas segura y eficaz posibte.
Para obtener mas informaci6n sobre el cuidado y el funcionamiento, Itame a su tienda Sears mas cercana.
Necesitara et modelo y los nQmeros de serie compIetos para soticitar informacion.
El modelo y Io_ nQmeros de serie de su aspiradora estan situados en Ia pIaca de modeIo y nQmero de serie.
Utiliceelespacioa continuacionpararegistrarel nQmerode modeloy elnQmerode serie de sunueva aspiradoraKenmore.
NOde modelo.
NOde serie.
Fecha de compra
Guarde este libro y su ticket de compra (recibo) en un tugar seguro para referencias futuras.
GARANTiA
LIMITADA
DE UN AgO EN LA ASPIRADORA
KENMORE
Esta garantia sera valida durante un a_o a partir de la fecha de compra, e incluye solamente el
domestico de la aspiradora. Durante el ai_o de garantia, siempre que esta aspiradora se haga
funcionar y se mantenga segun las instrucciones en el manual dei propietario,
gratuitamente cualquier defecto material o de mano de obra.
Sears reparara
Esta garantia excluye las correas de Ia aspiradora, las bombillas, y ios filtros, que son piezas
consumibles que se gastan debido al uso normal.
Para beneficiarse
y Reparaciones
del servicio bajo la garantia, devuelva
esta aspiradora
al Centro de Piezas
Sears m_s cercano de los Estados Unidos.
Esta garantia s61o se aplicara siempre que este producto se utilice en el interior de los Estados Unidos.
Esta garantia le da derechos legales especificos, y tambien puede tener otros derechos que
varian de estado a estado.
Sears, Roebuck and Co., D/817WA,
Hoffman Estates, IL 60179
-1-
AVISO
- Parareducirel riesgo de ,uego, descargael_ctricao lesiones:
Su seguridad es muy importante para nosotros. Para reducir el riesgo de fuego, descarga
el_ctrica, lesiones a personas o daSos durante el uso de su aspiradora, respete las
precauciones b_sicas de seguridad, incluyendo las siguientes:
Lea este manuaI antes de montar o utilice su
No coloque ningOnobjeto sobresus orificios de salida.
No la utilicesi susorificiosde salidaeatanbloqueados;
aspiradora.
Utilice su aspiradora solo seg0n Io descrito en este
manual. Utilice 0nicamente con los acoesoriosinctuidos.
Para reducir el riesgo de descargas electricas - No
mantengalalimpia polvo,pelusa,pelo y cualquier
cosaque puedareducirelflujo de aire.
Mantenga elpelo,laropasuelta,losdedos,ytodastaspartes
delcuerpolejosdeJosorificiea
desaliday laapiezasm6viles.
No utitice la aspiradora sin el deposito de
potvotfiltros en su sitio.
Siempre timpieeldepositode polvodespuesde limpiar
utilice at aire tibre o sobre superficies mojadas.
Desconecte la alimentacion antes de reparar o
timpiar el area. No hacerlo podria dar tugar a
descargas electricas o que et cepilIo se active
repentinamente.
laalfombraconla aspiradora,tantoelpolvocomoel polvo
fino, Estosproductostimpiadoresobstruyenelfiltro,
reducenlacirculacionde airey puedencausardafiosa Ja
aspiradora.De no limpiarel depositodepolvo,pod@
Siempre apague Ia aspiradora antes de conectar
o desconectar Ia manguera.
Siempre apague la aspiradoraantes de desenchufarto.
No Io desenchufe tirando del cable. Para
desenchufarlo, tire del enchufe, no del cable.
No to utilice si el cable o el enchufe estan da_ados.
Si la aspiradora no funoiona como debe, se ha caido,
da_ado, sacado al exterior, o se ha caido en el agua,
devu61valaa un Centro de servicio de Sears.
Notiredelcabledelaaspiradora,
noIoutilicacomeaaa,cierreuna
puettasobreelcable,o Iohagapasarporbordesoesquinaa
afladas.
Nodesplaca
laaspiradora
sobreelcable.Mantenga
elcablede
alimentacion
lejoadesuper[cies
calientes.
No sealejedelaaspiradora
cuandoeat€enchufada.
Desenchufe
delatomacuandonovayaa utilizarla
y antesde repararla.
No permita que sea utiIizada como un juguete. Preste
atencion ai utilizar la aspiradora cerca de los ni_os.
No toqueel enchufeo taaspiradoracon las manosmojadas.
causardaSospermanentesa ta aspiradora.
No utilicelaaspiradora
paraeliminarobjetosdurosy afiladoa,
juguetespequefios,chinchetas,
clipsdepapeLetc. Estoa
podriandafiarlaaspiradorao eldepositodepolvo..
No aspire nadaque se este quemando o suelte humc
pot ejemplo cigarrillos,fosforos,o cenizas calientes.
No utitice la aspiradora para eliminar liquidos
inflamabteso combustibles (gasolina, quitamanchas,
perfumes, etc.), o to utilice en areas donde estos
puedan estar presentes. Los humos de estas
sustancias pueden representar crear un riesgo
de incendio o explosi6n,
Empleeun cuidadoespecialalaspirarescaleras.
NocoJoque
laaspiradora
sobreunasilla,mesa,etc.Mantengala
sobreelsuelo.
Usted es responsable de asegurarse de que su
aspiradora no sea utitizada por alguien incapaz de
hacerla funcionar correctamente.
GUARDE ESTAS INSTRUCCIONES
EI montaje y el uso seguro de su aspiradora son sus responsabitidades. Su aspiradora esta disefiada
@icamente para el uso domestico. Lea cuidadosamente el manual de del propietario para obtener informacion
importanteaoerca del use y la seguridad. Esta guia contiene comentarios de seguridad bajo simbolos de
advertencia y precauoion. Pot favor, preste especial atencion a estos recuadros y siga las instrucoiones
facilitadas. Los comentarios de AVlSO le alertan de peligros come fuego, descargas el6ctricas, quemaduras
y daSos corporates serios. Los comentarios de ADVERTENClA le alertan de peligros como daSos corporales
moderador y/o daSos a la propiedad.
-2-
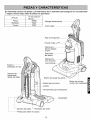
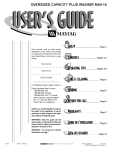
Es importanteconocerlas piezasy caractedsticasde su aspiradoraparaasegurarun usoadecuado
y seguro. Revise estas antes de utilizar su as _iradora.
Articuto
Filtros
NOde pieza en
EE.UU.
85880
Bombilla
5240
Correa
5282
Mango
telescopico
I nterruptor
Asa de transporte
Handi-mate
Jr.®
Palancapara
liberareldep0sit0
de p01v0
Deposito
de polvo
Manguera
con boquilla
Luz
Palanca
telescopica de inicio
rebobinado
rapido de cable
ei polvo
para hendiduras
Gancho del cable
Protector del motor
Pedal para soltar el cuerpo
-3-
Bot6n de relnicio
(motor deI mezclador'
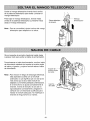
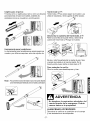
Suelte el mango telesc6pico tirando hacia arriba
de Ia palanca telesc6pica para soltar y extraer et
mango tetesc6pico.
Para bajar el mango telescopico, tirando hacia
arriba de Ia paIanca tetesc6pica y presione hacia
abajo et mango tetesc6pico.
Palanca
telescdpico
deliberaci6n
telescdpico
I
Nota : Para su comodidad, ajuste la altura del mango
telesc6pico para adaptarto a su attura.
J
Gire el soporte de emisidn rapida det cable hacia
cuaIquier tado para soltar el cable de atimentaci6n.
Para almacenarel cable de alimentaci6n, enrolle el cable
de alimentaci6n alrededor del soportede emisi6n rapida
del cable y el gancho, y sujete el enchufe sobre el cable
de alimentaci6n.
Nota : Para reducir el riesgo de descargas eloctricas,
eeta aspiradora cuenta con un enchufe
polarizado, to que significa que una clavija es
mas ancha que la otra. Eete enchufe se
adaptara a un enchufe polarizado unidireccional.
Si el enchufe no se ajusta completamente al
enchufe, invierta el enchufe. Si a_n asi no
Iogra adaptarto correctamente, pongase en
contacto con un electricista cuatificado para
instalar el enchufe adecuado. No modifique el
enchufe de ninguna forma o manera.
-4-
Soportede
emisi6nrapida
deIcable
Gancho
del cable
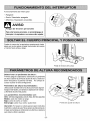
Funcionamiento del interruptor
• Apagado
• Suelo: Mezclador apagado
• Alfombra: Mezclador encendido
AVISO
Peligro de lesiones personales
Paraevitarlesionespersonates,
noencienda/apague
et
interruptorsilaaspiradora
o susrnanosest_nrnojadas.
Suelte eJcuerpo de la aspiradora presionando hacia
abajo con su pie sobre el pedal de ernision del cuerpo
y tirando hacia atras y abajo.
Pedal de emision del cuerpo
Seleccionar un par_metro de altura :
Primero apague la aspiradora. Seleccione un parametro
de altura usando Japerilia de ajuste de altura. Deslice el
boton de ajuste a la posieion correcta. No eoloque el
cuerpo cuando Woeste configurando.
Par_metros
de altura recomendados
:
Usted puedenecesitaretevarta aIturapara hacer aIgunos
trabajosrnasfaciles, por ejemplola aspiracionde mantas
y atfombrasde pelo rnasgrueso.
Los par_metros recomendados son :
Alto: alfombras
desgastadas,
peloalto,felpa,alfombras
peque_as
Medio: pelo de medio a largo
Bajo: pelo de corto a medio
Extra bajo: pelo muy corto, suelo libre
Pedlla de ajuste de altura
Atenci6n: Esnecesario
uncuidado
especial
alaspirarciertostipos
dealfombra
o cubiertadesuelo.Revisesiempre1asinstrucciones
de
limpieza
recomendadas
porelfabricante
deJaalfombra
o cubiertade
sueloantesdeutiJizar
laaspiradora.
-5-
AREA DE LIMPIEZA
ACCESORIO
Muebles
*
Entre
cojines*
X
CEPILLOPARA'_--_
ELPOLVO
Cortinas*
_
X
X
X
X
HANDI.MATE l_'_",_
Jr.®
_
Paredes
X
X
HERRAMIENTA
PARA
HENDIDURA_
Escaleras
X
X
X
X
• Limpie siempre tos accesorios antes de utiiizarlos sobre las tetas.
Bordes
de alfombras
Utiliceaccesoriostalescome laherramientapara hendiduras
et cepillopara el polvo, Handi-mateJr. ® en los bordes
de la atfombra.
Consuttela pagina7, 8
AVISO
Peligro de lesibn
personal
Tengacuidado
sipiensa
aspirar
enlasescaleras,
Si la
aspiradora
secayera,
podria
causar
lesiones
personales
oda6os
a lapropiedad.
Uso de los accesorios
1 ) Coloque la aspiradora sobre una superficie plana,
Retire la varilla del cuerpo agarrando y rotandola mientras tira hacia arriba.
2) Fije la aitura del pelo en Alta
3) Fije el interruptor
en mode "Suelo".
-6-
Handi-mate Jr.@:
Cepillo para el polvo:
Funcionacomo un cepillo para el polvo, como una boquilta Handi-mate Jr.@ se acopia segOn se muestra y se
para tapicerias 0til para los muebtes, estantes etc.
utiliza en escaleras y otros lugares de dificil acceso.
Ac6ptela como se muestra a continuaci6n.
Desmontar la cubierta del Handi-mate Jr.@:
Retirelos 2 tomillosde la parteinferiory desmonte ta
cubiertadelHandi-mateJr.@segt_nse muestra.
Herramienta para hendiduras:
La herramienta para hendiduras se acopta segOn se
muestra y se utiliza en esquinas, entre los cojines, etc.
Revisey retirefrecuentementelos restos de pelo, hilos,
y pelusa acumulada en el &rea del cepillo. De no
haceflo podria causar daSosal Handi-mate Jr.@.
Para extender
la varilla:
Gire ia varilIa para desbloquear
Nota : Paraaumentar
elalcance
delcepillo
depolvo,
estepuede
utilizarse
conlaherramienta
parahendiduras
comosemuestra
acontinuacbn.
y tirar.
Tirar
ADVERTENCIA
No desplace la aspiradora alrededor del
cuarto tirando de la manguera.
Podria
causar dahos a la propiedad.
ALMACENAR ACCESORI08
Devuelva la varilla a su posici6n en el cuerpo
y los accesorios a sus soportes.
-7-
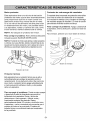
Motor protector
Protector de sobrecarga
del mezclador
Esta aspiradora tiene una vaIvuIa de derivacion
protectora del motor que se abre automaticamente
para proporcionar aire frio al motor cuando una
obstrucci6n evita el flujo normat de aire aI motor.
Si Ia una vaIvuIa de derivaci6n se abre para evitar
et recaIentamiento deI motor y los posibIes daSos
a Ia aspiradora, notara un cambio del ruido, como
et aire corriera a traves Ia abertura de la valvula.
El mezctadortieneincorporadaunaprotecci6ncontradaSos
en el motorsi sufrieraunaobstrucci6nen el mezclador.
Si el mezcladorseralentizao para,elprotectorde sobrecarga
del mezcladorapagar&el mezclador. El motorde succi6n
permaneceraencendidoduranteese tiempo.
Para corregir el problema: Apague y desenchufe
la aspiradora,retire laobstrucci6ny presioneel bot6n de
reinicio.
NOTA: No bloquee el protector del motor,
Para reiniciar, presione una vez el boton de reinicio.
Para corregir el problema: Revlseyelirnine
lasobstrucciones.
Consultetasecci6nELIMINAROBSTRUCCt0N.
NOTA: El protector
detmotorpuedeabrirsealutilizaraccesorios
o al Iimpiarunanuevaalfombra,debidoal reducidofiujodeaire
causadoporlos propiosaccesorioso porlapelusade lanueva
alfombraqueestatlenadorapidamente
eI dep6sitode polvo.
Bot6n de reinicio
Protectordel motor
Protector t_rmico
Estaaspiradoratiene un protectortermicoque seactiva
automaticamenteparaprotegerla aspiradoracontrael
recalentamiento.Si unaobstrucci6nevita elflujo normalde
aire al motor,el protectortermicoapagaautomaticamente
el motor parapermitirenfriarseal motory evitar posibtes
daSosa la aspiradora.
Para corregir el problema: Si esto ocurriera,apague
y desenchufeelcablede alimentacionparapermitirel
enfriamientode laaspiradora.Revisey eliminelas
obstrucciones,si fueranecesario. Ademas,revisey
limpie/cambiecualquierfiltro obstruido.Espere
aproximadamentetreinta(30)minutosy enchufede nuevo
laaspiradoray vuelva a encenderlapara comprobarque el
protectordel motorse haya reiniciado.El sistemadel
protectortermico nose reiniciarahastaque la aspiradora
se haya enfriado.
-8-
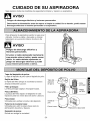
CUIDADO DE SU ASPIRADORA
Siga siempre todas las medidas de seguridad al limpiar y reparar su aspiradora.
AVISO
Peligro de descarga electrica y lesiones personales.
Desconectela alimentacibnantes de repararo limpiarla unidad.De no hacerlo,podria causar
descargaselectricaso lesionespersonalesa la aspiradora.
Para almacenar la aspiradora cuando no vaya a ser
utilizada, monte su cable y devuelva su mango
tetesc6pico a su posicion inferior de ahorro de
espacio.
AVISO
Peligro de descarga electrica y
lesione8 personales.
Envolver el cable demasiado fuertemente
crea presi6n sobre el cable y puede causar
dahos. Un cable da_ado representa un
peligro de descargas electricas y puede
causa lesione personales o da_os.
Tapa del deposito de polvo:
Latapade1depositode polvocubreeldepositode polvo.
Rejilla del filtro:
El rejilla del filtro atrapa la suciedad y basura
atraida mediante succion.
Tapadet
dep6sito
de polvo
Filtro principal:
La filtro principal captura micropart iculas.
Placa del filtro:
La placa del filtro separa el dep6sito en dos
espacios para los varios tipos de polvo y basura.
Placadefiitro
Placa base:
Utilizada para extraer el polvo del dep0sito.
Palanca de la placa base:
Utilizada para abrir la placa base para la
eliminaci6n de polvo y basura.
Depoaito de polvo:
Donde se recoge la suciedad.
-9-
_
,_,
principal
PARA VACIAR EL DEPOSITO DE POLVO,
ParaIograrel mejorrendimiento,vaciesiempreel dep6sito
depolvocuandoel niveldesuciedadalcancelalinea"M,_XIMO'L presione Ia placa base segun se muestra.
Peligro de descarga
lesiones
personales,
Desenchufe
alimentaci6n
cualquier
el_ctrica
y
Palancade la
siempre
el cable de
antes de realizar
reparaci6n
_
placa base
a su aspiradora,
PARA DESMONTAREL DEPOSITO DE POLVO, presione Nota : AIcambiareldepositode polvodela aspiradora,
necesitaradeslizarlo
y encajarloa presbn.AsegtJrese
la palancade liberaci6n deldep6sito de polvo hasta que
queel dep6sitodepolvoestacempletamente
encajado,
escuche un chasquido,y deslice el depositofuera de la
de otraformala potenciadesuccionpodriaset baja.
aspiradora.
ADVERTENCIA
Palanca
deliberaci6n
Desplace
eldep6sito
depolvo
porelaea,como
semuestra,
PARALIMPtARELDEPOSITOY LOSFILTROSDE POLVO,
Para Iograrel rendimientom&sadecuado,revise losfiltros
primeroseparetodosloscomponentesdetatapadeldep6sito
de polvo,y limpieel dep6sitoy los filtrosde polvoconagua.
con frecuencia y limpielos cuando esten sucios. Tome
la rejilladel filtro, girela a ta izquierda y extraigala.
Retire elfiltro principal de la rejilladel filtro.
Aclarelaunicamentecon agua timpia,no utiliee detergente
ojab6n.
-10-
Permitaque el filtro principaly la rejillasesequen durante
PARA CAMBIAR
24 horasantes de volvera colocarlas.AsegtJresede que
los fltros esten totalmentesecos.
extraigalo de la aspiradora y cambie!o por uno nuevo.
NO LO LIMPIE CON AGUA O LIQUIDO.
Cuandolimpiarelfiltro principalya norestablezcalapotencia
Este filtro no se puede limpiar y debe cambiarse
para Iograr el funcionamiento apropiado.
de succiondela aspiradoraa su m&ximapotencia,necesitara
EL FILTRO DE EXTRACCION,
sustituirel filtro principal.
ADVERTENCIA
ro mojado puede causar da_os
nentes a la aspiradora.
I Aseg,',rese
quetodoslosflltrosestencompletamente
secos,
AsegOrese de que el interruptor de la aspiradora este
apagado y desconecte el cable de atimentacion.
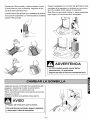
Retire dos tornillos y la cubierta de la luz.
Retire la bombilla girandota y empujandola levemente;
despues tire de ella.
Cambie la bombilla empujandola hacia adentro.
AVISO
Peligro de lesiones personales.
Paraevitarlesionespersonales,
apague
laaspiradora
,desconecte
elcabledealimentaci6n,
-11-
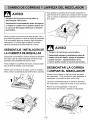
Para sustituir la cubierta de la boquitia, enganche ta
parte frontal de la cubierta de ta boquilla sobre la base
y de la vuelta a ia aspiradera. Sustituya los 4 tornilios
de la base.
AVISO
Peligro de lesiones personales y
descargas el_ctricas.
Desconectela alimentaci6nantes de reparar
o limpiarla unidad.De no hacerlopodriaser
la causa dedescargasel_ctricas o lesiones
personales.
Revisey elimine con frecuencialos restos de pelo, hilos,y
acumulaci6nde pelusaen el area delcepillo delmezclador.
Si la acumulaci6nIlegaa ser excesiva,sigua los pasosa
continuaci6n.Si la cerrea Ilegase aflejarao rompiera,
sigualas instruccionesde desmontejede la correa.
DESMONTAJE
/ INSTALACION
DE
LACUBIERTADE BOQUILLAS
Peligro
de lesiones
personales.
Desenchufe siempre la aspiradora antes de
Desconectela alimentaci6n,presioneel pedalde liberaci6n
delcuerpoy gireel cuerpohacia abajo,de tel formaque
aspiradoraeste comptetamentesobreel suelo.
limpiar el _rea deI cepillo, porque el mezclador
podria iniciarse,
repentinamente.
El no
hacerlo podria resultar en Iesiones personales.
Para proteger la supe_cie deI sueIo, co{oque papel
bajo el &rea de trabajo y de Ia boquitla.
Retire los 4 tomiIIos de ta base, come se muestra.
De la vuelta a ia aspiradora para desmontar la cubierta.
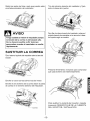
DESMONTAR LA CORREA
/ LIMPIAR EL MEZCLADOR
CoIoque sus manes en los extremes opuestos
deI mezclador. Si la correa aQn esta acopIada al
mezclador, provocara tension sobre ella.
Levante cuidadosamente
el extremo derecho
del mezclador y despues levante el otro extremo.
Retire Ia correa gastada o rota de Ia
transmision
dei motor y Iimpie el mezclador.
Correa
-12-
Retire Ios restos de hilos o pelo que puedan estar
enrotIados alrededor det mezclador.
AVISO
Tire del extremo derecho det mezclador y fijeto
sobre la base det inyector.
Para fijar el extremoderecho delmezclador,coloqueel
extremoderecho de mezcladoren la ranurade la base
Tenga cuidadoal retirarel mezclador porque
la tensi6n de la correaes demasiadoalta.
del inyectorseg_n semuestra.
De no hacerlo podria sufrir lesiones
personales cuando el mezclador se suelte
r_pidamente.
SUSTITUIR
LA CORREA
Fije el extremoizquierdo
delmezcladorsobrela basedel
inyector.
Presione firmemente, revisando para comprobar
que cada extremo se inserte totalmente.
EnrotIe Ia nueva correa sobre el eje del motor.
EnrolIe el otro extremo de la correa sobre ta polea
de correa en et extremo derecho del mezclador.
Para sustituir la cubierta del inyector, respete
la secci6n DESMONTAJE DE LA CUBIERTA
DEL INYECTOR / INSTALAClON.
-13-
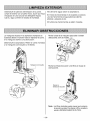
Desenchufe el cable de alimentacion de la pared.
Limpie el exterior con un paso limpio, suave que haya
empapado en una solucion de detergente liquido
suave y agua y elimine el exceeo de humedad.
NO derrame agua sobre la aspiradora.
NO Iimpietas herramientasen el lavaplatoso lavadora.
Lave laeherramientasen aguajabonosa ealiente,
aclarelas y eequetaeal aire.
NO utilice las herramientas si estan mojadas.
La manguera eituada en ta aspiradora traneporta ia
suciedad desde el inyector hasta el deposito de polvo.
Si la manguera eufriera una obstruccion:
Revisela basede la manguerapara sabersi existen
obstrucoiones,
comesemuestra.___
Desenchufe ta aspiradora. Retire la varilta montada
y la manguera con boquilla y reviselas.
Manguera
conboquilla
Revise la entradade succi6ny los filtrosen buscade
obstruceiones.
Revisela
entradadesucoi6n.
Nota : Losfiltrosobstruidospuedencausarque lapotencia
desucoionsea baja.Paralimpiarel filtro,consultela
secoionLIMPIEZA/CAMBIO
DEFILTROS.
-14-
Reviseestegraflcoparaencontrarsolucionessimplesparalos probiemasmenoresdefuncionamiento.Si necesitaraun servicio
adicional,
a excepcion
delosdescritosenestemanuaW
de1propietario,
deberarealizarse
en unCentrodereparacbny PiezasdeSears.
AVlSO
Peligro de descarga
el_ctrica y lesiones personales.
Desconecte
laalimentaci6nantesderepararo timpiarlaunidad,Deno hacerlopodriacauserpeligrode
descargaet_ctricao lesionespersonales.
!!!l!!!!i!i
!!,
!!!!! !!!!;:
LA ASPIRADORA 1. Desenchufadodelatomade pared. 1. Enchufe
laaspiradora
firmemente,
reviseelinterruptor/fusible.
NO FUNClONA
2. tnterruptor en posici6napagado. 2. Presione el interruptoral modo suelo o aIfombra.
3. Protector t_rmico activado
3. Consulte"para corregirel problema",en la pagina 9
1. Eldep6sito
dep@oestaIlenouobstruido 1. Vacie el dep6sito de polvo y limpJe{os fittros
2. Correa del mezclador rote.
2. Cambie la correa det mezclador.
3. Manguera o boquiIla obstruida. 3. Limpie el area de ta manguera o de la boquitla.
4. Manguera
noinsertada
completamente4. Inserte ta manguera
MAL
5. Cambie el mezclador.
5. Mezclador desgastado.
RENDIMIENTO DE 6. Agujero en la manguera
6. Cambie la manguera.
LA RECOGIDA DE 7. El dep6sito de polvo est_
7. Instate correctamente el dep6sito de polvo
SUCIEDAD
instaladoincorrectamente
8. Lacorrea
noestainstalada
enelejedelmotor 8. Instale la correa en el eje det motor
g. El sistema de protecci6n det
g. Revise si hay obstrucciones
motor est_ activado.
10. El protector de sobrecarga del 10. CensuRe "pare corregir el problema", en la pagina 9.
mezctador esta activado
ELPOLVO
SEESCAPA
DEL 1. El dep6sito de polvo est_
DEPOSITO
DEPOLVO
incorrectamente
Jnstalado.
1. Instale correctamente
LA LUZ NO
FUNCIONA
1. Cambiar la bombilta.
1. BombJlta fuedida.
-15-
et dep6sito
de polvo.
Acuerdos de protecci6n original
Felicidades por reatizar una compra inteligente.
Su nuevoproductoKenmore@
estadise_adoy fabricado
paraproporcionarafiosde funcionamiento
fiabte.
Per&comotodoslosproductos,
puederequerirunmantenimiento
deprevencbno ciertasreparaciones
enalgunaocasi6n
Aquiesdondeteneranacuerdodeprotecci6n
originalpuede
ahorrartedineroy molestias
Adquieraahoraunacuerdodeprotecci6n
originaly protejase
contrainesperadas
ycostosas
molestias
Unavezqueadquiera
elacuerdo,unasimpleIlamadadetelefono
seratodoIoquenecesite
hacerparaconceflar
unacitaconelservicio
UstedpuedeIlamarencualquiermemento
deldiao delanoche,
oprogramar
anacitadeservicioonline
Elacuerdodeprotecci6noriginaltambi6nayudaa extenderla
vidadesu nuevoproduoto.
A continuaci6npuedevet qu6
seinduyedentrodelacuerdo:
Se aplicar_n ciertas limitaciones y exclusiones.
Paraobtenerinformacionadioionalaoercade nueatroa
[] Experto servicio de nuestros 12.000profesionales
y especialistasde reparaci6n Especialistas
Servicio de instalaci6n Sears
[] Servicio gratuito ilimitado de piezas y mano de
obra en todas las reparaciones cubiertas
[] Garantia "No-lemon" - sustituci6ndesuproducto
cubiertosi experimenta
cuatroo masavedasenel producto
enan plazode docemeses
Searstienemasde 12000espedalistas
profesionales
dela
reparacion,
quetienenaccesoamasde4,5millones
depiezas
yacoesorios
decalidad.Esaesladasedeprofesionalismo
con
laqueusteddeseacontarparaayudafleaprolongar
lavidade
sanuevaadquisicion,
iAdquiera
suacuerdodeprotecoi6n
originalhoymismo!
precioa,Ilameal 1-800-827-6655,
Paracontratar
elservicio
deinstalaci6n
profesional
deSearsen
electrodomesticos,
cierres
depuertasdegaraje,calentadores
de
agua,
yotrosimportantes
articulos
dom_sticos
enEEUUName
al
1-800-4-MY-HOME <"_
[] Sustitucidn del producto si su producto cubierto
no puede repararse
[] Revisi6n anual preventiva de mantenimiento
seg_n la soticite - sin ningfln recargo
[] Ayuda telef6nica r_pida - asistenciatelef6nicade
lostecnicosdeSearsenaquellosproductosquerequieran
lareparaci6n
eaelhogarmasunc6modo
horario
dereparaci6n
[] Protecci6ncontrasubidasde tensi6n contralos
daSosel¢ctricosdebidosalas fluctuacionesde energia
[] Reembolso del alquiler si reparaci6n de su
producto cubierto tarda m_s deI tiempo prometido
-16-
Your Home
For repair - in your home - of all major brand appliances,
lawn and garden equipment, or heating and cooling systems,
no matter who made it, no matter who sold it!
For the replacement parts, accessories and
owner's manuals that you need to do-it-yourself.
For Sears professional installation of home appliances
and items like garage door openers and water heaters.
1-800-4-MY-HOME ®
(1-800-469-4663)
www,sears,com
Anytime, day or night
(U.S.A. and Canada)
www,sears,ca
Our Home
For repair of carry-in products like vacuums, lawn equipment,
and electronics, call or go on-line for the nearest
Sears Parts and Repair Center.
1-800-488-1222
Anytime, day or night (U.S.A. only)
www.sears,com
To purchase a protection agreement (U.S.A.)
or maintenance agreement (Canada) on a product serviced by Sears:
1-800-827-6655
(U.S.A.)
1-800-361-6665 (Canada)
Para pedir servicio de reparation Au Canada pour service en frangais:
a domicilio, y para ordenar piezas:
1-800-LE-FOYERMo
1-888-SU-HOGAR sM
(!-800-533-6937)
(1-888-784-6427)
www.sears.ca
'ililililililililililililililililiiiii,_.
¸
© Sears, Roebuck and Co.
TM
SM
© Registered Trademark /
Trademark /
Service Mark of Sears, Roebuck and Co.
TM
SM
© Marca Registrada /
Marca de Fabrica /
Marca de Servicio de Sears, Roebuck and Co
_vD
_,_cMarque de commerce
/ _ Marque deposee de Sears, Roebuck and Co.