1
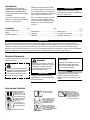
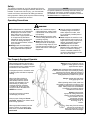
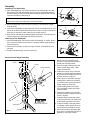
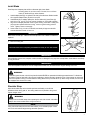
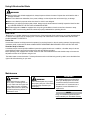
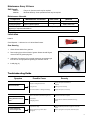
SHINDAIWA OWNER’S/OPERATOR’S MANUAL
Model: 65004
MULTI-PURPOSE
BRUSHCUTTER TOOL
Minimize the risk of injury to yourself and others!
Read this manual and familiarize yourself with the
contents. Always wear eye and hearing protection
WARNING! when operating this unit.
X7502883202
03/14
Introduction
The Multipurpose Tool has been
designed and built to deliver superior
performance and reliability without
compromise to quality, comfort, safety
or durability.
While every attempt has been made
to provide the latest information about
your Shindaiwa product, there may be
some differences between your attachment and what is described here.
As an owner/operator, you’ll soon
discover for yourself why Shindaiwa is
simply in a class by itself!
Echo, Inc. reserves the right to make
changes to products without prior
notice, and without obligation to make
alterations to units previously manufactured.
Contents
PAGE
Attention Statements........................... 2
Safety.................................................. 3
Product Description............................. 5
IMPORTANT!
The information contained in these
instructions describes units available at
the time of publication.
PAGE
Specifications...................................... 5
Assembly............................................. 6
Operation............................................. 8
PAGE
Maintenance........................................ 8
Troubleshooting Guide........................ 9
Warranty Statement........................... 10
IMPORTANT!
The operational procedures described in this manual are intended to help you get the most from this unit as well as to
protect you and others from harm. These procedures are guidelines for safe operation under most conditions, and are not
intended to replace any safety rules and/or laws that may be in force in your area. If you have questions regarding your
Shindaiwa hand held power equipment, or if you do not understand something in this manual, contact your local Shindaiwa
dealer for assistance. You may also contact Shindaiwa at the address printed on the back of this Manual.
Read and follow this
operators manual.
Failure to do so could
result in serious injury.
Attention Statements
Throughout this manual are special “attention statements”.
DANGER!
A statement preceded by the triangular attention symbol and the word
“DANGER” contains information
that should be acted upon to prevent serious injury or death.
International Symbols
Read and follow this
operators manual.
Failure to do so could
result in serious injury.
Wear eye and hearing
protection at all times
during the operation
of this unit.
Keep bystanders
at least 50 feet (15 m)
away during operation.
Beware of thrown or
ricocheted objects.
2
Do not operate this unit
with a blade unless the
WARNING!
A statement preceded by the triangular attention symbol and the word
“WARNING” contains information
that should be acted upon to prevent serious bodily injury.
Read and follow this
IMPORTANT!
operators manual.
Failure to do so could
A statement preceded
byinthe
word
result
serious
injury.
“IMPORTANT” is one that possesses
Wear eye and hearing
special significance.protection at all times
Wear eye and hearing
protection at all times
CAUTION! during the operation
of this unit.
A statement preceded
by the word
Keep bystanders
“CAUTION” contains
information
at least 50
feet (15 m)
during
operation.
that should beaway
acted
upon
to prevent mechanical damage.
Beware of thrown or
ricocheted
NOTE: objects.
A statement preceded by the word
“NOTE” contains information that is
handy to know and
may
makethis
your
Do not
operate
unitjob
with a blade unless the
easier.
unit is equipped with a
during the operation
of this unit.
Shindaiwa-approved
handlebar or barrier.
Keep bystanders
at least 50 feet (15 m)
away during operation.
Always wear a harness
when operating this unit
with a blade. A harness
is also recommended when
using trimmer line.
Beware of thrown or
ricocheted objects.
If unit is used as a
brushcutter, beware of
blade thrust. A jammed
blade can cause the unit
to jerk suddenly and may
cause the operator to
lose control of the unit.
Do not operate this unit
with a blade unless the
unit is equipped with a
Shindaiwa-approved
handlebar or barrier.
Always wear a harness
when operating this unit
with a blade. A harness
is also recommended when
using trimmer line.
If unit is used as a
brushcutter, beware of
blade thrust. A jammed
blade can cause the unit
to jerk suddenly and may
cause the operator to
Safety
This machine operates at very high speeds and has the
potential to do serious damage if misused, abused or mishandled. To reduce the risk of injury, you must maintain
control at all times, and observe all safety precautions
during operation. Never permit a person without training
or instruction to operate this machine!
NOTE:
For specific maintenance and safety information about your
Multipurpose Tool Carrier, consult the owner's manual
provided with it. If it has been lost or misplaced, contact a
Shindaiwa dealer for a replacement.
Operating Precautions
WARNING!
■■This Shindaiwa tool is specifically
designed for use on the Shindaiwa
Multipurpose Tool Carrier. Installation and/or use on any other
model, brand or type of power tool
is not approved by Shindaiwa.
Attempts to use on non-approved
models can damage the equipment and cause accidents, serious
injury or death.
■■Always make sure the Multipurpose Tool is properly installed and
firmly tightened before operation.
■■Never use a cracked or warped
cutting attachment: replace it with
a serviceable one and make sure
it fits properly.
■■Before starting the engine, make
sure the cutting attachment is not
contacting anything.
■■Always stop the engine immediately and check for damage if
you strike a foreign object or if the
machine becomes tangled. Do not
operate with broken or damaged
equipment.
■■Stop the machine immediately if
it suddenly begins to vibrate or
shake. Inspect for broken, missing or improperly installed parts or
attachments.
■■Never transport the machine or set
it down with the engine running. An
engine that’s running could be accidentally accelerated causing the
cutting attachment to rotate.
■■ALWAYS keep a Solid Stance.
Maintain footing and balance at all
times. Do not stand on slippery,
uneven or unstable surfaces. Do
not work in odd positions or on ladders. Do not over reach.
The Properly Equipped Operator
Wear hearing protection devices and a
broad-brimmed hat or helmet. A helmet
is required when using a blade-equipped
brushcutter to clear small trees.
Prolonged exposure to excessive noise
is fatiguing and could lead to impaired
hearing.
Wear close-fitting clothing to
protect legs and arms. Gloves
offer added protection and are
strongly recommended. Do not
wear clothing or jewelry that
could get caught in machinery
or underbrush. Secure long hair
so that it is above shoulder level.
NEVER wear shorts!
Long-term exposure to vibration
can damage your hands.
Keep a proper footing and do not
overreach. Maintain your balance at all
times during operation.
Wear appropriate footwear (non-skid
boots or shoes): do not wear opentoed shoes or sandals. Never work
barefooted!
Always wear eye protection such as
goggles or safety glasses to shield
against thrown objects.
Always wear a harness when operating the unit.
It adds comfort and helps ensure safety by limiting
movement fore and aft. When the harness is
adjusted properly, the unit should balance with the
cutting attachment parallel to the ground.
Always operate with both hands
firmly gripping the unit.
When operating with a blade, make sure
the handle is positioned to provide you with
maximum protection from contacting the
blade. Always make sure the handlebar
is installed in accordance with the
manufacturers instructions.
Always make sure the
appropriate cutting attachment
shield is correctly installed and
in good condition. Do not
operate the unit if the
cutting attachment shield
is missing, loose, or
broken.
Keep away from the rotating
trimmer line or blade at all
times, and never lift a moving
attachment above waist-high.
3
Be Aware of the Working Environment
Avoid long-term
operation in very hot
or very cold weather.
Make sure
bystanders or
observers outside
the 15 meter
(50 feet) “danger
zone” wear eye
protection.
15 METERS (50
FEET)
Be extremely careful
of slippery terrain,
especially during rainy
weather.
Always make sure
the appropriate
cutting attachment
shield is correctly
installed.
Be constantly alert for
objects and debris that
could be thrown either
from the rotating cutting
attachment or bounced
from a hard surface.
If contact is made with a hard object,
stop the engine and inspect the cutting
attachment for damage.
Reduce the risk of bystanders
being struck by flying debris. Make
sure no one is within 15 meters
(50 feet)— that’s about 16 paces
of an operating attachment. Stop
immediately if a child, pet, or
person comes within a 15 meter
(50 feet)radius. Outside this
radius, there is still a risk of injury
from thrown objects.
Do not operate the unit
if the cutting attachment
shield is missing, loose,
or broken.
Beware of a coasting
blade when brushcutting or
edging. A coasting blade
can injure while it continues
to spin after the throttle
trigger is released or after
the engine is stopped.
ALWAYS clear your work area of
trash or hidden debris that could
be thrown back at you or toward
a bystander. When operating in
rocky terrain or near electric wires
or fences, use extreme caution to
avoid contacting such items with
the cutting attachment.
Safety Labels
IMPORTANT!
Safety and Information Labels: Make sure all safety and information labels are undamaged, readable and up to date.
Immediately replace damaged or missing labels.
New labels are available through your local authorized
Shindaiwa dealer.
4
Product Description
Using the illustration as a guide, familiarize yourself with your machine and its various components. Understanding your machine helps ensure
top performance, long service life and safer
operation.
1 - Outer tube
2 - Gearcase
3 - Blade
4 - Cutting attachment shield
Multipurpose
Brushcutter Tool
1
2
4
WARNING!
Do not make unauthorized
modifications or alterations to this unit
or its components.
3
Specifications
Length/Width/Height
Weight
Gearcase Lubrication
Gear Reduction
Gearcase Arbor Size
904 x 254 x 147 mm (35.6 x 10.0 x 5.8 in)
1.55 kg (3.43 lb)
Lithium based grease
1.57:1
10 mm Left-hand thread
*Specifications are subject to change without notice.
Prior to Assembly
Before assembling, make sure you have all the components
required for a complete unit:
■■Brushcutter Attachment
■■Barrier Bar (1)
■■5x35 Screws (4)
■■5mm Nuts (4)
■■Hanger Bolt (1)
■■Split Pin 20x22 (10)
■■Hanger Nut
■■Hanger
■■Shoulder Harness
■■ Manual del Operador
■■Assembly Tool (s)
■■Carefully inspect all components for damage.
IMPORTANT!
The terms “left”, “left-hand”, and “LH”;
“right”, “right-hand”, and “RH”; “front” and
“rear” refer to directions as viewed by the
operator during normal operation.
5
Assembly
A
Installing a Tool Attachment
G
1. Place the Multipurpose Tool Carrier (A) and the Tool Assembly (B) on a clean,
flat surface so that both assemblies fit end to end. The powerhead assembly
should be facing up, and the tool assembly should be positioned with the locking hole in the tube (C) end facing up.
F
C
CAUTION!
Keep the open ends of the tubes clean and free of Debris!
M23004
D
2. Slip off the protective cover from the end of the tool, and loosen the coupler
screw knob (D).
E
B
E
G
3. Insert the tool assembly into the coupler (E), with the tool decal facing up, until
the line of the decal is flush with the end of the coupler. Twist the tool back and
forth until you are sure it snaps in place by the coupler latch (F).
4. When the two tube halves are locked together, press down on the spring-loaded latch protector (G) and tighten the coupler screw knob.
M23005
D
Removing a Tool Attachment
1. Place the Multipurpose Tool Carrier and the Tool Assembly on a clean, flat surface, loosen the coupler screw knob (D). The spring-loaded coupler protector
(G) should pop up.
2. Press down on the latch (F) with your finger or thumb. This releases the coupler latch.
3. Pull the tool assembly (B) out of the coupler (E).
M23006
Barrier Bar and Hanger Assembly
1. Remove the four socket-head cap
screws on the handle and remove the
handle and mounting bracket.
Socket-head Capscrews
Handle
Throttle Assembly
3. Position the hanger on the outer tube
between the handle and throttle assembly and secure the hanger with the nut
and bolt as shown in Figure 2.
Nut
4. Slide coupler on outer tube, and align
locating holes. Make sure flat side of
“D” washer is facing outer tube before
sliding coupling on outer tube.
Outer Tube
Bolt
Hanger
Figure 2
6
Nuts
5. Thread locating screw into locating
hole, and tighten locating and clamp
screws securely.
6. Position the handle on the outer tube
forward of Handle Positioning Label as
shown in Figure 2.
7. Install the barrier bar with the sockethead cap screws and nuts. Tighten the
screws finger-tight ONLY at this time.
BCC07
Barrier Bar
2. Unscrew coupler locating screw, and
loosen coupler clamp screw. Slide
coupler off outer tube.
Handle Positioning Label
8. Locate the handle in the best position
for operator comfort (usually about 10
inches ahead of the throttle housing).
9. Secure the handle by alternately tightening the four socket-head screws in a
diagonal or “criss-cross” fashion.
Install Blade
Parts Required: Adapter plate w/25 mm diameter pilot, lower blade mounting plate, 10 mm hex nut w/L.H. thread, 2 mm x 25 mm cotter pin, blade w/25 mm arbor diameter.
1. Install adapter plate (D) on splined PTO shaft, pilot side down. Blade installation requires Adapter Plate (D) with 25 mm pilot.
D
2. Install Blade (K) on adapter plate pilot. Secure blade with Lower Plate (H),
and 10 mm L.H. nut (G). Turn nut counter-clockwise on PTO shaft to tighten.
3. Align hole in adapter plate with notch in gear housing, and insert Locking Tool
(A) to prevent splined shaft from turning. Arrow on gear housing points to
notch. Tighten 10 mm nut securely.
K
H
4. Insert Cotter Pin (L) in hole in PTO shaft, and bend pin legs around shaft
counterclockwise to retain 10 mm nut.
G
IMPORTANT!
L
Never reuse a cotter pin - install a new cotter pin each time a blade is installed or
replaced.
A
D
5. Remove locking tool.
25
The unit should now be completely assembled and ready for use with a blade.
K
H
G
L
IMPORTANT!
Discard blades that are bent, warped, cracked, broken or damaged in any way.Use a sharp blade. A dull blade is more likely
to snag and thrust.
IMPORTANT!
Units with adjustable carburetors must be readjusted for blade use, otherwise serious engine damage can occur.
WARNING!
A standard grass trimmer unit with loop handle should NEVER be operated with blade-type attachments. For blade use,
the trimmer must be fitted with a bicycle-type handlebar or barrier bar that is located in front of the operator to reduce the
risk of the operator coming in contact with the cutting attachment. (Per ANSI B175.3). When using a blade, the unit must
be equipped with a harness or strap.
Shoulder Strap
Adjust the shoulder strap so the shoulder pad rests comfortably on the off-side
shoulder and the cutting path of the cutting attachment is parallel to the ground.
Tighten hanger screw.
WARNING!
Always wear a shoulder strap when operating this unit with a blade. A shoulder
strap is also recommended when using trimmer line.
NOTE:
Using a shoulder strap with a brush-cutter allows you to maintain proper control
of the unit and reduces fatigue during extended operation.
7
Using A Brushcutter Blade
WARNING!
■■Before working with a blade-equipped unit, always inspect and clean the area of objects that could interfere with or
damage the blade.
■■Never use a blade near sidewalks, fence posts, buildings or other objects that could cause injury or damage.
■■Never use a blade for purposes other than those for which it was designed.
■■Whenever you strike a hard object with a blade, always stop the brushcutter and carefully inspect the blade for damage. NEVER OPERATE THE UNIT WITH A DAMAGED BLADE!
■■A blade-equipped unit must be equipped with a bicycle-type handlebar or barrier as well as a harness or strap.
■■Always make sure the cutting attachment shield is properly installed before operating the unit.
Blade Thrust
‘Blade thrust’ is a sudden sideways or backward motion of the brushcutter. Such motion may occur when the blade jams
or catches on an object such as a sapling tree or tree stump. BE CONSTANTLY ALERT FOR BLADE THRUST AND
GUARD AGAINST ITS EFFECTS!
Barrier Bar
A brushcutter’s barrier bar helps prevent the operator from moving forward, or the unit moving rearward, thus preventing
inadvertent bodily contact with the blade. ALWAYS KEEP THE BARRIER BAR SECURELY IN PLACE ON THE UNIT!
Shoulder Strap or Harness
A shoulder strap or harness provides additional protection against blade thrust. In addition, a shoulder strap or harness
gives significant support and comfort to help ensure safe and efficient operation.
When operating a unit equipped with a blade, make sure both the handle/barrier bar and shoulder strap or harness are
adjusted to the size of the operator using the unit.
The blade rotates counter-clockwise. For best performance and to minimize being struck by debris, move the blade from
right to left while advancing on your work.
Maintenance
WARNING!
Before performing any maintenance, repair, or cleaning work on
the unit, make sure the engine and
cutting attachment are completely
stopped. Disconnect the spark plug
wire before performing service or
maintenance work.
IMPORTANT!
WARNING!
Non-standard parts may not operate properly with your unit and may
cause damage and lead to personal injury.
For detailed maintenance information
about your Multipurpose Tool Carrier,
consult the owner's manual that was
provided with it. If it has been lost or
misplaced, contact Shindaiwa for a
replacement.
NOTE:
Using non-standard replacement parts
could invalidate your Shindaiwa warranty.
8
Maintenance Every 50 Hours
Skill Levels
Level 1 =
Level 2 =
Easy to do. Common tools may be required.
Moderate difficulty. Some specialized tools may be required.
Maintenance Intervals
Component
Maintenance Procedure
Skill Level
Interval
Gear Housing
Grease
1
Every 50 hours of use [1]
Screws/Nuts/Bolts
Inspect/Tighten/Replace
1
Before Each Use
IMPORTANT - Time intervals shown are maximum. Actual use and your experience will determine the
frequency of required maintenance.
[1] Apply grease.
Lubrication
Level 1.
Parts Required: Lubricant 8 oz. or Lithium Base Grease.
Gear Housing
1. Clean all loose debris from gear box.
2. Remove plug (A) and check level of grease. Grease should fill gear
case to bottom of grease plug hole.
3. Add grease if necessary using manual grease gun or squeeze-type
tube. Do not use high pressure grease gun. DO NOT over-fill.
4. Install plug (A).
A
Troubleshooting Guide
Symptom
Excessive vibration.
Cutting attachment will not
move.
Cutting attachment
moves at engine idle.
Possible Cause
Remedy
Warped or damaged attachment.
Inspect and replace attachment as
required.
Loose gearcase.
Tighten gearcase securely.
Bent main shaft/worn or damaged bushings.
Inspect and replace as necessary.
Shaft not installed in powerhead or gearcase.
Inspect and reinstall as required.
Broken shaft.
Consult with an authorized Shindaiwa servicing
dealer.
Damaged gearcase.
Engine idle too high.
Adjust idle. Check Specifications page for correct idle
speed.
Broken clutch spring or worn clutch
spring boss.
Replace spring/shoes as required, check idle speed.
9
SHINDAIWA LIMITED WARRANTY STATEMENT FOR
PRODUCT SOLD IN USA AND CANADA BEGINNING 01/01/2013
ECHO, INC’S RESPONSIBILITY
ECHO Incorporated’s (ECHO, INC.) Limited Warranty, provides to the original purchaser that this Shindaiwa product is free from
defects in material and workmanship. Under normal use and maintenance from date of purchase, ECHO, INC. agrees to repair
or replace at it’s discretion, any defective product free of charge at any authorized Shindaiwa servicing dealer within listed below
application time periods, limitations and exclusions. THIS LIMITED WARRANTY IS ONLY APPLICABLE TO SHINDAIWA PRODUCTS SOLD BY AUTHORIZED SHINDAIWA DEALERS. IT IS EXTENDED TO THE ORIGINAL PURCHASER ONLY, AND IS
NOT TRANSFERABLE TO SUBSEQUENT OWNERS EXCEPT FOR EMISSION RELATED PARTS. Repair parts and accessories replaced under this warranty are warranted only for the balance of the original unit or accessory warranty period. Any damage caused by improper installation or improper maintenance is not covered by this warranty. All parts or products replaced under
warranty become the property of ECHO, INC. This warranty is separate from the Emission control warranty statement supplied with
your new product. Please consult the Emission Control Warranty Statement for details regarding emission related parts. For a list
of Authorized Shindaiwa Dealers refer to WWW.SHINDAIWA.COM or call 1-877-986-7783.
OWNER’S RESPONSIBILITY
To ensure trouble free warranty coverage it is important that you register your Shindaiwa equipment on-line at WWW.SHINDAIWA.
COM or by filling out the warranty registration card supplied with your unit. Registering your product confirms your warranty coverage and provides a direct link if we find it necessary to contact you.
The owner shall demonstrate reasonable care and use, and follow preventative maintenance, storage, fuel and oil usage as prescribed in the operator’s manual. Should a product difficulty occur, you must, at your expense, deliver or ship your Shindaiwa unit
to an authorized Shindaiwa servicing dealer for warranty repairs (within the applicable warranty period), and arrange for pick-up
or return of your unit after the repairs have been made. For your nearest authorized Shindaiwa servicing dealer, call Shindaiwa’s
Dealer Referral Center, at 1-877-986-7783 or you can locate a Shindaiwa servicing dealer at WWW.SHINDAIWA.COM. Should you
require assistance or have questions concerning Shindaiwa’s Warranty Statement, you can contact our Consumer Product Support
Department at 1-800-673-1558 or contact us through the web at WWW.SHINDAIWA.COM.
PRODUCT WARRANTY PERIOD
RESIDENTIAL APPLICATION
• 5 YEAR WARRANTY - Units for residential, or non-income producing use will be covered by this limited warranty for
five (5) years from date of purchase.
EXCEPTIONS:
• For engine powered products, the electronic ignition module, flexible drive cable, and solid drive shaft are warranted for
the life* of the product on parts only.
• Cutting attachments such as, but not limited to, bars, chains, sprockets, tines, blades, PowerBroomTM, belts, and nylon
trimmer heads for residential or non-income producing use will be covered for failures due to defects in material or
workmanship for a period of 60 days from original product purchase date. Any misuse from contact with concrete,
rocks, or other structures is not covered by this warranty.
• Multipurpose Tool Attachments carry the same warranty duration as the units they are designed to fit.
COMMERCIAL APPLICATION
• 90 DAY WARRANTY - All Chain Saws and Cut-Off Saws for commercial, institutional, agricultural, industrial, or income producing use will be covered by this limited warranty for 90 Days from the date of purchase.
• 2 YEAR WARRANTY - All other units for commercial, institutional, agricultural, industrial, or income producing use will be covered by this limited warranty for two (2) years from the date of purchase.
EXCEPTIONS:
• For engine powered products, the electronic ignition module, flexible drive cables, and solid drive shafts are warranted
for the life* of the product on parts only.
• Cutting attachments such as, but not limited to, bars, chains, sprockets, tines, blades, PowerBroomTM, belts, and nylon
trimmer heads for commercial, institutional, agricultural, industrial, rental, or income producing will be covered for failures due to defects in material or workmanship for a period of 30 days from original product purchase date. Any misuse
from contact with concrete, rocks, or other structures is not covered by this warranty.
• Multipurpose Tool Attachments carry the same warranty duration as the units they are designed to fit.
RENTAL APPLICATION - 90 DAYS WARRANTY
• Units for rental use will be covered against defects in material and workmanship for a period of 90 days from the date of purchase.
*
10
ECHO INC’s liability under the “Lifetime” coverage is limited to furnishing parts specified under the PRODUCT Warranty
PERIOD section of this warranty statement for “Life” free of charge for a period of ten (10) years after the date of the complete
unit’s final production.
PURCHASED REPAIR PARTS AND ACCESSORIES
• 90-day all applications
ATTENTION ENGINE POWERED PRODUCT OWNERS
This Shindaiwa engine powered product is a quality-engineered unit which has been manufactured to exact tolerances to provide
superior performance. To help ensure the performance of the unit, it is required to use engine oil which meets the ISO-L-EGD
Standard per ISO/CD 13738 and JASO M345/FD Standards. Shindaiwa Red ArmorTM and Shindaiwa OneTM are a premium engine
oil specifically formulated to meet ISO-L-EGD (ISO/CD 13738) and JASO M345/FD Standards. The use of engine oils designed
for other applications, such as for outboard motors or lawnmowers can result in severe engine damage, and will void your engine
limited warranty.
THIS WARRANTY DOES NOT COVER DAMAGE CAUSED BY:
• Lack of lubrication or engine failure, due to the use of engine oils that do not meet the ISO-L-EGD (ISO/CD 13738) and JASO
M345/FD Standards. Shindaiwa Red ArmorTM and Shindaiwa OneTM Engine Oil meets the ISO-L-EGD and JASO M345/FD
Standard. Emission related parts are covered for 5 years residential or 2 years commercial use regardless of two-stroke oil used,
per the statement listed in the EPA or California Emission Control Warranty Explanation.
• Damage caused by use of gasohol, containing methanol (wood alcohol), or gasoline containing less than 89 octane. Only use
gasoline which contains 89 octane or higher. Gasohol which contains a maximum 10% ethanol (grain alcohol) or 15% MTBE
(methyl/tertiary/butyl/ether) is also approved. The prescribed mixing ratio of gasoline to oil is listed on the Shindaiwa oil label and
covered in your operator’s manual.
• Engine damage caused by use of ether or any starting fluids.
• Damage caused by tampering with engine speed governor or emission components, or running engines above specified and
recommended engine speeds as listed in your operator’s manual.
• Operation of the unit with improperly maintained/removed cutting shield or removed/damaged air filter.
• Damage caused by dirt, pressure or steam cleaning the unit, salt water, corrosion, rust, varnish, abrasives, and moisture.
• Defects, malfunctions or failures resulting from abuse, misuse, neglect, modifications, alterations, normal wear, improper servicing, or use of unauthorized attachments.
• Incorrect storage procedures, stale fuel, including failure to provide or perform required maintenance services as prescribed in
the operator’s manual. Preventative maintenance as outlined in the operator’s manual is the customer’s responsibility.
• Failures due to improper set-up, pre-delivery service or repair service by anyone other than authorized Shindaiwa servicing
dealer during the warranty period.
• Certain parts and other items are not warranted, including but not limited to: lubricants, starter cords, and engine tune-ups.
• Use of spark plugs other than those meeting performance and durability requirements of the OEM spark plug listed in the Operator’s Manuals.
• Overheating or carbon scoring failures due to restricted, clogged exhaust port or combustion chamber, including damage to
spark arrester screen.
• Adjustments after the first (30) thirty days and beyond, such as carburetor adjustment and throttle cable adjustment.
• Damage to gears or gear cases caused by contaminated grease or oil, use of incorrect type or viscosity of lubricants, and/or
failure to comply with recommended grease or oil change intervals.
• Damage caused by pump or sprayer running dry, pumping or spraying caustic or flammable materials, or lack of or broken
strainers.
• Additional damage to parts or components due to continued use after operational problem or failure occurs. Should operational
problem or failure occur, the product should not be used, but delivered as is to an authorized Shindaiwa servicing dealer.
It is a dealer’s and/or customer’s responsibility to complete and return the warranty registration card supplied with your Shindaiwa
product or by visiting WWW.SHINDAIWA.COM. Your receipt of purchase including date, model and serial number must be maintained and presented to an authorized Shindaiwa servicing dealer for warranty service. Proof of purchase rests solely with the customer. Some states do not allow limitations on how long an implied warranty lasts, so the above limitations may not apply to you.
Some states do not allow the exclusion or limitation of incidental or consequential damages, so you may also have other specific
legal rights which vary from state to state. This limited warranty is given by ECHO Incorporated, 400 Oakwood Rd., Lake Zurich, IL
60047.
DISCLAIMER OF IMPLIED WARRANTIES
This limited warranty is in lieu of all other expressed or implied warranties, including any warranty of FITNESS FOR A PARTICULAR PURPOSE OR USE and any implied warranty of MERCHANTABILITY otherwise applicable to this product. ECHO, INC. and
its affiliated companies shall not be liable for any special incidental or consequential damage, including lost profits. There are no
warranties extended other than as provided herein. This limited warranty may be modified only by ECHO, INC.
X7561120400
01/13
11
Servicing Information
Parts/Serial Number
Genuine Shindaiwa Parts and Assemblies for your Shindaiwa products are available only from an Authorized Shindaiwa
Dealer. When you do need to buy parts always have the Model Number and Serial Number of the unit with you. You can
find these numbers on the engine. For future reference, write them in the space provided below.
Model No. _____________ SN. ______________
Service
Service of this product during the warranty period must be performed by an Authorized Shindaiwa Service Dealer. For
the name and address of the Authorized Shindaiwa Service Dealer nearest you, ask your retailer or call: 1-877-986-7783.
Dealer information is also available on WWW.SHINDAIWA.COM. When presenting your unit for Warranty service/repairs,
proof of purchase is required.
Consumer Product Support
If you require assistance or have questions concerning the application, operation or maintenance of this product you may
call the Shindaiwa Consumer Product Support Department at 1-877-986-7783 from 8:30 am to 4:30 pm (Central Standard
Time) Monday through Friday. Before calling, please know the model and serial number of your unit.
Warranty Registration
To ensure trouble free warranty coverage it is important that you register your Shindaiwa equipment by filling out the warranty registration card supplied with your unit. Registering your product confirms your warranty coverage and provides a
direct link if we find it necessary to contact you.
Additional or Replacement Manuals
Replacement Operator and Parts Catalogs are available from your Shindaiwa dealer or at WWW.SHINDAIWA.COM or by
contacting the Consumer Product Support Department (1-877-986-7783). Always check WWW.SHINDAIWA.COM for updated information.
ECHO Incorporated.
400 Oakwood Road
Lake Zurich, IL 60047-1564 U.S.A.
Telephone: 1-877-986-7783
Fax: 1-847-540-8416
www.shindaiwa.com
Copyright© 2014 By Echo, Incorporated
All Rights Reserved.
12
Yamabiko Corporation
7-2 Suehirocho 1-Chome, Ohme,
Tokyo, 198-8760, Japan
Phone: 81-428-32-6118
Fax: 81-428-32-6145
T21000001001/T21000999999