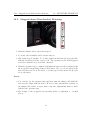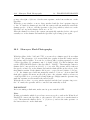
1
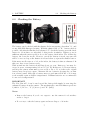
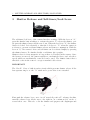
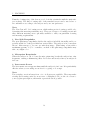
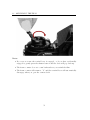
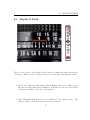
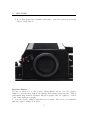
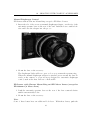
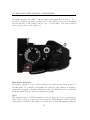
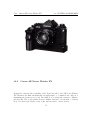
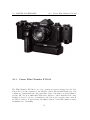
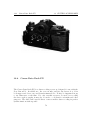
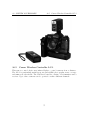
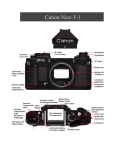
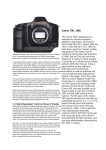
Canon New F1
Instructions Manual
Lars Heineken
23rd December 2002
1
CONTENTS
CONTENTS
Contents
1 Attaching the Lens
4
2 Battery
2.1 Loading the Battery . . . . . . . . . . . . . . . . . . . . . . . . . .
2.2 Checking the Battery . . . . . . . . . . . . . . . . . . . . . . . . . .
6
6
7
3 Shutter Release and Self-timer/Lock Lever
9
4 Holding the Camera
11
5 Focusing
12
6 Loading the Film
14
7 Setting the ASA/ISO Film Speed
15
8 Frame Counter
16
9 Exposure
18
10 Shutter
19
11 How to Choose a Shutter Speed
11.1 Freezing Motion . . . . . . . . . . . . . . . . . . . . . . . . . . . . .
11.2 Blurring the Subject’s Motion . . . . . . . . . . . . . . . . . . . . .
11.3 Panning . . . . . . . . . . . . . . . . . . . . . . . . . . . . . . . . .
21
21
22
22
12 Aperture
23
13 Exposure Modes
13.1 Full-aperture Metering . . . . . . . . . . . . . . . . . . . . . . . . .
13.2 Stopped-down Metering . . . . . . . . . . . . . . . . . . . . . . . .
25
25
26
14 Meter Mode Selector
27
15 Which viewfinder did you purchase?
28
16 Eye-Level Finder FN
16.1 Match-needle Metering . . . . . . . . . . . . . . . . . . . . . . . . .
16.2 Stopped-down (Fixed-index) Metering . . . . . . . . . . . . . . . .
29
29
32
17 AE Finder FN
33
2
CONTENTS
CONTENTS
18 Aperture-priority AE
18.1 Stopped-down AE . . . . . . . . . . . . . . . . . . . . . . . . . . . .
18.2 Match-needle Metering . . . . . . . . . . . . . . . . . . . . . . . . .
18.3 Stopped-down (Fixed-index) Metering . . . . . . . . . . . . . . . .
33
35
36
36
19 Shutter-priority AE
38
20 Meter Coupling Range
41
21 Metering Sensitivity Areas
42
22 Exposure Compensation
45
23 Rewinding the Film
50
24 Depth of Field
52
25 Self-timer
54
26 Multiple Exposures
57
27 Exposure in Multiple Exposures
60
28 Flash Photography
28.1 AE Flash Photography with Speedlites 011A, 133A, 155A,
177A, 188A, 199A, 533G and 577G. . . . . . . . . . . . . . .
28.2 Slow-sync Flash Photography . . . . . . . . . . . . . . . . .
28.3 General Flash Photography . . . . . . . . . . . . . . . . . .
61
166A,
. . . .
. . . .
. . . .
61
62
63
29 Shooting with Close-up Accessories
65
30 System Accessories
30.1 Canon AE Motor Drive FN . .
30.2 Canon AE Power Winder FN .
30.3 Canon Film Chamber FN-100 .
30.4 Canon Data Back FN . . . . . .
30.5 Canon Wireless Controller LC-1
71
71
72
73
74
75
31 Specification
.
.
.
.
.
.
.
.
.
.
.
.
.
.
.
.
.
.
.
.
.
.
.
.
.
.
.
.
.
.
.
.
.
.
.
.
.
.
.
.
.
.
.
.
.
.
.
.
.
.
.
.
.
.
.
.
.
.
.
.
.
.
.
.
.
.
.
.
.
.
.
.
.
.
.
.
.
.
.
.
.
.
.
.
.
.
.
.
.
.
.
.
.
.
.
.
.
.
.
.
76
3
1 ATTACHING THE LENS
1
Attaching the Lens
To remove the body cap, turn it counterclockwise until it stops and pull it off. To
reattach, align the red dot on the cap with the camera’s red dot. Then lightly push
the cap in and turn it fully clockwise.
Turn the rear lens cap in the direction of the arrow until it stops and pull it off. To
reattach, align the arrow on the cap with the lens’ red dot. Then lightly push the
cap in and turn it fully clockwise.
To mount the lens, align its red positioning point with the camera’s red dot and
turn the lens in the direction of the arrow until it stops and the lens release button
pops out. To remove the lens, turn it counterclockwise while pressing the lens release button.
CAUTION
Do not mount the lens if the red dot inside the camera mount and the red line
on the stop-down slide are showing. In this case, push in the stopdown slide so that
it locks in the normal (retracted) position and these warning marks can no longer
be seen.
4
1 ATTACHING THE LENS
The following lenses cannot be mounted on the New Canon F-1:
FL 19mm f/3.5
FL 58mm f/1.2
R
50mm f/1.8
R
58mm f/1.2
R
R
FLP
100mm
100mm
38mm
f/3.5
f/2
f/2.8
Notes:
• Do not push the stop-down slide while advancing the film. Otherwise, it may
be impossible to mount the lens.
• Do not press the lens release button while mounting the lens or it may not
pop out, thus causing the lens to work incorrectly.
5
2 BATTERY
2
2.1
Battery
Loading the Battery
The action grip of the camera also serves as a battery chamber cover and therefore
must be removed to load a battery. To do this, press the release button and lift up
the grip.
Use one of the batteries listed below or an equivalent of another brand:
Lithium 6V
Duracell PX 28L
Alkaline - manganese 6V Eveready (UCAR)
No. A544 IEC 4LR44
Silver Oxide 6V
Eveready (UCAR)
No. 544,
Durqceli PX 28,
IEC 4SR44
To ensure proper contact, wipe the battery terminals with a clean, dry cloth before
loading. Load a new battery so that its terminals are in the directions indicated by
the diagram inside the battery chamber. Insert the negative end first, then push
down and insert the positive end. The camera will not function if the battery is
loaded incorrectly.
Then slide the action grip’s tab into the guide hole as shown, and lower the grip
until it locks in place.
6
2 BATTERY
2.2
2.2 Checking the Battery
Checking the Battery
The battery can be checked with the shutter dial at any setting other than ”A”, and
at any ASA/ISO film speed setting. With the shutter dial on ”B,” battery check is
possible only after the film has been advanced. To check the battery, press the check
button for about three seconds while looking in the viewfinder. Battery power is
sufficient when the meter needle is above the battery check index. The weaker the
battery, the lower the needle. However, even if the battery is weak, exposure will
still be correct as long as the shutter is released when you press the shutter button.
If the meter needle rests at or below the index, the battery is almost exhausted. In
this case, have a new battery ready.
With normal use the battery should last about one year. Battery po’wer may decrease, however, at temperatures below 0◦ C (32◦ F). In this case, load a new battery
and keep the camera warm until you are ready to shoot. Do not throw the original
battery away; keep it as a spare. Alternate the two batteries, keeping the one that
is not in use warm. Although a battery may not perfomm well in the cold, it may
work normally again at higher temperatures. Lithium batteries are recommended
for use at low temperatures.
IMPORTANT
The New Canon F- 1 can be used even if the battery fails simply by removing the
exhausted battery from the camera. The mechanically controlled shutter speeds are
1/2000 to 1/125 sec., ”S” (1/90 sec.) and ”B” (bulb).
Notes:
• Remove the battery if you do not expect to use the camera for about three
weeks or longer.
• Do not try to take the battery apart and never dispose of it in fire.
7
2.2 Checking the Battery
2 BATTERY
Try to make a habit of checking the battery at the followingtimes:
• After loading a new battery.
• If the shutter won’t function with the selftimer/lock lever on ”A.”
• Before and after making many long exposures at slow speeds other than ”B.”
• When you are using the camera at low temperatures.
• Before shooting important events.
• When the camera is used frequently.
• After storing the camera for a long time.
• Before going on a trip.
The battery check button also serves to cancel the self-timer, meter reading, illumination of viewfinder information (”LIGHT” setting of meter mode selector), and
shutter operation during long exposures. The circuit is cancelled the moment you
press the button, and the second curtain will close when you remove your finger.
The shutter will not be released if you press the shutter button while pressing the
battery check button.
8
3 SHUTTER RELEASE AND SELF-TIMER/LOCK LEVER
3
Shutter Release and Self-timer/Lock Lever
The self-timer/lock lever of the camera has three settings. With the lever at ”A,”
press the shutter button halfway to activate the meter. To release the shutter, gently press the shutter button all the way down. When the level is at ”L,” the shutter
button is locked. It is advisable to turn the lock lever to ”L” when the camera is
not in use to prevent accidental shutter release and battery consumption. With the
lever at ”S,” the camera’s 10-second self-timer can be activated simply by pressing
the shutter button. For further details on self-timer photography.
Shutter release is electromagnetic as long as there is a battery in the camera. Once
the battery is removed, the camera switches to mechanical release, and only those
speeds which are mechanically controlled can be used. The shutter button has a
threaded socket in the center to accept a standard cable release.
IMPORTANT
The New F- 1 has a built-in safety circuit which prevents shutter release if the
lens aperture ring is on the ”A” mark and a power drive is not attached.
First push the advance lever out to its 30◦ stand-off position To advance the film,
turn the advance lever all the way to the right in one continuous 139◦ stroke or
several short ones. This also cocks the shutter and prepares the diaphragm and
9
3 SHUTTER RELEASE AND SELF-TIMER/LOCK LEVER
mirror for the next shutter release. The film must be advanced fully to the next
frame or the shutter will not release.
10
4 HOLDING THE CAMERA
4
Holding the Camera
The best way to prevent image blur from camera movement is to hold the camera
as steady as possible, with your left hand supporting the camera and lens. Lightly
rest your right index finger on the shutter button, and the tip of your thumb on the
film advance lever or on the body. Wrap your other right fingers around the action
grip. Then press your left elbow to your body and lightly press the camera against
your cheek or forehead. For a vertical shot, steady at least one elbow against your
body. Spread your feet slightly apart. one foot ahead of the other, and relax. Lean
against a steady support if one is available.
There is, of course, no one correct way to hold the camera.
Experiment to find the most suitable way for you. Select a method that provides
comfort in addition to stability. It may help to practice in front of a mirror.
When shooting at a shutter speed of 1/30 sec. Or slower or with a telephoto lens,
it is advisable to mount the camera on a tripod. If the tripod screw is especially
long, be careful not to screw it in beyond the limit of the camera’s tripod socket.
11
5 FOCUSING
5
Focusing
1. Laser-matte screen
2. Microprism rangefinder
3. New split rangefinder
4. Overexposure warning mark
5. Meter Needle
6. Stopped-down metering/battery check index
7. Aperture needle
8. Underexposure warning mark twhen using f/1.4 lens)
9. Shutter speed display
out of focus
in focus
12
5 FOCUSING
Turn the focusing ring of the lens as you look in the viewfinder until the main subject is sharp. The three focusing aids of the standard screen can be used alone or
in combination according to the subject and your own preference.
Note:
The New Canon F- 1’s focusing screen, which makes precise focusing possible, also
determines the metering sensitivity area. There are 13 types of focusing screens and
three different metering areas optionally available to suit your particular focusing
and metering requirements.
1. New Split Rangefinder
The new split-image rangefinder divides the subject in half horizontally and is especially useful for a subject which has vertical lines. The subject is in focus when
the two halves merge to become one unbroken image. When using a lens with a
maximum aperture of f/5.6 or smaller, one-half of the split-image rangefinder may
take on,a slight color.
2. Microprism Rangefinder
When the subject is out of focus, the microprism ring breaks the subject into tiny
fragments, causing a shimmering effect. It is clear and steady when your subject is
in focus.
3. Laser-matte Screen
The laser-matte screen appears fuzzy until the subject is -in focus. It is particularly
effective when you are using accessories for copying or close-ups.
Note:
Ten eyesight correction lenses from +3 to -4 diopters are available. They may make
viewing and focusing easier if you are near- or farsighted. Choose the one closest to
your eyeglass prescription, then make a practical test if possible.
13
6 LOADING THE FILM
6
Loading the Film
Pressing the safety stopper, pull up the rewind knob until the camera back pops
open. Be sure to shield the film from direct sunlight while loading. Place the cartridge in the film chamber as shown. Then push down the rewind knob, turning it
until it drops into its normal position.
Note:
Remove the plastic insert from the pressure plate before loading the first film cartridge.
Pull the film leader across the camera and insert the tip into any slot of the take-up
spool.
Advance the film once. Make sure the sprocket teeth engage the film perforations.
The film should be taut. If there is any slack, unfold the rewind crank and gently
turn it in the direction of the arrow until it stops. Note that the rewind crank must
be unfolded before you turn it; otherwise, the knob will turn freely. Then fold the
rewind crank back in. Close the camera back.
Take several blank shots, releasing the shutter and advancing the film until the
frame counter reaches ”1.” While doing this, keep an eye on the rewind knob. If it
rotates in ,the direction of the arrow, the film is loaded correctly.
CAUTION
NEVER remove the camera’s rewind coupler cover from the baseplate when film
is loaded in the camera. This will expose the film to light. It is not necessary to
remove the coupler cover except for attaching the AE Motor Drive FN.
14
7 SETTING THE ASA/ISO FILM SPEED
7
Setting the ASA/ISO Film Speed
Turn the setting dial, while pressing the lock release button, until the desired film
speed aligns with the index. The dial cannot be turned lower than ASA6 or higher
than ASA6400. The table on the next page shows the ASA/ISO film speeds which
can be set on the New Canon F-1. Figures in parentheses are intermediate speeds
which are indicated by dots on the ASA/ISO dial.
ASA/ISOis a numerical rating of the film’s sensitivity to light. The higher the number, the faster the film and the more sensitive it is to a given amount of light as
compared to a film with a lower number. The film manufacturer’s ASA/ISO rating
can be found on the film cartridge, the carton, and the data sheet.
15
8 FRAME COUNTER
8
Frame Counter
Each time you advance the film, the frame counter also advances to the next number. It can count up to 39 frames. The numbers 1, 12, 20, 24 and 36 are in orange,
the latter four to call your attention to the fact that rolls with those numbers are
or are almost finished. The frame counter automatically returns to ”S” when you
open the camera back. During multiple exposures, the frame counter advances each
time you wind the advance lever.
The New Canon F-1 will also accept bulk film loaded into standard cartridges. In
this case. be sure to trim the leader as shown before loading it into the camera.
Memo Holder
The camera back has a memo holder. It conveniently holds the end of the film box
as a reminder of the type of film in use and the rnumber of exposures.
16
8 FRAME COUNTER
17
9 EXPOSURE
9
Exposure
The amount of light that exposes a frame is determined by the aperture and shutter
speed. The size of the aperture controls the amount of light allowed to reach the
film, while the shutter speed controls how long the light strikes the film. For the
same exposure, a change in shutter speed requires an equal and opposite change
in aperture, and vice versa. There are usually several combinations of shutter
speed and aperture which will give the same exposure. If. for example, the meter
indicates that exposure will be correct at f/4 and 1/60 sec., you usually have other
combinations to choose from. Some of the combinations in this example include
f/5.6 at 1/30 sec. and f/2.8 at 1/125 sec. The two main considerations involved in
selecting one particular combination over the others are the subject’s motion and
depth of field; each of these affects the way a picture will look. You can control
the effect of a picture simply by choosing a certain shutter speed and aperture
combination. The next three sections provide information which you may find
useful whether you are using the camera manually or automatically with an AE
accessory.
18
10 SHUTTER
10
Shutter
The New Canon F- 1 ’s hybrid shutter is electronically as well as mechanically controlled. Shutter speeds from 1/2000 to 1/125 sec., ” f ” 1/90 sec.) and ”B” (bulb)
are mechanically governed, while 1/60 to 8 sees. are electronically controlled. With
the AE Finder FN attached and the shutter dial on ”A,” shutter speeds from 1/1000
to 8 sees. are electronically controlled.
The shutter dial of the camera has settings from 2000 to 8, ”A,” ” f ,” and ”B.” The
slow shutter speeds from 2 to 8 seconds are in yellow, while shutter speeds from 1
to 1/2000 sec. are in white. The white numbers are reciprocals of the true shutter
speeds; ”125,” for example, indicates a speed of 1/125 sec. Intermediate settings on
the dial cannot be used, and the dial cannot be turned between ”B” and ”A.”
The red ”A” is for shooting in the aperture priority and stopped-down AE modes
with the Canon AE Finder FN attached. For this setting, pull up the outer ring
and turn the dial until ”A” is aligned with the index on the finder. A scale with
shutter speeds from 8 to 1/1000 sec. will now be displayed below the field of view
as long as the AE Finder FN is attached.
The ” t ” setting is for synchronized flash photography at an X sync. speed of 1/90
sec. It is not necessary to set the shutter dial to ” t ” when using a dedicated Canon
Speedlite; once the Speedlite’s pilot lamp glows, the camera automatically switches
to 1/90 sec. provided the shutter dial is not on ”B.”
When the shutter dial is set to ”B,” the shutter will remain open as long as you
press the shutter button. The camera’s meter will not give a reading on ”B,” thus
AE photography and match-needle metering are impossible. You will have to experiment or use a separate exposure meter to find the best exposure. It is advisable
to use a tripod and locking cable release for long exposures.
Since ”B” is mechanically controlled, the battery will not be drained on this setting
19
10 SHUTTER
regardless of the exposure duration.
To cancel shutter operation during a long exposure, press the battery check button.
Mechanical Operation
There are several shutter speeds available with the New Canon F-1 even if the battery fails. In this case, remove the battery from the battery chamber. Shutter speeds
from 1/2000 to 1/125 sec. , ”S” (1/90 sec.) and ”B,” which are all mechanically
controlled, can be used. If the shutter dial is set to any speed between 1/60 and 8
secs., the camera switches automatically to 1/90 sec. when you press the shutter
button.
IMPORTANT
The camera will not operate if you leave the exhausted baterry in the battery chamber.
20
11 HOW TO CHOOSE A SHUTTER SPEED
11
How to Choose a Shutter Speed
The shutter controls exposure by the length of time it remains open. The basic
function of shutter speed is to provide correct exposure, but you can also use it to
control the expression of your subject’s motion and to control the effect of camera
movement.
11.1
Freezing Motion
The faster the subject is moving, the higher the shutter speed required to stop the
action. To freeze the motion of a pedestrian, for example, choose a speed of at least
1/60 sec.; for a moving car, as fast as 1/1000 sec. The motion of the motorcycle in
this photo was frozen at 1/2000 sec.
21
11.2 Blurring the Subject’s Motion
11 HOW TO CHOOSE A SHUTTER SPEED
11.2
Blurring the Subject’s Motion
Blurring part of the picture can give a convincing sense of action. To blur the subject, simply set a shutter speed which is too slow to freeze its action. In this photo
it was blurred at 1/15 sec.
11.3
Panning
You can blur the background while keeping the subject relatively sharp by ”panning.” Choose a shutter speed suitable for the subject’s motion and release the
shutter as you follow the movement, turning the upper part of your body.
22
12 APERTURE
Blurring part of the picture can heighten the sense of action. In most cases, however, image blur is undesirable. To avoid blurred pictures from camera movement,
choose a shutter speed of at least 1/60 sec. for handheld shooting with a standard
lens.
With a telephoto lens, it is advisable to use faster shutter speeds. The rule of thumb
is to use a shutter speed no slower than the reciprocal of the lens in use. This means
that for a 100mm lens, the shutter speed should be at least 1/125 sec.; for a 500mm
lens, it should be at least 1/500 sec.
12
Aperture
The size of the aperture determines the amount of light allowed to reach the film.
The apertures are indicated by a series of numbers, called f/stops or f-numbers,
iV‘hich can be found on the aperture ring. The smaller numbers are called large
f/stops while the larger numbers are called small f/stops. This is because the smaller
numbers represent larger apertures which allow more light to pass through the lens.
The largest f/stop on the lens is called the lens maximum aperture; the smallest
f/stop the lens minimum aperture. The maximum and minimum apertures differ
depending on the lens.
Each time you turn the aperture ring from one f/stop to the next smaller one,
the amount of light allowed through is exactly halved. Using f/2 as a standard, the
amount of light striking the film will change according to the f/stop indicated below.
How the Aperture Affects the Picture
In addition to controlling the quantity of light, the aperture influences depth of field
which, in turn, affects the way a picture will look. When your subject is in focus,
there is a certain area in front of and behind it which will also be in focus. This
range of sharpness is called depth of field.
f/stop
(1.2)
1.4
(1.8) 2 2.8
4
5.6
8
11
Brightness ratio
3
2
1-1/4 1 1/2 1/4 1/8 1/16 1/32
f/stop
16
22
32
Brightness ratio 1/64 1/128 1/256
23
12 APERTURE
The smaller the aperture, the wider the range of sharpness. This is illustrated by
the picture above which was taken at f/22. Compare it with the photo to s right.
This extended depth of field is especially good for such subjects as landscapes.
The larger the aperture, the narrower the range of sharpness. An aperture of f/1.4,
for instance, can isolate your subject from its surroundings. This is often used to
blur a disturbing background in portraiture.
Depth of field is also greater the shorter the focal length of the lens. A 24mm lens,
for example, will show greater depth of field than a 50mm lens, provided the aperture and shooting distance are the same. Depth of field is also greater the longer the
shooting distance, and is generally greater in the background than in the foreground
by a ratio of two to one.
24
13 EXPOSURE MODES
13
Exposure Modes
The New Canon F-1 is basically a manual-exposure camera capable of through-theiens, full-aperture metering and stopped-down metering with the Eye-Level Finder
FN. It can be converted to automatic exposure (AE) simply by attaching the suitable AE accessory, such as the AE Finder FN for aperture-priority AE, or the AE
Power Winder FN or AE Motor Drive FN for shutter-priority AE. Manual exposure
is still possible with one or both of these accessories attached.
The following exposure modes are possible with the New Canon F-1:
• Match-needle Metering
• Shutter-priority AE
• Aperture-priority AE
• Stopped-down (Fixed-index) Metering
• Stopped-down AE
Detailed information of these modes is provided in the sections entitled ”Eye-Level
Finder FN,” ”AE Finder FN,” and ”Shutter-priority AE.”
13.1
Full-aperture Metering
With a Canon FD lens, metering is done with the lens at maximum aperture. This
is called ”full-aperture metering.” The lens diaphragm does not close down until the
shutter is released. Afterwards, it reopens automatically to the maximum aperture.
One of the primary advantages of full-aperture metering is that you are able to view
and meter the subject with the viewfinder at its brightest.
1. Match-needle Metering
Set the desired shutter speed and turn the lens’ aperture ring until the meter needle
bisects the aperture ring. The position of the meter needle is determined by the
film speed, shutter speed and the lighting conditions. This manual mode is suitable
for virtually all subjects.
2. Shutter-priority AE
Set the desired shutter speed and the camera automatically selects the proper aperture according to lighting conditions. This AE mode is suitable for most subjects
but especially useful in action photography.
25
13.2 Stopped-down Metering
13 EXPOSURE MODES
[For this mode. the AE Power Winder FN or AE Motor Drive FN must be attached
to the camera and the lens set to the ”A” mark.]
3. Aperture-priority AE
Set the lens to the desired aperture and the camera automatically selects the proper
shutter speed according to the lighting conditions. This AE mode is useful for
portraiture and still photography such as landscapes where depth of field is of importance.
[For this mode, the AE Finder FN must be attached to the camera and the shutter
dial set to ”A”]
13.2
Stopped-down Metering
Stopped-down metering is necessary whenever you are using a non-FD lens, such as
the Reflex 500mm, which has a fixed aperture, the TS 35mm lens or any of the older
FL lenses. It is also necessary whenever you insert accessories which do not have
a full-aperture signal pin, such as bellows or extension tubes, between the camera
body and lens. Stoppeddown metering is possible, though unnecessary, with an FD
lens. For correct exposure, set an aperture smaller than f/2.8.
For stopped-down metering, the lens diaphragm must be closed down (stopped
down) to the working aperture. Since the diaphragm will open and close as you
turn the lens’aperture ring, depth of field can be easily checked.
1. Stopped-down (Fixed-index) Metering
Set an aperture and unlock the stop-down slide by pushing it in and then releasing
it. Turn the shutter dial (or aperturering) until.the meter needle is in line with the
stopped-down metering index.
2. Stopped-down AE
Set an aperture and unlock the stop-down slide by pushing it in and then releasing
it. The camera will automatically select the proper shutter speed for the lighting
conditions.
This AE mode is especially advantageous in such fields as photomacrography and
photomicrography.
[For this mode, the AE Finder FN must be attached to the camera and the shutter
dial on ”A.”]
26
14 METER MODE SELECTOR
14
Meter Mode Selector
There are three ways to turn on the meter, each designed to suit particular metering
requirements. To set a meter mode, simply turn the mode selector so that its index
aligns with the desired setting.
NORMAL
The meter turns on only while the shutter button is pressed halfway (except for ”B”
and ” S ” settings on the shutter dial). This mode is suited for AE photography.
HOLD
The meter turns on the moment you press the shutter button halfway and stays on
for 16 seconds even if you remove your finger from the shutter b’utton. It automatically turns off after the specified time, thus conserving battery power. This mode is
particularly suited for manual exposure and any situation in which you need more
time to meter.
LIGHT
As on ”HOLD,” the meter, once activated, stays on for 16 seconds even if you remove your finger from the shutter button. In addition, the aperture scale in the
viewfinder is illuminated for the same period of time. This mode allows you to
meter in low-light situations.
In the ”HOLD” and ”LIGHT” modes, you can cancel the meter reading any time
within the 16 seconds simply by pressing the battery check button. Each mode-ids
also cancelled when the shutter is released. If you have turned on the meter on the
”LIGHT” setting and wish to cancel only the illumination, turn the mode selector
to ”HOLD” or ”NORMAL.” The meter will continue to read, automatically turning
off after 16 seconds.
Note:
With the AE Finder FN attached and the shutter dial set to ”A,” a different
scale than that used for match-needle metering displays exposure information for
aperture-priority and stopped-down AK. Consequently, there is no display illumination in the ”LIGHT” mode when the shutter dial is on ”A.”
27
15 WHICH VIEWFINDER DID YOU PURCHASE?
15
Which viewfinder did you purchase?
Eye-Level Finder FN
AE Finder FN
28
16 EYE-LEVEL FINDER FN
16
Eye-Level Finder FN
With the Eye-Level Finder FN, an aperture scale and the pre-set shutter speed
are displayed to the right of the field of view. Focusing Screen FN-PE, which
offers selective-area metering, is supplied with the New Canon F-1 Eye-Level Finder
combination.
16.1
Match-needle Metering
1. Turn the shutter dial to the desired speed.
2. Look into the viewfinder and focus the subject.
29
16.1 Match-needle Metering
16 EYE-LEVEL FINDER FN
3. Place your subject so that it fills the rectangular area in the center of the
viewfinder. This shaded portion is the light measuring area of the camera’s
silicon photocell and is 12% of the field of view.
4. Turn the meter mode selector to the desired mode. Then lightly press the
shutter button halfway to turn on the meter.
The meter needle should be outside of the exposure warning zones. If it is
in either zone, turn the shutter dial until the meter needle moves out of the
zone.
5. For correct exposure, turn the lens’ aperture ring until the center of the aperture needle aligns with the meter needle. The diameter of the circle is equivalent to one f/stop, and exposure adjustment is possible in one-half f/stop
increments simply by turning the lens’ aperture ring.
one f/stop
one half f/stop
Notes:
• The aperture needle moves only between the minimum and maximum apertures of the lens in use.
• The meter does not operate with the shutter dial on ”B” or ”S”.r
30
16 EYE-LEVEL FINDER FN
16.1 Match-needle Metering
Overexpsoure warning zone
Underexposure warning zone
Underexposure Warning
The position of the red underexposure warning mark is determined by the lens’
maximum aperture. If the meter needle points to the underexposure mark, choose
a slower shutter speed until the needle moves away from the mark.
Overexposure Warning
The red marks next to 32, 22 and 16 in the aperture scale are overexposure warning
zones. If the meter needle points to one of these zones, check the lens’ minimum
aperture. If, for example, the meter needle points to the red zone between f/16 and
f/22 and the minimum aperture is f/16, turn the shutter dial to a faster speed until
the meter needle points to an aperture of f/16 or larger.
31
16.2 Stopped-down (Fixed-index) Metering
16.2
16 EYE-LEVEL FINDER FN
Stopped-down (Fixed-index) Metering
1. Turn the shutter dial to the desired speed.
2. Look into the viewfinder and focus the subject.
3. Unlock the stop-down slide. To do this, push it in and then release it; the slide
will unlock and its red line can be seen. The aperture needle will disappear
from view with the stop-down slide extended.
4. Turn the aperture ring (or shutter dial) until the meter needle is aligned with
the stopped-down metering/battery check index. Choose a slower speed if the
meter needle rests below the index, or a.faster speed if the meter needle rests
above the index.
Notes:
• You can also set the aperture first and then turn the shutter dial until the
meter needle aligns with the index. However, since intermediate settings on
the shutter dial cannot be used, minor exposure adjustments must be made
wih the lens’ aperture ring.
• The height of the stopped-down metering index is equivalent to one-half
f/stop.
32
18 APERTURE-PRIORITY AE
17
AE Finder FN
The primary role of the AE Finder FN is to convert the camera to aperture-priority
AE or stopped-down AK. For these two modes, a shutter speed scale and, with a
New FD lens mounted, the pre-set aperture are displayed below the field of view.
Manual exposure is also possible with the finder. In manual, the aperture scale
and shutter speed are displayed to the right of the field of view. Thus AE and
manual modes are clearly differentiated and you know immediately in which mode
the camera is set simply by the location of the exposure information.
Focusing Screen FN-AE, which provides center-weighted average metering, is supplied when the New Canon F-1 is purchased initially with an AE Finder FN.
18
Aperture-priority AE
1. After attaching the AE Finder FN, set the shutter dial to ”A.” To do this,
pull up the outer ring and turn the dial until ”A” is aligned with the index
on the finder. The shutter dial cannot be turned between the ”A” and ”B”
settings.
2. Turn the lens’ aperture ring to the desired aperture.
3. Look into the viewfinder and focus the subject.
4. Turn the meter mode selector to ”A”. Then press the shutter button halfway
to turn on the meter. Exposure will be correct as long as the meter needle is
not pointing to either of the exposure warning zones. If the meter needle is
in either zone, turn the aperture ring until it moves out of the zone.
5. To release the shutter, press the shutter button all the way down.
There is a possibility of camera movement if the meter needle indicates a shutter
speed of 1/30 sec. or slower. In this case, choose a larger aperture until the shutter
speed indicated is 1/60 sec. or faster. If you have set the maximum aperture and
the shutter speed is still slower than 1/60 sec., attach the camera to a tripod, use
a flash or add artificial light.
On the other hand, if the meter needle indicates over exposure even after you have
set the m n mum aperture, attach a neutral density (ND) filter to the lens. This
will reduce the amount of light to the film.
Notes
If the shutter dial is set to ”A” before the finder is attached, exposure information
33
18 APERTURE-PRIORITY AE
will not be displayed. In this case, first turn the shutter dial to ”2000,” then back
to ”A.”
Notes:
• Exposure information will not be displayed with a different finder attached
and the shutter dial set on ”A.”
• With a New FD lens ”without chrome mount ring), the aperture is displayed
adjacent to the shutter speed scale in the viewfinder. It is impossible, however,
to read the aperture when using an FD lens with a chrome mount ring or when
using an extender, extension tubes or other close-up accessories between the
camera body and lens.
34
18 APERTURE-PRIORITY AE
18.1 Stopped-down AE
• If your eye will not be to the eyepiece the moment you release the shutter,
close the eyepiece shutter by pushing the lever clockwise. This will prevent
stray light from entering and adversely affecting the exposure.
18.1
Stopped-down AE
1. Following the procedure on p. 40, set the shutter dial to ”A.”
2. Look into the viewfinder and focus the subject.
3. Turn the lens’ aperture ring to the desired aperture.
4. Unlock the stop-down slide. To do this, push it in and then release it; the
slide will unlock and its red line can be seen.
5. The shutter speed is automatically selected according to the aperture set on
the aperture ring.
If the meter needle is in either exposure warning zone, turn the aperture ring
until the needle moves out of the zone.
Overexposure, underexpd ture and camera shake warnings are the same as for aperture priority AE.
35
18.2 Match-needle Metering
18 APERTURE-PRIORITY AE
incorrect exposure
18.2
correct exposure
Match-needle Metering
To meter the subject manually, simply disengage the shutter dial from ”A.” The
shutter speed scale will disappear, and the aperture scale and shutter speed display
will appear to the right of the field of view. Then set the shutter speed and aperture
in the usual manner, matching the meter and aperture needles in the viewfinder.
18.3
Stopped-down (Fixed-index) Metering
Although stopped-down AE is a much simpler and faster method of metering, you
can still use fixed-index stopped-down metering.
36
18 APERTURE-PRIORITY AE
18.3 Stopped-down (Fixed-index) Metering
Note Use of the following accessories is limited when the AE Finder FN is attached:
• Early TS 35mm f/2.8 lenses: The fens’ shift knob will touch the finder as you
rotate the lens, preventing full rotation.
• Early Auto Bellows: The finder will touch the bellows’ rear standard as you
rotate the camera, making vertical shots impossible.
For details concerning modification of either accessory, please contact the nearest
Canon authorized service facility.
37
19 SHUTTER-PRIORITY AE
19
Shutter-priority AE
When the AE Power Winder FN or AE Motor Drive FN is attached to the New
Canon F-1, a choice of shutter-priority AE or manual exposure is available according
to the shooting situation and your personal preference.
For shutter-priority AE, simply turn the lens’ aperture ring to the ”A” mark and
turn the shutter dial to the desired speed. The aperture scale and the shutter
spee ‘which you have selected are displayed, as in match-needle metering, to the
right of the field of view. The aperture needle, however, disappears from view.
When you press the shutter button halfway, the meter needle will point to the aperture which the camera has selected automatically. If the meter needle points to
either the over- or underexposure warning mark, simply turn the shutter dial until
the needle moves away from the mark.
With both the AE Finder FN and the power winder or motor drive attached, any of
38
19 SHUTTER-PRIORITY AE
the various exposure modes can be used. For aperture-priority AK, first disengage
the lens’ aperture ring from the ”A” mark. Then set thg shutter dial to ”A,” and
manually select an aperture. The camera will select the shutter speed automatically.
For manual exposure, make sure that both the lens’ aperture ring and the shutter
dial are disengaged from the ”A” setting. Then set the shutter speed and aperture
manually, aligning the two needles in the viewfinder in the usual way.
For further details, see the power drive’s instructions.
Note
In general, center-weighted average metering is recommended for AE photography.
Please see p. 48 for further details.
Socket Covers
There are three socket covers in the baseplate of the camera. All three must be
removed to attach the motor drive; for the power winder, only two (2) and (3) must
be removed. Do not remove them unless you intend to attach one of these AE power
drives. Above all, NEVER remove the rewind coupler cover (1) when film is loaded
in the camera or the film will be exposed to light.
CAUTION
• Do not set both the shutter dial and the lens’ aperture ring to the ”A” settings.Otherwise, the lens will stop down to the smallest aperture and the
camera will operate in aperture-priority AE. Depending on the lighting conditions, this may result in undesirably slow shutter speeds.
39
19 SHUTTER-PRIORITY AE
• After removing the power winder or motor drive, do not forget to remove the
lens’ aperture ring from the ”A” mark or the shutter will not release when
you press the shutter button.
• Before attaching the finder or motor drive, wipe the contacts with a clean,
dry cloth to prevent poor contact from dirt.
40
20 METER COUPLING RANGE
20
Meter Coupling Range
With an FD 50mm f/1.4 lens and ISO 100/21◦ (ASA 100/21 DIN) film, the New
Canon F-1’s built-in exposure meter couples within a range of EV.- 1 (4 sec. at
f/1.4) to EV 20 (1/2000 sec. at f/22). In aperture-priority AE or stoppeddown AE,
the coupling range is EV-1 to EV 19 (1/1000 sec. at f/22).
EV (Exposure Value) is a numerical value of exposure which is based on proper
combinations of shutter speed and aperture. The camera’s EV coupling range varies
with lens speed and ISO film sensitivity.
41
21 METERING SENSITIVITY AREAS
21
Metering Sensitivity Areas
With the New Canon F-1, a special optical element in each focusing screen determines the metering sensitivity area. Thus the metering area can be changed,
according to the sub ect you are shooting and the lens in use, simply by replacing
the focusing screen.
There are three different light measuring areau available, each designed to suit particular metering requirements.
1. Center-weighted Average Metering
With this system, the meter reads the entire viewing area with special emphasis on
the central portion where the subject is most likely to be. It can be used for general
photography, and is recommended especially for AE photography.
2. Selective-area Metering
The selective-area system, with its 12% coverage, allows you to meter a certain
portion of a scene. It, too, is suited for all-around use, and is particularly effective
for metering highcontrast scenes, such as landscapes with a bright sky and backlit
subjects. Manual exposure is recommended for optimum results. This system can
be used for AE photography, but special attention must be paid to ensure that the
subject is within the 12% metering area.
42
21 METERING SENSITIVITY AREAS
3. Spot Metering
Spot metering is ideal for subjects which require carefully-aimed, precise measurement. Since the metering area is 3% of the field of view, you can select a small,
exact area from the overall scene. It is especially advantageous for metering inaccessible subjects and when shooting with a telephoto lens. Also very effective for
stage and close-up photography. This system is not suitable for AE photography;
for best results, use manual exposure metering.
Since the optical element is located in close proximity to the focal plane, this new
system of metering sensitivity distribution ensures extremely accurate results. The
actual measuring area, which is slightly shaded, can be seen in the center of the
viewfinder with selective-area and spot metering. It is not visible, however, with
center-weighted average metering.
43
21 METERING SENSITIVITY AREAS
44
22 EXPOSURE COMPENSATION
22
Exposure Compensation
With center-weighted average metering, the camera’s meter reads the average brightness of the subjects in a scene, with special emphasis placed on those in the center.
Certa n lighting conditions, however, may necessitate exposure correction. If there
is bright light, such as the sun or a window, behind the subject, the meter may be
influenced by that light and your subject will be underexposed. On the other hand,
if you are shooting an actor on a dimly-lit stage, the meter may be ”fooled” and
your subject will be overexposed. Thus it is preferable, whenever possible, to meter
the part of the scene which requires the most accurate exposure. This is particularly
true if the scene has strong contrasts in brightness.
Selective-area metering is less influenced by the surrounding lighting conditions
provided the main subject covers most of the 12% metering area. However, if the
subject is quite small, some exposure compensation may still be necessary.
Since spot metering allows you to select a small, exact area, it is virtually unaffected
provided the subject fills the 3% center spot.
Exposure compensation may also be necessary if you wish to intentionally overexpose or underexpose the shot for creative effect.
You can compensate exposure in any one of the following ways:
• Manual Exposure
• Exposure Compensation Dial
• Adjust the ISO Setting
45
22 EXPOSURE COMPENSATION
1. Manual Exposure
After setting the desired shutter speed, turn the aperture ring until the aperture
needle aligns with the meter needle. You can now over- or underexpose the subject in
one-half f/stop increments simply by turning the aperture ring to a larger or smaller
aperture. Note that the diameter of the aperture needle’s circle is equivalent to one
f/stop. This method of exposure correction is useful, for example, when shooting a
subject with strong backlight.
46
22 EXPOSURE COMPENSATION
2. Exposure Compensation Dial
The exposure compensation dial allows you to make exposure corrections in increments as small as 1/3 f/stop. To ma1te a correction, simply turn the dial, while
pressing the lock release button, until the desired correction aligns with the index.
47
22 EXPOSURE COMPENSATION
The whole numbers are for increasing exposure while the fractions are for reducing
exposure. The numbers ”2” and ”1/2” are equivalent to one f/stop (or one step of
the shutter dial), while ”4” and ”1/4” are equivalent to two f/stops (or two steps of
the shutter dial). The intermediate settings indicate increments of 1/3 f/stop. The
table above shows which settings can be used depending on the ISO film speed.
This means of exposure compensation is possible regardless of the exposure mode,
and is useful for bracketing. It is particularly advantageous for AE photography
since it allows you to adjust the exposure quickly.
IMPORTANT Once you have made an exposure correction, dc. not forget to
reset the dial to ”1.” Otherwise, all following frames will be incorrectly exposed.
3. Adjusting the ISO Rating
You can also correct exposure in manual or AE by changing the film speed setting
on the camera.
A film with an ISO rating twice that of another film requires only half the amount
of light for correct exposure. Thus if you have an ISO 100 film loaded and you wish
to underexpose the subject one f/stop, simply change the ISO setting to ISO 200.
It is possible to over- or underexpose the subject by up to two f/stops using any of
these three methods. For compensating more than two f/stops, make the adjustment by changing the ISO rating or by manually setting the aperture and shutter
speed.
48
22 EXPOSURE COMPENSATION
Note
When it is difficult to determine exactly how much correction to make, bracket the
exposure. using any of the three methods.
4. ”Pushing” the ISO Rating
There may be occasions when, due to insufficient lighting, you are forced to use
undesirably slow shutter speeds. In this case, you can ”push” the ISO setting on
the camera to a higher value. Usually this is done by multiplying the normal ISO
film speed by a multiple of two, such as two or four. The entire roll of film must
be shot at the ”pushed” ISO setting; otherwise, exposure will not be correct for all
frames. It is also necessary to inform the developing lab of the change in the ISO
rating or the film will be incorrectly developed. Hbwever, since not all films can be
”pushed” with acceptable results, it is recommended to read the film data sheet or
other photographic literature before you try this technique.
49
23 REWINDING THE FILM
23
Rewinding the Film
When you have reached the end of the film, the film advance lever will stop before
the end of its stroke.
1. Turn the rewind lever in the direction of the arrow and push it down until it
locks.
2. Unfold the rewind crank and turn it in the direction of the arrow. You will
hear a sound as you turn the rewind crank which indicates the film is being
rewoun t When you no longer hear the sound, the film is completely rewound.
3. Pressing the safety stopper, open the camera back by pulling up the rewind
knob and take out the film. Be sure to shield the film from direct sunlight
while unloading.
50
23 REWINDING THE FILM
Notes
• If you are not sure the rewind lever is engaged, or if you have accidentally
engaged it, gently press the shutter button and the lever will pop back up.
• The frame counter does not count backwards as you rewind the film.
• The frame counter will return to ”S” and the rerwind lever will automatically
disengage when you open the camera back.
51
24 DEPTH OF FIELD
24
Depth of Field
There are two ways to check depth of field. One is by using the depth-of-field scale
on the lens. This is a scale of f/stops repeated on each side of the distance index.
1. First focus. Then press the shutter button halfway and note to which f/stop
the meter needle points in the viewfinder. Find the two f/stops on the depthof-field scale which correspond to that number.
2. Draw imaginary lines from those two numbers to the distance scale. The
effective depth of field lies between those two distances.
52
24 DEPTH OF FIELD
You can check depth of field visually in the following way:
• Focus the subject. Then press the shutter button halfway and note to hich
f/stop the meter needle points in the viewfinder.
• Turn the lens’ aperture ring to that f/stop.
• Push in and then release the stop-down slide so that it unlocks and you can
see its red line. Now, just by looking at your subject through the viewfinder,
you can see the range of sharp focus.
• After checking depth of field, push in and then release the stop-down slide.
Note
It is impossible to release the stop-down slide when the lens’ aperture ring is on
”A.” If you are using the camera in shutter-priority AK, first disengage the lens
from ”A” and set the working aperture. After checking depth of field, return the
aperture ring to the ”A” mark.
53
25 SELF-TIMER
25
Self-timer
• First make sure the film is advanced to the next frame.
• Turn the self-timer/lock lever to ”S.”
• Focus the subject and take a meter reading. Do not set the shutter dial to
”B” because the self-timer will not function on this setting.
• Press the shutter button. A ”beep-beep” sound will be emitted. The shutter
will be released automatically ten seconds later. At two seconds before shutter
release, the camera will begin to beep at a faster rate.
• Following exposure, turn the lever back to ”A” or ”L” unless you want to use
the selftimer for the next shot.
Notes
• In shutter-priority AE. the camera is designed to reflect any last-second changes
in lighting and will not set the exposure until an instant before the shutter
itself is released.
• In aperture-priority AE, the camera sets the shutter speed the moment you
press the shutter button. Therefore, do not stand in front of the lens while
you press the shutter button or exposure may be incorrect.
54
25 SELF-TIMER
• If you have started the self-timer and wish to cancel its operation, press the
battery check button.
Eyepiece Shutter
If your eye will not be to the eyepiece during shutter release, close the eyepiece
shutter to prevent stray light from entering and causing underexposure. This is
particularly important in self-timer AE photography, and also applies to remote
control and night photography.
To close the eyepiece shutter, push the lever clockwise. The red dot is a reminder
that the eyepiece shutter is in place.
55
25 SELF-TIMER
56
26 MULTIPLE EXPOSURES
26
Multiple Exposures
The New F-1’s provision for multiple exposures allows you to easily make two or
more exposures on the same frame for creative effect.
57
26 MULTIPLE EXPOSURES
1. First advance the film to the next frame.
2. Then take up any film slack. To do this, unfold the rewind crank and gently
turn it in the direction of the arrow until it stops.
3. Focus, compose your subject and take the picture.
4. Turn and press down the rewind lever in the usual manner; the film will now
retain stationary for multiple exposures.
5. Gently turn the film advance lever. This will cock the shutter for the next
exposure.
You can make any number of exposures on the same frame simply by repeating
steps 3, 4 and 5 above in the proper order. Each time you turn the film advance
lever, the camera’s frame counter will advance once. There is, however, a possibility
of slight movement of the film if you make an excessive number of exposures on the
same frame.
If you have engaged the rewind lever for multiple exposure and wish to cancel it,
lightly press the shutter button before turning the advance lever. Note that it is
not advisable to make multiple exposures on the first or last several frames due to
possible film curl which may adversely affect image registration.
58
26 MULTIPLE EXPOSURES
Note
Multiple exposures are also possible when the AE Power Winder FN or AE Motor
Drive FN is attached to the camera. To release the shuter, use either of the two
shutter buttons of the power drive. To return to normal shooting, cap the lens and
take a blank shot using the camera’s shutter button.
59
27 EXPOSURE IN MULTIPLE EXPOSURES
27
Exposure in Multiple Exposures
Generally, the first exposure of a series should be of a relatively dark subject so
that the image in the next exposure will show up clearly. For best results, it is
advisable to decrease the exposure for each shot. Depending on the situation, there
are several ways to do this. One way is to change the ISO setting to a higher value
as described earlier. In this method, you must first decide how many exposures you
want to make on the same frame. If a double exposure, make lSoth exposures at
twice the normal ISO rating; if a triple exposure, make all three exposures at three
times the normal ISO rating, and so forth.
Another way to correct exposure is to use the exposure compensation dial. This
method is the same as that of changing the ISO. That is, for a double exposure, set
the dial to ”1/2” for both exposures; for a triple exposure, at the setting between
”1/2” and ”1/4”, and so on. Both methods described above are merely guideiines,
and your technique will benefit greatly from practice.
Exposure Compensation Scale
1/2
Between 1/2 and 1/4
1/4
Number of Multiple Exposures
Double
Triple
Quadruple
60
28 FLASH PHOTOGRAPHY
28
28.1
Flash Photography
AE Flash Photography with Speedlites 011A, 133A,
155A, 166A, 177A, 188A, 199A, 533G and 577G.
Once the Speedlite is attached to the camera and its pilot lamp is glowing, the
camera switches automatically to the X sync speed of l/90 sec. provided the shutter
dial is not on ”B.”
In addition, the meter needle points simultaneously to the aperture which you have
set on the back of the Speedlite. Thus you do not have to take your eye away from
the viewfinder; as soon as the meter needle points to the auto working aperture,
the flash is ready. Now simply turn the lens’ aperture ring until the aperture needle
aligns with the meter needle.
With the AE Finder FN attached and the shutter dial on ”A,” the camera will
switch automatically to the X sync speed of 1/90 sec. and the meter needle will
61
28.2 Slow-sync Flash Photography
28 FLASH PHOTOGRAPHY
point to the right of 1/60 sec. Set the same aperture on the lens as that set on the
Speedlite.
With the power winder or motor drive attached and the lens’ aperture ring set
to the ”A’ mark for shutter-priority AE, the camera will automatically switch the
shutter speed to 1/90 sec. and the aperture to the f/stop which you have set on the
Speedlite as long as the shutter dial is not on ”B.”
After the shutter is released, the camera automatically switches back to the speed
actually set on the shutter dial until the Speedlite’s pilot lamp glows again.
28.2
Slow-sync Flash Photography
With Speedlites 199A, 533G and 577G, you can select a shutter speed slower than
1/90 sec. The advantage of slow-sync flash photography is that the background in
the picture will be lighter. You can choose among three working apertures on each
of these Speedlites for optimum control of depth of field. For this technique, first
set the AUTO/MANU switch of the Speedlite to ”MANU.” Then turn the camera’s
shutter dial to any speed from 1/60 sec. to 8 seconds. The picture will be taken at
the speed you have set on the shutter dial and the flash will fire at the release of the
first shutter curtain. If the shutter dial is set to a speed from 1/2000 to 1/125sec.
or ”S”, the shutter speed will automatically switch to 1/90 sec. As in normal AE
flash photography, the meter needle will point to the aperture which you have set
on the Speedlite as soon as the pilot lamp lights up. Simply turn the aperture ring
until the aperture needle matches the meter needle.
With the motor drive or power winder attached and the lens’ aperture ring set to
the ”A” mark, the aperture will be controlled automatically as well.
IMPORTANT
Before mounting a flash unit, make sure its power switch is OFF.
Note
If using a viewfinder which does not have an accessory shoe, such as the Waist-Level
Finder FN connect the Speedlite to the camera’s PC socket via a synchronization
cord. Then turn the shutter dial to ”t” (1/90 sec.) and set the same aperture on
the lens as that set on the flash unit.
62
28 FLASH PHOTOGRAPHY
28.3
28.3 General Flash Photography
General Flash Photography
When using an automatic flash unit other than a Canon Speedlite, first turn the
shutter dial to ”~” (1/90 sec) Then turn the aperture ring to the same aperture
which you have set on the flash. With the shutter dial on ” f ,” other types of
electronic flash units can be synchronized either through the hot shoe or via the PC
socket on the side of the camera. These allow two separate flash units to be fired
simultaneously. Set the shutter dial according to the information in the table on
the following page.
When shooting with a flash bulb or a manual flash unit, calculate the aperture with
a guidenumber formula or with the calculator dial if the flash unit has one. Turn
the lens’ aperture ring to that aperture.
CAUTION
It is recommended to use a Canon flash unit on this camera. Using a flash or flash
accessory of another make may cause the camera to work improperly or even possibly damage the camera itself. If you use a non-Canon flash. turn off the unit before
YoU attach it to or remove it from the camera’s hot shoe. Before removing the flash,
press the flash test button if it has one to discharge any power remaining in the
capacitor. These are merely precautions; following these steps will not necessarily
prevent the camera from being damaged by the flash unit.
63
28.3 General Flash Photography
28 FLASH PHOTOGRAPHY
Infrared Index Mark
Infrared light has longer wavelengths which focus on a plane slightly behind that of
ordinary visible light. It is necessary, therefore, to slightly adjust the focus of the
lens when using blackand-white infrared film. The infrared index mark engraved on
the lens is used for this purpose. After focusing in the usual way, note the small
red dot engraved on the lens barrel to the right of the distance index, and turn the
focusing ring to align the focused distance with this dot. For instance,if the focus
is at 1 Om on the distance scale,turn the focusing ring to align the10m mark with
the red dot. After making this correction, you can release the shutter. When using
black-and-white infrared film, visible light must be kept out by means of a deep red
filter, such as an R1 or Kodak Wratten 87. The position of the infrared index mark
has been computed for the use of infrared film with peak sensitivity at 800nm, such
as Kodak IR 135.
For further details, refer to the film manufacturer’s instructions.
64
29 SHOOTING WITH CLOSE-UP ACCESSORIES
29
Shooting with Close-up Accessories
65
29 SHOOTING WITH CLOSE-UP ACCESSORIES
66
29 SHOOTING WITH CLOSE-UP ACCESSORIES
With few exceptions (noted in the instructions for the accessory), stopped-down
metering is necessary whenever you insert an accessory between the camera and
lens for close-up photography.
• If you insert an accessory designed for AUTOMATIC diaphragm control, such
as the Auto Bellows or Bellows FL, between the camera and ANY lens, follow
the steps for stopped-down metering.
• If you insert an accessory designed for MANUAL diaphragm control, such as
M Extension Tubes or Bellows M, between the camera and a NON-FD lens,
follow the steps for stopped-down metering. Turn the A-M ring of an FL lens
to ”M” for taking the shot (not necessary if Canon Macro Auto Ring and
Double Cable Release are used).
• If you insert in accessory designed for MANUAL diaphragm control between
the camera and an FD lens, unless you use the Canon Macro Auto Ring
and Double Cable Release, first set the lens for manual diaphragm control
before mounting it on the accessory. Then follow the steps for stopped-down
metering.
Note
The instructions with the accessory will tell you whether or not manual diaphragm
control is necessary. The procedure differs according to the type of lens.
67
29 SHOOTING WITH CLOSE-UP ACCESSORIES
Manual Diaphragm Control
FD Lenses without Chrome Mount Ring except for FD Macro Lenses
1. Insert the slot of the accessory manual diaphragm adapter over the tip of the
automatic aperture lever at the rear of the lens. Push the lever counterclockwise and lower the adapter into the groove.
2. Mount the lens on the accessory.
The diaphragm blades will now open or close as you turn the aperture ring.
When the manual diaphragm adapter is attached, never mount the lens directly on the camera or on an accessory designed for automatic diaphragm
control, such as the Auto Bellows or Bellows FL.
FD Lenses vvith Chrome Mount Ring and FD Macro Lenses (except for
FD 200mm f/4 Macro Lens)
1. Push the automatic aperture lever at the rear of the lens countesclockwise
until it automatically locks.
2. Mount the lens on the accessory.
Note
Some of these lenses have an additional lock lever. With these lenses, push the
68
29 SHOOTING WITH CLOSE-UP ACCESSORIES
automatic aperture lever fully counterclockwise, then push the lock lever to ”L”.
Be sure to reset the automatic aperture lever to its normal position before mounting
the lens directly on the camera. In the case of a lens with a lock lever, switch it
back to the position of the white dot.
Film Plane Indicator
This mark, engraved on top of,-the camera body, indicates the exact position of
the film plane. It is useful for measuring the exact shooting distance from film to
subject in closeup photography. Distances on the lens’ distance scale are calibrated
from this mark. It is not used in general photography.
Note
The aperture ring of an FD lens must be removed from ”A” before you mount the
lens on any of these close-up accessories except for FD-U Extension Tubes and Extenders FD 2x and FD 1.4x, which are designed for normal full-aperture metering.
69
29 SHOOTING WITH CLOSE-UP ACCESSORIES
70
30 SYSTEM ACCESSORIES
30
30.1
System Accessories
Canon AE Motor Drive FN
The AE Motor Drive FN is designed as an integral part of the New Canon F-1
system. Attached tq the camera, this accessory redefines the meaning of automatic
in motorized SLR photography by providing you with automatic film winding and
power rewinding as well as shutter-priority AK, the ideal exposure mode for sports,
action and candid photography Three separate power sources, the Battery Pack
FN, Ni-Cd Pack FN, and the High Power Ni-Cd Pack FN, are available to suit
your preference and the shooting situation. With Battery Pack FN or High Power
Ni-Cd Pack FN, sequential shooting at up to five frames per second is possible;
Ni-Cd Pack FN enables film advance at 4.5 frames per second. The motor drive is
equipped with two shutter buttons for maximum ease of operation when shooting
in either the horizontal or vertical format, and a remote control socket.
71
30.2 Canon AE Power Winder FN
30.2
30 SYSTEM ACCESSORIES
Canon AE Power Winder FN
Designed to increase the versatility of the New Canon F- 1, the AE Power Winder
FN advances the film automatically in single-frame or continuous shooting at a
maximum two frames per second. In addition, it converts the camera to shutterpriority AK. The power winder has two shutter buttons for horizontal or vertical
hots. A socket is provided for any of the various remote control devices
72
30 SYSTEM ACCESSORIES
30.3
30.3 Canon Film Chamber FN-100
Canon Film Chamber FN-100
The Film Chamber FN-100 is one of tt e system accessories designed for the New
Canon F-1. Used in conjunction. the AE Motor Drive FN and film chamber provide
continuous or singleframe shooting capability of up to 100 frames, as well as shutterpriority AK. Yet it is sufficiently light and compact to afford hand-held shooting,
making it ideal for sports, documentary and action photography where utmost
mobility is desired. A special grip and shutter button on the film chamber ensure
maximum ease of handling.
73
30.4 Canon Data Back FN
30.4
30 SYSTEM ACCESSORIES
Canon Data Back FN
The Canon Data Back FN is a data-recording accessory designed for use with the
New Canon F-1. In addiSion to the year, month, and day, the letters A to G in
both upper and lower case and Roman numerals I to X may be imprinted in up
to six characters on the film. Not only can this accessory be used for recording
the data on photographs, it may also be used to code them for scientific and other
purposes. The data back’s special direct contact enables data recording in perfect
synchronization with exposure.
74
30 SYSTEM ACCESSORIES
30.5
30.5 Canon Wireless Controller LC-1
Canon Wireless Controller LC-1
This remote control device uses infrared light to control cameras from a distance.
The LC-1 is particularly useful in sports and wildlife photography, news coverage
and numerous other fields. The Wireless Controller consists of a transmitter and a
receiver. Up to three cameras can be operated on three different channels.
75
31 SPECIFICATION
31
Specification
Type:
35mm single-lens reflex (SLR) camera
Format:
24 x 36mm
Interchangeable Lenses:
Canon FD (for fullaperture metering)
and Canon FL, R and non-FD (for stopped-down
metering) series lenses.
Standard Lenses:
FD 50mm f/1.2L, FD 50mm f/1.2, FD 50mm f/1.4
and FD 50mm f/1.8
Lens Mount:
Canon breech-lock mount.
Exposure Modes:
Match-needle and stoppeddown manual exposure.
Shutter-priority AE possible by attaching AE
Power Winder FN or AE Motor Drive FN and setting
lens’ aperture ring to ”A.” Aperture-priority
AE and stopped-down AE possible by attaching
AE Finder FN and setting shutter dial to ”A.”
AE flash possible with specified Canon Speedlites.
Viewfinder:
Interchangeable eye-level pentaprism as standard.
97% vertical and horizontal coverage of
actual picture area with 0.8x magnification
at infinity with a standard lens. Aperture
scale with f/stops from f/1.2 to f/32,
overexposure and underexposure warning marks,
meter needle, aperture needle and battery
check/stoppeddown metering index are displayed
to the right of the field of view. Shutter
speed displayed below aperture scale. Speeds
include 1/2000 to 1 see, ” S ”and ”B” in
green; full seconds of 2, 4 and 8 are in
orange.
Viewfinder Illuminator:
Provided; illuminates aperture scale
and shutter speed for 16 seconds when meter
mode selector is set to ”LIGHT” and shutter
button pressed halfway.
76
31 SPECIFICATION
Eyepiece Shutter:
Built-in. Keeps out extraneous light during
self-timer and remote control operation.
Dioptric Adjustment:
Built-in eyepiece adjusted to standard
-1 diopter.
Focusing Screen:
Standard split-image/microprism rangefinder.
Twelve other types of interchangeable
screens are optionally available.
Light Metering System:
Through-the-lens (TTL) metering by
silicon photocell (SPC). Metering area
is determined by special optical element
incorporated in each focusing screen.
Center-weighted average, selectivearea and
spot metering are optionally available by
changing the focusing screen.
Meter Coupling Range:
EV -1 (4 sec. at f/1.4) to EV 20
(1/2000 sec. at f/22) with ISO 100 film and
FD 50mm f/1.4 lens.
Exposure Preview:
By pressing shutter button halfway.
Meter Mode:
At ”NORMAL,” meter activated as long as shutter
button is pressed halfway. At ”HOLD,” meter,
once activated, stays on for 16 sec. At ”LIGHT,”
meter, once activated, stays on for 16 sees.
and viewfinder information is illuminated.
Cancellation possible.
Exposure Compensation Dial:
+- 2 f/stop range in 1/3 f/stop
increments: 1/4.. 1/2 .. 1 .. 2 .. 4
Shutter:
Horizontal-travel, titanium focal-plane
shutter with four spindles. Eiectromechanical
hybrid control. Mechanically controlled at
speeds from 1/2000 to 1/125 sec., ”d ”
(1 /90 sec.) and B. Electronically
controlled at speeds from 1/60 to 8 sees.
77
31 SPECIFICATION
Mechanical Shutter
Operation:
By removing battery from battery
chamber. Only mechanically controlled speeds
can be used.
Mirror:
Instant-return type with shock-absorbing
mechanism.
ISO Film Speed Scale:
ISO 6-6400.
Shutter Dial:
1/2000 to 8 sec., ”A”
(for aperture-priority AE or stopped-down
AE with AE Finder FN), ”B” (bulb) and ”S”
(1/90 sec.). Shutter speeds from 1/2000
to 1 sec., ” S ” and ”B” are in white,
2 to 8 sees. in yellow and ”A” is in red.
Two-step button with electromagnetic release.
Mechanical release when battery is
removed from the camera. Pressing it
halfway activates meter circuit, pressing
it fully releases the shutter. Can be
locked by setting self-timer/lock lever
to ”L.” With cable release socket.
Shutter Button:
Self-timer/Lock Lever:
Three positions: ”A,” ”L,” and ”S”.
At ”L,” the shutter button is locked
as a safety feature. ”S” position is
for self-timer operation.
Self-timer:
Electronically controlled. Selftimer/lock
lever set to ”S.” Activated by pressing
shutter button. Ten-second delay with
electronic ”beep-beep” sound. Number
of beeps emitted per second increases
two seconds before shutter release.
Cancellation possible.
Stop-down Slide:
For depth-of–field preview or stopped-down
metering.
78
31 SPECIFICATION
Power Source:
One 6V lithium (Duracell PX 28L),
alkaline-manganese (Eveready [UCAR]
No. A544), or silver oxide (Eveready
[UCAR] No. 544) battery. Battery
lasts about one year under normal use.
Battery Check:
By pressing battery check button. Battery
power is sufficient if the meter
needle registers above the battery
check index.
Cancellation of Camera By pressing battery check button.
Circuit:
Cancels shutter operation,
self-timer operation, meter reading
and viewfinder illumination.
Multiple Exposure:
Possible by engaging rewind lever
before winding film advance lever to
recock the shutter. Cancelled by
lightly pressing shutter button.
Flash Synchronization:
Speeds up to 1/90 sec. with
electronic flash; FP- and M-sync
at 1/30 sec. or slower. Direct
contact at accessory shoe for
hot-shoe flash. Threaded PC socket
(JIS-B type) for cord-type flash
or multiple flash photography.
Accessory shoe has contact for
normal automatic flash and special
contact for AE flash with specified
Canon Speedlites.
79
31 SPECIFICATION
Automatic Flash:
New Canon Auto Tuning System (New CATS)
with specified Canon Speedlites.
Shutter speed is automatically set
to 1/90 sec. with shutter dial at
any setting except B. Meter needle
indicates auto working aperture
in the viewfinder as soon as
Speedlite’s pilot lamp glows.
Aperture controlled automatically
when AE Power Winder FN or AE Motor
Drive FN is attached and lens’
aperture ring set to ”A” mark.
Slow-Sync Flash
Rhotography:
Possible with Speedlites 199A, 533G and
577G. Flash synchronizes with shutter
speed set at slow settings from 1/60 to 8 secs.
Camera switches automatically
to 1/90 sec. when shutter dial
is set from 1/2000 to 1/125 sec.
or ” S .”
Camera Back:
Opened by pressing safety stopper while
pulling up rewind knob. Removable
for attaching Data Back FN or Film
Chamber FN-100. With memo holder.
Via multi-slot take-up spool.
Film Loading:
Film Advance Lever:
Single-stroke 139◦ throw with 30◦
stand-off. Ratchet winding possible.
Frame Counter:
Additive type. Automatically resets to ”S”
upon opening camera back. Advances
during multiple exposures.
Film Rewinding:
By turning rewind leverclockwise and
pressing it down and turning
rewind crank. Rewind lever
automatically resets when camera
back is opened and when shutter
button is lightly pressed.
80
31 SPECIFICATION
Other Safety Camera will not function when power level
Devices:
is insufficient or when lens’ aperture
ring is set to ”A” and the power
winder or motor drive is not
attached. Film winding impossible
while shutter is in operation.
Dimensions:
146.7 x 48.3 x 96.6 mm
(5-3/4” x 1-7/8” x 3-3/4”) body only.
Weight:
795g (28 ozs) body only 1,030g (36-5/16 ozs)
with FD 50mm f/1.4.
81
32 CARING FOR YOUR CAMERA
32
Caring for your Camera
As with any precision instrument, proper care and maintenance involve a few simple
rules in addition to common sense. Observing these few rules will keep your New
Canon F-1 in top condition at all times.
• The best thing you can do for your camera is to use it regularly. In the event
that you must store it for quite a while, first remove it from its case or camera
bag. Remove the battery. Wrap the camera in a clean, soft cloth and place
it in a cool, dry, dust-free place. If you store the body and lens separately,
attach both the body and rear lens caps.
• Keep the camera and lens out of direct sunlight and away from ”hot spots,”
such as the trunk, rear window shelf or glove compartment of a car. Do not
store the camera in a laboratory or other such area where chemicals may cause
corrosion.
• To keep the camera in top condition during prolonged storage, occasionally
insert the battery and take several blank shots to ”exercise” the mechanisms.
Check the operation of each part before you use the camera following storage.
• Reliable under normal use, your camera can be damaged by water, excessive
spray or humidity, sand and shock. Clean it especially well after you use it in
an area with excessive dust or saltwater spray. If you accidentally drop it in
water, it may be irreparable but take it immediately to an authorized Canon
service facility for inspection.
• To clean the exterior of the camera body, first blow off dust with a blower
brush. Wipe off smudges with a silicone cloth or chamois leather. If smudges
remain on the eyepiece after using a blower brush, wipe it lightly with lenscleaning tissue which has been moistened with a couple of drops of lens cleaner.
• If the lens surfaces are clean, yet the viewfinder appears dusty, the picture
will not be affected by the dust in the viewfinder. If the mirror gets dirty, it
will not affect pictures but it may make viewing difficult. Dust it very gently
with a blower brush. If further cleaning is necessary, take the camera to the
nearest authorized.Canon service facility.
• The film chamber needs cleaning from time to time to remove film dust which
may scratch the film. Gently dust it out with a blower brush, being careful
not to press on the film rails, shutter curtain and pressure plate.
82
32 CARING FOR YOUR CAMERA
• To clean the lens surfaces, use only a blower brush, cleaning fluid and tissue
made specially for cleaning camera lenses. Carefully follow the lens’ instructions.
Using the Camera at Very Low Temperatures
When you use the New F-1 in cold conditions, try to protect it from outside air and
avoid extreme temperature changes. Condensation forming on a camera and lens
taken from subzero outside temperatures into a warm room may cause corrosion.
To avoid this, place the camera in a plastic bag while still outdoors. Then seal the
bag and take it indoors, leaving the camera in the bag until it gradually reaches
room temperature. Generally, this takes about one-half hour. Also, remember that
at temperatures below 0◦ C (32◦ F), battery power may decrease or fail. Please see
page 9 for tips on battery care when shooting in cold conditions.
If you are using the camera in conjunction w ith the motor drive, the High Power
Ni-Cd Pack FN is the most reliable power source for uninterrupted shooting at low
temperatures. It can be used as the sole power source for both the camera and the
motor drive by attaching the Battery Cord C-FN.
Neckstrap
Thread the tips of the neckstrap through the corresponding rings on the camera
so that the tips are on the inside. Then adjust the neckstrap to the length most
comfortable for you.
83