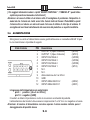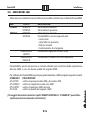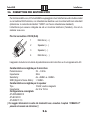
1
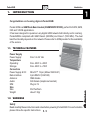
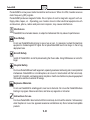
0
180 7.05)
S
/DC e 0
MO M900 7.07 sto)
D
0
GS GSM e Te
AN
E
B
(
nd T DU
AL
-Ba ndi A S (P
l
U
a
u a
M
D
cc
)
m De comione S
2 V 1800 7.05
e
3
d
0
a
n
z
)
o
S
e
o
e
M sti ric oc a 5
DC and de
Ge vio e ax, V ne d 900/ 7.07 xt mo
In ti, F tazio GSM M0 d Te
c
E GS an
Da imen
Vd
nd nds( PDU
l
2
a
A
3
-B a (
o
ual commpport oice m 5 t
D
o
AT S su ax, V ply fr
M a, F up
S
t
Da wer S
Po
POCKET GSM
M
DE
Quick Guide
7D1361 rev. 3.1 12/2004
http://www.digicom.it
PocketGSM
Indice
INDICE
PREMESSA
CONDIZIONI AMBIENTALI
PULIZIA DELL’APPARATO
VIBRAZIONI O URTI
II
II
II
II
DICHIARAZIONE CE DI CONFORMITA'
II
1. INTRODUZIONE
1.1. CARATTERISTICHE TECNICHE
1.2. AVVERTENZE
1.1
1.1
1.2
2. INSTALLAZIONE
2.1. DESCRIZIONE DEL CONNETTORE (PIN-OUT)
2.2. LA SIM CARD
2.3 COLLEGAMENTO ANTENNA ESTERNA
2.4. ALIMENTAZIONE
2.5. INDICATORI LED
2.6. CONNETTORE PER GESTIONE VOCE
2.1
2.1
2.2
2.3
2.4
2.5
2.6
3.
3.1
ESEMPI FUNZIONALI
I
PocketGSM
Premessa
PREMESSA
E’ vietata la riproduzione di qualsiasi parte di questo manuale, in qualsiasi forma, senza esplicito permesso
scritto della Digicom S.p.A. Il contenuto di questo manuale può essere modificato senza preavviso.
Al fine di salvaguardare la sicurezza, l’incolumità dell’operatore ed il funzionamento dell’apparato, devono
essere rispettate le seguenti norme installative:
CONDIZIONI AMBIENTALI
Temperatura ambiente
Umidità relativa
da -20 a +55°C
dal 20 a 80% n.c.
Si dovrà evitare ogni cambiamento rapido di temperatura e umidità.
Il sistema compresi i cavi, deve venire installato in un luogo privo o distante da:
Polvere, umidità, calore elevato ed esposizione diretta alla luce del sole.
Oggetti che irradiano calore. Questi potrebbero causare danni al contenitore o altri problemi.
Oggetti che producono un forte campo elettromagnetico (altoparlanti Hi-Fi, ecc.)
Liquidi o sostanze chimiche corrosive.
PULIZIA DELL’APPARATO
Usare un panno soffice asciutto senza l’ausilio di solventi.
VIBRAZIONI O URTI
Attenzione a non causare vibrazioni o urti.
DICHIARAZIONE
DI CONFORMITA'
Noi, Digicom S.p.A. via Volta 39 - 21010 Cardano al Campo (Varese - Italy) dichiariamo sotto la nostra
esclusiva responsabilità, che il prodotto:
Nome: PocketGSM Tipo: Modem Dual-Band EGSM 900/1800MHz
al quale questa dichiarazione si riferisce, soddisfa i requisiti essenziali della sotto indicata Direttiva:
1999/5/CE del 9 marzo 1999, R&TTE, (riguardante le apparecchiature radio e le apparecchiature terminali di
telecomunicazione e il reciproco riconoscimento della loro conformità).
Come designato in conformità alle richieste dei seguenti Standard di Riferimento o ad altri documenti normativi:
EN 60950
EN 301 489-1
EN 301 489-7
EN 301-419-1
EN 301-511
II
PocketGSM
1.
Introduzione
INTRODUZIONE
Congratulazioni per aver scelto il PocketGSM digicom.
PocketGSM è un modem GSM Dual-Band (EGSM900/DCS1800), ideale per l’utilizzo in
applicazioni DATI, SMS, FAX e VOCE.
E’ stato progettato per operare con le reti di tutti gli operatori GSM sia in modo diretto che
in roaming.
PocketGSM è conforme alla Classe 4 (900 Mhz) e Classe 1 (1800 Mhz). La funzionalità
dual band dipende dalla rete, fate riferimento all’operatore GSM per verificare la disponibilità
di tale servizio.
1.1. CARATTERISTICHE TECNICHE
Alimentazione
Alimentazione:
da 5 a 32 Vcc
Temperature
Funzionamento:
Immagazzinamento:
da -20°C a +55°C
da -20°C a +70°C
Connettori
Alimentazione e I/O:
Dati:
Antenna:
Audio:
SIM:
Mini-Fit™ 12 pin (Molex 556912A1)
9 pin RS232 (V24/V28)
SMA femmina
RJ6 femmina (cornetta telefonica)
Plug-In 3V
Ingombri
Dimensioni:
Peso:
87x75x25mm
130gr circa
1.1
PocketGSM
Introduzione
1.2. AVVERTENZE
Informazioni sulla SICUREZZA
Leggere attentamente le istruzioni e norme qui riportate prima di accendere il PocketGSM.
Violare tali norme potrebbe essere illegale e potrebbe creare situazioni di pericolo.
Per ognuna delle situazioni descritte è necessario fare riferimento alle disposizione e
norme del caso.
Il PocketGSM è una radioricetrasmittente a bassa potenza. Quando è in funzione, invia e
riceve energia a radiofrequenza (RF).
Il modem produce campi magnetici per questa ragione deve essere tenuto lontano da
supporti magnetici quali dischetti, nastri ecc.
Il funzionamento del PocketGSM vicino a dispositivi elettrici ed elettronici quali radio,
telefoni, televisioni e computer può causare interferenze.
Interferenze
Il PocketGSM, così come tutti i dispositivi senza fili è soggetto ad interferenze che possono influire sulle
prestazione del dispositivo.
Utilizzo in auto
Non utilizzate il PocketGSM se siete alla guida. Nel caso di utilizzo su autovetture è necessario verificare
se i dispositivi elettronici del veicolo siano protetti contro l’emissione RF. Non installare il PocketGSM
sull’airbag o nello spazio che l’airbag occuperebbe gonfiandosi.
Utilizzo in aereo
Spegnete il vostro PocketGSM quando siete in aereo scollegando il cavo di alimentazione. L’utilizzo di
dispositivi GSM su aeromobili è illegale.
Utilizzo all’interno degli ospedali
Spegnete il PocketGSM in prossimità di apparecchiature medicali, in particolare potrebbero verificarsi
interferenze con stimolatori cardiaci e protesi acustiche. Inoltre non essendo il PocketGSM un telefono
cellulare non è previsto l’uso a contatto con il corpo umano. E’ necessario porre la massima attenzione
1.2
PocketGSM
Introduzione
nell’utilizzo del PocketGSM negli ospedali e nei centri sanitari in quanto è possibile che siano in uso
dispositivi sensibili a segnali esterni di radiofrequenza. Nei centri sanitari dove espressamente indicato
l’apparecchio va tenuto spento.
Utilizzo in prossimità di materiali esplosivi
Non utilizzare il PocketGSM in depositi di carburante, impianti chimici o in aree caratterizzate dalla
presenza di gas esplosivi o dove operazioni con esplosivi sono in corso. Sarà necessario rispettare le
limitazioni ed attenetevi a qualunque norma o disposizione prevista.
Modalità d’uso
Non utilizzate il PocketGSM a contatto col corpo umano, non toccate l’antenna se non strettamente
necessario.
Utilizzate solo accessori approvati. Consultate i manuali di eventuali dispositivi che dovete collegare al
Pocket GSM. Non collegare dispositivi incompatibili.
1.3
PocketGSM
2.
Installazione
INSTALLAZIONE
L’installazione del modem deve essere effettuata entro il range di temperatura, ed il range
di alimentazione indicati sul presente manuale d’uso.
Attenzione: la tensione di alimentazione non deve superare il valore massimo indicato, pena il
danneggiamento del prodotto stesso.
2.1. DESCRIZIONE DEL CONNETTORE (PIN-OUT)
Collegate la porta seriale del vostro dispositivo al PocketGSM tramite un connettore dritto
standard, con vaschetta a 9 pin RS232.
La seguente tabella descrive l’assegnazione dei segnali sul connettore di PocketGSM:
Connettore 9 pin femmina (DCE) Pin
1
2
5
1
3
4
5
9
6
6
7
8
9
Descrizione
Data Carrier Detect
Receive Data
Transmitted Data
Data Terminal Ready
Signal Ground
Data Set Ready
Request To Send
Clear To Send
Ring Indicator
Sigla
DCD
RD
TD
DTR
GND
DSR
RTS
CTS
RI
Nel caso la vostra applicazione supporti solo i segnali TD e RD (trasmissione e ricezione),
è comunque possibile collegarla a PocketGSM. In questo caso però è importante
configurare PocketGSM per ignorare i criteri non presenti.
[ Per maggiori informazioni in merito ai comandi, vedere i capitoli “ESEMPI FUNZIONALI” e “COMANDI
AT”; quest’ultimo capitolo è presente nel manuale sul sito Internet ]
Il modem è in grado di ricevere comandi AT alle velocità comprese tra 300 e 115200 bit/s.
2.1
PocketGSM
Installazione
2.2. LA SIM CARD
Il PocketGSM supporta SIM del tipo PLUG-IN.
Al fine di evitare il danneggiamento della SIM o la perdita di informazioni vi consigliamo di
non toccare la parte dorata della SIM (dove sono presenti i contatti).
Attenzione: verificate con l’operatore telefonico che la SIM sia abilitata al traffico DATI ed eventualmente
FAX. Infatti, la maggior parte delle SIM sono abilitate originariamente per la chiamata e la ricezione
per il traffico VOCE; mentre per quanto concerne la gestione DATI e FAX sono abilitate solo per la
chiamata, e non per la ricezione.
Per attivare la ricezione anche per il traffico DATI e FAX è necessario consultare l’operatore telefonico
che Vi assegnerà due numeri supplementari (uno per ricevere chiamate DATI ed uno per ricevere
chiamate FAX).
Inserimento della SIM
Probabilmente la SIM card Vi sarà fornita su un supporto compatibile con i dispositivi che
utilizzano la SIM full-size.
1. Staccate la SIM con cautela dal supporto per farla diventare della
dimensioni PLUG-IN.
2. Assicuratevi che il PocketGSM sia spento, scollegando
l’alimentazione.
3. Individuate l’alloggiamento della SIM ed esercitate una leggera
pressione sul perno di sgancio del porta SIM, con un dito
o con una matita.
4. Inserite la SIM nello specifico porta SIM con i contatti rivolti
verso l’alto, verificando che l’angolo tagliato sia posizionato
in modo corretto.
5. Chiudete il porta SIM premendolo fino in fondo. In caso di
difficoltà non forzate assolutamente il porta SIM, ma
verificatene il corretto posizionamento.
2.2
PocketGSM
Installazione
2.3 COLLEGAMENTO ANTENNA ESTERNA
Per collegare l’antenna esterna, procedete nel modo seguente:
1. Assicuratevi che il PocketGSM sia spento, scollegando l’alimentazione.
2. Collegate il connettore SMA maschio dell’antenna esterna al connettore di PocketGSM avvitandolo in
senso orario. In caso di difficoltà non forzate assolutamente il connettore ma verificatene il corretto
posizionamento.
3. Posizionate l’antenna/PocketGSM, avendo cura di verificare la presenza di un buon segnale dell’operatore GSM.
E’ possibile verificare il segnale GSM in tre modalità:
Attraverso un telefono cellulare
Inserite la SIM che andrà nel PocketGSM in un telefono cellulare e verificate la zona in cui il segnale è
maggiore.
Attraverso il Led STATUS
Alimentate il modem e verificate se il Led STATUS lampeggia. Il Led STATUS rosso lampeggiante indica
che il modem è registrato alla rete GSM, in questo modo si può verificare la presenza del segnale GSM,
ma non la qualità del segnale.
Attenzione: la sola segnalazione di avvenuta registrazione alla rete GSM tramite il led STATUS, non
garantisce la presenza di un segnale sufficiente ad utilizzare il modem GSM.
Attraverso il comando AT+CSQ
Attraverso questo comando si ha la possibilità di verificare con maggiore precisione la zona migliore in
cui installare il modem e/o l’antenna.
Alimentate il PocketGSM e collegatelo alla Vostra “applicazione”, quindi inviate al modem il comando
AT+CSQ. Il modem risponderà con +CSQ:x,y; dove “x” indica la qualità del segnale e “y” il BER (Bit Error
Rate). La qualità del segnale “x” potrà avere un valore compreso tra 0 e 31, o 99; i valori più alti indicano
un segnale migliore.
Da 0 a 9 = Scarso/insufficiente
Da 10 a 15 = Buono
Da 16 a 31 = Ottimo
99 = Sconosciuto o non calcolabile
Valori di BER (“y”) superiori a 2 possono precludere il buon funzionamento dell’apparato.
In questo caso cercare un migliore posizionamento dell’antenna/PocketGSM.
Una volta individuato il campo migliore fissate il modem e/o l’antenna.
2.3
PocketGSM
Installazione
[ Per maggiori informazioni vedere i capitoli “ESEMPI FUNZIONALI” ; “COMANDI AT”; quest’ultimo
capitolo è presente nel manuale sul sito Internet ]
Attenzione: nel caso di utilizzo di un’antenna stilo, Vi consigliamo di posizionare il dispositivo in
modo tale che l’antenna sia rivolta verso l’alto. Cercate inoltre di fissare il PocketGSM, e quindi
l’antenna stilo, ad almeno un metro dal suolo. Nel caso di utilizzo di altro tipo di antenna, Vi
consigliamo di non fissarla direttamente alla meccanica del prodotto o su superfici metalliche.
2.4. ALIMENTAZIONE
Gli ingressi, le uscite e l’alimentazione sono gestiti attraverso un connettore Minifit 12 poli,
la cui descrizione è riportata di seguito:
Vista frontale
PIN
1
2
3
4
5
6
7
8
9
10
11
12
Descrizione
OUTPUT 2 (Open Collector)
OUTPUT 1 (Open Collector)
INPUT DIGITALE 4
INPUT DIGITALE 3
INPUT DIGITALE 2
INPUT DIGITALE 1
N.C.
N.C.
Alimentazione da 5 a 32Vcc
GND
INPUT ANALOGICO 2
INPUT ANALOGICO 1
(GPO2)
(GPO1)
(GPIO5)
(GPIO4)
(GPIO0)
(GPI3)
(ADC2)
(ADC1)
L’ingresso dell’alimentazione è polarizzato:
pin 9 : positivo [da +5 a +32Vcc]
pin 10 : negativo [GND]
Il modem è dotato di protezione contro le inversioni accidentali di polarità.
L’alimentazione del modem deve essere compresa tra i 5 e 32 Vcc con negativo a massa
Attenzione: la tensione di alimentazione non deve superare il valore massimo indicato, pena il
danneggiamento del prodotto stesso.
2.4
PocketGSM
Installazione
2.5. INDICATORI LED
Attraverso due indicatori luminosi detti Led, è possibile verificare alcuni stati del PocketGSM:
LED
POWER
STATUS
STATO
SPENTO
ACCESO
SPENTO
ACCESO
LAMPEGGIO
LENTO
LAMPEGGIO
VELOCE
DESCRIZIONE
Alimentazione assente
Alimentazione presente
Alimentazione assente
PocketGSM in uno dei seguenti stati:
- ricerca rete;
- carta SIM non presente;
- PIN non inserito;
- funzionamento di emergenza.
PocketGSM registrato alla rete GSM
PocketGSM connesso con altro dispositivo
PocketGSM è pronto ad operare in maniera ottimale solo al termine della registrazione
alla rete GSM, e con una buona qualità del segnale GSM.
Per verificare che PocketGSM sia pronto per gestire chiamate, e SMS, eseguite i seguenti comandi:
COMANDO
DESCRIZIONE
AT+CPIN?
verifica la presenza della SIM e del codice PIN
AT+CREG?
verifica la registrazione alla rete GSM
AT+COPS?
verifica l’operatore GSM corrente
AT+CSQ
verifica la qualità del segnale GSM
[ Per maggiori informazioni consultare i capitoli “ESEMPI FUNZIONALI” e “COMANDI AT”; quest’ultimo
capitolo è presente nel manuale sul sito Internet ]
2.5
PocketGSM
Installazione
2.6. CONNETTORE PER GESTIONE VOCE
Per la funzionalità voce, il PocketGSM è equipaggiato di un’interfaccia audio double ended
su connettore RJ6 femmina, con intestazione identica a un ricevitore telefonico standard
(attenzione: le cornette dei telefoni “SIRIO” non hanno intestazione standard).
L’interfaccia può essere collegata sia ad un ricevitore telefonico (handset), che ad un
sistema viva-voce.
Pin-Out connettore VOICE (RJ6)
4
3
2
1
Microfono ( + )
2
Speaker ( + )
3
Speaker ( - )
4
Microfono ( - )
1
L’apparato include la circuiteria di polarizzazione del microfono e di accoppiamento AC.
Caratteristiche consigliate per il microfono
Polarizzazione :
2V – 0.5mA
Impedenza:
2KΩ
Sensitivity :
da –40dBm a –50dBm
SNR (Signal to Noise Ratio) : > 50dBm
Caratteristiche consigliate per lo speaker
Tipo :
10mW, electro-magnetic
Impedenza :
da 32 a 150 Ω
Configurazione consigliata
AT+SPEAKER=0
AT+ECHO=0
AT+SIDET=1,3
[ Per maggiori informazioni in merito alla funzionalità voce, consultare il capitolo “COMANDI AT”
presente nel manuale sul sito Internet ]
2.6
PocketGSM
3.
Esempi Funzionali
ESEMPI FUNZIONALI
Il PocketGSM è dotato di una serie di comandi AT che permettono la programmazione del
dispositivo e l’esecuzione di tutte le funzionalità supportate dal modem GSM.
Nel caso di utilizzo del modem PocketGSM/GPRS, le informazioni per la gestione del
GPRS sono presenti nel capitolo “COMANDI AT”, nel manuale completo sul sito Internet.
Di seguito vengono descritte degli esempi di utilizzo di alcuni comandi AT.
Per maggiori informazioni in merito al prodotto ed alla sua programmazione, vi invitiamo a consultare
il manuale completo in formato PDF disponibile sul sito internet www.digicom.it nella sezione
supporto/Download/Manuali.
Attenzione: la configurazione di fabbrica del PocketGSM prevede la gestione dei comandi AT solo alla
velocità di 9600bit/s (il PocketGSM/GPRS solo alla velocità di 115200bit/s). Prima di procedere alle
vostre personalizzazioni occorre impostare il vostro emulatore terminale (es. HyperTerminal) o la
vostra applicazione con i seguenti settaggi: 9600,8,N,1 (nel caso di PocketGSM/GPRS: 115200,8,N,1)
successivamente potrete modificare la velocità di interfaccia con i valori compresi tra 300 e
115200bit/s con il comando AT+IPR.
[ Per maggiori informazioni consultare il capitolo “COMANDI AT” presente nel manuale sul sito Internet]
A) Gestione PIN
B) PocketGSM pronto a lavorare
C) Cavo seriale non completo
D) Trasferimento Dati
E) Gestione SMS (Formato TESTO)
3.1
PocketGSM
Esempi Funzionali
A) GESTIONE PIN
Normalmente, per ragioni di sicurezza le SIM richiedono l’inserimento del codice PIN.
Con il PocketGSM è possibile inserire il PIN con il comando AT+CPIN.
Se invece la Vostra applicazione ha altri strumenti di sicurezza, potete disabilitare la richiesta
del PIN utilizzando un normale telefono cellulare.
Esempi:
Comando:
Risposta:
Risposta:
Risposta:
Risposta:
Risposta:
AT+CPIN?
ERROR
+CPIN: READY
+CPIN: SIM PIN
+CPIN: SIM PUK
+CPIN: SIM PIN2
(Verifica la presenza della SIM e lo stato del PIN)
(Lettura carta SIM fallita)
(Codice PIN presente: SIM pronta)
(E’ richiesto l’inserimento del codice PIN)
(E’ richiesto l’inserimento del codice PUK)
(E’ richiesto l’inserimento del codice PIN2)
In caso di codice PIN non presente, prima di utilizzare la carta SIM occorre inserirlo:
Comando:
AT+CPIN=4321
(Inserimento PIN)
Risposta:
OK
(Codice PIN corretto)
Risposta:
ERROR
(Codice PIN errato)
Attenzione: ricordiamo che se il codice PIN viene inserito in modo errato per 3 volte, la carta SIM
rimane bloccata. Per sbloccarla occorrerà inserire il codice PUK.
[ Per maggiori informazioni consultare il capitolo “COMANDI AT” presente nel manuale sul sito Internet]
3.2
PocketGSM
Esempi Funzionali
B) POCKETGSM PRONTO A LAVORARE
PocketGSM è pronto ad operare in maniera ottimale solo al termine della registrazione
alla rete GSM, e con una buona qualità del segnale GSM.
Per verificare che PocketGSM sia pronto per gestire chiamate, e SMS, eseguite i seguenti
comandi:
Comando:
Risposta:
AT+CPIN?
+CPIN: READY
Comando:
Risposta:
AT+CREG?
+CREG: 0,1
OK
(modem GSM registrato alla rete)
Comando:
Risposta:
AT+COPS?
+COPS: 0,2,22288
OK
(PocketGSM registrato all’operatore 22288)
Comando:
Risposta:
AT+CSQ
+CSQ: 15,0
OK
(segnale GSM: Buono)
(la SIM è pronta)
Il valore di CSQ può essere compreso tra 0 e 31, dove 0 = –113dBm e 31 = –51dBm.
Ogni unità corrisponde a 2 dBm.
Da 0 a 9 = Scarso/insufficiente
Da 10 a 15 = Buono
Da 16 a 31 = Ottimo
99 = Sconosciuto o non calcolabile
[ Per maggiori informazioni consultare il capitolo “COMANDI AT” presente nel manuale sul sito Internet]
3.3
PocketGSM
Esempi Funzionali
C) CAVO SERIALE NON COMPLETO
Nel caso la vostra applicazione (es. PLC) supporti solo i segnali TD e RD (Trasmissione e
Ricezione), è comunque possibile collegarla a PocketGSM. In questo caso però utilizzerete
un cavo seriale non completo, per questa ragione è importante configurare PocketGSM
per ignorare i criteri seriali non presenti. I criteri che il PocketGSM controlla abitualmente
durante le fasi di comunicazione, sono il 108 (Data Terminal Ready) ed il 105 (Request To
Send): per la loro disabilitazione bisogna agire sui comandi AT&D e AT+IFC.
Esempi:
Comando:
Comando:
Risposta:
AT&D0
AT&D2
OK
Comando:
Comando:
Risposta:
AT+IFC=0,0 (Criterio 105 ignorato: controllo di flusso OFF)
AT+IFC=2,2 (Criterio 105 gestito come da normativa: controllo di flusso ON)
OK
(Criterio 108 ignorato)
(Criterio 108 gestito come da normativa)
D) TRASFERIMENTO DATI
Il PocketGSM può chiamare ed essere chiamato da apparati analogici (PSTN), da apparati
digitali (ISDN) e da apparati GSM. Normalmente le connessioni DATI con modem analogici
avvengono a 9600bit/s con il protocollo V.32; le connessioni con dispositivi ISDN invece
utilizzano il protocollo V.110 con velocità di 9600bit/s. Lo scambio di dati con un altro
apparato GSM può avvenire utilizzando il protocollo V.32 oppure V.110.
Chiamate DATI
E’ possibile effettuare una chiamata attraverso il comando ATD. Ad esempio, per chiamare
il numero 0123456789 bisognerà inviare al modem il comando ATD0123456789<Invio>.
In base all’impostazione del comando AT+CBST è possibile programmare il PocketGSM
per chiamare modem analogici, digitali o GSM:
AT+CBST=0,0,1 collegamento con modem analogici o GSM in multistandard (V.32)
AT+CBST=7,0,1 collegamento con modem analogici o GSM solo in V.32 a 9600bit/s
AT+CBST=71,0,1 collegamento con modem digitali o GSM solo in V.110 a 9600bit/s
3.4
PocketGSM
Esempi Funzionali
Attenzione: verificate con l’operatore telefonico che la SIM sia abilitata al traffico DATI ed eventualmente
FAX. Infatti, la maggior parte delle SIM sono abilitate originariamente per la chiamata e la ricezione
per il traffico VOCE; mentre per quanto concerne la gestione DATI e FAX sono abilitate solo per la
chiamata, e non per la ricezione.
Per attivare la ricezione anche per il traffico DATI e FAX è necessario consultare l’operatore telefonico
che Vi assegnerà due numeri supplementari (uno per ricevere chiamate DATI ed uno per ricevere
chiamate FAX).
Esempi:
Comando:
Risposta:
Comando:
Risposta:
AT+CBST=7,0,1
OK
ATD0123456789
CONNECT 9600
Chiamata V.32 a 9600bit/s
Comando:
Risposta:
Comando:
Risposta:
AT+CBST=71,0,1
OK
ATD0123456789
CONNECT 9600
Chiamata V.110 a 9600bit/s
Ricezione chiamate DATI
Normalmente il PocketGSM è configurato con la risposta automatica disabilitata (S0=0):
in questo caso il modem risponderà solo dopo aver ricevuto il comando ATA.
Nel caso in cui si voglia abilitare la risposta automatica, occorrerà impostare il registro S0
col numero di squilli dopo i quali rispondere; (es. S0=2 risposta automatica dopo due squilli).
La configurazione di fabbrica del PocketGSM prevede l’impostazione AT+CBST=0,0,1 in
questo modo, PocketGSM potrà rispondere e gestire qualsiasi tipo di chiamata, sia essa
originata da modem analogici, ISDN o GSM.
[ Per maggiori informazioni consultare il capitolo “COMANDI AT” presente nel manuale sul sito Internet]
3.5
PocketGSM
Esempi Funzionali
E) GESTIONE SMS (Formato TESTO)
Il PocketGSM gestisce l’invio e la ricezione degli SMS in formato TESTO ed in formato PDU.
Invio SMS (Formato TESTO)
Di seguito verranno indicati una serie di comandi necessari per la gestione dell’invio SMS
in formato TESTO.
1) Lettura ed impostazione del Centro Servizi
Per attivare la gestione degli SMS, occorre inserire il numero identificativo del Centro
Servizi dell’operatore GSM utilizzato. Le carte SIM più recenti hanno l’identificativo già
presente in memoria: per la verifica è possibile utilizzare un telefono cellulare, oppure
con PocketGSM procedete come indicato di seguito:
Comando:
Risposta:
AT+CSCA? (lettura del Centro Servizi)
+CSCA: “+393205858500”,145
(Centro Servizi presente)
OK
Se il numero del Centro Servizi non è presente, consultate l’operatore telefonico, quindi
inserite l’identificativo in questo modo:
Comando:
Comando:
Comando:
Risposta:
Comando:
Risposta:
AT+CSCA=”+393359609600”
(es. Centro Servizi Tim)
AT+CSCA=”+393492000200”
(es. Centro Servizi Vodafone-Omnitel)
AT+CSCA=”+393205858500”
(es. Centro Servizi Wind)
OK
AT+CSAS
(Salva il numero del Centro Servizi)
OK
Attenzione: i numeri dei Centro Servizi sopra riportati potrebbero essere modificati dall’Operatore
Telefonico. In caso di errore dopo l’invio del SMS, verificate l’identificativo del Centro Servizi con il
vostro Operatore Telefonico.
3.6
PocketGSM
Esempi Funzionali
2) Definizione formato
Comando:
AT+CMGF=1 (Formato TESTO)
Risposta:
OK
Comando:
Risposta:
AT&W
OK
(Salva la configurazione)
3) Invio messaggio:
Comando:
AT+CMGS=”+393217654321”<invio>
Risposta:
>
Testo:
Primo messaggio SMS con PocketGSM<ctrl z>
Risposta:
+CMGS: <sms index>
OK
Dopo aver digitato il messaggio che si vuole inviare, premere <ctrl z> (Hex =1A).
In questo esempio viene inviato il messaggio “Primo messaggio SMS con PocketGSM” al
numero +393217654321.
Attenzione: in caso di errore dopo l’invio del SMS, verificate con l’operatore telefonico il corretto
identificativo del Centro Servizi.
Lettura SMS (Formato TESTO)
PocketGSM è configurato di fabbrica per la segnalazione spontanea circa l’arrivo di un
nuovo SMS.
Il PocketGSM all’arrivo di un SMS invierà verso il DTE (es. PC) il seguente messaggio:
+CMTI: “SM”,2 ( il 2 indica la locazione di memoria della carta SIM in cui è stato memorizzato
l’SMS). Per leggere il messaggio utilizzate il comando AT+CMGR:
Comando:
Risposta:
AT+CMGR=2
+CMGL: 2,"REC UNREAD","+393217654321",,"01/01/75,12:05:46+04"
Secondo messaggio SMS con PocketGSM
3.7
PocketGSM
Esempi Funzionali
Per visualizzare tutti i messaggi presenti nella memoria SIM:
Comando:
Risposta:
AT+CMGL=”ALL”
+CMGL: 1,"REC READ","+393217654321",,"01/01/75,12:05:46+04"
Primo messaggio SMS con PocketGSM
+CMGL: 2,"REC UNREAD","+393217654321",,"01/01/75,12:06:26+04"
Secondo messaggio SMS con PocketGSM
OK
Tramite il comando AT+CNMI è inoltre possibile programmare il PocketGSM per inviare
verso il DTE (es. PC) subito il messaggio ricevuto:
Comando:
Risposta:
AT+CNMI=2,2
OK
Con questa configurazione, quando il PocketGSM riceve il messaggio dalla rete, invia
subito il messaggio verso il DTE:
+CMT: "+393217654321",,"01/01/75,12:06:14+00"
Primo messaggio SMS con PocketGSM
Cancellazione SMS
Per cancellare ad esempio il secondo messaggio:
Comando:
Risposta:
AT+CMGD=2
OK
[ Per maggiori informazioni consultare il capitolo “COMANDI AT” presente nel manuale sul sito Internet]
3.8
PocketGSM
Index
INDEX
PREFACE
ENVIRONMENTAL CONDITIONS
CLEANING THE TERMINAL
VIBRATIONS OR DROPPING
II
II
II
II
DECLARATION CE OF CONFORMITY
II
1. INTRODUCTION
1.1. TECHNICAL FEATURES
1.2. WARNINGS
1.1
1.1
1.1
2.
2.1.
2.2.
2.3.
2.4.
2.5.
2.6.
INSTALLATION
PIN-OUT CONNECTOR
SIM CARD
CONNECTION TO THE EXTERNAL ANTENNA
POWER SUPPLY
LED INDICATORS
CONNECTOR FOR THE VOICE MANAGEMENT
2.1
2.1
2.2
2.2
2.4
2.5
2.6
3.
FUNCTIONAL EXAMPLES
3.1
I
PocketGSM
Preface
PREFACE
All rights reserved; no part of this publication may be reproduced, stored in a retrieval system, or transmitted
in any form or by any means, electronic, otherwise, without the prior written permission of Digicom S.p.A.
The following installation rules should be respected in order to have the best working order of the equipment
and for the user’s safety.
ENVIRONMENTAL CONDITIONS
Enviromental temperature Relative humidity
from -20 to +55°C
from 20 to 80% n.c.
Rapid changes of temperature or humidity should be avoided.
This equipment, including cables, should be installed in an area free from:
Dust, humidity, heat from direct sun light.
Objects which irradiate heat. These could cause damage to the container or other problems.
Objects which produce a strong electtromagnetic field (loudspeakers, etc.)
Liquids or chemical corrosive substances.
CLEANING THE TERMINAL
Use a clean and soft cloth. Wet the cloth with water or natural detergent if it is necessary to remove any
stains. Never use chemical products such as petrol or solvents.
VIBRATIONS OR DROPPING
Caution against vibrations and dropping.
DECLARATION
OF CONFORMITY
We, Digicom S.p.A. registered office at: via Volta 39 - 21010 Cardano al Campo (Varese - Italy) declare
under our sole responsability that the product:
Name: POCKET GSM Type: Modem Dual-Band GSM 900/1800MHz
satisfies the basic requirement of the below indicated Directive:
1999/5/CE of March 9 1999, R&TTE
as having been designed in conformity with the requirements of following Reference Standards:
EN 60950
EN 301 489-1
EN 301 489-7
EN 301-419-1
EN 301-511
II
PocketGSM
1.
Introduction
INTRODUCTION
Congratulation on choosing digicom PocketGSM.
Pocket GSM is a GSM Dual-Band modem (EGSM900/DCS1800), perfect for DATA, SMS,
FAX and VOICE applications.
It has been designed to operate on any digital GSM network both directly and in roaming.
PocketGSM is compliant with GSM Class 4 (900Mhz) and Class 1 (1800 Mhz). The dual
band functionality depends on the network. Please refer to GSM provider for the availability
of the service.
1.1. TECHNICAL FEATURES
Power Supply
Power Supply:
Temperature
Operating:
Storage:
Connectors
Power Supply & I/O:
Data interface:
Antenna:
Audio:
SIM:
Size
Size:
Weight:
from 5 to 32 Vdc
from -20°C to +55°C
from -20°C to +70°C
Mini-Fit™ 12 pin (Molex 556912A1)
9 pin RS232 (V24/V28)
SMA female
RJ6 female (telephone handset)
Plug-In 3V
87x75x25mm
about 130gr
1.2. WARNINGS
Satefy
Read carefully these instructions and notes before powering PocketGSM. For each situation
please follow the specific instructions. 1.1
PocketGSM
Introduction
PocketGSM is a low power radio transmitter and receiver. When it is ON, it sends receives
radio frequency (RF) signals.
PocketGSM produces magnetic fields. Do not place it next to magnetic support such as
floppy disks, tapes, et. . Operating your modem close to other electrical equipment such
as television, phone, radios and personal computer, may cause interference.
Interference
PocketGSM, like all wireless devices, is subject to interferences that may reduce its performances.
Road Safety
Do not use PocketGSM while driving. In case of use on cars, it is necessary to check that electronic
equipment is shielded against RF signal. Do not place PocketGSM over the air bag or in the air bag
deployment area.
Aircraft Safety
Switch off PocketGSM in aircraft by disconnecting the Power cable. Using GSM devices on aircraft is
illegal.
Hospital Safety
Do not use PocketGSM near health equipment, especially pacemaker and hearing aids, to avoid potential
interferences. PocketGSM is a not mobile phone, do not use it in direct contact with the human body.
Switch it off in hospitals, and medical center. Hospitals or health care facilities may be using equipment
that could be sensitive to external RF energy.
Explosive Materials
Do not use PocketGSM in refuelling points, near fuel or chemicals. Do not use the PocketGSM where
blasting is in progress. Observe restrictions, and follow any regulation or instruction.
Instructions for use
Do not use PocketGSM in direct contact with the human body, do not touch the antenna if not necessary
when the phone is in use. Use approved accessories and batteries only. Do not connect incompatible
products.
1.2
PocketGSM
2.
Installation
INSTALLATION
The GSM modem installation must be carried out between a range of temperature indicated
in the manual.
Attention: the power supply voltage must not exceed the indicated maximum value as this may cause
a damage of the product.
2.1. PIN-OUT CONNECTOR
Connect the serial port of your device to PocketGSM through a 9 pin RS232 right standard
connector .
This table describes the position of the signals on Pocket GSM connector:
9 pin female connector (DCE)
5
9
1
6
Pin
1
2
3
4
5
6
7
8
9
Description
Data Carrier Detect
Receive Data
Transmitted Data
Data Terminal Ready
Signal Ground
Data Set Ready
Request To Send
Clear To Send
Ring Indicator
Initials
DCD
RD
TD
DTR
GND
DSR
RTS
CTS
RI
In case your application supports TD and RD (transmission and reception)signals only, it
is possible to connect it to the Pocket GSM. In this case it is important to configure
PocketGSM to ignore the not present criteria.
[ For further information about commands, see the chapters “Functional Examples” and “AT
Commands”; you’ll find the “AT Commands” chapter in the user’s manual present on Digicom
website ]
The modem can receive AT commands at the speeds between 300 and 115200 bit/s.
2.1
PocketGSM
Installation
2.2. SIM CARD
Plug-in SIM are supported by PocketGSM.
To prevent damaging or losing information avoid touching the sim gold area.
Attention: Check with your GSM provider if your SIM is enable for data and fax traffic, if not ask him for
this service, he will give you other two numbers (one for data calls and the other for fax calls).
Insert the SIM
Probably the SIM card will be supplied in a card holder compliant with the devices using
the full-size SIM.
1. Remove the SIM carefully from the SIM holder.
2. Turn off Pocket GSM, by disconnecting the power connector.
3. Discover the SIM slot and press on the release pin with a finger or
a pencil.
4. Insert the SIM card into the holder. Be sure the angled corner is top
right.
5. Close the SIM holder and press it up to the end. Do not force the
SIM holder and verify the correct position. .
2.3. CONNECTION TO THE EXTERNAL ANTENNA
To connect the external antenna go on as follows:
1. Turn off your Pocket GSM by disconnecting the power
connector.
2. Connect the SMA male connector to the external antenna of
Pocket GSM, screwing it clockwise.
3. Place the antenna and check there is a good quality signal.
2.2
PocketGSM
Installation
You can check the signal:
Using a cellular phone
Insert the SIM of the PocketGSM in a cellular phone and check the quality of the signal.
Through the Led STATUS
Power on the modem and verify the STATUS Led. If it is red blinking, it means the modem is recognized
by the GSM network. In this way you can check the signal but not its quality.
Attention: even if you see the STATUS Led blinking, it may not be sufficient for data transmission.
Through the AT+CSQ command
By using this command it is possible to detect a more precise signal. Power on PocketGSM and connect
it to a Personal cpmputer, using a serial cable. With a hyperterminal send to the modem the command
AT+CSQ.
The modem will answer with +CSQ: x,y; where “x” is the signal quality, “y” is the BER (But Error Rate).
The value of “x” can be included between 0 to 31; the higher value indicates a better signal.
From 0 to 9 : poor
From 10 to 15 : good
From 16 to 31 : excellent
99 = Unknown or uncalculable
BER values higher than 2 may compromise the good operation of the device. In this case place the
antenna in a better position.
[ For further information about commands, see the chapters “Functional Examples” and “AT
Commands”; you’ll find the “AT Commands” chapter in the user’s manual present on Digicom
website ]
Attention: for better performances of the supplied stilo antenna, we suggest to position it upwards. Try
to fix Pocket GSM and its antenna at least one meter from the floor.
In case you use a different antenna, do not fix it directly to the mechanics of the product or on
metal surfaces.
2.3
PocketGSM
Installation
2.4. POWER SUPPLY
The inputs, outputs and power supply use a Minifit 12 pin connector:
Frontal view
PIN
1
2
3
4
5
6
7
8
9
10
11
12
Description
OUTPUT 2 (Open Collector)
OUTPUT 1 (Open Collector)
DIGITAL INPUT 4
DIGITAL INPUT 3
DIGITAL INPUT 2
DIGITAL INPUT 1
N.C.
N.C.
Power supply from 5 to 32Vdc
GND
ANALOG INPUT 2
ANALOG INPUT 1
(GPO2)
(GPO1)
(GPIO5)
(GPIO4)
(GPIO0)
(GPI3)
(ADC2)
(ADC1)
pin 9 : positive [from +5 to +32Vdc]
pin 10 : negative [GND]
The modem has a special protection in case you accidentally invert the polarity.
The modem power supply must be included between 5 and 32 Vdc with ground negative.
Attention: the power supply voltage must not exceed the indicated maximum value as this may cause
a damage of the product.
2.4
PocketGSM
Installation
2.5. LED INDICATORS
Through two led indicators you can control the status of Pocket GSM:
LED
POWER
STATUS
OFF
ON
OFF
ON
STATUS
SLOW BLINKING
FAST BLINKING
DESCRIPTION
No power supply
Power supply on
No power supply
PocketGSM is in one of the following status:
- network search mode;
- SIM card not present;
- PIN not inserted;
- emergency mode.
PocketGSM detected by the GSM network
PocketGSM connected to another device
PocketGSM is ready to work only after it has been registered by the GSM network and
with a good quality signal.
To verify that PocketGSM is ready for calls and SMS, follow these commands:
COMMAND
AT+CPIN?
AT+CREG?
AT+COPS?
AT+CSQ
DESCRIPTION
Verifies the presence of the SIM and the PIN code
Verifies the registration to the GSM network
Verifies the current GSM operator
Verifies the quality of GSM signal
[ For further information about commands, see the chapters “Functional Examples” and “AT
Commands”; you’ll find the “AT Commands” chapter in the user’s manual present on Digicom
website ]
2.5
PocketGSM
Installation
2.6. CONNECTOR FOR THE VOICE MANAGEMENT
For the voice functionality, Pocket GSM is equipped with a double ended audio interface
on RJ6 female connector with the same Pin-out of a standard telephone handset
The interface can be connected both to a handset or to a loud speaking telephone.
VOICE connector Pin-Out (RJ6)
4
3
2
1
Microphone ( + )
2
Speaker ( + )
3
Speaker ( - )
4
Microphone ( - )
1
The modem includes AC coupling and biasing for electret microphone.
Suggested characteristics for the microphone
Polarizzazione :
2V – 0.5mA
Impedance:
2KΩ
Sensitivity :
from –40dBm to –50dBm
SNR (Signal to Noise Ratio) : > 50dBm
Suggested characteristics for the speaker
Type :
10mW, electro-magnetic
Impedance :
from 32 to 150 Ω
Suggest configuration
AT+SPEAKER=0
AT+ECHO=0
AT+SIDET=1,3
[ For further information see the chapter “AT Commands” present in the user’s manual on Digicom
website ]
2.6
PocketGSM
3.
Functional Examples
FUNCTIONAL EXAMPLES
Pocket GSM can be programmed through a set of AT commands for the execution of all its
functionalities.
If you are using a PocketGSM/GPRS, information for the GPRS functionality are present
in “AT Commands” chapter. It is present in the user’s manual on Digicom web site.
Here the description of some applications. For the complete AT command set, see the
chapter “AT Commands”.
Attention: In the factory configuration the AT commands are managed at 9600bit/s only (the PocketGSM/
GPRS at 115200bit/s only). Before going on with your settings, you must set your terminal emulator
(e.g. HyperTerminal) or your application as follows: 9600,8,N,1 (with PocketGSM/GPRS : 115200,8,N,1)
then you can modify the interface speed with the values included between 300 and 115200bit/s
with the command AT+IPR.
[ For further information see the chapter “AT Commands” present in the user’s manual on Digicom
website ]
A) PIN management
B) PocketGSM ready to work
C) Serial cable not completed
D) Data transfer
E) SMS Management (Text mode)
3.1
PocketGSM
Functional Examples
A) PIN MANAGEMENT
Due to security reasons, usually SIM cards require the insertion of PIN code. With Pocket
GSM you can insert the PIN code through the AT+CPIN command.
If your application has other security systems, you can disable the PIN request using a
mobile phone.
Examples:
Command:
Answer:
Answer:
Answer:
Answer:
Answer:
AT+CPIN?
ERROR
+CPIN: READY
+CPIN: SIM PIN
+CPIN: SIM PUK
+CPIN: SIM PIN2
(Verify the SIM and the PIN status)
(SIM card reading failed)
(PIN code present: SIM ready)
(PIN code insertion is required)
(PUK code insertion is required)
(PIN2 code insertion is required)
In case the PIN code is not present, it must be inserted before using the SIM card:
Command:
AT+CPIN=4321
(PIN insertion)
Answer:
OK
(PIN code right)
Answer:
ERROR
(PIN code wrong)
Attention: remember that if the PIN code is wrongly inserted for three times, the SIM card will block. To
unblock it you must insert the PUK code.
[ For further information see the chapter “AT Commands” present in the user’s manual on Digicom
website ]
3.2
PocketGSM
Functional Examples
B) POCKET GSM READY TO WORK
PocketGSM can work only after it has been detected by the network and with a good GSM
signal. To verify PocketGSM is ready to manage calls and SMS, follow these commands:
Command:
Answer:
AT+CPIN?
+CPIN: READY
Command:
Answer:
AT+CREG?
+CREG: 0,1
OK
(GSM modem is registered by the network)
Command:
Answer:
AT+COPS?
+COPS: 0,2,22288
OK
(PocketGSM is registered at operator 22288)
Command:
Answer:
AT+CSQ
+CSQ: 15,0
OK
(GSM signal: good)
(SIM is ready)
The CSQ value can be included between 0 and 31, where 0 = –113dBm and
31 = –51dBm.
Every unit corresponds to 2 dBm.
From 0 to 9 = not sufficient
From 10 to 15 = good
From 16 to 31 = excellent
[ For further information see the chapter “AT Commands” present in the user’s manual on Digicom
website ]
3.3
PocketGSM
Functional Examples
C) SERIAL CABLE NOT COMPLETED
In case your application (eg. PLC) supports only TD and RD signals (Trasmission and
Reception), it is however possible to connect it to the PocketGSM. In this case you will
use a non-completed serial cable; for this reason it is important to configure PocketGSM
so that it ignores the serial criteria not present. Usually PocketGSM, during the
communication phase, checks the following criteria: 108 (Data Terminal Ready) and 105
(Request To Send): to disable them use the commands AT&D and AT+IFC.
Examples:
Command:
AT&D0
Command:
AT&D2
Answer:
OK
Command:
Command:
Answer:
(Criterion 108 ignored)
(Criterion 108 managed as per specification)
AT+IFC=0,0 (Criterion 105 ignored: flow control OFF)
AT+IFC=2,2 (Criterion 105 managed as per specification: flow control ON)
OK
D) DATA TRANSFER
PocketGSM can call and be called by analog (PSTN), digital (ISDN) and GSM devices.
Usually DATA connections with analog modems are at 9600bit/s (V.32 protocol); ISDN
connections use V.110 protocol with speed at 9600bit/s. The data transfer with another
GSM device is carried out using V.32 or V.110 protocols.
DATA Calls
Using the ATD command it is possible to make a call. For example, to call the number
0123456789 you must send to the modem the command ATD0123456789<Enter>.
Depending on the AT+CBST command setting it is possible to program PocketGSM for
analog, digital or GSM calls:
AT+CBST=0,0,1 connection with analog or GSM modems in multistandard (V.32)
AT+CBST=7,0,1 connection with analog or GSM modems only in V.32 at 9600bit/s
AT+CBST=71,0,1 connection with digital or GSM modem only in V.110 at 9600bit/s
3.4
PocketGSM
Functional Examples
Attention: check with your telephone operator if your SIM is enabled for DATA and eventually for FAX.
In fact most SIMs are enabled for Voice(call and reception) while for DATA and FAX only the call is
enabled.
To enable the reception of DATA and FAX traffic it is necessary to ask the telephone operator that
will assign two additional numbers (one to receive DATA calls and one to receive FAX calls).
Examples:
Command:
Answer:
Command:
Answer:
AT+CBST=7,0,1
OK
ATD0123456789
CONNECT 9600
V.32 call at 9600bit/s
Command:
Answer:
Command:
Answer:
AT+CBST=71,0,1
OK
ATD0123456789
CONNECT 9600
V.110 call at 9600bit/s
DATA calls reception
Generally in PocketGSM the automatic answer is disabled (S0=0): in this case the modem
will answer only after it received the ATA command.
In case you want to enable the automatic answer, you must set the S0 register with the
number of rings after which to answer (eg. S0=2 automatic answer after two rings).
PocketGSM factory configuration has the AT+CBST=0,0,1 setting, in this way it will be
able to answer to any call coming from an analog, ISDN or GSM modem.
[ For further information see the chapter “AT Commands” present in the user’s manual on Digicom
website ]
E) SMS MANAGEMENT (TEXT mode)
PocketGSM manages the SMS in TEXT and PDU format.
Send an SMS (TEXT mode)
You find here the necessary commands to send SMS in TEXT mode.
3.5
PocketGSM
Functional Examples
1) Reading and Setup of the Services Center
To activate the SMS management, you must insert the identifier number of the Services
Center for your GSM operator. In the most recent SIM cards, the identifier is already
present in memory: to verify you can use a mobile phone or, with Pocket GSM, you can
act as follows:
Command:
Answer:
AT+CSCA?
+CSCA: “+393205858500”,145
OK
(reading of Services Center)
(Services Center present)
If the Services Center number is not present, ask the telephone operator, then insert the
identifier as follows:
Command:
Answer:
Command:
Answer:
AT+CSCA=”+393359609600”
OK
AT+CSAS
OK
(eg. TIM Services Center)
(Save the number of Services Center)
Attention: the above mentioned numbers (Services Centers) could be modified by the telephone
operator. In case of error after you send the SMS, check the identifier of the Services Center with
your Telephone Operator.
2) Define the mode
Command:
AT+CMGF=1
Answer:
OK
Command:
Answer:
AT&W
OK
(TEXT mode)
(Save the configuration)
3) Send a message:
Command:
AT+CMGS=”+393217654321”<enter>
Answer:
>
3.6
PocketGSM
Text:
Answer:
Functional Examples
First SMS message with Pocket GSM<ctrl z>
+CMGS: <sms index>
OK
After you digit yuor message, press <ctrl z> (Hex =1A).
In this example the message “First SMS message with Pocket GSM” is sent to number
+393217654321.
Attention In case of error after you send the SMS, check the identifier of the Services Center with your
Telephone Operator.
Read the SMS (TEXT mode)
The factory configuration of PocketGSM detects the coming of a new SMS. When an
SMS arrives, PocketGSM send to the DTE (eg. PC) the following message: +CMTI: “SM”,2
(2 indicates the memory location of the SIM card where the SMS has been stored). To
read the message use the AT+CMGR command:
Command:
Answer:
AT+CMGR=2
+CMGL: 2,"REC UNREAD","+393217654321",,"01/01/75,12:05:46+04"
Second SMS message with PocketGSM
To display all the messages present in the SIM memory:
Command:
Answer:
AT+CMGL=”ALL”
+CMGL: 1,"REC READ","+393217654321",,"01/01/75,12:05:46+04"
First SMS message with Pocket
+CMGL: 2,"REC UNREAD","+393217654321",,"01/01/75,12:06:26+04"
Second SMS message with PocketGSM
OK
3.7
PocketGSM
Functional Examples
Through the AT+CNMI command it is possible to program the PocketGSM so as it sends
immediately the received message to the DTE (eg. PC):
Command:
Answer:
AT+CNMI=2,2
OK
With this configuration PocketGSM sends immediately the message to the DTE, when it
receives it from the network:
+CMT: "+393217654321",,"01/01/75,12:06:14+00"
First SMS message with Pocket GSM
Cancel the SMS
For example, to cancel the second message:
Command:
Answer:
AT+CMGD=2
OK
[ For further information see the chapter “AT Commands” present in the user’s manual on Digicom
website ]
3.8
ITALY
21010 Cardano al Campo VA
via A. Volta 39