1
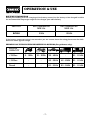
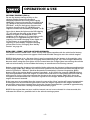
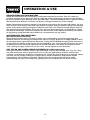
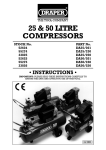
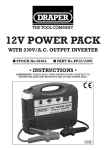
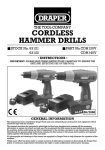
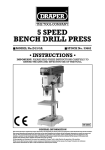
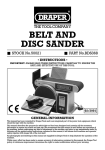
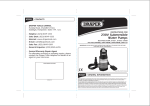
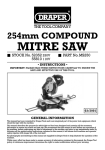
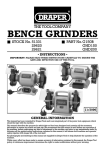
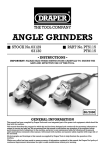
BATTERY CHARGER /
STARTER & TESTER
■ STOCK No.66801
■ PART No.BCS60
• INSTRUCTIONS •
IMPORTANT: PLEASE READ THESE INSTRUCTIONS CAREFULLY TO ENSURE THE
SAFE AND EFFECTIVE USE OF THIS TOOL.
10/2001
GENERAL INFORMATION
This manual has been compiled by Draper Tools and is an integrated part of the equipment, which should be
kept with the product.
This manual describes the purpose for which this tool has been designed and contains all the necessary
information to ensure its correct and safe use.We recommend that this manual is read before any operation of
the machine, before performing any kind of adjustment to the machine, and prior to any maintenance tasks. By
following all the general safety instructions contained in this manual, it will ensure both machine and operator
safety, together with longer life of the tool itself.
All photographs and drawings in this manual are supplied by Draper Tools to help illustrate the operation of the
machine.
Whilst every effort has been made to ensure accuracy of information contained in this manual, the Draper Tool
policy of continuous improvement determines the right to make modifications without prior warning.
BATTERY CHARGER /
STARTER & TESTER
■ STOCK No.66801
CONTENTS:
■ PART No.BCS60
Page No.
Contents/Declaration .......................................................................................1
Specification/Guarantee...................................................................................2
Safety Features .................................................................................................3
General Safety Instructions ..............................................................................4
Power Supply ...................................................................................................5
Getting To Know Your Battery Charger .............................................................6
Operation & Use ..........................................................................................7-10
DECLARATION OF CONFORMITY
We
Draper Tools Ltd. Hursley Road, Chandler’s Ford, Eastleigh, Hampshire.
SO53 1YF. England.
Declare under our sole responsibility that the product:
Stock No. :- 66801.
Part No. :- BCS60.
Description:- Battery Charger.
To which this declaration relates is in conformity with the following directive(s)
89/336EEC & 73/23EEC.
With reference to: EN60335-1:1994/A11/A1/A2,A13,A14,A15, EN60335-2-29:1996/A11,
EN55014-1:1993/A1/A2, EN55014-2:1997, EN61000-3-2:1995/A12,A1,A2,A14
& EN61000-3-3:1995.
JOHN DRAPER
Managing Director
Issue Date:
05/09/2001
-1-
SPECIFICATION
The Draper Tools policy of continuous improvement determines the right to change specification
without notice.
Stock No. ................................................................................................................ 66801
Part No. .................................................................................................................. BCS60
Supply Voltage ................................................................................................ 230v~50hz
Charging Voltage ....................................................................................................... 12v
Input Power .............................................................................................................. 350w
No. Charging Steps ........................................................................................................ 3
Start Charging Current .............................................................................................. 60A
Effective Charging Current (12v) ................................................................................ 26A
Av Charging Current (EN60335) ................................................................................ 17A
For batteries rated between ......................................................................... 30Ah-135Ah
Dimensions ........................................................................................... 250x150x135mm
Weight .................................................................................................................... 4.5kg
WARNING:ALWAYS WEAR HAND AND EYE PROTECTION WHEN HANDLING LEAD ACID BATTERIES.
GUARANTEE
Draper tools have been carefully tested and inspected before shipment and are
guaranteed to be free from defective materials and workmanship for a period of 12
months from the date of purchase except where tools are hired out when the guarantee
period is ninety days from the date of purchase.
Should the machine develop any fault, please return the complete tool to your nearest
authorized warranty repair agent or contact Draper Tools Limited, Chandler's Ford,
Eastleigh, Hampshire, SO53 1YF. England. Telephone: (023) 8026 6355.
If upon inspection it is found that the fault occurring is due to defective materials or
workmanship, repairs will be carried out free of charge. This guarantee does not apply
to normal wear and tear, nor does it cover any damage caused by misuse, careless or
unsafe handling, alterations, accident, or repairs attempted or made by any personnel
other than the authorised Draper warranty repair agent.
This guarantee applies in lieu of any other guarantee expressed or implied and
variations of its terms are not authorised.
Your Draper guarantee is not effective unless you can produce upon request a dated
receipt or invoice to verify your proof of purchase within the 12 month period.
Please note that this guarantee is an additional benefit and does not affect your
statutory rights.
Draper Tools Limited
-2-
GENERAL SAFETY INSTRUCTIONS
FOR BATTERY CHARGERS
WARNING
Please read the following instructions carefully, failure to do so could lead to serious personal injury.
IMPORTANT
Draper Tools Limited recommends that this machine should not be modified or used for any application
other than that for which it was designed. If you are unsure of its relative applications do not hesitate to
contact us in writing and we will advise you.
1.
WARNING - RISK OF EXPLOSIVE
GASES
a. WORKING IN THE VICINITY OF A
LEAD-ACID BATTERY IS DANGEROUS,
BATTERIES GENERATE EXPLOSIVE
GASES DURING NORMAL BATTERY
OPERATION. FOR THIS REASON, IT IS
OF UTMOST IMPORTANT, IF YOU HAVE
ANY DOUBT, THAT EACH TIME
BEFORE USING THE CHARGER,YOU
READ THIS MANUAL AND FOLLOW
THE INSTRUCTIONS.
b.
2.
When working with a lead-acid
battery, remove personal metallic
items such as rings, bracelets,
necklaces and watches. A lead-acid
battery can produce a short-circuit
current high enough to weld a ring, or
the like to metal, which may cause
severe burns.
h.
Use the battery charger for charging
“lead-acid batteries only”. Do not
use for charging dry-cell or Ni-Cad
batteries that are commonly used with
home appliances. For example, radios,
torches etc. These batteries may
explode and cause injury to persons
and damage to property. Gel Filled
and other Sealed Batteries use BCI
model only (See page 9 for further
information).
i.
NEVER charge or boost and frozen
battery.
j.
NEVER allow clamps to touch one
another or to contact the same piece of
metal to prevent arcing.
To reduce risk of battery explosion,
follow these instructions and those
published by the battery manufacturer
and manufacturer of any equipment
you intend to use in the vicinity of the
battery. Review warning marks on all
these products and on the engine.
PERSONAL PRECAUTIONS:
a. When working near a lead-acid
battery, someone should be within
range of your voice, close enough to
come to your aid.
b.
Have plenty of fresh water and soap
nearby in case battery acid contacts
skin, clothing or eyes.
c.
Wear complete eye, hand and clothing
protection. Avoid touching eyes when
working with batteries.
d.
g.
3.
If battery acid contacts skin or
clothing, wash immediately with soap
and water. If acid enters eyes,
immediately flood eye with cool, clean
running water for at least 15 minutes
and get medical attention immediately.
e.
NEVER smoke or allow a spark or
flame in vicinity of battery or engine.
f.
Be extra cautious to reduce risk of
dropping a metal tool onto a battery. It
could spark or short circuit the battery
or, any other electrical part possibly
causing an explosion.
-3-
OTHER IMPORTANT SAFETY
INSTRUCTIONS
a. Do not use the charger in damp or wet
conditions.
b.
Keep out of reach of children.
c.
Do not submerge in water.
d.
Do not operate near flammables such
as petrol, paraffin, or thinners etc.
e.
If the charger receives a sharp blow or
is otherwise damaged in any way, do
not disassemble. Have it checked by a
qualified service person. Return to
source.
SAFETY FEATURES
The BSC60 battery charger is fitted with the following safety features:
1. Polarity inversion protection.
2.
Short circuit overload protection.
3. Thermal overload protection (Two Auto Reset Fuses).
Explanation of Symbols Featured on Rating Label
This symbol indicates machine is for indoor use only.
Indication that the machine is double insulated.
This is an indication that the machine is fitted with automatic overload protection.
Note: After an extended period of charging especially in the “fast” charge mode, the
thermal cut-out protection may be activated. This is to allow the charger a sufficient amount
of time to cool down (approx. 20mins) once the charger has sufficiently cooled, then
charging will recommence automatically.
-4-
POWER SUPPLY
CONNECTING YOUR MACHINE TO THE POWER SUPPLY: (230V)
To eliminate the possibility of an electric shock your machine has been fitted with a BS
approved, non rewireable moulded plug and cable which incorporates a fuse, the value
of which is indicated on the pin face of the plug. Should the fuse need to be replaced an
approved BS1362 fuse must be used of the same rating, marked thus
.
The fuse cover is detachable, never use the plug with the cover omitted. If a replacement
fuse cover is required, ensure it is of the same colour as that visible on the pin face of the
plug (i.e. red). Fuse covers are available from your Draper Tools stockist.
If the fitted plug is not suitable, it should be cut off and destroyed. *The end of the cable
should now be suitably prepared and the correct type of plug fitted. See below.
*WARNING:
A plug with bare flexible wires exposed is hazardous if engaged in a live power socket
outlet.
WARNING: THIS APPLIANCE IS DOUBLE INSULATED.
Blue – Neutral, Brown – Live.
As these colours may not correspond with the coloured markings identifying the
terminals in your plug, proceed as follows:
The wire which is coloured blue must be connected to the terminal which is marked with
the letter ‘N’ or coloured black or blue.
The wire which is coloured brown must be connected to the terminal which is marked
with the letter ‘L’ or coloured red or brown.
-5-
GETTING TO KNOW YOUR
BATTERY CHARGER
Fig.1.
✚✌
✕✌
✙✌
✗✌
✘✌
✖✌
Fig.1.
1. Charging unit.
2. Large insulated battery clips.
3. Normal fast/ start switch.
4. LED display.
5. BS non-rewireable moulded plug and cable.
6. Carry handle.
-6-
OPERATION & USE
BATTERY INFORMATION
Before procceeding with the charging of the battery ensure that the battery to be charged is within
the recommended amperage range for the charger (see table below).
PART NO.
RECOMMENDED
MIN. Ah.
RECOMMENDED
MAX. Ah.
BCS60
30Ah
135Ah
If the battery amperage rating is not stated or you are unsure about the rating please see the table
below for some typical ratings.
EXAMPLES OF TYPICAL VEHICLE BATTERY Ah RATINGS (For guidance only).
ENGINE
CAPACITY
<1300cc
5 - 15Ah
15 - 30Ah
35 - 45Ah
-
60 - 110Ah
>1300cc
-
-
45 - 65Ah
45 - 65Ah
60 - 110Ah
Diesel
-
-
60 - 90Ah
60 - 90Ah
60 - 110Ah
-7-
OPERATION & USE
BATTERY TESTING (FIG 2):
To use the battery testing facility on the
charger. Firstly ensure the charger is
disconnected from the mains power supply
(230V AC). Connect the positive charging lead
✪✌ (RED) to the positive terminal connection
(marked + or P) on the battery. Connect the
negative charging lead ✫✌ (BLACK) to the
negative terminal on the battery (marked - or N).
Once this is done the lights on the LED display
✬✌ will indicate the state of the battery. The
number of lights lit will depend on the
condition of the battery (i.e. if two lights are lit,
the battery is at approximately 25% of its
capacity and needs charging. If four lights are
lit, the battery is at approximately its full
capacity). If your battery requires charging
please refer to the “Charging Your Battery
section” on page 10.
Fig.2.
✫✌
✪✌
✬✌
USING THE “START” OPTION ON YOUR CHARGER
The BCS60 model is fitted with a “start” facility. This option together with the vehicles flat battery,
can deliver a starting current for approx 10 seconds suitable enough to start the vehicle engine.
NOTE:If the battery is in a flat state, then it may be required that the battery is charged for a few
minutes using the “fast” option (for charging instructions see page 10). This charge is beneficial
because when using the start option all the current from the charger goes into starting the vehicle
and not to the battery. It also enables the battery to contribute to the starting current.
Before connecting the charger to the vehicle, firstly make sure the charger is disconnected from the
mains supply (230V AC). Ensure that all electrical loads on the vehicle are switched off and that the
vehicle is placed in “Neutral” (Park for Automatic Transmission). Connect the positive (RED)
battery clip to the positive battery terminal (marked + or P). Attach the negative (BLACK) battery
clip to the ground on either the engine or chassis, but make sure it is away from fuel lines and any
moving parts. Only at this point connect the charger to the mains supply (230V AC). Once the
charger is connected select the “Fast/Start” option on the charger and then proceed to crank the
engine for several seconds.
If the jump start is successful then the internal cut out of the “Start” option will come into operation.
If the engine has not started then proceed to crank the engine again but if the engine still hasn’t
started after two or three attempts then leave the charger connected for a period of approximately
5 mins on the “Fast/Start” setting and then proceed to try again.
NOTE:If the engine does not start and the internal cut out is not activated in a few seconds, this
indicates that there is a possible fault in the vehicle starting system.
-8-
OPERATION & USE
BEFORE CHARGING YOUR BATTERY
NOTE: We recommend that the battery is disconnected from the vehicle. This will avoid any
possible damage to the alternator. Loss of codes for audio and security systems can be avoided
by connecting a Draper Memory Saver (Part No.CMS1 - Stock No.38330) or similar product before
disconnecting the battery. Check the car battery voltage matches that of the charger.
Before connecting the battery charger to the battery ensure that the charger and battery are on a
level surface. If the battery cell filler caps loosen or remove them to assist the escape of charging
gases. (If the battery being charged is a Maintenance Free, Gel Filled or Sealed battery refer to
the appropriate section below). Once the cell caps have been loosened, it is advisable to check
the level of electrolyte. If the level is below the mark on the under side of the battery, this should
be topped up using distilled water (Under no circumstances use tap water).
MAINTENANCE FREE BATTERIES
(Low Maintenance Batteries)
These batteries often have cells with no filler caps and therefore cannot be topped up with
distilled water so we strongly recommend the use of a Draper Automatic Charger (BC8A or BCI)
for charging these types of batteries. However if using Part No.BCS60 charging these batteries, it
is important that during charging they are not allowed to “gas” because this will reduce the level
of electrolyte which cannot be replaced.You should take extra care when the battery reaches
“Full” during charging and do not use the “Fast” charge option on such batteries.
GEL FILLED AND OTHER SEALED BATTERIES (Use BCI model Only)
This type of battery normally contains gel electrolyte and may be referred to as “Dry Fit”. They
are most commonly used in applications such as, electric golf trolleys, mobility wheelchairs,
camping, caravanning and marine activities etc. To charge this type of battery we strongly advise
you only use the Draper intelligent Charger (BCI), which is fitted with temperature sensor
compensation which allows continuous adjustment of the unsupervised charge to ovoid
overcharging and loss of electrolyte by ‘gassing’ which can shorten the life of the battery.
-9-
OPERATION & USE
CHARGING YOUR BATTERY
NOTE: Whilst carrying out the actions ensure
the battery charger is NOT connected to the
mains supply (230V AC).
Fig.3.
✮✌
While connected to the vehicle
If you intend to charge the battery whilst it is
still connected to the vehicle, make sure that all
electrical loads are switched off. Connect the
appropriate charger lead to the battery power
(This is usually the positive (RED) lead) and
connect the other lead (BLACK) to ground on
either the chassis or the engine away from any
fuel lines or the battery vents.
✭✌
When disconnected from the vehicle (Fig 3):
Connect the positive charging lead ✭✌(RED) to
the positive terminal connection on the battery
(marked + or P). Connect the negative charging
lead ✮✌ (BLACK) to the negative battery
terminal connection (marked - or N).
Once both battery clips are secure, select the
correct charge setting, either “Fast” or “Normal”
by adjusting the option switch ✯✌ accordingly
(Fig 4).
Fig.4.
NOTE: To ensure a longer battery life, it is
advisable to select the “Normal” charge facility.
✯✌
Fig.5.
After the correct charge setting has been
selected, only at this point should the charger
be connected to the mains supply (230V AC).
Once connected, the lights on the LED display
✰✌will be lit, the number of lights lit depends
on the condition of the battery (Fig 5).
During charging the status of the battery
charge can be monitored on the LED display.
When the charging light on the display is lit this
indicates the battery is fully charged.
Once the charging has been completed switch
off the mains supply (230V AC) before
removing the charger clips from the battery
terminals. Retighten cell caps if necessary (It is
advisable to take extreme care and please read
Personal Precautions on page 3).
- 10 -
✰✌
DRAPER TOOLS LIMITED,
Hursley Road, Chandler's Ford, Eastleigh, Hants. SO53 1YF. U.K.
Helpline: (023) 8049 4344.
Sales Desk: (023) 8049 4333.
General Enquiries: (023) 8026 6355.
Fax: (023) 8026 0784.
http://www.draper.co.uk
e-mail: [email protected]
YOUR DRAPER STOCKIST
©Published by Draper Tools Ltd.
No part of this publication may be reproduced,
stored in a retrieval system or transmitted in
any form or by any means, electronic, mechanical
photocopying, recording or otherwise without prior
permission in writing from Draper Tools Ltd.