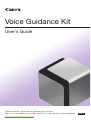
1
Voice Guidance Kit
User's Guide
Please read this guide before operating this product.
After you finish reading this guide, store it in a safe place for future reference.
Downloaded from ManualsPrinter.com Manuals
ENG
Downloaded from ManualsPrinter.com Manuals
Voice Guidance Kit
User's Guide
Downloaded from ManualsPrinter.com Manuals
How This Manual Is Organized
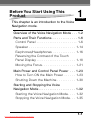
Chapter 1 Before You Start Using This Product
Chapter 2 Making Copies in the Voice Navigation
Mode
Chapter 3 Using the Send and Fax Functions in the
Voice Navigation Mode
Chapter 4 Customizing Settings
Chapter 5 Appendix
Includes a summary of the various
Copy modes that can be used in the
Voice Navigation Mode.
•Considerable effort has been made to ensure that this manual is
free of inaccuracies and omissions. However, as we are
constantly improving our products, if you need an exact
specification, please contact Canon.
•To view the manual in PDF format, Adobe Reader/Acrobat
Reader/Acrobat is required. If Adobe Reader/Acrobat Reader/
Acrobat is not installed on your system, please download it from
the Adobe Systems Incorporated website (http://www.adobe.com.)
Downloaded from ManualsPrinter.com Manuals
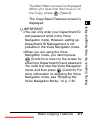
Contents
Preface . . . . . . . . . . . . . . . . . . . . . . . . viii
How To Use This Manual . . . . . . . . . . . ix
Symbols Used in This Manual . . . . . . . .ix
Displays Used in This Manual . . . . . . . .xi
Trademarks . . . . . . . . . . . . . . . . . . . . . xiii
Chapter 1 Before You Start Using This
Product
Overview of the Voice Navigation
Mode . . . . . . . . . . . . . . . . . . . . . . . . . . 1-2
Parts and Their Functions . . . . . . . . . 1-6
Control Panel . . . . . . . . . . . . . . . . . . . 1-6
Speaker . . . . . . . . . . . . . . . . . . . . . . 1-14
Earphones/Headphones . . . . . . . . . 1-16
Reversing the Contrast of the Touch
Panel Display. . . . . . . . . . . . . . . . . . 1-18
Moving the Focus . . . . . . . . . . . . . . 1-21
Main Power and Control Panel
Power . . . . . . . . . . . . . . . . . . . . . . . . 1-23
How to Turn ON the Main Power . . . 1-23
Shutting Down the Machine. . . . . . . 1-30
iii
Downloaded from ManualsPrinter.com Manuals
Starting and Stopping the Voice
Navigation Mode . . . . . . . . . . . . . . . 1-32
Starting the Voice Navigation
Mode . . . . . . . . . . . . . . . . . . . . . . . . 1-32
Stopping the Voice Navigation
Mode . . . . . . . . . . . . . . . . . . . . . . . . 1-35
Chapter 2 Making Copies in the Voice
Navigation Mode
Basic Copying Features . . . . . . . . . . 2-3
Before Making Copies . . . . . . . . . . . . 2-3
Flow of Copy Operations . . . . . . . . . . 2-9
Specifying the Required Number of
Copies . . . . . . . . . . . . . . . . . . . . . . . 2-16
Canceling a Copy Job . . . . . . . . . . . 2-19
Placing Originals . . . . . . . . . . . . . . .
Orientation. . . . . . . . . . . . . . . . . . . .
Platen Glass . . . . . . . . . . . . . . . . . .
Feeder . . . . . . . . . . . . . . . . . . . . . . .
2-20
2-22
2-24
2-30
Basic Copy Settings . . . . . . . . . . . .
Paper Selection . . . . . . . . . . . . . . . .
Manual Exposure Adjustment . . . . .
Original Type Selection . . . . . . . . . .
Changing Color Modes . . . . . . . . . .
2-37
2-37
2-41
2-46
2-50
iv
Downloaded from ManualsPrinter.com Manuals
Setting the Copy Ratio. . . . . . . . . . .
Preset Zoom . . . . . . . . . . . . . . . . .
Zoom by Percentage . . . . . . . . . .
Auto Zoom. . . . . . . . . . . . . . . . . . .
Collating Copies . . . . . . . . . . . . . . .
Collating Copies into Sets in
Page Order . . . . . . . . . . . . . . . . . .
Grouping Copies of the Same
Page Together. . . . . . . . . . . . . . . .
Collating Pages and Stapling . . . .
2-Sided Copying . . . . . . . . . . . . . . .
Making 2-Sided Copies from
1-Sided Originals . . . . . . . . . . . . .
Making 2-Sided Copies from
2-Sided Originals . . . . . . . . . . . . .
Making 1-Sided Copies from
2-Sided Originals . . . . . . . . . . . . .
Making 2-Sided Copies from
Facing Pages in a Book . . . . . . . .
2-57
2-57
2-62
2-65
2-68
2-70
2-75
2-79
2-84
2-85
2-89
2-94
2-97
Canceling a Copy Mode . . . . . . . . 2-102
v
Downloaded from ManualsPrinter.com Manuals
Chapter 3 Using the Send and Fax Functions
in the Voice Navigation Mode
Basic Send/Fax Features . . . . . . . . . 3-2
Before Sending/Faxing
a Document . . . . . . . . . . . . . . . . . . . . 3-3
Flow of Sending Operations . . . . . . . 3-5
Canceling a Job. . . . . . . . . . . . . . . . 3-18
Sending Fax Document
Manually . . . . . . . . . . . . . . . . . . . . . . 3-20
Specifying Registered
Destinations . . . . . . . . . . . . . . . . . . . 3-29
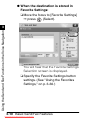
Using the Favorites Settings . . . . . . 3-30
Confirming the Destination List . . . 3-34
Scan Settings . . . . . . . . . . . . . . . . . .
Resolution . . . . . . . . . . . . . . . . . . . .
Scan Size . . . . . . . . . . . . . . . . . . . .
Density . . . . . . . . . . . . . . . . . . . . . .
Original Type . . . . . . . . . . . . . . . . . .
Preset Zoom . . . . . . . . . . . . . . . . .
Zoom by Percentage . . . . . . . . . .
2-Sided Originals. . . . . . . . . . . . . . .
Different Size Originals . . . . . . . . . .
Changing the Zoom Ratio . . . . . . . .
vi
Downloaded from ManualsPrinter.com Manuals
3-37
3-38
3-42
3-48
3-53
3-68
3-72
3-58
3-62
3-67
Auto Zoom. . . . . . . . . . . . . . . . . . . 3-77
Chapter 4 Customizing Settings
Enabling/Disabling the Voice
Navigation Mode . . . . . . . . . . . . . . . . 4-2
Setting the Maximum Volume of
the Voice Guidance . . . . . . . . . . . . . . 4-5
Setting the Auto Reset Mode . . . . . . 4-8
Voice Type Settings . . . . . . . . . . . . . 4-12
Volume and Voice Speed
Settings. . . . . . . . . . . . . . . . . . . . . . . 4-15
Enabling/Disabling the Voice Guide
from Speaker . . . . . . . . . . . . . . . . . . 4-21
Chapter 5 Appendix
Copy Mode Summary . . . . . . . . . . . . 5-2
Send/Fax Mode Summary . . . . . . . . 5-10
vii
Downloaded from ManualsPrinter.com Manuals
Preface
Thank you for purchasing the Canon Voice
Guidance Kit. Please read this manual thoroughly
before operating the Voice Guidance Kit to
familiarize yourself with its capabilities, and to
make the most of its many functions. After
reading this manual, store it in a safe place for
future reference.
The Voice Guidance Kit enables users of a Canon
MFP/Color MFP (hereinafter referred to as "the
machine") to hear voice instructions when
operating the machine.
It may be necessary to expand the memory or
add a PCI expansion slot to your machine in order
to use the Voice Navigation mode, depending on
the model of your machine.
A PDF file of this manual is included on the
CD-ROM included with this kit. For users who are
visually impaired, the content of this manual is
also explained in full text format in the "Voice
Guidance Kit User's Guide - Text Version" file
contained on the CD-ROM included with this kit. If
necessary, please use a screen reader with the
"Voice Guidance Kit User's Guide - Text Version"
file to help you operate the machine.
viii
Downloaded from ManualsPrinter.com Manuals
How To Use This Manual
Symbols Used in This Manual
The following symbols are used in this
manual to explain procedures, restrictions,
handling precautions, and instructions that
should be observed for safety.
WARNING
Indicates a warning
concerning operations that
may lead to death or injury to
persons if not performed
correctly. To use the
machine safely, always pay
attention to these warnings.
CAUTION
Indicates a caution
concerning operations that
may lead to injury to
persons, or damage to
property if not performed
correctly. To use the
machine safely, always pay
attention to these cautions.
ix
Downloaded from ManualsPrinter.com Manuals
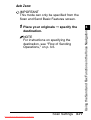
IMPORTANT Indicates operational
requirements and
restrictions. Be sure to read
these items carefully to
operate the machine
correctly, and to avoid
damage to the machine.
NOTE
x
Downloaded from ManualsPrinter.com Manuals
Indicates a clarification of an
operation, or contains
additional explanations for a
procedure. Reading these
notes is highly
recommended.
Displays Used in This Manual
Screen shots of the touch panel display used
in this manual are those taken of the
imageRUNNER ADVANCE C5051 with paper
sizes displayed in inches, unless otherwise
stated.
[Direct] may be displayed as [1:1], depending
on the region you live in.
Note that functions that cannot be used
depending on the model or options, are not
displayed on the touch panel display.
xi
Downloaded from ManualsPrinter.com Manuals
The keys which you should press are marked
with a
, as shown below.
When multiple keys can be pressed on the
touch panel display, all keys are marked.
Select the keys which suit your needs.
Press this
key for
operation.
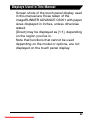
If you find it difficult to read what is on the
touch panel display, reverse the display
colors. The resulting display will have white
text on a black background. For instructions
on reversing the display colors, see
"Reversing the Contrast of the Touch Panel
Display," on p. 1-18.
xii
Downloaded from ManualsPrinter.com Manuals
Trademarks
MEAP and the MEAP logo are trademarks of
Canon Inc.
Other product and company names herein
may be the trademarks of their respective
owners.
xiii
Downloaded from ManualsPrinter.com Manuals
xiv
Downloaded from ManualsPrinter.com Manuals
Before You Start Using This
Product
1
CHAPTER
This chapter is an introduction to the Voice
Navigation mode.
Overview of the Voice Navigation Mode . . . 1-2
Parts and Their Functions. . . . . . . . . . . . . . 1-6
Control Panel . . . . . . . . . . . . . . . . . . . . . . 1-6
Speaker . . . . . . . . . . . . . . . . . . . . . . . . . 1-14
Earphones/Headphones . . . . . . . . . . . . 1-16
Reversing the Contrast of the Touch
Panel Display . . . . . . . . . . . . . . . . . . . . . 1-18
Moving the Focus. . . . . . . . . . . . . . . . . . 1-21
Main Power and Control Panel Power . . . 1-23
How to Turn ON the Main Power . . . . . . 1-23
Shutting Down the Machine . . . . . . . . . . 1-30
Starting and Stopping the Voice
Navigation Mode . . . . . . . . . . . . . . . . . . . . 1-32
Starting the Voice Navigation Mode. . . . 1-32
Stopping the Voice Navigation Mode. . . 1-35
1-1
Downloaded from ManualsPrinter.com Manuals
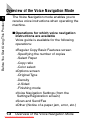
Overview of the Voice Navigation Mode
The Voice Navigation mode enables you to
receive voice instructions when operating the
machine.
Before You Start Using This Product
1
■ Operations for which voice navigation
instructions are available
Voice guide is available for the following
operations:
•Regular Copy Basic Features screen
-Specifying the number of copies
-Select Paper
-Copy ratio
-Color select
•Options screen
-Original Type
-Density
-2-Sided
-Finishing mode
•Voice Navigation Settings (from the
Settings/Registration screen)
•Scan and Send/Fax
•Other (Notice of a paper jam, error, etc.)
1-2
Overview of the Voice Navigation Mode
Downloaded from ManualsPrinter.com Manuals
1
CAUTION
Overview of the Voice Navigation Mode
Downloaded from ManualsPrinter.com Manuals
1-3
1
Before You Start Using This Product
Voice guide is not available for paper
jam removal procedures, or toner
replacement procedures. As it is
necessary to open certain covers of the
machine depending on your machine
model, to perform these procedures,
please seek assistance, and do not
open the covers. The procedure for
opening and closing the covers of the
machine may result in personal injury.
Also, there are some areas inside the
machine which are subject to high
voltages. Therefore, do not touch the
inside of the machine, as this may
result in burns or electrical shock.
1
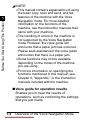
NOTE
• This manual contains explanations of using
the basic copy, scan and send, and fax
features of the machine with the Voice
Navigation mode. For more detailed
information on the functions of the
machine, see the instruction manuals that
came with your machine.
• The handling of errors in the machine is
not supported by the Voice Navigation
mode. However, the voice guide will
announce that a paper jam has occurred.
Please seek assistance if the voice guide
announces that there is a paper jam.
• Some functions may not be available
depending on the model of the machine
you are using.
• For more information on specifying the
functions mentioned in this manual, see
Chapter 5, "Appendix," or the instruction
manuals included with the machine.
Before You Start Using This Product
1
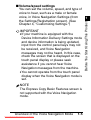
■ Voice guide for operation results
Enables you to hear the results of
operations, such as confirming the settings
that you just made.
1-4
Overview of the Voice Navigation Mode
Downloaded from ManualsPrinter.com Manuals
1
IMPORTANT
• If your machine is equipped with the
Device Information Delivery Settings mode
and device information is being updated,
input from the control panel keys may not
be received, and Voice Navigation
messages may not be heard. In this case,
check the screen that is displayed on the
touch panel display or please seek
assistance if you cannot hear Voice
Navigation messages from the machine.
• You cannot operate from the touch panel
display when the Voice Navigation mode is
set.
NOTE
The Express Copy Basic Features screen is
not supported with the Voice Navigation
mode.
Overview of the Voice Navigation Mode
Downloaded from ManualsPrinter.com Manuals
1-5
1
Before You Start Using This Product
■ Volume/speed settings
You can set the volume, speed, and type of
voice to hear, such as a male or female
voice, in Voice Navigation Settings (from
the Settings/Registration screen). (See
Chapter 4, "Customizing Settings.")
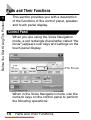
Parts and Their Functions
This section provides you with a description
of the functions of the control panel, speaker,
and touch panel display.
Before You Start Using This Product
1
Control Panel
When you are using the Voice Navigation
mode, a red rectangle (hereinafter called "the
focus") appears over keys and settings on the
touch panel display.
The Focus
When in the Voice Navigation mode, use the
numeric keys on the control panel to perform
the following operations:
1-6
Parts and Their Functions
Downloaded from ManualsPrinter.com Manuals
1
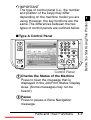
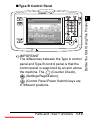
■ Type A Control Panel
Control Panel
Checks the Status of the Machine
Press to hear the message that is
displayed in the Job/Print Status Display
Area. (Some messages may not be
heard.)
Pause
Press to pause a Voice Navigation
message.
Parts and Their Functions
Downloaded from ManualsPrinter.com Manuals
1-7
1
Before You Start Using This Product
IMPORTANT
The type of control panel (i.e., the number
and position of the keys) may differ
depending on the machine model you are
using. However, the key functions are the
same. The differences between the two
types of control panels are outlined below.
1
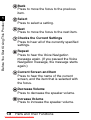
Back
Press to move the focus to the previous
item.
1
Before You Start Using This Product
Select
Press to select a setting.
Next
Press to move the focus to the next item.
Checks the Current Settings
Press to hear all of the currently specified
settings.
Repeat
Press to hear the Voice Navigation
message again. (If you paused the Voice
Navigation message, the message starts
again.)
Current Screen and Item
Press to hear the name of the current
screen, and the item that is selected with
the focus.
Decrease Volume
Press to decrease the speaker volume.
Increase Volume
Press to increase the speaker volume.
1-8
Parts and Their Functions
Downloaded from ManualsPrinter.com Manuals
1
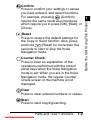
Reset
Press to restore the default settings for
the Copy or Send function. Also, press
and hold
(Reset) for more than five
seconds to start or stop the Voice
Navigation mode.
Counter Check
Press to hear an explanation of the
operations performed with the control
panel keys when the Voice Navigation
mode is set. When you are in the Voice
Navigation mode, the regular Counter
Check screen of the machine is not
displayed.
Clear
Press to clear entered numbers or values.
Start
Press to start copying/sending.
Parts and Their Functions
Downloaded from ManualsPrinter.com Manuals
1-9
1
Before You Start Using This Product
Confirm
Press to confirm your settings or values
you have entered, and select functions.
For example, pressing
(Confirm)
returns the same result as procedures
which require you to press [OK], [Next], or
[Close].
1
Stop
Press to stop a copy/send job in progress.
Energy Saver
Press to set or cancel the Energy Saver
mode.
Before You Start Using This Product
1
Control Panel Power Switch
(Sub Power Supply)
Press to turn the control panel ON or OFF.
When turned OFF, the machine is in the
Sleep mode.
Main
Power
Error
Main Power Indicator
Lights when the main power is turned ON.
Error Indicator
Flashes or lights if there is an error in the
machine. When the Error indicator
flashes, follow the instructions that appear
on the touch panel display. When the
Error indicator maintains a steady red
light, contact your local authorized Canon
dealer.
1-10 Parts and Their Functions
Downloaded from ManualsPrinter.com Manuals
1
Processing/Data Indicator
Flashes or blinks green when the
machine is performing operations. When
the Processing/Data indicator maintains a
steady green light, fax data is stored in
memory.
Brightness Adjustment Dial
Use to adjust the brightness of the touch
panel display.
Settings/Registration
Press to specify settings/registration.
Volume Settings Key
Press to display the screen for adjusting
settings such as the transmission volume
and fax sending/receiving alarm volume.
Main Menu key
Press to return to the main menu screen.
Quick Menu key
Press to retrieve a favorite functions
stored in Quick Menu. Also, if you are
using authentication, Quick Menu set for
each individual user can be displayed.
Parts and Their Functions 1-11
Downloaded from ManualsPrinter.com Manuals
1
Before You Start Using This Product
Processing/Data
1
Before You Start Using This Product
1
Status Monitor/Cancel key
Press to check the status of jobs or to
cancel print jobs. Also, press to check
status of the machine, such as checking
the amount of paper remaining.
NOTE
• The Energy Saver key, Control Panel
Power Switch, Volume Settings key, Quick
Menu key, and Status Monitor/Cancel key,
cannot be used when in the Voice
Navigation mode.
• According to the model of the machine you
are using, the control panel may resemble
the following.
1-12 Parts and Their Functions
Downloaded from ManualsPrinter.com Manuals
1
■ Type B Control Panel
IMPORTANT
The differences between the Type A control
panel and Type B control panel is that the
control panel is supported by an arm above
the machine. The
(Counter Check),
(Settings/Registration),
(Control Panel Power Switch) keys are
in different positions.
Parts and Their Functions 1-13
Downloaded from ManualsPrinter.com Manuals
Before You Start Using This Product
1
1
Speaker
The Voice Guidance Kit includes a speaker
for hearing Voice Navigation messages.
Before You Start Using This Product
1
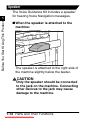
■ When the speaker is attached to the
machine:
The speaker is attached to the right side of
the machine slightly below the feeder.
CAUTION
Only the speaker should be connected
to the jack on the machine. Connecting
other devices to the jack may cause
damage to the machine.
1-14 Parts and Their Functions
Downloaded from ManualsPrinter.com Manuals
1
NOTE
Voice Navigation messages cannot be
heard using the internal speaker of the
machine.
You must use the external speaker included
with the Voice Guidance Kit to be able to
hear Voice Navigation messages.
Parts and Their Functions 1-15
Downloaded from ManualsPrinter.com Manuals
Before You Start Using This Product
IMPORTANT
Make sure not to get the cables of the
speaker caught when opening or closing the
cover on the right side of the machine, as
1
this may cause damage to the cables, and
result in the speaker not operating correctly.
1
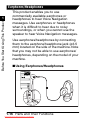
Earphones/Headphones
Before You Start Using This Product
1
This product enables you to use
commercially available earphones or
headphones to hear Voice Navigation
messages. Use earphones or headphones
when it is difficult to hear due to noisy
surroundings, or when you cannot use the
speaker to hear Voice Navigation messages.
Use earphones/headphones by connecting
them to the earphone/headphone jack (ø3.5
mm) located on the side of the machine. Note
that you may not be able to use earphones/
headphones, depending on the model of your
machine.
■ Using Earphones/Headphones
1-16 Parts and Their Functions
Downloaded from ManualsPrinter.com Manuals
1
CAUTION
NOTE
• Do not let the cable of the earphones/
headphones get caught in the main unit
cover or feeder/platen cover to ensure the
clearest sound possible. Ensuring that the
earphone/headphone and speaker cables
are parallel to each other when connected
is recommended.
• Contact the store where you purchased
your earphones/headphones for
information on wiring and volume
adjustment.
Parts and Their Functions 1-17
Downloaded from ManualsPrinter.com Manuals
1
Before You Start Using This Product
Do not connect other devices to the
earphone/headphone jack. Also, make
sure that the main power of the
machine is OFF before connecting
earphones/headphones. Connecting
earphones/headphones when the main
power of the machine is ON may cause
damage to this product.
1
Before You Start Using This Product
1
• Voice Navigation messages are output
from the speaker of the machine by default,
even if you connect earphones/
headphones to the jack on the side of the
machine. For instructions on hearing Voice
Navigation messages only from
earphones/headphones, see "Enabling/
Disabling the Voice Guide from Speaker,"
on p. 4-21.
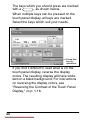
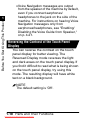
Reversing the Contrast of the Touch Panel
Display
You can reverse the contrast on the touch
panel display for better viewing. The
Reversed Display mode reverses the light
and dark areas on the touch panel display. If
you find it difficult to read what is being shown
on the touch panel display, try using this
mode. The resulting display will have white
text on a black background.
NOTE
The default setting is 'Off'.
1-18 Parts and Their Functions
Downloaded from ManualsPrinter.com Manuals
1
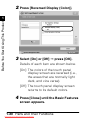
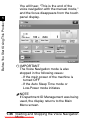
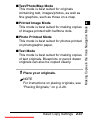
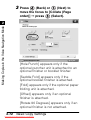
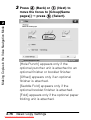
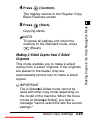
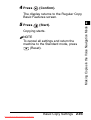
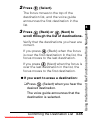
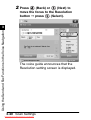
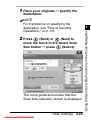
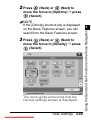
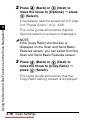
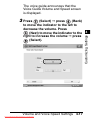
1 Press
(Settings/Registration) ➞
[Preferences] ➞ [▼] ➞ [Accessibility].
Before You Start Using This Product
1
Parts and Their Functions 1-19
Downloaded from ManualsPrinter.com Manuals
1
2 Press [Reversed Display (Color)].
Before You Start Using This Product
1
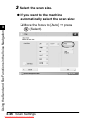
3 Select [On] or [Off] ➞ press [OK].
Details of each item are shown below.
[On]: The colors of the touch panel
display screen are reversed (i.e.,
the areas that are normally light
dark, and vice versa).
[Off]: The touch panel display screen
returns to its default colors.
4 Press [Close] until the Basic Features
screen appears.
1-20 Parts and Their Functions
Downloaded from ManualsPrinter.com Manuals
1
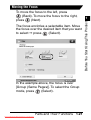
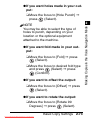
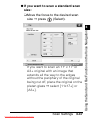
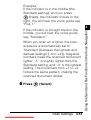
Moving the Focus
The focus encircles a selectable item. Move
the focus over the desired item that you want
to select ➞ press
(Select).
In the example above, the focus is over
[Group (Same Pages)]. To select the Group
mode, press
(Select).
Parts and Their Functions 1-21
Downloaded from ManualsPrinter.com Manuals
1
Before You Start Using This Product
To move the focus to the left, press
(Back). To move the focus to the right,
press
(Next).
1
Before You Start Using This Product
1
NOTE
• The focus cannot be moved to functions,
settings, or screens that are not supported
by the Voice Navigation mode.
• The focus is not displayed on any other
screens other than the Main Menu screen,
Copy Basic Features screen, Scan and
Send Basic Features screen, Fax Basic
Features screen, and Settings/Registration
screen.
• You will hear a beeping sound when you
move the focus away from the first setting
the focus is over, and when the focus
returns to the first setting the focus is over.
• For more information on the modes and
settings that are supported by the Voice
Navigation mode, see Chapter 5,
"Appendix."
1-22 Parts and Their Functions
Downloaded from ManualsPrinter.com Manuals
Main Power and Control Panel Power
How to Turn ON the Main Power
This section explains how to turn ON the
main power.
IMPORTANT
Please seek assistance when performing
this procedure.
1 Make sure that the power plug is
firmly inserted into the power outlet.
WARNING
Do not connect or disconnect the
power cord with wet hands, as this
may result in electrical shock.
Main Power and Control Panel Power 1-23
Downloaded from ManualsPrinter.com Manuals
1
Before You Start Using This Product
The machine is provided with two power
switches, a main power switch and a
(Control Panel Power Switch), as well as
a breaker that detects excess current or
leakage current.
1
2 If the optional security key is inserted
into the machine, make sure that it is
in the ON position (turn it to the
right).
Before You Start Using This Product
1
Security
When using the machine,
insert the security key
into the main unit, and
then turn it to the right.
1-24 Main Power and Control Panel Power
Downloaded from ManualsPrinter.com Manuals
1
"I" side. The main power switch is
located on the right side of the
machine.
1
The main power indicator on the control
panel lights when the main power switch
is turned ON.
Before You Start Using This Product
3 Press the main power switch to the
When operating the main power switch,
open the main power switch cover.
IMPORTANT
IMPORTANT
If the main power indicator on the control
panel does not light even though the main
power switch is ON, be sure to check the
breaker to see if it is OFF.
Main Power and Control Panel Power 1-25
Downloaded from ManualsPrinter.com Manuals
1
4 Various screens are displayed when
system software is loading.
Before You Start Using This Product
1
If you are using Department ID
Management or Department ID
Management with the Card Reader, see
"Flow of Copy Operations," on p. 2-9.
IMPORTANT
IMPORTANT
The screen for entering the user name
and password for the login service is not
supported by the Voice Navigation mode.
Also, the machine will not enter the Voice
Navigation mode if a login service is
being used.
1-26 Main Power and Control Panel Power
Downloaded from ManualsPrinter.com Manuals
1
❑ The Start Up screen is displayed until
the Main Menu screen appears.
NOTE
The time it takes for the Main Menu
screen to display may differ according to
the model of the machine you are using.
Main Power and Control Panel Power 1-27
Downloaded from ManualsPrinter.com Manuals
Before You Start Using This Product
1
1
The screen below is displayed.
Before You Start Using This Product
1
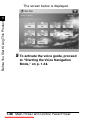
5 To activate the voice guide, proceed
to "Starting the Voice Navigation
Mode," on p. 1-32.
1-28 Main Power and Control Panel Power
Downloaded from ManualsPrinter.com Manuals
1
Main Power and Control Panel Power 1-29
Downloaded from ManualsPrinter.com Manuals
1
Before You Start Using This Product
NOTE
• For information on login services, see
the instruction manuals that came with
your machine.
• You can change the display order of the
function that appears on the Main Menu
screen. (See the instruction manuals
that came with your machine.)
• You can change the Start Up screen to
other than Main Menu screen, but
cannot be used with the Voice
Navigation mode. (See the instruction
manuals that came with your machine.)
1
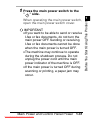
Shutting Down the Machine
Before You Start Using This Product
1
If there are any jobs currently being
processed, or a MEAP application is running
when the Shutdown mode is activated, the
machine asks you to confirm and cancel any
existing jobs, and then access to the hard
disk is restricted. This procedure protects the
hard disk from access errors the next time the
machine is turned ON.
When the machine shuts down, it also
performs an internal cooling down process,
which enables the machine to be shut down
safely. Follow the instructions below to safely
shutdown the machine.
1-30 Main Power and Control Panel Power
Downloaded from ManualsPrinter.com Manuals
1
1 Press the main power switch to the
" side.
When operating the main power switch,
open the main power switch cover.
IMPORTANT
IMPORTANT
• If you want to be able to send or receive
I-fax or fax documents, do not turn the
main power OFF. Sending or receiving
I-fax or fax documents cannot be done
when the main power is turned OFF.
• The machine may continue to operate
during the shutdown process. Do not
unplug the power cord until the main
power indicator of the machine is OFF.
• If the main power is turned OFF during
scanning or printing, a paper jam may
occur.
Main Power and Control Panel Power 1-31
Downloaded from ManualsPrinter.com Manuals
1
Before You Start Using This Product
"
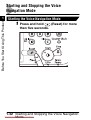
Starting and Stopping the Voice
Navigation Mode
1
Before You Start Using This Product
Starting the Voice Navigation Mode
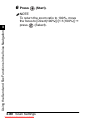
1 Press and hold
(Reset) for more
than five seconds.
1-32 Starting and Stopping the Voice Navigation
Mode
Downloaded from ManualsPrinter.com Manuals
1
The Focus
IMPORTANT
IMPORTANT
If nothing is displayed on the touch panel
display, or if the machine is in the Sleep
mode, the Voice Navigation mode will not
start even if you press and hold
(Reset) for more than five seconds.
Starting and Stopping the Voice Navigation 1-33
Mode
Downloaded from ManualsPrinter.com Manuals
1
Before You Start Using This Product
You will hear, "The voice navigation will
begin with the manual mode." and then
the focus is displayed on the touch panel
display.
1
Before You Start Using This Product
1
NOTE
• For information on how to resume
operating the machine when the main
power is turned OFF, see "How to Turn
ON the Main Power," on p. 1-23. If the
machine has entered the Energy Saver,
Sleep, or Low-Power mode, see the
instruction manuals that came with your
machine.
• Depending on the model of the machine
you are using, the voice may be
distorted if you start the Voice
Navigation mode immediately after the
machine is started. However, you can
continue using the Voice Navigation
mode normally. (The voice will return to
normal approximately 60 seconds after
starting the machine.)
1-34 Starting and Stopping the Voice Navigation
Mode
Downloaded from ManualsPrinter.com Manuals
1
Stopping the Voice Navigation Mode
1 Press and hold
(Reset) for more
1
Before You Start Using This Product
than five seconds.
Starting and Stopping the Voice Navigation 1-35
Mode
Downloaded from ManualsPrinter.com Manuals
1
You will hear, "This is the end of the
voice navigation with the manual mode,"
and the focus disappears from the touch
panel display.
Before You Start Using This Product
1
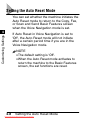
IMPORTANT
IMPORTANT
The Voice Navigation mode is also
stopped in the following cases:
- If the main power of the machine is
turned OFF
- If the Auto Sleep Time mode or
Low-Power mode initiates
NOTE
If Department ID Management was being
used, the display returns to the Main
Menu screen.
1-36 Starting and Stopping the Voice Navigation
Mode
Downloaded from ManualsPrinter.com Manuals
Making Copies in the Voice
Navigation Mode
2
CHAPTER
This chapter explains how to use the copying
functions of the machine that are supported
by the Voice Navigation mode.
Basic Copying Features . . . . . . . . . . . . . . . 2-3
Before Making Copies . . . . . . . . . . . . . . . 2-3
Flow of Copy Operations . . . . . . . . . . . . . 2-9
Specifying the Required Number of
Copies . . . . . . . . . . . . . . . . . . . . . . . . . . 2-16
Canceling a Copy Job . . . . . . . . . . . . . . 2-19
Placing Originals. . . . . . . . . . . . . . . . . . . .
Orientation . . . . . . . . . . . . . . . . . . . . . . .
Platen Glass . . . . . . . . . . . . . . . . . . . . . .
Feeder . . . . . . . . . . . . . . . . . . . . . . . . . .
2-20
2-22
2-24
2-30
Basic Copy Settings . . . . . . . . . . . . . . . . .
Paper Selection . . . . . . . . . . . . . . . . . . .
Manual Exposure Adjustment . . . . . . . .
Original Type Selection . . . . . . . . . . . . .
Changing Color Modes . . . . . . . . . . . . .
Setting the Copy Ratio . . . . . . . . . . . . . .
2-37
2-37
2-41
2-46
2-50
2-57
2-1
Downloaded from ManualsPrinter.com Manuals
1
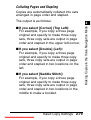
Collating Copies. . . . . . . . . . . . . . . . . . . 2-68
2-Sided Copying . . . . . . . . . . . . . . . . . . 2-84
Canceling a Copy Mode . . . . . . . . . . . . . 2-102
Making Copies in the Voice Navigation Mode
2
2-2
Downloaded from ManualsPrinter.com Manuals
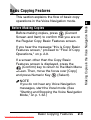
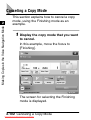
Basic Copying Features
Before Making Copies
Before making copies, press
(Current
Screen and Item) to confirm that you are on
the Regular Copy Basic Features screen.
If you hear the message "this is Copy Basic
Features screen," proceed to "Flow of Copy
Operations," on p. 2-9.
If a screen other than the Copy Basic
Features screen is displayed, press the
(Confirm) key to return to the Main Menu
screen. Then, move the focus over [Copy]
and press Numeric Key
(Select).
NOTE
If you do not hear any Voice Navigation
messages, start the Vocal mode. (See
"Starting and Stopping the Voice Navigation
Mode," on p. 1-32.)
Basic Copying Features
Downloaded from ManualsPrinter.com Manuals
2-3
2
Making Copies in the Voice Navigation Mode
This section explains the flow of basic copy
operations in the Voice Navigation mode.
1
● If the machine is being managed
using control cards:
You will hear a message informing
you to insert a control card.
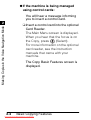
2
Making Copies in the Voice Navigation Mode
❑ Insert a control card into the optional
Card Reader.
The Main Menu screen is displayed.
When you hear that the focus is on
the Copy, press
(Select).
For more information on the optional
card reader, see the instruction
manuals that came with your
machine.
The Copy Basic Features screen is
displayed.
2-4
Basic Copying Features
Downloaded from ManualsPrinter.com Manuals
1
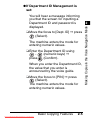
● If Department ID Management is
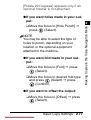
set:
❑ Move the focus to [Dept. ID] ➞ press
(Select).
The machine enters the mode for
entering numeric values.
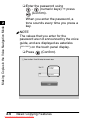
❑ Enter the Department ID using
(numeric keys) ➞
press
(Confirm).
When you enter the Department ID,
the value that you enter is
announced by the voice guide.
❑ Move the focus to [PIN] ➞ press
(Select).
The machine enters the mode for
entering numeric values.
Basic Copying Features
Downloaded from ManualsPrinter.com Manuals
2-5
2
Making Copies in the Voice Navigation Mode
You will hear a message informing
you that the screen for inputting a
Department ID and password is
displayed.
1
❑ Enter the password using
(numeric keys) ➞ press
(Confirm).
When you enter the password, a
tone sounds every time you press a
key.
Making Copies in the Voice Navigation Mode
2
NOTE
The values that you enter for the
password are not announced by the voice
guide, and are displayed as asterisks
(*******) on the touch panel display.
❑ Press
2-6
(Confirm).
Basic Copying Features
Downloaded from ManualsPrinter.com Manuals
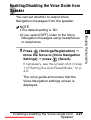
1
The Main Menu screen is displayed.
When you hear that the focus is on
the Copy, press
(Select).
IMPORTANT
• You can only enter your Department ID
and password while in the Voice
Navigation mode. However, setting up
Department ID Management is not
possible in the Voice Navigation mode.
• When you are using the Voice
Navigation mode, you cannot press
(Confirm) to return to the screen for
entering a Department ID and password.
You must first stop the Voice Navigation
mode, and then press
(Confirm). For
more information on stopping the Voice
Navigation mode, see "Stopping the
Voice Navigation Mode," on p. 1-35.
Basic Copying Features
Downloaded from ManualsPrinter.com Manuals
2-7
2
Making Copies in the Voice Navigation Mode
The Copy Basic Features screen is
displayed.
1
• You cannot start the Voice Navigation
mode if the login service such as
SSO-H(Single Sign-On H) screen is
displayed. For more information on
logging in using a login service, see the
instruction manuals that came with your
machine.
Making Copies in the Voice Navigation Mode
2
NOTE
• If the Department ID or password you
entered is incorrect, you will hear a Voice
Navigation message prompting you to
confirm your entry.
• For instructions on using Department ID
Management, see the instruction
manuals that came with your machine.
• If you do not hear the key entry sound
when you enter the password, please
seek assistance.
• You will not hear passwords entered
using the numeric keys.
2-8
Basic Copying Features
Downloaded from ManualsPrinter.com Manuals
1
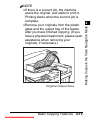
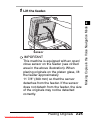
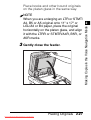
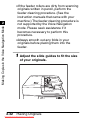
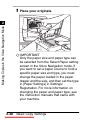
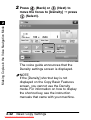
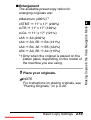
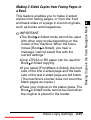
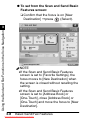
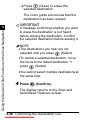
Flow of Copy Operations
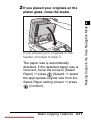
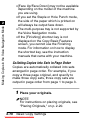
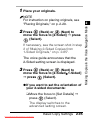
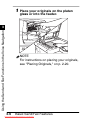
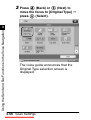
1 Place your originals on the platen
glass or into the feeder.
The feeder is above the control panel
with a plastic tray that can hold
numerous originals, and contains two
slide guides to fit the width of your
originals.
The platen glass is a flat, square glass
that is located under the feeder cover.
Open the feeder cover, and place your
original face down with the top edge of
the original aligned with the back edge
of the platen glass (by the arrow in the
top left corner).
Basic Copying Features
Downloaded from ManualsPrinter.com Manuals
2-9
Making Copies in the Voice Navigation Mode
2
1
IMPORTANT
• Place originals on the platen glass when
copying bound originals (such as books
and magazines), heavy or lightweight
originals, and transparencies. Place
originals into the feeder when you want
to copy several originals at the same
time. Place your originals in the following
way.
- Platen glass: Place your original face
down, align the top edge of the original
with the back edge of the platen glass
(by the arrow in the top left corner).
- Feeder: Adjust the slide guides to the
size of the originals, and place the
originals face-up into the feeder.
• For instructions on placing your
originals, see "Placing Originals," on p.
2-20.
Making Copies in the Voice Navigation Mode
2
2-10
Basic Copying Features
Downloaded from ManualsPrinter.com Manuals
1
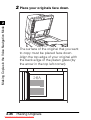
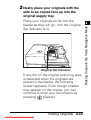
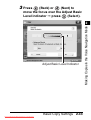
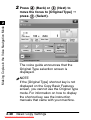
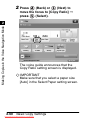
2 If you placed your originals on the
platen glass, close the feeder.
If you placed your originals in the
feeder, proceed to step 5.
The paper size is automatically
detected. If the detected paper size is
incorrect, move the focus to [Select
Paper] ➞ press
(Select) ➞ select
the appropriate original size from the
Select Paper setting screen ➞ press
(Confirm).
Basic Copying Features 2-11
Downloaded from ManualsPrinter.com Manuals
Making Copies in the Voice Navigation Mode
2
1
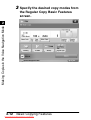
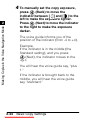
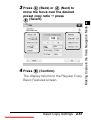
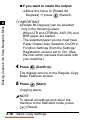
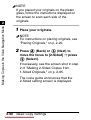
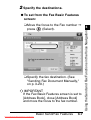
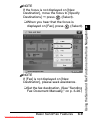
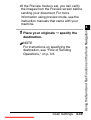
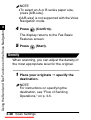
3 Specify the desired copy modes from
the Regular Copy Basic Features
screen.
Making Copies in the Voice Navigation Mode
2
2-12
Basic Copying Features
Downloaded from ManualsPrinter.com Manuals
1
4 Enter the copy quantity.
NOTE
For instructions on setting the number of
copies, see "Specifying the Required
Number of Copies," on p. 2-16.
Basic Copying Features 2-13
Downloaded from ManualsPrinter.com Manuals
2
Making Copies in the Voice Navigation Mode
NOTE
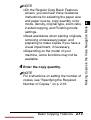
• On the Regular Copy Basic Features
screen, you can hear Voice Guidance
instructions for selecting the paper size
and paper source, copy quantity, color
mode, density, original type, zoom ratio,
2-sided copying, and Finishing mode
settings.
• Seek assistance when placing originals,
removing unnecessary paper, and
preparing to make copies if you have a
visual impairment, if necessary.
• Depending on the model of your
machine, some functions may not be
available.
1
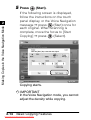
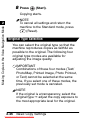
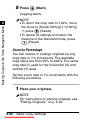
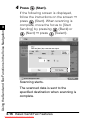
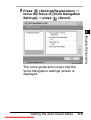
5 Press
(Start).
If the following screen is displayed,
follow the instructions on the touch
panel display, or the Voice Navigation
message ➞ press
(Start) once for
each original. When scanning is
complete, move the focus to [Start
Copying] ➞ press
(Select).
Making Copies in the Voice Navigation Mode
2
Copying starts.
IMPORTANT
In the Voice Navigation mode, you cannot
adjust the density while copying.
2-14
Basic Copying Features
Downloaded from ManualsPrinter.com Manuals
1
Original Output Area
Basic Copying Features 2-15
Downloaded from ManualsPrinter.com Manuals
2
Making Copies in the Voice Navigation Mode
NOTE
• If there is a current job, the machine
scans the original, and waits to print it.
Printing starts when the current job is
complete.
• Remove your originals from the platen
glass and the output tray of the feeder
after you have finished copying. (If you
have a physical impairment, please seek
assistance when removing your
originals, if necessary.)
1
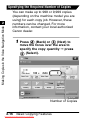
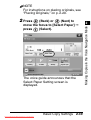
Specifying the Required Number of Copies
Making Copies in the Voice Navigation Mode
2
You can make up to 999 or 9,999 copies
(depending on the machine model you are
using) for each copy job. However, these
numbers can be changed. For more
information, contact your local authorized
Canon dealer.
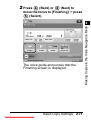
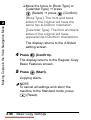
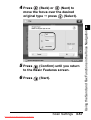
1 Press
(Back) or
(Next) to
move the focus over the area to
specify the copy quantity ➞ press
(Select).
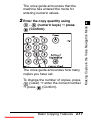
Number of Copies
2-16
Basic Copying Features
Downloaded from ManualsPrinter.com Manuals
1
The voice guide announces that the
machine has entered the mode for
entering numeric values.
(numeric keys) ➞ press
(Confirm).
The voice guide announces how many
copies you have set.
To change the number of copies, press
(Clear) ➞ enter the correct number
➞ press
(Confirm).
Basic Copying Features 2-17
Downloaded from ManualsPrinter.com Manuals
2
Making Copies in the Voice Navigation Mode
2 Enter the copy quantity using
1
IMPORTANT
• You cannot change the number of
copies while the machine is copying.
• If you pressed
(Confirm) after
setting the copy quantity, and you want
to change the number of copies
specified, press
(Select) to return to
the mode for entering numeric values,
press
(Clear), and then enter the
correct number of copies.
Making Copies in the Voice Navigation Mode
2
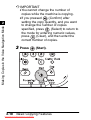
3 Press
2-18
(Start).
Basic Copying Features
Downloaded from ManualsPrinter.com Manuals
1
Canceling a Copy Job
1 Press
The copy job is canceled.
NOTE
If you cancel a copy job while the
machine is scanning, make sure to
remove your originals.
Basic Copying Features 2-19
Downloaded from ManualsPrinter.com Manuals
Making Copies in the Voice Navigation Mode
(Back) or
(Next) to
move the focus to [Stop] ➞ press
(Select) on the pop-up screen that
2
appears while the machine is
scanning, printing, or waiting to print.
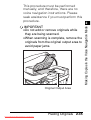
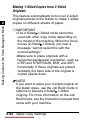
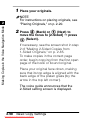
Placing Originals
Making Copies in the Voice Navigation Mode
2
Place your originals on the platen glass or
into the feeder, depending on the size and
type of the original, and the copy modes you
want to use.
NOTE
If the original has too many pages to be
placed in the feeder all at once, use the Job
Build mode on the Options screen. For more
information on using the Job Build mode,
see the instruction manuals that came with
your machine. The Job Build mode is not
supported by the Voice Navigation mode.
Please seek assistance if you need to use
this mode.
■ Platen Glass
Place your originals on the platen glass
when copying bound originals (such as
books and magazines), heavy or
lightweight originals, and transparencies.
2-20
Placing Originals
Downloaded from ManualsPrinter.com Manuals
1
Placing Originals 2-21
Downloaded from ManualsPrinter.com Manuals
2
Making Copies in the Voice Navigation Mode
■ Feeder
Place your originals into the feeder when
you want to copy several originals at the
same time, and press
(Start). The
machine automatically feeds the originals
to the platen glass and scans them. 2-sided
originals can also be automatically turned
over and scanned as 2 or 1-sided
documents.
1
Orientation
Making Copies in the Voice Navigation Mode
2
You can place an original either vertically or
horizontally. Always align the top edge of your
original with the back edge of the platen glass
(by the arrow in the top left corner) or the
back edge of the feeder.
Platen Glass
Place the original
face down.
Place the original
face down.
Vertical Placement
Horizontal Placement
Feeder
Place the original
face up.
Vertical Placement
2-22
Placing Originals
Downloaded from ManualsPrinter.com Manuals
Place the original
face up.
Horizontal Placement
1
Placing Originals 2-23
Downloaded from ManualsPrinter.com Manuals
2
Making Copies in the Voice Navigation Mode
NOTE
• If the top edge of the original is not aligned
with the back edge of the platen glass (by
the arrow in the top left corner), your
original may not be scanned correctly,
depending on the copy modes that you
have set.
• Originals of the following sizes can be
placed either vertically or horizontally.
However, the scanning speed for
horizontally placed originals is somewhat
slower than vertically placed originals.
Place originals horizontally when scanning
with a Preset Zoom, such as when
enlarging an LTR/A4 original onto 11" x
17"/A3 paper.
- Platen glass: LTR and STMT/A4, B5, and
A5
- Feeder: LTR and STMT/A4 and B5
• Horizontally placed LTR and STMT/A4, B5,
and A5 originals are referred to as LTRR
and STMTR/A4R, B5R, and A5R.
• 11" x 17" and LGL/A3 and B4 originals
must be placed horizontally.
1
Platen Glass
Making Copies in the Voice Navigation Mode
2
You should use the platen glass when
copying bound originals (such as books and
magazines), heavy or lightweight originals,
and transparencies. (See "Paper Selection,"
on p. 2-37.)
NOTE
The machine automatically detects the size
of the following originals: 11" x 17", LGL,
LTR, LTRR, and STMTR/A3, B4, A4, A4R,
B5, B5R, A5, and B6.
2-24
Placing Originals
Downloaded from ManualsPrinter.com Manuals
1
1 Lift the feeder.
Sensor
IMPORTANT
This machine is equipped with an open/
close sensor on the feeder (see circled
area in the above illustration). When
placing originals on the platen glass, lift
the feeder approximately
11 7/8" (300 mm) so that the sensor
detaches from the feeder. If the sensor
does not detach from the feeder, the size
of the originals may not be detected
correctly.
Placing Originals 2-25
Downloaded from ManualsPrinter.com Manuals
Making Copies in the Voice Navigation Mode
2
1
2 Place your originals face down.
Making Copies in the Voice Navigation Mode
2
The surface of the original that you want
to copy must be placed face down.
Align the top edge of your original with
the back edge of the platen glass (by
the arrow in the top left corner).
2-26
Placing Originals
Downloaded from ManualsPrinter.com Manuals
1
Place books and other bound originals
on the platen glass in the same way.
3 Gently close the feeder.
Placing Originals 2-27
Downloaded from ManualsPrinter.com Manuals
Making Copies in the Voice Navigation Mode
NOTE
When you are enlarging an LTR or STMT/
2
A4, B5 or A5 original onto 11" x 17" or
LGL/A3 or B4 paper, place the original
horizontally on the platen glass, and align
it with the LTRR or STMTR/A4R, B5R, or
A5R marks.
1
IMPORTANT
CAUTION
•Close the feeder gently to avoid
catching your hands, as this may
result in personal injury.
•Do not press down hard on the
feeder when using the platen glass
to make copies of thick books.
Doing so may damage the platen
glass and result in personal injury.
Making Copies in the Voice Navigation Mode
2
IMPORTANT
If you are placing the original on the
platen glass, the size of the original is
detected after the feeder is closed. Be
sure to close the feeder before copying.
NOTE
• Remove the original from the platen
glass when scanning is complete.
2-28
Placing Originals
Downloaded from ManualsPrinter.com Manuals
1
• For more information, see "Paper
Selection," on p. 2-37.
Placing Originals 2-29
Downloaded from ManualsPrinter.com Manuals
2
Making Copies in the Voice Navigation Mode
• If the size of the original is not detected,
press
(Start) ➞ follow the
instructions on the screen to specify the
original size. You can also manually
select the paper size.
1
Feeder
Making Copies in the Voice Navigation Mode
2
You should use the feeder when you want to
copy several originals at the same time. Place
your originals into the feeder, and then press
(Start). The machine automatically feeds
the originals to the platen glass and scans
them. 2-sided originals can also be
automatically turned over and scanned as 2
or 1-sided documents.
You can place the following originals into the
feeder's original supply tray:
•Weight:
- One-sided scanning: 11 to 32 lb bond
(42 to 128 g/m2)
- Two-sided scanning: 13 to 32 lb bond
(50 to 128 g/m2)
•Size:
- 11" x 17", LGL, LTR, LTRR, STMT, or
STMTR/A3, B4, A4, A4R, B5, B5R, A5,
A5R, or B6R
•Tray Capacity:
- 150 sheets of paper (20 lb bond (80g/m2))
2-30
Placing Originals
Downloaded from ManualsPrinter.com Manuals
1
These specifications may vary, depending on
the machine you are using. For exact
specifications, please see the instruction
manuals that came with your machine.
Placing Originals 2-31
Downloaded from ManualsPrinter.com Manuals
2
Making Copies in the Voice Navigation Mode
IMPORTANT
•Thin originals may become creased, if
used in a high temperature or high humidity
environment.
•Do not place the following types of originals
into the feeder:
- Originals with tears or large binding holes
- Severely curled originals or originals with
sharp folds
- Clipped or stapled originals
- Carbon backed paper or other originals
which may not feed smoothly
- Transparencies and other highly
transparent originals
•If the same original is fed through the
feeder repeatedly, the original may fold or
become creased, and make feeding
impossible. Limit repeated feeding to a
maximum of 30 times (this number varies,
depending on the type and quality of the
original).
1
•If the feeder rollers are dirty from scanning
originals written in pencil, perform the
feeder cleaning procedure. (See the
instruction manuals that came with your
machine.) The feeder cleaning procedure is
not supported by the Voice Navigation
mode. Please seek assistance if it
becomes necessary to perform this
procedure.
•Always smooth out any folds in your
originals before placing them into the
feeder.
Making Copies in the Voice Navigation Mode
2
1 Adjust the slide guides to fit the size
of your originals.
2-32
Placing Originals
Downloaded from ManualsPrinter.com Manuals
1
2 Neatly place your originals with the
side to be copied face up into the
original supply tray.
Original Set Indicator
If any dirt on the original scanning area
is detected when the originals are
placed in the feeder, the following
screen appears. Even though streaks
may appear on the copies, you can
continue to scan your documents by
pressing
(Select).
Placing Originals 2-33
Downloaded from ManualsPrinter.com Manuals
2
Making Copies in the Voice Navigation Mode
Place your originals as far into the
feeder as they will go, until the Original
Set indicator is lit.
1
It is recommended, however, that you
open the feeder, clean the scanning
area (thin glass strip on the platen glass’
left side with a slightly dampened, well
wrung-out cloth), and then close the
feeder. The following screen depicting
how to clean the thin glass strip will not
appear once the scanning area is clean.
Making Copies in the Voice Navigation Mode
2
For instructions on cleaning the original
scanning area, see the instruction
manuals that came with your machine.
2-34
Placing Originals
Downloaded from ManualsPrinter.com Manuals
1
IMPORTANT
• Do not add or remove originals while
they are being scanned.
• When scanning is complete, remove the
originals from the original output area to
avoid paper jams.
Original Output Area
Placing Originals 2-35
Downloaded from ManualsPrinter.com Manuals
2
Making Copies in the Voice Navigation Mode
This procedure must be performed
manually, and therefore, there are no
voice navigation instructions. Please
seek assistance if you must perform this
procedure.
1
NOTE
• The scanned originals are output to the
original output area in the order that they
are fed into the feeder.
• When you are enlarging an LTR or
STMT/A4 or B5 original onto 11" x 17" or
LGL/A3 or B4 paper, place the original
horizontally.
• You can place different size originals
together into the feeder if you set the
Different Size Originals mode. (See the
instruction manuals that came with your
machine.) The Different Size Originals
mode is not supported by the Voice
Navigation mode. Please seek
assistance if you need to use this mode.
Making Copies in the Voice Navigation Mode
2
2-36
Placing Originals
Downloaded from ManualsPrinter.com Manuals
Basic Copy Settings
Paper Selection
You can manually specify a paper size or set
the machine to automatically select a paper
size for you.
IMPORTANT
You cannot specify the multi-purpose tray or
select [Change MP Tray Paper] while in the
Voice Navigation mode.
NOTE
The default setting is 'Auto'.
Basic Copy Settings 2-37
Downloaded from ManualsPrinter.com Manuals
2
Making Copies in the Voice Navigation Mode
This section explains the procedure for
specifying basic copy settings, such as
selecting the paper size, and setting the
Original Type, Select Color, Density, Copy
Ratio, 2-Sided, and Finishing modes.
1
1 Place your originals.
Making Copies in the Voice Navigation Mode
2
IMPORTANT
Only the paper size and paper type can
be selected from the Select Paper setting
screen in the Voice Navigation mode. If
you want to set a paper source to hold a
specific paper size and type, you must
change the paper loaded in the paper
drawer and the size, and then set the type
in [Paper Settings] in Settings/
Registration. For more information on
changing the paper and paper type, see
the instruction manuals that came with
your machine.
2-38
Basic Copy Settings
Downloaded from ManualsPrinter.com Manuals
1
NOTE
For instructions on placing originals, see
"Placing Originals," on p. 2-20.
(Back) or
(Next) to
move the focus to [Select Paper] ➞
press
(Select).
The voice guide announces that the
Select Paper Setting screen is
displayed.
Basic Copy Settings 2-39
Downloaded from ManualsPrinter.com Manuals
2
Making Copies in the Voice Navigation Mode
2 Press
1
3 Press
(Back) or
(Next) to
move the focus to the paper source
containing the desired paper size ➞
press
(Select).
Making Copies in the Voice Navigation Mode
2
The voice guide announces the paper
source number, paper size, and paper
type that is loaded in that paper source.
4 Press
(Confirm).
The display returns to the Regular Copy
Basic Features screen.
2-40
Basic Copy Settings
Downloaded from ManualsPrinter.com Manuals
1
NOTE
You can also move the focus to [OK] and
press Numeric Key
(Select) to close
the Paper Selection screen.
(Start).
Copying starts.
NOTE
To cancel all settings and return the
machine to the Standard mode, press
(Reset).
Manual Exposure Adjustment
You can manually adjust the exposure to the
most appropriate level for the original.
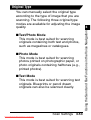
1 Place your originals.
NOTE
For instructions on placing originals, see
"Placing Originals," on p. 2-20.
Basic Copy Settings 2-41
Downloaded from ManualsPrinter.com Manuals
Making Copies in the Voice Navigation Mode
5 Press
2
1
2 Press
(Back) or
(Next) to
move the focus to [Density] ➞ press
(Select).
Making Copies in the Voice Navigation Mode
2
The voice guide announces that the
Density settings screen is displayed.
NOTE
If the [Density] shortcut key is not
displayed on the Copy Basic Features
screen, you cannot use the Density
mode. For information on how to display
the shortcut key, see the instruction
manuals that came with your machine.
2-42
Basic Copy Settings
Downloaded from ManualsPrinter.com Manuals
1
3 Press
(Back) or
(Next) to
move the focus over the Adjust Basic
Level indicator ➞ press
(Select).
Adjust Basic Level Indicator
Basic Copy Settings 2-43
Downloaded from ManualsPrinter.com Manuals
Making Copies in the Voice Navigation Mode
2
1
4 To manually set the copy exposure,
press
(Back) to move the
indicator between [ ] and [ ] to the
left to make the exposure lighter.
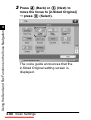
Press
(Next) to move the indicator
to the right to make the exposure
darker.
Making Copies in the Voice Navigation Mode
2
The voice guide informs you of the
position of the indicator (from -4 to +4).
Example:
If the indicator is in the middle (the
Standard setting), and you press
(Next), the indicator moves to the
right.
You will hear the voice guide say, "plus
1."
If the indicator is brought back to the
middle, you will hear the voice guide
say, "standard."
2-44
Basic Copy Settings
Downloaded from ManualsPrinter.com Manuals
1
5 Press
(Select).
6 Press
(Confirm).
NOTE
To automatically adjust the background
density, move the focus to [Auto] ➞ press
(Select).
The selected mode is set.
7 Press
(Confirm).
The display returns to the Regular Copy
Basic Features screen.
Basic Copy Settings 2-45
Downloaded from ManualsPrinter.com Manuals
2
Making Copies in the Voice Navigation Mode
IMPORTANT
When you make a copy, the copy
exposure is automatically set to
'Standard' (between the lightest and
darkest settings ('-4 to +4')). Negative
numbers make the copies lighter. '-1', is
slightly lighter than the Standard setting,
and '-4' is the lightest setting. The
movement from +1 to +4 follows the same
pattern, making the copy darker.
1
8 Press
(Start).
Copying starts.
NOTE
To cancel all settings and return the
machine to the Standard mode, press
(Reset).
Making Copies in the Voice Navigation Mode
2
Original Type Selection
You can select the original type so that the
machine reproduces copies as faithful as
possible to the original. The following four
original type modes are available for
adjusting the image quality.
IMPORTANT
Combinations of these four modes (Text/
Photo/Map, Printed Image, Photo Printout,
or Text) cannot be selected at the same
time. If you select one of these modes, the
previously set mode is canceled.
NOTE
If the original is a transparency, select the
original type ➞ adjust the copy exposure to
the most appropriate level for the original.
2-46
Basic Copy Settings
Downloaded from ManualsPrinter.com Manuals
1
■ Text/Photo/Map Mode
This mode is best suited for originals
containing text, images/photos, as well as
fine graphics, such as those on a map.
■ Photo Printout Mode
This mode is best suited for photos printed
on photographic paper.
■ Text Mode
This mode is best suited for making copies
of text originals. Blueprints or pencil drawn
originals can also be copied clearly.
1 Place your originals.
NOTE
For instructions on placing originals, see
"Placing Originals," on p. 2-20.
Basic Copy Settings 2-47
Downloaded from ManualsPrinter.com Manuals
2
Making Copies in the Voice Navigation Mode
■ Printed Image Mode
This mode is best suited for making copies
of images printed with halftone dots.
1
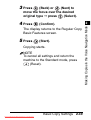
2 Press
(Back) or
(Next) to
move the focus to [Original Type] ➞
press
(Select).
Making Copies in the Voice Navigation Mode
2
The voice guide announces that the
Original Type selection screen is
displayed.
NOTE
If the [Original Type] shortcut key is not
displayed on the Copy Basic Features
screen, you cannot use the Original Type
mode. For information on how to display
the shortcut key, see the instruction
manuals that came with your machine.
2-48
Basic Copy Settings
Downloaded from ManualsPrinter.com Manuals
1
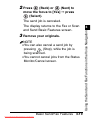
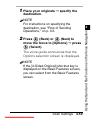
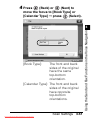
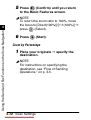
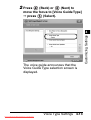
3 Press
(Back) or
(Next) to
move the focus over the desired
original type ➞ press
(Select).
(Confirm).
The display returns to the Regular Copy
Basic Features screen.
5 Press
(Start).
Copying starts.
NOTE
To cancel all settings and return the
machine to the Standard mode, press
(Reset).
Basic Copy Settings 2-49
Downloaded from ManualsPrinter.com Manuals
2
Making Copies in the Voice Navigation Mode
4 Press
1
Changing Color Modes
If the model of the machine you are using can
make color copies, you can also select the
color mode.
Making Copies in the Voice Navigation Mode
2
You can select the following five types of color
mode.
NOTE
The default setting is 'Auto(Color/Black)'.
■ Auto (Color/Black)
If the Auto(Color/Black) mode is selected,
the machine automatically recognizes
whether the original is in color or
black-and-white. Color originals are copied
in the Full Color mode, while
black-and-white originals are copied in the
Black mode.
2-50
Basic Copy Settings
Downloaded from ManualsPrinter.com Manuals
1
■ Full Color
The Full Color mode always copies in color
regardless of whether the original is in color
or black-and-white.
NOTE
If a black-and-white original is copied in the
Full Color mode, it is counted as a color
copy.
Basic Copy Settings 2-51
Downloaded from ManualsPrinter.com Manuals
Making Copies in the Voice Navigation Mode
IMPORTANT
When the Auto(Color/Black) mode is set
and your originals contain color sections,
the machine copies them in the Full Color
mode. However, the machine may copy
2
color originals in the Black mode under the
following conditions. To avoid this, set the
color mode to 'Full Color'.
- If the originals contain few color sections
- If the color sections are located only on
the left side (within 3/8" (10 mm) from the
left edge) or the right side (within 5/8" (17
mm) from the right edge) of the originals
when placing the originals in the feeder
- If the originals contain light color densities
- If the color sections of the originals are
close to black
1
■ Black
The Black mode always copies in
black-and-white regardless of whether the
original is in color or black-and-white.
Making Copies in the Voice Navigation Mode
2
■ Single Color
The Single Color mode enables you to
make one-color copies.
IMPORTANT
You can select Red, Green, Blue, Yellow,
Magenta, or Cyan as the color.
NOTE
If a black-and-white document is copied in
the Single Color mode, it is counted as a
color copy.
■ Two Colors
The Two Colors mode enables you to make
two-color prints, composed of a color you
specify, and black.
IMPORTANT
You can select Red, Green, Blue, Yellow,
Magenta, or Cyan as the color.
2-52
Basic Copy Settings
Downloaded from ManualsPrinter.com Manuals
1
NOTE
If a black-and-white document is copied in
the Two Colors mode, it is counted as a
color copy.
NOTE
For instructions on placing originals, see
"Placing Originals," on p. 2-20.
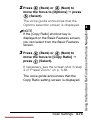
2 Press
(Back) or
(Next) to
move the focus to [Select Color] ➞
press
(Select).
The voice guide announces that the
Select Color screen is displayed.
Basic Copy Settings 2-53
Downloaded from ManualsPrinter.com Manuals
Making Copies in the Voice Navigation Mode
1 Place your originals.
2
1
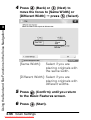
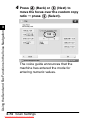
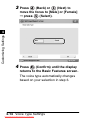
3 Press
(Back) or
(Next) to
move the focus over the desired
Color mode ➞ press
(Select).
● If you selected [Auto(Color/Black)],
[Full Color], or [Black]:
Making Copies in the Voice Navigation Mode
2
❑ Press
(Confirm).
The display returns to the Regular
Copy Basic Features screen.
2-54
Basic Copy Settings
Downloaded from ManualsPrinter.com Manuals
1
● If you selected [Single Color]:
❑ Move the focus over the desired
color ➞ press
(Select).
❑ Press
(Confirm).
The display returns to the Regular
Copy Basic Features screen.
Basic Copy Settings 2-55
Downloaded from ManualsPrinter.com Manuals
Making Copies in the Voice Navigation Mode
2
1
● If you selected [Two Colors]:
❑ Move the focus over the desired
color ➞ press
(Select).
Making Copies in the Voice Navigation Mode
2
❑ Press
(Confirm).
The display returns to the Regular
Copy Basic Features screen.
4 Press
(Start).
Copying starts.
NOTE
To cancel all settings and return the
machine to the Standard mode, press
(Reset).
2-56
Basic Copy Settings
Downloaded from ManualsPrinter.com Manuals
1
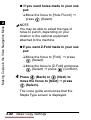
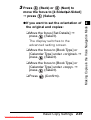
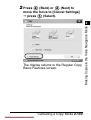
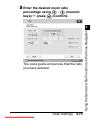
Setting the Copy Ratio
There are seven types of copy ratio settings,
however, only the Preset Zoom, Zoom by
Percentage and Auto Zoom modes can be
set in the Voice Navigation mode.
NOTE
To set the copy ratio to 100%, select
[Direct(100%)]/[1:1(100%)].
Preset Zoom
The machine offers you a variety of preset
copy ratios to reduce or enlarge standard size
originals to another standard paper size.
IMPORTANT
Place the originals horizontally in the
following cases:
- If you are enlarging LTR/A4 originals to
11" x 17"/A3 or B4
- If you are enlarging STMT originals to
11" x 17" (when the original is placed on
the platen glass)
- If you are enlarging B5 originals to B4
Basic Copy Settings 2-57
Downloaded from ManualsPrinter.com Manuals
2
Making Copies in the Voice Navigation Mode
You can set the machine to adjust the copy
ratio automatically, or you can specify the
copy ratio manually.
1
- If you are enlarging A5 originals to A3
- If you are reducing 11" x 17"/A3 or B4
originals to LTR/A4 or B5 with Auto
Orientation in Copy Settings (from the
Settings/Registration screen) set to 'Off',
load LTRR/A4R or B5R paper in Paper
Drawer or the multi purpose tray.
Making Copies in the Voice Navigation Mode
2
■ Reduction
The available preset copy ratios for
reducing originals are:
•LGL ➞ LTR (78%)
•11" x 17" ➞ LGL or 11" x 15" ➞ LTR (73%)
•11" x 17" ➞ LTR (64%)
•11" x 17" ➞ STMT (50%)
•A3 ➞ B4, A4 ➞ B5 (86%)
•B4 ➞ A4, B5 ➞ A5 (81%)
•A3 ➞ A4, B4 ➞ B5 (70%)
•A3 ➞ B5 (61%)
•A3 ➞ A5 (50%)
•Minimum (25%)
2-58
Basic Copy Settings
Downloaded from ManualsPrinter.com Manuals
1
■ Enlargement
The available preset copy ratios for
enlarging originals are:
1 Place your originals.
NOTE
For instructions on placing originals, see
"Placing Originals," on p. 2-20.
Basic Copy Settings 2-59
Downloaded from ManualsPrinter.com Manuals
2
Making Copies in the Voice Navigation Mode
•Maximum (400%)*1
•STMT ➞ 11" x 17" (200%)
•LTR ➞ 11" x 17" (129%)
•LGL ➞ 11" x 17" (121%)
•A5 ➞ A3 (200%)
•A4 ➞ A3, B5 ➞ B4 (141%)
•A4 ➞ B4, A5 ➞ B5 (122%)
•B4 ➞ A3, B5 ➞ A4 (115%)
*1 Only when the original is placed on the
platen glass, depending on the model of
the machine you are using.
1
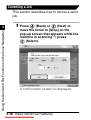
2 Press
(Back) or
(Next) to
move the focus to [Copy Ratio] ➞
press
(Select).
Making Copies in the Voice Navigation Mode
2
The voice guide announces that the
Copy Ratio setting screen is displayed.
IMPORTANT
Make sure that you select a paper size
[Auto] in the Select Paper setting screen.
2-60
Basic Copy Settings
Downloaded from ManualsPrinter.com Manuals
1
3 Press
(Back) or
(Next) to
move the focus over the desired
preset copy ratio ➞ press
(Select).
4 Press
(Confirm).
The display returns to the Regular Copy
Basic Features screen.
Basic Copy Settings 2-61
Downloaded from ManualsPrinter.com Manuals
Making Copies in the Voice Navigation Mode
2
1
5 Press
(Start).
Copying starts.
NOTE
• To return the copy ratio to 100%, move
the focus to [Direct(100%)]/[1:1(100%)]
➞ press
(Select).
• To cancel all settings and return the
machine to the Standard mode, press
(Reset).
Making Copies in the Voice Navigation Mode
2
Zoom by Percentage
You can reduce or enlarge originals by any
copy ratio in 1% increments. The available
copy ratios are from 25% to 400%. The same
copy ratio is used for the horizontal (X) and
vertical (Y) axes.
Set the zoom ratio in 1% increments with the
following procedure.
1 Place your originals.
NOTE
For instructions on placing originals, see
"Placing Originals," on p. 2-20.
2-62
Basic Copy Settings
Downloaded from ManualsPrinter.com Manuals
1
2 Press
(Back) or
(Next) to
move the focus to [Copy Ratio] ➞
press
(Select).
3 Press
(Back) or
(Next) to
move the focus over the custom copy
ratio ➞ press
(Select).
The voice guide announces that the
machine has entered the mode for
entering numeric values.
4 Enter the desired zoom ratio
percentage using
(numeric
keys) ➞ press
(Confirm).
The voice guide announces that the ratio
you have entered.
Basic Copy Settings 2-63
Downloaded from ManualsPrinter.com Manuals
2
Making Copies in the Voice Navigation Mode
The voice guide announces that the
Copy Ratio setting screen is displayed.
1
5 Press
(Confirm) until you return
to the Copy Basic Features screen.
NOTE
If you enter a value outside the setting
range, you will hear a voice message
prompting you to enter an appropriate
value.
Making Copies in the Voice Navigation Mode
2
6 Press
(Start).
Copying starts.
NOTE
• To return the copy ratio to 100%, move
the focus to [Direct(100%)]/[1:1(100%)]
➞ press
(Select).
• To cancel all settings and return the
machine to the Standard mode, press
(Reset).
2-64
Basic Copy Settings
Downloaded from ManualsPrinter.com Manuals
1
Auto Zoom
IMPORTANT
•You cannot copy highly transparent
originals, such as transparencies, using the
Auto setting on the Copy Ratio screen. Use
the Preset Zoom or Zoom by Percentage
mode instead.
•To use the Auto setting on the Copy Ratio
screen, your originals must conform to one
of the standard paper sizes: 11" x 17", LGL,
LTR, LTRR, STMT, or STMTR/A3, B4, A4,
A4R, B5, B5R, A5, A5R, or B6, or B6R
(You can place B6 only on the platen glass.
You can place the B6R and A5R only into
the feeder.)
Basic Copy Settings 2-65
Downloaded from ManualsPrinter.com Manuals
2
Making Copies in the Voice Navigation Mode
You can set the machine to automatically
select the appropriate copy ratio based on the
size of the original and the selected copy
paper. The same copy ratio is used for the
horizontal (X) and vertical (Y) axes. The
available copy ratios are from 25% to 400%.
1
1 Place your originals.
NOTE
For instructions on placing originals, see
"Placing Originals," on p. 2-20.
Making Copies in the Voice Navigation Mode
2
2 Press
(Back) or
(Next) to
move the focus to [Copy Ratio] ➞
press
(Select).
If necessary, see the screen shot in step
2 of "Preset Zoom," on p. 2-57.
The voice guide announces that the
Copy Ratio setting screen is displayed.
IMPORTANT
Make sure that you select a paper size
other than [Auto]. If you do not select a
paper size, the copy ratio is automatically
set to match the size of the paper loaded
in Paper Drawer 1.
2-66
Basic Copy Settings
Downloaded from ManualsPrinter.com Manuals
1
3 Press
(Back) or
(Next) to
move the focus to [Auto] ➞ press
(Select).
4 Press
(Confirm).
The display returns to the Regular Copy
Basic Features screen.
5 Press
(Start).
Copying starts.
Basic Copy Settings 2-67
Downloaded from ManualsPrinter.com Manuals
Making Copies in the Voice Navigation Mode
2
1
NOTE
• If the original is placed on the platen
glass, the copy ratio automatically
appears when the feeder is closed,
provided that the original size can be
detected.
• If the original is placed in the feeder, the
copy ratio appears when
(Start) is
pressed.
• To return the copy ratio to 100%, move
the focus to [Direct(100%)]/[1:1(100%)]
➞ press
(Select).
• To cancel all settings and return the
machine to the Standard mode, press
(Reset).
Making Copies in the Voice Navigation Mode
2
Collating Copies
The Finishing modes can be selected to
collate the copies in various ways, either by
pages or copy sets.
There are three Finishing modes that are
supported by the Voice Navigation mode:
Collate, Group, and Staple.
2-68
Basic Copy Settings
Downloaded from ManualsPrinter.com Manuals
1
NOTE
• To use the Staple mode, an optional
finisher must be attached to the main unit.
• The Face Up/Face Down mode enables
you to specify whether to output paper face
up or face down. Press [Face Up/Face
Down], and then select from the following:
- [Auto]: If you are copying a single page
original, copying on nonstandard size
paper, or other available paper that is
loaded in the multi-purpose tray, the
printed sheets are output face up.
Otherwise, the printed sheets are output
face down.
- [Face Down (Normal)]: Printed sheets are
always output face down.
- [Face Up (Reverse)]: Printed sheets are
always output face up.
Basic Copy Settings 2-69
Downloaded from ManualsPrinter.com Manuals
2
Making Copies in the Voice Navigation Mode
IMPORTANT
•The Finishing modes cannot be set if
Transparency, Tracing Paper, or Labels is
selected as the paper type.
•The Finishing mode cannot be used with
other copy modes, depending on the model
of the machine. When the focus moves
[Finishing], you hear a message "cannot
select this with the current settings."
1
• [Face Up/Face Down] may not be available
depending on the model of the machine
you are using.
• If you set the Staple or Hole Punch mode,
the side of the paper which is printed on
will always be output face down.
• The multi-purpose tray is not supported by
the Voice Navigation mode.
• If the [Finishing] shortcut key is not
displayed on the Copy Basic Features
screen, you cannot use the Finishing
mode. For information on how to display
the shortcut key, see the instruction
manuals that came with your machine.
Making Copies in the Voice Navigation Mode
2
Collating Copies into Sets in Page Order
Copies are automatically collated into sets
arranged in page order. For example, if you
copy a three page original, and specify to
make three copy sets, three copy sets are
output in page order from page 1 to page 3.
1 Place your originals.
NOTE
For instructions on placing originals, see
"Placing Originals," on p. 2-20.
2-70
Basic Copy Settings
Downloaded from ManualsPrinter.com Manuals
1
2 Press
(Back) or
(Next) to
move the focus to [Finishing] ➞ press
(Select).
The voice guide announces that the
Finishing screen is displayed.
Basic Copy Settings 2-71
Downloaded from ManualsPrinter.com Manuals
Making Copies in the Voice Navigation Mode
2
1
3 Press
(Back) or
(Next) to
move the focus to [Collate (Page
order)] ➞ press
(Select).
Making Copies in the Voice Navigation Mode
2
[Hole Punch] appears only if the
optional puncher unit is attached to an
optional finisher or booklet finisher.
[Saddle Fold] appears only if the
optional booklet finisher is attached.
[Fold] appears only if the optional paper
folding unit is attached.
[Offset] appears only if an optional
finisher is attached.
[Rotate 90 Degrees] appears only if an
optional finisher is not attached.
2-72
Basic Copy Settings
Downloaded from ManualsPrinter.com Manuals
1
● If you want holes made in your output:
❑ Move the focus to [Hole Punch] ➞
press
(Select).
● If you want fold made in your output:
❑ Move the focus to [Fold] ➞ press
(Select).
❑ Move the focus to desired fold type
and press
(Select) ➞ press
(Confirm).
● If you want to offset the output:
❑ Move the focus to [Offset] ➞ press
(Select).
● If you want to rotate the output:
❑ Move the focus to [Rotate 90
Degrees] ➞ press
(Select).
Basic Copy Settings 2-73
Downloaded from ManualsPrinter.com Manuals
Making Copies in the Voice Navigation Mode
NOTE
You may be able to select the type of
holes to punch, depending on your
location or the optional equipment
attached to the machine.
2
1
IMPORTANT
• [Rotate 90 Degrees] can be selected
only in the following cases:
- When LTR and LTRR/A4, A4R, B5, and
B5R paper are loaded
- The selected paper source must have
Paper Drawer Auto Selection On/Off in
Function Settings (from the Settings/
Registration screen) set to 'On'. (See
the instruction manuals that came with
your machine.)
• If there is no paper which can be rotated,
the output will be collated.
Making Copies in the Voice Navigation Mode
2
4 Press
(Confirm).
The display returns to the Regular Copy
Basic Features screen.
5 Press
(Start).
Copying starts.
NOTE
To cancel all settings and return the
machine to the Standard mode, press
(Reset).
2-74
Basic Copy Settings
Downloaded from ManualsPrinter.com Manuals
1
Grouping Copies of the Same Page Together
1 Place your originals.
NOTE
For instructions on placing originals, see
"Placing Originals," on p. 2-20.
2 Press
(Back) or
(Next) to
move the focus to [Finishing] ➞ press
(Select).
If necessary, see the screen shot in step
2 of "Collating Copies into Sets in Page
Order," on p. 2-70.
The voice guide announces that the
Finishing screen is displayed.
Basic Copy Settings 2-75
Downloaded from ManualsPrinter.com Manuals
2
Making Copies in the Voice Navigation Mode
All copies of the same original page are
grouped together. For example, if you copy a
three page original and specify to make three
copy sets, the first copy set that is output will
contain three copies of the first page, the
second copy set will contain three copies of
page 2, and the third copy set will contain
three copies of page 3.
1
3 Press
(Back) or
(Next) to
move the focus to [Group(Same
pages)] ➞ press
(Select).
Making Copies in the Voice Navigation Mode
2
[Hole Punch] appears only if the
optional puncher unit is attached to an
optional finisher or booklet finisher.
[Offset] appears only if an optional
finisher is attached.
[Saddle Fold] appears only if the
optional booklet finisher is attached.
[Fold] appears only if the optional paper
folding unit is attached.
2-76
Basic Copy Settings
Downloaded from ManualsPrinter.com Manuals
1
[Rotate 90 Degrees] appears only if an
optional finisher is not attached.
❑ Move the focus to [Hole Punch] ➞
press
(Select).
NOTE
You may be able to select the type of
holes to punch, depending on your
location or the optional equipment
attached to the machine.
● If you want fold made in your output:
❑ Move the focus to [Fold] ➞ press
(Select).
❑ Move the focus to desired fold type
and press
(Select) ➞ press
(Confirm).
● If you want to offset the output:
❑ Move the focus to [Offset] ➞ press
(Select).
Basic Copy Settings 2-77
Downloaded from ManualsPrinter.com Manuals
2
Making Copies in the Voice Navigation Mode
● If you want holes made in your output:
1
● If you want to rotate the output:
❑ Move the focus to [Rotate 90
Degrees] ➞ press
(Select).
IMPORTANT
• [Rotate 90 Degrees] can be selected
only in the following cases:
- When LTR and LTRR/A4, A4R, B5, and
B5R paper are loaded
- The selected paper source must have
Paper Drawer Auto Selection On/Off in
Function Settings (from the Settings/
Registration screen) set to 'On'. (See
the instruction manuals that came with
your machine.)
Making Copies in the Voice Navigation Mode
2
4 Press
(Confirm).
The display returns to the Regular Copy
Basic Features screen.
5 Press
(Start).
Copying starts.
NOTE
To cancel all settings and return the
machine to the Standard mode, press
(Reset).
2-78
Basic Copy Settings
Downloaded from ManualsPrinter.com Manuals
1
Collating Pages and Stapling
The output is as follows:
2
■ If you select [Corner] (Top Left):
For example, if you copy a three page
original and specify to make three copy
sets, three copy sets are output in page
order and stapled in the upper left corner.
Making Copies in the Voice Navigation Mode
Copies are automatically collated into sets
arranged in page order and stapled.
■ If you select [Double] (Left):
For example, if you copy a three page
original and specify to make three copy
sets, three copy sets are output in page
order and stapled in two locations on the
left.
■ If you select [Saddle Stitch]:
For example, if you copy a three page
original and specify to make three copy
sets, three copy sets are output in page
order and stapled in two locations in the
middle to make a booklet.
Basic Copy Settings 2-79
Downloaded from ManualsPrinter.com Manuals
1
IMPORTANT
The Saddle Stitch mode can only be
selected set if an optional finisher is
attached to the machine. However, the
Saddle Stitch mode is not supported by the
Voice Navigation mode. Please seek
assistance, if necessary, if you need to set
this mode.
Making Copies in the Voice Navigation Mode
2
1 Place your originals.
NOTE
For instruction on placing originals, see
"Placing Originals," on p. 2-20.
2 Press
(Back) or
(Next) to
move the focus to [Finishing] ➞ press
(Select).
If necessary, see the screen shot in step
2 of "Collating Copies into Sets in Page
Order," on p. 2-70.
The voice guide announces that the
Finishing screen is displayed.
2-80
Basic Copy Settings
Downloaded from ManualsPrinter.com Manuals
1
3 Press
(Back) or
(Next) to
move the focus to [Staple] ➞ press
(Select).
[Hole Punch] appears only if the optional
puncher unit is attached to an optional
finisher or booklet finisher.
[Fold] appears only if the optional paper
folding unit is attached.
Basic Copy Settings 2-81
Downloaded from ManualsPrinter.com Manuals
Making Copies in the Voice Navigation Mode
2
1
● If you want holes made in your output:
❑ Move the focus to [Hole Punch] ➞
press
(Select).
2
Making Copies in the Voice Navigation Mode
NOTE
You may be able to select the type of
holes to punch, depending on your
location or the optional equipment
attached to the machine.
● If you want Z-Fold made in your output:
❑ Move the focus to [Fold] ➞ press
(Select).
❑ Move the focus to [Z-Fold] and press
(Select) ➞ press
(Confirm).
4 Press
(Back) or
(Next) to
move the focus to [Next] ➞ press
(Select).
The voice guide announces that the
Staple Type screen is displayed.
2-82
Basic Copy Settings
Downloaded from ManualsPrinter.com Manuals
1
5 Press
(Back) or
(Next) to
move the focus to [Corner] or
[Double] ➞ press
(Select).
(Back) or
(Next) to
move the focus over the desired
stapling position ➞ press
(Select).
7 Press
(Confirm).
The display returns to the Staple Type
screen.
8 Press
(Confirm).
The display returns to the Regular Copy
Basic Features screen.
NOTE
To cancel all settings and return the
machine to the Standard mode, press
(Reset).
Basic Copy Settings 2-83
Downloaded from ManualsPrinter.com Manuals
2
Making Copies in the Voice Navigation Mode
6 Press
1
2-Sided Copying
This mode enables you to make 2-sided
copies from 1-sided or 2-sided originals, or
make 1-sided copies from 2-sided originals.
IMPORTANT
You may not be able to make 2-sided copies
on some types of paper, depending on the
paper.
Making Copies in the Voice Navigation Mode
2
NOTE
• If you are copying in the 2-Sided mode,
align the top edge of the original with the
back edge of the platen glass (by the arrow
in the top left corner), or with the black
edge of the feeder.
• Paper used to make 2-sided copies must
conform to the following specifications:
- Paper size: 11" x 17", LGL, LTR, LTRR,
STMT, or STMTR/12"x18", 11"x17", LGL,
LTR, LTRR, EXEC, or STMT/305 x 457
mm, A3, B4, A4, A4R, B5, B5R, or A5R
- Paper weight: 14 lb bond to 110 lb index
(52 to 209 g/m2)
• These specifications may vary depending
on the machine model you are using.
2-84
Basic Copy Settings
Downloaded from ManualsPrinter.com Manuals
1
Making 2-Sided Copies from 1-Sided
Originals
This mode enables you to make 2-sided
copies from 1-sided originals.
IMPORTANT
•The 1-Sided 2-Sided mode cannot be
used with other copy modes, depending on
the model of the machine. When the focus
moves [1-Sided 2-Sided], you hear a
message "cannot select this with the
current settings."
•Make sure to place originals with a
horizontal (landscape) orientation, such as
LTRR and STMTR/A4R, B5R, and A5R,
horizontally. If these originals are placed
vertically, the back side of the original is
copied upside down.
Basic Copy Settings 2-85
Downloaded from ManualsPrinter.com Manuals
2
Making Copies in the Voice Navigation Mode
• If the [2-Sided] shortcut key is not
displayed on the Copy Basic Features
screen, you cannot use the 2-Sided mode.
For information on how to display the
shortcut key, see the instruction manuals
that came with your machine.
1
•If there are an odd number of originals, the
back side of the last copy is left blank. (The
machine's counter does not count the blank
page as a copy.)
•If the 2-Sided mode is used with the
Different Size Originals mode, the copies of
different size originals will be printed as
one-sided copies on paper of their
respective sizes. If you want to make
two-sided copies with different size
originals, you must select the paper size
beforehand.
Making Copies in the Voice Navigation Mode
2
1 Place your originals.
NOTE
For instructions on placing originals, see
"Placing Originals," on p. 2-20.
2-86
Basic Copy Settings
Downloaded from ManualsPrinter.com Manuals
1
2 Press
(Back) or
(Next) to
move the focus to [2-Sided] ➞ press
(Select).
The voice guide announces that the
2-Sided setting screen is displayed.
Basic Copy Settings 2-87
Downloaded from ManualsPrinter.com Manuals
Making Copies in the Voice Navigation Mode
2
1
3 Press
(Back) or
(Next) to
move the focus to [1-Sided 2-Sided]
➞ press
(Select).
● If you want to set the orientation of
your 2-sided documents:
Making Copies in the Voice Navigation Mode
2
❑ Move the focus to [Set Details] ➞
press
(Select).
The display switches to the
advanced setting screen.
❑ Move the focus to [Book Type] or
[Calendar Type] ➞ press
(Select) ➞ press
(Confirm).
[Book Type]: The front and back
sides of the copy will have the same
top-to-bottom orientation.
[Calendar Type]: The front and back
sides of the copy will have opposite
top-to-bottom orientations.
The display returns to the 2-Sided
setting screen.
2-88
Basic Copy Settings
Downloaded from ManualsPrinter.com Manuals
1
4 Press
(Confirm).
The display returns to the Regular Copy
Basic Features screen.
(Start).
Copying starts.
NOTE
To cancel all settings and return the
machine to the Standard mode, press
(Reset).
Making 2-Sided Copies from 2-Sided
Originals
This mode enables you to make 2-sided
copies from 2-sided originals. If the originals
are placed in the feeder, they are
automatically turned over to make 2-sided
copies.
IMPORTANT
The 2-Sided 2-Sided mode cannot be
used with other copy mode depending on
the model of the machine. When the focus
moves [2-Sided 2-Sided], you hear a
message "cannot select this with the current
settings."
Basic Copy Settings 2-89
Downloaded from ManualsPrinter.com Manuals
Making Copies in the Voice Navigation Mode
5 Press
2
1
NOTE
If you placed your originals on the platen
glass, follow the instructions displayed on
the screen to scan each side of the
originals.
Making Copies in the Voice Navigation Mode
2
1 Place your originals.
NOTE
For instructions on placing originals, see
"Placing Originals," on p. 2-20.
2 Press
(Back) or
(Next) to
move the focus to [2-Sided] ➞ press
(Select).
If necessary, see the screen shot in step
2 of "Making 2-Sided Copies from
1-Sided Originals," on p. 2-85.
The voice guide announces that the
2-Sided setting screen is displayed.
2-90
Basic Copy Settings
Downloaded from ManualsPrinter.com Manuals
1
3 Press
(Back) or
(Next) to
move the focus to [2-Sided 2-Sided]
➞ press
(Select).
❑ Move the focus [Set Details] ➞
press
(Select).
The display switches to the
advanced setting screen.
❑ Move the focus to [Book Type] or
[Calendar Type] under <original> ➞
press
(Select).
❑ Move the focus to [Book Type] or
[Calendar Type] under <copy> ➞
press
(Select).
❑ Press
(Confirm).
Basic Copy Settings 2-91
Downloaded from ManualsPrinter.com Manuals
2
Making Copies in the Voice Navigation Mode
● If you want to set the orientation of
the original and copies:
1
Original
[Book Type]:
Making Copies in the Voice Navigation Mode
2
The front and back
sides of the original
have the same
top-to-bottom
orientation.
[Calendar Type]: The front and back
sides of the original
have opposite
top-to-bottom
orientations.
Copy
[Book Type]:
The front and back
sides of the copy will
have the same
top-to-bottom
orientation.
[Calendar Type]: The front and back
sides of the copy will
have opposite
top-to-bottom
orientations.
The display returns to the 2-Sided
setting screen.
2-92
Basic Copy Settings
Downloaded from ManualsPrinter.com Manuals
1
4 Press
(Confirm).
The display returns to the Regular Copy
Basic Features screen.
(Start).
Copying starts.
NOTE
To cancel all settings and return the
machine to the Standard mode, press
(Reset).
Basic Copy Settings 2-93
Downloaded from ManualsPrinter.com Manuals
Making Copies in the Voice Navigation Mode
5 Press
2
1
Making 1-Sided Copies from 2-Sided
Originals
This feature automatically turns over 2-sided
originals placed in the feeder to make 1-sided
copies on different sheets of paper.
Making Copies in the Voice Navigation Mode
2
IMPORTANT
•The 2-Sided 1-Sided mode cannot be
used with other copy mode depending on
the model of the machine. When the focus
moves [2-Sided 1-Sided], you hear a
message "cannot select this with the
current settings."
•Make sure to place originals with a
horizontal (landscape) orientation, such as
LTRR and STMTR/A4R, B5R, and A5R,
horizontally. If these originals are placed
vertically, the back side of the original is
copied upside down.
NOTE
If you want to place your 2-sided original on
the platen glass, use the Job Build mode in
Options to execute 2-Sided 1-Sided
copying. For more information on the Job
Build mode, see the instruction manuals that
came with your machine.
2-94
Basic Copy Settings
Downloaded from ManualsPrinter.com Manuals
1
1 Place your originals.
2 Press
(Back) or
(Next) to
move the focus to [2-Sided] ➞ press
(Select).
If necessary, see the screen shot in step
2 of "Making 2-Sided Copies from
1-Sided Originals," on p. 2-85".
The voice guide announces that the
2-Sided setting screen is displayed.
3 Press
(Back) or
(Next) to
move the focus to [2-Sided 1-Sided]
➞ press
(Select).
● If you want to set the orientation of
your 2-sided documents:
❑ Move the focus to [Set Details] ➞
press
(Select).
The display switches to the
advanced setting screen.
Basic Copy Settings 2-95
Downloaded from ManualsPrinter.com Manuals
2
Making Copies in the Voice Navigation Mode
NOTE
For instruction on placing originals, see
"Placing Originals," on p. 2-20.
1
❑ Move the focus to [Book Type] or
[Calendar Type] ➞ press
(Select) ➞ press
(Confirm).
[Book Type]: The front and back
sides of the original will have the
same top-to-bottom orientation.
[Calendar Type]: The front and back
sides of the original will have
opposite top-to-bottom orientations.
Making Copies in the Voice Navigation Mode
2
The display returns to the 2-Sided
setting screen.
4 Press
(Confirm).
The display returns to the Regular Copy
Basic Features screen.
5 Press
(Start).
Copying starts.
NOTE
To cancel all settings and return the
machine to the Standard mode, press
(Reset).
2-96
Basic Copy Settings
Downloaded from ManualsPrinter.com Manuals
1
Making 2-Sided Copies from Facing Pages in
a Book
IMPORTANT
•The Book 2-Sided mode cannot be used
with other copy mode depending on the
model of the machine. When the focus
moves [Book 2-Sided], you hear a
message "cannot select this with the
current settings."
•Only LTR/A4 or B5 paper can be used for
Book 2-Sided copying.
•If you select [Front/Back 2-Sided], the front
side of the first 2-sided page and the back
side of the last 2-sided page are left blank.
(The machine's counter does not count the
blank pages as copies.)
•Place your original on the platen glass. The
Book 2-Sided mode cannot be used when
the original is placed in the feeder.
Basic Copy Settings 2-97
Downloaded from ManualsPrinter.com Manuals
2
Making Copies in the Voice Navigation Mode
This feature enables you to make 2-sided
copies from facing pages, or from the front
and back sides of a page in bound originals,
such as books and magazines.
1
1 Place your originals.
NOTE
For instructions on placing originals, see
"Placing Originals," on p. 2-20.
Making Copies in the Voice Navigation Mode
2
2 Press
(Back) or
(Next) to
move the focus to [2-Sided] ➞ press
(Select).
If necessary, see the screen shot in step
2 of "Making 2-Sided Copies from
1-Sided Originals," on p. 2-85.
To make copies in the correct page
order, begin copying from the first open
page of the book or bound original.
Place your original face down, making
sure that its top edge is aligned with the
back edge of the platen glass (by the
arrow in the top left corner).
The voice guide announces that the
2-Sided setting screen is displayed.
2-98
Basic Copy Settings
Downloaded from ManualsPrinter.com Manuals
1
3 Press
(Back) or
(Next) to
move the focus to [Book 2-Sided] ➞
press
(Select).
❑ Move the focus to [Set Details] ➞
press
(Select).
The display switches to the
advanced setting screen.
❑ Move the focus to [Left/Right
2-Sided] or [Front/Back 2-Sided] ➞
press
(Select) ➞ press
(Confirm).
The display returns to the 2-Sided
setting screen.
[Left/Right 2-Sided]: The facing
pages of a book or bound original
are copied on the front and back
sides of a single sheet of paper.
Basic Copy Settings 2-99
Downloaded from ManualsPrinter.com Manuals
2
Making Copies in the Voice Navigation Mode
● If you want to select the desired
type of 2-sided layout:
1
Making Copies in the Voice Navigation Mode
2
[Front/Back 2-Sided]: The front and
back sides of the left page, or the
front and back sides of the right
page, are copied on the front and
back sides of a single sheet of
paper.
4 Press
(Confirm).
The display returns to the Regular Copy
Basic Features screen.
5 Press
(Start).
To copy the next two facing pages, turn
the page of the original ➞ place your
original on the platen glass ➞ press
(Start).
Scanning starts.
2-100 Basic Copy Settings
Downloaded from ManualsPrinter.com Manuals
1
6 When scanning is complete, press
(Back) or
(Next) to move the
focus to [Start Copying] ➞ press
(Select).
NOTE
To cancel all settings and return the
machine to the Standard mode, press
(Reset).
Basic Copy Settings 2-101
Downloaded from ManualsPrinter.com Manuals
Making Copies in the Voice Navigation Mode
Copying starts.
2
Canceling a Copy Mode
Making Copies in the Voice Navigation Mode
2
This section explains how to cancel a copy
mode, using the Finishing mode as an
example.
1 Display the copy mode that you want
to cancel.
In this example, move the focus to
[Finishing].
The screen for selecting the Finishing
mode is displayed.
2-102 Canceling a Copy Mode
Downloaded from ManualsPrinter.com Manuals
1
2 Press
(Back) or
(Next) to
move the focus to [Cancel Settings]
➞ press
(Select).
The display returns to the Regular Copy
Basic Features screen.
Canceling a Copy Mode 2-103
Downloaded from ManualsPrinter.com Manuals
Making Copies in the Voice Navigation Mode
2
1
Making Copies in the Voice Navigation Mode
2
2-104 Canceling a Copy Mode
Downloaded from ManualsPrinter.com Manuals
Using the Send and Fax Functions
in the Voice Navigation Mode
3
CHAPTER
This chapter explains the send and fax
functions that are supported by the Voice
Navigation mode.
Basic Send/Fax Features . . . . . . . . . . . . . . 3-2
Before Sending/Faxing a Document . . . . 3-3
Flow of Sending Operations. . . . . . . . . . . 3-5
Canceling a Job . . . . . . . . . . . . . . . . . . . 3-18
Sending Fax Document Manually . . . . . . . 3-20
Specifying Registered Destinations . . . . . 3-29
Using the Favorites Settings . . . . . . . . . 3-30
Confirming the Destination List. . . . . . . . . 3-34
Scan Settings . . . . . . . . . . . . . . . . . . . . . .
Resolution. . . . . . . . . . . . . . . . . . . . . . . .
Scan Size . . . . . . . . . . . . . . . . . . . . . . . .
Density . . . . . . . . . . . . . . . . . . . . . . . . . .
Original Type . . . . . . . . . . . . . . . . . . . . .
2-Sided Originals . . . . . . . . . . . . . . . . . .
Different Size Originals. . . . . . . . . . . . . .
Changing the Zoom Ratio . . . . . . . . . . .
3-37
3-38
3-42
3-48
3-53
3-58
3-62
3-67
3-1
Downloaded from ManualsPrinter.com Manuals
Basic Send/Fax Features
This section explains the send and fax
functions that are supported by the Voice
Navigation mode.
You can send fax and I-fax documents, e-mail
messages, or send documents to a file
server, or Mail Box destination (if the
destination has been registered in a Favorite
Settings in advance).
Using the Send and Fax Functions in the Voice Navigation
3
NOTE
• An optional product may be necessary to
use the Scan and Send or Fax function.
For more information, see the instruction
manuals that came with your machine.
• The Voice Navigation mode dose not
supported the installation of optional
equipment. Please seek assistance, or
contact your local authorized Canon
Dealer if you must install optional
equipment.
3-2
Basic Send/Fax Features
Downloaded from ManualsPrinter.com Manuals
1
Before Sending/Faxing a Document
Basic Send/Fax Features
Downloaded from ManualsPrinter.com Manuals
3-3
3
Using the Send and Fax Functions in the Voice Navigation
Before sending or faxing a document, press
(Current Screen and Item) to confirm
which screen is displayed.
If you hear a Voice Navigation message
informing you that the current screen is the
Scan and Send or Fax Basic Features
screen, proceed to "Flow of Sending
Operations," on p. 3-5.
If the Copy Basic Features screen or Voice
Navigation Settings screen is displayed,
press
(Confirm) to return to the Main
Menu ➞ move the focus over [Scan and
Send] or [Fax] ➞ press
(Select).
1
IMPORTANT
•According to recent amendments to the
FCC (Federal Communications
Commission) rules governing the use of
facsimile equipment in the United States,
the following sender information must be
printed on every facsimile transmission:
-Your fax number
-Your personal name or company name
-Time and date of transmission
•Network settings must be specified to send
scanned documents to an e-mail address,
I-fax address, or a file server. Please seek
assistance from your network administrator
if network settings are not set.
Using the Send and Fax Functions in the Voice Navigation
3
NOTE
• If you do not hear any Voice Navigation
messages, start the Voice Navigation
mode. (See "Starting and Stopping the
Voice Navigation Mode," on p. 1-32.)
• For more information on Send Settings,
see the instruction manuals that came with
your machine.
3-4
Basic Send/Fax Features
Downloaded from ManualsPrinter.com Manuals
1
•
Flow of Sending Operations
Basic Send/Fax Features
Downloaded from ManualsPrinter.com Manuals
3-5
3
Using the Send and Fax Functions in the Voice Navigation
NOTE
The maximum number of send jobs that the
machine can handle is 120, including jobs
with error codes. Among a these, 64 fax
jobs can be handled. However, the actual
number of send jobs that the machine can
handle may be less than 120, depending on
the following conditions:
-When multiple documents are being sent at
the same time
-When large documents are being sent
-When a large amount of memory is being
used for the Mail Boxes and Fax/I-Fax
Inbox
1
1 Place your originals on the platen
glass or into the feeder.
Using the Send and Fax Functions in the Voice Navigation
3
NOTE
For instructions on placing your originals,
see "Placing Originals," on p. 2-20.
3-6
Basic Send/Fax Features
Downloaded from ManualsPrinter.com Manuals
1
2 Specify the destinations.
● To set from the Fax Basic Features
screen:
❑ Specify the fax destination. (See
"Sending Fax Document Manually,"
on p. 3-20.)
IMPORTANT
IMPORTANT
If the Fax Basic Features screen is set to
[Address Book], close [Address Book]
and move the focus to the fax number.
Basic Send/Fax Features
Downloaded from ManualsPrinter.com Manuals
3-7
3
Using the Send and Fax Functions in the Voice Navigation
❑ Move the focus to the Fax number ➞
press
(Select).
1
● To set from the Scan and Send Basic
Features screen:
❑ Confirm that the focus is on [New
Destination] ➞press
(Select).
Using the Send and Fax Functions in the Voice Navigation
3
NOTE
•If the Scan and Send Basic Features
screen is set to [Favorite Settings], the
focus moves to [New Destination] when
the screen is closed without recalling the
setting.
•If the Scan and Send Basic Features
screen is set to [Address Book] or
[One-Touch], close [Address Book] or
[One-Touch] and move the focus to [New
Destination].
3-8
Basic Send/Fax Features
Downloaded from ManualsPrinter.com Manuals
1
NOTE
If the focus is not displayed on [New
Destination], move the focus to [Specify
Destinations] ➞ press
(Select).
NOTE
If [Fax] is not displayed on [New
Destination], please seek assistance.
❑ Set the fax destination. (See "Sending
Fax Document Manually," on p. 3-20.)
Basic Send/Fax Features
Downloaded from ManualsPrinter.com Manuals
3-9
Using the Send and Fax Functions in the Voice Navigation
❑ When you hear that the focus is
displayed on [Fax], press
(Select). 3
1
● When the destination is stored in
Favorite Settings:
❑ Move the focus to [Favorite Settings]
➞ press
(Select).
Using the Send and Fax Functions in the Voice Navigation
3
You will hear that the Favorite Settings
Selection screen is displayed.
❑ Specify the Favorite Settings button
settings. (See "Using the Favorites
Settings," on p. 3-30.)
3-10 Basic Send/Fax Features
Downloaded from ManualsPrinter.com Manuals
1
Basic Send/Fax Features 3-11
Downloaded from ManualsPrinter.com Manuals
3
Using the Send and Fax Functions in the Voice Navigation
NOTE
•Favorite Settings can only be set for the
Scan and Send function.
•If you do not want to recall a setting,
press
(Confirm).
•A maximum of 256 destinations can be
specified at the same time. If you specify
a group, which is made up of several
destinations, each destination is counted
as a separate address.
•The specifying of new addresses other
than fax destinations and existing
addresses stored in One-Touch,
searching for destinations stored on a
server, setting cc and bcc destinations,
and storing of addresses in Favorite
Settings, are not supported with the Voice
Navigation mode. For information on
these operations, see the instruction
manuals that came with your machine.
•The selecting of destinations from the
Address Book is not supported with the
Voice Navigation mode.
1
3 If you want to change the scan
settings, perform the following
procedure.
❑ Move the focus to each scan settings
➞ press
(Select).
Using the Send and Fax Functions in the Voice Navigation
3
● If you want to change the scan setting on the Fax Basic Features
screen:
Fax Basic Features screen
3-12 Basic Send/Fax Features
Downloaded from ManualsPrinter.com Manuals
1
Options screen
Basic Send/Fax Features 3-13
Downloaded from ManualsPrinter.com Manuals
Using the Send and Fax Functions in the Voice Navigation
3
1
● If you want to change the scan setting on the Scan and Send Basic
Features screen:
Using the Send and Fax Functions in the Voice Navigation
3
Scan and Send Basic Features screen
3-14 Basic Send/Fax Features
Downloaded from ManualsPrinter.com Manuals
1
Options screen
NOTE
If the focus does not move to a setting,
that setting is not supported with the
Voice Navigation mode.
Basic Send/Fax Features 3-15
Downloaded from ManualsPrinter.com Manuals
Using the Send and Fax Functions in the Voice Navigation
3
1
4 Press
Using the Send and Fax Functions in the Voice Navigation
3
(Start).
If the following screen is displayed,
follow the instructions on the screen ➞
press
(Start). When scanning is
complete, move the focus to [Start
Sending] by pressing
(Back) or
(Next) ➞ press
(Select).
Scanning starts.
The scanned data is sent to the
specified destination when scanning is
complete.
3-16 Basic Send/Fax Features
Downloaded from ManualsPrinter.com Manuals
1
NOTE
•During a scan, you may hear the
message "an error has occurred for an
unknown reason." If you are having
difficulties handling the error, please seek
assistance.
•For information on canceling a send job,
see "Canceling a Job," on p. 3-18.
5 When scanning is complete, remove
your originals from the platen glass
or the output tray of the feeder.
Basic Send/Fax Features 3-17
Downloaded from ManualsPrinter.com Manuals
3
Using the Send and Fax Functions in the Voice Navigation
IMPORTANT
IMPORTANT
The size of the original is detected
automatically. However, if the output
paper in the recipient's machine is not
equal to the scanned document size, the
original image maybe reduced in size to
match it.
1
Canceling a Job
This section describes how to cancel a send
job.
1 Press
Using the Send and Fax Functions in the Voice Navigation
3
(Back) or
(Next) to
move the focus to [Stop] on the
pop-up screen that appears while the
machine is scanning ➞ press
(Select).
A confirmation screen is displayed.
3-18 Basic Send/Fax Features
Downloaded from ManualsPrinter.com Manuals
1
2 Press
(Back) or
(Next) to
move the focus to [Yes] ➞ press
(Select).
The send job is canceled.
3 Remove your originals.
NOTE
•You can also cancel a send job by
pressing
(Stop), while the job is
being scanned.
•You cannot cancel jobs from the Status
Monitor/Cancel screen.
Basic Send/Fax Features 3-19
Downloaded from ManualsPrinter.com Manuals
3
Using the Send and Fax Functions in the Voice Navigation
The display returns to the Fax or Scan
and Send Basic Features screen.
Sending Fax Document Manually
It is necessary to specify a destination to
send a fax. This section describes the
procedure for sending a fax.
Using the Send and Fax Functions in the Voice Navigation
3
IMPORTANT
•The destination entered here is deleted
once the fax is sent.
•Manual Sending enables you can to send a
document consisting of two or more pages
only if you use the feeder. You can only
send one page at a time when you place
your original on the platen glass.
•You can specify only one destination at a
time if you are using the Direct Sending
mode.
•Memory Sending is automatically set if the
Delayed Send mode is set, or if multiple
destinations are specified. For more
information on the Delayed Send mode,
see the instruction manuals that came with
your machine.
3-20 Sending Fax Document Manually
Downloaded from ManualsPrinter.com Manuals
1
Sending Fax Document Manually 3-21
Downloaded from ManualsPrinter.com Manuals
3
Using the Send and Fax Functions in the Voice Navigation
NOTE
• For more information on storing
destinations, see the instruction manuals
that came with your machine.
• You can only enter the fax number with the
Voice Navigation mode.
• To specify a destination that is previously
stored, use the Favorite Settings button.
(See "Using the Favorites Settings," on p.
3-30.)
• You can erase destinations on the Scan
and Send Basic Features screen before
scanning. (See "Confirming the
Destination List," on p. 3-34.)
• For information on setting the pause time,
see the instruction manuals that came with
your machine.
• If you set the Direct Sending mode, it is
automatically canceled after sending is
complete.
• For more information on the Direct
Sending mode, see the instruction
manuals that came with your machine.
• For information on using fax information
services, see the instruction manuals that
came with your machine.
1
1 See "Basic Send/Fax Features," on p.
3-2 to display the new destination.
2 Press
Using the Send and Fax Functions in the Voice Navigation
3
(Back) or
(Next) to
move the focus to fax number ➞
press
(Select).
The New Destination screen
for the Fax function
3-22 Sending Fax Document Manually
Downloaded from ManualsPrinter.com Manuals
1
The New Destination screen
for the Scan and Send function
The voice guide announces that the
machine has entered the mode for
entering numeric values.
Sending Fax Document Manually 3-23
Downloaded from ManualsPrinter.com Manuals
Using the Send and Fax Functions in the Voice Navigation
3
1
3 Enter the recipient's fax number
using
-
(numeric keys).
Using the Send and Fax Functions in the Voice Navigation
3
The New Destination screen
for the Fax function
3-24 Sending Fax Document Manually
Downloaded from ManualsPrinter.com Manuals
1
The New Destination screen
for the Scan and Send function
IMPORTANT
IMPORTANT
Make sure that you hear the dial tone
before entering the fax number. If you
enter the fax number before hearing the
dial tone, the call may not be connected,
or an incorrect number may be dialed.
Details of each item are shown below.
[Pause]: Insert a pause of several
seconds in the fax number that
you are dialing. If you insert a
pause, the letter <p> is
displayed between the
numbers, and the letter <P>
Sending Fax Document Manually 3-25
Downloaded from ManualsPrinter.com Manuals
Using the Send and Fax Functions in the Voice Navigation
3
1
appears at the end of the
number. When dialing an
overseas number, insert a
pause after the country code,
and at the end of the telephone
number.
Using the Send and Fax Functions in the Voice Navigation
3
[Tone]: Press when you want to
directly call an extension line
that is connected to a PBX
(Private Branch eXchange)
which accepts only tone
signals. If you press [Tone], the
letter <T> appears.
[Direct]: Press to send documents
directly to the recipient. If you
do not select the Direct
Sending mode, Memory
Sending mode is used instead.
*Items other than those indicated on the
previous page are not supported with
the Voice Navigation mode.
3-26 Sending Fax Document Manually
Downloaded from ManualsPrinter.com Manuals
1
NOTE
•If you make a mistake when entering the
fax number, press
(Clear) to clear
your entry ➞ enter the correct number.
•If you want to enter a pause or tone, it is
necessary to press
(Confirm) to
confirm the number. After pressing
(Confirm), move the focus to [Pause]
or [Tone], and then press
(Select).
If you want to enter numbers after
entering a pause or tone, move the focus
to the area for entering numeric values,
and press
(Select).
•If you enter a pause at the end of the
number, the pause is always 10 seconds
long.
Sending Fax Document Manually 3-27
Downloaded from ManualsPrinter.com Manuals
3
Using the Send and Fax Functions in the Voice Navigation
IMPORTANT
IMPORTANT
• You cannot insert a pause at the
beginning of a number.
• If you cancel manual sending during
transmission, the pages that have
already been scanned are sent.
1
4 Press
(Confirm).
The number you entered is specified as
the fax destination, and the voice guide
announces the number.
Using the Send and Fax Functions in the Voice Navigation
3
5 Press
(Confirm).
The display returns to the Fax or Scan
and Send Basic Features screen.
NOTE
If Confirm Entered Fax Numbers in
Function Settings (from the Settings/
Registration screen) is set to 'On', a
confirmation screen is displayed when a
user enters a fax number, to prevent
misdialing.
6 Press
(Start).
Scanning starts and the document is
sent.
3-28 Sending Fax Document Manually
Downloaded from ManualsPrinter.com Manuals
Specifying Registered Destinations
NOTE
• You can erase destinations on the Scan
and Send Basic Features screen or on the
Fax Basic Features screen before
scanning. (See "Confirming the
Destination List," on p. 3-34.)
• A maximum of 256 destinations can be
specified at the same time. If you specify a
group, which is made up of several
destinations, each destination is counted
as a separate address.
• The destinations in the destinations list can
be changed before scanning originals, but
this operation is not supported with the
Voice Navigation mode. For information on
confirming/changing destinations, see the
instruction manuals that came with your
machine.
Specifying Registered Destinations 3-29
Downloaded from ManualsPrinter.com Manuals
3
Using the Send and Fax Functions in the Voice Navigation
You can recall the destinations and settings
stored in the favorites buttons to check their
contents, or delete them.
1
Using the Favorites Settings
Using the Send and Fax Functions in the Voice Navigation
3
If you frequently send documents with the
same document settings to the same
destination, store these settings in a favorites
button. Then, when you need to specify the
destination, all you have to do is select the
favorites button containing your stored
document settings and the desired
destination, and send your document.
IMPORTANT
To use this feature, you must first register
the desired document settings and
destinations in favorites buttons beforehand.
The registering of favorites buttons is not
supported with the Voice Navigation mode.
For more information on storing destination
and settings in a favorites button, see the
instruction manuals that came with your
machine.
NOTE
• Favorite Settings can only be set for the
Scan and Send function.
• Even if the name of the Favorite Settings is
changed, you cannot recall using the new
name.
3-30 Specifying Registered Destinations
Downloaded from ManualsPrinter.com Manuals
1
1 Press
(Back) or
(Next) to
move the focus to [Favorite Settings]
➞ press
(Select).
The voice guide announces that the
Favorite Settings selection screen is
displayed.
NOTE
If no favorite settings are registered, you
will hear a message informing you that no
favorites buttons can be recalled.
Specifying Registered Destinations 3-31
Downloaded from ManualsPrinter.com Manuals
Using the Send and Fax Functions in the Voice Navigation
3
1
2 Press
(Back) or
(Next) to
move the focus over the desired
favorite settings ➞ press
(Select).
The Favorite Settings in the memory key
is displayed.
Using the Send and Fax Functions in the Voice Navigation
3
3 Verify the settings ➞ press
(Back)
or
(Next) to move the focus to
[Yes] ➞ press
(Select).
The selected mode is set.
The display returns to the Scan and
Send Basic Features screen.
3-32 Specifying Registered Destinations
Downloaded from ManualsPrinter.com Manuals
1
Using the Send and Fax Functions in the Voice Navigation
NOTE
•If you do not want to recall the settings
stored in the favorites button, move the
(Select).
focus to [No] ➞ press
•You can manually change the settings
recalled from the selected favorites
button before you send your documents. 3
•If you select another favorites button, the
settings stored in that button are recalled.
•To cancel all settings and return the
machine to the Standard mode, press
(Reset).
•The destinations may not be listed in the
order in which they were set.
Specifying Registered Destinations 3-33
Downloaded from ManualsPrinter.com Manuals
Confirming the Destination List
You can confirm the destinations specified.
1 Press
Using the Send and Fax Functions in the Voice Navigation
3
(Back) or
(Next) to
move the focus to the destination list.
Destination List
The voice guide announces that the
current number of destinations are set.
3-34 Confirming the Destination List
Downloaded from ManualsPrinter.com Manuals
1
(Select).
The focus moves to the top of the
destination list, and the voice guide
announces the first destination in the
list.
3 Press
(Back) or
(Next) to
scroll through the list of destinations.
Verify that the destinations you hear are
correct.
If you press
(Back) when the focus
is over the first destination in the list, the
focus moves to the last destination.
If you press
(Next) when the focus is
over the last destination in the list, the
focus moves to the first destination.
● If you want to erase a destination:
❑ Press
(Select) when you hear the
desired destination.
The voice guide announces that the
destination is selected.
Confirming the Destination List 3-35
Downloaded from ManualsPrinter.com Manuals
3
Using the Send and Fax Functions in the Voice Navigation
2 Press
1
❑ Press
(Clear) to erase the
selected destination.
The voice guide announces that the
destination has been erased.
Using the Send and Fax Functions in the Voice Navigation
3
IMPORTANT
IMPORTANT
A message confirming whether you want
to erase the destination is not heard
before erasing the destination. Confirm
the selected destination before erasing it.
NOTE
•The destinations you hear are not
selected until you press
(Select).
•To cancel a selected destination, move
the focus to the dialed destination ➞
press
(Select).
•You cannot select multiple destinations at
the same time.
4 Press
(Confirm).
The display returns to the Scan and
Send Basic Features screen.
3-36 Confirming the Destination List
Downloaded from ManualsPrinter.com Manuals
Scan Settings
NOTE
• Changed scan settings are not saved. For
instructions on saving settings, please
seek assistance, or refer to the instruction
manuals that came with your machine.
• To cancel all settings and return the
machine to the Standard mode, press
(Reset).
• This section describes the operations on
the Fax Basic Features screen. Unless
otherwise noted, the operation is same on
the Scan and Send screen.
Scan Settings 3-37
Downloaded from ManualsPrinter.com Manuals
3
Using the Send and Fax Functions in the Voice Navigation
This section describes the procedure for
changing the scan settings using the Voice
Navigation mode.
1
Resolution
You can specify the resolution before
scanning the original.
Using the Send and Fax Functions in the Voice Navigation
3
IMPORTANT
•The maximum image size that you can
send at a resolution of 600 x 600 dpi
resolution is 11" x 17" or A3. If the image
exceeds this size, it may be cut off.
•If you are sending documents by fax, the
maximum image size that you can send at
a resolution of 400 x 400 dpi is 11" x 17" or
A3.
•If you are sending documents by fax, select
Black 200 x 100 dpi, Black 200 x 200 dpi,
Black 200 x 400 dpi, or Black 400 x 400
dpi. Otherwise, the document will be sent
at a poor resolution.
•If you send a long original at 600 x 600 dpi,
the periphery of the original image may be
cut off slightly.
•If [OOXML] is selected as the file format,
you can only send in [300 x 300 dpi] or [600
x 600dpi].
3-38 Scan Settings
Downloaded from ManualsPrinter.com Manuals
1
•If the Preview mode is set, you can verify
the images from the Preview screen before
sending your document. For more
information using preview mode, see the
instruction manuals that came with your
machine.
1 Place your originals ➞ specify the
destination.
NOTE
For instructions on specifying the
destination, see "Flow of Sending
Operations," on p. 3-5.
Scan Settings 3-39
Downloaded from ManualsPrinter.com Manuals
Using the Send and Fax Functions in the Voice Navigation
3
1
2 Press
(Back) or
(Next) to
move the focus to the Resolution
button ➞ press
(Select).
Using the Send and Fax Functions in the Voice Navigation
3
The voice guide announces that the
Resolution setting screen is displayed.
3-40 Scan Settings
Downloaded from ManualsPrinter.com Manuals
1
3 Press
(Back) or
(Next) to
move the focus over the desired scan
resolution ➞ press
(Select).
If [PDF (Trace)], [PDF(Compact)], or
[XPS(Compact)] is selected as the file
format, and you select any resolution
other than [300x300 dpi], and then
press [OK] or
(Select), a message
asking for your confirmation to change
the PDF or XPS file format appears on
the screen.
Scan Settings 3-41
Downloaded from ManualsPrinter.com Manuals
Using the Send and Fax Functions in the Voice Navigation
3
1
4 Press
(Confirm).
The display returns to the Fax Basic
Features screen.
5 Press
Using the Send and Fax Functions in the Voice Navigation
3
(Start).
Scan Size
You can manually specify the document size
when the machine cannot detect the paper
size automatically, such as when scanning
transparencies. Specify the document size as
well, if you want to scan an 11" x 17" or A3
original with an image that extends all the
way to the edges without the periphery of the
original being cut off. You can also store the
specified document size.
3-42 Scan Settings
Downloaded from ManualsPrinter.com Manuals
1
Scan Settings 3-43
Downloaded from ManualsPrinter.com Manuals
3
Using the Send and Fax Functions in the Voice Navigation
IMPORTANT
•You cannot select [Auto] when scanning
the following types of originals. Specify the
size of these documents manually.
-Nonstandard size originals
-Highly transparent originals, such as
transparencies
-Originals with an extremely dark
background
-STMT, STMTR, B6 or smaller originals
that are placed on the platen glass
•If you are sending a fax in the Direct
Sending or Manual Sending mode and you
place your originals into the feeder, the
Document Size Select setting that you
specifying will be disabled.
•If the original is placed in the feeder, you
cannot scan by selecting [Custom] in Scan
Size.
•[Long Original] and [Custom] are not
supported with the Voice Navigation mode.
To use these modes, you must store them
in Favorite Settings. For information on
using long originals, see the instruction
manuals that came with your machine.
1
Using the Send and Fax Functions in the Voice Navigation
3
NOTE
•Vertically placed B5 originals are sent as
horizontal B4 documents. Horizontally
placed B5 originals are sent as LTR or A4
documents.
•If you scan a registered document size,
the scanned image is not rotated
automatically.
•If you select [Custom] in Scan Size, you
cannot select [Finished Stamp].
•If the Preview mode is set, you can verify
the images from the Preview screen
sending your document. For information
on using preview mode, see the
instruction manuals that came with your
machine.
•For information on the procedure for
specifying document sizes as numeric
values, registering document sizes, and
selecting registered document sizes, see
the instruction manuals that came with
your machine.
3-44 Scan Settings
Downloaded from ManualsPrinter.com Manuals
1
1 Place your originals ➞ specify the
destination.
2 Press
(Back) or
(Next) to
move the focus to the Select Scan
Size button ➞ press
(Select).
The voice guide announces that the
Scan Size selection screen is displayed.
Scan Settings 3-45
Downloaded from ManualsPrinter.com Manuals
3
Using the Send and Fax Functions in the Voice Navigation
NOTE
For instructions on specifying the
destination, see "Flow of Sending
Operations," on p. 3-5.
1
3 Select the scan size.
● If you want to the machine
automatically select the scan size:
❑ Move the focus to [Auto] ➞ press
(Select).
Using the Send and Fax Functions in the Voice Navigation
3
3-46 Scan Settings
Downloaded from ManualsPrinter.com Manuals
1
● If you want to scan a standard scan
size:
❑ Move the focus to the desired scan
size ➞ press
(Select).
If you want to scan an 11" x 17" or
A3+ original with an image that
extends all the way to the edges
without the periphery of the original
being cut off, place the original on the
platen glass ➞ select [11x17+] or
[A3+].
Scan Settings 3-47
Downloaded from ManualsPrinter.com Manuals
Using the Send and Fax Functions in the Voice Navigation
3
1
NOTE
•To select an A or B series paper size,
press [A/B-size].
•[A/B-size] is not supported with the Voice
Navigation mode.
Using the Send and Fax Functions in the Voice Navigation
3
4 Press
(Confirm).
The display returns to the Fax Basic
Features screen.
5 Press
(Start).
Density
When scanning, you can adjust the density of
the most appropriate level for the original.
1 Place your originals ➞ specify the
destination.
NOTE
For instructions on specifying the
destination, see "Flow of Sending
Operations," on p. 3-5.
3-48 Scan Settings
Downloaded from ManualsPrinter.com Manuals
1
2 Press
(Back) or
(Next) to
move the focus to [Options] ➞ press
(Select).
3 Press
(Back) or
(Next) to
move the focus to [Density] ➞ press
(Select).
The voice guide announces that the
Density settings screen is displayed.
Scan Settings 3-49
Downloaded from ManualsPrinter.com Manuals
3
Using the Send and Fax Functions in the Voice Navigation
NOTE
If the [Density] shortcut key is displayed
on the Basic Features screen, you can
select from the Basic Features screen.
1
4 Press
(Back) or
(Next) to
move the focus over the Adjust Basic
Level indicator ➞ press
(Select).
Using the Send and Fax Functions in the Voice Navigation
3
Adjust Basic Level Indicator
5 To manually set the scan exposure,
press
(Back) to move the
indicator between [ ] and [ ] to the
left to make the exposure lighter.
Press
(Next) to move the indicator
to the right to make the exposure
darker.
The voice guide informs you of the
position of the indicator (from -4 to +4).
3-50 Scan Settings
Downloaded from ManualsPrinter.com Manuals
1
Example:
If the indicator is in the middle (the
Standard setting), and you press
(Next), the indicator moves to the
right. You will hear the voice guide say,
"Plus 1."
When you scan an original, the scan
exposure is automatically set to
'Standard' (between the lightest and
darkest settings ('-4 to +4')). Negative
numbers make the scanned document
lighter. '-1', is slightly lighter than the
Standard setting, and '-4' is the lightest
setting. The movement from +1 to +4
follows the same pattern, making the
scanned document darker.
6 Press
(Select).
Scan Settings 3-51
Downloaded from ManualsPrinter.com Manuals
Using the Send and Fax Functions in the Voice Navigation
If the indicator is brought back to the
middle, you will hear the voice guide
say, "Standard."
3
1
7 Press
(Confirm).
The selected mode is set.
Using the Send and Fax Functions in the Voice Navigation
3
NOTE
To automatically adjust the background
density, move the focus to [Auto] ➞ press
(Select).
8 Press
(Confirm) until you return
to the Basic Features screen.
9 Press
(Start).
3-52 Scan Settings
Downloaded from ManualsPrinter.com Manuals
1
Original Type
■ Text/Photo Mode
This mode is best suited for scanning
originals containing both text and photos,
such as magazines or catalogues.
■ Photo Mode
This mode is best suited for scanning
photos printed on photographic paper, or
photo originals containing halftones (e.g.,
printed photos).
■ Text Mode
This mode is best suited for scanning text
originals. Blueprints or pencil drawn
originals can also be scanned clearly.
Scan Settings 3-53
Downloaded from ManualsPrinter.com Manuals
3
Using the Send and Fax Functions in the Voice Navigation
You can manually select the original type
according to the type of image that you are
scanning. The following three original type
modes are available for adjusting the image
quality.
1
Using the Send and Fax Functions in the Voice Navigation
3
IMPORTANT
•Combinations of these three modes (Text/
Photo, Photo, and Text) cannot be selected
at the same time. If you select one of these
modes, the previously set mode is
canceled.
•If you scan an original containing halftones,
such as a printed image, using the Photo
mode, the moiré effect (a shimmering,
wavy pattern) may occur. In this case, you
can lessen this moiré effect by using the
Sharpness mode. For more information on
the Sharpness mode, see the instruction
manuals that came with your machine.
NOTE
If the original is a transparency, select the
original type ➞ adjust the exposure to the
most appropriate level for the original.
3-54 Scan Settings
Downloaded from ManualsPrinter.com Manuals
1
1 Place your originals ➞ specify the
destination.
2 Press
(Back) or
(Next) to
move the focus to [Options] ➞ press
(Select).
The voice guide announces that the
Options selection screen is displayed.
NOTE
If the [Original Type] shortcut key is
displayed on the Basic Features screen,
you can select from the Basic Features
screen.
Scan Settings 3-55
Downloaded from ManualsPrinter.com Manuals
3
Using the Send and Fax Functions in the Voice Navigation
NOTE
For instructions on specifying the
destination, see "Flow of Sending
Operations," on p. 3-5.
1
3 Press
(Back) or
(Next) to
move the focus to [Original Type] ➞
press
(Select).
Using the Send and Fax Functions in the Voice Navigation
3
The voice guide announces that the
Original Type selection screen is
displayed.
3-56 Scan Settings
Downloaded from ManualsPrinter.com Manuals
1
4 Press
(Back) or
(Next) to
move the focus over the desired
original type ➞ press
(Select).
5 Press
(Confirm) until you return
to the Basic Features screen.
6 Press
(Start).
Scan Settings 3-57
Downloaded from ManualsPrinter.com Manuals
Using the Send and Fax Functions in the Voice Navigation
3
1
2-Sided Originals
You can set the machine to automatically turn
over 2-sided originals that are placed in the
feeder, and scan each side separately.
Using the Send and Fax Functions in the Voice Navigation
3
IMPORTANT
•The 2-Sided Original mode cannot be used
with other send modes, depending on the
model of the machine. When the focus
moves [2-Sided Original], you hear a
message "cannot select this with the
current settings."
•The 2-Sided Original mode cannot be used
when sending a fax document in the Direct
Sending or Manual Sending mode.
•When you are scanning originals with a
horizontal (landscape) orientation, such as
LTRR, A4R, or B5R, make sure to place
them horizontally into the feeder. If these
originals are placed vertically, the back
sides of these originals are scanned upside
down.
3-58 Scan Settings
Downloaded from ManualsPrinter.com Manuals
1
1 Place your originals ➞ specify the
destination.
2 Press
(Back) or
(Next) to
move the focus to [Options] ➞ press
(Select).
The voice guide announces that the
Options selection screen is displayed.
NOTE
If the [2-Sided Original] shortcut key is
displayed on the Basic Features screen,
you can select from the Basic Features
screen.
Scan Settings 3-59
Downloaded from ManualsPrinter.com Manuals
3
Using the Send and Fax Functions in the Voice Navigation
NOTE
For instructions on specifying the
destination, see "Flow of Sending
Operations," on p. 3-5.
1
3 Press
(Back) or
(Next) to
move the focus to [2-Sided Original]
➞ press
(Select).
Using the Send and Fax Functions in the Voice Navigation
3
The voice guide announces that the
2-Sided Original setting screen is
displayed.
3-60 Scan Settings
Downloaded from ManualsPrinter.com Manuals
1
4 Press
(Back) or
(Next) to
move the focus to [Book Type] or
[Calendar Type] ➞ press
(Select).
[Book Type]:
The front and back
sides of the original
have the same
top-bottom
orientation.
[Calendar Type]: The front and back
sides of the original
have opposite
top-bottom
orientations.
Scan Settings 3-61
Downloaded from ManualsPrinter.com Manuals
Using the Send and Fax Functions in the Voice Navigation
3
1
5 Press
(Confirm) until you return
to the Basic Features screen.
6 Press
3
(Start).
Using the Send and Fax Functions in the Voice Navigation
Different Size Originals
This mode enables you to scan different size
originals together.
IMPORTANT
•The Different Size Originals mode cannot
be used with other send modes, depending
on the model of the machine. When the
focus moves to [Different Size Originals],
you hear a message "cannot select this
with the current settings."
•The Different Size Original mode cannot be
used when sending a fax document in the
Direct Sending or Manual Sending mode.
•If the Scan Size setting is set to anything
other than 'Auto', all of the originals are
scanned in the specified size. If you want to
scan the originals in their original sizes,
make sure to set Document Size Select to
'Auto'.
3-62 Scan Settings
Downloaded from ManualsPrinter.com Manuals
1
Using the Send and Fax Functions in the Voice Navigation
•If the originals are placed in the feeder,
make sure that the different size originals
are of the same weight (paper type).
•Align the top edge of the originals with the
back edge of the feeder if you are placing
originals with different widths. ("Width"
3
refers to the vertical measurement of the
paper from the front of the machine to the
back of the machine when the paper is
placed in the feeder or on the platen glass.)
•If you send different sized originals via fax,
the paper size used to output the faxes on
the recipient's machine is the size of the
largest document you sent. For example, if
you send an LTR and 11" x 17" or A3 and
B4 original via fax, they will both be output
on 11" x 17" or A3 paper on the recipient's
machine.
•If the originals are placed in the feeder, set
differently size originals in the following
combinations. Other combinations may
damage the originals.
-11" x 17" and LGL, LTR and LGL, LTR and
LTRR/A3 and B4, B4 and A4R, A4 and B5
Scan Settings 3-63
Downloaded from ManualsPrinter.com Manuals
1
Using the Send and Fax Functions in the Voice Navigation
3
•If you place originals with different widths
into the feeder, the originals may move
slightly when fed to the platen glass. As a
result, the images may be scanned and
copied as slanted.
•If the Different Size Originals mode is set,
the scanning speed may be slower than
normal.
1 Place your originals ➞ specify the
destination.
NOTE
For instructions on specifying the
destination, see "Flow of Sending
Operations," on p. 3-5.
2 Press
(Back) or
(Next) to
move the focus to [Options] ➞press
(Select).
The voice guide announces that the
Options selection screen is displayed.
NOTE
If the [Different Size Originals] shortcut
key is displayed on the Basic Features
screen, you can select from the Basic
Features screen.
3-64 Scan Settings
Downloaded from ManualsPrinter.com Manuals
1
3 Press
(Back) or
(Next) to
move the focus to [Different Size
Originals] ➞ press
(Select).
The voice guide announces that the
Different Size Originals setting screen is
displayed.
If you hear the Voice Navigation
message "The specified settings have
been selected," proceed to Step 5.
Scan Settings 3-65
Downloaded from ManualsPrinter.com Manuals
Using the Send and Fax Functions in the Voice Navigation
3
1
4 Press
(Back) or
(Next) to
move the focus to [Same Width] or
[Different Width] ➞ press
(Select).
Using the Send and Fax Functions in the Voice Navigation
3
[Same Width]:
Select if you are
placing originals with
the same width.
[Different Width]: Select if you are
placing originals with
different widths.
5 Press
(Confirm) until you return
to the Basic Features screen.
6 Press
(Start).
3-66 Scan Settings
Downloaded from ManualsPrinter.com Manuals
1
Changing the Zoom Ratio
You can set the machine to adjust the zoom
ratio automatically, or you can specify the
zoom ratio manually before scanning the
original.
IMPORTANT
•The maximum image size that you can
send at a resolution of 600 x 600 dpi
resolution is 11" x 17"/A3. If the image
exceeds this size, it may be cut off.
•If PDF(Trace & Smooth), PDF(Compact),
PDF(OCR), XPS(Compact), XPS(OCR), or
OOXML is selected as the file format, you
can only send at a copy ratio of 100%.
•If [Long Original] is selected as the
document size, documents can only be
sent at a zoom ratio of 100%.
Scan Settings 3-67
Downloaded from ManualsPrinter.com Manuals
Using the Send and Fax Functions in the Voice Navigation
3
1
Preset Zoom
1 Place your originals ➞ specify the
destination.
● Reduction
Using the Send and Fax Functions in the Voice Navigation
3
The available preset copy ratios for
reducing originals are:
-LGL ➞ LTR (78%)
-11" x 17" ➞ LGL or 11" x 15" ➞ LTR
(73%)
-11" x 17" ➞ LTR (64%)
-11" x 17" ➞ STMT (50%)
-A3 ➞ B4, A4 ➞ B5 (86%)
-B4 ➞ A4, B5 ➞ A5 (81%)
-A3 ➞ A4, B4 ➞ B5 (70%)
-A3 ➞ B5 (61%)
-A3 ➞ A5 (50%)
● Enlargement
The available preset enlargement
copy ratios are:
-STMT ➞ 11" x 17" (200%)
-LTR ➞ 11" x 17" (129%)
-LGL ➞ 11" x 17" (121%)
-A5 ➞ A3 (200%)
3-68 Scan Settings
Downloaded from ManualsPrinter.com Manuals
1
-A4 ➞ A3, B5 ➞ B4 (141%)
-A4 ➞ B4, A5 ➞ B5 (122%)
-B4 ➞ A3, B5 ➞ A4 (115%)
2 Press
(Back) or
(Next) to
move the focus to [Options] ➞ press
(Select).
The voice guide announces that the
Options selection screen is displayed.
NOTE
If the [Copy Ratio] shortcut key is
displayed on the Basic Features screen,
you can select from the Basic Features
screen.
Scan Settings 3-69
Downloaded from ManualsPrinter.com Manuals
3
Using the Send and Fax Functions in the Voice Navigation
NOTE
For instructions on specifying the
destination, see "Flow of Sending
Operations," on p. 3-5.
1
3 Press
(Back) or
(Next) to
move the focus to [Copy Ratio] ➞
press
(Select).
Using the Send and Fax Functions in the Voice Navigation
3
The voice guide announces that the
Copy Ratio setting screen is displayed.
3-70 Scan Settings
Downloaded from ManualsPrinter.com Manuals
1
4 Press
(Back) or
(Next) to
move the focus over the desired
preset copy ratio ➞ press
(Select).
Preset Copy Ratios
Scan Settings 3-71
Downloaded from ManualsPrinter.com Manuals
Using the Send and Fax Functions in the Voice Navigation
3
1
5 Press
(Confirm) until you return
to the Basic Features screen.
Using the Send and Fax Functions in the Voice Navigation
3
NOTE
To return the zoom ratio to 100%, move
the focus to [Direct(100%)]/[1:1(100%)] ➞
press
(Select).
6 Press
(Start).
Zoom by Percentage
1 Place your originals ➞ specify the
destination.
NOTE
For instructions on specifying the
destination, see "Flow of Sending
Operations," on p. 3-5.
3-72 Scan Settings
Downloaded from ManualsPrinter.com Manuals
1
2 Press
(Back) or
(Next) to
move the focus to [Options] ➞ press
(Select).
NOTE
If the [Copy Ratio] shortcut key is
displayed on the Basic Features screen,
you can select from the Basic Features
screen.
3 Press
(Back) or
(Next) to
move the focus to [Copy Ratio] ➞
press
(Select).
If necessary, see the screen shot in step
3 of "Preset Zoom," on p. 3-68.
The voice guide announces that the
Copy Ratio setting screen is displayed.
Scan Settings 3-73
Downloaded from ManualsPrinter.com Manuals
3
Using the Send and Fax Functions in the Voice Navigation
The voice guide announces that the
Options selection screen is displayed.
1
4 Press
(Back) or
(Next) to
move the focus over the custom copy
ratio ➞ press
(Select).
Using the Send and Fax Functions in the Voice Navigation
3
The voice guide announces that the
machine has entered the mode for
entering numeric values.
3-74 Scan Settings
Downloaded from ManualsPrinter.com Manuals
1
5 Enter the desired zoom ratio
percentage using
(numeric
keys) ➞ press
(Confirm).
The voice guide announces that the ratio
you have entered.
Scan Settings 3-75
Downloaded from ManualsPrinter.com Manuals
Using the Send and Fax Functions in the Voice Navigation
3
1
6 Press
(Confirm) until you return
to the Basic Features screen.
Using the Send and Fax Functions in the Voice Navigation
3
NOTE
If you enter a value outside the settings
range, you will hear a voice guidance
message prompting you to entering
appropriate value.
7 Press
(Start).
NOTE
To return the zoom ratio to 100%, move
the focus to [Direct(100%)]/[1:1(100%)] ➞
press
(Select).
3-76 Scan Settings
Downloaded from ManualsPrinter.com Manuals
1
Auto Zoom
IMPORTANT
This mode can only be specified from the
Scan and Send Basic Features screen.
destination.
NOTE
For instructions on specifying the
destination, see "Flow of Sending
Operations," on p. 3-5.
Scan Settings 3-77
Downloaded from ManualsPrinter.com Manuals
3
Using the Send and Fax Functions in the Voice Navigation
1 Place your originals ➞ specify the
1
2 Press
(Back) or
(Next) to
move the focus to [Options] ➞ press
(Select).
If necessary, see the screen shot in step
3 of "Preset Zoom," on p. 3-68.
Using the Send and Fax Functions in the Voice Navigation
3
The voice guide announces that the
Options selection screen is displayed.
NOTE
If the [Copy Ratio] shortcut key is
displayed on the Scan and Send Basic
Features screen, you can select from the
Scan and Send Basic Features screen.
3 Press
(Back) or
(Next) to
move the focus to [Copy Ratio] ➞
press
(Select).
The voice guide announces that the
Copy Ratio setting screen is displayed.
3-78 Scan Settings
Downloaded from ManualsPrinter.com Manuals
1
4 Press
(Back) or
(Next) to
move the focus to [Auto] ➞ press
(Select).
5 Press
(Confirm) until you return
to the Scan and Send Basic Features
screen.
Scan Settings 3-79
Downloaded from ManualsPrinter.com Manuals
Using the Send and Fax Functions in the Voice Navigation
3
1
6 Press
(Start).
NOTE
To return the zoom ratio to 100%, move
the focus to [Direct(100%)]/[1:1(100%)] ➞
press
(Select).
Using the Send and Fax Functions in the Voice Navigation
3
3-80 Scan Settings
Downloaded from ManualsPrinter.com Manuals
Customizing Settings
4
CHAPTER
This chapter explains how to change the
default settings of the Voice Navigation mode,
and customize them to suit your needs.
Enabling/Disabling the Voice
Navigation Mode . . . . . . . . . . . . . . . . . . . . . 4-2
Setting the Maximum Volume of
the Voice Guidance. . . . . . . . . . . . . . . . . . . 4-5
Setting the Auto Reset Mode . . . . . . . . . . . 4-8
Voice Type Settings. . . . . . . . . . . . . . . . . . 4-12
Volume and Voice Speed Settings . . . . . . 4-15
Enabling/Disabling the Voice Guide from
Speaker . . . . . . . . . . . . . . . . . . . . . . . . . . 4-21
4-1
Downloaded from ManualsPrinter.com Manuals
Enabling/Disabling the Voice Navigation
Mode
Enable the Voice Navigation mode to hear
explanations and instructions while operating
the machine.
IMPORTANT
When the Voice Navigation mode is
disabled, the Voice Navigation mode will not
start even if you press and hold
(Reset)
for more than five seconds.
Customizing Settings
4
NOTE
• The default setting is 'On'.
• There is no Voice Navigation message
available to guide you to Voice Navigation
Settings screen in Accessibility(from
Settings/Registration screen). This setting
must be specified by pressing keys on the
touch panel display only. Therefore, please
seek assistance from the administrator, if
necessary.
• This setting can only be specified by the
administrator.
• Even if you change this setting, the Voice
Navigation Settings will not return to their
default values.
4-2
Enabling/Disabling the Voice Navigation
Mode
Downloaded from ManualsPrinter.com Manuals
1
1 Press
(Settings/Registration) ➞
[Preferences] ➞ [▼] ➞ [Accessibility]
➞ [Voice Navigation Settings] ➞ [Use
Voice Navigation].
2 Select [On] or [Off] ➞ press [OK].
Customizing Settings
4
The selected mode is set.
Enabling/Disabling the Voice Navigation
Mode
Downloaded from ManualsPrinter.com Manuals
4-3
1
3 Press [Close] repeatedly until the
Main Menu screen appears.
NOTE
The voice guide will not start until you
press
(Reset) for more than five
seconds.
Customizing Settings
4
4-4
Enabling/Disabling the Voice Navigation
Mode
Downloaded from ManualsPrinter.com Manuals
Setting the Maximum Volume of the Voice
Guidance
You can set the maximum volume of the
Voice Guidance. If you are having difficulties
hearing the Voice Guidance, set "Maximize."
1 Press
(Settings/Registration) ➞
[Preferences] ➞ [▼] ➞ [Accessibility]
➞ [Voice Navigation Settings] ➞
[Voice Guide Max Volume].
Setting the Maximum Volume of the Voice
Guidance
Downloaded from ManualsPrinter.com Manuals
4-5
4
Customizing Settings
NOTE
• This item is not supported with the Voice
Navigation mode.
• This setting can only be specified by the
administrator.
1
2 Select [Standard] or [Maximize] ➞
press [OK].
Customizing Settings
4
The specified volume is set.
Standard: The volume is set to a
standard volume.
Maximize: The volume is set to a higher
volume than a standard volume.
4-6
Setting the Maximum Volume of the Voice
Guidance
Downloaded from ManualsPrinter.com Manuals
1
3 Press [Close] repeatedly until the
Main Menu screen appears.
Setting the Maximum Volume of the Voice
Guidance
Downloaded from ManualsPrinter.com Manuals
4
Customizing Settings
NOTE
•Even if you change the settings, the
volume setting for the Voice Navigation
will not be reset.
• If you specify [Maximize], the people in
your vicinity may consider the sound to
be too loud, depending on your
environment.
4-7
Setting the Auto Reset Mode
You can set whether the machine initiates the
Auto Reset mode to return to the Copy, Fax,
or Scan and Send Basic Features screen
when the Voice Navigation mode is set.
4
Customizing Settings
If Auto Reset in Voice Navigation is set to
'Off', the Auto Reset mode will not initiate
after a certain period time if you are in the
Voice Navigation mode.
NOTE
• The default setting is 'Off'.
• When the Auto Reset mode activates to
return the machine to the Basic Features
screen, the set functions are reset.
4-8
Setting the Auto Reset Mode
Downloaded from ManualsPrinter.com Manuals
1
1 Press
(Settings/Registration) ➞
move the focus to [Voice Navigation
Settings] ➞ press
(Select).
Customizing Settings
4
The voice guide announces that the
Voice Navigation settings screen is
displayed.
Setting the Auto Reset Mode
Downloaded from ManualsPrinter.com Manuals
4-9
1
2 Press
(Back) or
(Next) to
move the focus to [Auto Reset in
Voice Navigation] ➞ press
(Select).
Customizing Settings
4
The voice guide announces that the
Auto Reset in Voice Navigation settings
screen is displayed.
4-10 Setting the Auto Reset Mode
Downloaded from ManualsPrinter.com Manuals
1
3 Press
(Back) or
(Next) to
move the focus to [On] or [Off] ➞
press
(Select).
Details of each item are shown below.
[On]: The Auto Reset mode is enabled
in the Voice Navigation mode.
[Off]: The Auto Reset mode is not
enabled in the Voice Navigation
mode.
4 Press
(Confirm) until the display
returns to the Basic Features screen.
Setting the Auto Reset Mode 4-11
Downloaded from ManualsPrinter.com Manuals
Customizing Settings
4
Voice Type Settings
You can set the Voice Navigation mode to use
either a male or female voice.
NOTE
The default setting is 'Female'.
Customizing Settings
4
1 Press
(Settings/Registration) ➞
move the focus to [Voice Navigation
Settings] ➞ press
(Select).
If necessary, see the screen shot in step
1 of "Setting the Auto Reset Mode," on p.
4-8.
The voice guide announces that the
Voice Navigation settings screen is
displayed.
4-12 Voice Type Settings
Downloaded from ManualsPrinter.com Manuals
1
2 Press
(Back) or
(Next) to
move the focus to [Voice Guide Type]
➞ press
(Select).
The voice guide announces that the
Voice Guide Type selection screen is
displayed.
Voice Type Settings 4-13
Downloaded from ManualsPrinter.com Manuals
Customizing Settings
4
1
3 Press
(Back) or
(Next) to
move the focus to [Male] or [Female]
➞ press
(Select).
Customizing Settings
4
4 Press
(Confirm) until the display
returns to the Basic Features screen.
The voice type automatically changes
based on your selection in step 3.
4-14 Voice Type Settings
Downloaded from ManualsPrinter.com Manuals
Volume and Voice Speed Settings
You can set the volume and speed of Voice
Navigation messages.
Volume and Voice Speed Settings 4-15
Downloaded from ManualsPrinter.com Manuals
4
Customizing Settings
NOTE
• The default settings for the voice volume
and speed are '0 (Standard)'.
• Voice guide is available for this setting.
1
1 Press
(Settings/Registration) ➞
move the focus to [Voice Navigation
Settings] ➞ press
(Select).
If necessary, see the screen shot in step
1 of "Setting the Auto Reset Mode," on p.
4-8.
Customizing Settings
4
The voice guide announces that the
Voice Navigation settings screen is
displayed.
2 Press
(Back) or
(Next) to
move the focus to [Voice Guide
Volume/Speed] ➞ press
(Select).
4-16 Volume and Voice Speed Settings
Downloaded from ManualsPrinter.com Manuals
1
The voice guide announces that the
Voice Guide Volume and Speed screen
is displayed.
3 Press
Volume and Voice Speed Settings 4-17
Downloaded from ManualsPrinter.com Manuals
4
Customizing Settings
(Select) ➞ press
(Back)
to move the indicator to the left to
decrease the volume. Press
(Next) to move the indicator to the
right to increase the volume ➞ press
(Select).
1
There are nine volume levels. As the
indicator moves to the left, the volume
decreases from -1 to -4. Minus 1 is
slightly lower than the standard volume
setting, and -4 is the lowest setting. As
the indicator moves to the right, the
volume increases from +1 to +4.
Customizing Settings
4
Example:
If the indicator is in the middle (the
Standard setting), and you press
(Next), the indicator moves to the
right. The voice guide will say, "Plus 1."
You can also adjust the volume using
and
. (See "Control Panel," on p.
1-6.)
❑ Press
(Confirm).
The voice guide announces that the
Voice Guide Volume and Speed
screen is displayed.
4-18 Volume and Voice Speed Settings
Downloaded from ManualsPrinter.com Manuals
1
4 To set the voice guide’s reading
speed:
4
Customizing Settings
❑ Press
(Next) to move the focus to
the Speed indicator ➞ press
(Select) ➞
(Back) or
(Next) to adjust the voice guide’s
speed ➞ press
(Select).
There are 11 speed levels (from -5 to
+5). As the indicator moves to the
left, the speed decreases. As the
indicator moves to the right, the
speed increases.
Volume and Voice Speed Settings 4-19
Downloaded from ManualsPrinter.com Manuals
❑ Press
1
(Confirm).
The voice guide announces that the
Voice Guide Volume and Speed
screen is displayed.
5 Press
(Confirm) until the display
returns to the Basic Features screen.
Customizing Settings
4
IMPORTANT
IMPORTANT
The speed/sound setting is only enabled
after you press
(Confirm).
4-20 Volume and Voice Speed Settings
Downloaded from ManualsPrinter.com Manuals
Enabling/Disabling the Voice Guide from
Speaker
You can set whether to output Voice
Navigation messages from the speaker.
1 Press
(Settings/Registration) ➞
move the focus to [Voice Navigation
Settings] ➞ press
(Select).
If necessary, see the screen shot in step
1 of "Setting the Auto Reset Mode," on p.
4-8.
The voice guide announces that the
Voice Navigation settings screen is
displayed.
Enabling/Disabling the Voice Guide from 4-21
Speaker
Downloaded from ManualsPrinter.com Manuals
4
Customizing Settings
NOTE
• The default setting is 'On'.
• If you select [OFF], listen to the Voice
Navigation messages using headphones
or earphones.
1
2 Press
(Back) or
(Next) to
move the focus to [Voice Guide From
Speakers] ➞ press
(Select).
Customizing Settings
4
The voice guide announces that the
Voice Guide From Speakers settings
screen is displayed.
4-22 Enabling/Disabling the Voice Guide from
Speaker
Downloaded from ManualsPrinter.com Manuals
1
3 Press
(Back) or
(Next) to
move the focus to [On] or [Off] ➞
press
(Select).
Customizing Settings
4
4 Press
(Confirm) until the display
returns to the Basic Features screen.
Enabling/Disabling the Voice Guide from 4-23
Speaker
Downloaded from ManualsPrinter.com Manuals
1
Customizing Settings
4
4-24 Enabling/Disabling the Voice Guide from
Speaker
Downloaded from ManualsPrinter.com Manuals
Appendix
5
CHAPTER
This chapter explains the functions that are
supported by the Voice Navigation mode.
Copy Mode Summary . . . . . . . . . . . . . . . . . 5-2
Send/Fax Mode Summary . . . . . . . . . . . . 5-10
5-1
Downloaded from ManualsPrinter.com Manuals
Copy Mode Summary
The following is an explanation of the copying
modes which can be used with the Voice
Navigation mode. For more information, see
Chapter 2 or the instruction manuals that
came with your machine.
5
*
Appendix
Mode Name
Copies
5-2
Summary
Set how many copies to make
(up to 999 or 9,999,
depending on the model of
the machine.)
Copy Mode Summary
Downloaded from ManualsPrinter.com Manuals
1
Mode Name
Copy Mode Summary
Downloaded from ManualsPrinter.com Manuals
5-3
5
Appendix
Summary
Specify the zoom ratio for the
copies. You can set the
machine to adjust the zoom
ratio automatically, or you can
specify the zoom ratio
manually.
Offers you a variety of preset
copy ratios to reduce or
Preset
enlarge standard size
Zoom
originals to another standard
Copy
paper size.
Ratio
You can set the machine to
automatically select the
Auto Zoom appropriate zoom ratio based
on the size of the original and
the selected copy paper size.
Direct or
Sets the copy ratio to 100%.
1:1
Enables you to specify a copy
Zoom by
ratio in 1% increments to
Percentage
reduce or enlarge copies.
1
Summary
Select the paper size and
Paper Select
paper source containing the
desired paper size.
The machine automatically
Automatic
selects the copy paper size
Paper
based on the size of your
Selection
original.
5
Collate
The copies are automatically
(Page
collated into sets arranged in
order)
page order.
Group
All copies of the same original
(Same
page are grouped together.
pages)
The copies are automatically
collated into sets arranged in
Finishing Staple
page order and stapled.
The copies are shifted
alternately to the front and
back of the tray, in a vertical
Offset
(portrait) orientation, or a
horizontal (landscape)
orientation, depending on the
orientation of your originals.
Appendix
Mode Name
5-4
Copy Mode Summary
Downloaded from ManualsPrinter.com Manuals
1
Mode Name
Copy Mode Summary
Downloaded from ManualsPrinter.com Manuals
5-5
5
Appendix
Summary
The machine automatically
Z-folds 11" x 17"/A3 copies
Z-Fold
into LTR/A4 copies,
respectively.
The machine folds LTRR/
Accordion
A4R copies into accordion
Z-Fold
Z-fold.
The machine C-folds LTRR/
C-Fold
A4R copies into three-fold
copies.
The machine half-folds
Finishing
Half Fold LTRR/A4R copies into
STMT/A5 copies.
Double
The machine folds A4R
Parallel
copies into double parallel
Fold
fold.
Saddle
The machine saddle-folds
Fold
multiple sheets in 2-folds.
The machine punches two
Hole
or three holes (depending
Punch
on the paper size) into the
copies.
1
Summary
The copies are
automatically collated into
Rotate 90
sets arranged in page order,
Degrees
and are output in alternating
Finishing
directions.
Specify whether the printed
Face Up/
sheets are output as face up
Face Down
5
or face down.
Enables you to make
1-Sided
2-sided copies from 1-sided
2-Sided
originals.
Enables you to make
2-sided copies from 2-sided
originals. If the originals are
2-Sided
placed in the feeder, they
2-Sided
are automatically turned
2-Sided
over to make 2-sided
copies.
Automatically turns over
2-sided originals placed in
2-Sided
the feeder to make 1-sided
1-Sided
copies on different sheets of
paper.
Appendix
Mode Name
5-6
Copy Mode Summary
Downloaded from ManualsPrinter.com Manuals
1
Mode Name
Copy Mode Summary
Downloaded from ManualsPrinter.com Manuals
5-7
5
Appendix
Summary
Enables you to make
2-sided copies from facing
Book
pages, or from the front and
2-Sided
2-Sided
back sides of a page in
bound originals, such as
books and magazines.
Enables you to manually
adjust the copy exposure to
the most appropriate level
for the original.
Density
Enables you to make copies
Background
by erasing the background
Density
color of the original.
1
Summary
This mode is best suited for
making copies of originals
Text/Photo/ that contain both text and
Map Mode photos, or originals such as
maps that contain fine text
and diagrams.
This mode is best suited for
Photo
5
making copies of photos
Printout
printed on photographic
Original Mode
paper.
Type
This mode is best suited for
Printed
Image
making copies of images
printed with halftone dots.
Mode
This mode is best suited for
making copies of text
Text Mode originals. Blueprints or
pencil drawn originals can
also be copied clearly.
Appendix
Mode Name
5-8
Copy Mode Summary
Downloaded from ManualsPrinter.com Manuals
1
Mode Name
NOTE
•Some functions may not be available,
depending on the model of your machine.
•Some of these functions may require
optional equipment.
Copy Mode Summary
Downloaded from ManualsPrinter.com Manuals
5-9
5
Appendix
Select
Color
Summary
Detects whether the original
Auto
is color or black-and-white,
(Color/
and selects the appropriate
Black)
mode.
Copies the original in the Full
Color mode, regardless of
Full Color
whether it is a color or
black-and-white original.
Copies the original in the
Black and White mode,
Black
regardless of whether it is a
color or black-and-white
original.
Single
Enables you to copy in a
Color
single color.
Two
Enables you to copy in a
Colors
single color and black.
Send/Fax Mode Summary
This section describes the Send/Fax
functions you can use with the Voice
Navigation mode.
For more information on the various
functions, see Chapter 3 or the instruction
manuals that came with your machine.
Appendix
5
Mode Name
New Address
Summary
You can specify the
destination that has not
been stored in the
Address Book. (such as
an e-mail address, I-fax
address, or file server
address)
5-10 Send/Fax Mode Summary
Downloaded from ManualsPrinter.com Manuals
1
Mode Name
Appendix
Favorites Settings
Summary
If you frequently send
documents with the same
document settings to the
same destination, store
these settings in a
favorites button. Then,
when you need to specify
the destination, all you
5
have to do is select the
favorites button
containing your stored
document settings and
the desired destination,
and send your document.
You can set the machine
to automatically turn over
2-Sided original that are
placed in the feeder, and
scan each side
separately.
Scan
Settings
2-Sided
Original
Send/Fax Mode Summary 5-11
Downloaded from ManualsPrinter.com Manuals
1
Mode Name
Appendix
5
Scan
Settings
Summary
You can scan different
size originals with the
same widths (11" x 17"
and LTR, LTRR and
STMT, A3 and A4, or B4
Different
and B5) or different
Size
widths (11" x 17" and
Originals
STMT, LTR and LGL, A3
and B4, or A4 and B5),
together as one group by
setting them in the
feeder.
You can manually specify
the document size when
the machine cannot
detect the paper size
automatically, such as
when scanning
transparencies. Specify
the document size as
Scan Size well, if you want to scan
an 11" x 17" or A3
original with an image
that extends all the way
to the edges without the
periphery of the original
being cut off.
You can also store the
specified document size.
5-12 Send/Fax Mode Summary
Downloaded from ManualsPrinter.com Manuals
1
Mode Name
NOTE
Some of these functions may require
optional equipment.
Send/Fax Mode Summary 5-13
Downloaded from ManualsPrinter.com Manuals
5
Appendix
Scan
Settings
Summary
You can set the machine
to adjust the zoom ratio
Copy
automatically, or you can
Ratio
specify the zoom ratio
manually before scanning
the original.
You can specify the
Resolution resolution before
scanning the original.
You can manually adjust
the scan exposure to the
Density
most appropriate level for
the original.
You can manually select
the original type
Original
according to the type of
Type
image that you are
scanning.
1
Appendix
5
5-14 Send/Fax Mode Summary
Downloaded from ManualsPrinter.com Manuals
Downloaded from ManualsPrinter.com Manuals
CANON INC.
30-2, Shimomaruko 3-chome, Ohta-ku, Tokyo 146-8501, Japan
CANON U.S.A., INC.
One Canon Plaza, Lake Success, NY 11042, U.S.A.
CANON CANADA INC.
6390 Dixie Road Mississauga, Ontario L5T 1P7, Canada
CANON EUROPA N.V.
Bovenkerkerweg 59-61 1185 XB Amstelveen, The Netherlands
(See http://www.canon-europe.com/ for details on your regional dealer)
CANON LATIN AMERICA, INC.
703 Waterford Way Suite 400 Miami, Florida 33126 U.S.A.
CANON AUSTRALIA PTY. LTD
1 Thomas Holt Drive, North Ryde, Sydney, N.S.W. 2113, Australia
CANON CHINA CO., LTD
15F Jinbao Building No.89 Jinbao Street, Dongcheng District, Beijing 100005, China
CANON SINGAPORE PTE. LTD.
1 HarbourFront Avenue #04-01 Keppel Bay Tower, Singapore 098632
CANON HONGKONG CO., LTD
19/F., The Metropolis Tower, 10 Metropolis Drive, Hunghom, Kowloon, Hong Kong
FT5-2656 (000)
Downloaded from ManualsPrinter.com Manuals
© CANON INC. 2009