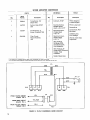
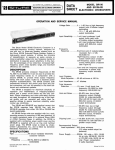
1
SR105 Power Amplifier
OPERATION AND SERVICE MANUAL
Manufactured by
SHURE BROTHERS INC.
222 Hartrey Avenue
Evanston, Illinois 60204 U.S.A.
WARNING
To reduce the risk of fire or electric shock, do not
expose this appliance to rain or extreme moisture.
Copyright 1979, Shure Brothers Inc.
27A888 (SJ) (95B652)
Printed in U.S.A.
SR105 Power Amplifier
SPECIFICATIONS
The following specifications apply to both SR105A and SR105B Power Amplifiers except where noted. The SR105A Power
Amplifier provides both direct-coupled speaker output and transformer-coupled, constant-voltage, 70-volt output. The
SRlO5B Power Amplifier is equipped for direct-coupled speaker output only.
Amplifier Type
. . . . . . . All silicon transistor power
amplifier
Power Output . . . . . . . .200 watts rms continuous to
4-ohm load
100 watts rms continuous to
8-ohm load
150 watts rms continuous to
70-volt line (33-ohm load)*
Voltage Gain . . . . . . . . . 27 2 2 dB (4-ohm load at 1 kHz)
35 e3.5 dB (33-ohm load at 1 kHz
across 70-volt output)'
Sensitivity . . . . . . . . . . . 1.2 volts nominal (full rated output)
Frequency Response . . &I
.5 dB, 20-20,000 Hz (typical)
*2 dB, 50-15,000 Hz (typical,
70-volt output)"
Input Impedance . . . . .39 kilohms &30%, balanced or
unbalanced*
25 kilohms &30%, balanced or
unbalanced* *
Total Harmonic
Distortion . . . . . . . . . 2 % max. at 1 kHz, 200W (4-ohm
load, 28.3 Vrms output)
3% max. at 1 kHz, 150W (33-ohm
load, 70.7 Vrms output)*
Hum and Noise . . . . . . .80 dB below rated output (less than
2.8 mV at direct-coupled speaker
output with Volume Control at 0)
Output Clipping Level. . 28.3 Vrms min. at 1 kHz (4-ohm
load)
Load lmpedance:
Direct-Coupled
Speaker Output . . 4 ohms or greater (4 ohms min.)
70-Volt Output* . . . . I 5 0 watts max. (33 ohms min.)
Model SR105A
"Model SR105B
only.
only.
Load Regulation:
Direct-Coupled
Speaker Output . . Less than 1 dB from no-load to 4ohm load at 200 watts rms output
70-Volt Output* . . . . Less than 2 dB from no-load to 33ohm load at 150 watts rms output
Phasing.. . . . . . . . . . . . Pin 3 and phone jack tips of inputs in phase with speaker output phone jack tips, and 28V
and 70V terminals
Power Supply . . . . . . . . 120 volts, 50/60 Hz ac only. Power
consumption: 40 watts max. (20
watts typical) with no signal, 450
watts with 1 kHz signal and 200
watts output; 500 watts maximum
Temperature Range:
Operating . . . . . . . . . -7' to 43OC (20' to 110°F)
Storage . . . . . . . . . . .-34' to 74OC (-30' to 165OF)
Dimensions . . . . . . . . . .I78 mm x 483 mm x 270 mm
(7 in. H x 19 in. W x 10% in. D)
Weight:
SR105A . . . . . . . . . . . 15.66 kg (34 Ib 8 oz)
SR105B . . . . . . . . . . . 12.23 kg (27 Ib)
Finish . . . . . . . . . . . . . . Matte black
Installation . . . . . . . . . . Equipped for standard 19" (483
mm) rack mounting; may be operated in optional A105A Carrying Case
Certifications ........ Listed by Underwriters' Laboratories, Inc.; listed by Canadian
Standards Association as certified
SR105 Power Amplifier
SPECIFICATIONS
(Curves shown are typical)
FREQUENCY (Hz1
OUTPUT POWER (WATTS)
TOTAL HARMONIC DISTORTION VS. OUTPUT POWER TO
4-OHM LOAD AT 50 HZ, 1 KHZ & 10 KHz (DIRECT OUTPUT
ONLY)
OUTPUT POWER VS. FREQUENCY AT 1 % 812% TOTAL HARMONIC DISTORTION TO 4-OHM LOAD (DIRECT OUTPUT
ONLY)
LOAD RESISTANCE, OHMS
OUTPUT POWER (WATTS)
TOTAL HARMONIC DISTORTION VS. OUTPUT POWER (VARIOUS LOADS) AT 1 KHz AND CONSTANT 70.7V OUTPUT
(70V OUTPUT ONLY)*
FREQUENCY ( HJ
OUTPUT POWER (WATTS)
TOTAL HARMONIC DISTORTION VS. OUTPUT POWER TO
150-WATT (33-OHM) LOAD AT 1 KHz FOR INCREASING OUTPUT VOLTAGES (70V OUTPUT ONLY)*
'Model SRIO~A only.
OUTPUT POWER VS. FREQUENCY AT 1% & 2% TOTAL HARMONlC DISTORTION TO 33-OHM LOAD (70V OUTPUT ONLY)*
iii
SR105 Power Amplifier
TABLE OF CONTENTS
Section
Page
SPECIFICATIONS . . . . . . . . . . . . . . . . . . . . . . . . . . . . . . . i i
DESCRIPTION . . . . . . . . . . . . . . . . . . . . . . . . . . . . . . . . . . 1
OPERATING INSTRUCTIONS
Functional Identification . . . . . . . . . . . . . . . . . . . . . . . . 3
General Operating Instructions . . . . . . . . . . . . . . . . . . 3
Mounting and Ventilation . . . . . . . . . . . . . . . . . . . . . . . . 4
Thermal Overload . . . . . . . . . . . . . . . . . . . . . . . . . . . . . 4
Power Requirements . . . . . . . . . . . . . . . . . . . . . . . . . . . 4
Functional Circuit Description . . . . . . . . . . . . . . . . . . . 4
Input Connections . . . . . . . . . . . . . . . . . . . . . . . . . . . . . 4
Output Connections . . . . . . . . . . . . . . . . . . . . . . . . . . . . 6
Amplifier-to-Speaker Impedance Matching . . . . . . . . . 8
Output Voltage Meter . . . . . . . . . . . . . . . . . . . . . . . . . . . 9
Basic Operating Hints . . . . . . . . . . . . . . . . . . . . . . . . . . 10
SPECIAL OPERATING INSTRUCTIONS
Adding SRlO5A Amplifiers in a
70-Volt System (Cascaded) . . . . . . . . . . . . . . . . . . . 10
Bridging Connections . . . . . . . . . . . . . . . . . . . . . . . . . . 11
Adding Headphone Jack to Speaker Connections . . . 11
SERVICE INSTRUCTIONS
Amplifier Service . . . . . . . . . . . . . . . . . . . . . . . . . . . . . . 12
Section
Page
.
Replacement Parts . . . . . . . . . . . . . . . . . . . . . . . . . . . 12
Fuse Replacement . . . . . . . . . . . . . . . . . . . . . . . . . . . . . 12
Bottom Plate Removal . . . . . . . . . . . . . . . . . . . . . . . . . . 12
Cover Removal . . . . . . . . . . . . . . . . . . . . . . . . . . . . . . . . 12
Lamp Replacement . . . . . . . . . . . . . . . . . . . . . . . . . . . . 12
Dc Output Balance Adjustment . . . . . . . . . . . . . . . . . . . 12
Output Voltage Meter Calibration . . . . . . . . . . . . . . . . . 12
Printed Circuit Board Removal . . . . . . . . . . . . . . . . . . . 13
Small Signal and Predriver Transistors . . . . . . . . . . . . 14
Driver Transistors . . . . . . . . . . . . . . . . . . . . . . . . . . . . . 14
Output Transistors . . . . . . . . . . . . . . . . . . . . . . . . . . . . . 15
Diodes . . . . . . . . . . . . . . . . . . . . . . . . . . . . . . . . . . . . . . . 15
Diode Bridge Rectifier . . . . . . . . . . . . . . . . . . . . . . . . . . 15
Checking Transistors and Diodes . . . . . . . . . . . . . . . . . 15
SR105B Amplifier Conversion for 70-Volt Output . . . . 15
Service lllustrations . . . . . . . . . . . . . . . . . . . . . . . . . . . . 17
Guarantee . . . . . . . . . . . . . . . . . . . . . . . . . . . . . . . . . . . . 17
Shipping Instructions . . . . . . . . . . . . . . . . . . . . . . . . . . . 17
PARTS LIST . . . . . . . . . . . . . . . . . . . . . . . . . . . . . . . . . . . . 19
CONDENSED OPERATING INSTRUCTIONS . . . . . . . . . 27
ARCHITECTS' AND
ENGINEERS' SPECIFICATIONS . . . . . . . . . . . . . . . 27
SR105 Power Amplifier
LlST OF ILLUSTRATIONS
Figure
1
2
3
4
5
6
7
8
9
Page
SR105 Power Amplifier Front Panel . . . . . . . . . . .
SR105 Power Amplifier Rear Panel . . . . . . . . . . .
SR105 Power Amplifier Dimensional
Outline Drawing . . . . . . . . . . . . . . . . . . . . . . . . .
SR105 Power Amplifier Block Diagram . . . . . . . .
Input Connections . . . . . . . . . . . . . . . . . . . . . . . . .
Output Power vs . Load lmpedance from
2 Ohms to 32 Ohms . . . . . . . . . . . . . . . . . . . . . .
70-Volt Output Power vs . Direct Output Load
Impedance from 4 Ohms to 100 Ohms . . . . . . .
Recommended Wire Gauge vs . Amplifier-toSpeaker Distance: Direct Output . . . . . . . . . . .
Recommended Wire Gauge vs . Amplifier-toSpeaker Distance: 70-Volt Output
(SR105A Only) . . . . . . . . . . . . . . . . . . . . . . . . . .
2
2
4
5
6
7
7
8
8
Figure
10
11
12
13
14
15
16
17
18
19
20
21
Page
70-Volt System Attenuator . . . . . . . . . . . . . . . . . . . 11
Bridged Amplifier Connections . . . . . . . . . . . . . . . 11
Headphone Jack for Speaker Connections . . . . .11
SR105 Power Amplifier Top View, Cover
Removed (SR105A Model Shown) . . . . . . . . . . 13
SR105 Power Amplifier Bottom View.
Cover Removed (SR105A Model Shown) . . . . . 14
70-Volt Conversion: Added Circuitry . . . . . . . . . . 16
70-Volt Conversion: Transformer Mounting . . . . . 17
70-Volt Conversion: Internal Wiring . . . . . . . . . . . 18
Main Circuit Board Parts Location Diagram . . . . 22
Filter Circuit Board Parts Location Diagram . . . .22
Transistor Lead Codes . . . . . . . . . . . . . . . . . . . . .23
SR105 Power Amplifier Circuit Diagram . . . . . . . 25
SR105 Power Amplifier
DESCRIPTION
(Shown in A105A
Carrying Case)
The Shure SR105 Power Amplifier is a high-power amplifier designed for sound reinforcement applications. It is
capsble of delivering 200 watts rms to a 4-ohm load, and is
available in two models, the SR105A and SR105B. The
SRlO5A Power Amplifier provides both a direct-coupled
speaker output and a transformer-coupled constant-voltage, 70-volt output, while the SR105B Power Amplifier is
equipped with a direct-coupled speaker output only. In
this manual "Amplifier" refers to both SRI05A and SRlOSB
models unless otherwise specified.
The Amplifier is of rugged construction and is conservatively designed to provide reliable operation at high power
levels with minimum distortion and phase shift. Used in
conjunction with a suitable mixer-preamplifier or audio
console such as the Shure Model SR101, a versatile, highquality, high-power, sound reinforcement system may be
assembled for use with a variety of speaker systems. Several SR105 Power Amplifiers may be interconnected (described under Operating Instructions) to provide greater
power output for large installations and redundant operation. The basic direct-coupled speaker output capabilities
of the Amplifier are well suited to the source-oriented
speaker systems used in theatres, auditoriums, stadiums,
ballrooms, and convention halls, in short, wherever maximum coverage with reserve power is required. The addi-
tional 70-volt output feature of the SR105A Power Amplifier
makes it equally adaptable to source-oriented or distributed speaker systems such as those used for background
music or announcements in industrial buildings, institutions
or public places.
An Output Voltage Meter in the Amplifier facilitates adjustment and output level monitoring.
Silicon transistors and similar solid-state devices are
used throughout the Amplifier. Short-circuit and thermal
overload protection are design features which eliminate
the need for special installation or operation precautions.
All components are of the highest quality and are operated
well within their respective ratings to assure maximum
reliability under normal use conditions.
The Shure SR105 Power Amplifier is supplied with one
1.8m (6 ft) audio input connecting cable and an accessory package consisting of four rack-mounting screws, one
Volume Control Cover, one Power On-Off Switch Cover, and
one spare 5-ampere fuse.
The SR105A and SRIO5B Power Amplifiers are listed by
Underwriters' Laboratories, Inc., and are listed by Canadian
Standards Association as certified.
The A105A Portable Carrying Case accessory is designed specifically for use with the SR105 Power Amplifier.
FIGURE 1. SR105 POWER AMPLIFIER FRONT PANEL
FIGURE 2. SR105 POWER AMPLIFIER REAR PANEL
(SR105A MODEL SHOWN)
SR105 Power Amplifier
OPERATING INSTRUCTIONS
FUNCTIONAL IDENTIFICATION (Refer to Figures 1 and 2,
Page 2).
1. OUTPUT VOLTAGE Meter - lndicates Amplifier output voltage in percentage of maximum voltage.
2. VOLUME Control - Controls Amplifier output level.
3. THERMAL OVERLOAD Indicator Lamp - lndicates
Amplifier shutdown due to excessive heat sink temperature.
4. POWER ON-OFF Switch - Applies ac power to Amplifier.
5. BALANCED BRIDGING lnput Jack - Provides for balanced bridging, high-impedance input connection.
6. 3AGl5A Ac Line Fuse - Protects Amplifier ac input
line aaainst
overload.
7. Ac Line Cord - Connects ac power to Amplifier power
supply.
8. DIRECT OUTPUT Jacks (Four) - Provide for output
connection to direct-coupled speaker systems.
9. DIRECT OUTPUT Terminal Strip - Provides for output
connection to direct-coupled speaker systems.
10. 70V-OFF Switch (SRIO5A Amplifier only) - Activates
70-volt output transformer for use with distributed
speaker systems.
11. 70V OUTPUT Terminal Strip (SRI05A Amplifier only) Provides for output connection to 70-volt distributed
speaker systems.
12. SPARE FUSE Fuseholder- Holds spare 3AG-5A
power supply fuse.
13. UNBALANCED PARALLELED HlGH IMPEDANCE Input Jacks (Two) - Provide unbalanced (one side
grounded) input connections for use with high-impedance sources.
14. 70-Volt Output Cover Plate (SRIOSB Amplifier only) Covers pre-drilled and marked area where Switch (10)
and Terminal Strip (11) are located.
GENERAL OPERATING INSTRUCTIONS
WARNING
Voltages in this equipment are hazardous to life. Make
all input and output connections with ac power disconnected. Refer servicing to qualified service personnel.
DIRECT SPEAKER OUTPUT OPERATION
(MODEL SRIO5A and SR105B AMPLIFIERS)
1. Install Amplifier before making electrical connections.
Using hardware supplied, secure Amplifier in rack or
carrying case, allowing at least 51 mm (2 in.) above
and behind case for ventilation. Use forced-air cooling
for multiple-amplifier installations.
2. Set Switches (4,lO) to OFF and VOLUME Control (2)
to 0.
3. Connect required speakers to Amplifier DIRECT OUTPUT jacks (8) andlor to terminal strip (9), using proper
wire size and arranging speaker connections for total
speaker load impedance as close to 4 ohms as possible.
Remove DIRECT OUTPUT Cover (14) and use rightangle phone plugs to connect speakers to Amplifier.
When using DIRECT OUTPUT Terminal Strip (9), thread
wires through Cover grommet. Replace cover.
CAUTION
In multiple speaker installations, be sure not to exceed maximum power rating of any speaker.
4. Connect audio console or microphone mixer output to
Amplifier UNBALANCED PARALLELED HlGH IMPEDANCE lnput Jack (13) (standard phone jack). For interconnections up to 15m (50 ft), use single-conductor, shielded, low-capacitance cable. For interconnections longer than 50 ft, use 600-ohm balanced line
into Amplifier BALANCED BRIDGING lnput Jack (5)
(professional, 3-pin, female audio connector).
5. Connect additional power amplifiers or other auxiliary
equipment as required to remaining Amplifier input
jacks.
6. Connect line cord (7) to grounded 120 Vac & l o % ,
50/60 Hz source capable of supplying 450 watts.
7. With VOLUME Control (2) set at 0, turn front-panel
POWER Switch (4) on. Adjust VOLUME Control to desired amplifier operating level.
CONSTANT-VOLTAGE 70-VOLT SPEAKER OUTPUT
(MODEL SR105A AMPLIFIER ONLY)
1. Connect auxiliary equipment as for direct speaker operation in steps 1, 2, 4, 5 and 6 above.
2. Connect required speakers to 70V OUTPUT Terminals
(11) and, if necessary, DIRECT OUTPUT Connectors
(8,9). Total speaker impedance should be as close to 33
ohms as possible. Be careful not to exceed Amplifier
150-watt power output capability. (See Output Connections, Page 6.)
3. Connect audio console or microphone mixer output to
Amplifier UNBALANCED PARALLELED HlGH IMPEDANCE Input Jack (13) (standard phone jack). For interconnections up to 15m (50 ft), use single-conductor, shielded, low-capacitance cable. For interconnections longer than 50 ft, use 600-ohm balanced line
into Amplifier BALANCED BRIDGING lnput Jack (5)
(professional, 3-pin, female audio connector).
4. Turn 70V-OFF Switch (10) to 70V.
5. Connect line cord (7) to grounded 120 Vac * l o % ,
50160 Hz source.
6. With VOLUME Control (2) set at 0, turn front-panel
POWER Switch (4) on. Adjust VOLUME Control to desired amplifier operating level.
MOUNTING AND VENTILATION
The SR105 Power Amplifier is designed for rack-mounting in a standard 19-inch (483 mm) audio equipment cabinet
rack and is supplied with the necessary mounting hardware.
To insure adequate air circulation, a minimum clearance of
51 mm (2 in.) should be provided above and behind the
Amplifier (see Figures 3, Page 4). If the cabinet ambient
temperature reaches 43OC (llO°F), forced air ventilation
should be provided to avoid the possibility of thermal overload (see following section). The Amplifier may be operated
in an ambient temperature range from - 7 " to 43°C (20"
to 110°F) in continuous duty without derating.
The Amplifier may also be operated while mounted in a
Shure A105A Carrying Case.
..
P ,
?
I
* NOT INCLUDING CABLE AND LlNE
-00-518
270 mm'
N
I ).-
CORD CLEARANCE DEPTH.
I
FIGURE 3. SR105 POWER AMPLIFIER
DIMENSIONAL OUTLINE DRAWING
THERMAL OVERLOAD
The SR105 Power Amplifier is equipped with thermal
sensing switches on the output transistor heat sinks. The
thermal switches are set to s h ~ ioff
t ac power to the Amplifier when a temperature of 90°C (194°F) is attained on the
heat sinks; the switches automatically recycle and re-apply
power when the heat sink temperature drops to 73°C
(164°F). A THERMAL OVERLOAD light (3), located on the
front panel of the Amplifier, indicates if thermal cycling
has occurred. Thermal cycling may occur if air is not allowed to circulate across the black finned heat sinks and
through the grilles of the Amplifier, or if there is a prolonged short-circuit on the output.
POWER REQUIREMENTS
The SR105 Power Amplifier is furnished with a threeconductor power cable and three-prong grounded plug
(7). Connect the power cable to an outlet which supplies
volts ac, 50160 Hz power. The maximum power
120 ~ 1 0 %
consumption at 120 volts under any normal operating condition is 450 watts (3.75 amperes at 120 volts). Idle power
consumption with no input signal is nominally 20 watts.
If extension cords are required to supply power to the
Amplifier, a high quality 18-gauge or larger cord should
be used.
A POWER toggle switch on the front panel (4) controls
the application of ac power to the Amplifier. The tamperproof cover supplied may be used to eliminate accidental
movement of this switch.
Main ac power fusing is provided by a 5-ampere, type
3AG, cartridge-type fuse (6) located on the rear panel. A
spare ac power fuse is supplied for mounting in the clip on
the rear panel (12).
Additional protection is provided by wired-in fuses in the
main ac power circuit (FI, 8 amperes) and in the ac pilot
lamp circuit (F3, 1 ampere). These fuses are located under
the chassis.
FUNCTIONAL CIRCUIT DESCRIPTION (See Figure 4,
Page 5)
The inputs of the SR105 Power Amplifier consist of two
unbalanced (grounded) phone jacks (13) and one balancedbridging, three-pin, female audio connector (5). The balanced-bridging input is wired in parallel to the phone jacks
after passing through an isolation transformer. The input
signal then passes through the VOLUME Control (2), and
if the Amplifier is an SR105A, either passes through a Filter
Assembly and 70V-OFF Switch (10) to the Power Amplifier
circuitry, or bypasses the Filter Assembly and goes directly
to the Power Amplifier circuitry. In the SR105B Amplifier the
signal passes directly from the VOLUME Control (2) to the
Power Amplifier circuitry.
The Power Amplifier circuitry contains a dc balance adjustment to minimize idle power consumption and eliminate
dc offset at the direct-coupled (28V) output. The balance
adjustment is generally only performed when active Power
Amplifier circuit components are replaced.
The metering circuit, located at the output of the Power
Amplifier circuit, contains a meter calibration adjustment,
a meter rectifier, and an output meter that indicates percentage of output voltage. NOTE: 100% is the maximum
Amplifier output voltage prior to clipping regardless of load.
Maximum power output is obtained with a direct-coupled
speaker load impedance of 4 ohms, or a 70-volt output
speaker load of 150 watts (33 ohms), or a combination of
direct-coupled and 70-volt loads which results in optimum
loading for maximum power output.
The Power Amplifier circuit output goes to four phone
jacks (8) and one two-contact terminal strip (9). In the
SR105A Amplifier, the output goes through the 70V-OFF
Switch (lo), a constant-voltage, 70-volt output transformer,
and a three-contact terminal strip (11).
A detailed description of the Amplifier circuits and controls and their uses is provided in the following paragraphs
of this section.
INPUT CONNECTIONS
Three LlNE LEVEL INPUTS Connectors are located on
the rear panel of the Amplifier (see Figure 2, Page 2). A
professional, three-pin, female audio connector (5)* provides a balanced bridging, high-impedance input connection. Unbalanced, high-impedance input connections are
provided by two standard 1/4" phone jacks (13) wired in
parallel.
The Amplifier may be driven to full-rated output by any
audio console, preamplifier or microphone mixer capable
of delivering 1.2 volts across a 25-kilohm load.
When using the Shure SR101 Audio Console as the
mixer-preamplifier, connect the cable supplied with the
Amplifier from one of the PROGRAM OUTPUTS Jacks
labeled LlNE LEVEL on the SR101 to one of the LlNE LEVEL
INPUT Jacks (13) labeled UNBALANCED PARALLELED
HIGH IMPEDANCE on the Amplifier (see Figure 5A, Page
6). If a longer interconnecting cable is desired, a singleconductor, shielded, low-capacitance cable (such as Belden #8401, 8410, or 8411) should be used.
'Des~gnedto mate with Cannon XL S e r ~ e s Sw~tchcraft
,
A3
(0 G ) Series, or equivalent connector
VOLTMETER
(70)
METER
RECTIFIER
INPUTS
0''
I'
-
UNBALANCED
METER
ADJUST
aI
DIRECT
SPEAKER
OUTPUTS
/
BALANCED
BRIDGING
11
?
INPUT
XFMR
VOLUME
/
I
-
LOW-CUT
FILTER
ASSEMBLY !&
'0
d
I
I
I
I
I
!& SRIOSA AMPLIFIER ONLY.
=
7 0V
I
I
I
I
I
I
I
I
I
I
I
I
I
L
f
1 1
BALANCE
XFMR*
*
- - -- -- - - - - - - - - - - - - - - 1
I
FIGURE 4. SR105 POWER AMPLIFIER BLOCK DIAGRAM
In applications where the Amplifier is located at a considerable distance from the mixer-preamplifier, electrical
interference or excessive hum pickup may be encountered.
Hum pickup may also be encountered over shorter distances as a result of ground loop conditions between the units.
Under these circumstances, a balanced line, such as is
used for low-impedance microphones, should be used for
interconnections. A low-capacitance, two-conductor,
shielded cable (such as Belden #8412 or 8422) is recommended. A professional, three-pin, female audio connector
is required for wnnection to the mixer-preamplifier, and a
similar three-pin male connector is necessary for connection to the Amplifier (see Figure 5B, Page 6). When wiring
these connectors, connect the cable shield to pin 1 in each
connector, one of the cable conductors to pin 2, and the
other conductor to pin 3 in each connector. For balanced
line operation, use the cable as described above to connect
the mixer-preamplifier PROGRAM OUTPUTS three-pin connector labeled LlNE LEVEL to the Amplifier LlNE LEVEL
INPUTS connector labeled BALANCED BRIDGING (5).
Since the two input jacks of the Amplifier are wired in
parallel, one jack may be used as an auxiliary, high-level,
unbalanced output to feed the signal to another Amplifier
(SR105 or similar equipment) or the high-impedance input
of a tape recorder. The three-pin input connector (5) is connected through an isolation transformer in parallel with the
two input jacks (13). If not otherwise in use, the three-pin
connector may be used as a balanced, high-level, signal
source for a second Amplifier or other auxiliary equipment
(see Figure 5C, Page 6).
Additional SR105 Power Amplifiers may be added to the
system for a fail-safe type operation where complete redundancy is required. Refer to the section on Bridging
Connections (Page 11).
Certain input equipment, such as passive equalizers,
step attenuators and matching networks, may require a
600-ohm termination for optimum performance. (This is
not required with any Shure products.) When a 600-ohm
terminated input is required, a 620-ohm, 5%, %-watt resistor must be connected to the terminals of the input cable
connector (see Figure 5D, Page 6). This resistor must be
connected between pins 2 and 3 of the three-pin connector,
or between the tip and sleeve terminals of the phone plug.
The resistor will fit inside the sleeve of the three-pin connector or phone plug. Be careful not to damage the wires,
connections, sleeve or resistor when making this installation.
An occasion may arise where it is desirable or expedient
to feed the Amplifier from a 70-volt line. This could be in
connection with the expansion of an existing installation,
or as a result of efforts to minimize cable runs in a new installation. An input signal for the Amplifier may be derived
from a 70-volt line through the use of an attenuator (see
Adding Amplifiers i n a 70-Volt System, Page 10). When
operating from a 70-volt line, the VOLUME Control (2) on
the Amplifier should be set to the "7" position. With the
recommended attenuator, this setting will produce approxior
mately 28.3 volts at the DIRECT OUTPUT terminals (8,9),
70 volts at the 70V OUTPUT terminals (SRlO5A Amplifier)
(11) when the 70-volt input line is at 70 volts.
@
UNBALANCED PARALLELED
MIXERPREAMPLIFIER
POWER
AMPLIFIER
0
I
I
I
I
I
\ A
\ /
UNBALANCED PARALLELED
HIGH-IMPEDANCE INPUTS
0
A-
-
+
I
TO POWER AMPLIFIER
OR HIGH-IMPEDANCE
TAPE RECORDER INPUT
TO POWER AMPLIFIER
OR OTHER AUXILIARY
EQUIPMENT
SR105
POWER
AMPLIFIER
MIXERPREAMPLIFIER
@
BALANCED
BRIDGING
INPUT
-
6-TT-
SLEEVE
5
570,114 W
TIP
FIGURE 5. INPUT CONNECTIONS
OUTPUT CONNECTIONS
Four standard 1/4" phone jacks (8) and one two-terminal
barrier strip (9) on the rear panel of the Amplifier provide
direct-coupled speaker output connections (see Figure 2,
Page 2). All connectors are wired in parallel and provide for simultaneous connection of a number of speaker
systems. A three-terminal barrier strip ( l l ) , labeled 70V
OUTPUT (SR105A Amplifier only), provides for connection to the 70-volt output of the Amplifier (see Figure 2,
Page 2). This output is present only when the 70V-OFF
Switch (10) is set to the 70V position.
The Amplifier utilizes direct coupling between the output
stage and the direct-coupled speaker output load. The
full-rated 200-watt output of the Amplifier is obtained when
the speaker load connected to the DIRECT OUTPUT terminals (8,9) is four ohms. The output voltage under these
conditions is 28.3 volts. Speaker loads of less than four
ohms should not be used with this Amplifier. If less than
four ohms is inadvertently used, no damage to the speakers or Amplifier will occur, but a reduction in power output
and an increase in distortion will be experienced. Thermal
shutoff of the Amplifier may also result.
It should be noted that various speaker loads will affect
the output power of the Amplifier. See Figure 6, Page 7,
to determine Amplifier output power for a given speaker
load. Refer to the section entitled, Amplifier-to-Speaker
Matching (Page 8) for assistance in calculating speaker
load.
In the event that an SRlO5A Amplifier is operated in an
application where the 70-volt output is not used, the 70VOFF Switch (10) should be turned off. This disconnects the
70-volt transformer which would otherwise be operating
without a load. If the transformer is allowed to operate in a
no-load condition, i t may activate the output transistor pro-
CAUTION
Parallel connection of the DIRECT OUTPUT Connectors (8,9), or the speaker cables between two
SR105 Power Amplifiers, or the SR105 Amplifier and
any other amplifier, should not be attempted. Balancing paralleled amplifiers is virtually impossible,
and the circuitry mismatch cannot be balanced. The
same precaution should be observed with regard to
the 70V OUTPUT Connectors (11) of two SR105A
Amplifiers, or the SR105A Amplifier and any other
amplifier. Such a connection may result in damage to
one or both amplifiers and is not covered by the
Guarantee. This restriction does not extend to the
series amplifier connections described in Bridging
Connections, Page 11.
2
3
4
5 678910
20
30 40
LOAD IMPEDANCE (OHMS)
FIGURE 6. TYPICAL OUTPUT POWER VS. LOAD IMPEDANCE
FROM 2 OHMS TO 32 OHMS
I 1 KHz. 2% TOTAL HARMONIC DISTORTION)
(DIRECT OUTPUT ONLY)
tection circuitry and cause low-frequency breakup or distortion of the Amplifier audio output.
The 70-volt output of the SRlO5A Amplifier is transformer-coupled to facilitate the use of balanced lines in
the long cable runs associated with distributed speaker
systems. A center-tap connection to the secondary of the
output transformer (CT) is provided on the 70-VOLT OUTPUT terminal strip (11). This terminal may be grounded to
provide speaker lines which are balanced to ground. This
is done by connecting a wire from the center-tap terminal to
the ground terminal. This arrangement can be effective in
eliminating hum induced in the speaker lines by strong
external fields. It can also be effective in eliminating crosstalk and a tendency for system oscillation in applications
where the 70-volt speaker output and low-level audio input
are run in the same raceway.
The full-rated output of 150 watts from the SRI05A Amplifier at the 70-volt output terminals (11) will be realized with
a 33-ohm load. The output voltage under these circumstances will be 70.7 volts. In order to activate the 70-volt
output of the Amplifier, turn on the 70V-OFF Switch (10).
When using this output, care should be taken to see that
the sum of the individual loads (i.e., each speaker in a distributed speaker system) does not exceed the 150-watt
power output capability of the Amplifier.
It is possible to utilize both the direct-coupled speaker
output and the 70-volt output of the SR105A Amplifier
simultaneously, if desired. In this case, reference should
be made to Figure 7, Page 7 to determine the power available to the 70-volt output as a function of the load on the
direct speaker output. As an example, assume an 8-ohm
speaker load is to be connected to the direct-coupled
speaker output, and the 70-volt output is also to be used.
Following the 8-ohm vertical line on the graph (Figure 7,
Page 7) to the point where i t intersects the curve, note
that the horizontal line also passing through this point is
80 watts. This is the power available on the 70-volt output
with a simultaneous 8-ohm direct output load.
As indicated on the rear panel of the Amplifier, Class 2
wiring* may be used for speaker connections to the
DIRECT OUTPUT terminals (8,9) of the Amplifier as well as
the interconnection between speakers in the direct-coupled
distribution circuit. Class 2 wiring may be used for speaker
connection to the 70V OUTPUT terminals (11) of the Amplifier or interconnection of speakers within this circuit.
In order to avoid appreciable power loss in the cables
used for speaker connection, it is necessary to consider the
length of cable required, the total impedance of the speakers being connected, and the Amplifier output (direct or
70-volt) being used. The graph presented in Figure 8, Page
8, for direct speaker output indicates the recommended
wire gauge for various speaker loads and amplifier-tospeaker distances. As an example, assume two 16-ohm
speakers are to be connected in parallel at a distance of
18.3m (60 ft) from the amplifier, and the direct output of
the Amplifier is to be used. The total impedance of the
speakers connected in parallel is eight ohms. Following
the 8-ohm horizontal line on the graph (Figure 8) to the
point where it intersects a vertical line representing 18.3m
(60 ft), note that the nearest solid diagonal line to this
point is labeled AWG 18. This is the recommended wire
* A s defined by U.S. National Electrical Code.
160
140
E 120
I-
-I
I-
I00
f, 8 0
Z
g
60
I-
2
40
I-
s
20
0
I
2
3
4 5 6 8 1 0
20
40
6080100
DIRECT SPEAKER OUTPUT LOAD (OHMS)
FIGURE 7. 70-VOLT OUTPUT POWER VS. DIRECT OUTPUT
LOAD IMPEDANCE FROM 4 OHMS TO 100 OHMS
(SRIOSA ONLY)
AMPLIFIER-TO-SPEAKER
200
400
DISTANCE
600
to reduce the wire size in increments as the speaker load
becomes less toward the end of the cable run or as
branches are split off the main line. The economy of such
an arrangement will vary depending upon the details of
each installation and should be evaluated accordingly.
(FEET1
800
1000
1200
36
i
32
0)
28
Y
2
24
0
Y
1
20
P
3
16
L
J
I2
0
8
4
0
50
100
1%
200
AMPLIFIER-TO-SPEAKER
250
300
DISTANCE (METERS1
FIGURE 8. RECOMMENDED WIRE GAUGE VS.
AMPLIFIER-TO-SPEAKER DISTANCE:
DIRECT OUTPUT
gauge. This procedure should be followed for each speaker cable connected to the DIRECT OUTPUT Connectors
(8,9) of the Amplifier. If a point plotted on the graph falls
between two of the wire gauge lines, the larger of the two
should be the wire gauge used. This will limit the power
loss in the cable to less than 10%.
The graph of Figure 9, Page 8, provides wire gauge
recommendations for use with the 70-volt output of the
SR105A Amplifier. A 70-volt line is usually used for distributed speaker systems where many speakers and long
cable runs are involved. The wire gauge value determined
from the graph would be satisfactory for the entire cable
run in a distributed speaker system. However, it is possible
AMPLIFIER-TO-SPEAKER IMPEDANCE MATCHING
DIRECT SPEAKER OUTPUT
In order to obtain maximum transfer of Amplifier power
to the speaker load at the direct speaker output and reduce
distortion, the total impedance of the speaker load should
be as near to four ohms as practical under the existing
circumstances (see Figure 6, Page 7). If the speakers
being used have a rated impedance of 16 ohms (such as
the Shure SR102 and SR103), then four such speakers
connected in parallel present a total load impedance of
four ohms to the direct speaker output of the Amplifier.
This is an,ideal match to the Amplifier. If, as often happens,
an exact match is not possible, it is desirable to have a
speaker load higher than the Amplifier minimum load impedance.
In general, if more than one speaker is to be connected
to the DIRECT OUTPUT Connectors (8,9) of the Amplifier,
a determination should be made as to which method series, parallel or series-parallel interconnection of speakers - will provide the best match to the Amplifier. To calculate the total impedance of a number of speakers connected in series, merely add the individual speaker impedance values together. To calculate the total impedance
of a number of speakers of identical impedance connected
in parallel, divide the impedance of one speaker by the
number of speakers in the group. For example, the total
impedance of three 16-ohm speakers connected in parallel
is 16 divided by 3, or 5.3 ohms.
In the event that a group of speakers of different individual impedances are connected in parallel, the total impe-
AMPLIFIER-TO-SPEAKER
DISTANCE (FEET I
a
W
0
100
200 300
400
500
600
AMPLIFIER-TO-SPEAKER
700
800
900
DISTANCE (METERS)
FIGURE 9. RECOMMENDED WIRE GAUGE VS.
AMPLIFIER-TO-SPEAKER DISTANCE:
TO-VOLT OUTPUT (SRlOSA ONLY)
1000
1100
1200
dance may be calculated by the formula:
1
-
=
ZT
1
-
ZI
1
f
-
+
22
1
- . . . . etc.
Z,
where ZTis the total impedance, Z, is the impedance of the
first speaker, Z, is the impedance of the second speaker,
and so forth, with a total number of fractional terms equal
to the total number of speakers in the group. Before attempting to add the individual fractions, a common denominator for all fractions must be determined. For example, if
an 8-ohm and a 16-ohm speaker are connected in parallel,
the expression is written:
Examination indicates that 16 would be an appropriate
common denominator, allowing the expression to be rewritten as follows:
and simplifying,
Taking the reciprocal of (inverting) the final expression
gives:
16
ZT = - = 5.3 ohms
3
For a series-parallel interconnection of different speaker
impedances, determine the total parallel-connected speaker impedance, and add it to the total of series-connected
impedances. The sum is the total load impedance.
In planning a multiple speaker installation, the maximum
power ratings of the individual speakers being used should
be kept in mind. This is particularly important where speakers of different impedance values are connected to the DIRECT OUTPUT Connectors (8,9). For example, assume an
8-ohm and a 16-ohm speaker are connected in parallel
across the Amplifier output and the Amplifier is operated
at full-rated output. Figure 6, Page 7, shows that approximately 120 watts are developed across the 8-ohm speaker,
while only 60 watts are produced across the l g o h m
speaker. The power ratings of the speakers employed must
be evaluated accordingly.
70-VOLT OUTPUT
When the 70-volt output of the SR105A Amplifier is utilized, matching the speaker load to the Amplifier output
impedance is not necessary. The only requirement is that
the total wattage of the speaker load connected to the 70volt output does not exceed the power rating of the Amplifier.
In a 70-volt speaker system it is standard practice to couple each speaker to the 70-volt line with a line transformer.
These transformers are equipped with tapped secondary
windings to accommodate various speaker impedances.
The primary winding is also tapped and labeled with the
wattage rating applicable to each tap. For example, the
Shure A102A, a 50-watt transformer, has taps at 50, 25, 12
and 6 watts. (Transformers are available at various power
ratings to suit the requirements of the application.) The primary taps allow adjustment of the power level delivered to
the speaker when the transformer is connected to the 70volt line. Connection of the 50-watt tap to the 70-volt line
produces 50 watts across the speaker when the audio
signal level on the line is 70 volts. Similarly, use of the 25watt tap produces 25 watts across the speaker.
The total load in watts presented by a 70-volt multiple
speaker system is the sum of the individual speaker loads.
The value of each individual speaker load is indicated by
the wattage rating of the transformer primary tap connected to the 70-volt line. For example, assume only two
speakers are connected to a 70-volt line, the first using a
50-watt primary tap and the second using a 25-watt tap.
The total load across the 70-volt line is therefore 50 plus 25,
or 75 watts.
In the design of sound reinforcement installations, good
engineering practice allows for change or growth. An example of this is a 70-volt installation requiring 300 watts.
This system could be handled by two 70-volt lines of 150
watts each, connected individually to two SR105A Amplifiers. This system would be operating at full capacity with
no room for expansion. The preferred installation would be
three 70-volt lines of 100 watts each, connected individually
to three SR105A Amplifiers. This arrangement allows additions or changes in each 70-volt line of up to 50 watts.
OUTPUT VOLTAGE METER
The OUTPUT VOLTAGE Meter (1) provides a convenient
aid for adjusting and monitoring the Amplifier operating
level. The meter scale is calibrated in percent, with 100%
being equivalent to the maximum output voltage of the
Amplifier, prior to clipping. The performance of the meter
is similar to that of a VU meter and it responds to program
material in a similar manner.
It should be noted that a 100% meter indication represents a signal level of 28.3 volts rms across the DIRECT
OUTPUT (8,9). The maximum rated amplifier power output
of 200 watts is obtained only when the total speaker load
is 4 ohms across the DIRECT OUTPUT. With loads other
than 4 ohms, a 100% meter indication represents a lower
power output, e.g., for a total speaker load of 8 ohms, a
100% reading indicates a power output of 100vvatts. Note
that it is not possible to obtain a greater power output with
this load.
Figure 6 may be used as an approximate guide to the
power indicated by a 100% meter indication for various direct speaker loads. Note that while the meter is calibrated
for 28.3 volts output, the typical output power available is
somewhat higher and is indicated by meter readings
greater than 100%.
In the SR105A Amplifier, a 100% indication represents
a signal level greater than 70.7 volts rms across the 70V
OUTPUT Terminals (11). The OUTPUT VOLTAGE Meter
(1) may be recalibrated for a 100% indication with 70.7V
output. Maximum 70-volt amplifier power output is obtained with a 150-watt load (33 ohms) across the 70V
OUTPUT Terminals. Similarly, maximum power output
may be obtained with a combination of direct and 70-volt
loads (see Figure 7, Page 7).
The relationship between the OUTPUT VOLTAGE Meter
(1) reading and the Amplifier direct-coupled output power
is illustrated in the following table:
Meter Reading
Output Power
100%
86.7%
70.7%
50 %
33.3%
10%
1X
3/4X
1/2X
1/4X
1/10X
1/1oox
In most applications, the VOLUME Control (2) setting
of the Amplifier is determined by the sound level requirements of the area being served. Initial adjustments are
made in the audio console feeding the Amplifier to set the
average program output level to a value convenient for
monitoring on the audio console VU meter, usually 0 VU.
This can be done either with program material or with an
internal tone oscillator as in the Shure SRlO1 Audio Console. With this signal as an input to the Amplifier, adjust
the VOLUME Control to provide the desired sound level
from the speakers connected to the Amplifier. At this point,
it is important to note the reading of the OUTPUT VOLTAGE
meter (1). If the average reading is 70% or higher, i t is
likely that peak excursions in the program material will
exceed 100% and enter the clipping region of the Amplifier.
If the program material is of relatively constant level, as in
"hard rock" music, this operating condition may be acceptable or even desirable. It should be noted that a moderate amount of clipping is not readily detectable and is tolerated by some users in the interests of maintaining a higher
average sound level at the amplifier output. If the dynamic
range of the program material is expected to be large, as in
a live orchestral or dramatic production, i t is advisable to
set the output voltage level to 50% or less to reduce the
possibility of noticeable clipping on loud passages. In
either case, to achieve the best overall performance from
the sound system, the operator should keep in mind the
operating level he has set up for the Amplifier, and control
the console output accordingly.
The tamper-proof cover supplied is designed to replace
the pull-off VOLUME Control knob (2) and keep the VOLUME Control at a preset position.
BASIC OPERATING HINTS
Should any difficulty be encountered in Amplifier operation, the problem may often be traced to some simple
source such as an error in interconnection. The following
is offered as a basic guide to problems of this sort.
Symptom:
Amplifier is "dead" (no output, OUTPUT
VOLTAGE Meter lamps out)
1. Check that ac power source is "live" and
that Amplifier is plugged in.
2. Check that POWER ON-OFF Switch (4) is
on.
3. Check to see that rear-panel 3AG/5A Fuse
( 6 ) is good.
4. Check that THERMAL OVERLOAD Lamp
(3) is not lit.
Symptom:
Check:
Symptom:
Check:
Amplifier is "dead" (no output, OUTPUT VOLTAGE Meter lamps lit)
1. Check that VOLUME Control (2) is set high
enough.
2. Check for defective input cable or source.
3. Check for defective output cables or
speakers.
4. Check for input and output cables reversed.
No 70-volt output (direct output present)
(SR105A only)
1. Check that 70V-OFF Switch (10) is set to
70V.
2. Check for defective 70-volt output cables
or speakers.
Symptom:
Check:
Low or distorted output
1. Check for incorrect speaker load, shorted
or defective cables, and proper connections.
2. Check that speaker power handling capability is adequate.
3. Check that 70V-OFF Switch (10) is not
turned on without a 70-volt load (SR105A;
direct output operation only).
4. Check that output cables are of sufficient
size (gauge) for load.
Symptom:
Check:
Hum or noise in output
1. Check for defective source or input cable
by disconnecting input cable.
2. Check need for balanced line on long cable
runs or to avoid ground loop condition between units.
3. Check speaker line for balance (should not
be grounded at speaker).
4. Check 70V OUTPUT Terminal Strip (11);
grounding the center-tap (CT) terminal may
reduce or eliminate condition (SR105A
only).
SRl05 Power Amplifier
SPECIAL OPERATING INSTRUCTIONS
The information contained in this section is provided to
more fully utilize the capabilities of the SR105 Power
Amplifier.
ADDING SR105A AMPLIFIERS IN A
70-VOLT SYSTEM (CASCADED)
For added power or when additional speakers are to be
installed, an additional SR105A Amplifier may be added to
an existing 70-volt system. The Amplifier may be installed
either at the end, or anywhere along the system, by using
an attenuator such as that shown in Figure 10, Page 11.
Connect the attenuator to the 70-volt line as shown, and
connect the attenuator plug to the BALANCED BRIDGING
Input Jack (5) on the added Amplifier. Set the VOLUME
Control (2) on the added Amplifier to 7 to obtain a 70-volt
output when the system voltage is at 70 volts. This will pro-
duce approximately 28.3 volts at the DIRECT OUTPUT
terminals (8,9), or 70 volts at the 70V OUTPUT terminals
(11) when the 70-volt input line is supplying 70 volts.
70-VOLT
LINE
*
3-PIN MALE
AUDIO CONNECTOR
ATTENUAm
r---i
I
I
- I
g
I
5
u
Part
8
=
b
-
I
INPUT
FIGURE 10. 70-VOLT SYSTEM ATTENUATOR
Recommended Type
Phone Jack
Phone Plug
Volume Control
(L-Pad)
Transformer, 25V
Line to Voice Coil
1
1
1
1
.
lr
Qty.
Switchcraft 12-8
Switchcraft 280
Switchcraft 666Pl or 656
Essex-Stancor A-8095
or A-8096
Connect the parts as shown in Figure 12, Page 11. Make
certain the "hot" speaker lead (28V) is connected to a onewatt or less tap on the 25-volt transformer; this connection
sets the maximum headphone volume. If only stereo headphones are to be used, interconnect the tip and sleeve
contacts of the headphone jack. If i t is desired to monitor
the 70-volt output of an SRlOSA Amplifier, substitute a 70volt line to voice coil transformer for the 25-volt transformer listed above.
BRIDGING CONNECTIONS
If greater power or optimum system reliability becomes
extremely important, two Amplifiers may be connected in
series (never in parallel!) to obtain an output of 400 watts
into an 8-ohm load, or 200 watts into a 16-ohm load (6 ohms
minimum load). To determine available power, divide the
actual load impedance by two and, referring to Figure 6,
Page 7, double the output power shown on the graph. This
connection also provides a fail-safe, or redundant, system:
if one Amplifier fails, the second remains functional at its
normal power output. This series connection of amplifier
outputs is commonly referred to as a bridged configuration.
Connect the Amplifier balanced inputs out of phase as
shown in Figure 11, Page 11, with the speaker load connected between the two 28V terminals of the DIRECT OUTPUT Terminal Strips (9). Connect the two GND terminals
together.
If a 140-volt output is required (SRlO5A Amplifier only),
two SR105A Amplifiers may be connected in series as
described above, except that the 70-volt outputs are used.
Connect the speaker load to the 70V terminals (11) of the
two SR105A Amplifiers and connect the COM terminals
together. Use Class 1 wiring.*
IMPEDANCE..
.. 8n NOM
6 f i MIN
POWER TO
e n . . . .4oo w
POWER TO 1 6 n . . . 2 0 0 W
VOLTAGE OUT
SR105
.....5 6 . 6 V
AMPLIFIER
BA
ER
ADDING HEADPHONE JACK TO SPEAKER
CONNECTIONS
If i t is desirable to monitor the Amplifier direct output
through headphones, a headphone output may be fabricated as follows. Obtain parts listed below or their equivalent.
FIGURE 11. BRIDGED AMPLIFIER CONNECTIONS
'As def~nedby U.S. Nat~onalElectrical Code
PHONE
PLUG
VOLUME CONTROL
(%-OHM L-PAD)
TRANSFORMER
I W OR L E S S
SPEAKER
TERMINAL
TO
-3 1
PHONE
8 OHM
COIL
COM
COM
--
-
NOTE: USE JUMPER FOR STEREO
HEADPHONES ONLY.
FIGURE 12. HEADPHONE JACK FOR
SPEAKER CONNECTIONS
NOTE
--
JACK
TIP
RING
SLEEVE
SR105 Power Amplifier
SERVICE INSTRUCTIONS
AMPLIFIER SERVICE (See Guarantee)
The SR105 Power Amplifier uses components of the highest quality, operating well within their respective ratings to
assure long life.
WARNING
Voltages in this equipment are hazardous to life.
Make all input and output connections with ac power
disconnected. Refer servicing to qualified service
personnel.
REPLACEMENT PARTS
Parts that are readily available through local electronic
parts distributors are not shown on the accompanying
Parts List. Their values are shown on the Circuit Diagram
(Figure 21, Page 25). Commercial parts not readily available and uniaue arts are shown on the Parts List and may
be ordered diredtly from the factory.
The commercial alternates shown on the Parts List are
not necessarily equivalents, but are electronically and
mechanically similar, and may be used in the event that
direct factory replacements are not immediately available.
To maintain the highest possible performance and reliability, Shure factory replacement parts should be used. When
ordering replacement parts, specify the Shure Replacement
Kit Number, description, product model number and serial
number.
FUSE REPLACEMENT
To replace line fuse F2 (with no apparent problems in the
unit), disconnect the line cord and remove the rear-panel
fuseholder cap. Replace the defective fuse only with a
3AG-5A fuse.
NOTE: The following symbol
on the rear panel denotes a fast
operating fuse.
CAUTION
If trouble symptoms - overheating (thermal cycling),
erratic operation, etc. -were apparent before the
fuse blew, or if the replacement fuse blows, troubleshoot the Amplifier carefully to find the source of the
trouble. Do not continue to replace fuses unless the
trouble has been corrected.
The Amplifier also contains two wired-in fuses, one in
series with rear-panel line fuse F2 (FI, 3AG-8A) and one
in the meter lamp circuit (F3, SAG-1A). If replacement becomes necessary, replace only with identical fuses.
BOTTOM PLATE REMOVAL
To remove the chassis bottom plate, turn the Amplifier
upside-down and remove the 10 screws located at the
edges of the chassis.
COVER REMOVAL
To service components on the top of the chassis, the
protective cover grille (MP7) must be removed. This is
done by removing one screw from the top, two screws from
each side, and eight screws from the back surface. To remove, slide cover up and to the rear of the Amplifier.
LAMP REPLACEMENT
Two bayonet-base pilot lamps (PL2, PL3) illuminate the
scale of the OUTPUT VOLTAGE meter. These lamps are
mounted on the top surface of the chassis behind the meter
as shown in Figure 13, Page 13. To replace a lamp, remove
the grille cover and the nut on the lamp bracket mounting
stud. Swing the bracket up and out until the lamp is accessible. Push the lamp inward, twist it 1/8-turn counterclockwise, and withdraw it from its socket. After replacing
the lamp, reposition the assembly under the meter and
tighten the bracket nut. Replace the grille cover.
DC OUTPUT BALANCE ADJUSTMENT
In order to minimize the idle power consumption of the
Amplifier and eliminate dc offset at the direct-coupled
output, a dc balance control (R4-DC BAL.) has been provided. This control is located on the Main Circuit Board
under the chassis, as shown in Figure 14, Page 14, and may
be reached by removing the bottom cover. The dc balance
of the Amplifier should be checked and adjusted as necessary whenever any circuit components are replaced.
The dc balance adjustment is made with the Amplifier
VOLUME control (R41) full counterclockwise and no
speaker load. If the Amplifier being adjusted is equipped
with a 70-volt output (SR105A), the 70V-OFF Switch (S4)
should be turned off. Connect a dc voltmeter (preferably
with a 0.1 Vdc full-scale range) across the terminals of the
DIRECT OUTPUT terminal strip (TSI).
CAUTION
The polarity of any dc voltage at the output may be
either positive or negative and could be as much as
10 volts; care should be exercised in connecting the
meter such that an on-scale reading is obtained.
Carefully adjust the dc balance control for 0 Vdc +-25 mV
at the output.
If the 70V-OFF Switch was moved to make this adjustment, return it to its original position. Replace the bottom
cover.
OUTPUT VOLTAGE METER CALIBRATION
In the event that the OUTPUT VOLTAGE Meter (MI) or
its associated circuitry is repaired, a meter calibration
check and adjustment should be performed. With the
Amplifier off, check the zero position of the meter. If it is
not on zero, use a small screwdriver to turn the meter zero
R39
T2
C14
C15
R 31
R40
Dl2
Q8
R35
R36
Q7
R43
PL2
(XPL2)
MI
PL3
(XPL3)
Y SRIOSA MODEL ONLY
FIGURE 13. SR105 POWER AMPLIFIER TOP VIEW,
COVER REMOVED (SRlOSA MODEL SHOWN)
adjustment screw below the meter face until the needle is
properly positioned. With no load on the Amplifier (speaker
disconnected), connect an ac voltmeter across one of the
DIRECT OUTPUT Terminals. Turn the Amplifier on and apply a 1 kHz sine-wave signal at approximately 3 volts rms
to one of the Amplifier inputs. Adjust the VOLUME Control
for 28.3 volts at the output. Remove the bottom cover and
adjust the Meter Adjust resistor (R27-METER ADJ. located
on the Main Circuit Board under the chassis as shown in
Figure 14, Page 14) for a 100% reading on the OUTPUT
VOLTAGE Meter. No further adjustment is necessary. Replace the bottom cover.
To calibrate the meter for a 100% indication with 70.7V
output, connect the voltmeter and an appropriate load
across the 70V OUTPUT terminals and proceed as above.
PRINTED CIRCUIT BOARD REMOVAL
The underside of the SR105A Amplifier chassis contains
two printed circuit boards: a Main Circuit Board and a Filter
Circuit Board. (The SR105B Amplifier contains only a Main
Circuit Board.) The foil side of the boards may be made
accessible for servicing without disconnecting any leads
by removing the four Phillips head screws securing the
board. The boards may be completely removed as follows
(see Figure 14, Page 14). Remove the bottom cover. On the
Main Circuit Board, remove all 15 interconnecting leads
from the push-on board terminals, noting connections as
listed in the table below.
CAUTION
Similar wire colors are used in different circuits; make
sure proper re-connections can be made. Take care
not to bend or break the push-on terminals.
Remove the four Phillips head screws from the board and
remove the board from the chassis.
The Filter Circuit Board may be removed in the same
manner. Replace bottom cover after servicing boards.
13
Main Circuit Board
Letter
Wire Color
Letter
Wire Color
A
Blue
Black
Gray
Green/Black
Violet
Red
White
White
J
Yellow/Black
Orange/Black
Orange
Brown
Yellow
Green
White
B
C
D
E
F
G
H
K
L
M
N
P
R
" 1;
Filter Circuit Board
;
2;"
Yellow
-
Yellow/Black
-
-
NOTE: Production variations may result in wire colors differing from those in the table.
SMALL SIGNAL AND PREDRIVER TRANSISTORS
Transistors Q1 through Q6, Q13, Q14, and Q201 through
Q203 are mounted on printed circuit boards. When replacing these transistors i t is imperative that proper lead
configuration be followed. A minimum of soldering heat
should be used to avoid damage to the transistor or printed
circuit board. Refer to the Notes to Circuit Diagram (Figure
20, Page 23) for the transistor lead codes.
DRIVER TRANSISTORS
Driver transistors Q7 and Q8 (Figure 13, Page 13) are
mounted on a bracket located on the top surface of the
Amplifier chassis. Before removing these transistors, write
down the lead color and location at each transistor solder
junction. When replacing transistors, apply Wakefield Type
120 thermal joint compound to each side of the insulating
wafer to provide good heat transfer from transistor to
bracket. After replacement and before connecting transistor leads, check the transistors between case and chassis
with an ohmmeter; there should be no continuity. Be sure
that these transistors are not interchanged in the circuit;
they are not identical devices. Q7 is an NPN transistor and
Q8 is a PNP transistor. Refer to the Notes to Circuit Diagram
(Figure 20, Page 23) for the transistor lead codes.
R45
R46
R30
J6
WI
F2
(XF2)
FI
TI
F3
R4
841
Al
MPI
M P4
R27
PLI
R37
C14
C15
R3
DII
* SR105A MODEL ONLY
FIGURE 14. SR105 POWER AMPLIFIER BOTTOM VIEW,
COVER REMOVED (SR105A MODEL SHOWN)
MP5
OUTPUT TRANSISTORS
Output transistors Q9 through Q12 (Figure 13, Page 13)
are located on the black, finned heat sinks. The replacement procedure is the same as that used for driver transistors Q7 and Q8.
NOTE: Output transistors Q9 through Q12 must be
matched for current gain. When replacing output transistors, be sure to replace with devices which have the same
gain and part number as the original transistors. Shure
transistors have a letter suffix in the part number (i.e.,
86A360A) which serves as a gain code. Transistors with the
same part number and suffix letter have equal current gain.
DIODES
Diodes D l 5 and D l 6 (Figure 13, Page 13) are located on
the black, finned sinks with the output transistors. Special
care is required to insulate these diodes from the heat sink
while providing good heat transfer from sink to diode. Heatshrinkable tubing or "spaghetti" should be placed over the
diode and connecting leads; the diode should be securely
clamped to the heat sink with the clamp provided.
DIODE BRIDGE RECTIFIER
Silicon diode bridge rectifier D l 1 is mounted on the
underside of the chassis as shown in Figure 14, Page 14.
When replacing this component, apply Wakefield Type 120
thermal joint compound between the heat sink base of the
rectifier and the chassis to provide good heat transfer to
the chassis. Note that the base of the rectifier is provided
with a locating pin. When installing the rectifier be sure
to position it such that the locating pin fits into the hole
provided for it in the chassis. The terminals are marked to
indicate the ac connections to the power transformer and
the (+) and (-) dc output connections to filter capacitors
C14 and C15.
CHECKING TRANSISTORS AND DIODES
Defective transistors and diodes may be located by use
of a standard ohmmeter such as a Simpson Model 260.
(Polarity of the ohmmeter must be verified before these
checks are made.)
With a known diode orientation, measure the diode resistance in the forward and reverse directions. The lowest
meter reading establishes the probe at the cathode end
(schematic symbol arrow points to cathode) as the "minus"
probe while the other probe is "plus." Some ohmmeters
are not polarized in this manner with relation to "volts
plus probe" and "volts minus probe." With the ohmmeter
"plus" probe on the anode end of a diode and the "minus"
probe on the cathode end, the ohmmeter should read approximately 2 kilohms or less. With the meter probes
reversed, a reading of about 10 kilohms or more should
occur. If either of these conditions is not met, the diode
should be replaced.
When checking the bridge rectifier disconnect all leads
to the assembly, noting the terminals to which they were
connected. Check each diode leg of the bridge in the same
manner as described previously for individual diodes. Refer
to the preceding section, Diode Bridge Rectifier, for installation instructions if replacement is required.
To check transistors, the ohmmeter should be set to the
100- or 1,000-ohm scale. Small signal transistors (Q1
through Q6, Q13, (214, Q201 through (2203) must be removed from the circuit before testing. Transistors mounted
with screws (Q7 through Q12) may be tested in place; however, the base and emitter leads to these transistors must
be removed.
If all conditions in the following table are met, the transistors may be considered free of any major defect; if any
of the following conditions are not met, the transistor
should be replaced. See Notes to Circuit Diagram (Figure
20, Page 23) for transistor terminal codes.
Ohmmeter Connections
"Plus" Lead "Minus" Lead
Collector
Emitter
Emitter
Collector
Collector
Base
Emitter
Base
Base
Collector
Base
Emitter
Ohmmeter Reading
NPN
Transistor
High
High
High
-
Low
Low
PNP
Transistor
High
High
Low
Low
High
-
SR105B AMPLIFIER CONVERSION FOR
70-VOLT OUTPUT
If it becomes necessary to equip a Model SRIOSB Power
Amplifier for 70-volt output (distributed speaker) operation
in addition to the existing 28-volt direct output, the conversion may be accomplished using the parts and procedures
described below. The required parts may be ordered
through a local Shure Franchised Dealer or directly from
the Shure Factory. No modifications to the metal chassis or
front panel are required.
WARNING
This conversion should only be performed by qualified service personnel or the Shure Factory Service
Department.
Once the conversion is performed, the Amplifier is identical
to the SR105A Amplifier and all instructions and diagrams
pertaining to the SR105A Amplifier apply.
The following parts, materials and tools are required to
perform the 70-volt conversion (NOTE: Figure 15, Page 16
shows the electrical circuitry involved. Reference to the
SR105A Amplifier Circuit Diagram, Figure 21, Page 25, will
aid in understanding the circuit modifications.)
Remove the line cord from the ac outlet and remove all
input and output cables. Remove the metal grille cover as
described previously in this section. Remove the two locknuts securing the two lamp socket assemblies (see Figure
16, Page 17). Remove the lamp socket assemblies from the
mounting studs and move them away from the studs to
permit mounting of the 70-volt transformer. Place the transformer over the four mounting studs, orienting the transformer leads toward the center of the Amplifier chassis.
Replace the lamp socket assemblies, orienting them as
shown in Figure 16, and secure the transformer using the
two locknuts previously removed and the two supplied with
the transformer. Pass the transformer leads through the
unused grommet nearest the rear of the Amplifier chassis.
Turn the Amplifier upside-down and remove the chassis
bottom plate as described previously in this section. Remove the rear-panel 70-volt conversion Cover (marked
SHURE MODEL SRlO5B) (MP6) by removing the four
screws securing i t to the chassis. Mount the terminal strip
SR105B AMPLIFIER CONVERSION
MATERIALS
PARTS
Qty.
Shure
Part No.
1
51A244
1
1
1
55C131
56A204
90A2038
Description
Qty.
Description
Transformer, 70V
Output (T3)
2
Locknuts, 10-32*
Switch, Slide, DPDT
64)
2
Machine Screws,
Phillips Round
Head, 4-40 x 3/16"
Terminal Strip, 3Screw-Terminal (TS2)
4
TOOLS
/I
Description
Pliers, Diagonal,
or Wire Stripper
I( Pliers, Long-nose
1
I
I
Machine Screws,
Phillips Head,
6-32 x % "
Machine Screws,
Phillips Head,
6-32 x 1'4' "* *
4
Filter Circuit
Board Assembly
(A21
1
-
Wire, Hookup,
16 Gauge AWG,
Stranded Copper,
Vinyl Insulation
-
Wire, Hookup, 20
Gauge AWG, Stranded
Copper, Vinyl
Insulation
-
Solder, Rosin-Core
Screwdriver
Screwdriver, Phillips Head
Soldering Iron,
Low Wattage
Wrench, Open-End,
Adjustable
Two locknuts are presently securing lamp socket assemblies; two more are required.
*'Four machine screws presently securing rear-panel 70-Volt Conversion Cover (53A1319) may be used.
T3
GRN
RED
YEL
BLK
r
-
WHT
WHT
TS 2
0
0
0
d
0
COM
CT
70V
28V
GND
s4-
FROM FILTER CIRCUIT
BOARD PIN V
FROM MAIN CIRCUIT
BOARD PIN J
FROM FILTER CIRCUIT
BOARD PIN T
OFF
YEL/BLK
BLU
0
0
70 V
FIGURE 15. 70-VOLT CONVERSION: ADDED CIRCUITRY
16
TS I
J4 -J7
I
--
in the space exposed by removal of the cover using four
6-32 x 3h1' Phillips head machine screws. Be sure to orient
the screw contacts on the terminal strip in the same manner as the existing DIRECT OUTPUT terminal strip. Mount
the slide switch next to the terminal strip in the space provided, using two Phillips round head 4-40 x 3/16" machine
screws. Mount the Filter Circuit board next to the Main
Circuit board using the four 6-32 x 1/4" Phillips head machine screws previously used to secure the cover.
V (yellow preferred) to the upper left (viewed from terminal
side) terminal of switch S4; from pin T (blue preferred) to
the bottom left (viewed from terminal side) terminal of
switch S4; and from pin S (red preferred) to the positive
(red dot) terminal of capacitor C14.
Solder a length of 16-gauge hook-up wire (white preferred) from the 28V terminal of the 28-volt terminal strip
(TS1) to the bottom right (viewed from terminal side) terminal of switch S4 (see Figure 17, Page 18). Solder transformer T3 leads coming out of the chassis grommet as
follows:
Transformer
Lead Color
Part
Connection
Part Terminal
Designation
Red
28V Terminal
Strip (TS1)
GND
Black
Yellow
Green
70V Terminal
Strip (TS2)
70V
CT
COM
Blue
70V Slide
Switch (S4)
Right Center
Terminal
TRANSFORMER
The Amplifier conversion is now complete. Perform a dc
balance adjustment as described previously in this section.
Reassemble the Amplifier and return it to service.
FIGURE 16. 70-VOLT CONVERSION:
TRANSFORMER MOUNTING
Remove the white lead from pin H on the Main Circuit
board and fasten it to pin Won the Filter Circuit board. Remove the yellowlblack lead from pin J on the Main Circuit
board and fasten it to pin Y o n the Filter Circuit board. Cut
a length of 20-gauge hook-up wire (yellowlblack preferred)
and solder one end to pin J on the Main Circuit board.
CAUTION
Be careful not to damage board or adjacent components when soldering.
Run the soldered wire roughly parallel to the long edge of
the Main Circuit board to the main wiring harness and along
the harness to the 70-volt slide switch (S4). Solder the hookup wire to the left center terminal (viewed from terminal
side) of the switch (see Figure 17, Page 18). Cut a length of
20-gauge hook-up wire (white preferred) and solder one
end to pin H on the Main Circuit board. Run the soldered
wire twice around the two yellowlblack wires (Main Circuit
board J to switch S4, and Filter Circuit board Y to potentiometer R41) to form a loose shield. Solder the other end of
the white wire to pin X on the Filter Circuit board.
Cut three lengths of 20-gauge hook-up wire and solder
them to pins on the Filter Circuit board as follows: from pin
SERVICE ILLUSTRATIONS
The pages that follow contain parts locating drawings
and an overall Circuit Diagram. The parts locating drawings
are of the Main and Filter Circuit boards. Foil circuit paths
are shown as shaded areas on the drawings. The Circuit
Diagram shows all printed circuit board and chassismounted parts.
GUARANTEE
This Shure product is guaranteed in normal use to be
free from electrical and mechanical defects for a period
of one year from date of purchase. Please retain proof
of purchase date. This guarantee includes all parts and
labor. This guarantee is in lieu of any and all other guarantees or warranties, express or implied, and there shall
be no recovery for any consequential or incidental
damages.
SHIPPING INSTRUCTIONS
Carefully repack the unit and return it prepaid to:
Shure Brothers Incorporated
Attention: Service Department
1501 West Shure Drive
Arlington Heights, Illinois 60004
If outside the United States, return the unit to your dealer
or Authorized Shure Service Center for repair. The unit
will be returned to you prepaid.
S4
OFF
JI-J2
e
TS2
-
GROMMET
WHT
a
FILTER
CIRCUIT
BOARD
&-
TU
x
J
e
d
3
m
+
t
1
YEL / BLK
H&
a
J
RED
MAIN
CIRCUIT
BOARD
R41
VOLUME
FIGURE 17. 70-VOLT CONVERSION: INTERNAL WIRING
REPLACEMENT PARTS FOR SR105 POWER AMPLIFIER
-
Reference
Designation
Replacement
Kit. NO.*
Replacement Kit Consists Of:
Description
Part No.
Qty.
Commercial
Alternate
Q8
-
-
86A362
Transistor, Silicon, PNP, Driver,
BVCEO 120V min.
Motorola 2N3741
(Selected)
Q9-Q12
-
86A360
Transistor, Silicon, NPN
RCA 2N3773
R35-R40
45EB439D
Resistor, Fixed, 0.43 ohms, 5%, 7W
None
46A041
Potentiometer, 50K, VOLUME
None
-
45CB758C
Resistor, Fixed, 7.5 ohms, 5%, 1W
Allen-Bradley GB
R45, R46
-
-
45CB308C
Resistor, Fixed, 3.0 ohms, 5%, 1W
Allen-Bradley GB
S1
-
-
55A96
Switch, Toggle, SPST, POWER
Cutler-Hammer
751OK12
RKC37
1
95A551
Thermostat, SPST
None
55C131
Switch, Slide, DPDT, 70V-OFF (SRl05Aonly)
None
-
90K2150
Transformer Assembly, Balanced Input
None
-
51A256
Transformer, Power
None
51A244
Transformer, 70V Output (SR105A only)
None
56A211
Terminal Strip, 2-screw, DIRECT OUTPUT
Cinch 2-141-Y
R41
R43, R44
52, S3
-
S4
TB1
-
TB2
-
56A204
Terminal Strip, &screw, 70V (SR105A only)
Cinch 3-141-Y
W1
-
-
95A632
Line Cord and 3-Conductor Ac Plug Assembly
None
-
90A1522
Cable and Plug Assembly, 6-Foot, with
2 Phone Plugs
None
Fuseholder, 3AG-5A
Littelfuse 342014
95A598
Lampholder and Bracket Assembly
None
XPL2
-
-
95A429
XPLl
-
95A599
Lampholder and Bracket Assembly,
Nylon Sleeve
None
TI
T2
T3
W2
XF1
MAIN CIRCUIT BOARD ASSEMBLY
C1
-
-
86K628
Capacitor, Electrolytic, 250 PF, 16V
Sprague
30A-TE11645;
Mallory MTA250F15
C2
-
50KC224
Capacitor, Film, .22 PF, 100V
CDE 1P22-10
C5
-
-
86D630
Capacitor, Electrolytic, 10 PF, IOV
Sprague
30D-TE1128;
CDE NLW-10-16
C6
-
86H628
Capacitor, Electrolytic, 80 PF,25V
Sprague
30D-TE1210;
CDE NLW-100-25
D1
RKC23
1
86A409
Zener Diode, Silicon, 2.6V
Motorola 1N4729A
D2, D3, D6
RKC21
4
86A404
Silicon Rectifier, 100V, 1/2A
Motorola 1N4002
Diode,Silicon, Computer, 75V
TI or GE 1N4148
04, D5
D8, D9
I
-
I RKCl9
I
1
4
1
86A415
1
1 86A405 1 Diode, Germanium.30V
RCA 1N48, IN60
'Parts listed as RKC Kits should be ordered by that kit number. Any orders received for piece parts where RKC Kit number is shown will be shipped in RKC quantities.
20
REPLACEMENT PARTS FOR SR105 POWER AMPLIFIER
Reference
Designation
Replacement Kit Consists Of:
Kit. No.*
I
1
RKC9
-
1
4
1
1 /
Part No.
86A349
I
/
1
Commercial
Alternate
Descri~tion
Transistor. Silicon. NPN
Motorola 2N5088;
TI 2N3711
Transistor, Silicon, NPN
Motorola MPS-A06
Transistor, Silicon, Power, PNP
Motorola 2N5680
-
86A355
-
86A354
RKC53
1
86A333
Transistor, Silicon, NPN
Motorola 2N5682
-
-
86A363
Transistor, Silicon, Power, NPN, VI Limiting
Motorola MPS-A20' *
-
-
86A364
Transistor, Silicon, PNP, VI Limiting
Motorola MPS-A70**
46A042
Potentiometer, P.C. Bd. Mtg., 10K
-
Resistor, Metal Film, 1.3k, 1%, 1/2 W
-
-
45F6818B
Resistor, Metal Film, 68.1 ohms, 1% , 112 W
IRC CEC-TO
-
-
45F6498B
Resistor, Metal Film, 64.9 ohms, 1% , 1/2 W
IRC CEC-TO
FILTER BOARD ASSEMBLY (SRIOSA ONLY)
-
50KB224
Capacitor, Film, .22 aF, IOOV
CDE 1P22-10
C202, C203
-
50KA104
Capacitor, Film, .IaF, IOOV, 5%
Sprague
225P10491;
CDE 1P1-10
C204
-
-
86A630
Capacitor, Electrolytic, 4.7 or 5 PF,35V
Sprague
30D-TE1303;
CDE NLW-5-50
C205
-
-
50KA124
2 PF, 1OOV, 5%
Capacitor, Film, .I
None
C206
-
-
86K628
Capacitor, Electrolytic, 250 PF, 16V
Sprague
BOD-TE1164.5;
Mallory MTA250F15
4
86A349
Transistor, Silicon, NPN
Motorola 2N5088;
TI 2N3711
-
86A348
Transistor, Silicon, Low Power, PNP
Motorola 2N5087
C201
Q201, Q202
Q203
RKC9
-
'Parts listed as RKC Kits should be ordered by that kit number. Any orders received for piece parts where RKC Kit number is shown will be shipped in RKC quantities
^*Use i n emergency only. Select for high gain. May affect power output and reliability.
FIGURE 18. MAIN CIRCUIT BOARD
PARTS LOCATION DIAGRAM
2038-21525-2
FIGURE 19. FILTER CIRCUIT BOARD
PARTS LOCATION DIAGRAM
SR105 Power Amplifier
NOTES TO CIRCUIT DIAGRAM
FIGURE 20. TRANSISTOR LEAD CODES
determine that the input and output voltages to each board
assembly are correct. If an incorrect ac voltage is found
at any board output, perform Dc Voltage Measurements on
that board as described below to isolate the problem area.
AC VOLTAGE MEASUREMENTS
The numbers within rectangular symbols 0on the
Circuit Diagram denote the ac voltage at that point under
the following test conditions:
1. Voltage measured with respect to chassis unless otherwise indicated.
2. Line voltage: 120V, 50/60 Hz.
3. Test signal of 0.3V, 1 kHz applied across connector J1.
4. Ac voltage measurements may vary t 2 0 % from values
shown.
5. Measurements made with ac VTVM of 1 megohm or
greater input impedance.
6. Four-ohm non-inductive 200-watt load across DIRECT
OUTPUT Terminal Strip TS1 for direct output measurements or (SR105A only) 33-ohm non-inductive 150-watt
load across 70-volt OUTPUT Terminal Strip TS2 (70VCOM) for 70-volt output measurements, but not both.
7. Volume Control set to maximum (10).
8. SR105A Only: 70V-OFF Switch set to OFF for all circuit
measurements except 70-volt circuitry (Filter Circuit
board and associated components). Filter Circuit board
rolls off the low frequencies; amplifier output should
be -3 -c-1 dB at 30 Hz referenced to 1 kHz and -12
-c-3 dB at 20 Hz.
DC VOLTAGE MEASUREMENTS
The numbers within elliptical symbols 0 on the circuit
diagram denote the dc voltage at that point under the
following test conditions:
1. Voltages measured with respect to chassis unless otherwise indicated.
2. Line voltage: 120V, 50160 Hz.
3. No input signal applied.
4. Dc voltage measurements may vary t 2 0 % from values
shown.
5. Measurements made with VTVM of 11 megohms or
greater input impedance.
TROUBLESHOOTING
A general troubleshooting process is as follows: If the
Amplifier is completely "dead," check the ac power source,
fuses, and power supply output (52.5V at pin F of Main
Circuit board). If the indicator lamps are on but the output
is distorted, low or not present, apply an input signal as
described under Ac Voltage Measurements below, and
RESISTANCE MEASUREMENTS
With the ac line cord disconnected from the ac source
and the POWER ON-OFF Switch in the OFF position, the
following ohmmeter measurements may be made:
1. Transformers may be checked for continuity of each
winding.
2. To test transistors and diodes, see Page 15.
GENERAL
Shure part numbers are not shown in the Parts List
accompanying the Circuit Diagram (Figure 21, Page 25)
if parts are readily available through local electronics parts
suppliers. In these instances, the Circuit Diagram shows
only the reference designation and value of the standard
parts.
All capacitor values are shown in microfarads unless
otherwise designated. All non-electrolytic capacitors are
100 working volts dc or more unless otherwise specified.
Electrolytic capacitors are shown in microfarads x volts.
All resistor values are shown in ohms (k = 1000). Resistors are 10% tolerance unless otherwise specified. Resistors are Vi-watt unless otherwise specified.
Transistor lead codes are as shown in Figure 20. Acceptable replacements are as shown in the Parts List.
The following round symbols denote:
Chassis Ground
Circuit Ground &
Printed Circuit Board Ground
4
A
LINE LEVEL INPUTS
120 VAC
5 0 1 6 0 Hr
NOTE I:
DIFFERENCES BETWEEN SRIOSA AND SR105B: "STRAIGHT- THROUGH"
WIRING SHOWS SRlOSB CIRCUITS; SRIOSA CIRCUITS INCLUDE
ASSEMBLY A2, SWITCH S4, TRANSFORMER T3, AND TERMINAL
STRIP TS2.
SRIOSB
REFERENCE
NO.
DESCRIPTION
-12kb C13 ADDED
C17, CIB ADDED
R I, R 9 WERE
FIGURE 21. SR105 POWER AMPLIFIER CIRCUIT DIAGRAM
SR105 Power Amplifier
CONDENSED OPERATING INSTRUCTIONS
DIRECT SPEAKER OUTPUT
(MODELS SRlOSA and SRlOSBI
I.'with line cord unplugged, install Amplifier in rack or
carrying case, allowing adequate ventilation.
2. Connect speakers to DIRECT OUTPUT Jacks and/or
Terminal S t r i ~ .
3. Connect con'sole or mixer output to UNBALANCED
PARALLELED HIGH IMPEDANCE Input Jack. For cable
length greater than 15m (50 ft), use 600-ohm batanced line into BALANCED BRIDGING Input Jack
(three-pin).
4. connect additional power amplifiers or auxiliary equipment as required.
5. Connect line cord to ac source.
6. Turn on POWER ON-OFF Switch and adjust VOLUME
Control to desired level.
CONSTANT VOLTAGE 70-VOLT SPEAKER OUTPUT
(MODEL SRlOSA ONLY)
l.
connect
Amplifier and
auxiliary equipment as
for Direct Speaker Output operation.
2. Connect speakers to 70V OUTPUT Terminal Strip.
3. Connect console or mixer output to UNBALANCED
PARALLELED HIGH IMPEDANCE Input Jack. For cable
length greater than 15rn (50 ft), use 600-ohm balanced line into BALANCED BRIDGING Input Jack
(three-pin).
. .
4. fur, 70V-OFF Switch to 70".
5. Connect line cord to ac source.
6. Turn POWER ON-OFF Switch on and adjust VOLUME
Control.
SR105 Power Amplifier
ARCHITECTS' AND ENGINEERS' SPECIFICATIONS
SRlOSA POWER AMPLIFIER
The Amplifier shall be a rack-mounted, 120-volt, 50/60
Hz line-operated, all silicon transistor, 200-watt power
amplifier.
The Amplifier shall deliver 200 watts rms continuous output power at 1 kHz into a 4-ohm load with less than 2%
distortion (DIRECT OUTPUT), and 150 watts rms continuous
output power with less than 3% distortion to a 33-ohm load
(70-VOLT OUTPUT). Typical frequency response shall be
20 to 20,000 Hz t 1 . 5 dB with a 4-ohm load (DIRECT OUTPUT) and 50 to 15,000 Hz 2 db with a 33-ohm load (70VOLT OUTPUT).
The Amplifier shall have four phone jacks and one terminal strip speaker output for 25-volt output, plus one terminal strip for 70-volt output.
The Amplifier shall have built-in circuitry to protect the
Amplifier from open circuit, short circuit, or mismatched
output loads, by using current-limiting, voltage-limiting,
temperature-sensing diodes, and thermal-sensing switches.
The automatic thermal-sensing switches and temperature-sensing diodes shall be mounted on the output transistor heat sinks to protect the Amplifier from overheating
due to short circuits, mismatched output loads, or high
ambient temperatures. The thermal switches shall automatically shut off the ac power in the event of overheating
and shall automatically restore the ac power when the
Amplifier has reached a safe operating temperature. When
the Amplifier has thermally cycled off, a THERMAL OVERLOAD indicator shall light.
The INPUTS shall accept signals from high impedance
sources. The balanced bridging input shall be a professional three-pin audio connector. The unbalanced input
connectors shall be standard %-inch phone jacks.
The Amplifier shall have an independent VOLUME control, POWER ON-OFF Switch and 70-VOLTIOFF Switch
to activate the 70-volt output transformer.
The Amplifier shall be enclosed in a metal, rack-mounting cabinet, with a scuff-resistant vinyl-covered front panel.
The dimensions shall be 178 mm x 483 mm x 270 mm
(7 inches in height, 19 inches in width, and lO5/8 inches
in depth). The weight shall be no more than 15.66 kg (34
pounds 8 ounces).
The Amplifier shall have a maximum voltage gain of
27 -+2 dB at 1 kHz, and a nominal input sensitivity of
1.2 volts for 200 watts rms output power to a 4-ohm load.
Seventy-volt circuitry voltage gain shall be 35 %3.5 dB
at 1 kHz, and a 1.2-volt nominal input sensitivity for 150
watts rms output power to a 33-ohm load.
The Amplifier hum and noise shall be at least 80 dB
below 200 watts rms output with a 4-ohm resistive load.
The Amplifier shall contain 4 silicon output transistors,
13 other silicon transistors, and 1 Zener diode.
Any Amplifier not meeting all of the above specifications
shall be deemed unacceptable under this specification.
The Amplifier shall be a Shure Model SR105A.
SRlOSB POWER AMPLIFIER
The Amplifier shall be a rack-mountable, 120-volt, 50/60
Hz line-operated, all silicon transistor, 200-watt powar
amplifier.
The Amplifier shall deliver 200 watts rms continuous
power at 1 kHz into a 4-ohm load with less than 2% distortion. Typical frequency response shall be 20 to 20,DOO Hz
2 1 . 5 dB with a 4-ohm load.
The Amplifier shall have four phone jacks and one terminal strip speaker output for 25-volt output.
The Amplifier shall have built-in circuitry to protect the
Amplifier from open circuit, short circuit, or mismatched
output loads, by using current-limiting, voltage-limiting,
temperature-sensing diodes, and thermal-sensing switches.
The automatic thermal-sensing switches and temperature-sensing diodes shall be mounted on the output transistor heat sinks to protect the Amplifier from overheating
due to short circuits, mismatched output loads, or high
ambient temperatures. The thermal switches shall automatically shut off the ac power in the event of overheating
and shall automatically restore the ac power when the
Amplifier has reached a safe operating temperature. When
the Amplifier has thermally cycled off, a THERMAL OVERLOAD indicator shall light.
The INPUTS shall accept signals from high impedance
sources. The balanced bridging input shall be a professional three-pin audio connector. The unbalanced input
connectors shall be standard %-inch phone jacks.
The Amplifier shall have an independent VOLUME Control and POWER ON-OFF Switch. The Amplifier shall be enclosed in a metal, rack-mounting cabinet, with a scuffresistant vinyl-covered front panel. The dimensions shall
be 178 mm x 483 mm x 270 mm (7 inches in height, 19
inches in width, and 105h inches in depth). The weight
shall be no more than 12.23 kg (27 pounds).
The Amplifier shall have a maximum voltage gain of
27 k 2 dB at 1 kHz, and a nominal input sensitivity of
1.2 volts for 200 watts rms output power to a 4-ohm load.
The Amplifier hum and noise shall be at least 80 dB
below 200 watts rms output with a 4-ohm resistive load.
The Amplifier shall contain 4 silicon output transistors,
10 other silicon transistors, and 1 Zener diode.
Any Amplifier not meeting all of the above specifications
shall be deemed unacceptable under this specification.
The Amplifier shall be a Shure Model SR105B.