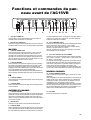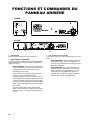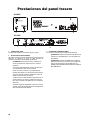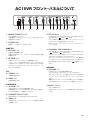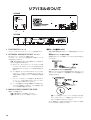
1
E F G S J 2
Welcome to VOX .......................... 5
Bienvenue à VOX ! ..................... 11
Willkommen bei VOX ................. 17
Bienvenido a VOX ...................... 23
VOX にようこそ............................. 29
3
IMPORTANT SAFETY INSTRUCTIONS
•
•
•
•
•
•
•
•
•
•
•
•
•
•
•
•
•
•
•
•
•
Read these instructions.
Keep these instructions.
Heed all warnings.
Follow all instructions.
Do not use this apparatus near water.
Mains powered apparatus shall not be exposed to dripping
or splashing and that no objects filled with liquids, such as
vases, shall be placed on the apparatus.
Clean only with dry cloth.
Do not block any ventilation openings. Install in
accordance with the manufacturer’s instructions.
Do not install near any heat sources such as radiators,
heat registers, stoves, or other apparatus (including
amplifiers) that produce heat.
Do not defeat the safety purpose of the polarized or
grounding-type plug. A polarized plug has two blades with
one wider than the other. A grounding type plug has two
blades and a third grounding prong. The wide blade or the
third prong are provided for your safety. If the provided
plug does not fit into your outlet, consult an electrician for
replacement of the obsolete outlet. (for USA and Canada)
Protect the power cord from being walked on or pinched
particularly at plugs, convenience receptacles, and the
point where they exit from the apparatus.
Only use attachments/accessories specified by the
manufacturer.
Unplug this apparatus during lightning storms or when
unused for long periods of time.
Turning off the power switch does not completely isolate
this product from the power line so remove the plug from
the socket if not using it for extended periods of time.
Install this product near the wall socket and keep the
power plug easily accessible.
WARNING—This apparatus shall be connected to a mains
socket outlet with a protective earthing connection.
Refer all servicing to qualified service personnel. Servicing
is required when the apparatus has been damaged in any
way, such as power-supply cord or plug is damaged, liquid
has been spilled or objects have fallen into the apparatus,
the apparatus has been exposed to rain or moisture, does
not operate normally, or has been dropped.
Do not install this equipment on the far position from wall
outlet and/or convenience receptacle.
Do not install this equipment in a confined space such as a
box for the conveyance or similar unit.
Excessive sound pressure from earphones and
headphones can cause hearing loss.
Use only with the cart, stand, tripod, bracket, or table
specified by the manufacturer, or sold with the apparatus.
When a cart is used, use caution when moving the cart/
apparatus combination to avoid injury from tip-over.
The lightning flash with arrowhead symbol
within an equilateral triangle, is intended to
alert the user to the presence of uninsulated
“dangerous voltage” within the product’s
enclosure that may be of sufficient magnitude
to constitute a risk of electric shock to persons.
The exclamation point within an equilateral triangle is intended to alert the user to the presence of important operating and maintenance
(servicing) instructions in the literature accompanying the product.
THE FCC REGULATION WARNING (for USA)
This equipment has been tested and found to comply with the
limits for a Class B digital device, pursuant to Part 15 of the
FCC Rules. These limits are designed to provide reasonable
protection against harmful interference in a residential installation. This equipment generates, uses, and can radiate radio
frequency energy and, if not installed and used in accordance
with the instructions, may cause harmful interference to radio
communications. However, there is no guarantee that interference will not occur in a particular installation. If this equipment
does cause harmful interference to radio or television reception, which can be determined by turning the equipment off
and on, the user is encouraged to try to correct the interference by one or more of the following measures:
• Reorient or relocate the receiving antenna.
• Increase the separation between the equipment and
receiver.
• Connect the equipment into an outlet on a circuit different
from that to which the receiver is connected.
• Consult the dealer or an experienced radio/TV technician
for help.
Unauthorized changes or modification to this system can void
the user’s authority to operate this equipment.
Notice regarding disposal (EU only)
When this “crossed-out wheeled bin” symbol is displayed on the product, owner’s manual, battery, or
battery package, it signifies that when you wish to dispose of this product, manual, package or battery you
must do so in an approved manner. Do not discard
this product, manual, package or battery along with
ordinary household waste. Disposing in the correct
manner will prevent harm to human health and potential damage to the environment. Since the correct method of disposal
will depend on the applicable laws and regulations in your
locality, please contact your local administrative body for
details. If the battery contains heavy metals in excess of the
regulated amount, a chemical symbol is displayed below the
“crossed-out wheeled bin” symbol on the battery or battery
package.
CALIFORNIA USA ONLY
California 93120 Compliant for Formaldehyde.
“The Airborne Toxic Control Measure to reduce
Formaldehyde Emissions from Composite Wood
Products.”
4
*
All product names and company names are the trademarks
or registered trademarks of their respective owners.
Welcome to VOX
Many thanks for adding the VOX AC30VR/AC15VR amplifier to your sonic arsenal.
It was designed by our UK based VOX engineering team and built by our state of the art, vertically integrated manufacturing facility
and we’re sure it’ll give you countless hours of great guitar tones that will feel as good as they sound! To insure a long and happy
relationship with your amplifier, please read this manual at least once, and (as they say), “use the product as directed.” Keep the
manual for future reference after you’ve read it.
WHAT IS VR?
HOW DOES IT WORK?
The VR series of amplifiers are designed, as to what we
believe are the next generation of “hybrid” guitar amplifiers.
What does HYBRID mean, you may ask? Well, basically
“hybrid” means that it utilizes a mixture of technologies—in
this case those technologies are Tube and Solid State.
The Preamp stages consist of discrete transistors for sound
generation, and integrated circuits (op-amps) to do signal
management that would not be done effectively with transistors alone—i.e. channel switching, etc.
The Power amp stage uses a 12AX7 vacuum tube (or valve,
depending where you live in the world) in a configuration that
we at VOX call Valve Reactor.
It basically works by having each half of the 12AX7 (the
12AX7 tube is actually two identical tubes in one glass tube
a.k.a. dual triode) and configuring it to work as a small tube
power amplifier. This circuit provides all the tonality and feel of
an all-tube power amp. Obviously this “small” power amp
would not be very loud if it was connected directly to a loudspeaker—therefore the tube circuit is connected to a larger,
completely transparent solid-state power amplifier, that is run
very cleanly so that it does not add its own colouration to the
tube signal.
This power output amplifier also has some special circuits that
feed the loudspeaker impedance information back to the tube
power amplifier in order to give it the loose sound & feel that
an all-tube amp does.
The patented Valve Reactor power amp technology is used in
all Valvetronix products. It was originally designed for the
award winning VOX Valvetronix modelling guitar amplifier
range, and now we have taken that same technology and further revised it into the format that is built into your AC30VR/
AC15VR amplifier.
SO WHAT DOES THIS MEAN?
We think that the VOX VR amplifier range brings you superb
tone (vintage & modern) that includes the high harmonic content and compression that goes all the way back to the original
VOX AC15 & 30 amplifiers that were created more than 50
years ago, and are still revered to this day.
5
AC30VR FRONT PANEL FEATURES
12
3
4
5
6
7
8
9 10 11 12 13 14
15
16
17
1. MAINS POWER SWITCH
12. OVERDRIVE STYLE BUTTON
Turns your AC30VR OFF/ON from the connected mains
power.
This button changes the distortion characteristics (STYLE) of
the Overdrive channel—OUT=OD1, IN=OD2.
OD1 is a warm natural “vintage” overdrive flavour, ideal for
“blues” based sounds.
OD2 is a harder, more aggressive, high gain style distortion,
more suited to “modern” playing.
2. POWER LED
Illuminates RED when your amplifier is switched on, and is
also connected to a suitable mains power supply.
MASTER
3. VOLUME
This controls the amount of volume produced by the
AC30VR’s Valve Reactor power amplifier circuit, and therefore the overall volume that your AC30VR supplies to any of
the loudspeaker systems that are connected.
4. REVERB
This controls the amount of digital reverb that is mixed with the
direct signal to produce a slight shimmer of reverb (low settings) to concert hall depth (at high settings).
The built-in digital reverb can be cancelled or activated by the
optional VFS2 Dual Footswitch. (Channel-Reverb)
5. TONE CUT
This circuit is placed in the power amp as opposed to the preamp section like the Treble and Bass controls. What this does
is the opposite of what you may think. Turning it clockwise will
decrease the higher frequencies and turning it counterclockwise adds higher frequencies.
OVERDRIVE CHANNEL
6. TREBLE CONTROL
This controls the amount of TREBLE in the Overdrive channel.
7. MIDDLE CONTROL
This controls the amount of MIDDLE frequency in the Overdrive channel.
8. BASS CONTROL
This controls the amount of BASS in the Overdrive channel.
9. VOLUME CONTROL
This controls the amount of overdrive generated by the preamp signal that is sent to the Valve Reactor power amplifier.
Use this to set the loudness required for your use, and also to
balance the overdrive sound against your clean (Normal)
sound.
10. CHANNEL SELECT LED
Illuminates RED when the Overdrive channel is selected.
11. GAIN CONTROL
This regulates the amount of preamp “gain” and therefore the
amount of overdrive or distortion that is generated by the
Overdrive Channel. Like the Normal Volume control, lower
settings mean less distortion, higher settings mean much,
much more distortion!
6
13. CHANNEL SWITCHING BUTTON
This button controls whether your amplifier is set for Normal or
Overdrive—OUT = NORMAL, IN = OVERDRIVE.
Your AC30VR can also be channel switched by using the
optional VFS2 Dual Footswitch (connected via the back panel
Footswitch Jack). This function can only be operated when the
front panel button is “IN” position.
When the Normal channel is selected, the LED is not illuminated—when the Overdrive channel is selected, the Red LED
is illuminated.
NORMAL CHANNEL
14. TREBLE CONTROL
This controls the amount of TREBLE in the Normal channel.
15. BASS CONTROL
This controls the amount of BASS in the Normal channel.
16. VOLUME CONTROL
This controls the volume of the clean (NORMAL) channel. At
lower settings the sound will be very clean and bright, at
higher settings the sound will become somewhat thicker and
warmer, whilst at the highest settings the sound will “break up”
into a natural vintage style distortion.
As different types of electric guitars have vastly different
amounts of tonal qualities and output levels, your guitar will
have a major influence on where you will need to set the position of the controls on this amplifier to achieve the response
you desire.
Please Note—for this control to be functional the
amplifier channel switching facility needs to be set to
the Normal channel.
17. INPUT JACK
Connect your guitar into this socket.
AC15VR FRONT PANEL FEATURES
1 2
3
4
5
6
7
8
9 10 11 12
13
1. MAINS POWER SWITCH
11. CHANNEL SWITCHING BUTTON
Turns your AC15VR OFF/ON from the connected mains
power.
This button controls whether your amplifier is set for Normal or
Overdrive—OUT = NORMAL, IN = OVERDRIVE. Your
AC15VR can also be channel switched by using the optional
VFS2 Dual Footswitch (connected via the back panel Footswitch Jack). This function can only be operated when the
front panel switch is “IN” position.
When the Normal channel is selected, the LED is not illuminated—when the Overdrive channel is selected, the Red LED
is illuminated.
2. POWER LED
Illuminates RED when your amplifier is switched on, and is
also connected to a suitable mains power supply.
MASTER
3. VOLUME
This controls the amount of volume produced by the
AC15VR’s Valve Reactor power amplifier circuit, and therefore the overall volume that your AC15VR supplies to any of
the loudspeaker systems that are connected.
4. REVERB
This controls the amount of digital reverb that is mixed with the
direct signal to produce a slight shimmer of reverb (low settings) to concert hall depth (at high settings).
The built-in digital reverb can be cancelled or activated by the
optional VFS2 Dual Footswitch. (Channel-Reverb)
EQ
5. TREBLE CONTROL
This controls the amount of TREBLE in your sound.
6. BASS CONTROL
This controls the amount of BASS in your sound.
OVERDRIVE CHANNEL
7.
VOLUME CONTROL
NORMAL CHANNEL
12. VOLUME CONTROL
This controls the volume of the clean (NORMAL) channel. At
lower settings the sound will be very clean and bright, at
higher settings the sound will become somewhat thicker and
warmer, whilst at the highest settings the sound will “break up”
into a natural vintage style distortion.
As different types of electric guitars have vastly different
amounts of tonal qualities and output levels, your guitar will
have a major influence on where you will need to set the position of the controls on this amplifier to achieve the response
you desire.
Please Note—for this control to be functional the
amplifier channel switching facility needs to be set to
the Normal channel.
13. INPUT JACK
Connect your guitar to this socket.
This controls the amount of overdrive generated by the preamp signal that is sent to the AC15VR’s Valve Reactor power
amplifier. Use this to set the loudness required for your use,
and also to balance the overdrive sound against your clean
(Normal) sound.
8. CHANNEL SELECT LED
Illuminates RED when the Overdrive channel is selected.
9. GAIN CONTROL
This regulates the amount of preamp “gain” and therefore the
amount of overdrive or distortion that is generated by the
Overdrive Channel. Like the Normal Volume control, lower
settings mean less distortion, higher settings mean much,
much more distortion!
10. OVERDRIVE STYLE BUTTON
This button changes the distortion characteristics (STYLE) of
the Overdrive channel—OUT=OD1, IN=OD2.
OD1 is a warm natural “vintage” overdrive flavour, ideal for
“blues” based sounds.
OD2 is a harder, more aggressive, high gain style distortion,
more suited to “modern” playing.
7
REAR PANEL FEATURES
AC30VR
1
2
3
AC15VR
1
2
3
1. FOOTSWITCH JACK
3. MAINS POWER CONNECTOR/FUSE
Connect the optional VFS2 Dual Footswitch to this jack.
The mains power required by your amplifier is connected
using this device.
2. EXTERNAL SPEAKER OUTPUT JACK
An external loudspeaker system can be connected to your
amplifier by using this socket. This socket disconnects the
amplifier from the internal loudspeaker.
WARNING! To ensure that your system works correctly, you must observe the following points.
a) Only use an external cabinet with a combined
impedance of 8ohms.
b) Don’t connect a speaker whose rated input capacity is less than 15 watts (for AC15VR) or 30 watts (for
AC30VR). The speaker may be destroyed if you
ignore this caution—not recommended!
c) You must use a speaker cable to connect an external speaker. Don’t use a shielded cable like the one
you use to connect a guitar to an amp.
d) You must turn off the power before connecting the
cable. Connecting the cable while the power is turned
on may damage your amp.
8
WARNING! Use only the power cord supplied with
your amplifier, or a replacement of the exact same
specification.
WARNING! Only connect this amplifier to a suitable
mains power supply that matches the rating indicated
on the back panel of your AC30VR/AC15VR amplifier. IF IN ANY DOUBT CONTACT YOUR DEALER!
SPECIFICATIONS
AC30VR
AC15VR
Twin channel, guitar amplifier with 2x 12 inch VX 12 Celestion
custom made loudspeaker and digital reverb.
30 watts RMS power output utilising VOX proprietary Valve
Reactor power amplifier technology with built-in 12AX7/
ECC83 tube (valve).
Twin channel, guitar amplifier with 1x 12 inch VX 12 Celestion
custom made loudspeaker and digital reverb.
15 watts RMS power output utilising VOX proprietary Valve
Reactor power amplifier technology with built-in 12AX7/
ECC83 tube (valve).
• Dimensions (W x D x H):
702 x 265 x 556 mm (27.64 x 10.43 x 21.89 inches)
• Dimensions (W x H x D):
602 x 265 x 456 mm (23.70 x 10.43 x 17.95 inches)
• Weight: 23 kg (50.71 pounds)
• Weight: 16.4 kg (36.16 pounds)
• Output Power: 30 Watts RMS into 8 Ohms
• Output Power: 15 Watts RMS into 8 Ohms
• Speaker: 2x 12", 16 Ohm VX12 Celestion custom speaker
• Speaker: 1x 12", 8 Ohm VX12 Celestion custom speaker
• Inputs: Input jack, Footswitch jack
• Inputs: Input jack, Footswitch jack
• Outputs: External LoudSpeaker jack
• Outputs: External LoudSpeaker jack
• Options: VFS2 Dual Footswitch
• Options: VFS2 Dual Footswitch
*Specifications are subject to change without notice.
9
INFORMATIONS IMPORTANTES DE SECURITE
•
•
•
•
•
•
•
•
•
•
•
•
•
•
•
•
•
•
•
•
•
Lisez attentivement ces instructions.
Veuillez conserver ces instructions.
Observez tous les avertissements.
Suivez toutes les consignes à la lettre.
N’utilisez jamais cet appareil dans un endroit humide ni à
proximité d’eau.
L’appareil alimenté par courant électrique ne peut pas être
exposé à des éclaboussures; évite en outre de placer des
récipients contenant des liquides, comme un vase (ou un
verre de bière), sur l’appareil.
Nettoyez uniquement l’appareil avec un chiffon doux et sec.
Ne bloquez jamais les orifices de ventilation de l’appareil et
installez-le toujours conformément aux instructions du
fabricant.
N’installez jamais l’appareil à proximité d’une source de
chaleur, telle que des radiateurs, poêles ou tout autre
dispositif (y compris des amplificateurs) générant de la
chaleur.
N’essayez jamais de contourner le dispositif de sécurité d’une
prise de type polarisée ou d’une prise de terre. Une prise dite
polarisée dispose de deux broches, dont l’une est plus large
que l’autre. Une prise de terre comporte trois broches, dont
une de mise à la terre. Cette broche plus large ou broche de
mise à la terre vise à assurer votre sécurité. Si la fiche du
cordon d’alimentation ne correspond pas au type de prise de
courant de votre région, faites remplacer la prise obsolète par
un électricien qualifié (pour les Etats-Unis et le Canada).
Placez toujours le cordon d’alimentation de sorte qu’on ne
risque pas de marcher dessus ni de le pincer. Cette
précaution vise tout spécialement la fiche du cordon et sa
sortie de l’appareil.
Utilisez exclusivement les fixations/accessoires préconisés
par le fabricant.
S’il y a risque d’orage ou que vous ne comptez pas utiliser
l’appareil pendant une période prolongée, débranchez-le du
secteur.
La mise sur OFF de l’interrupteur d’alimentation n’isole pas
totalement ce produit de la ligne secteur; aussi, retirez la fiche
de la prise s’il doit rester inutilisé pendant une période
prolongée.
Installez ce produit près de la prise électrique murale et
gardez un accès facile à la prise électrique et au cordon
d’alimentation.
ATTENTION: Cet appareil doit absolument être connecté à
une prise électrique reliée à la terre.
Confiez tout travail de réparation uniquement à un S.A.V.
qualifié. Faites appel au S.A.V. si l’appareil a subi tout
endommagement, comme par exemple si sa fiche secteur ou
son cordon d’alimentation sont endommagés, si de l’eau ou
des objets ont pénétré à l’intérieur de l’appareil, si celui-ci a
été exposé à la pluie ou à la moisissure, s’il est tombé ou
présente tout signe de dysfonctionnement.
N’utilisez jamais d’allonge trop longue avec cet appareil et ne
l’alimentez jamais via les prises secteur équipant d’autres
dispositifs.
N’installez jamais cet appareil dans un endroit confiné comme
une caisse de transport ou tout autre récipient similaire.
Des niveaux d’écoute trop importants lors de l’utilisation d’un
casque ou d’écouteurs peuvent entraîner des pertes
d’audition.
Utilisez l’appareil uniquement avec le chariot, stand, trépied,
fixation ou table spécifiés par le fabricant ou fourni avec
l’appareil. Si vous avez placé l’appareil sur un chariot, soyez
très prudent quand vous déplacez le chariot, afin d’éviter une
chute et des blessures.
10
L’éclair dans le triangle est un symbole destiné à
attirer l’attention de l’utilisateur sur la présence de
parties non isolées et de “tension dangereuse” à
l’intérieur de l’appareil, qui posent des risques
d’électrocution pour l’utilisateur.
Le point d’exclamation dans un triangle est un
symbole destiné à attirer l’attention de
l’utilisateur sur des sections de ce manuel
contenant des informations importantes, liées
à l’utilisation et à l’entretien de ce produit.
Note concernant les dispositions (Seulement EU)
Quand un symbole avec une poubelle barrée d’une
croix apparait sur le produit, le mode d’emploi, les
piles ou le pack de piles, cela signifie que ce produit,
manuel ou piles doit être déposé chez un
représentant compétent, et non pas dans une
poubelle ou toute autre déchetterie conventionnelle.
Disposer de cette manière, de prévenir les dommages
pour la santé humaine et les dommages potentiels pour
l'environnement. La bonne méthode d'élimination dépendra
des lois et règlements applicables dans votre localité, s’il vous
plaît, contactez votre organisme administratif pour plus de
détails. Si la pile contient des métaux lourds au-delà du seuil
réglementé, un symbole chimique est affiché en dessous du
symbole de la poubelle barrée d’une croix sur la pile ou le
pack de piles.
*
Tous les noms de produits et de sociétés sont des marques
commerciales ou déposées de leur détenteur respectif.
Bienvenue à VOX !
Nous vous remercions d’avoir choisi l’amplificateur VOX AC30VR/AC15VR pour compléter votre arsenal sonore. Conçu
par notre équipe d’ingénieurs VOX basée au Royaume-Uni, et monté dans nos installations de pointe, verticalement intégrées, il vous apportera, nous en sommes certains, des heures et des heures de plaisir. Vous produirez des sons de guitare
superbes à déguster sans modération ! Pour que votre relation avec votre amplificateur soit longue et fructueuse, veuillez
lire ce manuel au moins une fois, et puis, conseil de rigueur même si vous le saviez déjà, “utilisez ce produit conformément
aux instructions”. Enfin, veillez à conserver ce manuel pour référence ultérieure.
UN MOT SUR LA SÉRIE VR
Les amplificateurs de la série VR sont conçus comme ce que
nous estimons être la nouvelle génération d’amplis guitare “hybrides”.
Vous vous demandez certainement ce que nous entendons par
HYBRIDE. Et bien, à la base, “hybride” se réfère à l’utilisation de
tout un éventail de technologies—les technologies représentées
ici étant celles des lampes et des semi-conducteurs.
Les étages préamplificateur sont constitués de transistors distincts pour la production des sons et de circuits intégrés (opamps) pour une gestion du signal qui ne pourrait pas être effectuée de façon efficace au moyen des seuls transistors, notamment la commutation de canaux, etc.
L’étage amplificateur de puissance utilise une lampe (ou tube
électronique) 12AX7 dans une configuration que nous avons
nommée Valve Reactor.
La technologie d’amplification de puissance avec Valve Reactor
brevetée par VOX est utilisée dans tous les produits Valvetronix.
Elle était à l’origine conçue pour la gamme d’amplis à modélisation pour guitare VOX Valvetronix primée. Nous avons maintenant repris cette même technologie et l’avons remaniée pour
l’intégrer à votre amplificateur AC30VR/AC15VR.
COMMENT TOUT CELA FONCTIONNE-T-IL ?
Chaque moitié de la lampe 12AX7 (la lampe 12AX7 est en fait
constituée de deux lampes identiques contenues dans un tube
de verre, constituant une triode double) travaille comme un petit
amplificateur de puissance à lampe. Ce circuit offre toute la sonorité et le feeling d’un amplificateur de puissance traditionnel à
lampe. Il est évident que ce “petit” amplificateur ne serait pas très
puissant s’il était raccordé directement à un haut-parleur—par
conséquent, le circuit de la lampe est raccordé à un amplificateur
de puissance à transistors plus important, complètement transparent, qui fonctionne de façon très pure afin de ne pas ajouter
sa propre coloration au signal de la lampe.
Cet amplificateur de puissance de sortie est aussi muni de plusieurs circuits spéciaux qui redirigent les informations d’impédance du haut-parleur vers l’amplificateur de puissance à lampe de
manière à lui donner le son et le feeling détachés d’un amplificateur à lampe traditionnel.
RÉSULTAT ?
Nous pensons que la série d’amplificateurs VOX VR vous offrira
une sonorité superbe (Vintage et moderne) intégrant le contenu
hautement harmonique et la compression représentatifs des
amplificateurs originaux VOX AC15 & 30 créés il y a plus de 50
ans et encore révérés à ce jour.
11
Fonctions et commandes du panneau avant de l'AC30VR
12
3
4
5
6
7
1. Interrupteur POWER ON
Cet interrupteur vous permet de mettre sous/hors tension le
AC30VR quand il est branché sur le secteur.
2. LED indicatrice POWER ON
S’allume en rouge quand votre amplificateur est mis sous tension
et quand il est branché sur une source d’alimentation appropriée.
MASTER
3. Commande POWER LEVEL
Cette commande vous permet de régler le volume à la sortie
du circuit d’amplificateur de puissance à Valve Reactor du
AC30VR et par conséquent le volume général fourni par votre
AC30VR à l’un des quelconques systèmes acoustiques raccordés—que ce soit le haut-parleur de 10 pouces intégré ou un système acoustique externe ou enfin un casque.
4. Commande REVERB
Cette commande vous permet de régler le signal du réverbérateur à ressort mixé avec le signal direct pour produire un effet
allant d’une réverbération légère comme un tremblotement
(réglage sur des valeurs inférieures) à la profondeur d’une salle
de concert (réglage sur des valeurs supérieures).
Le réverbérateur à ressort intégré peut aussi être désactivé ou
activé à l’aide de la pédale optionnelle VFS2. (Channel-Reverb)
5. Selecteur de tonalité
Ce circuit est placé dans l’ampli de puissance à l’opposé du
préampli qui contrôle notamment les aigues ou les basses. Ce
que cela produit est l’inverse de ce que vous pouvez penser.
Tournez le dans le sens des aiguilles d’une montre réduira les
hautes fréquences alors que si vous le tournez dans le sens
inverse des aiguilles d’une montre elles augmenteront.
OVERDRIVE CHANNEL
8
9 10 11 12 13 14
15
16
17
10. LED indicatrice
S’allume en rouge quand le canal overdrive est sélectioné.
11. Commande GAIN
Cette commande vous permet de régler le “gain” ou niveau général du préamplificateur et par conséquent le montant de saturation ou de distorsion produit par le canal overdrive. Comme pour
la commande Normal Volume, un réglage sur une valeur inférieure épure le son tandis qu’un réglage sur une valeur supérieure
produit de la distorsion à revendre !
12. Touche OVERDRIVE STYLE
Cette touche vous permet de changer les caractéristiques de distorsion (STYLE) du canal overdrive—OD1 ou OD2.
OD1 est une couleur naturelle chaleureuse “Vintage” saturée,
idéale pour les sons basés sur le “blues”.
OD2 est une distorsion plus dure, plus agressive, à gain élevé,
mieux adaptée à un jeu “moderne”.
13. Touche de commutation de mode CHANNEL
Cette touche vous permet de sélectionner le mode de l’amplificateur, normal ou overdrive—position haute = mode normal, position basse = mode overdrive.
Le mode de votre AC30VR peut aussi être commuté à l’aide de
la pédale optionnelle (raccordée via la prise FOOT SW du panneau arrière. Cette fonction ne peut être utilisée que lorsque le
bouton du panneau avant est réglé sur la position “IN”.
Lorsque le canal normal est sélectionné, la LED est éteinte. Lorsque le canal overdrive est sélectionné, la LED rouge est allumée.
NORMAL CHANNEL
14. Commande TREBLE
Cette commande vous permet de régler le niveau de l’aigu sur le
canal normal.
6. Commande TREBLE
Cette commande vous permet de régler le niveau des aigus sur
le canal overdrive.
15. Commande BASS
Cette commande vous permet de régler le niveau du grave sur le
canal normal.
7. Commande Middle
Cette commande vous permet de régler le niveau des médium
sur le canal overdrive.
16. Commande VOLUME
Cette commande vous permet de régler le volume du son clean
(NORMAL).
Avec un réglage sur les valeurs inférieures le son sera très pur et
brillant, tandis qu’aux valeurs supérieures le son s’épaissira et
prendra de la chaleur. Aux valeurs les plus élevées, le son se
“désintégrera” avec une saturation de style Vintage.
Les différent types de guitares électriques sur le marché présentant une vaste gamme de qualités sonores et de niveaux de sortie, la position idéale des commandes de cet amplificateur pour
obtenir le son souhaité dépendra de la guitare utilisée.
8. Commande BASS
Cette commande vous permet de régler le niveau des graves sur
le canal overdrive.
9. Commande VOLUME
Cette commande vous permet de régler le montant de saturation
produit par le signal du préamplificateur envoyé à l’amplificateur
de puissance à Valve Reactor. Utilisez cette commande pour
obtenir le contour souhaité et équilibrer le son saturé par rapport
au son clean (normal).
12
17. Prise INPUT
Branchez votre guitare sur cette prise.
Fonctions et commandes du panneau avant de l'AC15VR
1 2
3
4
5
6
7
8
9 10 11 12
13
1. Interrupteur POWER ON
Cet interrupteur vous permet de mettre sous/hors tension le
AC30VR quand il est branché sur le secteur.
la commande Normal Volume, un réglage sur une valeur inférieure épure le son tandis qu’un réglage sur une valeur supérieure
produit de la distorsion à revendre !
2. LED indicatrice POWER ON
S’allume en rouge quand votre amplificateur est mis sous tension
et quand il est branché sur une source d’alimentation appropriée.
10. Touche OVERDRIVE STYLE
Cette touche vous permet de changer les caractéristiques de distorsion (STYLE) du canal overdrive — OD1 ou OD2.
OD1 est une couleur naturelle chaleureuse “Vintage” saturée,
idéale pour les sons basés sur le “blues”.
OD2 est une distorsion plus dure, plus agressive, à gain élevé,
mieux adaptée à un jeu “moderne”.
MASTER
3. Commande POWER LEVEL
Cette commande vous permet de régler le volume à la sortie
du circuit d’amplificateur de puissance à Valve Reactor du
AC15VR et par conséquent le volume général fourni par votre
AC15VR à l’un des quelconques systèmes acoustiques raccordés—que ce soit le haut-parleur de 10 pouces intégré ou un système acoustique externe ou enfin un casque.
4. Commande REVERB
Cette commande vous permet de régler le signal du réverbérateur à ressort mixé avec le signal direct pour produire un effet
allant d’une réverbération légère comme un tremblotement
(réglage sur des valeurs inférieures) à la profondeur d’une salle
de concert (réglage sur des valeurs supérieures).
Le réverbérateur à ressort intégré peut aussi être désactivé ou
activé à l’aide de la pédale optionnelle VFS2. (Channel-Reverb)
EQ
5. Commande TREBLE
Cette commande vous permet de régler le niveau des aigus sur
le canal overdrive.
6. Commande BASS
Cette commande vous permet de régler le niveau des graves sur
le canal overdrive.
11. Touche de commutation de mode CHANNEL
Cette touche vous permet de sélectionner le mode de l’amplificateur, normal ou overdrive — position haute = mode normal, position basse = mode overdrive.
Le mode de votre AC15VR peut aussi être commuté à l’aide de
la pédale optionnelle (raccordée via la prise FOOT SW du panneau arrière. Cette fonction ne peut être utilisée que lorsque le
bouton du panneau avant est réglé sur la position “IN”.
Lorsque le canal normal est sélectionné, la LED est éteinte. Lorsque le canal overdrive est sélectionné, la LED rouge est allumée.
NORMAL CHANNEL
12. Commande NORMAL VOLUME
Cette commande vous permet de régler le volume du son clean
(NORMAL).
Avec un réglage sur les valeurs inférieures le son sera très pur et
brillant, tandis qu’aux valeurs supérieures le son s’épaissira et
prendra de la chaleur. Aux valeurs les plus élevées, le son se
“désintégrera” avec une saturation de style Vintage.
Les différent types de guitares électriques sur le marché présentant une vaste gamme de qualités sonores et de niveaux de sortie, la position idéale des commandes de cet amplificateur pour
obtenir le son souhaité dépendra de la guitare utilisée.
OVERDRIVE CHANNEL
7. Commande VOLUME
Cette commande vous permet de régler le montant de saturation
produit par le signal du préamplificateur envoyé à l’amplificateur
de puissance à Valve Reactor. Utilisez cette commande pour
obtenir le contour souhaité et équilibrer le son saturé par rapport
au son clean (normal).
13. Prise INPUT
Branchez votre guitare sur cette prise.
8. LED indicatrice
S’allume en rouge quand le canal overdrive est sélectioné.
9. Commande GAIN
Cette commande vous permet de régler le “gain” ou niveau général du préamplificateur et par conséquent le montant de saturation ou de distorsion produit par le canal overdrive. Comme pour
13
FONCTIONS ET COMMANDES DU
PANNEAU ARRIÈRE
AC30VR
1
2
3
AC15VR
1
2
1. Prise FOOT SW
Branchez la pédale optionnelle VFS2 sur cette prise.
2. PRISE EXTERNAL LOUDSPEAKER
Une enceinte externe peut être raccordée à votre amplificateur à
l'aide de cette prise. Cette prise déconnecte l’amplificateur du
haut-parleur interne.
AVERTISSEMENT! Pour que votre système fonctionne correctement, respectez les points suivants.
a) Utilisez exclusivement des enceintes dont
l’impédance est de 8 ohm.
b) Ne branchez pas d’enceinte dont la capacité
d’entrée nominale est inférieure à 30W
(AC15VR:15W). Si vous ne tenez pas compte de
cette remarque, vous risquez de détruire l’enceinte!
c) Utilisez un câble pour enceinte afin de brancher
une enceinte externe. Ne vous servez pas de câble
blindé comme celui utilisé pour brancher une guitare à ampli.
d) Coupez l’alimentation avant de brancher le
câble. Si vous branchez le câble alors que l’ampli
est sous tension, vous risquez d’endommager ce
dernier.
14
3
3. Prise d’alimentation secteur/Fusible
L’alimentation requise pour votre amplificateur passe par ce dispositif.
AVERTISSEMENT! Utilisez seulement le cordon
d’alimentation fourni avec votre amplificateur, ou
un cordon de rechange dont les spécifications sont
absolument identiques.
AVERTISSEMENT! Raccordez seulement cet
amplificateur à une alimentation secteur dont la
tension correspond à celle spécifiée sur le panneau arrière de votre amplificateur AC15VR/
AC30VR. EN CAS DE DOUTE QUELCONQUE,
CONTACTEZ VOTRE DISTRIBUTEUR!
SPÉCIFICATIONS
AC30VR
AC15VR
Amplificateur de guitare doubles canaux avec doubles enceintes
custom de 12" pouces VX Celestion et réverbérateur digital.
Puissance de sortie de 30 watts RMS. Technologie d’amplification de puissance avec Valve Reactor brevetée par VOX à
lampe (tube électronique) intégrée 12AX7/ECC83.
Amplificateur de guitare doubles canaux avec enceinte custom
de 12" pouces VX Celestion et réverbérateur digital.
Puissance de sortie de 15 watts RMS. Technologie d’amplification de puissance avec Valve Reactor brevetée par VOX à
lampe (tube électronique) intégrée 12AX7/ECC83.
Dimensions (L x P x H) : 702 x 265 x 556 mm
Dimensions (L x P x H) : 602 x 265 x 456 mm
Poids : 23 kg
Poids : 16,4 kg
Puissance de sortie : 30 watts RMS sous 8 ohms
Puissance de sortie : 15 watts RMS sous 8 ohms
Haut-parleur : Vox (2 x 12 pouces, 16 ohms Celestion)
Haut-parleur : Vox (1 x 12 pouces, 8 ohms VX12 Celestion)
Entrées : prise Input, prise Footswitch
Entrées : prise Input, prise Footswitch
Sorties : prise de haut-parleur externe, prise de casque
Sorties : prise de haut-parleur externe, prise de casque
Options : Pédale VFS2
Options : Pédale VFS2
*Les spécifications sont sujettes à modifications sans préavis.
15
WICHTIGE SICHERHEITSHINWEISE
•
•
•
•
•
•
•
•
•
•
•
•
•
•
•
•
•
•
•
•
•
Bitte lesen Sie sich alle Bedienhinweise durch.
Bewahren Sie diese Bedienhinweise auf.
Beachten Sie alle Warnungen.
Befolgen Sie alle Instruktionen.
Verwenden Sie dieses Gerät niemals in der Nähe von Wasser.
Ein netzgespeistes Gerät darf niemals Regen- oder
Wassertropfen ausgesetzt werden. Außerdem darf man keine
Flüssigkeitsbehälter wie Vasen usw. darauf stellen.
Reinigen Sie es ausschließlich mit einem trockenen Tuch.
Versperren Sie niemals die Lüftungsschlitze und stellen Sie das
Gerät nur an Orten auf, die vom Hersteller ausdrücklich
empfohlen werden.
Stellen Sie das Gerät niemals in die Nähe einer Wärmequelle,
z.B. eines Heizkörpers, Ofens oder eines anderen Wärme
erzeugenden Gerätes (darunter auch Endstufen).
Versuchen Sie niemals, die polarisierte Leitung bzw. Erde
hochzulegen oder zu umgehen. Ein polarisierter Stecker ist mit
zwei flachen Stiften unterschiedlicher Breite versehen. Ein
Stecker mit Erdung weist zwei Stifte und eine Erdungsbuchse
auf. Wenn der beiliegende Stecker nicht in Ihre Steckdose
passt, sollten Sie einen Elektriker bitten, die Steckdose zu
erneuern (für die USA und Kanada).
Sorgen Sie dafür, dass man weder über das Netzkabel stolpern
kann, noch dass es in unmittelbarer Nähe einer Steckdose,
darunter auch Zusatzsteckdosen anderer Geräte, abgeklemmt
wird. Auch am Austritt aus dem Gerät darf das Netzkabel auf
keinen Fall gequetscht werden.
Verwenden Sie nur Halterungen/Zubehör, die/das vom
Hersteller ausdrücklich empfohlen werden/wird.
Im Falle eines Gewitters bzw. wenn Sie das Gerät längere Zeit
nicht verwenden möchten, lösen Sie bitte den Netzanschluss.
Durch Ausschalten des Hauptschalters wird dieses Erzeugnis
nicht vollständig vom Netz getrennt. Ziehen Sie deshalb den
Stecker des Netzkabels aus der Steckdose, wenn Sie das
Erzeugnis längere Zeit nicht verwenden.
Stellen Sie diesen Verstärker in der Nähe einer Wand
Schutzkontaktdose auf und achten Sie auf die freie
Zugänglichkeit des Netzanschlusskabels.
Warnhinweis: Dieser Verstärker darf nur an Steckdosen mit
Schutzleiter (Erdung) betrieben werden.
Überlassen Sie alle Wartungsarbeiten einem erfahrenen
Wartungstechniker. Wartungsarbeiten oder Reparaturen sind
erforderlich, wenn das Netzkabel oder der Stecker beschädigt
ist, wenn Flüssigkeit oder andere Gegenstände in das
Geräteinnere gefallen sind, wenn das Gerät im Regen
gestanden hat, sich nicht erwartungsgemäß verhält oder wenn
es gefallen ist.
Stellen Sie das Gerät niemals unmittelbar neben die Steckdose
und/oder Erweiterungssteckdose eines anderen Geräts.
Stellen Sie das Gerät während des Betriebes niemals in einen
Türschrank oder den Lieferkarton.
Hohe Schallpegel bei Verwendung eines großen oder kleinen
Kopfhörers können Hörschäden verursachen.
Stellen Sie das Gerät nur auf einen Wagen, Ständer, Stative,
Halterungen oder Tische, die vom Hersteller ausdrücklich
empfohlen werden oder eventuell zum Lieferumfang gehören.
Seien Sie beim Verschieben eines geeigneten Wagens
vorsichtig, damit weder er, noch das Gerät selbst umkippt bzw.
hinfällt und Sie eventuell verletzt.
16
Der als Pfeil dargestellte Blitz in einem
Dreieck weist den Anwender auf nicht
isolierte, „gefährliche Spannungen“ im
Geräteinneren hin, die so stark sein können,
dass sie einen Stromschlag verursachen.
Das Ausrufezeichen in einem Dreieck weist
den Anwender darauf hin, dass zum
Lieferumfang des Gerätes wichtige Bedienund Wartungshinweise (eventuell
Reparaturhinweise) gehören.
Hinweis zur Entsorgung (Nur EU)
Wenn Sie das Symbol mit der „durchgekreuzten Mülltonne“ auf Ihrem Produkt, der dazugehörigen Bedienungsanleitung, der Batterie oder dem Batteriefach
sehen, müssen Sie das Produkt in der vorgeschriebenen Art und Weise entsorgen. Dies bedeutet, dass
dieses Produkt mit elektrischen und elektronischen
Komponenten nicht mit dem normalen Hausmüll entsorgt werden darf. Für Produkte dieser Art existiert ein separates, gesetzlich festgelegtes Entsorgungssystem.
Gebrauchte elektrische und elektronische Geräte müssen
separat entsorgt werden, um ein umweltgerechtes Recycling
sicherzustellen. Diese Produkte müssen bei benannten Sammelstellen abgegeben werden. Die Entsorgung ist für den
Endverbraucher kostenfrei! Bitte erkundigen sie sich bei ihrer
zuständigen Behörde, wo sie diese Produkte zur fachgerechten Entsorgung abgeben können.
Falls ihr Produkt mit Batterien oder Akkumulatoren ausgerüstet ist, müssen sie diese vor Abgabe des Produktes entfernen
und separat entsorgen (siehe oben). Die Abgabe dieses Produktes bei einer zuständigen Stelle hilft ihnen, dass das Produkt umweltgerecht entsorgt wird. Damit leisten sie
persönlich einen nicht unerheblichen Beitrag zum Schutz der
Umwelt und der menschlichen Gesundheit vor möglichen
negativen Effekten durch unsachgemäße Entsorgung von
Müll. Batterien oder Akkus, die Schadstoffe enthalten, sind
auch mit dem Symbol einer durchgekreuzten Mülltonne
gekennzeichnet. In der Nähe zum Mülltonnensymbol befindet
sich die chemische Bezeichnung des Schadstoffes.
Cd oder NiCd steht für Cadmium, Pb für Blei und Hg für
Quecksilber.
*
Alle Produkt- und Firmennamen sind Warenzeichen oder eingetragene Warenzeichen der betreffenden Eigentümer.
Willkommen bei VOX
Vielen Dank, dass Sie sich für einen VOX AC30VR/AC15VR Verstärker entschieden haben.
Er wurde von unserem VOX-Entwicklungsteam in Großbritannien entworfen und in unseren hochmodernen, vertikal integrierten Produktionsanlagen gebaut. Wir sind sicher, dass Sie unzählige Stunden mit tollen Gitarrensounds erleben werden,
die sich genauso gut anfühlen wie sie klingen! Damit Sie möglichst lange Freude an Ihrem Verstärker haben, sollten Sie
diese Anleitung mindestens einmal komplett durchlesen und anschließend das Produkt (nach der typischen
Floskel) "sachgemäß verwenden". Bewahren Sie die Anleitung zum Nachschlagen auf.
WAS IST VR?
UND WIE FUNKTIONERT DAS?
Die Amps der VR-Baureihe sind unsere aktuelle, nächste
„Hybrid“ - Gitarrenverstärker Generation. Optisch und
klanglich eine Hommage an unsere legendären AC Röhrenverstärker.
Und was meinen wir hier mit HYBRID, fragen Sie? Im Prinzip bedeutet „Hybrid“, dass wir eine Mischung verschiedener Technologien einsetzen—in diesem Fall Röhren und
Analog- (Solid State) Schaltungen.
Die Vorverstärker-Stufe besteht aus diskreten Transistoren zur Klangerzeugung und integrierten Schaltkreisen
(„Op-Amps“) für das Signalmanagement, das sich nicht
effektiv mit Transistoren alleine ausführen lässt—z.B.
Kanalumschalten usw.
Die Endstufe arbeitet mit einer 12AX7 (oder auch ECC83)Röhre (manchmal auf Englisch auch „Valve“ genannt) in
einer Konfiguration, die wir bei VOX „Valve Reactor“ nennen.
Grundsätzlich ist das Funktionsprinzip, dass jede Hälfte
der 12AX7 (die 12AX7-Röhre besteht aus zwei identischen Röhren in einer Glasröhre, auch „Dual Triode“genannt) zur Funktion als kleine Röhrenendstufe konfiguriert ist. Diese Schaltung bietet die Tonalität und das
Gefühl einer vollwertigen Röhrenendstufe. Es ist klar, dass
diese „kleine“ Endstufe nicht sehr laut wäre, wenn man sie
direkt an einen Lautsprecher anschließen würde—deshalb
ist der Röhrenschaltkreis an eine größere, vollständig
transparent arbeitende Analogendstufe angeschlossen,
die sehr sauber arbeitet, um dem Röhrensignal keine
eigene Klangfärbung hinzuzufügen.
Diese Endstufe enthält auch einige spezielle Schaltkreise,
die die Lautsprecherimpedanzinformation zurück zum
Röhrenverstärker speisen, um ihr das prägnante und
dynamische Verhalten eines echten Röhrenverstärkers zu
geben.
Die patentierte Valve Reactor Röhrenendstufentechnologie wird in allen Valvetronix-Produkten eingesetzt. Sie
wurde ursprünglich für die preisgekrönte VOX Valvetronix
Modeling-Gitarrenverstärker-Produktreihe entwickelt.
Jetzt sorgt die gleiche Technologie in Ihrem AC30VR/
AC15VR-Verstärker für authentische Tubeamp Tones und
eine entsprechend dynamische Wiedergabe/Signalverarbeitung.
UND WAS BEDEUTET DAS?
Wir glauben, dass die Verstärkerserie VOX VR Ihnen
superben Klang (sowohl vintage als auch modern), der
hohen Harmonikanteil und Kompression enthält, die ganz
auf den originalen VOX AC15 und -30 Verstärkern aufbauen, die vor mehr als 50 Jahren gebaut wurden und
auch heute noch geschätzt werden.
17
MERKMALE DES AC30VR BEDIENPANELS
12
3
4
5
6
7
1. HAUPT-NETZSCHALTER
Schaltet die Netzstromversorgung für Ihren AC30VR EIN/
AUS.
2. POWER LED
Leuchtet ROT auf, wenn Ihr Verstärker eingeschaltet und
und an eine geeignete Netzversorgung angeschlossen ist.
MASTER
3. GESAMTLAUTSTÄRKE (MASTER VOLUME)
Steuert die Lautstärke, die von der VOX ValveReactor™
Röhrenendstufenverstärkerschaltung des AC30VR
erzeugt wird und dadurch die Gesamtlautstärke, die Ihr
AC30VR über die internen Lautsprecher bzw. über Erweiterungsboxen liefert.
4. REVERB
Regelt den Anteil des Federhalls, der dem direkten Signal
beigemischt wird, um einen leichten Hauch von Reverb
(niedrige Einstellung) bis zum Nachhall einer Konzerthalle
(hohe Einstellung) zu erzeugen. Der eingebaute Federhall
(Spring-Reverb), kann mit dem optionalen VFS2 Fußschalter aktiviert/deaktiviert werden. (Kanal-Reverb)
5. TONE CUT
Diese Schaltung befindet sich in der Endstufe (während
TREBLE und BASS im Vorverstärker wirken). Sie arbeitet
folgendermaßen: Wenn man den Regler nach rechts
dreht, werden die Höhen abgesenkt. Dreht man ihn nach
links, so werden Höhen hinzugefügt.
OVERDRIVE CHANNEL
6. HÖHENREGLER (TREBLE)
Regelt den Anteil der Höhen (TREBLE) im OverdriveKanal.
7. MITTENREGLER (MIDDLE)
Regelt den Anteil der Mitten (MIDDLE) im OverdriveKanal.
8. BASSREGLER (BASS)
Regelt den Anteil der Bässe (BASS) im Overdrive-Kanal.
9. LAUTSTÄRKE-REGELUNG (VOLUME)
Regelt den Grad der Vorverstärkung, der an die ValveReactor-Endstufe gespeist wird. Verwenden Sie diesen
Regler zum Einstellen der Lautstärkeverhältnisse zwischen Overdrive- und Normal-Kanal.
10. KANALWAHL-LED
Leuchtet ROT auf, wenn der Overdrive-Kanal gewählt ist.
11. GAIN REGLER (GAIN)
Regelt den Grad der Verzerrung des Overdrive-Kanals.
Niedrigere Einstellungen produzieren weniger Distortion,
höhere entsprechend mehr Distortion.
18
8
9 10 11 12 13 14
15
16
17
12. OVERDRIVE-STIL-TASTE (STYLE OD1/OD2)
Diese Taste ändert die Distortion-Eigenschaften (STYLE)
des Overdrive-Kanals—OD1 oder OD2.
OD1 ist ein warmer natürlicher „Vintage“ Overdrive-Stil,
ideal für „Blues“ Sounds.
OD2 ist eine härtere, aggressivere Distortion mit höherem
Gain, die besser für „moderne Stilistiken“ geeignet ist.
13. KANALUMSCHALTTASTE
Dieser Knopf dient der Kanalwahl: Nicht gedrückt = NORMAL, gedrückt = OVERDRIVE.
Die Kanalumschaltung am AC30VR ist auch mit dem
optionalen VFS2 Fußschalter möglich (Anschluß über die
Fußschalterbuchse an der Rückseite). Diese Funktion ist
nur aktiv, wenn der Schalter auf dem Bedienpanel
gedrückt ist, also auf der "IN" Position steht. Wenn der
Normalkanal gewählt ist, leuchtet die LED nicht - wenn der
Overdrive-Kanal gewählt ist, leuchtet die LED ROT.
NORMAL CHANNEL
14. HÖHENREGLER (TREBLE)
Regelt den Anteil der Höhen (TREBLE) im Normal-Kanal.
15. BASSREGELUNG (BASS)
Regelt den Anteil der Bässe (BASS) im Normal-Kanal.
16. LAUTSTÄRKEREGELUNG (VOLUME)
Regelt die Lautstärke des Normal Kanals (NORMAL).
Bei niedrigeren Einstellungen ist der Sound unverzerrt,
sauber und hell, bei höheren Einstellungen wird der Sound
voluminöser und wärmer, während er bei der höchsten
Einstellung in eine natürliche Distortion im Vintage-Stil
„aufbricht“. Da verschiedene elektrische Gitarren ganz verschiedene tonale Eigenschaften und Ausgangspegel
haben, hängt es zu einem großen Teil von Ihrer Gitarre ab,
welche Reglereinstellung Sie wählen müssen, um das
gewünschte Ansprechverhalten zu erzielen.
Bitte beachten—damit dieser Regler richtig arbeitet,muss die Verstärker-Kanaleinstellung auf den
Normal-Kanal gestellt sein.
17. INPUT-BUCHSE
Schließen Sie Ihre Gitarre an diese Buchse an.
MERKMALE DES AC15VR BEDIENPANELS
1 2
3
4
5
6
1. HAUPT-NETZSCHALTER
Schaltet die Netzstromversorgung für Ihren AC15VR EIN/
AUS.
2. POWER LED
Leuchtet ROT auf, wenn Ihr Verstärker eingeschaltet und
und an eine geeignete Netzversorgung angeschlossen ist.
MASTER
3. GESAMTLAUTSTÄRKE (MASTER VOLUME)
Steuert die Lautstärke, die von der VOX ValveReactor™
Röhrenendstufenverstärkerschaltung des AC15VR
erzeugt wird und dadurch die Gesamtlautstärke, die Ihr
AC15VR über die internen Lautsprecher bzw. über Erweiterungsboxen liefert.
4. REVERB
Regelt den Anteil des Federhalls, der dem direkten Signal
beigemischt wird, um einen leichten Hauch von Reverb
(niedrige Einstellung) bis zum Nachhall einer Konzerthalle
(hohe Einstellung) zu erzeugen. Der eingebaute Federhall
(Spring-Reverb), kann mit dem optionalen VFS2 Fußschalter aktiviert/deaktiviert werden.
(Kanal-Reverb)
EQ
5. HÖHENREGLER (TREBLE)
Regelt den Anteil der Höhen (TREBLE) im OverdriveKanal.
6. BASSREGELUNG (BASS)
Regelt den Anteil der Bässe (BASS) im Overdrive-Kanal.
OVERDRIVE CHANNEL
7. LAUTSTÄRKE-REGELUNG (VOLUME)
Regelt den Grad der Vorverstärkung, der an die ValveReactor-Endstufe gespeist wird. Verwenden Sie diesen
Regler zum Einstellen der Lautstärkeverhältnisse zwischen Overdrive- und Normal-Kanal.
7
8
9 10 11 12
13
10. OVERDRIVE-STIL-TASTE (STYLE OD1/OD2)
Diese Taste ändert die Distortion-Eigenschaften (STYLE)
des Overdrive-Kanals—OD1 oder OD2.
OD1 ist ein warmer natürlicher „Vintage“ Overdrive-Stil,
ideal für „Blues“ Sounds.
OD2 ist eine härtere, aggressivere Distortion mit höherem
Gain, die besser für „moderne Stilistiken“ geeignet ist.
11. KANALUMSCHALTTASTE
Dieser Knopf dient der Kanalwahl: Nicht gedrückt = NORMAL, gedrückt = OVERDRIVE.
Die Kanalumschaltung am AC15VR ist auch mit dem
optionalen VFS2 Fußschalter möglich (angeschlossen
über die Fußschalterbuchse an der Rückseite). Diese
Funktion ist nur aktiv, wenn der Schalter auf dem Bedienpanel auf "IN" steht. Wenn der Normalkanal gewählt ist,
leuchtet die LED nicht - wenn der Overdrive-Kanal gewählt
ist, leuchtet die LED ROT.
NORMAL CHANNEL
12. LAUTSTÄRKEREGELUNG (VOLUME)
Regelt die Lautstärke des Normal Kanals (NORMAL).
Bei niedrigeren Einstellungen ist der Sound unverzerrt,
sauber und hell, bei höheren Einstellungen wird der Sound
voluminöser und wärmer, während er bei der höchsten
Einstellung in eine natürliche Distortion im Vintage-Stil
„aufbricht“. Da verschiedene elektrische Gitarren ganz verschiedene tonale Eigenschaften und Ausgangspegelhaben, hängt es zu einem großen Teil von Ihrer Gitarre ab,
welche Reglerposition Sie wählen müssen, um das
gewünschte Ansprechverhalten zu erzielen.
Bitte beachten—damit dieser Regler richtig arbeitet, muss die Verstärker-Kanaleinstellung auf den
Normal-Kanal gestellt sein.
13. INPUT-BUCHSE
Schließen Sie Ihre Gitarre an diese Buchse an.
8. KANALWAHL-LED
Leuchtet ROT auf, wenn der Overdrive-Kanal gewählt
ist.
9. GAIN REGLER (GAIN)
Regelt den Grad der Verzerrung des Overdrive-Kanals.
Niedrigere Einstellungen produzieren weniger Distortion,
höhere entsprechend mehr Distortion.
19
MERKMALE AN DER RÜCKSEITE
AC30VR
1
2
3
AC15VR
1
2
3
1. FUSSSCHALTERBUCHSE (FOOTSWITCH)
Schließen Sie den optionalen Fußschalter VFS2 an diese
Buchse an.
3. HAUPT-NETZANSCHLUSS/SICHERUNG
Hier wird der Verstärker mit der notwendigen Netzspannung verbunden.
2. EXTERNE LAUTSPRECHERBUCHSE (EXTERNAL SPEAKER
OUTPUT)
Über diese Buchse können Erweiterungsboxen an Ihren
Verstärker angeschlossen werden.
Diese Buchse trennt den Verstärker vom internen Lautsprecher ab.
Wichtig: Verwenden Sie nur das mit Ihrem Verstärker mitgelieferte Netzkabel oder ein Ersatzteil
mit genau den gleichen Spezifikationen.
Wichtig: Das System funktioniert nur, wenn Sie die
folgenden Punkte beachten.
a) Man kann nur Boxen mit einer Impedanz von 8
Ohm anschließen.
b) Die externe Box muss eine Kapazität von mindestens 30W haben. Boxen, die diese Anforderungen
nicht erfüllen, werden beschädigt.
c) Für die Verbindung der Box benötigen Sie ein
Lautsprecherkabel. Geschirmte, d.h.Gitarrenkabel
eignen sich hierfür nicht.
d) Schalten Sie den Verstärker vor dem Anschließen der Box aus. Bei Nichtbeachtung kann der Verstärker beschädigt werden.
20
Wichtig: Schließen Sie diesen Verstärker nur an
eine geeignete Netzversorgung an, die den Angaben auf dem Typenschild auf der Rückseite des
Verstärkers AC30VR/AC15VR entspricht. IM
ZWEIFELSFALL FRAGEN SIE BEI IHREM FACHHÄNDLER NACH!
TECHNISCHE DATEN
AC30VR
AC15VR
2 Kanal, Gitarrenverstärker mit speziell angefertigten 10Zoll Lautsprechern und Federhall (Spring-Reverb)
30 Watt effektive Ausgangsleistung mit VOX-eigener
Valve-Reactor-Endstufenverstärkertechnologie mit eingebauter 12AX7/ECC83-Röhre (Valve).
2 Kanal, Gitarrenverstärker mit speziell angefertigten 10Zoll Lautsprechern und Federhall (Spring-Reverb)
15 Watt effektive Ausgangsleistung mit VOX-eigener
Valve-Reactor-Endstufenverstärkertechnologie mit eingebauter 12AX7/ECC83-Röhre (Valve).
Abmessungen (B x H x T): 702 x 265 x 556 mm
Abmessungen (B x H x T): 602 x 265 x 456 mm
Gewicht: 23 kg
Gewicht: 16,4 kg
Ausgangsleistung: 30 Watt effektiv an 8 Ohm
Ausgangsleistung: 15 Watt effektiv an 8 Ohm
Lautsprecher: VOX VX12 (12 Zoll, 16 Ohm)
Lautsprecher: VOX VX12 (12 Zoll, 8 Ohm)
Eingänge: Eingangsbuchse, Fußschalterbuchse
Eingänge: Eingangsbuchse, Fußschalterbuchse
Ausgänge: Externe Lautsprecherbuchse
Ausgänge: Externe Lautsprecherbuchse
Optionen: Fußschalter VFS2
Optionen: Fußschalter VFS2
*Änderungen bei technischen Daten bleiben vorbehalten.
21
INSTRUCCIONES DE SEGURIDAD IMPORTANTES
•
•
•
•
•
•
•
•
•
•
•
•
•
•
•
•
•
•
•
•
•
•
Lea todas las instrucciones antes de utilizar el producto.
GUARDE ESTAS INSTRUCCIONES
Cumpla estas instrucciones
No utilice este producto cerca del agua; por ejemplo, cerca de
una bañera, lavabo, lavadero, en un sótano húmedo, o cerca
de una piscina o similar.
Este producto sólo debe ser utilizado en el soporte
recomendado por el fabricante.
Este producto, ya sea solo o en combinación con un
amplificador y auriculares o altavoces puede causar pérdida
auditiva permanente. No lo utilice durante largo tiempo a gran
volumen, o a un volumen que resulte incómodo. Si nota alguna
pérdida de audición, consulte con un especialista.
El producto debe ser colocado en tal forma que no se interfiera
con su adecuada ventilación.
El producto debe ser situado lejos de fuentes de calor, como
radiadores, calefactores u otros aparatos que produzcan calor.
El producto debe ser conectado a una fuente de corriente
eléctrica del tipo descrito en las instrucciones de
funcionamiento o tal como esté marcado en el producto.
El cable de alimentación debe ser desenchufado cuando no se
vaya a utilizar el aparato durante largo tiempo.
Debe ponerse especial cuidado en que no caigan objetos o
líquidos en el interior por las aberturas.
Debe ponerse especial cuidado en que las aberturas de
ventilación estén libres y que haya suficiente espacio de aire
alrededor de la unidad.
El producto debe ser revisado por personal cualificado cuando:
El cable de alimentación o el enchufe se haya dañado, o
Hayan caído objetos o líquidos en el producto, o El producto
haya sido expuesto a la lluvia, o El producto no funcione
normalmente o exhiba un cambio importante de prestaciones,
o El producto se haya caído, o el chasis se haya dañado.
No intente realizar mantenimiento de este producto más que
como se describe en las instrucciones de mantenimiento por
parte del usuario. Todas las demás tareas deben ser llevadas a
cabo por personal cualificado.
Instale este producto cerca de un enchufe y deje el cable de
corriente accesible.
ATENCIÓN—Este producto ha de ser conectado a un enchufe
con toma de tierra.
Use solamente los accesorios y soportes especificados por el
fabricante.
Desenchufe este aparato durante tormentas eléctricas o si no
lo va a utilizar durante un largo periodo.
No instale este equipo en una posición alejada de la toma de
alimentación.
No instale este equipo en un lugar confinado, tal como una caja
o similar.
La presión sonora excesiva de los auriculares y los propios
auriculares pueden causar pérdida de audición.
Use este equipo solamente con el carro, soporte, trípode o
mesa especificado por el fabricante. Si usa un carro tenga
cuidado al moverlo para evitar daños a personas si se cae del
carro.
22
El símbolo del rayo significa que existen voltajes
peligrosos sin aislar en el interior de la unidad,
que pueden ser de magnitud suficiente para
constituir un riesgo de electrocución.
El signo de admiración indica al usuario que
existen instrucciones de funcionamiento y
mantenimiento importantes en el manual que
acompaña al producto.
.
Nota respecto a residuos y deshechos (solo UE)
Cuando aparezca el símbolo del cubo de basura
tachado sobre un producto, su manual de usuario, la
batería, o el embalaje de cualquiera de éstos, significa
que cuando quiere tire dichos artículos a la basura, ha
de hacerlo en acuerdo con la normativa vigente de la
Unión Europea. No debe verter dichos artículos junto
con la basura de casa. Verter este producto de manera
adecuada ayudará a evitar daños a su salud pública y posibles
daños al medioambiente. Cada país tiene una normativa
específica acerca de cómo verter productos potencialmente
tóxicos, por tanto le rogamos que se ponga en contacto con su
oficina o ministerio de medioambiente para más detalles. Si la
batería contiene metales pesados por encima del límite
permitido, habrá un símbolo de un material químico, debajo del
símbolo del cubo de basura tachado.
* Los nombres de empresas, nombres de productos y nombres
de formatos, etc., son marcas registradas de sus respectivos
propietarios.
Bienvenido a VOX
Muchas gracias por añadir el VOX AC15VR/AC30VR a tu equipo de sonido. Ha sido diseñado por el equipo de ingenieros
de VOX en el Reino Unido y construido por nuestra innovadora fábrica. Estamos seguros de que te proporcionará incontables horas de grandes sonidos de guitarra. Para asegurarte una larga y feliz relación con tu amplificador, ten siempre a
mano este manual, y como se suele decir: "sigue las indicaciones"
.
¿Qué es VR?
¿Cómo funciona?
La serie de amplificadores VR está diseñada para ser lo
que nosotros consideramos como la siguiente generación
de amplificadores "híbridos". ¿Y qué significa híbrido? te
preguntarás. Básicamente "híbrido" significa que emplea
una mezcla de tecnologías –en este caso esas tecnologías son válvulas y estado sólido. La sección de preamplificación incorpora transistores para la generación del
sonido, y circuitos integrados (amplificadores operacionales) para manejar la señal que no puede ser controlada
directamente por los transistores, por ejemplo la conmutación de canal. La etapa de potencia emplea una válvula
12AX7 (o lámpara, dependiendo de la jerga que utilices)
en una configuración que VOX denomina Valve Reactor.
Básicamente funciona tomando cada mitad de la válvula
12AX7 (la 12AX7 son realmente dos válvulas en una, concretamente un triodo dual) y configurándola para que funcione como un pequeño amplificador a válvulas. Este circuito proporciona la tonalidad y el carácter del sonido
clásico de válvulas. Obviamente este "mini" amplificador a
válvulas no tiene mucha potencia si se conecta a un
altavoz, por lo que el circuito se conecta a un amplificador
de estado sólido separado, completamente transparente y
que no añade coloración al sonido.
Este amplificador de salida tiene algunos circuitos especiales que alimentan la impedancia del altavoz de vuelta al
amplificador de válvulas para conseguir ese sonido tan
característico.
La tecnología patentada de amplificación Valve Reactor
se emplea en todos los amplificadores Valvetronix. Fue
diseñada originalmente para la multipremiada serie VOX
Valvetronix, y ahora hemos empleado esa misma tecnología y la hemos adaptado para crear los modelos
AC15VR y AC30VR.
¿Y qué significa todo eso
Pensamos que la gama de amplificadores VOX VR
proporciona una calidad de sonido superior (tanto vintage
como actual) que incluye el gran contenido armónico y la
compresión que recuerda a la de los originales VOX AC15
y AC30 fabricados hace más de 50 años, y todavía admirados.
23
Panel frontal del AC30VR y prestaciones
12
3
4
5
6
7
1. CONMUTADOR DE ENCENDIDO
Sirva para encender y apagar el amplificador a la corriente.
2. LED DE ENCENDIDO
Se ilumina en rojo cuando el amplificador está encendido,
y está conectado a la fuente de alimentación.
MASTER
3. VOLUMEN
Controla la cantidad de volumen producida por el circuito
de potencia Valve Reactor del AC30VR, y por tanto el volumen general que el amplificador entrega al altavoz al que
está conectado.
4. REVERB
Controla la cantidad de reverberación digital que se mezcla con la señal directa, desde ajustes leves hasta sala de
conciertos.
La reverb incorporada se puede activar y desactivar con el
pedal interruptor opcional VFS2.
5. CORTE DE TONO
Este circuito está ubicado en el amplificador de potencia,
al contrario que los ajustes de graves y agudos, que están
localizados en el preamplificador. Su función es la contraria a lo que parece. Girándolo en sentido horario se
atenúan las altas frecuencias y en sentido anti-horario se
enfatizan los agudos.
CANAL DE SATURACIÓN
6. AGUDOS
Controla la cantidad de agudos en el canal saturado.
7. MEDIOS
Controla la cantidad de medios en el canal saturado.
8. GRAVES
Controla la cantidad de graves en el canal saturado.
9. VOLUMEN
Controla la cantidad de saturación generada en el preamplificador y enviada a la etapa de potencia Valve reactor.
Úsalo para conseguir la cantidad de saturación deseada,
así como para balancear entre el sonido limpio y el sonido
saturado.
10. LED DE SELECCIÓN DE CANAL
Se ilumina en rojo cuando el canal saturado está seleccionado.
11. GANANCIA
Regula la cantidad de ganancia del preamplificador y por
tanto la cantidad de saturación o distorsión que se genera
en el canal saturado. Al igual que el control de volumen
normal, ajustes bajos producen poca distorsión y ajustes
muy altos producen... ¡mucha distorsión!
24
8
9 10 11 12 13 14
15
16
17
12. BOTÓN DE ESTILO DE SATURACIÓN
Este botón ajusta el estilo del canal saturado.
OD1 es un tono natural y clásico para sonidos tipo “blues”.
OD2 es más agresivo para sonidos más modernos.
13. BOTÓN DE CONMUTACIÓN DE CANAL
Este botón controla si el amplificador está en modo normal
(sin apretar) o en modo saturado (apretado). El AC30VR
también puede conmutar el canal a través del pedal opcional VFS2 (conectado en el panel trasero). Esta función
solamente se puede realizar cuando el botón del panel
frontal está apretado.
Cuando está seleccionado el canal normal, el LED está
apagado, y cuando se selecciona el canal saturado, el
LED se ilumina en rojo.
CANAL NORMAL
14. AGUDOS
Controla la cantidad de agudos en el canal normal.
15. GRAVES
Controla la cantidad de graves en el canal normal.
16. VOLUMEN
Controla el volumen del canal limpio (normal). Ajustes
bajos el sonido es limpio y brillante, ajustes altos es sonido
se hace más cálido y grueso, a tope el sonido se distorsiona de forma natural, al estilo vintage.
Los distintos tipos de guitarra eléctrica tienen diferentes
cualidades tonales y niveles de salida, con lo que tu guitarra tendrá un papel protagonista en la consecución de tu
sonido a través de los controles.
Nota — para que este control este operativo el conmutador de canal del amplificador debe estar en
posición normal.
17. JACK DE ENTRADA
Conecta la guitarra en esta entrada
Panel frontal del AC15VR y prestaciones
1 2
3
4
5
6
1. CONMUTADOR DE ENCENDIDO
Sirva para encender y apagar el AC15VR a la corriente.
2. LED DE ENCENDIDO
Se ilumina en rojo cuando el amplificador está encendido,
y está conectado a la fuente de alimentación.
MASTER
3. VOLUMEN
Controla la cantidad de volumen producida por el circuito
de potencia Valve Reactor del AC15VR, y por tanto el volumen general que el amplificador entrega al altavoz al que
está conectado.
4. REVERB
Controla la cantidad de reverberación digital que se mezcla con la señal directa, desde ajustes leves hasta sala de
conciertos.
La reverb incorporada se puede activar y desactivar con el
pedal interruptor opcional VFS2 (canal y reverb)
ECUALIZADOR
5. AGUDOS
Controla la cantidad de agudos del sonido.
6. GRAVES
Controla la cantidad de graves del sonido.
7
8
9 10 11 12
13
11. BOTÓN DE CONMUTACIÓN DE CANAL
Este botón controla si el amplificador está en modo normal
(sin apretar) o en modo saturado (apretado). El AC15VR
también puede conmutar el canal a través del pedal opcional VFS2 (conectado en el panel trasero). Esta función
solamente se puede realizar cuando el botón del panel
frontal está apretado.
Cuando está seleccionado el canal normal, el LED está
apagado, y cuando se selecciona el canal saturado, el
LED se ilumina en rojo.
CANAL NORMAL
12. VOLUMEN
Controla el volumen del canal limpio (normal). Ajustes
bajos el sonido es limpio y brillante, ajustes altos es sonido
se hace más cálido y grueso, a tope el sonido se distorsiona de forma natural, al estilo vintage.
Los distintos tipos de guitarra eléctrica tienen diferentes
cualidades tonales y niveles de salida, con lo que tu guitarra tendrá un papel protagonista en la consecución de tu
sonido a través de los controles.
Nota — para que este control este operativo el conmutador de canal del amplificador debe estar en
posición normal.
13. JACK DE ENTRADA
Conecta la guitarra en esta entrada.
CANAL DE SATURACIÓN
7. VOLUMEN
Controla la cantidad de saturación generada en el preamplificador y enviada a la etapa de potencia Valve reactor
del AC15VR. Úsalo para conseguir la cantidad de saturación deseada, así como para balancear entre el sonido
limpio y el sonido saturado.
8. LED DE SELECCIÓN DE CANAL
Se ilumina en rojo cuando el canal saturado está seleccionado.
9. GANANCIA
Regula la cantidad de ganancia del preamplificador y por
tanto la cantidad de saturación o distorsión que se genera
en el canal saturado. Al igual que el control de volumen
normal, ajustes bajos producen poca distorsión y ajustes
muy altos producen... ¡mucha distorsión!
10. BOTÓN DE ESTILO DE SATURACIÓN
Este botón ajusta el estilo del canal saturado.
OD1 es un tono natural y clásico para sonidos tipo “blues”.
OD2 es más agresivo para sonidos más modernos.
25
Prestaciones del panel trasero
AC30VR
1
2
3
AC15VR
1
2
1. CONEXIÓN DEL PEDAL
Conecta aquí el pedal conmutador opcional VFS2
2. SALIDA PARA ALTAVOZ EXTERNO
Se puede conectar un recinto de altavoces externo en este
conector. Al conectar un jack en esta entrada se
desconecta el altavoz principal del amplificador.
¡ATENCIÓN! Para asegurar que tu sistema funciona correctamente, debes tener en cuenta lo
siguiente.
a) Conecta exclusivamente recintos de altavoces
cuya impedancia total sea de 8 ohmios.
b) No conectes un altavoz cuya capacidad de
entrada sea inferior a 15 vatios (para el AC15VR) o
30 vatios (para el AC30VR). El altavoz se puede
dañar si no tienes esto en cuenta.
c) Debes usar un cable de altavoz para conectar un
recinto externo. No uses un cable normal de guitarra para conectar el amplificador a un recinto de
altavoces.
d) Debes apagar el amplificador antes de conectar
el cable. Conectar el cable mientras el amplificador
está encendido puede dañarlo.
26
3
3. CONEXIÓN DE CORRIENTE/FUSIBLE
La toma de corriente para el cable de alimentación.
¡ATENCIÓN! Utiliza exclusivamente el cable suministrado con el amplificador o uno de iguales características.
¡ATENCIÓN! Conecta el amplificador exclusivamente a una toma de corriente con el voltaje indicado en el panel trasero del amplificador. SI
TIENES CUALQUIER DUDA CONTACTA CON TU
DISTRIBUIDOR.
Especificaciones
AC30VR
AC15VR
Amplificador de guitarra con dos canales, equipado con
dos altavoces Celestion VX12 de 12 pulgadas y reverb
digital.
30 vatios de potencia RMS y tecnología de amplificación
VOX Valve Reactor con válvula 12AX7/ECC83
Amplificador de guitarra con dos canales, equipado con un
altavoz Celestion VX12 de 12 pulgadas y reverb digital.
15 vatios de potencia RMS y tecnología de amplificación
VOX Valve Reactor con válvula 12AX7/ECC83
• Dimensiones (ancho x profundo x alto):
• Dimensiones (ancho x profundo x alto):
702 x 265 x 556 mm
602 x 265 x 456 mm
• Peso: 23 Kg.
• Peso: 16,4 Kg.
• Potencia de salida: 30 vatios RMS a 8 ohmios
• Potencia de salida: 15 vatios RMS a 8 ohmios
• Altavoces: 2 x 12" 16 ohmios, Celestion VX12 custom
• Altavoz: 1 x 12" 8 ohmios, Celestion VX12 custom
• Entradas: guitarra y pedal
• Entradas: guitarra y pedal
• Salidas: toma para altavoz externo
• Salidas: toma para altavoz externo
• Opciones: pedal interruptor dual VFS2
• Opciones: pedal interruptor dual VFS2
* Las especificaciones están sujetas a cambio sin previo aviso.
27
安全上のご注意
ご使用になる前に必ずお読みください
ここに記載した注意事項は、製品を安全に正しくご使用いただき、あなた
や他の方々への危害や損害を未然に防ぐためのものです。
注意事項は誤った取り扱いで生じる危害や損害の大きさ、または切迫の
程度によって、内容を「警告」、
「注意」の 2 つに分けています。これらは、あ
なたや他の方々の安全や機器の保全に関わる重要な内容ですので、よく
理解した上で必ずお守りください。
マークについて
製品には下記のマークが表示されています。
・ 修理、部品の交換などで、取扱説明書に書かれていること以
外は絶対にしない。
・ 電源コードを無理に曲げたり、発熱する機器に近づけない。
また、電源コードの上に重いものをのせない。
電源コードが破損し、感電や火災の原因になります。
・ 大音量や不快な程度の音量で長時間使用しない。
大音量で長時間使用すると、難聴になる可能性があります。
万一、聴力低下や耳鳴りを感じたら、専門の医師に相談して
ください。
・ 本製品に異物(燃えやすいもの、硬貨、針金など)を入れない。
・ 温度が極端に高い場所(直射日光の当たる場所、暖房機器の
近く、発熱する機器の上など)で使用や保管はしない。
・ 振動の多い場所で使用や保管はしない。
・ ホコリの多い場所で使用や保管はしない。
・ 風呂場、シャワー室で使用や保管はしない。
・ 雨天時の野外のように、湿気の多い場所や水滴のかかる場所
で、使用や保管はしない。
・ 本製品の上に、花瓶のような液体が入ったものを置かない。
・ 本製品に液体をこぼさない。
マークには次のような意味があります。
・ 濡れた手で本製品を使用しない。
このマークは、機器の内部に絶縁されていない「危険な電
注意
圧」が存在し、感電の危険があることを警告しています。
このマークは注意喚起シンボルであり、取扱説明書などに
一般的な注意、警告、危険の説明が記載されていることを
表しています。
火災・感電・人身障害の危険を防止するには
この注意事項を無視した取り扱いをすると、傷害を負う可能性
または物理的損害が発生する可能性があります
・ 正常な通気が妨げられない所に設置して使用する。
・ ラジオ、テレビ、電子機器などから十分に離して使用する。
ラジオやテレビ等に接近して使用すると、本製品が雑音を受
けて誤動作する場合があります。また、ラジオ、テレビ等に
図記号の例
雑音が入ることがあります。
記号は、
注意
(危険、
警告を含む)を示しています。
記号の中には、具体的な注意内容が描かれています。
左の図は
「一般的な注意、
警告、危険」を表しています。
記号は、
禁止
(してはいけないこと)
を示しています。
記号の中には、具体的な注意内容が描かれることがあります。左
の図は「分解禁止」を表しています。
記号は、強制(必ず行うこと)を示しています。
記号の中には、具体的な注意内容が描かれることがあります。左
の図は「電源プラグをコンセントから抜くこと」を表しています。
以下の指示を守ってください
本製品の磁場によってテレビ等の故障の原因になることがあ
ります。
・ 外装のお手入れは、乾いた柔らかい布を使って軽く拭く。
・ 電源コードをコンセントから抜き差しするときは、必ず電源
プラグを持つ。
・ 本製品を使用しないときは、電源プラグをコンセントから抜く。
電源スイッチをオフにしても、製品は完全に電源から切断さ
れていません。
・ 付属の電源コードは他の電気機器で使用しない。
付属の電源コードは本製品専用です。他の機器では使用でき
ません。
警告
この注意事項を無視した取り扱いをすると、
死亡や重傷を負う可能性が予想されます
・ 電源プラグは、必ず AC100V の電源コンセントに差し込む。
・ 電源プラグにほこりが付着している場合は、ほこりを拭き取る。
感電やショートの恐れがあります。
・ 本製品はコンセントの近くに設置し、電源プラグへ容易に手
が届くようにする。
・ 次のような場合には、直ちに電源を切って電源プラグをコン
セントから抜く。
○ 電源コードやプラグが破損したとき
○ 異物が内部に入ったとき
○ 製品に異常や故障が生じたとき
修理が必要なときは、コルグ・サービス・センターへ依頼し
てください。
・ 本製品を分解したり改造したりしない。
・ 他の電気機器の電源コードと一緒にタコ足配線をしない。
本製品の定格消費電力に合ったコンセントに接続してください。
・ スイッチやツマミなどに必要以上の力を加えない。
故障の原因になります。
・ 外装のお手入れに、ベンジンやシンナー系の液体、コンパウ
ンド質、強燃性のポリッシャーを使用しない。
・ 不安定な場所に置かない。
本製品が落下してお客様がけがをしたり、本製品が破損する
恐れがあります。
・ 本製品の上に乗ったり、重いものをのせたりしない。
本製品が落下または損傷してお客様がけがをしたり、本製品
が破損する恐れがあります。
・ 本製品の隙間に指などを入れない。
お客様がけがをしたり、本製品が破損する恐れがあります。
・ 地震時は本製品に近づかない。
・ 本製品に前後方向から無理な力を加えない。
本製品が落下してお客様がけがをしたり、本製品が破損する
恐れがあります。
*すべての製品名および会社名は、各社の商標または登録商標です。
28
VOX にようこそ
このたびは、
VOXハイブリッド・ギター・アンプ AC30VR/AC15VRをお買い上げいただきまして、
まことにありがとうございま
す。
本機はイギリス VOX チームの最高水準の技術で設計され、
VOX が管理する工場によって製造されています。
本機の素晴らしいサウンドを十分にお楽しみください!
なお、本製品を末永くお使いいただくためにも、
この取扱説明書をよくお読みになって正しい方法でご使用ください。また取扱説
明書は、お読みになった後も大切に保管してください。
WHAT IS VR?
AC30VR/AC15VR は、
次世代の「ハイブリッド」ギター・アンプとして設計しました。
「ハイブリッド」とは?
「ハイブリッド」は複数のテクノロジーを混合して利用することを意味します(本機の場合、真空管とソリッド回路です)。
プリ・アンプ部は、
音作りのためのディスクリート・トランジスター回路とチャンネル切り替えなどの信号コントロール用の IC
(オペアンプ)回路で構成されています。
パワー・アンプ部は、12AX7 真空管を使用する VOX で開発した Valve Reactor 回路で構成されています。
Valve Reactor パワー・アンプ技術は、すべての Valvetronix 製品において使われています。
このテクノロジーは元々VOX Valvetronixのために開発され、さまざまなギター・アンプをモデリングすることに成功しました。
そして、その同じテクノロジーを本機へ組み込むために改良し搭載しました。
Valve Reactor について
Valve Reactor 回路は通常プリアンプに使用される 12AX7 をパワー・アンプとして動作させます。
12AX7 はデュアル三極管(ひとつのチューブの中に 3 極管が 2 つ入っている真空管)
です。そのためギター・アンプの多くに見ら
れるプッシュプル回路を1本の真空管で作ることができます。
ただし、この小さな真空管をパワー・アンプとして動作させても、
当
然ながら得られる出力は大変小さいものです。そこで、極めてクリーンに出力だけを大きくするソリッドステートのパワー・アン
プと、動作したスピーカーのインピーダンスの変化を、真空管に反映させることができる特別な回路を接続しています。こうする
ことによって、小さく、入手しやすいもっともポピュラーな真空管 12AX7 だけを使ってオール真空管のアンプと同様のレスポン
ス、あるいはフィールと呼ばれる弾き心地を得ることができる̶これが Valve Reactor 回路です。
29
AC30VR フロント・パネルについて
12
3
4
5
6
7
1. MAINS POWER スイッチ
8
9 10 11 12 13 14
15
16
17
11.CHANNEL GAIN ノブ
アンプの電源スイッチです。
OVERDRIVE チャンネルのプリアンプ・ゲインを調節し、
歪み具
付属の電源ケーブルがアンプとコンセントに差し込まれている
合を調整します。
かを確かめてください。
2. POWER LED
電源がオンのときは、ランプが点灯します。
MASTER
3. VOLUME ノブ
12.STYLE ボタン
OVERDRIVE チャンネル(OD1 または OD2)の歪みのスタイル
を切り替えます。
(
= OD1、
= OD2)
OD1 は、暖かい自然な「ヴィンテージ・タイプ」のオーバー・ドラ
イブ音(「ブルース」を連想させるような)です。
OD2 は、よりハードでアグレッシブな、
ハイ・ゲインのオーバー・
ドライブ音です。
全体的な音量を調節します。
接続した外部のスピーカー・キャビネットも含めて全体的な音量
を制御します。
4. REVERB ノブ
13.CHANNEL SWITCHING ボタン
NORMAL または OVERDRIVE のチャンネルに切り替えます。
(
= NORMAL、
= OVERDRIVE)
内蔵のデジタル・リバーブのミックス量を調整します。
NORMAL チ ャ ン ネ ル を 選 ぶ と、LED は 消 灯 し ま す。OVER-
コンサート・ホールのような深さ
(高いセッティングで)
から、
ご
DRIVE チャンネルを選ぶと、LED は点灯します。
くわずかなリバーブ音をダイレクト音と混ぜ合わすことができ
また、
オプションの VFS2 デュアル・フット・スイッチを接続する
ます。オプションの VFS2 デュアル・フット・スイッチでリバーブ
と、ペダルによってチャンネルを切り替えることもできます。ペ
のオン / オフができます。
ダルを使用するときは、このボタンをオン
(
5. TONE CUT ノブ
)の状態にしてく
ださい。
TREBLE や BASS ノブなどのプリアンプ・セクションとは対照
的に、この回路はパワー・アンプ内にあります。
右に回すと高域成
NORMAL
分が減少し、左に回すと高域成分が多くなります。
14.TREBLE ノブ
NORMAL チャンネルを選択しているときの高音域を調整しま
OVERDRIVE
6. TREBLE ノブ
す。
15.BASS ノブ
OVERDRIVE チャンネルを選択しているときの高音域を調整し
NORMAL チャンネルを選択しているときの低音域を調整しま
ます。
す。
7. MIDDLE ノブ
16.VOLUME ノブ
OVERDRIVE チャンネルを選択しているときの中音域を調整し
NORMAL チャンネルの音量を調節します。
ます。
このノブを下げると、美しいクリーン・サウンドになります。
8. BASS ノブ
OVERDRIVE チャンネルを選択しているときの低音域を調整し
ます。
9. CHANNEL VOLUME ノブ
また、このノブを上げると、太く暖かいサウンドになり、最大にす
ると、ヴィンテージ・スタイルのディストーション・サウンドにな
ります。
接続するエレキ・ギターによって音の品質と出力レベルが異なり
ます。
使用するギターによってボリュームを調整してください。
OVERDRIVE チャンネルの音量を調節します。
必要な音量をセットして、
OVERDRIVE チャンネルと NORMAL
チャンネルの音のバランスを調整してください。
10.CHANNEL SELECT LED
OVERDRIVE チャンネルを選んだときに点灯します。
30
17.INPUT ジャック
ギターを接続します。
質の良いギター(シールド)
・ケーブルを使用することをおすすめ
します。
AC15VR フロント・パネルについて
1 2
3
4
5
6
1. MAINS POWER スイッチ
7
8
9 10 11 12
13
10.STYLE ボタン
アンプの電源スイッチです。
OVERDRIVE チャンネル(OD1 または OD2)の歪みのスタイル
付属の電源ケーブルが、
アンプとコンセントに差し込まれている
を切り替えます。
(
かを確かめてください。
OD1 は、暖かい自然な「ヴィンテージ・タイプ」のオーバー・ドラ
2. POWER LED
電源がオンのときは、ランプが点灯します。
MASTER
3. VOLUME ノブ
全体的な音量を調節します。
= OD1、
= OD2)
イブ音(「ブルース」を連想させるような)です。
OD2 は、
よりハードでアグレッシブな、ハイ・ゲインのオーバー
ドライブ音です。
11.CHANNEL SWITCHING ボタン
NORMAL または OVERDRIVE のチャンネルに切り替えます。
(
= NORMAL、
= OVERDRIVE)
接続した外部のスピーカー・キャビネットも含めて全体的な音量
NORMAL チ ャ ン ネ ル を 選 ぶ と、LED は 消 灯 し ま す。OVER-
を制御します。
DRIVE チャンネルを選ぶと、LED は点灯します。
4. REVERB ノブ
内蔵のデジタル・リバーブのミックス量を調整します。
コンサート・ホールのような深さ
(高いセッティングで)
から、
ご
くわずかなリバーブ音をダイレクト音と混ぜ合すことができま
また、
オプションの VFS2 デュアル・フット・スイッチを接続する
と、ペダルによってチャンネルを切り替えることもできます。ペ
ダルを使用するときは、このボタンをオン
(
)の状態にしてく
ださい。
す。オプションの VFS2 デュアル・フット・スイッチでリバーブの
オン / オフができます。
NORMAL
12.VOLUME ノブ
EQ
NORMAL チャンネルの音量を調節します。
5. TREBLE ノブ
このノブを下げると、美しいクリーン・サウンドが出ます。
高音域を調整します。
6. BASS ノブ
低音域を調整します。
また、このノブを上げると、太く暖かいサウンドになり、最大にす
ると、ヴィンテージ・スタイルのディストーション・サウンドにな
ります。
接続するエレキ・ギターによって音の品質と出力レベルが異なり
ます。
使用するギターによってボリュームを調整してください。
OVERDRIVE
7. VOLUME ノブ
13.INPUT ジャック
OVERDRIVE チャンネルの音量を調節します。
ギターを接続します。
必要な音量をセットして、
OVERDRIVE チャンネルと NORMAL
質の良いギター(シールド)
・ケーブルを使用することをおすすめ
チャンネル音のバランスを調整してください。
します。
8. CHANNEL SELECT LED
OVERDRIVE チャンネルを選んだときに点灯します。
9. GAIN ノブ
OVERDRIVE チャンネルのプリアンプ・ゲインを調節し、歪み具
合を調整します。
31
リアパネルのついて
AC30VR
1
2
3
AC15VR
1
2
1. FOOTSWITCH ジャック
オプションの VFS2 デュアル・フット・スイッチを接続します。
2. EXTERNAL SPEAKER OUTPUT ジャック
8Ω のスピーカー・キャビネットを接続します。
ここにスピーカー・キャビネットを接続すると内蔵スピーカーか
3
電源コードの接続について
感電と機器の損傷を防ぐために、
アース接続を確実に行ってくだ
さい。
接地極付きコンセントに接続する場合
接地極付きコンセントに電源コードのプラグをそのまま差し込
んでください。
らは音が出なくなります。
注意: 最高の演奏のために、下記の事項を守ってご使用いた
だくことを強くおすすめします。
a) 8Ωのインピーダンスのスピーカー・キャビネットをお使
いください。それより低いインピーダンス(例えば4Ω)
は
絶対に使用しないでください。
アンプが壊れる原因とな
ります。
b) ワット数が 30 ワット以下
(AC15VR は 15 ワット以下)
アース端子付きコンセントに接続する場合
電源コードのプラグに、2P-3P 変換器を取り付けます。そして、コ
のスピーカー・キャビネットは使用しないでください。こ
ンセントのアース端子にアース線を接続し、2P-3P 変換器のプラ
の警告を無視した場合、
スピーカーが破損する可能性が
グを差し込みます。
あります。
c) スピーカー・キャビネットとの接続には、
常に質の良いス
ピーカー・ケーブルをご使用ください。ギター(シールド)
ケーブルは決して使用しないでください。
d) ケーブルを接続するときは必ず電源をオフの状態で行っ
てください。
電源をオンのままケーブルを抜き差しする
とアンプが壊れる原因となります。
3. MAINS POWER CONNECTOR/FUSE
電源コードを接続します。
注意:付属の電源コードを接続してください。
注意:必ず 100V コンセントに接続してください。
注意:ア ー ス 接 続 は、コ ン セ ン ト に プ ラ グ を 差 し 込 む 前 に
行ってください。また、アース接続を外すときは、コンセント
からプラグを抜いてから行ってください。
2P-3P 変換器のアース線の U 字端子にカバーが付いている場合
は、カバーをはずして使用してください。
32
仕様
AC30VR
外形寸法(W x D x H):
702 x 265 x 556mm
質量:
23kg
出力:
30 ワット RMS
スピーカー:
VX12 Celestion カスタム 12 インチスピーカー (16Ω) x 2
入力端子:
INPUT ジャック、FOOT SWITCH ジャック
出力端子:
EXTERNAL SPEAKER OUTPUT ジャック
オプション:
VFS2 デュアル・フット・スイッチ
AC15VR
外形寸法(W x D x H):
602 x 265 x 456 mm
質量:
16.4kg
出力:
15 ワット RMS
スピーカー:
VX12 Celestion カスタム 12 インチスピーカー (8Ω) x 1
入力端子:
INPUT ジャック、FOOT SWITCH ジャック
出力端子:
EXTERNAL SPEAKER OUTPUT ジャック
オプション:
VFS2 デュアル・フット・スイッチ
* 仕様および外観は、
改良のため予告無く変更することがあります。
33
34
保証規定(必ずお読みください)
本保証書は、保証期間中に本製品を保証するもので、付属品類(ヘッ
ドホンなど)は保証の対象になりません。保証期間内に本製品が故障
した場合は、保証規定によって無償修理いたします。
アフターサービス
■ 保証書
本製品には、保証書が添付されています。
お買い求めの際に、販売店が所定事項を記入いたしますので、
「お買
1. 本保証書の有効期間はお買い上げ日より 1 ケ年です。
い上げ日」
、
「販売店」等の記入をご確認ください。記入がないものは
2. 次の修理等は保証期間内であっても有料修理となります。
無効となります。
・消耗部品(スピーカー、真空管、電池など)の交換。
なお、保証書は再発行致しませんので、紛失しないように大切に保管
・お取扱い方法が不適当のために生じた故障。
してください。
・天災(火災、浸水等)によって生じた故障。
■ 保証期間
・故障の原因が本製品以外の他の機器にある場合。
・不当な改造、調整、部品交換などにより生じた故障または損傷。
・保証書にお買い上げ日、販売店名が未記入の場合、または字句
が書き替えられている場合。
お買い上げいただいた日より一年間です。
■ 保証期間中の修理
保証規定に基づいて修理いたします。詳しくは保証書をご覧くださ
・本保証書の提示がない場合。
い。
尚、当社が修理した部分が再度故障した場合は、保証期間外であっ
本製品と共に保証書を必ずご持参の上、修理を依頼してください。
ても、修理した日より 3 ケ月以内に限り無償修理いたします。
■ 保証期間経過後の修理
3. 本保証書は日本国内においてのみ有効です。
修理することによって性能が維持できる場合は、お客様のご要望によ
This warranty is valid only in Japan.
り、有料で修理させていただきます。ただし、補修用性能部品(電子
4. お客様が保証期間中に移転された場合でも、保証は引き続きお使
回路などのように機能維持のために必要な部品)の入手が困難な場合
いいただけます。詳しくは、サービス・センターまでお問い合わ
は、修理をお受けすることができませんのでご了承ください。また、
せください。
外装部品(パネルなど)の修理、交換は、類似の代替品を使用するこ
5. 修理、運送費用が製品の価格より高くなることもありますので、
あらかじめサービス・センターへご相談ください。発送にかかる
ともありますので、あらかじめサービス・センターへお問い合わせく
ださい。
■ 修理を依頼される前に
費用は、お客様の負担とさせていただきます。
6. 修理中の代替品、商品の貸し出し等は、いかなる場合においても
故障かな?とお思いになったら、まず取扱説明書をよくお読みのう
え、もう一度ご確認ください。
一切行っておりません。
本製品の故障、または使用上生じたお客様の直接、間接の損傷につき
それでも異常があるときは、サービス・センターへお問い合わせくだ
ましては、弊社はいっさいの責任を負いかねますのでご了承くださ
さい。
い。
■ 修理時のお願い
本保証書は、保証規定により無料修理をお約束するためのもので、こ
れよりお客様の法律上の権利を制限するものではありません。
修理に出す際は、輸送時の損傷等を防ぐため、ご購入されたときの箱
と梱包材をご使用ください。
■ お願い
■ ご質問、ご相談について
1. 保証書に販売年月日等の記入がない場合は無効となります。記入
修理についてのご質問、ご相談は、サービス・センターへお問い合わ
できないときは、お買い上げ年月日を証明できる領収書等と一緒
せください。
に保管してください。
商品のお取り扱いについてのご質問、ご相談は、お客様相談窓口へお
2. 保証書は再発行致しませんので、紛失しないように大切に保管し
てください。
問い合わせください。
お客様相談窓口 TEL 03(5355)5056
●サービス・センター:
〒 168 ー 0073
東京都杉並区下高井戸 1-15-12
保証書
TEL 03(5355)3537
FAX 03(5355)4470
VOX AC30VR / AC15VR
WARNING!
本保証書は、上記の保証規定により無料修理をお約束するもの
This Product is only suitable for sale in Japan. Properly qualified
service is not available for this product if purchased elsewhere.
Any unauthorised modification or removal of original serial number will disqualify this product from warranty protection.
です。
お買い上げ日
年
月
日
(この英文は日本国内で購入された外国人のお客様のための注意事項です)
販売店名
輸入販売元 : KORG Import Division
〒 206-0812 東京都稲城市矢野口 4015-2
http://www.korg.co.jp/KID/
IMPORTANT NOTICE TO CONSUMERS
This product has been manufactured according to strict specifications and voltage requirements
that are applicable in the country in which it is intended that this product should be used. If you
have purchased this product via the internet, through mail order, and/or via a telephone sale,
you must verify that this product is intended to be used in the country in which you reside.
WARNING: Use of this product in any country other than that for which it is intended could be
dangerous and could invalidate the manufacturer´s or distributor´s warranty. Please also retain
your receipt as proof of purchase otherwise your product may be disqualified from the
manufacturer´s or distributor´s warranty.
REMARQUE IMPORTANTE POUR LES CLIENTS
Ce produit a été fabriqué suivant des spécifications sévères et des besoins en tension
applicables dans le pays où ce produit doit être utilisé. Si vous avez acheté ce produit via
l´internet, par vente par correspondance ou/et vente par téléphone, vous devez vérifier que ce
produit est bien utilisable dans le pays où vous résidez.
ATTENTION: L´utilisation de ce produit dans un pays autre que celui pour lequel il a été conçu
peut être dangereuse et annulera la garantie du fabricant ou du distributeur. Conservez bien
votre récépissé qui est la preuve de votre achat, faute de quoi votre produit ne risque de ne
plus être couvert par la garantie du fabricant ou du distributeur.
WICHTIGER HINWEIS FÜR KUNDEN
Dieses Produkt wurde unter strenger Beachtung von Spezifikationen und
Spannungsanforderungen hergestellt, die im Bestimmungsland gelten. Wenn Sie dieses Produkt
über das Internet, per Postversand und/oder mit telefonischer Bestellung gekauft haben, müssen
Sie bestätigen, dass dieses Produkt für Ihr Wohngebiet ausgelegt ist.
WARNUNG: Verwendung dieses Produkts in einem anderen Land als dem, für das es bestimmt ist,
verwendet wird, kann gefährlich sein und die Garantie des Herstellers oder Importeurs hinfällig
lassen werden. Bitte bewahren Sie diese Quittung als Kaufbeleg auf, da andernfalls das Produkt
von der Garantie des Herstellers oder Importeurs ausgeschlossen werden kann.
NOTA IMPORTANTE PARA EL CONSUMIDOR
Este producto ha sido fabricado de acuerdo a estrictas especificaciones y requerimientos de
voltaje aplicables en el país para el cual está destinado. Si ha comprado este producto por
internet, a través de correo, y/o venta telefónica, debe usted verificar que el uso de este
producto está destinado al país en el cual reside.
AVISO: El uso de este producto en un país distinto al cual está destinado podría resultar
peligroso y podría invalidar la garantía del fabricante o distribuidor. Por favor guarde su recibo
como prueba de compra ya que de otro modo el producto puede verse privado de la garantía
del fabricante o distribuidor.
E F G S J 2
© 2009 VOX AMPLIFICATION LTD.