1
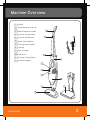
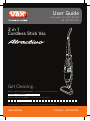
User Guide
Vax Careline: AU: 1300 361 505
NZ: 0800 800 900
2 in 1
Cordless Stick Vac
Get Cleaning...
What’s your Vax’s model number? (Located on the top flap of the packaging)
VST144VL / VST144VPPL
What’s your serial number? (Located on the base of the machine)
Note these down in case you need them in future. Please keep instructions for further use.
vax.com.au
VST144VL / VST144VPPL
Vax Service line: AU: 1300 361 505
NZ: 0800 800 900
Machine Overview
1
Handle
2 On/off button for stick vac
3
1
Release button for handle
4 Hand vac release button
12
2
5 Hand vac on/off button
6 Power light indication
7
Dust cup release button
8 Dust cup
9 Stick-vac body
10 Floor brush
3
11 Charging & Storage base
4
12 AC power adapter
5
6
7
8
9
11
10
vax.com.au
2
General Safety Information
FOR HOUSEHOLD USE ONLY.
18. Keep vacuuming area well lit.
When using the vacuum cleaner, basic safety precautions should
always be observed, including the following:
19. Store the vacuum cleaner in a cool, dry area.
1.
Only use the vacuum cleaner indoors on dry surfaces.
20. Turn off the on/off switch before unplugging the vacuum
cleaner from the charger base.
2. Turn off the vacuum cleaner controls before disconnecting or
connecting from the battery.
3.
Always unplug the vacuum cleaner from the charger base before
connecting or disconnecting the vacuum accessories.
4. Children should be supervised to ensure that they do not play
with the appliance.
5. This appliance is not intended for use by persons (including
children) with reduced physical, sensory or mental capabilities,
or lack of experience and knowledge, unless they have been given
supervision or instruction concerning use of the appliance by
a person responsible for their safety.
6. Use only as described in this manual. Use only Vax
recommended attachments.
7.
Do not use the vacuum cleaner if it has been dropped, damaged,
left outdoors or dropped into water. Do not use the vacuum
cleaner charger with a damaged cord or plug. If the supply cord
is damaged, it must be replaced by the manufacturer, its service
agent or similarly qualified persons in order to avoid a hazard.
8. Do not pull or carry charger by cord. Do not use the cord as a
handle, close a door on the cord or pull cord around sharp edges
or corners. Do not run the vacuum cleaner over the cord. Keep
the cord away from heated surfaces.
9.
Do not handle the plug or vacuum cleaner with wet hands. Do
not use outdoors or on wet surfaces.
10. Do not put any objects into openings. Do not use with any
openings blocked and do not restrict airflow. Keep all openings
free of dust, lint, hair or anything that might reduce airflow.
11. Keep hair, loose clothing, fingers and all parts of the body away
from openings and moving parts.
12. Do not pick up hot ash, coals, cigarette butts, matches or any hot,
smoking or burning objects.
13. Do not pick up flammable or combustible materials (lighter fluid,
petrol, kerosene etc.) or use in the presence of explosive liquids
or vapours.
WARNING: Always switch off and unplug the vacuum
cleaner from the battery charger before assembling, opening
or emptying the dirt container, or before connecting/disconnecting
the attachments.
WARNING: Do not recharge non-rechargable batteries.
WARNING: Indoor Use Only.
CAUTION: The vacuum cleaner is a very powerful unit.
Before plugging in the battery charger make sure the
switch is in the ‘off’ position. Hold the vacuum cleaner
firmly when starting and in use.
IMPORTANT: If the inlet OR floor head is blocked, switch off
the vacuum cleaner and remove the blockage(s) before
re-starting the vacuum cleaner.
IMPORTANT: Cleaning filters improves vacuum performance.
Vax recommends that your filters should be checked and
cleaned periodically. If your filters are washable make sure
they are completely dry before inserting back into the
vacuum cleaner.
This machine is intended for household use only, and NOT
for commercial or industrial use.
PLEASE KEEP THESE INSTRUCTIONS FOR FURTHER USE.
14. Do not vacuum harmful or toxic material (chlorine, bleach,
ammonia, drain cleaner etc.).
15. Do not vacuum hard or sharp objects such as glass, nails,
screws, coins, concrete or plaster dust.
16. Do not use without ALL of the filters in place.
17. Take extra care when vacuuming on stairs.
3
Vax Service line: AU: 1300 361 505
NZ: 0800 800 900
Operation
Vacuum Assembly and Charging
NOTE: Before assembling, please be sure that all parts and accessories are included by reviewing the
‘Machine Overview’ page.
Extend the handle into an upwards
position – it will lock into place.
Place the handheld vacuum onto the Slide the stick vac onto the charger
body of the machine.
base by aligning the slot on the back
of the stick vac to the slot on the
charger base.
Insert the plug adaptor to the power
outlet and then the connection into
the side of the charging base.
For initial battery charge – allow 11
hours. For ongoing product charging
– allow between 8-11 hours
depending on the battery drain.
When charging is complete, the
indicator light will turn green.
The charger indicator lights (on the
side of the charging base) will turn
red to show it is charging.
vax.com.au
4
Operation
To use vacuum as a Stick Vac
Once charging is complete – remove the stick vac from the charging base.
Slide the on/off switch to ‘on’ and
begin cleaning hard floors, carpets
or rugs.
To use vacuum as a Handheld
Remove the handheld unit from the
main body by pressing the two
release buttons on the sides of the
stick vac body.
5
Slide the on/off switch located on
the handheld vacuum to power the
unit. The handheld vacuum has a
built-in crevice tool for convenient
cleaning in hard to reach places
and car interiors.
Vax Service line: AU: 1300 361 505
NZ: 0800 800 900
Operation
Storage
Once vacuuming tasks are complete, return the handheld unit to the main body and place back into the
charging base.
The handle can be folded down for easy storage by pressing the release latch at the front of the cleaner.
Begin the charging process as described on page 4.
vax.com.au
6
Maintenance (Keep your Vax as good as new)
How to empty and clean the dust cup
1. Always operate the vacuum cleaner with the dust cup installed.
2. When the dust cup is full (the
“MAX” mark is reached), press
the dirt cup release button,
then tilt dirt cup down and away
from unit.
3. Remove filter from the center of
the dirt cup, then empty contents
into waste basket.
4. Press dust cup’s front cover
release button to take crevice
nozzle, then clean crevice nozzle
with dry cloth.
When replacing the dust cup’s front cover – angle it to the back first before the top to help for alignment.
You will hear a click when it is in place.
Dust Cup Button
Dust cup front
release button
Dust Tank
Filter Assembly
7
Crevice Nozzle
Vax Service line: AU: 1300 361 505
NZ: 0800 800 900
Maintenance (Keep your Vax as good as new)
Cleaning filter
1. Filter can be rinsed when it becomes visibly solid. We recommend to do this often to avoid the filter from
clogging or damaging the vacuum cleaner.
2. Always operate the cleaner with filter installed.
3. Do not use a washing machine for rinsing filter, do not use a tumble dryer or any other device for drying it.
4. Rinse filter in cool tap water.
5. Allow filter to completely dry before replacing it back into the machine – it is recommended at least 24 hours to dry.
vax.com.au
8
FAQ’s
WARNING: To reduce the risk of personal injury, unplug the vacuum cleaner before performing
maintenance/troubleshooting checks.
Problem
Solution
Is there an accessory missing?
Check the ‘Machine Overview’ page in this guide to make sure the part is definitely included in your unit.
If it is missing, we’re here to help. Simply call us on AU: 1300 361 505 / NZ: 0800 800 900
Why won’t the vacuum cleaner
pick up?
The filters may be clogged: Refer to the Maintenance section.
The Dirt Container is full or blocked: Refer to the Maintenance section.
The Dirt Container may be incorrectly installed.
Why is dust escaping from
the vacuum?
The filters may not be installed correctly.
The Dirt container may be incorrectly installed: Remove the Dirt Container from the unit by
pressing the Dirt Container Release Button and reattach it to the unit, ensuring it is locked firmly
back into place.
The filter may be clogged: Refer to the Maintenance section.
What do I do if an accessory/the
unit becomes damaged or broken?
9
Visit www.vax.com.au for parts and spares.
Please call our Vax careline to purchase new spares or order a replacement:
AU: 1300 361 505 / NZ: 0800 800 900
Vax Service line: AU: 1300 361 505
NZ: 0800 800 900
Other Information
Vax Service & Help
Vax Careline:
Australia
New Zealand
1300 361 505
0800 800 900
Monday-Friday
8.30am to 5.00pm
If you have queries or concerns about using your Vax, call the Vax Careline. Calls are charged at the standard
local rate. Please make a note of the serial number and model number of the vacuum cleaner before calling.
For the nearest Service Agent, please call the Vax Customer Careline or visit vax.com.au
Technical Specification
Vacuum Cleaner
Voltage:
Capacity:
Filters:
14.4V d.c
600ml
Air Inlet: HEPA 10 Mesh filter – washable
Air Outlet: Foam filter – Non-removable
3.7kg
Weight:
Charger
Voltage Input:
220-240V ~50Hz
Voltage Output: 18V d.c at 400mA
Suitable for battery supplied with Vax 2 in 1 Stick Vacuum only VST144VL / VST144VPPL
N197
Double
Insulated
Indoor
Use
Read
Instructions
Battery
Battery Type:
Ni-MH Battery 1800mA
Battery Charge Time: 11 hours initial charge time
8-11 hours on-going charge time
Approx. Run Time:
20 minutes
Subject to technical change without notice.
Waste electrical products should not be disposed of with household waste. Please recycle where
facilities exist. Check with your Local Authority or retailer for recycling advice.
vax.com.au
10
Distributed by Techtronic Industries Pty. Ltd.
Level 1, 660 Doncaster Road, Doncaster, Australia 3108.
www.vax.com.au Service Line: AU: 1300 361 505 / NZ: 0800 800 900