1
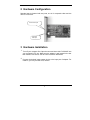
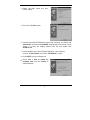
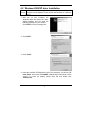
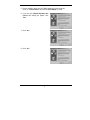
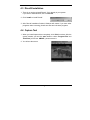
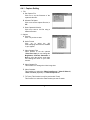
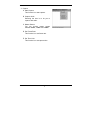
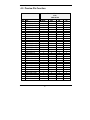
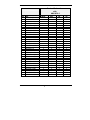
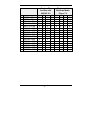
User’s Manual For PV-CX881P DOC NO: 54-0881P-01 02/01/21 Rev.A FCC Requirement This device has been certified to comply with the limits for a Class B computing device pursuant to Subpart J of Part 15 of the FCC Rules. See instructions if interference to radio reception is suspected. WARNING: This equipment generates and uses radio frequency energy and, if not installed or used properly, that is, in strict accordance with the manufacturer's instructions, may cause interference to radio or television reception. It has been tested and found to comply with the limits for a Class B compliant device in accordance with the specifications in Subpart J of Part 15 of FCC Rules, which are designed to provide reasonable protection against such interference in a residential installation. However, there is no guarantee that interference-will not occur in a particular installation. If this equipment does cause interference to radio or television reception, which can be determined by turning the equipment off and on, the user is encouraged to try to correct the interference by one or more of the following measures: ˙ ˙ ˙ ˙ Reorient the receiving antenna Relocate the computer away from the receiver Move the computer away from the receiver Plug the computer into a different outlet so that the computer and the receiver are on different branch circuits ˙ Ensure that the card's mounting screws, attachment connector screws, and ground wires are tightly secured ˙ Ensure that slot covers are installed in all unused slots If necessary, consult your dealer, service representative, or an experienced radio/television Technician for additional suggestions. The manufacturer is not responsible for any radio or TV interference caused by unauthorized modifications to this equipment. It is the responsibility of the user to correct such interference. The user may find the following booklet prepared by the Federal Communications Commission helpful: How to Identify and Resolve Radio-TV Interference Problems. This booklet is available from the Government Printing Office, Washington, D.C. 20402, Stock No. 004-000-00345-4. NOTE: CAUTION: You must use shielded interface cables with a ferrite bead in order to maintain compliance with the limits for a Class B device. CHANGES OR MODIFICATIONS NOT EXPRESSLY APPROVED BY THE PARTY RESPONSIBLE FOR COMPLIANCE COULD VOID THE USER'S AUTHORITY TO OPERATE THE EQUIPMENT I Notice The information in this document is subject to change in order to improve reliability, design, or function without prior notice and does not represent a commitment on the part of this company. In no event will we be liable for direct, indirect, special, incidental, or consequential damages arising out of the use or the inability to use the product or documentation, even if advised of the possibility of such damages. No part of this reference manual may be reproduced or transmitted in any form or by any means without the prior written permission of this company. 2002 Trademark Acknowledgements All brand names and trademarks are the property of their owners. Limited Warranty Our company warrants this product against defects in materials and workmanship for a period of one (1) year from the date of purchase. During the warranty period, a product determined by us to be defective in form or function will be repaired or at our option, to be replaced at no charge. This warranty does not apply if the product has been damaged by accident, abuse, misuse, or as a result of service or modification other than by us. This warranty is in lieu of any other warranty expressed or implied. In no event shall we be held liable for incidental or consequential damages, such as lost revenue or lost business opportunities arising from the purchase of a this product. II TABLE OF CONTENTS 1 Feature .........................................................................................................1 2 Hardware Configuration .............................................................................2 3 Hardware Installation..................................................................................2 4 Software Installation ...................................................................................3 4.1 Windows 98SE/ME driver Installation ......................................................... 3 4.2 Windows 2000/XP driver Installation........................................................... 5 4.3 DirectX Installation....................................................................................... 7 4.4 Capture Tool ................................................................................................. 7 4.5 Preview Pin Function.................................................................................. 10 4.6 Capture Pin Function and Playback ............................................................ 13 5 FAQ .............................................................................................................16 III 1 Feature □ Supports NTSC/PAL/SECAM video decoding. □ Zero wait state PCI burst writes. □ Multiple YCrCb and RGB pixel formats supported on output. □ Multiple composite and S-Video inputs. □ Supports planner YUV data format. □ VBI data capture for closed caption data decoding. □ Only support Windows 98SE / WindowsME / Winsows2000/ WindowsXP □ Fully PCI Rev 2.1 compliant. 1 2 Hardware Configuration Standard type is featured with two ports, one is for composite video and the other is for S-Video. S-Video video input Composite video input 3 Hardware Installation 1. Turn off your computer first. Open the case and insert this PV-CX881P into your computer’s PCI slot. Make sure the adapter is well seated in the slot then fasten it with screws. Put the outer case back afterwards. 2. Connect the desired image output device to the input port of adapter. For instance, you may connect VCR, camera. 2 4 Software Installation 4.1 Windows 98SE/ME driver Installation After hardware installation, power on your computer, and then system Notice will detect a new hardware. Please set the new hardware to “Unknown Device”. 1. After turn on your computer, the Windows 98SE/ME will detect the newly added hardware and will show the following message on your monitor. Click ‘NEXT’ on every message box. 2. The operating system will automatically detect the TV card as a new device and display the Add New Hardware Wizard dialog box. Click-on the ‘Next’ button to continue. 3. The next dialog box will ask how would you like to install the driver. Click-on ‘Search for the best driver for your device. (Recommended)’ option and Click-on the ‘Next’ button to continue. 3 4. Please DO NOT select any item, chick-on “Next”. 5. Click-on the “Finish” button. 6. Insert the AutoRun CD-ROM driver (wait a few seconds). You will see ‘TV Card Series’ and choose ‘PV-CX881P’ window that will be shown on the screen. If it does not display, please brow CD and double click ‘AutoRun.exe’. 7. Put the AutoRun driver into CD-ROM (waiting for a few seconds). Click on ‘TV Card Series’ and choose ‘PV-CX881P’ to install. 8. Click ‘NEXT’ on every message box. 9. Chose ‘Yes, I want to restart my computer now’ and click ‘Finish’ to restart Windows. 4 4.2 Windows 2000/XP driver Installation After hardware installation, power on your computer, and then system Notice will detect a new hardware. Please set the new hardware to “Unknown Device”. 1. After turn on your computer, the Windows 2000 will detect the newly added hardware and will show the following message on your monitor. Click ‘NEXT’ on every message box. 2. Click ‘NEXT’. 3. Click ‘Finish’. 4. Insert the AutoRun CD-ROM driver (wait a few seconds). You will see ‘TV Card Series’ and choose ‘PV-CX881P’ window that will be shown on the screen. If it does not display, please brow CD and double click ‘AutoRun.exe’. 5 5. Put the AutoRun driver into CD-ROM (waiting for a few seconds). Click on ‘TV Card Series’ and choose ‘PV-CX881P’ to install. 6. If you see any ‘Digital Signature Not Found’ this dialog box please click ‘Yes’. 7. Click ‘Yes’. 8. Click ‘Yes’. 6 4.3 DirectX Installation 1. There is no need to reinstall DirectX, if it is already in your system. If you want to install DirectX, click-on ‘DirectX’. 2. Click ‘Install’ to install DirectX. 3. After DirectX installation finished, Windows will restart. If you have other programs under executing, please save files and exit those programs. 4.4 Capture Tool 1. When you install capture driver completely, click ‘finish’ to reboot. After the system restarts, you can click ‘start’ button to choice ‘Program Files’ and ‘PixelView’ you will see ‘AMCAP’, please execute it. 2. You will see the screen. 7 4.4.1 Capture Setting 1. File A. Set Capture File Click–on to set the filename of the captured video file. B. Allocate File Space Click–on to set the capture file size, in MB. C. Save Captured Video As Click–on to save a .AVI file using a different filename. 2. Options A. Preview Click –on preview to start. B. Audio Format Click –on to select the .AVI audio-sampling format that is installed in your system. C. Video Capture Filter Video decode to set the optional ‘Video Proc Amp’ you can change the Brightness, Contrast, Saturation or Hue by using the various scroll bars and viewing the effect on your video monitor. D. Video Capture Pin This function is to change the video image size. E. Video Crossbar This function is to select the ‘Video Input Source’: ‘Video S-Video In’, ‘Video TV Tuner (Optional)’ or ‘Video Composite In’. F. TV Tuner (This function is only for product with Tuner) This function is to select the channel what you want to watch. 8 3. Capture A. Start Capture This function is to start capture. B. Capture Audio Selecting the item is to let you to capture with audio. C. Master Stream You can choose master stream between ‘None’, ‘Video’ and ‘Audio’. D. Set Frame Rate This function is to set frame rate. E. Set Time Limit This function is to set capture time. 9 4.5 Preview Pin Function Preview Pin function with AMCAP 8.0 NO Item 1 2 RGB555 80 x 60 RGB555 88 x 72 RGB555 128 x 96 RGB555 160 x 120 RGB555 176 x 144 RGB555 240 x 176 RGB555 240 x 180 RGB555 320 x 240 RGB555 352 x 240 RGB555 352 x 288 RGB555 640 x 240 RGB555 640 x 288 RGB555 640 x 480 RGB555 720 x 240 RGB555 720 x 288 RGB555 720 x 480 RGB24 80 x 60 RGB24 88 x 72 RGB24 128 x 96 RGB24 160 x 120 RGB24 176 x 144 RGB24 240 x 176 RGB24 240 x 180 RGB24 320 x 240 RGB24 352 x 240 RGB24 352 x 288 RGB24 640 x 240 RGB24 640 x 288 RGB24 640 x 480 RGB24 720 x 240 RGB24 720 x 288 RGB24 720 x 480 98SE ME 2K XP V V V V V V V V V V V V V V V V V V V V V V V V V V V V V V V V V V V V V V V V V V V V V V V V V V V V V V V V V V V V V V V V V V V V V V V V V V V V V V V V V V V V V V V V V V V V V V V V V V V V V V V V V V V V V V V V V V V V V V V V V V V V V V V V 10 NO Item 3 4 YVU9 80 x 60 YVU9 88 x 72 YVU9 128 x 96 YVU9 160 x 120 YVU9 176 x 144 YVU9 240 x 176 YVU9 240 x 180 YVU9 320 x 240 YVU9 352 x 240 YVU9 352 x 288 YVU9 640 x 240 YVU9 640 x 288 YVU9 640 x 480 YVU9 720 x 240 YVU9 720 x 288 YVU9 720 x 480 YUY2 80 x 60 YUY2 88 x 72 YUY2 128 x 96 YUY2 160 x 120 YUY2 176 x 144 YUY2 240 x 176 YUY2 240 x 180 YUY2 320 x 240 YUY2 352 x 240 YUY2 352 x 288 YUY2 640 x 240 YUY2 640 x 288 YUY2 640 x 480 YUY2 720 x 240 YUY2 720 x 288 YUY2 720 x 480 Preview Pin function with AMCAP 8.0 98SE ME 2K V V V V V V V V V V V V V V V V 11 V V V V V V V V V V V V V V V V V V V V V V V V V V V V V V V V XP V V V V V V V V V V V V V V V V V V V V V V V V V V V V V V V V NO Item 5 I420 80 x 60 I420 88 x 72 I420 128 x 96 I420 160 x 120 I420 176 x 144 I420 240 x 176 I420 240 x 180 I420 320 x 240 I420 352 x 240 I420 352 x 288 I420 640 x 240 I420 640 x 288 I420 640 x 480 I420 720 x 240 I420 720 x 288 I420 720 x 480 Preview Pin function with AMCAP 8.0 98SE ME 2K XP V V V V V V V V V V V V V V V V V V V V V V V V V V V V V V V V V V V V V V V V V V V V 12 4.6 Capture Pin Function and Playback Capture Pin function with AMCAP 8.0 NO Item 1 RGB555 80 x 60 RGB555 88 x 72 RGB555 128 x 96 RGB555 160 x 120 RGB555 176 x 144 RGB555 240 x 176 RGB555 240 x 180 RGB555 320 x 240 RGB555 352 x 240 RGB555 352 x 288 RGB555 640 x 240 RGB555 640 x 288 RGB555 640 x 480 RGB555 720 x 240 RGB555 720 x 288 RGB555 720 x 480 2 RGB24 80 x 60 RGB24 88 x 72 RGB24 128 x 96 RGB24 160 x 120 RGB24 176 x 144 RGB24 240 x 176 RGB24 240 x 180 RGB24 320 x 240 RGB24 352 x 240 RGB24 352 x 288 RGB24 640 x 240 RGB24 640 x 288 RGB24 640 x 480 RGB24 720 x 240 RGB24 720 x 288 RGB24 720 x 480 98SE ME V V V V V V V V V V V V V V V V V V Playback with Windows Media Player 7.0 2K V V V V V V V V V XP V V V V V V V V V 98SE V V V V V V V V V ME V V V V V V V V V 2K V V V V V V V V V XP V V V V V V V V V V V V V V V V V V V V V V V V V V V V V V V V V V V V V V V V V V V V V V V V V V V V V V V V V V V V V V V V V V V V V V V V V V V V V V V V V V V V V V V V V V V V V V V V V V V V V V V V V V V V V V V V V 13 Capture Pin function with AMCAP 8.0 NO Item 3 YVU9 80 x 60 YVU9 88 x 72 YVU9 128 x 96 YVU9 160 x 120 YVU9 176 x 144 YVU9 240 x 176 YVU9 240 x 180 YVU9 320 x 240 YVU9 352 x 240 YVU9 352 x 288 YVU9 640 x 240 YVU9 640 x 288 YVU9 640 x 480 YVU9 720 x 240 YVU9 720 x 288 YVU9 720 x 480 4 YUY2 80 x 60 YUY2 88 x 72 YUY2 128 x 96 YUY2 160 x 120 YUY2 176 x 144 YUY2 240 x 176 YUY2 240 x 180 YUY2 320 x 240 YUY2 352 x 240 YUY2 352 x 288 YUY2 640 x 240 YUY2 640 x 288 YUY2 640 x 480 YUY2 720 x 240 YUY2 720 x 288 YUY2 720 x 480 98SE ME V V V V V V V V V V V V V V V V V V 2K V V V V V V V V V XP V V V V V V V V V Playback with Windows Media Player 7.0 98SE ME 2K XP V V V V V V V V V V V V V V V V V V V V V V V V V V V V V V V V V V V V V V V V V V V V V V V V V V V V V V V V V V V V V V V V V V V V V V V V V V V V V V V V V V V V V V V V V V V V V V V V V V V V V V V V V V V 14 Capture Pin function with AMCAP 8.0 NO Item 5 I420 80 x 60 I420 88 x 72 I420 128 x 96 I420 160 x 120 I420 176 x 144 I420 240 x 176 I420 240 x 180 I420 320 x 240 I420 352 x 240 I420 352 x 288 I420 640 x 240 I420 640 x 288 I420 640 x 480 I420 720 x 240 I420 720 x 288 I420 720 x 480 98SE ME Playback with Windows Media Player 7.0 2K XP 98SE ME 2K XP V V V V V V V V V V V V V V V V V V V V V V V V V V V V V V V V V V V V V V V V V V V V V V V V V V V V V V V V V V V V V V V V V V V V V V V V V V V V V V V V 15 5 FAQ Q: What VGA card could be used to run PV-CX881P? A: The VGA card spec requested for PV-CX881P is as following: 1. Linear frame buffer 2. Hardware cursor 3. Graphics mode support 640x480/hi-color Q: Why the video picture motion is slowly when I capture or see at preview mode? A: That is normal, because the signal is via CPU and memory to display. Q: How to enable audio function. A: 1. Double-click ‘speaker’. 2. Click ‘properties ’ of ‘Options’. 3. Enable ‘Line-in’ of ‘Playback’. Q: The system will hang up when I launch application program on my motherboard (all in one motherboard). A: Please change the slot of capture card far away CPU slot. It caused by resource of motherboard. As we know, the resource of slot that near CPU is the same with other device that on board of motherboard. (sound card, modem, VGA...) 16