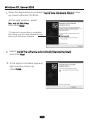
1
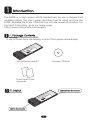
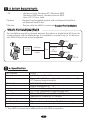
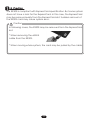
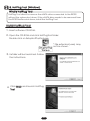
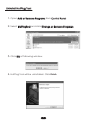
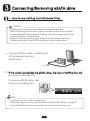
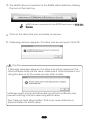
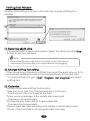
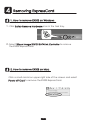
eSATA ExpressCard/34
EX30S
User's Guide
Mar. / 2007 Rev 1.2
ᵰᵟᵲ
ᵭᵡ
ᴾᵱ
ᵧᶌᶒ
ᶋᶑᵊᴾ
ᶗᶑᶒᶃ
ᵿᶒᶇᶍ
㪼
ᵱᵣ
ᵰᵧᵟ
ᶃ
ᶌᵿᶊ
0S
3
X
E
ᶃᶐᶌ
ᵪ
ᵟᵲᵟ ᶀᵍᶑ
ᵑᴾᵥ
㪘㩷
㪪㪘㪫
㪜㫏㫇
㫉㪼㫊
㫉㪻
㫊㪚㪸
ᵧᶌᶑᶃ
㪆㪊㪋
ᶐᶒ
Contents
1
Introduction
-1. Package Contents
-2. Layout
-3. System Requirements
-4. Specifications
-5. Caution
***2
***2
***2
***3
***3
***4
2
Setup
-1. Installation on Windows System
-2. To Verify Driver Installation (Windows)
-3. Hot-plug tool (Windows)
-4. Installation on Mac system
***5
***5
***7
***8
* * *10
3
Connecting/Removing eSATA drive
-1. Windows
-2. Mac
* * *11
* * *11
* * *15
4
Removing ExpressCard
-1. How to remove EX30S on Windows
-2. How to remove EX30S on Mac
* * *16
* * *16
* * *16
5
Registration & Tech-Support
-1. Registration
-2. Tech-Support
* * *17
* * *17
* * *17
6
Appendix
* * *18
1
1
Introduction
The EX30S is a high speed eSATA ExpressCard for use in ExpressCard
enabled system. This user's guide describes how to install and use the
EX30S. ReadMe file in the CD-ROM may include newer information. For
the latest information, go to our home page.
http://www.ratocsystems.com/english.
1
-1. Package Contents
If any of these items are missing, contact the supplier immediately.
ᶊ
ᶐᶒ
ᶒᶇᶍᶌᵿ
0S
EX3
ᵧᶌᶑᶃ
ᶃᶐᶌᵿ
ᴾᵧᶌᶒ
ᶋᶑᵊ
ᶗᶑᶒᶃ
ᵡᴾᵱ
㪊㪋
㪻㪆
㪚㪸㫉
㫉㪼㫊㫊
㩷㪜㫏㫇
ᵰᵟᵲᵭ
㪫㪘
㪼㪪㪘
ᵱᵣ
ᵰᵧᵟᵪ
ᶃ
ᵟ ᶀᵍᶑ
ᵟᵲᵑᴾᵥ
eSATA ExpressCard/34
Software CD-ROM
Quick Install Guide
Appendix
1
-2. Layout
ExpressCard Connector
ᶊ
ᶒᶇᶍᶌᵿ
㪊㪋
㪸㫉㪻㪆
㫊㫊㪚
㫏㫇㫉㪼
㪫㪘㩷㪜
㪼㪪㪘
0S
EX3
ᶃᶐᶌᵿ
ᴾᵧᶌᶒ
ᶋᶑᵊ
ᶗᶑᶒᶃ
ᵡᴾᵱ
ᵰᵟᵲᵭ
ᵱᵣ
ᵰᵧᵟᵪ
ᶃ
ᵟ ᶀᵍᶑ
ᵟᵲᵑᴾᵥ
eSATA Connector
2
ᶐᶒ
ᵧᶌᶑᶃ
1
-3. System Requirements
* OS
:
* System
:
* Device
:
Windows Vista, Windows XP, Windows 2000,
Windows 2000 Server, Windows Server 2003
Mac OS X 10.4 or later
ExpressCard-enabled system with an ExpressCard/34 or
an ExpressCard/54 slot
Device with an eSATA connector(Support
Support Port Multiplier)
What's Port Multiplier(PM)?
Port multipliers are silicon-based devices that allow a single Serial ATA port to
communicate with multiple drives. It is possible to connect up to 15 drives to
one SATA PM port via a port multiplier.
HD1
?
SATAII
HOST
3.0Gbps
PM
Only one
cable
3.0Gbps
or
1.5Gbps
.......
HD2
HD14
HD15
1
-4. Specification
Part number
Product name
Bus interface
SATA Controller
Connector
Transfer rate
Voltage
Power Consumption
Dimensions
Weight
Bundled software
Warranty
EX30S
eSATA ExpressCard/34
ExpressCard/34(ExpressCard Standard Release 1.0)
PCI Express-based module
SiI3132 (SATA II Compliant)
eSATA connector x 1 *1
3.0Gbps/1.5Gbps (theoretical number)
DC +3.3V (Supplied by ExpressCard slot)
520mA (TYP) Standby: 380mA (TYP)
34mm(W) x 100mm(L) x 11mm(H)
24.5g
Driver software, Hot-plug utility(Windows only)
1 Year
*1 The eSATA connector is different from the SATA connector.
3
1
-5. Caution
The EX30S is compliant with ExpressCard specification. But some system
does not have a lock for the ExpressCard. In this case, the ExpressCard
may be removed easily from the ExpressCard slot. Sudden removal of
the EX30S card may cause system error.
Caution
In following cases, the EX30S may be removed from the ExpressCard
slot.
* When removing the eSATA
cable from the EX30S.
* When moving whole system, the card may be pulled by the cable.
4
2
Setup
Refer to 2-3, for the installation on Mac system.
2 -1. Installation on Windows system
1. Power on and start the system.
2. Put the ExpressCard in the ExpressCard slot.
The EX30S works on both
ExpressCard/34 slot and
ExpressCard/54 slot.
Note
Insert the card while the system is powered
Caution
Be careful that the card is not removed from the slot while setup
process.
5
Windows XP, Server 2003
1. When the ExpressCard is inserted, Found New Hardware Wizard shows
up. Insert software CD-ROM.
At the right window, select
No, not at this time
time,
then click Next.
Next
* If internet connection is available,
the driver can be downloaded from
Microsoft Windows Update.
automatically(Recommended)
2. Select Install the software automatically(Recommended),
and click Next
Next.
3. If the driver is installed properly,
right window shows up.
Click Finish.
Finish
6
2
-2. To Verify Driver Installation
1. Open Device Manager. (To open the Device Manager, go to Start Right click My Computer - Properties - Hardware - Device Manager)
2. On the device manager, double click on SCSI and RAID controllers.
3132 SATALink Controller is registered
Make sure if Silicon Image SiI
SiI3132
properly.
If Silicon Image Si
3132 SATA
SiI3132
Link Controller is shown without
yellow ! point, the driver is installed
properly.
7
2
-3. HotPlug Tool (Windows)
What's HotPlug Tool
HotPlug Tool allows to remove the eSATA drive connected to the EX30S
without the system shut down. If the eSATA drive needs to be removed from
the EX30S before shut down, install the HotPlug Tool.
Install HotPlug Tool
1. Insert software CD-ROM.
2. Open the CD-ROM and click HotPlugTool folder.
Double click on SetupHotPlugTool.exe.
* File extension(.exe) may
not be shown.
3. Installer will be launched. Follow
the instructions.
4. Click Finish and launch HotPlug
Tool
Tool.
8
Uninstall HotPlug Tool
Panel
1. Open Add or Remove Programs from Control Panel.
Programs
2. Select HotPlugTool and click Change or Remove Programs.
3. Click OK at following window.
4. HotPlug Tool will be uninstalled. Click Finish.
9
2 -4. Installation on Mac System
1. Insert software CD-ROM. Double click on SiI3132_1.1.6u_Sil_Pkg and
follow the instructions.
2. Restart the system and insert the EX30S to ExpressCard slot.
3. Card icon will be shown on the Apple menu bar.
10
3
3
Connecting/Removing eSATA drive
-1. How to use HotPlug Tool (Windows Only)
Caution
* HotPlug tool can not be used for removing ExpressCard.
* When removing eSATA drive, follow the instructions in this chapter.
Removing eSATA drive without HotPlug Tool may cause data loss or
physical defect of eSATA drive.
* ExpressCard may be removed easily from the ExpressCard slot.
Sudden removal of the EX30S card may cause system error.
1. Connect eSATA cable to eSATA port
of the ExpressCard and
eSATA drive.
eSATA cable
2. If the system recognizes the eSATA drive, the icon of HotPlug Tool will
be shown in the task tray.
To remove eSATA drive, click
the icon of HotPlug Tool.
Note
* HotPlug Tool runs in the background.
* If the icon does not show up, install the HotPlug Tool. Refer to page 8.
* If an eSATA drive is not connected, the icon does not show up.
11
3. The eSATA drives connected to the EX30S will be listed by clicking
the icon in the task tray.
eSATA drives connected to the EX30S are shown as SCSI Disk
Device.
Device
4. Click on the drive that you would like to remove.
5. If following window appears. The drive can be removed. Click OK.
Caution
If following message appears. the drive can not be removed. The
other software may use the drive. Make sure if other software is not
using the drive or try the same process after a while.
Software which scans hard drives like an anti virus software may
prevent HotPlug Tool from removing eSATA drive.
Don't remove hard drive forcibly. That may cause data loss or
physical defect of eSATA drive.
12
6. Unplug the eSATA cable.
Note
Unplugging the cable from
the drive is recommended.
The EX30S may be
removed easily from
the ExpressCard slot.
Caution
Unplugging the eSATA cable from the eSATA drive is highly
recommended.
ExpressCard may be removed easily
from the ExpressCard slot.
Be careful that the ExpressCard card
will not be removed by pulling the
eSATA cable. Sudden removal of the
EX30S card may cause system error.
13
HotPlug Tool Window
Double click HotPlug Tool icon in the task tray to open HotPlug Tool
window.
[1]
[2]
[3]
[1] Removing eSATA drive
Connected eSATA drives will be listed. Select the drive and click Stop
button to remove the drive.
Note
Drive set as Dynamic disk will not be listed, even if the drive is
connected. Dynamic disk is not supported by hot plugging.
[2] Change HotPlug Tool setting
If the check box is checked, HotPlug Tool runs in the pack ground. If it is
unchecked, HotPlug Tool will not run automatically at the next start.
* To start HotPlug Tool, go to Start - Program - Hot plug tool and select
HotPlug Tool.
[3] Customize
You can customize HotPlug Tool function.
* Hide icon from Task Tray, if removable disk is not found.
If unchecked, the icon shows all the time.
* Show warning message, if the system disk is removed.
Checked is recommended.
* Enumerate only basic disk as a removable disk.
Checked is recommended.
* Rescan hard disk after resuming from stanby or hibernation mode.
Check, If the hard disk is not recognize after resuming.
14
3
-2. Connecting/Removing eSATA drive on Mac
1. Connect eSATA cable to eSATA port of the ExpressCard and
eSATA drive.
eSATA cable
2. If the drive is formatted properly, drive will be mounted.
3. On Mac system, software is not necessary to remove eSATA drive.
Just trash the icon of the eSATA drive (Drag and drop the icon to
trash) before unplugging eSATA cable.
4. Remove the eSATA cable carefully.
Note
Unplugging the cable form
the drive is recommended.
The EX30S may be
removed easily from
the ExpressCard slot.
15
4
4
Removing ExpressCard
-1. How to remove EX30S on Windows
1. Click Safely Remove Hardware icon in the task tray.
2. Select Silicon Image SiI3132 SATALink Controller to remove
the EX30S ExpressCard.
4
-2. How to remove EX30S on Mac
Click a small card icon upper right side of the screen and select
Power off Card to remove the EX30S ExpressCard.
16
5
Registration & Tech-support
Registration
We highly recommend to register the product through our on-line
registration.
http://www.ratocsystems.com/english/
Software Update and Support
The latest software is subject to change for improvement or bug fix.
You can download the latest version from our web site.
http://www.ratocsystems.com/english/
Technical Support
If you have any question, please feel free to contact to our tech-support:
Open 9:30AM-5:00PM(PST) Mon-Fri(except holidays)
RATOC Systems International, Inc. Tech support
Address: 2000 Wyatt drive
Suite 9
Santa Clara, CA 95054
TEL: 408-986-9040 FAX: 408-986-9042
E-mail: http://www.ratocsystems.com/english/contact/support.html
17
6
Appendix
Trademarks
-Windows is a registered trademark of Microsoft Corporation.
-MacOS, PowerMacintosh, PowerBook and Mac logo are registered
trademarks of Apple Computer, Inc.
-Other brand and product names may be registered trademarks or
trademarks of their respective holders.
Regulatory Agency Notice FCC Compliance Statement This equipment
has been tested and found to comply with the limits for a Class B digital
device, pursuant to Part 15 of the FCC Rules. These limits are designed to
provide reasonable protection against harmful interference in a residential
installation. This equipment generates, uses and can radiate radio
frequency energy and, if not installed and used in accordance with the
instructions, may cause harmful interference to radio communications.
However, there is no guarantee that interference will not occur in a
particular installation. If this equipment does cause harmful interference
to radio or television reception, which can be determined by turning
the equipment off and on, the user is encouraged to try to correct the
interference by one or more of the following measures:
(1) Reorient or relocate the receiving antenna.
(2) Increase the separation between the equipment and receiver.
(3) Connect the equipment into an outlet on a circuit different from that
to which the receiver is connected.
(4) Consult the dealer or an experienced radio/TV technician for help.
Changes or modifications not expressly approved by the party responsible
for compliance may result in this unit not complying with FCC Rules Part 15.
18
http://www.ratocsystems.com/
C
RATOC Systems, Inc. All rights reserved.