1
s5000/ s6000
STEREO DIGITAL SAMPLER
Software version V1.21
WARNING
To prevent fire or shock hazard, do not
expose this appliance to rain or moisture.
Operator’s Manual
Important Notice
The material in this document is copyright to AKAI professional M.I. Corp., and may not be
quoted or reproduced in any form without written permission from the company.
LIMITED SOFTWARE WARRANTY POLICY
All the software provided with, or purchased especially for, AKAI professional products has
been tested for functionality. AKAI professional M.I. Corp. will make its best efforts to correct
reported software defects for future releases subject to technical practicabilities.
AKAI professional M.I. Corp. makes no warranty or representation either expressed or
implied with respect to the system's performance or fitness for a particular purpose.
In no event will AKAI professional M.I. Corp. be liable for direct or indirect damages arising
from any defect in the software or its documentation. Further, AKAI professional M.I. Corp.
will not accept any liability for any programs, sounds, audio recording or sequences stored in
or used with AKAI professional products, including the cost of recovery of such data.
The warranties, remedies and disclaimers above are exclusive and take precedence over all
others, oral or written, express or implied, to the extent permitted by law in the geographical
area of the product's use. No employee of AKAI professional M.I. Corp., agent, distributor or
employee of an agent or distributor is authorised to offer any variation from this policy.
WARNING!!
To prevent fire or shock hazard, do not expose this appliance to rain or moisture.
1-En
CAUTION
RISK OF ELECTRIC SHOCK
DO NOT OPEN
CAUTION: TO REDUCE THE RISK OF ELECTRIC SHOCK
DO NOT REMOVE COVER (OR BACK).
NO USER-SERVICEABLE PARTS INSIDE.
REFER SERVICING TO QUALIFIED SERVICE PERSONNEL.
THE SYMBOLS ARE RULED BY UL STANDARDS (U.S.A.)
The lightning flash with arrowhead symbol , within an equilateral triangle, is
intended to alert the user to the presence of uninsulated “dangerous voltage”
within the product’s enclosure; that may be of sufficient magnitude to
constitute a risk of electric shock to persons.
The exclamation point within an equilateral triangle is intented to alert the user
to the presence of important operating and maintenance (servicing) instructions in the literature accompanying the appliance.
5B-En
Lithium battery
This product uses a lithium battery for memory backup.
The lithium battery should only be replaced by qualified service personnel.
Improper handling may cause risk of explosion.
24A-En
09/22/2000 Rev.4
s5000/ s6000
WARNING
WARNING: WHEN USING ELECTRIC PRODUCTS, BASIC PRECAUTIONS SHOULD ALWAYS
BE FOLLOWED, INCLUDING THE FOLLOWING:
WARNING
The S5000/S6000 is designed to be used in a standard household environment.
Power requirements for electrical equipment vary from area to area. Please ensure that your S5000/
S6000 meets the power requirements in your area. If in doubt, consult a qualified electrician or AKAI
professional dealer.
120 VAC
@ 60 Hz for USA and Canada
220~240 VAC
@ 50 Hz for Europe
240 VAC
@ 50 Hz for Australia
PROTECTING YOURSELF AND THE S5000/S6000
• Never touch the AC plug with wet hands.
•
Always disconnect the S5000/S6000 from the power supply by pulling on the plug, not the
cord.
•
Allow only an AKAI professional dealer or qualified professional engineer to repair or reassemble
the S5000/S6000. Apart from voiding the warranty, unauthorized engineers might touch live
internal parts and receive a serious electrical shock. There are no serviceable parts inside.
•
Do not put, or allow anyone to put any object, especially metal objects, into the S5000/S6000.
•
Use only a household AC power supply. Never use a DC power supply.
•
If water or any other liquid is spilled into or onto the S5000/S6000, disconnect the power, and
call your dealer.
•
Make sure that the unit is well-ventilated, and away from direct sunlight.
•
To avoid damage to internal circuitry, as well as the external finish, keep the S5000/S6000
away from sources of direct heat (stoves, radiators, etc.).
•
Avoid using aerosol insecticides, etc. near the S5000/S6000. They may damage the surface,
and may ignite.
•
Do not use denatured alcohol, thinner or similar chemicals to clean the S5000/S6000. They will
damage the finish.
•
Modification of this equipment is dangerous, and can result in the functions of the S5000/
S6000 being impaired. Never attempt to modify the equipment in any way.
•
Make sure that the S5000/S6000 is always well-supported when in use (either in a speciallydesigned equipment rack, or on a firm level surface).
•
When installing the S5000/S6000 in a 19” rack system, always allow 1U of ventilated free
space above it to allow for cooling. Make sure that the back of the rack is unobstructed to allow
a clear airflow.
•
In order to assure optimum performance of your S5000/S6000, select the setup location carefully,
and make sure the equipment is used properly. Avoid setting up the S5000/S6000 in the following
locations:
1.
2.
3.
4.
5.
Version 1.21
In a humid or dusty environment
In a room with poor ventilation
On a surface which is not horizontal
Inside a vehicle such as a car, where it will be subject to vibration
In an extremely hot or cold environment
i
s5000/ s6000
WARNING
WARNING
THIS APPARATUS MUST BE EARTHED
IMPORTANT
This equipment is fitted with an approved non-rewireable UK mains plug.
To change the fuse in this type of plug proceed as follows:
1) Remove the fuse cover and old fuse.
2) Fit a new fuse which should be a BS1362 5 Amp A.S.T.A or BSI approved type.
3) Refit the fuse cover.
If the AC mains plug fitted to the lead supplied with this equipment is not suitable for your type of
AC outlet sockets, it should be changed to an AC mains lead, complete with moulded plug, to the
appropriate type. If this is not possible, the plug should be cut off and a correct one fitted to suit the
AC outlet. This should be fused at 5 Amps.
If a plug without a fuse is used, the fuse at the distribution board should NOT BE GREATER than
5 Amp.
PLEASE NOTE:
THE SEVERED PLUG MUST BE DESTROYED TO AVOID A POSSIBLE
SHOCK HAZARD SHOULD IT BE INSERTED INTO A 13 AMP SOCKET
ELSEWHERE.
The wires in this mains lead are coloured in accordance with the following code:
GREEN and YELLOW
— Earth
BLUE
— Neutral
BROWN
— Live
As the colours of the wires in the mains lead of this apparatus may not correspond with the coloured
markings identifying the terminals in your plug, please proceed as follows:
The wire which is coloured GREEN and YELLOW must be connected to the terminal which is
marked with the letter E or with the safety earth symbol
or coloured GREEN or coloured
GREEN and YELLOW.
The wire which is coloured BLUE must be connected to the terminal which is marked with the
letter N or coloured BLACK.
The wire which is coloured BROWN must be connected to the terminal which is marked
with the etter L or coloured RED.
THIS APPARATUS MUST BE EARTHED
Ensure that all the terminals are securely tightened and no loose strands of wire exist.
Before replacing the plug cover, make certain the cord grip is clamped over the outer sheath of the
lead and not simply over the wires.
6D-En
ii
Version 1.21
s5000/ s6000
WARNING
FCC WARNING
This equipment has been tested and found to comply with the limits for a Class B digital device
pursuant to Part 15 of the FCC rules. These limits are designed to provide reasonable protection
against harmful interference in a residential installation. This equipment generates, uses, and
can radiate radio frequency energy and, if not installed and used in accordance with the
instructions, may cause harmful interference to radio communications. However, there is no
guarantee that interference will not occur in a particular installation. If this equipment does
cause harmful interference to radio or television reception, which can be determined by turning
the equipment off and on, the user is encouraged to try to correct the interference by one or
more of the following measures:
•
Reorient or relocate the receiving antenna.
•
Increase the separation between the equipment and receiver.
•
Connect the equipment into an outlet on a circuit different from that to which the receiver is
connected.
•
Consult the dealer or an experienced radio/TV technician for help.
21B-En
AVIS POUR LES ACHETEURS CANADIENS DU S5000/S6000
Le présent appareil numérique n’ément pas de bruits radioélectriques dépassant les limites
applicables aux appareils numériques de la Class B prescrites dans le Règlement sur le
brouillage radioélectrique édicté par le ministère des Communications du Canada.
27-F
This digital apparatus does not exceed the Class B limits for radio noise emissions from digital
apparatus set out in the Radio Interference Regulations of the Canadian Department of
Communications.
27-En
VENTILATION
Do not prevent the unit’s ventilation, especially by placing the unit on the soft carpet, in a
narrow space, or by placing objects on the unit’s chassis—top, side, or rear panels. Always
keep the unit’s chassis at least 10 centimeters from any other objects.
31C-En
CHANGES OR MODIFICATIONS NOT EXPRESSLY APPROVED BY THE MANUFACTURER
FOR COMPLIANCE COULD VOID THE USER’S AUTHORITY TO OPERATE THE
EQUIPMENT.
32-En
COPYRIGHT NOTICE
The AKAI S5000/S6000 is a computer-based device, and as such contains and uses software in
ROMs. This software, and all related documentation, including this Operator’s Manual, contain
proprietary information which is protected by copyright laws. All rights are reserved. No part of
the software or its documentation may be copied, transferred or modified. You may not modify,
adapt, translate, lease, distribute, resell for profit or create derivative works based on the software
and its related documentation or any part there of without prior written consent from AKAI
professional M.I. Corp., Yokohama, Japan.
Version 1.21
iii
WARNING
s5000/ s6000
WARRANTY
AKAI professional M.I. Corp. warrants its products, when purchased from an authorized “AKAI professional”
dealer, to be free from defects in materials and workmanship for a period of 12 (twelve) months from the date
of purchase. Warranty service is effective and available to the original purchase only, and only on completion
and return of the AKAI professional Warranty Registration Card within 14 days of purchase.
Warranty coverage is valid for factory-authorized updates to AKAI professional instruments and their software,
when their installation is performed by an authorized AKAI professional Service Center, and a properly
completed Warranty Registration has been returned to your “AKAI professional” dealer.
To obtain service under this warranty, the product must, on discovery of the detect, be properly packed and
shipped to the nearest AKAI professional Service Center. The party requesting warranty service must provide
proof of original ownership and date of purchase of the product.
If the warranty is valid, AKAI professional will, without charge for parts or labor, either repair or replace the
defective part(s). Without a valid warranty, the entire cost of the repair (parts and labor) is the responsibility of
the product’s owner.
AKAI professional warrants that it will make all necessary adjustments, repairs and replacements at no cost
to the original owner within 12 (twelve) months of the purchase date if:
1)
The product fails to perform its specified functions due to failure of one or more of its components.
2)
The product fails to perform its specified functions due to defects in workmanship.
3)
The product has been maintained and operated by the owner in strict accordance with the written
instructions for proper maintenance and use as specified in this Operator’s Manual.
Before purchase and use, owners should determine the suitability of the product for their intended use, and
owner assumes all risk and liability whatsoever in connection therewith. AKAI professional shall not be liable
for any injury, loss or damage, direct or consequential, arising out of use, or inability to use the product.
The warranty provides only those benefits specified, and does not cover defects or repairs needed as a result
of acts beyond the control of AKAI professional, including but not limited to:
1)
Damage caused by abuse, accident, negligence. AKAI professional will not cover under warranty any
original factory disk damaged or destroyed as a result of the owner’s mishandling.
2)
Damage caused by any tampering, alteration or modification of the product: operating software,
mechanical or electronic components.
3)
Damage caused by failure to maintain and operate the product in strict accordance with the written
instructions for proper maintenance and use as specified in this Operator’s Manual.
4)
Damage caused by repairs or attempted repairs by unauthorized persons.
5)
Damage caused by fire, smoke, falling objects, water or other liquids, or natural events such as rain,
floods, earthquakes, lightning, tornadoes, storms, etc.
6)
Damage caused by operation on improper voltages.
IMPORTANT NOTE:
This warranty becomes void if the product or its software is
electronically modified, altered or tampered with in any way.
AKAI professional shall not be liable for costs involved in packing or preparing the product for shipping, with
regard to time, labor, or materials, shipping or freight costs, or time or expense involved in transporting the
product to and from AKAI professional Authorized Service Center or Authorized Dealer.
AKAI professional will not cover under warranty an apparent malfunction that is determined to be user error,
or owner’s inability to use the product.
THE DURATION OF ANY OTHER WARRANTIES, WHETHER IMPLIED OR EXPRESS, INCLUDING BUT
NOT LIMITED TO THE IMPLIED CONDITION OF MERCHANTABILITY, IS LIMITED TO THE DURATION
OF THE EXPRESS WARRANTY HEREIN.
AKAI professional hereby excludes incidental or consequential damages, including but not limited to:
1) Loss of time.
iv
2)
Inconvenience
3)
Delay in performance of the Warranty.
4)
The loss of use of the product.
5)
Commercial loss.
6)
Breach of any express or implied warranty, including the Implied Warranty of Merchant-ability, applicable
to this product
Version 1.21
s5000/ s6000
WARNING
CONTENTS
INTRODUCTION ............................................................................................................... 1
WELCOME ............................................................................................................................ 1
KEY FEATURES .................................................................................................................... 1
USER INTERFACE ................................................................................................................ 3
ABOUT THIS MANUAL .......................................................................................................... 3
S6000 FRONT PANEL ........................................................................................................... 5
MAIN PANEL .............................................................................................................. 5
REMOVABLE PANEL (S6000 ONLY) ......................................................................... 5
REMOVING THE PANEL (S6000 ONLY) ................................................................... 7
REMOVABLE PANEL CABLE LENGTH ..................................................................... 7
S6000 REAR PANEL ............................................................................................................. 8
S5000 FRONT PANEL ......................................................................................................... 10
S5000 REAR PANEL ............................................................................................................11
CONNECTING THE S6000 ..................................................................................................11
MOUNTING THE S6000 ...................................................................................................... 12
SWITCHING THE S6000 ON ............................................................................................... 13
KEY CONVENTIONS ........................................................................................................... 15
POP-UP WINDOWS ............................................................................................................ 18
TOOLS MENUS ................................................................................................................... 20
NUMERIC KEYPAD ............................................................................................................. 21
CURSOR KEYS ................................................................................................................... 21
NAMING ............................................................................................................................... 21
MARK/JUMP KEYS ............................................................................................................. 22
USER KEYS (S6000 ONLY) ................................................................................................ 22
STRUCTURE/TERMINOLOGY ....................................................................................... 23
S6000 STRUCTURE ........................................................................................................... 23
VOICE ARCHITECTURE ..................................................................................................... 26
ASSIGNABLE PROGRAM MODULATION (APM) ............................................................... 27
LOAD ............................................................................................................................... 29
LOAD FOLDER .................................................................................................................... 30
LOADING MULTIS ............................................................................................................... 31
LOADING PROGRAMS ....................................................................................................... 31
LOADING SAMPLES ........................................................................................................... 32
AUTOLOAD ......................................................................................................................... 33
GET INFO ............................................................................................................................ 33
OPEN/CLOSE FOLDER ...................................................................................................... 34
AUDITION SAMPLE ............................................................................................................ 34
SELECTING DISKS ............................................................................................................. 35
DISK TOOLS ........................................................................................................................ 36
DISK INFO ................................................................................................................ 36
CLEAR MEMORY ..................................................................................................... 36
VIEW ITEMS ............................................................................................................. 36
MULTI .............................................................................................................................. 37
SELECTING PARTS ............................................................................................................ 40
CREATING A MULTI ............................................................................................................ 42
ASSIGNING PROGRAMS TO PARTS ................................................................................. 43
EDITING PARTS .................................................................................................................. 44
WINDOW FUNCTIONS ....................................................................................................... 47
PART LEVEL WINDOW ............................................................................................ 47
OUTPUT WINDOW .................................................................................................. 47
EFFECTS SEND WINDOW ...................................................................................... 48
FINE TUNE WINDOW .............................................................................................. 49
EDIT PART ........................................................................................................................... 50
MULTI TOOLS ..................................................................................................................... 51
GET INFO ................................................................................................................. 51
QUICKLOAD ............................................................................................................. 52
QUICKSAVE ............................................................................................................. 53
MULTI LIST ............................................................................................................... 55
Version 1.21
v
WARNING
s5000/ s6000
SELECTING MULTIS REMOTELY VIA MIDI .......................................................................
PART TOOLS MENU ...........................................................................................................
PROGRAM LIST .......................................................................................................
QUICKLOAD .............................................................................................................
QUICKSAVE .............................................................................................................
USING MULTIS ....................................................................................................................
USING MULTI MODE TO PLAY SINGLE PROGRAMS ...........................................
USING MULTI MODE TO PLAY LAYERED PROGRAMS ........................................
USING MULTI MODE TO PLAY KEYSPLITS ...........................................................
USING MULTI MODE MULTI-TIMBRALLY ...............................................................
PLAYING LIVE OVER A SEQUENCED BACKING TRACK .....................................
USING THE S6000 AS TWO SAMPLERS ...............................................................
58
59
59
69
75
75
76
76
77
77
78
78
EDIT PROGRAM ............................................................................................................. 80
EDIT PROGRAM ................................................................................................................. 80
EDIT PART ........................................................................................................................... 80
OUTPUT .............................................................................................................................. 82
MIDI/TUNE ........................................................................................................................... 86
EDIT USER ............................................................................................................... 87
PITCHBEND ........................................................................................................................ 88
LFOS .................................................................................................................................... 89
LFO 2 ........................................................................................................................ 91
KEYGROUP ......................................................................................................................... 95
SELECTING KEYGROUPS ................................................................................................. 97
KEYGROUP ZONES ........................................................................................................... 98
ZONE LEVEL WINDOW ......................................................................................... 101
PAN/BALANCE WINDOW ...................................................................................... 101
FINE TUNE WINDOW ............................................................................................ 102
PLAYBACK WINDOW ............................................................................................ 103
SELECTING AND EDITING ZONES ...................................................................... 104
KEYSPAN .......................................................................................................................... 105
KEYGROUP CROSSFADE ................................................................................................ 106
KG PITCH/AMP ................................................................................................................. 107
FILTER ............................................................................................................................... 108
AMP ENVELOPE ............................................................................................................... 122
AMP ENVELOPE WINDOW FUNCTIONS ............................................................. 123
FILTER ENVELOPE ........................................................................................................... 124
AUX ENVELOPE ............................................................................................................... 125
AUX ENVELOPE WINDOWS ................................................................................. 126
CREATING PROGRAMS ................................................................................................... 127
CREATING (COPYING) KEYGROUPS ............................................................................. 127
PROG TOOLS MENU ........................................................................................................ 128
GET INFO ............................................................................................................... 128
PROGRAM LIST ..................................................................................................... 129
QUICKLOAD ........................................................................................................... 140
QUICKSAVE ........................................................................................................... 140
EDIT SAMPLE ............................................................................................................... 141
EDIT SAMPLE ...................................................................................................................
MONITOR ..........................................................................................................................
MASTER ............................................................................................................................
TRIM ..................................................................................................................................
CHOP .................................................................................................................................
LOOP .................................................................................................................................
SETTING A GOOD LOOP .................................................................................................
JOIN ...................................................................................................................................
MIX .....................................................................................................................................
FADE UP/DOWN ...............................................................................................................
TIMESTRETCH ..................................................................................................................
PITCH SHIFT .....................................................................................................................
BPM MATCH ......................................................................................................................
RE-SAMPLE ......................................................................................................................
EQ ......................................................................................................................................
vi
141
141
142
145
148
151
155
157
160
162
163
167
168
169
170
Version 1.21
s5000/ s6000
WARNING
SAMPLE TOOLS ............................................................................................................... 171
GET INFO ............................................................................................................... 171
QUICKLOAD ........................................................................................................... 172
QUICKSAVE ........................................................................................................... 172
W/FORM ................................................................................................................. 173
SAMPLE LIST ......................................................................................................... 175
STEREO AND MONO SAMPLES ...................................................................................... 177
RECORD ....................................................................................................................... 178
RECORD ............................................................................................................................ 178
SETTING RECORD LEVELS ............................................................................................
NAMING RECORDINGS ...................................................................................................
MAKING A RECORDING ...................................................................................................
OVERWRITING AN EXISTING SAMPLE ..........................................................................
RE-RECORDING THE SAMPLER’S OUTPUTS ...............................................................
RECORD ERROR MESSAGES ........................................................................................
180
180
181
183
184
185
FX .................................................................................................................................................. 186
FX ....................................................................................................................................... 186
RING MOD/DISTORTION .................................................................................................. 192
EQ ...................................................................................................................................... 193
EQ TEMPLATES .................................................................................................... 194
EQ MODULATION .................................................................................................. 195
MODULATION EFFECTS .................................................................................................. 196
CHORUS ................................................................................................................ 196
FLANGE ................................................................................................................. 196
PHASE .................................................................................................................... 197
ROTARY SPEAKERS ............................................................................................. 198
FREQ/AMP MOD .................................................................................................... 200
PITCH SHIFT .......................................................................................................... 201
PITCH+FEEDBACK ............................................................................................... 202
MODULATION EFFECTS TEMPLATES ................................................................. 203
DELAY FX .......................................................................................................................... 204
MONO LEFT ........................................................................................................... 204
MONO L/R .............................................................................................................. 205
XOVER L+R ........................................................................................................... 206
STEREO DELAY .................................................................................................... 206
DELAY EFFECTS TEMPLATES ............................................................................. 206
REVERB EFFECTS ........................................................................................................... 207
OUTPUT MIX (MULTIFX1 AND 2 ONLY) .......................................................................... 210
EFFECTS TOOLS .............................................................................................................. 212
COPYING EFFECTS ......................................................................................................... 213
SAVE ............................................................................................................................................. 216
SAVE .................................................................................................................................. 216
NOTES REGARDING SAVE .............................................................................................. 218
UTILITIES ...................................................................................................................... 219
UTILITIES .......................................................................................................................... 219
SYSTEM SETUP ............................................................................................................... 219
SET CLOCK ....................................................................................................................... 221
PREFERENCES ................................................................................................................ 222
MIDI SETUP ....................................................................................................................... 223
MIDI FILTER ........................................................................................................... 224
FX IN/OUTS ....................................................................................................................... 225
DISK UTILS ........................................................................................................................ 226
RENAMING ITEMS ON DISK ................................................................................. 226
DELETING ITEMS FROM DISK ............................................................................. 227
FORMATTING DISKS ............................................................................................ 228
UNLOCK DISK ....................................................................................................... 232
MEMORY TEST ................................................................................................................. 233
SHOW HARDWARE .......................................................................................................... 234
SET PLAY KEY .................................................................................................................. 235
Version 1.21
vii
s5000/ s6000
WARNING
TEST TONE .......................................................................................................................
SAVE O/S TO FLASHROM ................................................................................................
SAVE O/S TO FLOPPY DISK ............................................................................................
LOADING OPERATING SYSTEMS ...................................................................................
235
236
238
239
VIRTUAL SAMPLES ..................................................................................................... 242
VIRTUAL SAMPLES .......................................................................................................... 242
TO PLAY BACKING TRACKS ................................................................................ 242
FOR ‘SPINNING IN’ ................................................................................................ 242
FOR MASTERING .................................................................................................. 242
HOW DOES IT WORK? ..................................................................................................... 243
RECORDING VIRTUAL SAMPLES ................................................................................... 245
LOADING VIRTUAL SAMPLES ......................................................................................... 247
CONVERTING SAMPLE TYPES ....................................................................................... 248
EDITING VIRTUAL SAMPLES .......................................................................................... 249
WORKING WITH VIRTUAL SAMPLES IN A PROGRAM .................................................. 249
SPECIFICATIONS ......................................................................................................... 250
SPECIFICATIONS ............................................................................................................. 250
APPENDICES
APPENDIX A ................................................................................................................. 251
MIDI CONTROLLER LIST ................................................................................................. 251
S5000/S6000 MIDI IMPLEMENTATION CHART ............................................................... 252
APPENDIX B ................................................................................................................. 253
NOTES ON USING HARD DISK DRIVES .........................................................................
SCSI CABLES ....................................................................................................................
TERMINATION ...................................................................................................................
SCSI IDs ............................................................................................................................
SCSI CABLE LENGTH ......................................................................................................
253
253
253
254
254
APPENDIX C ................................................................................................................. 253
TRANSFERRING DATA BETWEEN THE S6000 AND A PC .............................................
TRANSFERRING DATA BETWEEN THE S6000 AND A MAC ..........................................
USING WINDOWS 95 ON THE MAC ................................................................................
SHARING DISKS BETWEEN AN S6000 AND A MAC/PC ................................................
255
257
260
261
APPENDIX D ................................................................................................................. 253
CONNECTING THE SAMPLER TO A MAC/PC VIA SCSI ................................................. 262
APPENDIX E ................................................................................................................. 265
SOUND LIBRARY COMPATIBILITY .................................................................................. 265
APPENDIX F ................................................................................................................. 265
INSTALLING EXTRA MEMORY (To Service Technicians) ................................................. 268
NOTES ON BUYING MEMORY ........................................................................................ 269
APPENDIX G ................................................................................................................. 271
WHAT IS SAMPLING? ....................................................................................................... 271
INDEX ............................................................................................................................ 277
viii
Version 1.21
s5000/ s6000
INTRODUCTION
INTRODUCTION
WELCOME
Congratulations on purchasing your new Akai sampler. The S5000 and S6000 represent the next
generation of Akai’s already industry standard samplers with brand new technology, a unique and
innovative new user interface and new functionality. Some of it’s key features are:
•
Unique removable panel allows you to place the S6000 functionality away from the rack and
into your work area.
•
128-voice polyphony on the S6000
S5000.
•
Expandable to 256Mbytes using SIMMs.
•
16 outputs configurable as 8 x stereo pairs or 16 individual mono outs (S5000 has 8 outputs
expandable to 16).
•
Optional ADAT™ digital audio interface giving 16 digital outputs
•
320 x 240 backlit LCD.
•
44.1kHz/48kHz sampling frequencies.
•
18-bit stereo ADCs with 64 x oversampling 5th order Delta Sigma
•
20-bit DACs with 128 x oversampling Delta Sigma with 8 x digital filter on all outputs.
•
SPDIF or AES/EBU digital I/O on balanced jacks or optical.
•
EB20 4-channel 20-bit multi-effects processor (optional on S5000).
•
PS2 QWERTY keyboard input for easy naming.
•
2 x MIDI IN/OUT/THRU for 32-channel multitimbral operation.
•
2 x SCSI ports for easy connection to disk drives.
•
Wordclock input allows you to easily integrate the S5000 and S6000 into an all-digital
environment.
•
Flash ROM programmable operating system.
•
.WAV sample format allows access to a huge range of sounds from PCs or the Internet.
•
DOS disk format allows connection of the sampler’s disk drive to PCs.
•
Icon based operating system and GUI (graphical user interface).
•
Virtual Sample function allows you to play long samples direct from disk within a program for
easy integration of disk recordings in a multi timbral environment.
1
Version 1.21
1
and 64-voice polyphony (expandable to 128) on the
Some S6000 configurations in the USA may differ. Please consult your dealer for information.
1
INTRODUCTION
s5000/ s6000
•
26 powerful resonant filter types.
•
2 x Low Frequency Oscillators (LFOs) each offering 9 control waveforms.
•
2 x hardware ADSR envelope generators allow ultra fast and accurate shaping of sounds.
•
A multi-stage auxiliary envelope can be used to create more complex envelope shapes.
•
Assignable Program Modulation allows you to route the LFOs, envelope generators, MIDI
controllers, etc., to up to 17 different destinations - you can even route controllers to controllers!
•
Stereo phase coherent timestretch sample processing.
•
New off-line stereo pitch shift and BPM matching sample editing algorithms.
•
3-band off-line digital EQ.
•
New QUICKLOAD functions allow you to get sounds into the sampler quickly and easily.
•
Icon based DISK system makes navigation simple. Sounds are stored in folders and folders
can contain further sub-folders for efficient organisation of sound library.
•
Responds to channel or polyphonic aftertouch.
•
Compatible with S1000 and S3000 series samplers2
And much, much more....
2
2
Due to the radical new developments in the S5000 and S6000, some old sound library
may need ‘tweaking’.
Version 1.21
s5000/ s6000
INTRODUCTION
USER INTERFACE
Perhaps the most physically obvious feature of the S6000 is its large LCD and 16 soft keys giving
rise to a unique new user interface.
Using what we at AKAI professional affectionately call “Touch and Tweak”, parameter access is
usually just one button press away - simply touch the key alongside the parameter you wish to
change and tweak its value with the DATA wheel! Not only does this make operation fast, simple
and intuitive but in most circumstances, completely eliminates the need for awkward cursor
movement. It also has the directness of a touch screen but with the reliability and tactile feedback
of physical switches.
The user interface also makes much use of graphics and icons and pop-up windows and prompts
are used throughout making the user experience more like that of a Mac™ or Windows™ computer.
ABOUT THIS MANUAL
This operator’s manual has been written to allow you to get the best out of your new sampler.
Please take the time to read it to gain a full understanding of its features, functions and operations.
It is written in the order you are most likely to work when you first use your sampler - i.e. the first
thing you will probably do is load some sounds. The next thing you will probably do is create a multi
using those sounds. The next thing you may do is edit the programs in that multi and after that, you
may edit the samples in those programs. You may try to record something yourself. After all that,
you may try to save your work. So the running order (after the description of the basics and getting
to know your way around your new sampler) is:
LOAD > MULTI > EDIT PROGRAM/PART > EDIT SAMPLE > RECORD > SAVE.
After that, we delve into the FX and UTILITIES modes and other issues.
Of course, if this is not the order in which you will use your new purchase, feel free to skip to each
appropriate section as you like/
Whatever, please try to find the time to read this operator’s manual as it is designed to help you get
the most from your investment.
You will note that both the S5000 and the S6000 are described in this manual. In most respects,
the two samplers are functionally identical except that the S6000 comes with the full complement
of options3 already installed and has the extra USER KEYS. By producing just one manual, we
can make a small contribution to the environment by saving paper and also, of course, it saves on
printing costs allowing us to bring you the new samplers at the best possible price.
All references will be to the S6000 except where specified.
3
Version 1.21
Except for the ADAT™ digital interface board
3
s5000/ s6000
INTRODUCTION
S6000 FRONT PANEL
MAIN PANEL
POWER
Turns power on and off to the S6000.
FLOPPY DISK
This accepts 3.5” floppy disks. It may be used to load sound library but
may also be used to boot operating systems.
DISK OPTION SLOT
This allows you to install a 3.5” removable hard disk such as Zip, Jaz,
Syquest, etc.. Please consult your dealer or AKAI professional distributor
for details of compatible drives. If you plan to install a drive here, this
should be done by an Akai approved engineer.
MAIN VOLUME
This sets the level of the main L/R outputs (outputs 1/2). Outputs 3/
4~15/16 are not affected by this control.
PHONES LEVEL
This sets the level of the main L/R outputs (outputs 1/2) on the headphone
output.
The level of the headphone output is not affected by the MAIN VOLUME
setting.
PHONES
This allows you to insert a pair of stereo headphones to monitor the
main L/R output (outputs 1/2).
NOTE: Sounds assigned to outputs 3/4 - 15/16 will not be heard at the headphone output.
4
L/MONO IN
This accepts a 1/4-inch mono jack plug and is used when recording in
mono. This overrides the rear panel equivalent input.
RIGHT IN
This accepts a 1/4 inch mono jack plug and, together with the L/MONO
IN jack, is used for recording stereo. This overrides the rear panel
equivalent input.
Version 1.21
s5000/ s6000
INTRODUCTION
REMOVABLE PANEL (S6000 ONLY)
ASCII KEYBOARD
This will accept a PS2 QWERTY keyboard which can be used for naming.
Underneath the LCD are the sampler’s operating modes.
MULTI
This is where you play programs either singly, layered or multi-timbrally.
FX
This is where you select and edit the effects you want to use in the
currently selected MULTI.
EDIT SAMPLE
This is where you edit samples, the raw sound data used in programs.
EDIT PROGRAM
This is where you edit programs, mapping samples out across the
keyboard range as appropriate. Programs are the basic sounds used in
a MULTI.
RECORD
This is where you record your own samples. These are subsequently
edited in EDIT SAMPLE and then mapped out across the keyboard in
EDIT PROGRAM.
UTILITIES
This is where you can set certain parameters that affect the S6000 as a
whole.
SAVE
Here, you may save the data in memory to a storage device such as
floppy or hard disk.
LOAD
This is used to load data into the sampler’s memory.
These keys illuminate when selected to indicate which mode you are in. Furthermore, they flash
upon reception of MIDI data.
Version 1.21
5
s5000/ s6000
INTRODUCTION
F1-F16
Function keys down either side of the LCD give direct access to
parameters. Their actual function varies according to the selected
page.
DATA WHEEL
This is used to enter data.
CURSOR </> KEYS
These are used to move the cursor left or right in parameter fields.
This is particularly useful when editing parameters with long
numeric values such as samples.
These keys are also used in conjunction with the DATA wheel for
naming.
NUMERIC KEYPAD
These are used to enter numeric data.
WINDOW
This is used to open the ‘window’ function.
UNDO
This has no function in Version 1.20 of the operating system.
EXIT
This takes you out of the currently selected function and back to
the screen you were in previously.
ENT/PLAY
This allows you to audition the currently selected sound.
MARK/JUMP
These allow you to mark a page, go to another page and then
jump back and forth between them.
USER KEYS
These allow you to assign the pages and functions you use most
often for quick, convenient access. For example, if you find yourself
always going to the FILTER, AMPLITUDE ENVELOPE and
REVERB 1 pages, these may be assigned to each of the USER
KEYS.
DISPLAY CONTRAST
This ‘thumbwheel’ control, found on the top/rear of the panel sets
the viewing angle for the LCD.
A screen saver function in UTILITIES allows you to turn the
backlight off at timed intervals to help preserve the LCD.
6
Version 1.21
s5000/ s6000
INTRODUCTION
REMOVING THE PANEL (S6000 ONLY)
To remove the S6000 front panel, turn the two chrome ‘thumb screws’ found top left and right of the
panel counter clockwise until they feel very loose.
Using the recessed finger grips either side of the panel, with a gentle but firm action, pull the top of
the panel forward:
Try not to use too much force. Now lift the panel up and out of the recess.
If the panel does not come away, check the ‘thumbscrews’ in case one or both of them are still
attached to the main case.
To attach the panel, simply do the reverse.
REMOVABLE PANEL CABLE LENGTH
The S6000 is supplied with a short cable for packing and transportation purposes. This allows the
S6000 to be used immediately with the removable panel attached to the main chassis. If you wish
to use a longer cable, you need a simple 9-pin > 9-pin (female to female) extension lead. These
are readily available in most computer stores.
The maximum recommended length is 10 metres. If you use a cable longer than this, you may
experience unreliable operation.
If you have any difficulty obtaining such a cable, please contact your AKAI professional dealer.
Version 1.21
7
s5000/ s6000
INTRODUCTION
S6000 REAR PANEL
INPUT L/R
These are the duplicates of the L/MONO IN and RIGHT IN inputs of the
front panel - S6000 only. The inputs on the front panel override these
inputs.
MAIN OUTPUT L/R
These are the duplicates of the main stereo L/R outputs (Outputs 1/2) S6000 only. They both output the same signal.
OUTPUTS 1-16
These are the S6000’s outputs. They can be used as 8 x stereo pairs or
as 16 individual outputs or any combination of the two (e.g. you could
have stereo sounds appearing at outputs 1/2 and 3/4 with, say, bass
appearing at output 5 and kick drum, snare drum and hi-hat appearing
at outputs 6, 7 and 8 respectively).
Output 1/2 is regarded as the ‘main’ stereo output for the S6000.
All outputs are polyphonic.
NOTE: Outputs 13-16 are also used as the sampler’s internal effects sends. Therefore, any
sounds routed to the effects channels FX1, FX 2, RV3 and/or RV4 will appear at outputs 13,
14, 15 and/or 16 respectively. If you wish to utilise all 16 outputs, you should not use the
internal effects. Similarly, if you are using the internal effects, you should avoid using outputs
13-16 as individual outputs. This is a hardware restriction that cannot be overcome in software.
DIGITAL I/O
This offers two balanced jacks for AES/EBU digital audio in and out (this
can be switched to SPDIF in the UTILITIES mode if you prefer). An
optical I/O is also provided.
Either digital input can be used to record digitally and both outputs carry
a stereo mix of the main L/R outputs (outputs 1/2). Sounds assigned to
outputs 3-8 (or 3-16 if the optional output expander is installed for S5000)
do not appear at the digital outputs.
8
Version 1.21
s5000/ s6000
WORDCLOCK
INTRODUCTION
This BNC connector is used to synchronise the sampler to a studio’s
‘house sync’. This would be used in a predominantly digital studio to
ensure that all digital devices (mixer, hard disk recorder, effects, etc.)
are running at a common sampling frequency.
The terminator switch should be ON when the S6000 is the last digital
device in the wordclock chain. Otherwise, it should be OFF. Failure to
observe the correct switching of wordclock termination may result in
unpredictable results.
SCSI
Two 50-pin high-pitch SCSI connectors are provided. One is simply a
‘thru’ of the other and is used when connecting the S6000 to a SCSI
chain.
SCSI TERMINATOR
This should be switched ON when the S6000 is the last device in a SCSI
chain. If the S6000 sits somewhere in the middle of a SCSI chain, it
should be switched off. Failure to observe the correct switching of SCSI
termination may result in unpredictable results.
OPTION SLOTS
These are provided to allow future expansion.
One such board is the optional ADAT digital I/O which offers 16 digital
outputs, ideal for interfacing with suitably equipped digital mixing
consoles. The ADAT I/O also allows you to record from a digital source
equipped with an ADAT output.
MIDI IN/OUT/THRU
Two completely separate MIDI busses A and B are provided offering 32channel operation (1-16A and 1-16B).
Each MIDI THRU passes on the data received at their respective MIDI
inputs.
MAINS INPUT
This should be connected to a suitable mains outlet using the supplied
cable.
SIGNAL GROUND
This can be used to reduce ground loops by connecting it to a common
earthing point.
Version 1.21
9
INTRODUCTION
s5000/ s6000
S5000 FRONT PANEL
Although laid out differently to accommodate the ergonomics of the S5000’s 3U panel, the keys
and controls on the S5000 are almost identical to the S6000’s except that the S5000 omits the
USER KEYS.
Another difference is that the S5000 does not have rear panel analogue audio inputs so the ones
found on the front of the S5000 are the main analogue record inputs.
It is also not possible to install an optional removable drive on the S5000’s front panel.
S5000 REAR PANEL
Again, the S5000’s rear panel is almost identical except that there are no balanced XLR inputs or
outputs and outputs 9-16 are optional.
10
Version 1.21
s5000/ s6000
INTRODUCTION
CONNECTING THE S6000
Main L/R outputs
(Outputs 1/2)
SCSI
Outputs 3-16
HARD DISK,
CD-ROM,
MO, Jaz, Zip, etc..
MIDI IN
DIGI I/O
%
MIDI OUT
mx1000
Connect the MIDI output of your MIDI controller (in this example, an Akai MX1000 master keyboard)
to MIDI IN A of the S6000. Connect outputs 1/2 to a stereo amplifier, a stereo input channel on a
mixer (or to two mono channels of a mixer remembering to pan each channel hard left and right to
take full advantage of the S6000’s stereo outputs). Outputs 3-16 (or 3-8 on the S5000 without the
optional expander board) should be connected to channels of your mixer where they may be
mixed, EQ’d and processed separately..
The digital I/O can be connected to any similarly equipped digital audio device such as DAT,
recordable CD, MiniDisk or the channels of a digital mixer.
The above diagram shows a fairly simple setup. When used with a sequencer, assuming it has two
or more MIDI outputs, connect one to MIDI IN A and the other to MIDI IN B. In this way, you can
achieve 32-channel multi-timbral sequencing.
Another option may be to connect one output from your sequencer to MIDI IN A and the output of
your MIDI keyboard to MIDI IN B. This way, you can have some sounds being sequenced whilst
you play certain other sounds from the keyboard. This might be a good setup for live applications
where the sequencer provides the backing tracks and you play live over the top of that.
There are many permutations and no doubt you will find your own according to your set-up and/or
application.
Version 1.21
11
INTRODUCTION
s5000/ s6000
MOUNTING THE S6000
If you plan to rack mount the S6000, try to leave some ‘breathing space’ around it to prevent
overheating. It is recommended you leave 1U of rack space above and below the sampler.
If you are placing the sampler on a table, make sure that the table is sturdy and that the sampler is
not positioned precariously.
If you are using the S6000 with a hard disk device of any kind, the disk drive MUST be mounted
horizontally. If the disk drive is at an angle, even a slight one, you may have unreliability problems
and even data corruption.
If you are planning to rack mount the hard disk with the sampler, it is recommended you use the
‘padded’ type of rack mount adapter available from most manufacturers of rack and flight cases
especially if you are likely to be travelling a lot with the set-up. The padding will help protect the
disk drive’s delicate head mechanism against shock and excessive vibration.
It goes without saying that the S6000 and the disk drive are delicate pieces of precision electronics
and they don’t take kindly to being thrown around however sturdy your flight case might be!
12
Version 1.21
s5000/ s6000
INTRODUCTION
SWITCHING THE S6000 ON
Before turning on the sampler, it’s a good idea to turn its volume down or to turn the volume down
on the amplifier or the mixer channels as the power up ‘thump’, although very slight, could damage
sensitive speakers, especially if the amp is turned up loud (this is good practice when turning the
S6000 off as well).
Now turn on the S6000. You will see the following LCD screen as it boots up:
The icons appearing at the bottom of the screen indicate what hardware is installed.
The icons are:
Shows the sampler’s polyphony4 .
Shows the amount of memory installed.
Shows whether the EB20 multi-channel effects board is installed.
Shows whether the optional ADAT digital I/O is installed.
Indicates that an external ASCII keyboard is connected.
Those items NOT installed will be shown with a ‘X’ through them (e.g. as shown in the above
screen shot for the ADAT board).
4
Version 1.21
On an unexpanded S5000, the same icon will be shown but with the number 64 instead.
13
s5000/ s6000
INTRODUCTION
The S6000 then scans its SCSI buss to see what storage devices are connected and after a short
period of time5 , you will see something like this screen:
Connected drives will be shown. The disk icons are:
Floppy disk
Removable hard disk
Fixed hard disk
CD-ROM
Your S6000 is now ready to use. Press any of the mode keys to continue.
You can check that the S6000 is receiving MIDI data by looking at the front panel - the selected
mode’s key will flash on and off whenever a note-on/off is received.
5
14
The exact time depends on how many drives you have attached and also the speed of those
drives. Of course, the more you have, the longer the scan will take and if you have, say, a particularly
slow old 4x CD-ROM attached, this will slow the boot up process further.
Version 1.21
s5000/ s6000
INTRODUCTION
KEY CONVENTIONS
The following are the different types of keys and parameters:
This is a parameter down the left of the screen.
This is a parameter down the right of the screen.
To select them, simply touch the key to their left or right.
When a parameter is selected, it becomes highlighted:
The parameter is immediately available for editing and the whole range of the parameter (0-100)
can be set in about three complete turns of the DATA wheel.
However, if you wish to make larger changes to the value more quickly, you can use the CURSOR
< key to move the cursor to the ‘tens’ or ‘hundreds’ field:
Whilst this not may save a lot of time with two or three digit numbers, moving the cursor around the
parameter is useful when the value is a long number such as when editing samples:
On ‘signed’ fields such as shown below:
The numeric keypad’s +/- keys can be used to quickly change the sign from + to - or vice versa.
Version 1.21
15
INTRODUCTION
s5000/ s6000
Other parameter conventions are:
The downward pointing arrow indicates that the parameter has a WINDOW function.
When you land on the parameter for the first time, the parameter is selected and is immediately
available for editing as described above. However, pressing the WINDOW key (or pressing the
selected parameter’s key again - i.e. ‘double clicking’ on it) pops up a window revealing further
‘sub-functions’ associated with the selected parameter. In this way, screens are clear and uncluttered
with only the most commonly used functions immediately available but with further functionality
hidden away by way of the WINDOW function.
For example, the PART LEVEL window looks like this:
The parameters shown in the window may be edited in much the same way simply by touching the
key alongside them and tweaking the DATA wheel. The window may be closed by pressing CLOSE
WINDOW.
Another type of parameter is this:
This is a modulation input. When you land on this type of parameter for the first time, the modulation
depth is selected and is immediately available for editing as described above.
However, pressing the key again selects the modulation source:
You may select another modulation source using the DATA wheel. This is common for all such
parameters displaying the
indicator.
16
Version 1.21
s5000/ s6000
INTRODUCTION
The various function key types are shown below:
This is a typical ‘go to page’ key characterised by the border within the
key.
This is a typical ‘do it’ key and usually generates a YES/NO/CANCEL
type prompt.
This is a function ‘toggle’ ON/OFF key. The
the function is switched OFF.
indicates ON.
indicates
This highlighted key is a ‘selected function’ or ‘radio’ key. The key (i.e.
the function) will highlight when selected.
This is a typical ‘scroll up’ key. This is used to move up through a list.
This is a typical ‘scroll down’ key. This is used to move down through a
list.
This is a typical ‘select up’ key. This is used to move up through a list
and select the currently highlighted item.
This is a typical ‘select down’ key. This is used to move down through a
list and select the currently highlighted item.
SELECT and SCROLL UP/DOWN keys are ‘context sensitive’ in that
when you are at the top of a list, the ‘up’ arrow isn’t shown and at the
bottom of a list, the ‘down’ arrow isn’t shown.
They are also ‘repeater’ keys in that if you press and hold them, you will
scroll through the list automatically without having to press them each
time.
Version 1.21
17
INTRODUCTION
s5000/ s6000
POP-UP WINDOWS
Throughout the user interface, you will encounter various ‘pop-up’ windows and prompts. These
override the current page’s functions (which become ‘greyed out’ in the background) and use
further function keys to decide the outcome. There are ‘alert’ and ‘warning’ prompts. For example...
And there are ‘dialogue’ prompts:
18
Version 1.21
s5000/ s6000
INTRODUCTION
Progress bars are also used throughout the user interface to indicate status. For example, during
off-line sample editing functions or during record (in fact, any process that takes time), you would
see these progress displays....
Some progress displays (such as the sample processing window above) also show animated
icons as a further indicator of activity.
All off-line processing screens have an ABORT key so that you can cancel the process at any time
if you want. Also, all off-line processing displays end with this screen:
This allows you to audition the new processed version and the original so that you can compare
the two. You are also offered the opportunity to keep the new one and discard the original or keep
the original and discard the new one or you can choose to keep both. You may also choose to
overwrite the original version with the new, processed version.
The recording progress display ends with this screen:
Here you may audition the recording you have just made and, if you are happy with it, you can
keep it otherwise you can discard it and try again.
Version 1.21
19
INTRODUCTION
s5000/ s6000
TOOLS MENUS
In most of the pages, you will find a ‘tools’ key on F9 that offers a drop down menu with further
functionality.
For example, in MULTI mode with a part selected, you have a PART TOOLS menu. Pressing this
would cause this drop down menu to appear:
In all cases, you will see that there is a certain consistency.
•
F9 is always CLOSE TOOLS.
•
F10 is always GET INFO and will show details of the selected item.
•
F12 will always take you to a list of the selected item type (multi, program, sample).
•
F13 is always QUICKLOAD which allows you to quickly load items relevant to the selected
mode (i.e. load multis, programs, samples).
•
F14 is always QUICKSAVE which allows you to quickly save items relevant to the selected
mode (i.e. save multis, programs samples).
•
F15 and F16’s functions change according to context.
NOTE: The LOAD and SAVE modes differ slightly in this respect. Please refer to those sections
for more details.
We will see these tools menus in each modes’ respective sections.
20
Version 1.21
s5000/ s6000
INTRODUCTION
NUMERIC KEYPAD
This is used to enter numeric data as an alternative to the DATA wheel. It can also be used to enter
numbers into a name.
CURSOR KEYS
Whilst cursor movement is kept to a minimum with the unique ‘touch and tweak’ user interface,
there are times when you need to move a cursor, particularly in long numeric fields such as sample
start and end times, loop parameters, etc.. These keys allow you to move the cursor around
numeric parameters. They are also used occasionally to move between fields in some pages.
NAMING
Naming is also done by way of a pop-up prompt. Naming is done when copying and/or creating a
new item (i.e. a multi, program or sample) and when creating a new sample through any of the offline DSP functions such as timestretch, EQ, etc.. You may also name samples at the time of
recording.
A typical naming prompt looks like this:
This pops up when creating a new multi. Pretty much the same pop-up would be seen when
creating or copying a program and/or sample.
An autonaming process is used throughout the operating system and you may be happy to stick
with the autonamed version of the name. However, if you do choose to rename the item, use the
CURSOR </> keys to move the cursor around the name field and use the DATA wheel to select the
letter, symbol or number. The full range of upper case and lower case characters are available to
you as are all the commonly used symbols. The SPACE and DELETE keys can be used to enter
spaces and/or delete characters.
A name can consist of up to 20 characters.
NOTE: Although it is only possible to enter up to 20 characters on the S6000 itself, long
filenames are supported if you are using files created or named on a PC.
Version 1.21
21
s5000/ s6000
INTRODUCTION
Of course, a much easier and quicker way to enter a name is to connect a standard PS2 QWERTY
keyboard to the ASCII KEYBOARD input on the front panel and type a name in from that. Use the
keyboard’s cursor left/right keys to move around the name and press RETURN to finish the name
(or ESC to cancel the process).
NOTE: The following are illegal characters in .DOS and cannot be used in names:
“ < > : * ? | / \
If you try to use any of these characters in a name, you will be prompted:
MARK/JUMP KEYS
The MARK and JUMP keys can be used to make navigation around the screens much easier and
faster.
For example, imagine you were constantly toggling between MULTI MODE and the ENVELOPE 1
page in EDIT PROGRAM. Whilst this is only two or three keypresses, it can be made instant by
first going to the ENVELOPE 1 page and pressing MARK, then going back to MULTI. Now, pressing
JUMP will take you straight back to ENVELOPE 1 and pressing JUMP again would return you
immediately to MULTI. And so on. In this way, you can ‘toggle’ between two pages with a single
key press.
The MARK and JUMP keys can be used to switch between any two pages in any mode.
USER KEYS (S6000 ONLY)
These allow you to assign the pages and functions you use most often for quick, convenient
access. For example, if you find yourself always going to the FILTER, AMPLITUDE ENVELOPE
and REVERB 1 pages, these may be assigned to each of the USER KEYS.
The keys default to showing you the various ‘lists’ of each mode (e.g. MULTI LIST, PROGRAM
LIST and SAMPLE LIST). However, it is possible to assign your own pages to the USER KEYS.
To do this, go to the page you wish to assign and simply press and hold MARK followed by one of
the USER KEYS. This will assign that page to the selected USER KEY and in future, you need
only press that USER KEY to have direct access to the page you marked.
Please note that the assignments are not retained when you turn the sampler off.
22
Version 1.21
s5000/ s6000
STRUCTURE
S6000 STRUCTURE
Before we go on to look at the sampler’s various operating modes, it would be a good idea to have
a basic understanding of how sounds are made up on the S60006 .
The raw audio data used in any sound is a SAMPLE. This is denoted by this icon:
Samples may be extensively edited in the S6000 using a variety of different editing tools and
functions such as TRIM, LOOP, NORMALISE, FADE UP/DOWN and DSP processes such as
TIMESTRETCH, PITCH SHIFT, BPM MATCH and DIGITAL EQ.
Samples are then assigned to PROGRAMS denoted by this icon:
Programs are made up of keygroups and each keygroup can contain up to four stereo samples.
Keygroups allow you to map out a collection of samples across the keyboard range (a technique
known as ‘multi-sampling’). A keygroup has its own keyspan and a program can contain as many
as 99 keygroups mapped out across the keyboard range as you want or, at the other extreme, can
have just one keygroup spanning the entire keyboard range. Some typical examples would be as
follows:
KEYGROUP 1
A simple program with one keygroup covering the entire keyboard range
KEYGROUP 1
KEYGROUP 2
A program with two keygroups - a typical keysplit
KG1
KG2
KG3
KG4
KG5
A typical multi-sample program with each keygroup covering an octave range
A typical drums program with a collection of keygroups each assigned to their own notes.
6
Version 1.21
If you are new to sampling, you might like to read Appendix B which describes the process in more
detail.
23
s5000/ s6000
STRUCTURE
Keygroups can also overlap:
KEYGROUP 1
KEYGROUP 2
A program with two overlapping keygroups with a crossfade
In this case, when keygroups overlap, a crossfade is automatically applied to make the transition
smooth.
You can also layer keygroups:
KG 6
KG3 KG4
KG1
KG2
KG5
KG1
KG 6
KG2
KG3
KG7
KG4 KG5
KG6
KG1
KG7
KG2
KG8
KG3
KG9 KG10
KG4 KG5
Some examples of layered keygroups
Although layering keygroups in this way is excellent for creating rich textures, you may find it
easier to layer sounds in the multi simply by assigning the appropriate sounds to parts and playing
them all on the same MIDI channel.
Each keygroup has four ZONES where samples may be layered on top of each other and/or
switched between using velocity.
Different programs may share samples (for example, you could use the same kick and snare drum
in a variety of different drum programs).
As well as mapping samples/keygroups across the keyboard range, programs also allow you to
apply envelope shaping, filtering, LFO modulation (vibrato, etc.) and much more and such is the
flexibility of the program’s sound shaping functions that the S6000 can be used as a very powerful
synthesiser as well.
24
Version 1.21
s5000/ s6000
STRUCTURE
Once you have one or more programs in memory, these are then placed in a MULTI where they
can be played either singly or in combination with other programs. The multi mode allows up to
128 programs to be played simultaneously.
In the MULTI mode, the individual programs that go to make up a multi may be mixed, tuned,
routed to individual outputs and/or the internal effects processor (if installed on the S5000).
Up to 128 multis may reside in memory at any one time, each one containing a different combination
of programs. Different multis may share programs (for example, several multis may use the same
drum program or piano sound, whatever).
The overall structure of a multi, therefore, might look something like this:
AMBI DRUM SET (Multi Part 1) has sixteen keygroups/samples, each assigned to their own separate
notes whilst the program HIRES MINI BASS (Multi Part 2) has three keygroups/samples.
MELLOTRON CHOIR (Multi Part 3) has ten keygroups/samples whilst TRAD E.PF (Multi Part 4
contains just five. LEGATO VLNS (Multi Part 5) has seven keygroups/samples mapped out across
C1-C6 whilst JAZZ GUITAR (Multi Part 6), like TRAD E.PF uses five samples. In this example,
each sound is being played on its own MIDI channel and shows a typical multi-timbral setup. The
same, of course, would be true of other parts (7-128) although some parts may be layered and
some could have keyboard splits set..
There are no hard and fast rules about how samples are assigned to keygroups (and hence
programs) and likewise, there are no rules on how programs are assigned to a multi and each
situation will vary according to the sound and the application.
Multis, samples and programs are saved to disk and can be subsequently loaded back into memory
at any time.
Version 1.21
25
s5000/ s6000
STRUCTURE
VOICE ARCHITECTURE
A single voice on the S6000 is not unlike any typical synthesiser and a simplified block
diagram of one voice looks something like this:
PROGRAM
KEYGROUP
Keygroup
Zones
Filter
Amplifier
Filter Mod
APM
APM
Aux
Envelope
Amp Mod
APM
Filter
Envelope
OUTPUT
PAN
Output
Mod
Pan
Mod
Amplitude
Envelope
APM
Keygroup Pitch Mod
Modwheel
APM
APM
APM
Pitch Bend
APM
Aftertouch
APM
LFO 1
Keyboard
LFO 2
APM
Velocity
APM
Rate
Mod
Delay Depth
Mod
Mod
Rate
Mod
Delay Depth
Mod
Mod
External
Whereas on a synthesiser, you have oscillators with preset waveforms (or preset samples contained
in Read Only Memory - ROM) which you cannot change, the S6000 allows you to record any
sound you want which can be then used as a waveform in any of the four keygroup zones for an
almost unlimited range of sounds. These are then mixed, tuned and fed through a multi-mode
resonant filter and then through an amplifier. The keygroups are then mixed and fed through a final
output section that controls overall level and pan/balance.
The keygroup’s pitch, filter and amplifier and the final output section all have assignable modulation
inputs allowing them to be controlled by any of the controllers (the filter and amplifier also have
their own dedicated ADSR envelope generator).
Two Low Frequency Oscillators (LFOs) and a multi-stage auxiliary envelope are also available
and using the S6000’s Assignable Program Modulation (APM) function (see the next page for a
more detailed description of this), these can be freely assigned to pitch, filter, amplitude and also
LFO 1 and LFO 2 rate, depth and delay where their control signals may be mixed and inverted for
a wide range of effects. The dedicated filter envelope and amplitude envelope can also be used in
the APM matrix.
MIDI controllers such as modwheel, pitchbend, aftertouch, velocity and a user definable external
MIDI controller may also be routed to any of the pitch, filter, amplitude and/or LFO modulation
inputs. Each of the 128 voices on the S6000 is identical.
26
Version 1.21
s5000/ s6000
STRUCTURE
ASSIGNABLE PROGRAM MODULATION (APM)
Assignable Program Modulation is a concept that was introduced by Akai in 1993 with the release
of the S3000 series samplers and subsequently in the S2000 and S3000XL range and now, of
course, in the S5000 and S6000. Basically, APM allows you to route any of the controllers (128
MIDI controllers, LFO1, LFO2 and envelopes) to pitch, filter, amplitude and panning - even back to
the LFOs themselves. Thus the S6000 is also a powerful synthesiser as well.
However, these techniques are not limited to only creating wild and extravagant synth sounds you could, for example, use aftertouch routed to the filter to introduce swells and growls on brass
samples or you could use velocity to control detune to create a more ensemble sound in a layered
strings sound. The modwheel could be used to control the rate of amplitude, panning and/or pitch
modulation to recreate a rotary speaker effect on an organ sound. The auxiliary envelope could be
used to control the feedback element in a heavy metal guitar sound or could be used to fade
vibrato in and out in a controlled way over time. The possibilities are enormous.
One way to consider APM is as a matrix:
OUTPUT
KEYGROUP
P/AMP FILTER
AMP PAN
LFO1
LFO2
1 2 1 2 3 1 2 A 1 2 3 R DL D R DL D
MOD WHEEL
PITCH BEND
AFTERTOUCH
EXTERNAL MIDI
VELOCITY
KEYBOARD
LFO 1
LFO 2
AMP ENV
FILTER ENV
AUX ENV
MOD WHEEL
PITCH BEND
EXTERNAL
This resembles the ‘patch pin’ matrix used by an early make of British analogue synthesiser where
pins are inserted into a board to make a connection. Down the left are the modulation sources and
across the top are the destinations (or modulation inputs) they can be routed to and in the above
example, the MODWHEEL is routed to amplitude and panning. AFTERTOUCH is also routed to
the second amplitude modulation input. As you can see, LFO 2 is routed to control panning and
also filter cutoff frequency. In this example, the AUX ENV is controlling the depth of LFO 2’s output
whilst the MODWHEEL is controlling LFO 2 rate. As you can imagine, there are many permutations
and possibilities.
NOTE: A modulation input may only have one control source routed to it so it is not possible,
for example, to route LFO2 and the MODWHEEL to, say, FILTER mod input 1. However the
same effect can be achieved by routing MODWHEEL to filter input 1 and LFO 2 to filter input
2.
Version 1.21
27
STRUCTURE
s5000/ s6000
Routing controllers to destinations on the S6000 is easy.
Down the right side of many of the EDIT PROGRAM pages, you will see the modulation inputs.
For example, the FILTER:
OUTPUT, KG PITCH/AMP and the LFOs are similarly laid out for consistency between pages.
In this example, VELOCITY is routed to MOD INPUT 1, LFO2 to MOD INPUT 2 and the AMP ENV
to MOD INPUT 3. To set these controllers levels, simply press the soft key to their right and use the
DATA wheel to set a value between +/-100.
To assign another controller, simply press the appropriate key again. This will place the cursor on
the actual controller field:
You may now use the DATA wheel to select any of the controllers you want.
One other useful feature is the GOTO SOURCE found on F16 on any page that has modulation
inputs. Pressing this will take you directly to the selected controller’s page where you may set its
parameters. In the controller’s page, you will find an equivalent GOTO DEST (i.e. destination) to
return you back to where you came from. In this way, it is easy to interact with the control source
and the destination.
28
Version 1.21
s5000/ s6000
LOAD
LOAD
Probably the first thing you will want to do after booting up your sampler is to load some sounds (if
you wish to record your own sounds first, then skip to the section that describes recording). When
you press LOAD, you will see something like this screen:
Here, you see a list of folders (or ‘directories’). These contain sounds or can contain further subfolders containing more sounds, etc.. Folders are selected using the SELECT keys on F15/F16 or
via the DATA wheel. Once you have selected a folder, if you know what’s in it, you can load its
entire contents into memory by pressing F14 - LOAD FOLDER.
If you need to look inside a folder, it can be opened using F11- OPEN FOLDER. If the folder
contains sub-folders, you may see something like this:
Here, there are nested folders within the selected folder. The operation described above applies
equally to loading and opening sub-folders.
NOTE: These sub-folders could equally contain further sub-folders. For example, the
WOODWIND folder could contain further sub-folders FLUTE, CLARINET, OBOE, BASSOON
and PICCOLO. The same process applies to all nested sub-folders.
Version 1.21
29
s5000/ s6000
LOAD
LOAD FOLDER
When you press LOAD FOLDER, you will see this pop-up prompt window:
The ‘check boxes’ on F6, F7 and F14 allow you to disable certain items from loading. For example,
you may just wish to load only the programs and samples from a folder in which case, you could
disable the loading of multis by pressing F6.
You should press EXECUTE or CANCEL LOAD as appropriate.
NOTE: If a folder contains sub-folders, the contents of those folders will also be loaded when
you use LOAD FOLDER.
The load order is very specific - first, any multis, programs and samples in the ‘main’ folder are
loaded into memory followed by the contents of each sub-folder in turn. This is mentioned
because if a sub-folder contains items that have the same name as items in the main folder,
the items being loaded from the sub-folder(s) will overwrite those that have already been
loaded from the main folder. So, for example, if the main folder and a sub folder both have a
sample called SNARE 1 , first SNARE 1 will be loaded from the main folder but will overwritten
when the other SNARE 1 is loaded from the sub-folder.
Back in the main LOAD page, if a folder contains actual sounds, pressing OPEN FOLDER may
show something like this:
Here we see actual ‘sounds’ - multis, programs and samples. The icons are:
Multi
Program
Sample
You will note that the LOAD key on F14 is ‘context sensitive’ and as you select different items, so
the label changes on F14. With the cursor on a multi, F14 is labelled LOAD MULTI. Move the
cursor to a program and the key is labelled LOAD PROGRAM. Move the cursor to a sample and
the key is labelled LOAD SAMPLE. In this way, the type of load you wish to perform is automatically
taken care of.
30
Version 1.21
s5000/ s6000
LOAD
LOADING MULTIS
It is possible to load a multi complete with all the programs and samples associated with it.
Simply select a multi and press LOAD MULTI. You will receive this pop-up prompt window:
Again, a series of ‘check boxes’ appear and you can, if you wish, select all multis in the current
folder if you wish and/or you may choose to load the multi(s) with or without the associated programs
and samples.
LOADING PROGRAMS
When a program is selected, F14 changes to LOAD PROGRAM and if you press this, you will
receive this pop-up prompt window:
You may choose to load just the selected program or all programs in the current folder. You may
also choose whether or not to load the samples associated with the program(s).
Version 1.21
31
s5000/ s6000
LOAD
LOADING SAMPLES
When a sample is selected, F14 changes to LOAD SAMPLE and if you press this, you will receive
this pop-up prompt window:
Using the check boxes, you may choose to load just the selected sample or all the samples in the
current folder.
The OVERIDE TYPE check box allows you to choose how the selected sample will load. With this
key checked, F15 changes and you may select to load the sample as a ‘virtual’ sample or as a
normal RAM sample. Simply pressing F15 toggles between the two choices. In this way, you can
select that maybe a long sample which you recorded as a normal RAM sample is loaded as a
‘virtual’ sample or, alternatively, you may want to load a ‘virtual’ sample into RAM in its entirety to
facilitate easier sample editing.
NOTE: You cannot overide the type for ALL SAMPLES. If OVERIDE TYPE is checked and you
select ALL SAMPLES, OVERIDE TYPE will be disabled. Similarly, if ALL SAMPLES is checked
and you press OVERIDE TYPE, the prompt will revert to THIS SAMPLE.
Please see the section that describes VIRTUAL SAMPLES for more details on this.
Whichever load type is used, you will see the filenames appear in a pop-up as they are loaded:
You can use F8 to cancel the load process if you wish.
32
Version 1.21
s5000/ s6000
LOAD
AUTOLOAD
It is possible to create a special folder that will be automatically loaded when you switch the
sampler on. This may be useful in a live situation where you could load your set automatically
when you switch on.
To use the AUTOLOAD function, simply create a new folder (in SAVE) and call it AUTOLOAD:
The folder MUST be in the root directory and not buried in another folder. It can use any combination
of ‘case’ and “AUTOLOAD”, “Autoload”, “AutoLoad” would be valid. However, “Auto Load” or
“Autoload 1” would not.
When you power on, the S6000 will scan the SCSI bus to identify the drive(s) connect and will then
do a quick search to see if it can find the AUTOLOAD folder. If it does, it will automatically load its
contents (including the contents of any sub-folders) as normal. At the end, it will automatically take
you to MULTI mode with the first multi in memory automatically selected and ready to play.
In this way, you can turn up at your gig, set up, switch on and be ready for action after the autoload.
NOTE: If you have several drives connected that have AUTOLOAD folders on them, the
S6000 will only load the first one it finds.
GET INFO
In the LOAD page you can use the GET INFO key to find out more about a selected item be it a
folder, multi, program, whatever. Pressing GET INFO will show this screen:
You can see what it is, where it is, how big it is and, if it’s a folder, what it contains. Press CLOSE
INFO to close the window.
Version 1.21
33
s5000/ s6000
LOAD
OPEN/CLOSE FOLDER
These keys allow you to open and close folders.
In the event of you trying to open or close an item on disk that is not a folder, you will receive the
following prompt:
Similarly, should you try to close a folder that is already closed, you will receive this prompt:
AUDITION SAMPLE
The AUDITION SAMPLE key in the main LOAD page allows you to audition a sample to check it
prior to loading. This function is only available when a sample is selected (you cannot audition
programs or multis). Should you try to audition anything other than a sample, you will get this
prompt:
When you press AUDITION SAMPLE, there will be a small delay as the sample is found on disk
and played out. You should press and hold the AUDITION SAMPLE key until the sound is played.
NOTE: If the sound does not sound immediately, please try to be patient and do not keep
stabbing the key as this will cause the disk head to go off searching and searching for the
selected sample in a frenzy which may cause problems!
34
Version 1.21
s5000/ s6000
LOAD
SELECTING DISKS
If you have more than one disk drive attached, you may select the one you want to load from using
the DISK LIST. This is accessed by pressing F8 in the main LOAD page and you will something
like this screen:
If a disk has partitions, you will see something more like this:
Disks and their partitions are shown as ‘virtual’ drives giving you direct access to them thus making
access to sounds very quick.
The disk you want to use is selected simply by touching the key to its left (or using the SCROLL
KEYS on F15/16 or using the DATA wheel) and pressing SELECT DISK (F8). This will select the
disk and automatically return you to the LOAD page where you will see its contents.
TIP: You can select a disk very quickly simply by ‘double clicking’ the key to its left.
**** VERY IMPORTANT NOTE ****
If you have removable disks of any kind (Zip, Jaz, CD-ROM, etc.) and change
the disk,
you must always press UPDATE on F11 to refresh the list.
Failure to do so may result in unpredictable behaviour.
If you need to find out about the selected disk, use GET INFO (this is described on the next page).
If you do not wish to select another disk, simply press CLOSE LIST (F9).
Version 1.21
35
LOAD
s5000/ s6000
DISK TOOLS
Back in the main LOAD page, there are other functions you may use. The DISK TOOLS drop down
menu on F9 shows this:
DISK INFO
This will display a pop-up giving information on the currently selected drive. For example:
CLEAR MEMORY
It is possible to clear the contents of memory using this key (the same function also appears at the
LOAD prompt).
VIEW ITEMS
These keys allow you to view file sizes or the date and time they were saved in the file list. For
example, with DATE+TIME selected:
To keep clutter on the screen to a minimum however, you may prefer to view NAME ONLY.
36
Version 1.21
s5000/ s6000
MULTI
MULTI
Once you have some sounds in memory, you will want to play them. This is done in the MULTI
mode.
Programs may be played singly or in combination and the MULTI mode has up to 128 ‘parts’ slots into which programs may be assigned and typically, this is used to sequence several sounds
multi-timbrally by setting each part to be on a different MIDI channel.
However, you don’t have to use the multi mode multi-timbrally - you can assign just one program
to it if you want and just play that from your keyboard or whatever. In a similar way, it is also
possible to assign several programs to a multi and set them to the same MIDI channel so that you
can layer two or more programs on top of each other for a rich, expansive (expensive?) sound.
Furthermore, you may set low and high keyboard ranges for each part so that sophisticated keyboard
splits may be created.
Each part may be routed to one of the four effects channels and you have a total of four effects that
can be applied to the parts in the multi7 . More than one part may be routed to any one of the
effects channels so that parts may share effects and each part has its own effects send level.
Effects settings are stored with each multi so that as you select different multis, so the correct
effects are recalled.
However, you may prefer to use your sampler with external effects processors using a mixing
console. To accommodate this, each part may be routed to the individual outputs. By doing this,
each part may have its own mixer channel where it can be EQ’d, mixed, panned and effected
using your favourite outboard effects processors. The individual outputs may be configured as
stereo pairs and/or as individual mono outputs.
Of course, a combination of these is possible and some parts may be on unique MIDI channels
whilst others share the same channels for layering and/or key splits. Some parts may be routed to
the internal effects processor in the S6000 whilst others are sent out via the individual outputs for
processing on the mixing console.
As you can see, the MULTI mode is very flexible.
Furthermore, you may load up 128 multis into memory allowing you to switch from one setup of
sounds to another very quickly.
7
Version 1.21
On the S5000, the EB20 is optional.
37
MULTI
s5000/ s6000
Assuming you have loaded a multi and its associated programs, pressing MULTI will show something
like this:
If you have more than one multi loaded, they are selected using F1 and the DATA wheel (or can be
selected in the MULTI LIST).
Down the left hand side in a large, easily read font are the programs assigned to the first six parts.
However, you may select to view more parts if you wish by pressing VIEW 12 PARTS found on F8:
38
Version 1.21
s5000/ s6000
MULTI
Or you may view 18 parts:
And you may revert back to 6 parts:
Version 1.21
39
s5000/ s6000
MULTI
SELECTING PARTS
Parts are selected simply by pressing one of the function keys F2-F7 alongside it. For example,
pressing F2 would select Part 1 - DRUMS 1:
The part’s parameters appear down the right hand side of the screen where you may set level,
output assign, FX send level, etc.. The logic for selecting parts is as follows:
•
When you press any F key 2-6, the part’s number field is always selected so that you can scroll
through parts in the multi quickly and easily using the DATA wheel. You may also use the
SCROLL UP/DOWN keys to step through each part though this may be a slow way to move
through a multi with 128 parts!
NOTE: When viewing 12 parts, the function keys select the parts in pairs. Press the function
key once to select the first part of the pair, then again to select the second.
When viewing 18 parts, the function keys select the parts in ‘threes’. Press the function key to
select the first of the three parts, again to select the second and again to select the third.
•
When the cursor is on the number field as shown on the preceding page, press the CURSOR
> key to move to the part name field to assign a program to that part:
You can use CURSOR < to move back to the number field if you wish or you can just hit the F key
again.
When the part name field is selected as shown above, using the SCROLL DOWN/UP keys keeps
the cursor in the name field for every part. In this way, you can assign programs to parts very
quickly. For example, first press F2 to select Part 1 then press CURSOR > to select the name field
and assign the program. Now press scroll down, assign program, scroll down, assign program,
etc.).
40
Version 1.21
s5000/ s6000
•
MULTI
When a part parameter is selected (e.g. LEVEL), the whole part box is highlighted:
In this situation, you can use the SCROLL UP/DOWN keys to select another part if you wish to edit
the same parameter for that part. For example, if, in the above screen shot, you wanted to balance
the levels for Parts 6, 7, 8, etc., you could use SCROLL DOWN very effectively:
Version 1.21
41
MULTI
s5000/ s6000
CREATING A MULTI
If you have just switched the S6000 on (or you loaded only programs and samples in the LOAD
mode) and no multis are loaded, pressing MULTI will show this screen:
To create a multi, you must first press CREATE MULTI (F16). You will receive this prompt:
A default name is provided by the S6000’s autoname function. You can use this name or you may
enter a name of your choosing either from the front panel using the cursor </> keys in conjunction
with the DATA wheel or, more conveniently, using an external QWERTY keyboard. Whether you
stick with the default name or enter a name of your own choosing (for example, BACKING TRACK
1), you have a choice of whether you want to create a multi with 32, 64 or 128 parts using F14 F16. Pressing one of these will display the new empty multi:
The new multi is initialised and Parts 1-16 are assigned to MIDI channels 1A-16A and Parts 17-32
are assigned to MIDI channels 1B-16B. If you created a 64 part multi, parts 33-48 will be assigned
to MIDI channels 1A-16A and parts 49-64 will be assigned to MIDI channels 1B-16B. A 128 part
multi will be similarly assigned. You may now fill those parts with sounds to play.
42
Version 1.21
s5000/ s6000
MULTI
ASSIGNING PROGRAMS TO PARTS
If you already have some programs loaded into memory, these may be assigned to parts very
quickly and easily. First, touch the key to the left of the part you wish to assign the sound to. E.g..
Part 1:
Now press the CURSOR > key below the DATA wheel:
The cursor moves to the program name field. Now simply rotate the DATA wheel to scroll
through the programs that are in memory until the one you wish to assign to the part is selected.
For example:
It could be that you only want to play the one sound in isolation and so this may be all you need to
do. However, to add more sounds to the multi, simply select another part and repeat the process
described above.
TIP: Once on the program name field, you may use the SCROLL UP/DOWN keys to move up
and down that column.
TIP: You may ‘cancel’ a part’s program assignment at any time by turning the DATA wheel fully
counter clockwise (it may take a few turns depending on how many programs are in memory).
Fully CCW, the part is effectively ‘emptied’ with no program assigned to it.
Version 1.21
43
MULTI
s5000/ s6000
EDITING PARTS
Once you have one or more programs assigned to parts, you may want to edit them. MULTI mode
allows you to edit parameters such as part level, pan/balance, output assignment, tuning, effects
send, MIDI channel, etc.. We will use the following multi as our example:
Let’s imagine we want to edit Part 1. First select Part 1 by pressing the key to its left. It will become
highlighted:
Down the right hand side of the screen are the most commonly used parameters you may want to
edit. These are selected and edited simply by touching the keys to their right and turning the DATA
wheel.
44
Version 1.21
s5000/ s6000
MULTI
For example, to set the part’s level, simply press PART LEVEL (F10):
The parameter highlights and is immediately available for editing. You will also note that the whole
of the part field is highlighted to show clearly which part you are editing.
Other parameters are selected and edited in exactly the same way. The parameters are:
PART LEVEL
Sets the level of the selected part.
OUTPUT
Allows you to route the selected part to any pair of outputs or individual
output. The range is 1/2~15/16 in pairs and then 1, 2, 3...~16 as individual
mono outputs.
It is possible to route a stereo program to a single, individual output.
This will route both sides of the stereo image to the selected output in
mono.
Please note, however, that in this case, the PAN/BALANCE control is
still a BALANCE parameter even though the signal is effectively mono.
Setting it to L50 means you will only hear the left channel through the
single output. Likewise, setting it to R50 means you will only hear the
right channel. Setting it to MID will allow you to hear both channels equally
though summed in mono though the selected single output.
NOTE 1: On the S5000, unless the optional output expander is installed, the range is 1/2 ~ 7/
8 in pairs and then 1, 2, 3,...~8 individual outputs. You may install the optional output expander
to have 16 outputs.
NOTE 2: Outputs 13-16 are also used as the effects sends. Therefore, any sounds routed to
the effects will appear at these outputs. If you wish to utilise all 16 outputs, you should not use
the internal effects8 . Similarly, if you are using the internal effects, you should avoid using
outputs 13-16. This is a hardware restriction that cannot be overcome in software.
8
Version 1.21
Ideally, you should also turn the effects off in UTILITIES > FX IN/OUT > FX OUTPUT.
45
s5000/ s6000
MULTI
EFFECTS SEND
This sets the effects send level of the part.
NOTE: On the S5000, the EB20 effects processor needs to be installed.
FINE TUNE
This allows you to tune the part +/-50 ‘cents’ or +/-1 semitone.
MIDI CHANNEL
This allows you to set the selected part’s MIDI channel. You may set 116A and 1-16B.
Those, then, are the key parameters for the parts. To edit them, simply select the part you want to
edit, then select the parameter and turn the DATA wheel.
TIP: Once you have selected a parameter to edit, you can use the SCROLL UP/DOWN keys
to set the same parameter for other parts.
For example, to set the levels of parts, select one part, select (and set) the LEVEL parameter
and then use the SCROLL keys to set LEVEL for the other parts. In this way, you don’t have to
keep jumping between the soft keys on the left and those on the right of the screen.
46
Version 1.21
s5000/ s6000
MULTI
WINDOW FUNCTIONS
There are times when you will want access to further functions. These are available using the
WINDOW function.
Any part parameters have the ‘window’ icon ( ) in them indicating that further functions are available
and these can be accessed by pressing the yellow WINDOW key. The window functions are as
follows.
PART LEVEL WINDOW
The parameters are:
PART LEVEL
A duplication of the main PART LEVEL parameter.
OUTPUT
This is a duplication of the main OUTPUT parameter described on the
previous page and is included here for convenience.
PAN/BALANCE
This allows you set the pan position of mono programs or the stereo
balance of stereo programs. If an individual output is select (e.g. 1, 2, 3,
4, etc.), this parameter has no effect.
MUTE PART
This allows you to mute a part without having to disrupt mix settings.
SOLO PART
This will mute all other parts so that you may hear the selected part in
isolation.
OUTPUT WINDOW
This is actually identical to the PART WINDOW. Please see the preceding page for a description of
the parameters.
Version 1.21
47
s5000/ s6000
MULTI
EFFECTS SEND WINDOW
The parameters are:
EFFECTS CHANNEL
You may select OFF, FX 1, FX 2 (the two multiFX channels), RV3 or
RV4 (the two reverb only channels).
EFFECTS SEND
This is a duplication of the main EFFECTS SEND parameter.
NOTE 1: It is also possible to send individual keygroups to the FX. This can be useful in, say,
a drums program where each individual drum can have its own effect type and send level. Of
course, other types of programs may also use this function.
This is mentioned here simply because you may load a sound, assign it to a part, set the
effects channel and send level in this window but get unpredictable results. For example, you
may load something, route it to RV4 but find that multiFX1 is applied. The reason for this will
almost undoubtedly be that the original programmer assigned the program’s keygroups to
multiFX1 in EDIT PROGRAM (for some reason!).. If you do experience this, go to EDIT PART
(or EDIT PROGRAM) and check the OVERIDE FX parameter in the main KEYGROUP page.
NOTE 2: On the S5000, even if the EB20 is not installed, you still have access to these
parameters even though they have no function.
48
Version 1.21
s5000/ s6000
MULTI
FINE TUNE WINDOW
FINE TUNE
This is a duplication of the main FINE TUNE function.
TRANSPOSE
This allows you to tune the part in semi-tone steps.
NOTE: You will note that the TRANSPOSE parameter is not a pitch shift function but a MIDI
transpose function - this overcomes the problem of playing back samples out of their range.
What this function does is introduce an offset so that with a +12 setting, if you play C3 on the
keyboard, this is offset to play the samples on C4 - it is not playing the samples on C3 an
octave higher and hence introducing transposition distortion of any kind.
LOW NOTE/HIGH NOTE
This sets the low and notes for a part allowing you to create
keysplits. To create a keysplit, you would normally assign two
programs to two parts, assign them to the same MIDI channel
and then set an appropriate keysplit (i.e. Part 1: C0-B2 and Part
2: C3-G8).
All windows are closed either by pressing CLOSE WINDOW (F9) or by pressing the WINDOW key
again.
Version 1.21
49
s5000/ s6000
MULTI
EDIT PART
Whilst it is possible to edit level, pan, effects send, tuning and other ‘superficial’ program parameters
within a part, sometimes you need to delve further into a sound. Maybe a string part’s attack is too
slow and it’s not sitting well in the track or maybe its release is too long causing it to ‘blur’ the part.
Maybe a piano is too bright or a synth bass has too much (or not enough) resonance. This level of
editing is done in EDIT PROGRAM.
However, in cases like this, you may need to hear the other parts playing as you adjust program
parameters - in the example of the string attack, you will want to hear the track playing so as to
adjust the attack time in context until the part is sitting correctly in the track.
This is done using EDIT PART.
This is slightly different to EDIT PROGRAM. When using EDIT PART, all editing is done within the
context of the current multi and as you edit the program, you can also hear the other parts playing.
You could use EDIT PROGRAM if you wanted to but the program would be heard in isolation and
out of context making adjustment potentially difficult.
To edit a part at the program level, first select the part you want to edit and press EDIT PART (F8).
You will be taken to a variation of the EDIT PROGRAM screens where you may edit the sound at
the program level. Functionally, EDIT PART and EDIT PROGRAM are almost identical except for
the following points:
•
In EDIT PART, you hear and edit the program in the context of the current multi (in EDIT
PROGRAM you hear it in isolation and out of context).
•
In EDIT PART, you cannot select another program for editing (in EDIT PROGRAM, any program
can be selected and edited).
Please see the section EDIT PROGRAM for more details on program editing.
50
Version 1.21
s5000/ s6000
MULTI
MULTI TOOLS
With the cursor on the multi name (i.e. press F1), pressing MULTI TOOLS on F9 shows this:
The functions are:
GET INFO
Shows how many multis and programs are currently in memory and how memory is used/
available. The current operating system version number is also shown as the time and
date:
Version 1.21
51
MULTI
s5000/ s6000
QUICKLOAD
In the MULTI TOOLS menu or in MULTI LIST, QUICKLOAD allows you to load multis quickly and
easily. Pressing QUICKLOAD would show something like this:
This is showing you all the multis in a folder called “MINIMOOG STUFF” which is on a removable
hard disk called “S5000 DISK”. You may close the currently active folder and select and open a
different one and/or you may also select another disk to load from using DISK LIST on F8.
In QUICKLOAD, you only see the items that are appropriate to load and so, in this case, you only
see multis. To load them, simply select them and press LOAD MULTI (F14). You will receive this
prompt:
Using the ‘checkboxes’ on F6 and F7, you may select whether you want to load just the selected
multi or all the multis in the current folder. You may also select whether you want to load the
programs and samples associated with the multi(s). The default for this is ‘checked’ however, you
may override this if you want to load an empty multi to maybe use as a template for a new one.
The multis will be stored in memory in the order in which they are loaded. If ALL MULTIS is selected
as the load option, the multis will be loaded in the order in which they appear on disk.
If you change your mind, press CANCEL LOAD to abort and press EXIT to leave QUICKLOAD.
52
Version 1.21
s5000/ s6000
MULTI
QUICKSAVE
Pressing QUICKSAVE will show this screen:
The currently active multi is selected to save. You see its name and the folder it will be saved to.
You also have the option to save all the multis in memory if you prefer (or just the currently selected
one) with or without the associated programs and samples.
The CHECK NAMES key allows you to disable the file checking - with it ON (checked ), if a multi
of the same name exists in the selected folder, you will be prompted and asked if you want to
overwrite it or not. With CHECK NAMES switched OFF (checked ), files of the same name will
automatically be overwritten without prompting you.
The defaults are sensibly chosen to save just the selected multi and all its programs and samples
(though to save time, if you have previously saved all the programs and samples and are happy
that they are ok and/or haven’t been edited or changed in any way, you can disable PROGS/
SAMPS and just save the multi which will be very quick).
Press EXECUTE to save; CANCEL SAVE to abort.
NOTE: The folder the multi(s) will be saved to is shown. If this is not the right one, you should
press CANCEL SAVE and use the actual SAVE function to navigate your way to the folder
where you want the multi to be saved. The ‘full’ SAVE function is described in a separate
chapter.
Version 1.21
53
s5000/ s6000
MULTI
MULTI LIST
Once you have some multis loaded, you may view them in MULTI LIST:
The currently active multi is highlighted.
You may select multis to play from this page. Simply scroll down to the multi you want using F15/
F16 and either press CLOSE LIST or press the main MULTI mode key. The multi you have
highlighted in the MULTI LIST page will become the currently active multi.
You may also rename, copy, delete, create and renumber multis in this page.
RENAME MULTI
Pressing RENAME will pop-up this prompt:
You may enter a new name in the usual manner using the cursor </>
keys and the DATA wheel or more conveniently from an external
QWERTY keyboard. If you are entering the name from the front panel,
you may find the DELETE and SPACE keys a convenient way to delete
characters or add spaces.
54
Version 1.21
s5000/ s6000
COPY MULTI
MULTI
Pressing COPY MULTI will pop-up this prompt:
The multi is given a default ‘autoname’ but you may enter a new name if
you prefer in the normal way.
DELETE MULTI
Pressing DELETE MULTI will pop-up this prompt:
You can use the check boxes to select whether or not the programs and
samples associated with the multi will also be deleted.
NOTE: With the PROGS/SAMPS checkbox ticked, if any programs in the selected multi are
used in one or more multis in memory, those programs will not be deleted as this would corrupt
the other multis.
However, if the programs and/or samples are not used by any other multis, they will be deleted.
You may also select to delete all multis in memory.
NOTE: Deleting ALL MULTIS and also selecting to delete the programs and samples is the
equivalent of clearing the memory completely
Pressing DELETE will initiate the delete function. CANCEL will close the
prompt.
CREATE MULTI
Version 1.21
This allows you to create multis. The function is identical to CREATE
MULTI in the main multi page.
55
MULTI
s5000/ s6000
EXPAND MULTI
This allows you to change the number of parts in a multi. Pressing this
will pop-up a prompt and you have the option to expand the currently
selected multi to 64- or 128-parts (or to cancel). If the multi already has
64- or 128- parts, you will be prompted accordingly.
This is useful in the event of you accidentally creating a 32-part multi
when in fact you wanted a 64- or 128-part multi or in cases where you
reach the limit of the current multi and need to add more parts.
RENUMBER MULTI
This takes you to a new page where you may change the MIDI program
number of the multis in memory. Pressing RENUMBER will show
something like this screen:
MIDI program numbers are used in order to select multis remotely via
MIDI. For example, in a live situation, you may wish to use MIDI program
change to select multis remotely from your keyboard or sequencer. Multis
may be given a number 1-128 or OFF.
To renumber a multi, simply move the cursor to the multi you want to
renumber and use the DATA wheel to set the appropriate number (or
switch it to OFF).
for example, “GIG FOLDER”). When you come to load that folder prior
to your gig, they will load in the correct order 1-XXX.
Pressing RENUMBER 1-XXX (F13) will renumber all the multis in memory
sequentially 1-128 (or whatever the upper limit is of the number of multis
in memory). The multis will be renumbered in the order in which they
appear in the list. For example:
If there are more than 128 multis in memory, any above 128 will be
renumbered to 128. When you press RENUMBER 1-XXX, you will receive
a prompt asking you to confirm that you wish to proceed. Respond
accordingly.
56
Version 1.21
s5000/ s6000
MULTI
Pressing SET ALL TO OFF will (not surprisingly!) turn all program
numbers off. This way, you can clear all program numbers so that it is
easier and clearer to renumber just those that will be affected by MIDI
program change. When you press SET ALL TO OFF, you will receive a
prompt asking you to confirm that you wish to proceed. Respond
accordingly.
NOTE: If two (or more) multis are assigned the same program number, if that MIDI program
number is sent to the sampler, the first multi with that number will be selected.
NOTE: The numbers assigned here apply equally to bank numbers should you choose to
select multis using BANK SELECT in UTILITIES > MIDI SETUP > MULTI SELECT (see
below).
TIP: If you are using this function for live work, to set the multis in some sort of sensible, logical
order, load each one individually in the order you want them to appear. Then use RENUMBER
1-XXX to number them sequentially in that order and re-save them back to a new folder (called,
for example, “GIG FOLDER”). When you come to load that folder prior to your gig, they will
load in the correct order 1-XXX.
Version 1.21
57
s5000/ s6000
MULTI
SELECTING MULTIS REMOTELY VIA MIDI
If you have numbered multis to select them remotely via MIDI, you also need to specify which MIDI
channel will be used for the multi’s program change command. This is set in the UTILITIES mode
in the MIDI page:
First it is necessary to enable remote selection of multis by switching MULTI SELECT (F3) to ON.
You must also set the MIDI channel you want the multi select MIDI program change commands to
be received on using MULTI SLCT CH (F4). Once set, any MIDI program change commands
received on that channel will cause the appropriate multi to be selected.
NOTE: The MIDI channel designated for receiving MIDI program change commands for remote
multi selection is automatically disabled for selecting programs via MIDI program change
commands. Therefore, be sure to set a MIDI channel that you know won’t be required for
selecting programs.
The MULTI SELECT parameter also allows you to use MIDI BANK change commands to remotely
select multis. In this case, the numbers set in RENUMBER still apply but they will be selected
using the MIDI bank change command instead of MIDI program change. This has the advantage
that all 16 MIDI channels are still available for selecting programs within parts.
58
Version 1.21
s5000/ s6000
MULTI
PART TOOLS MENU
When a part is selected, F9 is labelled PART TOOLS and, like MULTI TOOLS, it is a drop down
menu which offers further functionality. Pressing it displays this:
The functions are:
PROGRAM LIST
This takes you to a page where you may see the programs currently loaded into memory:
This is not unlike MULTI LIST and you may rename, copy, delete and create programs.
RENAME PROGRAM
This pops up a prompt and you may rename the program:
You can name the program in the usual way.
Version 1.21
59
s5000/ s6000
MULTI
COPY PROGRAM
This pops up a prompt and you may copy the selected program:
You may use the name automatically generated by the copy process or
you may enter your own.
DELETE PROGRAM
You may delete the selected program:
The SAMPLES checkbox on F14 allows you to select whether you also
want to delete the samples associated with the selected program. With
it checked, the samples will be deleted.
NOTE: If any samples are used by any other programs currently in memory, those particular
samples will not be deleted.
CREATE PROGRAM
60
You may create a new program:
Version 1.21
s5000/ s6000
PURGE
MULTI
This useful function deletes all programs and samples not currently being
used by any multis in memory (these programs are referred to as
‘orphans’):
You may end up with ‘orphans’ in memory when you load several sounds
to try out. For example, when building up a multi, you may load in a few
drums programs to see which one you like. Once you have settled on
the one you want to use, all the others are redundant. Rather than deleting
each one manually, you can use PURGE to get rid of these and make
more memory available.
Whilst the PURGE function is useful for clearing orphan programs and their samples
from memory, it could be that you have programs ‘outside’ the multis that are intended to be
selected via MIDI program change within the parts.
Be careful with your use of PURGE as you may accidentally delete these.
Version 1.21
61
MULTI
CONVERT -L/-R
s5000/ s6000
This allows you to convert ‘old’ Akai -L/-R stereo samples into interleaved
stereo .WAV samples. Pressing this pops-up this prompt:
To continue, press YES (or NO to cancel).
The process will examine the program and convert each -L/-R sample
into a single stereo file. It will remove the original samples from the
program (but not from memory) and will also make the appropriate
adjustments to the keygroup zones to which they are assigned (i.e.
instead of two mono zones panned hard left and right, you will end up
with one stereo zone panned centrally).
If the process is successful, you will be returned to the PROGRAM LIST
screen.
62
Version 1.21
s5000/ s6000
MULTI
**** NOTES REGARDING CONVERT -L/-R ****
The process is looking for identically matching pairs.
Because it is not possible to have separate start and end times of left and right loop points in
an interleaved stereo sample, both samples have to have identical settings. This is normally
the case with stereo samples as any difference in start times, loop length or position will result
in the stereo imaging being inaccurate.
If the process finds a stereo pair of samples that do not match exactly, you will receive the
following prompt:
You should press OK and identify those samples that do not match and make the necessary
adjustments.
Alternatively, you can try again but this time switch OVERIDE to ON (i.e. checked ). This will
run the process but will automatically copy the parameters from the left channel to the right
channel. Please note, however, that this may upset the loop on the right channel which may
cause clicks or other loop related glitches. In this case, you are advised to re-loop the new -S
stereo sample created by the process.
It must be said that this function assumes that the original sample editing was done in ‘stereo’
and so, to preserve stereo phase coherency, start times of the left and right channels should
be the same as should loop start and end times. If, however, some ‘mono’ editing was done on
each ‘leg’ of the stereo sample by the original programmer (which, ideally, it shouldn’t have!),
the success of this function cannot be guaranteed.
Version 1.21
63
s5000/ s6000
MULTI
CONV OLD MULTI
This allows you to convert ‘old’ Akai ‘multis’ or layers into new, S5/6000
format multis. For newcomers to the S5/6000, to understand this function,
a quick history lesson is required!
On the S1000, S1100 and S3000, multis and layers were achieved by
setting several programs to the same program number. In the case of
multi-timbral setups, each program would be given its own unique MIDI
channel or, in the case of layering, programs would share the same
MIDI channel. Thus, you may have:
*1
*1
*1
*1
*1
*1
DRUMS 1
GR PIANO
E.PIANO
SLAP BASS
BIG STRINGS
BASS SYNTH 4
MIDI 1
MIDI 2
MIDI 3
MIDI 4
MIDI 5
MIDI 6
Etc..
Although the concept of multis was introduced on the S2000, S3000XL
and S3200XL, for the sake of ‘legacy’, this feature was retained (and,
indeed, some people continued to use it despite the convenience of the
multi). The CONVERT OLD MULTI allows you to convert such setups to
a new S5/6000 format multi. It works as follows:
Imagine you have loaded an ‘old’ S1/2/3000 multi. You will have several
programs all sharing the same program number:
64
Version 1.21
s5000/ s6000
MULTI
You can confirm this by pressing RENUMBER:
In either screen, you can convert such a setup simply by moving the
cursor to any program sharing the same program number and pressing
CONVERT OLD MULTI. You will receive this prompt:
Press ADD TO CURRENT to add the selected program number to the
currently selected multi or press CREATE NEW to create a new multi to
add the program(s) to. If you create a new multi, its name will be that
shown in the prompt (i.e. S1-3K MULTI 1).
The multi will now contain all programs of the same number and the
MIDI channels, levels, pan position, output assignments, tuning, etc.,
used in the ‘old’ multi/layer will automatically be set and the new format
multi should play pretty much the same as the original would on an S1000,
S3000 or whatever.
NOTE: The function is not foolproof. For example, you may load in an old S1000-style ‘multi’
numbered, say, #3. If any other programs with that number are already loaded, they too will be
converted in this process. As such, the function is best used in the RENUMBER page so that
you can see programs’ numbers. The RENUMBER function is described below.
Version 1.21
65
MULTI
RENUMBER
s5000/ s6000
This takes you to a new page where you may change the MIDI program
number of the programs. Pressing RENUMBER will show something
like this screen:
Programs may be given a number 1-128 or OFF.
MIDI program numbers are used in order to select programs within a
part remotely via MIDI. For example, you may have a stereo acoustic
piano sound in Part 2/MIDI channel 2 that you want to use in the verses
of a song but which you want to change to an electric piano sound in the
chorus. By issuing an appropriate MIDI program change command on
channel 2, you can achieve this and the two will swap over when you
want them to. For example, if STEREO PIANO is MIDI program number
#5 and ELECTRIC PIANO is MIDI program #12 - by issuing program
change commands #5 and #12 on MIDI channel 2 at the appropriate
moments in the song, you can switch between these sounds.
However, a problem exists when you load these sounds into memory in
that, for example, the STEREO PIANO sound you loaded could have
MIDI program number #1 and the ELECTRIC PIANO sound could be
program #6 (or they could both be program #1 or OFF or whatever
depending on where they were loaded from). In other words, in order for
them to be selected correctly via MIDI program change, you need to
renumber them to the correct MIDI program numbers.
Another potential problem exists. You may renumber the stereo piano
and electric piano correctly but may find that other programs with these
numbers already exist in memory. To prevent a conflict in these
circumstances, other programs may need to be renumbered.
There is another problem too! The range of MIDI program numbers is 1128. However, it is possible to load many more programs than this into
the S6000’s memory and, theoretically, you may have hundreds of
programs loaded. However, there may only be a handful of programs
you need to change within a multi using MIDI program change.
The RENUMBER screen allows you to renumber those programs that
will be required to be changed via MIDI program change whilst switching
those that don’t to ignore such changes.
66
Version 1.21
s5000/ s6000
MULTI
To renumber a program (or programs), move the cursor to the program
you want to renumber and use the DATA wheel to set the appropriate
number (or switch it to OFF). Once they have been renumbered, simply
leave the RENUMBER page - the new numbers will be set.
Pressing RENUMBER 1-XXX will renumber all programs sequentially
1-128 (or whatever the upper limit is of the number of programs in
memory). The programs will be renumbered in the order in which they
appear in the list. If there are more than 128 programs in memory, any
above 128 will be renumbered as 128.
When you press RENUMBER 1-XXX, you will receive a prompt asking
you to confirm that you wish to proceed. Respond accordingly.
Pressing SET ALL TO OFF will (not surprisingly!) turn all programs
numbers off. This way, you can clear all program numbers so that it is
easier and clearer to renumber just those that will be affected by MIDI
program change.
When you press SET ALL TO OFF, you will receive a prompt asking you
to confirm that you wish to proceed. Respond accordingly.
KNOWN PROBLEMS WITH MIDI PROGRAM CHANGE
This scheme is far from foolproof and there are some problems associated with program
change. Some are unique to samplers whilst others are common to all sound modules. These
are listed here:
•
If two programs share the same program number and you select that program number via
a MIDI program change command, the first program found will be selected.
•
If several parts share the same MIDI channel and a program change command is sent on
that channel, all parts will select the one sound which will appear in all four parts.
•
If a program is renumbered (perhaps because another program has that program number),
you will need to change the program change number on the sequencer.
•
If SAVE MULTI+PROGS+SAMPS is used, programs ‘outside’ the multi that are intended
for remote selection via MIDI will not be saved and so it will be necessary to save these
separately (or to load them in separately next time you load the multi).
Version 1.21
67
MULTI
s5000/ s6000
If you try any of the above routines and no programs are loaded, you will receive this prompt:
You are offered the option to create one. To cancel the prompt, simply press NO (F8).
68
Version 1.21
s5000/ s6000
MULTI
QUICKLOAD
QUICKLOAD allows you to load sounds from disk directly into parts. Imagine we want to add a
new sound to Part 7 in our existing multi. First, we need to select Part 7:
Next, press PART TOOLS followed by QUICKLOAD. You will see this screen display:
Here you are taken to a variation of the main LOAD mode. In this example, we are in the ‘root
directory’ of a disk called S5000 DISK. Let’s imagine we want to load in something from the folder
SWM STUFF.
First, press SELECT DOWN (F16) to select the folder:
Version 1.21
69
MULTI
s5000/ s6000
Next, open the folder:
The QUICKLOAD screen is much like the normal load page except that, because you cannot load
samples or multis into a part, you only see the programs in the selected folder.
You need to select the sound you wish to load (for example, VOXY PAD):
Now press LOAD INTO PART (F14). You will receive this prompt:
If you change your mind, press F8 - CANCEL LOAD but, assuming you wish to proceed, press
EXECUTE.
70
Version 1.21
s5000/ s6000
MULTI
As the program and its samples are being loaded, you will see a progress display:
You will see the program and its associated samples being loaded in turn.
Version 1.21
71
MULTI
s5000/ s6000
At the end of the load process, you will be returned to this screen display:
As you can see, the program VOXY PAD is now loaded into Part 7. A feature of QUICKLOAD is
that you may immediately audition this sound by sending MIDI data on the appropriate channel. If
the sound is not to your liking, you can repeat the QUICKLOAD procedure until you find a sound
you like. Once you have settled on a sound you like, if you return to the main MULTI page (either
by pressing EXIT - F13 - followed by CLOSE TOOLS or more directly by pressing the MULTI mode
key), you would see this:
You can see the new sound in the selected part. If you want to build up more parts into your multi,
you can repeat the above procedure.
However, another feature of QUICKLOAD is that you do not necessarily have to return to the main
MULTI page to select another part to load into. By pressing F2 when in the QUICKLOAD page,
you may select another part. For example, let’s back-track to just after you loaded VOXY PAD:
72
Version 1.21
s5000/ s6000
MULTI
By pressing F2, you may select the next part you wish to load into using the DATA wheel or +/keys on the numeric keypad:
To move the cursor back to the list of programs to load (or folders to open), press SELECT DOWN
(F16) to return you to the list then proceed as described above. If you want to load further sounds
from the selected folder, then simply select the sound. Otherwise, use CLOSE FOLDER to return
to the ‘root directory’ and select another folder and proceed as described above. This process can
be repeated until you have loaded all the sounds (programs) you want into the various parts. In
this way, you can build up complex multis quickly and easily without having to leave QUICKLOAD.
When you have loaded all the parts you want, you can return to the main MULTI page.
Of course, when using QUICKLOAD, it could be that sounds you want are contained on another
disk, To select another disk, press DISK LIST (F8). You will see something like this screen display:
The disk you want to use is selected simply by touching the key to its left and pressing SELECT
DISK (or you may ‘double click’ the key). This will select the disk and automatically return you to
the QUICKLOAD page where you will see its contents. You may proceed as above to load sounds
into the selected part.
Version 1.21
73
s5000/ s6000
MULTI
NOTE REGARDING QUICKLOAD:
It is possible to use QUICK LOAD even if you have not created a multi first. In the blank multi
page, select the part you wish to QUICKLOAD into. Now press PART TOOLS followed by
QUICKLOAD. Select the sound you want to load and press LOAD INTO PART. Because you
have not yet created the multi, you will receive this prompt first:
Pressing CREATE NEW will pop-up the name prompt:
You should create the multi after which you can proceed with QUICKLOAD as described.
74
Version 1.21
s5000/ s6000
MULTI
QUICKSAVE
Pressing QUICKSAVE will pop-up this prompt:
The currently selected program is selected to save. You see its name and the folder it will
be saved to. Using the check boxes, you also have the option to save all the programs in
memory if you prefer (or just the currently selected one) with or without the samples.
The CHECK NAMES key allows you to disable the file checking - with it ON (checked ),
if a file of the same name exists in the selected folder, you will be prompted and asked if
you want to overwrite it or not. With CHECK NAMES switched OFF (checked ), files of
the same name will automatically be overwritten without prompting you.
The defaults are sensibly chosen to save just the selected program and its associated
samples (though to save time, if you have previously saved the samples and are happy
that they are ok and/or they haven’t been edited or changed in any way, you can disable
SAMPLES and just save the selected program which will be very quick).
Press EXECUTE to save; CANCEL SAVE to abort.
NOTE: The folder the program(s) will be saved to is shown. If this is not the right one, you
should press CANCEL SAVE and use the actual SAVE function to navigate your way to the
folder where you want the program to be saved. The ‘full’ SAVE function is described in a
separate chapter.
USING MULTIS
As mentioned, it is possible to have up to 128 multis in memory at any one time. Each multi may
contain as many as 128 programs or as little as one and each multi may contain a different
combination of programs.
Basically, the MULTI mode is the S6000’s ‘play’ mode and is where you can play programs singly
or in combination and is designed to be flexible enough to cover a wide range of applications.
Whereas on most synthesisers, sound modules, samplers, etc., you have various playback modes
(single, multi, combi, performance, whatever), the S6000 has just one versatile and consistent
play mode to cover all applications.
Some suggestions are shown here on the next few pages.
Version 1.21
75
s5000/ s6000
MULTI
USING MULTI MODE TO PLAY SINGLE PROGRAMS
A multi may contain just one program:
The MULTI mode can be used to play single programs simply by assigning just one program to a
part. In this way (especially with 128 multis available), the S6000 can be used as a simple playback
module for playing single sounds.
NOTE: If you only intend using the S6000 to play single programs, you can simply use EDIT
PROGRAM if you prefer. Using a multi to play a single program does give you greater flexibility,
however, especially regarding the use of effects and outputs.
USING MULTI MODE TO PLAY LAYERED PROGRAMS
An extension of ‘single’ playback - by assigning several programs to a multi with each part set to
the same MIDI channel, you may play layered programs:
Here, several sounds are played simultaneously for greater texture. Don’t forget that each of the
layers may be mixed, panned, tuned/detuned, routed to separate outputs and/or the internal effects
for even greater flexibility.
76
Version 1.21
s5000/ s6000
MULTI
USING MULTI MODE TO PLAY KEYSPLITS
Using the LOW NOTE/HIGH NOTE function in the FINE TUNE ‘window’, you may set key splits:
In this example, UPRIGHT BASS could be set to cover C1-B2 with JAZZY ROADS PNO set to
cover C3-E5 with a handful of BRASS STABS on F5-C6. The same technique could be used in a
string section setup to have cellos in the bottom octaves and violas/violins in the top octaves.
Again, each ‘element’ in the keysplit may be routed to separate outputs and/or the effects for
greater flexibility.
USING MULTI MODE MULTI-TIMBRALLY
Multi mode can also be used to play up to 128 sounds simultaneously on 32 MIDI channels9 :
Here you can see each part has its own MIDI channel (VIEW 18 PARTS is shown here to make the
example clearer).
Each sound may be mixed and panned and routed to different outputs (either as pairs or to individual
outputs). They may also be tuned and transposed and may also be routed to any one of the four
effects channels (the EB20 is optional on the S5000).
However, when using the S6000 in this way, certain parts may be set to the same MIDI channel so
that some parts will be layered (for example, in the above screen shot, Parts 10 and 11 both play
SLAP BASS #1, presumably detuned for a rich, chorus bass sound) whilst other parts just play
single programs. You could also use keysplits within such a multi.
9
Version 1.21
Even though a multi can have up to 128 parts, only 32 channels may be used. However, whilst at
first this may seem strange, this does allow many parts to be layered in a multi-timbral environment.
77
MULTI
s5000/ s6000
PLAYING LIVE OVER A SEQUENCED BACKING TRACK
As well as 32-channel multi-timbral operation, the two MIDI inputs also allow you to play one or
more sounds ‘live’ from a keyboard or other MIDI controller through one MIDI input whilst the other
input is fed by a sequencer to provide a 16-channel multi-timbral backing track. Such a multi may
look something like this:
In this example, the GRAND PIANO is the part you would play live through MIDI input B whilst the
other parts are sequenced via MIDI input A.
USING THE S6000 AS TWO SAMPLERS
Sometimes (especially in live situations), it is useful to have two keyboards on stage. This allows
you to play two sounds simultaneously and/or allows you to quickly switch between sounds without
having to mess around with program changes. By connecting one keyboard to MIDI input A and
the other to MIDI input B, you may effectively use your S6000 as two samplers! For example:
In this example, one keyboard would play the GRAND PIANO sound whilst the other plays the
huge layered pad combination. In such a situation, you might benefit from a weighted keyboard to
play the grand piano sound and a synth action keyboard for other sounds.
Don’t forget that to further enhance the S6000’s capabilities in this application, the sounds played
by each keyboard could be routed to their own sets of outputs.
A further variation on this would be to have two musicians playing the S6000 simultaneously. For
example, you could be vamping away on piano, clav - whatever - whilst the band’s drummer
triggers drum and percussion sounds from MIDI pads!
78
Version 1.21
s5000/ s6000
MULTI
These are just a handful of examples of the flexibility of the S6000’s MULTI mode. No doubt you
will find your own applications.
NOTES FOR EXISTING AKAI SAMPLER USERS.
The S6000’s MULTI mode replaces all other playback modes of Akai’s previous samplers.
Previously, on the S1000, S1100 and S3000, S3200, multi-timbral operation, layers and keysplits
were achieved by renumbering several programs to the same program number and then setting
MIDI channels, levels, etc., for each program accordingly. This had the advantage that whilst
being a bit cumbersome to use, it did allow you to have up to 128 multi-timbral setups loaded
simultaneously and these could be selected from the front panel or via MIDI program change
very quickly and easily. This way of working was good for live work, because, with some preproduction work, you could program your entire live set and have all the sounds for each song
loaded into memory (notwithstanding the old samplers’ memory limits, of course) and ready
for action with a turn of the DATA wheel or by sending out a MIDI program change command
from your keyboard to recall either a single sound, a set of layered or keysplit sounds or an
entire multi-timbral setup.
Then, in the S2000 and XL range, Akai introduced the MULTI mode. This had the advantage of
being quick and considerably easier to use plus had the benefit that you could use MIDI program
change on specific MIDI channels to change sounds within individual parts. However, having
only one multi in memory at any one time restricted the MULTI mode’s ability to be used live.
Furthermore, there was a limit of 16 parts (and 16 MIDI channels).
The S6000’s new MULTI mode embraces the benefits of both ways or working (as well as
overcoming each one’s restrictions!) and offers the best of all worlds as well as many
improvements and advantages:
•
It is quick and easy to use.
•
Up to 128 programs can be played simultaneously without the need for awkward
renumbering. Furthermore, using the CONVERT OLD MULTI function (PART/PROGRAM
TOOLS > PROGRAM LIST) allows you to convert ‘old’ Akai multis into the new format.
•
Single program playback, layered programs, keysplits and multi-timbral operation can all
be achieved within one convenient and consistent user interface.
•
32-channel multi-timbral operation.
•
Up to 128 multis may be loaded into memory at any one time and can be selected from the
front panel or via MIDI program or bank change thus allowing you to switch between single
program playback, layered sounds, keysplits and/or multi-timbral operation quickly and
conveniently (much like the ‘old’ Akai SINGLE mode, in fact!).
•
The programs in each part may be changed via MIDI program change on specific MIDI
channels.
Akai’s designers are well aware that for some ‘die-hard’ Akai users who may be used to using
the ‘old’ Akai way of working, the new regime may require some adaptation but it is felt that the
overwhelming benefits the new MULTI mode offers outweigh the temporary inconvenience of
‘converting’ to this new method of operation.
Version 1.21
79
EDIT PROGRAM
s5000/ s6000
EDIT PROGRAM
Pressing EDIT PROGRAM will show this screen:
This is ‘main’ EDIT PROGRAM page where you may select whatever it is you want to work on.
Pressing any of the keys takes you directly to that ‘section’. We will look at these in turn.
The program you wish to edit is selected by pressing F1 and turning the DATA wheel.
EDIT PART
It is also possible to edit a program within the context of a multi by pressing EDIT PART (F8) in the
multi mode. First select a part to edit - you will see something like this:
Then press EDIT PART. You will see this screen:
80
Version 1.21
s5000/ s6000
EDIT PROGRAM
As you can see, the ‘entry pages’ for EDIT PROGRAM and EDIT PART are essentially very similar
except...
•
In EDIT PART, you hear the selected program within the context of the selected multi (in EDIT
PROGRAM, you hear it in isolation).
•
In EDIT PART, you cannot select other programs to edit via F1 (in EDIT PROGRAM, you can
select any program to edit).
•
In EDIT PART, PROG TOOLS is replaced by SOLO PART. This allows you to solo the selected
sound so that you may hear it in isolation if you need to. You may toggle between SOLO on and
off very quickly simply by pressing F9.
•
You cannot create a new program in EDIT PART (in EDIT PROGRAM, F16 allows you to create
a new program if you want to build up a program from scratch).
•
In EDIT PART, the program in the selected part is automatically selected for editing (if you
press EDIT PROGRAM, the correct program may not necessarily be selected and you will
have to select the program separately).
EDIT PROGRAM, therefore, is where you can edit and create any program whilst EDIT PART is
where you edit a particular program within the context of the currently selected multi.
NOTE: If a program is shared between multis (i.e. in this example, if STRING SYNTH is
assigned to other multis), if you edit it using EDIT PART, those edits will be reflected in any
other multi where the program may be being used. If you need to edit differently within the
context of one multi without affecting other multis, you should first copy the program and work
on the copy.
Version 1.21
81
s5000/ s6000
EDIT PROGRAM
OUTPUT
Pressing this key (F2) will take you to the main OUTPUT page:
This page sets parameters that affect the final output level and pan position of the program. The
parameters are:
82
LOUDNESS
This sets the basic working level of the program. 100 is maximum. For
some degree of velocity sensitivity, this should be set to less than 100 (a
value of 80 is about ‘average’) but this may be varied (in conjunction
with the VELOCITY SENSITIVITY parameter) according to your playing
technique and/or the velocity sensitivity you require.
VELOCITY SENS
This sets the amount of effect velocity will have over the overall output
level of the program. +020 is about average but you may set this to any
value you like according to your playing technique. You may also invert
this for special effects where harder velocity makes loudness quieter!
This may be useful if you want to crossfade two programs with velocity.
In this case, set one to a positive velocity value and the other to a negative
velocity value.
Version 1.21
s5000/ s6000
AMP MOD 1/2
EDIT PROGRAM
These two parameters allow you to set the level for the controllers
assigned to these inputs. It is also possible to assign any of the sampler’s
controllers (MIDI controllers, LFOs, envelopes, etc.) to the two amplitude
modulation inputs.
To set the modulation amount, simply touch the key to the right of the
parameter you want to adjust and use the DATA wheel to set the value.
The controller is selected by ‘double’ clicking the key alongside the
parameter. For example, pressing it once will show this:
Here, you may set the modulation level.
Pressing the key again will move the cursor to the controller field and
will show this:
Here you may use the DATA wheel to scroll through the various
controllers.
This principle applies to all modulation inputs throughout EDIT
PROGRAM - press once to set level, press again to select the controller.
This type of operation is signified by the icon
in the corner of the
parameter field.
To do the same for the other AMP MOD input, repeat the above.
PAN MOD 1/2/3
These parameters allow you to create a variety of ‘autopan’ effects. The
most obvious of these, perhaps, would be to assign a slow LFO to one
of the PAN MOD inputs so that the sound moves backwards and forwards
across the stereo image. However, you could use velocity or aftertouch
or you could use an envelope so that the sound pans with every note.
Operation is identical to the AMP MOD inputs - press once to set level,
press again to select the controller.
Version 1.21
83
EDIT PROGRAM
GOTO SOURCE
s5000/ s6000
When the cursor is on either mod input field (controller or level) of any of
the modulation inputs - for example:
Pressing GOTO SOURCE will take you directly to that controllers page.
In the above example, you would go straight to LFO2:
Here, you may tweak and edit the LFO 2 parameters.
84
Version 1.21
s5000/ s6000
GOTO DEST
EDIT PROGRAM
Pressing GOTO DEST in this page will pop up this window:
You may return to the OUTPUT page (or any other destination)
immediately.
If the cursor is not on a valid modulation input (for example, if the
LOUDNESS parameter is selected or the cursor is on, say, the program
name) and you press GOTO SOURCE, you will receive this pop-up
dialogue prompt:
Similarly, if the mod source is one of the MIDI controllers (pitchbend,
modwheel, keyboard, etc. - in other words, a controller that has no
parameters associated with it), you will receive the same prompt.
NOTE: The GOTO SOURCE/DEST operation is common for all mod input functions in all
pages that have them.
MAIN
Version 1.21
This key takes you back to the main EDIT PROGRAM page.
85
s5000/ s6000
EDIT PROGRAM
MIDI/TUNE
Pressing MIDI/TUNE in the main EDIT PROGRAM page will show this screen:
The parameters are:
PROGRAM NUMBER
Sets the MIDI program number for the selected program. This allows
you to select programs remotely via MIDI within a part in a multi.
NOTE: You may also set the MIDI program number in the RENUMBER page in PART or
PROGRAM TOOLS > PROGRAM LIST. This may be more convenient as you can see the
program numbers for other programs simultaneously.
86
SEMITONE TUNE
Allows you to tune the program in semitones.
FINE TUNE
Allows you to fine tune the program.
TUNE TEMPLATE
This allows you select from a variety of different tuning templates such
as EVEN-TEMPERED, ORCHESTRAL, WERKMEISTER, etc.. You may
also set your own tuning template by selecting USER which you may
freely edit in the EDIT USER page.
KEY
Sets the key signature for the tuning template. The normal Western
EQUAL TEMPERAMENT allows you play in any key you like (which is
why it was developed!) but the other tunings can only be used in certain
key signatures. So, for example, if you want to use the WERKMEISTER
tuning on a piano sound and the piece you want play is D#, select D# in
the KEY parameter.
COPY TO USER
This key allows you to copy one of the preset templates to the USER
template so that you may edit it. To edit one of the templates, first select
it in the TUNE TEMPLATE field and press COPY TO USER. Now select
USER as the TUNE TEMPLATE. You may now use EDIT USER to modify
it.
Version 1.21
s5000/ s6000
EDIT PROGRAM
EDIT USER
Pressing EDIT USER shows this screen:
Here you may tune each semitone. To return to the MIDI/TUNE page, press F16. To return to the
main EDIT PROGRAM page, press MAIN (F8).
If you edit the tuning of each semitone in this page, you will see the changes in the graphic
representation of the keyboard in the MIDI/TUNE page.
Version 1.21
87
s5000/ s6000
EDIT PROGRAM
PITCHBEND
Here you may set pitchbend and other related parameters. Pressing PITCHBEND in the main
EDIT PROGRAM page will show this:
The parameters are:
PITCHBEND UP
This sets the limit for pitchbend up - the range is 24 semitones
PITCHBEND DOWN
This sets the limit for pitchbend down - the range is 24 semitones.
BEND MODE
You may select NORMAL or HELD.
NORMAL is the common type of pitchbend where all notes are bent as
you move the pitchbend wheel/lever regardless of whether you are
actually holding any notes down (i.e. they may be fading through their
release stage).
By selecting the HELD mode of pitchbend, ONLY THE KEY(S) YOU
ARE CURRENTLY HOLDING DOWN WILL BEND and all those notes
you are not playing but which may be fading through their release stage
will remain unchanged. If you release your finger from the key with the
pitchbend up (or down), as the note dies away, if you let the pitchbend
return to zero, that last note’s pitch will not change. If you release just
one note of a chord with pitchbend up or down, if you let the wheel or
lever settle at zero, only the notes you are holding will bend.
AFTERTOUCH
88
As well as using the pitchbend wheel or lever, you may also use aftertouch
to bend notes. The range is -12 to +12. You may only bend up or down
depending on the selection made - unlike the bend wheel/lever, you
cannot pitchbend both ways.
Version 1.21
s5000/ s6000
EDIT PROGRAM
LFOS
Pressing LFOs shows something like this screen:
The parameters are:
RATE
Sets the speed of the LFO. The range is very slow (at a setting of 0, it
takes over a minute to complete a full cycle) to very fast (around 100Hz).
An average vibrato rate setting is around 45.
DELAY
This sets the time it takes for the modulation to fade in.
DEPTH
Sets the initial depth of the modulation. This should be set to a value if
you want LFO1 modulation permanently on the sound (if you only want
to introduce vibrato or other modulation effects via the modwheel
however, this parameter should be set to 0 and the MODWHEEL
parameter - see below - should be set to a suitable value).
WAVEFORM
Nine modulation waveforms are available. These are
SINE
A smooth waveform suitable for vibrato. Also useful
for slow, smooth panning and filter sweeps.
TRIANGLE
Another waveform suitable for vibrato and slow
sweep effects.
Version 1.21
89
s5000/ s6000
EDIT PROGRAM
SQUARE
A ‘bi-polar’ square wave that moves above and below the note you are playing.
SQUARE +
This square wave only moves above the note you
are playing. It is suitable for trills and octave jumps,
etc..
SQUARE This square wave only moves down from the note
you are playing.
SAW BI
A ‘bi-polar’ rising sawtooth wave that moves above
and below the note you are playing.
SAW UP
This sawtooth rises up to the note you are playing.
SAW DOWN
This sawtooth falls down from the note you are playing.
RANDOM
Gives out completely random control signals.
LFO SYNC
When set to ON, all 128 LFOs10 (one per voice) run together at the
same rate. When switched to OFF, they each run at a slightly different
speed to create a more ‘ensemble’ effect on sounds such as strings,
brass, pads, etc..
RATE MOD
You may modulate LFO 1’s rate with this parameter and here you may
select a controller and set the amount of rate modulation. Press the key
once to set the mod amount; press again to select the controller.
DELAY MOD
You may modulate the delay time. Press once to set the amount of delay modulation; press again to select the controller.
DEPTH MOD
You may modulate the LFO’s output level here. The same principle applies - press once to set the depth mod amount; press again to select
the controller.
10
90
64 LFOs on an unexpanded S5000.
Version 1.21
s5000/ s6000
EDIT PROGRAM
MODWHEEL
Sets the amount of modulation that will be introduced by the modwheel.
AFTER TOUCH
This allows you to introduce vibrato using aftertouch.
GOTO DEST
This pops up a list of destinations the LFO may be assigned to for quick
and easy access to their pages.
GOTO SOURCE
When any of the mod input parameters are selected, pressing this key
will take you directly to the controller’s page.
NOTE: If a mod parameter is not selected, you will receive a dialogue prompt advising you of
this. Similarly, if the mod source is one of the MIDI controllers, you will receive the same popup prompt.
LFO 2
LFO 1 gives you access the LFO 2 via F7. Pressing this will show this screen:
The parameters are:
RATE
Sets the speed of the LFO. The range is very slow (at a setting of 0, it
takes over a minute to complete a full cycle) to very fast (around 100Hz).
An average vibrato rate setting is around 45.
DELAY
This sets the time it takes for the modulation to fade in.
DEPTH
Sets the initial depth of the modulation. This should be set to a value if
you want LFO1 modulation permanently on the sound (if you only want
to introduce vibrato or other modulation effects via the modwheel
however, this parameter should be set to 0 and the MODWHEEL
parameter - see below - should be set to a suitable value).
WAVEFORM
Nine modulation waveforms are available. These are
SINE
A smooth waveform suitable for vibrato. Also useful
for slow, smooth panning and filter sweeps.
TRIANGLE
Another waveform suitable for vibrato and slow
sweep effects.
Version 1.21
91
s5000/ s6000
EDIT PROGRAM
SQUARE
A ‘bi-polar’ square wave that moves above and below
the note you are playing.
SQUARE +
This square wave only moves above the note you
are playing. It is suitable for trills and octave jumps,
etc..
SQUARE This square wave only moves down from the note
you are playing.
SAW BI
A ‘bi-polar’ rising sawtooth wave that moves above
and below the note you are playing.
SAW UP
This sawtooth rises up to the note you are playing.
SAW DOWN
This sawtooth falls down from the note you are
playing.
RANDOM
Gives out completely random control signals.
LFO RE-TRIGGER.
Here, you can set whether or not LFO2 will re-trigger with every new
note-on or not. With RETRIGGER set to ON, each note you play will
reset the cycle of the selected waveform to its leading edge. For example,
with the triangle wave selected, you would get this result:
MIDI NOTE ON
This is useful for certain types of modulation effects where you want the
effect to start at the same point in the modulation waveform for every
note you play. For example, if you are using the square wave, you may
want it to always start on the rising edge with each note you play. The
same may apply for the sawtooth and random waveforms.
92
Version 1.21
s5000/ s6000
EDIT PROGRAM
However, there are occasions when you want the LFO to be free running
in the background. For example, on filter or panning sweeps where you
want the effect to be gradual as you play, you will want to switch
RETRIGGER to OFF to get this result:
MIDI NOTE ON
Here, the modulation waveform will ignore incoming note-on messages
and will be rising and falling giving you a gradual sweep through whatever
it is applied to. This is particularly useful when triangle is selected and
applied to the filter(s) as you can re-create the old filter sweep effects of
analogue synths.
RATE MOD
You may modulate LFO 2’s rate with this parameter and here you may
select a controller and set the amount of rate modulation. Press the key
once to set the mod amount; press again to select the controller.
DELAY MOD
You may modulate the delay time. Press once to set the amount of delay
modulation; press again to select the controller.
DEPTH MOD
You may modulate the LFO’s output level here. The same principle applies
- press once to set the depth mod amount; press again to select the
controller.
MIDI CLOCK
This ‘check box’ allows you to switch MIDI clock sync on or off. When it
is switched on, the LFO will only run when the sampler receives MIDI
clock signals.
CLOCK DIVISION
This sets how many beats there will be for each complete LFO cycle.
This way, you can synchronise filter, panning or other sweeps with your
song. For example, with it set to 4 BEATS/CYCLE one complete LFO
cycle will take place over the space of four crotchet beats so, in a 4/4
time signature, that equates to one cycle per bar:
Triangle wave set to 4 Beats/Cycle
To set the LFO to cycle, for example, over 4 bars of a 4/4 piece, youshould
set 16 and for 8 bars, 32, etc.. The total amount is 64 beats per cycle or
16 bars.
This scheme also allows you to cater for 3/4 time signature and so, for
example, to set the LFO to have one cycle over 4 bars of a 3/4 time
signature, you would set 12 or to have two cycles every two bars, you
would set 6.
Version 1.21
93
s5000/ s6000
EDIT PROGRAM
You may also set how many cycles there will be per beat and once you
go back beyond 1 BEAT/CYCLE, the parameter changes to X CYCLES/
BEAT. Thus, a setting of 8 CYCLES/BEAT will give you (not surprisingly!)
8 cycles for every crotchet beat.
**** NOTES ABOUT MIDI CLOCK SYNC ****
•
The MIDI clock tempo is actually a ‘global’ value that affects all programs equally. However,
each program may have its own clock division so that, for example, in one multi, you could
have four programs each set to sync to MIDI clock. Program 1 could be set to sweep the
filter once every four bars whilst program 2 could do the same over sixteen bars whilst
program 3 is panning back and forth over eight bars and program 4 uses a faster clock
division to sync vibrato to MIDI clock. It is not possible (or even desirable!) to have different
programs syncing to different tempos simultaneously.
•
You do not have to be receiving MIDI clock for LFO 2 to work and if the S6000 is not
receiving MIDI clock, the LFO will run at the tempo it last received. So, for example, if the
last MIDI clock it received was being generated at 144BPM, that is the speed (according to
the CLOCK DIVISION) that the LFO will run even if it is not actually receiving MIDI clock at
the time. This way, it is still possible to use LFO2 even if a no MIDI clock is present.
Furthermore, if you switch the sampler on and load programs that use MIDI clock sync (or
create programs and set MIDI clock sync), the default tempo will be 120BPM until such time
as the sampler actually receives actual MIDI clock. This is so that you can use and set LFO
2 without having to hook up your sequencer and load the sequence and have it running.
Once the sampler has received MIDI clock at any given rate, that is the rate at which the
programs’ LFOs will ‘free run’ when no MIDI clock is being received. So, for example, when
you switch on, the tempo will be 120BPM but once the sampler receives, say, 144BPM,
LFO 2 in all programs will subsequently ‘free-run’ at that rate when not actually receiving
MIDI clock.
•
You should only receive MIDI clock through one of the S6000’s MIDI inputs A or B. DO NOT
SEND MIDI CLOCK TO BOTH MIDI INPUTS. If you do, you will get extremely unpredictable
results (the LFOs will run twice as fast in fact as well as having erratic sync). If your sequencer
has multiple MIDI outputs and two are connected to the S6000 for 32-channel sequencing,
you should disable clock transmission on one the outputs (it doesn’t matter which).
•
LFO2 will sync to MIDI clock with an accuracy of better than 2%. The measurement error is
actually:
0.4% at 120BPM,
0.8% at 240BPM
1.6% at 480BPM and so on.
•
It is possible to see the incoming MIDI clock tempo in UTILITIES > MIDI SETUP.
GOTO DEST
This pops up a list of destinations the LFO may be assigned to for quick
and easy access to their pages.
GOTO SOURCE
When any of the mod input parameters are selected, pressing this key
will take you directly to the controller’s page.
NOTE: If a mod parameter is not selected, you will receive a dialogue prompt advising you of
this. Similarly, if the mod source is one of the MIDI controllers, you will receive the same popup prompt.
94
Version 1.21
s5000/ s6000
EDIT PROGRAM
KEYGROUP
So far we have seen functions that affect the program as a whole. The KEYGROUP pages allow
access to edit the individual keygroups. Pressing KEYGROUP shows this screen display:
The parameters are:
MUTE GROUP
This allows you to group several keygroups together so that they are
essentially monophonic. The main reason for this is for drums where
sometimes you want a sample to stop playing when another is played.
For example, you would want a closed hi-hat to stop an open hi-hat. To
do this, simply assign all the relevant keygroups to the same Mute Group.
For example, if all your hi-hats are in keygroups 3-6, assign those
keygroups to, say, Mute Group 1. All other keygroups will be unaffected
but all those in mute group 1 will be mutually exclusive - that is, if one is
sounding when another is played, it will be cut. For example:
OPEN HI-HAT
(or triangle, etc)
CLOSED HI-HAT
(or triangle, etc)
OPEN AND CLOSED HI-HAT WITH MUTE GROUP OFF
Version 1.21
95
s5000/ s6000
EDIT PROGRAM
OPEN HI-HAT
(or triangle, etc)
CLOSED HI-HAT
(or triangle, etc)
OPEN AND CLOSED HI-HAT WITH MUTE GROUP ON
In the first diagram, the open hi-hat continues to sound even though the
closed hi-hat is played. In the second example, however, the open hihat is shut off by the closed hi-hat thereby creating a more natural effect.
This function may also be used to emulate the characteristics of older
drum machines. On these early drum machines, whilst they offered
maybe 8 voice polyphony, each individual drum sound was usually
monophonic. This only became apparent when you tried to perform a
snare roll or something similar. Instead of the snare’s natural decay being
allowed to sound, the next hit would cut the previous one dead resulting
in a rather unnatural staccato effect. Of course, at the time, this was
undesirable but the dictates of musical fashion now say that this effect is
quite popular in some music styles!! By assigning your snare drum into
a mute group, you may re-create this effect. For example:
SNARE DRUM ROLL WITH MUTE GROUP OFF
In this example, each snare hit is allowed to decay naturally.
SNARE DRUM ROLL WITH MUTE GROUP ON
In this example, each hit is cut short by the next one.
On the S1000 and S1000 and in early versions of S2800, S3000 and
S3200 software, you needed to create a separate program, make it 1
voice polyphonic and assign it the same program number as the rest of
your drums. Now, you may do all this within one program which you may
find more convenient.
96
Version 1.21
s5000/ s6000
EDIT PROGRAM
OVERIDE FX
This allows you to send individual keygroups to the effects by overriding
the main program’s effects routing. The default will be MULTI (i.e. the
routing uses the effects buss selection set when the program is placed
in a MULTI) but you may also select OFF (i.e. the selected keygroup is
not routed to the effects) or FX1, FX2, RV3 or RV4.
FX SEND LEVEL
This allows you to set the amount of effect for each keygroup. In this
way, you can, for example, send individual drums in different amounts to
the effects. Furthermore, each drum could be routed to a different effect
(i.e. bass drum to a tight gated reverb, snare to a large hall, toms to a
medium hall, etc.).
SELECTING KEYGROUPS
In the top right hand corner of every keygroup page is the keygroup selector. Touch F9 and use the
DATA wheel to select the keygroup you wish to edit.
This key also has a drop down menu that allows you to switch between editing just single individual
keygroups or ALL keygroups. The selection is shown clearly in the keygroup select key:
You may still select individual keygroups using the DATA wheel but any edits you make will affect
all keygroups in the program.
TIP: A quick way of selecting keygroups is to press AND HOLD F1 and play a note on your
MIDI keyboard (or other controller). This will select that note’s keygroup. For example, in a
program with five keygroups spanning C0-B1, C2-B2, C3-B3, C4-B4, C5-G8, playing G3 will
select keygroup 3 - i.e. the one spanning C3-B3.
In the case where keygroups are layered or overlap, pressing and holding EDIT and repeatedly
playing the note will select each keygroup in turn.
Version 1.21
97
s5000/ s6000
EDIT PROGRAM
KEYGROUP ZONES
Pressing KEYGROUP ZONES shows something like this display:
The parameters are as follows:
ZONE 1/2/3/4
Samples are assigned here. To assign a sample, simply press F2, F3,
F4 or F5 and use the DATA wheel to scroll through the samples in memory.
A zone can contain a mono or a stereo sample11 and samples assigned
here can be normal RAM samples or ‘virtual’ samples. Having ‘virtual’
samples in a program means that they can be processed by the envelopes, filters, LFOs, etc., just like any normal sample and no distinction
is made between them. This opens up many exciting possibilities for
playing disk recordings alongside ordinary RAM samples.
TIP: When you select a keygroup zone using F2-5, if you now go to EDIT SAMPLE, the
sample in the selected zone is automatically selected for editing. Furthermore, if something
other than RAW SAMPLE is selected in the MONITOR parameter in EDIT SAMPLE, the program you are working on will also be automatically selected.
NOTE: Keygroups that have ‘virtual’ samples assigned to them have a polyphony of 1 voice
and you cannot play chords with ‘virtual’ samples. However, apart from this restriction, they
can be treated much like normal RAM samples.
11
98
Previous Akai samplers required the left and right channels to be assigned to Zones 1 and 2
separately with pan and other parameters set manually for each ‘leg’ of the stereo sample in each
zone. This restriction no longer applies. However, please note that ‘old’ Akai sound library will
transfer directly when loaded into the S6000 with the -L and -R ‘legs’ of the stereo sample appearing in their respective zones exactly as they were saved on the older model sampler. However, it is
possible to convert these ‘old’ stereo Akai samples into the newer .WAV format (see PROG TOOLS
> PROGRAM LIST > CONVERT -L/-R).
Version 1.21
s5000/ s6000
EDIT PROGRAM
ZONE LEVEL
This sets the level for the selected zone.
PAN/BALANCE
If the sample in the selected zone is mono, this parameter controls pan
to move the sound around the stereo image. If the sample in the selected
zone is stereo, this parameter works as a balance control.
FINE TUNE
This allows you to fine tune the selected zone.
PLAYBACK
This allows to select how the sample plays back. This overides the
sample’s own playback parameters. The options are:
Version 1.21
AS SAMPLE
The sample will play according to the PLAY
MODE set in EDIT SAMPLE.
LOOP IN REL
The sound will continue to loop during the
release phase of the envelopes.
LOOP TIL REL
The sound will loop as you hold a note down
but will play the rest of the sample after the
loop end during the release phase of the
envelopes.
NO LOOPING
The sound will play for its duration or until you
release the note, whichever is the shorter.
ONE-SHOT
The sample will play to the end regardless of
how long you play the note.
99
EDIT PROGRAM
s5000/ s6000
HIGH VELOCITY
This parameter set the high velocity range for the selected zone.
LOW VELOCITY
This parameter sets the low velocity for the selected zone.
For normal playback, you would normally set a zone to have a velocity
range of 0-127. However, by assigning different samples to the zones
and setting high and low velocity as appropriate, you can achieve velocity
crossfade and switching. For example:
In the first example, there are four distinctly different bass samples played
with different styles and these can be switched between using MIDI
velocity. Play soft and you’ll hear the sample SOFTBASS; play a bit
harder and you’ll hear THUMBBASS but really hit your keyboard hard
and you’ll hear PULL BASS.
If the velocity ranges overlap as shown in the second example, you can
use ZONE XFADE (F16) so that the zones will crossfade giving a
smoother transition.
ZONE XFADE
100
This ‘checkbox’ switches velocity crossfade on and off. With it set to off,
the zones will switch; when set to ON, zones with overlapping velocity
ranges will crossfade for a smoother transition.
Version 1.21
s5000/ s6000
EDIT PROGRAM
Like MULTI mode, the parameters down the right hand side of the screen have windows:
ZONE LEVEL WINDOW
The parameters are:
ZONE LEVEL
This duplicates the main ZONE LEVEL parameter seen in the ZONES
page and is included here for convenience.
PAN/BALANCE
This duplicates the PAN/BALANCE parameter found in the main ZONES
page.
OUTPUT
Here you may route zones to individual outputs.
When set to AS MULTI, when the program is placed in a multi part, the
keygroup(s) will appear at the outputs set in that part. If the program is
not associated with a multi, keygroups assigned AS MULTI will appear
at the main outputs 1/2.
TIP: The new output arrangement on the S6000 offers many improvements over previous
Akai samplers, especially for drum programs. On previous Akai samplers, it was not possible
to have some drum sounds coming out of the individual outputs with others appearing only at
the stereo outputs. This is easily achieved on the S6000.
For example, your kick, snare, hi-hats and tambourine keygroups can be routed to individual
outputs 1, 2, 3 and 4 respectively with your stereo mix of toms routed to outs 5/6 - in stereo!
Other stereo instruments or groups of instruments could appear at other stereo outs - all your
Latin percussion sounds appearing at, say outputs 7/8, for example. And so on.
This has never been possible on previous Akai samplers and is a great advance in output
routing flexibility.
FILTER
This parameter allows you to set the filter cutoff to maintain a consistent
tone between keygroups. The range is +/-100.
PAN/BALANCE WINDOW
This is actually identical to the ZONE LEVEL window shown above.
Version 1.21
101
EDIT PROGRAM
s5000/ s6000
FINE TUNE WINDOW
The parameters are:
KEYBOARD TRACK
Allows you to switch the keyboard off so that the zone plays at a constant
pitch of C3.
USEFUL TIP TO DRUM SAMPLISTS! Sample all your drums on C3 and assign them to any
key you like in the program and simply switch KEYBOARD TRACK to OFF for all keygroups.
They will now play back at exactly the pitch they were sampled at. In this way, you don’t have
to worry about setting notes when sampling and then trying to match them up in EDIT
PROGRAM. Other non-pitched samples such as sound effects, breakbeats, drum loops, etc.,
can be treated the same way.
102
SEMITONE TUNE
This allows you to tune the zone in semitone increments.
FINE TUNE
This duplicates the FINE TUNE parameter in the main ZONES page
and allows you to fine tune the selected zone.
Version 1.21
s5000/ s6000
EDIT PROGRAM
PLAYBACK WINDOW
The parameters are:
VELOCITY START
This parameter allows you to determine the way in which velocity affects
the playback starting point for each sample in a keygroup. The higher
the positive number, the earlier in the sample playback will start relative
to the key velocity (i.e. a high key velocity will start playback earlier in
the sample). A negative number has the opposite effect (a high key
velocity will start playback later in the sample than a low key velocity).
Played with a high velocity and a setting of +1000, the sample
starts at the beginning allowing the attack to be heard.
Played with a low velocity and a setting of +1000, the same sample
starts later in the sample thereby missing the attack of the sample .
Version 1.21
103
s5000/ s6000
EDIT PROGRAM
A positive setting is the normal selection and this effect is particularly
useful for simulating percussion instruments (try it with a bass drum)
because if you play hard, you hear the initial attack but if you play softly,
you don’t. Thus you can add more or less attack and ‘stick noise’ to the
sound using velocity. It can also be very effective with such instruments
as a heavily bowed cello - by setting a high positive value, hard keystrokes
will play the aggressive bowing whilst soft keystrokes will not. The same
could be done with overblown saxes or flutes, even synth sounds that
have a pronounced attack.
It is also recommended to use this with the VELOCITY > ATTACK
parameter found in the AMPLITUDE ENVELOPE (see later in this
section).
PLAYBACK
As per the main ZONES page.
SELECTING AND EDITING ZONES
This is not unlike the MULTI mode where you first select a part using the soft keys on the left and
then editing them using the parameter keys on the right, opening windows if necessary. So, for
example, to transpose Zone 2 by an octave, press F3, press FINE TUNE (F12) and then press the
WINDOW key (or press F12 again) to open the window where you can set the SEMITONE TUNE.
Close the window when you’ve finished.
TIP: When you select a keygroup zone using F1-4, if you now go to EDIT SAMPLE, the
sample in the selected zone is automatically selected for editing.
104
Version 1.21
s5000/ s6000
EDIT PROGRAM
KEYSPAN
This is where you set the note ranges of the keygroups to map them out across the keyboard as
you want. Pressing KEYSPAN shows something like this screen display:
A more complex program such as an intricately multi-sampled piano would look like this:
You may set note ranges in two ways - manually or via MIDI. Via MIDI is by far the easiest. First,
select the keygroup you want to set using F9 (typically, you will select KG1 to start from the
beginning). Now press SET HIGH NOTE or SET LOW NOTE as appropriate and switch SET VIA
MIDI to ON. Now play the notes on your keyboard to set the ranges. The cursor will jump to each
low and high note in the list. This is a very fast way to set up keygroup note spans and a whole
program can be set up in seconds!
The other way to set note ranges is manually. First select the keygroup you want to set using F9.
Now press SET HIGH/LOW NOTE to select the low or high note and use the DATA wheel to enter
a note. Now press SET HIGH/LOW NOTE again to select the low or high note and use the DATA
wheel to set the note. Repeat the process for all keygroups you want to set.
It is also possible to assign samples to Zone 1 of the keygroups in this page by pressing ASSIGN
SAMPLE (F14). In this way, it is possible to set up entire programs within the KEYSPAN page
without needing to jump between pages (however, please note that if you want to assign samples
to the other three zones, this should be done in the KEYGROUP ZONES page as normal).
Version 1.21
105
s5000/ s6000
EDIT PROGRAM
KEYGROUP CROSSFADE
As well as ‘butting’ keygroups end to end, you may also set keyspan overlaps.
Sometimes, when mapping samples out across the keyboard range, there can be abrupt tonal
changes from one sample/keygroup to another. In such circumstances, you may overlap adjacent
keyspan ranges. The S6000 will automatically crossfade the two keygroups for a smooth transition
between the keygroups. E.g.:
C0 - C4
KEYGROUP 1
D#3-G8
KEYGROUP 2
In this simple example, two keygroups have been set to overlap. When played, the region between
D#3 and C4 will crossfade.
NOTE: If there is a tuning discrepancy between the keygroups’ samples, you may experience
a ‘chorus’ effect in the overlap/crossfade region. Be sure to tune the samples precisely to
overcome this.
Also, please note that in the overlap region, two voices are used (four if they are stereo samples)
and so you will find that polyphony is reduced in the overlap/crossfade region.
106
Version 1.21
s5000/ s6000
EDIT PROGRAM
KG PITCH/AMP
Pressing KG PITCH/AMP in either the MAIN or KEYGROUP pages will show something like this:
The parameters are:
SEMITONE TUNE
This allows you to tune the keygroup in semitone steps.
FINE TUNE
This allows you to fine tune the selected keygroup.
KEYGROUP LEVEL
This sets the overall level of the keygroup. The range is +/-30dB.
You will note that this level control is after the filter and so cannot be
used to reduce level to the filter to prevent distortion if high resonance is
used. For that, use the filter’s ATTENUATION parameter. However, the
KEYGROUP LEVEL is useful when you have maybe used
ATTENUATION on the filter - the KEYGROUP LEVEL can be used to
bring the attenuated signal back up.
PITCH MOD 1/2
Here you may set pitch modulation levels for the selected keygroup.
You may also select a controller for the two pitch mod inputs by pressing
the soft key again to move the cursor to the controller field. Use the
DATA wheel to select the controller.
AMP MOD
Here you may set amplitude modulation levels for the selected keygroup.
You may also select a controller by pressing the soft key again to move
the cursor to the controller field. Use the DATA wheel to select the
controller.
GOTO SOURCE
This will take you directly to the selected controller’s page. Of course, a
mod input needs to be selected for this.
Version 1.21
107
EDIT PROGRAM
s5000/ s6000
FILTER
The filter page looks something like this:
The filter plays a key part in any sound and is responsible for some of the most dramatic real-time
effects available on the S6000. Amplitude can change level and panning can move the sound
around in the stereo image and, of course, you can add vibrato from LFO 1. The filters, on the
other hand, can totally transform a sound (especially with 26 to choose from!). So, before we look
at the various parameters, what is a filter?
A filter is a device that selectively removes, attenuates or boosts part of the sound and lets other
parts pass through unaffected. Almost every sound is made up of a series of very simple sine
waves at different frequencies. There is a fundamental frequency (i.e. the pitch of the note you are
playing) and then multiples of that frequency. These are called harmonics (sometimes also referred
to as overtones):
Fundamental
1st Harmonic (X2F)
2nd Harmonic (X3F)
3rd Harmonic (X4F)
108
Version 1.21
s5000/ s6000
EDIT PROGRAM
These harmonics combine to create more complex waveforms or sounds and the rule of thumb is
that the brighter the sound, the more harmonics it has (and/or, they are louder in respect to the
fundamental frequency). By manipulating these harmonics with a filter, you can transform the tone
or timbre of a sound.
Another way of looking at a sound is shown below. A typical synthesiser sawtooth wave would look
something like this if analysed (a brass instrument or strings or any other strident sounding instrument
may look similar):
FUNDAMENTAL
L
E
V
E
L
HARMONICS
FREQUENCY
There is the FUNDAMENTAL (i.e. the pitch of the note being played) and there is the series of
harmonics or overtones. In the case of a sawtooth wave, the first harmonic is twice the pitch or
frequency of the fundamental, the next is three times, the next four, then five, six, etc.. Each
harmonic is proportionally lower in level. In other words, the sound contains an equal spread of
odd and even harmonics.
A ‘true’ square wave such as you’d find on any synth comprises only odd numbered harmonics
(i.e. the harmonics are 3, 5, 7, 9, etc. times the fundamental). E.g.:
FUNDAMENTAL
L
E
V
E
L
HARMONICS
FREQUENCY
This gives the characteristic ‘hollow’ sound of not only a synth square wave but also clarinet and
other woodwind and ‘pipe’ sounds.
Both of these sounds are bright because you can hear all their harmonics. If you remove some of
these harmonics, however, their tone will change. The following, for example, would sound duller
or more muted than the sawtooth wave shown at the top of the page:
L
E
V
E
L
FREQUENCY
Version 1.21
109
s5000/ s6000
EDIT PROGRAM
Filters, therefore, can be used to remove harmonics from the sound (this is referred to as ‘subtractive
synthesis’) but other filters can be used to boost or emphasise certain frequencies.
The most basic filter is a LOWPASS filter, so called because it lets low frequencies pass though
unaffected but filters out higher frequencies.
For example, a lowpass filter whose filter cutoff frequency is set to maximum would have no effect
on the sound because all the harmonics would pass through unaffected:
L
E
V
E
L
FREQUENCY
This is the equivalent of selecting one of the S6000’s lowpass options with cutoff set to 100.
However, if you lower the cutoff frequency, some of the higher harmonics will be filtered out:
L
E
V
E
L
FREQUENCY
With the loss of upper harmonics, the sound will be more muted and duller in tone.
The lowpass filter is the most commonly used type because it mimics nature quite accurately.
In acoustic sounds, high frequencies usually have less energy and therefore die away faster than
low frequencies. As such, you can use an envelope generator applied to a lowpass filter to gradually
remove high frequencies throughout the duration of a note.
Also, the harder you play an acoustic instrument, the more you will ‘excite’ the higher harmonics
so the sound will not only be louder but also brighter in tone. Thus you can use velocity to control
timbre with a low velocity (i.e. playing ‘quietly’ so that cutoff is reduced) giving a muted timbre and
high velocity (i.e. playing ‘hard’ so that the cutoff frequency is raised) yielding a bright tone.
The lowpass filter is also the most commonly available filter type on most synthesisers and so can
be used to re-create the majority of synth sounds.
However, there are many different types of filter. Typically in the past, most synths were equipped
with nothing more than a simple lowpass filter but some advanced synthesisers (typically large
‘wall-to-wall’ modular synths) offered other filtering options. The S6000 is no exception and offers
not only a variety of lowpass options but also highpass, bandpass and many other filter types.
110
Version 1.21
s5000/ s6000
EDIT PROGRAM
A HIGHPASS filter is the opposite of LOWPASS in that it allows high frequencies to pass though
but removes or attenuates the lower frequencies:
L
E
V
E
L
FREQUENCY
This gives a characteristic ‘thin’ quality to the sound with the fundamental filtered out.
A BANDPASS filter lets a band of frequencies pass through unaffected whilst harmonics either
side of that band are removed or attenuated:
L
E
V
E
L
FREQUENCY
In the case of the BANDPASS, moving the cutoff frequency moves the band up or down the
frequency range thus lowering the cutoff would give this:
L
E
V
E
L
FREQUENCY
Another type of filter is the NOTCH filter:
L
E
V
E
L
FREQUENCY
The S6000 offers these and many more types of filtering options.
Version 1.21
111
s5000/ s6000
EDIT PROGRAM
Another aspect of filters, however, is RESONANCE. This emphasises the harmonics around the
cutoff frequency so, in the case of a lowpass filter, you might have something like this:
L
E
V
E
L
FREQUENCY
You can see that as well as boosting harmonics around the cutoff frequency, other harmonics are
also attenuated. If you sweep the cutoff frequency up and down its range (either manually from,
say, a modwheel or automatically from an LFO or envelope generator), instead of the brassy ‘waa’
sound you get with low resonance, you now get a characteristic ‘weeeoow’ sound as each harmonic
is emphasised and then attenuated through the filters frequency range.
The same would be true of a highpass filter:
L
E
V
E
L
FREQUENCY
In the case of a BANDPASS filter, increasing resonance tends to make the band narrower as well
as accentuating harmonics around the cutoff frequency:
L
E
V
E
L
FREQUENCY
The same is true of a notch filter except it’s the notch gets narrower (and usually deeper):
L
E
V
E
L
FREQUENCY
112
Version 1.21
s5000/ s6000
EDIT PROGRAM
There is one further aspect to filters one has to consider, however, and that is ROLL-OFF.
You will see filters referred to as 1-POLE, 2-POLE or 4-POLE - maybe even 6-POLE. A ‘pole’ is
equal to 6dB of attenuation per octave. Thus, a 2-POLE filter offers 12dB/Octave roll-off whilst a 4POLE offers 24dB/Octave rolloff. A 6-POLE filter offers a theoretical 36dB/Octave roll-off but these
are unusual largely because the difference between 4- and 6-POLE is so subtle that it is largely
inaudible in a properly designed filter - most of the ‘classic’ analogue synthesisers only offered 2or 4-POLE filters (i.e. 12dB/Octave and 24dB/Octave roll-offs). You can see the difference between
a 2-POLE and a 4-POLE lowpass filter in the following diagram:
Cutoff
L
E
V
E
L
FREQUENCY
A 2-POLE or 12dB/Octave lowpass filter
Cutoff
L
E
V
E
L
FREQUENCY
A 4-POLE or 24dB/Octave lowpass filter
Although the cutoff frequencies in both diagrams are the same, the roll-off on the 4-POLE is slightly
steeper. The effect is that the 2-POLE filter is a little ‘fizzier’ sounding than the 4-POLE as extra
harmonics are passing through because its roll-off is less severe.
In the ‘good old days’ of analogue synths, some manufacturers used 2-pole filters, others used 4pole filters. Moog synthesisers had 4-pole filters and many people attribute the classic MiniMoog’s
punchy bass end to this (other factors are actually responsible as well, as it happens). Sequential
Circuit’s Prophet 5 and Pro-1 also used 4-pole filters.
However, Oberheim synths typically had 2-pole filters and yet no-one accuses them of lacking any
‘punch’! Some synths offered a switch to choose the cutoff frequency’s response slope.
The S6000 offers both options and a wealth of other filter types besides.
So, with the theory out of the way, let’s now look at the filters’ parameters.
Version 1.21
113
EDIT PROGRAM
s5000/ s6000
FILTER MODE
Here you can select from one of the 26 different resonant filter types.
These are:
2-POLE LP
This is a 12dB/Octave lowpass filter with resonance.
4-POLE LP
This offers a 24dB/Octave lowpass filter with
resonance. This does the same as the 12dB/Octave
filter except that the roll-off slope is steeper. Thus
high frequencies are attenuated more dramatically
giving what some people refer to as a ‘punchier’sound
compared with the slightly ‘fizzier’ sound of the 2POLE lowpass filter.
2-POLE LP+
This is another 12dB/Octave lowpass filter but with
enhanced resonance.
2-POLE BP
This is a resonant bandpass filter with a 6dB/Octave
roll-off slope either side of the band.
4-POLE BP
This is a resonant bandpass filter with a 12dB roll-off
slope either side of the band. This has a similar effect
to the 2-POLE bandpass filter but its steeper rolloff
attenuates the harmonics more profoundly.
114
Version 1.21
s5000/ s6000
EDIT PROGRAM
2-POLE BP+
This is a bandpass filter with a 6dB/Octave roll-off
slope either side of the band but with enhanced
resonance.
1-POLE HP
A 6dB/Octave highpass with resonance. This allows
high frequency unaffected but attenuates low
frequency harmonics as the cutoff frequency is raised
from 0 to 100.
2-POLE HP
A 12dB/Octave resonant highpass filter similar to the
1-POLE HP but with a steeper roll-off.
1-POLE HP+
This offers a 12dB/Octave highpass filter but with
enhanced resonance.
Version 1.21
LO<>HI
A resonant filter that is lowpass at the lower end of
the frequency spectrum and highpass at the upper
end.
LO<>BAND
A resonant filter that is lowpass at the lower end of
the frequency spectrum and bandpass at the upper
end.
BAND<>HI
A resonant filter that is bandpass at the lower end of
the frequency range and highpass at the top end.
115
s5000/ s6000
EDIT PROGRAM
NOTCH 1
A notch filter with a single notch that attenuates
harmonics. The cutoff control sets the point of
attenuation whilst resonance simultaneously
increases the depth of the notch and narrows its
width.
NOTCH 2
A notch filter with a two notches spaced two octaves
apart. Resonance increases the depth of the notches
and narrows their width.
NOTCH 3
A notch filter with a two notches spaced three octaves
apart. Resonance increases the depth of the notches
and narrows their width.
WIDE NOTCH
Another dual notch filter with one notch in the upper
frequencies and the other in the lower frequencies.
Resonance has the same effect as the other notch
filters.
BI-NOTCH
A dual notch filter based on NOTCH 1 in which
modulation sweeps the notches in opposite
directions. As one moves up through the frequency
range, the other moves down and vice versa.
NOTE: The differences between the five notch filters are subtle, it must be said but with different
cutoff frequency and resonance settings and depending on the modulation settings and the
sound being processed, you will hear quite distinct differences.
116
Version 1.21
s5000/ s6000
EDIT PROGRAM
PEAK 1
A peak filter with a single peak that can be used to
emphasise a band of frequencies much like a single
band of EQ. Resonance increases the intensity of
the peak.
PEAK 2
A peak filter with a two peaks spaced two octaves
apart. Resonance increases the intensity of the
peaks.
PEAK 3
A peak filter with a two peaks spaced three octaves
apart. Resonance increases the intensity of the
peaks.
WIDE PEAK
Another dual peak filter with one peak in the upper
frequencies and the other in the lower frequencies.
BI-PEAK
A dual peak filter based on PEAK 1 in which
modulation sweeps the peaks in opposite directions
- as one moves up through the frequency range, the
other moves down and vice versa.
NOTE: The differences between the five peak filters are subtle, it must be said but with different
cutoff frequency and resonance settings and depending on the modulation settings and the
sound being processed, you will hear quite distinct differences.
Version 1.21
117
s5000/ s6000
EDIT PROGRAM
PHASER 1
A phase shifter created with a notch and peak filter
at around the same frequency. Resonance increases
the intensity of the peak and the depth of the notch.
PHASER 2
A phase shifter created with a notch and peak filter
with offset frequencies that has a slightly ‘swirlier’
sound as the frequency is modulated. Resonance
increases the intensity of the peak and the depth of
the notch.
BI-PHASE
118
A phase shifter based on PHASER 1 in which
modulation sweeps the peak and notch in opposite
directions - as one moves up through the frequency
range, the other moves down and vice versa.
Version 1.21
s5000/ s6000
VOWELISER
EDIT PROGRAM
This is a special filter configuration that is able to
produce certain vowel sounds and articulations (EEOO, EE-OR, EE-AH and OO-AA, OO-EH, OO-OW)
with certain settings (see the examples below).
NOTE: Because of the way that the FILTER ENVELOPE interacts with the filter and the special
way the VOWELISER works, it is recommended to set FILT ENV DEPTH to +000.
Two examples of vowel filters to produce vowel articulations as
described in their program names. The modwheel controls the effect.
Version 1.21
119
EDIT PROGRAM
s5000/ s6000
CUTOFF FREQ
Sets the initial cutoff frequency for the selected filter type.
RESONANCE
This allows you to sharpen the point at the cutoff frequency thereby
emphasising the harmonics at that point in some way (the exact effect
depends on the type of filter selected). The range is 0-15.
NOTE: Because of the high amounts of gain boost that take place with resonance, high settings
of resonance can cause distortion. If you experience such distortion, either back off the
resonance parameter a bit or, alternatively, reduce the input level to the filter using the
ATTENUATION parameter described below.
In extreme cases where the above measures do not reduce distortion, one option is to re-scale
the level of the actual sample(s) down in EDIT SAMPLE / MASTER.
KEYBOARD TRACK
Here you may set the keyboard to track the filter. This is so that you can
achieve an even tone across the keyboard range. +12 is the default and
this tracks the filter octave for octave - i.e. for every shift of pitch of one
octave, there is an according shift in cutoff frequency.
MOD INPUT 1/2/3
Here you may set the depth of the selected filter modulation controllers.
Different controllers may be assigned and mixed at these inputs for a
wide variety of filter sweeps and effects. These can range from subtle
timbral changes on an acoustic piano sound by routing a small amount
of velocity control. On the other hand, you could mix LFO1 (whose rate
is being controlled by, say, the modwheel) in with LFO 2 (whose depth is
being controlled by, say, the AUX ENVELOPE and whose rate is being
controlled by velocity) and also an inverted version of the AMP ENV for
outrageous synthesiser effects!
Pressing the mod input keys twice allows you to change the controller
assigned to the input.
FILT ENVELOPE
Takes you to the filter’s dedicated ADSR envelope page.
FILT ENV DEPTH
Sets the amount of sweep by the filter’s envelope. Note that this is a
duplication of the same parameter in the FILTER ENVELOPE page - it
is included here for convenience.
NOTE: When using the VOWELISER filter, because of the way the filter envelope controls the
filter, it is recommended that this parameter is set to +000
ATTENUATION
This allows you to turn down the level of the signal going to the filters to
compensate for potential distortion when using high resonance settings.
The range is 0-30dB in 6dB steps. 0dB is the normal setting but if you
experience any distortion with higher resonance settings, try adjusting
ATTENUATION.
NOTE: The gain boost produced by the ‘+’ type filters (i.e. 2-POLE LP+, 2-POLE BP+ and 1POLE HP+ can be so severe that even an ATTENUATION setting of -30dB may not be enough
to reduce distortion. In this case, back off the resonance a little or try other means of level
reduction.
120
Version 1.21
s5000/ s6000
GOTO SOURCE
EDIT PROGRAM
This will take you directly to the selected controller’s page. Of course, a
mod input needs to be selected for this.
Because each of the filter types have their own very distinctive characteristics, you may have to
adjust CUTOFF, RESONANCE and MOD INPUT settings as you switch from filter to filter to get
the best results. When switching between certain filter types, you may hear little or no difference at
all between them whilst switching between others will yield very distinct differences. Experimentation
is the name of the game here!
Version 1.21
121
EDIT PROGRAM
s5000/ s6000
AMP ENVELOPE
This is an ADSR envelope that is used to control overall amplitude:
The parameters are:
ATTACK
This sets the attack time of the envelope. High values produce a long
attack time (several seconds).
DECAY
This sets the time it takes for the amplitude to fall to the SUSTAIN level
(see below).
SUSTAIN
This sets the level the sound will sustain at when holding a note down.
RELEASE
This sets the time it takes for the sound to die away after the note is
released.
The graphic representation of the envelope shape is animated and updates in real-time as you
change these four parameters.
KEYSCALE
This allows you to vary the envelope shape according to key position
(i.e. higher notes can have a faster, shorter envelope than lower notes in
order to simulate the natural characteristics of certain sounds such as
piano, for example).
ENV TEMPLATE
This allows you to choose from a variety of preset envelope shapes.
NOTE: If you choose one of the templates and edit it in any way (tweak the attack or whatever),
it will revert to USER.
GOTO DEST
122
This pops up a window and allows you to go directly to any places where
the AMP ENVELOPE may be routed.
Version 1.21
s5000/ s6000
EDIT PROGRAM
AMP ENVELOPE WINDOW FUNCTIONS
As always, behind certain parameters is access to lesser used functions:
In the ATTACK window, parameters are:
ATTACK
Reproduced in the ATTACK window for convenience
VEL>ATTACK
This allows you to use velocity to control attack time. Setting a positive
value here will result in heavy keystrikes making the attack time faster
(and light keystrokes making the attack time slower). Negative values
set here will produce the opposite effect.
In the RELEASE window, the parameters are:
ON VEL>REL
This allows you to use note-on velocity to control the release time of a
sound. Setting a positive value here will result in heavy keystrikes making
the release time faster (and light keystrokes making the release time
slower). Negative values set here will produce the opposite effect.
RELEASE
This parameter is duplicated here for convenience.
Version 1.21
123
EDIT PROGRAM
s5000/ s6000
FILTER ENVELOPE
Pressing FILTER ENVELOPE in either the MAIN or KEYGROUP page will show this screen:
The parameters and window functions are identical to the AMP ENVELOPE described on the
pervious pages except....
FILTER
This takes you directly to the FILTER page.
ENV DEPTH
This sets the output level of the FILTER ENVELOPE.
Set to +000, it will have no effect on the filter or on anything else it may
be routed to in the APM modulation matrix.
NOTE: If you are using the FILTER ENVELOPE as a mod source elsewhere in the APM
modulation matrix (for example, if the filter envelope is being used to control, say, pitch), a
value other than +000 needs to be set here otherwise you will not hear the pitch sweep effect.
However, because this parameter also sets the level for the ‘hardwired’ link to the filter, setting
a value appropriate to the pitch sweep effect you want will also affect filter modulation which
may or may not be what you want.
124
Version 1.21
s5000/ s6000
EDIT PROGRAM
AUX ENVELOPE
Pressing AUX ENVELOPE will show something like this screen:
The parameters are:
RATE 1
Sets the time it takes for the envelope to get to LEVEL 1
RATE 2
Sets the time it takes for the envelope to get to LEVEL 2
RATE 3
Sets the time it takes for the envelope to get to LEVEL 3
RATE 4
Sets the time it takes for the envelope to get to LEVEL 4
LEVEL 1
Sets the level for RATE 1
LEVEL 2
Sets the level for RATE 2
LEVEL 3
Sets the level for RATE 3. This is also the level at which a note will
sustain when you hold a note
LEVEL 4
Sets the level for RATE 4.
Version 1.21
125
s5000/ s6000
EDIT PROGRAM
AUX ENVELOPE WINDOWS
RATE 1 and RATE 4 have window functions:
The parameters in the RATE 1 window are:
RATE 1
RATE 1 is duplicated here for convenience.
VEL>RATE 1
This allows you to use velocity to control RATE 1’s time. Setting a positive
value here will result in heavy keystrikes making RATE 1 faster (and
light keystrokes making the RATE 1 slower). Negative values set here
will produce the opposite effect.
The parameters in the RATE 4 window are:
126
KEYBOARD>R2/R4
This will set how much key position will affect RATE 2 and RATE 4.
VEL>RATE 4
This sets how much note-on velocity will affect the speed of RATE 4.
Setting a positive value here will result in heavy keystrikes making R4’s
time faster (and light keystrokes making R4’s time slower). Negative
values set here will produce the opposite effect.
RATE 4
This is duplicated here for convenience.
Version 1.21
s5000/ s6000
EDIT PROGRAM
CREATING PROGRAMS
In the main EDIT PROGRAM page, F15 is CREATE PROGRAM where you may create a brand
new, empty program. Pressing this pops up this screen:
An auto numbered name is automatically assigned using the currently selected program name as
a ‘seed’. You may, however, rename this if you want in the usual fashion either by using the
CURSOR </> keys and the DATA wheel or more conveniently with an external QWERTY keyboard.
CREATING (COPYING) KEYGROUPS
When in the KEYGROUP pages, it is possible to create (or rather copy) keygroups. In the
KEYGROUP pages, pressing COPY KEYGROUP (F15) will pop-up this prompt:
The selected keygroup will be copied. You may then use this as the basis for a new keygroup.
If you want to copy/create multiple keygroups, you may enter a number in the large numeric field
using the DATA wheel or numeric keypad.
Version 1.21
127
EDIT PROGRAM
s5000/ s6000
PROG TOOLS MENU
Pressing PROG TOOLS shows this drop down menu:
The functions are:
GET INFO
This shows the sampler’s current status regarding memory and items loaded, etc.:
128
Version 1.21
s5000/ s6000
EDIT PROGRAM
PROGRAM LIST
This takes you to a page where you may see the programs currently loaded into memory:
Here, you may rename, copy, delete and create programs as well as perform other program related
functions. These functions are:
RENAME PROGRAM
This pops up a prompt and you may rename the program:
You can name the program in the usual way.
Version 1.21
129
s5000/ s6000
EDIT PROGRAM
COPY PROGRAM
This pops up a prompt and you may copy the selected program:
You may use the name automatically generated by the copy process or
you may enter your own.
DELETE PROGRAM
You may delete the selected program:
The SAMPLES checkbox on F14 allows you to select whether you also
want to delete the samples associated with the selected program. With
it checked, the samples will be deleted.
NOTE: If any samples are used by any other programs currently in memory, those particular
samples will not be deleted.
130
Version 1.21
s5000/ s6000
CREATE PROGRAM
EDIT PROGRAM
You may create a new program:
This is the same as the CREATE PROGRAM function found on the main
EDIT PROGRAM page.
Version 1.21
131
EDIT PROGRAM
PURGE
s5000/ s6000
This useful function deletes all programs and samples not currently being
used by any multis in memory (these programs are referred to as
‘orphans’):
You may end up with ‘orphans’ in memory when you load several sounds
to try out. For example, when building up a multi, you may load in a few
drums programs to see which one you like. Once you have settled on
the one you want to use, all the others are redundant. Rather than deleting
each one manually, you can use PURGE to get rid of these and make
more memory available.
Whilst the PURGE function is useful for clearing orphan programs and their samples from
memory, it could be that you have programs ‘outside’ the multis that are intended to be
selected via MIDI program change within the parts.
Be careful with your use of PURGE as you may accidentally delete these.
132
Version 1.21
s5000/ s6000
CONVERT -L/-R
EDIT PROGRAM
This allows you to convert ‘old’ Akai -L/-R stereo samples into interleaved
stereo .WAV samples. Pressing this pops-up this prompt:
To continue, press YES (or NO to cancel).
The process will examine the program and convert each -L/-R sample
into a single stereo file. It will remove the original samples from the
program (but not from memory) and will also make the appropriate
adjustments to the keygroup zones to which they are assigned (i.e.
instead of two mono zones panned hard left and right, you will end up
with one stereo zone panned centrally).
If the process is successful, you will be returned to the PROGRAM LIST
screen.
Version 1.21
133
s5000/ s6000
EDIT PROGRAM
**** NOTES REGARDING CONVERT -L/-R ****
The process is looking for identically matching pairs.
Because it is not possible to have separate start and end times of left and right loop points in
an interleaved stereo sample, both samples have to have identical settings. This is normally
the case with stereo samples as any difference in start times, loop length or position will result
in the stereo imaging being inaccurate.
If the process finds a stereo pair of samples that do not match exactly, you will receive the
following prompt:
You should press OK and identify those samples that do not match and make the necessary
adjustments.
Alternatively, you can try again but this time switch OVERIDE to ON (i.e. checked ). This will
run the process but will automatically copy the parameters from the left channel to the right
channel. Please note, however, that this may upset the loop on the right channel which may
cause clicks or other loop related glitches. In this case, you are advised to re-loop the new -S
stereo sample created by the process.
It must be said that this function assumes that the original sample editing was done in ‘stereo’
and so, to preserve stereo phase coherency, start times of the left and right channels should
be the same as should loop start and end times. If, however, some ‘mono’ editing was done on
each ‘leg’ of the stereo sample by the original programmer (which, ideally, it shouldn’t have!),
the success of this function cannot be guaranteed.
134
Version 1.21
s5000/ s6000
CONV OLD MULTI
EDIT PROGRAM
This allows you to convert ‘old’ Akai ‘multis’ or layers into new, S5/6000
format multis. For newcomers to the S5/6000, to understand this function,
a quick history lesson is required!
On the S1000, S1100 and S3000, multis and layers were achieved by
setting several programs to the same program number. In the case of
multi-timbral setups, each program would be given its own unique MIDI
channel or, in the case of layering, programs would share the same
MIDI channel. Thus, you may have:
*1
*1
*1
*1
*1
*1
DRUMS 1
GR PIANO
E.PIANO
SLAP BASS
BIG STRINGS
BASS SYNTH 4
MIDI 1
MIDI 2
MIDI 3
MIDI 4
MIDI 5
MIDI 6
Etc..
Although the concept of multis was introduced on the S2000, S3000XL
and S3200XL, for the sake of ‘legacy’, this feature was retained (and,
indeed, some people continued to use it despite the convenience of the
multi). The CONVERT OLD MULTI allows you to convert such setups to
a new S5/6000 multi. It works as follows:
Imagine you have loaded an ‘old’ S1/2/3000 multi. You will have several
programs all sharing the same program number:
Version 1.21
135
EDIT PROGRAM
s5000/ s6000
You can confirm this by pressing RENUMBER:
In either screen, you can convert such a setup simply by moving the
cursor to program sharing the same program number and pressing
CONVERT OLD MULTI. You will receive this prompt:
Press ADD TO CURRENT to add the selected program number to the
currently selected multi or press CREATE NEW to create a new multi to
add the program(s) to. If you create a new multi, its name will be that
shown in the prompt (i.e. S1-3K MULTI 1).
136
Version 1.21
s5000/ s6000
EDIT PROGRAM
The multi will now contain all programs of the same number and the
MIDI channels, levels, pan position, output assignments, tuning, etc.,
used in the ‘old’ multi/layer will automatically be set and the new format
multi should play pretty much the same as the original would on an S1000,
S3000 or whatever.
NOTE: The function is not foolproof. For example, you may load in an old S1000-style ‘multi’
numbered, say, #3. If any other programs with that number are already loaded, they too will be
converted in this process. As such, the function is best used in the RENUMBER page so that
you can see programs’ numbers. The RENUMBER function is described below.
RENUMBER
This takes you to a new page where you may change the MIDI program
number of the programs. Pressing RENUMBER will show something
like this screen:
Programs may be given a number 1-128 or OFF.
MIDI program numbers are used in order to select programs within a
part remotely via MIDI. For example, you may have a stereo acoustic
piano sound in Part 2/MIDI channel 2 that you want to use in the verses
of a song but which you want to change to an electric piano sound in the
chorus. By issuing an appropriate MIDI program change command on
channel 2, you can achieve this and the two will swap over when you
want them to. For example, if STEREO PIANO is MIDI program number
#5 and ELECTRIC PIANO is MIDI program #12 - by issuing program
change commands #5 and #12 on MIDI channel 2 at the appropriate
moments in the song, you can switch between these sounds.
Version 1.21
137
EDIT PROGRAM
s5000/ s6000
However, a problem exists when you load these sounds into memory in
that, for example, the STEREO PIANO sound you loaded could have
MIDI program number #1 and the ELECTRIC PIANO sound could be
program #6 (or they could be both program #1 or whatever depending
on where they were loaded from). In other words, in order for them to be
selected correctly via MIDI program change, you need to renumber them
to the correct MIDI program numbers.
However, another potential problem exists. You may renumber the stereo
piano and electric piano correctly but may find that other programs with
these numbers already exist in memory. To prevent a conflict in these
circumstances, other programs may need to be renumbered.
There is another problem too! The range of MIDI program numbers is 1128. However, it is possible to load many more programs than this into
the S6000’s memory and, theoretically, you may have hundreds of
programs loaded. However, there may only be a handful of programs
you need to change within a multi using MIDI program change.
The RENUMBER screen allows you to renumber those programs that
will be required to be changed via MIDI program change whilst switching
those that don’t to ignore such changes.
To renumber a program (or programs), move the cursor to the program
you want to renumber and use the DATA wheel to set the appropriate
number (or switch it to OFF).
Pressing RENUMBER 1-XXX will renumber all programs sequentially
1-128 (or whatever the upper limit is of the number of programs in
memory). The programs will be renumbered in the order in which they
appear in the list. If there are more than 128 programs in memory, any
above 128 will be renumbered to 128.
When you press RENUMBER 1-XXX, you will receive a prompt asking
you to confirm that you wish to proceed. Respond accordingly.
Pressing SET ALL TO OFF will (not surprisingly!) turn all programs
numbers off. This way, you can clear all program numbers so that it is
easier and clearer to renumber just those that will be affected by MIDI
program change.
When you press SET ALL TO OFF, you will receive a prompt asking you
to confirm that you wish to proceed. Respond accordingly.
138
Version 1.21
s5000/ s6000
EDIT PROGRAM
KNOWN PROBLEMS WITH MIDI PROGRAM CHANGE
This scheme is far from foolproof and there are some problems associated with program
change. Some are unique to samplers whilst others are common to all sound modules. These
are listed here:
•
If two programs share the same program number and you select that program number via
a MIDI program change command, the first program found will be selected.
•
If several parts share the same MIDI channel and a program change command is sent on
that channel, all parts will select the one sound which will appear in all four parts.
•
If a program is renumbered (perhaps because another program has that program number),
you will need to change the program change number on the sequencer.
•
If SAVE MULTI+PROGS+SAMPS is used, programs ‘outside’ the multi that are intended
for remote selection via MIDI will not be saved and so it will be necessary to save these
separately (or to load them in separately next time you load the multi).
If you try any of the above routines and no programs are loaded, you will receive this prompt:
You are offered the option to create one. To cancel the prompt, simply press NO (F8).
Version 1.21
139
EDIT PROGRAM
s5000/ s6000
QUICKLOAD
This takes you to a simplified version of LOAD where you may load programs and their associated
samples into memory quickly and easily:
Being a ‘quickload’ function, it only shows the programs available for loading.
To load a program, simply select it in the usual way using F15/16 (SELECT), press LOAD PROGRAM
and follow the on-screen instructions.
To leave the page, press EXIT.
QUICKSAVE
`
This allows you to quickly save the selected program:
The currently selected program is selected to save. You see its name and the folder it will be saved
to (if any). Using the check boxes, you also have the option to save all the programs in memory if
you prefer (or just the currently selected one) with or without the samples.
NOTE: PROG TOOLS is not available in any of the keygroup pages. Neither is it available
when using EDIT PART.
140
Version 1.21
s5000/ s6000
EDIT SAMPLE
EDIT SAMPLE
Whilst MULTI is where you can set superficial attributes to a sound such as level, pan, FX send,
etc., and EDIT PROGRAM is where you have access to deeper levels of sound editing, EDIT
SAMPLE is where you edit the raw samples that make up a sound. Pressing EDIT SAMPLE
shows this page:
The sample you wish to edit is selected by pressing F1 and turning the DATA wheel.
On each sample edit screen, icons display information about the selected sample.
This icon shown after the sample name indicates that the sample is looped. If
this icon is not shown, the sample is not looped.
This icon indicates that the sample is mono.
This icon indicates that the sample is stereo.
Centre screen, further information about the current sample is also shown. You can see its length,
its sample rate and whether it is a normal RAM sample loaded into memory or a ‘virtual’ sample
that will play from disk. The sample’s original note is also shown here (in this case, C5). The
MEMORY box shows the contents of the sampler.
MONITOR
This allows you to monitor the ‘raw’ sample - i.e. in isolation with no processing by the program it
is in - or you can monitor/edit the sample within the context of the program it assigned to. For
example, let us say you have made a snare drum sample and this is placed into a program DRUMS
1. By selecting DRUMS 1 in this field, you will be able to edit it in EDIT SAMPLE whilst listening to
the other drums in the program.
TIP: When editing a sample within the context of a program (i.e. a program is assigned in the
MONITOR parameter), if you press and hold F1 whilst playing notes on the keyboard, the
samples assigned to those notes in the selected program’s keygroup will be automatically
selected. So, for example, if you want to edit the snare sample on D1 of your DRUMS program,
press and hold F1 and play D1 - the snare sample will be selected.
The rest of the keys on this page take you directly to the sample editing functions.
Version 1.21
141
s5000/ s6000
EDIT SAMPLE
MASTER
This gives access to certain ‘general purpose’ sample editing functions:
The sample’s waveform is shown at the bottom of the screen. The inverted/highlighted area is the
sample’s loop.
The parameters are:
142
ORIGINAL NOTE
Here you see the sample’s original note - i.e. the note it was recorded
on. This may be changed here.
SEMITONE TUNE
Here you may tune the sample in semitone steps.
FINE TUNE
This allows you to fine tune the sample.
MAKE MONO
This will convert a stereo sample into a mono sample by merging the left
and right channels into one mono sample that is half the size of the
original. This may be useful in non-critical situations where stereo is not
important (i.e. live gigging). Converting a stereo sample to mono will
also halve loading times as well as conserving memory which, again,
may be useful in a live gigging situation.
Version 1.21
s5000/ s6000
EDIT SAMPLE
Pressing MAKE MONO will show this progress display:
A progress bar will move left to right and a percentage of progress is
also shown. An animated ‘waveform processing’ icon is also used to
further indicate sample processing activity.
At the end of the process, you will receive this prompt:
Version 1.21
143
s5000/ s6000
EDIT SAMPLE
A new ‘autonamed’ sample will be created. You may rename this if you
want in the usual way using the CURSOR </> keys and the DATA wheel
or an external QWERTY keyboard (if connected). You can use PLAY
ORIGINAL and PLAY NEW to compare the two samples. Depending on
the results...
*
KEEP ORIGINAL will keep the original sample and will discard the
new sample (this is basically an ‘abort’ function).
*
KEEP NEW will keep the new sample created by the process but will
delete the original source sample from memory.
*
KEEP BOTH will, not surprisingly, keep both samples. This is the
safest option as you have the original to fall back on.
*
OVERWRITE will keep the new sample but will use the original
sample’s name.
IMPORTANT NOTE: This process is common to ALL off-line sample editing functions and is
consistent throughout all the off-line editing processes. As such, it is not specifically described
for each sample editing function but is simply referred to as the “PLAY/KEEP ORIGINAL/
NEW/BOTH and RENAME prompt”.
144
RE-SCALE LEVEL
This sets the level for the RE-SCALE function and allows you to turn the
level of a sample up or down. This is an ‘off-line’ function and will show
the “Processing sample” progress display described above followed by
the PLAY/KEEP ORIGINAL/NEW/BOTH and RENAME prompt.
RE-SCALE
This initiates the RE-SCALE process. Pressing this will show the
“Processing sample” progress display described above followed by the
PLAY/KEEP ORIGINAL/NEW/BOTH and RENAME prompt.
NORMALISE
This allows you to bring a sample’s level up to optimum. Pressing this
will show the “Processing sample” progress display described above
followed by the PLAY/KEEP ORIGINAL/NEW/BOTH and RENAME
prompt.
REVERSE
This allows you to reverse a sample. Pressing this will show the
“Processing sample” progress display described above followed by the
PLAY/KEEP ORIGINAL/NEW/BOTH and RENAME prompt.
MAIN
This returns you to the main EDIT SAMPLE page.
Version 1.21
s5000/ s6000
EDIT SAMPLE
TRIM
Pressing TRIM will show something like this screen display:
Here, you can set start and end points and discard audio either side of them. The waveform
display is slightly different to that shown in the MASTER page in that the upper waveform shows
an overview of the sample with the loop area highlighted whilst the main lower waveform display
allows you to zoom in on it for a finer resolution:
The parameters are:
START/END
These set the start and end points of the region you wish to edit. Use the
CURSOR keys to move around the field and the DATA wheel to adjust
the value. For example, in the screen shot shown above, to make a big
change to the start point, move the cursor to the 3 of 33989 using the
CURSOR < key. As you move the DATA wheel, you will increment in big
jumps. This is good for getting some way into the sound with little effort.
When you are close to where you want to be, move the cursor one
position right using the CURSOR> key to edit the start point in smaller
increments. As you get closer and closer to the point you want to set,
you can use finer incrementation until, with the cursor on the furthest
right field, you are editing to a resolution of individual sample accuracy.
You can use ZOOM IN to see the waveform with greater accuracy. You
will hear the results in real-time as you play your MIDI keyboard or use
the ENT/PLAY key and adjust the START or END times.
NOTE: If the sample has a loop, you cannot move the START and/or END point within the
loop.
Version 1.21
145
EDIT SAMPLE
FIND START/END
s5000/ s6000
Pressing either of these pops up a window:
You should set a threshold level at which to find the start (or end) point.
The above example is probably not a good one but in the case of a drum
sound with a lot of ‘dead space’ such as the following, FIND START and
FIND END is very useful.
By setting an appropriate THRESHOLD, you can automatically set
START and END points to aid you with your editing.
146
Version 1.21
s5000/ s6000
PLAY TO
EDIT SAMPLE
This allows you to play to the currently selected edit point (i.e. with the
START parameter selected, it will play to the start point; with the END
parameter selected, it will play to the end point).
An edit point must be selected for the PLAY TO function to work.
PLAY FROM
This allows you to play from the currently selected edit point (i.e. with
the START parameter selected, it will play from the start point; with the
END parameter selected, it will from the end point).
An edit point must be selected for the PLAY FROM function to work.
ZOOM IN/OUT
This allows you to zoom in on the main waveform display. The ‘overview’
(i.e. the upper, smaller waveform display) always displays the full sample
regardless of the zoom factor. The waveform display style (LOG or LIN)
is shown between the keys (see later - SAMPLE TOOLS).
NOTE: Either the START or END points need to be selected for the zoom function to work.
TRIM SAMPLE
This displays the following pop-up menu:
The options are:
DISCARD
LOOP START>END
This will discard audio before the TRIM start point and after the TRIM
end point.
This will discard audio either side of the loop (if one is set).
START>LOOP END
This will discard audio before the TRIM start point and after the LOOP
END point.
CANCEL
This closes the pop-up should you change your mind.
Pressing one of these will initiate the selected TRIM function. You will see the usual “Processing
sample” progress display followed by the PLAY/KEEP ORIGINAL/NEW/BOTH and RENAME
prompt12 .
12
Version 1.21
The process may be so fast that you may not see a progress display, especially on shorter
samples.
147
s5000/ s6000
EDIT SAMPLE
CHOP
Pressing CHOP shows something like this screen:
This is similar in many ways to TRIM except that edits are done within the START/END region and
you may erase a portion of the sample (i.e. remove it and keep the gap) or you may cut a portion
from the sample (i.e. remove it and close the gap).
The parameters are also similar:
START/END
Sets the start and end points for the edit.
NOTE: If the sample has a loop, you cannot move the START and/or END point within the
loop.
PLAY REGION
Allows you to play the region marked by the START/END points.
PLAY TO/FROM
Plays to or from the selected edit point. With START selected, PLAY TO
will play up to the start point; PLAY FROM will play from it. With END
selected, PLAY TO will play up to the end; PLAY FROM will play from
the end.
PLAY REGION and PLAY TO/FROM allow a great deal of flexibility when
auditioning your edit prior to committing it.
ZOOM IN/OUT
148
These allow you to zoom in on the selected editing point for greater
resolution.
Version 1.21
s5000/ s6000
EDIT SAMPLE
Pressing CHOP SAMPLE will show this pop-up menu:
EXTRACT allows you to mark a section of a sample and extract it to a new sample. For example,
this may be used to extract a snare drum or kick drum from a drum phrase. For example, you may
have this drum phrase:
Set the START and END points on the snare you want to extract:
Pressing EXTRACT will remove the snare drum and create a new sample.
Pressing ERASE will remove the area marked by the START and END but will keep the gap:
Original
After ERASE
Version 1.21
149
s5000/ s6000
EDIT SAMPLE
CUT will remove the area marked by the START and END points and will butt the remainder
together: E.g.:
Original
After CUT
CANCEL will, of course, abort the action.
Pressing EXTRACT, ERASE or CUT will initiate the selected function. You will see the usual
“Processing sample” progress display followed by the PLAY/KEEP ORIGINAL/NEW/BOTH and
RENAME prompt13 .
13
150
The process may be so fast that you may not see a progress display, especially on shorter
samples.
Version 1.21
s5000/ s6000
EDIT SAMPLE
LOOP
Pressing loop will display this screen:
The waveform display shown to the left of the screen shows an overview of the waveform and the
loop points. The loop length is shown above this display14 . This display is not affected by ZOOM
IN/OUT.
The smaller waveform display shown to the right of the screen shows the ‘loop join’ point at the
waveform level. You can use ZOOM IN to magnify this display in order to match the waveform
more precisely. The parameters on the LOOP page are:
LOOP START/END
These set the start and end of the loop. Unlike previous Akai samplers,
these are set independently of each other. Loop START and END times
cannot be set beyond the TRIM page’s START and END times.
PLAY MODE
This allows you to set how the sample will play. The choices are:
14
Version 1.21
NO LOOPING
This selection causes the sample to play without
loops for as long as the key is held down. If the
sound is not long enough, it will finish even though
you are holding down a note. If the sample is still
sounding, however, as soon as the key is released,
the sound will stop.
ONE SHOT
This will cause the sample to be played in its entirety
regardless of how long the key is pressed. This is
useful for triggering drums or ‘phrases’ as an
instantaneous trigger signal or key press will play
the whole sample and the key does not have to be
held down for the whole length of the sample.
LOOP IN REL
When a key is pressed, the sample will loop according
to the LOOP settings for as long as you hold the key.
When the key is released, the loop will continue to
play as the release falls away (this depends on the
settings of the envelope generators in EDIT
PROGRAM).
In UTILITIES - PREFERENCES, you can choose to display the loop length in time (i.e. minutes
and seconds) or in sample points. The screen shot shown above displays the loop length in
time.
151
s5000/ s6000
EDIT SAMPLE
LOOP TIL REL
This will play the sample and will loop for as long as
you hold the key but, as soon as you release the
note, the loop will stop playing and the rest of the
sound (if any) will play through the release phase of
the program’s envelope.
NOTE: It is not possible to loop ‘virtual’ samples. and so it is only possible to select NO
LOOPING or ONE-SHOT for ‘virtual’ samples.
The PLAY MODE’s WINDOW parameter reveals these further parameters:
The parameters are:
LOOP LOCK
Once you have set a good loop, you may lock its length and ‘slide’ it
around the sample to see if it sounds better in a different position.
PLAY MODE
The PLAY MODE parameter duplicated here for convenience.
LOOP DIRECTION
You may set FORWARDS or ALTERNATING:
Original with loop start/end settings
Playback with FORWARD loop
Playback with ALTERNATING loop selected
As you can see, you can get a smoother loop with ALTERNATING
selected in some circumstances. ALTERNATING is particularly useful on
long loops with sounds such as strings, etc.. It can also be useful for
looping decaying sounds such as cymbals or pianos.
152
Version 1.21
s5000/ s6000
XFADE LENGTH
EDIT SAMPLE
This sets the length of the loop crossfade. What this function does is to
crossfade a portion of the sound before and after the loop according to
the time set in the XFADE LENGTH field. This will (should!) smooth out
any glitches you may have. There are no rules and so some
experimentation will be required. Having said that, although the process
is not guaranteed, this can be very effective in getting smooth loops.
The XFADE LENGTH also has a WINDOW function. Pressing WINDOW
reveals these further functions:
FADE PROFILE
Here you may select from a choice of crossfade curves (LINEAR, LOG
and SINE). Of these, for a smooth crossfade, SINE is possibly the best
selection as it gives what is also known as an ‘equal power’ crossfade
but you may like to experiment for the best results.
XFADE LENGTH
This parameter is duplicated for convenience.
CROSSFADE
This initiates the crossfade function. Pressing this will display the usual
“Processing sample” progress display followed by the PLAY/KEEP
ORIGINAL/NEW/BOTH and RENAME prompt. You should respond
accordingly to the final prompt according to the results of the XFADE
function.
PLAY LOOP
This key will play only the looped portion of the sound you have set. This
is a fast and convenient way to hear the loop without having to also hear
the rest of the sample (particularly useful for long samples!).
However, a feature of this key is that it is a ‘latching’ key - press it once
to play the loop, press it again to stop playing the loop. What this means
is that you can set the loop start and end points in real-time playing
whilst the loop is cycling round.
So, to set a loop, place the LOOP START and END times at position
which ‘look’ good on the waveform display (i.e. at points of equal or
similar amplitude). Now press PLAY LOOP to play the loop you have
set. If it ‘glitches’ with pops and clicks, you can now adjust the start and
end points until the glitches are reduced (you could also use AUTO FIND
- see below) to assist you). Once you are happy with the loop, press
PLAY LOOP again to stop the loop playing and play as normal from your
keyboard.
NOTE: The PLAY LOOP function is automatically disabled (i.e. loop playback is stopped) as
soon as you leave the LOOP page.
Version 1.21
153
s5000/ s6000
EDIT SAMPLE
ZOOM IN/OUT
This allows you to view the right hand waveform display in greater detail
when trying to match waveforms.
AUTO FIND
Pressing this will cause the sampler to look for the best match point for
a loop. With simple waveforms, the results are almost guaranteed to be
perfect. However, with more complex waveforms, whilst you may get an
acceptable loop, it may still not be perfect and may exhibit some clicks
and thumps (in which case, use CROSSFADE to smooth them out
perhaps).
Repeated pressing of the AUTO FIND function moves the LOOP START
point nearer to the LOOP END point.
*** IMPORTANT NOTE ***
When trimming the end point of a looped sample, 15 sample points are required between the
loop end and the sample end.
Sample
Start
Loop
Start
Loop
End
Sample
End
15 samples
The reason for this is because of the complex interpolation method used on the S5/6000 to
minimise transposition distortion.
If S5/6000 samples were only played at nominal pitch (i.e. the original note the sample was
recorded on), life would be easy and this restriction would not apply. However, because samples
need to be transposed up and/or down several octaves, in order to maintain high quality
interpolation and to preserve smooth loops during such transpositions, a ‘headroom’ of 15
samples is required. This is not a contravention of the de facto WAV standard (in fact, the S5/
6000 adheres to this very strictly) but due to the fact that the S5/6000’s interpolation hardware
simply requires this ‘overhead’
The S5/6000 takes this requirement into consideration automatically when setting either the
loop end or sample end and always leaves 15 samples between the LOOP END and SAMPLE
END. 3rd party Mac/PC sample editors may not., however, because the samples intended for
editing will either not be transposed or will use a much cruder form of transposition interpolation
where this ‘overhead’ is not required. Also, you may find that some S1000, S3000 and XL
samples (where the interpolation method is simpler) may exhibit some problems for the same
reasons.
In the case of using 3rd party Mac/PC sample editors, please do not trim the sample end too
close to the loop end when using such wave editors. In the case of existing S1000/S3000 and/
or XL sound library, you may need to re-loop the samples.
154
Version 1.21
s5000/ s6000
EDIT SAMPLE
SETTING A GOOD LOOP
The first thing to do is to set the START and END points, referring to the overview waveform on the
left of the screen. You want to set the START and END at points which match in amplitude. For
example:
This would not be a suitable loop as it would give the following result:
As you can see quite clearly, the loop will have very noticeable clicks and thumps because of the
abrupt changes in level at the loop points. However, having said that, you may be able to cure this
using an ALTERNATING loop:
This may still produce a noticeable loop, however, due to the dips in level.
Setting the loop points as below using a FORWARD loop type may give better results.
Because the levels are better matched, a smoother loop is created
However, matching overall level is one thing - you also need to keep an eye on the right hand
waveform display which shows you the sound in more detail. Ideally, you want to match the two
waveforms so that the two look the same. For example:
Example 1
Example 2
Example 3
Example 1 would not make a good loop as the waveforms at the loop point are quite dissimilar.
Version 1.21
155
EDIT SAMPLE
s5000/ s6000
Example 2 may make a better loop as the waveforms are very similar. However, the small mismatch
at the join would undoubtedly cause a glitch or clicks.
Example 3 would probably provide a good loop as the waveforms match almost perfectly.
However, even though you may get a good level match in the left hand display and a good match
in the right hand waveform display, this is no guarantee that the loop will be free of clicks or other
glitches. This is where CROSSFADE can usually save the day.
The crossfade function creates a crossfade at the loop point which can help to smooth out any
clicks, thumps or other glitches you may have:
For tiny clicks (such as you may have with Example 2 or even Example 3 above), a small crossfade
of a few hundred samples can often do the trick. For more serious thumps and glitches (such as
you would have with Example 1 above), you might need to set longer crossfade values.
NOTE: Sometimes when crossfading the end and the start of the loop, because the end may
be slightly out of phase with the start, you may sometimes get a dip in level where they cancel
each other out. This is not a fault of the S6000 but something that cannot be avoided.
AUTO FIND and CROSSFADE are probably your best allies in looping. AUTO FIND will automatically
look for good points of equal amplitude and good waveform matches whilst CROSSFADE will
‘smudge’ the loop area to eliminate glitches, thumps and any other unpleasantness. Perfect results
are not always possible but you’ll be surprised at how easy looping can be on the S6000.
NOTE: Multiple loops are not supported on the S6000. Should you try to import samples with
multiple loops, only the first will be recognised.
156
Version 1.21
s5000/ s6000
EDIT SAMPLE
JOIN
Pressing JOIN will display this page:
This (and MIX described next) are the only two sample editing pages that don’t conform to the
normal page layout due to the fact that you are working with two samples.
Using F1 and F9, you may select the two samples A and B you wish to join. The JOIN process will
splice them end-to-end with or without a crossfade.
The parameters are:
SAMPLE A/B FROM
These parameters allow you to set the start point for the two samples.
SAMPLE A/B TO
These parameters allow you to set the end point for the two samples.
SAMPLE A/B LEVEL
These parameters allow you to set the level of both samples.
JOIN A>B/JOIN B>A
These two check boxes allow you to select whether sample A is followed
by B or sample B is followed by A. Switching one on disables the other.
PLAY SAMPLE A/B
These two keys allow you to audition the two samples A and B prior to
committing the join function.
Version 1.21
157
s5000/ s6000
EDIT SAMPLE
XFADE LENGTH
This allows you to set the crossfade length. The longer the crossfade,
the more the second sample is pulled back into the first. For example:
No crossfade
SAMPLE A
SAMPLE B
6 seconds
1 Second Crossfade
SAMPLE A
SAMPLE B
5 seconds
XFADE CURVE
This allows you to select a crossfade curve. The choices are LINEAR,
LOG and SINE.
Pressing JOIN SAMPLES (F16) will pop-up the usual progress display followed by the PLAY/
KEEP ORIGINAL/NEW/BOTH and RENAME prompt. However you will note a slight difference in
the ‘keep’ prompt:
The options are basically the same and you can compare the new sample with the originals but
because there are two originals with this process, you have the opportunity to play each one
before deciding to keep or discard them. If in doubt, press KEEP ALL and decide what to do with
the originals afterwards.
158
Version 1.21
s5000/ s6000
EDIT SAMPLE
NOTE: It is not possible to join two samples that have different sample rates. If you do, you will
receive the following prompt:
There is nothing that can be done to overcome this. Even if you try to re-sample one of them to
a different sample rate and try JOIN again, you will be prompted:
Version 1.21
159
s5000/ s6000
EDIT SAMPLE
MIX
Again, the MIX page does not conform to the usual page layout:
As in JOIN, use F1 and F9 to select the samples you want to mix. The process will merge the two
samples, effectively ‘layering’ them into one composite sample.
The parameters are:
SAMPLE A/B FROM
These parameters allow you to set the start point for the two samples.
SAMPLE A/B TO
These parameters allow you to set the end point for the two samples.
SAMPLE A/B LEVEL
These parameters allow you to set the level of both samples.
PLAY SAMPLE A/B
These two keys allow you to audition the two samples A and B prior to
committing the join function.
MAKE STEREO
This allows you to make a stereo mix out of two mono samples and will
place Sample A on the left and Sample B on the right. Pressing it will
show the usual off-line processing display followed by this prompt:
Because there are two originals with this process, you have the
opportunity to play each one before deciding to keep or discard them. If
in doubt, press KEEP ALL and decide what to do with the originals
afterwards
You may, of course, rename the new sample to something you prefer.
160
Version 1.21
s5000/ s6000
EDIT SAMPLE
NOTE: If one or both of the samples is already stereo, you will receive this prompt should you
press MAKE STEREO:
Pressing MIX SAMPLES (F16) will pop-up the usual progress display
followed by the PLAY/KEEP ORIGINAL/NEW/BOTH and RENAME
prompt:
However, as with MAKE STEREO, because there are two originals with
this process, you have the opportunity to play each one before deciding
to keep or discard them. If in doubt, press KEEP ALL and decide what to
do with the originals afterwards.
You can rename the sample if you want.
NOTE: As with Join, it is not possible to use the MAKE STEREO or MIX functions with samples
recorded at different sample rates. Should you try to do so, you will be prompted accordingly
with the pop-ups shown on Page 159.
Version 1.21
161
s5000/ s6000
EDIT SAMPLE
FADE UP/DOWN
Pressing the FADE UP/DOWN key will show this display:
The parameters are:
FADE UP/DOWN
These parameters set the length of the fade.
NOTE: If the sample has a loop, you cannot set FADE UP or FADE DOWN times within the
loop.
FADE CURVE
There are two FADE CURVE parameters - one for FADE UP and one for
FADE DOWN and both allow you to select from a choice of fade curves
(LINEAR, LOG and SINE). These give the following results:
Linear Fade Up
Log Fade Up
Sine Fade Up
You may zoom in and out of the waveform for detailed editing.
Pressing FADE SAMPLE will show the usual “Processing sample” progress display followed by
the PLAY/KEEP ORIGINAL/NEW/BOTH and RENAME prompt.
162
Version 1.21
s5000/ s6000
EDIT SAMPLE
TIMESTRETCH
Timestretch allows you to alter the length of a sample, shortening it or lengthening it, without
changing its pitch. Before we look at how to operate the timestretch functions on the S6000, let us
first look briefly at how timestretch works.
Timestretch works by instructing the digital signal processor to analyse the signal and insert or
delete blocks of sample data at appropriate places and crossfades are used to make the insertions
and deletions as seamless as possible. This has the effect of lengthening or shortening a recording.
As you can see from the following diagram, blocks of sample data have been inserted to create a
200% timestretch. The overall envelope of the sound data is preserved but there is twice as much
data in it causing it to play back twice as slow.
SAMPLE DATA BLOCKS
ORIGINAL RECORDING
WITH 200% TIMESTRETCH
In the following diagram, data has been removed to make the recording play back faster.
ORIGINAL RECORDING
70%
TIMESTRETCH
Unfortunately, however, perfect results using timestretch are sometimes difficult to achieve. It is
not a limitation of software or hardware but due to the fact that, although the processor is clever, it
is not that clever and can sometimes make mistakes in deciding which sample to insert or remove.
The end result of this is that, on occasions, especially with stretch factors exceeding 10% or so,
you may get an echo or ‘flam’ effect on some transients because the processor has inserted a
transient. When shrinking a recording, you may find a transient softened because the processor
has decided to remove it. You will find this to be the case more or less on all devices that feature
some form of time compression or expansion.
Version 1.21
163
EDIT SAMPLE
s5000/ s6000
A lot of these problems depend on the nature of the audio material being processed and settings
that process the spoken word perfectly could make a right mess of a percussive dance track. The
converse is also true. The biggest problem is in material that has a healthy balance of low and high
frequencies because different timestretch parameters are required to process different frequency
ranges - in audio material that has a wide frequency composition there is much adjustment to be
done to obtain the correct compromise so that both frequency ranges are adversely affected as
little as possible. To assist in the setting of timestretch, a selection of carefully programmed presets
optimised for certain types of material is provided. Please be aware that, on occasions, you may
never get absolutely perfect results and there may be occasional side effects, especially with
extreme settings of stretch. Over smaller ranges, however, you will find the timestretch on the
S6000 yields excellent results and will become an invaluable tool in your work, whatever application
you are working in.
The S6000 uses the same timestretch algorithms as the highly acclaimed Akai DD1500 Digital
Audio Workstation, a 16-track digital hard disk recorder used extensively in broadcast, video and
film post production suites across the world and responsible for the audio you have heard on many
of the TV programs, films and videos you may have seen! Naturally, when you’re working on a
mega budget blockbuster film, TV or video production, you demand the very best in digital signal
processing. Sampler users require no less and so the DD1500 timestretch process has been
ported directly into the S6000 to offer high quality, phase coherent stereo processing as well as a
range of easy to use presets for setting the timestretch parameters.
164
Version 1.21
s5000/ s6000
EDIT SAMPLE
Pressing TIMESTRETCH shows this display:
The parameters are:
STRETCH AMOUNT
This sets the timestretch factor. the range is 50% (twice the speed) to
200% (half the speed) with 100% being ‘no stretch’. Like any timestretch
process, extreme settings may introduce unwanted artefacts but a range
of +/-10% (i.e. 90%-110%) will yield excellent results most of the time.
PRESET
Instead of a complex array of incomprehensible parameters, the S6000’s
timestretch algorithm uses a series of 18 presets optimised for certain
types of sounds as described by their name. So, instead of sitting there
setting the parameters aimlessly for half a dozen or more meaningless,
confusing controls, the idea is that you simply select a preset, the
description of which largely fits the material you are trying to process
and you press STRETCH SAMPLE. If the results are not that good,
simply select another preset and try again.
Timestretch Presets:
1. FEM VOX
2. MALE VOX
3. LOW MALE VOX
4. VOCAL
5. HFREQ RHYTHM
6. MFREQ RHYTHM
7. LFREQ RHYTHM
8. PERCUSSION
9. LFREQ PERC.
10.
11.
12.
13.
14.
15.
16.
17.
18.
STACCATO
LFREQ SLOW
MUSIC 1
MUSIC 2
MUSIC 3
SOFT PERC.
HFREQ ORCH.
LFREQ ORCH.
SLOW ORCH.
However, the presets are merely guidelines and the LOW FREQ ORCH
B preset may do a fantastic job on an ambient loop! Experimentation is
the order of the day!
Each preset also has three variations (giving a total of 54 presets). These
are:
Version 1.21
A
Standard quality timestretch with fast processing.
B
Better quality timestretch but slower processing.
C
The highest quality timestretch results but slower
processing.
165
EDIT SAMPLE
s5000/ s6000
Furthermore, the PRESET parameter has a ‘window’ function that
provides access to an ADJUST parameter.
Sometimes, our presets may not quite satisfy your needs and some
kind of ‘manual override’ is required. This is the ADJUST control. The
ADJUST parameter gives access to the key parameters in any one preset
and allows you to ‘tweak’ the preset with one, easy to use control. There
are no strict rules to using this control other than if the selected preset
gives you almost acceptable results but there are few glitches in the
processed sound, try tweaking the ADJUST control and do it again to
see if this improves things.
The basic rule of thumb for using the ADJUST parameter is that a positive
value will help improve high frequency and percussive sounds whilst
negative values will help in improving bass notes. So, for example, if the
timestretched sample has a lot of percussive transients which are
‘flamming’ , try setting a positive value to improve things. This may,
however, cause lower frequency sounds, especially sustained bass parts,
to ‘wobble’ slightly. Conversely, if the bass end is more important and
the processed version exhibits any ‘wobble’, try setting a negative value
(although be aware that this may upset high frequency percussive
transients).
Pressing STRETCH SAMPLE will initiate the timestretch. You will see the usual “Processing sample”
progress display followed by the PLAY/KEEP ORIGINAL/NEW/BOTH and RENAME prompt.
Respond accordingly.
NOTE: When timestretching a sample that has loops, you may find that the processed versions
loop points are slightly disrupted and exhibit clicks. To overcome this, visit the LOOP page and
try AUTO FIND and/or a CROSSFADE - this should restore the loop fairly easily. However, a
bit of work may be necessary to get a perfect loop again.
166
Version 1.21
s5000/ s6000
EDIT SAMPLE
PITCH SHIFT
Pressing PITCH SHIFT will display this screen:
This process is a variation on timestretch. However, the ‘stretch factor’ in PITCH SHIFT is described
in terms of transposition. For example, if you have a sample in the key signature of C which you
want to use during a key transposition of a song where everything is transposed up a tone to the
key of D, set a SEMITONE TUNE value of +02 semitones.
Similarly, if you have a sample that is slightly out of tune, use the FINE TUNE parameter to bring
it back into tune by an appropriate amount.
The AUTO TUNE function allows you to set whether the new sample will automatically be
transposed. For example, let’s imagine you have a set of backing vocals sampled on C3 in the key
of C that you want to transpose so that they can be used during a 2 semitone key change in the
song. With AUTO TUNE set to OFF, after the pitch shift process is complete, if you press C3, the
sound will not be transposed - it will still play in the key of C on the ‘physical’ key C3 only slower. In
order to play the processed sample in the right key in the song, you will have to play D3.
With AUTO TUNE set to ON however, in the same example, after the sound has been processed,
when you play C3, it will automatically play 2 semitones higher in the key of D.
You may prefer that after processing the sample, it automatically transposes to the new pitch.
However, it could be that you find it odd playing the note C3 when the song is now in the key of D
so you may prefer to leave AUTO TUNE off and actually play the note D3 to hear it at the correct
pitch and speed.
As with the TIMESTRETCH page, a series of presets optimised for certain sounds is provided.
The ADJUST parameter is available via the PRESET parameter’s WINDOW function.
Pressing RETUNE SAMPLE will initiate the pitch shift. You will see the usual “Processing sample”
progress display followed by the PLAY/KEEP ORIGINAL/NEW/BOTH and RENAME prompt.
Respond accordingly.
NOTE: It is not possible to retune just a portion of the sample.
NOTE: When pitch shifting a sample that has loops, you may find that the processed version’s
loop points are slightly disrupted and exhibit clicks. To overcome this, visit the LOOP page and
try AUTO FIND and/or a CROSSFADE - this should restore the loop farily easily. However, a
bit of work may be necessary to get a perfect loop again.
Version 1.21
167
EDIT SAMPLE
s5000/ s6000
BPM MATCH
Pressing BPM MATCH will show something like this screen display:
This is another derivative of the timestretch algorithm. The parameters are almost identical to the
TIMESTRETCH function with the addition of the SOURCE TEMPO parameter.
The BPM MATCH function allows you to stretch a sample to a new tempo. It works like this:
You have a sample that you know is 123 BPM however, the track you are working on is 127 BPM.
To match the tempo of the sample to your track, set 123.00 BPM in the SOURCE TEMPO field (i.e.
the tempo of the original sample). Now set a value of 127 BPM in the NEW TEMPO field (i.e. the
tempo you want it to be to match the track you are working on). Choose a preset that approximates
the type of sample you are trying to process and press MATCH NEW BPM. You will see the usual
“Processing sample” progress display followed by the PLAY/KEEP ORIGINAL/NEW/BOTH and
RENAME prompt. Using the PLAY NEW and PLAY ORIGINAL, you will hear the tempo change.
You can decide whether you want to keep it or not.
Of course, the whole BPM MATCH process relies on you knowing the tempo of the sample you are
trying the process and the tempo of the track you are attempting to match it to.
As with the TIMESTRETCH and PITCH SHIFT pages, a series of presets optimised for certain
sounds is provided. The ADJUST parameter is available via the PRESET parameter’s WINDOW
function.
NOTE: When using BPM MATCH on a sample that has loops, you may find that the processed
versions loop points are slightly disrupted and exhibit clicks. To overcome this, visit the LOOP
page and try AUTO FIND and/or a CROSSFADE - this should restore the loop farily easily.
However, a bit of work may be necessary to get a perfect loop again.
168
Version 1.21
s5000/ s6000
EDIT SAMPLE
RE-SAMPLE
Pressing RE-SAMPLE shows this screen:
The RE-SAMPLE process allows you to change the sampling frequency of a sample. This can be
used to conserve memory but can also be used to ‘creatively’ to reduce the quality of a sound. The
parameters are:
RE-SAMPLE FREQ
This sets the new frequency of the sample.
RESOLUTION
You may change the ‘bit’ resolution here. Typically, this will be kept at
16-BIT but you may like to experiment with other settings for a ‘grungier’
sound15 .
QUALITY
There are three settings:
LOW
Least quality (i.e. transposed sounds will become aliased) but fastest
processing.
MED
Moderate quality and relatively fast processing.
HIGH
Best quality but slower processing.
PRESET
This allows you to select from a variety of preset re-sampling frequencies
(e.g..: 1/2, 3/4, 1/3, 2/3, etc.).
Pressing SET NEW FREQ will initiate the process. You will see the usual “Processing sample”
progress display followed by the PLAY/KEEP ORIGINAL/NEW/BOTH and RENAME prompt.
Respond accordingly.
15
Version 1.21
In theory, you would think that the resolution parameter would enable you to re-create the sound of
older 8- or 12-bit samplers. However, the ‘grungy’ sound these samplers produced was as much
due to their low quality D-A convertors as the bit-rate they were sampled at. Because of the high
quality 20-bit D-A converters used on the S6000, setting a low bit-rate using the RESOLUTION
parameter may not automatically result in the ‘lo-fi’ effect you are after. However, selecting a low
bit resolution here AND setting the lowest RE-SAMPLE FREQ(uency) will produce a suitably grungy,
muddy, lo-fi sound. Experiment!
169
s5000/ s6000
EDIT SAMPLE
EQ
Pressing EQ shows this screen display:
Here you have access to three bands of parametric EQ. Each band has variable frequency and
gain and the ‘window’ function in the GAIN parameters down the right hand side of the screen offer
further functionality.
The ranges for each frequency are:
LF
MF
HF
10Hz
500Hz
2000Hz
2000Hz (2kHz)
10000Hz (10kHz)
20000Hz (20kHz)
Gain for all bands is variable +/-18dB
The HF and LF GAIN parameters have a ‘window’ function that allows you to select a 6dB/Octave
shelf or 12dB/Octave shelf. This will give a more pronounced effect on the LF and HF GAIN. The
MF GAIN parameter’s ‘window’ function allows you to set a variable ‘Q’ or ‘bell’ allowing you to set
the ‘width’ of the EQ effect. A setting of 0.5 is the ‘widest’ bell you can have and a setting of 20 is
the narrowest.
The OUTPUT LEVEL parameter allows you to compensate for cut and/or boost settings in the
GAIN controls. With extreme gain boost on the frequencies, be sure to reduce OUTPUT LEVEL to
prevent distortion; with extreme cut values set on the three frequencies, be sure to boost the
OUTPUT LEVEL by an appropriate amount (or use NORMALISE after the EQ processing) to bring
the sample’s level back up to optimum.
The rule of thumb is quite simple - if you boost a frequency by XdB, reduce the OUTPUT LEVEL by
the same amount. If you boost two or more frequencies by XdB, reduce the OUTPUT LEVEL by
the amount of the sum of the frequency’s boost (i.e. boost LF by 3dB and HF by 6dB, reduce
output level by 9dB). If you use a mixture of cut and boost, reduce the OUTPUT LEVEL by an
appropriate amount equal to the sum of the three frequency’s cut/boost - for example, if LF is
boosted by 3dB, MF is cut by -5dB and HF is boosted by 6dB, add the lot together and reduce
OUTPUT LEVEL by -4dB (i.e. 3 + (-5) + 6 = +4dB of overall gain therefore an OUTPUT Level of 4dB will bring the overall signal back down to 0dB.
Of course, this only applies to a normalised signal running at optimum level. If the sample level is
less than optimum, you will just have to experiment!
170
Version 1.21
s5000/ s6000
EDIT SAMPLE
SAMPLE TOOLS
In all pages (except JOIN and MIX), F9 shows SAMPLE TOOLS. Pressing this pulls down a menu
of further options:
The functions are:
GET INFO
This shows information about the currently selected item:
.
Version 1.21
171
EDIT SAMPLE
s5000/ s6000
QUICKLOAD
This takes you to the sample QUICKLOAD function where you may load samples directly into
memory:
The screen only shows samples making loading very quick and convenient as you don’t have to
wade through other file types.
QUICKSAVE
This allows you to quickly save the currently selected sample. Pressing it pops up a prompt:
The currently selected sample name is shown as is the folder in which it will be saved. You may
save just the selected sample, all samples in memory or the entire contents of memory.
NOTE: If the folder to be saved to is not the correct one, cancel QUICKSAVE and use the
normal SAVE function to select the correct folder.
The CHECK NAMES key allows you to disable the file checking - with it ON (checked ), if a multi
of the same name exists in the selected folder, you will be prompted and asked if you want to
overwrite it or not. With CHECK NAMES switched OFF (checked ), files of the same name will
automatically be overwritten without prompting you.
172
Version 1.21
s5000/ s6000
EDIT SAMPLE
W/FORM
This allows you to select the type of waveform you will see in the EDIT SAMPLE pages. You may
choose between logarithmic and linear.
A logarithmic waveform gives an indication of the signal’s ‘energy’ (in much the same way as PPM
meters do) whilst a linear waveform shows a truer representation of the signal.
Logarithmic waveform display
The same sound with a linear waveform display
Previous Akai samplers used a log waveform display only.
Both display types have their uses. Linear is useful for seeing the signal’s true envelope when
editing but the problem is that low level signals are sometimes not seen. Thus in the linear display
above, there is no indication of the low level reverb between each beat - however, you do see the
beats more clearly defined.
The log waveform display, whilst not being a true representation of the envelope, does show quiet
signals more clearly and this can be useful when editing to ensure that you don’t accidentally trim
off more of the sound than you want.
For example, have a look at this cymbal sample:
Using the linear display as shown, you could rightly assume that you could set the END time as
follows:
However, if you switch to the LOG display, you can see quite clearly that this would be a big
mistake:
Using the LIN selection and editing visually, you would chop off over half of the sound.
Version 1.21
173
EDIT SAMPLE
s5000/ s6000
Another example of where a LOG display is more useful is when looping a sound:
With LIN selected, the waveform display in the loop view box to the right of the waveform overview
is very small making precise looping difficult if not impossible. However, select LOG as the waveform
display and you would see this:
As you can see, even though the waveform display is not a true representation of the sound’s
envelope, the loop view is greatly enhanced allowing far more detail when looping.
174
Version 1.21
s5000/ s6000
EDIT SAMPLE
SAMPLE LIST
This takes you to this page:
Here you may rename, copy, delete and otherwise manage your samples.
At the top of the display (next to CLOSE LIST) you will see the icons that show whether the
currently selected sample in the list is mono or stereo and/or looped, etc..
RENAME SAMPLE
This pops up a prompt and you may rename the sample in the usual
fashion.
COPY SAMPLE
This pops up a prompt and you may copy the selected sample. You may
use the name automatically generated by the copy process or you may
enter your own.
DELETE SAMPLE
You may delete the selected sample.
PURGE SAMPLES
This useful function deletes all samples not currently being used by any
programs that may be loaded (these samples are referred to as ‘orphans’).
This allows you clear out any redundant samples in order to make more
memory available.
Version 1.21
175
s5000/ s6000
EDIT SAMPLE
CONVERT -L/-R
This will convert ‘old’ S1000, S1100, S2000, S3000 and XL series ‘stereo’
samples that are appended -L and -R and will create a stereo .wav file
with -S appended to the name. For example, STRINGS C3 -L and
STRINGS C3 -R will become STRINGS C3 -S.
To convert an old -L/-R pair of samples, select either of the two ‘legs’ of
the stereo file (i.e. the -L or the -R sample) and press CONVERT -L/-R.
You will receive the usual progress display as the samples are processed
followed by the usual PLAY/KEEP ORIGINAL/NEW/BOTH prompt.
Once converted, you may subject it to the other stereo editing functions
such as MAKE MONO and SWAP L/R. Of course, all other sample editing
(TRIM, LOOP, TIMESTRETCH, etc.) will also be done in stereo.
**** NOTES REGARDING CONVERT -L/-R ****
The process is looking for identically matching pairs.
Because it is not possible to have separate start and end times of left and right loop points in
an interleaved stereo sample, both samples have to have identical settings. This is normally
the case with stereo samples as any difference in start times, loop length or position will result
in the stereo imaging being inaccurate.
If the process finds a stereo pair of samples that do not match exactly, you will be prompted
accordingly. You should press OK and make the necessary adjustments to one or other ‘leg’ of
the two samples.
Alternatively, you can try again but this time switch OVERIDE to ON (i.e. checked ). This will
run the process but will automatically copy the parameters from the left channel to the right
channel. Please note, however, that this may upset the loop on the right channel which may
cause clicks or other loop related glitches. In this case, you are advised to re-loop the new -S
stereo sample created by the process.
It must be said that this function assumes that the original sample editing was done in ‘stereo’
and so, to preserve stereo phase coherency, start times of the left and right channels should
be the same as should loop start and end times. If, however, some ‘mono’ editing was done on
each ‘leg’ of the stereo sample by the original programmer (which, ideally, it shouldn’t have!),
the success of this function cannot be guaranteed.
GET INFO, QUICKLOAD and QUICKSAVE are duplications of the functions found in the SAMPLE
TOOLS menu described on preceding pages.
176
Version 1.21
s5000/ s6000
EDIT SAMPLE
STEREO AND MONO SAMPLES
There is little or no distinction made between mono or stereo samples on the S6000 and stereo
samples are treated as one ‘file’ thus you don’t even really need to know what you are editing most
of the time. Mono and stereo files have an indicator after their name in all EDIT SAMPLE pages.
Mono samples are indicated thus:
A single speaker icon is shown.
Stereo samples are shown thus:
NOTE 1: Stereo samples use two voices of the S6000. Thus, if ALL samples are stereo,
polyphony is halved to 64 voices on the S6000 (32 on an unexpanded S5000).
However, it is possible to use a combination of mono and stereo samples simultaneously so
exact figures regarding polyphony cannot be given.
NOTE 2: S1000, S1100, S2000 and S3000 and XL series ‘stereo’ samples (i.e. those appended
with -L/-R) will be treated as mono files on the S6000 and will require individual editing.
If this is inconvenient, you should convert such samples into a single stereo .wav sample using
the CONVERT -L/-R function described on the previous page.
Version 1.21
177
s5000/ s6000
RECORD
RECORD
Pressing RECORD will show something like this screen:
The parameters are:
178
RECORD LEVEL
This sets the record level. This is a software control which is used instead
of a front panel control. You will note the icon in the parameter. Pressing
the RECORD LEVEL key again allows you to set the gain sensitivity of
the input and the choices are MIC, LINE and PRO. Use MIC to record
low level signals from microphones; use LINE to record line level signals
from keyboards or typical mixing consoles, etc.; use PRO when recording
from high level equipment running at +4dB.
RECORD TRIGGER
Here you may select what will initiate recording. The choices are:
THRESHOLD L/R
Recording will start once the threshold level
on either the left or right channel is exceeded.
THRESHOLD L
Recording will start when the input to the left
channel exceeds the threshold.
THRESHOLD R
Recording will start when the input to the right
channel exceeds the threshold.
AUTO L/R
Recording will start once the threshold level
on either the left or right channel is exceeded.
It will automatically stop recording if the signal
falls below the threshold.
AUTO L
Recording will start when the input to the left
channel exceeds the threshold. It will
automatically stop recording if the signal falls
below the threshold.
AUTO R
Recording will start when the input to the right
channel exceeds the threshold. It will
automatically stop recording if the signal falls
below the threshold.
MIDI NOTE-ON
Recording will start when a MIDI note-on is
received on the channel specified in the MIDI
TRIG CHAN (See below).
Version 1.21
s5000/ s6000
RECORD
THRESHOLD
This sets the threshold level for any of the THRESHOLD or AUTO options.
MIDI TRIG CHAN
Sets the MIDI channel when MIDI NOTE-ON is selected as the record
trigger.
RECORD TO
Here you may select where the recording will go - in RAM or direct to
disk (recording ‘virtual’ samples is described separately).
RECORD SOURCE
Here you may select the input source for the recording. These are:
ANALOGUE
Selects the front panel analogue inputs.
DIGITAL
Selects the rear panel phono digital input.
OPTICAL
Selects the rear panel optical digital input.
OUTPUT 1/2
Allows you to re-record the outputs of the
sampler. In this way, you can record a sound
with effects as a new sample (EB20 needs to
be installed on the S5000 to record with
effects).
ADAT 1/2 - 7/8
If the optional ADAT board is installed you may
record via this. The paired numbers actually
refer to the connected ADAT output - i.e. you
can record ADAT ‘tracks’ 1/2, 3/4, 5/6 or 7/8.
LENGTH MIN.SEC
This sets the length of the recording you are about to make. It is shown
in minutes and seconds.
ORIGINAL NOTE
This sets the note the recording will appear on (i.e. the note on which
the recording will play back at its correct pitch and speed). This may be
set manually using the DATA wheel or alternatively, when this parameter
is selected, the note may be set by playing the appropriate note on your
MIDI controller.
NOTE: It is possible to set the ORIGINAL NOTE more conveniently from a MIDI keyboard (or
other controller) by pressing and holding this key whilst playing the appropriate note on your
controller.
RECORD MODE
You may select STEREO or MONO.
SETUP D-D
You may set up where you will record a ‘virtual’ sample to (recording
‘virtual’ samples is described separately).
Version 1.21
179
RECORD
s5000/ s6000
SETTING RECORD LEVELS
In the centre of the screen are two level meters.
These are accurately calibrated to show level precisely. As signal is input to the sampler, so these
meters will move. At the far right of the meters is a small box that indicates clipping.
Above the meters, you can see the margin of headroom you have and this value is held until the
signal exceeds it again. To obtain optimum record level, you should select the appropriate input
sensitivity (MIC, LINE or PRO) and increase (or decrease) RECORD LEVEL until the margin is as
close to 0dB as possible. If the maximum headroom is exceeded by too loud a signal, the clip
indicator will illuminate and an exclamation mark (!) will appear above it. If this happens, reduce
RECORD LEVEL, press RESET MARGIN (F9) and try again.
NOTE: The RECORD LEVEL parameter has no effect when any of the digital inputs are selected
- e.g. DIGITAL, OPTICAL or the ADAT inputs (if the optional ADAT board is installed).
RECORD LEVEL also has no effect when recording OUTPUTS 1/2 (i.e. re-recording the outputs
of the sampler back into itself) as this is also a digital signal.
NAMING RECORDINGS
Recordings are automatically given a name and when you enter record, a new, unique sample
name is always created to prevent accidentally recording over an existing sample. The default
name is always NEW SAMPLE n (where n is a unique number).
You may, however, enter your own names by pressing RENAME/NEW on F16. You will receive the
usual name pop-up and you should enter the name you want to use using either the CURSOR </
> keys and the DATA wheel or an external QWERTY keyboard. Once the recording has been
made, the autoname process will use the name you gave the sample as the ‘seed’ name for the
next recording - i.e. if you named your original recording SNARE 1, the next autonamed recording
will be SNARE 2. This ‘seed’ name will then be used for all subsequent recordings and these will
be auto-numbered (i.e. 3, 4, 5, etc.) until such time as you specifically create a new name for a
new recording.
180
Version 1.21
s5000/ s6000
RECORD
MAKING A RECORDING
Once you have set the parameters described above as appropriate, press ARM (F8). You will see
this screen:
The sampler is waiting for the signal to exceed the threshold level (or receive a MIDI note on). You
may start recording using MANUAL START if you prefer.
Whichever method is used to start recording, you will see this record progress display:
At the end of the recording you will receive this prompt:
The new recording’s waveform will be shown and you may use PLAY NEW to audition it. If you like
it, press KEEP NEW; if you don’t, press DISCARD.
Version 1.21
181
RECORD
s5000/ s6000
If you keep the recording, a new autonamed recording will be created (if you renamed the sample
from NEW SAMPLE N to one of your choosing, the name you chose will be used as the ‘seed’
name for all subsequent recordings or until you change it).
If you press DISCARD, the recording will be abandoned and you will return to the main RECORD
page with the previous name still shown.
NOTE: If the sample clipped during record, you will receive this warning at the end of the
record process:
You should respond accordingly. If you press OK, you will be taken to the ‘keep/discard’ screen
shown on the previous page. DISCARD will take you back to the main RECORD page retaining
the name of the sample you discarded where you may try again.
182
Version 1.21
s5000/ s6000
RECORD
OVERWRITING AN EXISTING SAMPLE
Using F1, you may select an existing sample to record over. If you do this, you will, of course,
receive a prompt warning you of this.
You should take the appropriate action. If you press NO, the process will be aborted and the
existing sample will remain intact and unaffected. If you press YES, you will be taken to the “WAITING
FOR THRESHOLD...” prompt.
NOTE: If you press YES, this deletes the original sample. As a result, even if you press CANCEL
in the “WAITING FOR THRESHOLD...’ prompt, the damage has been done and the sample
will have been already overwritten. Please proceed with caution when selecting samples to
overwrite.
Version 1.21
183
RECORD
s5000/ s6000
RE-RECORDING THE SAMPLER’S OUTPUTS
One feature of the S5/6000 is its ability to re-record its own outputs. This allows you to re-record
huge, stacked programs with effects (on the S5000, the EB20 needs to be installed). In this way,
you can re-record big washes and layers to use as new samples.
The benefit of this is that sounds that took several layers of keygroups in a program and/or stacked
programs in a multi can be re-recorded as one single sample thus saving on polyphony. For
example, a stack of STRINGS, STRING SYNTH, MOODY PAD and BELL which would ordinarily
use up four voices per note (eight if the samples are stereo) can be re-recorded as one sample
and use only one voice (or two in stereo).
Another option is simply to re-record, say, a snare drum with one EB20 reverb effect (for example,
a large hall) and a kick/bass drum with another (for example, a tight room) and toms with another
(for example, a bright, large room) so that, each drum sound may have its own unique reverb (or
whatever) effect without tying up the four channels of EB20 which can then be used on other
sound sources.
This option may also be a viable alternative to the MIX function in EDIT SAMPLE in that samples
may be layered in EDIT PROGRAM (and/or MULTI) and re-recorded as a single new sample. Of
course, the result may need to be looped but that would also be true if you used the off-line MIX
function.
Whatever your application, to do this, simply set RECORD SOURCE to OUTPUTS 1/2 (it is not
possible to use other outputs to re-record) and set the RECORD parameters as described.
To select the sounds to re-record, simply set up the sound(s) in your chosen mode (EDIT PROGRAM
or MULTI) and then press the RECORD key. For example, if you wish to re-record a single program,
simply set up or select the appropriate program in EDIT PROGRAM and then press RECORD.
Likewise, if you wish to re-record a multi, set that up as appropriate and, from the MULTI mode,
press RECORD.
NOTE: This is a very general process and basically, the S6000 will record anything from the
last playback mode you were in (EDIT PROGRAM, MULTI or even EDIT SAMPLE). It has to
be said though, there is little benefit to be had re-recording a raw sample. However, it can be
done if you really want to.
The rule of thumb here is to set up the sound(s) you want to re-record in whatever mode is most
appropriate. In that mode, press RECORD and select OUTPUTS 1/2 to re-record it.
However.....
To prevent distortion when many (i.e. 64 or 128) voices are playing simultaneously, the default
global MASTER LEVEL in UTILITIES is set to -12dB. If you only re-record one note (or maybe
even two or three) with this setting, this will result in a low signal level when recording. As such, it
is recommended that you set the MASTER LEVEL to 0dB for the purposes of re-recording the
outputs. This way, you will re-record a much ‘hotter’ signal that is more suitable for normalising,
etc., in EDIT SAMPLE.
However, to prevent distortion when playing many voices normally, after recording OUTPUTS 1/2
in this way, you should reset MASTER LEVEL to the default -12dB after the recording.
TIP: Even if you don’t adjust the MASTER LEVEL parameter, don’t forget that you can normalise
the signal in EDIT SAMPLE after the recording has been made.
184
Version 1.21
s5000/ s6000
RECORD
RECORD ERROR MESSAGES
If you try to record using one of the digital inputs and nothing is connected to it, you will see this
dialogue:
You should either record via the analogue inputs or connect the appropriate digital device.
If the sampler is synchronised to external wordclock (in UTILITIES / SYSTEM SETUP) but the
wordclock is missing, you will see this dialogue:
You should either set SYNC SOURCE (in UTILITIES / SYSTEM SETUP) to INT 44.1kHz or INT
48kHz or connect the wordclock source.
Version 1.21
185
s5000/ s6000
FX
FX
This gives access to the S6000’s internal effects.
The EB20 is a 4-channel effects processor. Two channels (MULTIFX1 and MULTIFX2) offer multieffects that include (simultaneously) distortion, ring modulation, EQ, modulation effects (such as
flanging, chorus and phasing, stereo pitch shift, autopanning, rotary speaker simulations) plus
delay/echo and also reverb. The other two channels are reverb only channels (RV3 and RV4)
giving a total of four reverbs.
4-CHANNEL EFFECTS PROCESSOR
MULTI-EFFECTS CHANNEL FX1
DISTORTION/EQ
DISTORTION
EQ
MOD/DELAY EFFECTS
RING MOD
CHORUS
or
FLANGE
or
PHASE
or
PITCH SHIFT
or
PAN/FMOD
REVERB (RV1)
DELAY
REVERB
MULTI-EFFECTS CHANNEL FX2
DISTORTION/EQ
DISTORTION
EQ
MOD/DELAY EFFECTS
RING MOD
CHORUS
or
FLANGE
or
PHASE
or
PITCH SHIFT
or
PAN/FMOD
REVERB (RV2)
DELAY
REVERB
REVERB ONLY CHANNEL RV3
REVERB
REVERB
REVERB ONLY CHANNEL RV4
REVERB
REVERB
186
Version 1.21
s5000/ s6000
FX
In the multiFX channels, you also have control over the direction of the effects and the modulation
and delay effects can be placed before the final reverb, in parallel with the final reverb or after the
final reverb making it very flexible. Furthermore, RV3 and RV4 can take as their input source their
own effects send or can be fed from the two multiFX channels.
The effects are stored in the multi so that switching between multis recalls the correct effects
settings and configurations.
Pressing FX shows this screen:
The currently selected multi name is shown on F1 - if you want to edit the effects for another multi,
you may select that multi using the DATA wheel as normal.
Version 1.21
187
s5000/ s6000
FX
NOTE: If you try to enter the FX ‘mode’ when no multi is created (i.e. immediately after power
up), you will see this prompt:
You cannot access the FX pages without there being a valid multi.
For S5000 owners, if you press the FX key when the EB20 is not installed, you will receive this
pop-up dialogue:
Says it all really!
188
Version 1.21
s5000/ s6000
FX
You can see the block diagrams for the two multi effects channels, MULTIFX 1 and MULTIFX 2 .
Underneath those are the two reverb-only channels, RV 3 and RV 4. F4 and F5 allow you to set
the input source for RV3 and 4 and you may select the following:
RV3 SEND
This feeds RV3 with any signals sent on the RV3 effects send buss. This
is the default setting and allows four totally separate reverb channels.
FX1
This feeds RV3 with any signals sent on the FX1 effects send buss:
FX 1
DIST/RMOD/EQ
MODULATION FX
DELAY
REVERB (RV1)
REVERB (RV3)
FX1 DIST/EQ
The output of the DISTORTION/RING MOD/EQ section of FX1 will be
routed to RV3:
FX 1
DIST/RMOD/EQ
MODULATION FX
DELAY
REVERB (RV1)
REVERB (RV3)
FX1 MOD/ECHO
The output of the MOD/ECHO section in FX1 will be routed to RV3:
FX 1
DIST/RMOD/EQ
MODULATION FX
DELAY
REVERB (RV1)
REVERB (RV3)
FX1 REVERB
The output of FX1’s reverb will be routed to RV3:
FX 1
DIST/RMOD/EQ
MODULATION FX
DELAY
REVERB (RV1)
REVERB (RV3)
Using this facility, it is possible for one sound to have two reverb effects applied to it.
TIP: This can also be used to create a smoother, denser reverb sound. By selecting one of the
gated reverbs in the multiFX chain and then selecting FX1 REVERB as the input for RV3 and
selecting a hall or room reverb, the initial attack of the overall reverb sound will be more
diffused resulting in a smoother decay.
RV4 is identical except that it is partnered with MULTIFX2.
Version 1.21
189
s5000/ s6000
FX
EDITING THE EFFECTS
To edit MULTIFX 1 or 2, press F2 or F3; to edit any of the reverbs, press F10, 11, 12 or 13.
Selecting one of the multiFX channels (in this example, MULTIFX 1), you will see this screen:
Here you have access to the individual blocks in the chain.
As you edit each effect type, it is highlighted in the block diagram shown centre screen. The ‘ticks’
above each effect type indicate whether it is being used in the chain or not. If an effect in the chain
has been bypassed, an ‘X’ will be shown above it.
The multiFX are fully programmable and you can set anything you want to achieve the desired
effect combination. However, to assist you in setting up effects chains, each effect type (except for
the RING MOD/DISTORTION effect) has a series of templates offering a wide range of popular
effect settings. In this way, it is extremely quick and easy to set up complex chains of effects by
selecting an appropriate template for each effect type. For example, if you know you want something
like a thick, slow flange with long ping-pong delay and a large hall, simply select the appropriate
preset in each effect type. If the chosen templates are still not quite right, they can be edited and
modified to your own requirements.
190
Version 1.21
s5000/ s6000
FX
NOTE FOR EXISTING AKAI OWNERS
This method of embedding the effects in the multi and setting them up with easy to use templates
for each effect type in the chain replaces the old method of working with a single effects file
that is shared by all programs and multis. Instead, each multi has its own unique set of effects
and combinations which can be created either manually or using the templates. More importantly,
these effects are recalled whenever you load/select a particular multi so that as you switch
between multis, the correct effects are also recalled.
The old method of using an effects file was successful on the S2000 and S3000XL because
there was only one multi - you could load a multi and its associated FX file and all would be
well. On the new samplers, however, it is possible to have 128 multis loaded and so one
effects file with 50 preset combinations is not enough to service that number of multis in memory.
There would also be other complications with using effects files in the new samplers too. For
example, you may load a multi from one folder that has a particular effects file with a particular
combination of effects used by that multi. However, you may load another multi from another
folder that has a completely different effects file. This new effects file would overwrite the one
in memory and would therefore potentially corrupt the first multi’s effects.
Of course, one could argue that simply increasing the number of presets from 50 to ?? would
overcome this problem. However, flaws were also found in the previous system of having 50
preset ‘chains’ of effects in that if you were after a particular combination of effects (for example,
slow, deep flange followed by ping pong delay and a hall reverb), chances are, you’d probably
not find it! You might find something with the right flange effect but the wrong delay and reverb
type or you’d find the right delay type but an inappropriate mod effect and reverb. So, whilst
one effect type may be correct, the rest of the effects locks need extensive editing.
In the S6000, however, you simply dial up the appropriate template for each ‘block’ in the
chain, tweaking as appropriate for your needs if needs be. Thus, to create the example chain
described above, select the DEEP FLANGE template in the mod FX, PING PONG DLY in the
delay FX template and LONG HALL in the reverb FX template. Quick and convenient and
much easier than trying to find a preset chain that is only 20% close and tweaking the rest of it
to your needs.
Of course, you lose the one benefit of an effects file that services all sounds - namely, the
ability for two or more multis to share the same effects combination. However, the new effects
method on the S6000 has the means to copy multiFX and reverb settings from one multi to
another so that different multis can effectively share the same reverb and effects.
As a result, the concept of effects files does not exist on the S6000 and S5000 and old effects
files from the S2000, S3000 and XL series cannot be used in the S6000.
Version 1.21
191
s5000/ s6000
FX
RING MOD/DISTORTION
Pressing RING MOD/DISTORTION in the main MULTIFX page will show this screen:
A ring modulator is a device with two inputs and one output. One input carries the audio source
and the other a sine wave signal of variable frequency. The two signals are modulated to produce
sum and difference frequencies. For example, if one input is a sine wave of 500Hz and the other is
a sine wave of 750Hz, the output will carry the original signals AND the sum (1250Hz) and the
difference (250Hz). The result is enharmonic and ‘clangy’ sounds. With harmonically rich sounds
fed to the ring modulator, the sounds can be even more discordant.
Other effects are also possible. If the modulating oscillator’s frequency is low, the effect will be a
tremolo effect. At frequencies of 100Hz or so, you can produce the famous ‘dalek’ voices and other
robotic, metallic effects on speech. At high frequencies, the results are rather unpredictable and
largely depend on the audio input signal but, basically, they can best be described as discordant
and clangourous. The parameters are:
RMOD FREQUENCY
This sets the frequency of the sine wave modulation signal. It is variable
from 1Hz - 5000Hz
RMOD DEPTH
Sets the depth of the ring modulation effect.
The distortion processor offers variable distortion from mild clipping to heavy metal filth! The
parameters are:
DISTORTION
Sets the amount of distortion
OUTPUT LEVEL
Sets the output level of the distortion processor. This can be used to
compensate for the high gain you get with high DISTORTION levels.
The ACTIVE switch on F10 allows you to bypass the RMOD/DISTORTION effect.
You may return to the main FX page using F8 or you may return to the multiFX page using F7.
192
Version 1.21
s5000/ s6000
FX
EQ
Pressing EQ in the main MULTIFX page will show this screen:
The EQ section of the two multi-effects channels is a four band EQ offering lowpass control over a
low frequency, two bandpass mid frequencies and a highpass high frequency control. I.e.:
LP
GAIN
BP1
GAIN
BP2
GAIN
HP
GAIN
You may set the centre frequency and the gain for each of the four channels (on the two mid
frequency ranges, you may also set the width of the EQ effect).
FREQUENCY
G
A
I
N
LOW
Version 1.21
BP1
BP2
HI
193
s5000/ s6000
FX
The frequency of each of the four bands is variable and may overlap if you wish and you may
selectively boost these frequencies if you wish to enhance certain aspects of the sound. Furthermore,
you can modulate the frequencies of either of the two mid range sections to create auto-wah
effects such as you find on a wah-wah pedal. It is also possible to create synthesiser filter sweep
effects.
The parameters are:
LOW FREQ
Sets the low frequency. This is variable from 16Hz - 500Hz.
LF GAIN
Sets the low frequency gain.
LMID FREQ
Sets the low mid frequency. This is variable from 40Hz - 6.3kHz.
LMID GAIN
Sets the low mid gain.
HMID FREQ
Sets the high mid frequency. This is variable from 40Hz - 6.3kHz.
HMID GAIN
Sets the high mid gain.
HIGH FREQ
Sets the high frequency. This is variable from 500Hz - 16kHz
HF GAIN
Sets the high frequency gain.
The ACTIVE switch on F10 allows you to bypass the EQ effect.
For the two mid-range frequencies, you may also set the width of the EQ via their WINDOW
function. Larger values set a wider width whilst lower settings produce a narrow width.
WID = 00
WID = 99
With narrow WID(th) settings, you can accentuate certain frequencies more tightly whereas with
higher width settings, a wider frequency range is covered by this EQ parameter. If you are familiar
with synthesiser filters, this control is similar to the resonance control. If you are familiar with
parametric EQ devices, this is the same as the ‘Q’ or ‘bell’ control found on outboard EQ devices
or some very expensive mixers’ EQ sections.
EQ TEMPLATES
A handful of basic EQ templates are offered here. Because EQ is a very personal thing and one
that depends largely on context, it is almost impossible to provide a set of EQ templates to cover
every eventuality. As a result, some basic EQ settings are provided along with some ‘autowah’
settings.
194
Version 1.21
s5000/ s6000
FX
EQ MODULATION
Pressing EQ MODULATION (F16 in the EQ page) shows this screen:
The LOW MID and HIGH MID bandpass filters of the EQ are able to be modulated by their own
independent LFOs. The LMID and HMID LFO RATE parameters set the speed of these LFOs and
the LMID and HMID MOD DEPTH parameters set the amount of LFO modulation. In this page,
because there is a certain degree of interaction between the modulation and the LMID and HMID
frequency and gain settings, the LMID EQ controls are duplicated here for convenience to save
you swapping between pages
Many effects are possible using the modulation functions. Effects from ‘wah- wah’ clavinet and
guitar may be created by sweeping just one band (either will do) and more extreme filter sweep
effects can be created by sweeping both. High Q settings on the selected mid band (i.e. a tighter
‘bell’) accentuates the effect and with very high Q settings, very pronounced synth filter sweep
effects can be achieved.
The fact that both LMID and HMID bands can be independently controlled by their own LFOs
running at different rates further expands the possibilities.
The phase shifter option in the MOD section can also be enhanced by sweeping one (or both) of
the bandpass frequencies with narrow width settings at exactly the same rate as the phase shifter’s
LFO.
You could also experiment with setting the AUTOPAN selection in the MOD section to the same
rates so that EQ/filter sweeps pan in synchronisation with each other.
Pressing EQ PARAMETERS will return you to the EQ page.
Pressing MAIN will take you back to the main FX page.
Pressing F7 will return you to the selected multiFX page.
In either page, the ACTIVE switch on F10 allows you to bypass the EQ effect.
Version 1.21
195
s5000/ s6000
FX
MODULATION EFFECTS
A variety of modulation effects are also available. Pressing MODULATION FX will show something
like this screen. Using F2, you may select the various modulation effects.
CHORUS
The first of the modulation effects is CHORUS.
This uses four very short delay lines all modulated at different phase angles of the modulating LFO
to produce a rich, swirling stereo chorus effect. The parameters are:
RATE
Sets the speed of the chorus effect.
DEPTH
Sets the depth of the chorus effect
FEEDBACK
Sets the amount of signal that will be routed back to the chorus
processor’s input. Higher feedback levels accentuate the effect and can
be used to create flanging effects. The feedback level may be inverted
for different effects.
FLANGE
The next modulation effect is FLANGE:
This uses a dual delay line with the left and right delays swept in opposition (as one goes up, the
other goes down) to produce rich stereo flanging effects.
The parameters are identical to those found in the chorus effect.
196
Version 1.21
s5000/ s6000
FX
PHASE
The next modulation effect is PHASE.
This uses a single short delay line to produce certain phase shifter effects.
The parameters are identical to those found in the CHORUS and FLANGE effects. However,
please note that stronger phase effects are created with the DEPTH parameter set to low values.
Higher settings of the DEPTH parameter give effects more like simple flanging.
Also, as mentioned in the description of EQ, phasing can be augmented by sweeping one of the
EQ’s mid bands at the same rate as the phaser.
Version 1.21
197
s5000/ s6000
FX
ROTARY SPEAKERS
The next modulation effect available is ROTARY SPKRS.
SPEED 1
This sets one of the rotary speaker speeds. Typically, this will be used to
set the speed of the slow rotary speaker effect but it may be used as the
fast rotary speaker effect if you wish.
SPEED 2
This sets the second of the rotary speaker effect speeds.
ACCELERATION
On a ‘proper’ rotary speaker, because of mechanics and inertia, it takes
a certain amount of time for the speaker to change from the slow speed
to the fast speed and vice versa. This parameter allows you to set the
time in seconds it will take to go from SPEED1 to SPEED 2 and vice
versa.
DEPTH/WIDTH
This sets the depth (or width) of the rotary speaker effect. High settings
will give a wide left-right sweep, lower settings will give a narrower sweep.
INIT SPEED
This parameter sets which of the speeds will be the ‘initial’ speed when
you select this effect. It also allows you to listen to the speed parameter
you may be adjusting. For example, when setting speed 1, select SPEED
1 and when setting speed 2, select SPEED 2. This allows you to set up
rotary speaker effects without having a MIDI controller to hand.
MIDI CONTROL
This selects which MIDI controller will trigger the change from SPEED1
to SPEED2 and vice versa. You may select any of the 128 MIDI
controllers.
NOTE: If using MODWHEEL, make sure that this is not used to introduce vibrato to the sound
as well otherwise, as you change the rotary speaker speed, you will also increase/decrease
vibrato which may or may not be desirable.
198
Version 1.21
s5000/ s6000
CONTROL MODE
FX
Depending on the MIDI controller selected in the MIDI CONTROL
parameter, you may select whether crossing a threshold level of 64 that
will cause the speed change or a switch action that will cause the speed
change.
When LEVEL is selected, once the controller goes past a level of 64, the
speed will change. When TOGGLE is selected, the selected controller
will switch between speed 1 and speed 2 and vice versa. Confused?
Read on!
Let’s take a practical example. Let us imagine that you are using the
modwheel (controller #1 - the default) to switch between speed 1 and
speed 2. With LEVEL selected, pushing the modwheel up will cause the
controller to go over the 64 threshold (i.e. as it moves from 0-127) and
the rotary speaker effect will change from speed 1 to speed 2 (i.e. typically,
get faster). Bringing it back down again will once again go over the 64
threshold (i.e. as it travels from 127-0) causing the rotary speaker effect
to go from speed 2 to speed 1 (i.e. typically, get slower). However, with
TOGGLE selected, pushing it up will cause it to change from speed 1 to
speed 2 but you must bring the modwheel down again and push it back
up to go from speed 2 to speed 1.
LEVEL is recommended for use with continuous controllers (modwheel,
aftertouch, breath, foot pedal, etc.), whilst TOGGLE is recommended
for ‘switch action’ controllers (footswitch type controllers such as sustain,
etc.).
MIDI CHANNEL
Because several parts may be sharing the same effect, you must
designate which MIDI channel will initiate the change from SPEED1 to
SPEED2.
NOTE 1: In practice, it is likely that only one sound will be routed to a multi-effects channel
producing a rotary speaker effect (typically, an organ sound) in a multi. In this case, set the
MIDI CHANNEL parameter to the same channel as the part the organ sound (or whatever) is
in. For example, if the organ sound is in PART 5 on MIDI channel 5, set 5 in the MIDI CHANNEL
field shown here.
Of course, more than one part may be routed to a multi-effects channel producing a rotary
speaker effect but one channel must be designated to initiate the change from SPEED1 to
SPEED2. Select as appropriate.
NOTE 2: Please note that because the stereo mod section passes through the echo section,
any stereo mod effects you create will be ‘monofied’ when mono delay effects are selected. As
a result, you cannot effectively use the rotary speaker effects with mono echo.
NOTE 3: You will find that the rotary speaker effect is best created with no ‘straight’ signal. You
should use the DIRECT SIGNAL: ON/OFF function in the OUTPUT MIX page to turn off the
straight signal. Preset rotary speaker effects have DIRECT SIGNAL set to OFF.
TIP: You may find the sound of a rotary speaker is enhanced using just a hint of overdrive in
the DISTORTION section to re-create the overdrive effect commonly found on rock organ
sounds.
Version 1.21
199
s5000/ s6000
FX
FREQ/AMP MOD
The next modulation effect shows the following screen:
This effect type allows you to modulate frequency and/or amplitude for a variety of vibrato, autopan,
tremolo and Doppler Shift effects. The parameters are:
FMOD RATE
This sets the speed of the frequency modulation.
FMOD DEPTH
This sets the amount of frequency modulation.
FMOD FEEDBACK
This sets the amount of feedback from the output of the frequency
modulator back to its input. This parameter can be used to accentuate
the frequency modulation effect.
AMOD RATE
This sets the speed of the autopan effect.
AMOD DEPTH
This sets the ‘width’ of the autopan effect. With high settings the sound
will pan across a wider stereo image.
AMOD MODE
This sets the type of the autopan effect. The choices are:
L>R
The sound will move from left to right. As the sound crosses
the central axis, however, the effect is of the sound ‘rotating’’
(i.e. as it goes from left to right, the sound becomes more
distant and as it travels from right to left it becomes more
‘up-front’ and forward).
R>L
As above but in the opposite direction.
PAN
The sound will move from left to right but, as the sound
crosses the central axis, the level will be constant giving
the impression of it simply panning left to right.
TREMOLO The output of the autopanner is mono and the effect is a
tremolo effect (i.e. mono amplitude modulation)
The FREQ/AMP MOD can be used to produce many different sounds. It can be used as an ordinary
autopanner (i.e. FMOD parameters all set to 00) or to create vibrato and chorus effects (using just
the FMOD parameters; AUTOPAN parameters set to 00) or, using both panning AND frequency
modulation, you can create a Doppler effect (i.e. as the sound moves, it also changes pitch - the
classic ambulance siren effect!).
NOTE: Because the stereo mod section passes through the echo section, any stereo mod
effects you create here will be ‘monofied’ when mono delay effects are selected. As a result,
you cannot effectively use autopan with mono echo.
200
Version 1.21
s5000/ s6000
FX
PITCH SHIFT
The next modulation effect type is PITCH SHIFT:
This is a stereo pitch shifter with independent control over the left and right channels. The parameters
are:
LEFT SEMITONE
Sets the left channel’s pitch shift in semitone increments.
LEFT FINE
Allows you to fine tune the left channel’s tuning.
RIGHT SEMITONE
Sets the right channel’s pitch shift in semitone increments.
RIGHT FINE
Allows you to fine tune the right channel’s tuning.
Whilst the PITCH SHIFT effect can be used for special effects by tuning each channel to wide
semitone intervals, one of the most useful applications is to use just a hint of detune using the
LEFT/RIGHT FINE parameters. This gives a rich chorus or ensemble effect but without the inherent
cyclicness imposed by the LFO modulation found in chorus effects.
NOTE: As with all but the most expensive pitch shifters, there is a small delay in the pitch
shifted sound. This can be used to enhance an ensemble effect, however. Also, extreme pitch
shifts will exhibit some ‘wobbly’ artefacts. In this case, mix the level of the pitch shifted signal
back a bit.
Version 1.21
201
s5000/ s6000
FX
PITCH+FEEDBACK
This is the next and final modulation effect.
It is pretty much the same as PITCH SHIFT except that there is a delay line in the feedback path:
FBK L
DELAY L
SHIFT LEFT
FBK R
Audio in
DELAY R
SHIFT RIGHT
The signal from the pitch shifter is fed back into itself via a delay line. If you can imagine it - the
sound goes through the pitch shifter and, after a delay, the pitch shifted sound is fed back into the
pitch shifter where it is further pitch shifted. After a delay, it is fed back again after the delay and
shifted again. The amount of feedback and the delay time for each channel is separately variable
and this gives rise to all sorts of weird and wonderful arpeggio effects. The parameters are:
202
LEFT SEMITONE
Sets the left channel’s pitch shift in semitone increments.
LEFT FINE
Allows you to fine tune the left channel’s tuning.
LEFT DELAY
Sets the delay time for the left channel’s feedback.
LEFT FEEDBACK
Sets the amount of feedback for the left channel.
Version 1.21
s5000/ s6000
FX
RIGHT SEMITONE
Sets the right channel’s pitch shift in semitone increments.
RIGHT FINE
Allows you to fine tune the right channel’s tuning.
RIGHT DELAY
Sets the delay time for the right channel’s feedback.
RIGHT FEEDBACK
Sets the amount of feedback for the right channel.
NOTE: When PITCH+FEEDBACK is selected, this uses the delay line normally used for delay/
echo effects (you will note that the DDL section in the multiFX block diagram is also highlighted
when PITCH+FEEDBACK is selected to indicate this).
In other words, the delay/echo effects described next are not available when
PITCH+FEEDBACK is selected.
Attempting to access the DELAY FX in the main MULTIFX page in this case will pop up this
dialogue:
If you want to use the delay effects, please select another modulation effect type.
In all the modulation effects types, the ACTIVE switch on F10 allows you to bypass the selected
effect from the chain of effects.
MODULATION EFFECTS TEMPLATES
A wide variety of templates are offered that cover the whole range of modulation effects from mild
chorus to thick flanging to rotary speakers, autopan, tremolo, pitch shift and many other special
effects. These can be used ‘as is’ or can be edited and used as the basis for your own effects.
Simply select a template that is close to what you want and make the necessary tweaks to it for
your own requirements.
Version 1.21
203
s5000/ s6000
FX
DELAY FX
Pressing DELAY FX in the main MULTIFX page will give you access to the various delay/echo
effects. The delay line in the multi-effects is dual channel allowing you to create ping pong and
many other stereo delay effects. It can also operate in a mono mode and this has the advantage of
doubling the available delay time.
MONO LEFT
The first of these is a simple mono delay line:
This takes its input from the left output channel of the modulation section. The parameters are:
DELAY TIME
Here, you may set a delay time of up to 670mS
FEEDBACK
This sets the amount of repeats the echo effect will have by setting how
much of the delayed output is fed back into the delay line. This will
increase the number of repeats in the effect.
HF DAMPING
This sets the high frequency damping. The HF DAMP parameter filters
out some of the high frequency components in the sound in the feedback
loop. This is to simulate the effect that in real life, each repeat of the
echo gets slightly duller as the surfaces off which the sound is bouncing
absorb some of the high frequencies. The value shown is the frequency
that will be attenuated in the feedback loop.
FDBACK MONITOR
This selects where you will listen to the output of the delay and allows
you to set the direction of the modulation section and the echo section.
You may select POST which will give the effect of echo followed by the
mod effects or you may select PRE which will give the effect of the mod
effects followed by echo.
NOTE: When PRE is selected, you must set a value in the FEEDBACK parameter to hear any
delay effect
204
Version 1.21
s5000/ s6000
PING PONG
FX
This allows you to create stereo ‘ping pong’ echo effects that bounce
back and forth from left to right. A setting of 00 creates a mono echo
effect. A setting of +50 will create a ‘ping pong’ echo effect that goes
from right to left and back again. A setting of -50 will create a ‘ping pong’
echo effect that goes from left to right and back again. Settings in between
00 and ±50 will give ‘asymmetric’ or syncopated ‘ping pong’ effects.
For example, with a delay time of 500mS and a PING PONG setting of
+/-50, the result will be equally spaced repeats of 250mS. I.e.:
LEFT
IN
250mS
750mS
1.25Sec
RIGHT
500mS
1Sec
1.5Sec
With a PING PONG setting of, say, +/-25, however, the first repeat will
come after 125mS, the second after 500mS, the third after 625mS, etc.
(depending on the amount of feedback). I.e.
LEFT
IN
125mS
625mS
1.125Sec
RIGHT
500mS
1Sec
1.5Sec
MONO L/R
This sums the left and right outputs of the modulation section into a mono delay:
The parameters are identical to the MONO LEFT delay.
NOTE: Please note that because the stereo mod section passes through the echo section,
any stereo mod effects you create will be ‘monofied’ when either of mono delay effects described
above are selected. To enjoy stereo modulation effects with echo, please choose the stereo
delay option (see below).
Version 1.21
205
s5000/ s6000
FX
XOVER L+R
This is a ‘pseudo’ stereo effect that takes the left and right outputs of the mod effects sections and
feeds them through separate delay lines, the feedback paths of which crossover and feed each
other.
The parameters are identical to those found in the mono delay effects except that because two
delay lines are used, delay time is halved (to 335mS).
STEREO DELAY
This is a dual channel stereo delay with two independent delay lines:
The parameters are identical to those found in the mono and crossover delays except that you
have independent control over both channels delay time, feedback and HF damping. The PING
PONG parameter is not available in this delay effect type.
As with the crossover delay effect, because two delay lines are used for this effect, the maximum
delay time for each channel is 335mS.
In all the delay effects types, the ACTIVE switch on F10 allows you to bypass the selected delay
effect from the chain of effects.
DELAY EFFECTS TEMPLATES
Some basic delay effect templates are provided. However, because delay effects rely on a variety
of unpredictable factors such as the tempo of the song, etc., only basic ‘guidelines’ are offered.
You should tweak them according to your specific requirements.
206
Version 1.21
s5000/ s6000
FX
REVERB EFFECTS
The EB20 offers four channels of stereo reverb, RV1-4. RV1 and RV2 are associated with the two
multiFX channels and these may be accessed in the main FX page by pressing REVERB 1 (F10)
or REVERB 2 (F11) or via the main MULTIFX page. RV3 and RV4 are two ‘spare’ reverb-only
channels accessed in the main FX page on F12 and F13 respectively. However you access the
reverb page, you will see something like this:
As you can see, apart from the block diagram of the multiFX chain, both reverb screens are almost
identical.
Version 1.21
207
s5000/ s6000
FX
The parameters are:
208
REVERB TYPE
You may select from seven different reverb types - LARGE HALL, SMALL
HALL, LARGE ROOM, SMALL ROOM, GATED 1, GATED 2 and
REVERSE (the parameters change slightly for the two GATED and the
REVERSE reverb types - these are described separately).
PRE-DELAY
This sets the time between the original sound and the onset of the reverb.
TIME
This sets the time it takes for the reverb to die away.
DIFFUSION
This sets the density or ‘smoothness’ of the reverb. Typically, this will be
set to maximum but there may be occasions when you want a more
‘fluttery’ or ‘echoey’ reverb type in which case DIFFUSION should be set
to a lower value.
NEAR
This affects the amount of ‘agitation’ the direct sound will have on the
reverb decay and this has an effect on our perception of how close we
are to the direct sound. High settings give the impression of being closer
to the original sound whilst lower settings gives an enhanced sense of
distance.
ACTIVE
Allows you to bypass the reverb effect
REVERB LEVEL
Sets the output level of the reverb.
REVERB PAN
Sets the pan/balance of the reverb effect
LF DAMPING
This reduces the amount of low frequency signal in the reverb decay.
For a full sounding reverb, set a low frequency value but if you want a
thinner, more brittle sounding reverb, set a higher frequency.
HF DAMPING
This reduces the amount of high frequency content in the reverb decay.
This simulates the effect that in a natural acoustic environment, high
frequencies tend to get absorbed and so the reverb decay gets
progressively duller as it decays.
Version 1.21
s5000/ s6000
FX
When either of the GATED reverb types are selected, the screens change slightly:
The parameters for both gated reverb types are identical:
PRE-DELAY
Sets the time between the original sound and the onset of the gated
reverb effect.
REVERB DECAY
Sets the length of the gated reverb effect.
DIFFUSION
Sets the density of the gated reverb effect.
REVERB LEVEL and REVERB PAN serve the same function as for the other reverb types but the
gated reverb types do not have LF or HF damping or the NEAR parameter.
NOTE: The same parameters are available for RV3 and RV4 of course.
When the REVERSE reverb type is selected, a slightly different screen is shown:
The parameters are identical to the gated reverb types described above.
Version 1.21
209
s5000/ s6000
FX
OUTPUT MIX (MULTIFX1 AND 2 ONLY)
Pressing OUTPUT MIX in the main MULTIFX page shows this screen:
Here you may balance the various multiFX sections. The parameters are:
DIST/EQ LEVEL
Sets the output level of the RING MOD/DISTORTION/EQ block of effects.
DIST/EQ PAN
Sets the pan position of the RING MOD/DISTORTION/EQ block of
effects.
MOD/DEL LEVEL
Sets the level of the MODULATION/DELAY effects.
MOD/DEL PAN
Sets the stereo balance of the MODULATION/DELAY effects.
MOD/DEL WIDTH
Sets the width of the stereo image. At a value of 100, maximum stereo is
obtained but set lower than that and the sound becomes gradually
narrower. At a value of 0, the output from the MODULATION/DELAY
section is mono.
REVERB LEVEL
This sets the level of the reverb in the multiFX chain.
REVERB PAN
This sets the stereo balance of the reverb in the multiFX chain.
NOTE: REVERB LEVEL and REVERB PAN are duplications of the parameters found in the
main reverb pages and are included here for convenience.
DIRECT SIGNAL
210
You can switch out the direct signal from the multiFX chain. This is of
most relevance when using effects such as autopan or rotary speakers
although it can be useful in other circumstances.
Version 1.21
s5000/ s6000
PATH CONTROL
FX
This parameter allows you to set the flow or direction of the effects. Most
multi-effects processors follow a ‘traditional’ path for the effects:
DIST/EQ
MOD FX
ECHO
REVERB
However, there are times when you want to have the modulation and
echo effects in parallel with each other or to be able chorus, flange or
phase the reverb to add a shimmer or a ‘swoosh’ to the reverb decay.
When using separate outboard effects processors, this is simply a matter
of patching the effects in the order you want. Many multi-effects
processors don’t allow this, however, and you are limited to just one
path as depicted above.
The EB20 allows you to set the direction of the effects with one simple
control, the PATH CONTROL. You may have mod/echo followed by
reverb; you may have reverb followed by mod/echo or you may have
mod/echo and reverb in parallel.
MOD/ECHO
L/R outs
PATH
DIST/EQ
PATH CONTROL
PATH
REVERB
L/R outs
When the PATH CONTROL is set to 00, the mod/echo section and the
reverb section feed the main left/right outputs in parallel.
When set to +50, the output of the mod/echo section is fed into the
reverb.
When set to -50, the output of the reverb is fed into the mod/echo section.
When set to values in between, this means that part of the signal is
going to the reverb or the mod/echo section whilst also feeding the L/R
outputs directly. For example, setting the PATH CONTROL to +25
indicates that some of the mod/echo section is being fed to the reverb
whilst also going direct to the L/R outputs. Similarly, a setting of -25
would send some reverb to the mod/echo section whilst some reverb is
going direct to the main outputs.
Version 1.21
211
s5000/ s6000
FX
EFFECTS TOOLS
F9 of every effects page shows FX TOOLS. Pressing F9 will show this drop down menu:
Here you may selectively mute the effects channels. This can be useful when editing effects as it
allows you to hear the effect you are working on in isolation by muting the other channels.
To mute an effects channel, simply press the appropriate mute key. When muted, a diagonal line
will appear through the speaker icon (as shown for FX2/RV2 in the above screen shot).
EFFECTS TOOLS is available in all effects and reverb pages allowing you to quickly mute effects
channels at any time.
212
Version 1.21
s5000/ s6000
FX
COPYING EFFECTS
It is possible to copy effects from one multi to another. In this way, if there is a particular effects
combination you like, it can be used in another multi. On the main FX page, F16 shows COPY
EFFECTS:
This allows you to copy all four channels of effects to another multi. Pressing COPY EFFECTS will
pop up this prompt:
The currently selected multi will be selected by default as the destination multi - using the DATA
wheel, you should choose the multi you want to copy the effects to and press YES (or CANCEL if
you change your mind).
Version 1.21
213
s5000/ s6000
FX
As well as copying all four channels of effects, you may also copy individual channels. For example,
in the main MULTIFX page, F16 shows COPY MULTIFX1 (or 2 depending on the selected channel):
Pressing this will show this prompt:
You should select the multi you wish to copy the multiFX chain to and press YES (or CANCEL if
you change your mind).
214
Version 1.21
s5000/ s6000
FX
Similarly, it is possible to copy individual reverbs from one multi to another. F16 in all the reverb
pages shows COPY REVERB n:
Pressing this will pop-up this prompt:
You should select the multi you wish to copy the selected reverb to and press YES (or CANCEL if
you change your mind).
Version 1.21
215
SAVE
s5000/ s6000
SAVE
Once you have done work on multis, programs and samples, you will no doubt want to save them.
This is done using the SAVE key.
Depending on what you are working on, pressing SAVE will show something like this screen:
In this example, you were working on the multi BACKING TRACK 2 when you pressed SAVE. This
is therefore the item selected to save. Had you been working on a sample or a program, the
appropriate item would be shown to be saved.
The window shows the current contents of memory and you may select another item to save if you
prefer. To save the selected item, press F14. This key’s label changes according to the item selected
(i.e. multi, program, sample). If you want, you can save the entire contents by pressing F8.
Also shown is the currently selected folder where the selected item(s) will be saved to. If you need
to change the destination folder (or disk), press VIEW DISK. The window will change:
216
Version 1.21
s5000/ s6000
SAVE
The window shows you the contents of the root directory or the currently open folder and you can
use OPEN and CLOSE FOLDER to navigate your way around your disk to set where the item
(multi, program or sample) will be saved. For example, opening SMF FOLDER:
The selected item will be saved to that folder.
Alternatively, you may also create a new folder to save to using NEW FOLDER.
If the selected disk is not the correct one, you can use DISK LIST to select another disk to save to.
Once selected, you may navigate your way around the folders as described above.
In either window, pressing F14 will show this prompt:
You may rename the item you are saving if you want. This is useful in case you want save an
edited copy of the item and retain the original on disk or in case you used an autoname and want
to give it a more meaningful name.
The selected folder where the item will be saved to is shown beneath the item’s name. If it is the
wrong destination, press CANCEL and select the correct folder.
Using the usual ‘checkboxes’, you can select what will be saved. In this case, you can choose to
save just the selected multi with or without its associated programs and their samples. You can
also choose to save all multis, again with or without the associated programs and samples.
Alternatively, you can save the entire contents of memory.
The CHECK NAMES key allows you to disable the file checking - with it ON (checked ), if a multi
of the same name exists in the selected folder, you will be prompted and asked if you want to
overwrite it or not. With CHECK NAMES switched OFF (checked ), files of the same name will
automatically be overwritten without prompting you.
Version 1.21
217
s5000/ s6000
SAVE
Pressing EXECUTE will pop-up a progress display:
Assuming you chose to save the programs and samples as well, you will see these being saved.
When saving an item, assuming CHECK NAMES is switched on and something of the same name
exists in the currently selected folder, you will receive this prompt:
Pressing YES will replace the item on disk with the item you are saving. Pressing SKIP will keep
the original on disk and will not save the new item.
If you press SKIP, the next time an item of the same name is found in the folder, you will receive the
same prompt again. However, pressing YES TO ALL will replace all items that may have the same
name without you receiving any further prompting.
If in any doubt at all, press CANCEL SAVE and re-appraise the situation before you save to prevent
accidentally overwriting anything valuable on disk.
NOTES REGARDING SAVE
•
You may only save to an MS-DOS formatted disk. This includes hard disk, removable disks
(Jaz, Zip, Syquest, etc.) and floppy disk.
•
Whilst you can load data from an S1000, S1100, S2000, S3000 or XL series hard disk, it is not
possible to save data to these or other Akai formatted disks.
NOTE: Similarly, you cannot record ‘virtual’ samples to anything other than an MS-DOS
formatted disk.
218
Version 1.21
s5000/ s6000
UTILITIES
UTILITIES
Pressing UTILITIES shows this screen:
As for EDIT PROGRAM and EDIT SAMPLE, the main page gives direct access to further functions.
These are:
SYSTEM SETUP
Pressing this shows this screen:
The parameters are:
TRANSPOSE
Sets the overall tuning of the sampler in semitones. Please note that this
is a MIDI transpose function and not a tuning function as such.
For example, if you transpose the S6000 up by 2 semitones using this
parameter, when you play C3, a 2 semitone offset will be added to that
and you will actually play the sample on D3. In this way, you may
transpose the overall tuning of the sampler without any ‘munchkin’ pitch
distortion.
SEMITONE TUNE
This also tunes the sampler in semitone increments. This, however, is a
true tuning function and physically tunes the whole sampler up or down
so anything you play may have some of the pitch distortion inherent in
sample playback.
FINE TUNE
Allows you to fine tune the sampler to external instruments.
Version 1.21
219
s5000/ s6000
UTILITIES
MASTER LEVEL
Sets the overall output level of the sampler.
NOTE REGARDING MASTER LEVEL: The default setting for this parameter is -12dB, the
reason being that, unlike DAT or other stereo digital recorders which record at 0dB and playback
at 0dB, the S6000 records at 0dB but has to play many voices simultaneously (the other
recorders only need to play exactly what they recorded). Each voice you play adds extra gain
to the output so, if you were to set 0dB and play many voices, you would get distortion. By
setting it to -12dB, you have 12dB of headroom before clipping will occur.
However, if you are only recording and playing back a stereo recording on its own (for example,
mastering a track down to stereo using the disk recording functions), you would be advised to
set the MASTER LEVEL parameter to 0dB so that you put out the same level as you recorded.
SYSTEM SCSI ID
This sets the SCSI ID of the S6000’s CPU. The default is 6.
NOTE: It is vital that the SCSI ID set here does not conflict with any other devices on the SCSI
bus or unreliable operation may occur.
SYNC SOURCE
DIGITAL I/O
220
This sets the sampling rate and/or external digital wordclock sync options.
These are:
INT 44.1kHz
Sets the internal clock to run at 44.1kHz.
INT 48.0kHz
Sets the internal clock to run at 48kHz.
EXT WORDCLOCK
The sampler will run at whatever sampling rate
is received at the WORDCLOCK BNC
connector.
DIGITAL INPUT
The sampler will run at whatever sampling rate
is received at the digital I/O phono input.
OPTICAL INPUT
The sampler will run at whatever sampling rate
is received digital I/O optical input.
ADAT INPUT
The sampler will run at whatever sampling rate
is received at the ADAT input (if installed).
Here you may select between CONSUMER and PROFESSIONAL
depending on the type of digital equipment you are using with the S6000.
Version 1.21
s5000/ s6000
UTILITIES
SET CLOCK
Here you may set up the S6000’s internal clock. Pressing it displays this screen:
The time you entered this page is captured in the centre of the screen (the actual time the sampler
was previously set to keeps ticking away in the top left corner). You should set the various parameters
accordingly to set the time and date and, at an appropriate moment, press SET (F16) to actually
set the time.
The clock is used to date stamp files when you save them.
Version 1.21
221
UTILITIES
s5000/ s6000
PREFERENCES
This allows you to personalise your sampler’s settings. Pressing PREFERENCES shows something
like this screen:
The parameters are:
NOTE DISPLAY
This allows you to choose whether to display notes as MIDI numbers
(i.e. 0-127) or as names (C 0 - G 8) in all displays where notes are
shown.
LOOP DISPLAY
This allows you to select whether LOOP LENGTH is displayed in time
(i.e. 1 sec) or samples (i.e. 44100).
SCREEN DISPLAY
This allows you to invert the screen display. You may have white lettering
on a blue background (NORMAL) or blue lettering on a white background
(INVERTED).
SCREEN SAVER
This turns off the LCD’s backlight at timed intervals in order to preserve
it. If the function is enabled, the backlight will switch off after n minutes
of inactivity. To re-activate it, press any key.
KEY REPEAT DLY
This sets the delay time before certain keys such as SCROLL UP/DOWN
and SELECT keys start auto-repeating.
FAN SPEED
This sets the speed of the internal fan, used to cool any hard drives that
may be installed. The options are SLOW or NORMAL.
NOTE: The FAN SPEED control is only applicable to the S6000. This parameter does not
appear on the S5000.
222
Version 1.21
s5000/ s6000
UTILITIES
MIDI SETUP
This sets up how the S6000 will respond to MIDI. Pressing MIDI SETUP shows this screen:
The parameters are:
PROGRAM CHANGE
This applies to remote program selection of programs via MIDI within
parts. It may be switched ON or OFF
MULTI SELECT
This allows you to select whether MIDI program change or MIDI bank
change will remotely select multis. Multis may be given MIDI program
numbers in the RENUMBER MULTI page. If BANK is selected, the same
MIDI program numbers are used. Thus, sending a command to change
to bank 2 will cause the multi with MIDI program number 2 to be selected.
MULTI SLCT CH
This sets the channel for the reception of program change commands
for remote selection of multis. Of course, this parameter has no effect if
MULTI SELECT is not switched on.
NOTE: When MULTI SELECT is switched on, the selected MIDI channel cannot be used to
remotely select programs in parts. For example, if MIDI channel 16B is selected for remote
selection of multis, you cannot select programs on that channel. This is done automatically.
Version 1.21
223
s5000/ s6000
UTILITIES
EXT APM CONTROL
You may select any one of the 128 MIDI control parameters to be used
as a controller in the APM matrix (see Appendix A for a full listing of
these).
AFTERTOUCH
This is a ‘system-wide’ parameter that allows you to select whether the
S6000 responds to CHANNEL or POLYPHONIC aftertouch.
With channel aftertouch, pressing harder on one note will affect all notes
that are held. With polyphonic aftertouch, pressing harder on one note
affects only that note. Polyphonic aftertouch is therefore much more
expressive, especially with ensemble sounds such as strings or brass
where one voice can be made brighter or louder or to have more vibrato,
whatever.
Your MIDI keyboard (or other controller) must be capable of generating
polyphonic aftertouch for this to work. If your keyboard or controller only
generates channel aftertouch (as most aftertouch-equipped keyboards
do) and you select polyphonic aftertouch in this parameter, you will get
no aftertouch at all. This is because the MIDI commands for channel
aftertouch are not recognised by polyphonic aftertouch and are therefore
ignored.
At the bottom of the screen are 32 (1-16A and 1-16B) ‘PPMs’ meters that allow you to monitor
incoming MIDI. This can be useful for troubleshooting. Also shown above these is whether or not
MIDI clock is being received. Its tempo is also shown although, if MIDI clock is not being received,
it shows the default 120BPM.
MIDI FILTER
Pressing this will show this screen:
This page allows you to selectively filter out certain types of MIDI events on selected MIDI channels.
This can help to reduce bottlenecks at the MIDI inputs and therefore help to keep note-on delays
to a minimum.
The MIDI event types are selected using F2/F10 for note-on, F3/F11 for aftertouch, F4/F12 for
wheels (pitchbend and modwheel) and F4/F13 for MIDI volume. The channels are selected using
the CURSOR </> keys. Use the DATA wheel to turn them on and off.
With the cursor on ALL, you can disable the selected MIDI event on all channels.
Use MIDI A and MIDI B (F14 and F15) to select the MIDI input.
224
Version 1.21
s5000/ s6000
UTILITIES
FX IN/OUTS
Back in the main UTILITIES page, pressing FX IN/OUTS will show this page:
It is possible to use the EB20 as an effects processor for external signals fed into the sampler’s
inputs (the EB20 is an option on the S5000). An effects channel may share an external input AND
internal sounds. For example, you may route some parts to FX channel 1 which also has an
external input routed to it. If you want an FX channel for exclusive use by an external sound
source, do not route any parts to that FX channel. The parameters in the FX I/O page are:
INPUT LEVEL
This sets the overall input level for both inputs. By double clicking this
key, you may also set the inputs’ overall sensitivity (i.e. MIC, LINE or
PRO). Input level is set by observing incoming signal level on the meters
and adjusting INPUT LEVEL accordingly. As with RECORD, the ideal
input level is as close to 0dB as possible.
Above the meters, you can see the margin of headroom you have and
this value is held until the signal exceeds it again. To obtain optimum
record level, you should select the appropriate input sensitivity (MIC,
LINE or PRO) and increase (or decrease) RECORD LEVEL until the
margin is as close to 0dB as possible. If the maximum headroom is
exceeded by too loud a signal, the clip indicator will illuminate and an
exclamation mark (!) will appear above it. If this happens, reduce
RECORD LEVEL, press RESET MARGIN (F9) and try again.
EXT IN LEFT/RIGHT
These two parameters allow you to select which of the four effects
channels the external inputs will be routed to (OFF, FX1, FX 2, RV3,
RV4).
L/R DIRECT LEVEL
This sets how much of the input’s direct signal is passed to the outputs.
If you are using the S6000 as a standalone effects processor with an
external mixer via the mixer’s AUX sends, this should be set to 0 otherwise
set the levels as appropriate.
NOTE: It is only possible to use the analogue inputs as a signal source to the effects.
Furthermore, because there are only two inputs, only two effects channels may be nominated
to be used with external sounds.
FX OUTPUT
Version 1.21
You may, if you wish, route the effects to appear at a pair of the individual
outputs. This allows you to balance the relative levels of the ‘straight’
signal and the effects signal on an external mixing console and you may
select OFF (no effects), 1/2, 3/4, etc., as you wish. You will note, however,
that the outputs selected here carries a mix of all four effects channels’
outputs and it is not possible to route individual effects channels to
different outputs.
225
s5000/ s6000
UTILITIES
DISK UTILS
Pressing DISK UTILS will show this screen:
This is not like LOAD to look at except that F13 allows you to rename the selected item and F14
allows you to delete the selected item.
RENAMING ITEMS ON DISK
To rename an item, move the cursor to the item you want to rename and press RENAME. You will
get this prompt:
You should enter a new name and press F16 (or press F8 - CANCEL - if you change your mind).
If you proceed and a file of that name already exists in the location, you will be prompted:
You should press OK (F16) and try again with a new name.
226
Version 1.21
s5000/ s6000
UTILITIES
DELETING ITEMS FROM DISK
To delete something from disk, move the cursor to the item you want to delete. F14 is used to
delete the item and, like load and save, its label changes according to the item selected. So, for
example, if the cursor is on a folder, the key will be labelled DELETE FOLDER and if it’s on a
MULTI, it will be labelled DELETE MULTI. The same would be true for programs and samples.
Pressing F14 pops up this prompt:
You should proceed (with caution!) as appropriate. If the folder contains any data, to prevent
accidental deletion, you are warned:
You should delete the contents first before finally deleting the folder.
**** IMPORTANT NOTE REGARDING DELETE FOLDER ****
If your sampler is connected to a hard disk that has PC data on it (for example, a removable
drive that has been used to store W95/8 or Mac folders), whilst you are able to see these
folders in the sampler’s disk list, if you open these folders, it is quite possible that you will not
see anything in them. This is because the sampler does not recognise any non-Akai files
(word processor documents such as .txt, graphics files such as .jpg or .bmp, etc.).
As a result, you could have a situation where you go to delete a particular folder that appears
to be empty but which, in fact, contains non-Akai data. In this case, you will receive the prompt
shown above and you will not be able to delete that folder on the S6000.
If such folders exist on your sampler’s disk drive, they should be deleted either on a PC or on
a Mac that has PC Exchange installed or which uses a W95/8 emulator.
Version 1.21
227
UTILITIES
s5000/ s6000
FORMATTING DISKS
It is possible to format hard disks to MS-DOS format in the DISK UTILS page in DISK LIST:
To select the disk to format, press the soft key alongside it. Now press FORMAT DISK (do not
press SELECT DISK on F8). You will see this prompt:
You should select whether you want to perform a QUICK FORMAT or a FULL FORMAT using the
check boxes on F6 and F14. FULL FORMAT is required if the disk is brand new or has maybe
been used with some other device (for example, a disk that may have been used on an older Akai
sampler). The FULL FORMAT takes much longer of course but sets the disk up properly. QUICK
FORMAT can be used if you are re-formatting an existing MS-DOS disk.
228
Version 1.21
s5000/ s6000
UTILITIES
Pressing PROCEED pops up this prompt:
You should respond (with caution) as appropriate.
***** WARNING *****
PRESSING YES AT THIS STAGE WILL CAUSE ALL DATA ON ALL PARTITIONS ON
THE DISK TO BE COMPLETELY ERASED.
Please proceed with caution and abort now (press NO)
if you have the slightest doubt.
Version 1.21
229
s5000/ s6000
UTILITIES
Assuming you proceed, you will see this progress display:
An animated icon in the top right of the prompt shows activity and you should also see disk activity
LEDs on your hard disk flashing (or if it is fitted internally, you should hear some disk activity) as
the process takes place.
Because a half formatted disk would be totally unusable (and may not even be able to be reformatted), the S6000 does not offer an abort function during format - you’ll just have to sit it out.
**** IMPORTANT NOTE ***
DO NOT SWITCH THE SAMPLER AND/OR DRIVE OFF DURING THE
FORMAT PROCESS AS THIS COULD DAMAGE THE DRIVE
IRREPARABLY.
230
Version 1.21
s5000/ s6000
UTILITIES
At the end of the formatting process, you will be returned to the DISK UTILITIES page:
You will see a blank directory list. The free space (correctly shown as 100Mb for this Zip cartridge)
is shown at the top of the page. The disk is now ready for use.
NOTE: The S6000 will divide the selected drive into 2Gbyte partitions. Thus if you try to format
a 4Gb drive, it will have two x 2Gb partitions. It is not possible to set the partition size or name
the disk or partitions in this version of software.
Also, the S5000/6000 formats the disk to FAT16. This is chosen as FAT32 does not allow the
use of removable drives which are very popular for sound library storage.
If you require more sophisticated formatting functions, it is suggested you format your drive on
a PC or on a Mac that uses a W95 emulator.
Version 1.21
231
UTILITIES
s5000/ s6000
UNLOCK DISK
If ‘virtual’ samples are loaded from a removable disk medium such as Jaz, Zip, Syquest, MO, etc.,
the disk becomes locked and you are unable to eject it from the drive’s own front panel without first
unlocking it in the DISK UTILITIES/DISK LIST page:
This is because it is impossible to play ‘virtual’ samples without the disk being present. If the disk
were to be ejected leaving just the ‘noses’ of the samples in memory, they would not play correctly.
If you want to eject the disk, the ‘virtual’ samples first need to be deleted from memory.
Any disk that has ‘virtual’ samples loaded will be shown as locked with a small padlock icon
alongside it. Pressing UNLOCK DISK will pop-up a prompt informing you to delete the ‘virtual’
samples from disk so that the disk can be ejected safely:
You should press OK and, in EDIT SAMPLE, identify the ‘virtual’ samples in memory and delete
them. Once all the ‘virtual’ samples from the selected disk are deleted, you can eject the disk as
usual from its own front panel.
**** NOTE REGARDING USING VIRTUAL SAMPLES WITH REMOVABLE DRIVES ****
Many removable drives have an automatic ‘sleep’ action where the unit spins down into a
‘dormant’ phase if unused for some time. However, this is very inconvenient when trying to
play ‘virtual’ samples from such a disk because if the disk is asleep when you try to play the
sample, playback will fail because it will take a long time for the disk to ‘wake up’ and play the
sample(s).
Therefore, when ‘virtual’ samples are loaded, the S6000 overrides the drive’s ‘sleep’ function
so that the disk is always ready to play from disk instantly.
As such, it is not advisable to have ‘virtual’ samples loaded from a removable drive in the
sampler for too long as this may mean that the drive will never have a chance to ‘sleep’ and so
may run the risk of overheating.
232
Version 1.21
s5000/ s6000
UTILITIES
MEMORY TEST
Pressing this shows this pop-up:
After a while, you will see something like this dialogue:
This test is mostly for service engineers for diagnostic purposes but you may find it useful to check
how much memory is in your S6000 (especially if you have just installed some SIMMs and want to
check they are correctly seated and recognised by the system). If a slot doesn’t have a SIMM
installed, it will show NOT AVAILABLE; if there is a problem with a SIMM, the appropriate slot will
show FAULTY.
Version 1.21
233
UTILITIES
s5000/ s6000
SHOW HARDWARE
This is a useful utility for checking what hardware is and isn’t installed or connected. Pressing it
shows something like this screen:
After which....
At a glance, you can see how many voices are available to you, how much memory is installed,
whether the effects processor EB20 is installed (S5000 only), whether the ADAT option is fitted,
whether the keyboard is attached and what drives are connected. Those items shown with a cross
through them indicate that they are not installed/attached.
234
Version 1.21
s5000/ s6000
UTILITIES
SET PLAY KEY
Pressing this shows this screen:
The parameters are:
PLAY KEY MODE
NOTE 1 - 4
This allows you to choose from three ‘play’ modes for the ENT/PLAY
key. These are:
SINGLE
Pressing ENT/PLAY will play the selected
sound at C3 (or whatever NOTE 1 is tuned to)
ARPEGGIO
This will play NOTES 1 - 4 in succession. This
may be useful to check multi-samples and
sounds across the keyboard’s range when
away from a MIDI keyboard.
CHORD
This will play NOTES 1 - 4 simultaneously as
a chord.
Allows you to tune the notes to an arpeggio or chord. If SINGLE is selected
in PLAY KEY MODE, only NOTE 1 is used.
TEST TONE
Pressing this puts out a 1kHz sine wave test tone at nominal level through all outputs. Again, this
is mostly for diagnostic purposes for service engineers to check that all the outputs are working
and are at the correct level but you may find it useful for checking audio connections and/or for
setting levels on an external mixer.
NOTE: Because of the way audio is internally routed through the sampler, the test tone actually
passes through the effects sends. The effects are muted when the test tone is being generated
but they are re-initialised when you switch the test tone off resulting in a short burst of reverb
that sounds not unlike a submarine sonar! This is normal and is not a fault with the S6000.
To overcome it, switch FX OUTPUT to OFF in the FX IN/OUTS page.
This problem does not exist on the S5000 unless the EB20 is installed.
Version 1.21
235
UTILITIES
s5000/ s6000
SAVE O/S TO FLASHROM
This allows you to save the system settings and preferences to FlashROM or floppy disk. Pressing
SAVE O/S will pop-up this prompt:
By saving to FlashROM, your sampler will boot with your settings every time.
Pressing SAVE TO FLASH will show a progress display. This is slightly different to the normal
progress displays:
Followed by....
236
Version 1.21
s5000/ s6000
UTILITIES
As the FlashROM is erased (to make room for the new OS), you will see a series of dots move
across the display followed by “OK”. Then the O/S will be written to FlashROM:
A series of dots fill up the prompt line by line and the display will scroll up the prompt window as the
O/S is written to FlashROM. At the end, you will be returned to the original SAVE O/S prompt.
*** IMPORTANT NOTE ABOUT SAVING TO FLASHROM ***
ONLY USE [SAVE O/S] IN UTILITIES IMMEDIATELY AFTER INSTALLING
AN OPERATING SYSTEM OR IMMEDIATELY AFTER SWITCHING THE
SAMPLER ON (I.E. WHEN THERE IS NO DATA IN MEMORY)
Version 1.21
237
UTILITIES
s5000/ s6000
SAVE O/S TO FLOPPY DISK
You may also use SAVE O/S to create a ‘boot disk’ so that starting the sampler up with this in the
floppy drive will boot the sampler up with your personalised settings. Creating a boot disk may be
useful to back up your settings but also if you are likely to be using another S6000 or S5000 and
you want it to have the same system settings and preferences as yours.
When you press SAVE TO FLOPPY, you will get this prompt:
As the prompt informs you, all data on the floppy disk will be destroyed - ensure that the disk in the
floppy disk drive does not contain valuable sound library or other data. As the OS is being saved to
floppy disk, you will see this display:
At the end of the OS save, you will be returned to the SAVE TO FLOPPY prompt shown above.
Press NO/CANCEL to abort.
When you boot from this disk, start-up will be slower as the O/S is loaded from floppy disk (it will
take about a minute to boot up). At the end, you will see the usual “Searching for disks...” and the
AKAI professional ‘welcome’ screen after which you will be taken to a prompt that asks if you want
to write the operating system to FlashROM. If you respond NO, you can run the S6000 from the O/
S loaded from floppy disk. If you respond YES, you will see the progress displays the screens
shown on the previous page as the O/S is programmed into the FlashROM (this process is described
on the next page).
238
Version 1.21
s5000/ s6000
UTILITIES
LOADING OPERATING SYSTEMS
There will be occasions when you want to install an operating system. This may be to re-install a
backup O/S created using SAVE O/S described on the preceding page or to install a new operating
system as they are released.
To load an operating system, with the sampler switched off, simply insert the floppy disk into the
disk drive and power on. The screen will be blank and all the mode keys will illuminate. You will
also see the floppy disk drive working.
After about 35 seconds, you will see this screen:
The sampler is setting up the SCSI bus.
After this is done, you will receive this prompt:
You should respond accordingly.
Version 1.21
239
UTILITIES
s5000/ s6000
If you respond YES, you will see this sequence of screens and progress displays:
As the FlashROM is erased (to make room for the new O/S), you will see a series of dots move
across the display followed by “OK”.
Then the O/S will be written to FlashROM:
A series of dots fill up the prompt line by line and the display will scroll up the prompt window as the
O/S is written to FlashROM. At the end, you will be returned to the main UTILITIES page.
As it is not possible to load just part of the O/S, there is no ABORT function.
240
Version 1.21
s5000/ s6000
UTILITIES
NOTES REGARDING SAVING AND LOADING THE O/S USING FLOPPY DISKS
•
You can only use DOS formatted floppy disks. Pre-formatted disks are readily available
from any computer store. Some music stores also sell them. If you wish to format your own
floppy disk, then you will need to use a PC or a Mac running either PC Exchange or a W95/
98 emulator because it is not possible to format floppy disks on the S5/6000.
•
Always save the O/S to a new or freshly formatted disk - try not to use old disks.
•
If loading the O/S from floppy disk fails, simply switch off and try again - this will normally fix
the problem. If the problem persists, use either a new disk or re-format the disk that is
causing trouble.
•
It is a good idea to create a backup floppy disk of your current O/S so that may re-install it
in the event of problems. Keep that disk safe.
•
Do not eject the disk whilst the O/S is loading - this may result in an incomplete O/S which
may render your sampler unusable (though you should be able to re-boot and re-install in
this case). Ejecting the disk during load may also damage the disk.
•
AKAI professional frequently release new versions of the S5/6000 operating system. These
are available upon request from your local AKAI professional dealer but, you have Internet
access, you may download them from Akai’s website:
http://www.akaipro.com/
Please visit the site regularly for information about updates.
PC versions of the O/S are available as .ZIP files. You will need WINZIP to unzip the file
prior to copying the O/S to a floppy disk.
Mac versions are available as .SIT files so you will need to have Stuffit Expander to unstuff
the file prior to copying the OS to a floppy disk. You will also need to have PC Exchange
installed and enabled to use DOS formatted floppies.
•
Version 1.21
It is only possible to load an O/S from floppy disk. You cannot load, install or update the O/
S from any form of hard disk.
241
VIRTUAL SAMPLES
s5000/ s6000
VIRTUAL SAMPLES
A major feature of the S5/6000 is the ability to record and playback what we call ‘virtual’ samples.
Virtual samples are, in fact, recordings made to and played back directly from disk. They may be
used in pretty much the same way an ‘normal’ samples loaded into memory except, of course,
their length is not restricted by how much memory you have installed.
The fact that they can be used almost exactly like normal samples means that they can be edited
and placed in a program just like any normal sample and can be processed by the filters, LFOs,
envelopes, etc., just like any normal sample and a program can contain multiple virtual samples
mapped out across the keyboard just like any normal sample (programs can contain a combination
of RAM and ‘virtual’ samples by the way).
Programs containing virtual samples can be placed in a multi just like any other program and can
be tuned, mixed and sent to the EB20 (if installed on an S5000) and/or routed to their own outputs,
just like any other program .
Any edits you may make to these virtual samples, programs and multis can be saved just like any
normal sample, program or multi and when you go to LOAD, ‘virtual’ samples appear in the list just
like any other. Load a program that contains ‘virtual’ samples and they will load just like any other
program (except, of course, you are not actually loading the sample(s) into memory as such so
load is VERY fast). Similarly, scroll down to a ‘virtual’ sample and load it individually and it will load
just like any normal sample (except a lot faster!).
Virtual samples can be used in a number of applications:
TO PLAY BACKING TRACKS
If you use DAT or some other means of playing pre-recorded stereo backing tracks live, you could
record these as virtual samples, place them in programs as appropriate and trigger them from the
S6000. Not only does this give you immediate playback of the backing tracks but the running order
of your set can be changed on the fly.
FOR ‘SPINNING IN’
They can be used to play ‘spin ins’ such as backing vocals, guitar or sax solos, whatever - stuff
that would normally use a lot of memory. The programs to which these ‘spin ins’ are assigned can
sit in a multi along with other ‘normal’ programs you may be playing so that they may be triggered
alongside other material. With a sequencer, you could be sequencing normal instruments such as
drums, piano, bass - whatever - whilst triggering virtual samples at the same time and playing live
over the top of this.
FOR MASTERING
You could conceivably mix down to your S6000 by recording the outputs of your mixer as virtual
samples. These may be edited later (for example, editing out the count in, applying a fade out at
the end, adding some EQ - whatever). Once you have mastered all your tracks in this way, they
are much easier to transfer to DAT, MiniDisk, CD-R digitally (you could even map each one across
the keyboard in a program and then ‘play’ them to your mastering machine).
In a similar vein, you can master the outputs of the sampler by selecting OUTPUTS 1/2 as the
record source and recording directly to disk.
NOTE: In these two cases, it is possible to be playing the S6000 at the same time as recording
to disk. If, however, the sampler is playing back virtual samples at the same time as recording
you may experience problems if the disk bandwidth is exceeded. Recording requires more
disk bandwidth than playing back and so recording may fail and/or virtual samples that previously
played back perfectly may fail.
242
Version 1.21
s5000/ s6000
VIRTUAL SAMPLES
HOW DOES IT WORK?
The problem with playing back recordings from disk has always been disk speed as it takes a finite
time for the disk heads to actually find the data to play back (known as the seek time). Fixed hard
disks are relatively fast. Removable drives, however, tend to be much slower with seek times as
great as 50 milliseconds or more and to compound the issue, seek times are not consistent - if the
head only has to move from track on the disk to another, seek time can be relatively fast but if has
to seek from one end of the disk to another, seek time will be proportionally slower.
All of this (combined with other factors as well) means that it is not feasible to play directly from
disk without getting unacceptable delays so the S6000 gets around this by keeping just a small
portion of the start of the virtual sample - we call it the ‘nose’ - in memory. When you trigger a virtual
sample, the ‘nose’ is played from RAM giving the disk time to find the rest of the sample to play
back directly from disk. Thus you have note-on times that are as fast as ‘normal’ samples whilst
sample length is limited only by the size of your disk.
Because only very short ‘noses’ are loaded, this has the benefit that load times for virtual samples
are very fast and you could have a program that contains a lot of stereo virtual samples that
amount to maybe 200Mb or more that would load in seconds rather than minutes!
But there is a catch!
All hard disks have a finite bandwidth - that is, they can only transfer data up to a finite limit. The
result of this is that you cannot expect the same polyphony from virtual samples played from disk
as you can from normal samples played from RAM.
Another problem is that samples are often transposed in pitch as you play them, sometimes some
considerable distance from their original pitch. In this case, a virtual sample recorded on C3 but
played at C4 means the drive is having to work (literally) twice as hard and so polyphony will be
even more restricted. Add pitch bend and/or vibrato to that and the disk is working even harder!
So, a disk that can nominally play 16 mono samples simultaneously could only manage half that
(or less) if every one was transposed an octave.
Finally, virtual samples use the S6000’s voices to play (this is how they can be played in programs
using the filters, effects, etc., just like any ordinary sample). However, because it is not possible for
several voices to access the same data simultaneously from the same place on disk, virtual samples
cannot be played polyphonically and so each individual virtual sample is automatically set to play
monophonically when it is recorded or loaded (a mono virtual sample will use one voice and a
stereo virtual sample will use two). This doesn’t mean that you can only play one virtual sample at
a time - it means that if you place a single virtual sample into a program, whilst you can play it up
and down the keyboard, run it through the filters, add pitch bend and modulation, etc., (i.e. all the
things you can do with normal samples), you cannot play chords with it. However, if you have
several virtual samples in the program mapped across the keyboard as appropriate, you could
play them all together (notwithstanding the polyphony restriction imposed by the speed of your
disk drive) and so effectively, you can play ‘chords’ with several virtual samples16 .
16
Version 1.21
You cannot assign the same virtual sample to several keygroups and expect to play chords. The
same restrictions described above apply in this case.
243
VIRTUAL SAMPLES
s5000/ s6000
Some guidelines as to the number of virtual samples you can expect to play simultaneously from
different drive types are shown below:
TYPICAL MODERN HARD DISK DRIVE
JAZ CARTRIDGE
MO CARTRIDGE
ZIP CARTRIDGE
12-16 mono samples
10-12 mono samples
8-10 mono samples
6-8 mono samples
NOTE: Halve the figures shown above for stereo.
However, this is in no way a definitive statement or promise of what to expect and Akai Electric
Co., Ltd. does not and cannot guarantee the performance of these or any other drives as there are
so many variables.
For example, one brand of drive may offer impressively fast seek times but may not be able to
sustain high rates of data transfer (throughput) for any length of time. Others may have dependable
throughput but slower seek times. Different brands and models of drives also rotate at different
speeds and so this will also affect performance.
The number of samples any given disk can play simultaneously also depends on how the data is
organised on disk. For example, if you are trying play a virtual sample at one end of the disk
simultaneously with another at the opposite end of the disk, performance may suffer. If you are
trying to play several virtual samples that are scattered all over the disk, performance may suffer
even more.
How you play the virtual samples is also a crucial factor in this and the above guidelines are based
on playing virtual samples at their nominal pitch (i.e. the pitch they were recorded at). If any of
these is transposed in any way (especially if any are transposed up in pitch), the disk is having to
work much harder. For example, if you play a virtual sample recorded on C3 at, say, C4, then the
disk is having to work (literally) twice as hard for that particular sample and so the performance of
others you may be trying to play will probably suffer.
None of the above is a deficiency on the part of the S6000 as all devices that play audio back from
hard disk are faced with similar problems but the fact that you can transpose virtual samples and
change their pitch in real-time simply compounds the issue (multi-track hard disk recorders typically
play all their recordings at nominal pitch and so can predict track performance slightly more
accurately).
However, if you bear the above in mind, virtual samples are a valuable resource if only to save
memory usage and to speed load times up.
NOTE: As mentioned, virtual samples use the S6000’s voices just like any normal RAM sample
and polyphony is not increased when using virtual samples (i.e. 64/126 voices PLUS the
virtual samples). In fact, it’s quite the opposite. Assuming you have a drive capable of playing
8 mono virtual samples, 8 voices of the S6000’s polyphony will be used to play them.
244
Version 1.21
s5000/ s6000
VIRTUAL SAMPLES
RECORDING VIRTUAL SAMPLES
To record a virtual sample, select DISK in the RECORD TO parameter (F6):
However, before you make a ‘virtual’ recording, you need to select where on the disk you are going
to record to. This is done in D-D SETUP (F14) which will display something like this screen:
You can use the SELECT keys (F15/16) in conjunction with OPEN and CLOSE FOLDER to navigate
your way around the folders in the filelist to select where the new disk recording will be recorded
to. Alternatively, you can create a new folder to record to.
Version 1.21
245
VIRTUAL SAMPLES
s5000/ s6000
Once you have selected where the new recording will be placed, return to the main RECORD
page (press RECORD SETUP - F14 - or the main RECORD mode key), set the record parameters
as appropriate and record as normal. The whole process is exactly the same and you will receive
exactly the same prompts:
However, please note that due to the slowness of disk drives (and depending on the length of the
disk recording you made), you will find that the display of the new recording’s waveform at the end
of the record process takes some time. Much of this will depend on the speed of your drive (faster
drives will give a better performance, of course) and the length of the recording.
IMPORTANT NOTE: You can only record to MS-DOS formatted hard disks. It is not possible
to record to old S1000, S1100, S2000, S3000 or XL series formatted disks.
246
Version 1.21
s5000/ s6000
VIRTUAL SAMPLES
LOADING VIRTUAL SAMPLES
No special distinction is made when loading virtual samples.
If you load a multi that contains programs that use virtual samples, they will load as you would
expect and as saved.
If you load a program that contains virtual samples, it will load as you would expect and as saved.
If you go to load a virtual sample, you will see the usual prompt:
The OVERIDE TYPE check box allows you to choose how the selected sample will load. With it
‘unchecked’ as shown above, the sample will load in its ‘native’ format (i.e. virtual or RAM). However,
if you ‘check’ the OVERIDE key by pressing F14, F15 also changes:
LOAD AS VIRTUAL is shown as the default and you may change this if you want simply by pressing
F15 which will ‘toggle’ between LOAD AS VIRTUAL or LOAD AS RAM. In this way, you can choose
to load a virtual sample as a RAM sample (you may find it more convenient to edit the virtual
sample as a RAM sample (see EDITING VIRTUAL SAMPLES). Of course, if you choose to load a
virtual sample as a RAM sample, you need to have sufficient memory installed/free to accommodate
it.
NOTE: You cannot overide the type for ALL SAMPLES. If OVERIDE TYPE is checked and you
select ALL SAMPLES, OVERIDE TYPE will be disabled. Similarly, if ALL SAMPLES is checked
and you press OVERIDE TYPE, the prompt will revert to THIS SAMPLE.
Version 1.21
247
VIRTUAL SAMPLES
s5000/ s6000
CONVERTING SAMPLE TYPES
Using the OVERIDE TYPE key described on the previous page, it is possible not only to load
virtual samples as normal RAM samples for more convenient editing but you may also load RAM
samples as virtual ones.
•
To convert a virtual sample to a RAM sample, simply press OVERIDE TYPE and select LOAD
AS RAM on F15. If you save the sample, it will be saved as a RAM sample and will subsequently
load as a RAM sample. You can convert it back to virtual by using OVERIDE TYPE and selecting
LOAD AS VIRTUAL at a later date (saving this will, of course, save it as virtual and it will
subsequently load as such).
It can be useful to ‘temporarily’ load a virtual sample as a RAM sample for editing purposes.
Once edited, it can be saved (as a RAM sample) and then subsequently loaded (and saved) as
a virtual sample.
•
To convert a RAM sample to virtual, observe the same procedure - press OVERIDE TYPE (F15
will show LOAD AS VIRTUAL- the default). Pressing EXECUTE will cause the RAM sample to
be loaded as a virtual sample. If you wish, this can be saved in this format (you can change it
back to a RAM sample by using OVERIDE TYPE in subsequent loads).
It can be useful to load (and save) a long RAM sample to conserve memory or in the case
where you accidentally recorded to RAM when you perhaps meant it to be a virtual sample.
It can also be useful to load a long RAM sample as virtual in situations where your memory may
already be close to full but you desperately need that one extra long sample.
NOTE 1 : If you have made up a program containing one or more virtual samples but you load
them as RAM samples, the program will still play correctly and you will not have to re-assign
the samples in their ‘new’ format to the program.
Likewise, if you load RAM samples as virtual, any program(s) that use those samples will play
correctly.
NOTE 2: RAM samples less than 1.5 seconds will not be converted the reason being that
these would be shorter than the ‘nose’. In this case, even if you load them as virtual, they will
be loaded (and subsequently saved) as RAM samples.
248
Version 1.21
s5000/ s6000
VIRTUAL SAMPLES
EDITING VIRTUAL SAMPLES
There is no distinction made between normal RAM samples and ‘virtual’ samples. However, there
are a few things to be aware of when editing ‘virtual’ samples.
•
You may experience some delays in playback when editing, particularly when setting start and
end points for ‘virtual’ samples. For example, you may move the START point quite some way
into the sample - in this case, you may experience a small delay in playback . The reason is that
the START point is now way beyond the small ‘nose’ and so the sampler has nothing to play
while it fetches the rest of the recording off disk.
•
You may experience some delays when using PLAY TO, PLAY FROM and PLAY REGION with
‘virtual’ samples for the same reasons.
•
You will experience delays when selecting different ‘virtual’ samples. This is because the sample’s
waveform has to be loaded in from disk and this can take some time, especially with long
recordings.
•
When you select a ‘virtual’ sample for editing, it may take a short while for the waveform to be
displayed on the screen (the waveform information has to be loaded from disk). ZOOM IN/OUT
is also slower than when editing normal RAM samples. The actual amount of time it takes
depends on the length of the ‘virtual’ sample.
NOTE: These delays may be made worse if your drive has a default ‘sleep’ function. In this
case, you may also have to wait for the drive to ‘wake up’ after periods of inactivity.
•
You cannot play chords when editing ‘virtual’ samples.
•
You cannot loop ‘virtual’ samples and so you may only select NO LOOPING or ONE SHOT in
the PLAY MODE parameter (F11 in the LOOP page)
If you find any of the above inconvenient, you may prefer to load all your samples as RAM samples,
do all the editing while they are in RAM, save them and then load them using the OVERIDE TYPE
function to load them as ‘virtual’ samples.
WORKING WITH VIRTUAL SAMPLES IN A PROGRAM
The only restriction with using ‘virtual’ samples in a program is that any keygroup they are assigned
to will have a polyphony of 1 note so it is not possible to play chords on one virtual sample.
However, if you have many virtual samples in keygroups in the same program mapped out across
the keyboard, these may all be played simultaneously (notwithstanding the speed of your hard
disk).
Apart from that, working with virtual samples in a program is pretty much the same as working with
normal RAM-based samples.
NOTE: When virtual samples are assigned to keygroup zones, the PLAYBACK parameter
(F13) only allows you to select AS SAMPLE or ONE SHOT - the looping options are not
available.
Version 1.21
249
s5000/ s6000
SPECIFICATIONS
SPECIFICATIONS
Model Name
: MIDI Stereo Digital Sampler S6000/S5000
Sampling Data format
: 16-bit linear encoding
Sampling rates
: 44.1 kHz
48 kHz
Sampling time
(unexpanded memory)
: 1 minute 23 seconds - mono Fs = 44.1 kHz
1 minute 16 seconds - mono Fs = 48 kHz
39 seconds - stereo Fs = 44.1 kHz
36 seconds - stereo Fs = 48 kHz
Internal Memory
: 8 Mbyte, expandable to 256 Mbytes using 72pin SIMMs
Polyphony
: 128 - S6000/64 - S5000 Voices
Filter
: Digital dynamic multi-stage filter (12/24 dB/octave with resonant)
Envelope generators
: 3 x digital Envelope generators (1 multi-stage)
L.F.O.
: 2 x Multi-Wave Low Frequency Oscillators
Display
: Backlit 320 x 240 dot graphic LCD
Diskette drive
: 3.5" dual density floppy drive (2HD, 2DD)
Connectors
REC IN
STEREO OUT
ASSIGNABLE OUTS
HEADPHONES
MIDI
(20 Hz~20 kHz audio band width)
(20 Hz~22 kHz audio band width)
: 2 x XLR (balanced) - S6000 only
2 x 1/4-inch stereo phone (balanced)
: 2 x XLR (balanced) - S6000 only 6dBm/600Ω
2 x 1/4-inch phone (unbalanced) 6dBm
: 16 - S6000/8 - S5000 x 1/4-inch phone (unbalanced) 6dBm
: 1 x 1/4-inch stereo phone
: 6 x 5-pin DIN (IN, OUT, THRU x 2)
SCSI Interface
: 2 x 50-pin high pitch SCSI
AES/EBU digital IN/OUT
: 2 x 1/4-inch stereo phone (balanced) and Optical input/output
Word clock input
: BNC (75Ω term ON/OFF)
ASCII Keyboard input
: 6-pin Mini DIN
REC GAIN
: MIC -45dBm, LINE -22dBm, PRO +2dBm
Power Requirements
: 100 - 240 V AC 50/60 Hz 60 W,
without option 35W - S6000/28W - S5000
Dimensions
: 483W x 177H x 410D mm (EIA 4U size) - S6000
483W x 133H x 410D mm (EIA 3U size) - S5000
Weight
: 11.2kg - S6000/8.9kg - S5000
Accessories
: AC power cable ..................................................................
Sound Library Disk .............................................................
Cable set for SCSI drive .....................................................
Operator’s Manual ..............................................................
Optional Accessories
VOX64
EB20
IB-1616A
IB-S56USB
S6SM64
:
:
:
:
:
1
1
1
1
64-Voice Expansion Board (S5000 only)
Multi Effects Board (S5000 only)
2-IN/16-OUT adatTM Interface Board
USB Interface Board
64 Mbyte SIMM Memory Board
* Above specifications are subject to change without prior notice.
250
Version 1.21
s5000/ s6000
APPENDIX A
MIDI CONTROLLER LIST
The following is a list of the controllers that may be used as an EXTERNAL controller within a
program. The selected controller is set in EXT APM CONT field in the MIDI page in UTILITIES.
0
1
2
3
4
5
6
7
8
9
10
11
12
13
14-15
16-19
20-31
32-63
64
65
66
67
68
69
70
71
72
73
74
75-79
80-79
84
85-90
91
92
93
94
95
96
97
98
99
100
101
102-119
120-127
Version 1.21
Bank Select
Modulation wheel or lever
Breath controller
Undefined
Foot controller
Portamento time
Data entry MSB
Main volume
Balance
Undefined
Pan
Expression controller
Effect control 1
Effect control 2
Undefined
General purpose controllers (#1-4)
Undefined
LSB for values 0-31
Damper pedal (sustain)
Portamento ON/OFF
Sostenuto
Soft pedal
Legato footswitch (vv = 00-3F: NORMAL, 40-7F: LEGATO)
Hold 2
Sound controller 1 (default: Sound Variation)
Sound controller 2 (default: Timbre/Harmonic content)
Sound controller 3 (default: Release time)
Sound controller 4 (default: Attack time)
Sound controller 5 (default: Brightness)
Sound controllers 6-10 (No defaults)
General purpose controllers (#5-8)
Portamento control
Undefined
Effects 1 depth
(formerly External Effects Depth)
Effects 2 depth
(formerly Tremolo Depth)
Effects 3 depth
(formerly Chorus Depth)
Effects 4 depth
(formerly Celeste (Detune) Depth)
Effects 5 depth
(formerly Phaser Depth)
Data increment
Data decrement
Non-Registered Parameter Number LSB
Non-Registered Parameter Number MSB
Registered Parameter Number LSB
Registered Parameter Number MSB
Undefined
Reserved for Channel Mode messages
251
s5000/ s6000
APPENDIX A
S5000/S6000 MIDI IMPLEMENTATION CHART
Version : V1.20
Date : June, 1999
RECOGNISED
X
X
1-16
1-16
Memorized (disk)
Default:
Messages:
Altered:
X
X
**********
MODE 3
MODE 1
Multi Mode
Program/Sample Mode
True Voice:
X
**********
21-127
21-127
A-1 - G8
A-1 - G8
Note ON:
Note OFF:
X
X
O
X
Key's:
Channel:
X
X
O
O
Selectable as KEY or
CHANNEL
X
O
+/- 24 Semitones
X
X
X
X
X
X
O
O
O
O
O
O
Bank Select (Multi)
Modulation Wheel
Volume
Pan
Sustain Pedal
Via EXT CONT in APM
X
**********
O (0-127)
Shown as 1-128.
By preset number value
O
O
AKAI ID : 47H
S5000/S6000 ID : 5EH
Song Pos:
Song Sel:
Tune:
X
X
X
X
X
X
Clock:
Commands:
X
X
O
X
All Sound Off:
Reset Controllers:
Local ON/OFF
AUX
All Notes OFF:
MESSAGES
Active Sensing:
System Reset:
X
X
X
X
X
X
O
O
X
O
O
X
BASIC
CHANNEL
MODE
NOTE
NUMBER
Default:
Changed:
VELOCITY
AFTERTOUCH
PITCH BEND
CONTROL CHANGE
0
1
7
10
64
0-127
PROGRAM CHANGE
True #:
SYSTEM EXCLUSIVE
SYSTEM
COMMON
SYSTEM
REAL TIME
Mode 1 : OMNI ON, POLY
Mode 3 : OMNI OFF, POLY
252
REMARKS
TRANSMITTED
FUNCTION...
Mode 2 : OMNI ON, MONO
Mode 4 : OMNI OFF, MONO
To sync LFO2
O : YES
X : NO
Version 1.21
s5000/ s6000
APPENDIX B
NOTES ON USING HARD DISK DRIVES
SCSI CABLES
Always use high quality SCSI cables. Using cheaper SCSI cables may seem an attractive
proposition, especially if you have a tight budget but low quality cables can give rise to data errors.
Cheap cables are also not always properly grounded which could give rise to unpleasant noise
‘leaking’ into your audio system during disk activity (i.e. saving, loading or playing ‘virtual’ samples).
The S6000 uses 50-pin high-pitch SCSI connectors. You may need to buy adapters or special
SCSI cables from a computer store depending on the SCSI device you are attaching the S6000 to.
TERMINATION
A chain of SCSI devices must be terminated at either end of the SCSI chain. Any SCSI devices in
between the S6000 and the last SCSI device in the chain must be un-terminated. The maximum
number of devices you can have in a SCSI chain is eight. Connecting any more than this will
almost certainly cause severe problems and potential loss or corruption of data.
The S6000 has a switch on the rear panel that allows you to switch termination on or off very
conveniently. If the S6000 is at the end of a SCSI chain, termination should be switched on. If the
S6000 is positioned anywhere else in the SCSI chain, termination should be switched off.
Disk drives and CD-ROMs can usually be terminated via a switch on the back of the unit whilst
some units will automatically determine their position in the chain and switch their own termination
status accordingly. Older drives and CD-ROMs may require you to insert or remove special
terminating resistors whilst others may require you use in-line SCSI terminators. Please consult
your SCSI device’s documentation for details on how to terminate or unterminate your unit.
Terminated
Total
Cable
Length
6 Metres
Unterminated
Jaz
Unterminated
Zip
Terminated
CD-ROM
Incorrect termination on any of the devices may give rise to data errors and possibly corrupted
data so please ensure everything is set correctly. If you have any doubts, please contact your
dealer who will be able to help.
Version 1.21
253
APPENDIX B
s5000/ s6000
SCSI IDs
All SCSI devices MUST have a unique SCSI ID otherwise there will be contention on the SCSI
buss which will almost certainly cause problems. The SCSI ID is normally set via switches on the
rear of the unit. Most drives allow you to set a SCSI ID from 0-7 though some devices only offer a
choice of two IDs. Some, however, have fixed SCSI IDs which cannot be changed. Again, please
consult the documentation that came with your device.
The S6000’s SCSI ID is set in UTILITIES - SYSTEM SETUP using the SYSTEM SCSI ID parameter
SCSI CABLE LENGTH
The SCSI specification states that the total length of the SCSI chain must not exceed 6 metres.
“Total length” means the length of the whole chain between the first and the last device and not the
length of the cable between each of the devices. SCSI chains that are longer than the specified
length may cause data errors and possibly corruption of data.
254
Version 1.21
s5000/ s6000
APPENDIX C
TRANSFERRING DATA BETWEEN THE S6000 AND A PC
Because the ‘native’ file format for samples is .WAV and because the disk format for the S6000 is
MS-DOS, it is possible to take a disk from an S6000, take it to a PC and work on it there. This
offers the ability to organise your sound library efficiently into folders and sub-folders more
conveniently simply by dragging them around in Windows Explorer.
For example, you may have several folders of orchestral sounds on your S6000 - e.g. a STRINGS
folder, a BRASS folder, a FLUTE folder, a CLARINET folder, an OBOE folder and an orchestral
PERCUSSION folder. In Explorer, you could create a new folder called ORCHESTRAL and drag
these folders into it so that all your orchestral sounds are in one convenient folder. Furthermore,
within the ORCHESTRAL folder, you could create another called WOODWIND in which you place
the FLUTE, CLARINET and OBOE folders. You could end up with something like this:
And if you open the ORCHESTRAL folder, you would see something like this:
When the disk is returned to the S6000, the data will be organised in the same way.
Version 1.21
255
APPENDIX C
s5000/ s6000
Other benefits are...
•
You can use commercially available or shareware sample editing applications to edit the samples
on an S6000 disk on your PC. These can be saved and then transferred back to the S6000
where they may be loaded as normal.
•
You can run commercially available disk utility applications for de-fragmenting, repairing,
analysing and rescuing disks.
•
Standard .WAV files downloaded from the Internet or wherever can be taken to the S6000
where they may be edited and played within programs.
•
Conversely, sounds created on your S6000 can be taken to your PC and uploaded to the
Internet.
•
.WAV files created on your S6000 can be used in multi-media projects on your PC.
NOTES REGARDING TAKING DISKS TO A PC
256
•
In order to transfer sounds between the S6000 and a PC (and vice versa), you will, of
course, need to install a suitable SCSI board in your PC.
•
You will need to have installed the appropriate drivers for your disk drive.
•
In order to play the .WAV files on your PC, you will need to have a suitable soundcard
installed.
•
Whilst it is possible to move and copy files around on a PC in the usual fashion, please note
that the S6000 does not recognise ‘shortcuts’ to files.
•
AKAI professional M.I. Corp. cannot accept responsibility for the loss or corruption of data
due to the use of third party SCSI boards and/or soundcards or the use of disk utility
applications. Neither can AKAI professional M.I. Corp. assume any responsibility for the
loss or corruption of data when S6000/S5000 disks/cartridges are used on a PC or when
PC disks/cartridges are used with the S6000/S5000.
Version 1.21
s5000/ s6000
APPENDIX C
TRANSFERRING DATA BETWEEN THE S6000 AND A MAC
Because the Mac can read MS-DOS disks as well as its own HFS (Hierarchical File Structure) or
HFS+ format disks, it is possible to take S6000 disks and hook them up to an Apple Macintosh.
You could have something like this on your Mac desktop:
Here, a disk containing S5000 sound library has been taken to a Mac and opened on the desktop.
This contains a variety of folders that contain multis, programs and samples. Sound libraries may
be organised in the usual way on the Mac simply by dragging files into their respective folders on
the desktop.
Version 1.21
257
APPENDIX C
s5000/ s6000
You may create folders on the Mac desktop to place your sound library in and of course, folders
can contain sub-folders (for example, the WOODWIND folder in ‘ORCHESTRAL’ could contain
further folders CLARINETS, FLUTES, OBOES, etc.).
Files and folders can be dragged, moved, copied, renamed exactly as you want in the usual Mac
way. Furthermore, items can be dragged into the wastebasket for deletion. Items can also be
moved onto the desktop. For example:
Some string samples have been dragged from the STRINGS folder onto the desktop. You will
note, however, that if you now take this disk to the sampler, you will see a new folder in the filelist
which has been created automatically by the Mac, namely DESKTOP FOLDER which will contain
the string samples you moved to the desktop.
The same will happen if you move any items into the wastebasket on the Mac - in the S6000’s
filelist you will see a folder called TRASH which will contain any multis, programs and samples you
may have dragged to the wastebasket. They can still be loaded into the sampler in the normal way.
NOTE: Of course, if you delete the items in the wastebasket on the Mac, then the TRASH
folder will be empty when you take it to the sampler. Similarly, if you move the samples on the
desktop back to another folder, the DESKTOP FOLDER will be empty on the sampler.
Another folder that will automatically appear when you use a disk on your sampler that has had
work done on it on a Mac is one called RESOURCE.FRK. This is an ‘invisible’ folder on the Mac
and is used to store the resource forks of Mac files on an MS-DOS disk (the samplers multis,
programs and samples are not Mac files even after you move them around on a Mac). This folder
is only needed if you are saving actual Mac generated files to your S5000/S6000 disk (highly
unlikely!) and will normally be empty. It will do no harm to the sampler if you open it (or even try to
load it!) and you can ignore it. However, if its presence irritates you, you can delete it from the disk
in DISK UTILS in UTILITIES.
258
Version 1.21
s5000/ s6000
APPENDIX C
IMPORTANT NOTES REGARDING TAKING DISKS TO A MAC
For the Mac to read MS-DOS disks, it is necessary for the PC EXCHANGE control panel to be
installed and active (which is the usual default following a MacOS installation). However, there
are a few things to bear in mind.
The S5/6000 allows support of long filenames (i.e. greater than eight characters). PC
EXCHANGE only supports long filenames in MacOS 8.1 (or higher) using PC EXCHANGE
V2.2.x (or higher). PC EXCHANGE 2.2.x cannot be used on a MacOS less than OS8.1.
Therefore, if you wish to use filenames longer than eight characters on the S5/6000, you must
use MacOS 8.1 (or higher) and PC EXCHANGE V2.2.x (or higher).
If you are using MacOS 7.x.x or MacOS8, please be sure to restrict filenames on the S5/6000
to a maximum of eight characters or less. Failure to do so may result in unpredictable behaviour
when using S5/6000 disks on your Mac. This is not a limitation of the S5/6000 but of versions
of PC EXCHANGE less than V2.2.x. Please bear in mind that all the default names generated
by the samplers’ autonaming process are greater than 8 characters so you may have some
problems using these unless you specifically rename them to have names shorter than 8
characters. Ideally, as mentioned, MacOS8.1 is recommended.
However, please be aware that even when using S5/6000 disks with PC EXCHANGE 2.2,
there is a known incompatibility where several files all share the same first eight characters.
These will not be recognised correctly by the Mac and what happens is that all the files whose
first characters are identical are renamed to the same name. For example, in one folder, if you
have 5 samples called.....
NEW SAMPLE 1.WAV
NEW SAMPLE 2.WAV
NEW SAMPLE 3.WAV
NEW SAMPLE 4.WAV
NEW SAMPLE 5.WAV
When you open that folder on the Mac, you will only see one sample - NEW SAMPLE 1.WAV.
The files are still there but because the Mac cannot have files with the same name in one
folder, four of them are not shown.
Our engineers are trying to get to the bottom of this strange problem with the Mac’s PC
EXCHANGE and it is due to be fixed in a forthcoming release. In the meantime....
Ensure that the first 8 characters of anything you know will end up on your Mac have unique
characters. For example, instead of BIG STRINGS C1, BIG STRINGS C2, BIG STRINGS C3,
etc., where the first 8 characters - BIG STRI - are identical, call them C1 BIG STRINGS, C2
BIG STRINGS, etc.. With a unique identifier in the first 8 characters, they will show up properly
on the Mac.
Of course, filenames such as KICK 1, KICK 2, SNARE 1, SNARE 2, SNARE 3, etc., will be ok
on the Mac. - the problem is just with multiple files where the first 8 characters are identical.
Version 1.21
259
APPENDIX C
s5000/ s6000
Please also note the following:
•
Whilst it is possible to move and copy files around on the Mac in the usual fashion, please
note that the S6000 does not recognise aliases to files.
•
If you want to play .WAV files on your Mac, you will need a suitable .WAV player. QUICKTIME
will be able to play them but for more flexibility, shareware such as D-Sound Pro (http:/
/ourworld.compuserve.com/homepages/sdaino) allows playback and conversion
of a wide range of sound file formats as well as sample editing features.
•
Macintosh disk utility applications such as Norton Utilities and Apple’s own Disk First Aid
cannot be used with S6000 disks as these only allow analysis and repair of Mac formatted
HFS or HFS+ disks, not MS-DOS disks.
•
AKAI professional M.I. Corp. cannot assume any responsibility for the loss or corruption of
data when S6000/S5000 disks/cartridges are used on a Mac or when Mac disks/cartridges
are used with the S6000/S5000.
USING WINDOWS 95 ON THE MAC
If your Mac has a PC card or a W95 emulator such as Virtual PC17 or SoftWindows, you may also
use those PC environments to manage your sound library if you prefer (although this will be much
slower than organising your sound library on the Mac desktop). If you do choose to use a PC card
or ‘emulated’ PC environment, you will need to have the appropriate drivers for your disk drive
installed18 on your PC card or emulator. For information relating to organising your sound library
using Windows, please refer to the section “TRANSFERRING DATA BETWEEN THE S6000 AND
A PC”.
NOTE: You will note that the problems with filenames described on the previous page do not
apply when using W95 on a Mac.
260
17
Ideally, Virtual PC Version 2 should be used as earlier versions of VPC do not support long filenames.
18
Virtual PC V2.0 allows you to access removable drives such as Jaz, Zip or Syquest as ‘virtual’
disks in W95 by nominating them as ‘shared folders’ in which case, it is not necessary to have the
drivers installed in VPC for the disk to appear as a drive in My Computer on the PC desktop.
Please consult your Virtual PC V2.0 documentation for details regarding this.
Version 1.21
s5000/ s6000
APPENDIX C
SHARING DISKS BETWEEN AN S6000 AND A MAC/PC
By far the safest way to transfer material between your S6000 and a PC/Mac is to have separate
systems with a compatible removable disk format (e.g. Zip, Jaz, Syquest, MO):
Fig. 1 - Sharing compatible drives
By equipping both systems separately with the same removable drive, cartridges can be exchanged
easily and conveniently.
This offers several practical advantages not least of which is that every time you swap cartridges
and access the drive, the disk directory is refreshed and so you will see an accurate representation
of any changes you made on either system. In fact, this is the recommended configuration if you
plan to exchange data between your sampler and your PC/Mac.
***** IMPORTANT NOTE *****
WHEN SWAPPING A REMOVABLE CARTRIDGE SUCH AS JAZ, ZIP, ETC., AS SOON
AS YOU INSERT THE CARTRIDGE INTO THE S5/6000, IT IS ESSENTIAL TO PRESS
THE ‘UPDATE’ KEY IN LOAD > DISK LIST.
FAILURE TO DO SO MAY CAUSE DISK ERRORS AND UNRELIABLE OPERATION.
PCs and Macs always update automatically when you insert a cartridge.
Of course, if budget is tight, it may not be possible to duplicate drives for both systems. In this
case, you can share one drive between both systems by disconnecting it from one and attaching
it to the other as necessary.
NOTE: It is not possible to ‘hot swap’ SCSI devices so when disconnecting and connecting a
drive between two systems, be sure that all connected devices (S6000, drive, PC/Mac) are
switched off. Failure to do so may result in damage to the equipment. AKAI professional M.I.
Corp. cannot be held responsible for such damage.
Version 1.21
261
s5000/ s6000
APPENDIX D
CONNECTING THE SAMPLER TO A MAC/PC VIA SCSI
It is theoretically possible to connect your sampler to a Mac/PC and share the disk drive as follows:
However, great care must be taken because you can potentially damage your drive and lose data
irretrievably. As a result.....
THIS SETUP IS NOT RECOMMENDED.
The reason you may experience problems with this setup is because it is not good practice to have
two SCSI initiators on the same SCSI bus at the same time (an ‘initiator’ being a device with a CPU
- such as a Mac/PC or sampler - communicating with a SCSI peripheral). Furthermore, many SCSI
boards for Macs and PCs do not treat SCSI bus arbitration correctly (i.e. multiple initiators in a
system is not handled correctly). As a result, SCSI bus crashes can occur when a hard disk is
accessed by a sampler and a Mac/PC at the same time and depending on what the two devices
were doing at the time, this SCSI bus crash can corrupt a hard disk easily. SCSI was never designed
as a ‘networking’ system, just a means to connect a single initiator to SCSI peripherals such as
disk drives, CD-ROMs, etc. (for example, you would not network PCs or Macs together using
SCSI).
There are also other known problems when using a single disk shared by two SCSI initiators as
shown above. These are not unique to sharing an S5/6000 with a Mac/PC but can occur on any
SCSI system that has two initiators (for example, two Mac/PCs sharing the same SCSI drive).
When a disk is ‘seen’ by a SCSI initiator, the disk’s directory is loaded into its RAM disk cache. The
directory (also referred to as the FAT or File Allocation Table) is where all the information about the
data stored on the disk is held. If the directory is damaged in even the slightest way, it is almost
impossible to access the data on the disk.
Under normal circumstances (i.e. a single initiator hooked up to one or more drives), any changes
you may make to data on that drive automatically update the directory in the initiator’s RAM so that
it knows about the changes and can deal with the data correctly. However, in the case where there
are two initiators sharing the same drive (as shown above), if changes are made to the disk by one
initiator, the other initiator’s directory cache is not updated and so it doesn’t have the latest and
current directory. And that’s where the problems start!
262
Version 1.21
s5000/ s6000
APPENDIX D
The kind of ‘real-world’ things that can go wrong are........
A.
You delete some files on the disk using the sampler - they are deleted, the sampler’s disk
cache is updated, the files don’t appear in the LOAD filelist and everything is fine.
However, the Mac/PC’s disk cache has not been updated and so it doesn’t know anything
about these changes - as far as it’s concerned, the files are still there and so it will still display
the deleted or renamed items. This isn’t a problem in itself but if you try to do anything with
them, because they have been deleted, the system may get confused, the SCSI bus might
crash and the system could lock up with a disk error and it’s possible that the Mac/PC could
cause the disk directory to be corrupted causing irreparable disk failure.
NOTE: The same could happen when renaming files.
B.
You move some items from one folder to another on the Mac desktop or in Windows Explorer
in an attempt to organise your sound library more logically. You will see the changes on the
Mac/PC (of course). However....
The sampler knows nothing about the changes you made on your Mac/PC because its disk
cache has not been updated so as far as it’s concerned, the files are still where they originally
were. In the LOAD page, should you attempt to load these files, because they have been
moved elsewhere and don’t actually exist in the folders shown on the sampler anymore, you
may get a disk error, possibly a SCSI crash and maybe even a directory corruption rendering
the disk unusable.
C. If you edit a sample using a Mac/PC wave editor and save that sample back to the disk, the
sampler will not automatically know these changes have even taken place.
For example, if you chop a 1Mb sample in half on a Mac/PC wave editor, the Mac/PC’s disk
cache is updated and it knows the new filesize. The sampler, on the other hand, has no idea
that these changes have taken place - as far as it’s concerned, it’s still a 1Mb sample because
that’s the information it has in its disk cache. Should you try to load this sample into the
sampler.....
That’s right - the sampler is looking for a 1Mb file stored in a particular place on the drive, it
doesn’t find it so there will be a disk error, probably a SCSI crash and possibly even damage
to the disk.
D. The worst of all scenarios! You have the same sample loaded into your sampler AND your
Mac/PC wave editor (maybe intentionally or accidentally). You save it on the sampler and, at
the same time you save it on the Mac/PC. You now have two initiators trying to write different
data to the same point on the disk. You may as well throw the disk in the bin!
It’s a potentially ugly situation! And these are just four situations where things can go wrong. Bring
into the equation SCSI ID mismatches, incorrect termination, etc., and you have a disaster waiting
to happen!
None of this is due to limitations in the S5/6000 or the Mac/PC but is due to the fact that SCSI was
not really intended to be used in this way, as a means of networking devices (that’s why networks
of computers normally use Ethernet or something similar like AppleTalk).
You can now begin to see why sharing a disk between a Mac/PC and an S5/6000 is not
recommended - it’s possible but there are too many risks associated with it.
Version 1.21
263
s5000/ s6000
APPENDIX D
***** DISCLAIMER *****
There is nothing stopping you sharing a drive with your sampler and your Mac/PC in this way.
With care, you may be lucky and have no problems.
However., there is a huge potential risk of irreparable data corruption. As such....
Should you choose to share a disk drive between your sampler and your Mac/PC via a direct
SCSI connection as described on the previous pages, please be aware that you do so at your
own risk and AKAI professional M.I. Corp. cannot be held liable for any problems you may
have on your PC/Mac and/or S5000/6000 or for any damage to equipment or loss of data that
may result if an S5/6000 is connected directly to a Mac/PC.
264
Version 1.21
s5000/ s6000
APPENDIX E
SOUND LIBRARY COMPATIBILITY
The S6000 can read data from the S1000, S1100, S2800, S3000, S3200, CD3000, S2000, S3000XL,
S3200XL and CD3000XL samplers. However, due to differences in the hardware and the operating
system, it could be that some sounds may not sound exactly as they did on the sampler they were
created on.
For example, the filters on the S1000 and S1100 were 18dB/Octave lowpass with no resonance.
The S6000’s lowpass filters, however, are 12dB/Octave (2-POLE LP) and 24dB/Octave (4-POLE
LP) so there is no direct translation possible to 18dB/Octave. Also, the S3000 series (including
S2800 and S2000) had the option to install a second filter board, the IB304F. The S6000 does not
have this option and so sounds that rely on the second filter will not sound the same when loaded
into the S6000 (in much the same way as the same sounds loaded into an S3000 without the
IB304F installed). On previous samplers, the LFOs were different too (the S6000’s LFOs have a
much larger range of speed than any of the previous samplers) so this may account for some
small differences in the sound.
The way the effects are done is completely different on the S6000 and so previous samplers’
effects files cannot be used on the S5/6000.
The hardware on the S5/6000 is also greatly improved, in particular, the interpolation (i.e. the
process that defines the quality of pitch transposition). Thus, if you load a sound from a previous
Akai sampler where excessive pitch transposition is used, it will sound different in the S6000
(better in fact due to the higher quality interpolation).
The output arrangement on the S6000 is also different. All previous samplers had a stereo out and
8 mono outputs. The S6000 has 8 stereo outputs (or 16 mono outputs). However, on previous Akai
samplers, sounds could be routed to the stereo outs and the individual outs simultaneously. This is
not strictly possible on the S6000 where sounds are assigned to outputs 1/2 or 3/4 or 5/6, etc.,
(and/or 1 or 2 or 3 or 4, etc.)19 . Thus, when loading in sounds from previous samplers, the logic is
as follows:
•
If sounds are not routed to individual outputs (i.e. they only appear at the main stereo outs),
they will be routed to outputs 1/2 on the S6000.
•
If sounds are routed to the individual outputs, these take priority and the sounds will be routed
to their respective outputs on the S6000.
Thus the following situation may arise in the case of loading an S3000XL (or S2000) multi into an
S5/6000:
S3000XL/S2000
Part
1
2
3
4
5
6
7
8
19
Version 1.21
Program
DRUMS
PIANO
BASS
STRINGS
CLAVINET
BRASS
PERCUSSION
ORGAN
S5000/S6000
Out
Stereo
1
2
3
4
Stereo
5
Stereo
Part
1
2
3
4
5
6
7
8
Program
DRUMS
PIANO
BASS
STRINGS
CLAVINET
BRASS
PERCUSSION
ORGAN
Out
1/2
1
2
3
4
1/2
5
1/2
Actually, in a program, it is possible to have some keygroups appear at outputs 1/2 whilst others
appear at other individual or stereo outputs.
265
s5000/ s6000
APPENDIX E
As you can see, there is a conflict with some output assignments which will need some intervention
(in this case, maybe assign Parts 1, 6 and 8 to outputs 9/10 or maybe give each of those parts their
own outputs now that you have more to play with!).
Something similar would happen with a program:
Previous generation Akai sampler
Kg
1
2
3
4
5
6
7
8
Sample
KICK
SNARE
RIMSHOT
CLOSED HAT
MED HAT
OPEN HAT
CRASH CYMB
RIDE CYMB
Out
1
2
2
3
3
3
OFF
OFF
S5000/S6000
Kg
1
2
3
4
5
6
7
8
Sample
KICK
SNARE
RIMSHOT
CLOSED HAT
MED HAT
OPEN HAT
CRASH CYMB
RIDE CYMB
Out
1
2
2
3
3
3
As Multi
As Multi
As you can see, the kick, snares and hi-hats all appear at the correct outputs when loaded into the
S6000. The two cymbals, however, have no individual output routing on the original and so, on the
S6000, these will be assigned “AS MULTI”. What this means is that if the program is not yet
assigned to a multi part, the cymbals will appear at the default outputs 1/2 (thereby conflicting with
the kick and snares). However, if the program is assigned to a part which is routed to, say, outputs
3/4, the cymbals will appear at outputs 3/4 (conflicting with the hi-hats!). Some manual intervention
would required in this case.
However, as it happens, this situation is likely to be rare. Because it is not possible to remove
individual keygroups from the stereo mix outputs on previous generation Akai samplers, the
combination of output assignments shown above is a bit meaningless. For example, if the original
program was setup in this way with some sounds routed to the individual outputs for external
processing and mixing with others intended to be heard via the stereo outs, not only would the
cymbals be appearing at the main stereo outputs but so would the kick, snares, hi-hats and any
other keygroups routed to individual outputs which sort of defeats the object of assigning them to
individual outs in the first place! In most cases, all the keygroups will either come out of their own
individual outs or will not be assigned at all, appearing instead only at the stereo outs. Therefore,
a more likely scenario is as follows:
Previous generation Akai sampler
Kg
1
2
3
4
5
6
7
8
Sample
KICK
SNARE
RIMSHOT
CLOSED HAT
MED HAT
OPEN HAT
CRASH CYMB
RIDE CYMB
Out
1
2
2
3
3
3
7
8
S5000/S6000
Kg
1
2
3
4
5
6
7
8
Sample
KICK
SNARE
RIMSHOT
CLOSED HAT
MED HAT
OPEN HAT
CRASH CYMB
RIDE CYMB
Out
1
2
2
3
3
3
7
8
This translates perfectly when loaded into an S5/6000. Likewise, a multi where each and every
part has its own individual output assignment is going to translate perfectly - it’s only when some
sounds are routed to individual outputs and others are not are you likely to have conflicts. Once
you’ve fixed those on the S6000, save the results.
266
Version 1.21
s5000/ s6000
APPENDIX E
Of course, the S5/6000 can also read .WAV files. However, some considerations need to be borne
in mind.
Many .WAVs are only intended to be played at nominal pitch (i.e. the pitch they were recorded at).
Very often, they were never intended to be transposed up and down and, if they were, they either
have a limited transposition range and/or use a crude form of interpolation to do the transposition.
As a result of this, these samples are sometimes looped and then trimmed so that the end point of
the sample is exactly the same as the end point of the loop. For the application they were intended,
this will work fine.
However, the S6000 uses an extremely complex interpolation method to allow high quality
transposition over an extremely wide range. To ensure loops are played correctly without glitches
over that range, 15 samples are required after the loop end. For example:
Sample
Start
Loop
Start
Loop
End
Sample
End
15 samples
The S6000 takes care of this automatically and leaves 15 samples between the two end points but
WAVs that have been edited on another system so that the sample end and the loop end are the
same (or where the sample end is less than 15 samples away from the loop end) may exhibit
random clicks in the loop when transposed. In this case, your only course of action is to adjust the
loop on the S6000 (maybe AUTOFIND will fix the problem) and save the result.
NOTE: The S6000 cannot read .AIFF files or other soundfiles that may exists but there are
many conversion utilities that allow you to convert these to .WAV files.
NOTE: It is not possible to load S5/6000 sounds into any of Akai’s previous generation of
samplers. The huge differences in hardware, software and also file and disk format make this
impossible.
Version 1.21
267
s5000/ s6000
APPENDIX F
INSTALLING EXTRA MEMORY (To Service Technicians)
To install extra memory, you must remove the top of the case.
** IMPORTANT NOTE **
Consult your AKAI professional dealer regarding installation of any options (including
memory) to the S5000 or S6000. Self-servicing or user installation of memory boards
and/or options may cause malfunction of components or the instrument itself.
AKAI professional does not guarantee against the unit’s malfunction, damage or any
loss caused by self-servicing, user installation of memory and or options or improper
operation.
Remove the top of the case by undoing the four large screws on top of the case and the smaller
screw in the centre of the top of the rear panel. Looking inside the S5/6000, you will see something
like this:
Power Supply
Analogue Outputs
Option Slots
Voice Card Slots
1
2
3
4
SIMM Slots
Disk Drives
The S6000’s internal memory can be expanded to 256Mbytes. The S6000 comes with 8Mb of
memory ‘hardwired’ and there are four slots in which you can install SIMMs. Installation is fairly
simple. The SIMMs board is inserted at a slight angle and then pushed back where it clips into
place. Because SIMMs boards can differ, it is not possible to say “Install them with the components
facing the front of the S6000” or anything like that because some SIMMs boards have the memory
chips mounted on both sides sometimes. However, the boards can only be inserted one way so
you shouldn’t have any problems but be very careful not to force them into place otherwise they
may snap.
268
Version 1.21
s5000/ s6000
APPENDIX F
There are many different types of SIMMs available. The S6000 uses 72-pin SIMMs and both ‘fast
page’ and EDO memory can be used, even in combination. Parity or non-Parity can be used.
NOTE: SIMMs from S2000, S3000XL and S3200XL can be used in the S5000 and S6000 so
if you are upgrading, you may like to retain the SIMMs from your S2000 or XL to use in your
new sampler.
SIMMs come in various sizes and any combination of 4Mb, 8Mb, 16Mb, 32Mb and 64Mb boards
may be installed. Provided only 4, 8, 16 or 32Mb boards are used, there is no specific order of
insertion and they can reside in any slot. It does not matter whether you start with Slot 1 or Slot 4
- even if a slot in the middle is left free, the full memory complement is utilised.
However, in the case of using 64Mb boards, Slot 4 must always be the first to have a 64Mb board
installed and any subsequent upgrades with 64Mb modules must be done in descending order Slot 3, Slot 2, etc.. However, if you are mixing memory boards of different sizes, as long as the
64Mb SIMMs are inserted in the higher numbered boards, there is no specific order the smaller
modules need be inserted.
For example, the following would work perfectly giving a total of 152Mb or memory:
Slot 4: 64Mb
Slot 3: 64Mb
Slot 2: 8Mb
Slot 1: 8Mb
Plus 8Mb ‘hardwired’ memory.
However, in the following example, only 25% of the 64Mb board in Slot 2 would be addressed
giving a total of 104Mb:
Slot 4: 64Mb
Slot 3: 8Mb
Slot 2: 64Mb
Slot 1: 8Mb
Plus 8Mb ‘hardwired’ memory.
NOTE: The maximum memory the S6000 can address is 256Mb total. Thus, when 4 x 64Mb
SIMMs are installed, the 8Mb of ‘hardwired’ memory is ignored.
However, please note that even when only 3 x 64Mb boards are installed in Slots 4, 3 and 2,
the hardwired memory is not addressed restricting you to 192Mb of total memory. Slot 1 can
still be used to install any size memory module up to 64Mb.
If you have any doubts about installing memory, please consult your Akai dealer.
NOTES ON BUYING MEMORY
Always buy high quality memory from reputable vendors. It may be a bit more expensive but will
give better results. Inferior memory (i.e. bargain basement, cheap SIMMs from unknown
manufacturing sources) can cause data corruption and other problems and tests performed with
commercially available modules from a variety of PC wholesalers have shown that problems may
arise in specific cases. For example, the full complement of memory was not recognised, sound
was distorted and in some cases, caused the sampler to malfunction. Please consult your AKAI
professional dealer for recommended sources of memory modules. Memory is the core of a sampler
so it is unwise to economise. Buy the very best you can afford - it is better to have a reliable 32Mb
board than a cheap, unreliable 64Mb board that corrupts data and causes problems. In practice,
you shouldn’t have any problems but you have been advised!
Version 1.21
269
APPENDIX F
s5000/ s6000
NOTES REGARDING INSTALLATION:
If you plan to install memory, please be aware that memory chips are sensitive to static electricity
so observe the following precautions:
•
Isolate the S5000/6000 by disconnecting it from the mains or your mixer/amp/whatever
before installing the board(s).
•
The SIMMs may come with a special wrist strap to discharge static electricity. It is highly
recommended that you attach the strap to the S5000/6000’s case and to your wrist. If a
wrist strap or any other such accessory is not supplied, try discharging any static by touching
an earthed metal object before handling the boards.
•
Always handle the memory board by its edges - avoid touching the components on the
board.
•
To minimise static electricity, avoid carpeted areas (especially synthetically carpeted areas)
and low humidity areas.
•
Under no circumstances should you force the boards into their slots. Should you do so, you
could damage the memory boards and/or the sampler’s motherboard.
Please note that user installation will invalidate your warranty and it is recommended that you
only use an AKAI professional authorised service centre to install memory boards. AKAI
professional M.I. Corp. does not guarantee against the unit’s malfunction, damage or any loss
resulting from user installation of memory boards. Neither can AKAI professional be liable for
damage caused to memory boards or the S5000/S6000’s circuitry by user installation.
270
Version 1.21
s5000/ s6000
APPENDIX G
WHAT IS SAMPLING?
Sampling is a process where we record sound digitally. All natural sound comes in the form of
variations in sound pressure. Using a microphone, we can convert those changes in air pressure
into rising and falling voltages. Once they exist in that format, we can process them through
ANALOGUE TO DIGITAL CONVERTERS (ADCs) to turn those voltages into streams of digital
data. Once they exist as digital data, we can edit them with alarming precision.
SOUND
MIC
VOLTAGE
WAVEFORM
ADC
DIGITISED
WAVEFORM
In the ADC, the sound is ‘sampled’ at a rate of 44,100 times per second. You can liken this to film.
If we take a lot of photographs in very quick succession, when we play them back (also in quick
succession), we have the illusion of movement. The same is true of sampling. If we take enough
samples, we get an accurate reproduction of the sound. To carry this analogy even further, if you
think of the very early days of film where they didn’t take so many frames in a second, the results
were jerky and distorted. The same could be said about old samplers - because they sampled less
(that is, the sampling rate was lower), the sound quality was not so good. In order to reproduce
sound accurately, you need to sample at a frequency that is at least twice the upper reaches of the
sound’s frequency range. In other words, if a sound contains frequencies that extend to, say,
15kHz, you need to sample at 30kHz at least. Instruments such as cymbals which are very bright
and contain many overtones need to be sampled at 40kHz. A bass drum, however, which has very
few upper harmonics, could feasibly be sampled at 20kHz.
The S6000 samples at 44.1kHz (the same as compact disc) and at 48kHz (the same as DAT) so
you can be sure you are getting the highest quality sound from your sampler.
The digitised waveform is held in RANDOM ACCESS MEMORY (RAM) where it exists as numbers.
As you know, computers and microprocessors are very good at dealing with numbers and so we
are able to rearrange those numbers and so alter the sound.
At the end of the process, we need to be able to convert those numbers back into an electrical
analogue waveform in order to hear them and so the numbers are reconstituted into an analogue
signal via DIGITAL TO ANALOGUE CONVERTERS (DACs) and output to your mixer or amplifier.
However, one of the inherent problems with sampling is the RAM and because of cost, it is not
possible to have an endless supply of it installed in the sampler (although the S6000 does allow up
to 256Mbytes of RAM to be installed offering nearly fifty minutes of mono samples to be held in
memory!!). As a result, recordings (or samples as they are more commonly known) are often fairly
short.
Version 1.20
271
s5000/ s6000
APPENDIX G
In order to make them last longer so that long notes can be sustained, we need to loop them. This
involves selecting a portion of the sound that will repeat over and over again when we hold our
finger(s) on the keyboard.
LOOP ZONE
ORIGINAL SOUND
Note on
LOOP
LOOP
LOOP
SUSTAIN PORTION (KEY HELD DOWN)
Note off
The biggest problem, though, is that when you play samples back at anything other than the pitch
they were recorded at, they speed up or slow down - for example, something recorded on C3 but
played back at C4 will play back twice as fast (much like speeding up an analogue tape recorder).
For some sounds this isn’t a problem but instruments with pronounced vibrato or drum or other
musical phrases can suffer quite badly.
Furthermore, most musical instruments have particular resonant frequencies (or ‘formants’ as
they are sometimes called) plus other characteristics such as vibrato, etc.. On the instrument
themselves, these characteristics stay constant regardless of the notes being played but, on a
sampler, because you are transposing the sound up and down, these are also transposed which
leads to a phenomena quaintly referred to as “munchkinisation”. We have all laughed at hearing
our voice speeded up on a tape recorder sounding like some bizarre cartoon character - the same
will happen on a sampler and this is because the voice has string fixed frequency formants and
other attributes which do not transpose well. Similarly, the sound’s envelope will change - transposed
down an octave, a percussive attack will sound quite sluggish.
To overcome this, we need to use a technique known as MULTI-SAMPLING - that is, taking various
samples of the instrument at a variety of pitches across its range so that, at any one time, the
sound is never transposed too much and so avoids serious “munchkinisation” and envelope
distortion. Typically, you can get away with one sample per octave but some difficult instruments
with strong formants need more. The saxophone, voice and piano are two instruments that spring
to mind and which are notoriously difficult to capture. The ideal multi sampling range is to take a
sample every minor third so that the sound is never transposed more than a semitone away from
its original pitch (of course, the ideal multi-sample range is one sample for every note but that’s not
always practical or possible!)
Another property of an acoustic instrument is that it can make so many sounds depending on how
it’s played. When played softly, the sound is not only quieter but softer in tone and, when played
hard, is louder and brighter. Some instruments have quite extreme ranges in tone. Coupled with
playing techniques (i.e. thumbed and slapped bass, bowed and plucked violin, etc.), to accurately
replicate this on a sampler, we can take different samples according to playing styles. On the
S6000 we have four velocity zones that allow us to use playing technique to switch between these
different samples so that you could, for example, use velocity to switch between a slow legato
viola and an aggressively bowed viola.
Of course, a lot of the time you don’t have to go to such lengths and you can simply record just a
few samples, loop them for sustain, map them out across the keyboard and have perfectly acceptable
results which are usable in a wide range of applications (some sounds can even work with just one
sample across the whole keyboard range although this is rare). For some sounds such as drums
and percussion, you don’t even need to loop. However, when you have some multi-samples in
memory, you need to somehow map them out across the keyboard range. This is done in a program.
272
Version 1.20
s5000/ s6000
APPENDIX G
A program is where you assemble your raw, edited samples for playback. In the SAMPLE mode,
the samples are unprocessed by envelopes, vibrato, etc.. If they have been looped, it is quite
possible they have lost some their dynamics - all of this can be overcome in a program.
Furthermore, because of powerful synthesiser functions, the S6000 can be used to play and process
samples much like an analogue synth. With two low frequency oscillators (LFOs), envelope
generators, resonant multi-mode filters, panning and more, the S6000 can radically transform any
sound offering the creative musician and programmer almost endless possibilities. In short, what
it means is that as well as owning a superb sampler, you also have a very excellent and versatile
analogue style synthesiser.
On top of this, you may set sophisticated keyboard splits and layers, set velocity switching and
crossfading, assign samples to individual outputs as well as tune and transpose your samples.
“But”, you may be asking “why have programs? Why not just play samples from EDIT SAMPLE?”
A good question. The reason we have programs is because raw samples, however much you may
have trimmed, looped, crossfaded, stretched and otherwise mangled them are only half the story.
In EDIT SAMPLE, you can only play one sample at a time spanning the entire keyboard range
whereas in a program, you can assign several samples to different areas of the keyboard for
playback. To do this, we place the samples into what we call KEYGROUPS.
A KEYGROUP is precisely that - a group of keys which have a particular note range on the keyboard.
The simplest program you can have is with one keygroup that spans the entire MIDI range on C0G8. I.e.:
KEYGROUP 1
Perhaps the next level up is to have a program with two keygroups. One covers the range C0-B2,
the other C3-G8 - this would be a simple keyboard split. I.e.:
KEYGROUP 1
KEYGROUP 2
The next level may be a program which has five keygroups - one for each octave on a normal
synth keyboard. Such a program may be useful for something like piano or strings which have
been sampled on the G of every octave. I.e.:
KG1
Version 1.20
KG2
KG3
KG4
KG5
273
s5000/ s6000
APPENDIX G
After that, of course, it’s anyone’s guess what the next level may be but it could be something like
this:
Here we have 17 keygroups in one program - some are assigned to individual keys whilst some
span an octave or so. Hopefully, you can now get a feel for how flexible the keygroup assignment
can be. But there can be more to it than that.
Within each keygroup, you may assign up to four samples in what are referred to as ZONES.
These can be used for a number of things that include velocity switching and crossfading and
layering.
To do a simple velocity switch/xfade, you could have something like this:
Zone 1 KG1
KG2
KG3
KG4
KG5
Zone 2
Here we have five keygroups, each with two zones being used. This type of program is also
suitable for a two way velocity switch - by setting zone 1 of each keygroup to a velocity range of 090 and setting zone 2 to 91-127, you could, for example switch between a thumbed bass and a
slapped bass or a normal snare hit and a rim shot using velocity.
This kind of program is also suitable for layering sounds on top of each other. In the above example,
four synth samples could be mapped out on the keyboard (one for each octave, perhaps) and
zone 2 of each keygroup could also contain the same sample as zone 1 and these could be
panned and detuned for a fat, pseudo stereo layered synth sound. Of course, each zone could
have different synth sounds in them.
To round things off, each keygroup has no less than four zones and a program may ‘look’ something
like this:
KG1
KG2
KG3
KG4
KG5
Here, we have five keygroups, each using the four zones. This may be for a four way velocity
switch or for layering four samples together.
The ultimate program, would be for each key to have its own keygroup with each keygroup containing
four samples using a four way velocity switch.
274
Version 1.20
s5000/ s6000
APPENDIX G
So far we have seen keygroups side by side. This is usually fine for most applications but there are
sometimes occasions where the abrupt transition between one keygroup and another can be a bit
obvious. For example, in a strings program where you maybe have five string samples each at the
G of every octave, the transition between B2 and C3 may sound a little strange.
The reason for this will normally be that the G2 sample is transposed up by four semitones at B2
and so sounds a little brighter whilst the G3 sample is being played 7 semitones down so it may
sound a little duller. As a result, when played next to each other, especially when playing a scale,
the crossover point is not even.
To overcome this, we can overlap keygroups simply by setting their key ranges accordingly. When
keygroups are overlapped in this way, the S6000 will automatically crossfade keygroups for a
smooth transition where one keygroup gradually fades down through the overlap whilst the other
fades up. I.e.:
Of course, you can use a combination of any of the above techniques and have crossfading,
velocity switched keygroups in programs alongside layered and split keyboard assignments. The
above diagram examples represent only part of the flexible program editing and multi-sampling
potential of the S6000.
If all this seems very confusing, don’t worry! There are many easy routines in EDIT PROGRAM
that allow you to edit all keygroups simultaneously or to copy keygroups. Key ranges can be
conveniently set by playing your MIDI keyboard if you wish and, within a short time, you will be
making programs very quickly and easily.
Of course, once you have a number of programs in memory (either ones you have loaded or ones
you may have made yourself), you may want to play a number of them simultaneously. This is
done in the multi mode.
Multi mode is where you can combine programs together so that they may be played simultaneously.
The MULTI mode has up to 128 ‘parts’ - slots into which programs may be assigned and typically,
this is used to sequence several programs multi-timbrally20 by setting each part to be on a different
MIDI channel (i.e. Piano on Channel 1, Bass on Channel 2, Drums on Channel 3, Strings on 4,
etc.).
However, it is also possible to set parts to the same MIDI channel so that you can layer programs.
Furthermore, you may set low and high keyboard ranges for each part so that sophisticated keyboard
splits may be created.
20
Version 1.20
The S6000 can respond to 32 MIDI channels simultaneously in the MULTI mode (16
channels through MIDI input A and another 16 channels through MIDI input B). ‘MULTITIMBRAL’ literally means ‘many sounds’. In the early days of synthesisers, you needed
a separate synthesiser for every part you wanted to play but, with the advent of MIDI, a
synthesiser or sampler could be coaxed into playing several different sounds together
so that only one synth/sampler was required to play several parts. With the S6000’s 128voice polyphony, (64-voice on an unexpanded S5000) complex multi-part arrangements
can be performed using the MULTI mode.
275
APPENDIX G
s5000/ s6000
Each part may be routed to one of the four effects channels and more than one part may be routed
to any one of the effects channels so that programs may share effects. Each part has its own
effects send level.
NOTE: The effects are optional on the S5000.
However, you may prefer to use the S6000 with external effects processors via a mixing console.
To accommodate this, each part may be routed to one of the 16 individual outputs so that each
part may have its own mixer channel where it can be EQ’d, mixed, panned and effected using your
favourite outboard effects processors.
Of course, a combination of these is possible and some parts may be on unique MIDI channels
whilst others share the same channels for layering and/or key splits. Similarly, some parts may be
routed to the internal effects processor in the S6000 whilst others are sent out via the individual
outputs for processing on the mixing console.
If you have already owned an Akai sampler, then you will probably be familiar with a lot of what is
described here but, if this is your first time with an Akai sampler, it is worth taking the time to get a
fairly good understanding of these basic principles if you are going to get the best out your sampler.
276
Version 1.20
s5000/ s6000
INDEX
A
D
(APM) 26, 27
Active Switch (Delay FX) 206
Active Switch (Distortion/RMod) 192
Active Switch (EQ) 194, 195
Active Switch (Mod FX) 203
Active Switch (Reverb) 206
Adjust (BPM Match) 168
Adjust (Pitch Shift/Edit Sample) 167
Adjust (Timestretch) 166
Aftertouch (LFO 1) 91
Aftertouch (MIDI Setup 224
Aftertouch (Pitch Bend) 88
AMP ENVELOPE Page 122
Amp Envelope Windows 123
Amp Mod 107
Amp Mod 1/2 83
Arpeggio (Play Key) 235
ASCII Keyboard 5
Assigning Programs to Parts 43
Attack (Amp Env) 122, 123
Attenuation 120
Audition Sample 34
Auto Find 154
Auto Tune (Pitch Shift/Edit Sample) 167
AUX ENVELOPE Page 125
Data Wheel 6
Decay (Amp Env) 122
Delay (LFO 1) 89
DELAY FX Page 204
Delay LFO 2) 91
Delay Mod (LFO 1) 90
Delay Mod (LFO 2) 91
Delete Multi 55
Delete Program 60, 131
Delete Sample 175
Deleting Disk Items (Disk Utils) 227
Depth (LFO 1) 89
Depth (LFO 2) 91
Depth Mod (LFO 1) 89
Depth Mod (LFO 2) 91
Digital EQ (Offline - Edit Sample) 170
Digital I/O 8
Digital I/O (System) 221
Disk Info 36
Disk Option 4
Disk Tools Menu 36
DISK UTILS Page 226
Display Contrast 6
B
Bend Mode 88
BOOTING/POWER ON 13
BPM MATCH Page 168
C
Check Names (Save) 75
CHOP Page 148
Chop Sample Menu 149
Chord (Play Key) 235
Chorus (FX) 196
Clear Memory 36
Clock (System) 221
Clock Division (LFO 2) 93
Close Folder 34
Convert -L/-R 62, 133, 176
Convert Old Multi 64, 135
Copy Keygroup 127
Copy Multi 55
Copy Program 60, 130
Copy Sample 175
Copy To User 86
Copying FX 213
Copying MultiFX 1/2 214
Copying Reverbs 215
Create Multi 42, 55
Create Program 60, 127, 131
Crossfade (Keygroups) 106
Crossfade (Loop) 153
CURSOR KEYS 6, 21
Cutoff Frequency (Filter) 120
Version 1.21
E
Edit All KGs 97
EDIT PART 50, 80
EDIT PROGRAM (Main Page) 80
EDIT SAMPLE (Main Page) 141
EDIT USER Page 87
Editing Parts 44
Effects 186
Effects Channel 48
Effects Send Window 48
Effects Tools 212
ENT/PLAY Key 6
Env Template (Amp Env) 122
EQ (FX) 193
EQ (Offline - Edit Sample) 170
EQ Modulation (FX) 195
Exit Key 6
Expand Multi 56
Ext APM Control (MIDI Setup) 223
Ext In Left/Right (FX) 225
F
Fade Curve 162
Fade Up/Down 162
FADE UP/DOWN Page 162
Fan Speed (Prefs) 222
Filter (Zone) 101
Filter Env Depth 120, 124
Filter Envelope 120
FILTER ENVELOPE Page 124
Filter Mod Inputs 120
FILTER Page 108
Filter, What is a... 108
Find Start/End (Trim) 146
277
s5000/ s6000
INDEX
F (Cont)
L
Fine Tune 49
Fine Tune (FX-Pitch Shift) 201
Fine Tune (Keygroup) 107
Fine Tune (Pitch Shift/Edit Sample) 167
Fine Tune (Sample) 142
Fine Tune (System) 219
Fine Tune (Zone) 99
Fine Tune Program) 86
Fine Tune Window 49
Fine Tune Window (Zone) 102
FineTune (Zone) 102
Flange FX) 196
Floppy Disk 5
Formatting Disks 228
Freq/Amp Mod (FX) 200
FX 186
FX INS/OUTS Page 225
FX Output (FX) 225
FX Send Level (Keygroup) 97
L/R Direct Signal (FX) 225
Length min.sec (Record) 179
Level 1-4 (Aux Env) 125
Level Window (Zones) 101
LFO1 Page 89
LFO2 Page 91
LFO>MIDI CLOCK SYNC 91
LIN Waveform 173
LOAD 29
Load Folder 30
Load Multi 31
Load O/S 239
Load Program 31
Load Sample 32
LOG Waveform 173
Loop Crossfade 152
Loop Crossfade Window 153
Loop Direction 152
Loop Display (Prefs) 222
Loop Lock 152
LOOP Page 151
Loudness 82
Low/High Note 49
G
Gated Reverb 209
Get Info 51
Get Info (Load) 33
Get Info (Program) 128
Get Info (Sample) 171
Goto Dest 85, 91, 94, 122
Goto Source 84, 91, 94, 107, 121
Ground Connector 9
H
High/Low Velocity (Zone) 100
I
Icons (Disk) 30
Icons (Edit Sample) 141
Input Level (FX) 225
Inputs (S5000) 10
Inputs (S6000) 5
Installing memory 268
Installing O/S 239
J
JOIN page 157
K
Key (MIDI/Tune) 86
KEY CONVENTIONS 15
Key Repeat Dly (Prefs) 222
Keyboard Track (Filter) 121
Keyboard Track (Zone) 101
KEYBOARD>R2/R4 126
KEYGROUP 95
Keygroup Crossfade 106
Keygroup Level 107
KEYGROUP ZONES Page 98
Keyscale (Amp Env) 122
KEYSPAN Page 105
KG PITCH/AMP Page 107
278
M
Main Input 9
Main Volume 5
Make Mono 142
Make Stereo (Mix) 160
Making a recording 180
MARK/JUMP KEYS 6, 22
Master Level (System) 219
MASTER Page (EDIT SAMPLE) 142
MEMORY TEST Prompt 233
MIDI Clock (LFO 2) 93
MIDI Controller list 251
MIDI FILTER Page 224
MIDI IN/OUT/THRU 9
MIDI PROGRAM CHANGE (Multis) 58
MIDI PROGRAM CHANGE (Parts/Programs) 66, 86,
137
MIDI Receive PPMs 224
MIDI SETUP Page 223
MIDI Trig Chan (Record) 179
MIDI/TUNE Page 86
MIX 160
MODE KEYS 5
MODULATION FX Page 196
Modwheel (LFO 1) 90
Monitor (Edit Sample) 141
Mono L/R (Delay FX) 205
Mono Left (Delay FX) 204
MOUNTING THE S6000 12
MULTI 37
MULTI LIST 55
Multi Select (MIDI Setup) 223
Multi Select Channel (MIDI Setup) 223
MULTI TOOLS MENU 51
MultiFX 1/2 190
Version 1.21
s5000/ s6000
INDEX
M (Cont)
P
Mute Effects 212
Mute Group 95
Mute Part 47
Play To/From (Chop) 148
Play To/From (Trim) 146
Playback Mode 104
Playback Modes (Zone) 99
Playback Window (Zone) 103
POP-UP WINDOWS 18
PREFERENCES Page 222
Preset (BPM Match) 168
Preset (Pitch Shift/Edit Sample) 107
Preset (Re-Sample) 169
Preset (Timestretch) 165
PROG TOOLS MENU 128
Program Change (MIDI Setup) 223
Program List 59, 129
Program Number 66, 86, 137
PROGRESS DISPLAYS 18, 143, 218
Purge 61, 132
Purge Samples 175
N
NAMING 21
New Folder (Save) 217
New Tempo (BPM Match) 168
Normalise 144
Note 1-4 (Play Key) 235
Note Display (Prefs) 222
NUMERIC KEYPAD 6, 21
O
O/S - updating 239
On Vel>Rel (Amp Env) 123
Open Folder 34
Open/Close Folder (Save) 217
Option Slots 9
Original Note (Edit Sample) 142
Original Note (Record) 179
Output (Zone) 101
Output Mix (FX) 210
OUTPUT Page (Edit Program) 82
Output Window 47
Outputs 8
Outputs 1/2 184
Overide FX 97
P
Pan Mod 1/2/3 83
Pan/Balance (Zone) 99, 101
Pan/Balance Window (Zone) 101
Part Effects Send 46
Part Fine Tune 46
Part Level 46, 47
Part Level Window 47
Part MIDI Channel 46
Part Output 46, 47
Part Pan/Balance 47
PART TOOLS MENU 59
Path Control (FX) 211
Phase (FX) 197
Phones Level 5
Phones Output 5
Ping Pong (Delay FX) 205
Pitch Mod 1/2 107
Pitch Shift (FX) 201
Pitch Shift + Feedback (FX) 202
PITCH SHIFT Page (Edit Sample) 167
Pitchbend Down 88
PITCHBEND Page 88
Pitchbend Up 88
Play Mode 151
Play Mode (Loop) 152
Play Mode Window 152
Play Region (Chop) 148
Play Sample A/B (Join) 157
Play Sample A/B Mix) 160
Version 1.21
Q
Quality (Re-Sample) 169
Quickload (Multi) 52
Quickload (Program) 69, 140
Quickload (Sample) 172
Quicksave (Multi) 53
Quicksave (Program) 75, 140
Quicksave (Sample) 172
R
Rate (LFO 1) 89
Rate (LFO 2) 91
Rate 1-4 (Aux Env) 125
Rate Mod (LFO 1) 90
RE-SAMPLE Page 169
Re-Scale 144
Re-Scale Level 144
Record Length 179
Record Level 178, 180
Record Mode 180
RECORD Page 178
Record Source 179
Record Threshold 179
Record To 179
Record Trigger 178
Recording Virtual Samples 245
Release (Amp Env) 122
REMOVABLE PANEL 5
Rename Multi 55
Rename Program 59, 129
Rename Sample 175
Renaming Disk Items (Disk Utils) 226
Renumber Multi 56
Renumber Program 66, 137
Reset Margin (FX) 225
Reset Margin (Record) 180
Resolution (Re-Sample) 169
Resonance (Filter) 120
Retrigger (LFO 2) 92
Retune Sample (Pitch Shift/Edit Sample) 167
279
s5000/ s6000
INDEX
R (Cont)
REVERB 2207
Reverse 144
Reverse Reverb 209
RING MOD/DISTORTION 192
Rotary Speakers (FX) 198
RV1-4 207
RV3/RV4 Input 189
S
S5000 FRONT PANEL 10
S5000 REAR PANEL 11
S6000 FRONT PANEL 5
S6000 REAR PANEL 8
S6000 STRUCTURE/TERMINOLOGY 23
Sample A/B From (Join) 157
Sample A/B From (Mix) 160
Sample A/B Level (Join) 157
Sample A/B Level (Mix) 160
Sample A/B To (Join) 157
Sample A/B To (Mix) 160
SAMPLE LIST 175
SAMPLE TOOLS Menu 171
Save Multi 216
SAVE O/S (Utilities) 236, 238
SAVE Page 216
Save Program 217
Save Sample 222
Screen Display (Prefs) 222
Screen Saver (Prefs) 222
SCSI 9, 253
SCSI Terminator 9
SELECT DISK 35
Selecting Keygroups 97, 104
Selecting Parts 40
Selecting Zones 104
Semitone Tune (FX-Pitch Shift) 201
Semitone Tune (Keygroup) 107
Semitone Tune (Pitch Shift/Edit Sample) 167
Semitone Tune (Program) 86
Semitone Tune (Sample) 142
Semitone Tune (System) 219
Semitone Tune (Zone) 102
Send Level 48
SET CLOCK Page 221
SET PLAY KEY Page 235
Setting Keyspan 105
Setup D-D (Record) 180
SHOW HARDWARE Page 234
Single (Play Key) 235
Solo Part 47
Source Tempo (BPM Match) 168
Start/End (Chop) 148
Start/End (Loop) 151
Start/End (Trim) 146
Stereo Delay (FX) 206
Stereo/Mono Samples 177
Stretch Amount (Timestretch) 165
Sustain (Amp Env) 122
Sync (LFO 1) 90
SYSTEM SETUP Page 219
280
T
Templates (Amp Env)) 122
Templates (Delay) 206
Templates (EQ) 194
Templates (Mod FX) 203
Termination (SCSI) 253
Termination (WORDCLOCK) 8
TEST TONE 235
Threshold (Record) 179
TIMESTRETCH 163
TOOLS MENUS 20
Transpose 49
Transpose (System) 219
TRIM Page 145
Trim Sample Menu 147
Tune Template 86
U
Undo Key 6
Unlock Disk (Disk Utils) 232
USER KEYS (S6000 only) 6, 22
UTILITIES Page 219
V
Vel>Attack (Amp Env) 123
VEL>RATE 1 126
VEL>RATE 4 126
Velocity Sens 82
Velocity Start 103
View Items 36
View Parts 38
VIRTUAL SAMPLES 242
VIRTUAL SAMPLES (Converting) 248
VIRTUAL SAMPLES (Editing) 249
VIRTUAL SAMPLES (Loading) 247
VIRTUAL SAMPLES (Recording) 245
VOICE ARCHITECTURE 26
Voweliser Filter 119
W
W/FORM 173
Waveform (LFO 1) 89
Waveform LFO 2) 91
WINDOW function 16, 47
Window Key 6
Wordclock 8
X
Xfade (Loop) 153
Xfade (Zone) 100
XFade Curve (Join) 158
Xfade Length (Join) 158
XOver L+R (Delay FX) 206
Version 1.21
s5000/ s6000
INDEX
Z
Zone Level 99, 101
Zone Xfade 100
Zones 102
Zones 1/2/3/4 98
Zoom In/Out (Chop) 148
Zoom In/Out (Fade) 154
Zoom In/Out (Loop) 151
Zoom In/Out (Trim) 147
Version 1.21
281
%
1-3, Hiranuma 1-chome, Nishi-ku,
Yokohama, Japan
000922-4
APC
Printed in Japan


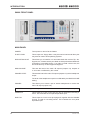
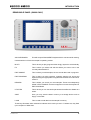
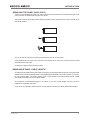
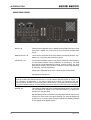


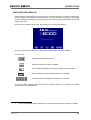

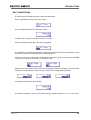
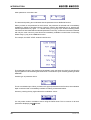
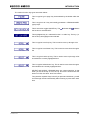
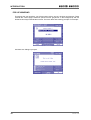
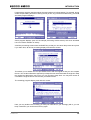
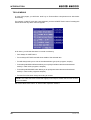
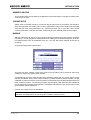
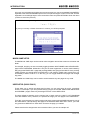


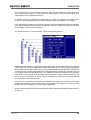
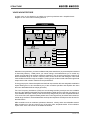
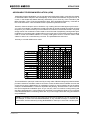
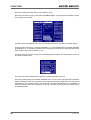
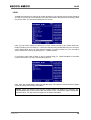


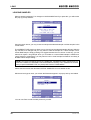
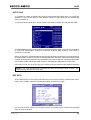
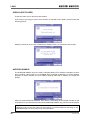
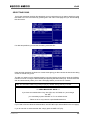
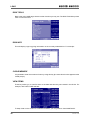

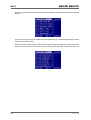

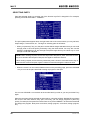
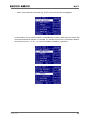
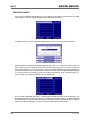
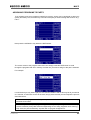
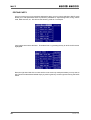
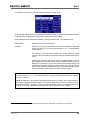
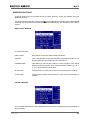
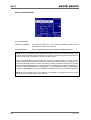
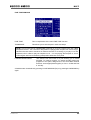
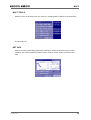
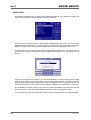


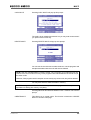


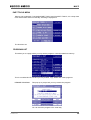
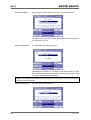
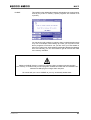
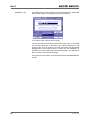
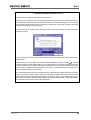

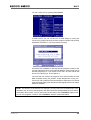


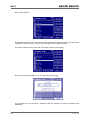
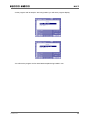
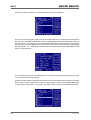
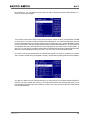
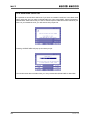
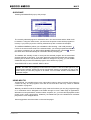
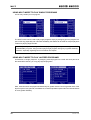
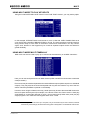

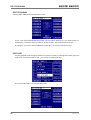
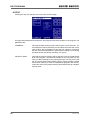

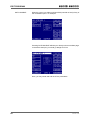
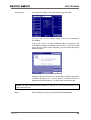
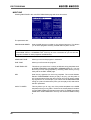
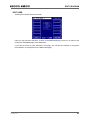
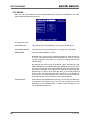
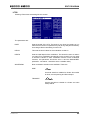
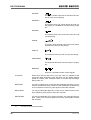
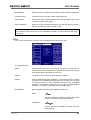
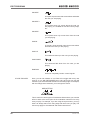
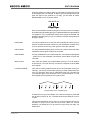
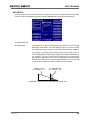


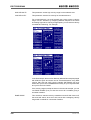
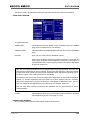
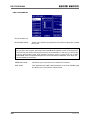
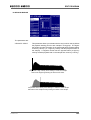
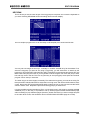
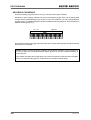
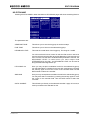

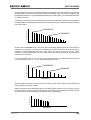
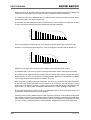
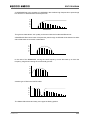
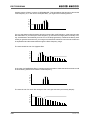


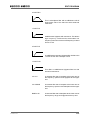
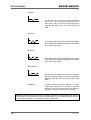
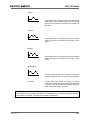
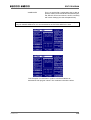

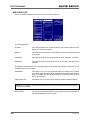
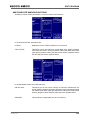

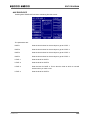
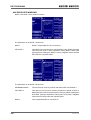
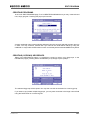
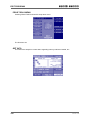
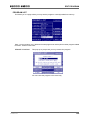
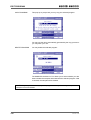
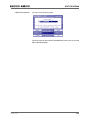
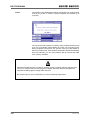


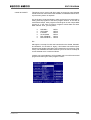
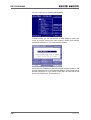
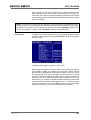

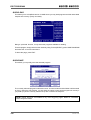
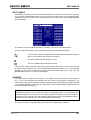
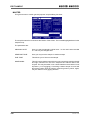
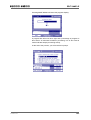
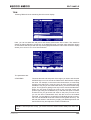
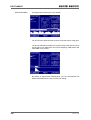
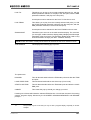

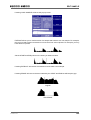
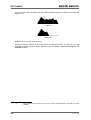
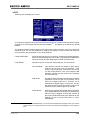

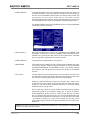
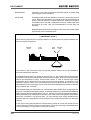

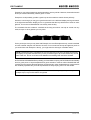

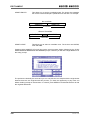
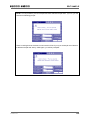
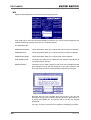
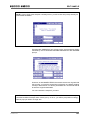


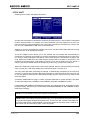

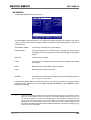

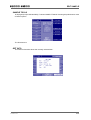

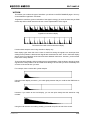
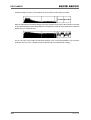
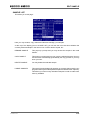

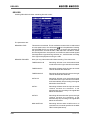
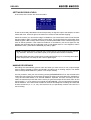
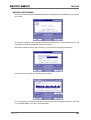
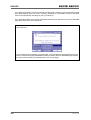
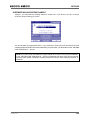
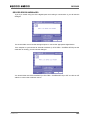
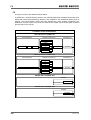


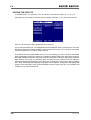
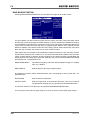
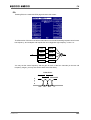
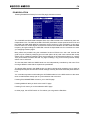
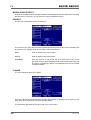
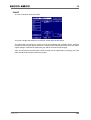


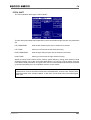

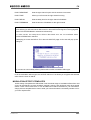
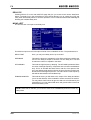
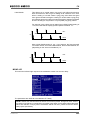
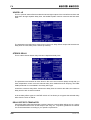
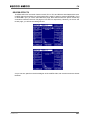

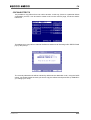
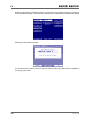

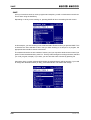

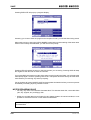
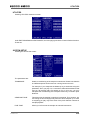
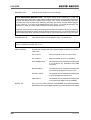
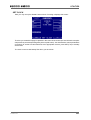
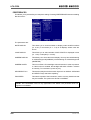
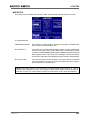
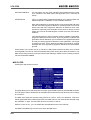
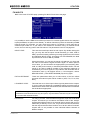


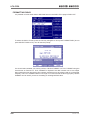
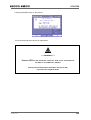
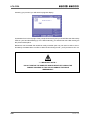
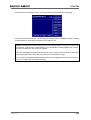

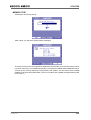
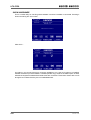
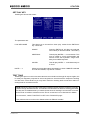
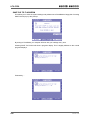
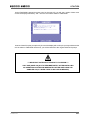


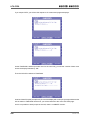
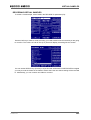
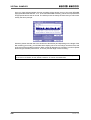
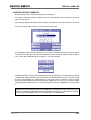

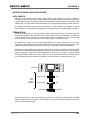
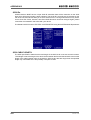
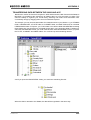

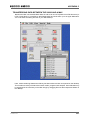
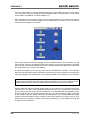
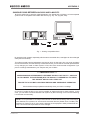
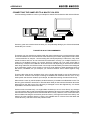

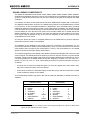
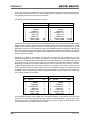
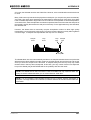


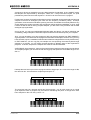
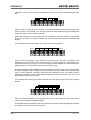
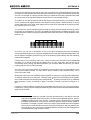


![User`s Manual MV2000[SU:M] Ventilator System 0470](http://vs1.manualzilla.com/store/data/005841388_1-c867b5a0773523e6306e353a41d4c56d-150x150.png)