1
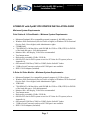
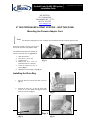
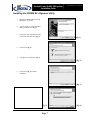
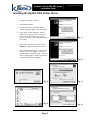
EC
SCRIBE EC with OptiEC PRO PRINTER
INSTALLATION GUIDE
www.mfdigital.com
Scribe EC Quick Installation Guide
ScribeEC
PRO printer
with with
PrismOptiEC
PLUS Printer
Installation Guide
222
Document Revision: 2005/05/20
2004/12/07
Table Of Contents
Subject
Page
Minimum System Requirements……………………………………………..3
Installing the Firewire Adapter Card………………………………………...4
Installing the Drive Bay…………………………………………...……………4
Making the Connection…………………………………………………………5
Installing the Scribe EC Software………………………………………….....6
Installing the Scribe EC Alignment Utility…………………………………..7
Installing the OptiEC PRO Printer Driver ..……………………………….…8
Adjusting the OptiEC PRO Printer Driver Settings…………………….….10
Aligning the Drive Tower …………………………………………………...…11
Aligning the OptiEC PRO printer…………………………………………..…12
Setting up the ScribeEC software for the printer……………………….....13
Installing / changing ink cartridges in the OptiEC PRO printer…………14
Generating a PRN file for the OptiEC PRO printer…………………..…….15
Appendix A…………………………………………………………………….….17
Troubleshooting Section……………………………………………………….18
Page 2
333
Scribe EC Quick Installation Guide
ScribeEC
PRO printer
with with
PrismOptiEC
PLUS Printer
Installation Guide
Document Revision: 2005/05/20
2004/12/07
SCRIBE EC with OptiEC PRO PRINTER INSTALLATION GUIDE
Minimum System Requirements
Print Station & 1-Drive Models – Minimum System Requirements:
•
•
•
•
•
•
•
•
•
•
•
Minimum Pentium® III or compatible personal computer @ 800 MHz or faster.
Windows 2000 Professional (Service Pack 4 or higher) or Windows XP Professional
(Service Pack 1.0a or higher) with Administrative rights.
512MB RAM
7200 RPM ATA-100 hard drive with 850 MB for CD-R or 5GB (NTFS) for DVD-R
of free hard disk space - fully defragmented.
Monitor: 800 x 600 display, 16-bit color recommended.
Two button mouse.
High quality recordable CD-Rs / DVD-Rs
One free PCI slot for DVD system or two free PCI slots for CD system (refer to
Appendix A).
One external COM Port (COM1 or COM2) for the ScribeEC loader.
*USB to Serial Converter can be used if COM port is not available.
IEEE-1394 B Adapter (Included).
2-Drive & 4-Drive Models – Minimum System Requirements:
•
•
•
•
•
•
•
•
•
•
•
Minimum Pentium® 4 or compatible personal computer @ 2 GHz or faster.
Windows 2000 Professional (Service Pack 4 or higher) or Windows XP Professional
(Service Pack 1.0a or higher) with Administrative rights.
1GB RAM
7200 RPM ATA-100 hard drive with 850 MB for CD-R or 5GB (NTFS) for DVD-R
of free hard disk space - fully defragmented.
Monitor: 800 x 600 display, 16-bit color recommended.
Two button mouse.
High quality recordable CD-Rs / DVD-Rs.
One free PCI slot for DVD system or two free PCI slots for CD system (refer to
Appendix A).
One external COM Port (COM1 or COM2) for the ScribeEC loader.
*USB to Serial Converter can be used if COM port is not available.
IEEE-1394 B Adapters (Included).
Page 3
Scribe EC Quick Installation Guide
ScribeEC
PRO printer
with with
PrismOptiEC
PLUS Printer
Installation Guide
444
Document Revision: 2005/05/20
2004/12/07
MF DIGITAL
121 Carolyn Blvd.
Farmingdale, NY 11735
001 631 249 9393
www.mfdigital.com
IF YOU PURCHASED A PRINT STATION – SKIP THIS PAGE
Mounting the Firewire Adapter Card
Note: The internal configuration of your computer may be different from the computer picture below
DVD dive ScribeEC requires only one PCI
firewire B controller card (IEEE-1394B).
For additional information on making the
firewire connection refer to Appendix A.
1.
2.
3.
4.
5.
6.
Shut down the PC.
Turn the PC’s power off.
Unplug the PC.
(fig.
Remove the PC’s cover as
indicated in the PC’s manual.
Locate an empty PCI slot, as
seen in (fig.1).
Install the firewire adapter card (fig. 2).
(fig. 2)
1)
Installing the Drive Bay
1.
Place the drive bay onto the base unit as seen in
(fig. 1).
2.
Position the drive bay so that the front right
corner sits over the dotted line (fig. 2). Proper
position is shown in (fig. 3).
(fig.1)
Page 4
(fig. 2)
(fig. 3)
Scribe EC Quick Installation Guide
ScribeEC
PRO printer
with with
PrismOptiEC
PLUS Printer
Installation Guide
555
Document Revision: 2005/05/20
2004/12/07
Making the Connection
1 & 2 Drive Systems have one firewire B cable connection (IEEE-1934B).
4 Drive Systems have two firewire B cable connections (IEEE-1934B).
USB cable to
the host PC
Power cable
Power cables
Serial cable to
the host PC
Printer Interface cable between
the loader and the printer.
FIREWIRE cable to the
host PC (IEEE-1394)
PC Connection
Power cable
Serial cable to
the loader
USB cable to
the printer
Note:
*Firewire cable
to the drive bay
Page 5
For additional information
on the firewire connection
refer to Appendix A
Scribe EC Quick Installation Guide
ScribeEC
PRO printer
with with
PrismOptiEC
PLUS Printer
Installation Guide
666
Document Revision: 2005/05/20
2004/12/07
Installing the SCRIBE EC Software
1.
Insert the SCRIBE EC
software CD.
2. From the CD ROM drive of
the computer, click Install
SCRIBE Software.
(fig. 1)
3. Click Next (fig. 1).
4.
Accept the license agreement
and click Next (fig. 2).
(fig. 2)
5.
Click Install (fig. 3).
(fig. 3)
6.
Click Finish (fig. 4).
(fig. 4)
Page 6
Scribe EC Quick Installation Guide
ScribeEC
PRO printer
with with
PrismOptiEC
PLUS Printer
Installation Guide
777
Document Revision: 2005/05/20
2004/12/07
Installing the SCRIBE EC Alignment Utility
1.
Insert the SCRIBE CD into the CDROM drive of your PC.
2.
Click on setup.exe of the alignment
utility and Click Next (fig. 1).
3.
Choose the setup type that best suits
your needs, then click Next (fig. 2).
4.
Click Install (fig. 3).
5.
A progress bar will appear (fig. 4).
(fig. 1)
(fig. 2)
6.
Click Finish (fig. 5) to finish
installation.
(fig. 3)
(fig. 5)
Page 7
(fig. 4)
Scribe EC Quick Installation Guide
ScribeEC
PRO printer
with with
PrismOptiEC
PLUS Printer
Installation Guide
888
Document Revision: 2005/05/20
2004/12/07
Installing the OptiEC PRO Printer Driver
1.
Click Start-> Settings-> Printers
2.
Click Add New Printer
3.
The “Welcome to the Add Printer Wizard”
window will appear (fig. 1). Click Next button.
4.
In the “Local or Network Printer” window,
uncheck the “Automatically detect installed
printer” option, leaving the “Local printer
attached to computer” option (fig. 2) and click
Next button.
5.
In the “Select a Printer Port” window, select
USB001 port (fig. 3) then click Next button.
6.
In the “Install Printer Software” window, click
the “Have Disk” button (fig. 4). You will be
then prompted to “Install from Disk”, click the
“Browse” button (fig. 5). Browse the location
of the printer driver on a CD (fig. 6).
(fig. 1)
(fig. 2)
(fig. 5)
(fig. 6)
Page 8
(fig. 3)
(fig. 4)
Scribe EC Quick Installation Guide
ScribeEC
PRO printer
with with
PrismOptiEC
PLUS Printer
Installation Guide
999
Document Revision: 2005/05/20
2004/12/07
Installing the OptiEC PRO Printer Driver (cont.)
7.
8.
9.
10.
11.
12.
13.
After specifying location of a driver for the
OptiEC PRO printer, the printer “CD/DVD
Printer 6” will appear in the “Add Printer
Window” (fig. 7). Click Next to continue.
In the “Name your Printer” window, leave
the printer as the default name, and select the
printer to be the default printer name (fig. 8)
and click Next.
In the “Printer Sharing” window, select “Do
Not Share the Printer” (fig. 9) and click
Next.
Choose No for “Print Test Page” (fig. 10)
then click Next.
The “Completing the Add Printer Wizard”
window will appear (fig. 11). Click Finish.
Click on Continue Anyway button to proceed
(fig. 12).
You have now successfully installed the
printer driver for OptiEC PRO printer.
(fig. 7)
(fig. 8)
(fig. 11)
(fig. 9)
(fig. 12)
(fig. 10)
Page 9
Scribe EC Quick Installation Guide
ScribeEC
PRO printer
with with
PrismOptiEC
PLUS Printer
Installation Guide
101010
Adjusting the OptiEC PRO Printer Driver Settings
Printing Preferences
To change the printing preferences for the OptiEC
PRO printer, please do the following:
1.
2.
3.
4.
5.
Go to Start-> Settings -> Printers
Right-click on the CD/DVD Printer 6 in
the Printers Folder
Go to Printing Preferences
For the Scribe Program to use the printer
effectively, please match the settings of
your printer driver to the example on the
right-side of this page.
a. Ink Cartridge setting depends on
installed cartridge.
To save settings, click Apply and OK to
exit.
***NOTE: Any changes made to the printer
driver settings, require a NEW PRN file to be
made. If you change one of the settings, be sure
to create a NEW PRN file.***
Printer Spooling
It is important to disable printer spooling on the
OptiEC PRO printer. To do so, please follow the
steps below:
1.
2.
3.
4.
5.
6.
Go to Start-> Settings -> Printers
Right-click on the CD/DVD Printer 6
printer in the Printers Folder
Go to Properties
Go to the Advanced Tab
For the Scribe Program to use the printer
effectively, please match the settings of
your printer driver to the example on the
right-side of this page.
To save settings, Click Apply and OK to
exit.
***NOTE: Any changes made to the printer
driver settings, require a NEW PRN file to be
made. If you change one of the settings, be sure
to create a NEW PRN file.***
Page 10
Document Revision: 2005/05/20
2004/12/07
111111
Scribe EC Quick Installation Guide
ScribeEC
PRO printer
with with
PrismOptiEC
PLUS Printer
Installation Guide
Document Revision: 2005/05/20
2004/12/07
Aligning the Drive Tower
1.
From your Start Menu Open the SCRIBE EC
Alignment Utility (fig. 1). It will be located in
the folder designated when you installed the
alignment utility. Choose the appropriate COM
Port which the Scribe EC Loader is installed
on, select the “All other printer types or
drives’ bay” and then click the Start Test
button.
2.
Follow the onscreen instructions by opening
the top CD/DVD drive tray, and clicking the
Yes button (fig. 2). The loader arm will then
hover a disc over the open drive tray. Observe
the disc’s position and make the appropriate
adjustments to the drive bay tower (fig. 3).
3.
Click the Yes button when you are satisfied
with your adjustment (fig. 4).
4.
The picker arm will then place the disc onto
the drive tray. Follow the on screen
instructions and click the OK button (fig. 5).
5.
Once you are satisfied with the drive’s tower
alignment, secure the tower by tightening the
thumb-screws located on both sides of the
drive tower (fig. 6).
(fig. 1)
(fig. 2)
(fig. 3)
(fig. 4)
(fig. 6)
Page 11
(fig. 5)
121212
Scribe EC Quick Installation Guide
ScribeEC
PRO printer
with with
PrismOptiEC
PLUS Printer
Installation Guide
Document Revision: 2005/05/20
2004/12/07
Aligning the OptiEC PRO Printer
Alert:
Before starting the Alignment Utility,
position the back end of the inkjet printer
in line with the dotted line on the top of
the drive bay.
1.
From the Start Menu Open the SCRIBE EC
Alignment Utility. It will be located in the
folder designated when you installed the
alignment utility. Choose the appropriate COM
Port Number, which the Scribe EC Loader is
connected to then choose the OptiEC then
Click the Start Test button (fig. 1).
2.
Follow the onscreen instructions then Click
Yes button (fig. 2). The picker arm will then
hover a disc over the open printer tray.
Observe disc’s position and make the
appropriate adjustments to the printer (fig. 3).
3.
Click Yes when you are satisfied with your
adjustment (fig. 4).
4.
The picker arm will then place a disc onto the
printer tray. Follow the on screen instructions
then click the OK button (fig. 5).
5.
Once you are satisfied with the printer’s
alignment, tighten the thumbscrews located on
both side of the printer (fig. 6).
(fig. 1)
(fig. 2)
(fig. 5)
(fig. 3)
(fig. 6)
Page 12
(fig. 4)
131313
Scribe EC Quick Installation Guide
ScribeEC
PRO printer
with with
PrismOptiEC
PLUS Printer
Installation Guide
Setting up the ScribeEC software for the printer.
1.
Execute the ScribeEC software.
2.
Click the “Settings” tab.
3.
Click the “Change settings” button as
shown in the picture.
4.
In the “Scribe settings editor” window,
using the drop down menu select the
“MF Digital OptiEC Pro6 Printer” as
shown in the picture.
5.
Click the OK button.
6.
For the changes to take affect the
ScribeEC software needs to be restarted.
Page 13
Document Revision: 2005/05/20
2004/12/07
141414
Scribe EC Quick Installation Guide
ScribeEC
PRO printer
with with
PrismOptiEC
PLUS Printer
Installation Guide
Document Revision: 2005/05/20
2004/12/07
Installing / changing ink cartridges in the OptiEC PRO printer.
The ink level monitoring option was tested on the OptiEC PRO with both ink cartridge
configuration: Color+Black and Color+Photo.
There are two ways to install / replace ink cartridges in the OptiEC PRO
printer. CD/DVD Printer 6 User's manual shows both ways.
The first way is on pages 7-10
The second way is in the bottom of the table on page 25.
Installing / replacing a new cartridge:
1. With the printer tray closed, open the printer's front cover.
2. Press the Ink Cartridge Button on the top of the printer.
3. Insert the replacement ink cartridge into the cartridge carrier, copper-end first.
4. Close the printer's front cover.
5. Press and hold the Ink Cartridge Button for about 5 seconds until both the power and
busy lights start to blink at the same time in sequence: five blinks, pause, repeat.
6. Press the Power button to specify a new COLOR Cartridge.
Press the Ink Cartridge button to specify a new Black or Photo Cartridge.
NOTE:
When replacing both ink cartridges at the same time repeat steps 2-5 for each
cartridge.
Page 14
151515
Scribe EC Quick Installation Guide
ScribeEC
PRO printer
with with
PrismOptiEC
PLUS Printer
Installation Guide
Document Revision: 2005/05/20
2004/12/07
Generating a PRN file for the OptiEC PRO printer.
1) Open up the SureThing CD Label software as shown in fig. 1.
Fig.1 SureThing CD Label software.
2) Save all projects as a SureThing file for future implementation. Select File =>
Save As… type in a file name.
3) To generate a PRN file Select File => Print…
4) Under Printer option select the CD/DVD Printer 6, press the Advanced button as
shown in fig. 2.
Fig.2 Print window.
Page 15
Scribe EC Quick Installation Guide
ScribeEC
PRO printer
with with
PrismOptiEC
PLUS Printer
Installation Guide
161616
Document Revision: 2005/05/20
2004/12/07
5) Check the Print to file box, press the OK button as shown in fig.3
Fig.3 Selecting
Print to file option.
6) Press the OK button to proceed as shown in fig. 2.
7) Type the name and location of the output PRN file. You MUST use the “.PRN”
extension to successfully generate the PRN file. Click the OK button as shown
on the fig.4
Fig.4 Naming the PRN file.
NOTE:
You must use the “.PRN” extension to successfully generate a PRN file.
7) You have successfully generated the PRN file.
Page 16
Scribe EC Quick Installation Guide
ScribeEC
PRO printer
with with
PrismOptiEC
PLUS Printer
Installation Guide
171717
Document Revision: 2005/05/20
2004/12/07
Appendix A
DVD8Z-9001EC, DVD8Z-9002EC
1 and 2 DVD drive system requires only one PCI firewire B controller card (IEEE1394B) to be installed in the host PC. One firewire B cable is connected between the
host PC and the drive bay.
DVD8Z-9004EC
4 DVD drive system requires only one PCI firewire B controller card (IEEE-1394B) to
be installed in the host PC. Two firewire B cables are connected between the host PC
and the drive bay. Both of the firewire B cables are plugged into one PCI firewire B
controller card (IEEE-1394B).
CD-9001EC, CD-9002EC
1 and 2 CD drive system requires one PCI firewire A controller card (IEEE-1394) to be
installed in the host PC. One firewire A cable is connected between the host PC and the
drive bay.
CD-9004EC
4 CD drive system requires two PCI firewire A controller cards (IEEE-1394) to be
installed in the host PC. Two firewire A cables are connected between the host PC and
the drive bay. One firewire A cable is connected to one firewire A controller card.
Firewire B (IEEE-1394B)
Firewire A (IEEE-1394)
A picture shows both the firewire A and firewire B ports.
This picture shows the firewire B cable.
Page 17
This picture shows thea firewire A cable.
Scribe EC Quick Installation Guide
ScribeEC
PRO printer
with with
PrismOptiEC
PLUS Printer
Installation Guide
181818
Document Revision: 2005/05/20
2004/12/07
Troubleshooting
1. The ScribeEC program did not recognized the loader.
a. Check the power cable on the back of the ScribeEC loader.
b. Make sure the power switch in the power supply of the loader is in the ON
position (the I is pressed in).
c. Make sure the power switch on ScribeEC loader is turned ON.
d. Check the serial cable (RS232) connection between the ScribeEC loader
and the host PC.
2. ScribeEC program did not recognize any drives.
a. Press the eject button on the drive to check for power to the drives.
b. Check the power cable connection on the back of the drive bay.
c. Turn the power button on the drive bay. The power button is located on
the front of the tower. *The power button on the six bay tower is located
on the back.
d. Check the firewire cable connection between the drive bay and the host
PC.
e. Check the Device Manager for the IEEE-1394 Bus host controllers which
is the firewire PCI controller card installed in the host PC.
f. Check if the Windows operating system recognized the drives by going to
My Computer or Device Manager. Windows operating system must
initialize the drives prior to executing the ScribeEC program.
3. ScribeEC program did not recognize printer.
a. Make sure the power to the printer is turned ON. The power button is
located on the top of the printer.
b. Make sure the ScribeEC program is set for OptiEC PRO printer (page 12).
c. Check the USB cable connection between the printer and the host PC.
d. Check the printer interface cable connection between the printer and the
ScribeEC loader.
4. Generated PRN files fail to print.
a. Check the printer driver settings (page 9-10).
b. The PRN files depend on the correct printer driver settings.
c. Any changes to the printer driver settings results in creating a new PRN
file.
Page 18
191919
Scribe EC Quick Installation Guide
ScribeEC
PRO printer
with with
PrismOptiEC
PLUS Printer
Installation Guide
Document Revision: 2005/05/20
2004/12/07
Genuine MF Digital Consumables
Thermal Printer Supplies
Thermal CD/DVD Printer Ribbons
The Gold Standard
Part#
Product Description
CDP-PRN-BK
CDP-PRN-BLK
CDP-PRN-RED
CDP-PRN-BLUE
CDP-PRN-GRN
CDP-PRN-MULTI
750' Black Ribbon for Prism Plus (Fine Line Print)
850' Black Ribbon for Spectrum 2 Printers
656' Red Ribbon for Prism Plus & Spectrum 2 Printers
656' Blue Ribbon for Prism Plus & Spectrum 2 Printers
656' Green Ribbon for Prism Plus & Spectrum 2 Printers
656' Multi Ribbon for Prism Plus
Ink Jet Printer Supplies
Inkjet CD/DVD Printer Cartiridges
Part#
Product Description
CDP-OPTI-EC-C
CDP-OPTI-EC-CX
CDP-OPTI-EC-BLK
CDP-SIG4IC-BLK
CDP-SIG4IC-C
CDP-SIGPROIC-C
CDP-OPTI-EC-PROC-C
Color Ink Cartridge for OptiEC Inkjet Printer
Large Color Ink Cartridge for OptiEC Inkjet Printer
Black Ink Cartridge for OptiEC Inkjet Printer
Black Ink Cartridge for Sig IV,Sig Pro, & OptiEC PRO Printers
Color Ink Cartridge for Signature IV Inkjet Printer ONLY
Color Ink Cartridge for Sig Pro & OptiEC PRO Printers
Photo Ink Cartridge for OptiEC PRO Printer ONLY
www.mfdigital.com
Page 19