1
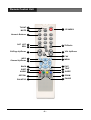
USER’S MANUAL SAB EXPLORER (FTA, CI, FTASC, CISC) Please read this User’s Manual carefully. The menu structure and specifications can be changed without notice. Table of Contents Safety----------------------------------------------------------------------------------------------------3 General Introduction-------------------------------------------------------------------------------4 Glossary------------------------------------------------------------------------------------------------5 Remote Control Unit-------------------------------------------------------------------------------6 Front/Rear Panel------------------------------------------------------------------------------------8 Receiver Connection------------------------------------------------------------------------------9 View Mode--------------------------------------------------------------------------------------------10 1. Channel Info Banner---------------------------------------------------------------------------10 2. To change channel in View mode---------------------------------------------------------10 3. Channel list---------------------------------------------------------------------------------------11 4. Satellite List--------------------------------------------------------------------------------------12 5. Favorite list---------------------------------------------------------------------------------------12 6. Volume Control----------------------------------------------------------------------------------12 7. Changing Mode---------------------------------------------------------------------------------12 8. Useful Function---------------------------------------------------------------------------------13 9. Program Guide Mode-------------------------------------------------------------------------13 Main Menu-------------------------------------------------------------------------------------------14 1. Installation---------------------------------------------------------------------------------------14 1.1 Service Searching-------------------------------------------------------------------------14 1.1.1 Edit----------------------------------------------------------------------------------------14 1.1.2 Rename----------------------------------------------------------------------------------17 1.1.3 Scan---------------------------------------------------------------------------------------17 1.1.4 Transponder----------------------------------------------------------------------------18 -1- Table of Contents 1.2 Data Base Upgrade-----------------------------------------------------------------------19 1.3 Initialize STB--------------------------------------------------------------------------------20 2. Channel Manager------------------------------------------------------------------------------20 2.1 Channel Edit--------------------------------------------------------------------------------20 2.2 Favorite Group-----------------------------------------------------------------------------21 3. System setting----------------------------------------------------------------------------------22 3.1 Language Setting---------------------------------------------------------------------------22 3.2 Video Settings--------------------------------------------------------------------------------23 3.3 Modulator Settings-------------------------------------------------------------------------23 3.4 Clock Settings--------------------------------------------------------------------------------24 3.5 Lock Settings---------------------------------------------------------------------------------24 3.6 System Information-------------------------------------------------------------------------25 4. Utility-----------------------------------------------------------------------------------------------26 5. Common interface-----------------------------------------------------------------------------27 Trouble Shooting---------------------------------------------------------------------------------28 Specification---------------------------------------------------------------------------------------29 -2- Safety Safety This receiver has been manufactured to satisfy the international safety standards. Please read the following safety precautions carefully. MAIN SUPPLY 110-240V, 50/60Hz, 30W OVERLOADING Do not overload a wall outlet, extension cord or adapter as this may result in fire or electric shock. LIQUIDS : This receiver shall not be exposed to dripping or splashing and that no objects filled with liquids, such as vases, shall be placed on the receiver. CLEANING : Disconnect the receiver from the main supply before cleaning. Do not use any kind of solvents to clean the receiver, only use a soft-dry cloth. VENTILATION : The slots on top of the receiver must be left uncovered to allow proper airflow to the unit. Do not stand the receiver on soft furnishings or carpets. Do not expose the receiver to direct sunlight or do not place it near a heater. Do not stack electronic equipments on top of the receiver. ATTACHMENTS : Do not use any unrecommended attachments as these may cause hazard or damage the receiver. CONNECTION TO THE SATTLITE DISH LNB : Disconnect the receiver from the main supply before connecting or disconnecting the cable from the satellite dish. FAILURE TO DO SO CAN DAMAGE THE LNB. CONNECTION TO THE TV. Disconnect the receiver from the main supply before connecting or disconnecting the cable from TV. FAILURE TO DO SO CAN DAMAGE THE TV. EARTHING The LNB cable MUST BE EARTHED to the system earth for the satellite dish. LOCATION : Place the receiver indoor in order not to expose to lightening, rain or sunlight. -3- General Introduction This manual will help you learn basic functions such as formatting, selecting channels and many other functions of the receiver. All functions can be performed from the remote control, and some from the Front panel. You can easily install it by selecting “Service Searching” function and upgrade its software through communication cable or satellite. The remote control is designed for easy access to all the functions at once and for comfortable grab for your hand. It is programmed to control all functions and to easily watch telecommunication programs via the receiver. This receiver is designed for your convenient use and you can upgrade software at anytime. -4- Glossary Antenna A device that collects and radiates electromagnetic waves. Includes a satellite dish and a broadband antenna. Forward Error Correction (FEC) A system of error control for data transmission. Frequency The number of cycles or events per one second, which is expressed in the unit of Hertz(Hz). Intermediate Frequency (IF) A frequency to which a carrier frequency is shifted as an intermediate step in transmission or reception. Low Noise Block (LNB) Downconverter A low noise microwave amplifier and converter which downconverts a range of frequencies to IF range. Packet Identifier (PID) A set of numbers that identifies transport stream packets containing data from a single data stream. Polarization Characteristic of an electromagnetic wave determined by the orientation of the electric field vector. Quaternary Phase Shift Keying (QPSK) Phase-shift keying in which four different phase angles are used. Transponder Equipment in a satellite which receives a single uplink channel from a satellite Earth station, amplifies it, converts the frequency and changes the polarization, then rebroadcasts it back to Earth. Transport Stream The bit stream formed prior to transmission of signals by combining the video, audio and data streams of one service. It consists of fixed length packets of 188 bytes of data.` -5- Remote Control Unit TV/SAT 2 MUTE 3 Numeric Buttons 4 SAT LIST EPG 5 14 CH/Page Up/Down 6 1 STANDBY 13 TV/Radio 9 VOL Up/Down 15 FAV 16 MENU INFO Channel Up/Down 7 BACK 10 17 EXIT SUBT AUDIO 11 18 TEXT 12 19 SLEEP OPTION 22 20 ZOOM PAL/NTSC 23 21 PAUSE 8 -6- Remote Control Unit 1 12 STANDBY . Switches between Operation and Standby modes 2 TV/SAT 13 Selects TV or Satellite mode. 3 MUTE 14 Numeric Buttons 15 16 SAT LIST 17 INFO 19 9 Channel Up/Down 10 BACK Moves back to the previous step without saving the changed information, or back to the previous channel 11 SLEEP Selects sleep and ON/OFF times 20 ZOOM Selects the 2X or the 4X zoom function Volume Up/Down Turns up/down volume or hanges the menu TEXT Loads the teletext service for the current channel Displays the program information box on the screen Changes channels or items on the menu EXIT Changes to channel mode without saving the changed information of the menu mode Page Up/Down 18 8 MENU Moves to main menu during TV viewing Changes the page of the channel list 7 FAV Favorite channel list . Selects favorite channel list or current channel list in the view mode 6 GUIDE Electronic Program Guide button; displays the TV/Radio program guide Change channels or select the menu options 5 TV/RADIO Switches between TV and Radio modes Turns the sound ON or OFF 4 AUDIO Changes audio mode to left+left, right+right, or stereo 21 PAUSE Pauses or continues the current picture 22 OPTION Reserved for future use 23 SUBT PAL/NTSC Changed Video system Selects the subtitle language for the current service -7- Front/Rear Panel Front Panel 1. : Turn on & off the power of the receiver. 2. MENU : Moves to main menu during TV viewing 3. OK : Displays the channel list and selects the item on the menu. 4. CH , CH : Changes channels or items from top to bottom on the menus. 5. VOL , VOL : Turns up/down volume. Rear Panel IF INPUT : Use to connect a LNB/Satellite Dish. IF OUTPUT : Use it when connecting to another receiver. ANT IN : Use to connect a terrestrial antenna or cable TV signal. TV OUT : Use to connect a RF signal from this receiver to RF(ANT) input jack on TV. DIGITAL AUDIO OUTPUT : S/PDIF output. VIDEO/AUDIO OUTPUT : Video/Audio signal from your receiver to VCR, TV, or to an external audio equipment TV SCART : For the video/audio input of the TV. VCR SCART : For the video/audio input/output of the VCR. RS-232C : Use it when connecting to your PC. -8- Receiver Connection Various equipment (TV/VCR) can be connected to this receiver. This manual will explain common ways to connect to the equipment. If you are using a RF cable, please synchronize the RF channels of the TV set and of the VCR. If you experience any problem, please contact your sales agency. 1. . How to connect the receiver to a TV set Connect one end of the SCART cable to the TV SCART socket on the back of the receiver and the other end to the SCART input socket on your TV. Connect the LNB[Dish] cable to the IF input connector of receiver. If you want to use an RF cable, connect one end of a RF cable to the TV OUT connector on the receiver and the other end to the RF IN connector on your TV. Connect your TV Arial cable to the ANT IN connector on the receiver for receiving terrestrial or cable channels 2. How to connect the TV and VCR Connect one SCART cable between the TV and the TV SCART socket on the receiver. Connect the other SCART cable between the VCR and the VIDEO SCART socket on the receiver. Connect one end of an RF cable to the TV OUT connector on the receiver and the other end to the RF IN connector on your VCR. Connect one end of a RF lead to the RF OUT connector on your VCR and the other end to the RF IN connector on your TV. Connect your TV antenna to the ANT IN connector on the receiver for receiving terrestrial or cable channels. Connect IF input connector of the receiver and antenna. 3. How to connect the Audio system Connect the AUDIO R, L terminal of the receiver and the LINE, AUX, SPARE or EXTRA input socket using the RCA/Cinch stereo cable. -9- View Mode 1. Channel Info Banner The details of services such as satellite name, channel information, channel names, program names and lock, scrambled, teletext, audio status, and now, next EPG will be displayed when pressing the “INFO” button on your remote control or changing channels. 2. To change channels in View mode Press the channel number you wish to watch. Press “OK” button to display channel list already searched Press the “CHt t”, “CHu u” button to change channel. Press “LEFT ”, “RIGHT ” button to move to all/free/scramble/favorite channel list. Press “OK” button to select a channel. Press “BACK” button to view previously watching channel. - 10 - View Mode 3. Channel list Press the “OK” button to display channel list already searched. You can change All SAT, Satellite, Scramble and Sort List mode by pressing the “RED, GREEN, YELLOW and BLUE COLOR” button. Press the “CHt t”, “CHu u” button to change sub list. Press the “LEFT ”, “RIGHT ” button to change satellite list. Press the “OK” button to select list and to display the selected channel list. Press the “BACK” button to previous list. Press the “EXIT” button to cancel this function. - 11 - View Mode 4. Satellite List Press the “SAT LIST” button to display the selected satellite list. Press “OK” button on a name to display and to select all channel lists in the satellite. Press the “OK” button to select a channel. 5. Favorite List Press the “FAV” button to display and to select the favorite channel group. Press “OK” button on a name to display and to select all channel lists in the satellite. Press the “OK” button to select a channel. * By pressing “RED” button to rename the group name. 6. Volume Control To increase or decrease volume, use the “Vol +”,“ Vol -” buttons. To temporarily cut off the volume, press the “MUTE” button. To cancel mute, press the “MUTE” button once again or press the “Vol +”, “Vol -” buttons. 7. Changing Mode (view mode – menu mode) You can change view mode to menu mode by pressing “MENU” button. You can change menu mode to view mode by pressing “EXIT” button - 12 - View Mode 8. Useful Function By pressing the “TV/R” button, you can change TV/ Radio mode. By pressing the “PAUSE” button, you can pause the screen and you can cancel this function by pressing “EXIT” button. By pressing the “AUDIO” button, you can change audio mode. By pressing the “TEXT/SUBT” button, you can use text/subtitle function and you can cancel this function by pressing “EXIT” button. By pressing the “PAL/NTSC” button, you can change the PAL, NTSC and AUTO bv mode. By pressing the “SLEEP” button, you can setting SETTOP BOX off time. By pressing the “ZOOM” button, you can use zoom function and cancel this Function by pressing “EXIT” button. 9. Program Guide mode By pressing the “EPG” button, you can get information about each programme. By pressing the “CHt t”, “CHu u” button, You can change the channel. Press the “RED, GREEN, YELLOW CORLOR” button to change other function. By pressing the “OK” button, you can get information selected channel. By pressing “EXIT”, “BACK” button, You can cancel this function. - 13 - Main Menu Plug in the receiver. Then press the “” button on the remote control or the “standby” button on the receiver front panel. The Main Menu screen, the beginning of the OSD screen, will appear as shown in the following picture. The Main Menu displays various functions of the receiver or you can select with “CHt t”, “CHu u”and the numeric buttons on the remote control. When a function is selected, the title changes its color. To proceed to the next stage, press the “OK” button on the remote control. 80 1. Installation The installation menu allows you to set the Antenna and various functions, and customize service. After selecting the “Main Menu” function and pressing the “OK” button on the Main Menu screen or selecting the “Service Searching” function and pressing the “OK” button to skip main menu. Use the “CHt t”, “CHu u” buttons on the remote control to select an option and press the “OK” button to proceed to the next stage. To move backwards to the previous stage, press the “Back” or “Menu” button. 1.1 Service Searching Select “Service Searching” function from the “ Installation” menu and press the “OK” button. More information about “Service Searching” function can be obtained from your sales representative, the Internet or satellite broadcasting magazines. You can use useful function by pressing the “RED, GREEN, YELLOW, BLUE CORLOR” buttons. 1.1.1 EDIT Sat. Name : Select the name of the satellite. See the Sat list by pressing the “OK” button. - 14 - Main Menu LNB power : Turn on/off the LNB’ Power. LNB Frequency : LNB Frequency value can be selected by using the “ ”, “ ” buttons and Enter a proper value by using numeric buttons(0~9). 22KHz : Select 22KHz On/Off/Auto to control and external tone switch. DiSEqC : DiSEqC must be used when using two or more antennas and LNBs. Select None, DiSEqC 1.0, DiSEqC 1.1, MOTOR and USALS. When selecting “MOTOR” Yellow Color button. 1) DiSEqC 1.2 Motor : You can move the motor to the left or right by pressing the “ ”, “ ” keys continuously, but when you stop pressing the “ ”, “ ” keys, the motor will be stopped. 2) Save : When you press the “OK” key, current position of the DiSEqC motor will be saved. 3) Go to Reference : Move to the position “0”. 4) Calculation : The difference between the current position and the new position of the current satellite is applied to all the other satellite also. 5) Limit : You can set the maximum move extent. You can control “Enable” or “Disable” mode. When you select “Enable” “East limit” and “West Limit” will be activated. Press the “OK” key, then current position will be restored as each limit. 6) Reset : After select the “Reset” and press the “OK” key, the original value of motor will be restored. - 15 - Main Menu When selecting “USALS” Yellow Color button If you have a USALS motorized system, you must set your position (latitude and longitude) in order to calculate all motor positions for viewable satellites. You should refer to the motor’s manual to get information for installing a USALS motorized system. 1) Longitude & Latitude : Input the value of latitude and longitude in which the dishinstaller is placed, press “NUMERIC” button. 2) Current Satellite : Indicate the current satellite name. 3) Rotate : To move the motor to the stored position, press “OK” button. 4) Limit : You can set the maximum move extent. You can control “Enable” or “Disable” mode. When you select “Enable”, “East limit” and “West Limit” will be activated. Press the “OK” key, then current position will be restored as each limit. 5) Go to Reference : To clear the east & west limit, press “OK” button. Committed : Set the port number of DiSEqC 1.0 switch. Uncommitted : Set the port number of DiSEqC 1.1 switch. Save : After Setup complete, Press “RED” Button to Save. - 16 - Main Menu 1.1.2 RENAME Select the satellite name you would like to rename and press the “OK” button. By using the “BACK” buttons, Move to be previous menu. Press “GREEN” Button to Save 1.1.3 SCAN You can select the satellite you want to scan by using the “ ”,“ ” keys. You can also select numerous satellite simultaneously by pressing the “OK” key consecutively, then the selected satellites will be highlighted. Network : If you want to have all other transponder information, you need to select network “On”. Search Mode : You can select All / FTA option mode in each satellite by using the keys. All : scan all channels, FTA : skip all scrambled channels. Press the “OK” key and Scan will begin. STB will automatically search all TV/Radio channels from a satellite and save them into the channel list. You can see the progressive status of channel searching. Press the “RED” or “EXIT” key to stop channel Search. When the Channel Search is completed, the result will be saved and the first channel of the searched ones will be displayed. - 17 - Main Menu 1.1.4 TRANSPONDER It will be more convenient to use this procedure when you want to search the channels for a specified transponder offered from the satellite. Select any transponder that you want to change the setting parameters or to scan, by using “ ”, “ ” keys. You can also select numerous transponders simultaneously by pressing the “OK” key consecutively. 1) EDIT : Press the “RED” key to change the parameter values of the selected transponder. Place the cursor on the sub menu by using the “ ”, “ ” keys and Press the “ ”, “ ” or “NUMERIC” button to change the setting. 2) ADD : If you cannot find the desired transponder from the transponder list, you can add it by inputting appropriate parameter values for a new transponder. When you want to change the parameter of an existing transponder, select the parameter using the “ ”,” ” keys and change its value by using the “ ”, “ ” or “NUMERIC” keys. 3) SCAN : This option will enable you to search all channels broadcasted over a specific transponder using its predefined information. Select the transponder from transponder list which you want to search, by using the “ ”,” ” keys. You can also select numerous transponders simultaneously by pressing the “OK” key consecutively, then the selected transponders will be highlighted. If you cannot find it from the transponder list, you should insert all the setting parameters. 4) DELETE : Press the “BLUE” key to delete the selected transponders. - 18 - Main Menu 1.2 Database Upgrade Lets you download database by RS-232 cable. Connect two receivers with RS-232 cable. The Receiver which receives database selects a “ Receive “ mode, the Receiver which sends database selects a “ Send “ mode. Press the “OK” button. - 19 - Main Menu 1.3 Initialize STB “Initialize STB” function formats all information including the existing parental lock code and favorite channels to the initial condition. After selecting “Initialize STB”, A warning message as shown right will be displayed. If you press the “OK” button, all preset information will be formatted. (default value : “0000”). 2. Channel Manager 2.1 Channel Edit You can delete, lock, rename & move channel’s position in the channel list. Delete : Select the searched satellite name , and press the “RED” button. By using the “EXIT”, “BACK” buttons, Move to be previous menu. Lock : You can select the channels that you want to lock or unlock by using the “ ”, “ ” keys. And press the “GREEN” key to confirm your selection. Once the program is locked, you can not watch the locked channel till you change the configuration from “Lock” to “Unlock” in the channel edit menu or List Menu. The symbol of “Lock” is marked at the right side of the channel name on the “Channel Edit” List. - 20 - Main Menu Rename : Press the “YELLOW” key to select the channels that you want to change the channel name, then the following “Channel Rename” menu and keyboard screen will be displayed. Use the “ ”,” ” and “ ”,” ” keys to place the cursor on the desired character and press “OK” key to select Move : Press the “BLUE” key to select the channels that you want to move its position of, and place the cursor on the position where you want to move it by using the “ ”, “ ” keys and press the “OK” key to confirm. 2.2 Favorite Group You can edit the Favorite Channel List, which facilitates you to easily find your favorite channel from the Channel List. You can choose TV or Radio Channels in an alternative way by pressing the TV/Radio key Sorting : Press the “RED” key and the Following “Program Sorting” menu screen will Be displayed. You can rearrange the lists by satellite, FTA / scramble, or alphabetically. Register : Before you can use the “Favorite Channels List”, you must first register your favorite channels into the favorite list. The list screen is divided into two, the list on the left displays all channels available and the list on the right displays selected favorite list. You can select the channels that you want to register into favorite groups by using the “ ”, “ ” keys, press the “OK” key to confirm your selection. Then press the “GREEN” key and the selected channels will be added to each group of the favorite channel list. - 21 - Main Menu Fav-Rename : Press the “YELLOW” key to change the name of Favorite Group, then the following “Favorite Rename” menu and keyboard screen will be displayed. Use the “ ”, “ ” and “ ”, “ ” keys to place the cursor on the desired character and press “OK” to select. Delete : You can also delete channels from the favorite channel list by pressing the “BLUE” key after selection by using the “ ”,” ” & “OK” keys . Press the “BACK” key to return to the previous menu 3. System Setting 3.1 Language Setting To select the desired language of the Menu & Subtitle or Soundtrack. Place the cursor on the sub menu by pressing the “ ”, “ ” keys and press the “ ”, “ ” keys to change language. The Language of Menu & Subtitle or Soundtrack will be changed to the selected language - 22 - Main Menu 3.2 Video Settings TV Scart Mode : Select your Tv scart video output format, RGB/CVBS, by pressing the “ ”, “ ” buttons. Aspect ratio : Select your screen format, AUTO/4:3 Normal screen/16:9 wide screen According to Tv Type, By pressing the “ ”, “ ” buttons. Letter Box : You can select “ON” When the format of your TV set is 4:3 and video source is 16:9, then the screen will display the letter box mode. Transparency : Set the level of OSD Transparency, it varies from 0 to 40. Default : 10 Display Iplate : If you select “ON” that the symbol of TV/Radio, Locked, teletext, Date, Time, Current program information(title, running time) or scrambling service is displayed when broadcasters of the desired service support. TV PAL/NTSC : Changes PAL or NTSC TV mode. 3.3 Modulator settings RF Type : Select TV standard Type. (PAL B/G, PAL I, PAL D/K, NTSC) RF channel : Select the RF channel number from 21 to 69. - 23 - Main Menu 3.4 Clock settings Daylight Saving Time : Select the “Daylight saving time” “ON/OFF” mode by using the “ ”, “ ” buttons. Adjust Time Zone : You can set the Current Time (Local area time) in this mode. To set the Current Time, select the value using the standardized information of current service area by pressing the “ ”, “ ” keys. On Timer : Sets up hour and minute of your receiver Power on time. Enter a Power on time by using numeric buttons(0~9). On Timer Mode : Powers on receiver by setting this option with “Once” or daily” by pressing the “ ”, “ ” buttons. 3.5 Lock Settings Select “Lock Settings” from the “Main Menu”, and you will be requested to insert the password. Default Password is “0000”. System Lock : To lock the receiver, select “System Lock” in the “Lock Settings” menu and change it to the “ON” mode by using “ ”, “ ” keys. If the receiver is locked , whenever you try to start the STB, the “Password” screen will appear and you will be asked to enter your Password Channel Manager Lock : To lock the channel Manager, select “Channel Manager Lock” in the “Lock Settings” menu and change it to the “ON” mode by using the “ ”, “ ” keys. - 24 - Main Menu Installation Lock : To lock the Installation menu, select “Installation Lock” in the “Lock Settings” menu and change it to the “ON” mode by using the “ ” “ ” keys Change Password : You can change your Password from the factory default value “0000” as follows: Select “Change Password” in the “Lock Settings” menu. You will then be asked for a new password. Once you enter a new password, the system will ask you to re-enter for confirmation. When you have entered a new password twice, the password has been changed. If you forget the password, contact the distributor to recover it. 3.6 System Information Current Receiver boot loader, software version and hardware version display - 25 - Main Menu 4. Utility This STB supports additional functions such as Calendar and Games. Calendar : “▼” : Previous Year “▲” : Next Year “◀” : Previous Month “◀” : Next Month αTetris : “OK” : Drop “▲” : Rotate “◀” : Move Left “◀” : Move Right . - 26 - Main Menu 5. Common Interface You can enjoy not only Free-To-Air services but also scrambled services using the Conditional Access Modules (CAM) & Smart card. This receiver currently supports various types of CAM & Smart card (Alphacrypt, Aston/Seca, Irdeto, VIACCESS, Nagravision, CONAX, CryptoWorks and more). Common Interface modules and smartcards are available from your dealer or from your service provider. If no CAM is used, then only free-to-air programmes will be received. CAUTION Smart Card Insert direction Please insert card whit the chip downstairs! - 27 - Trouble shooting TROUBLE SHOOTING Possible Causes Solution No picture but on screen menus appear ! Satellite system is incorrectly installed. Check all connections and leads, adjust satellite antenna, check LNB. Faulty LNB Replace LNB Faulty TP Replace TP High levels of signal loss through cables Use a signal booster or replace cables Faulty connection Repair connection Remote control not working ! Batteries exhausted Check batteries Incorrect function selected Press correct function key Remote control not pointed at device. Make sure your remote control is pointing on your device No stereo sound ! Incorrect cable connecting receiver and TV Check SCART cable Incorrect volume value Check volume value - 28 - Specification Conditional Access / Interface Slot 2 Slot PCMCIA DVB common Interface Standard Input Frequency Input Video Audio Serial Data Front Panel RF Modulator 950~2150MHz Connector F-Type Input Impedance 75 Ohms Input Level -25 ~ -65 dBm LNB Power 14/18V DC±5% LNB Control 22KHz, 600mVp-p DiSEqC Ver 1.0/1.1/1.2/USALS Maximum Current 500mA Overload Protection Demodulation QPSK Symbol Rate 2~45Mbaud(SCPC/MCPC) Decoding MPEG-II Output NTSC/PAL(Auto) Aspect Ratio 16:9, 4:3 Resolution 720480(NTSC)/720576(PAL) Output Level 1Vp-p / 75Ohms Output Connector RCA Phone Jack, TV/VCR Scart Decoding MPEG-I, Layer 2 Bit Rate Max, 384Kbps Output Level 0 dBm Output Impedance 600 Ohms Unbalanced Output Connector RCA Phone Jack, TV/VCR Scart Connector 9 Pin D-sub Signals RS232, 115,200Kbps 4 Digit 7 Segment Display Standby, CH Up/Down, Vol Up/Down, Menu, OK RF-Connector 75Ohms, IEC169-2 Male / Female Frequency 470MHz to 860 MHz Output Channel CH21-69 TV Standard PAL B/G, PAL I, PAL D/K Remote Control 15m Max Supply Voltage 110-240V AC, 50/60Hz Power Consumption 30 Watts Max Dimension 30022060 (WDH) Operating Temperature 0°C to 50°C - 29 -