1
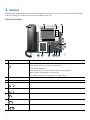
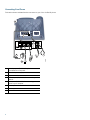
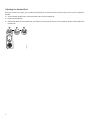
• Press line button for your extension, dial the number, and then lift the handset. Transfer a Call to Another Number Using the Hookflash • Press the Speaker button, and then dial the number. (For Cisco Unified IP Phone 6901 only.) • Verify that you are on an active call (not on hold). Answer a Call QUICK REFERENCE • Press and release the hookswitch to get a dial tone. • Lift the handset. • If you are using the speakerphone, press Speaker. End a Call • Enter the transfer recipient’s phone number. • Wait for the recipient to answer. (Or, skip to Step 5 while the call is ringing.) • Hang up. The transfer is complete. • If you are using a speakerphone, press the Speaker button. Place a Conference Call Using the Hookflash For Cisco Unified IP Phone 6901 only.) Redial a Number Quick reference is intended for Cisco Unified IP phone users who are already familiar with their phones. For details on your phones and phone features, see the user guide. Note Because of differences in phone models and features, not all procedures and soft keys described here apply to all phones. • Press the Redial button . • To place the call, get a dial tone on the line, then press the Redial button. 1. Verify that you are on an active call (not on hold). 2. Press and release the hookswitch to get a dial tone. 3. Dial the party’s number. • Complete numbered items in sequence. • Choose only one bulleted item. • Bold terms identifies soft keys. Place a Call • Lift handset and dial number. • Dial number and then lift the handset. • Look for a solid red light on your handset. You can configure the visual message waiting lamp using your User Options web pages. • Listen for a stutter tone when you lift the handset. You can configure the audible message waiting lamp using your User Options web pages. Listen to Voice Messages Hold a Call Hold • Press Hold button. 5. Press and release the hookswitch again. • To put a call on hold, press the Hold button . The line button flashes green. Resume a call • To resume the call, press the flashing green line button. Transfer a Call • Hookflash is used to transfer calls from the Cisco Unified IP Phone 6901. • The Transfer button is used to transfer calls from the Cisco Unified IP Phone 6911. • (For Cisco Unified IP Phone 6911 only.) Direct Transfer allows you to connect two calls to each other (without remaining on the line yourself). • Press the Messages button, then follow the voice prompts to listen to your messages. (For Cisco Unified IP Phone 6901 only.) • Using the keypad, dial the voice mail access number (provided by your system administrator), then follow the voice prompts to listen to your messages. Shared Lines 4. Wait for the recipient to answer. (Or, skip to Step 5. while the call is ringing.) 6. A conference with three participants is created. Set up a Conference (For Cisco Unified IP Phone 6911 only.) 1. Verify that you are on an active call (not on hold). 2. Press the Conference button Using the Quick Reference Card To check for voice messages: (For Cisco Unified IP Phone 6911 only.) • Hang up the handset. Cisco Unified Communications Manager Express Quick Reference Card for Cisco Unified IP Phones 6901 and 6911 Check for Voice Messages . 3. Enter the phone number for the party you want to add to the conference. 4. Wait for the party to answer (or skip to Step 5. while the call is ringing). 5. Press the Conference button again. The conference begins. Repeat these steps to add more parties, if desired. Shared lines allow you to use one phone number for multiple phones. You might have a shared line if you have multiple phones and want one phone number, share call-handling tasks with co-workers, or handle calls on behalf of a manager. For example, if you share a line with a co-worker: • When a call comes in on the shared line: – Your phone rings and the line button flashes amber. Americas Headquarters Cisco Systems, Inc. 170 West Tasman Drive San Jose, CA 95134-1706 USA http://www.cisco.com Tel: 408 526-4000 800 553-NETS (6387) Fax: 408 527-0883 Cisco and the Cisco Logo are trademarks of Cisco Systems, Inc. and/or its affiliates in the U.S. and other countries. A listing of Cisco's trademarks can be found at www.cisco.com/go/trademarks. Third party trademarks mentioned are the property of their respective owners. The use of the word partner does not imply a partnership relationship between Cisco and any other company. (1005R) © 2010 Cisco Systems, Inc. All rights reserved. Printed in the USA on recycled paper containing 10% postconsumer waste. OL-22883-01 – Your co-worker’s phone rings and the line button flashes amber. • If you answer the call: – Your line button turns green. – Your co-worker’s line button turns red. When button is red, that line cannot be used to barge in on the call or used to make another call. • If you put the call on hold: – Your line button flashes green – Your co-worker’s line button flashes red. When the line flashes red, your co-worker can pick up the call. Marywood University Cisco 6901 Phone Instructions Page 1 of 2 Summer 2012 Version 1 1. General Phone Settings Setup – e.g. Greeting, Voicemail, Personal Settings, etc. a. Dial ext. 8444 b. Enter 12345 as the pre-assigned temporary password (press # to confirm) c. Follow operator instructions (remember to select # to confirm) 2. The Cisco voice will instruct you to Record your name to identify you to other callers a. To record your name, in a pleasant voice, say your first and last name, or your professional name after the tone b. When finished saying your name, IMMEDIATELY press the # key c. To keep the recorded name, press the # again 3. To Change Password a. Select the messages icon b. Enter 12345 as the pre-assigned temporary password (press # to confirm) c. Press 4 for Setup Options d. Press 3 for Personal Settings e. Press1 to Change Password f. Enter new password (press #) g. Enter new password (press #) 4. Recording Your Greetings Must be set up in the general phone settings MUST set up the STANDARD Greeting a. Standard – School Hours Greeting “You have reached Sharon Jones’ voicemail. I am currently away from my desk. Please leave a message.” b. Closed – Message to be set up for after school hours c. Alternate – Overrides Standard and Closed greetings Message can be set up for when you are on vacation 5. Checking Voice Mail from your own desk phone a. Dial ext. 8444 b. Enter your password c. Follow Operator Options – e.g. To hear new messages press 1 d. To skip to next message without finishing current message enter # key e. To speed up a message playback hit 6 repeatedly… to slow down hit 4 f. Hit the 8 key to pause & resume message playback g. To delete messages enter a 3 h. To save for later enter a 2 i. To reply to a voicemail from a Cisco phone, enter a 4 j. To forward a copy of the message enter a 5 – to switch from alpha directory to numeric enter # # NOTE: To check voicemail on the old phone system, dial 4777 and follow the prompts Marywood University Cisco Phone Quick Help P a g e |1 Marywood University Cisco 6901 Phone Instructions Page 2 of 2 Summer 2012 Version 1 6. Checking Voice Mail from Another Extension other than your own a. Dial ext. 8444 b. Select the asterisk * key c. You are prompted to enter your id # (which is your extension e.g. x4304) d. Select the pound # key to confirm e. After the prompt, enter your password, select the pound # key to confirm f. Follow Operator Options – e.g. To hear new messages press 1 7. Checking Voice Mail from Outside Line a. Dial 570-963-8444, enter your extension, wait until you hear the message b. Select the asterisk * key c. You are prompted to enter your id # (which is your school extension e.g. x4304) d. Select the pound # key to confirm e. You are prompted to enter your password, select the pound # key to confirm f. Follow Operator Options – e.g. To hear new messages press 1, etc. NOTE: To check voicemail on the old phone system, dial 570-961-4777 and follow the prompts 8. Transferring Voice Mail Message from your voicemail to another user a. Listen to voice mail message b. Press 5 to Forward c. By default the system wants you to spell the user you want to forward the message to >>>Press ## to switch to extension numbers, if desired d. Enter the extension of the user you want to forward the message e. After forwarding you can save or delete your copy of the call 9. Placing an Outside Call with a 570 prefix (that is not considered long distance) a. Dial 9 570 and the remaining 7 digits 10. Placing an Outside Call with a 570 prefix (that is considered long distance) a. Dial 9 1 plus the 10 digit number 11. Making Long Distance Calls a. Dial the long distance number (Dial “9” for an outside line, dial “1” and the number) b. If prompted to enter a PIN, follow the on-screen instructions Marywood University Cisco Phone Quick Help P a g e |2 USER GUIDE Cisco Unified IP Phones 7942G and 7962G for Cisco Unified Communications Manager Express Version 7.1 1 Overview, page 2 2 Operating Your Phone, page 6 3 Phone Features Index, page 20 1 Overview This guide provides phone operating instructions, and feature descriptions for the Cisco Unified IP Phone multiline models 7942G and 7962G. The 7942G has two lines and the 7962G has six lines. Physical Description 2 1 3 16 1 4 5 6 7 8 15 1 14 13 12 11 10 137503 9 Name Description Line or speed-dial button Opens new line, speed-dials phone number, or ends call. Buttons light to indicate status: Green, steady: Active call or two-way intercom call Green, flashing: Held call Amber, steady: Privacy in use, one-way intercom call, DnD active. Amber, flashing: Incoming call or reverting call Red, steady: Remote line in use (shared line or BLF status) 2 LCD screen Displays information such as line/call status, phone number, and soft key tabs. 3 Footstand adjustment Allows you to adjust angle of phone base. 4 Messages button Provides access to voice mail. 5 Directories button Provides access to phone directories. 6 Help button Activates the Help menu. 7 Settings button Provides access to phone settings such as display contrast and ring type. 8 Services button Provides access to phone services. 2 9 Name (continued) Description (continued) Volume button Increases or decreases handset, headset, ringer, or speakerphone volume. 10 Speaker button Toggles speaker on and off. 11 Mute button Toggles mute on and off. 12 Headset button Toggles headset on and off. 13 Navigation button Scrolls through text and selects features that are displayed on the LCD screen. 14 Keypad Functions as traditional telephone keypad. 15 Soft keys buttons Engages functions visible on corresponding LCD tabs. 16 Handset with indicator light Functions as traditional handset and provides message waiting indicator light and message-waiting (stutter) tone. 3 Connecting Your Phone This section shows and describes the connectors on your Cisco Unified IP phone. 8 1 AUX 10/100 SW 10/100 PC + DC48V 7 2 3 4 5 1 DC adapter port (DC48V) for phones not provided with inline power 2 AC-to-DC power supply 3 AC power cord 4 Network port (10/100 SW) for connecting to the network 5 Access port (10/100 PC) for connecting your phone to your computer 6 Handset port 7 Headset port 8 Footstand button 4 113656 6 Adjusting the Handset Rest When you connect your phone, you can adjust the handset rest so that the receiver does not slip out of the cradle. To adjust the handset: 1. Set the handset aside and pull the square plastic tab from the handset rest. 2. Rotate the tab halfway. 3. Slide the tab back into the handset rest. An extension protrudes from the top of the rotated tab. Return the handset to the handset rest. 2 3 120521 1 5 2 Operating Your Phone This section describes how to operate your Cisco Unified IP phone and includes information on soft keys and phone features. Note Because there are differences in phone and site configurations, not all features described here might apply to your phone. Consult your system administrator for more information. Soft Key Descriptions Your Cisco Unified IP phone is equipped with soft keys for call features and options. Soft keys are displayed along the bottom of the LCD screen and activated using the corresponding buttons. Soft keys can change according to the state of the phone. Following is a comprehensive list of soft keys offered on these Cisco Unified IP Phones. Functions depend on your system configuration. Soft Key Function << or >> Navigates to edit characters. Use the backspace soft key to erase digits that you entered incorrectly. Answer Answers an incoming call. Callback Notifies callers that the called line is free. Cancel Cancels the last selection. CFwdALL Forwards all calls. Clear Clears directory history. Confrn Connects callers to a conference call. Delete Deletes selected number. Dial Dials the displayed number. DnD Enables the Do-Not-Disturb feature. Down Decreases the LCD screen contrast. EditDial Selects a number and activates the cursor for editing. EndCall Ends the current call. Exit Exits from the current selection. Flash Provides hookflash functionality for three-way calling and call waiting services provided by the PSTN or Centrex service. GPickUp Selectively picks up calls coming into a phone number that is a member of a pickup group. Hold Places an active call on hold. Resumes call on hold. LiveRcd Enables the user to record a phone conversation. Login Provides PIN-controlled access to restricted phone features. Contact your system administrator for instructions. more Scrolls through additional soft key options (for example, use more soft key to locate the DnD soft key). NewCall Opens a new line on the speakerphone to place a call. Ok Confirms the selection. Park Forwards calls to location from which calls can be retrieved by anyone in the system. PickUp Selectively picks up calls coming into another extension. Play Plays ring sound sample. 6 Soft Key Function Redial Redials last number dialed. RmLstC Removes Last Participant from the Conference Call. Resume Returns to active call. Save Saves last change. Search Initiates search in local directory. Select Selects highlighted option. Trnsfer Transfers active calls to another extension. TrnsfVM Transfers a call to voice mail. Up Increases LCD screen contrast. Place a Call Use one of the following methods to place a call: • Lift the handset and dial the number. • Dial the number, and then lift the handset. • Dial the number, and then press the Dial soft key. • Press the line button for your extension, and then dial. • Press the Speaker button, and then dial. • Press the New Call soft key, and then dial. • If you are using a headset, press the Headset button, and then dial. • Dial the number, and then press the Headset button. • If you have established speed-dial numbers, press a speed-dial button. • If you have selected a number from a directory, press the Dial soft key. Note Use the backspace (<<) soft key to erase digits that you enter incorrectly. Answer a Call To answer a call: • Lift the handset. • If you are using a headset, press the Headset button. If necessary, press the line button to select between incoming calls. • If you are using the speakerphone, press the Answer soft key or the Speaker button. End a Call To end a call: • Hang up the handset. • If you are using a headset, press the Headset button or the EndCall soft key. • If you are using a speakerphone, press the Speaker button or the EndCall soft key. Redial a Number To redial the most recently dialed number: • Lift the handset and press the Redial soft key. • Press the Redial soft key to dial using the speakerphone. 7 Hold a Call To place a call on hold while on the call: • Press the Hold soft key. To retrieve a held call: • Press the Resume soft key. – If multiple calls are on hold, use the Navigation button to select the desired call before you press Resume. – If multiple calls on multiple lines are on hold, press the line button for the line that you want to pick up. The active call on the other line is automatically put on hold. Note Because the hold feature can generate music or tones, avoid using hold when dialed into a remote conference system. Conferences that are created locally on your phone can safely be placed on hold without introducing music or tones into the conference. Mute a Call To mute a call: • While on a call, press the Mute button. The Mute button lights, indicating that the other party cannot hear you. To deactivate the mute function, do one of the following: • Press the Mute button again. • Lift the handset if you are using mute with your speakerphone. Note The Mute feature does not generate music or a tone. Manage Call Waiting If you are on a call when a second call comes in, you hear a call-waiting tone or see a flashing indicator light on the handset rest, depending on the configuration of your phone. To answer the new call on the same line: 1. Use the Navigation button to select the call 2. Press the Answer soft key to answer the call. The call on the other line is automatically put on hold. To return to the original call: 1. Use the Navigation button to reselect the call. 2. Press the Resume soft key to reconnect to the call. For calls on a separate line: • Press the Line button for the incoming call. The call on the other line is automatically put on hold. To return to the original call: • Press the Line button associated with the original call. Retrieve Voice Messages To retrieve voice messages: 1. Select an available Cisco Unified IP phone line by lifting the handset, pressing the speakerphone button, or pressing a line button. Listen for the dial tone. 2. Press the Messages button, and follow the voice instructions. 8 Note When you have one or more new messages, the message-waiting indicator (MWI) on your handset is lit. The MWI works only if the MWI is configured on your phone. Note Your company determines the voice message service that your phone system uses. For the most accurate and detailed information, see the documentation for your voice message service. Adjust the Volume for the Current Call To adjust the handset, speakerphone, or headset volume for the current call: 1. During a call, press the Up or Down Volume button. 2. Press the Save soft key to apply the new volume level to future calls. Adjust the Ring Volume • Press the Up or Down Volume button while the handset is in its cradle and the phone is idle. Select the Ring Type To change the ringer sound: 1. Press the Settings button. 2. Press 2 for Ring Type, or use the Navigation button to scroll to Ring Type and press the Select soft key. 3. Use the Navigation button to scroll through the list of ring types. Press the Play soft key to hear samples. 4. Highlight the ring you want, and then press the Select soft key. 5. Press the Ok soft key to select your setting. 6. Press the Save soft key to save the setting, or press Cancel to exit to the previous menu without changing the setting. 7. Press the Exit soft key to go to the main directory menu. Adjust the Display Contrast To adjust the contrast in your LCD display: 1. Press the Settings button. 2. Press 1 for Contrast, or use the Select soft key. 3. Use the Down or Up soft key to change the contrast. 4. Press the Ok soft key 5. Press the Save or Exit soft key. 6. Press the Ok soft key to select your contrast setting. 7. Press the Save soft key to save the setting, or press Cancel to exit to the previous menu without changing the setting. 8. Press the Exit soft key to go to the main directory menu. Note 9 In the following procedures, you might need to enter information using the keypad. Press the backspace (<<) soft key to erase digits that you enter incorrectly. Forward Incoming Calls To forward any incoming call to the call-forward destination, for example voice mail, preset on the Cisco Unified IP phone: • Press the DnD soft key. Note If the call-forward destination is not set, pressing the DnD soft key disables the ringer. Park a Call (SCCP) Call park allows a user to place a call on hold at a designated parking slot from which the call can be retrieved by anyone on the system. Note Contact your system administrator for your call park slot number. To park a call: • Press the Park soft key. The Cisco Unified Communications Manager Express system automatically selects an available call park slot and displays the number on the Cisco Unified IP phone screen. To park a call to a specific call park slot: • Press the Transfer softkey followed by the call park slot number provided by your administrator. To retrieve a parked call: • If your phone receives a call park notification, press the PickUp soft key followed by the asterisk (*). • Press the PickUp soft key followed by the call park slot number. Park a Call (SIP) Call park allows a user to place a call on hold at a designated parking slot from which the call can be retrieved by anyone on the system. Note Contact your system administrator for your call park slot number. To park a call: • Press the Park soft key. The Cisco Unified Communications Manager Express system automatically selects an available call park slot and displays the number on the Cisco Unified IP phone screen. To retrieve a parked call: • Dial the park slot extension. To park a call to a directed call park slot: • Press the Transfer softkey followed by the call park slot number provided by your system administrator. To retrieve a call parked at a directed call park slot: • Dial the retrieval park-slot extension. Pick Up Calls To pick up a call that is on hold or a call that is ringing at another extension: 1. Press the PickUp soft key. 2. Dial the extension number of the Cisco Unified IP phone that you want to pick up. Control of the call is transferred to your phone. To selectively pick up a call ringing at a number that belongs to a pickup group: 10 • Press the GPickUp soft key. If only one pickup group is defined in the entire Cisco Unified Communications Manager Express system, control of the call is transferred to your phone. • If the ringing telephone and your phone are in the same pickup group, press the asterisk (*) to transfer control of the call to your phone. If the ringing telephone and your phone are in different pickup groups, dial the pickup group number where the phone is ringing to transfer control of the call to your phone. Whisper Intercom The Whisper Intercom feature allows the user to make an intercom call to a busy extension. The recipient can hear the caller or hear the whisper intercom, and the original caller on the receiving phone does not hear the whisper intercom. The phone receiving a whisper intercom displays the extension and name of the party initiating the whisper intercom and a zipzip tone is played before the called party hears the caller's voice. The receiving party must select the intercom line button on their phone to speak to the caller. Note For intercom users to know whether the intercom is using one-way or two-way audio, the lamp for both intercom buttons are colored amber for one-way whisper intercom and green for two-way audio. To place an intercom call: • Dial the intercom directory number from your intercom line. The intercom recipient hears the intercom caller audio without answering the call. To answer an intercom call: • Press the intercom button to talk to the intercom caller. To end a whisper intercom call: • Press Endcall. Place a Priority (Precedence) Call In some specialized environments, such as military or government offices, you might need to make and receive urgent or critical calls. If you have the need for this specialized call handling, your system administrator can add Multilevel Precedence and Preemption (MLPP) to your phone. Keep these terms in mind: • Precedence indicates the priority associated with a call. • Preemption is the process of ending an existing, lower priority call while accepting a higher priority call that is sent to your phone. Priority Level of an MLPP Call To see the priority level of an MLPP call, look for an MLPP icon on your phone screen: Priority call Medium priority (immediate) call High priority (flash) call Highest priority (flash override) or executive override call Higher priority calls are displayed at the top of your call list. If you do not see an MLPP icon, the priority level of the call is normal (routine). Note 11 Contact your system administrator for a list of corresponding precedence numbers for calls. To Make a Priority (Precedence) Call: Enter the MLPP access number (provided by your system administrator) followed by the precedence level (0-4) and the phone number. Note If you enter an invalid MLPP access number, a verbal announcement alerts you of the error. To Answer an MLPP Call: End an active call (if necessary) and answer the MLPP call. If the active call has lower precedence than the incoming call, the active call is preempted. Tips – When you are receiving a priority (precedence) call, an MLPP icon on your phone screen indicates the priority level of the call. – When you make or receive an MLPP-enabled call, you hear special ring tones and call-waiting tones different from the standard tones. – When you or the other party are receiving a call that must preempt the current call, disconnect immediately to allow the higher priority call to ring through. – When you have more than 1 active call, the call with the lowest precedence is preempted. Similarly, for outgoing calls, the call with lower precedence is preempted first. Call-Blocking (Toll Bar) Override Call blocking prevents unauthorized use of phones. It is implemented by matching a pattern of specified digits during a specified time of day and day of week or date. The call-blocking override feature allows individual phone users to override the predefined call blocking. Note Contact your system administrator for your personal identification number (PIN). To place calls when call-blocking is enabled: 1. Press the Login soft key on the Cisco Unified IP phone. 2. Enter the Personal Identification Number (PIN) that is associated with the phone. Transfer a Call To transfer a selected call to another number, you can use blind transfer or consultative transfer: Blind Transfer Immediately redirects the call without allowing you to speak to the transfer recipient (the person to whom you are transferring the call). To make a blind transfer call: 1. During a call, press the Trnsfer soft key. The call is placed on hold. 2. Dial the number to which you want to transfer the call. Consultative Transfer Redirects the call after first allowing you to speak to the transfer recipient. To make a consultative transfer: 1. During a call, press the Trnsfer soft key. The call is placed on hold. 12 2. Dial the number to which you want to transfer the call. 3. Wait for the call to be answered. Speak to the transfer recipient. Then press the Trnsfer button or hang up the handset. 4. If the transfer fails, press the Resume soft key to return to the original call. Transfer to Voice Mail 1. Press TrnsfVM. 2. Enter the recipient’s extension number and press TrnsfVM again. Cancel Transfer 1. To cancel your consultative call-transfer attempt: – Press the EndCall soft key. 2. To reconnect to the original caller: – Press the Resume soft key. Forward All Calls To forward all incoming calls to another number: 1. Press the CFwdALL soft key. You hear a confirmation beep. 2. Dial the number to which you want to forward all your calls. Dial the number exactly as if you were placing a call to that number. Remember to include locally required prefix numbers. The phone display is updated to show that calls will be forwarded. 3. Press the pound key (#) or the EndCall soft key. Note To forward calls to voice mail, manually enter the voice mail number, or use the CFwdALL soft key plus the Messages button, followed by the EndCall soft key. When call forward all is set, the display shows the Call Forward Icon. To forward calls to a speed-dial number, use the CFwdALL soft key plus a speed-dial button, followed by the EndCall soft key. To cancel call forwarding: • Press the CFwdALL soft key. Place and Establish a Conference Call To create a three-party conference call: 1. During a call, press the more soft key and then the Confrn soft key to open a new line and put the first party on hold. 2. Place a call to another number. 3. When the call connects, press Confrn again to add the new party to the call. To establish a conference call between two- and three-party calls to a Cisco Unified IP phone, one active and the other on hold: • Press the Confrn soft key on the Cisco Unified IP phone. To establish a conference call between second- and third-party calls already present on a Cisco Unified IP phone, using separate line buttons, one active and the other on hold: 1. Press the Confrn soft key on the Cisco Unified IP phone. 2. Press the Line button of the call you want to add to the conference. Note 13 Your system administrator must have configured the system for three-party or eight-party ad-hoc conferences. Place a MeetMe Conference Call To Place a MeetMe conference call: 1. Obtain a MeetMe conference number from your system administrator 2. Distribute the MeetMe conference number to all the participants. 3. Go offhook, press the MeetMe soft key, and dial the MeetMe conference number. All other participants join the meeting by dialing into the MeetMe conference number. 4. To end the MeetMe conference call, all participants must hang up the handset or press the EndCall soft key. End a Conference Call To end the conference call: • Hang up the handset, or press the EndCall soft key. Note Depending on configuration when the conference call initiator disconnects, the conference call terminates. Alternate Methods to End a Conference Call Call initiators can use one of the following methods (functionality will vary according to your system configuration): • To end the conference and remain connected to the most recent call, press the Confrn soft key. The older call is placed on hold. • To disconnect from the conference, hang up the handset. The other parties remain on the conference call. Live Record a Call Call initiators can use the LiveRcd soft key to record an active call, private line or conference call. To record a call: 1. Press the LiveRcd soft key. This puts the other party on-hold and initiates a call to the configured live record number. 2. Press the LiveRcd again to stop the recording. Join a Shared-Line Call (SCCP) User can join a call on a shared line using the cBarge softkey. To join the shared-line call: 1. Highlight the remote-in-use call that you want to join. 2. Press the more to navigate to cBarge and press cBarge. Join a Shared Line Call (SIP) User can join a non-private call on a shared line call by using either Barge or cBarge soft keys. • Barge allows you to add yourself to the call by hosting the conference on your phone but does not allow others to join the conference. • cBarge allows you to add yourself to the conference and allows others to join the conference. To join a shared line call: 1. Highlight the remote-in-use call that you want to join. 2. Press Barge or cBarge to join the call. Tips – When you Barge a call, other parties hear a beep announcing your presence. You are disconnected from a call that you have joined using Barge if the call is put on hold, transferred, or turned into a conference call by the Barge initiator. 14 – If a phone that is using the shared line has Privacy enabled, call information and Barge/cBarge soft keys do not appear on the other phones that share the line. Hold a Shared-Line Call (SIP) User can put calls on a shared line on hold like calls on a non shared line. To place a call on hold while on a shared-line call: • Highlight the call that you want to put on hold. • Press the Hold soft key. Resume a Shared Line Call (SIP) User can resume a non-private call placed on hold on a shared line call. To resume a shared line call: 1. Highlight the call that you want to resume. 2. Press Resume to resume the call. Tip – When a shared-line call is placed on hold, a flashing green shared line button notifies all the other phones with the shared-line directory number that the call can be resumed. Enable Privacy on Shared-Line (SIP) Users can prevent others from viewing, barging, or resuming a Shared-Line Call by enabling the privacy feature on the phone. To prevent other from viewing or barging calls: 1. Press the privacy line button 2. The private icon . next to an amber line button verifies that privacy is on. 3. Press the privacy button again to disable privacy. Tips – The privacy button is not displayed on the shared-line phone by default. Your system administrator must enable privacy button on a per phone basis. – Privacy is enabled by default for shared-lines. Your system administrator can change the default privacy setting globally or on a per phone basis. – Calls placed on hold with privacy enabled have privacy disabled by default. Your system administrator can change the default privacy on hold setting globally. Place a Call from Your Local Directory To access the local phone directory established by your system administrator: 1. Press the Directories button. 2. Press the Navigation Up or Down button or press 4 to select the Local Directory. 3. Press the Navigation Up or Down button to select the Last, First, or Number field search option. 4. Using the keypad, enter the last name or first name for the entry. When entering letters, select the appropriate number key of the letter you want, and press that key a number of times that equals the position of the target letter. For example, to enter a B, press the 2 key two times, and to enter a C, press the 2 key three times. Use the backspace (<<) soft key to make corrections when entering data. 5. Press the Search soft key to find your selection. 6. If your search results in multiple listings, use the Navigation Up or Down button to select the correct number. 15 7. Press the Dial soft key to dial the selected number. Program Personal Speed-Dial Buttons After a system administrator defines one or more speed-dial instances for a Cisco Unified IP phone, you can reprogram numbers that are not locked or program numbers into an instance that has an empty dial string: 1. Select an available phone line by lifting the handset, pressing the NewCall soft key, or pressing a line button. Listen for the dial tone. 2. Press the pound key (#). 3. Press the speed-dial button that you want to program. A short beep confirms that you are starting to program this button. 4. Enter the speed-dial number. The digits appear on the phone display. When you are entering speed-dial numbers, use the backspace (<<) soft key to erase digits that you enter incorrectly. To remove a speed-dial number without replacing it with a new one. 1. Press the pound key (#). 2. Press the same speed-dial button a second time to indicate that you are done entering the speed-dial digits and to store the new speed-dial number. 3. Hang up the handset, or press a new speed-dial button and repeat this procedure. Place a Call from Your System Speed-Dial Directory To place a call from your system speed-dial directory: 1. Select an available Cisco Unified IP phone line (off hook or NewCall) and get a dial tone. 2. Press the Directories button, or use the Navigation button to locate the Directory and then press the Select soft key. 3. Use the Navigation button to scroll through the options. Use the Select soft key to select speed-dial options. – Press 5 for the Local Speed Dial. – Press 6 for the Personal Speed Dial (functionality varies depending on your system configuration). 4. Use the Navigation button to scroll through the speed-dial phone list. 5. To dial the selected phone number, either press the Select soft key or enter the number on the keypad. 6. Press the Exit soft key to go to the directory menu. Switching an In-Progress Call to Another Phone Using SNR The Single Number Reach (SNR) feature allows you to switch an in-progress call on your desktop phone to your remote destination phone, such as a mobile phone. You can pick up an in-progress call on the desktop phone or remote destination phone without losing the call. All unanswered calls are forwarded to your voice mail. Note Your system administrator must configure this feature for your IP Phone. Contact your system administrator for more information. Switch an in-progress Call from Your Desktop Phone to Your Remote Destination Phone To switch an in-progress call on your desktop phone to your remote destination phone: 1. Press the Mobility soft key. 2. Select Send Call to Mobile Phone. 3. Answer the in-progress call on your remote destination phone. The desktop phone line button turns red and handset icons and the calling party number appear on the phone display. You cannot use same phone line for any other calls, but if your desk phone supports multiple lines, you can use another line to make or receive calls. 16 Switch an in-progress Call from a Remote Destination Phone to Your Desktop Phone 1. Press Resume on your desk phone and start talking on your desk phone. 2. Hang up the call on your remote phone to disconnect the phone. Change Your Remote Destination Phone Number You can replace the existing remote destination phone number with a new phone number. To change the existing remote destination phone number: 1. Press Services button and select My Phone Apps. 2. Select Single Number Reach. 3. Use << soft key to type your new remote destination phone number. Make sure you add the appropriate dialing prefix or access code (if applicable) to your remote destination number. 4. Press Submit. Enable or Disable Single Number Reach You can enable or disable Single Number Reach (SNR) on your phone by using the Mobility soft key. • To disable SNR, press Mobility soft key and select Disable Mobile Connect. • To enable SNR, press Mobility soft key and select Mobile Connect On. View Call History To view recent missed, received, or placed calls: 1. Press the Directories button. 2. Use the Navigation button to scroll and select the desired call list. Press the Select soft key, or: – Press 1 on the keypad for Missed Calls. – Press 2 on the keypad for Received Calls. – Press 3 on the keypad for Placed Calls. 3. Press the Exit soft key to return to the previous directory menu. Place a Call from Call History To place a call to a number in the call history list: 1. Use the Navigation button to scroll through the call history list. 2. Use the Select soft key to select a phone number. The digits appear on the phone display. 3. To dial the number as it appears on the phone display: – Press the Dial soft key. To edit the number on the phone display before dialing: 1. Press the EditDial soft key to place the cursor at the beginning of the number on the phone display. 2. Use the keypad to edit the digits as needed. Use the backspace (<<) soft key to erase digits that you enter incorrectly. 3. Press the Dial soft key to place the call. Clear Call History To clear all numbers in the directory histories: • Press the Clear soft key. Note 17 The Clear soft key clears all call history lists. Selective clearing of call history lists is not supported. Use the Intercom Feature Cisco Unified Communications Manager Express supports intercom functionality for one-way and press-to-answer voice connections using a dedicated pair of intercoms on two phones that speed-dial each other. To use the intercom feature: 1. Press the Speaker button and get the dial tone. 2. Press the speed dial key or dial the directory number to start the intercom call. Note The called Cisco Unified IP phone automatically answers the call in speakerphone mode with mute activated or deactivated depending on the configuration. The phone beeps to alert the recipient to the incoming call. To respond to an intercom call: • If the Mute key is lighted, Press the Mute button or lift the handset. • If the Mute key is not lighted, reply to caller handsfree. Activate Do Not Disturb (SCCP) For visual call alerting and information without audible ringing, use Do Not Disturb (DnD). Calls receive normal call-forward-busy and no-answer treatment. To activate the Do-Not-Disturb feature: 1. Press the more soft key to locate the DnD soft key. 2. Press the DnD soft key. A text message displays to indicate that the phone is in Do-Not-Disturb mode. Note Pressing the DnD soft key immediately forwards the call to the call-forward destination set on the phone. If the call-forward destination is not set, pressing the DnD soft key disables the ringer. To deactivate the Do-Not-Disturb feature, repeat Steps 1 and 2. Activate Do Not Disturb (SIP) For visual call alerting and information without audible ringing, use Do Not Disturb (DnD). Calls receive normal call-forward-busy and no-answer treatment. To activate the Do-Not-Disturb feature: 1. Press the more soft key to locate the DnD soft key. 2. Press the DnD soft key. A text message displays to indicate that the phone is in Do-Not-Disturb mode. To deactivate the Do-Not-Disturb feature, repeat Steps 1 and 2 in idle state. Place a Call Using Your Cisco Extension Mobility Profile Cisco Extension Mobility (EM) allows the user to temporarily configure a Cisco Unified IP phone to function as user’s own phone. After the user is logged-in to Cisco EM, the phone adopts the user’s profile, including the line buttons, features, and established services. To log-in to Cisco Extension Mobility: 1. Press Services button and select Extension Mobility. 2. Enter your user ID and password. 3. Press Submit. The phone temporarily configures your profile and settings. Note 18 Your system administrator must configure Cisco Extension Mobility for you. Place a Call from Your Personal Speed-Dial To place a call from your Personal Speed-Dial using My Phone Apps: 1. Log-in to Extension Mobility. 2. Select My Phone Apps and scroll down to Personal Speed Dial. 3. Select Personal Speed Dial. 4. Add a Label and Number. 5. Go back to My Phone Apps and press Reset Phone. You Personal Speed-Dial number appears on the phone display screen. 19 3 Phone Features Index This section provides an alphabetical list of features for your Cisco Unified IP phone. Features supported in both SIP and SCCP protocols are marked as “Supported” and features not supported in either one of the protocols are marked as “Not Supported”. However, there are differences in how the feature works based on the call protocol. Table 1 Features (with page number references) Supported in SIP and SCCP Protocols. Features SIP SCCP Activate Do Not Disturb 14 Supported Supported Adjust the Display Contrast 9 Supported Supported Adjust the Ring Volume 9 Supported Supported Adjust the Volume for the Current Call 8 Supported Supported Answer a Call 7 Supported Supported Call-Blocking (Toll Bar) Override 10 Not Supported Supported Clear Call History 13 Supported Supported Divert Incoming Calls 9 Supported Supported Enable Privacy on Shared-Line (for SIP) 15 Supported Not Supported End a Call 7 Supported Supported End a Conference Call 11 Supported Supported Forward All Calls 10 Supported Supported Hold a Call 7 Supported Supported Hold a Shared-Line Call (for SIP) 15 Supported Not Supported Join a Shared-Line Call 12 Not Supported Supported Live Record a Call 12 Not Supported Supported Manage Call Waiting 8 Supported Supported Mute a Call 8 Supported Supported Park a Call 9 Not Supported Supported Pick Up Calls (for SIP and SCCP) 10 Not Supported Supported Place a Call 7 Supported Supported Place a Call from Call History 13 Supported Supported Place a Call from Your Local Directory 12 Supported Supported Place a Call from Your Personal Speed-Dial 15 Not Supported Supported Place a Call from Your System Speed-Dial Directory 12 Supported Place a Call Using Your Extension Mobility (EM) Profile 14 Not Supported Supported Place a MeetMe Conference Call 11 Not Supported Supported Place a Priority (precedence) Call 11 Supported Supported Place and Establish a Conference Call 11 Supported Supported Program Personal Speed-Dial Buttons 12 Not Supported Supported Redial a Number 7 Supported Supported Resume a Shared Line Call (for SIP) 15 Supported Not Supported Retrieve Voice Messages 8 Supported Supported Select the Ring Type 9 Supported Supported Switching an In-Progress Call to Another Phone Using SNR 16 Not Supported Supported Supported 20 Table 1 Features (with page number references) Supported in SIP and SCCP Protocols. Features SIP SCCP Transfer a Call 10 Supported Supported Transfer to Voice Mail 10 Not Supported Supported Use the Intercom Feature 13 Supported Supported View Call History 13 Supported Supported Whisper Intercom 11 Not Supported Supported 21 Americas Headquarters Cisco Systems, Inc. 170 West Tasman Drive San Jose, CA 95134-1706 USA www.cisco.com Tel: 408 526-4000 800 553-NETS (6387) Fax: 408 527-0883 Asia Pacific Headquarters Cisco Systems, Inc. 168 Robinson Road #28-01 Capital Tower Singapore 068912 www.cisco.com Tel: +65 6317 7777 Fax: +65 6317 7799 Europe Headquarters Cisco Systems International BV Haarlerbergpark Haarlerbergweg 13-19 1101 CH Amsterdam The Netherlands www-europe.cisco.com Tel: 31 0 800 020 0791 Fax: 31 0 20 357 1100 Cisco has more than 200 offices worldwide. Addresses, phone numbers, and fax numbers are listed on the Cisco Website at www.cisco.com/go/offices. Cisco, Cisco Systems, the Cisco logo, and the Cisco Systems logo are registered trademarks or trademarks of Cisco Systems, Inc. and/or its affiliates in the United States and certain other countries. All other trademarks mentioned in this document or Website are the property of their respective owners. The use of the word partner does not imply a partnership relationship between Cisco and any other company. (0705R) © 2009 Cisco Systems, Inc. All rights reserved. OL-16771-01 Marywood University Cisco 7962 Phone Instructions Page 1 of 4 Summer 2012 Version 1 1. General Phone Settings Setup – e.g. Greeting, Voicemail, Personal Settings, etc. a. Select the Messages button on the phone or dial 8444 b. Enter 12345 as the pre-assigned temporary password (press # to confirm) c. Follow operator instructions (remember to select # to confirm) 2. The Cisco voice will instruct you to Record your name to identify you to other callers a. To record your name, in a pleasant voice, say your first and last name, or your professional name after the tone b. When finished saying your name, IMMEDIATELY press the # key c. To keep the recorded name, press the # again 3. To Change Password a. Select the messages icon b. Enter 12345 as the pre-assigned temporary password (press # to confirm) c. Press 4 for Setup Options d. Press 3 for Personal Settings e. Press1 to Change Password f. Enter new password (press #) g. Enter new password (press #) 4. Recording Your Greetings Must be set up in the general phone settings MUST set up the STANDARD Greeting a. Standard – School Hours Greeting “You have reached Sharon Jones’ voicemail. I am currently away from my desk. Please leave a message.” b. Closed – Message to be set up for after school hours c. Alternate – Overrides Standard and Closed greetings Message can be set up for when you are on vacation 5. Checking Voice Mail from your own desk phone a. Select the Messages Button or dial 8444 b. Enter Your Password c. Follow Operator Options – e.g. To hear new messages press 1 d. To skip to next message without finishing current message enter # key e. To speed up a message playback hit 6 repeatedly… to slow down hit 4 f. Hit the 8 key to pause & resume message playback g. To delete messages enter a 3 h. To save for later enter a 2 i. To reply to a voicemail from a Cisco phone, enter a 4 j. To forward a copy of the message enter a 5 – to switch from alpha directory to numeric enter # # NOTE: To check voicemail on the old phone system, dial 4777 and follow the prompts Marywood University Cisco Phone Quick Help P a g e |1 Marywood University Cisco 7962 Phone Instructions Page 2 of 4 Summer 2012 Version 1 6. Checking Voice Mail from Another Extension other than your own a. b. c. d. e. f. Select the Messages Button or dial 8444 Select the asterisk * key You are prompted to enter your id # (which is your extension e.g. x4304) Select the pound # key to confirm After the prompt, enter your password, select the pound # key to confirm Follow Operator Options – e.g. To hear new messages press 1 7. Checking Voice Mail from Outside Line a. Dial main phone # (570-963-8444), enter your extension, wait until you hear the message b. Select the asterisk * key c. You are prompted to enter your id # (which is your school extension e.g. x4304) d. Select the pound # key to confirm e. You are prompted to enter your password, select the pound # key to confirm f. Follow Operator Options – e.g. To hear new messages press 1, etc. NOTE: To check voicemail on the old phone system, dial 570-961-4777 and follow the prompts 8. Call Forwarding – All Calls To Your Voice Mail or another extension a. Select the CFwdAll or FwdAll softkey button b. Listen for 2 beeps c. Press messages button, or another extension number, then hear confirming tone d. The phone will automatically hang up e. Confirm completion of forwarding by looking at animated icon in upper right corner next to your extension number f. To Remove Call Forwarding – hit the CFwdAll or Fwd Off softkey buttons g. The phone will automatically hang up h. Note: You can’t forward or un-forward your phone from another location 9. Call Transfer – To Another Extension a. While the call is active… Select the Transfer softkey button b. Dial the extension # you want to transfer the call to c. For a warm hand-off Wait for answer Tell the recipient who is calling (they’re on hold) d. Select the Transfer softkey button again and hang up your phone e. The call is now connected If the recipient does not want to speak to the caller, you must select the EndCall softkey button (which ends Transfer sequence) the select the Resume softkey button (to resume the call) and handle the call. 10. Call Transfer – To Another Extension’s Voicemail a. While the call is active… Select the Transfer softkey button b. Dial the * key, then the extension to receive the call, then the Transfer softkey button c. The call will then go to their voicemail Marywood University Cisco Phone Quick Help P a g e |2 Marywood University Cisco 7962 Phone Instructions Page 3 of 4 Summer 2012 Version 1 11. Transferring Voice Mail Message from your voicemail to another user a. Listen to voice mail message b. Press 5 to Forward c. By default the system wants you to spell the user you want to forward the message to >>>Press ## to switch to extension numbers, if desired d. Enter the extension of the user you want to forward the message e. After forwarding you can save or delete your copy of the call 12. Conference Call – To Another Person or persons a. While the call is active… Select More then the Confrn softkey button b. Dial the extension # you want to transfer the call to c. Select the Confrn softkey button again…. He is now conferenced in to the call d. Repeat to add another person (up to 16 total participants). Outside numbers like cell phones may be conferenced in, too! e. Anyone, even the originator, can hang up and the rest stay connected f. If you’re not talking, use your local mute button to keep extra noise under control 13. Missed and Placed Calls a. Select the directories button b. Select the number that is highlighted on the display screen by either selecting the number keypad or hitting the word Select c. You now have the option to dial a missed call by scrolling through your calls with your arrow keys and then selecting the Dial button 14. Corporate Directory a. Select the directories button b. Select either 6 on the number keypad or scroll with arrows until 6 is highlighted and then hit the Select button c. Search Fields shows by First Name, Last or by Number d. To search by first name, select the number keypad that has the alpha letters of the person’s name e.g. S H E R R I 7 43 774 (For the letter S, the number 7 would be selected 4 times) (For the letter H, the number 4 would be selected 2 times) 15. Placing a Call Directly into Users Voice Mail – their phone won’t ring a. Select the asterisk key and then the extension b. Record the message - their extension won’t ring 16. Placing an Outside Call with a 570 prefix (that is not considered long distance) a. Dial 9 570 and the remaining 7 digits 17. Placing an Outside Call with a 570 prefix (that is considered long distance) a. Dial 9 1 plus the 10 digit number Marywood University Cisco Phone Quick Help P a g e |3 Marywood University Cisco 7962 Phone Instructions Page 4 of 4 Summer 2012 Version 1 18. Making Long Distance Calls a. Dial the long distance number (Dial “9” for an outside line, dial “1” and the number) b. If prompted to enter a PIN, follow the on-screen instructions 19. Meet Me Conference – up to 16 Marywood University phones can be conferenced together a. One person must act as the host – I. Contact your participants somehow, and notify them of the date & time & MeetMe conference number you’ll be using, currently _______________________________________ II. To have the conference, Pick up handset, select more softkey button, then MeetMe softkey button, hear 2 beeps, then dial the MeetMe conference number you’re using III. A MeetMe conference continues even if the conference controller hangs up Marywood University Cisco Phone Quick Help P a g e |4