1
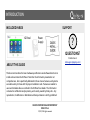
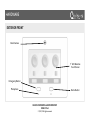
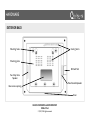
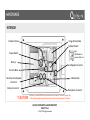
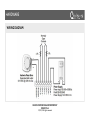
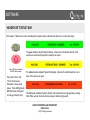
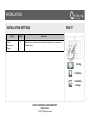
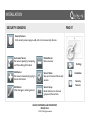
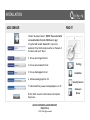
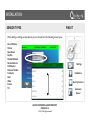
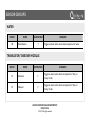
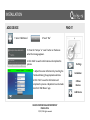
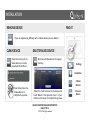
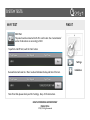
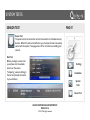
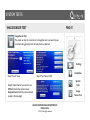
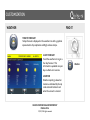
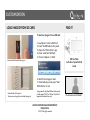
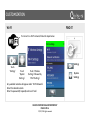
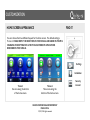
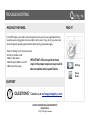
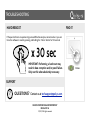
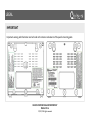
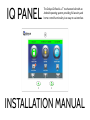
IQ PANEL
The Qolsys IQ Panel is a 7” touchscreen built with an
Android operating system, providing full security and
home control functionality in an easy to use interface.
INSTALLATION MANUAL
INTRODUCTION
INCLUDED IN BOX
SUPPORT
IQ Panel
Power
Supply
?
QUESTIONS?
Contact us at
[email protected]
ABOUT THIS GUIDE
This document outlines the basic hardware specifications and software directions to
install and customize the IQ Panel. Note that the information presented is not
comprehensive, but is specifically dedicated to those menus, features, and systems
accessible solely to those with the proper installation code. Features accessible to
users and installers alike are outlined in the IQ Panel User Guide. The information
contained is confidential and proprietary, and is solely owned by Qolsys Inc. Any
reproduction, modification or distribution without permission is strictly prohibited.
QOLSYS CONFIDENTIAL AND PROPRIETARY
PAGE 2 OF 64
© 11/4/13 All rights reserved
TABLE OF CONTENTS
CONTENTS
HARDWARE
5- Exterior Front
6- Exterior Back
7- Interior
8- Wiring Diagram
9- Installing the Back Plate
10- Connecting Power
11- Mounting the Hardware
!
SOFTWARE
13- Home Screen Overview
14- Header or “Status” Bar
15- Footer
16- Settings
17- Settings Menu
!
!
!
INSTALLATION
19- Installation
20- Installation Settings
22- Security Account
25- Security Sensors
26- AutoLearn Sensor
27- Add Sensor
28- Sensor Types
29- Sensor Groups
35- Z-Wave Sensors
36- Add Z-Wave Device
37- Remove Device
43- Image Sensor Test
44- Z-Wave Test
SYSTEM TESTS
39- System Tests
40- Wi-Fi Test
41- Sensor Test
42- Phone Test
!
!
QOLSYS CONFIDENTIAL AND PROPRIETARY
PAGE 3 OF 64
© 11/4/13 All rights reserved
!
CUSTOMIZATION
46- Changing Date and Time
47- Weather
48- Photo Frame Screensaver
49- Load Images from SD Card
50- Sound
51- Custom Names
52- Edit Chimes
53- Wi-Fi
54- User Management
55- Home Screen Appearance
TROUBLESHOOTING
57- Various issues
INSTALLATION
HARDWARE
HARDWARE
EXTERIOR FRONT
Panel Camera
7” LCD Resistive
Touch Screen
Emergency Button
Microphone
Home Button
QOLSYS CONFIDENTIAL AND PROPRIETARY
PAGE 5 OF 64
© 11/4/13 All rights reserved
HARDWARE
EXTERIOR BACK
Mounting holes
Cooling Vents
Mounting plate
SD Card Slot
Two-Way Voice
Speaker
Panel Sounds Speaker
Rear access opening
Siren
QOLSYS CONFIDENTIAL AND PROPRIETARY
PAGE 6 OF 64
© 11/4/13 All rights reserved
HARDWARE
INTERIOR
Image Sensor Radio
Cellular Antenna
Cellular Module
Note:
GSM Models will
contain a SIM card
Tamper Switch
Battery*
Panel Speaker Connector
Terminal Block
Z-Wave Radio
Two-Way Voice Speaker
Connector
Battery Connector*
*CAUTION
Microphone Connector
The battery should NEVER be disconnected from the panel. Failure to comply may
result in data corruption, panel failure, and a void of the manufacturer's warranty
QOLSYS CONFIDENTIAL AND PROPRIETARY
PAGE 7 OF 64
© 11/4/13 All rights reserved
HARDWARE
WIRING DIAGRAM
QOLSYS CONFIDENTIAL AND PROPRIETARY
PAGE 8 OF 64
© 11/4/13 All rights reserved
HARDWARE
INSTALLING THE BACK PLATE
Remove the retainer screw
and place in a safe location
Remove the back plate
from the panel by pulling
downward from the top
Secure one corner of the
plate in the desired
location, be sure to
position rear access
opening over the location
of your wires
QOLSYS CONFIDENTIAL AND PROPRIETARY
PAGE 9 OF 64
© 11/4/13 All rights reserved
Ensure the plate is level
and secure to wall with
mounting hardware (not
provided)
HARDWARE
POWERING THE PANEL
Hang the panel’s
suspension strap on the
hook mounted to the back
plate.
Connect wires from power
supply to terminal block.
Red- DCIN +
Black- DCIN-
Connect wires to Power
Supply terminals.
Red- Positive
Black- Negative
Insert plug into receptacle
and secure with provided
hardware.
IMPORTANT: Reversing
polarity on these wires
may cause damage to
the IQ Panel.
CONNECT TO A
RECEPTACLE
CONTROLLED BY A
SWITCH OR HIGH
VOLTAGE.
!
QOLSYS CONFIDENTIAL AND PROPRIETARY
PAGE 10 OF 64
© 11/4/13 All rights reserved
!WARNING: DO NOT
HARDWARE
MOUNTING THE HARDWARE
Once connected to
primary power, panel
should power up within
30-45 seconds
Plug in battery connector
Seat bottom of panel onto
back plate and tilt upward
until it snaps in place.
CAUTION: Once connected, DO NOT unplug
the battery. Disconnecting the battery may
result in data corruption or panel failure and a
void of the manufacturer warranty.
QOLSYS CONFIDENTIAL AND PROPRIETARY
PAGE 11 OF 64
© 11/4/13 All rights reserved
Replace retainer screw and
tighten
INSTALLATION
SOFTWARE
SOFTWARE
HOME SCREEN OVERVIEW
FIND IT
The home screen is divided into three sections. The header shows date, and time and is
color coded to show current status. The Primary User Interface contains the panel apps,
and the footer holds settings, help, and the dealer contact portal.
Header or
“Status” Bar
Home
Primary
User
Interface
Footer or
“Help” Bar
QOLSYS CONFIDENTIAL AND PROPRIETARY
PAGE 13 OF 64
© 11/4/13 All rights reserved
SOFTWARE
HEADER OR “STATUS” BAR
The header or “Status” bar is color coded based on system status, and shows the date, time, and current status.
The green header is labeled “System Ready – Disarmed” and indicates that all of the
sensors are closed and the system is ready to be armed.
Green LED when disarmed
Red LED when armed
The panel’s “Panic” and
“Home” buttons also
illuminate to show panel
status. These LED lights will
NOT illuminate if the panel
is running on battery only
The yellow header is labeled “System Not Ready – Disarmed” and indicates that one or
more of the sensors are open.
Feb 26, 2013
SYSTEM ARMED- AWAY MODE
Tue - 03:12 PM
The red header is labeled “System Armed” and indicates the arming type (Stay or Away)
Note: When armed, the home button and panic button will glow red.
QOLSYS CONFIDENTIAL AND PROPRIETARY
PAGE 14 OF 64
© 11/4/13 All rights reserved
SOFTWARE
FOOTER
The footer bar contains the Settings App, Help and Dealer portal
Settings
Access panel installation and customization options. This area requires a valid Installer or Master
code and provides varied access by user permission level.
Help
Access video tutorials, FAQs, and URLs for other documentation.
Contact Us
Access security provider contact information including phone numbers, website and e-mail address
for support and service.
QOLSYS CONFIDENTIAL AND PROPRIETARY
PAGE 15 OF 64
© 11/4/13 All rights reserved
SOFTWARE
SETTINGS
FIND IT
To access Settings you must enter a code, however only the
installer code has access to installation options. The Master Code
does NOT have access to the installation menu.
Default Installer Code
Default Master Code
Access to all
functions to install
and customize the
panel and
peripherals
Access to limited
functions, including
editing sensor
names, user
management, and
connecting to Wi-Fi
11 11 1 2 34
QOLSYS CONFIDENTIAL AND PROPRIETARY
PAGE 16 OF 64
© 11/4/13 All rights reserved
Settings
SOFTWARE
SETTINGS MENU
FIND IT
Settings
QOLSYS CONFIDENTIAL AND PROPRIETARY
PAGE 17 OF 64
© 11/4/13 All rights reserved
INSTALLATION
INSTALLATION
INSTALLATION
INSTALLATION
FIND IT
Settings
Installation
QOLSYS CONFIDENTIAL AND PROPRIETARY
PAGE 19 OF 64
© 11/4/13 All rights reserved
INSTALLATION
INSTALLATION SETTINGS
Setting
Default
FIND IT
Description
Installer Code
1111
Set name and code to access installer-level settings
Master Code
1234
Set name and code to access primary end user-level settings
Duress Code
0000
Set name and code to trigger silent alarm
Entry/Exit Delay
30/60
Entry delay indicates how much time users have to enter their code after
opening a door programmed as an Entry/Exit delay door. You can edit this to
be any value from 30 to 240 (must disable SIA Limits to reduce delays below
defaults)
Exit delay indicates how much time you have to open and close a door
programmed as an Entry/Exit delay door before the panel arms. You can edit
this to be any value from 45 to 255
Temperature
Languages
F
English
Select whether weather app displays in Fahrenheit or Celsius
Change the panel user interface into one of several different languages.
NOTE: Installation menu will ALSO be changed.
QOLSYS CONFIDENTIAL AND PROPRIETARY
PAGE 20 OF 64
© 11/4/13 All rights reserved
Settings
Installation
Installation
Settings
INSTALLATION
INSTALLATION SETTINGS
Setting
Loss of
Supervisory
Signals
Default
4
FIND IT
Description
Panel will wait a certain amount of time before reporting a non-responsive
sensor or device
Settings
Installation
Installation
Settings
QOLSYS CONFIDENTIAL AND PROPRIETARY
PAGE 21 OF 64
© 11/4/13 All rights reserved
INSTALLATION
SECURITY ACCOUNT
Setting
Account Number
Power Management
Power Management Sleep
Timeout
SIA Power Restoration
Installer Code
Default
blank
FIND IT
Description
Security provider account number (up to 10 characters)
Enabled
Energy-saving functionality when running on battery power only
1
Panel initiates power management mode a specified number of
minutes after last touch
Disabled
1111
Turn on or off sensor hold for 60 seconds during power
restoration
Code to access installer options in settings
Duress Authentication
Disabled
Toggle whether or not to allow duress codes
Secure Camera
Enabled
Require user code to access camera app
Secure Arming
Disabled
Require code for arming panel
No Arm Low Battery
Disabled
Will not allow panel to arm if battery is low
QOLSYS CONFIDENTIAL AND PROPRIETARY
PAGE 22 OF 64
© 11/4/13 All rights reserved
Settings
Installation
Security
Account
INSTALLATION
SECURITY ACCOUNT
Setting
FIND IT
Default
Description
Auto Bypass
Enabled
Toggle whether or not to bypass open sensors automatically
Auto Stay
Enabled
If panel is armed “Away” but a delay door is not opened, the panel
assumes you are still home and changes arming to “Stay” mode
Arm Stay No Delay:
Enabled
Arm stay immediately with no countdown timer
Auto Exit Time Extension
Enabled
Automatically extend countdown timer if delay door is opened
during countdown process a second time
Keyfob No Delay
Disabled
Turn off entry and exit delays if keyfob is used to arm system
Siren Timeout
4 min
Determine how long before siren stops sounding during an alarm
event (4 minutes to 8 minutes)
Disable Siren
Enabled
Turn piezo siren on or off
Loss of Supervisory Signals
Enabled
Select how long to wait before indicating in the “Status” app that a
device is non-responsive. (4 , 12, or 24 hours)
QOLSYS CONFIDENTIAL AND PROPRIETARY
PAGE 23 OF 64
© 11/4/13 All rights reserved
Settings
Installation
Security
Account
INSTALLATION
SECURITY ACCOUNT
Setting
Default
FIND IT
Description
SIA Limits
Enabled
Dial Delay
:30
Amount of time (in seconds) before panel will attempt call to
central station after an alarm event is triggered
F
Select whether weather app displays in Fahrenheit or Celsius
English
Change the panel user interface into one of several different
languages. NOTE: Installation menu will ALSO be changed.
Temperature
Languages
Toggle on to override panel settings with SIA limits for entry, exit,
and dialer delay times.
SIA Limits are as follows:
Entry Delay 030 to 240 seconds Exit Delay 045 to 254 seconds Dialer Delay 015 to 045 seconds
Home Screen
Theme 2
Optional layout(s) for home screen. NOTICE: Instructions in this
document are based on Theme 2. Locations of apps may be
different from optional themes.
Z-Wave
Disabled
Activate Z-Wave radio to allow Z-Wave devices to be paired with
panel
QOLSYS CONFIDENTIAL AND PROPRIETARY
PAGE 24 OF 64
© 11/4/13 All rights reserved
Settings
Installation
Security
Account
INSTALLATION
SECURITY SENSORS
FIND IT
Security Sensors
In the security sensor app you add, edit, or remove security devices.
Auto Learn Sensor
Pair sensors quickly by tampering
and then editing information
Delete Sensor
Remove sensor
Add Sensor
Pair sensors manually by typing in
device information
Sensor Status
See current status of all security
sensors
Edit Sensor
Make changes to existing sensors
Sensor Group
Quick reference to all sensor
groups and their actions
QOLSYS CONFIDENTIAL AND PROPRIETARY
PAGE 25 OF 64
© 11/4/13 All rights reserved
Settings
Installation
Security
Sensors
INSTALLATION
AUTO LEARN SENSOR
FIND IT
1. Select “Auto Learn Sensor”
2. Look for message at bottom of screen above footer.
“Press Tamper or trip the sensor. Image Sensor learning
times out in 4 mins.”
3. Tamper sensor
Settings
4. Click “OK” when you hear the panel chime
5. Adjust the sensor information by touching the fields and
making the appropriate selections. (NOTE: These same fields
can be edited later from the “Edit Sensor” app)
6. Click “Add” to save the information and complete the
process. Adjustments can be made later from “Edit Sensor”
app
QOLSYS CONFIDENTIAL AND PROPRIETARY
PAGE 26 OF 64
© 11/4/13 All rights reserved
Installation
Security Sensors
Auto Learn
Sensor
INSTALLATION
ADD SENSOR
FIND IT
1. Select “AutoLearn Sensor” (NOTE: These same fields
can be edited later from the “Edit Sensor” app)
2. Tap the field marked “Sensor ID” to open the
keyboard. Enter the DL number written on the back of
the device and touch “Done”
3. Choose sensor type from list
4. Choose sensor name from list
5. Choose chime type from list
6. Indicate sensor group from list
7. Indicate whether you want voice prompts on or off
8. Click “Add” to save the information and complete
the process.
QOLSYS CONFIDENTIAL AND PROPRIETARY
PAGE 27 OF 64
© 11/4/13 All rights reserved
Settings
Installation
Security Sensors
AutoLearn
Sensor
INSTALLATION
SENSOR TYPES
FIND IT
When adding or editing security devices you can choose from the following sensor types:
!
Door/Window
Motion
Glass Break
KeyFob
Medical Pendant
Smoke Detector
CO Detector
Takeover Module
Translator
Heat
Water
Freeze
Tilt
Settings
Installation
Security Sensors
AutoLearn
Sensor
QOLSYS CONFIDENTIAL AND PROPRIETARY
PAGE 28 OF 64
© 11/4/13 All rights reserved
SENSOR GROUPS
DOOR/WINDOW
GROUP
NAME
SUPERVISED
SCENARIO
10
Entry/Exit Delay
Y
Allows you to exit during countdown after selecting arming type and
when opened starts countdown before triggering alarm
13
Instant Perimeter
Y
Door or window that triggers alarm instantly when system is armed
14
Instant Interior
Door
Y
Interior door that triggers alarm instantly when system is armed
25
Local Safety Sensor
Y
Regardless of arming state, this device triggers a chime if it is opened
(non-reporting to central station) Great for medicine cabinets, pool
gates, chemical storage, etc.
8
Reporting Safety
Sensor
Y
Regardless of arming state, this device triggers a chime or an alarm if
it is opened. Intended for gun safes, valuables safe, etc.
QOLSYS CONFIDENTIAL AND PROPRIETARY
PAGE 29 OF 64
© 11/4/13 All rights reserved
SENSOR GROUPS
MOTION/IMAGE SENSOR
GROUP
NAME
SUPERVISED
SCENARIO
17
Away- Instant Motion
Y
Used when armed in “Away”mode to trigger the alarm
immediately when motion is detected
15
Stay- Instant Motion
Y
Used when armed in “Stay”mode to trigger the alarm
immediately when motion is detected
35
Stay- Delay Motion
Y
Used when armed in “Stay”mode to trigger a countdown when
motion is detected
20
Away- Delay Motion
Y
Used when armed in “Away”mode to trigger a countdown when
motion is detected
25
Safety Motion
Y
Triggers a local alarm if motion is detected regardless of arming
state (non-reporting to central station)
QOLSYS CONFIDENTIAL AND PROPRIETARY
PAGE 30 OF 64
© 11/4/13 All rights reserved
SENSOR GROUPS
GLASS
GROUP
NAME
SUPERVISED
SCENARIO
13
Glass Break
Y
Arms IQ Glass in both “Stay” and “Away” mode
17
Glass Break Away Only
Y
Arms IQ Glass in “Away” mode only
GROUP
NAME
TILT
SUPERVISED
SCENARIO
12
Garage Tilt
Y
Will trigger alarm if the garage is opened and system is
armed (according to delays set inside settings).
25
Garage Tilt- Safety Tilt
Y
Panel will chime or trigger a local alarm if the garage is
opened, regardless of arming state (non-reporting)
QOLSYS CONFIDENTIAL AND PROPRIETARY
PAGE 31 OF 64
© 11/4/13 All rights reserved
SENSOR GROUPS
KEY FOB/MEDICAL PENDANT
GROUP
NAME
SUPERVISED
SCENARIO
1
Mobile Intrusion
N
Worn or carried, the device is programmed to trigger a police panic
0
Fixed Intrusion
Y
Installed in a fixed location such us under a desk, the device is
programmed to trigger a police panic
2
Fixed Silent
Y
Installed in a fixed location such us under a desk, the device is
programmed to trigger a silent police panic
6
Mobile Medical
N
Worn as a wrist watch or pendant, the device is programmed to trigger a
medical panic
4
Fixed Medical
Y
Installed in a fixed location such us under a desk, the device is
programmed to trigger a medical panic
QOLSYS CONFIDENTIAL AND PROPRIETARY
PAGE 32 OF 64
© 11/4/13 All rights reserved
SENSOR GROUPS
SMOKE DETECTOR/HEAT
GROUP
26
NAME
Smoke-Heat
SUPERVISED
Y
SCENARIO
Triggers an alarm when detects smoke/rapid rise in heat.
CO DETECTOR
GROUP
34
NAME
CO
SUPERVISED
Y
SCENARIO
Triggers an alarm when device detects Carbon Monoxide.
FREEZE
GROUP
29
NAME
Freeze
SUPERVISED
Y
SCENARIO
Triggers an alarm when detects low temperatures
QOLSYS CONFIDENTIAL AND PROPRIETARY
PAGE 33 OF 64
© 11/4/13 All rights reserved
SENSOR GROUPS
WATER
GROUP
38
NAME
Water Sensor
SUPERVISED
Y
SCENARIO
Triggers an alarm when sensor detects presence of water
TRANSLATOR/TAKEOVER MODULE
GROUP
NAME
SUPERVISED
SCENARIO
13
Translator
Y
Triggers an alarm when device is tampered in “Stay” or
“Away” mode
13
Takeover
Y
Triggers an alarm when device is tampered in “Stay” or
“Away” mode
QOLSYS CONFIDENTIAL AND PROPRIETARY
PAGE 34 OF 64
© 11/4/13 All rights reserved
INSTALLATION
Z-WAVE DEVICES
FIND IT
Z-Wave Devices
In the Z-Wave device app you add, edit, or remove Z-Wave devices.
Delete Failed Device
Remove a Z-Wave device from
your panel’s memory (does not
Add Device
Pair new devices
require you to have the device)
Edit Device
Make changes to existing devices
Remove All Devices
Delete all Z-Wave devices from
system memory
Remove Device
Clear a Z-Wave device’s
memory (Requires you touch the
Rediscover Network
Reconnect to each device by
reestablishing the Z-Wave mesh
network.
“Pair” button on the device)
QOLSYS CONFIDENTIAL AND PROPRIETARY
PAGE 35 OF 64
© 11/4/13 All rights reserved
Settings
Installation
Z-Wave
Devices
INSTALLATION
ADD DEVICE
FIND IT
1. Select “Add Device”
2. Touch “Pair”
3. Press the “Tamper” or “Learn” button on the device
when the message appears.
4. Click “Add” to save the information and complete the
process.
Settings
5. Adjust the sensor information by touching the
fields and making the appropriate selections.
Installation
6. Click “Pair” to save the information and
complete the process. Adjustments can be made
later from “Edit Device” app
Z-Wave
Devices
Add Device
QOLSYS CONFIDENTIAL AND PROPRIETARY
PAGE 36 OF 64
© 11/4/13 All rights reserved
INSTALLATION
REMOVE DEVICE
FIND IT
If you are experiencing difficulty with a Z-Wave device you can delete it.
CLEAR DEVICE
Clears the memory of a ZWave device so it can be
paired with the IQ Panel.
DELETE FAILED DEVICE
Removes a Z-Wave device from panel
memory.
Settings
Installation
Press the button on the
Z-Wave device to
complete the process.
Z-Wave
Devices
Select the check mark next to the device and
touch “Delete.” Then press the “learn” or “pair”
button on the device to complete the process.
QOLSYS CONFIDENTIAL AND PROPRIETARY
PAGE 37 OF 64
© 11/4/13 All rights reserved
Remove
Device
CUSTOMIZATION
SYSTEM TESTS
SYSTEM TESTS
SYSTEM TESTS
FIND IT
System Tests
There are several tests you can run to ensure the system is operating properly.
Wi-Fi Test
Test the panel’s connection to
the wireless (Wi-Fi) network
Settings
Sensor Test
Test the panel’s communication
with individual security sensors
Image Sensor Test
Test the panel’s connection to
Image Sensors
Cellular Test
Test the panel’s connection to
the cellular network
Z-Wave Test
Test the panel’s
communication with
individual Z-Wave devices
QOLSYS CONFIDENTIAL AND PROPRIETARY
PAGE 39 OF 64
© 11/4/13 All rights reserved
Installation
System
Tests
SYSTEM TESTS
WI-FI TEST
FIND IT
Wi-Fi Test
The panel must be connected to Wi-Fi to run this test. See “customization”
section for directions on connecting to Wi-Fi.
To perform a Wi-Fi Test, touch the “Run” button.
Settings
Successful test will result in a “Pass” result and indicates the day and time of the test.
Note: If test fails, please check your Wi-Fi settings. See p. 52 for instructions.
QOLSYS CONFIDENTIAL AND PROPRIETARY
PAGE 40 OF 64
© 11/4/13 All rights reserved
Installation
SYSTEM TESTS
SENSOR TEST
FIND IT
Sensor Test
The panel can test its connection and communication to individual security
devices. Before this test can be effective, you must pair at least one security
sensor with the system. See pages 26 or 27 for instructions on adding new
sensors.
Start Test
Before you begin a sensor test
you will see a list of available
sensors on the screen.
“Tampering” a sensor will begin
the test and provide the results
to you as follows:
Settings
Installation
System
Tests
Sensor Test
QOLSYS CONFIDENTIAL AND PROPRIETARY
PAGE 41 OF 64
© 11/4/13 All rights reserved
SYSTEM TESTS
CELLULAR TEST
FIND IT
Cellular Test
The panel’s built in cellular module can test it’s connection to the cellular
network. Before this test can be effective, you must activate the cellular
module by creating an alarm.com account.
To begin the test press “Start” and watch for the results on the screen below.
Settings
Installation
System
Tests
Cellular
Test
QOLSYS CONFIDENTIAL AND PROPRIETARY
PAGE 42 OF 64
© 11/4/13 All rights reserved
SYSTEM TESTS
IMAGE SENSOR TEST
FIND IT
Image Sensor Test
The panel can test it’s connections to Image Sensors to ensure they are
communicating properly and can take photos as desired.
Settings
Installation
Step 1: Touch “View”
Step 2: Tap “Sensor Tests”
System
Tests
Step 3: Select the test you want to run.
PIR Test checks the motion sensor
Request Peek In tests the camera (check
results in Camera App)
Image
Sensor Test
QOLSYS CONFIDENTIAL AND PROPRIETARY
PAGE 43 OF 64
© 11/4/13 All rights reserved
SYSTEM TESTS
Z-WAVE TEST
FIND IT
Z-Wave Test
The panel can test it’s connections to Z-Wave devices to ensure they are
communicating properly.
To perform a Z-Wave Test, touch the “Run” button.
Settings
Successful test will result in a “Normal” result and indicates the day and time of the test.
Installation
System
Tests
Note: If test fails, please delete the device and re-pair it with the panel. See p. 35-36
QOLSYS CONFIDENTIAL AND PROPRIETARY
PAGE 44 OF 64
© 11/4/13 All rights reserved
Z-Wave
Test
CUSTOMIZATION
CUSTOMIZATION
CUSTOMIZATION
WEATHER
FIND IT
TODAY’S FORECAST
Today’s forecast is displayed on the weather icon with a graphical
representation of precipitation and High and Low temps.
78
45
4-DAY FORECAST
Touch the weather icon to get a
four day forecast. This
information is updated once per
day via Alarm.com services.
LOCATION
Weather reporting is based on
location as indicated by the zip
code entered into Alarm.com
when the account is created.
QOLSYS CONFIDENTIAL AND PROPRIETARY
PAGE 46 OF 64
© 11/4/13 All rights reserved
Weather
CUSTOMIZATION
PHOTO FRAME
FIND IT
PHOTO FRAME
When you open the Photo Frame app, you will see
thumbnails of the images saved in the panel, as well as
buttons to play slideshow now, edit your settings, and
load new images.
START PHOTO FRAME
Starts Photo Frame
immediately
!
SETTINGS
Toggle settings like slide
transition, duration, effects, etc.
!
LOAD FROM SD CARD
Add your own photos
QOLSYS CONFIDENTIAL AND PROPRIETARY
PAGE 47 OF 64
© 11/4/13 All rights reserved
Apps
Photo Frame
CUSTOMIZATION
LOAD IMAGES FROM SD CARD
FIND IT
To load new images from an SD card:
!
1- Load photos* onto an SD Card
2- Insert the SD Card into the panel
3- Open the “Photo Frame” app
4- Press “Load from SD Card”
5- Choose “Replace” or “Add”
Insert card with the label facing you
SD Card Slot:
Left side of panel behind
bezel
6- Wait for the images to load
7- Once loaded, you can press “Start
Photo Frame” to test.
Card will slide all the way in.
To remove, push gently and card will spring out.
*Images must be less than 1MB each and saved in
a folder named “DCIM” or “Photos” Only first 40
images will be detected on card.
QOLSYS CONFIDENTIAL AND PROPRIETARY
PAGE 48 OF 64
© 11/4/13 All rights reserved
Photos look best at 800x480
CUSTOMIZATION
SOUND SETTINGS
FIND IT
The IQ Panel’s sound settings are completely customizable.
Setting
Description
Volume
Controls the master volume for the entire panel and all its audible functions (except
siren) including tones, videos, voice chimes, etc
Edit Chimes
Allows you to select from various chimes for each individual device.
Voice Settings
Indicates whether the panel should “speak.” Sensors, panel messages and safety sensors
can all be toggled independently.
Chime Settings
Indicates whether the panel should emit tones/beeps. Sensors, panel and safety
sensors can all be toggled independently.
Trouble Beeps
Enables the audible warning when a sensor has a low battery, a sensor has been
tampered, and an option to set the number of minutes until this beep times out
QOLSYS CONFIDENTIAL AND PROPRIETARY
PAGE 49 OF 64
© 11/4/13 All rights reserved
Apps
Sound
CUSTOMIZATION
CUSTOM NAMES
FIND IT
1. Select the “Sensor Name” field
2. Select “Custom Description” from the available choices. NOTE: You may need to scroll
up or down to find this option
3. A blank field will appear next to “Custom Description” Tap this field with your finger.
Settings
4. Use the keypad to type the sensor name (24 characters max)
6. Remember to touch “Save”
or “Add” to complete the
process and save your changes.
Installation
Security Sensors
Edit Sensor
5. Tap “Done” to exit keyboard
QOLSYS CONFIDENTIAL AND PROPRIETARY
PAGE 50 OF 64
© 11/4/13 All rights reserved
CUSTOMIZATION
EDIT CHIMES
FIND IT
When you select “Edit
Chimes” you will see a list
of all the sensors learned
into the panel
Apps
Sound
Selecting the “Edit” icon allows you to see the
current chime type and “Play” the chime. To change
it, tap the chime type and select a different chime
from the list. When done, touch “Save”
QOLSYS CONFIDENTIAL AND PROPRIETARY
PAGE 51 OF 64
© 11/4/13 All rights reserved
CUSTOMIZATION
WI-FI
FIND IT
To connect to a Wi-Fi network, follow the steps below:
Touch
“Settings”
Settings
Touch
“System
Settings”
Touch “Wireless
Settings” followed by
“Wi-Fi Settings”
Any available networks will appear under “Wi-Fi Networks”
Select the desired network
Enter the password (if required) and touch “back”
QOLSYS CONFIDENTIAL AND PROPRIETARY
PAGE 52 OF 64
© 11/4/13 All rights reserved
System
Settings
CUSTOMIZATION
USER MANAGEMENT
FIND IT
To add a new user follow the steps below. Similar steps can be used to make
changes to existing users from the “Edit User “App.
Settings
Touch
“Settings”
Touch “User
Management”
Touch “Add User”
Enter user information and
touch “Add User” to complete.
NOTE: Once you add a User you can edit all but user type (Installer, Master, User, Guest)
QOLSYS CONFIDENTIAL AND PROPRIETARY
PAGE 53 OF 64
© 11/4/13 All rights reserved
User
Management
CUSTOMIZATION
HOME SCREEN APPEARANCE
FIND IT
You can choose from two different layouts for the home screen. The default setting is
Theme 2. PLEASE NOTE: THE DIRECTIONS IN THIS MANUAL ARE BASED ON THEME 2.
CHANGING THIS SETTING MAY ALTER THE LOCATIONS OF APPLICATIONS
DESCRIBED IN THIS MANUAL
Settings
Installation
Theme 1
Six icons along the bottom
of the home screen.
Theme 2
Three icons along the
bottom of the home screen.
QOLSYS CONFIDENTIAL AND PROPRIETARY
PAGE 54 OF 64
© 11/4/13 All rights reserved
Security
Account
CUSTOMIZATION
TROUBLESHOOTING
TROUBLESHOOTING
MANUAL SOFTWARE UPDATE VIA WI-FI
FIND IT
To perform a software update using a Wi-Fi connection:
!
Be sure you are connected to Wi-Fi
Touch “Settings” and enter your installer code
Touch “Installation”
Touch “Upgrade Software”
Touch “Patch Tag” and enter the code for the new software
Touch “Upgrade using Network” and follow the prompts.
IMPORTANT: Interrupting a software update before completion
may result in data corruption and/or panel failure.
SUPPORT
?
QUESTIONS?
Settings
Installation
Upgrade
Software
Contact us at [email protected]
QOLSYS CONFIDENTIAL AND PROPRIETARY
PAGE 56 OF 64
© 11/4/13 All rights reserved
TROUBLESHOOTING
SOFTWARE UPDATE VIA SD CARD
FIND IT
To perform a software update using an SD Card:
!
Obtain an SD card with at least 1GB of free space.
Login to Dealers.Qolsys.com and locate the software update on the “Downloads” page.
Save the file onto your SD card.
Slide the SD card into the slot on the back left of the panel.
Touch “Settings” and enter your installer code
Touch “Installation”
Touch “Upgrade Software”
Touch “Upgrade via SD Card” and follow the steps
Settings
Installation
IMPORTANT: Interrupting a software
update before completion may result in
data corruption and/or panel failure.
QOLSYS CONFIDENTIAL AND PROPRIETARY
PAGE 57 OF 64
© 11/4/13 All rights reserved
Upgrade
Software
TROUBLESHOOTING
MOVING THE PANEL
FIND IT
If, for ANY reason, you need to move the panel, be sure you have enough battery life to
keep the panel running while not connected to A/C power. If you do not, you must shut
down the panel’s operating system before disconnecting the power supply.
!
1.Select “Settings” from the home screen
2.Enter the installer code.
3.Select “Shut down”
IMPORTANT: Failure to perform these
4.Wait for panel LEDs to turn off
steps in the proper sequence may result in
5.Disconnect the power
data corruption and/or panel failure.
Settings
Power
Down
SUPPORT
?
QUESTIONS?
Contact us at [email protected]
QOLSYS CONFIDENTIAL AND PROPRIETARY
PAGE 58 OF 64
© 11/4/13 All rights reserved
TROUBLESHOOTING
PANEL REBOOT
FIND IT
If the panel is experiencing difficulties you can often resolve it by resetting the operating
system.
Select “Settings” from the home screen
1.Enter the installer code.
2.Select “Panel Reboot”
3.Wait for the panel to restart
IMPORTANT: Failure to follow these steps properly may result in data
corruption and/or panel failure.
SUPPORT
?
QUESTIONS?
Contact us at [email protected]
QOLSYS CONFIDENTIAL AND PROPRIETARY
PAGE 59 OF 64
© 11/4/13 All rights reserved
Settings
Panel
Reboot
TROUBLESHOOTING
HARD REBOOT
FIND IT
If the panel is frozen or experiencing serious difficulties and you cannot resolve it, you can
force the software to reset by pressing and holding the “Home” button for 30 seconds.
x 30 sec
IMPORTANT: Performing a hard reset may
result in data corruption and/or panel failure.
Only use this when absolutely necessary.
SUPPORT
?
QUESTIONS?
Contact us at [email protected]
QOLSYS CONFIDENTIAL AND PROPRIETARY
PAGE 60 OF 64
© 11/4/13 All rights reserved
Home
LEGAL
IMPORTANT
Important warning and information can be found on the interior and exterior of the panel’s mounting plate.
QOLSYS CONFIDENTIAL AND PROPRIETARY
PAGE 61 OF 64
© 11/4/13 All rights reserved
LEGAL
IMPORTANT
This equipment has been tested and found to comply with the limits for a Class B digital device, pursuant to part
15 of the FCC Rules. These limits are designed to provide reasonable protection against harmful interference in a
residential installation. This equipment generates, uses and can radiate radio frequency energy and, if not
installed and used in accordance with the instructions, may cause harmful interference to radio communications.
However, there is no guarantee that interference will not occur in a particular installation. If this equipment does
cause harmful interference to radio or television reception, which can be determined by turning the equipment
off and on, the user is encouraged to try to correct the interference by one or more of the following measures:
!
—Reorient or relocate the receiving antenna. —Increase the separation between the equipment and receiver. —Connect the equipment into an outlet on a circuit different from that to which the receiver is connected. —Consult the dealer or an experienced radio/TV technician for help.
!
!
QOLSYS CONFIDENTIAL AND PROPRIETARY
PAGE 62 OF 64
© 11/4/13 All rights reserved
LEGAL
IMPORTANT
This Class [B] digital apparatus meets all requirements of the Canadian Interference-Causing Equipment
Regulations.
Cet appareil numérique de la classe [B] respecte toutes les exigences du Réglement sur le matériel brouilleur du
Canada.
!
IMPORTANT! Changes or modifications not expressly approved by Qolsys Inc. could void the user’s authority to
operate the equipment.
!
CAUTION! This equipment complies with radiation exposure limits set forth for uncontrolled environment. The
antenna(s) used for this transmitters must be installed to provide a separation distance of at least 20 cm from all
persons and must not be collocated or operating in conjunction with any other antenna or transmitter.
This device complies with Part 15 of the FCC Rules. Operation is subject to the following two conditions: (1) this
device may not cause harmful interference, and (2) this device must accept any interference received, including
interference that may cause undesired operation.
QOLSYS CONFIDENTIAL AND PROPRIETARY
PAGE 63 OF 64
© 11/4/13 All rights reserved
Document#: IQPANEL-IM-11-13
Revision Date: 11/4/13
Qolsys Part #: QS-9004-VRZ
Conforms to UL Std. S985, 1023. & 1635
Certified to ULC Sub C1023 & ULC Std S545
Qolsys Inc. proprietary.
Reproduction without permission is not permitted.