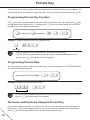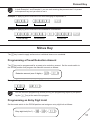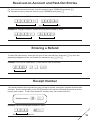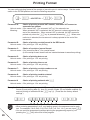
1
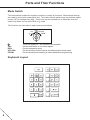
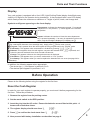
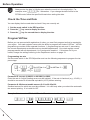
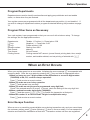
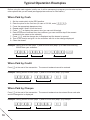
XE-A130
ELECTRONIC CASH REGISTER
Thank you for purchasing the SHARP Electronic Cash Register Model XE-A130. Please read
this manual carefully before operating your machine. Keep this manual for future reference. It
will help you solve any operational problems that you may encounter.
Handling Cautions
Install the cash register in a location not subject to direct sunlight, unusual temperature
changes, high humidity, or splashing water.
Do not operate the cash register with wet hands. Water can cause internal component failure.
The cash register plugs into any standard wall outlet (official (nominal) voltage). Other electrical
devices on the same electrical circuit can cause the cash register to malfunction.
Clean the cash register with a dry, soft cloth. Never use volatile liquids, such as benzine or
thinner. Chemicals can discolor or damage the cabinet.
For protection against data loss, please purchase and install three AA batteries before using this
cash register.
Important Information
Before using the cash register for the first time you must reset it according to the procedure
described on page 5. DO NOT install the batteries into the cash register before performing
the above mentioned procedure, as it may result in distorted memory contents and the malfunctioning of the cash register.
English
English
Table of Contents
Parts and Their Functions ........................................................................................... 4
Mode Switch ........................................................................................................................... 4
Keyboard Layout ..................................................................................................................... 4
Display .................................................................................................................................... 5
Before Operation .......................................................................................................... 5
Reset the Cash Register ......................................................................................................... 5
Install Batteries ....................................................................................................................... 6
Install the Paper Roll ............................................................................................................... 6
Set the Time and Date ............................................................................................................ 7
Check the Time and Date ....................................................................................................... 8
Program VAT/tax ..................................................................................................................... 8
Program Departments ............................................................................................................. 9
Program Other Items as Necessary ........................................................................................ 9
When an Error Occurs ................................................................................................. 9
Error Escape Function ............................................................................................................ 9
Typical Operation Examples ..................................................................................... 10
When Paid by Cash .............................................................................................................. 10
When Paid by Credit ............................................................................................................. 10
When Paid by Cheque .......................................................................................................... 10
Mixed Tender Sale ................................................................................................................ 11
Corrections ................................................................................................................. 11
Correction of Entered Numbers ............................................................................................ 11
Correction of the Last Entry (Direct Void) ............................................................................. 11
Correction of Earlier Entries (Indirect Void) ........................................................................... 12
Correction After Issuance of Receipt .................................................................................... 12
Repetitive Entries ....................................................................................................... 12
Repetitive Department Entries .............................................................................................. 12
Multiplication Entries ............................................................................................................. 13
Department ................................................................................................................. 13
Programming a Preset Unit Price ......................................................................................... 13
Programming the Department Status ................................................................................... 13
Operation Using a Preset Unit Price ..................................................................................... 14
Single Item Cash Sale (SICS) Entry ..................................................................................... 15
VAT/tax Calculation .................................................................................................... 15
Opening the Drawer with No Sale............................................................................. 15
Percent Key ................................................................................................................ 16
Programming Percent Key Function ..................................................................................... 16
Programming Percent Rate .................................................................................................. 16
Discounts and Premiums Using the Percent Key ................................................................. 16
Minus Key ................................................................................................................... 17
Programming a Preset Reduction Amount ............................................................................ 17
Programming an Entry Digit Limit ......................................................................................... 17
Discounts Using the Minus Key ............................................................................................ 18
Non-add Code Number ..............................................................................................
Received-on-Account and Paid-Out Entries ............................................................
Entering a Refund ......................................................................................................
Receipt Number ..........................................................................................................
Printing Format ..........................................................................................................
Miscellaneous Settings .............................................................................................
2
18
19
19
19
20
21
Table of Contents
Secret Code ................................................................................................................ 22
Checking the Machine Settings ................................................................................ 22
General & Tax Settings ......................................................................................................... 22
Reading and Resetting of Sales ............................................................................... 23
X Reports for Reading of Sales ............................................................................................ 23
Z Reports for Reading and Resetting of Sales (without resetting GT) .................................. 23
Z Reports for Reading and Resetting of Sales (with resetting of GT) ................................... 23
Flash Reports for Viewing on the Display ............................................................................. 23
Basic Calculator Function ......................................................................................... 25
Calculation Examples ........................................................................................................... 25
Using the Memory Key .......................................................................................................... 25
Drawer Handling......................................................................................................... 26
Locking the Drawer ............................................................................................................... 26
Removing the Drawer ........................................................................................................... 26
Manually Opening the Drawer .............................................................................................. 26
Maintenance ............................................................................................................... 26
Batteries ................................................................................................................................ 26
Paper Roll ............................................................................................................................. 27
Ink Roller ............................................................................................................................... 28
In Case of Power Failure or Paper Jam.................................................................... 28
Before Calling for Service ......................................................................................... 29
Specifications ............................................................................................................. 29
3
Parts and Their Functions
Mode Switch
The mode switch enables the register to perform a variety of functions. Mode switch settings
are made by turning the mode switch key. Two kinds of mode switch keys are provided, operator key (OP) or manager key (MA). These keys can be inserted into or withdrawn from the
switch only when it is set to the REG or o mode.
The functions you can make in each mode are as follows:
REG
CAL
o
o:
CAL:
REG:
X/FLASH:
Z/PGM:
X/FLASH
Z/PGM
Turns the display off. No operations are possible.
Permits calculation on the cash register.
Permits transaction entry.
Permits printing of sales reports and displaying the flash report.
Permits printing and resetting of sales reports and programming.
Keyboard Layout
u
fxc
789
456
123
:
4
MFV
+p-
$R%
#gG
@ S
!L
Parts and Their Functions
Display
Your cash register is equipped with a front LED (Light-Emitting Diode) display that affords easy
visibility of 9 digits for the operator during transaction. It also equipped with a rear LED display
which clearly shows the customers a maximum of 7 digits of prices, totals, and change due.
Symbols and figures appearing on the front display:
987654321
Departments: Indicates the department entered. For example,
if department 1 was pressed, “1” would appear in the extreme
left position.
Repeat: Indicates the number of times the same department
key is pressed repeatedly. If an entry is repeated more than ten
times, only the first digit is displayed (13 displays as 3).
(e ) Error: This appears when an error is made and is accompanied by an alarm sound. If this occurs
during a transaction because of an extra digit entry, simply press c and re-enter correctly.
(p ) Program: This is present when the cash register is being programmed in the “Z/PGM” mode.
(f ) Finalization: This appears when a transaction is finalized by pressing L, G or g .
(o ) Subtotal: This appears when the cash register computes the subtotal when S is pressed, and
also when the amount tendered is less than the total sale amount.
(c ) Change: This appears whenever the change due amount is displayed.
(C ) Calculation: This appears when you set the mode switch to “CAL” position.
(l ) Low battery: This appears when you need to replace the batteries with new ones (see page 26 for
explanation).
In addition, the following appear when appropriate:
•The minus sign (-) can appear in positions 2 to 9.
•The decimal point appears in positions 1 to 3.
Before Operation
Please do the following before using the register for the first time.
Reset the Cash Register
In order for your cash register to operate properly, you must reset it before programming for the
first time. Follow this procedure.
1. Remove the register from its packing carton.
2. Set the mode switch to the REG position.
3. Insert the plug into the AC outlet. Ensure the batteries are not fitted at this point. A
buzzer will sound three times.
4. The register display should now show “l
5. Press M to confirm the clock starts from “l
0.00”.
0-00”.
6. Now proceed with battery installation as described on page 6.
5
Before Operation
Install Batteries
Batteries must be installed in the cash register to prevent the data and user-programmed
settings from being erased from memory, when the AC cord is accidentally disconnected or in
case of power failure. Please purchase and install three AA batteries before proceeding with
setup and use of this cash register. Once installed, the batteries will last approximately one
year before needing replacement. At this time, the “l” symbol will appear on the display to
indicate that the batteries are low and that you must replace them within two days.
Install batteries according to this procedure with the AC cord connected and set to “REG” mode position.
1. Push the printer cover forward and detach it.
2. Open the battery cover next to the paper roll cradle.
3. Insert three new AA batteries.
l” lights off.
4. Confirm the low battery symbol “l
5. Close the battery cover.
6. Replace the printer cover.
C
Incorrectly using batteries can cause them to burst or leak, possibly damaging the
interior of the cash register. Note the following precautions:
• Be sure that the positive (+) and negative (-) poles of each battery are facing in the
proper direction.
• Never mix batteries of different types.
• Never mix old batteries and new ones.
• Never leave dead batteries in the battery compartment.
• Remove the batteries if you do not plan to use the cash register for long periods.
Should a battery leak, clean out the battery compartment immediately, taking care to
avoid letting the battery fluid come into direct contact with your skin.
Install the Paper Roll
Always install the paper roll even when you set the register for not printing receipt.
In the case of receipt printing
1. Push the printer cover forward and detach it.
2. Push the paper roll release lever in the arrow direction and
install the paper roll onto the paper roll holder correctly.
6
Before Operation
3. Insert the paper straight into the paper inlet, and press the
f key. The inserted end appears at the printing area.
4. Attach the printer cover.
In the case of journal printing
1.-3. Same as receipt printing shown above.
4. Insert the top end of the paper into the slit in the spool shaft
and wind the paper two or three turns.
5. Place the take-up spool on the bearing and attach the
printer cover.
Set the Time and Date
The time and date will appear on all the receipts/journal and on all the reports.
Setting the time
Set the mode switch to the Z/PGM position and enter the time in 4 digits (“hhmm” format) using
the 24 hour system. Then press the S key once to go to the next programming or twice to
exit the program mode.
Example: Set the time to 2:30 p.m.
1430 S(S)
Time
D
Always enter the time in 4 digits even when the hour is in the single digit. For example, enter 0630 for 6:30 a.m.
Setting the date
In the Z/PGM mode, enter the date in 6 digits using the day-month-year format. Then press the
S key once to go to the next programming or twice to exit the program mode.
Example: Set the date to 15 November, 1995.
151195 S(S)
Date
7
Before Operation
D
Always enter the date in 6 digits even when the month is in the single digit. For
example, enter 0111 for 1 November. If you change the date format in the
Z/PGM mode, follow the specified format when setting the date.
Check the Time and Date
You can display the time and date to check if they are correctly set.
1. Set the mode switch in the REG position.
2. Press the M key once to display the time.
3. Press the M key the second time to display the date.
Program VAT/tax
Before you can proceed with registration of sales, you must first program tax that is required by
your region. Your cash register comes with the ability to program two kinds of VAT/tax. VAT/tax
programming consists of two separate functions: 1. programming tax rate, and 2. associating
the correct departments as taxable and non-taxable departments. Your cash register comes
preprogrammed with all departments 1 to 5 assigned to taxable 1. If this does not fit your
needs, change the settings referring to the Department section on page 13.
Programming tax rate
Set the mode switch in the Z/PGM position and use the following sequence to program the tax
percentage:
9 ➝ S ➝ 1 for VAT/tax 1 or 2 for VAT/tax 2 ➝ x
➝ R ➝ x (➝ Q )➝ L
Parameter R: tax rate (0.0000% to 99.9999%)x10000
Enter the rate in 6 digits (leading zeros may be omitted). If the rate is fractional (e.g., 4 3/8%), it
should be converted to its decimal equivalent (4.375) before entering.
Parameter Q: Minimum taxable amount (0.01 to 99.99)x100
Smallest amount for which tax must be collected. It is valid only when you selectt the automatic
tax amount printing. It is invalid for VAT.
Example: Set a tax rate of 7% for VAT/tax 1. The minimum taxable amount is 0.11.
9S 1x 70000 x11 L
VAT/tax 1
8
Tax rate
Min. taxable amount
Before Operation
Program Departments
Departments are used to classify merchandise and apply group attributes such as taxable
status, on items when they are entered.
Your register comes pre-programmed with all the departments as positive (+) and taxable 1. If
you wish to change a department’s status, program as desired following the procedure on page
13.
Program Other Items as Necessary
Your cash register is pre-programmed so that you can use it with minimum setup. To change
the settings, see the appropriate sections.
Departments:
% key:
- key:
Receipt number:
Date format :
Time format:
Printing format:
Taxable 1. Positive (+). Preset price: 0.00
Negative (-). Preset rate: 0.00
Preset amount: 0.00
Starting from 0001
ddmmyy
24 hour format
Printing manual VAT amount, journal format, printing date, time, receipt
number, and taxable subtotal, and not printing of subtotal with S
When an Error Occurs
When your register goes into an error state, it displays the error message “e” accompanied with
a warning beep. Clear the error state by pressing the c key and take an appropriate action.
1.When you enter an over 7-digit number to the department or an over 8-digit number
(79999999) to RA, PO, credit or cheque operation:
Press c and re-enter a correct number.
2.When you make an error in key operation:
Press c and operate keys correctly.
3.When you make an entry beyond a programmed entry digit limit:
Check if the entered amount is correct. If correct, check the setting of the entry digit limit.
4.When a subtotal exceeds eight digits (79999999):
Press c and then press L, G or g to finalize the transaction at that point.
5.When the number of an item exceeds 3 digits in multiplication entry:
Press c and re-enter a correct number.
Error Escape Function
When an error or something uncontrollable occurs during transaction entry and you cannot keep
the customer waiting, press V twice (following c when in the error state). You can escape the
situation and finalize the transaction at that time. Transaction entries until then are registered.
9
Typical Operation Examples
Before using the cash register in daily use, it will be necessary to program your tax rate and any
other options that you will need (see appropriate sections for information).
When Paid by Cash
1.
2.
3.
4.
5.
6.
Set the mode switch to the REG position.
Enter the price for the first item (in case of £15.00, enter 1500).
Press the appropriate department key.
Repeat steps 2 and 3 for all the items.
Press S to display the amount due (you can omit this step).
Enter the amount received from the customer (you can omit this step if the amount
tendered is the same as the subtotal).
7. Press L, and the change due is displayed and the drawer is opened.
8. Tear off the receipt and give it to the customer with his or her change displayed.
9. Close the drawer.
Example: Selling a £5.00 item (dept. 1) and an £8.00 item (dept. 3) for cash and receiving
£20.00 from your customer.
500! 800# S 2000 L
Price and dept.
Price and dept.
Amount tendered
When Paid by Credit
Press G at the end of the transaction. The amount tendered cannot be entered.
Example: Selling an £85.50 item (dept. 1) and a £15.00 item (dept. 3) by credit.
8550! 1500# S G
Price and dept.
Price and dept.
When Paid by Cheque
Press g at the end of the transaction. The amount tendered can be entered like a cash sale
and the change due is displayed.
Example: Selling an £85.50 item (dept. 1) and a £15.00 item (dept. 3) by cheque.
8550! 1500# S g
Price and dept.
10
Price and dept.
Typical Operation Examples
Mixed Tender Sale
When the amount tendered by cash or cheque is less than the sales amount including tax, the
display shows a deficit and “o”. To compensate for the deficit, make an additional amounttendered entry or make a charge entry.
Example: Your customer pays £8.30 in cash and £50.00 by credit for an including-tax subtotal
of £58.30.
...S 830
L G
Amount received
Displays a deficit and “o”.
Corrections
If you should make an error when entering an item into a sale, correct it using the following
procedures. c is used to clear numerical entries made before further operations are performed. V is used to clear entries that have been completed.
Correction of Entered Numbers
When you enter an incorrect number, delete it by pressing
c immediately after the entry.
Example: You incorrectly entered a price and found it before entering department.
894 c 895! L
Incorrect price
Correct price and dept.
Correction of the Last Entry (Direct Void)
If you make a mistake when making a department entry, repetitive or multiplication entry, discount or premium entry by % or -, you can correct this by pressing V.
Example: You incorrectly entered a price and found it after entering department.
894@ V 895! L
Incorrect price and dept.
Correct price and dept.
11
Corrections
Correction of Earlier Entries (Indirect Void)
With this function, you can correct any incorrect entry made during a transaction if you find it
before finalizing the transaction by pressing L, G , g, etc.
Example: You incorrectly entered a price a few steps back while adding up a sale.
350@ 850! 350V@
Incorrect entry
Correct entry
Delete incorrect entry
300@ L
Correct entry
Correction After Issuance of Receipt
If you find errors after issuing the receipt, you can void the whole entries made in an incorrect
receipt in the following procedure:
1. With the manager key (MA), set the mode switch to the X/FLASH position and press
the V key. The cash register enters the void mode.
2. Enter the same details that are on the incorrect receipt.
3. Make another void mode entry, or press the V key again to exit the void mode. If you
want to make another transaction entries, return the mode switch back to the REG
position.
D
Always enter the void mode after you complete the current transaction entries.
Repetitive Entries
Repetitive Department Entries
To enter two or more of the same item, press the appropriate department key repeatedly.
D
Even when a unit price is preset for a department key, the price entered for the
repeat function is entered instead of the preset unit price.
Example: Selling two £2.00 items (department 1) and three £3.50 items (department 3) for
cash.
200!! 350### L
12
Two £2.00 items
Three £3.50 items
Repetitive Entries
Multiplication Entries
To enter a sale of two or more, especially three or more of the same item, use this function.
Example: Selling seven £1.50 items (department 1) and five £1.00 items (department 3) for
cheque payment.
7x150! 5x100# g
Seven £1.50 items
Five £1.00 items
Department
Merchandise can be classified into 5 departments. Items sold with use of the department keys
can later be printed on a report that shows the quantities sold and sales amounts classified by
department. The data is useful for making purchasing decisions and other managerial operations.
Programming a Preset Unit Price
The preset unit price function assigns a frequently purchased item to a department key and
enables you to enter the price by simply pressing the department key.
Set the mode switch to the Z/PGM position and assign a price as follows:
( S)
Unit price (max. 5 digits) ➝ Department key ➝
Example: Assign a price to department 1.
895 ! (S)
Preset price
D
You can continue programming without printing the programming report by not pressing the S key at the end of each program step.
Programming the Department Status
You can assign various status to a department key, such as +/- sign, single item cash sale
function, taxable status and entry digit limit.
Set the mode switch to the Z/PGM position and assign a department status as follows:
13
Department
ABCDE ➝
x
( S)
➝ Department key ➝
Parameter A:
Choice of + or - sign
Value to enter: 0 for + or 1 for Meaning:
+ sign: Assign the plus sign to departments in which normal sale amounts
are to be entered.
- sign: Assign the minus sign to departments in which payments for items
such as refunds, bottle returns or other minus transactions are entered.
Parameter B:
Choice of single item cash sale function
Value to enter: 0 for normal or 1 for single item cash sale
Meaning:
Normal: Allows the operator to use the department key in the usual way.
Single item cash sale (SICS): Allows the operator to finalize the transaction entry by entering the unit price of one item and pressing the department
key set for single item cash sale. If the unit price is preset for the department key set for single item cash sale, you can finalize the transaction entry
only by pressing the department key.
Parameters C and D:
Choice of taxable status
Value to enter: 00 for non-taxable, 01 for taxable 1, or 10 for taxable 2
Parameter E:
Entry digit limit (0 to 7 digits)
Value to enter: 0, 1, 2, 3, 4, 5, 6, or 7
Meaning:
Setting this parameter prevents the accidental entry of too large an amount
during a sale. For example, if the highest entry to be allowed to a certain
department is 9.99, enter 3. If you enter 0, you cannot enter a price to the
department during transaction. Only the preset price can be used.
D
When entering parameters A to E, any leading zeros in the sequence can be omitted.
For example, if A=0, B=0, C=0, D=0, and E=7, you can input 7.
Example: Program departments 1, 2 and 3 as follows:
A
B
C and D
E
+ or SICS
Tax
Entry digit limit
Department 1 + (0)
No (0) Taxable 1 (01)
7 (7)
Department 2 + (0)
No (0) Non-taxable (00)
7 (7)
Department 3 + (0)
Yes (1) Taxable 2 (10)
5 (5)
17x!
7x@
Dept. 1 programming Dept. 2 programming
D
1105x#
(S)
Dept. 3 programming
You can continue programming without printing the programming report by not pressing the S key at the end of the program.
Operation Using a Preset Unit Price
To enter an item whose price has been preset to a department, simply enter the department to
which it has been assigned.
14
Department
Example: Selling an £8.95 item assigned to department 1 and receiving £10.00 by cash.
!
1000
Dept. to which price is assigned
L
Amount tendered
Single Item Cash Sale (SICS) Entry
This function is used when a sale is for only one item paid by cash, such as a pack of cigarettes.
It is applicable only to departments programmed for single-item cash sales. The transaction is
finalized and the drawer opens after pressing the department key.
Example: Selling a £3.00 item (department 3) for cash.
300
#
Dept. to which SICS is programmed
VAT/tax Calculation
Your cash register automatically computes the VAT/tax amount for any item entered to the
department using the department key.
Example: Selling a £95.00 item (department 1, taxable 1) and £65.00 item (department 3,
taxable 2) for cash.
9500! 6500#
Price and dept.
D
S L
Price and dept.
As a default, the VAT/tax amount is not printed on each receipt unless you press u
after pressing S . You can also select the automatic VAT/tax amount printing. See
page 20 for details on changing the setting.
Opening the Drawer with No Sale
Press L only. The drawer opens. This feature is useful when you want to make change.
15
Percent Key
The percent key is used to apply a discount or premium to individual items or to a subtotal. You
can manually enter the discount or premium rate, or you can use the rate preset for the % key.
Programming Percent Key Function
The % key can be programmed as a discount key or a premium key. As a default, the % key
is programmed as a discount key. To program the % key, set the mode switch to the Z/PGM
position and use the following sequence:
1 for discount or 0 for premium ➝ x ➝ % (➝ S)
Example: Program the percent key for a discount key.
1
x%(S)
Minus sign
D
• When programming for a premium key, you can omit entering 0.
• You can continue programming without printing the programming report by not
pressing the S key at the end of the program.
Programming Percent Rate
You can preset the percent rate to the percent key. Set the mode switch to the Z/PGM position
and use the following sequence:
Percent rate (0.01% to 99.99%) ➝
% (➝ S)
Example: Program for a percent rate of 10%.
1000
%(S)
Percent rate
D
You can continue programming without printing the programming report by not pressing the S key at the end of the program.
Discounts and Premiums Using the Percent Key
If you want to apply a discount or a premium for an item, enter the percent rate and press the
percent key. If you want to apply a discount or a premium for the subtotal, enter all the items,
press S and then press the percent key following the percent rate.
16
Percent Key
D
In both Example 1 and Example 2, you can omit entering the percent rate if it is preset
to the percent key and you want to use it.
Example 1: Applying a 20% discount to an item belonging to department 3.
800#
2000%
Price and dept.
L
Percent rate
Example 2: Applying a 20% discount to the subtotal of a transaction.
1000! 500@ S 2000% L
Price and dept.
Price and dept.
Percent rate
Minus Key
The - key is used to apply a discount on individual items or on a subtotal.
Programming a Preset Reduction Amount
The - key can be programmed for a preset price reduction amount. Set the mode switch to
the Z/PGM position and program the reduction amount as follows:
Reduction amount (max. 5 digits) ➝
- (➝ S)
Example: Program the minus key for a £1.00 reduction.
100
-(S)
Reduction amount
D
You can continue programming without printing the programming report by not pressing the S key at the end of the program.
Programming an Entry Digit Limit
Set the mode switch to the Z/PGM position and assign an entry digit limit as follows:
Entry digit limit (0 to 7) ➝
x ➝ - (➝ S)
17
Minus Key
Example: Program the minus key for 7-digit limit.
7
x-(S)
Entry digit limit
D
You can continue programming without printing the programming report by not pressing the S key at the end of the program.
Discounts Using the Minus Key
If you want to apply a discount for an item, enter the reduction amount and press the minus key.
If you want to apply a discount for the subtotal, enter all the items, press S and then press
the minus key following the reduction amount.
D
In both Example 1 and Example 2, you can omit entering the reduction amount if it is
preset to the minus key and you want to use it.
Example 1: Applying a £1.00 discount to a £25.00 item belonging to department 3.
2500#
100-
Price and dept.
Reduction amount
L
Example 2: Applying a £1.00 discount to the subtotal of a transaction.
1200! 900@ S 100- L
Price and dept.
Price and dept.
Reduction amount
Non-add Code Number
Non-add code numbers can be entered and printed on the receipt or journal during the entry of
a sale. Non-add codes can be used for a variety of things. For example: credit numbers, check
numbers, serial numbers, product codes, service charge codes, or any other numbers for later
reference to specific transactions. Enter a code number of up to 8 digits and press S.
Example: Selling a £25.00 item (department 3) by charge account to a customer whose code
number is 123.
123S 2500# G
Code number
18
Price and dept.
Received-on-Account and Paid-Out Entries
For the received-on-account entry, enter the amount (up to 799999.99) and press R .
For the paid-out entry, enter the amount (up to 799999.99) and press p .
Example 1: Receiving £60.00 on account from a customer whose code number is 12345.
12345S 6000R
Code number
Amount of received-on-account
Example 2: Paying £30.00 to a vendor whose account number is 6789.
6789S 3000p
Code number
Amount of paid-out
Entering a Refund
To make the refund entry, enter the unit price of the returned item, press the F key, then the
appropriate department key and finalize the transaction by L or G .
Example: One £45.00 (department 1) item sold for cash is returned.
4500 F ! L
Refund amount
Receipt Number
The receipt number can be printed on every receipt or journal, and report, together with the date
and time. Set the mode switch to the Z/PGM position and use the following sequence to set the
receipt start number. To start from a specific number, enter the number less one.
Receipt number ➝
x➝S
Example: Set the receipt start number to “1001”.
1000
xS
Receipt start number less one
19
Printing Format
You can set the printing format of the receipt or journal to print in various ways. Set the mode
switch to the Z/PGM position and use the following sequence:
2 ➝ S ➝ ABCDEFGH ➝ S (➝ S)
Parameter A:
Choice of printing manual VAT amount, automatic VAT amount or
automatic tax amount
Value to enter: 0 for manual VAT, 1 for automatic VAT or 2 for automatic tax
Meaning:
When automatic VAT is selected, the VAT amount is always printed at the
end of the transaction. When manual VAT is selected, the VAT amount is
printed only when the S key is pressed followed by u. When automatic tax is selected, the tax amount is always printed at the end of the
transaction.
Parameter B:
Choice of printing receipt/journal in the REG mode
Value to enter: 0 for printing or 1 for not printing
Parameter C:
Choice of receipt or journal format
Value to enter: 0 for journal format or 1 for receipt format
(In the receipt format, blank lines are inserted between transaction printing.)
Parameter D:
Choice of printing date or not
Value to enter: 0 for printing or 1 for not printing
Parameter E:
Choice of printing time or not
Value to enter: 0 for printing or 1 for not printing
Parameter F:
Choice of printing receipt numbers or not
Value to enter: 0 for printing or 1 for not printing
Parameter G:
Choice of printing taxable subtotal
Value to enter: 0 for printing or 1 for not printing
Parameter H
Choice of printing subtotal with S
Value to enter: 0 for printing or 1 for not printing
Example: Set the format for printing manual VAT amount (0), printing receipt (0) in the journal
format (0) and printing date (0), time (0), receipt number (0) and taxable subtotal (0),
and not printing of subtotal with the S key (1). (These are the factory default
settings.)
2S
(0000000)1
A
D
20
B
C
D
E
F
G
S(S)
H
• When entering parameters A to G, any leading zeros in the sequence can be omitted. For example, if A=0, B=0, C=0, D=0, E=0, F=0, G=1, H=1, you can input 11.
• You can continue programming without printing the programming report by not
pressing the S key at the end of the program.
Miscellaneous Settings
You can program miscellaneous settings using the following sequence:
1 ➝ S ➝ ABCDEFGH ➝ S (➝ S)
Parameter A:
Choice of date format
Value to enter: 0 for mmddyy, 1 for ddmmyy or 2 for yymmdd
Parameter B:
Choice of time format
Value to enter: 0 for 12 hour system or 1 for 24 hour system
Parameter C:
Choice of decimal point setting
Value to enter: 0, 1, 2 or 3
Parameter D:
Choice of resetting receipt no. when issuing Z report
Value to enter: 0 for not resetting or 1 for resetting
Parameter E:
Choice of amount tendered compulsory
Value to enter: 0 for not compulsory or 1 for compulsory
Meaning:
When set for compulsory, always enter the amount tendered by the customer before finalizing the transaction.
Parameter F:
Choice of S compulsory
Value to enter: 0 for not compulsory or 1 for compulsory
Meaning:
When set for compulsory, always press S before finalizing the transaction.
Parameter G:
Entry digit limit for G , g,
Value to enter: 0, 1, 2, 3, 4, 5, 6, 7 or 8
R, and p
Parameter H:
Rounding
Value to enter: 0 for rounding off, 1 for rounding up or 2 for rounding down
Example: Set the date format of ddmmyy (1), time format of 24 hour system (1) and decimal
point setting of 2 (2), do not reset the receipt no. with Z report (0), set the amount
tendered for not compulsory (0) and S for not compulsory (0), set the entry digit
limit of 8 (8) and rounding off (0). (These are the factory default settings.)
1S 11200080 S(S)
A
D
B
C
D
E
F
G
H
• When entering parameters A to H, any leading zeros in the sequence can be omitted.
For example, if A=0, B=0, C=0, D=0, E=0, F=0, G=8, H=0, you can input 80.
• You can continue programming without printing the programming report by not
pressing the S key at the end of the program.
21
Secret Code
The secret code, if specified in the Z/PGM mode, is used in order that only those who know the
secret code may issue Z reports for reading and resetting of sales.
With the mode switch in the Z/PGM position, use the following sequence to set the secret code:
Secret code (max. 4 digits) ➝
x➝L
To remove the secret code, enter 0000 (or nothing) for the code in the above sequence.
Your unit comes preprogrammed with the secret code turned off (0000).
Checking the Machine Settings
To obtain a printout that shows the cash register settings, set the mode switch to the Z/PGM
position and use the following sequence:
General & Tax Settings
To see the general and tax settings, set the mode switch to the Z/PGM position and press
S.
Taxable status
Unit price
Dept. code
Entry digit limit
SICS (1) / Normal (0)
Entry digit limit for Amount for Sign and rate for %
Secret code
Miscellaneous settings
Printing format
VAT/tax 1 rate
Minimum taxable amount
VAT/tax 2 rate
Minimum taxable amount
Date
Time
Receipt number
22
D
Minimum taxable amount is printed only when automatic tax is selected.
Reading and Resetting of Sales
All the data on all of your registrations as well as other transaction information will remain in the
memory of your cash register as long as your cash register has power (Be sure you have live
batteries installed in case of a power failure). This information can be printed in the form of a
report which can be helpful to you in running your business.
X Reports for Reading of Sales
This report, when taken in the X/FLASH mode, prints the accumulated information of sales.
Taking an X report is a good way to do a mid-day check on daily sales. You can take X reports
any number of times, because they do not affect the cash register’s memory.
To issue an X report, set the mode switch to the X/FLASH position and press L.
Z Reports for Reading and Resetting of Sales
(without resetting GT)
This report, when taken in the Z/PGM mode, prints the same information as an X report. Once
this report had been printed, the cash register’s memory of daily information is cleared and all
the transaction totals are reset for zero (except for Grand Total). Be sure to issue a Z report at
the end of each day.
To issue a Z report, set the mode switch to the Z/PGM position, enter the secret code of max. 4
digits and then press L.
D
If the secret code is not programmed, you need not enter the secret code. Just press
L in the Z/PGM mode.
Z Reports for Reading and Resetting of Sales
(with resetting of GT)
If you want to reset the Grand Total when taking the Z report, press g instead of L in the
key sequence when taking the report. Other than resetting the Grand Total, this report is the
same as the normal Z reports.
To issue a Z report with resetting of GT, set the mode switch to the Z/PGM position, enter the
secret code of max. 4 digits and then press g.
D
If the secret code is not programmed, you need not enter the secret code. Just press
g in the Z/PGM mode.
Flash Reports for Viewing on the Display
Use this function for on-the-spot sales checking of individual cash registers items. The sales
total is shown on the display but is not printed or cleared from the cash register’s memory.
To display the flash report for each individual item, press the following key in the X/FLASH
mode:
Department Total
Sales Total
Cash in Drawer
Department key
S
G
23
Reading and Resetting of Sales
Reset counter
Reset symbol (“X” is printed in the case of X reports.)
Grand total
Quantity
Amount
Dept. code
Dept counter and
total
Void counter and
total
Refund counter and
total
Percent counter and
total
Minus counter and
total
Void mode counter and
total
Taxable 1 total
VAT/tax 1 total
Taxable 2 total
VAT/tax 2 total
Count of customers
Sales total
Cash sale total
Cheque sale counter and
total
Credit sale counter and
total
Received-on-account total
Paid-out total
No sale counter
Cash in drawer
24
Basic Calculator Function
Set the mode switch to the CAL position, and your cash register can be used as a calculator.
Calculation Examples
You can make calculations just like when using a normal calculator. However, decimals of the
quotient are omitted.
Example: Making the following calculations:
45+32-18=
45 ! 32 @ 18 L
(63-57)x16=
63 @ 57 # 16 L
(126÷3-37)x24-9=
126 $ 3 @ 37 # 24 @ 9 L
26x(13+23)=
(This is an example of how to use the R key to store and recall a number to and
from memory.)
26 R 13 ! 23 # R L
Using the Memory Key
When the mode is changed from REG to CAL, pressing the R key will recall the subtotal from
the transaction in the REG mode and display it without the decimal point. Pressing R twice in
the CAL mode will clear the memory. You can use it as both a Memory Store key and a Memory
Recall key.
When you change back to the REG mode from the CAL mode, pressing R recalls the last total
made in the CAL mode.
Example: Selling items whose subtotal is £26.75 and dividing the price by three.
Mode
(REG)
Action
Enter the transaction.
(CAL)
Recalls the subtotal.
Key Operation
Divide the subtotal by three.
...S
R
$3L
(REG)
The subtotal is displayed.
Make amount tendered
operations for two persons.
Receive the rest from the
third person.
D
RL
RL
L
Display
o
C
C
o
o
o
f
Pressing the S key opens the drawer in the CAL mode.
2675
2675
891
2675
1784
893
893
25
Drawer Handling
Locking the Drawer
Develop the habit of locking the drawer when not using the register
for any extended period of time.
To lock:
Insert the key into the drawer lock and turn it 90 degrees counter-clockwise.
To unlock: Insert the key into the drawer lock and turn it 90 degrees clockwise.
Removing the Drawer
To remove the drawer, pull it out and lift it up.
D
To prevent burglary, it is a good idea to
empty the drawer after work and leave it
open at the end of the day.
(Large drawer type)
Manually Opening the Drawer
In case of a power failure or if the machine is out of
order, locate the lever at the bottom of the machine
and move it in the direction of the arrow to open the
drawer. The drawer will not open if it is locked with
the drawer lock key.
(Large drawer type)
Maintenance
Batteries
This cash register provides a low battery symbol (l) which appears on the far left of the display
in one of the following situations:
• When less than 3 batteries are installed in your cash register.
• When the voltage of the batteries installed in your cash register is under the required level.
• When the batteries installed in your cash register are dead.
When this symbol appears, check your batteries. If no batteries are installed, install three AA
batteries at once. If batteries are already installed, replace them with new ones as soon as
possible. If the AC power cord is disconnected or a power failure occurs when the batteries are
dead or not installed, all the programmed settings will be reset to the default settings and any
data stored in memory will be cleared.
D
26
If the low battery symbol appears while you are making a transaction, complete the
transaction before you replace the batteries.
Maintenance
Replacement
1. Be sure that the cash register is plugged in.
2. Set the mode switch key to the REG position.
3. Pull the printer cover upward and detach it.
4. Open the battery cover and remove the old batteries.
5. Install three new AA batteries into the battery
compartment.
l” symbol has disappeared.
6. Check that the “l
7. Close the battery cover.
8. Replace the printer cover.
C
Incorrectly using batteries can cause them to burst or leak,
possibly damaging the interior of the unit. See the cautions on page 6.
Paper Roll
When colored dye appears on the edges of the paper roll, it is time to replace the roll. Use
paper of 57 mm in width. To prevent jamming be sure to use the quality paper specified by
SHARP.
Replacement (in the case of journal printing)
1. Set the mode switch to the REG position.
2. Open the printer cover.
3. Press f to advance the paper several lines. Remove the
take-up spool from the bearing.
4. After cutting the existing paper, remove the paper roll. Then
remove the remaining paper by pressing f .
5. Remove the used journal paper roll (if used) from the
take-up spool.
6. Install a new paper roll and the take-up spool according to
the instructions on page 6.
D
In the case of receipt printing, do the above procedure 1,
2, 4 and 6.
27
Maintentance
Ink Roller
When printing becomes faded, replace the existing ink roller with a new one available from
SHARP.
Replacement
1. Open the printer cover.
2. Remove the ink roller by pulling it upward.
3. Install a new ink roller.
4. Close the printer cover.
In Case of Power Failure or Paper Jam
The following situations occur during a power failure or paper jam. (Batteries must be correctly
installed.) It disappears with the next key operation.
When a power failure occurs with the register turned on
or during a computation process:
When power returns, the register resumes operation from the point of failure.
When a power failure occurs during the printing of
a sales transaction:
When power returns, the register prints
“############” and resumes correct printing of
the transaction.
When a power failure occurs during the printing of
X (reading) or Z (reading and resetting) report:
When power returns, the register prints
“############” and resumes correct printing of
the report.
Before
power
failure
Power
failure
mark
After
power
failure
What to do when the printer motor locks:
If the printer motor locks, printing stalls and intermittent beeping starts. First, unplug the
power cord and repair the paper jam. Then plug in the power cord, feed the roll paper to
the proper position and press c. The register will then resume correct printing after
printing “############”.
28
Before Calling for Service
If you encounter a problem, use this chart before calling for service.
Problem
• The display shows symbols that do
not make sense.
• The display will not illuminate even
when the mode switch is not set to
“o”. The machine fails to operate
when any key is pressed.
• The display is illuminated, but the
machine does not accept key
entries.
• Journal paper does not feed properly in the printer.
• Printing is faded or illegible.
Item to check
• Was the machine reset in the proper way shown on
page 5?
• Is the power supplied to the electrical outlet? (Plug in
another electrical device.)
• Is the power cord firmly connected to the electrical
outlet?
• Is the mode switch properly set to the REG position?
• Was the machine reset in the proper way shown on
page 5?
• Is the take-up spool installed properly?
• Is there a paper jam?
• Isn’t the ink roller used up?
• Is the ink roller installed properly?
Specifications
Model:
Size:
XE-A130
330 (W) x 380 (D) x 213 (H) mm
420 (W) x 436 (D) x 234 (H) mm (Large drawer type)
Weight:
4.3 kg
9.8 kg (Large drawer type)
Power Source:
Official (nominal) voltage and frequency
Power Consumption:
Stand-by: 6.5 W, Operating: 14 W
Working Temperature: 0 to 40˚C
Display:
LED (Light-Emitting Diode) numeric display
Printer:
1 station print wheel selective type
Printing Capacity:
Max. 14 characters
Paper Roll:
Width:
57.5mm + 0.5mm
Max. external diameter: 80mm
Min. internal diameter: 12mm
Cash Drawer:
3 slots for bills, 5 for coins
4 slots for bills, 8 for coins (Large drawer type)
Accessories (supplied): Paper roll
1 roll
Manager key (MA) 2
Operator key (OP) 2
Drawer lock key
2 (located inside the drawer)
Instruction manual 1 copy (this manual)
Ink roller
1 (already installed)
Take-up spool
1
*Specifications and appearance are subject to change without notice.
29