1
PLEASE READ TH/S OWNER_SMANUAL THOROUGHLY BEFORE OPERATING,
LMH151
LMH151
T
SAFETY .............................................................
3-4
Precautions to Avoid Possible Exposure
to Excessive Microwave Energy .........................
Grounding Instructions ........................................
Important Safety Instructions .............................
UNDERSTANDING
YOUR
MICROWAVE OVEN ......................................
3
3
4
5-11
Specifications ......................................................
Installation ...........................................................
Parts and Accessories ........................................
Built-In Kits ..........................................................
Control Panel ......................................................
5
5
6
6
7
Cooking Comparison Guide ................................
Cookware Guide .................................................
8
9
Using the Rack System ......................................
Tips for Microwave Cooking .............................
Precautions .......................................................
9
10
11
Cleaning ............................................................
11
USING YOUR MICROWAVE OVEN ............. 12-22
Setting the Clock ...............................................
Timer On/Off .....................................................
Child Lock .........................................................
Ez On ................................................................
Hold Warm ........................................................
Reminder ..........................................................
Recall ................................................................
Start/Pause .......................................................
Clear .................................................................
More/Less .........................................................
Custom Set .......................................................
Custom Set Chart .............................................
12
12
12
12
13
13
13
13
13
14
14
14
Timed Cooking ..................................................
Help ...................................................................
Multi-Stage Cooking ..........................................
Microwave Power Levels ..................................
14
14
15
15
Sensor Touch Operation Instruction .................
Sensor Cook .....................................................
16
16
Sensor Popcorn ................................................
16
Sensor Reheat ..................................................
16
Sensor Cook Guide .....................................
17-19
Sensor Reheat Guide .......................................
20
Defrost Auto/Time .............................................
21
Auto Defrost ......................................................
21
Auto Defrost Chart ............................................
21
Time Defrost .....................................................
22
Q-Defrost ..........................................................
22
UNDERSTANDING
YOUR
CONVECTION OVEN ........................................
suggest you record the details of your contact
with LG (LG Electronics U.S.A., Inc.)
Convection
Cooking Guide ..........................
28-30
UNDERSTANDING
YOUR
COMBINATION OVEN .......................................
31
Tips for Combination Cooking ..........................
Helpful Hints for Combination Cooking .............
Precautions .......................................................
Combination ......................................................
USING YOUR COMBINATION
Combination
HEATING/REHEATING
FRESH VEGETABLE
31
31
31
31
OVEN ............... 32
Cooking Guide .............................
32
GUIDE ..........................
33
GUIDE ............................
34
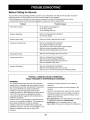
TROUBLESHOOTING
..................................
Questions and Answers ...............................
Before Calling for Service .................................
WARRANTY .............................
Model No:
Serial No:
Dealer:
concerning this unit.
Dealer Phone No:
Customer Relations
Staple your receipt here for proof of purchase.
23
23
USING YOUR CONVECTION OVEN .......... 24-30
Auto Bake .........................................................
24
Auto Roast ........................................................
24
Auto Bake Guide ...............................................
25
Auto Roast Guide .............................................
26
Convection ........................................................
27
LG Electronics U.S.A., Inc.
Service Division Bldg. #3
201 James Record Rd.
Huntsville, AL 35824-0126
35-37
35-36
37
Inside back cover
Thank you for purchasing a LG microwave oven.
Please record the model number and serial
number of this unit for future reference. We also
23
Tips for Convection Cooking .............................
Precaution .........................................................
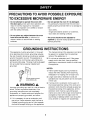
PRECAUTIONS TO AVOID POSSIBLE EXPOSURE
TO EXCESSIVE MICROWAVE ENERGY
, Do not attempt to operate this oven with
the door open, since open-door operation can
result in harmful exposure to microwave
energy. It is important not to defeat or tamper
with the safety interlocks.
° Do not place any object between the oven
front face and the door, or allow soil or
cleaner residue to accumulate on sealing
surfaces.
GROUNDING
This appliance
of an electrical
must be grounded. In the event
short circuit, grounding reduces
the risk of electric shock by providing an escape
wire for the electric current. This appliance is
equipped with a cord having a grounding wire
and a grounding plug. The plug must be plugged
into an outlet that is properly installed and
grounded.
Do not operate the oven if it is damaged.
It is particularly important that the oven door
closes properly and that there is no damage to
the:
- door (bent),
- hinges and latches (broken or loosened),
- door seals and sealing surfaces.
° The oven should not be adjusted or
repaired by anyone except properly qualified
service personnel.
INSTRUCTIONS
The marked rating of the extension cord shall
be equal to or greater than the electrical
rating of the appliance,
or...
2. Do not use an extension cord. If the power
supply cord is too short, have a qualified
electrician or serviceman install an outlet near
the appliance.
NOTES:
1. A short power-supply
cord is provided to
reduce the risks resulting from becoming
entangled in or tripping over a longer cord.
Ensure proper ground
exists before use
a, WARNING
Improper grounding can result in a risk of electric
shock. Consult a qualified electrician if the
grounding instructions are not completely
understood, or if doubt exists as to whether the
appliance is properly grounded, and either:
1. If it is necessary to use an extension cord,
use only a 3-wire extension cord that has a
3-blade grounding plug and a 3-slot receptacle that will accept the plug on the appliance.
2. Longer cord sets or extension cords are
available and may be used if care is exercised
in their use.
3. If a long cord or extension cord is used, (1)
the marked electrical rating of the cord set or
extension cord should be at least as great as
the electrical rating of the appliance, (2) the
extension cord must be a grounding-type
3-wire cord, and (3) the longer cord should be
arranged so that it will not drape over the
countertop or tabletop where it can be pulled
on by children or tripped over accidentally.
IMPORTANT SAFETY INSTRUCTIONS
The safety instructions
below will tell you how to use your oven to avoid harm to yourself or damage to your oven.
WARNING -
To reduce the risk of burns, electric shock, fire, injuryto persons, or exposure to excessive
microwave energy:
1. Read all instructionsbefore using the appliance.
2. Read and follow the specific PRECAUTIONS TO AVOID POSSIBLE EXPOSURE TO EXCESSIVE
MICROWAVE ENERGY found on page 3 of thismanual.
3. This appliance must be grounded. Connect only to properly grounded outlet. See GROUNDING INSTRUCTIONS
found on page 3 of this manual.
4. Installor locate this appliance only in accordance with the provided installationinstructions.
5. Some products, such as whole eggs and sealed containers - for example, closed glass jars are able to explode and
should not be heated in this oven.
6. Use this appliance only for its intended use as described in the manual. Do not use corrosive chemicals
or vapors in this appliance. This type of oven is specificallydesigned to heat, cook, or dry food. It is not designed for
industrial or laboratory use.
7. As with any appliance, close supervision is necessary when used by children.
8. Do not operate this appliance if it has a damaged cord or plug, if it is not working properly, or if it has
been damaged or dropped.
9. This appliance should be servicedonly by qualified service personnel. Contact the nearest authorized service facility for
examination, repair, or adjustment.
10. Do not cover or block any openings on the appliance.
11. Do not store this appliance outdoors. Do not use this product near water - for example, near a kitchen sink, in a wet
basement, near a swimming pool, or similar location.
12. Do not immerse cord or plug in water.
13. Keep cord away from heated surfaces.
14. Do not let cord hang over the edge of a table or counter.
15. When cleaning surfaces of door and oven that come together on closing the door, use only mild,
nonabrasive soaps or detergents applied with a sponge or soft cloth.
16. To reduce the risk of fire in the oven cavity:
a. Do not over cook food. Carefullyattend appliance when paper, plastic, or other combustible materials are placed inside
the oven to facilitate cooking.
b. Remove wire twist-ties from paper or plastic bags before placing bag in oven.
c. If materials inside the oven ignite, KEEP OVEN DOOR CLOSED, turn oven off, and disconnect the power cord or shut
off power at the fuse or circuit breaker panel.
d. Do not use the cavity for storage purposes. Do not leave paper products, cooking utensils, or food in the cavity when not
in use.
17. Do not heat any type of baby bottlesor baby food. Uneven heating may occur and could cause personal injury.
18. Avoid heating small-necked containers such as syrup bottles.
19. Avoid using corrosive and vapors, such as sulfide and chloride.
20. Liquids heated in certain shaped containers (especiallycylindrical-shapedcontainers) may become overheated.The liquid may splash out with a loud noise during or after heating or when adding ingredients (instantcoffee, etc.), resulting in
harm to the oven and possible injury. In all containers, for best results,
stir the liquid several times before heating. Always stir liquid several times between reheatings.
21. Liquids, such as water, coffee, or tea are able to be overheated beyondthe boiling pointwithout appearing to be boiling.
Visible bubbling or boilingwhen the container is removed from the microwave oven is not always present.THIS COULD
RESULT IN VERY HOT LIQUIDS SUDDENLY BOILING OVER WHEN THE CONTAINER IS DISTURBED OR A
SPOON OR OTHER UTENSIL IS INSERTED INTO THE LIQUID.
To reducethe risk of injuryto persons;
- Do not overheat the liquid.
- Stir the liquid both before and halfway through heating it.
- Do not use straight-sided containerswith narrow necks.
- After heating, allow the container to stand in the microwave oven for a short time before removing the container.
- Use extreme care when inserting a spoon or other utensil into the container.
SAVE THESE INSTRUCTIONS
4
SPECIFICATIONS
MODEL
Power Supply
Rated Power
consumption
LMH1517CV/LMH1517CVST
120 VAC, 60 Hz
.......M!crow.ave...............................................................................
1.:.50..0....W...
...................................................
convection
1,500 w
.......
M!crowave
..............................................................................
t,000w*...................................................
Power Output
Convection
Frequency
Rated Current
1,500W
2,450 MHz
Microwave
13 A
.......Convect[on ..................................................................................
i3A .......................................................
Overall Dimensions (WxHxD)
Oven Cavity Dimensions (WxHxD)
Capacity of Oven Cavity
22% x 147/8 x 20
15114x 107/8 x 151/4
1.5 Cu. Ft.
*IEC 60705 RATING STANDARD
Specifications subject to change without prior notice.
INSTALLATION
A. Circuits
D. Do not block the air vents
For safety purposes this oven must be plugged into a
20 Amp circuit. No other electrical appliances or lighting circuits should be on this line. If in doubt, consult a
licensed electrician.
All air vents should be kept clear during cooking. If air
vents are covered during oven operation the oven may
overheat. In this case, a sensitive thermal safety device
automatically turns the oven off. The oven will be
inoperable until it has cooled sufficiently.
B. Voltage Warning
The voltage used at the wall receptacle must be the
same as specified on the oven name plate located on
the back or on the side of the control panel of the oven.
Use of a higher voltage is dangerous and may result in
a fire or other type of accident causing oven damage.
Low voltage will cause slow cooking. In case your
microwave oven does not perform normally in spite of
proper voltage, remove and reinsert the plug.
C. Placement of the Oven
Your microwave oven can be placed easily in your
kitchen, family room, or anywhere else in your home.
Place the oven on a flat surface such as a kitchen
countertop or a specially designed microwave oven
cart at least 100cm (39.4 inches) from floor. Do not
place oven above a gas range. Free air flow around
the oven is important. Allow at least 4 inches
of space at the top, sides, and back of the oven for
proper ventilation.
NOTES:
• Never place the turntable in the oven upside down.
o You can build your microwave oven into a wall or
cabinet by using one of the trim kits listed in the
"Built-In Kits" section.
E. Radio interference
1. Microwave oven operation may interfere with TV
or radio reception.
2. When there is interference, it may be reduced or
eliminated by taking the following measures:
a. Clean the door and the sealing surfaces of the
oven.
b. Reorient the receiving antenna of radio or TV.
c. Relocate the microwave oven in relation to the
TV or radio.
d. Move the microwave oven away from the
receiver.
e. Plug the microwave oven into a different outlet
so that microwave oven and receiver are on
different branch circuits.
PARTS AND ACCESSORIES
Your oven comes with the following accessories:
1 Owner's Manual and Cooking Guide
1 Glass Turntable
1 Rotating Ring
1 Metal Rack
Oven Front
Window
Plate
Door Screen
Door Seal
/
Display
Window
Control
Panel
Safety Interlock
System
Glass Turntable
Metal Rack
Rotating
Ring
NOTE: This microwave oven is designed for household use only.
It is not recommended for commercial use.
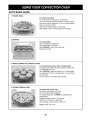
BUILT-IN KITS
You can build in your microwave oven by using one of the following trim kits.
These kits are available from your dealer.
SIZE
COLOR
27
White
CMK-1527W
Stainless
CMK1527ST
30
KIT MODEL
NO.
White
CMK-1530W
Stainless
CMK1530ST
FOR INSTALLATION
OVER OVEN MODEL
Whirlpool Oven: RBS270PD, RBS275PD, GBS277PD,
KEBI171 D, KEBS177D.
Amana Oven: ACO27SE1, AOCC2740, AOES2730.
GE Oven: JKP18, JKP15, JKP27, JKP45, JKP56,
JK910, JK950, ZEK737, JEK757.
Whirlpool
Oven: RBS305PD,
RBS307PD, GBS307PD,
KEBI101 D, KEBS107D.
Amana Oven: AOCS3040, AOES3030.
GE Oven: JKP18, JKP15, JKP27, JKP45, JKP56,
JK910, JK950, ZEK737, JEK757.
6
CONTROL
PANEL
1. DISPLAY: The display includes a clock and
indicators that tell you the time of day, cook time
settings, and cooking functions selected
2. AUTO BAKE: Touch this pad to bake foods
automatically.
3, AUTO ROAST: Touch this pad to roast foods
automatically:
4. CONVECTION COOK: Touch this pad to cook
with convection manua[Ey:
5. COMBINATION ROAST: Touch this pad to cook
with combination roast..
6. COMBINATION BAKE: Touch this pad to cook
combination bake.
7. SENSOR COOK: Touch this pad to cook without
entering a cook power or time.
8. SENSOR POPCORN: Touch this pad to pop
popcorn without entering a cook power or time.
9. SENSOR REHEAT: Touch this pad to reheat
without entering a cook power or time.
10. MORE: Touch this pad to add time to Sensor
Cook, Time Cook, and other oven functions, or to
increase temperature _or the convection cooking.
11. LESS: Touch this pad to subtract time from
Sensor C_k, Time Cook, and other oven
functions, or to decrease temperature in the
convection cooking.
12. TIMER ON/OFF: Touch this pad to use your
microwave oven as a kitchen timer.
13. CUSTOM SET: Touch this pad to select sound
control, clock Off o,r On, scroll speed, Demo Off
or On, Ibs °F/kg _C_and language selection.
14, WARM HOLD: Touch this pad to keep hot,
cooked foods warm in your microwave oven.
15. HELP: Touch this pad for feature information.
16. DEFROST AUTO/TIME: Touch this pad to
defrost foods by entering weight or c_k time.
17. Q-DEFROST: Touch this pad to defrost foods
quickly.
18. EZ ON: Touch this pad to cook at '100% cook
power for 1 minute to 99 minutes, 59 seconds_
19. NUMBER PADS: Touch number pads to enter
_k time, _wer level, quantities, or weights,
20. TIME: Touch this pad to set a cook time.
21. POWER: Touch this pad to set a cook power.
22. REMINDER: Touch this pad to use your oven like
an alarm clock,
Convection
Combination
4
C_R
23. RECALL: Touch this pad to repeat the previous
manual cooking program.
24. STARTIPAUSiE: Touch this pad to start all
entries, stop cooking without opening the door, or
pause the oven temporarily during cooking,
25. CLEAR: Touch this. pad to clear all entries during
cooking and programming.
26. CLOCK: Touch this pad to enter the time of day.
7
6
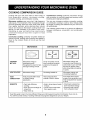
COOKING
COMPARISON
GUIDE
Cooking with your new oven offers a wide variety of
food preparation
options:
microwave
cooking,
convection cooking, and combination cooking.
Combination
cooking combines microwave energy
with convection to cook with speed and accuracy, while
browning and crisping to perfection.
Microwave cooking uses very short, high-frequency
radio waves. The movement of the microwaves through
the food generates heat and cooks most foods faster
than regular methods, while retaining their natural
texture and moisture. Microwave cooking heats food
directly, not the cookware or the interior of the oven.
Reheating
is easy and defrosting
is particularly
convenient
because
less time is spent in food
preparation.
You can use microwave cooking, convection cooking,
or combination cooking to cook by time. Simply preset
the length of cooking time desired and your oven turns
off automatically.
The following guide shows at a glance the difference
between microwave, convection, and combination
cooking.
Convection cooking constantly circulates heated air
around the food, creating even browning and sealed-in
flavor by the constant motion of hot air over the food
surfaces.
MICROWAVE
CONVECTION
COMBINATION
I'
L_
•
COOKING
METHOD
Microwave energy is
distributed evenly
throughout the oven for fast,
thorough cooking of food.
Hot air circulates around
food to produce browned
exteriors and sealed-in
juices.
Microwave energy and
convection heat combine to
cook foods in up to one-half
the time of regular ovens,
while browning and sealing
in juices.
HEATSOURCE
Microwave energy.
Circulating heated air.
Microwave energy and
circulating heated air.
HEAT
CONDUCTION
Heat produced within food
by instant energy
penetration.
Heat conducted from
outside of food to inside.
Food heats from instant
energy from penetration and
heat conducted from outside
of food.
BENEFITS
• Fast, high efficiency
cooking.
• Oven and surroundings do
not get hot.
• Easy clean-up.
• Aids in browning and seals
in flavor.
• Cooks some foods faster
than regular ovens.
• Shortened cooking time
from microwave energy.
• Browning and crisping
from convection heat.
Read this guide to learn the many different things your Microwave!Convection/Combination
Oven can do.
You will find a wide variety of cooking methods and programs designed to suit your lifestyle.
8
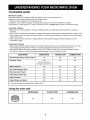
COOKWARE GUIDE
Microwave Cooking
Most heat-resistant, non-metallic cookware is safe for use in your microwave oven.
However, to test cookware before using, follow these steps:
1. Place the empty cookware in the microwave oven.
2. Measure 1 cup of water in a glass measuring cup and place it in the oven beside the cookware.
3. Microwave on 100% power for 1 minute. If the dish is warm, it should not be used for microwave cooking.
Convection Cooking
• Metal Pans are recommended for all types of baked products, but especially where browning or crusting is
important.
• Dark or dull finish metal pans are best for breads and pies because they absorb heat and produce a crisper crust.
• Shiny aluminum pans are better for cakes, cookies, or muffins because these pans reflect heat and help produce
a light, tender crust.
• Glass or glass-ceramic casserole or baking dishes are best suited for egg and cheese recipes due to the
cleanability of glass.
Combination Cooking
• Glass or glass-ceramic baking containers are recommended. Be sure not to use items with metal trim as it may
cause arcing (sparking) with oven wall or oven shelf, damaging the cookware, the shelf or the oven.
• Heat-resistant plastic microwave cookware (safe to 450 ° F) may be used, but is not recommended for foods
that require crusting or all-around browning, because plastic is a poor conductor of heat.
COOKWARE
MICROWAVE
Heat-Resistant Glass, Ceramic Glass
CONVECTION
COMBINATION
Yes
Yes
Yes
Yes
(Do not use china
with gold or silver trim)
Yes
Yes
No
Yes
No
No
No
No
Microwave-Safe Plastic
Yes
No
Yes*
Plastic Wrap, Wax Paper
Yes
No
No
Paper Products
Yes
No
No
Straw, Wicker, and Wood
Yes
No
No
Ceramics,
China
Metal Cookware
Non Heat-Resistant
Glass
* Use only microwave cookware that is safe to 450°F
Using the oven rack
MICROWAVE
No
CONVECTION
Yes
COMBINATION
Yes
TIPS FOR MICROWAVE
COOKING
BROWNING
Meat and poultry with high fat content cooked for at
least 10 to 15 minutes will brown lightly. Foods cooked
a shorter time can be brushed with a browning agent,
such as Worcestershire sauce, soy sauce, or barbecue
sauce.
ARRANGEMENT
Do not stack food. Arrange in a single layer in the dish
for more even cooking. Because dense foods cook
more slowly, place thicker portions of meat, poultry,
fish, and vegetables toward the outside of the dish.
TESTING FOR DONENESS
Foods cook quickly in a microwave oven; test frequently
for doneness.
COVERING
A cover will trap heat and steam and cause the food to
cook more quickly. Use a lid or microwave-safe plastic
wrap with one corner folded back to vent the excess
steam. Lids on glass casseroles can become hot
during cooking; always handle carefully. Waxed paper
will prevent the food from splattering in the oven and
help retain heat. When warming bread items, use
waxed paper, napkins, or paper towels. To absorb extra
moisture, wrap sandwiches and fatty foods in paper
towels.
STANDING TIME
Food often needs to stand from 2 to 15 minutes after
being removed from the oven. Usually, you need to
cover food during standing time to retain heat. Remove
most foods when they are slightly undercooked and
they will finish cooking during standing time. The
internal temperature of food will rise about 10 ° F during
standing time.
SPACING
Arrange individual foods, such as baked potatoes,
cupcakes, and hors d'oeuvres in a circle and at least
1 inch apart. This will help the food cook more evenly.
SHIELDING
To prevent some portions of rectangular or square
dishes from overcooking, you may need to shield
them with small strips of aluminum foil to block the
microwaves. You can also cover poultry legs and
wing tips with foil to keep them from overcooking.
Always keep foil at least 1 inch from oven walls
to prevent arcing.
STIRRING
Stirring blends flavors and redistributes the heat in
foods. Always stir from the outside toward the center
of the dish. Food at the outside of the dish heats first.
PIERCING
Pierce the shell, skin, or membrane of foods before
cooking to prevent them from bursting. Foods that
require piercing include yolks and whites of eggs, hot
dogs, clams, oysters, and whole vegetables, such as
potatoes and squash.
TURNING
Large foods, such as roasts and whole poultry, should
be turned so that the top and bottom cook evenly. Also
turn over chicken pieces and chops.
10
PRECAUTIONS
• Place the front surface of the door three inches or
more from the countertop edge to avoid accidental
tipping of the microwave oven during normal use.
° To program the oven, make sure you touch the center
of each pad firmly since the areas between the pads
will not activate the oven. A tone will sound each time
a pad is touched correctly. Do not touch several pads
• Use thermometers that have been approved for
microwave oven cooking.
• The turntable must always be in place when you
operate the oven.
• Do not use your microwave oven to cook eggs in the
shell. Pressure can build up inside the shell, causing it
to burst.
at once.
• There are several precautions to follow when
microwaving popcorn:
-- Do not pop popcorn, except in a microwave-safe
container or commercial packages designed for
microwave ovens.
-- Never try to pop popcorn in a paper bag that is not
microwave-approved.
-- Overcooking may result in smoke and fire.
-- Do not repop unpopped kernels.
-- Do not reuse popcorn bags.
-- Listen while corn pops. Stop oven when popping
slows to 2-3 seconds between pops.
-- Do not leave microwave unattended while popping
• Do not strike the control panel with silverware,
cookware, etc. Breakage may occur.
• Always use caution when taking cookware out of the
oven. Some dishes absorb heat from the cooked food
and may be hot. See the "Cookware Guide" earlier in
this section for more information.
• Do not rinse cookware immediately after cooking. This
may cause breakage. Also, always allow the turntable
to cool before removing it from the oven.
• Never operate the oven when it is empty. Food or
water should always be in the oven during operation
to absorb the microwave energy.
• Do not use the oven to dry newspapers or clothes.
They may catch fire.
corn.
-- Follow directions on bag.
CLEANING
DOOR
For best performance and safety, the inner door panel
and the oven front frame should be free of food or
NOTE: Before cleaning the oven, unplug the power
cord. If this is impossible, open the oven door to
prevent an accidental oven start.
grease buildup. Wipe often with a mild detergent; then
rinse and wipe dry. Never use cleaning powders or
rough pads.
INTERIOR
Wipe the oven inside and outside with a soft cloth and
a mild detergent solution. Then rinse and wipe dry. This
should be done weekly or more often, if needed. Never
use cleaning powders or rough pads.
After cleaning the control panel, touch CLEAR to clear
any entries that might have been entered accidentally
while cleaning the panel. Also make sure that the
turntable and rotating ring are in the right position.
Excessive oil splatters on the inside top will be difficult
to remove if left for many days. Wipe splatters with a
wet paper towel, especially after cooking chicken or
bacon.
REMOVABLE PARTS
The turntable and rotating ring are removable. They
should be hand-washed in warm (not hot) water with a
mild detergent and a soft cloth. Once they are clean,
rinse well and dry with a soft cloth. Never use cleaning
powders, steel wool, or rough pads.
• The turntable may be cleaned at the sink. Be careful
not to chip or scratch the edges as this may cause
the turntable to break during use.
• The rotating ring should be cleaned regularly.
11
SE ING
THE CLOCK
CHILD LOCK
When your oven is plugged in for the first time or when
power resumes affera _wer interruption, the contents
of who_e display will show on the display,
This is a unique safety feature that prevents unwanted
oven operation by children. Once the CHILD LOCK is
set, no cooking can take place.
To set the clock for 12:30.
To set the Child Lock.
¥1
1. Touch CLEAR.
1 Touch and ho_d 0 until LOCKED
appears in the display and two
tones are heard, if the clock is
already set, the time of day will
show on the disp,lay.
2, Touch CLOCK.
Display scrolls the words
ENTER TIME OF DAY,
3. Enter the correct time by
touching the numbers in
sequence. Display scrolls
the words TOUCH START.
1
2
8
.....
O
If the CHILD LOCK is set and another cooking pad is
touched, the word LOCKED will show in the display.
O
To cancel the Child Lock.
4. Touch START/PAUSE
1. Touch and hold 0 until
LOCKED disappears from the
display:
TIMER ON/OFF
....
O
After CHILD LOCK is turned off, the time of day will
show on the display and the oven's cooking functions
will operate normally,
Timer On/Off operates as a kitchen timer for timing up
to 99 minutes 99 seconds and can be used at any
time, even when the oven is operating.
EZ ON
To set 3 minutes.
A time-saving feature_ this pad lets you set and start
microwave cooking without touching START/PAUSE.
1. Touch CLEAR
To cook for 2 minutes.
2, Touch TIMER ON/OFF,
Display scrolls the words
ENTER TIME IN MIN AND SEC,
oochc
3. Enter the time by touching the
numbers in sequence.
Display scrolls the words
TOUCH TIMER,
2. Touch Ez On twice.
3. At the end of the _ok time,
four tones will sound,
The oven will stop.
4. Touch TIMER ON/OFF.
To cancel timer at any time, touch
TIMER ON/OFF,
NOTES:
. To set the timer when the oven is operating_ touch
TIMER ON/OFF and enter the desired time by
touching the number pads; then touch
TIMER ON/OFF again,
The timer countdown will show on the display for four
seconds, then the cooking time will display again.
• You can check the timer at any time while the oven is
operating by touching the TIMER ON/OFF pad,
• To cancel the timer, touch TIMER ON/OFF twice.
12
i
;
x2
HOLD WARM
The reminder feature can be used _ikean alarm clock
without starting the oven. The reminder time can be
set to activate up to 12 hours Iater.
You can safely keep hot, cooked food warm in your
microwave oven for up to 99 minutes. "Youcan use
HOLD WARM by itself, or to automatically follow a
timed cooking cycie.
Be sure the clock shows the correct time of day.
To use HOLD WARM.
l
1, Touch CLEAR.
1. Put hot, cooked food in the oven
and cbse the door,
L
CLEAR
2, Touch REMINDER.
Display scrolls the words
ENTER REMIND TIME
2. Touch CLEAR.
3. Touch HOLD WARM,
Display scrolls the words
TOUCH START.
3_
4 Touch START/PAUSE
Display shows WARM.
Enter the time you want the
oven to remind you.
Display scrolls the words
TOUCH REMINDER.
4. Touch REMINDER.
Display scrolls the words
REMINDER SET Once.
To program HOLD WARM to automatically follow
another cooking cycle:
• After entering the timed cooking instruction_ touch
HOLD WARM before touching START/PAUSE.
. When the last c_king cycle is over, you will hear
two tones. "WARM" will show on the display while
the oven continues to run.
NOTE: P_:ogramm_ reminder time can be displayed by
touching REMINDER To clear the reminder pr_ram,
touch REMINDER then touch CLEAR,
NOTES:
- Opening the door or touching CLEAR cancels HOLD
WARM Close the door and touch HOLD, WARM,
then touch START/PAUSE if additional HOLD
WARM time is desired,
* Food that is covered during cooking should be
covered during HOLD WARM,
. Pastry items (pies, turnovers, etc.) should be
uncovered during HOLD WARM,
. Complete meals kept warm on a dinner p_ateshould
be cover_ during HOLD WARM
. Do not use more than one complete HOLD WARM
cycle, The quality of some foods wil{ suffer with
extended time.
This convenient feature lets you repeat the previous
cooking function without having to reprogam the oven.
To set RECALL
1_ Put the food in the oven and
close the door
2. Touch CLEAR.
3. Touch RECALL.
The oven will repeat the previous
cooking
program.
Touch this pad to:
1, Start the function you set
2. Pause the oven temporarily during cooking.
• Touch this pad again to restart after PAUSE,
Touch this pad to:
1, Cancel a program during cooking,
2. Erase or reset during programmiing.
13
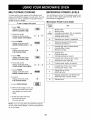
TIMED COOKING
The MORE and LESS functions will adjust the cook
time of many oven _nctions. MORE will add 10
seconds to the cook time each time you press it
LESS wHIIsubtract 10 seconds of cook time each time
you press it
This feature lets you program a specific cook time
and power: There are 10 power level settings in
addition to HiGH power (100%), Refer to the
"Microwave Power Level Chart" on page 15 for more
information,
To adjust SENSOR POPCORNfor =_re cook time.
To cook for 5 minutes 30 seconds at 80% pow_.
1. Touch SENSOR POPCORN.
1. Touch TIME
Display scrolls the words
ENTER COOKING TIME
The oven wiil cook food automatically with the
sensor system.
2. Touch MORE. Remaining cook time will increase
by 10 seconds,
2. Touch 5, 3, and 0.
Display scrolls the words
TOUCH START OR POWER,
NOTES:
• MORE and LESS do not adjust cook time for the
DEFROST and HOLD WARM functions.
• Use MORE and LESS during the cook cycle.
- For _nvection c_k[ng, MORE and LESS are used
as temperature selection pads.
4. Touch 8.
Display scrolls the words
P-80 TOUCH START
Program your microwave oven to turn the c_ock and
demo modes on or off, adjust the sound level, adjust
the scroll speed of the display, and switch between
3ounds and kilograms, °C and °E English and Spanish,
5_Touch START/PAUSE
NOTE: ]f you _ not select a power level, the oven will
automatically cook at HIGH (100%) power.
2, Touch 2.
Display scrolls the words
CLOCK ON TOUCH1 OFF TOUCH2.
2
3. Touch 2.
CLOCK OFF.
2
The Help displays feature information and helpfu_ hint&
Press Help, then sel_t a feature pad.
To learn about custom set.
NOTE: To turn the clock back on, repeat Steps 1-3.
1. Touch HELP.
SET CHART
Choices
2 Touch CUSTOM SET.
Sound Control
1
Mute, Low_ Medium, Loud
Clock ON/OFF
2
Clock On or Clock Off
Scroll Speed
3
Slow, Normal Fast
LBS oF/KG '_C
4
Demo ON!OFF
English/Spanish
Lbs _ F or Kg _C
5
_
Demo On or Demo Off
_
6
[
The oven will stop,
1, Touch CUSTOM SET.
Touch
Keypad
8
6 At the end of the cook time,
four tones will sound.
To turn off the crock.
Function
3 0
3, Touch POWER
Display scrolls the words
ENTER POWER LEVEL 1 - l&
CUSTOM SET
CUSTOM
S
English or Spanish
NOTE: When the power cord is first plugg_ in, the
default settings are: Loud Sound,. Clock ON, Normal
Speed, LBS _ F, Demo OFE and English,
14
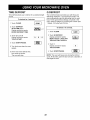
MULTI-STAGE
MICROWAVE POWER LEVELS
COOKING
For best re,suits, some recipes call for different cook
powers during different stages of a cook cycle. You can
program your oven to switch from one power level to
another for up to 2 stages,
Your microwave oven has 10 cook power levels to let
you cook or heat a wide variety of foods. Refer to the
chart below for suggestions:
Microwave
Power Level Chad
To set a 2-stage cook cycle,
Use
Power
Level
1. Touch TIME.
Display scrolls the words
ENTER COOKING TIME.
10
(High)
2. Touch 5, 3, and O.
Display scrolls the words
TOUCH START OR POWER.
3. Touch POWER.
Display scrolls the words
ENTER POWER LEVEL 1 - 10.
4. Touch 8.
Display scrolls the words
P-_ TOUCH START.
6. Touch 3, O, and O.
Display scrolls the words
TOUCH START OR POWER.
7. Touch POWER.
Display scrolls the words
ENTER POWER LEVEL 1 - 10.
g.
3
(
Touch START/PAUSE.
PAUSE
10. When the first stage is over, you
will hear two sho_ tones as the
oven begins the second
stage,
• Reheating rice, pasta, & vegetables.
8
, Reheating prepared foods quickly:
• Reheating sandwiches.
7
• Cooking cakes, breads.
• Melting chocolate.
6
• Cooking veal.
, Cooking whole fish.
• Cooking puddings & custard.
5
• Cooking ham, whole poultry, & lamb.
• Cooking rib roast, sirloin tip.
4
• Thawing meat, poultry, & seafood.
3
• Cooking less tender cuts of meal
• Cooking pork chops, roast.
2
8. Touch 3.
Display scrolls the words
P-30 TOUCH START.
cook
11. At the end of the cook time,
four tones will sound.
The oven will stop,
NOTE: If you are using the AUTO DEFROST feature
as one of the cooking stages, it must be programm_
as the first stage.
15
• Cooking poultry pi_es, fish, & vegetables.
• Cooking tender cuts of meat.
, Cooking whoJe poultry.
9
8
5. Touch TIME.
Display scrolls the words
ENTER COOKING TIME.
• Boiling water.
• Making candy.
Taking chill out of fruit.
• Softening butter.
"i
1
• Keeping casseroles &main dishes warm.
• Softening butter & cream cheese.
0
, Standing time,
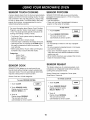
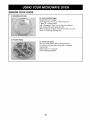
SENSOR TOUCH COOKING
SENSOR POPCORN
A sensor detects steam from the fo_ and automaticallly
adjusts cook time for the best cooking results. It's easy
and convenient--the oven will guide you, step-by-step,
to cook or reheat foods. The Sensor Menu, with many
popular food choices, is preprogrammed to cook or
reheat food perfectly eve_t[me.
SENSOR POPCORN betsyou pop commercially
packaged microwave popcorn (1.75 to 3.5 ounces).
For best results:
• Use fresh popcorn.
, Place only one bag of prepackag_ microwave
popcorn on the center of turntable.
To pop 3.5 oz.
For more information about Sensor Touch Cooking
Programs, see the "Sensor Cook Guide" on pages
17-20. This Guide provides specific instructions for
cooking and heating a variety of foods.
1. Touch CLEAR.
2, Touch SENSOR POPCORN.
The oven will cook fo_
- The Sensor Touch system works by detecting a
build-up of vapor.
• Make sure the door remains closed,
, Once the vapor is detected, two beeps will sound.
- Opening the door or touching the CLEAR before
the vapor is detected will aboR the process. The
oven will stop,
• Before using Sensor Touch, make sure the glass
turnt_le is dry, to assure the best tesults.
automatically by sensor system_
NOTES:
• Do not attempt to reheat or cook any unpopped
kernels,,
• Do not use popcorn popping devices in microwave
oven with this feature,
- If you use a microwave popper, test it on sensor.
There are many such devices available and their
results may vary,
• [N NO CASE should you use a popper that concentrates the microwave energy,
Sensor Cook
Sensor Popcorn
Sensor Reheat
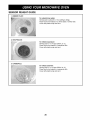
SENSOR
SENSOR
C:00K
REHEAT
This feature allows you to reheat precooked, roomtemperature or refrigerated fo_s without selecting
cooking times and power levels,
SENSOR COOK allows you to cook most of your
favorite foods without having to select cooking times
and power levels. The oven automatically determines
required cooking times for each food item.
Sensor Cook has i 0 fo_
_R
Sensor Reheat has 3 caLegofies: Dinner plate,
Soup/Sauce, Casserole.
categories,
To reheat casserole.
To cook FROZEN ENTREE.
1. Touch CLEAR.
1. Touch CLEAR
2 Touch SENSOR REHEAT,
Display scrolls the words
SELECT MENU 1 - 3
2. Touch SENSOR COOK,
Display scrolls the words
SELECT MENU 0 - 9
3. Touch 4.
Display shows SENSING.
The oven will cook food
_R
C_
3, Touch 3,
Display shows SENSING.
The oven win cook food
automatically by sensor system.
4
automaticarly by sensor system,
16
3
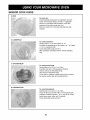
SENSOR COOK GUIDE
1. POTATOES
To cook potatoes:
Serving size is 1 to 4 medium, about 8 to 10 oz (225g
to 28%) each.
Pierce each potato several times with a fork and place
around the edge of the oven tray, at least 1 inch
(2.5cm) apart.
2. FRESH VEGETABLES
To cook fresh vegetables:
Serving size is 1 to 4 cups (250mL to 1L),
Place moist vegetables in a microwavable container:
Add 2 to 4 tablespoons water.
Cover with plastic wrap and vent.
Most vegetables need stirring and 2 to 3 minutes
standing time after cooking.
3. FROZEN VEGETABLES
To cook frozen v_etables:
Serving size is 1 to 4 cups (250mL to 1L).
Remove from package and place vegetable in a
microwavable container.
Add 2 to 4 tablespoons water,
Cover with plastic wrap and vent.
Most vegetables need stirring and 2 to 3 minutes
standing after cooking.
4°FROZEN
ENTREE
To cook a frozen entree:
Entree size: 10 to 20 oz (28% to 560g}.
Remove from outer package. Loosen cover on three
sides.
If entr6e is not in a microwave-safe container, place it
on a plate, cover with plastic wrap and vent.
Most entr6es need 2 to 3 minutes standing time after
cooking.
17
SENSOR COOK GUIDE
5. RICE
To cook rice:
Follow package instructions for ingredient amounts.
Place rice and liquid (water, chicken, or vegetable
stock) in a microwave-safe container, _ver with
casserore ![dor plastic wr_ and vent,
Most rice needs 2 to 3 minutes standing time a_er
cooking.
6. CASSEROLE
To cook casseroles:
Serving size is I to 4 cups (250mL to 1L),
Combine the ingredients per the recipe in a 1_to 2-quart
(1- to 2-L) casseroJe dish,
Cover with plastic wrap and vent.
After cooking is compllete, allow 3 minutes standing
time.
7. GROUND,
MEAT
To cook ground meat:
Serving size is 4 to 32 oz (V_to 2 Ibs).
Crumble meat into a microwavab]e container.
Season and cover with plastic wrap.
Vent cover for well=done meat,
Cover dish for medium cooked meat (such as meat to
be us_ ionanother dish and cooked further),
8, FISH/SEAFOOD
To cook fish/seafood:
Serving size is 4 to 32 oz (V_to 2 Ibs).
Place the food around the sides of a microwave=safe
container. Season and add % to V_ cup (60 to 125ml)
liquid (wine, water, sails& etc.) if desired
Cover with plastic wrap and vent.
18
SENSOR COOK GUIDE
9. SCRAMBLED
EGGS
To cook scrambl_ _gs:
Sewing size is 2 to 5 eggs.
Break eggs into a 4-cup (1 L) measuring cup or
1-quart (1L) casserole dish.
Add 1 tabJespoon (15mL) milk or water per egg and
beat. Cover with plastic wrap and vent.
When cooking is complete, remove from oven, stir, and
allow 1 to 2 minutes standing time.
0. FROZEN PIZZA
To cook frozen pica:
Use onJy frozen pizza made for microwave use,
Do not cover (the kind that _mes with a succeptor
_oking tray).
Serving size is I or 2 pizzas.
Follow package directions.
19
SENSOR REHEAT GUIDE
!. DINNER PLATE
To reheat dinner plate:
Serving size is about 8 to 16 oz (225g to 450g).
Place food to be heated on a dinner plate or similar dish,
Cover with plastic wrap and vent.
2. SOUP/SAUCE
To reheat soup/sauce:
Serving size is 1 to 4 cups (25OraL to IL),
Place food to be heated in a casserome dish.
Cover with plastic wrap and vent,
iiiiiiiiiiiiiiiiii _
3. CA_EROLE
To reheat casserole:
Serving size is 1 to 4 cups (250mL to 1L),
Place food to be, heated in a casserole dish.
Cover with plastic wrap and venL
2O
DEFROST AUTO/TIME
For best results:
• Remove fish, shellfish, meat, and poultry from its
original closed paper or plastic package (wrapper).
Otherwise, the wrap will hold steam and juice close to
the foods, which can cause the outer surface of the
foods to cook_
• Form the meat into the shape of a doughnut before
freezing. When defrosting, scrape off thawed meat
when the beep sounds and continue defrosting.
• Place foods in a shallow glass baking dish or on a
microwave roasting rack to catch drippings,
° Foods should still be somewhat icy in the center
when removed from the oven,
The Defrost Auto/Time feature gives you two ways to
defrost frozen foods. Touch DEFROST AUTO/TIME
once for Auto Defrost or twice for Time Defrost.
AUTO DEFROST
Four defrost choices are preset in the oven. The
defrost feature provides you with the best defrosting
method for frozen foods_ The Auto Defrost fist shows
which defrost se_ing is recommended for the food you
are defrosting. With the Auto Defrost feature, the oven
automatically sets the defrosting times for each food
item ac_rding to the weight you enter_ For a_ed
convenience, the Auto Defrost includes a buHtqn tone
mechanism that reminds you to check, turn over,
separate or rearrange the food during the defrost
cycle. Four different defrosting leve_s are provided.
1. MEAT
2. POULTRY
3. FISH
4. BREAD
AUTO DEFROST' CHART
Sequence
Food
i. MEAT
BEEF
0.1 to 6.0 Ibs Ground _ef, Round steak, Cu_s for stew,
(01 to 4.0kg) Tenderloin steak, Pot roast, Rib roast,
Rump roast, Chuck roast, Hamburger patty.
After touching the DEFROST AUTO/TIME pad once,
select the food catego_ by touching a number pad: 1
(MEAT), 2 (Poultry), 3 (Fish), and 4 (Bread). Available
weights for Meat, Poultry and Fish are &l to 6.0 lbs
(0. I to 4.0kgs). The available weight for Bread is 0.1 to
I lb (0,1 to 0.5kg)
LAMB
Chops (1-inch thick), Rol_edroast
PORK
Chops (q_-inchthick), Hot dogs, Spareribs,
Countryostyle ribs.
Roiled roast, Sausage,
VEAL
To defrost 1.2 Ibs of meat,
Cutlets (1 Ib, W-inch thick)
1. Touch CLEAR.
2, POULTRY POULTRY
0.1 to 6.0 Ibs Who_ (under 4 bs}, Cut up,Breasts(boneless)
2, Touch DEFROST AUTO/TIME
once, Display scrolls the words
MEAT TOUCH 1 POULTRY
TOUCH 2 FiSH TOUCH 3
BREAD TOUCH 4.
3. Touch 1
Display scrolls the words
ENTER WEIGHT
(0,1
CORNISH
HENS
Who_e
TURKEY
Breast (under 6 Ibs)
3. FISH
FISH
0.'1 to 6.0 ibs Fillets, Whole Steaks
1
(0.1 to 4.0kg) SHELLFIS.H
Crab meat, Lobster tails, Shrimp, Scallops
4. BREAD
4. Enter the weight by touching
1 and 2. Display scrolls the
words i.2 LBS TOUCH START,
5oTouch START/PAUSE
to 4,0kg)
MUFFINS
0,1 to 10 Ib ROLL CAKE
to 0.5k )
I PA_E
ST_T I
NOTE: After you touch START/PAUSE, the display
counts down the defrost time. The oven will beep once
during the Defrost cyc]e, At this time, open the door and
turn separate, or rearrange the food as needed.
Remove any portions that have thawed then re_rn
frozen portions to the oven and touch STARTIPAUSE
to resume the defrost cycle. The oven will not STOP
during the BEEP unless the door is opened.
21
TIME DEFROST
Q DEFROST
Time Defrost a_lows you to defrost for a selected _ength
of time.
The Q Defrost feature provides you with the quick
defrosting method for 1.0 pound frozen foods. The
oven automatically sets the defrosting time for each
food, Three quick defrost settings are preset in the
oven. Select a category by touching the number pad:
1 (Meat_, 2 (Poultry) and 3 (Fish)
To defrost for 3 minutes.
1. Touch CLEAR.
2. Touch DEFROST
AUTO/TIME twice,
To defrost I Ib of meat.
x2
Display scrolls the words
ENTER DEFROST TIME
1 Touch CLEAR,
5. Turn food over when the oven
signals.
6. At the end of the defrost time,
four tones will sound,
The oven will stop.
C_
}
2. Touch Q DEFROST.
Display scrolls the words
MEAT TOUCH 1 POULTRY
TOUCH 2 FiSH TOUCH 3.
3. Touch 3, 0, and 0,
Displlay scroills the words
TOUCH START.
4, Touch START/PAUSE
(
START
PAUSE
3, Touch 1.
Display scrolls the words
TOUCH START.
i
4, Touch START/PAUSE.
NOTE: The oven will beep once during the Defrost
cycle. At: this time, open the door and turn, separate, or
rearrange the food.
TIPS FOR CONVECTION
COOKING
This section gives you cooking instructions and procedures for operating each convection function.
Please read these instructions carefully.
Convection cooking circulates hot air through the oven cavity with a fan. The constantly moving air surrounds the
food to heat the outer portion quickly, creating even browning and sealed-in flavor by the constant motion of hot air
over the food surfaces. Your oven uses convection cooking whenever you use the Convection Command Pads.
DO NOT USE THE OVEN WITHOUT THE TURNTABLE IN PLACE.
1. You can cook food with the Metal Cooking Rack on the turntable.
2. Do not cover turntable or metal rack with aluminum foil. It interferes with the flow of air that cooks the food.
3. Round pizza pans are excellent cooking utensils for many convection-only items.
Choose pans that do not have extended handles.
4. Use convection cooking for items like souffles, breads, cookies, angel food cakes, pizza, and for some meat
and fish cooking.
5. You do not need to use any special techniques to adapt your favorite oven recipes to convection cooking;
however, you may need to lower some temperatures or reduce some cooking times from the convection oven
cooking directions. See examples in the charts in this section.
6. When baking cakes, cookies, breads, rolls, or other baked foods, most recipes call for preheating. Preheat the
empty oven just as you do a regular oven. You can start heavier dense foods such as meats, casseroles, and
poultry without preheating.
7. All heatproof cookware or metal utensils can be used in convection cooking.
8. As in conventional cooking, the distance of the food from the heat source affects cooking results. Refer to
the charts in this Use and Care Guide.
9. Use metal utensils only for convection cooking. Never use for microwave or combination cooking since arcing
and damage to the oven may occur.
10. After preheating, if you do not open the door, the oven will automatically hold at the preheated temperature
for 30 minutes.
PRECAUTIONS
• The oven cavity, door, turntable, rotating ring, metal racks, and cooking utensils will become very hot.
USE THICK OVEN GLOVES when removing the food, cooking utensil, metal rack, and turntable from the oven
after convection cooking.
• Do not use lightweight plastic containers, plastic wraps, or paper products during any convection cycle.
23
This section gives you the instructionsfor operating automatic convection and combination c_king.
"Youcan select among 8 popular foods using Auto Roast and Auto Bake.
AUTO BAKE
AUTO ROAST
Auto Bake automatically bakes frozen pizza, muffins,
biscuits, and frozen french fries. Some foods have a
preheat time. When you cook muffins and biscuits,
place food on the rack after the preheat cycle.
Auto Roast automatically roasts beef, whole chicken.
turkey breasts, and poA
1_Touch CLEAR.
To bake 6 muffins.
I, Touch CLEAR,
To roast a whole chicken (3 Ibs),
C_
2, Touch AUTO BAKE,
Display scrolls the words
FROZEN PI_A TOUCH i
MUFFINS TOUCH 2 BiSCUiT/
DINNER ROLL/BoSTICK
TOUCH 3 FROZEN FRENCH
FRIES TOUCH 4_
2. Touch AUTO ROAST,
Display scrolls the words
BEEF TOUCH i WHOLE
CHICKEN TOUCH 2 TURKEY
BREASTS TOUCH 3 PORK
TOUCH 4.
3. Touch 2 for whole chicken.
Display scrolls the words
USE RACK ENTER 2.5 - 6LBS°
3. Touch 2 for muffins.
Display scrolls the words
USE RACK AND 6 CUP
MUFFIN PAN NO FOOD IN
OVEN TOUCH START,
C_
4.
2
Touch the 3, 0 to set the
desired weight,
Display scrolls the words
3.0 LBS TOUCH START,
5. Touch the START/PAUSE
4, Touch tlhe START/PAUSE,
PAU_
After preheat cycle ends, the oven
will beep and directions will be
dispmayedduring auto cooking
Follow the instructions. Open the
door and place muffin cup on the
rack. Close the door.
5. Touch the START/PAUSE.
NOTES:
• Frozen pizza and frozen french fries do not have a
preheat time.
• Auto Bake can be programmed with MOREILESS.
When you want to adjust the time of the preset
program, use MORE or LESS a_er Step 3,
• Refer to the "Auto Bake Guide" on page 25 for more
information,
NOTE:
, Auto Roast can be programmed with MORE/LESS,
When you want to adjust the time of the preset
program, use MORE or LESS after Step 4,
• The available weight for each food is different.
Refer to the "Auto Roast Guide' on page 26.
AUTO BAKE GUIDE
1. FROZEN PIZZA
To cook frozen pizza:
For best results a pizza pan is not required
Use a 12-inch thin-crust frozen pizza, if using a rising
crust pizza, add an add[t:ional 10 to 20 minutes baking
time on convection 450 ° R
Place frozen pizza directly on short rack
After baking is over, remove pizza from the oven.
2_ MUFFINS
To cook muffins:
Use 1 package of a muffin mix.
Place short rack on turntable.
After PREHEAT, use 6-_p muffin pan;
place pan on rack.
3. B|SCU!T/D|NNER
ROLL/BREAD
STICKS
To cook biscuits, dinner rolls, or bread sticks:
For best results_ bake one pan of biscuits, dinner rolls,
or breadsticks at a time.
After PREHEAT,, place the biscuits 1 to 2 inches apa_
on engrossed 12oinch round pizza pan or cookie sheet
on short ra_.
Cool on rack for 10 minutes after cooking
4oFROZEN FRENCH FRIES
To cook frozen french fries:
Use frozen, prepared french fries.
Do not overlap or layer potatoes,
For crispier potatoes, use MORE to add additional
cooking time_
Spread the french fries on 104nch pan.
Place the 12-inch pan on short rack.
After cooking, remove pan from the oven.
Weight range: 4 to 16 oz.
AUTO ROAST GUIDE
!. BEEF
To cook beef roast:
Weigh roast and pat dq¢ with paper towels,
Place a microwave-safe/heat-proof plate on turntable to catch
drippings.
Place roast on short rack.
After cooking, loosely tent roast beef with aluminum foil and ]et
stand for 5 to 10 minutes.
Weight range: 2 to 4 [bs,
2. WHOLE CHICKEN
To cook whole chicken:
Weigh whole chicken. Remove giblets and neck and discard.
ThorougHy wash inside and outside of chicken with cold water:
Pat chicken dry with paper towels. Secure the legs with kitchen
_[ne. Brush outside of chicken with melted butter or margarine.
Place a microwave-safe/heat-proof plate on turntable to catch
drippings. Place chicken breast side up on sho_ rack,
A_er _oking, loosely tent roast chicken with aluminum foil and
let stand for 10 minutes_
Weight range: 2.5 to 6 Ibs.
3, TURKEY
BREAST
To cook turkey breast:
Weigh turkey bre_t and pat dry with paper towels. Brush turkey
breast with meilted butter. Place a microwave=safe/heat-proof
plate on turntable to catch dr[ppings. Place turkey breast on
short rack.
After oook[ng, bosely tent roast turkey with aluminum foil and let
stand for 5 to 10 minutes.
Weight range: 3 to 6 _bs.
4. PORK ROAST
To cook pork roast:
Weigh roast and pat dry with paper towel&
Place a microwave-safe/heat-proof plate on turntable to catch
drippings
Place roast on short rack.
After _oking, loosely tent roast with aluminum foil and
let stand for 5 to 10 minutes.
Weight range: 2 to 4 _bs,
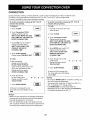
Duringconvection
cooking,a heatingelementisusedtoraisethetemperature
oftheairinsidetheoven,
Convection
cookingtemperature
rangefrom225°'Fto450°Fand100°Fmaybeprogrammed.
Itis besttopreheattheovenwhen_nvectioncooking
Tosettheconvectioncookingat325°Ffor45
To set the convection cooking at 375°F for
minuteswith preheat.
minutes without preheat.
To preheat:
To cook
f
1 Touch CLEAR
_
1_ Put food on the oven rack, and
dose the door.
2. Touch Convection COOK_
Display scrolls the words
350F TOUCH MORE OR LESS
FOR TEMP SET OR START OR
ENTER COOKING TIME
3, Touch LESS on_
2. Touch CLEAR.
.
to set 325 _E
DispUay scrolls the words
325F TOUCH START FOR
PREHEAT OR ENTER
COOKING TIME
4, Touch
Display START/PAUSE
shows PREHEAT
45
Touch Convection COOK.
Display scrolls the words
3_F TOUCH MORE OR LESS
FOR TEMP SET OR START OR
ENTER COOKING TIME.
4. Touch MORE once to set 375°R
325F.
l
8T_
PA_E
1
To cook:
.
5. After preheating_
display scrolls the ,words
PLACE FOOD ON RACK,
Open the _or, place food on the
oven rack, and close the door,
DispUayscrolls the words
ENTER COOKING TIME
Touch 4_ 5, O, 0 to set the
cooking time,
Disptay scrolis the words
TOUCH START
6 Touch START/PAUSE,
4
S 0
0
PAUSE
At the end of the cooking time,
four tones will sound and display
shows END,
6. Touch 4, 5, 0, 0 to
set the cooking time.
DispUayscrolls the words
TOUCH START.
7. Touch START/PAUSE.
Display scrolls the words
375F TOUCH START FOR
PREHEAT OR ENTER
COOKING TIME.
PA_E
At the end of cooking time, four
tones will sound and display shows
END.
NOTES:
- When the oven reaches the set preheat temperature,
five tones wiil sound and the oven will automatically
hold that temperature for 30 minutes
• The oven temperature drops very quickly when the
door is open_; however_ this should not prevent food
from being fl.JHycooked during normal cooking time.
NOTES:
, By using the MORE/LESS in convection cooking, you
can set the desired temperature.
• The temperature range has 10 steps from 225_F to
450 ° F including 100 ° F (dough rising).
, Use MORE!LESS to increase!decrease the
temperature by 25 ° F after touching theConvection.
(The default temperature is 350 _F.)
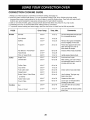
CONVECTION
COOKING
GUIDE
1. Always use metal accessory rack when convection baking. (See page 6.)
2. Aluminum pans conduct heat quickly. For most convection baking, light, shiny finishes give best results
because they prevent overbrowning in the time it takes to cook the center areas. Pans with dull (satin-finish)
bottoms are recommended for cake pans and pie pans for best bottom browning.
3. Dark or non-shiny finishes, glass, and pyroceram absorb heat which may result in dry, crisp crusts.
4. Preheating the oven is recommended when baking foods by convection.
5. To prevent uneven heating and save energy, open the oven door to check food as little as possible.
FOOD
Breads
Cakes
Cookies
Oven Temp.
Time,
Min.
Comments
Biscuits
400 o F
10to 12
Corn Bread
400 ° F
15 to 20
Muffins
400 ° F
18 to 24
Remove from pans immediately
and cool slightly on wire rack.
Popovers
350 o F
30 to 40
Nut Bread or Fruit Bread
350°F
55 to 65
Pierce each popover with a fork
after removing from oven to
allow steam to escape.
Interiors will be moist and tender.
Yeast Bread
375°F
18 to 25
Plain or Sweet Rolls
350°F
13 to 16
Lightly grease baking sheet.
Angel Food
Cheesecake
350°F
40 to 50
Invert and cool in pan.
350°F
60 to 65
After cooking, turn oven off and
let cheesecake stand in oven 30
minutes with door ajar.
Coffee Cake
350°F
25 _ 30
Cup Cakes
350°F
15 _ 20
Fruit Cake (loaf)
300°F
80 _ 90
Gingerbread
350°F
35 _ 40
Butter Cakes, Cake Mixes
350°F
30 _ 40
(2 layers)
Fluted Tube Cake
Use 2 shelves. Top layer may
bake in less time.
350°F
40 _ 50
Grease and flour pan.
Pound Cake
350°F
60 _ 70
Bar
350°F
35 _ 45
Cool in pan 10 minutes before
inverting on wire rack.
Use same time for bar cookies
from a mix.
375°F
lOto
Drop or Sliced
28
14
Canned refrigerated biscuits take
2 to 4 minutes less time.
Interior will be moist and tender.
Use same time for sliced cookies
from a mix.
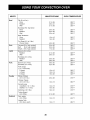
FOOD
Fruits,
Other
Desserts
Pies,
Pastries
Casseroles
Comments
Oven Temp.
Time, Min.
Baked Apples or Pears
350°F
30 to 40
Bake in cookware with shallow sides.
Bread Pudding
300°F
35 to 40
Pudding is done when knife inserted
near center comes out clean.
Cream Puffs
400°F
30 to 35
Puncture puffs twice with toothpick
to release steam after 25 minutes
of baking time.
Custard (individual)
350°F
45 to 50
Set cups in baking dish. Pour
boiling water around cups to a
depth of 1 inch.
Meringue Shells
300°F
30 to 35
When done, turn oven off and let
shells stand in oven 1 hour to dry.
Frozen
375°F
40 to 45
Follow package directions.
Meringue-topped
325°F
13 to 16
Follow package directions.
Two-crust
400°F
50 to 55
Follow package directions.
Quiche
350°F
30 to 35
Let stand 5 minutes before cutting.
Pastry Shell
400°F
10 to 16
Pierce pastrywith fork to prevent
shrinkage.
Meat, chicken, seafood
combinations
350°F
20 to 40
Cook times vary with casserole size
and ingredients.
Pasta
350°F
25 to 45
Cook times vary with casserole size
and ingredients.
Potatoes, scalloped
350°F
55 to 60
Let stand 5 minutes before serving.
Vegetable
350°F
25 to 35
Cook times vary with casserole size
and ingredients.
350°F
30 to 35
Follow package directions.
Convenience Frozen Bread Dough
Foods
Frozen Dinners
350°F
20 to 25
Follow package directions.
Frozen Entrees
350°F
50 to 60
Follow package directions.
Frozen Pizza Rolls,
Egg Rolls
Pizza
400°F
425°F
15 to 25
Slice and Bake Cookies
375°F
13 to 15
Meat Loaf
325°F
55 to 60
Let stand 5 minutes after cooking.
Oven-Baked Stew
325°F
80 to 90
Brown meat before combining with
liquid and vegetables.
Swiss Steak
350°F
60 to 70
Let stand 2 minutes after cooking.
Stuffed Peppers
350°F
40 to 45
Use green, red, or yellow peppers.
Acorn Squash Halves
375°F
55 to 60
Pierce skin several places. Add %
cup water to dish. Turn squash
halves cut side up after 30 minutes
of cook time and cover.
Baked Potatoes
425°F
50 to 60
Pierce skin with a fork before
baking.
Twice-Baked Potatoes
400°F
25 to 30
Pierce skin with fork before baking.
8to10
Follow package directions.
Follow package directions.
Let stand a few minutes before
removing from pan to cool.
Main
Dishes
Vegetables
29
MEATS
Beef
MINUTES/POUND
OVEN TEMPERATURE
Rib (2 to 4 Ibs.)
Rare
Medium
Well
21 to 26
26 to 31
31 to 36
325 oF
325 o F
325 o F
Boneless Rib, Top Sirloin
Rare
Medium
Well
25 to 30
30 to 35
35 to 40
325 o F
325 o F
325 o F
Beef Tenderloin
Rare
Medium
12 to 16
16 to 20
325 o F
325 ° F
Pot Roast (21/2to 3 Ibs.)
Chuck, Rump
45 to 50
325 ° F
Ham
Canned (3-lb. fully cooked)
Butt
(5-lb. fully cooked)
Shank (5-lb. fully cooked)
20 to 25
20 to 25
17 to 20
325 ° F
325 ° F
325 o F
Lamb
Bone-in (2 to 4 Ibs.)
Medium
Well
21 to 26
26 to 31
325 o F
325 o F
Boneless (2 to 4 Ibs.)
Medium
Well
25 to 30
29 to 34
325 o F
325 oF
Bone-in (2 to 4 Ibs.)
Boneless (2 to 4 Ibs.)
26 to 30
32 to 36
325 o F
325 o F
12 to 15
15 to 18
18 to 25
325 ° F
325 ° F
325 ° F
25 to 35
375 o F
13 to 16
350 o F
Cornish Hens
Unstuffed (1 to 11/2Ibs.)
Stuffed (1 to 11/2Ibs.)
10 to 15
15 to 20
375 o F
375 o F
Duckling (4 to 5 Ibs.)
19 to 21
375 o F
Turkey Breast
(4 to 6 Ibs.)
21 to 25
325 o F
10 to 15
400 ° F
12 to 17
350 oF
Pork
Poultry
Pork Chops
(1/2to 1-inch thick)
2 chops
4 chops
6 chops
Whole Chicken
(21/2to 3!/2 Ibs.)
Chicken Pieces
(21/2to 3!/2 Ibs.)
Seafood
Fish, whole
(3 to 5 Ibs.)
Lobster Tails
(6 to 8-oz. each)
30
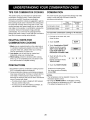
TIPS FOR COMBINATION COOKING
COMBINATION
This section gives you instructions to operate each
combination cooking function. Please read these
instructions carefully, Sometimes combination
microwave-convection cooking is suggested to get the
best cooking results since it shortens the cooking time
for foods that normally need a long time to cook. This
cooking process also ]eaves meats juicy on the inside
and crispy on the outside. In combination cooking, the
convection heat and microwave energy alternate
automatically. Your oven has two preprogrammed
settings that make it easy to cook with both convection
heal and microwave energy automatically:
This oven has two pre-programmed settings that make
it easy to cook with both convection heat and
microwave automatically.
Oven
Microwave
Power
Combination Roast
350 ° F
40%
Combination Bake
375 ° F
1 _/_
To roast with combination cooking
for 45 minutes.
1. Put food on the oven rack, and
close the door.
HELPFUL HINTS FOR
COMBINATION COOKING
2_ Touch CLEAR
3. Touch Combination ROAST.
Display scrolls the words
3_F TOUCH MORE OR:
LESS FOR TEMP SET
OR ENTER COOKING TIME,
1. Meats may be roasted directly on the metal rack or
in a shallow roasting pan pla_d on the rack, When
using the metal rack, please check your cooking
chart for informationon proper use,
2. Less tender cuts of beef can be roasted and
tenderized using oven cooking bags.
3. When baking, check for doneness after cooking
time is up If not completely done, let stand in oven
for a few minutes to complete cooking.
4_
Touch 4, 5, O, 0 to set the
cooking time.
Display scrolls the words
TOUCH START,.
4
5
0
0
5. Touch the START/PAUSE.
At the end of cooking time,
four tones sound and display
shows END.
1. All _okware used for combination cooking must be
BOTH microwave-safe and ovenproof.
2, During combination baking, some baking cookware
may cause arcing when it comes in contact with the
oven walls or metal accessory racks Arcing is a
discharge of electricity that occurs when microwaves
_me in _ntact with metal,
If arcing occurs, place a heatprc_f dish between
the pan and the metal rack,
If arcing o_urs with other baking cookware, do
not use them for combination c_king.
NOTES:
• The temperature can be adjusted; however, the
microwave power cannot.
, By using the MOREtLESS in combination cooking,
you can adjust the temperature by 25 ° F a_e,r step 3.
(The default temperature is 350 _R)
31
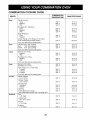
COMBINATION
COOKING GUIDE
COMBINATION
TEMPERATURE
MEATS
Beef
Rib (2 to 4 Ibs.)
Rare
Medium
Well
MINUTES/POUND
300°F
300°F
300°F
11 to 14
14 to 17
17 to 20
300°F
300°F
300°F
11 to 14
14 to 17
17 to 20
300°F
300°F
14 to 17
17 to 20
275°F
30 to 40
300°F
300°F
300°F
15 to 18
15 to 18
15 to 18
300°F
300°F
13 to 18
18 to 23
Boneless (2 to 4 Ibs.)
Medium
Well
300°F
300°F
14 to 19
19 to 24
Pork
Turn over after half of cooking time.
Bone-in (2 to 4 Ibs.)
Boneless (2 to 4 Ibs.)
300°F
300°F
13 to 16
14 to 17
350°F
350°F
350°F
10 to 13
13 to 16
16 to 19
Poultry
Pork Chops (3/4to 1-inch thick)
2 chops
4 chops
6 chops
Turn over after half of cooking time.
Whole Chicken
(21/2to 6 Ibs.)
Chicken Pieces
(21/2to 6 Ibs.)
Cornish Hens
Unstuffed
Stuffed
375°F
18 to 20
375°F
15 to 18
375°F
375°F
18 to 25
23 to 30
375°F
300°F
15 to 18
11 to 15
350°F
7to 10
350°F
10 to 15
350°F
8to 13
350°F
8to 13
Boneless Rib, Top Sirloin
Rare
Medium
Well
Beef Tenderloin
Rare
Medium
Chuck, Rump or Pot Roast (21/2to 3 Ibs.)
(Use cooking bag for best results.)
Ham
Lamb
Seafood
Turn over after half of cooking time.
Canned (3-lb. fully cooked)
Butt
(5-lb. fully cooked)
Shank
(5-lb. fully cooked)
Turn over after half of cooking time.
Bone-in (2 to 4 Ibs.)
Medium
Well
Duckling
Turkey Breast (4 to 6 Ibs.)
Turn breast side up after half of cooking time.
Fish
1-lb. fillets
Lobster Tails
(6 to 8-oz. each)
Shrimp
(1 to 2 Ibs.)
Scallops
(1 to 2 Ibs.)
32
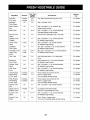
To heat or reheat successfully in a microwave oven, it is important to follow several guidelines. Measure the amount
of food in order to determine the time needed to reheat. Arrange the food in a circular pattern for best results. Room
temperature food will heat faster than refrigerated food. Canned foods should be taken out of the can and placed
in a microwave-safe container. The food will heat more evenly if covered with a microwave-safe lid or vented plastic wrap. Remove cover carefully to prevent steam burns. Use the following chart as a guide for reheating cooked
food.
ITEMS
Slicedmeat
3 slices(1/4-inchthick)
COOK TIME
(AT HIGH)
SPECIAL INSTRUCTIONS
1-2 minutes
Placesliced meat on microwavableplate.
Coverwith plasticwrap and vent.
Note:Gravyor sauce helpsto keep meatjuicy.
2-31/2minutes
11/2-3minutes
Placechickenpieceson microwavableplate. Cover with plastic
wrap and vent.
2-4 minutes
Placefish on microwavableplate. Coverwith plasticwrap and
vent.
4-6 minutes
Placelasagnaon microwavableplate. Coverwith plasticwrap
and vent.
1 cup
4 cups
Casserolecream or cheese
1-31/2minutes
5-8 minutes
COOKcovered in microwavablecasserole.Stir once halfway
throughcooking.
1 cup
4 cups
SloppyJoeor BarbecuedBeef
1 sandwich
(1/2cup meat filling)
withoutbun
11/2-3minutes
3'/2-51/2minutes
COOKcovered in microwavablecasserole.Stir once halfway
throughcooking.
Reheatfillingand bun separately.
Cookfilling coveredin microwavablecasserole.Stir once.
Heat bun as directed in chart below.
Chickenpieces
1 breast
1 leg and thigh
Fish fillet
(6-8 oz.)
Lasagna
1 serving (101/2oz.)
Casserole
1-21/2minutes
Mashedpotatoes
1 cup
4 cups
1-3 minutes
5-8 minutes
COOKcovered in microwavablecasserole.Stir once halfway
throughcooking.
Bakedbeans
1 cup
11/2-3minutes
COOKcovered in microwavablecasserole Stir once halfway
throughcooking.
Raviolior pasta in sauce
1 cup
4 cups
21/2-4minutes
71/2-11minutes
COOKcovered in microwavablecasserole.Stir once halfway
throughcooking.
1
1
1/2-3/2
minutes
4-61/2minutes
COOKcovered in microwavablecasserole.Stir once halfway
throughcooking.
Rice
1 cup
4 cups
Sandwichroll or bun
.......
!.ro!t........................................................
)5-30seconds
................
Wrae.!n
paper
!o e!andp.tace
onglass.,micro avab[e
ra.ck
.................
Vegetables
1 cup
4 cups
11/2-21/2
minutes
4-6 minutes
COOKcoveredin microwavablecasserole.Stir once halfway
throughcooking.
Soup
1 serving (8 oz.)
11/2-21/=
minutes
COOKcovered in microwavablecasserole.Stir once halfway
throughcooking.
33
2 medium
4 medium
Cook Time
at High
(Minute)
5-8
10-13
Asparagus,
Fresh,Spears
1 lb.
Beans,Green &
Wax
Vegetable
Artichokes
(8 oz. each)
Amount
Instructions
Standing
Time
Trim.Add 2 tsp water and 2 tsp juice. Cover.
2-3 minutes
3-6
Add 1/2cupwater.Cover.
2-3 minutes
1 lb.
7-11
Add 1/2cupwater in 11/2qt. casserole.Stir
halfwaythroughcooking.
2-3 minutes
Beets,Fresh
1 lb.
12-16
Add 1/2cupwater in 11/2qt. coveredcasserole.
Rearrangehalfwaythroughcooking.
2-3 minutes
Broccoli,Fresh,
Spears
1 lb.
4-8
Placebroccoli in bakingdish. Add 1/2cup water.
2-3 minutes
Cabbage,Fresh,
Chopped
1 lb.
4-7
Add 1/2cupwater in 11/2qt. coveredcasserole.
Stir halfwaythroughcooking.
2-3 minutes
2 cups
2-4
Add 1/4cupwater in 1 qt. coveredcasserole.
Stir halfwaythroughcooking.
2-3 minutes
1 lb.
7-11
Trim,Add 1/4cup water in 1 qt. coveredcasserole.
Stir halfwaythroughcooking.
2-3 minutes
Slice.Add 1/2cup water in 11/2qt. coveredcasserole.
Stir halfwaythroughcooking.
2-3 minutes
Husk.Add 2 tbsp water in 11/2qt. bakingdish.
Cover.
2-3 minutes
Carrots,Fresh,
Sliced
Cauliflower,
Fresh,Whole
Flowerettes,Fresh
Celery,Fresh,
Sliced
2 cups
4 cups
Corn, Fresh
2 ears
5-9
Mushrooms,
Fresh,Sliced
1/2lb.
2-31/2
Placemushroomsin 11/2qt. coveredcasserole.
Stir halfwaythroughcooking.
2-3 minutes
Parsnips,Fresh,
Sliced
1 lb.
4-8
Add 1/2cupwater in 11/2qt, coveredcasserole.
Stir halfwaythroughcooking.
2-3 minutes
4 cups
7-10
Add 1/2cupwater in 11/2qt, coveredcasserole.
Stir halfwaythroughcooking.
2-3 minutes
Sweet Potatoes
Whole Baking
(6-8 oz. each)
2 medium
4 medium
5-10
7-13
Piercepotatoesseveral timeswith fork.
Placeon 2 papertowels.
Turnover halfwaythrough cooking.
2-3 minutes
2-3 minutes
White Potatoes,
WholeBaking
2 potatoes
4 potatoes
5-8
10-14
Piercepotatoesseveraltimes with fork.
Placeon 2 papertowels.
2-3 minutes
2-3 minutes
Peas,Green,
Fresh
21/2-41/2
6-8
!6-8
oz:each!
................................................................
Turn
o e!ha!! a!h ough
cooking.
................................................................
Spinach,Fresh,
Leaf
1 lb.
4-7
Add 1/2cupwaterin 2 qt.coveredcasserole.
2-3 minutes
Squash,Acorn or
Butternut,Fresh
1 medium
6-8
Cut squashin half.Removeseeds.
Placein 8 x 8-inchbakingdish.Cover.
2-3 minutes
Zucchini,Fresh,
Sliced
1 lb.
Add 1/2cupwater in 11/2qt. coveredcasserole.
Stir halfwaythroughcooking.
2-3 minutes
Zucchini,Fresh,
Whole
1 lb.
Pierce. Placeon 2 papertowels.
Turnover and rearrangehalfwaythroughcooking.
2-3 minutes
41/2-71/2
6-9
34
Questions and Answers
Operation
Answer
Question
Why is the oven light not on during
cooking?
There may be several reasons why the oven light is not on.
Have you:
• Set a cook time?
° Touched START?
Why does steam come out of the air
exhaust vent?
Steam is normally produced during cooking. The microwave oven
has been designed to vent this steam.
Will the microwave oven be damaged if it
operates empty?
Yes. Never operate the oven empty or without the glass turntable.
Does microwave energy pass through the
viewing screen in the door?
No. The metal screen bounces the energy back to the oven cavity.
The holes (or ports) allow only light to pass through. They do not
let microwave energy pass through.
Why does a tone sound when a pad on the
control panel is touched?
The tone tells you that the setting has been entered.
Can my microwave oven be damaged if
food is cooked for too long?
Like any other cooking appliance, it is possible to overcook food
to the point that the food creates smoke and even possibly fire
and damage to the inside of the oven. It is always best to be near
the oven while you are cooking.
When the oven is plugged into wall outlet
for the first time, it might not work properly.
What is wrong?
The microcomputer controlling your oven may temporarily
become scrambled and fail to function as programmed when you
plug in for the first time or when power resumes after a power
interruption. Unplug the oven from the 120-volt household outlet
and then plug it back in to reset the microcomputer.
Why do I see light reflection around the
outer case?
This light is from the oven light which is located between the
oven cavity and the outer wall of the oven.
What are the various sounds I hear when
the microwave oven is operating?
The clicking sound is caused by a mechanical switch turning the
microwave oven's magnetron ON and OFF.
The heavy hum and clunk is from the change in power the
magnetron draws as it is turned ON and OFF by a mechanical
switch. The change in blower speed is from the change in line
voltage caused by the magnetron being turned ON and OFF.
Food
Question
Answer
What is wrong when baked foods have a
hard, dry, brown spot?
A hard, dry, brown spot indicates overcooking. Shorten the
cooking or reheating time.
Why do eggs sometimes pop?
When baking, frying, or poaching eggs, the yolk may pop due to
steam build-up inside the yolk membrane. To prevent this,
simply pierce the yolk before cooking.
CAUTION: Never microwave eggs in the shell.
35
Questions and Answers (continued)
Food
Answer
Question
Why are scrambled eggs sometimes a
little dry after cooking?
Eggs will dry out when they are overcooked, even if the same
recipe is used each time. The cooking time may need to be varied
for one of these reasons:
• Eggs vary in size.
• Eggs are at room temperature one time and at refrigerator
temperature another time.
• Eggs continue cooking during standing time.
Is it possible to pop popcorn in a
microwave oven?
Yes, if using one of the two methods described below:
(1) microwave-popping devices designed specifically for
microwave cooking
(2) prepackaged commercial microwave popcorn that is made
for specific times and power output needed
Follow exact directions given by each manufacturer for
its popcorn popping product and do not leave the oven
unattended while the corn is being popped. If corn fails
to pop after the suggested time, discontinue cooking.
Overcooking could result in an oven fire.
CAUTION:
• Never use a brown paper bag for popping corn or attempt
to pop leftover kernels.
• Do not pop prepackaged commercial microwave popcorn
directly on the glass turntable. To avoid excessive heating
of the glass turntable, place the popcorn bag on a plate.
• Listen while corn pops. Stop oven when popping slows to
2-3 seconds between pops.
• Do not leave microwave unattended while popping corn.
• Follow directions on bag.
Why do baked apples sometimes burst
during cooking?
The peel has not been removed from the top half of each apple to
allow for expansion of the interior of the apple during cooking. As
in conventional cooking methods, the interior of the apple expands
during the cooking process.
Why do baked potatoes sometimes
burn during cooking?
If the cooking time is too long, fire could result. At the end of the
recommended cooking time, potatoes should be slightly firm.
CAUTION: Do not overcook.
Why is a standing time recommended
after microwave cooking time is over?
Standing time allows foods to continue cooking evenly for a few
minutes after the actual microwave oven cooking cycle. The
amount of standing time depends upon the density of the foods.
Why is additional time required for
cooking food stored in the refrigerator?
As in conventional cooking, the initial temperature of food affects
total cooking time. You need more time to cook food taken out of a
refrigerator than for food at room temperature.
36
Before Calling for Service
You can often correct operating problems yourself. If your microwave oven fails to work properly, locate the
operating problem in the list below and try the solutions listed for each problem.
If the microwave oven still does not work properly, contact the nearest LG Authorized Service Center.
LG Authorized Service Centers are fully equipped to handle your service requirements.
Problem
Oven does not start
Possible Causes
• Is the power cord plugged in?
• Is the door closed?
• Is the cooking time set?
Arcing or Sparking
• Are you using approved cookware?
• Is the oven empty?
Incorrect time of day
• Have you tried to reset the time of day?
Unevenly Cooked Foods
•
•
•
•
•
Overcooked Foods
• Was the time/cooking power level correct?
Undercooked Foods
•
•
•
•
Improper Defrosting
• Are you using approved cookware?
• Was the time/cooking power level correct?
• Did you turn or stir the food during the defrosting cycle?
Are you using approved cookware?
Is the glass turntable in the oven?
Did you turn or stir the food while it was cooking?
Were the foods completely defrosted?
Was the time/cooking power level correct?
Are you using approved cookware?
Were the foods completely defrosted?
Was the time/cooking power level correct?
Are the ventilation ports clear?
FEDERAL COMMUNICATIONS
COMMISSION
RADIO FREQUENCY
INTERFERENCE
STATEMENT
WARNING:
This equipment generates and uses ISM frequency
energy and if not installed and used properly, that is in
strict accordance with the manufacturer's instructions,
may cause interference to radio and television
reception. It has been type tested and found to
comply with limits for ISM Equipment pursuant to part
18 of FCC Rules, which are designed to provide
reasonable protection against such interference in a
residential installation.
However, there is no guarantee that interference wil!
not occur in a particular installation. If this equipment
does cause interference to radio or television
• Reorient the receiving antenna of the radio or
television.
• Relocate the microwave oven with respect to the
receiver.
• Move the microwave oven away from the receiver.
• Plug the microwave oven into a different outlet so
that the microwave oven and the receiver are on
different branch circuits.
The manufacturer is not responsible for any radio or
TV interference caused by unauthorized
modification to this microwave oven. It is the
responsibility of the user to correct such interference.
reception, which can be determined by turning the
equipment off and on, the user is encouraged to try to
correct the interference by one or more of the
following:
37
38
LG Electronics Inc. will repair or replace your product, at LG's option, if it proves to be defective in material or workmanship under normal use, during the warranty period set forth below, effective from the date
of original consumer purchase of the product. This limited warranty is good only to the original purchaser
of the product and effective only when used in the United States, including U.S.Territories.
WARRANTY PERIOD:
HOW SERVICE IS HANDLED:
Model: LMH1517CV
Call 1-877-714-7486 and choose the appropriate
prompt.
Please have product type (Microwave)
and ZIP code
ready.
LMH1517CVST
Labor: I Year from the Date of Purchase.
Parts: 1 Year from the Date of Purchase.
Magnetron:
10 Years from the Date of
Purchase.
THISWARRANTY IS IN LIEUOF ANY OTHER WARRANTIES,EXPRESSOR IMPLIED, INCLUDING WITHOUT LIMITATION, ANY WARRANTY OF MERCHANTABILITY OR FITNESSFOR A PARTICULARPURPOSE.TO THE EXTENTANY
IMPLIED WARRANTY IS REQUIRED BY LAW, IT IS LIMITED IN DURATION TO THE EXPRESSWARRANTY PERIOD
ABOVE. LG WILL NOT BE LIABLEFOR ANY CONSEQUENTIAL, INDIRECT, OR INCIDENTAL DAMAGES OF ANY
KIND, INCLUDING LOSTREVENUESOR PROFITS,IN CONNECTION WITH THE PRODUCT. SOME STATESDO NOT
ALLOW LIMITATION ON HOW LONG AN IMPLIED WARRANTY LASTSOR THE EXCLUSION OF INCIDENTAL OR
CONSEQUENTIAL DAMAGES, SO THE ABOVE LIMITATIONS OR EXCLUSIONS MAY NOT APPLY TO YOU.
THIS LIMITED WARRANTY DOES NOT APPLY TO:
1. Service trips to your home to deliver, pick up, and!or
fuses or correct wiring, or correction of unauthorized
,
Damages or operating problems that result from
specifications or contrary to the requirements or
min, fire, flood, improper installation, acts of God,
electrical current or voltage, or commercial
use,
Therefore, the cost of repair or replacement
sumer.
install the product,
repairs; and
instruct, or replace
house
misuse, abuse, operation outside environmental
precautions in the Operating Guide, accident, verunauthorized modification
or alteration, incorrect
or use for other than intended purpose.
of such a defective product shall be borne by the con-
CUSTOMER INTER-ACTIVE CENTER NUMBERS:
To Prove Warranty Coverage
To Obtain Nearest Authorized Service
Center or Sales Dealer, or to Obtain
Product, Customer, or Service Assistance
Retain your Sales Receipt to prove date of purchase. A
copy of your Sales Receipt must be submitted at the
time warranty service is provided.
Call 1-877-714-7486 (Phone answered 24 hours - 365
days a year) and choose the appropriate
prompt from
the menu; or visit our website at:
http://us.lgservice.com.
39
B_
P/NO.: 3828W5A2249
®,
_s ©=
Printed in Korea