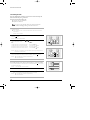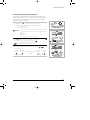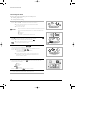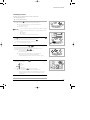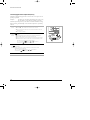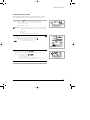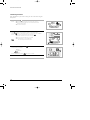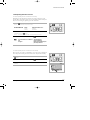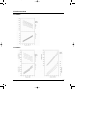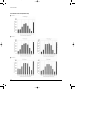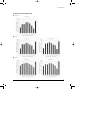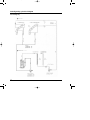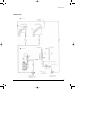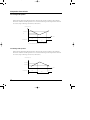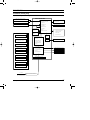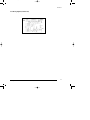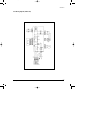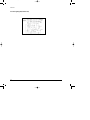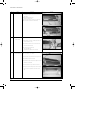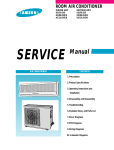
1
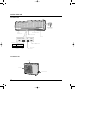
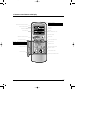
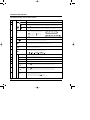
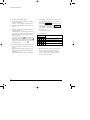
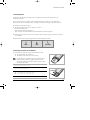
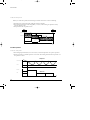
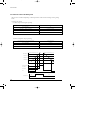
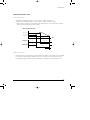
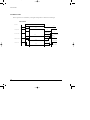
COVER-1
5/14/01 10:01 PM
Page 1-1
V Series
(WALL MOUNTED TYPE)
TECHNICAL
Manual
AIR CONDITIONER
CONTENTS
1. FEATURES AND OPERATION
2. SPECIFICATIONS
3. DIAGRAMS
4. DISASSEMBLE & REASSEMBLE
New 1
5/14/01 10:03 PM
Page 1
1
FEATURES AND OPERATION
New 1
5/14/01 10:03 PM
Page 2
1. FEATURES AND OPERATION
1-1 Model Identification . . . . . . . . . . . . . . . . . . . . . . . . . . . . . . . . 1-1
1-2 Model Line-up . . . . . . . . . . . . . . . . . . . . . . . . . . . . . . . . . . . . . . . 1-2
1-3 Features of Each Model . . . . . . . . . . . . . . . . . . . . . . . . . . . . 1-3
1-4 Outline and dimensions
1-4-1 Indoor Unit . . . . . . . . . . . . . . . . . . . . . . . . . . . . . . . . . . . . . . 1-4
1-4-2 Outdoor Unit . . . . . . . . . . . . . . . . . . . . . . . . . . . . . . . . . . . . . 1-4
1-5 Installation
1-5-1 Installation diagram of indoor unit and outdoor unit . . .
1-5-2 Wiring Connection . . . . . . . . . . . . . . . . . . . . . . . . . . . . . . .
1-5-3 Drain Line . . . . . . . . . . . . . . . . . . . . . . . . . . . . . . . . . . . . . . .
1-5-4 Grounding . . . . . . . . . . . . . . . . . . . . . . . . . . . . . . . . . . . . . . .
1-5
1-6
1-7
1-7
1-6 View of the unit
1-6-1 Indoor unit . . . . . . . . . . . . . . . . . . . . . . . . . . . . . . . . . . . . . . . 1-8
1-6-2 Outdoor unit . . . . . . . . . . . . . . . . . . . . . . . . . . . . . . . . . . . . . 1-8
1-7 Remote control Buttons and Display . . . . . . . . . . . . . 1-9
1-8 Features And Operation
1-8-1 Name & Function of Key in remote controller . . .
1-8-1(a) Cooling Only . . . . . . . . . . . . . . . . . . . . . . . . . . . . .
1-8-1(b) Heat Pump . . . . . . . . . . . . . . . . . . . . . . . . . . . . . . .
1-8-2 Getting Started . . . . . . . . . . . . . . . . . . . . . . . . . . . . . . . . .
1-8-3 Inserting the Remote Control Batteries . . . . . . . . . .
1-8-4 Setting the Time . . . . . . . . . . . . . . . . . . . . . . . . . . . . . . . .
1-8-5 Selecting the Automatic Operating Mode . . . . . . .
1-8-6 Cooling Your Room . . . . . . . . . . . . . . . . . . . . . . . . . . . . .
1-8-7 Heating Your Room . . . . . . . . . . . . . . . . . . . . . . . . . . . . .
1-8-8 Changing the Room Temperature Quickly . . . . . . .
1-8-9 Removing Excess Humidity . . . . . . . . . . . . . . . . . . . . .
1-8-10 Airing Your Room . . . . . . . . . . . . . . . . . . . . . . . . . . . . . .
1-8-11 Adjusting the Airflow Direction
1-8-11(a) Adjusting the Air Flow Direction Vertically . . . .
1-8-11(b) Adjusting the Air Flow Direction Horizontally . .
1-8-12 Switching the Unit On and Off Automatically
(On/Off Timer) . . . . . . . . . . . . . . . . . . . . . . . . . . . . . . . . . .
1-8-13 Setting the Sleep Timer . . . . . . . . . . . . . . . . . . . . . . . .
1-8-14 Setting the Quick Timer . . . . . . . . . . . . . . . . . . . . . . . .
1-8-15 Cancelling the On/Off Timer . . . . . . . . . . . . . . . . . . .
1-8-16 Cancelling the Sleep Timer . . . . . . . . . . . . . . . . . . . .
1-8-17 Cancelling the Quick Timer . . . . . . . . . . . . . . . . . . . .
1-9 Operating Recommendations . . . . . . . . . . . . . . . . . . . .
1-10 Temperature and Humidity Ranges . . . . . . . . . . . . .
1-11 Cleaning Your Air Conditioner . . . . . . . . . . . . . . . . . .
1-10
1-11
1-13
1-15
1-15
1-16
1-17
1-18
1-19
1-20
1-21
1-22
1-23
1-23
1-24
1-25
1-25
1-26
1-26
1-26
1-27
1-28
1-29
New 1
5/14/01 10:03 PM
Page 1-1
1. FEATURES AND OPERATION
1-1 Model Identification
■ Wall Mounted Type Air Conditioner
1
2
3
4
5
6
7
8
A
Q
1
2
A
1
V
E
Design
Serise
Spec
Serise
Destin
ation
Capacity
(BTU)
Type
A:Indoor unit
U:Outdoor unit
S:Cooling Only
Q:Heat Pump
:Nomianal
T:Tropical
V:Inverter
R:
L:
Cooling
Capacity
07: 7,000
09: 9,000
12:12,000
18:18,000
24:24,000
A:Edge
B:Round
C:
D:
E:
...
1: No Auto
Restart
2: Auto Restart
3:
4:
5:
...
V
Q
A
T
...
/
9
10
11
X
A
P
Buyer
A: 115V
60Hz
B: 220V
60Hz
C: 208-230V
60Hz
D: 200-220V
50Hz
E: 220-240V
50Hz
■ Piping(Parts Box)
1
2
3
4
5
6
7
8
F
S
C
1
4
1
2
A
Type
FSC:Cooling Only
FSH:Heat Pump
Samsung Electronics
Design
14:1/4”
38:3/8”
12:1/2”
Design
38:3/8”
12:1/2”
58:5/8”
34:3/4”
Option
A:
B:
C:
...
1-1
New 1
5/14/01 10:03 PM
Page 1-2
1-2 Model Line-up
■ 1999R
Type
Cooling
Only
Heat
Pump
1-2
Series
V
Capacity
Indoor Unit
Outdoor Unit
Piping Unit
7,000BTU
AS07A2VA
US07A2VA
FSC1438A
9,000BTU
AS09A2VA
US09A2VA
FSC1438A
12,000BTU
AS12A2VC
US12A2VC
FSC1412A
9,000BTU
AQ09A2VA
UQ09A2VA
FSH1438A
12,000BTU
AQ12A2VC
UQ12A12VC
FSH1412A
V
Samsung Electronics
New 1
5/14/01 10:03 PM
Page 1-3
1-3 Features of Each Model
Series V
Item
Cooling
H-Pump
Wireless remote
Control(Handy type)
Mode
Timer
Automatic
Heating
Cooling
Dry
Fan only
Q-Timer
ON Timer
OFF Timer
Clock
Air flow
Auto
Turbo
Mild
Adjustment
Up/Down
Temperature
Adjustment
Display
Mode
Fan Speed
Temperature
Timer
Battery
Fan
Speed
Samsung Electronics
1-3
5/14/01 10:03 PM
Page 1-4
1-4 Outline and dimensions
1-4-1 Indoor Unit
(Remote control)
298(11 7 in)
10
161(6 3 in)
10
(Front view)
Air
in
815(32 1 in)
10
1
182(7 in)
5
Air out
58(2
3
in)
10
22(
9
in)
10
Installation plate
(Rear view)
1-4-2 Outdoor Unit
2
10( in)
5
256(10 1 in)
10
2
10( in)
5
600(23 3 in)
5
(Front view)
720(28 3 in)
10
765(29 7 in)
10
1-4
532(20
9
in)
10
(Rear view)
4
435(17 in)
5
New 1
45(1 4 in)
5
7
in)
10
55(2 1 in)
10
3
245(9 in)
5
145(5
Samsung Electronics
5/14/01 10:03 PM
Page 1-5
1-5 Installation
1-5-1 Installation diagram of indoor unit and outdoor unit
A Indoor unit gas leak test check point
Piping may be laid to the rear, left,
right or down .
3
Indoor unit
Left
Right
2
Rear
Piping
Rear
Down
Tape vinyl
30mm(1in) or
more
1
B Drain hose installation
125mm(5in)
or more
Cut the piping hole
Cut the
piping hole
sloped
slightly
125mm(5in) or more
A
sloped slightly
B
5
6
M O DE
TURBO
OFF
Remote control
Remote control holder
600mm(24in) minimum
New 1
100m
m(4in
) minim
um
m
inimu
(4in) m
m
m
0
10
inimum
(24in) m
600mm
1
2
3
4
5
Samsung Electronics
4
10
Piping (Liquid) 1/4"
7K/9K BTU
12K BTU
Piping(Gas)3/8”
Piping(Gas)1/2”
Installation tube
Vinyl tape
Putty
6
Clamper tube
7
Installation plate
8
Pipe-connection
Screw
Drain hose
9
10
1-5
New 1
5/14/01 10:03 PM
Page 1-6
FEATURES AND OPERATION
1-5-2 Wiring Connection
<Heat Pump>
<Cooling Only>
1
2
3
4
1
2
3
N
L
N
L
Indoor unit
5
1
2
3
4
5
4
1
2
3
4
5
1
2
N
L
1
2
3
1
2
N
L
1
2
3
3
Auxiliary
power
s/w
Outdoor
unit
Outdoor unit
Distribution
board
Auxiliary
power
s/w
Outdoor
unit
Indoor unit
Outdoor unit
Distribution
board
conduit kit
1-6
N
L
1
N
L
E
2
3
conduit kit
N
L
1
N
L
E
2
3
Samsung Electronics
New 1
5/14/01 10:03 PM
Page 1-7
FEATURES AND OPERATION
1-5-3 Drain Line
• In heating and deice operation, condensed water may be generated.
Install drain line as following procedure.
Hole
1. Insert the drain plug into base hole.
2. And then connect drain hose to drin plug.
Base
Drain plug
Drain hose
1-5-4 Grounding
(The parts for this work are optional)
• The grounding screw hole is located in the position shown.
• A grounding terminal can be found on the outdoor unit as illustrated.
Grounding screw hole
1. When an existing grounding terminal is available.
(Grounding wire of ø1.6mm or larger<solid wire>or 2mm2 or larger <standard wire>)
Terminal used exclusively
for grounding.
Grounding resistance:
less than 100 ohms
(existing grounding electrode)
2. Use of a grounding electrode.
• Specifications of grounding electrode.
Carbon plastic
Steel core
PVC-insulated wire(2mm2x3.5m), green
Samsung Electronics
Terminal, M4
1-7
New 1
5/14/01 10:03 PM
Page 1-8
1-6 View of the unit
1-6-1 Indoor unit
ON/OFF switch
(Operation without
remote control)
Air flow blades (outlet)
Air Filter
(under the grille)
Remote control sensor
Air Inlet
OPERATION TIMER
FAN
TURBO
OPERATION indicator
Operation : GREEN
Heat Pump
Deice
: RED
Cooling Only Operation : GREEN
TIMER indicator
- YELLOW
TURBO indicator
- RED
FAN indicator
- GREEN
1-6-2 Outdoor unit
Air Inlet
Air Outlet
Connection Valve
1-8
Samsung Electronics
New 1
5/14/01 10:03 PM
Page 1-9
1-7 Remote control Buttons and Display
OPERATION indicator
Heat Pump
Auto, Cool, Dry, Fan, Heat
Cooling Only Auto, Cool, Dry, Fan
Remote control transmission indicator
Battery discharge indicator
Turbo mode
Temperature settings
Sleep mode
Fan speed
(AUTO, LOW, MEDIUM, HIGH)
Air flow direction
Time/Timer settings
Temperature adjustment buttons
Mode selection button
Heat Pump Auto, Cool, Dry, Fan, Heat
Cooling Only Auto, Cool, Dry, Fan
On/Off button
MODE
TURBO
OFF
Off Timer adjustment button
Turbo mode button
Sleep timer button
Air flow swing button
Fan speed adjustment button
Timer on/off buttons
Time adjustment buttons
Time setting Button
Timer setting/cancellation buttons
Samsung Electronics
1-9
New 1
5/14/01 10:03 PM
Page 1-10
1-8 Features And Operation
1-8-1 Name & Function of Key in remote controller
NO
FUNCTION OF KEY
NAME OF KEY
On/Off Button. Use this button to start and stop air conditioner.
1
2
(UP)
Temp. up button.
If the button is pressed once, the setting temperature is increased by 1°C(2°F)
(DOWN)
Temp. up button.
If the button is pressed once, the setting temperature is decreased by 1°C(2°F)
Each time you press this button,
MODE is changed in the following order.
3
MODE
: Auto Mode
: Cool Mode
: Dry Mode
: Fan Only
: Heat Mode
<Cooling Only>
<Heat Pump>
4
TURBO
Use this button to provide heavy duty cooling & Heating for 30 minutes.
5
OFF
Set up the reserve or cancel the timer off quickly
6
Use this button for sleep operation.
(The SLEEP mode can be selected at COOL and HEAT mode.)
7
Adjusts air flow vertically,
each time you press this button.
Each time you press this button,
FAN SPEED is changed in the following order.
8
9
10
11
12
13
C
O
V
E
R
T
I
M
E
R
ON TIMER
Set up the time that operation start.
OFF TIMER
Set up the time that operation stop.
SET
Use this button to reserve the timer on and timer off.
CANCEL
Use this button to cancel the timer on and timer off.
(UP)
If the
button is pressed once, the time increase by one minute
during the time set mode, and ten minutes during the timer set mode.
(DOWN)
If the
button is pressed once, the time decrease by one minute
during the time set mode, and ten minutes during the timer set mode.
14
15
TIME
1-10
Without regard to ON/OFF condition in remote controller,
use this button to set current time.
Adjust the current time using
button.
(Data can be transmitted after setting up the time)
Samsung Electronics
New 1
5/14/01 10:03 PM
Page 1-11
FEATURES AND OPERATION
1-8-1(a) Cooling Only
1. AUTO MODE : In this mode, operation
COOL mode is selected automatically by the
room temperature of initial operation.
Operation Type
Cool Operation
Room Temp
Tr≥ 24.5°C(78°F)+∆T
Compressor ON
Tr≤ 24°C(75°F)+∆T
Compressor OFF
∆T= -2°C(-4°F), -1°C(-2°F), 0°C, +1°C(2°F),
+2°C(4°F)
∆T is controlled by setting temperature
up/down key of remote controller
* FAN SPEED : AUTO
2. COOL MODE : The unit operates according
to the difference between the setting and
room temperature. (18°C(64°F)~30°C(86°F))
3. DRY MODE : Has 3 states, each determined
by room temperature.
The unit operates in DRY mode.
*Compressor ON/OFF Time is controlled
compulsorily(can not set up the fan speed,
always breeze).
*Protective function : Low temperature
release. (Prevention against freeze)
Samsung Electronics
4. TURBO MODE : This mode is available in
AUTO, COOL, DRY, FAN MODE.
When this button is pressed at first, the air
conditioner is operated “powerful” state for
30 minutes regardless of the set temperature, room temperature.
When this button is pressed again, or when
the operating time is 30 minutes, turbo
operation mode is canceled and returned to
the previous mode.
*But, if you press the TURBO button in DRY
or FAN mode that is changed with AUTO
mode automatically.
5. SLEEP MODE : Sleep mode is available
only in COOL mode.
The operation will stop after 6 hours.
*In COOL mode : The setting temperature
is automatically raised by 1°C(2°F) each
1hour
When the temperature has been raised by
total of 2°C(4°F), that temperature is maintained.
6. FAN SPEED : Manual (3 step), Auto (4 step)
Fan speed automatically varies depending
on both the difference between setting and
the room temperature.
1-11
New 1
5/14/01 10:03 PM
Page 1-12
FEATURES AND OPERATION
7. COMPULSORY OPERATION :
For operating the air conditioner without
the remote controller.
*AUTO : The operating is the same function that AUTO MODE in the remote controller.
8.
9.
SWING : BLADE-H is rotated vertically by
the stepping motor.
*Memory louver : When ON/OFF button is
pressed at stop state, the BLADE-H returns
to its original location which is operating
state before stop
*Swing Set : Press the
button under the
remote control is displayed on LCD the
,
and the blades move up and down, about 43°.
If the one more time press the
button, blatles location is stop.
11. SELF Diagnosis
LED DISPLAY
Check Point
operTIMER FAN Turbo
ation
Interruption of electric power and Power on.
Abnormal condition of the room sensor.
Abnormal condition of the indoor unit's heat exchanger sensor.
Indoor unit fan motor lock.
: LED blinking
: LED off
12. BUZZER SOUND : Whenever the ON/OFF
button is pressed or whenever change
occurs to the condition which is set up or
select, the compulsory operation mode,
buzzer is sounded "beep"
Quick OFF TIMER: OFF timer (quick timer)
allows reservation or cancel the timer off
quickly
When OFF timer button is pressed at operating state, LCD displays the polling state
sequentially.
The LCD also displays the time remaining.
10. 24-Hour ON/OFF Real Setting Timer. : The
air conditioner is turned ON at a specified
time using ON TIMER .
OFF TIMER : The air Conditioner is turned
OFF at a specified time using OFF TIMER .
*ON TIMER : Only timer LED lights on.
*OFF TIMER : Both timer and operation
LED lights on.
*3 minutes delay timer.
1-12
Samsung Electronics
New 1
5/14/01 10:03 PM
Page 1-13
FEATURES AND OPERATION
1-8-1(b) Heat Pump
1. AUTO MODE : In this mode, operation
mode(COOL, HEAT, DRY) is selected automatically by the room temperature of initial
operation.
Room Temp
Operation Type
Tr≥ 21°C(70°F)+∆T Cool Operation (Set Temp:AUTO SETTING)
4. DRY MODE : Has 3 states, each determined
by room temperature.
The unit operates in DRY mode.
*Compressor ON/OFF Time is controlled
compulsorily(can not set up the fan speed,
always breeze).
*Protective function : Low temperature
release. (Prevention against freeze)
21°C(70°F) +∆T>Tr Heat Operation (Set Temp : 22°C(72°F)+∆T)
∆T= -2°C(-4°F), -1°C(-2°F), 0°C, +1°C(2°F),
+2°C(4°F)
∆T is controlled by setting temperature
up/down key of remote controller
2. COOL MODE : The unit operates according
to the difference between the setting and
room temperature. (18°C(65°F)~30°C(86°F))
3. HEAT MODE : The unit operates according
to the difference between the setting and
room temperature.(16°C(61°F)~30°C(86°F))
*Prevention against cold wind : For about
3~5 minutes after initial operation, thermo
control or “de-ice”, the indoor fan will
either not operate or operate very slowly(510 rpm), then switch to the selected fan
speed. This period is to allow the indoor
unit's heat-exchanger to prewarm before
emitting warm air.
*High temperature release function : The
outdoor unit for and compressor ON/OFF
control for safety operation, when the overheat is heat exchanger of indoor unit.
*De-ice : Deicing operation is controlled by
indoor unit's heat exchanger temperature
and accumulating time of compressor's
operation.
De-ice end by sensing of the processing
time by de-ice condition.
Samsung Electronics
5. TURBO MODE : This mode is available in
AUTO, COOL, HEAT, DRY, FAN MODE.
When this button is pressed at first, the air
conditioner is operated “powerful” state for
30 minutes regardless of the set temperature, room temperature.
When this button is pressed again, or when
the operating time is 30 minutes, turbo
operation mode is canceled and returned to
the previous mode.
*But, if you press the TURBO button in DRY
or FAN mode that is changed with AUTO
mode automatically.
6. SLEEP MODE : Sleep mode is available
only in COOL or HEAT mode.
The operation will stop after 6 hours.
*In COOL mode : The setting temperature
is automatically raised by 1°C(2°F) each
1hour
When the temperature has been raised by
total of 2°C(4°F), that temperature is maintained.
*In HEAT mode : The setting temperature
is automatically droped by 1°C(2°F) each
1hour.
When the temperature has been droped by
total of 2°C(4°F), that temperature is maintained.
7. FAN SPEED : Manual (3 step), Auto (4 step)
Fan speed automatically varies depending
on both the difference between setting and
the room temperature.
1-13
New 1
5/14/01 10:03 PM
Page 1-14
FEATURES AND OPERATION
8. COMPULSORY OPERATION :
For operating the air conditioner without
the remote controller.
*AUTO : The operating is the same function that AUTO MODE in the remote controller.
9.
SWING : BLADE-H is rotated vertically by
the stepping motor.
*Memory louver : When ON/OFF button is
pressed at stop state, the BLADE-H returns
to its original location which is operating
state before stop
*Swing Set : Press the
button under the
remote control is displayed on LCD the
,
and the blades move up and down, about 43°.
If the one more time press the
button, blatles location is stop.
10. Quick OFF TIMER: OFF timer (quick timer)
allows reservation or cancel the timer off
quickly
When OFF timer button is pressed at operating state, LCD displays the polling state
sequentially.
The LCD also displays the time remaining.
1-14
11. 24-Hour ON/OFF Real Setting Timer. : The
air conditioner is turned ON at a specified
time using ON TIMER .
OFF TIMER : The air Conditioner is turned
OFF at a specified time using OFF TIMER .
*ON TIMER : Only timer LED lights on.
*OFF TIMER : Both timer and operation
LED lights on.
*3 minutes delay timer.
12. SELF Diagnosis
LED DISPLAY
Check Point
operTIMER FAN Turbo
ation
Interruption of electric power and Power on.
Abnormal condition of the room sensor.
Abnormal condition of the indoor unit's heat exchanger sensor.
Indoor unit fan motor lock.
: LED blinking
: LED off
13. BUZZER SOUND : Whenever the ON/OFF
button is pressed or whenever change
occurs to the condition which is set up or
select, the compulsory operation mode,
buzzer is sounded "beep"
Samsung Electronics
New 1
5/14/01 10:03 PM
Page 1-15
FEATURES AND OPERATION
1-8-2 Getting Started
You have just purchased a split-type room air conditioner and it has been installed by your
installation specialist.
Your Owner’s Instructions contain much valuable information on using your air conditioner.
Please take the time to read them as they will help you take full advantage of the unit’s features.
The booklet is organised as follows.
♦ The following figures are shown on pages 1-8 and 1-9 :
- Indoor and outdoor units
- Remote control (buttons and display)
They will help you find the buttons and understand the symbols displayed.
♦ In the main part of the document, you will find a series of step-by-step procedures for each function available.
The illustrations in the step-by-step procedures use three different symbols:
PRESS
PUSH
HOLD DOWN
1-8-3 Inserting the Remote Control Batteries
You must insert or replace the remote control batteries when:
♦ You purchase the air conditioner
♦ The remote control does not work correctly
Note
Use two LR03 1.5 V batteries. Do not use old batteries or
different kinds of batteries together. Batteries may be
completely discharged after 12 months, even if they have
not actually been used.
1 Slide the remote control out of its holder.
2 Push the battery cover on the rear of the remote control with your thumb in the
direction of the arrow and remove it.
3 Insert the two batteries, taking care to respect the polarities:
♦ + on the battery with + on the remote control
♦ - on the battery with - on the remote control
4 Close the cover by sliding it back until it clicks into place.
Samsung Electronics
1-15
New 1
5/14/01 10:03 PM
Page 1-16
FEATURES AND OPERATION
1-8-4 Setting the Time
Your air conditioner contains a clock used to start and stop the
unit automatically at a given time.
You must set the time when you:
♦ Purchase the air conditioner
♦ Replace the batteries
N o t e Be sure to reset the time when you change clocks from
standard todaylight savings time and vice versa.
Setting the Time for the First Time
1 Insert the batteries.
♦ Push the battery cover on the rear of the remote control with your thumb
and remove it.
Result: The clock starts.
2 Using a small pointed tool (ball-point pen for example),
Press the button.
Result: The AM indication flashes.
3 To set the current time, press the
or
cover on the remote control.
To...
Increase the time in one-minute intervals
Increase the time in ten-minute intervals
Decrease the time in one-minute intervals
Decrease the time in ten-minute intervals
buttons under the
Then...
Press the ( )button.
Hold down the ( )button.
Press the ( )button.
Hold down the ( )button.
Result: AM or PM is displayed to indicate whether the setting corresponds to a
time before or after midday.
4 When you are satisfied with your setting, confirm the time. To do so:
using a small pointed tool (ball-point pen for example), press the button.
Result: ♦ The AM or PM indication stops flashing.
♦ The clock starts.
Resetting the Time
If you have already set the time but wish to change it, proceed as follow.
1 Using a small pointed tool (ball-point pen for example), press the button under
the remote control flap.
Result: The AM or PM indication flashes.
2 Set the time, following the instructions in Step 3 in the procedure above.
3 When you are satisfied with your setting, confirm the time. To do so, press the
button, using a small pointed tool (ball-point pen for example).
Result: ♦ The AM or PM indication stops flashing.
♦ The clock starts.
1-16
Samsung Electronics
New 1
5/14/01 10:03 PM
Page 1-17
FEATURES AND OPERATION
1-8-5 Selecting the Automatic Operating Mode
You can start the air conditioner in Automatic mode from your remote
control. In the Automatic mode, the standard temperature and the optimum fan speed is selected automatically. You can adjust the standard
temperature but not the fan speed.
1 If necessary, press the
(On/Off) button.
Result: ♦ The OPERATION indicator on the indoor unit comes on.
♦ The air conditioner starts up in the mode selected when
the unit was last used.
♦ The indoor unit beeps.
IM
IMPORTANT
MODE
TURBO
OFF
The air conditioner is fitted with a protection mechanism to prevent
the unit from being damaged when it is started immediately after
being:
♦ Plugged in
♦ Stopped
It will start up normally after a three-minute.
2 If the
indication is not displayed at the top of the remote control, press the
button on the remote control one or more times until it appears.
Result: ♦ The indoor unit beeps each time you press
.
♦ The air conditioner starts up in AUTO mode.
Note
You can change modes at any time.
M OD E
M OD E
MODE
TURBO
OFF
MODE
TURBO
OFF
3 To adjust the standard temperature (The air conditioner automatically set the standard temperature by the current room temperature.), press the
or
buttons
one or more times.
SET TEMP.
-2°C(-4°F)
(
)
SET TEMP.
-1°C(-2°F)
(
)
< When you feel hot >
Samsung Electronics
Standard temperature
(
)
SET TEMP.
+1°C(2°F)
(
)
SET TEMP.
+2°C(4°F)
(
)
< When you feel chilly >
1-17
New 1
5/14/01 10:03 PM
Page 1-18
FEATURES AND OPERATION
1-8-6 Cooling Your Room
You must select the Cool mode if you wish to adjust the:
♦ Cooling temperature
♦ Fan speed when cooling
1 If necessary, press the
(On/Off) button.
Result: ♦ The OPERATION indicator on the indoor unit comes on.
♦ The air conditioner starts up in the mode selected when
the unit was last used.
♦ The indoor unit beeps.
IM
IMPORTANT
MODE
TURBO
OFF
The air conditioner is fitted with a protection mechanism to prevent
the unit from being damaged when it is started immediately after
being:
♦ Plugged in
♦ Stopped
It will start up normally after a three-minute.
2 If the indication is not displayed at the top of the remote control, press the
button on the remote control one or more times until it appears.
Result: ♦ The indoor unit beeps each time you press
.
♦ The air conditioner starts up in Cool mode.
N o t e You can change modes at any time.
M OD E
M OD E
3 To adjust the temperature, press the
or
buttons one or more
times until the required temperature is displayed.
Possible temperatures are between 18°C(61°F) and 30°C(86°F) inclusive.
Result: ♦ Each time you press
or
:
- The temperature is adjusted by 1°C(2°F)
- The indoor unit beeps
♦ The air conditioner starts cooling, provided that the room
temperature is higher than the selected temperature; the
fan will, however, operate.
MODE
TURBO
OFF
MODE
TURBO
OFF
4 Select the fan speed by pressing the
button one or more times until the
required setting is displayed:
Low
Medium
High
Automatic
Result: Each time you press
, the indoor unit beeps.
5 To control the direction of the air flow, refer to page 1-23.
1-18
Samsung Electronics
New 1
5/14/01 10:03 PM
Page 1-19
FEATURES AND OPERATION
1-8-7 Heating Your Room
You must select the Heat mode if you wish to adjust the:
♦ Heating temperature
♦ Fan speed when heating
1 If necessary, press the (On/Off) button.
Result: ♦ The OPERATION indicator on the indoor unit comes on.
♦ The air conditioner starts up in the mode selected when
the unit was last used.
♦ The indoor unit beeps.
IM
IMPORTANT
MODE
TURBO
OFF
The air conditioner is fitted with a protection mechanism to prevent
the unit from being damaged when it is started immediately after
being:
♦ Plugged in
♦ Stopped
It will start up normally after a three-minute.
2 If the indication is not displayed at the top of the remote control, press the
button on the remote control one or more times until it appears.
Result: ♦ The indoor unit beeps each time you press
.
♦ The air conditioner starts up in Heat mode.
Note
You can change modes at any time.
M OD E
M OD E
3 To adjust the temperature, press the
or
buttons one or more
times until the required temperature is displayed.
Possible temperatures are between 16°C(61°F) and 30°C(86°F) inclusive.
Result: ♦ Each time you press
or
:
- The temperature is adjusted by 1°C(2°F)
- The indoor unit beeps
♦ The air conditioner starts heating, provided that the room
temperature is lower than the desired temperature
(selected temperature+3°C(6°F)); the fan will, however, operate.
MODE
MODE
TURBO
TURBO
OFF
OFF
4 Select the fan speed by pressing the
button one or more times until the
required setting is displayed:
Low
Medium
High
Automatic
Result: ♦ Each time you press
, the indoor unit beeps.
♦ For the first three to five minutes, the fan operates very
slowly until the air has been sufficiently warmed. Once the correct
temperature has been reached, the fan is automatically set to the
required speed.
5 To control the direction of the air flow, refer to page 1-23.
Samsung Electronics
1-19
New 1
5/14/01 10:03 PM
Page 1-20
FEATURES AND OPERATION
1-8-8 Changing the Room Temperature Quickly
The Turbo cooling/heating function is used to cool or heat your room as
quickly as possible.
Example:
You have just come home and find that the room is very
hot. You wish to cool it down as quickly as possible.
The Turbo function operates for 30 minutes with the maximum settings
before returning automatically to the mode and temperature previously
selected.
1 If necessary, press the
(On/Off) button.
Result
♦ The OPERATION indicator on the indoor unit comes on.
♦ The air conditioner starts up in the mode selected when the unit
was last used.
♦ The indoor unit beeps.
2 Press the
Result: ♦
♦
♦
♦
TURBO
button.
The temperature and fan settings are adjusted automatically.
The TURBO indicator on the indoor unit lights up.
The air conditioner cools or heats the room as quickly as possible.
After 30 minutes, the air conditioner is reset automatically to the
previous mode, temperature and fan settings.
but, if you press the
button in or mode that is
changed with
mode automatically.
MODE
TURBO
OFF
TURBO
3 If you wish to stop the Turbo function before the end of the 30-minute period, press
the
button again.
Result: The air conditioner is reset automatically to the previous mode,
temperature and fan settings.
but, if you press the
button in or mode that is
changed with
mode automatically.
TURBO
TURBO
4 To control the direction of the air flow, refer to page 1-23.
1-20
Samsung Electronics
New 1
5/14/01 10:03 PM
Page 1-21
FEATURES AND OPERATION
1-8-9 Removing Excess Humidity
If the atmosphere in your room is very humid or damp, you can remove
excess humidity without lowering the room temperature too much.
1 If necessary, press the
(On/Off) button.
Result: ♦ The OPERATION indicator on the indoor unit comes on.
♦ The air conditioner starts up in the mode selected when
the unit was last used.
♦ The indoor unit beeps.
IM
IMPORTANT
MODE
TURBO
OFF
The air conditioner is fitted with a protection mechanism to prevent
the unit from being damaged when it is started immediately after
being:
♦ Plugged in
♦ Stopped
It will start up normally after a three-minute.
2 If the indication is not displayed at the top of the remote control, press the
button on the remote control one or more times until it appears.
Result: ♦ The indoor unit beeps each time you press
.
♦ The air conditioner starts up in Dry mode.
Note
You can change modes at any time.
M OD E
M OD E
MODE
3 To adjust the temperature, press the
or
buttons one or more
times until the required temperature is displayed.
Possible temperatures are between 18°C(65°F) and 30°C(86°F) inclusive.
Result: ♦ Each time you press
or
:
- The temperature is adjusted by 1°C(2°F)
- The indoor unit beeps
♦ The air conditioner starts removing the excess humidity;
the quantity of air is adjusted automatically.
MODE
TURBO
TURBO
OFF
OFF
4 To control the direction of the air flow, refer to page 1-23.
Samsung Electronics
1-21
New 1
5/14/01 10:04 PM
Page 1-22
FEATURES AND OPERATION
1-8-10 Airing Your Room
If the atmosphere in your room is stale, you can air the room using the
Fan feature.
1 If necessary, press the
(On/Off) button.
Result: ♦ The OPERATION indicator on the indoor unit comes on.
♦ The air conditioner starts up in the mode selected when
the unit was last used.
♦ The indoor unit beeps.
MODE
TURBO
OFF
2 If the indication is not displayed at the top of the remote control,
press the
button on the remote control one or more times until it appears.
Result: ♦ The indoor unit beeps each time you press
.
♦ The FAN indicator on the indoor unit lights up.
♦ The air conditioner starts up in Fan mode.
♦ The temperature is set automatically.
Note
You can change modes at any time.
M OD E
M OD E
MODE
TURBO
OFF
3 Select the fan speed by pressing the
button one or more times until the
required setting is displayed:
Low
Medium
High
Result: Each time you press
, the indoor unit beeps.
4 To control the direction of the air flow, refer to page 1-23.
1-22
Samsung Electronics
New 1
5/14/01 10:04 PM
Page 1-23
FEATURES AND OPERATION
1-8-11 Adjusting the Airflow Direction
1-8-11(a) Adjusting the Air Flow Direction Vertically
Depending on the position of the indoor unit on the wall of your room,
you can adjust the position of the outer air flow blade on the bottom of the
unit, thus increasing the efficiency of the air conditioner.
1 Press the
button under the remote control flap one or more times as required.
Result: The outer blade is adjusted vertically.
RECOMMENDATION
When...
Cooling
Heating
Adjust the blade to face...
Upwards.
Downwards.
2 If you want the blade to move up and down automatically when the air conditioner
is operating, press the
button.
Result: The blade move up and down, around the base position set.
3 To stop the blade moving up and down, press the
Note
button again.
If you switch the air conditioner... Then the blade is...
Off
Closed completely.
On again
Reset to the position that you
previously selected.
1-8-11(b) Adjusting the Air Flow Direction Horizontally
There are two sets of inner air flow blades. Just as the outer air flow blade
can be adjusted vertically, the inner blades can be adjusted horizontally.
1 Open the air flow blade along the bottom of the indoor unit, by pressing the
button.
2 To stop the blade moving up and down, press the
button again.
3 Adjust each set of inner blades to the required position, by pushing or pulling them
sideways.
Samsung Electronics
1-23
New 1
5/14/01 10:04 PM
Page 1-24
FEATURES AND OPERATION
1-8-12 Switching the Unit On and Off Automatically (On/Off Timer)
You can set the timer to switch the air conditioner on and/or off automatically at given times.
Example:
You wish to start cooling your room before you return
from work; you decide to:
♦ Switch the air conditioner on at 5:30 p.m.
♦ Switch it off at 11:30 p.m.
You can set:
♦ The switch-on time only
♦ The switch-off time only
♦ Both the switch-on and switch-off times
Check that the current time is correct before setting the
IM
IMPORTANT
timer; if it is not correct, refer to page 1-16 for details on
how to set it.
1 If necessary, press the
(On/Off) button.
2 Select the required mode by pressing the
button on the remote control one or
more times until the appropriate indication appears (in the above example, ).
M OD E
3 Press the
button under the cover on the remote control.
Result: ♦ The indication flashes.
♦ The current preset time is displayed.
Note
If you do not press a button within a few seconds, the Timer function is
cancelled and you must press the
button again.
MODE
TURBO
OFF
4 To set the switch-on time, press the
or
buttons.
To...
Then...
Increase the time in ten-minute intervals
Press the button.
Increase the time in one-hour intervals
Hold down the button.
Decrease the time in ten-minute intervals
Press the button.
Decrease the time in one-hour intervals
Hold down the button.
Result: AM or PM is displayed to indicate whether the setting corresponds to a
time before or after midday.
5 When you are satisfied with the switch-on time, press
.
Result: ♦ The indoor unit beeps.
♦ The TIMER indicator on the indoor unit lights up yellow.
Note
If not necessary to operate the air conditioner until the set up time for
starting, press
(On/Off) button off.
The air conditioner will start up automatically when the switch-on time is
reached.
6 To set the switch-off time, press the
button.
Result: ♦ The indication flashes.
♦ The current preset time is displayed.
7 Set the switch-off time, following the instructions in Step 4.
8 When you are satisfied with the switch-off time, press
.
Result: ♦ The indoor unit beeps.
♦ The TIMER indicator on the indoor unit lights up yellow.
♦ The air conditioner will switch off automatically when the
switch-off time is reached.
Note
If you wish to cancel the timer, refer to page 1-26.
1-24
Samsung Electronics
New 1
5/14/01 10:04 PM
Page 1-25
FEATURES AND OPERATION
1-8-13 Setting the Sleep Timer
The Sleep Timer can be used when you are cooling or heating your room
to switch the air conditioner off automatically after a period of six hours.
Note
If you wish to switch the unit off at a specific time, refer to
page 1-24.
1 Make sure that you have selected either the
or the
mode.
2 Press the
button .
Result: ♦ The indoor unit beeps.
♦ The
indication is displayed.
♦ The air conditioner will be controlled as indicated in the
illustrations below.
Cooling
Heating
The temperature is increased by 1°C(2°F)
every hour.
When it has been increased by 2°C(4°F)
(after two hours), the temperature is
maintained for four hours.
The temperature is decreased by
1°C(2°F) every hour.
When it has been decreased by 2°C(4°F)
(after two hours), the temperature is
maintained for four hours.
MODE
TURBO
OFF
2°C(4°F)
1°C(2°F)
Set
TEMP.
1hr 2hr
Set
TEMP.
6hr
Stop
time
Start
time
Start
time
Stop
time
1hr 2hr
6hr
-1°C(-2°F)
-2°C(-4°F)
1-8-14 Setting the Quick Timer
The Quick Timer enables you to set the air conditioner to switch off automatically after a given period of time, by pressing one single button. The
unit can be switched off automatically after 30 minutes, one hour, two
hours, three hours or five hours.
Note
If you wish to switch the unit off at a specific time, refer to
page 1-24.
1 If necessary, switch the air conditioner on and select the required mode.
2 Press
OFF
one or more times until the correct period is displayed:
Result: ♦ The TIMER indicator lights up yellow.
♦ The air conditioner will switch off automatically when the
counter displayed on the remote control reaches
.
Samsung Electronics
MODE
TURBO
OFF
1-25
New 1
5/14/01 10:04 PM
Page 1-26
FEATURES AND OPERATION
1-8-15 Cancelling the On/Off Timer
If you no longer wish to use the On/Off Timer that you have set, you can
cancel it at any time.
1 To cancel the...
Switch-on timer
Switch-off timer
Then press...
.
Result: The
indication flashes.
.
Result:
indication flashes.
The
2 Press the
button.
Result: ♦ The indoor unit beeps.
♦ The TIMER indicator on the indoor unit switches off if no
other timer is currently set.
♦ The air conditioner operates normally.
1-8-16 Cancelling the Sleep Timer
If you no longer wish to use the Sleep Timer that you have set, you can
cancel it at any time.
Press the
Result:
button.
♦ The indoor unit beeps.
♦ The
indication is no longer displayed.
♦ The air conditioner operates normally.
1-8-17 Cancelling the Quick Timer
If you no longer wish to use the Quick Timer that you have set, you can
cancel it at any time.
Press the
displayed.
Result:
1-26
OFF
button one or more times until the current time indication is
♦ The indoor unit beeps each time you press
♦ The air conditioner operates normally.
OFF
.
MODE
TURBO
OFF
Samsung Electronics
New 1
5/14/01 10:04 PM
Page 1-27
1-9 Operating Recommendations
Here are a few recommendations that you should follow when using your air conditioner.
Topic
Recommendation
Heating performances
The heat pump inside the air conditioner absorbs heat from outside air and brings it indoors. If the
temperature of the outside air drops, the air conditioner will heat less. If you find that the room is not
warm enough, use an additional heating appliance.
Warm air circulation
The air conditioner circulates warm air to heat your room; as a result, some time will be required
after starting the air conditioner to warm the entire room. If necessary, set the air conditioner going a
short time before you wish to use the room.
Frost
When outside temperatures are low and humidity is high, frost may form in the outdoor unit when
heating with your air conditioner.
If this happens:
♦ The heating operation is stopped.
♦ The Deice mode is triggered automatically for about seven minutes
♦ The OPERATION indicator on the indoor unit lights up red
No intervention is required from you; after about seven minutes, the air conditioner starts operating
again normally.
High indoor and outdoor
If both the indoor and outdoor temperatures temperatures are high and you select the Heat mode,
the outdoor unit’s fan and compressor may stop at times. This is normal; simply wait until the air conditioner switches on again.
Power failure
If a power failure occurs when the air conditioner is operating, the unit is switched off. When the
power returns, you must press
(On/Off) to restart it.
Samsung Electronics
1-27
New 1
5/14/01 10:04 PM
Page 1-28
1-10 Temperature and Humidity Ranges
The following table indicates the temperature and humidity ranges, within which the air conditioner can be
used.
If the air conditioner is used at...
Then...
High temperatures
The automatic protection feature may be triggered and the air conditioner stopped.
Low temperatures
A water leakage or some other malfunction may happen because the heat exchanger
freezes.
High humidity levels
Water may condense on and drip from the surface of the indoor unit if it is used for long
periods.
Mode
Heating
Cooling
Drying
Outdoor Temperature
0°C(32°F) to 24°C(75°F) approx.
21°C(70°F) to 43°C(109°F) approx.
18°C(64°F) to 43°C(109°F) approx.
Indoor Temperature
27°C(81°F) or less
18°C(64°F) to 32°C(90°F) approx.
18°C(64°F) to 32°C(90°F) approx.
Indoor Humidity
80% or less
-
• If the heating operation is used at below 0°C(32°F)(outdoor temperature) then, does not a full capacity.
If the cooling operation is used at over 33°C(91°F)(indoor temperature) then, does not a full capacity.
1-28
Samsung Electronics
New 1
5/14/01 10:04 PM
Page 1-29
1-11 Cleaning Your Air Conditioner
To get the best possible use out of your air conditioner, you must clean it
regularly to remove the dust that accumulates on the air filter.
IM
IMPORTANT
Before cleaning your air conditioner, ensure that you
have switched off the breaker used for the unit.
1 Open the front grille by pulling on the tabs on the lower right and left sides of the
indoor unit.
2 Lift out the bottom edge of the air filters and pull down to release them.
3 Remove all dust on the air filters with a vacuum cleaner or brush.
Front grille
4 When you have finished, insert the top part of the filters into their slot and push
down on the bottom edge until they click into place.
5 Clean the front panel with a damp cloth and mild detergent (do NOT use benzene,
solvents or other chemicals).
Note
♦ If you have not used the air conditioner for a long period
of time, set the fan going for three to four hours to dry the inside of
the air conditioner thoroughly.
♦ The removal of the front grille facilitates your cleaning the air conditioner. After opening the front grille, lift up to the max, push slightly
to the left, and pull down to release them and vice versa.
Samsung Electronics
Hook
Body groove
1-29
New 1
5/14/01 10:04 PM
Page 1-30
MEMO
1-30
Samsung Electronics
New 22-¡¯¬•
5/14/01 10:08 PM
Page 1
2
SPECIFICATIONS
New 22-¡¯¬•
5/14/01 10:08 PM
Page 2
2. SPECIFICATIONS
2-1 Series V
2-1-1 Cooling only . . . . . . . . . . . . . . . . . . . . . . . . . . . . . . . . . . . . . . . . . . . 2-1
2-1-2 Heat Pump . . . . . . . . . . . . . . . . . . . . . . . . . . . . . . . . . . . . . . . . . . . . . 2-2
2-2 Performance Data
2-2-1 7000BTU . . . . . . . . . . . . . . . . . . . . . . . . . . . . . . . . . . . . . . . . . . . . . . . 2-3
2-2-2 9000BTU . . . . . . . . . . . . . . . . . . . . . . . . . . . . . . . . . . . . . . . . . . . . . . . 2-3
2-2-3 12,000BTU . . . . . . . . . . . . . . . . . . . . . . . . . . . . . . . . . . . . . . . . . . . . . 2-4
2-2-4 Cooling capacity correction factors . . . . . . . . . . . . . . . . 2-4
2-2-5 Refrigerant charging . . . . . . . . . . . . . . . . . . . . . . . . . . . . . . . . . 2-4
2-3 Noise level measurement
2-3-1 Noise level check point . . . . . . . . . . . . . . . . . . . . . . . . . . . . . 2-5
2-3-2 Noise level Curve(indoor unit) . . . . . . . . . . . . . . . . . . . . . . 2-6
2-3-3 Noise level Curve(outdoor unit) . . . . . . . . . . . . . . . . . . . . . 2-7
2-4 Refrigerating cycle block diagram
2-4-1 Cooling only . . . . . . . . . . . . . . . . . . . . . . . . . . . . . . . . . . . . . . . . . . . 2-8
2-4-2 Heat Pump . . . . . . . . . . . . . . . . . . . . . . . . . . . . . . . . . . . . . . . . . . . . . 2-9
2-5 Operation Characteristics
2-5-1 Cooling mode operation . . . . . . . . . . . . . . . . . . . . . . . . . . . . 2-10
2-5-2 Heating mode operation . . . . . . . . . . . . . . . . . . . . . . . . . . . . 2-10
2-5-3 Automatic operation . . . . . . . . . . . . . . . . . . . . . . . . . . . . . . . . 2-11
2-5-4 Sleeping operation
2-5-4(a) At cooling mode . . . . . . . . . . . . . . . . . . . . . . . . . . . . . . 2-11
2-5-4(b) At heating mode . . . . . . . . . . . . . . . . . . . . . . . . . . . . . . 2-12
2-5-5 Mild operation
2-5-5(a) At cooling mode . . . . . . . . . . . . . . . . . . . . . . . . . . . . . . 2-12
2-5-5(b) At heating mode . . . . . . . . . . . . . . . . . . . . . . . . . . . . . . 2-13
2-5-6 Turbo operation(Cooling or Heating mode) . . . . . . . 2-13
2-5-7 Indoor fan control in the heating mode . . . . . . . . . . . 2-14
2-5-8 Overload protection control
2-5-8(a) At heating mode . . . . . . . . . . . . . . . . . . . . . . . . . . . . . . 2-15
2-5-8(b) At cooling mode . . . . . . . . . . . . . . . . . . . . . . . . . . . . . . 2-15
2-5-9 Defrost control . . . . . . . . . . . . . . . . . . . . . . . . . . . . . . . . . . . . . . 2-16
2-5-10 Freezing protection control(In the cool mode) . . 2-17
2-5-11 The others . . . . . . . . . . . . . . . . . . . . . . . . . . . . . . . . . . . . . . . . . . 2-17
New 22-¡¯¬•
5/14/01 10:08 PM
Page 2-1
2. SPECIFICATIONS
2-1 Series V
2-1-1 Cooling only
Item
Power Supply
BTU/h
kW/h
W
BTU/hW
Pts/h
A
A
Capacity
Total Input
Energy efficiency
Dehumiditying
Running current
Starting current
Model name
Air volume
I
N
D
O
O
R
U
N
I
T
O
U
T
D
O
O
R
U
N
I
T
P
I
P
I
N
G
Noise
level
Hi
Mid
Low
Hi
Mid
Low
Fan type
Fan motor output
Type
Heat
Area
exchanger
Fin Pitch
Finish
Booster Heater
Cond drain conn
W
Dimensions
H
D
Weight
Model name
Air volume
Noise level
Fan type
Fan motor output
Type
Heat
Area
exchanger
Fin pitch
Finish
Type
Model
Resistance
Compressor
Oil
O,L,P
Capacitor
L.R.A
W
Dimensions
H
D
Weight
Refrigerant
R-Charge
Pipe Size
Liquid
(OD)
Gas
Connection method
Height
Between
Length
CFM
CFM
CFM
dB(A)
dB(A)
dB(A)
W
m2
mm
kW
mm
mm
mm
mm
kg
CFM
dB(A)
W
m2
mm
Ω
Model
µF X V
A
mm
mm
mm
kg
1b(oz)
mm
mm
m
m
7,000
Cooling
Heating
1Ø-60Hz, 115V~
7,500
2.20
670
11.2
3.28
2.56
6.3
34.0
AS07A2VA
212
187
162
36.5
34.5
33
Ø95 Cross Flow Fan
35
Fin-Tube
0.154 (2Row)
1.5 Slit
Resin Co
OD17 (0.67”)
815 (32.08”)
298 (11.73”)
182 (7.17”)
9.6 (2.2ib)
US07A2VA
742
45
Ø405 Propeller
20
Fin-Tube
0.345 (1Row)
1.5 Wave
Rotary
44A072HW1E1
Suntex-200LT / 280 cc
MRA98706-12008
25µF X 370V
32.0
720 (28.35”)
525 (20.67”)
245 (9.65”)
27 (59.5ib)
R-22
1.34 (21.5)
6.35 (1/4”)
9.52 (3/8”)
Flared
10 (10.936yd)
3 (3.28yd)
9,000
Cooling
Heating
1Ø-60Hz, 115V~
9,000
2.64
880
10.2
3.00
3.41
8.3
45.0
AS09A2VA
230
205
180
40.5
38.5
36.5
Ø95 Cross Flow Fan
35
Fin-Tube
0.154 (2Row)
1.5 Slit
Resin Co
OD17 (0.67”)
815 (32.08”)
298 (11.73”)
182 (7.17”)
9.6 (2.2ib)
US09A2VA
742
47
Ø405 Propeller
20
Fin-Tube
0.345 (1Row)
1.5 Wave
Rotary
44B092HW1EG
SUNISD-4GSD-T / 360 cc
MRA12093-12007
45µF X 370V
47.0
720 (28.35”)
525 (20.67”)
245 (9.65”)
27 (59.5ib)
R-22
1.54 (24.7)
6.35 (1/4”)
9.52 (3/8”)
Flared
10 (10.936yd)
3 (3.28yd)
* Rating conditions cool : Indoor DB26.7°C(80.0°F), WB19.4°C(67.0°F)
Samsung Electronics
12,000
Cooling
Heating
1Ø-60Hz, 208~230V~
11,500
3.37
1,280
9.0
2.63
4.05
5.8
33.0
AS12A2VC
276
250
226
43.5
41.5
39.5
Ø95 Cross Flow Fan
35
Fin-Tube
0.154 (2Row)
1.2 Plate
Resin Co
OD17 (0.67”)
815 (32.08”)
298 (11.73”)
182 (7.17”)
9.6 (2.2ib)
US12A2VC
795
48
Ø405 Propeller
30
Fin-Tube
0.345 (2Row)
1.5 Wave
Rotary
48A135IV1E5
Suntex - 200LT / 410 cc
MRA12002-9200
25µF X 450V
31.0
720 (28.35”)
525 (20.67”)
245 (9.65”)
31 (ib)
R-22
1.94 (31.0)
6.35 (1/4”)
12.7 (1/2”)
Flared
10 (10.936yd)
3 (3.28yd)
Outdoor DB35°C(95.0°F), WB23.9°C(75.0°F)
2-1
New 22-¡¯¬•
5/14/01 10:08 PM
Page 2-2
SPECIFICATIONS
2-1-2 Heat Pump
9,000
Item
Power Supply
Cooling
BTU/h
kW
W
BTU/hW
Pts/h
A
A
Capacity
Total Input
Energy efficiency
Dehumiditying
Running current
Starting current
Model name
Air volume
I
N
D
O
O
R
Noise
level
Hi
Mid
Low
Hi
Mid
Low
Fan type
Fan motor output
U Heat
N exchanger
I
T Booster Heater
Type
Area
Fin pitch
Finish
Cond drain conn
Dimensions
W
H
D
Weight
Model name
Air volume
Noise level
O Fan type
U Fan motor output
T
D Heat
O exchanger
O
R
U
N Compressor
I
T
Dimensions
Type
Area
Fin pitch
Finish
Type
Model
Resistance
Oil
O,L,P
Capacitor
W
H
D
Weight
Refrigerant
P R-Charge
I Pipe Size
Liquid
P (OD)
Gas
I Connection method
N
Height
G Between
Length
CFM
CFM
CFM
dB(A)
dB(A)
dB(A)
W
m2
mm
kW
mm
mm
mm
mm
kg
CFM
dB(A)
W
2
m
mm
Ω
Model
µF X V
mm
mm
mm
kg
1b(oz)
mm
mm
m
m
Heating
1Ø-60Hz, 115V~
9,000
2.64
900
10.0
2.93
3.41
8.5
9,500
2,78
880
10.8
3.16
8.2
45.0
AQ09A2VA
230
205
180
40.5
38.5
36.5
244
215
191
40.0
38.0
36.0
Ø95 Cross Flow Fan
35
Fin-Tube
0.154 (2Row)
1.5Slit
Resin Co
OD17 (0.67”)
815 (32.08”)
298 (11.73”)
182 (7.17”)
9.6 (21.2ib)
UQ09A2VA
742
47
48
Ø400 Propeller
20
Fin-Tube
0.345(1Row)
1.3 Wave
Resin Co
Rotary
44B092HW1EG
Suniso 4GSD / 360 cc
MRA12093-12007
45µF X 370V
720 (28.35”)
525 (20.67”)
245 (9.65”)
28 (61.7ib)
R-22
1.70(27.2)
6.35 (1/4”)
9.52 (3/8”)
Flared
10 (10.936yd)
3 (3.28yd)
12,000
Cooling
Heating
1Ø-60Hz, 208~230V~
11,500
12,500
3.37
3.66
1,280
1,430
9.0
8.7
2.64
2.55
4.05
6.0
6.4
33.0
AQ12A2VC
276
290
250
265
226
240
43.5
43.0
41.5
41.0
39.5
39.0
Ø95 Cross Flow Fan
35
Fin-Tube
0.154 (2Row)
1.2Plate
Resin Co
OD17 (0.67”)
815 (32.08”)
298 (11.73”)
182 (7.17”)
9.6 (21.2ib)
UQ12A2VC
795
48
49
Ø400 Propeller
30
Fin-Tube
0.345(2Row)
1.5 Wave
Resin Co
Rotary
48H135IV1E5
Suniso 4GSD / 410 cc
MRA12002-9200
25µF X 450V
720 (28.35”)
525 (20.67”)
245 (9.65”)
32 (ib)
R-22
2.07(35.2)
6.35 (1/4”)
12.7 (1/2”)
Flared
10 (10.936yd)
3 (3.28yd)
* Rating conditions cool : Indoor DB26.7°C(80.0°F), WB19.4°C(67.0°F) Outdoor DB35°C(95.0°F), WB23.9°C(75.0°F)
* Rating conditions Heat : Indoor DB21.1°C(70.0°F), WB15.6°C(60.0°F) Outdoor DB8.3°C(47.0°F), WB6.1°C(43.0°F)
2-2
Samsung Electronics
New 22-¡¯¬•
5/14/01 10:08 PM
Page 2-3
2-2 Performance Data
2-2-1 7000BTU
2-2-2 9000BTU
Samsung Electronics
2-3
5/14/01 10:08 PM
Page 2-4
SPECIFICATIONS
2-2-3 12,000BTU
2-2-4 Cooling capacity correction factors
105
100
105
100
95
95
Input(%)
Capacity(%)
New 22-¡¯¬•
90
85
85
80
80
75
75
1
5
10
15
Piping lenght(m)
2-4
90
20
1
5
10
15
20
Piping lenght(m)
Samsung Electronics
New 22-¡¯¬•
5/14/01 10:08 PM
Page 2-5
2-3 Noise level measurement
2-3-1 Noise level check point
■ Indoor unit
h
h/2
0.8m(2ft 7 in)
10
1m(3ft 3 in)
10
■ Outdoor unit
1m(3ft 3 in)
10
1m(3ft 3 in)
10
Air
h
h/2
Samsung Electronics
h/2
2-5
New 22-¡¯¬•
5/14/01 10:08 PM
Page 2-6
SPECIFICATIONS
2-3-2 Noise level Curve(indoor unit)
■ 7,000BTU
45.0
40.0
35.0
30.0
25.0
20.0
15.0
10.0
5.0
■ 9,000BTU
45.0
45.0
40.0
40.0
35.0
35.0
30.0
30.0
25.0
25.0
20.0
20.0
15.0
15.0
10.0
10.0
5.0
5.0
45.0
45.0
40.0
40.0
35.0
35.0
30.0
30.0
25.0
25.0
20.0
20.0
15.0
15.0
10.0
10.0
5.0
5.0
■ 12,000BTU
2-6
Samsung Electronics
New 22-¡¯¬•
5/14/01 10:09 PM
Page 2-7
SPECIFICATIONS
2-3-3 Noise level Curve(outdoor unit)
■ 7,000BTU
■ 9,000BTU
■ 12,000BTU
Samsung Electronics
2-7
New 22-¡¯¬•
5/14/01 10:09 PM
Page 2-8
2-4 Refrigerating cycle block diagram
2-4-1 Cooling only
■ Indoor unit
“
■ Outdoor unit
2-8
Samsung Electronics
New 22-¡¯¬•
5/14/01 10:09 PM
Page 2-9
SPECIFICATIONS
2-4-2 Heat Pump
■ Indoor unit
■ Outdoor unit
Samsung Electronics
2-9
New 22-¡¯¬•
5/14/01 10:09 PM
Page 2-10
2-5 Operation Characteristics
2-5-1 Cooling mode operation
When selecting the Cooling Mode Operation, the unit will operate according to the setting by
the remote controller and the operation is as well as the following. Room temperature can be set
in 1°C(2°F) steps in the range of 18(64°F) to 30°C(86°F).
Room Temp.(°C)
Ts+0.5(1°F)
Ts
Time
On
Compressor
On
Off
• Ts means Remote Controller setting Temperature
2-5-2 Heating mode operation
When selecting the Heating Mode Operation, the unit will operate according to the setting by
the remote controller and the operation is as well as the following. Room temperature can be set
in 1°C(2°F) steps in the range of 16(61°F) to 30°C(86°F).
Room Temp.(°C)
Ts+5(9°F)
Ts+3(6°F)
Time
On
On
Compressor
Off
2-10
Samsung Electronics
New 22-¡¯¬•
5/14/01 10:09 PM
Page 2-11
SPECIFICATIONS
2-5-3 Automatic operation
When Automatic operation is set by the remote controller, the air conditioner senses the room
temperature then automatically selects the operation mode and setting temperature.
Standard Setting Temp.
Tsp = 21°C(70°F) + qT
Operating Mode
Setting Temp.
Remarks
Cooling
Tsp = 24°C(75°F) + qT
Heating
Tsp = 22°C(72°F) + qT
qT = -2(-4°F), -1(-2°F),
1(2°F), 2(4°F)
❍ In case that Room Temp. ≥ 21°C(70°F) + qT, The Unit is operated is operated in the Cool Mode.
❍ In case that Room Temp. < 21°C(70°F) + qT, The Unit is operated in the Heat Mode.
❍ qT means that user is able to change setting temperature within ±2(±4°F).
2-5-4 Sleeping operation
2-5-4(a) At cooling mode
When you set the sleep mode, the following movement will start to avoid overcooling.
• The indoor fan speed is fixed by setting the remote controller.
• The setting temperature will rise by 1°C(2°F) at the starting of operation and by 1°C(2°F) one
hour later.
• The operation will stop after 6 hours.
6h
1h
1h
Ts+2.5(5°F)
Ts+2.0(4°F)
1°C(2°F) up
Ts+0.5(1°F)
Ts
Start
Samsung Electronics
1°C(2°F) up
Stop
2-11
New 22-¡¯¬•
5/14/01 10:09 PM
Page 2-12
SPECIFICATIONS
2-5-4(b) At heating mode
When you set the sleep mode, the following movement will start to avoid overheating.
• The indoor fan speed is fixed by setting the remote controller.
• The setting temperature will be dropped by 1°C(2°F) at the starting of operation and by
1°C(2°F) one hour later.
• The operation will stop after 6 hours.
Start
Stop
Ts+5(9°F)
1°C(2°F) down
Ts+4(7°F)
Ts+3(6°F)
Ts+3(6°F)
1°C(2°F) down
Ts+2(4°F)
1hr
Ts+1(2°F)
1hr
6hr
2-5-5 Mild operation
2-5-5(a) At cooling mode
• The setting temperature(Tsar) is set to 3°C(6°F) over the temperature set at prior operation.
• The fan operates at a middle speed for 1 hour from the starting and after that it operates at a
low speed for 2 hour.
Compressor
Tsmc+0.5(1°F)
Tsmc
middle
Indoor Fan
Low
1hr
2-12
2hr
3hr
Samsung Electronics
New 22-¡¯¬•
5/14/01 10:09 PM
Page 2-13
SPECIFICATIONS
2-5-5(b) At heating mode
• The setting temperature(Tsar) is set to 3°C(6°F) below the temperature set at prior operation.
• The fan operates at a middle speed for 1 hour from the starting and after that it operates at a
low speed for 2 hour.
Compressor
Tsmh
Tsmh-2
middle
Indoor Fan
low
1hr
2hr
3hr
2-5-6 Turbo operation(Cooling or Heating mode)
If turbo operation is selected during heating or cooling mode, compressor is operated
for 30minutes regardless of room temperature. After 30minutes of turbo operation unit will
operate in normal state
Samsung Electronics
2-13
New 22-¡¯¬•
5/14/01 10:09 PM
Page 2-14
SPECIFICATIONS
2-5-7 Indoor fan control in the heating mode
Indoor fan is controlled depending on the temperature of indoor heat exchanger in the geating
mode.
1) Indoor fan control
(1) When compressor begins operating
The temperature of indoor heat exchanger
Indoor fan speed
below 28°C(82°F)
off
28°C(82°F) ~ below 34°C(93°F)
UL speed (510rpm)
34°C(93°F) ~ below 40°C(104°F)
LL speed (Low-35rpm)
above 40°C(104°F)
setting speed
(2) When compressor stops operating
The temperature of indoor heat exchanger
Indoor fan speed
above 20°C(68°F)
UL speed
below 20°C(68°F)
off
after 10 minutes when compressor stops operating
off
When comperssor is on
When comperssor is off
40°C(104°F)
34°C(93°F)
28°C(82°F)
20°C(68°F)
Setting speed
LL speed
UL speed
OFF
ON
Compressor
2-14
OFF
OFF
Samsung Electronics
New 22-¡¯¬•
5/14/01 10:09 PM
Page 2-15
SPECIFICATIONS
2-5-8 Overload protection control
2-5-8(a) At heating mode
• If indoor heat exchanger temp. is over 53°C(127°F), outdoor fan turns off.
• If indoor heat exchanger temp. is over 60°C(140°F), outdoor compressor stops.
• After compressor and fan are off if indoor heat exchanger temp. is over 50°C(122°F), outdoor
compressor and outdoor fan operate normally.
Indoor Heat Exchanger Temp.
60°C(140°F)
53°C(127°F)
50°C(122°F)
Time
Compressor
On
3min Delay
On
Off
Outdoor Fan
On
On
Off
2Sec
2-5-8(b) At cooling mode
If the temperature of compressor top is above about 130°C(266°F), each Compressor is controlled
by its OLP(over load protector) attached on the top of compressor to protect compressor coil
from being damaged. The outdoor fan runs continuously regardless of compressor On/Off.
Samsung Electronics
2-15
New 22-¡¯¬•
5/14/01 10:09 PM
Page 2-16
SPECIFICATIONS
2-5-9 Defrost control
Defrost operation is controlled by sensing the temperature of indoor heat exchanger
Defrost LED ON
Defrost Time
Defrost
On
1min
On
On
Compressor
Off
Off
On
more than 58sec
Outdoor Fan
Off
55sec
On
55sec
4-Way Vlave
Off
On
2-16
Thermo On
2sec
On
Indoor Fan
On
1min
Off
Setting Speed
Low Speed
Samsung Electronics
New 22-¡¯¬•
5/14/01 10:09 PM
Page 2-17
SPECIFICATIONS
2-5-10 Freezing protection control(In the cool mode)
1) First freezing protection
If the temperature of indoor heat exchanger is belows -1°C(-2°F) for over 6minutes, the outdoor fan turns off.
2) Second freezing protection
If the temperature of indoor heat exchger does not increse over 5°C(9°F) in 3minutes after
First freezing protection, compressor turns off.
3) If the temperature of indoor heat exchanger increase over 5°C(9°F) during the protection
function, the freezing protection function is released and compressor operates normally.
4) If the temperature of indoor heat exchanger increase over 0°C(0°F) during 6minutes counter is
cleared.
5) Operating Pattern
Indoor heat exchanger Temp.
5°C(9°F)
1st
2rd
0°C(0°F)
-1°C(-2°F)
6min
Compressor
3min
On
On
Off
Outdoor Fan
Indoor Fan
On
On
Off
Setting rpm
Setting rpm
LL rpm
2-5-11 The others
Time delay safety control
The compressor is stopped for 3minutes to balance the pressure in the refrigeration cycle.
(protection of compressor)
Samsung Electronics
2-17
New 22-¡¯¬•
5/14/01 10:09 PM
Page 2-18
MEMO
2-18
Samsung Electronics
New-3
5/14/01 10:16 PM
Page 1
3
DIAGRAMS
New-3
5/14/01 10:16 PM
Page 2
3. DIAGRAMS
3-1 Series V (Cooling only)
3-1-1 Micro computer block diagram . . . . . . . . . . . . . . . . . . . . . 3-1
3-1-2 Wiring diagram (Indoor unit) . . . . . . . . . . . . . . . . . . . . . . . . 3-7
3-1-3 Wiring diagram (Outdoor unit) . . . . . . . . . . . . . . . . . . . . . . 3-8
4-2 Series V (Heat Pump)
3-2-1 Micro computer block diagram . . . . . . . . . . . . . . . . . . . 3-10
3-2-2 Wiring diagram (Indoor unit) . . . . . . . . . . . . . . . . . . . . . . 3-16
3-2-3 Wiring diagram(Outdoor unit) . . . . . . . . . . . . . . . . . . . . . 3-17
New-3
5/14/01 10:16 PM
Page 3-1
3. DIAGRAMS
3-1 Series V (Cooling only)
3-1-1 Micro computer block diagram
HEAT EXCHANGER SENSOR
INDOOR CONTROL PANEL
•BLADE-H CONTROL
ROOM TEMPERATURE SENSOR
•INDOOR FAN MOTOR
CONTROL
INFRARED SIGNAL
RESET
CIRCUIT
•COMPRESSOR
CONTROL
INDOOR FAN MOTOR
SPEED DETECT
ZERO CROSSING
•TEMPERATURE
CONTROL
OSCILLATION
CIRCUIT
REMOTE CONTROLLER
•TIMER
•BUZZER CONTROL
MODE SELECT
SWITCH
TRIGER
SIGNAL
POWER ON/OFF
MODE
(AUTO, COOL, DRY, FAN)
TURBO
* INDICATOR PANNEL
OPERATION LED
TIMER LED
FAN ONLY LED
• COMPRESSOR CONTROL
SIGNAL
• STEPPING MOTOR
CONTROL SIGNAL
• BUZZER CONTROL
SIGNAL
SSR
INDOOR FAN MOTOR
• COMPRESSOR &
FAN SPEED SELECT
BLADE-H MOVING SELECT
ON, OFF TIMER SELECT
Out fan DRIVE
COMPRESSOR & OUT FAN
• STEPPING MOTOR
DRIVE
STEPPING MOTOR
BUZZER
• BUZZER DRIVE
DC 5V
DC 12V
VOLTAGE REGULATOR
TEMPERATURE SELECT
SLEEP SELECT
TIME SETTING
AC INPUT
VD : 200-220V/50Hz
VE : 220-240V/50HZ
Samsung Electronics
POWER TRANSFORMER
3-1
New-3
5/14/01 10:16 PM
Page 3-2
DIAGRAMS
3-1-2 Wiring diagram (Indoor unit)
3-2
Samsung Electronics
New-3
5/14/01 10:16 PM
Page 3-3
DIAGRAMS
3-1-3 Wiring diagram (Outdoor unit)
Samsung Electronics
3-3
New-3
5/14/01 10:16 PM
Page 3-4
3-2 Series V (Heat Pump)
3-2-1 Micro computer block diagram
HEAT EXCHANGER SENSOR
INDOOR CONTROL PANEL
•BLADE-H CONTROL
•INDOOR FAN MOTOR
CONTROL
ROOM TEMPERATURE SENSOR
•OUTDOOR FAN MOTOR
CONTROL
INFRARED SIGNAL
RESET
CIRCUIT
INDOOR FAN MOTOR
SPEED DETECT
ZERO CROSSING
•COMPRESSOR
CONTROL
•4-WAY VALVE
CONTROL
REMOTE CONTROLLER
POWER ON/OFF
MODE
(AUTO, COOL, DRY,
FAN, HEAT)
TURBO
FAN SPEED SELECT
BLADE-H MOVING SELECT
ON, OFF TIMER SELECT
TEMPERATURE SELECT
SLEEP SELECT
OSCILLATION
CIRCUIT
MODE SELECT
SWITCH
•TEMPERATURE
CONTROL
•TIMER
•BUZZER CONTROL
• COMPRESSOR CONTROL
SIGNAL
• OUTDOOR FAN
CONTROL SIGNAL
• 4-WAY VALVE
CONTROL SIGNAL
• STEPPING MOTOR
CONTROL SIGNAL
• BUZZER CONTROL
SIGNAL
• COMPRESSOR DRIVE
• OUTDOOR FAN
DRIVE
• 4-WAY VALVE
DRIVE
TRIGER
SIGNAL
SSR
* INDICATOR PANNEL
OPERATION LED
TIMER LED
FAN ONLY LED
DE-ICE LED
INDOOR FAN MOTOR
COMPRESSOR
OUTDOOR FAN MOTOR
4-WAY VALVE
• STEPPING MOTOR
DRIVE
• BUZZER DRIVE
STEPPING MOTOR
BUZZER
TIME SETTING
DC 5V
DC 12V
VOLTAGE REGULATOR
AC INPUT
VD : 200-220V/50Hz
VE : 220-240V/50HZ
3-4
POWER TRANSFORMER
Samsung Electronics
New-3
5/14/01 10:16 PM
Page 3-5
DIAGRAMS
3-2-2 Wiring diagram (Indoor unit)
Samsung Electronics
3-5
New-3
5/14/01 10:16 PM
Page 3-6
DIAGRAMS
3-2-3 Wiring diagram(Outdoor unit)
3-6
Samsung Electronics
New-4
5/14/01 10:21 PM
Page 1
4
DISASSEMBLE & REASSEMBLE
New-4
5/14/01 10:21 PM
Page 2
4. Disassembly & Reassembly
4-1 Serise V
4-1-1 Indoor Unit . . . . . . . . . . . . . . . . . . . . . . . . . . . . . . . . . . . . . . . . . . . . 4-1
4-1-2 Outdoor Unit . . . . . . . . . . . . . . . . . . . . . . . . . . . . . . . . . . . . . . . . . . 4-4
New-4
5/14/01 10:21 PM
Page 4-1
4. Disassembly & Reassembly
4-1 Serise V
4-1-1 Indoor Unit
No
Parts
1
Front Grille
Procedure
Remark
1) Stop the air conditioner operation and block
the main power.
2) Seperate tape of front panel upper.
3) Contract the second finger to the left, and
right handle and pull to open the inlet grille.
4) Take the left and right filter out.
* Take the Deadorizing and Electrostatic filter out.
(ONLY “1” and “5” Series models)
5) Loosen one of the right fixing screw and
seperate the terminal cover.
6) Loosen two fixing screws of front grille.
7) Pull the upper left and right of discharge
softly for the outside cover to be pulled out.
8) Pull softly the lower part of discharge and
push it up.
Caution;
Assemble the front panel and fix the
hooks of left and right.
Samsung Electronics
4-1
New-4
5/14/01 10:22 PM
Page 4-2
DISASSEMBLY & REASSEMBLY
No
Parts
2
Ass’y Tray Drain.
3
Electrical Parts
(Main PCB)
Procedure
Remark
1) Do “1”, above.
Separate the drain hose from the extension
drain hose.
2) Take the display PCB out.
(Center of indoor unit)
3) Loosen three fixing screws of left and right
4)Pull tray drain out from the back body.
1) Do “1”, “2”, above
2) Take all the connector of PCB upper side out.
(Inclusion Power cord)
3) Separate the outdoor unit connection wire
from the terminal block.
4) If pulling the Main PCB up.
It will be taken out.
(Separate the TRANS hook. it before).
4
Heat Exchanger
1) Do “1” and “2”, “3”, above
2) Loosen two fixing earth screws of right side.
3) Separate the connection pipe.
4) Separate the bush body at the upper side and
holder at the rearside.
5) Loosen the two fixing screws of left side.
6) Lifting the heat exchanger up a little to push
the up side for separation from the indoor
unit.
4-2
Samsung Electronics
New-4
5/14/01 10:22 PM
Page 4-3
DISASSEMBLY & REASSEMBLY
No
Parts
5
Fan Motor and
Cross Fan
Procedure
Remark
1) Do “1” “2” ”3” “4”, above.
2) Loosen the fixing three screws and separate
the motor holder.
3) Loosen the fixing screw of fan motor.
(By use of M3 wrench)
4) Separate the fan motor from the fan.
5)Separate the fan from the left holder bearing.
Samsung Electronics
4-3
New-4
5/14/01 10:22 PM
Page 4-4
DISASSEMBLY & REASSEMBLY
4-1-2 Outdoor Unit
No
Parts
Procedure
1
Common Work
1) Loosen the fixing screw and separate the
cover E-parts.
2) Separate the connection wire from the terminal block.
Remark
3) Loosen three fixing screws and separate the
upper cabinet.
4) Loosen the two fixing screws of Ass'y E-part.
5) Loosen seven fixing screws and separate the
side cabinet.
4-4
Samsung Electronics
New-4
5/14/01 10:22 PM
Page 4-5
DISASSEMBLY & REASSEMBLY
No
Parts
Procedure
2
Fan and Motor
1) Do “1”, above.
2) Loosen two fixing screw, of the front cabinet.
3) Push the brackets of the outer cover to separate the protection mesh from the rear side
of front cabinet.
Remark
4) Remove the nut flange (Turn to the right to
remove, as it is a left hand screw)
5) Separate the fan.
6) Loosen four fixing screws to separate the
motor.
3
Heat Exchanger
4
Compressor
Samsung Electronics
1) Do “1”, above.
2) Loosen three fixing screws of left and right
side.
3) Disassemble the inlet and outlet pipe by
welding.
4) Separate the heat exchanger.
1) Do “1”, above.
2) Open the terminal cover of compressor and
unscrew the connection terminal.
3) Disassemble the inlet and outlet pipe of
compressor by welding.
4) Disassemble the inlet and outlet pipe of condenser by welding
5) Loosen the three bolts of the lower part.
6) separate the compressor.
4-5
New-4
5/14/01 10:22 PM
Page 4-6
MEMO
4-6
Samsung Electronics
COVER-1
5/14/01 10:01 PM
Page 1-2
ELECTRONICS
© Samsung Electronics Co., Ltd. APR. 1999.
Printed in Korea.
Code No. DB81-00082A