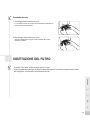
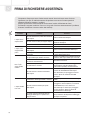
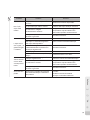
1
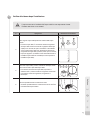
CHP-06DL
Prima di installare, leggere questo manuale e
conservarlo accuratamente
SISTEMA DI FILTRAGGIO
DELL’ACQUA AD OSMOSI INVERSA
Manuale
d'Installazione
"APPARECCHIO PER IL TRATTAMENTO DI ACQUA POTABILE"
"ATTENZIONE : QUESTA APPARECCHIATURA NECESSITA DI UNA
REGOLARE MANUTENZIONE PERIODICA" e
"L'INSTALLAZIONE DI QUESTA APPARECCHIATURA DEVE ESSERE
ESEGUITA DA SOGGETTI ABILITATI AI SENSI DELLA LEGGE 46/90"
CONTENTS
PRECAUTION… …………………………
- Electricity…………………………………
- Installation… ……………………………
- Use… ……………………………………
- Services… ………………………………
PRODUCT CHARACTERISTICS & SPECIFICATION…
- Product Characteristics…………………
- Major Specifications… …………………
- Appearance and Dimensions… ………
01
01
02
02
03
04
04
06
07
PRODUCT INSTALLATION… ………… 08
- Materials………………………………… 08
- Method…………………………………… 08
- Product… ……………………………… 09
- Checking the System after Installation… 11
HOW TO OPERATE… …………………
- Light Sensor Setting Function…………
- Quantative Extraction Function… ……
- To Drink Cold Water… …………………
- To Drink Hot Water… ……………………
- To Drink Ambient Water… ………………
- Continuous Extraction……………………
13
13
13
13
13
13
13
CLEANING METHOD……………………
- Inside Water Tank………………………
- Gutter… …………………………………
FILTER REPLACEMENT… ……………
14
14
16
16
BEFORE ASKING A/S… ……………… 17
PRECAUTION
Tips
The precautions are for consumers to use the product safely and correctly and for
service personnel to prevent accidents or risks in repairing the product. Please
read the precautions carefully and abide by them.
Precautions on Electricity
• Do not use a damaged power plug or loose electric outlet.
Otherwise electric shock or fire may occur as a result.
• If the product is not used for an extended period of time, close the feed water supply valve and
unplug the unit.
Otherwise electric shock or fire may occur as a result.
• Do not unplug the unit by pulling the power cord or touch the power plug with a wet hand.
Otherwise short circuit, electric shock, or fire may occur as a result.
• Do not forcefully bend the power cord or run it under a heavy object to prevent it from being
damaged or deformed.
Otherwise electric shock or fire may occur as a result.
• If the electric outlet is wet, carefully unplug the unit and let the electric outlet completely dry
before subsequent use.
Otherwise electric shock or fire may occur as a result.
• Unplug the unit before repair, inspection, or parts replacement.
Otherwise electric shock may occur as a result.
1
1
• Do not plug into an outlet or power strip that is being used by several other appliances.
Use an outlet dedicated to the unit.
Otherwise fire may occur as a result.
• Do not attempt to repair or modify the power cord.
Otherwise electric shock or fire may occur as a result.
• Remove any dust or water off the power plug.
Otherwise electric shock or fire may occur as a result.
• Do not plug and unplug the unit repeatedly.
Otherwise electric shock or fire may occur as a result.
• If the electric outlet is wet, carefully unplug the unit and let the electric outlet completely dry before
subsequent use. Otherwise electric shock or fire may occur as a result.
Precautions on Installation
English
• Do not install the product where the unit is exposed to direct sunlight or heating devices.
Otherwise product deformation or fire may occur as a result.
• Do not install the unit in areas where moisture, water (rainwater) is present.
Otherwise electric shock or fire may occur as a result.
•Do not operate the unit in areas where flammable gases or combustible materials are used
or stored. Otherwise fire may occur as a result.
• Install the unit on a level area and do not exert excessive force or shock on the unit.
Otherwise product damage or malfunction may occur as a result.
• Use tap water as feed water.
• Do not connect the water inlet to the warm water supply piping.
Otherwise malfunctions or accidents may occur as a result. (Make sure to connect to cold tap water
suppy piping.)
• The length of the water inlet hose must be 5 m or less.
If it is longer, it may degrade the product’s performance.
• The length of the water outlet hose must be 25cm or less.
If it is longer, it may degrade the product’s performance, and prevent complete drainage of water.
• Proper places to install the unit
Install the unit firmly on a level area. If the unit is installed in an unstable place, the system may not
function properly.
Precautions on Use
• Right after the installation, fill up the water tank and drain the water. Repeat it at least twice
before use.
• If water has been stored in the water tank for a long time without using the unit, completely drain
the water and clean the tank. In the case the tank cannot be cleaned, drain the water once again
before use.
• In order to have filtered potable water, replace filters regularly.
If filters are overused beyond their service life, the quality of the filtered water may deteriorate.
• Keep the surrounding areas neat and clean the inside of the water tanks once every two months.
• Do not place a heavy object or exert excessive pressure on the top of the product.
• Do not exert excessive shock on the product.
2
PRECAUTION
Precautions on Use
• If the water in the hot water tank is not to be used for a long time, the tank may be contaminated
with microorganisms. Drain the water from the hot water tank twice through the extraction cock
and side drain outlet.
• When cleaning the water storage tanks, drain the water (cold/hot/ambient temperature water)
from the tanks through extraction cock. Open the side drain door and then drain the water still
remaining in the hot water tank.
Precautions on Services
■ Before the service
• Do not let consumers disassemble, repair, or modify the product.
Otherwise electric shock, fire, or product damage may occur as a result.
• To prevent the risk of electric shock, unplug the unit before checking and repairing the unit.
Before checking or repairing the unit, make sure to discharge the electrical unit of PBA.
Otherwise, high-voltage electric shock may occur as a result.
• When disconnecting the power cord from the electric outlet, make sure to do so by pulling the
power plug, not the power cord.
If the power cord is damaged, electric shock or fire may occur as a result.
Do not pull out the power plug from the electric outlet with a wet hand.
■ During the service
• During the service, check for damage, deformation, or deterioration of the power plug and the
electric outlet.
If any abnormality is found, repair or replace the power plug or electric outlet to prevent electric
shock or fire.
• During the service, completely remove dust or foreign materials from electrical units, wiring units,
and connections. It is to prevent fire caused by short circuit.
• Check whether there is moisture on the electrical parts and power plug.
If moisture is found, replace the parts or remove the moisture completely.
• When replacing electrical parts, make sure to use proper parts.
Check the model number, rated voltage, and rated current of the electrical parts.
• During a repair, make sure that the harness wiring is fixed firmly.
If the harness wiring is defective, in may cause abnormal noise and malfunction of the unit.
• When disassembling and refitting the unit with its side touching the ground, perform the job on a
working cloth. Without the working cloth, the product may get scratches.
■ After the service
• After the service, check the overall assembly status and terminal connection of parts.
If the wiring is under pressure or the connection of parts is defective, reassemble the unit.
• Make sure that internal electrical wiring is not touching sharp parts of moving parts or electrical
equipment.
Otherwise, product malfunction, short circuit, or fire may occur as a result.
• Connect the electricity and check that the unit operates properly before let the consumer use the
product. Make sure to inform the consumer of the malfunction and repair details.
3
3
PRODUCT CHARACTERISTICS & SPECIFICATION
Product Characteristics
■ Electronic, one-touch extraction of water
- Select the mode (cold/hot/ambient water) you want, and touch the extraction
part; you can extract a cupful of water (or extract continuously), which is very
convenient.
■ Hot water lock, hot water alarm sound
- To prevent accidents to inquisitive children, a hot water lock is installed. Hot
water cannot be extracted when the lock is turned on. When trying to extract
water, alarm sound goes off.
■ Extract cold, hot and ambient water from a single faucet
- More convenient, having cold, hot and ambient water coming out of a
single faucet.
■ Automatic energy saving decreasing noise function
- The system automatically controls the operation of the cooler according to the
ambient light conditions, decreasing noise and energy use.
■ Display window showing the product conditions at a glance
- A display window shows mode status (cold-water /hot-water modes) at a glance,
enabling easy confirmation.
English
4
PRODUCT CHARACTERISTICS & SPECIFICATION
Product Characteristics
1. Characteristics of major parts
■ Feed+N.O.S valve (for security shut-off)
- Use: feed water shut-off and safety shut-off
- Operating principle: When the reed level sensor and overflow sensor detect the full water level signal, the
water flow is shut off, providing feed water shut-off in two steps.
■ 3-Way Valve
- Use: Electronically controls the extraction of cold/hot/ambient temperature water in a set quantity.
- Operating principle: Cold/hot/ambient temperature water is extracted through a single cock according to
electrical signals of the solenoid valve.
■ Bi-Metal (Manual type)
- Use: Prevents overheating.
- Operating principle: When the hot water is overheated, the power to the heater is automatically cut off by
two metal plates with different expansion rates.
■ Auto daily life water controller (linkage type)
- Use: Automatically controls the quantity of daily life water of the Membrane filter according to the feed
water supply pressure.
-O
perating principle: The quantity of daily life water is automatically controlled by the spring tension
according to the feed water supply pressure.
■ Reed level sensor
- Use: Monitors the water level in filtered water tanks.
- Operating principle:By sensing the water level in the filtered water tank in two steps, the water purifying
operation is controlled through the feed water supply valve.
■ Overflow sensor
- Use: Monitors the overflow in filtered water tanks.
- Operating principle:When the puriedfied water tank is full, the N.O.S. valve is adjusted to stop the water
purifying operation.
5
5
Major Specifications
■ Basic specifications
Model number
CHP-06DL
220 V - 240 V
Voltage
Tank capacity
50 Hz
Control
temperature
Filtered water tank
3L
Cold water tank
2.3 L
5 °C
Hot water tank
1.2 L
96 °C(Normal)
80 °C(Special)
TOTAL
6.5 L
-
Feed/NOS valve
Controlling
method
Thermistor
Thermistor Bi-metal
-
COCK Method (Extraction method)
ONE COCK
(Electronic set quantity extraction)
Safety devices and additional
functions
Hot water lock button, overheating/overcooling prevention, power
saving function 2-step water overflow shut-off safety devices
Display functions
Cold/hot water temperature indicators
Purification method
Reverse osmosis (Low-pressure membrane)
Filter
materials
Neosense
Filter 8˝ (S)
Polyethylene + granular activated carbon
Every 6 months
Membrane
Filter 8˝ (S)
Polysulfone + Polyamide
Every 20months
Postcarbon block
Filter 8˝ (S)
Polyethylene + powered activated carbon
Every 18 months
76.8 L/day (25 °C, 20 psi)
Product dimensions
260 (W) x 440 (D) x 510 (H) mm
Product weight
18.7 kg
English
Water-purifying capacity per hour
There may be some discrepancies in the actual water-purifying quantity depending on the
water temperature in season (Spring/fall, summer, and winter).
6
PRODUCT CHARACTERISTICS & SPECIFICATION
Appearance and Dimensions
440
440
510
510
440
■ CHP-06DL [260 (W) x 440 (D) x 510 (H) mm]
260
7
7
260
PRODUCT INSTALLATION
Installation Materials
1. Accessories
Owner’s Instructions
Installation book
Orange and blue tube set
Drain Hose
Water supply valve
Cooling Stopper
Adaptor
Installation Method
1. Precautions on installation
■ The water tank capacity of this water purification system is designed for home use.
English
It is prohibited to install the system for medium/large business or public use.
(If the water purification system is used beyond its capacity, water shortage and/or shortened
filter life may occur as a result.)
■ Install the product at least 10 cm away from the wall and on a firm and level floor.
■ Installation water pressure
The feed water supply pressure should be at least 20 psi for the purification system to work
properly, providing enough filtered water.
■ Installation distance from tap water supply
Feed water pressure 20 psi or higher: Install the system in a place within a range of 3M in height
and 25M in distance.
■ Do not install the system in a place where it is subjected to direct sunlight, freezing temperature,
and/or excessive moisture.
■ In the case the system is newly installed or relocated, read the User’s Manual once again before
installation.
■ This product is for 220 V - 240 V 50 Hz Make sure to check the rated voltage before connect
the power cord to the electrical outlet.
■ Make sure to connect the feed water inlet hose to the cold water piping.
In the case the feed water inlet hose is connected to warm water piping with the water
temperature of 40 °C or higher, filters may be damaged.
■ Right after the installation, fill up the water tank and drain the water.
Repeat it at least twice before use.
8
PRODUCT INSTALLATION
Installation Method
1. Precautions on installation
■ Cleaning the Neo Sense filter 8 inch (S) (for installation and replacement):
Clean the Neo Sense filter 8 inch (S) for about 30 seconds.
■ Cleaning the Post Carbon block filter 8 inch (S) (for installation and replacement):
Clean the Post Carbon block filter 8 inch (S) for about 3 minutes.
For initial installation, flush the Post Carbon block filter 8 inch (S) before installing it.
(Flushing the Post Carbon block filter 8 inch (S) during the initial installation minimizes the inflow of
fine particles into the water tank.)
■ Cleaning the Neo Sense filter and Post Carbon block filter
Remove the tubing from the bottom of the Neo Sense filter 8 inch (S).
Connect the Post Carbon block filter 8 inch (S) to the bottom of the Neo Sense filter 8 inch (S).
Clean the Post Carbon block filter 8 inch (S) with the water coming from the Neo Sense filter
8 inch (S) for about 3 minutes. (Water flow rate 300~500 ㎖ /min)
Separate the Post Carbon block filter 8 inch (S) from the Neo Sense filter 8 inch (S) and then
connect it to the bottom of the Membrane filter (RO) 8 inch.
Installing the Product
Cooling stopper
Main water supply
valve
Inlet tubing (Orange)
Outlet tubing (Blue)
9
9
PRODUCT INSTALLATION
Installing the Product
No.
1
2
Explanation
Reference picture
Close main water supply valve to separate the faucet.
Wind the teflon tape on the adaptor and fit it to the pipe.
Do not tum the water pipe.
Connect the faucet with the adaptor.
3
Shall install the adaptor with connector on the cold water
pipe.
4
Connect ¼ inch orange tubing with the connector on the
adaptor.
Flush water through each filter at least
5 minutes before connection.
English
5
Connect it to voltage rating that matches it on the rating
plate. Then, open the feed valve to supply water to the
filtration system.
PLUG
10
PRODUCT INSTALLATION
Checking the System after Installation
WARNING
Connect it to voltage rating that matches it on the rating plate.
- Then, open the feed valve to supply water to the filtration system.
PLUG
11
11
No.
Explanation
1
Select the cold button to drink cold water.
- To drink cold water, the cold water function must be operating. Press the cold button for three seconds, and the cold
water mode lamp comes on; you can then use cold water.
If you don’t need the cold water, press the cold button
again for three seconds, and the lamp goes out, exiting
cold water mode.
2
To drink cold water, press the cold button after the cold
water lamp comes on.
- To drink cold water, select the cold button and touch
the extraction part, and you can extract a cupful of water.
If you touch the extraction part again during extraction,
water stops flowing.
3
To drink ambient water, select the ambient button.
- Select the ambient water button and touch the extraction
part, and you can extract a cupful of water. If you touch the
extraction part again during extraction, water stops flowing.
Reference picture
Checking the System after Installation
The water in the hot water tank is extremely hot. Exercise caution not to get burned.
WARNING
Explanation
4
Select the hot button to drink hot water.
- To drink hot water, the hot water function must be
operating. Press the hot button for three seconds, and
the hot water mode lamp comes on; you can then use hot
water. If you don’t need the hot water, press the hot button
again for three seconds, and the lamp goes out, exiting hot
water mode. (The mode automatically returns to cold water
mode three seconds after the hot water mode is selected).
5
To drink hot water, select the hot button after the hot water
lamp goes on.
- Select the hot button and touch the extraction part, and you
can extract a cupful of water. If you touch the extraction
part again during extraction, the water stops flowing.
6
Empty the gutter periodically.
- Prevent water overflowing from the water receptacle by
periodically emptying it.
Reference picture
English
No.
12
HOW TO OPERATE
Light Sensor Setting Function
Light Sensor Setting Function Press the hot water mode selection button and cold water mode
selection button together for three seconds, the hot water mode selection indicator flickers with
a “pinging” sound, and the system enters the setting mode.
Press the cold water mode selection button once, the cold water mode selection indicator comes
on, and the light sensor function is set.(When the cold water mode selection indicator goes out,
the function is disabled.) After setting the mode, press the ambient water mode selection button
for three seconds, the system saves the last set mode and converts to standby mode.
Quantative Extraction Function
Press the hot water mode selection button and cold water mode selection button together
for three seconds, the hot water mode selection indicator flickers with a “pinging” sound, and
the system enters the setting mode. The quantity is adjusted each time the hot water mode
selection button is pressed(about 120 cc → 200 cc → 300 cc → 120 cc), and the hot water
temperature indicator goes on according to each quantity phase.
After setting the mode, press the ambient water mode selection button for three seconds, the
system saves the last set mode and converts to standby mode.
Tips
- To use both the hot water and cold water modes, press each button for
more than three seconds. Once both hot water and cold water mode lamp go on,
you can use them.
- “Light sensor” is set to disabled status at the initial usage.
To Drink Cold Water
If you check the cold water temperature indicator and press the extraction button by selecting
the cold water button, about 1 cup of the cold water (paper cup basis) is extracted.
When you press the extraction button again during the extraction, the extraction is stopped.
Tips
When the cold water does not extract from the product, please check if the cold water
mode selection indicator is on.
To Drink Hot Water
If you select the hot water button after checking the hot water temperature indicator and press
the extraction button, about 1 cup of the hot water (paper cup basis) is extracted.
When you press the extraction button again during the extraction, the extraction is stopped.
To Drink Ambient Water
When you select the ambient water button and press the extraction button, about 1 cup of the
ambient water (paper cup basis) is extracted.
When you press the extraction button again during the extraction, the extraction is stopped.
Continuous Extraction
13
If you press the extraction button (about 3 seconds) longer by selecting the wanted water
(cold water/hot water/ambient water), you can extract the selected water continuously with blinking
the extraction part indicator.
If you press the extraction button again during the continuous extraction, the extraction is stopped.
13
CLEANING METHOD
Inside Water Tank
1. Close the main water supply valve and turn off the cold
water/hot water mode by pressing the cold water/hot water
selection button in the front of the product for about 3
seconds.
Drain the cold water/ambient water completely inside of the
water filtration device through the continuous cold water
extraction.
2. Open the front draining cover and take out the red draining faucet. Take out the power cord after
draining the water in the hot water tank completely using the draining hose.
* When the draining hose is putted in, as the hot water is drained directly, be careful not to
get burnt.
3. Open the upper cover of the product, open the fixed clips (8 point) in the storage tank, and open
the storage tank cover.
1
2
English
3
4
14
CLEANING METHOD
Inside Water Tank
4. Please assemble the ceramic filter again after separating it from the water tank cover and
cleaning it by shaking in the taken water.
2
2
1
1
5. Please wipe the surface of the storage tank with soft clothes.
6. After rinsing the storage tank clearly with the taken water, connect the power cord and drain it
through the continuous extraction completely. Empty the newly filtered water once and use it.
When you drain
the cold water/ambient
water tank
When you drain
the hot water tank
7. Close the upper cover and open the main water supply valve.
Please operate the water filtration device again by pressing
cold water selection button in the front of the product after
checking if the water is coming from the cold water/ambient
water extraction faucet and the hot water extraction faucet.
Tips
15
15
Close the storage tank cover completely.
A worm or a foreign body can be entered.
When you clean the storage tank, don’t use the medicine
or the detergent. If you don’t clean the medicine or the
detergent cleanly, it can be harmful to the body.
- Keep the surroundings cleanly and clean the storage tank
once per two months.
Drugs, detergent, etc. ×
Gutter
1. Gutter separation method
The gutter can be separated easily with lifting up the front part of
the gutter and taking out.
2. Gutter assembling method
You just push the hook of the gutter slightly after sticking to the
product.
FILTER REPLACEMENT
- Average filter replacement cycle is 6 - 10 months
- Coway will call you in advance to check the taste of water and working condition to recommend
you to change filters if necessory
English
16
BEFORE ASKING A/S
The water purifier may operate abnormally due to minor causes not because of the product
malfunction but because of the fact that the user is not familiar with the product use. In such
a case, problems can be solved easily even without the help from the Service Center by
checking the following. please call the Service Center (Toll Free No : 800 128 232) if you
can solve the problem.
Problem
Check Items
Solutions
• Did you clean the water drum?
Clean the water drum.
Remove the stored water and clean the
The water tastes
•D
id you use the filter system for too long?
water drum.
weird.
Request filter change.
• Is it about time to change the filter?
Request filter change.
• Is it about time to change the filter?
The water is
flowing slower.
• Did you lock the water supply valve?
Open the water supply valve.
•D
id the temperature of the water drop
When the temperature drops, the amount
of water filtered decreases.
Turn the cold water mode on by pressing
the cold water button for 3 seconds
suddenly?
• Is the cold water lamp on?
•T
he cooling system may be
malfunctioning.
There is no cold
water.
• Is the power turned on?
•D
id you close the water supply valve?
•W
as the cold water mode indicator
lightened?
The cold water
doesn’t come.
•D
idn’t you close the main water supply
valve?
• Isn’t the back side of the water purifier
and the wall too close?
• Is the hot water lock lamp on?
There is no hot
water
• Is the hot water lamp on?
• Is the power connected?
• Is ambient-temperature water overflowing
or leaking?
17
17
Request A/S.
Connect the power to the voltage rating
that matches it on the rating plate.
If the water level is low, the cold water
function does not activate, to protect the
electronic motor. Open the water supply
valve.
Please press the cold water mode
selection button.
If it is the low water level to protect the
electric motor, the cooling function doesn’t
operate. Open the main water supply valve.
Please keep the distance between the back
of the water purifier and the wall to 10 cm
or more.
Deactivate hot water.
Turn the hot water mode on by pressing
the hot water button for 3 seconds
Connect the power to the voltage rating
that matches it on the rating plate.
Request A/S.
Problem
Check Items
• Is it about time to change the filter?
Solutions
Request filter change.
• Is the water supply valve closed, or the
Open the water supply valve.
water supply cut?
Water does not
come out, or the • C
old/warm/ambient-temperature water
Request A/S.
extraction faucet may be malfunctioning.
fixed quantity
has changed
Straighten the hose.
• Is the hose bent?
• Is the water inlet hose too long?
Shorten the water inlet hose to 5m or less.
• Is the water being supplied properly?
Check the water supply valve.
All functions
Connect the power to the voltage rating
• Is the power turned on?
that matches it on the rating plate.
suddenly stop
during operation. • Is ambient-temperature water overflowing
Request A/S.
or leaking?
Open the top cover and check.
There is
• Is water leaking from the water drum
Close the water supply valve and request
cover or from inside the product?
leakage.
A/S.
English
18
INDICE
PRECAUZIONI……………………………
- Elettricità…………………………………
- Installazione… …………………………
- Uso… ……………………………………
- Interventi di assistenza…………………
CARATTERISTICHE E SPECIFICHE DEL PRODOTTO…
- Caratteristiche del prodotto……………
- Specifiche principali… …………………
- Forma e dimensioni… …………………
01
01
02
02
03
04
04
06
07
INSTALLAZIONE DEL PRODOTTO……
- Materiali… ………………………………
- Metodo……………………………………
- Prodotto… ………………………………
- Verifica del sistema dopo l’installazione…
08
08
08
09
11
FUNZIONAMENTO……………………… 13
- Impostazione sensore luce ambientale…13
- Quantitativi di erogazione……………… 13
- Acqua da bere fredda… ……………… 13
- Acqua da bere calda…………………… 13
- Acqua da bere a temperatura ambiente… 13
- Erogazione continua…………………… 13
PULIZIA……………………………………
- Serbatoio interno dell’acqua…………
- Vaschetta di raccolta……………………
SOSTITUZIONE DEL FILTRO… ………
PRIMA DI RICHIEDERE ASSISTENZA… 17
PRECAUZIONE
Suggerimenti
Le precauzioni sono rivolte agli utenti per far sì che utilizzino il prodotto in modo sicuro
e corretto, e al personale di assistenza per prevenire eventuali incidenti o rischi durante
la riparazione del prodotto. Leggere attentamente le precauzioni e rispettarle.
Precauzioni relative ai collegamenti elettrici
1
• Non utilizzare un cavo o una spina di alimentazione danneggiati, né collegarli a una presa di
corrente allentata.
La mancata osservanza di questa precauzione può comportare una scarica elettrica o un incendio.
• Se si prevede di non utilizzare il dispositivo per lungo tempo, chiudere il rubinetto di
mandata dell’acqua in ingresso e scollegare l’unità dalla presa di corrente.
La mancata osservanza di questa precauzione può comportare una scarica elettrica o un incendio.
• Non scollegare l’unità tirando il cavo di alimentazione né afferrare la spina con le mani bagnate.
La mancata osservanza di questa precauzione può comportare un corto circuito,
una scarica elettrica o un incendio.
• Non far passare il cavo di alimentazione sotto oggetti pesanti per evitarne il danneggiamento
o la deformazione.
La mancata osservanza di questa precauzione può comportare una scarica elettrica o un incendio.
• Se il cavo o la spina sono bagnati, scollegare l’unità e lasciarla asciugare completamente prima di
ricollegarla.
La mancata osservanza di questa precauzione può comportare una scarica elettrica o un incendio.
• Prima di eseguire una qualsiasi attività di riparazione, ispezione o sostituzione, scollegare l’unità.
La mancata osservanza di questa precauzione può comportare una scarica elettrica.
1
14
14
16
16
• Non collegare l’unità a una presa di corrente o a una ciabatta alla quale sono collegate altre
apparecchiature.
Usare una presa di corrente separata.
La mancata osservanza di questa precauzione può comportare un incendio.
• Non tentare di riparare o modificare autonomamente il cavo di alimentazione.
La mancata osservanza di questa indicazione può comportare una scarica elettrica o un incendio.
• Rimuovere eventuale polvere o acqua dalla presa.
La mancata osservanza di questa precauzione può comportare una scarica elettrica o un incendio.
• Non collegare/scollegare ripetutamente l’unità.
La mancata osservanza di questa precauzione può comportare una scarica elettrica o un incendio.
• Se il cavo o la spina sono bagnati, scollegare l’unità e lasciarla asciugare completamente prima di
ricollegarla. La mancata osservanza di questa precauzione può comportare una scarica elettrica o un
incendio.
Precauzioni sull’installazione
Italiano
• Non installare il prodotto in una posizione che riceve luce solare diretta o presso fonti di calore.
La mancata osservanza di questa precauzione può comportare una deformazione dell’unità o un
incendio.
• Non installare l’unità in aree esposte all’umidità o all’acqua (pioggia).
La mancata osservanza di questa precauzione può comportare una scarica elettrica o un incendio.
•Non utilizzare l’unità in presenza di gas o materiali infiammabili. La mancata osservanza di questa
precauzione può comportare un incendio.
• Installare l’unità su una superficie livellata, e non appoggiarvi sopra pesi eccessivi né urtare l’unità.
La mancata osservanza di questa precauzione può comportare un danno all’unità o un
malfunzionamento.
• Usare l’acqua di rubinetto per alimentare l’unità.
• Non collegare l’ingresso dell’acqua alla mandata di acqua calda.
La mancata osservanza di questa precauzione può comportare malfunzionamenti o incidenti.
(Accertarsi di collegare l’unità alla mandata dell’acqua fredda.)
• La lunghezza del tubo dell’acqua di ingresso deve essere al massimo 5 di m.
Se il tubo è di lunghezza maggiore, ciò può comportare il degrado delle prestazioni del prodotto.
• La lunghezza del tubo dell’acqua di uscita deve essere al massimo 25cm.
Se il tubo è di lunghezza maggiore, può comportare il degrado delle prestazioni del prodotto e impedire
il completo drenaggio dell’acqua.
• Luoghi adatti all’installazione dell’unità
Installare l’unità su una superficie livellata e stabile. Se l’unità viene posizionata su una
superficie instabile, il sistema può non funzionare in modo corretto.
Precauzioni sull’uso
• Una volta terminata l’installazione, riempire il serbatoio e drenare l’acqua. Ripetere l’operazione
almeno due volte prima di usarla regolarmente.
• Se l’acqua è rimasta per molto tempo all’interno del serbatoio senza che l’unità sia stata usata, drenare
completamente l’acqua e pulire il serbatoio. Se è impossibile pulire il serbatoio, drenare l’acqua
nuovamente prima di riutilizzarla.
• Al fine di avere costantemente acqua potabile di buona qualità, sostituire regolarmente i filtri.
Se i filtri vengano utilizzati oltre la loro durata normale, la qualità dell’acqua depurata può degradare.
• Mantenere l’apparecchio pulito e procedere alla pulizia del serbatoio almeno una volta ogni due mesi.
• Non posizionare oggetti pesanti o esercitare una pressione eccessiva sulla parte superiore del prodotto.
• Non urtare violentemente il prodotto.
2
PRECAUZIONE
Precauzioni sull’uso
• Se l’acqua contenuta nel serbatoio dell’acqua calda non viene utilizzata per lungo tempo, il serbatoio
può essere contaminato da microrganismi. Drenare l’acqua dal serbatoio dell’acqua calda almeno
due volte attraverso l’ugello di estrazione e il foro di drenaggio posto sul lato del prodotto.
• Per pulire il serbatoio dell’acqua, drenare l’acqua (fredda/calda/ambiente) dai serbatoi mediante
il rubinetto di erogazione. Aprire lo sportello laterale di drenaggio e drenare l’acqua residua dal
serbatoio dell’acqua calda.
Precauzioni per interventi di riparazione
■P
rima dell’intervento
• Non consentire all’utente/al consumatore di disassemblare, riparare o modificare autonomamente il prodotto.
La mancata osservanza di questa precauzione può comportare una scarica elettrica, un incendio
o danni al prodotto.
• Per evitare una scarica elettrica, scollegare l’unità prima di verificarla e ripararla.
Prima di verificare e riparare l’unità, scaricare l’unità elettrica della PBA.
La mancata osservanza di questa precauzione può comportare una scarica elettrica ad alta tensione.
• Per scollegare l’unità dalla presa di corrente non tirare il cavo di alimentazione ma estrarre la spina.
Se il cavo di alimentazione è danneggiato, pericolo di scariche elettriche o incendio.
Non estrarre la spina dalla presa di corrente con le mani bagnate.
■D
urante l’intervento
• Durante l’intervento di assistenza, verificare eventuali danni, deformazioni o deterioramenti della spina
di alimentazione e della presa di corrente.
Se si riscontrano anomalie, riparare o sostituire la spina o la presa di corrente per evitare scariche
elettriche o incendi.
• Durante l’intervento di assistenza, rimuovere completamente eventuale polvere residua o corpi estranei
dall’unità elettrica, dai cablaggi e dalle connessioni. Ciò consente di prevenire un incendio causato da
un eventuale corto circuito.
• Verificare la presenza di condensa su parti elettriche e prese di corrente.
In caso si riscontri la presenza di condensa, sostituire le parti o rimuovere la condensa completamente.
• Durante la sostituzione delle parti, assicurarsi di usare i ricambi appropriati.
Verificare il numero del modello, il voltaggio corretto e le specifiche delle componenti elettriche.
• Durante una riparazione, accertarsi che i cablaggi siano serrati fermamente.
Un cablaggio difettoso può comportare una rumorosità anomala o il malfunzionamento dell’unità.
• In caso di smontaggio o rimontaggio dell’unità con l’unità appoggiata su un lato, eseguire l’operazione
appoggiando l’unità su un panno. Senza tale precauzione l’unità potrebbe graffiarsi.
■D
opo l’intervento
• Dopo un intervento di assistenza, verificare lo stato complessivo dell’assieme e i punti di fissaggio delle parti.
Se i cablaggi sono soggetti a tensione o sono difettosi, riassemblare l’unità.
• Accertarsi che le connessione elettriche interne non entrino in contatto con parti taglienti o in movimento
dell’apparecchiatura elettrica.
La mancata osservanza di questa precauzione può comportare malfunzionamento, corto circuito o incendio.
• Collegare l’apparecchio all’elettricità e verificare che l’unità sia in grado di funzionare regolarmente prima di
consentirne l’uso da parte dell’utente. Informare l’utente dei particolari del guasto e della riparazione.
3
3
CARATTERISTICHE E SPECIFICHE DEL PRODOTTO
Caratteristiche del prodotto
■ Erogazione elettronica dell’acqua con un solo tocco
- Selezionare la modalità (calda/fredda/ambiente) desiderata e premere il
tasto di erogazione; in questo modo è possibile ottenere comodamente un
bicchiere d’acqua (o l’erogazione continua).
■ Blocco acqua calda, allarme acqua calda
- Per evitare incidenti in presenza di bambini, nell’unità è stato installato un
dispositivo di blocco per l’erogazione di acqua calda. L’acqua calda non
può essere erogata quando il blocco è attivo. In caso contrario, l’allarme
entra in funzione.
■ Erogare acqua fredda, calda e ambiente da un unico rubinetto
- E’ più comodo avere acqua calda, fredda e a temperatura ambiente da un
unico rubinetto.
■ La funzione di risparmio energetico riduce la rumorosità
- Il sistema controlla automaticamente il funzionamento del refrigerante
in base alle condizioni di illuminazione ambientali, riducendo il consumo
energetico e la rumorosità.
■ Il pannello di controllo mostra le condizioni del prodotto
- Il pannello di controllo mostra lo stato delle modalità (fredda/calda)
permettendone una facile individuazione.
Italiano
4
CARATTERISTICHE E SPECIFICHE DEL PRODOTTO
Caratteristiche del prodotto
1. Caratteristiche delle parti principali
■ Valvola alimentazione+N.O.S (per interruzioni di sicurezza)
- Uso: interruzione di sicurezza dell’erogazione
- Principio di funzionamento: Quando il sensore di livello e il sensore di trabocco rileva il segnale di troppo
pieno, il flusso dell’acqua viene interrotto in due fasi.
■ Valvola a 3 vie
- Uso: Controlla elettronicamente la quantità di acqua fredda/calda/ambiente erogata.
- Principio di funzionamento: L’acqua fredda/calda/ambiente viene erogata attraverso un rubinetto in base ai
segnali elettrici ricevuti dalla valvola a solenoide.
■ Bi-Metal (manuale)
- Uso: Impedisce il surriscaldamento.
- Principio operativo: Quando l’acqua calda si surriscalda, due piastre metalliche con differenti velocità di
espansione interrompono immediatamente l’alimentazione.
■ Controllo automatico dell’acqua (gocciolamento)
- Uso: Controlla automaticamente la quantità di acqua contenuta nel filtro a membrana in base alla
pressione di alimentazione dell’acqua.
-P
rincipio operativo: La quantità di acqua viene costantemente e automaticamente controllata dalla
tensione di una molla in base alla pressione di alimentazione.
■ Sensore livello di lettura
- Uso: Monitorizza il livello di acqua depurata nei serbatoi.
- Principio operativo: monitorizzando il livello di acqua contenuto nel serbatoio dell’acqua depurata in due
fasi, il funzionamento è controllato da una valvola di fornitura dell’acqua.
■ Sensore di troppo pieno
- Uso: Monitorizza la fuoriuscita dal serbatoio di acqua depurata.
- Principio operativo: quando il serbatoio di acqua depurata è pieno, la valvola N.O.S. interrompe il
riempimento del serbatoio di acqua depurata.
5
5
Specifiche principali
■ Specifiche base
Modello
CHP-06DL
220 V - 240 V
Voltaggio
Capacità
serbatoio
Serbatoio acqua
depurata
3L
Temperatura
di controllo
Serbatoio acqua
fredda
2,3 L
5°C
Serbatoio acqua
calda
1,2 L
96°C (Normale)
80°C (Speciale)
TOTALE
6,5 L
-
50 Hz
Valvola Feed/NOS
Termistore
Metodo di
controllo
Termistore Bi-metal
-
Metodo di erogazione
UN RUBINETTO
(erogazione impostata elettronicamente)
Dispositivi di sicurezza e funzioni
aggiuntive
Tasto blocco acqua calda, prevenzione da eccessivo riscaldamento/raffreddamento, funzione di risparmio energetico e
spegnimento in due fasi da fuoriuscita.
Funzioni pannello visivo
Indicatori temperatura acqua fredda/calda
Metodo di depurazione
Osmosi inversa (membrana a bassa pressione)
Materiali di
filtraggio
Filtro Neosense
8˝ (S)
Polietilene + carbone attivo granulare
Ogni 6 mesi
Filtro a membrana
8˝ (S)
Polisulfone + Poliammide
Ogni 20 mesi
Filtro Postcarbon
8˝ (S)
Polietilene + carbone attivo
Ogni 18 mesi
76,8 L/giorno (25 °C, 20 psi)
Dimensioni prodotto
260 (L) x 440 (P) x 510 (A) mm
Peso prodotto
18,7 kg
Italiano
Capacità oraria di depurazione acqua
Possono sussistere alcune discrepanze in merito alla quantità effettiva di depurazione
dell’acqua in base alla temperatura stagionale (primavera/autunno, estate e inverno).
6
CARATTERISTICHE E SPECIFICHE DEL PRODOTTO
Forma e dimensioni
440
440
510
510
440
■ CHP-06DL [260 (L) x 440 (P) x 510 (A) mm]
260
7
7
260
INSTALLAZIONE DEL PRODOTTO
Materiali di installazione
1. Accessori
Manuale utente
Guida all’installazione
Set di tubi arancione e blu
Tubo di drenaggio
Rubinetto ingresso
acqua
Interruttore di
raffreddamento
Quattro adattatori
Metodo di installazione
1. Precauzioni durante l’installazione
■ La capacità dei serbatoi di acqua di questo sistema di depurazione è progettata per un uso
Italiano
domestico.
E’ vietato installare il sistema in ambiti lavorativi medio/grandi o in ambienti pubblici
(Se il sistema di depurazione viene usato oltre le sue capacità, può verificarsi mancanza di
acqua e/o una minore durata dei filtri).
■ Installare il prodotto ad almeno 10 cm dal muro e su una superficie piana e stabile.
■ Pressione dell’acqua di esercizio
La pressione di ingresso dell’acqua deve essere di almeno 20 psi perché il sistema di
depurazione funzioni regolarmente, fornendo una quantità sufficiente di acqua depurata.
■ Distanza di installazione dal rubinetto di mandata dell’acqua
La pressione di mandata dell’acqua deve essere di almeno 20 psi: Installare il sistema in un
luogo con un raggio di 3m in altezza e 25m di distanza.
■ Non esporre il dispositivo alla luce solare diretta, al gelo e/o ad eccessiva condensa.
■ In caso di spostamento o di nuova installazione del prodotto, leggere il Manuale utente
prima di effettuare l’installazione.
■ Questo prodotto richiede una alimentazione 220 V - 240 V 50 Hz. Verificare il voltaggio
prima di collegare il cavo di alimentazione alla presa di corrente.
■ Accertarsi di collegare il tubo di mandata dell’acqua alla conduttura dell’acqua fredda.
Se il tubo viene collegato alla tubazione dell’acqua calda con una temperatura di 40°C o
superiore, i filtri possono danneggiarsi.
■ Una volta terminata l’installazione, riempire il serbatoio d’acqua e drenare l’acqua.
Ripetere l’operazione almeno due volte prima di usarla regolarmente.
8
INSTALLAZIONE DEL PRODOTTO
Metodo di installazione
1. Precauzioni durante l’installazione
■ Pulizia del filtro Neo Sense da 8” (S) (per installazione e sostituzione):
Pulire il filtro Neo Sense da 8” (S) per circa 30 secondi.
■ Pulizia del filtro a carbone attivo da 8” (S) (per installazione e sostituzione):
Pulire il filtro a carbone attivo da 8” (S) per circa 3 minuti.
In caso di nuova installazione, sciacquare il filtro a carbone attivo da 8” (S) prima di montarlo.
(Sciacquando il filtro da 8” (S) durante la prima installazione si riduce l’ingresso di
microparticelle nel serbatoio dell’acqua.)
■ Pulizia del filtro Neo Sense e del filtro a carbone attivo
Rimuovere le tubazioni dal fondo del filtro Neo Sense 8” (S).
Collegare il filtro a carbone attivo 8” (S) al fondo del filtro Neo Sense 8” (S).
Pulire il filtro a carbone attivo 8”(S) con l’acqua proveniente dal filtro Neo Sense 8”(S) per circa
3 minuti. (Velocità di flusso dell’acqua 300~500 ㎖ /min)
Separare il filtro a carbone attivo da 8” (S) dal filtro Neo Sense da 8” (S) quindi collegarlo al
fondo del filtro a membrana (RO) da 8”.
Installazione del prodotto
Interruttore di
raffreddamento
Rubinetto principale
di mandata dell’acqua
Ingresso acqua
(Arancione)
Uscita acqua (Blu)
9
9
INSTALLAZIONE DEL PRODOTTO
Installazione del prodotto
N.
Spiegazione
1
Chiudere il rubinetto principale di mandata dell’acqua prima
di separare il rubinetto.
2
Avvolgere del nastro di teflon sull’adattatore e montarlo sulla
tubazione.
Prestare attenzione a non deformare la tubazione.
Illustrazione di riferimento
Collegare il rubinetto all’adattatore.
3
Installare l’adattatore e il connettore sulla tubazione
dell’acqua fredda.
Collegare il tubo da ¼ di pollice all’adattatore.
Far scorrere acqua nel filtro per almeno 5 minuti prima di
effettuare il collegamento.
5
Collegare l’alimentazione al voltaggio corrispondente a
quello indicato sulla piastra delle specifiche di alimentazione.
Quindi aprire il rubinetto di mandata dell’acqua per permettere l’ingresso dell’acqua nel sistema.
Italiano
4
PLUG
10
INSTALLAZIONE DEL PRODOTTO
Verifica del sistema dopo l’installazione
ATTENZIONE
Collegare l’alimentazione al voltaggio corrispondente a quello indicato
sulla piastra delle specifiche di alimentazione.
- Quindi aprire il rubinetto di mandata dell’acqua per permettere
l’ingresso dell’acqua nel sistema.
PLUG
11
11
N.
Spiegazione
1
Premere il tasto di erogazione dell’acqua fredda per erogare
acqua fredda.
- Per bere acqua fredda è necessario attivare l’erogazione
di acqua fredda. Premere il tasto di erogazione dell’acqua
fredda per tre secondi; la spia si accenderà e dal rubinetto
verrà erogata acqua fredda. Per disattivare la funzione
di erogazione di acqua fredda, premere il tasto per tre
secondi; la spia si spegnerà.
2
Per bere acqua fredda, premere il selettore dell’acqua
fredda una volta accesa la spia dell’acqua fredda.
- Per bere acqua fredda, impostare il selettore dell’acqua
fredda e premere il tasto di erogazione.
Per interrompere, premere nuovamente il tasto di
erogazione.
3
Per erogare acqua a temperatura ambiente, selezionare il
pulsante ROOM.
- Per ottenere una tazza di acqua a temperatura ambiente,
impostare il selettore ROOM e premere il tasto di
erogazione. Per interrompere, premere nuovamente il tasto
di erogazione.
Illustrazione di riferimento
Verifica del sistema dopo l’installazione
ATTENZIONE
L’acqua contenuta nel serbatoio dell’acqua calda ha una temperatura elevata.
Prestare attenzione a non scottarsi.
Spiegazione
4
Per erogare acqua calda premere il selettore dell’acqua
calda.
- Per bere acqua calda, è necessario attivare l’erogazione
di acqua calda. Premere il tasto di erogazione dell’acqua
calda per tre secondi; la spia si accenderà e dal rubinetto
verrà erogata acqua calda. Per disattivare la funzione di
erogazione di acqua calda, premere il tasto per tre secondi;
la spia si spegnerà. (Il sistema tornerà automaticamente in
modalità acqua fredda tre secondidopo aver impostato la
modalità acqua calda).
5
Per bere acqua calda, premere il selettore dell’acqua calda
una volta accesa la spia dell’acqua calda.
- Per ottenere una tazza di acqua calda, impostare il
selettore HOT e premere il tasto di erogazione. Premendo
nuovamente il tasto di erogazione, l’erogazione si
interrompe.
6
Vuotare periodicamente la vaschetta di scolo.
- Vuotando periodicamente la vaschetta di scolo si eviterà la
fuoriuscita dell’acqua residua.
Illustrazione di riferimento
Italiano
N.
12
FUNZIONAMENTO
Sensore di luce ambientale
Premere contemporaneamente i selettori di erogazione dell’acqua calda e fredda per tre secondi;
la spia della modalità di erogazione dell’acqua calda inizierà a lampeggiare ed emetterà
un segnale acustico; il sistema è ora in modalità di impostazione.
Premere il selettore di erogazione dell’acqua fredda una volta; la spia della modalità di
erogazione dell’acqua fredda si accenderà e il sensore della luminosità ambientale sarà attivato
(se la spia è spenta la funzione è disattivata). Una volta impostata la modalità, premere il
selettore della modalità di erogazione a temperatura ambiente
per tre secondi; il sistema memorizzerà l’ultima impostazione effettuata per poi tornare alla
modalità di standby.
Quantitativi di erogazione
Per accedere alla modalità di impostazione del prodotto, premere contemporaneamente i tasti di
selezione dell’acqua calda e dell’acqua fredda per tre secondi; la spia della modalità acqua calda
lampeggerà emettendo un segnale acustico e il sistema entrerà nella modalità di impostazione. La
quantità viene regolata a ogni pressione del selettore dell’acqua calda (circa 120 cc→ 200 cc → 300
cc → 120 cc), e la spia della temperatura dell’acqua si accende rispecchiando la quantità impostata.
Una volta impostata la modalità, premendo il selettore della modalità acqua ambiente per tre secondi,
il sistema memorizzerà l’ultima modalità impostata per poi tornare alla modalità standby.
Suggerimenti
- Per utilizzare entrambe le modalità di acqua calda e fredda, premere ogni tasto per più di tre
secondi. Una volta accese entrambe le spie, è possibile erogare acqua calda e acqua fredda.
- Il “sensore di luce ambientale” è inizialmente disattivato.
Acqua da bere fredda
Controllare l’indicatore della temperatura dell’acqua fredda, selezionare la funzione acqua fredda e
premere il tasto di erogazione per avere circa 1 tazza di acqua fredda (corrispondente a un bicchiere
di carta).
Premendo nuovamente il tasto di erogazione, l’erogazione viene interrotta.
Suggerimenti
Se l’acqua non viene erogata, verificare che la spia di selezione dell’acqua fredda sia
accesa.
Acqua da bere calda
Controllare l’indicatore della temperatura dell’acqua calda, selezionare la funzione di acqua calda e premere il
tasto di erogazione per avere circa 1 tazza di acqua calda (corrispondente a un bicchiere di carta).
Premendo nuovamente il tasto di erogazione, l’erogazione viene interrotta.
Acqua da bere a temperature ambiente
Premere il selettore di acqua a temperatura ambiente e il tasto di erogazione per erogare circa 1 tazza di
acqua a temperatura ambiente (corrispondente a un bicchiere di carta).
Premendo nuovamente il tasto di erogazione, l’erogazione viene interrotta.
Erogazione continua
13
Premendo il tasto di erogazione per oltre 3 secondi, oltre al selettore del tipo di acqua (fredda/calda/
ambiente) è possibile erogare il quantitativo di acqua desiderata (la spia di erogazione lampeggerà
continuamente).
Premendo nuovamente il tasto di erogazione, l’erogazione viene interrotta.
13
PULIZIA
Serbatoio interno dell’acqua
1. Chiudere il rubinetto di mandata dell’acqua e disattivare le
modalità acqua fredda/calda premendo i rispettivi selettori
per circa 3 secondi.
Drenare l’acqua fredda/ambiente residua mediante
l’erogazione continua di acqua fredda.
2. Aprire il coperchio anteriore di drenaggio ed estrarre il rubinetto di drenaggio di colore rosso.
Scollegare la spina di alimentazione dalla presa elettrica a muro dopo aver drenato completamente
l’acqua residua mediante il tubo di drenaggio.
* Prestare attenzione a non scottarsi con il tubo di drenaggio inserito poiché l’acqua calda viene
drenata direttamente.
3. Aprire il tappo superiore del prodotto, sganciare i fermi (8) e aprire il coperchio del serbatoio.
1
2
Italiano
3
4
14
PULIZIA
Serbatoio interno dell’acqua
4. Dopo aver estratto il filtro in ceramica dal coperchio del serbatoio e averlo sciacquato in una
bacinella d’acqua, rimontarlo.
2
2
1
1
5. Pulire la superficie del serbatoio con un panno morbido.
6. Dopo aver sciacquato il serbatoio con abbondante acqua, collegare l’alimentazione elettrica e
drenare l’acqua residua agendo sul tasto di erogazione continua. Svuotare una volta il serbatoio
dell’acqua depurata, quindi usarlo regolarmente.
Svuotamento del
serbatoio dell’acqua
fredda/ambiente
Svuotamento del
serbatoio
dell’acqua calda
7. Chiudere il coperchio superiore e aprire la mandata
generale dell’acqua. Procedere nuovamente al filtraggio
dell’acqua premendo il selettore dell’acqua fredda sul
davanti del prodotto dopo aver controllato l’effettiva
erogazione dell’acqua dal rubinetto dell’acqua fredda/
ambiente e dell’acqua calda dal rubinetto di erogazione.
Chiudere accuratamente il coperchio del serbatoio.
Ciò impedirà a corpi estranei di penetrare all’interno.
Durante la pulizia del serbatoio, non utilizzare prodotti chimici
o detergenti. Nel caso di una parziale pulizia interna, infatti,
Suggerimenti
i prodotti nocivi potrebbero essere rilasciati nell’acqua.
- Mantenere l’apparecchio pulito e procedere alla pulizia del
serbatoio almeno una volta ogni due mesi.
15
15
Prodotti chimici,
detergenti ecc. ×
Vaschetta di scolo
1. Smontaggio della vaschetta di scolo
La vaschetta di scolo può essere estratta facilmente sollevando la
parte anteriore ed estraendola.
2. Rimontaggio della vaschetta di scolo
Spingere delicatamente il gancio della vaschetta dopo averla
inserita in posizione.
SOSTITUZIONE DEL FILTRO
- In media, il filtro deve essere sostituito ogni 6-10 mesi.
- Coway contatterà gli utenti per verificare la bontà dell’acqua e le condizioni operative del prodotto
per consigliare, se necessario, la sostituzione dei filtri.
Italiano
16
PRIMA DI RICHIEDERE ASSISTENZA
Il depuratore d’acqua può avere funzionamenti anomali dovuti a diverse cause di minore
importanza, non per un malfunzionamento del prodotto ma a causa di errate operazioni
effettuate dall’utente inesperto. I problemi
possono quindi essere risolti facilmente anche senza l’ausilio dell’Assistenza clienti,
verificando le seguenti condizioni. Se non si è in grado di risolvere autonomamente il problema,
chiamare l’assistenza al numero verde: 800 128 232)
Problema
Verificare
•E
’ stata effettuata la pulizia del serbatoio
L’acqua ha un
sapore strano
L’acqua viene
erogata molto
piano.
dell’acqua?
Soluzioni
Pulire il serbatoio dell’acqua.
• E’ il momento di sostituire il filtro?
Rimuovere l’acqua residua e pulire il
serbatoio dell’acqua.
Richiedere un filtro sostitutivo.
• E’ il momento di sostituire il filtro?
Richiedere un filtro sostitutivo.
• E’ stato usato un filtro per troppo tempo?
•E
’ stata chiusa la valvola di mandata
dell’acqua?
Aprire la valvola di mandata dell’acqua.
•L
a temperatura dell’acqua è calata brus- Quando la temperatura scende, la quantità
camente?
• La spia dell’acqua fredda è accesa?
di acqua filtrata diminuisce.
Attivare la modalità acqua fredda premendo
il selettore dell’acqua fredda per 3 secondi
• Il sistema di raffreddamento potrebbe non Richiedere assistenza.
funzionare correttamente.
Non c’è più
acqua fredda
residua.
L’acqua fredda
non esce.
17
17
Collegare l’alimentazione al voltaggio
corrispondente a quello indicato sulla
piastra delle specifiche di alimentazione.
Se il livello dell’acqua è troppo basso, la
funzione di raffreddamento dell’acqua
•E
’ stata chiusa la valvola di mandata
viene disattivata per proteggere il motore
dell’acqua?
elettrico. Aprire la valvola di mandata
dell’acqua.
Premere il pulsante di selezione dell’acqua
•L
’indicatore dell’acqua fredda è acceso?
fredda.
Se il livello dell’acqua è basso per
proteggere il motore elettrico, La funzione
di raffreddamento non è attiva se il
•È
stata chiusa la valvola principale
dell’acqua?
livello dell’acqua è basso per proteggere
il motore elettrico. Aprire la valvola di
somministrazione dell’acqua.
Mantenere la distanza di 10 cm o più tra la
•L
a parte posteriore del dispositivo di
filtraggio dell’acqua e la parete sono
parte posteriore del dispositivo di filtraggio
troppo vicine?
dell’acqua e la parete.
•L
a macchina è accesa?
Problema
Verificare
•L
a spia di blocco dell’acqua calda è
accesa?
Non c’è più
acqua calda
residua.
• La spia dell’acqua calda è accesa?
•L
a macchina è collegata
all’alimentazione elettrica?
•L
’acqua a temperatura ambiente
fuoriesce o gocciola?
• E’ il momento di sostituire il filtro?
• E’ stata chiusa la valvola di mandata
dell’acqua o è mancata l’erogazione
dell’acqua dall’acquedotto?
L’acqua non viene erogata, o la • Il rubinetto di erogazione dell’acqua
calda/fredda/ambiente potrebbe non
quantità erogata
funzionare regolarmente.
è cambiata
• Il tubo è piegato?
• Il tubo di mandata dell’acqua è troppo
lungo?
•L
a mandata di acqua in ingresso è
collegata regolarmente?
Tutte le funzioni
si sono disatti•L
a macchina è accesa?
vate improvvisamente.
•L
’acqua a temperatura ambiente
fuoriesce o gocciola?
Si riscontra una
perdita.
• Si riscontra una perdita dal coperchio
del serbatoio dell’acqua o dall’interno
del prodotto?
Soluzioni
Disattivare la funzione acqua calda.
Attivare la modalità acqua calda premendo
il selettore dell’acqua calda per 3 secondi
Collegare l’alimentazione al voltaggio
corrispondente a quello indicato sulla
piastra delle specifiche di alimentazione.
Richiedere assistenza.
Richiedere un filtro sostitutivo.
Aprire la valvola di mandata dell’acqua.
Richiedere assistenza.
Raddrizzarlo.
Accorciare il tubo a 5 m o meno.
Verificare la valvola di mandata dell’acqua.
Collegare l’alimentazione al voltaggio
corrispondente a quello indicato sulla
piastra delle specifiche di alimentazione.
Richiedere assistenza.
Aprire il coperchio superiore e verificare
la perdita.
Chiudere il rubinetto di mandata
dell’acqua e richiedere assistenza.
Italiano
18
MEMO
19
19
MEMO
20
WARRANTY CARD OR WARRANTY LETTER
ONE YEAR LIMITED WARRANTY
WATER FILTRATION DEVICE CHP-06DL (“PRODUCT”)
Model:
Serial Number:
Customer Name:
Date of Purchase:
What This Warranty Covers:
Limitations and Exclusions:
Commencing with the date of purchase of the
Product and continuing for a period of one year,
if manufacturing defects in the Product cause the
Product to not operate properly for its intended
use, then subject to the exclusions, conditions, and
limitations contained herein, COWAY at its sole
TO THE EXTENT PERMITTED BY APPLICABLE
LAW, COWAY DISCLAIMS ANY OTHER
WARRANTY EXPRESS OR IMPLIED, THAN THAT
PROVIDED FOR HEREIN. THIS WARRANTY
IS IN LIEU OF AND EXCLUDES ALL OTHER
WARRANTIES, GUARANTEES, CONDITIONS
AND REPRESENTATIONS, EXPRESS OR
IMPLIED, ORAL OR WRITTEN, STATUTORY
OR OTHERWISE, INCLUDING BUT NOT
LIMITED TO ANY IMPLIED CONDITIONS OR
WARRANTIES AS TO THE MERCHANTABILITY
OR FITNESS FOR A PARTICULAR PURPOSE
OF THE COWAY PRODUCT. SOME STATES
DO NOT ALLOW LIMITATIONS ON HOW
LONG AN IMPLIED WARRANTY LASTS, SO
THE ABOVE LIMITATION MAY NOT APPLY TO
YOU. COWAY DOES NOT AUTHORIZE ANY
PERSON INCLUDING ITS REPRESENTATIVES,
TO MAKE ANY REPRESENTATION OR TO
OFFER ANY WARRANTY, CONDITION OR
GUARANTY IN RESPECT OF THE PRODUCT
OTHER THAN THIS WARRANTY. THIS LIMITED
WARRANTY SHALL BE THE OWNER’S SOLE
AND EXCLUSIVE REMEDY AGAINST COWAY
AND COWAY SHALL NOT BE LIABLE FOR ANY
CONSEQUENTIAL, EXEMPLARY, SPECIAL,
INCIDENTAL OR OTHER DAMAGES INCLUDING,
BUT NOT LIMITED TO, LOSS OF PROFITS, AND
LOSS OF USE. INCIDENTAL, CONSEQUENTIAL
AND EXEMPLARY DAMAGES SHALL NOT
BE RECOVERABLE EVEN IF THE REMEDIES
OR THE ACTIONS PROVIDED FOR IN THIS
WARRANTY FAIL OF THEIR ESSENTIAL
PURPOSE. SOME STATES DO NOT ALLOW THE
EXCLUSION OR LIMITATION OF INCIDENTAL OR
CONSEQUENTIAL DAMAGES, SO THE ABOVE
LIMITATION OR EXCLUSION MAY NOT APPLY
TO YOU. COWAY SHALL NOT BE LIABLE FOR
ANY DAMAGES WHICH ARE BASED UPON
NEGLIGENCE, BREACH OF WARRANTY, STRICT
LIABILITY OR ANY OTHER LEGAL THEORY
OF LIABILITY OTHER THAN THE EXCLUSIVE
LIABILITY SET FORTH IN THIS WARRANTY.
option will repair or replace the Product.
Decisions as to the extent of repair or replacement
required will be made solely by COWAY.
The remedy under this Warranty is available only for
that portion of the Product exhibiting defects at the
time of the warranty claim. The replacement Product
as well as any remaining original Product will be
warranted only for the original one year warranty
period. This limited warranty applies only to Product
used for an application specified by COWAY for
the Product and applied in strict accordance with
COWAY published specifications in effect at the
time of application. IF PRODUCT IS USED FOR
OTHER THAN ITS INTENDED PURPOSE, IT
IS SOLD AS IS AND WITHOUT ANY EXPRESS
OR IMPLIED WARRANTIES, INCLUDING OF
MERCHANTABILITY OR FITNESS FOR A
PARTICULAR PURPOSE.
What This Warranty Does Not Cover:
This Warranty warrants that the Product will be free
from manufacturing defects which affect the ability
of the Product to operate for its intended use; it is
not a warranty that the Product will never require
repairs or to undertake responsibilities, liabilities or
obligations other than those specifically identified in
the preceding section.
COWAY is not responsible or liable for personal
injury or property damage of any kind, even if
arising from a breach of this Warranty.
21
(“OWNER”)
21
Limitations on Implied Warranties:
Any implied warranty of merchantability or fitness for
a particular purpose or use, shall be limited to the
duration of the foregoing express written warranty.
Conditions of Warranty:
COWAY’s continuing liability under this Warranty is
conditioned upon the following :
a) The defect or damage is not caused by or is the
result of : abnormal use or conditions; improper
storage, unauthorized modifications or repair;
misuse, neglect, accident, alteration, improper
installation or other acts that are not the fault
of Coway or the manufacturer of the product
or that are not covered by the manufacturer’s
warranty;
b) The Product has not been altered, modified
or repaired without prior written approval of
COWAY;
c) The OWNER has notified COWAY in writing
of any failure of the Product covered by this
Warranty within thirty (30) days following such
failure;
d) There has been no misuse, abuse or
negligence with respect to the Product on the
part of the OWNER.
Waiver:
COWAY’s failure at any time to enforce or rely upon
any of the terms or conditions stated herein shall not
be construed to be a waiver of its rights hereunder.
Obtaining Warranty Service and OWNER’S
Duties:
If the Product fails to operate for its intended
purpose, then notify Coway or its Representative
Agency within 48 hours or within the next business
day after discovery of any defect in the Product.
The OWNER must give written notice to COWAY
no later than thirty (30) days after a defect is
discovered or should by reasonable diligence have
been discovered. Claims under this Warranty will
require proof of purchase by the OWNER.
Per manutenzione e/o per interventi tecnici, contattate il nostro Servizio Clienti.
Il prodotto e’ importato in Italia da Human & Technology Italia (Indirizzo : Corso Magenta 42, 20123 Milano)
Numero Verde : 800 128 232
22
SCHEDA DI GARANZIA O DICHIARAZIONE DI GARANZIA
GARANZIA LIMITATA DI UN ANNO
DISPOSITIVO DI DEPURAZIONE DELL’ACQUA CHP-06DL (“PRODOTTO”)
Modello:
Numero di serie:
Nome cliente:
Data di acquisto:
La Garanzia copre:
Limitazioni ed esclusioni:
A far data dalla data di acquisto originale del
Prodotto e per un periodo di un anno, qualora
eventuali difetti costruttivi nel Prodotto causino il
malfunzionamento del Prodotto per l’uso per il quale
è stato progettato, con le esclusioni, condizioni
e limitazioni descritte di seguito, COWAY a suo
insindacabile giudizio procederà alla riparazione o
sostituzione del Prodotto.
Qualsiasi decisione riguardante l’entità della
riparazione o la sostituzione eventuale del Prodotto
sarà prerogativa esclusiva di COWAY.
Il rimedio coperto dalla presente garanzia è
disponibile solo per la parte del Prodotto che
dimostra i difetti al momento della richiesta di
riparazione in garanzia da parte dell’utente. Il
Prodotto sostitutivo, così come eventuali altri
Prodotti originali, godranno della garanzia
residua a partire dalla data originale d’acquisto.
Questa garanzia limitata è applicabile solo a un
prodotto usato per gli scopi per i quali è stato
progettato da COWAY e in stretta osservanza della
documentazione tecnica pubblicata da COWAY
in vigore al momento dell’uso. QUALORA IL
PRODOTTO VENGA USATO PER ALTRI SCOPI
DIVERSI DA QUELLI PER I QUALI E’ STATO
PROGETTATO, VIENE VENDUTO COSI’ COME
E’ E SENZA ALCUNA GARANZIA ESPLICITA
O IMPLICITA, COMPRESA UNA GARANZIA
DI COMMERCIABILITA’ O IDONEITA’ PER UN
PARTICOLARE USO.
CON LA MASSIMA ESTENSIONE CONSENTITA
DALLA LEGGE VIGENTE, COWAY NON
RICONOSCE ALCUNA ALTRA GARANZIA SIA
IMPLICITA SIA ESPLICITA DIVERSA DA QUELLA
INDICATA IN QUESTO DOCUMENTO. QUESTA
GARANZIA E’ DA CONSIDERARSI SOSTITUTIVA
ED ESCLUDE QUALSIASI ALTRA GARANZIA,
CONDIZIONI E DICHIARAZIONI, SIA IMPLICITE
CHE ESPLICTE, ORALI O VERBALI, PRESCRITTE
DALLA LEGGE O MENO, COMPRESE MA NON
LIMITATE A QUALSIASI CONDIZIONE IMPLICITA
O GARANZIA DI COMMERCIABILITA’ O IDONEITA’
A UN PARTICOLARE USO DEL PRODOTTO
COWAY. ALCUNI STATI NON RICONOSCONO
LA DURATA DELLE GARANZIE IMPLICITE,
PERTANTO LA LIMITAZIONE DI CUI SOPRA PUO’
NON ESSERE APPLICABILE IN ALCUNI CASI.
COWAY NON AUTORIZZA ALCUNA PERSONA,
COMPRESO I PROPRI RAPPRESENTANTI,
A EFFETTUARE DICHIARAZIONI OD OFFIRE
ALCUNA GARANZIA O CONDIZIONE DEL
PRODOTTO DIVERSA DA QUANTO ESPRESSO
IN QUESTO DOCUMENTO. QUESTA GARANZIA
LIMITATA E’ L’UNICO DOCUMENTO VALIDO PER
L’ACQUIRENTE NEI CONFRONTI DI COWAY
E PERTANTO COWAY NON POTRA’ ESSERE
RITENUTA RESPONSABILE PER EVENTUALI
DANNI CONSEQUENZIALI, DI ESEMPIO,
SPECIALI, INCIDENTALI COMPRESI, MA NON
LIMITATI A, PERDITE DI PROFITTO E PERDITA
D’USO. I DANNI INCIDENTALI, ESEMPLARI
E CONSEQUENZIALI NON SARANNO
RIMBORSABILI ANCHE IN CASO I RIMEDI O LE
AZIONI PREVISTE DA QUESTA GARANZIA NON
RAGGIUNGANO L’OBIETTIVO PREFISSATO.
ALCUNI STATI NON RICONOSCONO
L’ESCLUSIONE O LA LIMITAZIONE DEI DANNI
INCIDENTALI O CONSEQUENZIALI, PERTANTO
LA LIMITAZIONE O L’ESCLUSIONE DI CUI
SOPRA PUO’ NON ESSERE APPLICABILE IN
ALCUNI CASI. COWAY NON POTRA’ ESSERE
RITENUTA RESPONSABILE PER EVENTUALI
DANNI DERIVANTI DA NEGLIGENZA,
VIOLAZIONE DELLE CONDIZIONI DI GARANZIA,
RESPONSABILITA’ DIRETTE DIVERSE DALLE
RESPONSABILITA’ ESCLUSIVE PREVISTE IN
QUESTA GARANZIA.
Ciò che questa garanzia non copre:
23
(“ACQUIRENTE”)
Questa Garanzia garantisce che il Prodotto è esente
da difetti di fabbricazione che possano influenzare
il regolare funzionamento del Prodotto per lo scopo
per il quale è stato progettato; tale garanzia non
sottintende che il Prodotto non richiederà in futuro
eventuali riparazioni e non deve essere considerata
come assunzione di responsabilità o obbligazione
diverse da quelle specificate nella sezione
precedente.
COWAY non è responsabile né può essere ritenuta
tale per eventuali danni causati alle cose o alle
persone di qualsiasi tipo, anche se derivanti da una
violazione di questa Garanzia.
23
Limitazioni o Garanzie implicite:
Rinuncia:
Qualsiasi garanzia implicita di commerciabilità o
idoneità per un particolare uso, è limitata alla durata
della garanzia espressa scritta.
La rinuncia da parte di COWAY in qualsiasi
momento di far valere o basarsi sui termini e le
condizioni qui indicate non può costituire una
rinuncia ai propri diritti qui sanciti.
Condizioni di garanzia:
Il perdurare della responsabilità di COWAY
secondo le condizioni indicate in questa Garanzia è
condizionato dalle seguenti condizioni :
a) Il difetto o danno non sia causato da o sia il
risultato di : uso o condizioni anomale;
stoccaggio improprio, modifiche o riparazioni
non autorizzate; abuso, negligenza, incidente,
alterazione, installazione impropria o altri atti non
imputabili a Coway o al produttore del prodotto
o che non siano coperti dalla garanzia del
costruttore;
b) Il prodotto non sia stato modificato, alterato o
riparato senza il consenso scritto da parte di
COWAY;
c) L’acquirente abbia notificato a COWAY per iscritto
eventuali malfunzionamenti del Prodotto coperto
da questa Garanzia entro trenta (30) giorni dal
verificarsi del guasto;
d) Non vi siano chiari segni di uso non corretto,
abuso o negligenza del Prodotto da parte
dell’acquirente.
Richiesta di assistenza in garanzia e obblighi
dell’ACQUIRENTE:
Qualora si riscontri un malfunzionamento del
Prodotto durante l’uso per il quale è stato
progettato, l’acquirente è tenuto a comunicare
a Coway o a un suo Rappresentante eventuali
difetti del prodotto, entro 48 ore dal guasto o
entro il giorno lavorativo successivo a quello
del malfunzionamento. L’acquirente dovrà
successivamente dare notifica a COWAY per
iscritto entro trenta (30) giorni dal verificarsi del
difetto o entro un tempo entro il quale è ragionevole
pensare si possa aver riscontrato il difetto. Eventuali
richieste di interventi in Garanzia dovranno essere
accompagnate dalla prova di acquisto da parte
dell’ACQUIRENTE.
Per manutenzione e/o per interventi tecnici, contattate il nostro Servizio Clienti.
Il prodotto e’ importato in Italia da Human & Technology Italia” (Indirizzo : Corso Magenta 42, 20123 Milano)
Numero Verde : 800 128 232
24
1209464
001
Made in Korea www.coway.com
Thank you for using our Coway Water Filtration Device.
Please read this Users’ Manual to use and maintain the product correctly.
If you encounter a problem while using the product, you may solve the problem referring to the User’s Manual.
As this manual contains the product warranty card, please keep it in a safe place.
Questo prodotto e conforme al decreto ministeriale DM 21/12/1990 n.443. Approvazione ministeriale n.
Per informazioni rivolgersi al proprio rivenditore o al nostro Servizio Clienti “ (Numero Verde : 800 128 232 ).
Se desidera acquistare il programma di manutenzione periodica contatti il nostro Servizio Clineti