1
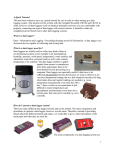
VISUAL WEATHERTM SOFTWARE INSTRUCTION MANUAL 3/02 COPYRIGHT (c) 2001-2002 CAMPBELL SCIENTIFIC, INC. This is a blank page. License for Use This software is protected by both United States copyright law and international copyright treaty provisions. The installation and use of this software constitutes an agreement to abide by the provisions of this license agreement. You may copy this software onto a computer to be used and you may make archival copies of the software for the sole purpose of backing-up CAMPBELL SCIENTIFIC, INC. software and protecting your investment from loss. This software may not be sold, included or redistributed in any other software, or altered in any way without prior written permission from Campbell Scientific. All copyright notices and labeling must be left intact. Limited Warranty CAMPBELL SCIENTIFIC, INC. warrants that the installation media on which the accompanying computer software is recorded and the documentation provided with it are free from physical defects in materials and workmanship under normal use. CAMPBELL SCIENTIFIC, INC. warrants that the computer software itself will perform substantially in accordance with the specifications set forth in the instruction manual published by CAMPBELL SCIENTIFIC, INC. The recommended minimum hardware for Visual Weather is a 300 MHz Pentium II processor with 64 megabytes of RAM and a screen resolution of at least 800x600. Visual Weather uses the features of Windows NT, 2000, or XP that maximize the reliability of unattended scheduled data collection and multitasking application programs. Visual Weather may be run successfully on Windows 95, 98, or ME if the user limits the number of screens open at any one time. CAMPBELL SCIENTIFIC, INC. will either replace or correct any software that does not perform substantially according to the specifications set forth in the instruction manual with a corrected copy of the software or corrective code. In the case of significant error in the installation media or documentation, CAMPBELL SCIENTIFIC, INC. will correct errors without charge by providing new media, addenda or substitute pages. If CAMPBELL SCIENTIFIC, INC. is unable to replace defective media or documentation, or if CAMPBELL SCIENTIFIC, INC. is unable to provide corrected software or corrected documentation within a reasonable time, CAMPBELL SCIENTIFIC, INC. will either replace the software with a functionally similar program or refund the purchase price paid for the software. The above warranties are made for ninety (90) days from the date of original shipment. CAMPBELL SCIENTIFIC, INC. does not warrant that the software will meet licensee’s requirements or that the software or documentation are error free or that the operation of the software will be uninterrupted. The warranty does not cover any diskette or documentation that has been damaged or abused. The software warranty does not cover any software that has been altered or changed in any way by anyone other than CAMPBELL SCIENTIFIC, INC. CAMPBELL SCIENTIFIC, INC. is not responsible for problems caused by computer hardware, computer operating systems or the use of CAMPBELL SCIENTIFIC, INC.’s software with non-CAMPBELL SCIENTIFIC, INC. software. ALL WARRANTIES OF MERCHANTABILITY AND FITNESS FOR A PARTICULAR PURPOSE ARE DISCLAIMED AND EXCLUDED. CAMPBELL SCIENTIFIC, INC. SHALL NOT IN ANY CASE BE LIABLE FOR SPECIAL, INCIDENTAL, CONSEQUENTIAL, INDIRECT, OR OTHER SIMILAR DAMAGES EVEN IF CAMPBELL SCIENTIFIC HAS BEEN ADVISED OF THE POSSIBILITY OF SUCH DAMAGES. CAMPBELL SCIENTIFIC, INC. IS NOT RESPONSIBLE FOR ANY COSTS INCURRED AS A RESULT OF LOST PROFITS OR REVENUE, LOSS OF USE OF THE SOFTWARE, LOSS OF DATA, COST OF RE-CREATING LOST DATA, THE COST OF ANY SUBSTITUTE PROGRAM, CLAIMS BY ANY PARTY OTHER THAN LICENSEE, OR FOR OTHER SIMILAR COSTS. LICENSEE’S SOLE AND EXCLUSIVE REMEDY IS SET FORTH IN THIS LIMITED WARRANTY. CAMPBELL SCIENTIFIC, INC.’S AGGREGATE LIABILITY ARISING FROM OR RELATING TO THIS AGREEMENT OR THE SOFTWARE OR DOCUMENTATION (REGARDLESS OF THE FORM OF ACTION; E.G., CONTRACT, TORT, COMPUTER MALPRACTICE, FRAUD AND/OR OTHERWISE) IS LIMITED TO THE PURCHASE PRICE PAID BY THE LICENSEE. 815 W. 1800 N. Logan, UT 84321-1784 USA Phone (435) 753-2342 FAX (435) 750-9540 www.campbellsci.com Campbell Scientific Canada Corp. 11564 -149th Street Edmonton, Alberta T5M 1W7 CANADA Phone (780) 454-2505 FAX (780) 454-2655 Campbell Scientific Ltd. Campbell Park 80 Hathern Road Shepshed, Loughborough LE12 9GX, U.K. Phone +44 (0) 1509 601141 FAX +44 (0) 1509 601091 Visual WeatherTM Software Table of Contents 1. Introduction.................................................................1 1.1 Background...............................................................................................2 2. System Requirements and Installation .....................2 2.1 Configuration of TCP/IP Services ............................................................2 3. Weather Station Configuration ..................................4 3.1 3.2 3.3 3.4 Before You Begin .....................................................................................4 Getting Help..............................................................................................4 Example Weather Station Configuration ..................................................4 After Configuring a Weather Station......................................................16 4. Manually Connecting to a Weather Station.............17 4.1 4.2 4.3 4.4 Retrieving Data Manually.......................................................................17 Setting a Weather Station Clock .............................................................18 Manually Sending a Program to a Weather Station................................18 Monitoring Weather Station Parameters and Status ...............................18 5. Generating Reports ..................................................19 5.1 Manually Generated Reports ..................................................................19 5.2 Batch Reports..........................................................................................20 6. Exporting Data to a File............................................20 7. Viewing All Stations in a Network ...........................20 8. Log Files for Troubleshooting Communication Problems ................................................................21 A. Evapotranspiration, Vapor Pressure Deficit, and Crop Water Needs ........................................ A-1 A.1 Evapotranspiration .............................................................................. A-1 A.2 Vapor Pressure Deficit of the Air ....................................................... A-9 A.3 Crop Water Needs, Crop Coefficients .............................................. A-10 i Visual Weather TM Software Table of Contents B. Growing Degree Days (GDD) and Pest Emergence................................................... B-1 B.1 Growing Degree Days ......................................................................... B-1 B.1.1 Method....................................................................................... B-1 C. Dew Point and Web Bulb Temperatures............... C-1 C.1 Dew Point ............................................................................................ C-1 C.1.1 Method....................................................................................... C-1 C.2 Wet Bulb Temperature ........................................................................ C-1 C.2.1 Method....................................................................................... C-2 D. Wind Chill................................................................ D-1 D.1 Wind Chill........................................................................................... D-1 D.1.1 Method ...................................................................................... D-1 D.2 References ........................................................................................... D-1 E. Chill Hours .............................................................. E-1 E.1 Chill Hours ...........................................................................................E-1 E.1.1 Method........................................................................................E-1 ii Visual Weather Software 1. Introduction Visual Weather software is designed to work with Campbell Scientific's preconfigured weather station models ET101, ET106, and MetData1. This software will allow you to: • • • • • • • • • • • Create and send configurations to one or more weather stations. Select a mode of communication (e.g., phone modem or RF) for each weather station. Define a data retrieval schedule for each station. Connect to any weather station that has been configured with Visual Weather. View a graphical display of a weather station’s current weather conditions. Print a summary of each weather station’s configuration. Monitor the "health" (e.g., battery voltage, internal temperature) of each weather station on a single screen. View and print preformatted reports (tables and graphs) from the data retrieved from each weather station. Perform post-processing on retrieved data to produce special meteorological and agricultural reports (e.g., evapotranspiration, dewpoint). Set up a schedule to automatically print reports (Batch Reports). Export retrieved data to an ASCII file (fixed column width) so it can be imported into a spreadsheet or other software package for further data processing. These tasks can be accomplished simply by clicking a few buttons and following the on-screen instructions. It requires no computer experience or indepth technical knowledge of the weather station equipment. We hope all users—novices or experts—will find Visual Weather a very easy to use, yet powerful, tool for managing a weather station network. NOTE This software is primarily designed to calculate quantities, such as evapotranspiration (ETo), crop water needs, and growingdegree-days, which are important to the agricultural community. This software expects that your weather station has at least a ‘full set’ of sensors, namely sensors that measure temperature, relative humidity, precipitation, solar radiation, and wind speed/wind direction. If your weather station does not measure these weather conditions, then you may not be able to utilize the full potential of this software. For example, if your station does not have a humidity sensor, then you will not be able to get reports on ETo, crop water needs, or wet bulb temperatures. It is best to consult the CSI applications engineers who will advise you on sensors required for your needs. 1 Visual Weather Software 1.1 Background Each weather station consists of a datalogger and a group of sensors. The sensors are designed to measure environmental factors such as air temperature or solar radiation. The datalogger measures the sensors and processes and stores the results. The stored results (final storage data) can be retrieved with a PC using communication software. Dataloggers must be "told" (that is, configured) when and how to measure the attached sensors, process these measurements, and store the information in final storage. Datalogger configuration can be a formidable task for many users. However, with Visual Weather you simply select the sensors connected to the weather station and the program is generated for you! 2. System Requirements and Installation The recommended minimum hardware for Visual Weather is a 300 MHz Pentium II processor with 64 megabytes of RAM and a screen resolution of at least 800x600. Visual Weather uses the features of Windows NT, 2000, or XP that maximize the reliability of unattended scheduled data collection and multitasking application programs. Visual Weather may be run successfully on Windows 95, 98, or ME if the user limits the number of screens open at any one time. NOTE If you need to contact weather station(s) in remote locations, then you may also need RF modems and radios or an analog phone line and a phone modem. Visual Weather can detect modems installed on your computer provided they were configured in your computer’s Window environment. During configuration of a new weather station you will find it convenient to select the detected modem. NOTE Some newer computers have USB ports instead of serial ports for communication with other devices. Communication using Visual Weather requires serial communication. If your computer has only a USB port, you will need a USB to serial port adapter. To install the software, insert the Visual Weather CD into the CD ROM drive of your computer. The installation process should begin automatically. If it does not begin, access your CD ROM drive and double-click the SETUP.EXE file. Follow the on-screen instructions to complete the installation. 2.1 Configuration of TCP/IP Services TCP/IP services must be running on the computer for Visual Weather to run. Following are the procedures for enabling TCP/IP communication on a Windows 95, 98, or NT system. For Windows 2000 the same things need to be set up, but they are accessed in different ways. See the documentation and help for Windows 2000 to add a dial-up connection and associate it with TCP/IP. 2 Visual Weather Software NOTE Before beginning this procedure make sure that you have your Windows installation CD-ROM (or floppy disks as appropriate) handy. As you install these options you may be prompted to insert various disks or the CDROM to complete the installation. 1. Click on the Start button and select Settings | Control Panel. 2. When the Control Panel window comes up double click on the Add/Remove Programs icon. 3. Select the Windows Setup tab. 4. Select Communications and click on the Details button. 5. On the Communications options screen click the box by “ Dial-Up Networking” (Win 98/95) or “ Phone Dialer” (NT). If already checked, click cancel and skip to step 9. 6. Click OK on the Communications Options screen and on the Windows Setup screen. 7. Provide the Windows installation software as prompted and then follow the directions. 8. When you are prompted to reboot the computer choose Yes. 9. After the computer boots, go to the Windows Control Panel and double click on the Network icon. 10. In the list box on the Configuration tab (Win95/98) or Protocols tab (NT) of the Network window which comes up, see if there is an entry TCP/IP -> Dial-Up Adapter or TCP/IP protocol. If this entry exists, cancel and skip the next steps. 11. Click on the Add button. In the Select Network Component Type window which comes up select Protocol or TCP/IP protocol and click on the Add or OK button. 12. When the Select Network Protocol window comes up select Microsoft under Manufacturers:, and TCP/IP under Network Protocols:. Click OK. 3 Visual Weather Software 3. Weather Station Configuration 3.1 Before You Begin This section assumes that: • You have installed Visual Weather on your computer. • You have installed a weather station and the desired sensors are connected properly to the station. (Please refer to the Weather Station manual.) • The battery supplying power to the station (12 Volts DC) is charged. • Communication hardware (e.g. modem, phone line, radio, etc.) is connected properly and functioning. 3.2 Getting Help Visual Weather has a complete on-line help system. Most screens have a Help button at the bottom right that, when pressed, will bring up help about the screen. In addition, help for any field, button, or option can be invoked by selecting it and pressing the F1 key on your computer. A Help file Table of Contents, an Index, and a Find function can be invoked by selecting Help from Visual Weather's main menu. 3.3 Example Weather Station Configuration An ET106 Weather Station is used in this example to demonstrate how a weather station is configured using Visual Weather. Configuration for an ET101 or MetData1 weather station is similar. 1. 4 From the Windows Start menu, select Programs | Visual Weather | Visual Weather. This opens Visual Weather's main screen. Visual Weather Software 2. VISUAL WEATHER MAIN SCREEN. From the list on the main screen select Configure a Weather Station (or from the menu select File | Configure New). 3. WEATHER STATION MODEL SELECTION. Select the option button for your weather station model. In the example below, ET106 has been chosen. To proceed to the next step, click Next. 5 Visual Weather Software 4. WEATHER STATION INFORMATION. This screen allows you to enter information about the weather station that may be helpful later, and that Visual Weather will use when saving a weather station's configuration files. A unique name must be given to each weather station. Visual Weather will not allow you to enter the name of an existing station. Station notes are optional, but they may be useful in identifying the weather station. Make sure to select the appropriate battery type for your station. When monitoring a weather station, the low battery alarm limit will be different depending upon the option chosen. If you would like to have a custom image or company logo appear on your Visual Weather screens and printed reports, you can select it by using the respective Browse button on this screen. If you do not choose a custom image, then the default image you see on this screen will be used. If you do not add a custom logo, then a logo will not appear on any of your printed reports. Click Next to proceed. 6 Visual Weather Software 5. TYPICAL OR CUSTOM STATION. An ET106 weather station is most often sold with the following sensors: • CS500 air temperature and relative humidity sensor • LI200X solar radiation sensor • TE525 tipping rain gage • 034A wind speed and direction sensor This is the default configuration, but Visual Weather allows you to select of other sensors by selecting the Custom option. Typical Weather Station When a Typical station is selected, the sensors noted above will be measured every 5 seconds. The measured values are processed every 15 minutes, hourly, and daily. For example, with a scan rate of 5 seconds, 720 measurements are performed in one hour (3600 ÷ 5). The sensor measurements are processed for this time period and stored for later use. Similarly, measurements are processed for the time spans of 24 hours and 15 minutes. When data is retrieved from the weather station, all of these values are saved on your computer associated with the unique station name you provided in Step 4. 7 Visual Weather Software If a Typical Weather Station setup is desired, select Next to proceed to the Communications section (and you may skip to step 8). If a Custom Weather Station setup is desired, additional setup screens will be presented. Custom Weather Station Select the Custom option if you are using sensors other than those mentioned above, if you want to use a different scan rate (10, 30, or 60 seconds), or if you want to set the shortest data storage interval to something other than 15 minutes (1 - 59 minutes). Select Next to proceed. 6. SENSOR SELECTION. This screen is used to select the sensors that are being measured by your custom weather station and the frequency at which they will be measured. Each of the seven fields on the left corresponds to the picture of the connectors on the right (this diagram represents the actual physical connectors of the weather station). Select the arrow button to the right of a field to invoke a list of valid sensors for that connector. The sensors selected for each field and the physical connection of the sensors to the weather station must match or you will receive incorrect data from the weather station. 8 Visual Weather Software NOTE Refer to the weather station's user manual for additional information on sensor connection. After the sensors have been selected for the weather station, select a scan interval (5, 10, 30, or 60 seconds). Select Next to proceed. 7. FINAL STORAGE. This screen is used to select the values that will be stored and the time span for the shortest data storage interval. By default, the time span for this interval is 15 minutes; you can select from 1 to 59 minutes. The check marks appearing in the Hourly Data and Daily Data columns (which are colored red in the software) indicate values that are automatically stored for the hourly and daily storage intervals (provided the sensors are connected to the weather station). To set the time for the Custom Data interval, click the up or down arrow that appears to the right of the Custom Data field and increase or decrease the value. In the example above, the custom data interval is 20 minutes. To set the data values that will be stored at this interval, select the check box for a measurement. In the example above, Wind Speed and Direction is selected. 9 Visual Weather Software Click Next to configure the communications link for the weather station. 8. COMMUNICATIONS. The Communications screen is where you define the type of link you will be using to communicate with your weather station. For all communication modes, you must indicate the appropriate COM port on your computer to which the cable or modem is attached. Select the arrow to the right of the COM Port field to display a list of available COM ports. Visual Weather can only use COM ports that are already installed on your computer. Click on the arrow to the right of the field Windows Modem/Com Port. A list consisting of a modem, if one was configured in Windows on your computer, and COM ports will be displayed. If the station you are configuring is to be contacted via phone modem or phone-to-RF then select the modem displayed in the list. Select/Enter rest of the applicable information such as mode of communication, station's contact phone number. If you are using Direct or Short haul or RF mode of communication then you must select the appropriate COM port from the displayed list of COM ports. Visual Weather expects a dedicated (reserved) COM port for these modes of communication. Note that only the COM ports available for connection are listed. For example, if another weather station is already connected directly to COM Port 1 of your computer then you may not connect another station on the same port. In this case you will not find COM1 in the list of COM Ports. 10 Visual Weather Software Next, select the mode of communication that will be used to contact the weather station by selecting the appropriate option button. Visual Weather supports five modes of communication (see Figure 1): Direct communication Cable SC25PS Cable SC12 RS 232 (SC32A) Short Haul Short haul modem Cable Twisted Pair Short haul modem Phone modem Phone modem SC932(C) CSI Remote modem (such as COM 300) Telephone line Analog wall phone jack Phone-to-RF Analog wall phone jack Radio Frequency (RF) Phone modem Remote modem RF Remote modem Base RF Radio Frequency (RF) Cable SC25PS RF (base modem) Radio Frequency (RF) RF Remote modem FIGURE 1. Modes of Communication Supported by Visual Weather • Direct - The weather station is connected directly to a computer's COM port using a serial cable. Direct communication is used when the weather station and computer are in close proximity (typically less than 25 feet). • Short Haul - The weather station is connected to a computer via a two twisted pair cable and short haul modems. Short haul modems are used in instances where the weather station and computer are a few hundred feet away from each other. • Phone Modem - A phone modem is installed at the computer, and another phone modem is installed at the weather station site. Phone modem communication is used when a telephone line (or cellular service) is available at the weather station site. 11 Visual Weather Software NOTE • RF - Two RF modems, one connected to the computer (called the base RF) and another at the weather station (called the remote RF), communicate via radio frequency (RF). Both modems have numeric addresses (referred to as RF switch IDs) to identify them. The base RF ID is assumed to be 255 and must be configured as such for communication to work. You need to know and enter the RF switch ID of the remote RF modem only. • Phone-to-RF - A combination of communication modes is used. Weather stations located in remote areas are sometimes contacted in this manner. You will need to know the phone number and remote RF switch ID. Visual Weather supports most commercially available internal and external phone modems. A list of modems is provided from which to choose when setting up the communications link for a station in Visual Weather. If you do not find your modem listed, select the <default modem>. This should work in most instances. If the default modem does not work, contact your Campbell Scientific representative for assistance. You will need to provide the command set included in the user's manual for your modem. Depending on the mode of communication you select, additional fields will be available under Communication Device Settings to enter baud rate, phone numbers, RF IDs, etc. WARNING Before continuing, check that the information entered into all the fields on this screen is correct. If you have entered any incorrect information, you will not be able to contact the weather station. Select Next to continue. 12 Visual Weather Software 9. DATA COLLECTION SCHEDULE. This screen is used to define the schedule on which the weather station will be called and data will be retrieved. The Next Time to Call fields determine when the first call will be made to the weather station. If the date and time entered have already passed, then a call will be made at the Calling Interval. The Calling Interval field is how often the weather station will be called. If you do not change any information in these three fields, Visual Weather will contact the station at the top of the next hour and every hour thereafter. The calling interval can be as frequent or infrequent as you desire. However, calling the station hourly will ensure that you have up-to-date information for your reports. Also, you will be more quickly alerted to problems that might occur with communication, the "health" of the datalogger, or the data itself. Retries are used to define a different schedule on which the weather station will be contacted if a scheduled attempt to contact the station fails. The Primary Retry Interval is the first interval that will be used. This interval will be used the number of times specified in the Number of Primary Retries field. If communication is successful on one of the primary retries, then data collection will revert back to the original calling interval. However, if all of the primary retries fail, then Visual Weather will call the station at the interval entered into the Secondary Retry field 13 Visual Weather Software (provided the checkbox next to this field is checked). Visual Weather will continue calling on this interval until a successful call is made, at which time it will revert back to the original calling interval. For example, in the screen above, the weather station will be contacted each hour. If a call fails, Visual Weather will wait 5 minutes and call again. This 5 minute interval will be attempted twice, then Visual Weather will begin calling every 24 hours. At any time during this process if communication is successful, Visual Weather will resume contacting the weather station on an hourly basis. The defined schedule can be turned on or off by selecting the appropriate option button. Schedule On is selected by default. This means that Visual Weather will attempt to contact the station based on the information entered on this screen. The schedule may be paused at any time by selecting the Off option. Pausing the schedule can be useful, such as when you are performing maintenance on the weather station, but in most instances you will want to set the Schedule option to On. Click Next to proceed. 14 Visual Weather Software 10. WEATHER STATION SUMMARY. The Summary screen displays all of the information you entered when configuring the weather station. After verifying that the information is correct the page can be printed and saved for your records. If you want to change a selection (for example, you noticed that you selected a wrong model for the Rain Gage sensor), click the Previous button and navigate through the screens until you reach the screen where you wish to make a different selection. After making the change(s) click the Next button on each screen to return to the Summary screen. Finally, click the Finish button to complete the weather station configuration. This configuration is saved under the name you gave the weather station in the Weather Station Information screen. The summary information can be reviewed at any time by selecting View | Summary from the menu. This page will also include information on the number of final storage locations used per day. 15 Visual Weather Software 11. SENDING THE CONFIGURATION TO THE WEATHER STATION. Upon completion of the weather station configuration, the following dialog box appears. If you answer Yes, the software will attempt to connect to the weather station. The weather station program created during configuration will be transferred once communication is established. A message will be returned when the program is compiled by the weather station, or if an error occurs during the process, the message "Station could not compile program" is displayed. To verify that the weather station configuration was successful, go to the main screen (Home) and select View | Collection Schedule. If you see the weather station name and collection schedule information, the station has been created successfully and it will be contacted for data retrieval per the schedule. There are times when you should not send, or cannot send, a program to the station: • If you are not a principal user or manager of the weather station(s), and the station manager has already configured the weather station(s) for data collection and the station is actively collecting data. If this is the case, you should contact the station manager and ask what sensors, scan rate, and outputs were selected during the weather station's configuration. Simply re-create the same configuration in Visual Weather and answer No when prompted to send the configuration to the station. This will associate your configuration with the one running on the station, and create a station locally on your computer. You may create reports, monitor the real-time weather, etc., from the weather station once it is set up. • If security is in place for the weather station. Enabled security prohibits anyone besides the station manager from sending a new program to the weather station. 3.4 After Configuring a Weather Station When the weather station configuration has been created and the resulting program transferred, Visual Weather can be left to run unattended. Note, however, that Visual Weather must be running for scheduled data retrieval and 16 Visual Weather Software batch reports to be performed. If for some reason you must close Visual Weather, these tasks will resume once the software is restarted. Data will not be lost unless the software has been closed a sufficient amount of time for the weather station to begin overwriting its oldest data with new data. This can be anywhere from 10 to 30 days depending upon the number and frequency of sensor measurements being stored to final storage and the memory capacity of the datalogger. It is prudent to retrieve data at least daily to protect against loss of data. An indication of the number of final storage locations used per day is provided on the summary information screen (View | Summary). Data collection from the stations can be verified by choosing View | Collection Schedule from the Visual Weather menu. The resulting window lists all stations and data collection status. The next time Visual Weather will attempt to collect data is displayed in the Next Data Collection column. The Collection State column indicates if data collection is Normal, or if collection is in a Primary or Secondary retry state. 4. Manually Connecting to a Weather Station In addition to performing automatic scheduled data retrieval, you can connect to a weather station manually and perform system maintenance, monitor current weather parameters, or retrieve data. To connect to a weather station, select Connect from the main screen. All weather stations that you have configured using Visual Weather will be listed on the left side of the screen under the Station Selection field. Select the weather station with which you want to communicate and press the Connect button. Visual Weather will attempt to establish communication with the weather station; once connected, the Connection Status will read Connected. The amount of time that your computer has been in communication with the weather station is indicated by the Time Elapsed Since Connection field. When communication is initiated manually, it will be maintained until you select the Disconnect button, you return to the Home screen, or you close Visual Weather. Note that whenever you are connected to a weather station, the weather station uses more power, the phone connection remains active (thus, phone costs may be incurred), no other station on that COM port can be contacted for data, and no other users may connect to the weather station. 4.1 Retrieving Data Manually To manually retrieve data from a weather station, click the Start button in the section of the screen titled Manual Data Collection. You will see an hourglass to indicate that Visual Weather is retrieving data. A number will be incremented in the Records Received field as records are received from the weather station. You will be notified by a message when the retrieval process is complete. You can stop data retrieval at any time by selecting the Stop button. 17 Visual Weather Software 4.2 Setting a Weather Station Clock When a successful connection is established with a weather station, the weather station time, your computer time, and the difference between these two times will be displayed in the lower right portion of the screen (Synchronize Clocks). A difference of a few seconds can be ignored, but if times differ by several minutes you may wish to set the weather station clock by selecting the Set Station Clock button. Note that it is nearly impossible to synchronize the two clocks exactly, since it takes time to transfer that clock setting to the weather station. 4.3 Manually Sending a Program to a Weather Station Another program may be transferred to the weather station provided that: • The program you want to transfer was created using Visual Weather software, and it is for the type of weather station you will be transferring it to (that is, a program transferred to an ET106 must be one that was created for an ET106). Real-time monitoring, special calculations, and report generation assume that the program in the datalogger is in a certain format. If this format is not used, then there will be numerous errors. Therefore, programs created with other tools (such as Campbell Scientific’s SCWIN or Edlog) should not be sent to a weather station if you wish to manage the weather station using Visual Weather. • Security has not been set in the weather station to restrict program transfer, or you have administrative rights to the security settings for the weather station. Select the Send Configuration button to send a new program file. You can also retrieve a program from a weather station by selecting Retrieve Configuration. (Note that programs cannot be reliably retrieved over some communications links, such as RF or slow telephone connections.) 4.4 Monitoring Weather Station Parameters and Status When you have a connection established with a weather station, you can view current weather parameters and the status of the weather station. To view weather parameters, select the Monitor Current Weather button at the upper right of the screen. This invokes a window with three tabs that displays information for: • Air Temperature, Relative Humidity, Wind Speed/Direction • Sunshine, Rain, ETo • Moisture, Temperature, Leaf Wetness, Snow Note that the tabs available will depend upon the sensors that are actually being measured by the weather station. To view datalogger status parameters (or the "health" of the datalogger), select View Station Status. A screen will appear that displays battery voltage (main 18 Visual Weather Software power source and backup), datalogger errors, datalogger internal temperature, and enclosure relative humidity. If any of these parameters are outside the acceptable range, the cells in which the values are displayed will be red. 5. Generating Reports Reports can be generated from retrieved data for the last 24 hours, daily (midnight-to-midnight), any 7 day period, or any 30 day period. Reports can be created for an existing weather station or for a weather station that was once in the network but has been deleted (in which case, reports will contain historical data only). There are four types of reports that can be selected. STATION STATUS REPORTS contain information on the "health" of the weather station—main and backup battery voltages, enclosure RH, and datalogger internal temperature. STANDARD WEATHER REPORTS consist of air temperature, solar radiation, rainfall, relative humidity, wind speed and direction, and wind rose data. By default, the Station Status and Standard Weather reports are selected; therefore, these reports will be generated when a report is initiated. However, you can choose not to generate these reports if desired. ADDITIONAL REPORTS include sensors that are not part of a typical weather station, but can be added to a custom weather station. These include leaf wetness, snow depth, soil or fuel temperature, and soil or fuel water content. SPECIAL REPORTS consist of calculations for evapotranspiration (ETo), growing-degree-days, dewpoint, wind chill factor, chill hours, and wet bulb temperature. Most of these calculations require additional user input (such as anemometer height and weather station elevation, longitude, and latitude when computing ETo). NOTE The formulas used in deriving the values for the Special Reports are presented in the Appendices of this manual. 5.1 Manually Generated Reports To create one or more reports, select Reports from the Main screen. Highlight the weather station for which to generate the report(s), and select the report period, report beginning and ending dates, and system of units (metric or nonmetric). If you would like a special image or company logo on the report(s), select the images to be used by pressing the Browse buttons for the Station Image and Company Logo fields. Select or clear the check boxes in the far right column of the screen to determine which reports to generate, and click the Create Reports button. Station Status Reports, Standard Weather Reports, and Additional Reports will be generated immediately. If any Special Reports have been selected, another screen will appear that has a tab for each report type. You will need to provide additional information for most of the reports before they can be generated. Once the information is typed in, press the Finish button and the reports will be created. 19 Visual Weather Software 5.2 Batch Reports Batch Reports let you define and save the settings so that it can be run again and again. A Batch Report can be set to run "on demand" (that is, when selected from a menu) or to run automatically on a defined schedule without any interaction from the user. To create a Batch Report choose Reports | Batch Reports | Create New Batch from the menu on Visual Weather's Home screen. Batch Reports can be created only for current weather stations (that is, you cannot create Batch Reports for historical data of deleted weather stations). Configuring a Batch Report is very similar to manual reports, except that you have additional fields in which you determine when the report should be generated (on a schedule or on demand) and in what format it should be output (to the printer, as a BMP, or as a JPG). To run reports on demand, select the Generate on Demand option, define the report types to be generated, and press the Create Batch button. Any time you want to run the report, select Reports | Batch Reports | Run Batch and the name of the report you want to run. To run reports automatically, select the Generate According to Schedule option, set up the schedule, define the report types to be generated, and press the Create Batch button. As long as Visual Weather is running, the report will be run. 6. Exporting Data to a File Data retrieved from a weather station can be exported to a file for further data processing. From the Main screen click Data Export. Highlight the desired weather station name from the Available Stations list. The names of the data tables in the weather station will be displayed. The tables are named HourlyT (one hour data), DailyT (24 hour data), and CustomT (the shorter interval table—by default, 15 minute data). Select one or more of the tables to be exported and choose the beginning and ending times for the data. Click Start Export to begin. By default, exported data will be saved in the c:\campbellsci\VisualWeather\Export folder with a name of weatherstation.dat (where weatherstation is the name that was provided when configuring the weather station). A different directory in which to store the file may be specified by pressing the Browse button. Data is exported in an ASCII comma-separated format with field names. It can be imported into a spreadsheet or other software for further data processing. 7. Viewing All Stations in a Network All weather stations in a network can be monitored on a single screen using Visual Weather (provided all the weather stations were configured with the computer system you are using to monitor them). 20 Visual Weather Software Select Weather Station Network from the Main screen. This screen shows weather stations currently in the network. You can view the current battery voltage, enclosure relative humidity, air temperature, rain, wind speed and direction, or solar radiation by highlighting the desired station image, selecting the parameter you want to view from the Displayed Station Information list, and clicking the Update Measurements button. Visual Weather will attempt to establish communication with the weather station and retrieve the requested information. This screen can also be used to remove a configured station from the network, edit the communication path for an existing station, or edit the schedule for an existing station. 8. Log Files for Troubleshooting Communication Problems If you experience difficulties in communicating with a weather station set up with Visual Weather, contact your Campbell Scientific representative. You may be asked to provide log files for your communication attempts. Log files are enabled by selecting File | Advanced | Low Level Logs from Visual Weather's main menu. When the log files are enabled, a check mark will appear beside the menu item. The log files can be toggled off by selecting the menu item a second time. These logs contain low level communication information for all devices in the network. They are useful in determining where the problem may lie in the communications link. If the default directories are accepted during the installation of Visual Weather, the logs files will be stored in C:\CampbellSci\Visual Weather\VWComms\Logs. NOTE Unless you are experiencing problems in communication, the log files should be disabled. Log files can consume a substantial amount of hard disk space since up to five 1.2 M files can be created. 21 Visual Weather Software This is a blank page. 22 Appendix A. Evapotranspiration, Vapor Pressure Deficit, and Crop Water Needs A.1 Evapotranspiration This appendix explains the process of evapotranspiration (ET) and the methods Visual Weather uses to calculate hourly ET values. It also explains the calculations for vapor pressure deficit of the air and crop irrigation based on ET. Evapotranspiration is the process of water loss in vapor form from a unit surface of land both directly (evaporation) and from leaf surfaces (transpiration). The energy required for vaporization comes mainly from the solar radiation and the ambient air temperature. Higher values of solar radiation and ambient air temperature increase ET. As the air near the soil surface saturates with water vapor, the rate of water loss due to evaporation decreases. Therefore, with increasing humidity ET decreases. The wind displaces saturated air with relatively drier air. Thus, at higher wind speeds ET increases. Other factors, such as soil composition, irrigation frequency, rain, and crop type also play important roles that effect the process. Given the diversity of crops, their heights, ability to absorb solar radiation, foliage resistance to wind, and variability in wind speeds at various altitudes some standards have to be predefined as a basis for comparisons of ET under variable climatic conditions. For the purpose of standardization the following definition has been adopted for a reference crop surface. [1] 'A hypothetical reference crop with an assumed crop height of 0.12 meters, fixed surface resistance of 70 S/m and an albedo of 0.23'. This hypothetical reference crop surface closely resembles an adequately watered, extensive surface of green grass of uniform height, completely shading the ground. The (bulk) surface resistance, rs, consists of resistance to vapor flow through the soil surface and crop leaves. The latter is called stomatal resistance. Stomata are small openings on leaves through which the vapor is lost. For the reference crop the value of rs is fixed at 70 S/m. Albedo is a crop's ability to reflect the incident radiation. Also known as canopy reflection coefficient, its value for the reference crop is 0.23 (unitless number). Reference crop surface albedo = (radiation energy reflected by reference crop surface) / (solar radiation incident on the reference crop surface) = 0.23. A-1 Appendix A. Evapotranspiration, Vapor Pressure Deficit, and Crop Water Needs Over the years the Food and Agriculture Organization of the United Nations (FAO) has published several documents related to evapotranspiration and other agriculture related issues. The above standard definition is recommended in the recent publication (FAO 56, 1998) on the subject of evapotranspiration. The FAO 56 Penman-Montieth (PM) equation is now accepted as a method to calculate ET from the reference crop surface, in all regions and climates. ETo represents the value of evapotranspiration (in units of mm/hour) from the reference crop surface. The ETo values are calculated using the following FAO56PMETo equation. ETo = where, 0.408 ∆ (R n - G) + γ (900 / (T + 273)) u 2 (e s - e a ) ∆ + γ (1 + 0.34∗ u 2 ) (1) ETo = reference evapotranspiration (mm/day); ∆ = slope of the vapor pressure versus temperature curve (kPa/°C) Rn = net radiation at the crop surface (MJ/m²/day) G = soil heat flux density (MJ/m²/day) γ = psychrometric constant (kPa/°C) T = air temperature at 2 m height (°C) u2 = wind speed at 2 m height (m/s) es = saturation vapor pressure (kPa) ea = actual vapor pressure (kPa) es - ea = saturation vapor pressure deficit (kPa) Time steps used in ETo calculations: The above equation yields an ETo value in mm/day. It uses values of temperature, relative humidity, wind speed, and solar radiation averaged over a day. It is, therefore, said to be using a daily time step for ETo calculations. Similarly, hourly averages of temperature, relative humidity (RH), wind speed, and solar radiation can be used in an hourly time step. Choice of the time step to be used in ETo calculations depends on availability of required data (e.g., hourly averaged temperature data may or may not be available), accuracy of ETo values desired by users, and the situation in which ETo results will be used. Given that the main climatic factors which determine ETo values (solar radiation, temperature, relative humidity, and wind speed) vary throughout the day, it is obvious that using hourly data values and an hourly time step, rather than their daily averages and a daily time step, will yield more accurate results. Visual Weather uses an hourly time step for better accuracy in ETo calculations. The FAO56 Penman-Montieth equation for the hourly time step is: ETo = A-2 0.408 ∆ (Rn - G) + γ (37 / (Thr + 273)) u 2 (e° (Thr ) - e a ) ∆ + γ (1 + 0.34 u 2 ) (2) Appendix A. Evapotranspiration, Vapor Pressure Deficit, and Crop Water Needs where, ETo = reference evapotranspiration (mm/hour) Rn = net radiation at the crop surface (MJ/m²/hour) G = soil heat flux density (MJ/m²/hour) Thr = mean hourly air temperature (°C) e°(Thr) = saturation vapor pressure at Thr (kPa) ea = average hourly actual vapor pressure (kPa) ea = e°(Thr)*RHhr/100 ; RHhr is average hourly relative humidity (%) u2 = average hourly wind speed (m/s), measured at 2 m height. Other variables and their units are the same as in equation (1). Equations used to calculate the value of each variable in equation (2), related quantities, their units, etc., are presented below. NOTE Please refer to Table 1 at the end of this Appendix for listings of all quantities and their symbols and units used in the ETo calculations) 1. Calculations for ∆[2, 3] (slope of the vapor pressure curve). ∆= 4098[0.6108 e (17.27T)/(T+237.3) ] (3) (T + 237.3) 2 T is temperature in °C. 2. Calculations for Rn (net radiation at the crop surface). The net radiation, Rn, is the algebraic sum of radiation at the crop's surface, with the sign convention that the incoming radiation is positive and the outgoing radiation is negative. The incoming radiation is higher in energy (i.e., shorter in wavelength) than the outgoing radiation (which is longer in wavelength). The net radiation at the crop's reference surface is: Rn = Σ (Radiation) = (Radiation received at reference crop surface) + (- Radiation lost) Rn = (Solar radiation received at reference crop) + ( - Solar Radiation reflected from the reference crop's surface) + (- Long wave radiation outgoing from the crop/earth's surface) Rn = Rs + (-α RS) + (Rnl) = RS (1-α) + (Rnl) = RS (1-0.23) + Rnl = 0.77Rs + Rnl (4) By definition the value of α (albedo or canopy reflection coefficient) is 0.23 for the reference crop, then the net solar or short wave radiation received at the crop, Rns = RS (1-α) = RS (1-0.23) = 0.77 RS In the above equation, Rnl represents the outgoing, lower energy (longer wavelength) radiation. In the daytime incoming net radiation > outgoing net radiation, Rns > Rnl, therefore Rn is positive. A-3 Appendix A. Evapotranspiration, Vapor Pressure Deficit, and Crop Water Needs In the nighttime incoming net radiation < outgoing net radiation, Rns < Rnl, therefore Rn is negative. The overall value of Rn is positive over a 24-hour period. Having determined Rns = 0.77Rs, next Rnl must be calculated. Calculation of Rnl is based on equations used in explaining black body radiation. 2a. Calculations for Rnl (long wave radiation at the crop surface). The amount of energy radiated back into the atmosphere is proportional to the fourth power of the absolute temperature of a radiating surface (Rnl 4 αT ). This is known as Stefan-Boltzmann's law, in context with black body radiation. The proportionality constant for this relation is known as Stefan-Boltzmann constant, σ. The value of the Stefan-Boltzmann constant is: 4.903x 10 -9 MJ m-2 K -4 day -1 = 4.903x 10-9 x 10 6 (1 day x 24 hours / day x 3600 sec / hour) -8 -2 -4 = 5.675 x 10 W m K σ= However, the radiation emitted into the atmosphere gets absorbed by clouds, vapors, dust and gases like CO2. Thus the magnitude of Rnl would be less than that predicted by the Stefan-Boltzmann law. Therefore, in calculating Rnl, the Stefan-Boltzmann law has to be corrected by considering factors such as humidity and clouds and assuming that concentrations of other absorbers remain constant. The following equation is used to calculate the long wave Rnl for the hourly time steps. Rnl = σ Thr (0.34 - 0.14 (e a) ) (1.35 (RS / RSO) - 0.35) 4 1/2 -2 (5) -1 where, Rnl = net outgoing longwave radiation (MJ m hour ) -10 -2 -4 -1 σ = 2.043 x 10 (MJ m K hour ) ea = actual vapor pressure (kPa) -2 -1 RS= measured solar radiation (MJ m hour ) -2 -1 RSO = calculated value of clear-sky solar radiation (MJ m hour ) RS/RSO = relative value of short wave radiation, 0.2 <RS/RSO <= 0.8 (no units) Thr = hourly average temperature in Kelvin During the daytime the ratio RS/RSO is calculated using the measured values of Rs. For a complete cloud cover, RS/RSO = relative value of short wave radiation, 0.3. The hourly values of the ratios, RS/RSO, are calculated as follows. 2b. Calculation of the ratio Rs/Rso. 2 Rs = measured value of solar radiation (MJ/m /hour) A-4 Appendix A. Evapotranspiration, Vapor Pressure Deficit, and Crop Water Needs Rso = clear sky solar radiation; i.e., solar radiation with no cloud cover 2 (MJ/m /hour) The general equation used to calculate the solar radiation is: Rs = (as + bs (n/N))Ra where as = constant = 0.25 bs= constant= 0.50 n = actual sunshine hours on a given day N = expected sunshine hours on a given day Ra= extraterrestrial radiation If the day is entirely clear then n = N and Rs = (as + bs )Ra = (0.25 + 0.50)Ra ˜ 0.75Ra = Rso If the day is entirely cloudy, then n = 0 and Rs = (as )Ra ˜ 0.25 Ra Therefore the ratio, Rs/Rso on a completely cloudy day would be: Rs/Rso ˜ 0.25 Ra/0.75 Ra ˜ 0.33 about 0.3. Therefore, 0.3 < Rs/Rso < 1.0 define limits of the ratio. In the nighttime Rs = 0. But Rs/Rso should not be taken to be 0 or 0.3, since the sky may be cloud free. For the nighttime Rs/Rso = Rs/Rso calculated for a time 2 to 3 hours before sunset. To identify the hour that is 2 to 3 hours before sunset apply the following definition to the hour. It is the hour for which the solar time angle ω, satisfies the following condition: (ωs - 0.79) <= ω < (ωs - 0.52) where ωs is the sunset hour angle (in radians), which is calculated as follows: ωs = π/2 - arctan[ tan(φ)tan(δ) / X ] 0.5 2 2 where X = 1 -[ tan(φ)] [tan(δ)] and X = 0.00001 if X <= 0 Thus, to find out the value of Rs/Rso for the nighttime, identify the value for a few hours before sunset, ω, by applying the condition above b) calculate the value of Rs/Rso for the near sunset hour c) use this value of Rs/Rso for the nighttime (when Rs ˜ 0) The lower limit on Rs/Rso should be 0.32 a) A-5 Appendix A. Evapotranspiration, Vapor Pressure Deficit, and Crop Water Needs In the beginning of a dataset or datalogger initiation, calculations for the value of ω at near sunset may be missing. In such cases for the first night Rs/Rso = 0.7 is used as an average approximation. On subsequent nights, the user can utilize the preceding approach based on ω near sunset and compute Rs/Rso. The actual vapor pressure, ea, can be calculated as shown later in items 5 and 6 below. 2c. Calculations for RSO (clear sky radiation). Measured values of solar radiation, RS , are actually extraterrestrial radiation (Ra) reaching the earth corrected by daily conditions; i.e., whether a particular day is clear or overcast. The following equation shows this relation: RS= (aS + bS (n/N)) Ra (6) Where n = number of hours of actual sunshine (hours) N =maximum possible number of hours of expected sunshine (hours) For a completely overcast day n = 0; therefore, RS= aS Ra, the constant aS = fraction of extraterrestrial radiation reaching the earth on a overcast day. For an entirely clear day n = N RS= (aS + bS )Ra = clear sky radiation , aS + bS = fraction of extraterrestrial radiation reaching the earth on a clear day. Thus, RS = (aS + bS )Ra = RSO (7) When calibrated values of aS and bS are not available, -5 RSO = (0.75 + 2 x 10 z )Ra z= station elevation in meters (8) 2d. Calculations for Ra (extraterrestrial radiation). The extraterrestrial radiation, Ra, for hourly steps can be calculated as follows: Ra = 12 (60) G Sc dr[(ω 2 - ω1)sin(φ )sin(δ ) + cos( φ )cos(δ )(sin(ω 2) - sin(ω1))] π -2 -1 3 (9) 2 GSc = Solar constant = 0.0820 MJ m Min =1.36 x 10 W/m = 1.36 k 2 W/m A-6 dr = inverse relative distance Earth-Sun = 1 + 0.033 cos ( (2 π /365) J ) , J is day of the year (10) δ = solar declination (radians) = 0.409 sin ((2 π/365) J - 1.39) (11) Appendix A. Evapotranspiration, Vapor Pressure Deficit, and Crop Water Needs φ = latitude of the location (radians ) = ( π/180) x latitude in degrees ω1 = solar time angle at the beginning of period (radians) = ω - π t1/24 = ω - π /24 for hourly step (12) ω2 = solar time angle at the end of period (radians) = ω + π t1/24 = ω + π /24 for hourly step, since t1 = 1 ω = solar time angle at midpoint of the period = ( π/12) [ (time + 0.06667( Lz - Lm ) + S c) -12] (13) time = standard (military) clock time at the midpoint of the period (hours); e.g., t =14.5 hours between 1400 and 1500 hours. Lz = Longitude of the center of the station's time zone (west of the o Greenwich line as 0 ) around the earth in clockwise direction (degrees west of Greenwich) Lm = Longitude of the measurement site (west of the Greenwich line as o 0) 3. 4. Sc = seasonal correction for the solar time (hour) = 0.1645 sin (2b) -0.1255 cos(b) -0.025 sin(b) (14) b = 2π (J-81)/364 where J is day of the year between 1 (January 1) and 365 or 366 (December 31) (15) Calculation of G (soil heat flux). During the day, Rs > 0 for a reference crop, G = 0.1* Rn (16) In the night time, Rs= 0, and G = 0.5* Rn (17) Calculation of γ (psychrometric constant). γ = cP P/ελ (18) where, cP = specific heat capacity at constant pressure = 1.013 x 10⁻³ MJ/kg/°C) ε = ratio of molecular weight of water to molecular weight of dry air = 0.622 λ = latent heat of vaporization of water = 2.45 MJ/kg P = atmospheric pressure (kPa) Substituting values of constants, γ becomes γ = 0.000665 P (19) where the atmospheric pressure is obtained from the following equation: 293 - 0.0065Z P = 101.3 293 5.26 (20) A-7 Appendix A. Evapotranspiration, Vapor Pressure Deficit, and Crop Water Needs where, Z = Elevation in meters. In the above calculation the temperature is assumed to be 20°C; hence, T (Kelvin) = T (°C) + 273 =293. Note that by taking the value of temperature to be 20 °C at all altitudes the temperature dependence of γ has been ignored. At sea level Z= 0; therefore, P = 101.3 kPa. At a higher altitude the pressure P drops below this value, since the air is less dense. As the altitude increases, P decreases and so does γ. Visual Weather computes the atmospheric pressure, P, based on the userentered elevation. Note that the latent heat of vaporization of water, λ is also a function of temperature. However, its variation with temperature is small enough to be neglected. For the FAO 56 PM equation the value of λ is assumed to be constant, λ = 2.45 MJ/kg. 5. Calculation of e°(Thr) (saturation vapor pressure at air temperature Thr). The saturation vapor pressure is related to air temperature, T e°(Thr) = 0.6108 e (17.27T) / (T + 237.3) (21) Note that the right-hand side of this equation forms a part of the numerator in equation (3) above. 6. Calculation of ea (average hourly actual vapor pressure). ea = e°(Thr)*RHhr/100 (22) RHhr is the average hourly relative humidity (%) Finally these individual results are combined to calculate hourly values of ETo by using equation (2). Denominator = ∆ + γ (1 + 0.34 u2 ) First term = 0.408 ∆ (Rn-G) / (∆ + γ (1 + 0.34 u2 )) Second term = γ (37/(Thr + 273)) u2 (e°(Thr)-ea)) / (∆ + γ (1 + 0.34 u2 )) ETo (mm/hour) = First term + Second term The 24 hourly values of ETo calculated using equation (2) are added to derive an ETo (mm/day) value for a day. This process is repeated 7 times for weekly reports and 30 times for a monthly report. A-8 Appendix A. Evapotranspiration, Vapor Pressure Deficit, and Crop Water Needs Additional Notes: 1. Visual Weather accesses hourly average values of temperature (T, °C), relative humidity (RH, fraction), wind speed (u, m/s), and total hourly solar radiation (Rs, W/m2) from the database. 2. Solar radiation values are stored in W/m but these are multiplied by a 2 factor of 0.0036 to convert them into MJ/m /hour, in order to maintain the same units as those used in the FAO 56 publication. 3. Wind speed varies with altitude. Anemometers are either 2 or 3 meters for agronomy, and 10 m above the ground level if the application is in meteorology. However, FAO 56PM equation requires that wind speeds be specified at a standard height of 2 meters. The following equation is applied to determine wind speed at 2 m height, regardless of the anemometer position above the ground level. 2 u2 = u* (4.87) D (23) Where, u2= wind speed at standard 2 meter height D = ln (67.8*Ht -5.42) Ht= Height is the height of anemometer above the ground level (meters) If Ht = 2 meters then u2 = u A.2 Vapor Pressure Deficit of the Air The vapor pressure deficit (kPa) of the air is the difference between the value of saturated vapor pressure (maximum vapor it can accommodate at a given temperature without condensation) and the actual vapor pressure (the amount of vapor it holds at the time). This difference is calculated by calculating the saturated vapor pressure of the air VP deficit = (e°(Thr)-ea)) Where, e°(T) saturated vapor pressure (kPa) of the air at temperature T (Ref. Equation (21) above) ea actual vapor pressure (kPa) of the air (Ref. Equation (22) above) This calculation is performed within the hourly ETo calculation and displayed in ETo reports. A-9 Appendix A. Evapotranspiration, Vapor Pressure Deficit, and Crop Water Needs A.3 Crop Water Needs, Crop Coefficients A crop's life cycle consists of four stages, initial period, development stage, mid-season stage, and the late-season stage. • The initial stage is the length of time (days) between the planting date and the date at which approximately 10% of the ground surface is covered with green vegetation. • The development stage is the number of days between the 10% ground cover to nearly full ground cover. The full ground cover often coincides with flowering. • The mid-season starts at full ground cover and ends when a crop shows signs of maturity, e.g. yellowing of leaves. • The late season lasts between crop's maturity to its harvest. During each stage a crop's water need will vary. This requires adjusting the amount of water supply to the crop. The amount of water (in mm/day or inches per day) needed by a crop is calculated by multiplying the reference crop evaporation (ETo) described earlier by the crop coefficient (Kc) applicable to that crop in a given stage of its growth. ETc = ETo x Kc (24) These topics, along with useful data applicable to several crops can be obtained by accessing the following web site: http://www.fao.org/docrep/X0490E/x0490e00.htm#Contents Information available at this web site should serve only as a guide. It is the responsibility of users to provide the correct value of Kc applicable to their situation. Contacting local agricultural agencies may provide information about crops grown in that region. Table 1. Names, symbols and units of all quantities used in calculations of hourly ETo values. Symbol Unit Mean hourly temperature Ta o Mean hourly RH RH percent Mean hourly wind speed at 2 meter height u2 m/sec Total hourly solar radiation Rs MJ/m2/hour Meteorological Data A-10 C Appendix A. Evapotranspiration, Vapor Pressure Deficit, and Crop Water Needs Data Related to Station's Location Elevation Z meters Weather station's longitude Always west of Greenwich line (with Greenwich line as 0 degrees) (user-entered) Lm degrees minutes seconds Weather station's latitude (user-entered) phi degrees minutes seconds North or south of the Equator (user-entered) N or S No Units Lz degrees Ht meters Day of the year J or DOY integer Begin time hour (military time, hour; e.g., 1400) tBegin hour End time hour (military time, hour; e.g., 1500) tEnd hour Standard (military) time at step's midpoint (e.g.; 14.5) time hour Slope of the vapor pressure curve ∆ kPa/oC Specific heat capacity at constant pressure Cp=0.001103 MJ/kg/oC Ratio of mol weights of water to dry air ε=0.622 no units Latent heat of vaporization of water λ=2.45 MJ/kg Atmospheric pressure P kPa Psychrometric constant γ kPa/oC Saturation vapor pressure at T eo(T) kPa Actual vapor pressure ea kPa Vapor pressure deficit of the air at T eo(T)-ea kPa Solar constant GSc= 0.082 MJ/m2/min Standard meridian (midpoint of the time zone) Anemometer position above the ground level (user-entered) Data Related to Time Calculated Values A-11 Appendix A. Evapotranspiration, Vapor Pressure Deficit, and Crop Water Needs Constant used in seasonal correction b radians sin (b) cos(b) sin(2b) none none none Seasonal correction Sc hour Inverse relative sun-earth distance dr meters Solar declination δ radians Solar time angle at the beginning of period ω1 radians Solar time angle at the ending of period sin(ω1) ω2 radians Solar time angle at midpoint of period sin(ω2) ω radians Length of the step (applies to hourly step only) t1 = 1 hour Extraterrestrial radiation Ra MJ/m2/hour Clear sky radiation RSO MJ/m2/hour Ratio of radiation Rs/RSO no units Ratio of radiation with total cloud cover Rs/RSO= 0.3 no units Ratio of radiation at nighttime in humid, subhumid climates Rs/RSO= 0.4 to 0.6 no units Ratio of radiation at nighttime in arid, semi-arid climates Rs/RSO= 0.7 to 0.8 no units Constant used in calculating Ra as= 0.75 Constant used in calculating Ra, bs*Z = 2 x 10⁻⁵*Z (Z = elevation in meters) Short wave, high energy radiation Rns MJ/m2/hour Stefan-Boltzmann constant SIGMA = 2.043 x 10 -10 MJ/m2/K4/hour SIGMA*(absolute temp)4 MJ/m2/hour Long wave, low energy radiation Rnl MJ/m2/hour Net radiation (short wave-long wave radiation) Rn MJ/m2/hour Soil heat flux (if Rs>0 then 0.1*Rn, else 0.5*Rn) G MJ/m2/hour Net radiation - soil heat flux (Rn-G) MJ/m2/hour A-12 Appendix A. Evapotranspiration, Vapor Pressure Deficit, and Crop Water Needs Denominator (Denom) in the equation for calculating ETo Denom = ∆ + γ (1+0.34 u2) First term in the equation for calculating ETo First term = 0.408 * ∆ * (Rn-G) / Denom Second term in the equation for calculating ETo Second term =(γ * (37/(T+273)) * u2* (eo-ea)) / Denom Hourly ETo value ETo (mm/hour) = first term + second term REFERENCES 1. Crop Evapotranspiration, Guidelines for Computing Crop Water Requirements, FAO Irrigation and Drainage Paper 56, Richard G. Allen, Luis S. Pereira, Dirk Raes, and Martin Smith, Food and Agriculture Organization of the United Nations, Rome, 1998. 2. 'Uber einige meteorologische Begriffe' , Tetens,O. , Z. GeoPhys., 6:297309, 1930. 3. 'On the computation of saturation vapor pressure', Murray, F.W., J. Appl. Meteor., 6:203-204, 1967. A-13 Appendix A. Evapotranspiration, Vapor Pressure Deficit, and Crop Water Needs This is a blank page. A-14 Appendix B. Growing Degree Days (GDD) B.1 Growing Degree Days This section explains the concept of growing degree-days (GDD) and methods used in Visual Weather to calculate its hourly values. Growing degree-days (GDD) is a measure of temperature condition that is favorable to plant growth. A range of temperatures is defined by entering lower and upper temperature limits. Temperatures lying within these limits are assumed to be conducive for growth of a given plant. The lower and upper limits of temperatures favorable to plant growth vary from plant-to-plant and are provided by the user. Generally, temperatures above 50°F (10°C) are considered favorable for plant growth. B.1.1 Method 1. An hourly average temperature value, Ta, is compared to the upper and lower temperature limit. 2. If Ta > upper temperature limit, then Ta is set equal to upper temperature limit, and If Ta < lower temperature limit, then Ta is set equal to lower temperature limit. 3. If upper temperature limit >Ta > lower temperature limit, then GDD = Ta- lower temperature limit is calculated for every hour. 4. The 24 hourly GDD values are summed. The GDD value calculated per day is added to the previous day's GDD value. This process is continued and a cumulative GDD value is reported. When the cumulative GDD value reaches a threshold for a given plant value, as judged by a user, then it is assumed that it has grown to an extent where it must be trimmed. B-1 This is a blank page. Appendix C. Dew Point and Wet Bulb Temperatures C.1 Dew Point Dew point is the temperature at which air saturates, upon cooling, without change in its water content. C.1.1 Method 1. The value of saturation vapor pressure, es (kPa), is calculated using the 1 polynomial in Ta, the air temperature es=(a0 + Ta*(a1+Ta*(a2+Ta*(a3+Ta*(a4+Ta*(a5+a6*Ta))))))*0.1;(1) where Ta is the mean hourly temperature and the polynomial coefficients are: a0=6.107799961; a3=2.650648471E-4; a6=6.136820929E-11; a1=4.436518521E-1; a4=3.031240396E-6; a2=1.428945805E-2; a5=2.034080948E-8; The quantity es is in mbars. Since 1000 mbars = 100 kPA, 1 mbar = 0.1 kPa. Thus, multiplying the polynomial result by 0.1 converts es from mbar into kPa. 2. The vapor pressure, ea (kPa), is calculated from ea = RH * eo/100, where RH is a measured value of relative humidity (%). 3. The dewpoint, Td (Celsius), is calculated using the equation 2 Td = C3 *ln(ea/ C1) / (C2-ln(ea/ C1)) (2) where C1 = 0.61078, C2 = 17.558, and C3 = 241.88 C.2 Wet Bulb Temperature Evaporation requires energy. The required energy is supplied by the surrounding. The surrounding cools due to loss of energy. For this reason, lower temperature can be noticed if a wet cloth is wrapped around mercury bulb and water is allowed to evaporate by blowing air on the cloth. This 'wet bulb temperature' is compared to the 'dry bulb temperature' (mercury bulb without wet cloth) in the same surrounding. The wet bulb temperature (Tw) is always lower than the dry bulb temperature (Ta). Wet bulb temperature is the lowest temperature that can be obtained by evaporating water into surrounding air at constant pressure. C-1 Appendix C. Dew Point and Wet Bulb Temperatures C.2.1 Method 1. Calculate the dewpoint temperature, Td. Express Td in Kelvin. Td (Kelvin) = Td (Celsius) + 273.15 2. (3) Calculate the atmospheric pressure, P (mBars), using equation P = Po* EXP(-Elevation/8500.0) (4) where Po = 1013 mBar = atmospheric pressure at the sea level. 3. Calculate the saturation vapor pressure, es (mBar), at air temperature, Ta (Kelvin) es = EXP(C15-C1*Ta-C2/Ta) (5) where C1 = 0.0091379024, C2 = 6106.396, and C15 = 26.66082. 4. Calculate the vapor pressure, ed (mBar), at dewpoint, Td (Kelvin) ed = EXP(C15-C1*Td-C2/Td) (6) where C1 = 0.0091379024, C2 = 6106.396, and C15 = 26.66082. 5. Estimate the first value of the wet bulb temperature, Tw (Kelvin ) First Guess Tw = (f*P*Ta + Td*S) / (f*P + S) (7) -1 where f = Cp/L*ε = 0.006355 (Kelvin ) , Cp = heat capacity of water at constant pressure = 1004 (J/kg*K) , L = Latent heat of vaporization of 6 water = 2.54 x 10 (J/kg) ε =mass of water vapor/mass of dry air = 0.622, P = atmospheric pressure (mBar) calculated above, Ta= air temperature (Kelvin), Td= dewpoint (Kelvin), and S = (es-ed) /(Ta-Td). 6. Difference between quantities, Diff, as shown below is calculated Diff = f*P*(Ta-Tw) - (ew-ed) (8) where ew = is vapor pressure at Tw, calculated using equation similar to equation (6). 7. If the quantity Diff < 0.0001 then looping calculations are stopped and wet bulb temperature is reported. Otherwise, new Tw is guessed (see equations (9a) and (9b), the loop index is increased and calculation is repeated. 8. To find a next guess value of Tw, find derivative, DiffDer, of the Diff 2 C-2 DiffDer = ew* (C1 - C2/Tw ) - f*P (9a) Next Guess of Tw = Tw - Diff / DiffDer (9b) Appendix C. Dew Point and Wet Bulb Temperatures New value is again tested as before. This calculation are repeated until the condition Diff < 0.0001 is met. Loop can be iterated at least 10 times, if not more. The final value, Tw, is returned. REFERENCES: 1. Calculating dewpoint from RH and air temperature, Technical Note 16, December 22, 20001 Campbell Scientific Limited, England. 2. Iribane, J.V., Godson, W.L., Atmospheric Thermodynamics, 3 rd Edition, pp. 259, D. Reidel, 1981. C-3 Appendix C. Dew Point and Wet Bulb Temperatures This is a blank page. C-4 Appendix D. Wind Chill D.1 Wind Chill Wind chill is a degree of ‘coldness’ experienced by exposed human skin due to increasing wind speeds at a given ambient temperature. Wind chill temperature drops with increasing wind speeds at a constant air temperature or with decreasing air temperatures at a constant wind speed. The wind chill effect is more pronounced when the wind speed increases and air temperature drops. Since the degree of coldness varies from person-to-person, the wind chill may have different meaning to different individuals in the same environment. Wind chill temperatures are meaningful at wind speeds exceeding 3 mph (~1.3 m/sec) and temperatures plummeting below 50°F (10°C). For wind speeds below 3 mph the reported wind chill temperature is equal to the ambient air temperature. D.1.1 Method The wind chill equivalent temperature (°F) can be obtained by using the [1] following equation : 0.16 0.16 Wind Chill (°F) = 35.74 + 0.6215T – 35.75 (V ) + 0.4275T (V ) where, T = Air Temperature in °F and V = Wind Speed in mph. Visual Weather calculates wind chill from the raw data of average values of temperatures and wind speeds. Users need not enter any parameters to calculate the wind chill. D.2 References 1. Bulletin of the American Meteorological Society, pp. 1743-1744, Vol. 74, No. 9, September 1993. 2. National Weather Service Announcement, August 2001, http://205.156.54.206/er/iln/tables.htm. D-1 This is a blank page. Appendix E. Chill Hours E.1 Chill Hours Chill hours represent the number of hours the temperature stayed at or below a certain base (or reference) temperature provided by the user. E.1.1 Method 1. The hourly average temperature value, Ta, is compared to the base temperature. 2. If Ta < = BaseTemp, then the number of chill hours = 1, and If Ta > BaseTemp, then the number of chill hours = 0 3. A value of either 1 (if the hourly average temperature stayed at or below the base temperature) or 0 (if the hourly average temperature stayed above the base temperature) is assigned to each hour of the day. 4. These values are summed at the end of each 24-hour period. The total value represents the number of chill hours; i.e., the number of hours the temperature remained at or below the base temperature. E-1 This is a blank page.