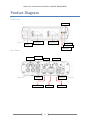
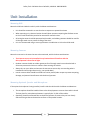
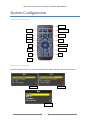
1
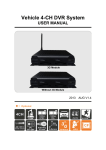
Safety Track 249 Main Street Belleville, MI 48111 888-286-9829
Safety Track UCIT 4 Channel DVR
Installation and Configuration Manual
Version 1.0.2 August, 2013
1
Safety Track 249 Main Street Belleville, MI 48111 888-286-9829
Table of Contents
Product Features………………………………………………………………………………………………………………………………3
Specifications………………………………………………………………………………………………………………………………….. 4
Product Diagram………………………………………………………………………………………………………………………………5
Front Panel…………………………………………………………………………………………………………………………………. 5
Rear Panel……………………………………………………………………………………………………………………………………5
Wiring Diagrams……………………………………………………………………………………………………………………………… 6
12-28v Alarm Input Harness…………………………………………………………………………………………………………6
Audio Input/Output Harness………………………………………………………………………………………………………. 6
4-Pin Video Cable Harness……………………………………………………………………………………………………………7
Power Harness……………………………………………………………………………………………………………………………. 7
Unit Installation…………………………………………………………………………………………………………………………….... 8
DVR Mounting……………………………………………………………………………………………………………………………. 8
Camera Mounting………………………………………………………………………………………………………………………. 8
Speaker/Microphone Mounting…………………………………………………………………………………………………. 8
System Configuration……………………………………………………………………………………………………………………… 9
Remote Diagram………………………………………………………………………………………………………………………….9
Menu Screen Overview………………………………………………………………………………………………………………. 9
Encoding Settings……………………………………………………………………………………………………………………… 10
Video Settings…………………………………………………………………………………………………………………………… 10
Time Settings……………………………………………………………………………………………………………………………. 10
Plate Settings……………………………………………………………………………………………………………………………. 11
CF Card Format…………………………………………………………………………………………………………………………. 11
On Screen Display (OSD) Settings……………………………………………………………………………………………… 11
Power Management…………………………………………………………………………………………………………………. 12
Firmware Version……………………………………………………………………………………………………………………… 12
Firmware Update……………………………………………………………………………………………………………………… 12
DVR Serial Number…………………………………………………………………………………………………………………… 13
3G Network Settings…………………………………………………………………………………………………………………. 13
12-28v Alarm Input Settings……………………………………………………………………………………………………… 14
On Screen Display (OSD)………………………………………………………………………………………………………………...15
Camera Views…………………………………………………………………………………………………………………………… 15
Status Indicators………………………………………………………………………………………………………………………..15
Playback Mode……………………………………………………………………………………………………………………………… 16
Accessing Playback Mode…………………………………………………………………………………………………………. 16
Reviewing Video Files……………………………………………………………………………………………………………….. 16
Support………………………………………………………………………………………………………………............................ 17
2
Safety Track 249 Main Street Belleville, MI 48111 888-286-9829
Product Features
•
•
•
•
•
•
•
•
•
4 Channel mobile DVR system with Live Streaming Video, Audio, and GPS Tracking.
Indoor and Outdoor cameras to give true 360° viewing coverage.
Video output for external monitor/In-Dash stereo connectivity.
Industry leading compression format – allowing video to stream over 3G signals.
Automatic and Scheduled Recordings
Four separate 12v inputs to switch the video view (example backup monitor).
Up to 64GB Compact Flash storage which will hold approximately 72 hours of continuous
recordings.
Video Backup capabilities for archive purposes.
Live GPS tracking with vehicle speed.
3
Safety Track 249 Main Street Belleville, MI 48111 888-286-9829
Specifications
Item
Video Format
Video Input
Audio Input
Video Output
Audio Output
Alarm Input
Alarm Output
Display Mode
Display Resolution
D1
Recording
Resolution
CIF
Recording Frame
Compression Format
Operation System
Triplex
Recording Mode
Schedule Recording
LED Indicator
Event Mode
Playback Mode
Network
GPS
Storage Type
Backup Device
Firmware Update
Multi-Language
G Sensor
Operation
Power Supply
Dimension
Weight
Operation Temperature
Description
NTSC
PAL
4CH Input BNC/ Harness Connector
1CH Input / Harness Connector
1CH Output BNC / Harness Connector
1CH Output RCA / Harness Connector
4 12v Inputs
Buzzer (Optional)
Full Screen, 4 Split
720 x 480
720 x 576
720 x 480
720 x 576
360 x 240
360 x 288
Max. 120 FPS
Max. 100 FPS
H.264 Technology
Embedded Linux Kernel
Record / Playback / Backup
Schedule or Automatic Recording
15/30/60/120 Minutes
Power, Recording(CF1), GPS(CF2)
Alarm Trigger / Video Loss
Normal Speed x1/Fast Forward/Fast Rewind
Search Function: Time / Event
3G Module
GPS
CF Card
PC VIEWER
USB
English / Traditional Chinese / Others (Customizable)
G Sensor
IR Remote Controller (Extending IR Lead)
8v - 28v DC
214mm x 160mm x 58mm (W x D x H)
0.92kg ( including CF card)
-20°C~65°C (inside vehicle)
4
Safety Track 249 Main Street Belleville, MI 48111 888-286-9829
Product Diagram
Front Panel
IR Extension
Compact Flash 1
Compact Flash 2
GPS Indicator
IR Receiver
Recording Indicator
Power Indicator
Rear Panel
Video Out
BNC Video In
USB
Audio Out
GPS Antenna
Aux Power In
12-28v ‘Alarm’ Input
4-pin Video In
5
Power Harness
Safety Track 249 Main Street Belleville, MI 48111 888-286-9829
Wiring Diagrams
12-28v Alarm Input (Alarm functionality outlined on page 14)
1.
2.
3.
4.
5.
Alarm Input 1
Alarm Input 2
Alarm Input 3
Alarm Input 4
Chassis Ground
Audio Input/Output
1.
2.
3.
4.
Chassis/Signal Ground
Audio Output (to speaker or radio)
Chassis/Signal Ground
Audio Input
6
Safety Track 249 Main Street Belleville, MI 48111 888-286-9829
4-Pin Video Cable Harness
1.
2.
3.
4.
Channel 1 (Black)
Channel 2 (Red)
Channel 3 (Yellow)
Channel 4 (White)
Power Harness
1.
2.
3.
4.
5.
6.
Switch Power (ACC)
Signal Ground
Chassis Ground
Constant Power
12v Output
Signal Ground
*Note: When connecting wiring harness, the Chassis Ground should be an isolated connection to a true
Chassis Ground not tapped into an existing ground circuit. The Signal Ground connections can be
combined and added to an existing ground circuit or a new ground circuit.
When extending wires on the power harness, a solder connection is recommended. If solder is not
available, a weatherproof butt style connector should be used.
7
Safety Track 249 Main Street Belleville, MI 48111 888-286-9829
Unit Installation
Mounting DVR
Mount the DVR unit inside the vehicle, with the below considerations:
•
•
•
•
Unit should be mounted in an area that has no exposure to potential moisture
When mounting unit, choose a location that will deter operator tampering but facilitate access
to the CF cards should they need to be removed for manual review.
All wiring harnesses should be protected with conduit, and rubber grommets should be used for
all through-metal runs to prevent chafing of the wires.
Unit is to be mounted using a screw-type fastener. No adhesive or Velcro should be used.
Mounting Cameras
Mount the cameras in the areas that are to be monitored, with the below considerations:
•
•
•
•
The Cameras are not to be installed in any location that will interfere with the
driver/operator’s direct line of sight.
Outdoor cameras should use rubber grommets for all through-metal runs and sealed with a
silicone to prevent wind noise or moisture from entering the vehicle.
Always dry-run your cables and connect the cameras to ensure they are recording what is
intended and at the right direction (e.g. not upside down).
Interior camera cables should be tucked into interior panels/under carpet to prevent tampering,
damage, and potential interference with the driver/operator.
Mounting Optional Speaker and Microphone
If the optional microphone is being installed, install inside the vehicle with the below considerations:
•
•
The microphone should be installed close to the driver/operator to ensure clear audio is heard.
The best place for microphone placement is typically the ‘A’ pillar of the vehicle.
Speaker(s) should be mounted close to the driver/operator to ensure they can hear clearly
without having to distract themselves to focus on the speaker location.
8
Safety Track 249 Main Street Belleville, MI 48111 888-286-9829
System Configuration
Unit Remote Overview
Channel 2
Channel 1
Record Start/Stop
Channel 3
Quad View
Channel 4
Menu
Mute
Direction Right
Enter
Fast Forward
Rewind
Stop
Play
Pause
Menu Screen Overview
The below images are the menu options of the DVR which will be outlined in the following sections.
Page 1
Page 2
Page 3
9
Safety Track 249 Main Street Belleville, MI 48111 888-286-9829
Encoding Settings
The Encoding settings determine the video quality and compression for live streaming. These settings
will be set by Safety Track prior to shipment, and should not be modified at any time. Modifying these
settings can alter the compression of the video which can cause undesired live viewing results, increased
data charges, and decreased storage intervals.
Video Settings
The Video Settings are used to adjust Brightness, Contrast, and Hue (Color). These settings can be
modified to adjust to a particular environment, however, it is recommended to keep the default settings
set by Safety Track.
Time Settings
The Time Settings are to set the DVR time to local time. The DVR uses GMT (Greenwich Mean Time)
adjustments to determine local time. Please use the below table to determine your GMT adjustment to
set your DVR to local time:
Time Zone
EST
CST
MST
PST
GMT Adjustment
GMT -5
GMT -6
GMT -7
GMT -8
*Note: The DVR does not adjust for Daylight Savings Time (DST). This is a feature being worked and will be released soon.
10
Safety Track 249 Main Street Belleville, MI 48111 888-286-9829
Plate Number
The Plate Number setting is not used on the DVR, it is set on the back end by Safety Track. This setting is
to give the DVR a unique identifier (e.g. Truck 38) for easy identification.
Compact Flash Card Format
The Format option should only be used under the direction of Support Professionals from Safety Track.
Executing this option will erase ALL video files currently on the CF card and cannot be recovered once
erased.
OSD (On Screen Display) Settings
The OSD setting is used for DVRs that are connected to an external monitor. This setting tells the DVR
which channel or channels to display on the OSD during normal recording.
11
Safety Track 249 Main Street Belleville, MI 48111 888-286-9829
Power Management
The Power Management setting is used to set the time the DVR will continue to record after the vehicle
has been shut off. By default, Safety Track sets this time to 15 minutes. The maximum time the DVR will
record after the vehicle is shut off is 120 minutes.
Firmware Version
The Firmware Version option shows the current version of the DVR’s firmware. This option will only be
used if a firmware update has been released with separate instructions.
Firmware Update
The Firmware Update option is used to upload the new firmware to the DVR. This option will only be
used if a firmware update has been released with separate instructions.
12
Safety Track 249 Main Street Belleville, MI 48111 888-286-9829
DVR Serial Number
The DVR Serial Number option shows the SN of the device. This number is how the DVR identifies itself
with the streaming servers at Safety Track. This option will only be used during device troubleshooting
with Support Professionals at Safety Track.
3G Network Settings
The 3G Network Settings tell the DVR how to communicate with the streaming servers at Safety Track.
These settings will be programmed prior to shipment and are not to be modified. Modifying these
settings will cause the DVR to no longer stream video and will result in support charges.
13
Safety Track 249 Main Street Belleville, MI 48111 888-286-9829
12-28v ‘Alarm’ Input
The Alarm Input setting is for DVRs that have an external monitor. This option is to tell the OSD to train
to one camera when a voltage input is received. This option can be used for backup cameras, blind spot
cameras when turn signals are used, to watch a tow truck hook a vehicle when the PTO is engaged, etc.
Example – Backup Camera: The Channel 2 camera is affixed to the license plate. The Alarm 1 wire on the
Alarm Input harness is tapped into the reverse light and the channel on the Alarm Setting is set to Ch2.
When the vehicle is placed in reverse, the OSD will automatically train to Channel 2’s camera and display
it full screen. Once the vehicle is taken out of reverse, the OSD will revert to its default setting (quad
display, channel 1, etc.)
Alarm Input OSD
Display
Default OSD
Display
14
Safety Track 249 Main Street Belleville, MI 48111 888-286-9829
On Screen Display (OSD)
Camera Views
By default, the OSD will display the default setting that was defined in the OSD Settings in the DVR
menu. To change the OSD to fix on a particular camera, press the corresponding channel key on the DVR
remote or press the quad key to view all four cameras simultaneously.
Status Indicators
The OSD will display three status indicators in the top right corner of the screen. The descriptions of the
indicators are below:
•
•
•
Red Dot: This indicates the DVR is recording.
Blue Box with G in the center: This indicates the DVR has a GPS fix.
Blue Box with N in the center: This indicates the DVR is connected to the 3G network and is
communicating with the streaming servers at Safety Track.
15
Safety Track 249 Main Street Belleville, MI 48111 888-286-9829
Playback Mode
For DVRs with an external monitor, the video files stored on the CF card can be viewed directly from the
device.
Accessing Playback Mode
To access the playback mode of the DVR, press the play button on the DVR remote.
Reviewing Video Files
Select the video file to review from the playback menu using the date and time closest to the timeframe
you wish to view. During playback, the remote can be used to perform several functions which are
outlined below:
•
•
•
•
•
•
Channel 1-4 buttons: Displays the respective channel on the OSD in full screen.
Quad Channel button: Returns the OSD to quad display.
Pause: Pauses current playback video.
Fast Forward: Advances video file.
Rewind: Returns video to original starting point.
Stop: Exits playback screen.
16
Safety Track 249 Main Street Belleville, MI 48111 888-286-9829
Support
Safety Track would like to thank you again for your purchase of our UCIT Mobile DVR. We are confident
our device will provide you streaming video for years to come with the proper care.
Should you have any technical issues or questions, please feel free to reach out to us in the following
ways:
Website
Visit www.safetytrack.net/support for support topics, FAQs and other support related items.
Email
Send an email to [email protected] and one of our Support Professionals will respond to your
inquiry by the next business day. When sending an email, please be sure to be detailed with your
question/issue and provide your contact information and the best time to reach out to you.
Sending an email to our support address will automatically generate a ticket on our end and a reference
number will be assigned. You will receive a follow up email shortly after with that reference number.
Phone
Call us at 888-286-9829 to speak with one of our Support Professionals.
17