1
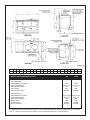
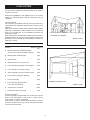
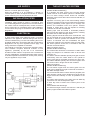
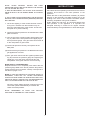
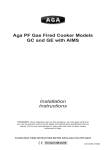
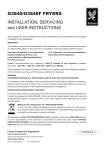
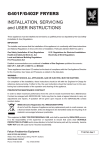
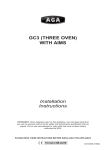
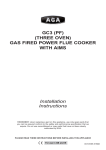
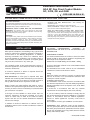
Installation Instructions for
AGA BF Gas Fired Cooker Models
GC, GCB, GE and GEB
Gas Fired Cookers
FOR USE IN GB & IE
PLEASE READ THESE INSTRUCTIONS BEFORE INSTALLING YOUR AGA
Consumer Protection
Firebricks, Fuel beds, Artificial Fuels - when handling use
disposable gloves.
As responsible manufacturers we take care to make sure that our
products are designed and constructed to meet the required safety
standards when properly installed and used.
Fire Cement - when handling use disposable gloves.
Glues and Sealants - exercise caution - if these are still in liquid
form use face mask and disposable gloves.
IMPORTANT NOTICE: PLEASE READ THE ACCOMPANYING
WARRANTY. Any alteration that is not approved by AGA could
invalidate the approval of the appliance, operation of the warranty
and could affect your statutory rights.
Glass Yarn, Mineral Wool, Insulation Pads, Ceramic Fibre,
Kerosene Oil - may be harmful if inhaled, may be irritating to skin,
eyes, nose and throat. When handling avoid inhaling and contact
with skin or eyes. Use disposable gloves, face-masks and eye
protection. After handling wash hands and other exposed parts.
When disposing of the product, reduce dust with water spray, ensure
that parts are securely wrapped.
Important
This appliance may contain some of the materials that are indicated.
It is the Users/Installers responsibility to ensure that the necessary
personal protective clothing is worn when handling, where
applicable, the pertinent parts that contain any of the listed materials
that could be interpreted as being injurious to health and safety, see
below for information.
NOTE: AGA GAS FIRED COOKERS ARE DELIVERED
EX-WORKS
UNASSEMBLED.
ASSEMBLY
IS
UNDERTAKEN ON SITE BY THE AUTHORISED AGA
DISTRIBUTOR.
INSTALLATION
With specific exceptions, the installing of any type of AGA
Cooker is subject to the respective directions contained in
current issue of The Building Regulations. In addition,
Planning Permission may need to be obtained, which
should be applied for separately. The complete range of
AGA cookers are suitable for Natural or Propane gases
only and cannot be used on any other gas.
Cooker Base or Hearth
It is essential that the base or hearth on which the cooker
stands should be level and be capable of supporting the
total weight of the respective cooker.
Models GC and GCB 406Kg, GE and GEB - 584Kg.
The complete cooker is floor-mounted and the space in
which the appliance is to be fitted must have the following
minimum dimensions:-
The top of the hearth must be of non-combustible material
thickness of 12mm.
The wall behind the cooker must be of non-combustible
material for a minimum thickness of 25mm.
A minimum clearance of 60mm is required above the
raised insulating cover handle.
Tiling
When the cooker is to stand in a recess, or against a wall
which is to be tiled, in no circumstances should the tiles
overlap the cooker top plate.
Installation Requirements
The installation of the cooker must be in accordance with
the relevant requirements of the Gas Safety Regulations,
Building Regulations and the bylaws of the local Water
Undertaking.
It should be in accordance also with any relevant
requirements of the Gas Region and Local Authority.
Side Clearances: A 3mm gap is required each side
between the cooker top plate and adjoining work surfaces
that maybe fitted, this is to allow for the safe removal of
the top plate should this be required at a later date.
Where cookers are fitted against side walls a 116mm
clearance is required at the right hand side for oven doors
access. (A further 116mm is necessary if a left hand side
gas connection is required.
If the Aga is to be installed in a brick recess, then the
minimum clearances should be increased by at least
10mm on either side, to allow for the walls not being
square and also for the natural dimensional variations
found in the castings.
In you own interest, and that of safety to comply with the
law, all gas appliances should be installed by a competent
person, in accordance with the relative regulations.
Failure to install appliances correctly could lead to
prosecution.
On completion, test the gas installation for soundness.
In addition a minimum clearance of 1000mm must be
available at the front of the cooker to enable the cooker to
be serviced.
REMEMBER, when replacing a part on this appliance,
use only spare parts that you can be assured conform to
the safety and performance specification that we require.
Do not use reconditioned or copy parts that have not been
clearly authorised by AGA.
1
09/10 EINS 511056
V = VENT PIPE
S = FLUE PIPE
A
B
C
D
E
F
G
H
J
K
mm 987 889 851 679 41 1330 756 1125 39
3
Models GC and GCB Balanced flue
NATURAL G20
MAXIMUM HEAT INPUT
Thermostat Bypass
Main Burner Injector
Pilot Injector
Inlet Pressure G20
PROPANE G31
MAXIMUM HEAT INPUT
Thermostat Bypass
Main Burner Injector
Pilot Injector
Inlet Pressure
Burner Pressure
L
M
N
P
Q
R
S
T
U
V
698 499 127 41 530 116 770 484 328 828
GC
GCB
5kW
100 or 120
285
N35
20mbar
5kW
120 or 140
285
N35
20mbar
5kW (357g/h) 5kW (357g/h)
60 or 80
80 or 100
180
180
L23
L23
37mbar
37mbar
28mbar
28mbar
For Natural Gas the gas valve outlet pressure is non-adjustable, BUT for reference purposes only. A pressure
drop of 1-2mbar can be observed between inlet and outlet pressures on a cold appliance.
2
V = VENT PIPE
S = FLUE PIPE
A
B
C
D
E
F
G
H
J
K
mm 1487 889 851 679 41 1330 756 1125 39
3
Models GE and GEB Balanced flue
NATURAL G20
MAXIMUM HEAT INPUT
Thermostat Bypass
Main Burner Injector
Pilot Injector
Inlet Pressure G20
PROPANE G31
MAXIMUM HEAT INPUT
Thermostat Bypass
Main Burner Injector
Pilot Injector
Inlet Pressure
Burner Pressure
L
M
N
P
698 632 591 51
Q
R
S
T
U
V
67 116 770 484 328 828
GE
GEB
5kW
100 or 120
285
N35
20mbar
5.8kW
120 or 140
330
N35
20mbar
5kW (357g/h) 5.8kW (414g/h)
60 or 80
80 or 100
180
200
L23
L23
37mbar
37mbar
28mbar
32mbar
For Natural Gas the gas valve outlet pressure is non-adjustable, BUT for reference purposes only. A pressure
drop of 1-2mbar can be observed between inlet and outlet pressures on a cold appliance.
3
FLUE SYSTEM
The terminal is suitable for wall thicknesses from 228mm
to 600mm cut size
Should the installation of the appliance be in an unusual
location or restricted space, special procedures may be
necessary.
Terminal Position
The minimum acceptable spacings from the terminal to
obstructions and ventilation openings are as shown in the
diagram.
Where the terminal is fitted within 600mm below plastic
guttering an aluminium shield 1500mm long should be
fitted to the underside and immediately beneath the
guttering or eaves.
Where the terminal is fitted within 450mm below eaves or
painted guttering an aluminium shield 750mm long should
be fitted to the underside and immediately beneath the
guttering or eaves.
AROUND THE HOUSE
DESN 511052
Minimum siting dimensions for Balanced Flue terminals
Position
A
Minimum Spacing
mm
Directly below an openable window,
air vent, or an other ventilation opening
300
B
Below gutter, drain/soil pipe
300
C
Below eaves
300
D
Below a balcony or car port roof
600
E
From vertical drain pipes and soil pipes
300
F
From internal or external corners
600
G
Above adjacent ground or balcony level
300
H
From surface facing the terminal
600
I
Facing terminals
600
J
From opening (door/window)
in car port into dwelling
1200
K
Vertical from a terminal
1500
L
Horizontally from a terminal
UNDER CAR PORT, ETC.
DESN 511053
300
Terminal Protection
A terminal guard is supplied with the cooker and must be
fitted if flue termination is less than 2 metres above
ground level, or subject to damage.
When fitted, it must be positioned to provide a minimum
of 50mm clearance from any part of the terminal and be
central over the terminal.
4
AIR SUPPLY
THE HOT WATER SYSTEM
Kitchen or Internal Space Air Supply
Where the appliance is to be installed in a kitchen or
internal space, it does not require the kitchen or internal
space containing it to have a permanent air vent.
(Models GCB and GEB Only)
In a domestic hot water system, the hot water storage
vessel must be of the indirect cylinder of calorifier type.
The hot water storage vessel should be insulated,
preferably, with not less than 75mm thick mineral fibre, or
its equivalent.
Pipework not forming part of the useful heating surface
should be insulated to help prevent heat loss and possible
freezing, particularly where pipes are run through roof
spaces and ventilated under floor spaces. Cisterns
situated in areas which may be exposed to freezing
conditions should also be insulated.
Draining taps must be located in accessible positions
which permit the draining of the whole system, including
the boiler and hot water storage vessel.
Draining taps should be at least 15mm nominal size. The
use of horizontal pipe runs should be avoided wherever
possible in order to prevent the collection of air in the
system. If horizontal runs are unavoidable, the pipes
should rise upwards in the direction away from the boiler.
Hot water systems should be in accordance with the
relevant recommendations.
Water Circulation System
(Models GCB and GEB only)
The cooker boiler should be connected to a cistern water
supply and subject to a maximum head of 18.25m and
minimum 1m.
The 28mm minimum diameter primary flow pipe must rise
continuously from the cooker boiler to the cylinder to
ensure good gravity circulation and have an open vent.
The 28mm diameter primary flow and return pipes must
not exceed 5.5m in length and be well insulated.
Water Connections
(Models GCB and GEB only)
The two 28mm copper flow and return pipes from the
boiler can be obtained for right or left hand connections.
Hot Water Storage Vessel
It is recommended that an indirect 190 litre (40 gallon) hot
water storage cylinder of the double feed type should be
lagged and fixed vertically as near as possible to the
cooker.
The water draw-off pipes to the taps must be dead leg
connection from the vent/expansion pipe.
A drain tap must be fitted at the lowest point of the
system.
Cooker Boiler Heat Exchanger
The heat exchanger must be connected to a 190 litre (40
gallon) copper double feed indirect cylinder.
INSTALLATION PIPES
Installation pipes should be fitted in accordance with
current Gas Regulations. Pipework from the meter/tank to
the cooker must be of adequate size, cooker connection
size of 15mm Dia. On completion test the gas installation
for soundness and purge in accordance with current Gas
Regulations.
ELECTRICAL
A 3Amp 230V~50Hz fused electrical supply is required
adjacent to the appliance. External wiring to the fan unit
must be installed using a 3 core heat resisting 85°C PVC
sheathed cable and in accordance with the current Wiring
Regulations and any local regulations which apply. The
wiring should be completed as indicated:
The method of connection to the mains electricity supply
must facilitate complete electrical isolation of the
appliance, preferably by the use of an unswitched
shuttered socket outlet in conjunction with a fused three
pin plug. Alternatively, a fused double pole switch, having
a contact separation of at least 3mm in both poles, serving
only the appliance may be used.
5
6
DESN 510252 ‘A’
5
OFF
ON
COMMISSIONING
LIGHTING THE BURNER - Fig. 2
CAUTION: NO SMOKING OR NAKED LIGHTS
Open the outer burner door to expose the gas control
combination valve.
OFF
CAUTION: BEFORE LIGHTING: ENSURE THAT THE
GAS VALVE CONTROL KNOB 2 IS SET IN THE OFF
POSITION (SEE FIG. A) AND COMBUSTION
DISCHARGE
SAFETY
DEVICE
BUTTON
IS
DEPRESSED.
FIG A
1. Turn off union gas cock 1. Test the gas installation
from the meter cock for soundness and purge.
IGNITION
2. Turn on gas supply to cooker and open gas cock 1.
3. Turn the gas valve control knob 2 anti-clockwise to
the position (see Fig. B.). Press down and hold the
knob in the position while depressing the piezo ignitor
3 several times until the pilot has lit. This can be
observed through the viewing window 4.
FIG B
WHITE BLOCK
LOW FIRE
4. When the pilot has lit continue to hold the gas valve
control knob for approximately 30 seconds. If it goes
out, wait 3 minutes and repeat the procedure holding
for a little longer.
5. With the pilot flame established, release the gas valve
control knob 2 gradually and rotate anti-clockwise to
its low fire position. Where upon the main burner will
automatically light. Leave in the low fire position for at
least 30 minutes.
FIG C
GREEN BAND
NORMAL RUNNING
NOTE: ANY ATTEMPT TO ROTATE THE CONTROL
KNOB BEFORE RELEASE MAY RESULT IN
DAMAGE.
6. After 30 minutes rotate the control knob further anticlockwise to the mid-position of the green band for
normal running (see Fig. D).
FIG D
6
NOTE: AFTER SEVERAL HOURS THE HEAT
INDICATOR SHOULD BE ON OR ABOUT THE CENTRE
OF THE SILVER SECTION.
IT MAY BE NECESSARY TO ADJUST THE CONTROL
KNOB SLIGHTLY IN THE GREEN BAND TO ACHIEVE
THIS.
INSTRUCTIONS
Hand these and the Operating Instructions to the User for
retention and instruct in the safe operation of the
appliance.
Advise the User of the precautions necessary to prevent
damage to the Domestic Hot Water System and to be
building in the event of the Domestic Hot Water System
remaining inoperative during frost conditions.
Finally advise the User that, for continued efficient and
safe operation of the appliance it is important the
adequate servicing is carried out at regular intervals
recommended by the Aga Distributor or local Gas Region.
IF THE FLAME HAS EXTINGUISHED FOR WHATEVER
REASON, WAIT THREE MINUTES (MINIMUM) BEFORE
RE-LIGHTING.
7. On the first lighting or if the cooker has been cold for
a long time. moisture from the insulation may run
down the enamelled front of the cooker. This should
be wiped off to prevent staining.
8. Check the inlet gas pressure is as indicated in the data
plate as follows:
(i) Turn the gas valve control knob 2 to OFF position (see
Fig. A). Remove the inlet pressure test nipple plug 5
and fit pressure gauge. Turn gas valve control knob 2
to the mid position of green band.
(ii) Check inlet pressure correctly corresponds to the
data plate.
(iii)Check that the gas pressure is unaffected when other
gas appliances are used.
(iv)Turn gas valve control knob 2 to ignition position (see
Fig. B). Remove the pressure gauge and replace gas
nipple plug. Turn gas valve control knob 2 to the
mid-position of the green band for normal running.
NOTE FOR L.P. COOKERS ONLY
Repeat instruction 8 on completely cold cooker with the
pressure gauge fitted to the burner pressure test point 6.
Check that the burner pressure correctly corresponds to
the table on pages 2 or 3.
NOTE: IF FOR ANY REASON A GAS RATE CHECK IS
REQUIRED, TURN OFF ALL OTHER APPLIANCES
USING GAS AND USING THE GAS METER TEST DIAL
AND STOP WATCH, CHECK THAT THE MAXIMUM GAS
INPUT IS AS INDICATED ON THE DATA PLATE.
Once the correct setting has been confirmed, the heat
control will operate automatically to maintain the
cooker at full temperature.
NOTE: REMEMBER TO NOTE THE SETTING
POSITION IF TURNING OFF THE COOKER.
7
With AGA's policy of continuous product improvement, the
Company reserves the right to change specifications and make
modifications to the appliance described and illustrated at any time.
AGA
Station Road
Ketley Telford
Shropshire TF1 5AQ
For further advice or information contact your
local AGA Specialist
www.aga-web.co.uk
www.agalinks.com
www.agacookshop.co.uk
England
8