1
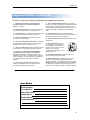
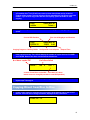
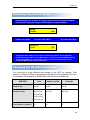
CONDRE CD/DVD TRACER PRO WITH HARD DRIVE O PERATOR’S MANUAL www.condre.com Condre, Inc. CONDRE, INC. Phone: Toll Free: 1-866-500-3472 Direct: (952) 294-4900 Technical Support: (952) 253-6843 FAX: (952) 937-8365 Email: [email protected] Headquarters Location: 15151 Technology Drive Eden Prairie, MN 55344 Document History: Edition 2.1 Rev.1 © Copyright 2004-2005, All rights reserved. Notices: The information in this document is subject to change without notice. NO WARRANTY OF ANY KIND IS MADE WITH REGARD TO THIS MATERIAL, INCLUDING, BUT NOT LIMITED TO, THE IMPLIED WARRANTIES OF MERCHANTABILITY AND FITNESS FOR A PARTICULAR PURPOSE. No liability is assumed for errors contained herein or for incidental or consequential damages in connection with the furnishing, performance, or use of this material. This document contains proprietary information which is protected by copyright. All rights are reserved. No part of this document may be photocopied, reproduced, or translated into another language without prior written consent. CAUTION! TO PREVENT RISK OF FIRE OR ELECTRIC SHOCK HAZARD, ENSURE THAT THE UNIT IS NOT EXPOSED TO RAIN, MOISTURE, SPLASHING AND THAT NO OBJECTS FILLED WITH LIQUIDS, SUCH AS VASES ARE PLACED ON THE UNIT. TO REDUCE THE RISK OF ELECTRIC SHOCK, DO NOT REMOVE EXTERIOR PANELS. NO USER SERVICABLE PARTS ARE INSIDE. DOING SO WILL VOID YOUR WARRANTY. REFER SERVICING TO QUALIFIED SERVICE PERSONNEL. OPERATE THE UNIT WITH ONLY THE PROPER ELECTRICAL SPECIFICATIONS AS LABELED IN THE TECHNICAL SPECIFICATIONS OR ON THE POWER SUPPLY. WARNING! DO NOT INSTALL THIS UNIT IN A CLOSET, CABINET OR IN ANOTHER CONFINED SPACE. ENSURE THAT THE UNIT IS WELL VENTILATED. TO PREVENT RISK OF ELECTRIC SHOCK OR FIRE HAZARD DUE TO OVERHEATING, ENSURE THAT CURTAINS AND ANY OTHER MATERIALS DO NOT OBSTRUCT THE VENTILATION OPENINGS. This document is © Copyright Condre, Inc. Any reproduction without express permission from Condre, Inc. is strictly prohibited. Stylus Standalone products are trademarks of Condre, Inc. All other trademarks are the property of their respective companies. All rights reserved. 2 Condre, Inc. Table of Contents Manufacturer Information …………………………….. 2 Important Safety Instructions ……………………….. 4 User Memo ………………………………………………. 4 Getting Started …………………………………………. 5 Thank You ………………………………………. 5 Unpacking and Inspection …………………….. 5 Choosing a Location …………………………… 5 Introduction ……………………………………………… 6 Copying with Internal Hard Drive............................... 7 Copying Direct From Disc to Disc.............................. 8 Switching Duplication Modes…………………………. 10 Changing the Hard Drive Partition ………………….. 10 Making a Composite CD with Hard Drive……………. 12 Making a Composite CD without Hard Drive………... 15 USB 2.0 Option ………………………………………….. 17 Menu Items ………………………………………………. 18 Main Menu ……………………………………… 18 Sub Menu ………………………………………. 19 Setup Options ………………………………….. 20 Troubleshooting ……………………………………….. 25 Limited Warranty ………………………………………. 27 3 Condre, Inc. Important Safety instructions Please be aware of the following installation and operation precautions. 1. Read these instructions - All the safety and operating instructions should be read before the appliance is operated. 2. Keep these instructions - The safety and operating instructions should be retained for future reference. 3. Heed all warnings - All warnings on the appliance and in the operating instructions should be adhered to. 4. Follow all instructions - All operating and use instructions should be followed. 5. Do not use this apparatus near water - for example, near a bathtub, washbowl, kitchen sink, laundry tub, in a wet basement or near a swimming pool, etc. 6. Clean only with a damp cloth. The appliance should be cleaned only as recommended by the manufacturer. 7. Install in accordance with the manufacturers instructions. Do not block any of the ventilation openings. For example, the appliance should not be situated on a bed, sofa, rug, or similar surface or placed in a built-in installation, such as a bookcase or cabinet that may impede the flow of air through the ventilation openings. 8. Do not install near any heat sources such as radiators, heat registers, stoves, or other apparatus (including computers) that produce heat. 9. Do not defeat the safety purpose of the groundingtype plug. A grounding type plug has two blades and a third grounding prong. The third prong are provided for your safety. When the provided plug does not fit into your outlet, consult an electrician for replacement of the obsolete outlet. 10. Protect the power cord from being walked on or pinched particularly at plugs, convenience receptacles, and the point where they exit from the apparatus. 11. Only use attachments/accessories specified by the manufacturer. 12. Use only with a cart, stand, tripod, bracket, or table specified by the manufacturer, or sold with the apparatus. When a cart is used, use caution when moving the cart/apparatus combination to avoid injury from tip-over. 13. Unplug this apparatus during lightning storms or when unused for long periods of time. 14. Refer all servicing to qualified service personnel. Servicing is required when the apparatus has been damaged in any way, such as power-supply cord or plug is damaged, liquid has been spilled or objects have fallen into the apparatus, the apparatus has been exposed to rain or moisture, does not operate normally, or has been dropped. User Memo Model Number: Serial Number: Date of Purchase: Vendor Name: Vendor Phone: Vendor Address: 4 Condre, Inc. Getting Started Thank you... ...for choosing a Condre Standalone Tower Duplicating System from Condre, Inc. Condre Duplicators are second to none in speed and capacity and are backed by an intuitive interface design. We hope it will be a valuable addition to your business for years to come. Unpacking and Inspection When unpacking your unit, inspect the carton and packaging material for damage. Damages that may have occurred during shipping could cause alignment and operation errors in your unit. Any damages found upon receiving your unit should be reported to the dealer you purchased it from immediately. Important!: Keep your packaging! In the event you need to ship the unit back to the manufacturer, the product must be shipped in the manner in which it was received. Other containers are not satisfactory and will void your warranty! If the container is lost or destroyed, another may be purchased from the manufacturer at a cost of $100 plus shipping. Contact your vendor for details. Choosing a Location Placing your unit in an unsuitable location can cause a number of problems. Many problems can be avoided by following these guidelines. • The unit must be placed on a flat, level surface. A tilt to the unit’s base can cause errors in calibration during use. The surface must also be relatively stable and resistant to bumps and jarring. • The surface the unit is placed on must be able to hold 100+ pounds and be resistant to bowing under such weight. • Place the unit in a location with adequate air circulation. Closets or cabinets are not suitable as heat build-up can cause the unit to malfunction. Likewise, do not place the unit on or near any heat sources such as heating vents or server racks. • The unit must not be placed in an area with direct sunlight, excessive dust, mechanical vibration or shock. 5 Condre, Inc. Introduction T he Tracer Pro Standalone Duplicator is a stand-alone duplicator that requires no computer connection to operate. Low cost, high performance, the Condre Tracer Pro Standalone series will fulfill your duplication requirements. Especially designed for office applications, the Condre Tracer Pro Standalone Duplicator is based upon a controller with a large LCD display and simple twobutton navigation, which make steps easy to follow during the duplication process. Should you encounter any difficulty, please refer to the "Troubleshooting" section (Page 23) or contact Condre Technical Support. We strongly suggest you locate your Condre Tracer Pro in a dust free environment. Dirty discs may cause duplication rejects or even total failure. Do not place unnecessary items on the unit. Important!: Make sure the voltage setting on the power supply is set correctly for the region in which you are located. Typically, the setting is 115V in the United States. Your unit should arrive pre-set to 115V. For recordable media selection, we recommend you choose high-speed rated and certified brand name discs (i.e. CMC, Taiyo Yuden, Fuji, Pioneer, Imation, etc.) and make sure to reserve some discs for possible troubleshooting issues in the future. Under no circumstance does Condre, Inc. encourage users to duplicate copyrighted or copy-protected materials. 6 Condre, Inc. Copying with Internal Hard Drive 1. Power on the system by pressing the round button at the bottom right of the front of the unit. This unit will run trough a self-test, displayed on the LCD screen. Power On ..15 2. Once the self-test procedure is completed, the COPY Mode will display on the LCD screen. Ensure that the duplicator is in the Hard Drive mode. Consult the manual for further detail on how to change to HDD to Disc Mode. Copy <mode 3. To load a CD/DVD into a Hard Drive Partition, press the MODE button a few times until the LCD screen reads Load. Load <mode 4. Insert the source disc into the top drive. The duplicator will scan the disc and begin to load it onto the hard drive partition for duplication later. The LCD screen will display numbers counting up as it loads. Current HDD Partition Disc size in Megabyte and Duration Drive mode. Consult Load L0620+00 Loading Progress Load Speed AA691M78:41 0X32 0: 16 Elapsed Time 5. Once the load is completed, the LCD will flash between Load and Pass. It will also eject the master CD/DVD. Remove the CD/DVD disc from the drive. Pass L0691+00 AA691M78:41 0X44 2: 33 6. To begin the duplication process, press the MODE button a few times until you get back to the Copy Mode. The HDD partition AA is now ready to be copied. Copy <mode AA691M78:41 7 Condre, Inc. 7. Open the drive trays and load a blank CD/DVD in each drive. Close each drive after you load the disc. The LCD will now count up from 1start, 2start and up to the full capacity of the system. The unit will start copying automatically if all drives have been loaded. If you wish to copy fewer than the full capacity, press GO button to start copying. Copy <mode AA691M78:41 7start > 8. The duplication process will start and the LCD will display the copying progress and speed. Current HDD Partition Drive mode. Consult Disc size in Megabyte and Duration Copy C0005+32 Copying Progress + Memory Buffer AA691M78:41 32X32 0:40 Set Speed X Current Speed Elapsed Time 9. Once the duplication process is completed, the system will eject the discs that have been copied correctly. The LCD will display the number of copies that have PASSED and FAILED. Remove the discs and discard the failed discs. # of discs copied OK PASS 7 # of discs failed NG 0 TOK 7 counter of total discs copied OK – reset back to 0 when master source is changed (new disc or new HDD partition) 10. For more copies of the same CD/DVD, repeat steps 7 through 9. For new CD/DVD, repeat steps 3 through 9. Copying Direct from Disc to Disc 1. Power on the system by pressing the round button at the bottom right of the front of the unit. This unit will run trough a self-test, displayed on the LCD screen. Power On ..15 8 Condre, Inc. 2. Once the self-test procedure is completed, the COPY Mode will display on the LCD screen. Ensure that the duplicator is in the Disc to Disc mode. Consult the manual for further detail on how to change to Disc to Disc Mode Copy <mode 3. Insert the master disc into the top drive. The duplicator will scan and begin to analyze the disc. The LCD screen will display the information about the disc. Copy <mode 691M78:41 4. Open the remaining drive trays and load a blank CD/DVD in each drive. Close each drive after you load the disc. The LCD will now count up from 1start, 2start and up to the full capacity of the system. The unit will start copying automatically if all drives have been loaded. If you wish to copy fewer than the full capacity, press GO button to start copying. Copy <mode 691M78:41 7start > 5. The duplication process will start and the LCD will display the copying progress and speed. Disc size in Megabyte and Duration Drive mode. Consult Copy C0005+32 Copying Progress+Memory Buffer 691M78:41 32X32 0:40 Set Speed X Current Speed Elapsed Time 6. Once the duplication process is completed, the system will eject the discs that have been copied correctly. The LCD will display the number of copies that have PASSED and FAILED. Remove the discs and discard the failed discs. # of discs copied OK # of discs failed PASS 7 NG 0 TOK 7 counter of total discs copied OK – reset back to 0 when master source is changed (new disc or new HDD partition) 7. For more copies of the same CD/DVD, repeat steps 4 through 6. For new CD/DVD, repeat steps 3 through 6. 9 Condre, Inc. Switching Duplication Modes 1. To switch the system between Disc-to-Disc and HDD-to-Disc modes, press and hold the MODE button for 5 seconds. A chirping sound will be heard. Release the MODE button and the display will change to indicate that it is in the Setup Mode. Setup <mode Go> 2. Press the GO button and the LCD will display CD to CD. Press MODE button to toggle between Yes and No. Yes: Disc to Disc Mode No: HDD to Disc Mode CD to CD [*] No [Q] 3. Press GO button and the system will take you back to the Copy Mode again. If no changes has been made, you will enter the next Setup options. Press GO button several times to get back to Setup Mode again. Then press and hold MODE button to exit the Setup Mode. For more details on how to browse around the menu items, consult the Menu Items section in the menu. Changing the Hard Drive Partition You may able to store different disc images to the HDD for copying. Total number of Partitions differs on the capacity of the hard drive installed in your unit. For example, if the capacity is 80GB, then HDD Partitions available are: CD-R 80G HDD DVD+R or DVD-R DVD+R DL Partition Size 850 MB 4.8 GB 9.6 GB Partition Groups AA to AZ (26) AA to AP AA to AH 16 8 BA to BZ (26) CZ to CZ (26) DA to DN (14) Total number of partitions 92 10 Condre, Inc. 1. Make sure the system is under HDD-To-Disc Mode. From the main menu, press and hold the MODE button for 5 seconds. A chirping sound will be heard. Release the MODE button and the display will change to indicate that it is in the Setup Mode. Setup <mode Go> 2. Press the GO button to enter the Setup menu. Press the GO button several times to until the LCD displays the HDD Partition Group. HDD Partition Group [*] A [Q] 3. Each disc image is stored in partitions represented by 2 letters of the English alphabet. For example, the first letter “A” is the currently selected partition group. Press the MODE button to change the partition group. Press GO button to choose the Partition Group. HDD Partition of A [*] A [Q] 4. Press Mode button to change partition and press GO button to choose the Partition. The partition selected above is AA (Group A, Partition A) which the system will copy from and load to. 5. Press GO button and the system will take you back to the Copy Mode again. If no changes has been made, you will enter the next Setup options. Press GO button several times to get back to Setup Mode again. Then press and hold MODE button to exit the Setup Mode. For more details on how to browse around the menu items, consult the Menu Items section in the menu. 11 Condre, Inc. Making a Composite CD with Hard Drive This procedure explains how to: identify and copy selected tracks from multiple CDs into a partition on the hard drive, and copy the loaded tracks from the hard drive to a CD. Before you begin, make sure you are in the HDD-to-Disc mode and your HDD partition is empty. 1. Turn on the system. Note the mode of operation in the LCD display area (copy, load, emulate, etc.). Your LCD display should look something like this: Copy <mode 2. Press and hold the Mode button until you hear the system “chirp.” Then release the Mode button. You should see setup displayed in the LCD panel: Setup <mode Go> 8. Press the Mode button once to enter the Edit mode. Edit <mode 9. Place the master CD that contains the first track(s) you wish to copy to the hard drive in the first CD drawer. Close the CD drawer. Note that the system automatically starts analyzing the contents of the master CD and displays the prompt, begin track: Begin Track [+] 0 [Q] 12 Condre, Inc. 10. Press the Mode button until the number of the first track you wish to load appears. For example, if you want to load track number 9 as the first track in your compilation of tracks, press the Mode button nine times to display the number 9. For example: Begin Track [+] 9 [Q] 11. Press the Go button to indicate that you want the copy process to start at the beginning of track number 9. 12. When end track is displayed in the LCD panel, press the Go button again to indicate that you want to copy just the one track: End Track [+] 9 [Q] In this example, we have just identified track 9 as the first track to be copied to the selected partition of the hard disk. The LCD will redisplay track 0, and it will indicate the number of minutes that the first track occupies in the partition. The identified track (track 9) occupies four minutes, thirteen seconds of the partition on the hard drive: Begin Track [+] 0 04:13 [Q] 13. To copy the identified track from the first master CD to the partition on the hard drive, press the Go button again. The system will copy the track and the display panel will indicate the number of minutes loaded into the partition, as shown in the example below: Edit L0038 AA 38M04:13 When the system has finished loading the selected track you will hear a three-tone beep, the master CD will be ejected automatically, and the LCD panel will display “pass.” 14. Place another master CD into the first CD drive. Wait until the system analyzes it and displays the first of the edit prompts: 13 Condre, Inc. Begin Track [+] 0 04:13 [Q] Note that the number of minutes that have been loaded into partition AA of the hard drive is displayed in the top right corner of the LCD display. This number of minutes will help you decide how many tracks you can load. The maximum is 80 minutes. 15. At the begin track 0 prompt, press the MODE button to display the number of the track you wish to copy. 16. Press the Go button at the prompt, begin track. 17. Press the Go button again at the prompt, end track. 18. At begin track 0, make your next selection using the MODE button to select the track. 19. Press the Go button at begin track. 20. Press the Go button again at end track. 21. Press the Go button again to load the selected track(s). When the tracks have successfully loaded, the master CD is automatically ejected, and “pass” is displayed. To add consecutive tracks, such as tracks 1, 2, 3, and 4, do the following: 22. At the begin track 0 prompt, press the Mode button to display the number of the first track you wish to copy. 23. Press the Go button at the prompt, begin track. 24. At end track, press the Mode button to select the last track in the series. 25. Press the Go button again at the prompt, end track. 26. Press the Go button again to load the selected tracks. When the tracks have successfully loaded, the master CD is automatically ejected, and “pass” is displayed. 27. Press the Go button again to load the selected track(s). When the tracks have successfully loaded, the master CD is automatically ejected, and pass is displayed. You can delete the last track from the partition in the hard drive. Here’s how: Press and hold the Mode button until you view the setup option. Then press the Mode button until you display the delete function. Press the Go button to 14 Condre, Inc. delete the last track that was loaded to the hard drive. 28. Press and hold the Mode button to display the copy mode. 29. Place a blank CD in the first CD drawer. Close the drawer. 30. At the system prompt, 1start>, press the Go button to copy the tracks from the hard drive to the CD. You have already set the system up to copy from the hard drive to CD, using all of the available drawers. You can make multiple copies of your track compilation by placing blank CDs in one or all of the remaining drawers. The system will automatically detect the number of blank CDs in the CD drawers. When you are copying fewer than maximum CDs, you must press the Go button to begin the duplication process. (It starts automatically when you put in all of the blank CDs.) Making a Composite CD without Hard Drive Making This procedure explains how to: identify and copy selected tracks from multiple CDs directly into blank CDs. Before you begin, make sure you are in the Disc-to-Disc mode. 1. Turn on the system. Note the mode of operation in the LCD display area (copy, load, emulate, etc.). Your LCD display should look something like this: Copy <mode 2. Press and hold the Mode button until you hear the system “chirp.” Then release the Mode button. You should see setup displayed in the LCD panel: Setup <mode Go> 3. Press the Mode button once to enter the Edit mode. 15 Condre, Inc. Edit <mode 4. Place the master CD that contains the first track(s) you wish to copy to the hard drive in the first CD drawer. Close the CD drawer. Load the blank CD into the remaining drawers and press GO. The system automatically starts analyzing the contents of the master CD and displays the prompt, begin track: Begin Track [+] 0 [Q] 5. Press the Mode button until the number of the first track you wish to copy appears. For example, if you want to load track number 9 as the first track in your compilation of tracks, press the Mode button nine times to display the number 9. For example: Begin Track [+] 9 [Q] 6. Press the Go button to indicate that you want the copy process to start at the beginning of track number 9. 7. When end track is displayed in the LCD panel, press the Go button again to indicate that you want to copy just the one track: End Track [+] 9 [Q] 8. The system will ask you if want to finalize the CD. If you have more tracks from another CD to be copied, select No and press Go button. The system will begin to copy the selected track to the blank CD. Edit L0038 38M04:13 9. When the tracks have successfully copied, the master CD is automatically ejected, and “pass” is displayed. 10. Place another master CD into the first CD drive. Wait until the system analyzes it and displays the first of the edit prompts: 16 Condre, Inc. Begin Track [+] 0 04:13 [Q] Note that the number of minutes that have been copied to the new disc is displayed in the top right corner of the LCD display. This number of minutes will help you decide how many tracks you can still copy. The maximum is 80 minutes. 11. Repeat the same procedures to copy more tracks to the CD. 12. If you have no more tracks to be copied, remember to select Yes to Finalize the disc. This will close the current Disc and no more track can be added. The copied CD cannot be used if not finalized. 13. Press the Go button again to copy the selected tracks. When the tracks have successfully copied, the master CD is automatically ejected, and “pass” is displayed. USB 2.0 Options ** Only for the DVD Tracer Pro Standalone ** On the back of each Condre DVD Tracer Pro Standalones there is a USB 2.0 Connector. This slot lets you connect the bottom drive of the Condre DVD Tracer Pro to your PC. Items Needed: 1.) One open USB 2.0 slot on your PC. 2.) One USB cable (Supplied with unit). 3.) One Condre DVD Tracer Pro Standalone. Using the USB Connection: Have your PC on and booted up ready to go. Have the Condre DVD Tracer Pro Standalone plugged into the wall, and the USB swtich on the back of the machine switched to “ON”. 17 Condre, Inc. Turn on the Condre DVD Tracer Pro Standalone. On your computer you should soon see a pop-up message saying New Device Detected. If you open up “My Computer” on your PC you should now see a new DVD drive there. You can now use this drive to create DVD’s with. It is recommended you use Record Now Max 4.5 or later. You can get this software from the dealer you purchased your Condre DVD Tracer Pro Standalone. When You are done using this drive and ready to duplicate. Turn the USB switch back to “Off”, and restart the Condre DVD Tracer Pro Standalone. Menu Items Overview of Menu Items: Main Menu (MODE: next, GO: enter) (Press and hold MODE for 5 seconds to enter Sub-Menu) A. Copy B. Copy+Comp C. Emulate D. Emu+Copy E. Load F. Compare G. Quick Erase H. Verity I. External Sub-Menu (MODE: next, GO: enter) (Press and hold MODE for 5 seconds to go back to Main Menu) 1. Setup Æ 2. Edit 3. Delete 4. Clear 5. Disc Info 6. Show Drive 7. Burn in 8. Update Å Set up Options (GO:next, MODE: change setting) 1.1 CD to CD 1.2 HDD Partition Size 1.3 HDD Partition Group 1.4 HDD Partition of 1.5 Start Writers 1.6 Write Method 1.7 CD Write Speed 1.8 HD to CD Write Speed 1.9 DVD Write Speed 1.10 HDD to DVD Write Speed 1.11 CDROM Drive 1.12 Autoloader 1.13 Load Nonblank Disc 1.14 CDDA Load Speed 1.15 Grip Before Accept 1.16 Eject Disc 1.17 Buzzer 1.18 CD+G 1.19 CopyComp Eject 1.20 Read CDDA Index0 1.21 Skip Read Error 1.22 Mode 2 Compare 1.23 Power On Wait 1.24 GO load trays 1.25 UDMA66 Support 1.26 Turbo copycomp 1.27 Model Number and Version 1.28 Startup Command Back to Setup 18 Condre, Inc. Main Menu: A. Copy: This is the primary function of the duplicator. When set to Copy, the duplicator will transfer the contents of a master disc or the current hard drive partition to any blank discs in the tower input bins. B. Copy+Comp: Like the “Copy” function, but followed by the Compare function (see “Compare”). C. Emulate: Like the “Copy” function, but nothing is actually written to the blank discs. It is used for testing Master disc readability and hardware. Emulate function does not work with DVD+R disc. D. Emu+Copy: After emulation is completed and successful, the duplicator will begin writing the actual data to the discs. E. Load: This function is used to load a Master disc onto its current partition. A Master must first be loaded to the hard drive before the Copy function can be used. F. Compare: This function will compare bit-for-bit the source disc and destination discs and will report an error if the two sets of discs do not match. This function does not work with Audio or Video CDs (VCD). Audio or Video CDs will instead be verified (see “Verify”). G. Quick Erase: Allows data on CD-RW/DVD-RW will be erased. H. Verify: Verification compares the structure of the discs in any drive against the industry standard. This function is good for verifying that your source disc is a suitable Master and can be read in most standard devices. I. External: The External function is not used. Sub-Menu: Holding down the MODE button for 5 seconds while in the Primary Menu will bring up the Sub Menu. Press the MODE button to cycle through the options and press GO button to select. 1. Setup: Different settings to control the duplicator’s operation. See Setup Options for details. 19 Condre, Inc. 2. Edit: see Making a Composite CD section for details. 3. Delete: Selecting "Delete" and pressing the GO button will delete the last track of a multi-track disc stored in the current partition of the hard drive. 4. Clear: Pressing GO will delete the contents of the currently selected partition. 5. Disc Info: Displays information from the media discs that are loaded to the writers, such as max. write speed, capacity, etc. 6. Show Drives: The LCD will display all devices connected with the duplicator, i.e. CD-ROM / DVD-ROM, CD-writer / DVD-writer, and hard drive. Press the MODE button to scroll through the devices. Press GO to exit. 7. Burn In: This function allows you to test if the duplicator is working properly. Please make sure a master disc is placed into the CD-ROM / DVD-ROM first. DVD+R disc is not available under this function. 8. Update: Under no circumstances should you attempt to update the firmware without express permission from the manufacturer or with firmware that is not Condre Tower-specific firmware provided by the manufacturer. Load the disc containing the latest firmware data into a CD-ROM/DVD-ROM drive and the duplicator should find the data and update its firmware automatically. During updating, don't turn off the power of machine until the update is complete. Turning off the machine during an update may cause severe damage! Setup Options: Holding down the MODE button for about 5 seconds then releasing, will bring up the Sub Menu. Press the GO button once to activate the Setup Options. We suggest you use the default settings during the whole process and not to make any changes unless you are familiar with these functions. * To reset factory defaults on your unit simply power the unit down. Press and hold the “Mode” button for 15 seconds while the unit is powering up. You will see the display go through a series of tests and boot the “Copy” mode screen. 1.1 CD to CD See Changing Duplication Mode for more detail. Set "Yes" to copy directly from CD-RW / DVD-RW to other burner(s) or set "No" to copy from selected partition of hard drive via the autoloader. Press the MODE button to change the setting. Press GO to confirm. Default: No 20 Condre, Inc. 1.2 HDD Partition Size See Changing HDD Partition for more detail. Press MODE button to change. Auto: controller will select partition size based on drives installed. DVD Dual Layer Drive: 9.6G DVD Single Layer Drive: 4.8G CD: 850M Default: Auto 1.3 HDD Partition Group See Changing HDD Partition for more detail. Partition groups differ on the capacity of the hard drive installed in your unit. Press the MODE button to change the Partition Group. Press GO to confirm. Default: A 1.4 HDD Partition See Changing HDD Partition for more detail Select partition to be loaded to or copied from. Press the MODE button to change the Partition Group. Press GO to confirm. Default: A 1.5 Start Writers This controls the number of writers that will be copying. This should normally equal the number of writers installed. However, if you wish to only use 2 out of 4 writers for example, then you can select 2 here the remaining 2 will be ignored during duplication. Press the MODE button to change the setting. Press GO to confirm. Default: Number of CD/DVD writers installed in the unit. 1.6 Write Method Choose Disc-At-Once or Track-At-Once. Track-At-Once is normally used only when mixing multiple tracks via the controller. We recommend leaving this at Disc-At-Once. Press the MODE button to change the setting. Press GO to confirm. Default: Disc at Once 1.7 CD Write Speed This setting controls the disc to disc writing speed for CD. Lowering the speed will ease duplication of troublesome masters. You may also lower the speed to allow use of older or slower-rated recordable media. Press the MODE button to change the setting. Press GO to confirm. Default: 32X 1.8 HD to CD Write Speed 21 Condre, Inc. This setting controls the HDD to disc writing speed for CD. Lowering the speed will ease duplication of troublesome masters. You may also lower the speed to allow use of older or slower-rated recordable media. Press the MODE button to change the setting. Press GO to confirm. Default: Max 1.9 DVD Write Speed This setting controls the disc to disc writing speed for DVD. Lowering the speed will ease duplication of troublesome masters. You may also lower the speed to allow use of older or slower-rated recordable media. Press the MODE button to change the setting. Press GO to confirm. Default: 4X 1.10 HD to DVD Write Speed This setting controls the HDD to disc writing speed for DVD. Lowering the speed will ease duplication of troublesome masters. You may also lower the speed to allow use of older or slower-rated recordable media. Press the MODE button to change the setting. Press GO to confirm. Default: Max 1.11 CD-ROM Drive Allows the selection of the reader drive for disc to disc copy. Press the MODE button to change the setting. Press GO to confirm. Default: Auto (top drive) 1.12 Autoloader For unit with Autoloader installed. This should remain set to “NO” at all times. Press the MODE button to change the setting. Press GO to confirm. Default: No 1.13 Load Nonblank Disc For unit with Autoloader installed. This should remain set to “NO” at all times. Press the MODE button to change the setting. Press GO to confirm Default: No 1.14 CD-DA Load Speed When duplicating an Audio CD, the duplicator will automatically lower the readspeed to preserve quality. Setting this to an option other than “Auto” may increase read-in time, but may also introduce errors. It is recommended that this setting remain at “Auto”. Press the MODE button to change the setting. Press GO to confirm. Default: Auto 22 Condre, Inc. 1.15 Grip Before Accept For unit with Autoloader installed. This should remain set to “NO” at all times. Press the MODE button to change the setting. Press GO to confirm Default: No 1.16 Eject Disc This setting controls the ejection of discs by writer. Three options are available: “Always” means the writers will always eject the discs no matter whether the operation is successful or failed. “No” means all discs will remain in writers when copying is done and you will have to eject discs from the writers manually. “Pass” setting will only eject the passed discs automatically and leave the failed ones in the writers. Press MODE to change the setting and GO to confirm. Default: Pass 1.17 Buzzer This turns on or off the buzzer tone in the duplicator. Press the MODE button to change the setting. Press GO to confirm. Default: On 1.18 CD+G Changing this setting to “Yes” will allow the Condre Tower to duplicate CD+Graphic (or “Karaoke”) discs if the installed writers support it. Press the MODE button to change the setting. Press GO to confirm. Default: No 1.19 Copy Comp Eject This setting controls the ejection of writer's tray under the "Copy + Compare" function. This should remain set to “Auto” for the Copy + Compare feature to function correctly. Press the MODE button to change the setting. Press GO to confirm. Default: Auto 1.20 Read CD-DA Index 0 The setting controls the copying of data in Index 0 of Audio discs. Set to "Yes", the Condre Tower will copy the data, set to "No” will leave it empty. On Audio discs, Index 0 is sometimes used for album and artist info and track names. Press the MODE button to change the setting. Press GO to confirm. Default: No 1.21 Skip Read Error This setting controls error skipping when reading in a master disc. If the setting is "No", when an error is detected during loading, the duplicator will stop loading 23 Condre, Inc. and display a read-error message. If the setting is "Yes", there will be no message shown even there is an error in reading. You can use this function to copy discs with errors or non-standard track configuration. Press the MODE button to change the setting. Press GO to confirm. Default: No 1.22 Mode 2 Compare This setting allows the unit to more properly compare Mode-2 formatted discs. Press the MODE button to change the setting. Press GO to confirm. Default: Yes 1.23 Power on Wait The setting controls the detecting time (in second) for devices that connected to the duplicating controller card. Default: 15 sec 1.24 Go load trays This function will allow the opened trays to be closed automatically by pressing the “GO” button. Press the MODE button to change the setting. Press GO to confirm. Default: No 1.25 UDMA66 support This option will increase performance and stability of copying function. Do not use this function unless all drives, including reader and HDD, support UDMA66 transfer mode. The system needs to reboot after any changes. Press the MODE button to change the setting. Press GO to confirm. Default: No 1.26 Turbo copycomp For achieving maximum burning speed allowed by writers. Press the MODE button to change the setting. Press GO to confirm. Default: No 1.27 Model Number and Version Displays model number and firmware version. 1.28 Startup Command This setting allows the user to pick which command will appear after booting up. Press the MODE button to change the setting. Press GO to confirm. Default: Copy 24 Condre, Inc. Troubleshooting There are no end-user serviceable components that can be replaced in the Condre CD/DVD Tracer Pro Standalone. Please contact your dealer for warranty repairs and service. If the answer to your problem is not listed here, you may call Condre, Inc. Technical Support at: (952) 253-6843, 8:00AM to 5:30PM CST Mon-Fri. No LCD display. - Please check if the power cord is connected properly and the utility power is supplied. Please check if the fan of power supply is rotating. If not, it might be broken. Error message shown on LCD. - Reboot the duplicator. Change master disc and try again. CD Drive doesn’t read disc and shows error message. - Check the format of master disc. Use other Master disc or other duplicator to test master. Switches do not function. - Task busy. Please wait. Restart unit. Faulty controller board. Call for Technical support Copy completed but disc is not readable / executable. - Use "Compare" to check. Test with another CD-ROM/DVD-ROM. Failure rate is high. - Lower writing speed and try again. Quality of blank disc is poor. Quality of master disc is poor. Rated speed of discs does not match writers. Ensure discs meet writers rated speed. 25 Condre, Inc. - Update the latest BIOS version. See manufacturer for latest firmware updates. Can't boot up or upgrade BIOS. - Contact your dealer. Check if the BIOS program is correct. Some functions are missing. - Please reboot the unit and press Mode for 3 seconds at the same time. 26 Condre, Inc. Limited Warranty Condre, Inc. () warrants that our duplicators are free from defects in materials and workmanship for a period of twelve (12) months from the date appearing on your invoice. Condre will provide remote technical support free of charge by phone or Email for 12 months after purchase of a product through a dealer. Condre will, at it’s discretion, repair or replace the product. If failures occur, contact Technical Support for assistance to determine a solution. If a return for repair or replacement is determined to be necessary, a Return Material Authorization (RMA) number will be issued by Condre Technical Support . Please refer to the RMA request procedure for details on return shipment requirements. Replacements requested before a return is received, known as “cross ship”, require the authorization of the dealer. All products are shipped in specially designed packaging with inserts that have been designed and tested to ensure that our products can endure long-distance transport and still arrive in working order. We advise you to save your box and original packing materials in case you need to return the product(s) for any reason. If product(s) are returned without proper packaging, your warranty will be void. If you have lost or damaged your original packaging, another may be purchased from. Please call for the current price on the replacement packaging and shipping cost. When you receive your product(s), please note the following: - Verify all components are received according to your packing list; - Inspect the shipping box for damage, if damage is found, inspect the product inside for damage. - Notify technical support immediately if discrepancies are noted. What is not covered: This limited warranty provided by does not cover: - Products which have been subjected to abuse, accident, alteration, modification, tampering, negligence, misuse, faulty installation, lack of reasonable care, or if repaired or serviced by anyone without authorization of Condre, Inc., or if the model or serial number has been altered, tampered with, defaced or removed. - Normal maintenance and replacement of consumables. -Losses due to theft, shipping damage other than initial or warranty replacement delivery. -Accessories. Notice: The products or software sold by Condre, Inc. may be used to assist you in reproducing material in which you own the copyright or have obtained permission to copy from the copyright owner. Unless you own the copyright or have permission to copy from the copyright owner, you may be violating copyright law and be subject to payment of damages and other remedies. If you are uncertain about your rights you should contact your legal advisor. If you experience trouble with any Condre, Inc. product, please contact our Technical Support department by email or fax anytime, by voice between 8am and 5:30pm central time, Monday to Friday, except holidays. CONDRE, INC. 1-866-500-3472 27