1
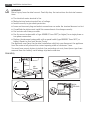
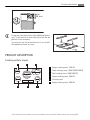
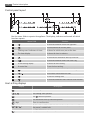
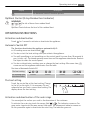
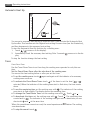
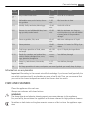
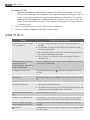
HK955070XB
EN HOB
USER MANUAL
2
FOR PERFECT RESULTS
Thank you for choosing this AEG product. We have created it to give you
impeccable performance for many years, with innovative technologies that help
make life simpler – features you might not find on ordinary appliances. Please
spend a few minutes reading to get the very best from it.
ACCESSORIES AND CONSUMABLES
In the AEG webshop, you’ll find everything you need to keep all your AEG
appliances looking spotless and working perfectly. Along with a wide range of
accessories designed and built to the high quality standards you would expect,
from specialist cookware to cutlery baskets, from bottle holders to delicate
laundry bags…
Visit the webshop at:
www.aeg.com/shop
Contents
3
CONTENTS
4
5
7
9
12
13
14
15
15
Safety information
Installation instructions
Product description
Operating instructions
Helpful hints and tips
Care and cleaning
What to do if…
Environment concerns
Warranty
The following symbols are used in this user
manual:
Important information concerning your
personal safety and information on how to
avoid damaging the appliance.
General information and tips
Environmental information
Subject to change without notice
4
Safety information
SAFETY INFORMATION
For your safety and correct operation of the appliance, read this manual carefully before
the installation and use. Always keep these instructions with the appliance also if you move
or sell it. The users must fully know the operation and safety functions of the appliance.
Children and vulnerable people safety
WARNING!
Do not let persons, children included, with reduced physical sensory, reduced mental functions or lack of experience and knowledge to use the appliance. They must have supervision
or instruction for the operation of the appliance by a person who is responsible for their
safety.
• Keep all packaging away from children. There is the risk of suffocation or injury.
• Keep the children away from the appliance during and after the operation, until the appliance is cold.
WARNING!
Activate the child safety device to prevent small children and pets from an accidental activation of the appliance.
Safety during operation
• Remove all packaging, stickers and layers from the appliance before the first use.
• Set the cooking zones to "off" after each use.
• The Risk of burns! Do not put cutlery or saucepan lids on the surface that you cook, as
they can become hot.
WARNING!
Fire risk! Too hot fats and oils can occur with ignition very quickly.
Correct operation
•
•
•
•
Always monitor the appliance during operation.
The appliance is only for domestic use!
Do not use the appliance as a work or a storage surface.
Do not put or keep very flammable liquids and materials, easy fusible objects (made of
plastic or aluminium) on or near the appliance.
• Be careful when you connect the appliance to the near sockets. Do not let the electricity
bonds touch the appliance or hot cookware. Do not let the electricity bonds to tangle.
How to prevent a damage to the appliance
• If the objects or cookware fall on the glass ceramic, the surface can be damaged.
• Cookware made of cast iron, cast aluminium or with damaged bottoms can cause
scratch of the glass ceramic. Do not move them on the surface.
• Do not let cookware boil dry to prevent the damage to cookware and glass.
• Do not use the cooking zones with empty cookware or without cookware.
Installation instructions
5
• Do not put the aluminium foil on the appliance.
WARNING!
If there is a crack on the surface, disconnect power supply to prevent the electrical
shock.
CAUTION!
5 mm ventilation space is essential, failure to include this during installation can cause appliance malfunctions which are not covered under warranty.
INSTALLATION INSTRUCTIONS
Before the installation, note down the serial number (Ser. Nr.) from the rating plate.The
rating plate of the appliance is on its lower casing.
949 595 020 00
HK955070XB
58 HCD AA AO 220-240 V 50-60-Hz
7,9 kW
AEG
The Safety Instructions
WARNING!
You must read these!
• Make sure that the appliance is not damaged because of transportation. Do not connect
a damaged appliance. If it is necessary, speak to the supplier.
• Only an authorized servicing technician can install, connect or repair this appliance. Use
only original spare parts.
• Only use the built-in appliances after you assemble the appliance into correct built-in
units and work surfaces that align to the standards.
• Do not change the specifications or change this product. Risk of injury and damage to
the appliance.
• Fully obey the laws, ordinances, directives and standards in force in the country where
you use the appliance (safety regulations, recycling regulations, electrical safety rules
etc.)!
• Keep the minimum distances to other appliances and units!
• Install shock protection, for example install the drawers only with a protective floor directly below the appliance!
• Keep safe the cut surfaces of the worktop from moisture with a correct sealant!
• Seal the appliance to the work top with no space between with a correct sealant!
• Keep safe the bottom of the appliance from steam and moisture, e.g. from a dishwasher
or oven!
• Do not install the appliance adjacent to doors and below windows! If not, when you
open the doors or windows they can push off hot cookware from the appliance.
6
Installation instructions
WARNING!
Risk of injury from electrical current. Carefully obey the instructions for electrical connections.
•
•
•
•
•
•
•
The electrical mains terminal is live.
Make electrical mains terminal free of voltage.
Install correctly to give shock protection.
Loose and incorrect plug and socket connections can make the terminal become too hot.
A qualified electrician must install the connections in the clamps correctly.
Use a strain relief clamp on cable.
Use the correct mains cable of type H05BB-F Tmax 90°C (or higher) for a single phase or
two phase connection.
• Replace the damaged mains cable with a special cable (type H05BB-F Tmax 90°C; or
higher). Speak to your local Service Centre.
The appliance must have the electrical installation which lets you disconnect the appliance
from the mains at all poles with a contact opening width of minimum 3 mm.
You must have correct devices to isolate: line protecting cut-outs, fuses (screw type fuses
removed from the holder), earth leakage trips and contactors.
Assembly
min.
50mm
min.
500mm
R 5mm
min.
50mm
=
600mm
490+1mm
880+1mm
=
min.
25 mm
min.
20 mm
Product description
7
min.
28 mm
If you use a protection box (the additional accessory1)), the protective floor directly below the appliance is not necessary.
You can not use the protection box if you install
the appliance above an oven.
PRODUCT DESCRIPTION
Cooking surface layout
1
2
3
145
mm
145/
/270
210mm
180
mm
170
mm
180
mm
mm
6
265
5
1
2
3
4
5
6
Single cooking zone 1200 W
Triple cooking zone 1050/1950/2700 W
Oval cooking zone 1400/2200 W
Single cooking zone 1800 W
Control panel
Single cooking zone 1800 W
4
1) The protection box accessory may not be available in some countries. Please contact your local supplier.
8
Product description
Control panel layout
1
2
3
12
4
11
5
10
9
8
6
7
Use the sensor fields to operate the appliance. The displays, indicators and sounds tell which
functions operate.
sensor field
function
1
It activates and deactivates the appliance.
2
It locks/unlocks the control panel.
3
Cooking zones' indicators of timer.
It shows for which zone you set the time.
4
The timer display.
It shows the time in minutes.
5
It activates the Automatic Heat Up function.
6
It activates and deactivates the outer ring.
7
A heat setting display
It shows the heat setting.
8
A control bar
To set the heat setting.
It activates and deactivates the outer rings.
9
It increases or decreases the time.
/
10
11
It sets the cooking zone.
12
It activates and deactivates theSTOP+GO function.
Heat setting displays
Display
Description
The cooking zone is deactivated.
The cooking zone operates.
-
The
function operates.
The Automatic Heat Up function operates
+ digit
There is a malfunction.
/
OptiHeat Control (3 step Residual heat indicator) : continue cook /
stay warm / residual heat.
/
Lock/The Child Safety function operates.
Operating instructions
Display
9
Description
The Automatic Switch Of function operates.
OptiHeat Control (3 step Residual heat indicator)
WARNING!
/ / The risk of burns from residual heat!
OptiHeat Control shows the level of the residual heat.
OPERATING INSTRUCTIONS
Activation and deactivation
Touch
for 1 second to activate or deactivate the appliance.
Automatic Switch Off
The function deactivates the appliance automatically if:
• All cooking zones are deactivated ( ).
• You do not set the heat setting after you activate the appliance.
• You spill something or put something on the control panel for more than 10 seconds, (a
pan, a cloth, etc.). The sound operates some time and the appliance deactivates. Remove
the object or clean the control panel.
• You do not deactivate a cooking zone or change the heat setting. After some time,
comes on and the appliance deactivates. See the table.
The times of Automatic Switch Off
The heat setting
The cooking zone
deactivates after
,
-
6 hours
-
-
-
5 hours
4 hours
1.5 hours
The heat setting
Touch the control bar at the heat setting. Change
to the left or the right, if it is necessary. Do not
release before you have a correct heat setting. The
display shows the heat setting.
Activation and deactivation of the outer rings
You can adjust the surface you cook to the dimension of the cookware.
. The indicator comes on. For
To activate the outer ring touch the sensor field /
more outer rings touch the same sensor field again. The subsequent indicator comes on.
Do the procedure again to deactivate the outer ring. The indicator goes out.
10
Operating instructions
Automatic Heat Up
12
11
10
9
8
7
6
5
4
3
2
1
0
1
2 3 4 5 6 7
8 9 10 11 12 13 14
You can get a necessary heat setting in a shorter time if you activate the Automatic Heat
Up function. This function sets the highest heat setting for some time (see the illustration),
and then decreases to the necessary heat setting.
To start the Automatic Heat Up function for a cooking zone:
1. Touch ( comes on in the display).
2. Immediately touch the necessary heat setting. After 3 seconds comes on in the display.
To stop the function change the heat setting.
Timer
Count Down Timer
Use the Count Down Timer to set how long the cooking zone operates for only this one
time.
Set the Count Down Timer after the selection of the cooking zone.
You can set the heat setting before or after you set the timer.
• To set the cooking zone: touch again and again until the indicator of a necessary
cooking zone comes on.
• To activate the Count Down Timer: touch of the timer to set the time ( 00 - 99
minutes). When the indicator of the cooking zone start to flash slow, the time counts
down.
• To see the remaining time: set the cooking zone with . The indicator of the cooking
zone starts to flash quickly. The display shows the remaining time.
• To change the Count Down Timer: set the cooking zone with . Touch or .
• To deactivate the timer: set the cooking zone with . Touch . The remaining time
counts back to 00 . The indicator of the cooking zone goes out. To deactivate you can
also touch and at the same time.
When the countdown comes to an end, the sound operates and 00 flashes. The cooking
zone deactivates.
• To stop the sound: touch
Operating instructions
11
CountUp Timer ( The count up timer)
Use the CountUp Timer to monitor how long the cooking zone operates.
• To set the cooking zone (if more than 1 cooking zone operate ) : touch again and
again until the indicator of a necessary cooking zone comes on.
• To activate the CountUp Timer: touch of the timer comes on. When the indicator
of the cooking zone starts to flash slow, the time counts up. The display switches between and counted time (minutes).
• To see how long the cooking zone operates: set the cooking zone with . The indicator of the cooking zone starts to flash quickly. The display shows the time that the cooking zone operates.
• To deactivate the CountUp Timer: set the cooking zone with and touch or to
deactivate the timer. The indicator of the cooking zone goes out.
Minute Minder
You can use the timer as a Minute Minder while the cooking zones do not operate. Touch
. Touch or of the timer to set the time. When the time comes to an end, the sound
operates and 00 flashes.
• To stop the sound: touch
STOP+GO
The function sets all cooking zones that operate to the lowest heat setting ( ).
When operates, you cannot change the heat setting.
The function does not stop the timer function.
• To activate this function touch . The symbol comes on.
• To deactivate this function touch . The heat setting that you set before comes on.
Lock
When the cooking zones operate, you can lock the control panel, but not . It prevents an
accidental change of the heat setting.
First set the heat setting.
To start this function touch . The symbol comes on for 4 seconds.
The Timer stays on.
To stop this function touch . The heat setting that you set before comes on.
When you stop the appliance, you also stop this function.
The child safety device
This function prevents an accidental operation of the appliance.
To activate the child safety device
• Activate the appliance with . Do not set the heat settings.
• Touch for 4 seconds. The symbol comes on.
• Deactivate the appliance with .
To deactivate the child safety device
• Activate the appliance with . Do not set the heat settings. Touch
The symbol comes on.
• Deactivate the appliance with .
for 4 seconds.
12
Helpful hints and tips
To override the child safety device for only one cooking time
• Activate the appliance with . The symbol comes on.
• Touch for 4 seconds. Set the heat setting in 10 seconds. You can operate the appliance.
• When you deactivate the appliance with , the child safety device operates again.
OffSound Control (Deactivation and activation of the sounds)
Deactivation of the sounds
Deactivate the appliance.
Touch for 3 seconds. The displays come on and go out. Touch for 3 seconds.
comes on, the sound is on. Touch , comes on, the sound is off.
When this function operates, you can hear the sounds only when:
• you touch
• the Minute Minder comes down
• the Count Down Timer comes down
• you put something on the control panel.
Activation of the sounds
Deactivate the appliance.
Touch for 3 seconds. The displays come on and go out. Touch for 3 seconds.
comes on, because the sound is off. Touch , comes on. The sound is on.
HELPFUL HINTS AND TIPS
Cookware
• The bottom of the cookware must be as thick and flat as possible.
• Cookware made of enamelled steel and with aluminium or copper bottoms can cause the
color change on the glass-ceramic surface.
Energy saving
•
•
•
•
If it is possible, always put the lids on the cookware.
Put cookware on a cooking zone before you start it.
Stop the cooking zones before the end of the cooking time to use residual heat.
The bottom of pans and cooking zones must have the same dimension.
Öko Timer (Eco Timer)
To save the energy, the heater of the cooking zone deactivates before the count down timer
signal. The difference in the operation time is depends of the heat setting level and the time
you cook.
The examples of cooking applications
The data in the table is for guidance only.
Care and cleaning
Heat
setting
Use to:
Time
13
Hints
Keep cooked foods warm
as necessary
Put a lid on a cookware.
1-3
Hollandaise sauce, melt: butter, chocolate, gelatine
5-25
min
Mix from time to time.
1-3
Solidify: fluffy omelettes, baked eggs
10-40
min
Cook with a lid on.
3-5
Simmer rice and milkbased dishes, heat- 25-50
ing up ready-cooked meals
min
Add the minimum two times as
much liquid as rice, mix milk dishes
at some point of the procedure
through.
5-7
Steam vegetables, fish, meat
20-45
min
Add some tablespoons of liquid.
7-9
Steam potatoes
20-60
min
Use max. ¼ l water for 750 g of potatoes.
7-9
Cook larger quantities of food, stews
and soups
60-150
min
Up to 3 l liquid plus ingredients.
9-12
Gentle fry: escalope, veal cordon bleu,
cutlets, rissoles, sausages, liver, roux,
eggs, pancakes, doughnuts
as necessary
Turn halfway through.
12-13
Heavy fry, hash browns, loin steaks,
steaks
5-15
min
Turn halfway through.
14
Boil large quantities of water, cook pasta, sear meat (goulash, pot roast), deep fry chips.
1
Information on acrylamides
Important! According to the newest scientific knowledge, if you brown food (specially the
one which contains starch), acrylamides can pose a health risk. Thus, we recommend that
you cook at the lowest temperatures and do not brown food too much.
CARE AND CLEANING
Clean the appliance after each use.
Always use cookware with clean bottom.
WARNING!
The sharp objects and abrasive cleaning agents can cause damage to the appliance.
For your safety, do not clean the appliance with steam cleaners or high-pressure cleaners.
Scratches or dark stains on the glass-ceramic cause no effect on how the appliance operates.
14
What to do if…
To remove the dirt:
1. – Remove immediately: melted plastic, plastic foil, and food with sugar. If not, the
dirt can cause damage to the appliance. Use a special scraper for the glass . Put the
scraper on the glass surface at an acute angle and move the blade on the surface .
– Remove after the appliance is sufficiently cool: limescale rings , water rings, fat
stains, shiny metallic discolorations. Use a special cleaning agent for glass ceramic
or stainless steel.
2. Clean the appliance with a moist cloth and some detergent.
3. At the end rub the appliance dry with a clean cloth.
WHAT TO DO IF…
Problem
Possible cause and remedy
You cannot activate the appliance or operate it.
• Activate the appliance again and set the heat setting in 10
seconds.
• You touched 2 or more sensor fields at the same time. Only
touch one sensor field.
• The Child Safety Device or the Lock or Stop+Go operates. See
the chapter Operating instructions.
• There is water or fat stains on the control panel. Clean the
control panel.
A Sound operates and the appliance deactivates.
A sound operates when the appliance is deactivated.
You put something on one or more sensor fields. Remove the object from the sensor fields.
The appliance deactivates.
You put something on the
sor field.
. Remove the object from the sen-
The residual heat indicator does The cooking zone is not hot because it operated only for a short
not comes on.
time. If the cooking zone should be hot, speak to the service centre.
The Automatic Heat Up function does not operate.
• There is still residual heat on the cooking zone. Let the cooking
zone become sufficiently cool.
• The highest heat setting is set. The highest heat setting has the
same power as the Automatic Heat Up function.
You cannot activate the outer
ring.
Activate the inner ring first.
The sensor fields become hot.
The cookware is too large or you out it too near to the controls.
Put large cookware on the rear cooking zones if it is necessary.
There is no signal when you
touch the panel sensor fields.
The signals are deactivated. Activate the signals (see OffSound
Control).
comes on
The Automatic Switch Off operates. Deactivate the appliance and
activate it again.
Environment concerns
Problem
and number comes on.
15
Possible cause and remedy
There is an error in the appliance.
Disconnect the appliance from the electrical supply for some
time. Disconnect the fuse from the electrical system of the house.
Connect again. If
comes on again, speak to the service centre.
If you tried the above solutions and cannot repair the problem, speak to your dealer or the
customer service. Give the data from the rating plate, three digit letter code for the glass
ceramic (it is in the corner of the glass surface) and an error message that comes on.
Make sure, you operated the appliance correctly. If not the servicing by a customer service
technician or dealer will not be free of charge, also during the warranty period. The instructions about the customer service and conditions of guarantee are in the guarantee booklet.
ENVIRONMENT CONCERNS
The symbol on the product or on its packaging indicates that this product may not be
treated as household waste. Instead it should be taken to the appropriate collection point
for the recycling of electrical and electronic equipment. By ensuring this product is
disposed of correctly, you will help prevent potential negative consequences for the
environment and human health, which could otherwise be caused by inappropriate waste
handling of this product. For more detailed information about recycling of this product,
please contact your local council, your household waste disposal service or the shop where
you purchased the product.
Packaging material
Guarantee/Customer Service Centres
EURO-LINE APPLIANCES
LENGTH OF WARRANTY
TWO YEAR FULL WARRANTY
from original date of purchase,
including parts and labour, to the first
purchaser of this appliance
This warranty is not transferable.
EURO-LINE WILL PAY FOR:
Replacement parts and/or labour to
repair defects in materials or
workmanship. Service must be provided
by an authorized Euro-Line company
(unless advised otherwise).
THIS GUARANTEE DOES NOT COVER COMMERCIAL USE.
The name Euro-Line Appliances, for service matters, incorporates work performed by authorized service
agents or service companies.
EXCEPTIONS:
EURO-LINE APPLIANCES WILL NOT PAY FOR THE FOLLOWING SERVICE CALLS:
1. To install or correct the installation of an appliance.
2. To instruct the use of an appliance.
3. To replace house fuses, re-set circuit breakers or correct house wiring.
4. To correct house plumbing.
5. To clean drains, filters or garbage disposers.
6. To repair an appliance if it fails due to misuse or abuse.
EURO-LINE APPLIANCES WILL NOT PAY WHEN THE FOLLOWING OCCURS:
1. Damage resulting from fires, acts of nature, alteration, improper installation, or installation
not in accordance with local building codes.
2. Pickup or delivery of major appliances requiring service. The appliances are designed to be
repaired in the home. However, Euro-Line will not be responsible for travelling and labour costs if the
customer lives in excess of 50 km/30 miles, or if the travel time is in excess of 30 minutes from the
nearest service center. Any excess to this will not be covered by the warranty.
In no event, will Euro-Line be responsible for incidental or consequential damages. For warranty service
and parts, contact EURO-PARTS. Service will be provided during normal business hours. Should you
have a service problem that is not resolved locally, contact:
For Service and Parts Contact:
EURO-PARTS, CANADA
Tel: 1-800-678-8352
Fax: 1-519-528 5001
[email protected]
EURO-LINE APPLIANCES
1-800-421-6332
Tel. Direct: 1-905-829-3980
Fax: 1-905-829-3985
EURO-PARTS, USA
Tel: 1-800-561-4614
Fax: 1-519-528-5001
[email protected]
User Instructions & Installation Manual
Service & Repair
To save you time and money please have the following information ready in case you have to call for
service:
•Name of the dealer from whom you purchased the appliance.
•Model number (shown on the rating plate)
•Serial number (shown on the rating plate)
•Date of purchase. You should also retain the original purchase receipt to support any claim made under
the warranty. (We suggest you staple the receipt to this page).
If service is required, contact the Service Center:
EURO-PARTS, CANADA
Tel: 1 800 678 8352
Fax: 1-519-528-5001
[email protected]
EURO-PARTS, USA
Tel: 1-800-561-4614
Fax: 1-519-528-5001
[email protected]
DISTRIBUTED BY:
EURO-LINE APPLIANCES
2278 SPEERS ROAD
OAKVILLE, ONTARIO CANADA L6L 2X8
Toll free 1-800-421-6332 Tel: 905-829-3980 Fax: 905-829-3985
www.euro-line-appliances.com