1
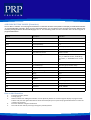
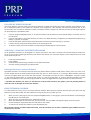
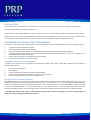
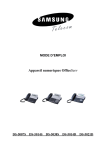
T E L E C O M
SAMSUNG
HANDSET USER GUIDE
FOR
DS-5007S / DS-5014S / DS-5038S / DS-5014D / DS-5021D
ITP-5107 / ITP-5114D / ITP5121D
FOR TECHNICAL TIPS PLEASE VISIT OUR WEBSITE
www.PRPTELECOM.co.uk
2
T E L E C O M
Table of Contents
Handset Diagram ......................................................................................................................................................3
Programmable button’s LED Indicators ....................................................................................................................4
Phone Status Indicator..............................................................................................................................................4
Using Feature Codes .................................................................................................................................................4
Selecting Programmed Functions .............................................................................................................................4
Assigning Button Values (Extenders) ........................................................................................................................5
How to Add Extenders ..............................................................................................................................................5
Controlling Volume Levels ........................................................................................................................................6
Handset Volume ...................................................................................................................................................6
Speakerphone Volume .........................................................................................................................................6
Ringer Volume ......................................................................................................................................................6
Selecting the Ring Tone ........................................................................................................................................6
Changing the Phone Passcode ..................................................................................................................................6
Switching Headset/Handset Mode ...........................................................................................................................6
Dialling by Directory Name .......................................................................................................................................7
Assigning/Changing Your Extension Name ...............................................................................................................7
Entering Characters on the LCD Panel ......................................................................................................................7
Busy Extension Callback ............................................................................................................................................7
Busy Extension Camp-On ..........................................................................................................................................8
Holding a Call ............................................................................................................................................................8
Retrieving Calls Held at Another Extension ..........................................................................................................8
Parking Calls..........................................................................................................................................................8
Transferring Calls ......................................................................................................................................................9
Call Waiting .............................................................................................................................................................10
Programming Personal Speed Dial Numbers ..........................................................................................................10
Assigning a Name to a Speed Dial Number ........................................................................................................10
Dialling Using Speed Dial Numbers .........................................................................................................................11
Programming One-touch Speed Dial Buttons .........................................................................................................11
Station Call Pickup...................................................................................................................................................11
Group Pick Up .........................................................................................................................................................11
Call Forwarding .......................................................................................................................................................12
3
T E L E C O M
Cancelling Call Forwarding ................................................................................................................................. 12
Forwarding All Calls............................................................................................................................................ 12
Forward Busy ..................................................................................................................................................... 12
Forward No Answer ........................................................................................................................................... 12
Forward Busy/No Answer .................................................................................................................................. 12
Forward DND...................................................................................................................................................... 12
Viewing and Changing Call Forward Options ..................................................................................................... 13
Forward Follow Me ................................................................................................................................................ 13
Internal Page .......................................................................................................................................................... 14
All Page ................................................................................................................................................................... 14
Meet Me Page: MMPG........................................................................................................................................... 14
Call Park and Page .................................................................................................................................................. 14
Programmed Messages .......................................................................................................................................... 14
Creating Your Own Message .............................................................................................................................. 15
Entering Characters on the LCD Panel ............................................................................................................... 15
Cancelling a Programmed Message ................................................................................................................... 15
Cancelling Messages & Message Waiting lights ..................................................................................................... 15
Background Music .................................................................................................................................................. 15
Appointment Reminder/Alarm Clock ..................................................................................................................... 16
Cancel Alarm ...................................................................................................................................................... 16
Alarm Messages ..................................................................................................................................................... 16
Boss / Secretary Hot Line........................................................................................................................................ 16
Group Listening ...................................................................................................................................................... 17
Off-Hook Voice Announcements............................................................................................................................ 17
Answering an OHVA Call .................................................................................................................................... 17
Rejecting an OHVA Call ...................................................................................................................................... 17
OHVA Block ........................................................................................................................................................ 17
Secure OHVA ...................................................................................................................................................... 18
Call Duration Timer................................................................................................................................................. 18
Storing a Caller Number ......................................................................................................................................... 18
Storing a Callers Number as a Speed Dial Number ................................................................................................ 18
Viewing CLIP for Calls on Hold or Parked ............................................................................................................... 19
Viewing CLIP for Previous Calls............................................................................................................................... 19
4
T E L E C O M
SAMSUNG HANDSET DIAGRAM
(DS-5007S / 5014S / 5038S / 5014D / 5021D & ITP-5014D / 5021D)
All buttons below are common across the Samsung range of handsets
SOFT KEYS - Used to activate features
STATUS INDICATOR LED
SPEAKER
- For-handsfree
SPEAKER
Used for
operation
handsfree calls
SCROLL KEY
VOLUME KEY
REDIAL KEY
CONFERENCE KEY
TRANSFER KEY
LIVE KEYPAD
HOLD KEY
PROGRAMMABLE
BUTTONS
SPEAKER KEY
MICROPHONE
The programmable buttons above the keypad are arranged in rows of 1x7 (7)
buttons, or 2x7, (14) buttons or 3 x7 (21) buttons and are numbered from 1 to 7
or 14 or 21 from top left to bottom right. By default, keys 1 and 2 are set as Call
keys. Call keys flash for incoming calls.
5
T E L E C O M
PROGRAMMABLE BUTTONS LED INDICATORS
The programmable buttons, [Transfer] button, [Hold] button, and [Speaker] button have LEDs that light red, green or amber when
it is being used. The following table summarises the functions of LEDs.
Function
Button LED Status
External line or function is in use
LED is steady green.
New incoming call is ringing
LED is a fast flashing green
A call is on hold
LED is a slow flashing green or red
A held or transferred call is recalling to the phone
LED is a slow flashing amber
PHONE STATUS INDICATOR
The status indicator is located on the upper right section of the LCD panel. It shows the status of the phone as described in the table.
Status of Phone
Status Indicator
Busy on call / Off-hook
Steady red
Internal extension ring
Flashing red
External (C.O.) line ring
Flashing green
Transferred / held call recalling
Flashing amber
Message waiting
Flashing red
Calling denied
Fast flashing red
USING FEATURE CODES
System features are programmed with default codes that you can dial to access the features. These are described in the relevant parts of
the guide. However, these codes may have been changed in programming; if so, you may find that a feature does not work as described. In such cases, refer to your system administrator for the correct codes (or ask them to check with the installation technician
if they don’t know what they are).
SELECTING PROGRAMMED FUNCTIONS
The most convenient way to select functions on your phone is to have them registered on the programmable buttons, so that you
simply press the required button. If a function is not programmed on a button, it can be selected on the LCD panel using the Scroll button
and soft buttons.
An advantage of using the soft buttons for functions is that the programmable buttons can be used to assign more buttons for direct extension selection and speed dialling.
6
T E L E C O M
ASSIGNING BUTTON VALUES (Extenders)
You can add an “extender” to some programmed buttons to make their functions more specific. For example, you could add the extender
“4” to the [PAGE] button. Normally, when you press the [PAGE] button, you are asked to enter the page zone to page. With the new
extender, pressing the button will automatically page zone 4. The following table lists the extenders that can be assigned to
programmable buttons.
Button
Description
Extender
AB
Absence
Extension number
ACC
Account
000-999
BOSS
Director/Secretary
1-4
DIR
Directory
1 (PERS), 2 (SYS), 3 (STN)
DP
Direct Call Pick-up
Extension or extension group number
DS
Direct Extension Select
Station number
FWRD
Call Forwarding
0 = FWD Cancel, 1 = FWD All, 2 = FWD
Busy, 3 = FWD No Answer, 4 FWD Busy/
No Answer, 5 = FWD DND and-6 = Follow
Me
GPIK
Group Call Pick-up
01-20
IG
In / Out Of Group
Extension group number 5xx(x)
MMPG
Meet Me Page
0-9, *
PMSG
Programmed Message
01-20
PAGE
Paging
0-9, *
PARK
Park orbit
0-9
RP
Ring Plan
1-6
SG
Extension Group Selection
Extension group number 5xx(x)
SP
UCD Supervise
UCD group number
SPD
Speed Dial
00-49, 500-999
VT
Voice Mailbox
Voice Mailbox Group (5xx)
How to Add Extenders
1.
2.
3.
4.
5.
Press the [Transfer] button.
Press [1] [0] [7].
Select the button for adding the extender. Use the [Volume] buttons to scroll through the display of programmable
buttons and press the right soft button to select the button (OR you can press the programmable button or enter the
number if you know it)
Enter the extender using the dial buttons.
Save and exit the new key value by pressing the [Transfer] button.
7
T E L E C O M
CONTROLLING VOLUME LEVELS
Volume levels for the speakerphone, ringer and handset can be adjusted using the [Volume] buttons. The levels you set will
be saved in memory. If background music is set, the volume levels of music and page announcements can also be adjusted
using the [Volume] buttons. There are 16 volume levels.
Handset Volume
1.
Pick up the handset and listen to the tone.
2.
To increase handset volume, press the [Volume] button.
3.
To decrease handset volume, press the [Volume] button.
Speakerphone Volume
1.
Press the [Speaker] button.
2.
To increase speakerphone volume, press the [Volume] button.
3.
To decrease speakerphone volume, press the [Volume] button.
Ringer Volume
1.
To increase ringer volume, press the [Volume] button while the phone is ringing.
2.
To decrease ringer volume, press the [Volume] button while the phone is ringing.
Selecting the Ring Tone
One of eight ring tones can be selected.
1.
Press the [Transfer] button.
2.
Press [1][1][1].
3.
Press button [1]-[8] in order, or press the [Volume] button, to listen to each ring tone.
4.
When you hear the desired dial tone, press the [Transfer] button to save the setting.
CHANGING THE PHONES PASSCODE
Your pre-assigned extension passcode is 1234. You can change the passcode if needed.
1.
Press the [Transfer] button.
2.
Press [1][0][1].
3.
Enter the current passcode (e.g. 1234).
4.
Enterthenewpasscode.Thepasscodemustbea4-digitnumber(0-9).
5.
Re enter the new passcode for confirmation. If the passcode is entered correctly, a beep will be heard twice. If four beeps
are heard, the passcode entry is incorrect.
6.
Save the new passcode by pressing the [Transfer] button.
SWITCHING HEADSET / HANDSET MODE
You can switch between handset mode and headset mode if you have a headset connected to your phone. In headset mode, you
answer or end a call by pressing the [Speaker] button.
1.
Press the [Transfer] button.
2.
Press [1][1][0].
3.
To use the handset, press [0][2][0] To use the headset, press [0] [2] [1]
4.
Save the selected entry by pressing the [Transfer] button.
NB: If your phone has a headset mode on/off button, press this button. The button’s LED will light when headset mode is set.
Press again to return to handset mode. The LED goes off
8
T E L E C O M
DIALLING BY DIRECTORY NAME
The online directory of names allows you to find any extension or speed dial number very quickly. Normally, every extension number or speed dial number in the system has a directory name assigned to it (for example, John Smith on extension 201, or Ann
Jones on 203). You can select an extension number or speed dial number using the list of directory names by scrolling through the
list, which displays in alphabetical order.
1.
2.
3.
4.
5.
Press the programmed [DIR] button, or use the Scroll button and soft buttons to select the DIR option in the CALL menu on
the LCD panel.
Press the soft button to select the directory you wish to use: PERS (Personal), SYS (System) or STN (Extension) OR Press [1]
(PERS), or [2] (SYS), or [3] (STN).
Press the dial button that matches the first letter of the name that you wish to find (e.g. J for John).
Find the name by using the [Volume] buttons to scroll through the list.
To dial the number, press the soft button corresponding to the DIAL option in the LCD panel.
ASSIGNING / CHANGING YOUR EXTENSION NAME
Up 11 alphabetic characters can be assigned as a name to your phone. The name is entered in the online directory to enable others to call you using the ‘dialling by directory name’ feature (see above). The name also displays in your LCD panel and in the LCD
panels of phones you call.
1.
2.
3.
4.
Press the [Transfer] button.
Press [1][0][4].
Enter the name. (See Entering Characters on the LCD Panel below)
Save the name by pressing the [Transfer] button.
Entering Characters on the LCD Panel
Alphabetic characters are entered on the LCD panel using the dial buttons (button 2=ABC, button 3=DEF, and so on). Press a button the number of times to select the required character (e.g. press “2” three times for “C”). Pressing a different button moves the
cursor to the right to allow you to enter the next character.* For example, if the text to enter is “SAM SMITH”, press the number
“7” four times to get the letter “S”; now press the number “2” once to get the letter “A” Continue selecting characters from the
keypad to complete your entry. Press the programmable “A” button to toggle between upper and lower case text (see below).
* Tip: When the character you want is on the same key as the previous character you typed in, press the [Volume] button to
move the cursor to the right, then select the character.
BUSY EXTENSION CALLBACK
If a called extension is busy, you can set a busy extension callback. When the busy extension becomes free, your phone will ring.
When you pick up the handset, the other extension will ring for the user to answer your call.
1.
2.
3.
4.
5.
When you hear a busy signal, press the programmed [CBK] button, or dial [4] [4] or press the soft button corresponding to
the CBK option on the LCD panel.
When you hear the confirmation tone, replace the handset.
When the called extension becomes free, your phone rings. The ‘CALL BACK’ message will appear on the LCD panel.
Lift the handset to ring the free extension and wait for it to answer.
To end the call, replace the handset or press the [Speaker] key.
NB: If you don’t answer a callback within 30 seconds, it will be cancelled. You can have a maximum of five callbacks set on extensions at any one time.
9
T E L E C O M
BUSY EXTENSION CAMP-ON
If a called extension is busy and you don’t want to wait for a callback, you can give the called extension off-hook ring tone and wait
for them to answer.
1.
2.
3.
Press the [CAMP] button or dial [4][5] or press the soft button corresponding to the CAMP option on the LCD panel.
The called extension will receive off-hook ring tone repeated every few seconds and its first available Call button will flash
to indicate your call is waiting.
The extension must release its first call or place it on hold before answering your camp-on.
HOLDING A CALL
There may be occasions when you need to temporarily interrupt your current call and keep the other party on hold (for example,
to get more information or to answer an important incoming second call). The types of hold function available are:
System hold
Exclusive hold
Consultation hold
Puts the current call on hold. Other phone users can take it off hold.
Puts the current call on hold. Other phone users cannot take it off hold.
Puts the current call on hold and allows you to consult with another phone user.
Retrieving Calls Held at Another Extension
When a call is on hold at another extension, the appropriate line button on your phone (if it is programmed) will have a flashing
red light. To retrieve the call on hold, press the line button.
When a call is on hold at another extension but you do not have a line key, dial [1] [2] followed by the line number or the extension
number of the extension that placed the call on hold.
PARKING CALLS
You can park an outside call in one of 10 “parking orbits” (0-9) to be picked up by another user.
Press the programmed [PARK] button.
Or, press the soft button corresponding to the PARK option on the LCD panel.
(If you press a dedicated [PARK] button with an extender for a parking orbit, skip step 2.)
1.
Press the orbit number required, [0]-[9] (the [PARK] button will flash.)
2.
To have the parked call picked up by another user, notify them of the parking orbit number.
To Retrieve a Parked Call
To pick up a parked call, press the [PARK] button followed by the required orbit number, or press the flashing [PARK] button.
10
T E L E C O M
TRANSFERRING CALLS
You can quickly and easily transfer your current call to another extension. A ‘blind’ transfer means you don’t announce the call,
unlike a ‘screened’ transfer where you do.
1.
2.
3.
While on a call, press the [Transfer] button.
Dial the extension or group number, or press the programmed [DS] button. Your current call is automatically put on transfer
hold. (See Note, below.)
For a ‘blind’ transfer, hang up when you hear ringing. For a ‘screened’ transfer, wait for the called party to answer and advise them of the call, then hang up.
Reconnecting with the Outside Party
If the transfer is refused and the called extension hangs up, you will be reconnected to the outside line. Alternatively, you can
press the [Transfer] button to return to the outside party.
Transferring to Another Extension
If you wish to send the call to another extension without waiting for the first extension to hang up, simply press another [DS] button. Alternatively, press the Call button or C.O. line button to return to the outside party and begin the transfer process again.
NB: When the extension answers, you may toggle between the parties by pressing the [Transfer] button. Neither party can hear
the other until the transfer is complete.
- If you receive No More Calls tone, the extension has no button available to receive another call or is in Do Not Disturb mode.
Press the [Transfer] button to return to the outside party.
- You cannot transfer an intercom call by pressing the [DS] button. Dial the destination extension number.
- When you are transferring a call to a phone set for Voice Announce or Auto Answer, the transferred call will always ring the
phone.
Transfer With Camp-On
When you are transferring a call to another extension and you receive a busy signal, you may “camp on” the call to this extension.
The extension will be alerted that a call is waiting (see Call Waiting, below). To camp on when transferring, simply hang up when
you hear a busy signal.
Transfer To Voice Mail
This feature is used to send a call directly to a voice mailbox. Your phone must have a programmed [VT] button to accomplish this.
1.
2.
3.
Press the [VT] button while you areon a call. Or, press the soft button corresponding to the [VT] entry on the LCD panel.
Dial the mailbox number.
Hang up.
11
T E L E C O M
CALL WAITING
If an outside call or other extension has camped-on to you, your phone will ring and the waiting call’s button will flash green.
Press the flashing button to answer the waiting call.
If your phone has the Auto Hold feature set, your current call will go on hold automatically and you are connected to the new call.
If this feature is not set, press the [Hold] button and then press the flashing button to answer the new call. (Or, finish the current
call and hang up. The waiting call will ring. Lift the handset or press the [Speaker] button to answer the new call.)
PROGRAMMING PERSONAL SPEED DIAL NUMBERS
Your station can be assigned up to fifty speed dial numbers (00-49). Ask the system administrator how many are assigned for you.
1.
2.
3.
4.
5.
6.
To program personal speed dial numbers:
Press the [Transfer] button and dial [1][0][5].
Dial the speed dial number (00-49), or use the [Volume] buttons to select and press the right soft button.
If programming an outside number, enter the outside line access code or line number (e.g. ‘9’, ‘702’, etc). A hyphen (“-“) is
automatically entered after the number.
Enter the phone number to be saved (maximum of 24 digits)
Press the [Transfer] button to save the number.
Assigning a Name to a Speed Dial Number
A name up to 11 characters can be assigned for each speed dial number. This name is used to dial numbers using the Dialling by
Directory Name feature.
1.
2.
3.
4.
5.
Press the [Transfer] button.
Dial [1][0][6].
Enter the speed dial number to be assigned a name (00-49).
Enter a name. (See Entering Characters on below to enter characters.)
Press the [Transfer] button to save the speed dial name.
Entering Characters on the LCD Panel
Alphabetic characters are entered on the LCD panel using the dial buttons (button 2=ABC, button 3=DEF, and so on). Press a button the number of times to select the required character (e.g. press “2” three times for “C”). Pressing a different button moves the
cursor to the right to allow you to enter the next character.* For example, if the text to enter is “SAM SMITH”, press the number
“7” four times to get the letter “S”; now press the number “2” once to get the letter “A” Continue selecting characters from the
keypad to complete your entry. Press the programmable “A” button to toggle between upper and lower case text (see below).
* Tip: When the character you want is on the same key as the previous character you typed in, press the [Volume] button to
move the cursor to the right, then select the character.
12
T E L E C O M
DIALLING USING SPEED DIAL NUMBERS
You can dial speed dial numbers from the list of system numbers 500-999 or 050-999 created by the system administrator or from
the personal list of numbers 00-49 or 000-049 you have created.
1.
2.
Press the programmed [SPD] button or dial [1][6].
Dial the speed dial number programmed for the number you want to call (e.g. 00) The number is dialled automatically.
TIP: Alternatively, to dial one of your first 10 personal speed dial numbers: Without lifting the handset, hold down a dial pad
button 0–9 corresponding to the speed dial number (00–09) for approximately two seconds. The telephone number programmed
in the personal speed dial location will be dialled automatically.
PROGRAMMING ONE-TOUCH SPEED DIAL BUTTONS
You can assign frequently used speed dial numbers to one-touch speed dial buttons for even more convenience. To do this, you
must have a programmed [SPD] button for each speed dial you require.
1.
2.
3.
4.
5.
Press the [Transfer] button.
Dial [1][0][7].
Press a [SPD] button.
Enter the speed dial number (00-49 to 500-999) or (000-049 to 050-999) to be assigned to this button.
Press the [Transfer] button to save the selected number.
Now, to make a call to the number, simply press this speed dial button.
STATION CALL PICKUP
If a call rings at another extension and you know the extension number:
1.
2.
3.
Pick up the handset or press the [Speaker] button.
Dial [6][5].
Dial the number of the ringing extension.
GROUP PICK UP
Extensions may be assigned to call pickup groups. If this is the case, when a call rings at another extension, and you know the
pickup group number:
1.
2.
Pick up the handset or press the [Speaker] button.
Dial [6][6] and dial the pickup group number. Or Press the flashing [PICKUP] button, if programmed.
NB: Station Call Pickup and Group Call Pickup cannot answer the recalls arriving on stations, and are only used for newly incoming calls (external/internal) and operator recalls.
13
T E L E C O M
CALL FORWARDING
If your phone has the FWD ALL, FWD BUSY, and FWD NO ANSWER buttons programmed, you can set the type of forwarding required by pressing one of the buttons. In this case, the button LED lights to indicate which forward option is enabled. Otherwise,
use the dialling codes as described below.
Cancelling Call Forwarding
To cancel any forwarding options you set (except Forward DND), dial [6][0][0].
Forwarding All Calls
To forward all calls sent to your phone:
1.
2.
3.
Dial [6][0][1].
Enter the extension number, group number, or external number where your calls are to be sent
Hang up after the attention tone.
NB: The extension receiving the forwarded calls can transfer the call back to your extension. This feature is useful when you are
expecting an important call and do not want to be disturbed by other calls.
- If you set Forward All Calls and there is no [FORWARD ALL] button, the [Transfer] button lights.
Forward Busy
To forward calls arriving when you are busy on another call:
1.
2.
3.
Dial [6][0][2].
Enter the extension number, group number, or external number where your calls are to be sent.
Hang up after the confirmation tone.
Forward No Answer
To forward calls arriving when you are away from your desk (calls will ring and then be forwarded after a set time):
1.
2.
3.
Dial [6][0][3].
Dial the extension number, group number, or external number where your calls are to be sent.
Hang up after the confirmation tone.
Forward Busy/No Answer
If the Forward Busy and Forward No Answer options are both already set, calls are forwarded to the numbers specified for each of
the options. You can select to have both options enabled at the same time.
1.
2.
Dial [6][0][4].
Hang up after the confirmation tone.
Forward DND
Normally, when you set your phone in Do Not Disturb (DND) mode, incoming callers hear busy tone. If you select Forward DND,
calls are forwarded to another destination when you put your phone in DND mode. Forward DND is cancelled when you cancel
DND mode.
1.
2.
3.
Dial [6][0][5].
Dial the extension number, group number, or external number where your calls are to be sent.
Hang up after the confirmation tone.
14
T E L E C O M
Viewing and Changing Call Forward Options
You can view or change your Call Forward options from the LCD panel of your phone.
1.
2.
3.
Press the [Transfer] button.
Dial [1][0][2].
Select the Call Forward option by pressing one of the buttons [0] to [5], or by using the [Volume] buttons
FORWARD FOLLOW ME
This feature has two purposes. The first is to allow you to transfer calls ringing at your normal extension to the extension you are
currently using. The second is to allow you to transfer calls from another extension to your own (called Remote Forwarding).
To transfer all calls ringing at your phone to the phone you are currently using:
1.
2.
3.
Dial [6][0][6] on the phone you are currently using.
Dial your normal extension number.
Hang up after the confirmation tone.
To transfer calls from another extension to your extension (Remote Forwarding):
1.
2.
3.
Dial [6][0][6].
Dial the number of the extension from which calls are to be forwarded.
Hang up after the confirmation tone.
INTERNAL PAGE
You can make internal announcements to extensions through their speakers. Extensions can be in page zones 1-4.
1.
2.
3.
4.
5.
Lift the handset and listen for dial tone.
Press the [PAGE] button* or dial [5][5], or select the PAGE option from the LCD panel using the soft button.*If you have
dedicated PAGE buttons for page zones (e.g. [PAGE1 ], [PAGE2], etc) press the required button and skip to step 4.
Select a zone number [1], [2], [3], or [4], or page all internal zones by pressing [0].
Start your announcement after the confirmation tone.
Hang up after paging.
ALL PAGE
You can page simultaneously through all internal and external zones.
1.
2.
3.
4.
5.
Pick up the handset and listen for dial tone.
Press the [PAGE] button or dial [5][5], or select the PAGE option from the LCD panel using the soft button.
Press the [*] or programmed [ALL PAGE] button.
Start your announcement after the confirmation tone.
Hang up after paging
15
T E L E C O M
MEET ME PAGE: MMPG
If you cannot directly contact someone or they are absent from their desk, you can page them and ask them to call you while you
wait off-hook.
1.
2.
3.
4.
5.
6.
7.
Pick up the handset and listen for dial tone.
Press the programmed [MMPG] button or dial [5][4], or select the MMPG option from the LCD panel using the soft button.
Press the zone number.
After the confirmation tone, instruct the paged party to dial [5][6].
Press the [Transfer] or programmed [WAIT] button.
Do not replace the handset. Wait for the paged party to call.
The call is automatically connected when the paged party enters the Meet Me Page Answer code.
CALL PARK AND PAGE
You can transfer an external call to another extension by “parking” the call and notifying the call through paging. This function is
useful in a factory or in a large office when you cannot easily contact the person who should receive the call.
1.
2.
3.
4.
5.
Press the [PAGE] button or select the PAGE option from the LCD panel using the soft button to automatically park the call.
If you have dedicated PAGE buttons for page zones (e.g. [PAGES], [PAGE6], etc) press the required button and skip to step 3.
Press the appropriate page zone number
Announce the parked call and your extension number or line number.
Hang up.
Retrieving a Parked Call
Press the [PARK] button or dial [1][0]. Then dial the announced number. The parked call is the connected
PROGRAMMED MESSSAGES
If you need to leave your station, you can set a message display on your phone to inform callers of your absence (for example “In a
Meeting”). The message also displays on your phone’s LCD panel. Some standard messages are already set in the system, and you
create your own if you wish.
Viewing and Selecting a Programmed Message
To view and select a set message:
1.
2.
3.
Press the [Transfer] button and dial [1][1][5].
Use the [Volume] buttons to scroll through the programmed messages.
Press the [Transfer] button to select your message.
It will then display on your LCD panel.
Selecting a Programmed Message Using Code Numbers
Dial [4][8] and dial the desired message number 00-20.
16
T E L E C O M
Creating Your Own Message
Personalised messages can be programmed using codes 16 to 20. To create a personalised message on your phone:
1.
2.
3.
4.
Press the [Transfer] button and dial [1][1][5].
Dial a code number 16-20
Enter your message (up to 16 characters see Entering Characters below)
Press the [Transfer] button to set your message
Entering Characters on the LCD Panel
Alphabetic characters are entered on the LCD panel using the dial buttons (button 2=ABC, button 3=DEF, and so on). Press a button the number of times to select the required character (e.g. press “2” three times for “C”). Pressing a different button moves the
cursor to the right to allow you to enter the next character.* For example, if the text to enter is “SAM SMITH”, press the number
“7” four times to get the letter “S”; now press the number “2” once to get the letter “A” Continue selecting characters from the
keypad to complete your entry. Press the programmable “A” button to toggle between upper and lower case text (see below).
* Tip: When the character you want is on the same key as the previous character you typed in, press the [Volume] button to
move the cursor to the right, then select the character.
Cancelling a Programmed Message
1.
2.
3.
To cancel a message
Dial [4][8] then [0][0] to cancel the message.
Your LCD display returns to normal
CANCELLING MESSAGES & MESSAGE WAITING LIGHTS
You can cancel message indications you left on other extensions, or that have been left at your extension by others.
Dial [4][2] and enter:
the extension number where you left the indication, OR, your extension number to cancel all indications left by others for you (the
flashing LEDs go out)
BACKGROUND MUSIC
You can listen to music through the phone’s speaker (if a music source is provided by the system).
1.
2.
3.
Press the [Hold] button.
Use the [Volume] buttons to adjust the music volume. This does not affect the speaker volume.
Press the [Hold] button again to cancel music.
17
T E L E C O M
APPOINTMENT REMINDER / ALARM CLOCK
This feature serves as an alarm clock. Up to three alarms may be set. Each alarm may be set as a one-day (today) alarm or daily
alarm. You set a time for each alarm: if set for today it will ring at the set time, unless cancelled; if set as a daily alarm it will ring at
the set time each day, unless cancelled.
When activated, you will hear a series of short rings and “Alarm Reminder” displays on the LCD. Lift the handset to answer the
alarm. If you do not answer, the alarm will repeat a number of times at set intervals before cancelling.
1.
2.
3.
4.
5.
6.
Press the [Transfer] button.
Dial [1][1][2].
Select the alarm number [1], [2] or [3].
Enter the time at which you want the alarm to sound. Enter the time as HHMM (hours and minutes) using the 24-hour clock
format (e.g. 1330 is 1.30 pm).
Select the alarm type: [0] (Not Set), [1] (Today) or [2] (Daily).
Press the [Transfer] button to save settings
Cancel Alarm
1.
2.
3.
4.
Press the [Transfer] button.
Dial [1][1][2].
Select the alarm number [1], [2] or [3].
Press the [Hold] button.
ALARM MESAGES
You can set a 16-character message to display when using the alarm feature (e.g. “Meeting with JS”).
1.
2.
3.
4.
5.
6.
7.
Press the [Transfer] button.
Dial [1][1][6].
Select the alarm number [1], [2] or [3].
Enter the time at which you want the alarm to sound. Enter the time as HHMM (hours and minutes) using the 24-hour clock
format (e.g. 1330 is 1.30 pm).
Select the alarm type: [0] (Not Set), [1] (Today) or [2] (Daily).
Enter the message using the dial buttons.
Press the [Transfer] button to save the alarm and message.
Boss / Secretary Hot Line
Phones for executives and secretaries can be connected via a “hot line”. Either phone can make a call to the other by pressing the
[BOSS] button or by selecting the BOSS option on the LCD panel using the soft button.
If DND is set on the executive’s phone, all calls will be forwarded to the secretary’s phone.
When the secretary’s phone receives the call, a red light flashes on the executive’s phone.
The secretary can transfer calls to the executive’s phone even when set in DND mode:
Press the [Transfer] button then the [BOSS] button, or select the BOSS option from the LCD panel using the soft button.
Either wait until the executive answers and announce the call, then hang up, or hang up without announcing the call
18
T E L E C O M
GROUP LISTENING
While you are on a call using the handset, you can allow others to hear the conversation through your phone’s speaker.
Turn on the speaker by pressing the programmed [LISTEN] button or selecting the LISTN option on the LCD panel* using the Scroll
button and soft button. Do not replace the handset.The microphone is not switched on, so the calling/called party cannot hear
anyone else in the office. * (“LISTN” changes to “listn” on the LCD).
To resume a private conversation, press the [LISTEN] button again, or select the ‘listn’ option on the LCD panel* using the soft button
NB: It is advisable, but not essential, to turn the group listening feature off before hanging up to prevent any “squeal” from the
speaker.
OFF-HOOK VOICE ANNOUNCEMENTS
You can make an announcement (OHVA call) through the handset or speaker of a phone that is currently busy on a call. This feature is useful when you have an urgent message to deliver. You must have a programmed [OHVA] button to do this. OHVA calls
cannot be made to phones in DND mode or which have anOHVA block set (see below). The OHVA feature works with intercom and
transferred calls.
To make an OHVA call:
1.
2.
3.
4.
Dial the extension number or press the [DSS] button.
When you hear busy tone, press the [OHVA] button or select the OHVA option from the LCD panel using the soft button.
Make your announcement after the confirmation tone.
Finish the call by replacing the handset, or pressing the [Speaker] button.
Answering an OHVA Call
When receiving an OHVA call, you will hear the announcement through your handset or speaker depending on which you are using. In either case, you can answer the call before continuing your current call.
Press the flashing [Call] button. This places your current call on hold and allows you to talk to the announcing party.
To disconnect the OHVA call and return to your original call, press the [Call] button for the original call.
Rejecting an OHVA Call
When receiving an OHVA call, press the programmed [REJECT] button or select the REJECT option from the LCD panel using the
soft button. This will disconnect the OHVA call and return you to the original caller.
OHVA Block
You can set an OHVA block to prevent OHVA calls at your phone. While the phone is idle, press the programmed [BLOCK] button or
select the OHBLK option from the OTHER menu on the LCD panel using the [Scroll] button and soft button.
Press the [BLOCK] button again, or turn off the OHBLK option, to cancel the block.
19
T E L E C O M
Secure OHVA
This option prevents your phone from receiving OHVA calls via the speaker, for privacy. Any OHVA call is broadcast via the handset
only when the SECURE OHVA option is turned on at your phone.
1.
2.
3.
4.
Press the [Transfer] button.
Dial [1][1][0]
Dial [1][3][1] to switch Secure OHVA on, or [1][3][0] to switch it off
Press the [Transfer] button to save settings.
CALL DURATION TIMER
The call timer is used to time the duration of external calls. It can also be manually set to time a call or as a simple stopwatch feature.
Setting Automatic Timer
If set, the timer appears on the LCD panel immediately for incoming calls, or when your call is answered after dialling an outgoing
call. It remains active during the call. The call duration is displayed in minutes and seconds, and is reset if the call lasts longer than
100 minutes.
1.
2.
3.
4.
While on-hook, press the [Transfer] button.
Dial [1][1][0].
Dial [0][1][1] to activate the auto timer or [0][1][0] to deactivate it.
Press the [Transfer] button to save settings.
Setting Manual Timer
To set the timer manually when on a call, you must have a programmed [TIMER] button. Press the button to start the timer, and
press it again to stop the timer.
1.
2.
3.
To start the timer while the phone is idle, press the [TIMER] button or select the TIMER option from the OTHER menu on
the LCD panel using the [Scroll] and soft buttons.
Press the [TIMER] button again or select TIMER from the LCD panel to stop the timer and confirm the elapsed time displayed.
Lift and replace the handset to return the phone to its normal LCD display.
STORING A CALLERS NUMBER
While you are on a call, you can store the number in memory by pressing the programmed [SAVE] button or selecting the SAVE
option from the CLIP menu on the LCD screen using the [Scroll] and soft buttons.
Calling a Stored Number
To redial a stored number, dial [1][7]
STORING A CALLERS NUMBER AS A SPEED DIAL NUMBER
You can store a caller’s number as a speed dial number in your personal speed dial list.
1.
2.
Press the programmed [STORE] button, or select the STORE option in the CLIP menu on the LCD panel.
You can view the speed dial number to which the number was stored by pressing the [Scroll] button
20
T E L E C O M
VIEWING CLIP FOR CALLS ON HOLD OR PARKED
When an incoming call is on hold or parked for you, you can view CLIP information and decide how to handle the call before answering.
1.
2.
3.
Press the programmed [INQIRE] button or select the INQIRE option from the CLIP menu on the LCD panel using the soft buttons. If you are currently on a call, that call will be put on hold (see the Note, below).
Dial the C.O. line number holding the call.
Press the [Call] button to answer the call, or the NND soft button to view more information on the call, or the IGNORE soft
button to ignore the call.
NB: If you are currently on an intercom call or you have cleared the automatic hold feature, you must either disconnect the call
or put it on hold. If you perform the above procedure for an external call, the message [call no longer available] will be displayed
on screen.
VIEWING CLIP FOR PREVIOUS CALLS
You can view CLIP information for up to 10 of the most recent calls you received. Call information is stored in memory on a “first-in
first-out” basis. The list also includes calls that rang but were not answered. While reviewing the list, you canpress a button to dial
the number currently displayed.
1.
2.
Press the programmed [REVIEW] button, or select the REVW option from the CLIP menu on the LCD panel using the [Scroll]
and soft buttons. The oldest call is displayed.
Press the, DIAL soft button to redial the number or Press the NND soft button to view more information or Press the CLEAR
soft button to delete the number or Store the number in your personal speed dial list by pressing the [Scroll] button and
selecting the STORE option from the CLIP menu on the LCD panel.