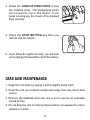
1
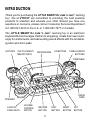
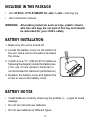
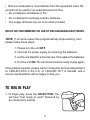
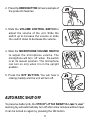
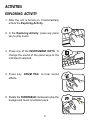
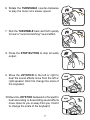
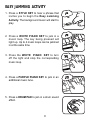
LITTLE SMART
USER’S MANUAL
© VTECH
Printed in China
91-01326-000
Dear Parent:
At VTech® we know that a child has the ability to do great
things. That’s why all of our electronic learning products
are uniquely designed to develop a child’s mind and allow
them to learn to the best of their ability. Whether it’s learning
about letters, numbers, geography or algebra, all VTech®
learning products incorporate advanced technologies and
extensive curriculum to encourage children of all ages to
reach their potential.
When it comes to providing interactive products that
enlighten, entertain, and develop minds, at VTech® we see
the potential in every child.
1
INTRODUCTION
Thank you for purchasing the LITTLE SMART DJ Jazz 'n Jam™ learning
toy! We at VTECH® are committed to providing the best possible
products to entertain and educate your child. Should you have any
questions or concerns, please call our Consumer Services Department
at 1-800-521-2010 in the U.S. or 1-800-267-7377 in Canada.
The LITTLE SMART DJ Jazz 'n Jam™ learning toy is an electronic
keyboard that encourages children to sing along, create their own music,
enjoy fun instruments, and add exciting sound effects with the turntable,
joystick and drum pads.
JOYSTICK
INSTRUMENT/
MELODY KEYS
MICROPHONE
ON BUTTON
PIANO LESSON
BUTTONS
TURNTABLE
DRUM
PADS
SPEAKER
LIGHT-UP
PIANO KEYS
VOLUME
CONTROL
SWITCH
RECORD
BUTTON
2
PLAY
BUTTON
DEMO
BUTTON
OFF
BUTTON
INCLUDED IN THIS PACKAGE
•
One VTECH® LITTLE SMART DJ Jazz 'n Jam™ learning toy.
•
One instruction manual.
WARNING: All packing materials such as tape, plastic sheets,
wire ties and tags are not part of this toy, and should
be discarded for your child's safety.
BATTERY INSTALLATION
1. Make sure the unit is turned off.
2. Locate the battery cover on the bottom of
the unit. Use a coin or screwdriver to loosen
the screw.
3. Install 4 new "C" (UM-2/LR14) batteries
following the diagram inside the battery box.
(The use of new alkaline batteries is
recommended for maximum performance.)
4. Replace the battery cover and tighten the
screw to secure the battery cover.
BATTERY NOTICE
• Install batteries correctly observing the polarity (+, -) signs to avoid
leakage.
• Do not mix old and new batteries.
• Do not use batteries of different types.
3
• Remove exhausted or new batteries from the equipment when the
unit will not be used for an extended period of time.
• Do not dispose of batteries in fire.
•
Do not attempt to recharge ordinary batteries.
•
The supply terminals are not to be short-circuited.
WE DO NOT RECOMMEND THE USE OF RECHARGEABLE BATTERIES.
NOTE: If for some reason the program/activity stops working, then
please follow these steps:
1. Please turn the unit OFF.
2. Interrupt the power supply by removing the batteries.
3. Let the unit stand for a few minutes, then replace the batteries.
4. Turn the unit ON. The unit should now be ready to play again.
If the problem persists, please call our Consumer Services Department
at 1-800-521-2010 in the U.S. or 1-800-267-7377 in Canada, and a
service representative will be happy to help you.
TO BEGIN PLAY
1. To begin play, press the ON BUTTON. You
will hear "Get ready to rock!" followed by
an introductory melody.
4
Get ready to rock!
2. Press the DEMO BUTTON to hear a sample of
the product's features.
3. Slide the VOLUME CONTROL SWITCH to
adjust the volume of the unit. Slide the
switch up to increase the volume or slide
the switch down to decrease the volume.
4. Slide the MICROPHONE VOLUME SWITCH
to adjust the microphone volume. The
microphone will turn off when the switch
is at its lowest position. The microphone
can turn on only when it is in the upright
position.
5. Press the OFF BUTTON. You will hear a
closing melody and the unit will turn off.
AUTOMATIC SHUT-OFF
To preserve battery life, the VTECH® LITTLE SMART DJ Jazz 'n Jam™
learning toy will automatically turn off after a few minutes without input.
It can be turned on again by pressing the ON button.
5
ACTIVITIES
EXPLORING ACTIVITY
1. After the unit is turned on, it automatically
enters the Exploring Activity.
2. In the Exploring Activity, press any piano
key to play music.
3. Press any of the INSTRUMENT KEYS to
change the sound of the piano keys to the
instrument selected.
4. Press any
effects.
DRUM PAD
to hear sound
5. Rotate the TURNTABLE clockwise to play the
background music at a faster pace.
6
6. Rotate the TURNTABLE counter-clockwise
to play the music at a slower speed.
7. Rub the TURNTABLE back and forth quickly
to hear a "record scratching" sound effect.
8. Press the STOP BUTTON to stop all audio
output.
9. Move the JOYSTICK to the left or right to
hear the sound effects move from the left or
right speaker. Hold it to change the scale of
the keyboard.
10.Move the JOYSTICK backward or forward to
hear ascending or descending sound effects
move closer to you or away from you. Hold it
to change the scale of the keyboard.
7
EASY JAMMING ACTIVITY
1. Press a STYLE KEY to hear a phrase that
invites you to begin the Easy Jamming
Activity. The background music will start to
play.
2. Press a WHITE PIANO KEY to jam in a
music loop. The key being pressed will
light up. Up to 4 music loops can be jammed
in at the same time.
3. Press the WHITE PIANO KEY to turn
off the light and stop the corresponding
music loop.
4. Press a PURPLE PIANO KEY to jam in an
additional music tune.
5. Press a DRUM PAD to jam in a drum sound
effect.
8
6. Slide the TURNTABLE clockwise to increase
the tempo of the music.
7. Slide the TURNTABLE counter-clockwise to
decrease the tempo of the music.
8. Rub the TURNTABLE back and forth quickly
to hear a "record scratching" sound effect.
9. Press an INSTRUMENT KEY to change the
instrument sound of the background music.
10.Press the STOP BUTTON to stop the
music.
9
11.You will hear an inviting phrase if there is no
input for a period of time.
12.The music will finish playing if there is no input
for a few minutes.
13.You will hear an encouraging phrase while
you play your own tunes.
14. Move the JOYSTICK to the left or right to hear
the music shift to the left or right speaker.
It also changes the key in which the music
is being played.
15.Move the JOYSTICK backward or forward to
hear the music moving closer to you or away
from you. It also changes the key in which
the music is being played.
KARAOKE ACTIVITY
1. Press a SONG KEY and you will hear a
phrase inviting you to sing along. The selected music will then start to play.
10
2. Press a WHITE PIANO KEY to change the
instrument of the song. The key being
pressed will light up.
3. Press the WHITE PIANO KEY to turn off the
light and change back to the normal instrument.
4. Press a PURPLE PIANO KEY or a drum pad
to hear jam-in phrases.
5. Slide the TURNTABLE clockwise to increase
the tempo of the song.
6. Slide the TURNTABLE counter-clockwise to
decrease the tempo of the song.
11
7. Rub the TURNTABLE back and forth quickly
to hear a "record scratching" sound effect.
8. Press an INSTRUMENT KEY to change the
instrument sound of the song.
9. Press the STOP BUTTON to stop the
music.
10.Move the JOYSTICK to the left or right to shift
the music to the left or right speaker. It also
changes the key in which the music is being
played.
11.Move the JOYSTICK backward or forward to
hear the music move closer to you or away
from you. Hold it to change the key of the
music.
12
RECORDING ACTIVITY
1. Press the RECORD BUTTON and you will
hear a phrase inviting you to start recording
your own tune. You can start to record your
own music and sound effects using all of
the input devices. You will not be able to
record any sounds through the microphone.
2. Press the STOP BUTTON to stop recording.
3. The recording activity will end after a few
minutes without input. You will hear an
ending tune when the recording mode has
ended.
4. Press the PLAY BUTTON to play back
your recorded music and sound effects.
You can play music while your recorded music plays back.
5. Press and hold the PLAY BUTTON for 1
second. The unit will play back the recorded
music and sound effects continuously.
13
6. You can record your own music, jamming pattern, or karaoke
instrument pattern in the Recording Activity. You will not be able
to record singing using the microphone in this activity.
PIANO LESSON ACTIVITY
Note:
These four songs contain notes which cannot be shown by the light-up
piano keys. Therefore, these songs cannot be used for piano lessons
1, 2 & 3.
-- Take Me Out To The Ball Game
-- Old King Cole
-- Sailing
-- Turkey In The Straw
LESSON 1:
1. Press the LESSON 1 BUTTON to hear an
introductory phrase such as "Pick a song and
follow the lights."
2. Press a SONG KEY to select a song you
want to learn.
14
3. Follow the LIGHT-UP PIANO KEYS and
learn to play the selected song. The lightup key will wait for you to press it before
proceeding to the next note of the music.
4. If there is no input after entering the Piano
Lesson Activity, the unit will terminate the
lesson and start the Exploring Activity.
5. Press the STOP BUTTON at any time to
end the lesson.
LESSON 2:
1. Press the LESSON 2 BUTTON to hear an
introductory phrase such as "Pick a song!
Ready? Follow the lights."
2. Press a SONG KEY to select a song. The
prelude of the song will then start playing.
15
3. Follow the LIGHT-UP PIANO KEYS to play
the song. The background music will not wait
for you in this lesson. However, if you press
a wrong key, the music will still play correctly.
The purpose of this lesson is to teach you
how to follow the rhythm of the music.
4. Press the STOP BUTTON at any time to
end the lesson.
LESSON 3:
1. Press the LESSON 3 BUTTON to hear an
introductory phrase such as "Wanna be a
star? Pick a song and follow the lights."
2. Press a SONG KEY to select a song. The
prelude of the song will then start playing.
16
3. Follow the LIGHT-UP PIANO KEYS to play
the selected song. The background music
will not wait for you in this lesson. If you
press a wrong key, the music of the pressed
keys will play.
4. Press the STOP BUTTON any time you
want to end the lesson.
5. If you follow the lights correctly, you will hear
encouraging phrasesat the end of the lesson.
CARE AND MAINTENANCE
1. Keep the unit clean by wiping it with a slightly damp cloth.
2. Keep the unit out of direct sunlight and away from any direct heat
source.
3. Remove the batteries when the unit is not in use for an extended
period of time.
4. Do not drop the unit on hard surfaces and do not expose the unit to
moisture or water.
17
POWER SUPPLY:
BATTERIES: 4 x 1.5V “C” / UM-2 / LR14
DO NOT USE RECHARGEABLE BATTERIES
ADAPTOR: Use VTECH or any standard adaptor complying with EN60742
DC 9V
300mA
✳ The transformer is not a toy.
✳ The toys is not intended for children under 3 years old.
✳ The toy is not to be connected to more than the
recommended number of power supplies.
Notice to Parents:
We would like to point out that any safety isolating transformer or
charging unit to be used with the toy should be regularly examined for
potential hazards, such as damage to the cable or cord, plug, enclosure
or other parts, and that, in the event of such damage, the toy must not
be used until that damage has been properly removed.
IMPORTANT NOTE:
Creating and developing preschool products is accompanied by a
responsibility that we at VTECH® take very seriously. We make
every effort to ensure the accuracy of the information, which forms
the value of our products. However, errors sometimes can occur. It
is important for you to know that we stand behind our products and
encourage you to call our Consumer Services Department at 1800-521-2010 in the U.S. or 1-800-267-7377 in Canada with any
problems and/or suggestions that you might have. A service
representative will be happy to help you.
18
Note:
This equipment generates and uses radio frequency energy and if not
installed and used properly, that is, in strict accordance with the
manufacturer's instructions, it may cause interference to radio and
television reception. It has been type tested and found to comply within
the limits for a Class B computing device in accordance with the
specifications in Sub-part J of Part 15 FCC Rules, which are designed
to provide reasonable protection against such interference in a residential
installation. However, there is no guarantee that interference will not
occur in a particular installation. If this equipment does cause
interference with radio or television reception, which can be determined
by turning the equipment off and on, the user is encouraged to try to
correct the interference by one or more of the following measures:
• reorient the receiving antenna
• relocate this product with respect to the receiver
• move this product away from the receiver
19