1
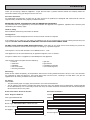
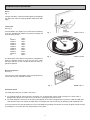
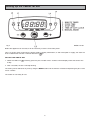
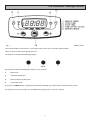
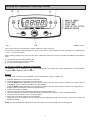
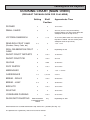
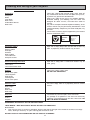
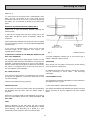
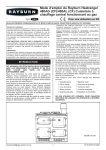
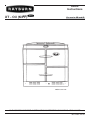
Users
Instructions
XT - Oil (K/PF)
For use in GB and IE
DESN 514112 B
PLEASE READ THESE INSTRUCTIONS BEFORE USING THIS APPLIANCE
10/13 EOPI 514136
CONTENTS
SECTION
PAGE
INTRODUCTION
3
FEATURES/ACCESSORIES
4-5
SETTING UP THE COOKER FOR USE
6
THE AUTOMATIC COOKING CONTROL
7
SETTING THE AUTOMATIC COOKING CONTROL
8-9
USING THE AUTOMATIC COOKING FACILITY
10
MAIN OVEN OPERATION
11
COOKING WITH YOUR APPLIANCE
12
COOKING WITH THE RAYBURN
13
CLEANING & CARING FOR YOUR RAYBURN
14
SERVICING OR FAULT
15
NOTE: SMOKE/SMELL EMITTED DURING INITIAL USAGE.
Some parts of the cooker have been coated with a light covering of protective oil. During initial
operation of the cooker, this may cause smoke/smell to be emitted and is normal and not a fault
with the appliance. It is therefore advisable to open doors and or windows to allow for ventilation.
Lift the insulating lids to prevent staining the linings.
2
Introduction
Thank you for buying a Rayburn Appliance. To get the best from it, please read this leaflet and carefully follow the
instructions before using your Rayburn for the first time.
Consumer Protection
As responsible manufacturers we take care to make sure that our products are designed and constructed to meet the
required safety standards when properly installed and used.
IMPORTANT NOTICE: PLEASE READ THE ACCOMPANYING WARRANTY
Any alteration that is not approved by AGA could invalidate the approval of the appliance, operation of the warranty and
could affect your statutory rights.
Health & Safety
See Installation & Servicing Instructions for details.
The Appliance
The Rayburn has been designed so that it can be turned on and off as required.
If the weather is very cold, or if you prefer, the appliance can be run continuously on the low setting and turned up as
required. DO NOT USE TO WARM A ROOM WITH THE APPLIANCE OVEN DOORS OPEN.
DO NOT LEAVE THE ROASTING OVEN DOOR OPEN - If left open for any length of time over-heating may cause the
overheat thermostat to activate which will require re-setting by a qualified engineer.
This Rayburn is for use with Kerosene C2 to BS2869 Part 2 : 1998
This appliance must be commissioned by an approved engineer, such as OFTEC.
A Rayburn cooker timer is supplied as a standard part of the appliance.
Your Rayburn comes complete with the following:1 meat tin
1 solid shelf
1 cookbook
1 users instruction
1 servicing instruction
1
2
1
1
grill rack
grid shelves
installation instruction
Commissioning Form
Oil Delivery
Switch off the cooker temporarily, where possible, whilst the oil is being refilled and leave it off for 1 hour. This will allow
any sediment to settle and prevent it from being drawn back into the burner, resulting in a break down. Ask your oil
supplier/driver to advise you before the oil tank is refilled.
Air Supply
Please Note:
• The permanently open air supply into the kitchen must never be blocked off.
• The air supply to the cooker is through both sides of the kick strip. This should never be blocked off. Avoid household
lint and dust build up. If it is necessary to clean this area, the cooker should be switched off. See that household pets
do not lie over this air entry zone.
Useful Information About the Cooker
About the Installation
Model: Rayburn 400K P/F
Installer
Fuel Type: Kerosene C2
Address
Serial No.
Burner Type: Monoflame Minor 1 Pressure Jet
Oil Tank Capacity
Oil Supplier 1.
Installation Date
2.
Service Engineer
3
Features/Accessories
Doors
Fig. 1
To open the doors. Twist the handle slightly to disengage
the door catch from the locking spindle and pull the door
open.
Thermodial
See Fig. 2
All thermodials vary slightly but if used with the following
chart, the approximate position for particular recipes will
soon become familiar.
L
MARK
MARK
MARK
MARK
MARK
MARK
MARK
MARK
MARK
H
1
2
3
4
5
6
7
8
9
120ºC
140ºC
150ºC
160ºC
180ºC
190ºC
200ºC
220ºC
230ºC
240ºC
250ºC
Fig. 1
DESN 514119
Fig. 2
DESN 514108
On opening the oven door the temperature will appear to
drop as it registers cooler air away from the oven. Close
the door and after a few minutes the dial will have regained its position.
Oven Grid Shelves
See Fig. 3
To ensure the correct operation of the oven grid shelves,
ensure that they are inserted as shown.
Fig. 3
DESN 510111
Solid Plain Shelf
The solid plain shelf can be used in two ways:l As a baking sheet for scones, pizzas, meringues, etc. Its high quality means it will not warp in the oven and it is
designed to fit directly on to the runners in the oven, leaving the grid shelves free.
l As a heat deflector. If the oven is too hot or food already in the oven is beginning to over-brown, slide the solid plain
shelf onto the top runner above the food and it will help prevent further browning by deflecting and absorbing heat.
It can be used from the start of cooking or can be inserted during cooking. Remember to remove the plain shelf at the end
of cooking as it may affect the oven temperature if left in place.
4
Features/Accessories (cont.)
SHELF POSITION 1
SHELF POSITION 2
SHELF POSITION 3
SHELF POSITION 4
SHELF POSITION 5
Fig. 3A
OVEN BASE
DESN 514195
Further accessories, tins, grid shelves, solid shelves, saucepans, aprons and gauntlets, etc. are available from your
Rayburn stockist.
7-Day Programmer (optional extra)
This control is available giving three individual time settings and an override control. It may be used for the following:1.
A pre-set morning programme, to turn the cooker to the desired temperature, so that it is ready for immediate use.
2.
Mid-day or evening timing to suit meal times.
3.
Alternative third programme setting if needed.
Note:
When using the external programmer, the internal clock within the Rayburn should be in the manual mode. The minute
timer can still be used.
5
Setting Up the Cooker for use
Fig. 4
DESN 514107
Before the appliance can be used, it will be necessary to set the ‘time-of-day clock’.
This is a 24-hour clock, and when the power supply is initially switched on, or after interruption in supply, the clock will
show 12.00 and the LED bar 4 will flash above the
sign.
SETTING THE TIME OF DAY
1. Whilst the LED bar 4
of day.
is flashing, press the plus + and/or minus - buttons until the display shows the correct time
2. After 5 seconds, the bar 4 will stop flashing.
The setting can be altered at any time by using the MODE button until the LED bar 4 flashes and pressing the plus + and
minus - buttons.
The cooker is now ready for use.
6
The Automatic Cooking Control
Fig. 5
DESN 514107
This control includes a minute timer, a time-of-day clock as well as an automatic cooking control.
There are three buttons which operate the timer.
The buttons are used for the following purpose:
l
-
l
Mode
l
+
By using these buttons the following functions can be selected:
l
Minute timer
l
Automatic cooking time
l
End of automatic cooking time
l
Time-of-day clock
Every time the MODE button is pressed a small LED bar will light up to show which function has been chosen.
The setting of any of the functions can be adjusted by using the plus + or minus - buttons.
7
Setting the Automatic Cooking Control
DESN 514107
Fig. 6
This can be used to set an automatic cooking programme at pre-set times.
The maximum length of cooking programme which can be set is 23 hours and 59 minutes e.g. delay time + cooking time
= max - 23 hours 59 minutes.
Before setting a programme, check that the clock is telling the correct time of day, and have the following information to
hand:
l the length of time the food needs to cook.
l the time that the food is to finish cooking.
l the oven control setting required.
TO SET AN AUTOMATIC COOKING PROGRAMME
The STOP
time or cooking time
can be entered first. Each setting will remain displayed for 5 seconds, before
changing back to displaying the time of day.
Example
The food needs 2 hours 30 mins at MARK 1 and is required to be ready by 18.00 hours.
1. Place the food on the correct shelves in the oven.
2. Check that the clock is telling the correct time of day.
3. Press the MODE button repeatedly until the LED bar 2 flashes and then press the plus + button until 2 hours 30 mins
is displayed. After 5 seconds the LED bar will stop flashing.
4. Press the MODE button repeatedly until the LED bar 3 flashes and then press the plus + button until 18.00 hours is
displayed. After 5 seconds the LED bar will stop flashing.
5. Set the oven control to MARK 1.
6. The time of day will remain displayed throughout the cooking programme.
7. When the cooking has finished, a beep will sound and continue for 2 minutes, unless cancelled manually.
8. To stop the beep manually, press any of the buttons.
9. Return the oven control knob to the OFF position.
Programmes can be changed at any time by pressing the appropriate buttons and the plus + and minus - buttons as
already described.
NOTE: It is not possible to change/set the time of day whilst an automatic programme is taking place.
8
Setting the Automatic Cooking Control
SETTING A STOP TIME ONLY
1. Place the food on the correct shelves in the oven.
2. Press the MODE button repeatedly until the LED bar 3 flashes and then press the plus + button until the time at which
the cooking is to end. After 5 seconds the LED will stop flashing.
3. Set the oven temperature control. Cooking will start immediately.
4. At the of the cooking time, a beep will sound and will continue for 2 minutes unless cancelled manually. This can
be cancelled by pressing any of the buttons.
5. Return the oven control knob to the OFF position.
To cancel any automatic programme, press the MODE button and then the minus - button until the display shows the time
of day. A signal will sound.
SETTING THE MINUTE TIMER
The minute timer can be set to time periods from 1 minute to 23.59 hours.
1. Press the MODE button repeatedly until the LED bar 1 flashes, above the
sign. Set the required time by using the
plus + and minus - buttons. (NOTE: The LED bar 1 will disappear if the plus + and minus - buttons are not pressed
within 5 seconds. The setting will then have to be repeated).
2. The set time will now remain displayed, the LED bar will remain steady and the timer will start to count down.
3. At the end of the set time, a beep will be heard (2 beeps every 2 seconds) and will continue sounding for 2 minutes
unless cancelled.
4. Press any of the buttons to stop the beep. The LED bar light will go out.
The minute timer can be used at any time, even if an automatic cooking programme has been set.
9
Using the Automatic Cooking Facility
Using this facility on the Rayburn timer allows the user to select the amount of time the appliance is on and the finish/off
time.
HINTS ON THE USE OF THIS FACILITY
*
The Rayburn should be COLD before starting any automatic cooking where there is a delay in the start time.
Because the Rayburn is made from cast iron and will therefore retain the heat for a number of hours after it is turned
off, food should NOT be loaded into the appliance for automatic cooking if the Rayburn has been used earlier in the
day, or is slightly warm, even if it has been turned off for some hours.
FAILURE TO OBSERVE THESE POINTS COULD RESULT IN FOOD POISONING
*
Only choose foods that require the same amount of time to cook and require the same oven temperature.
*
Food should be thoroughly thawed before it is put into the oven.
*
Warm food should NEVER be placed in the oven if there is a delay to the start of cooking. ie Stews prepared by
frying the meat/vegetables should be cooked immediately.
*
Dishes containing left-over food should not be cooked by this method.
*
On warm days or in centrally heated houses, the delayed start should be minimum, to avoid the growth of
harmful bacteria.
*
Dishes containing liquid should not be too full, to prevent boiling over.
*
At the end of the automatic cooking time although the Rayburn will switch off automatically it will remain hot for hours
after. FOOD MUST BE REMOVED IMMEDIATELY OR OVER COOKING WILL RESULT.
*
This facility should be used for the main oven only - NOT the lower oven or hotplate.
*
When starting from cold add an extra 40 minutes to the cooking time as an allowance for the Rayburn to warm up.
*
If a full load is to be cooked add an extra 30 minutes to the total cooking time.
*
ENSURE FOOD IS THOROUGHLY COOKED BEFORE SERVING
*
In the event of a short term power failure the auto cook will automatically adjust the amount of cooking time. As the
Rayburn retains its heat - OVER COOKING MAY RESULT.
10
Main Oven Operation
Note: care should be taken not to touch the hotplate, oven combustion chamber door and flue areas unless an insulated
glove is used, as these areas are hot working surfaces and will burn unprotected skin.
l
l
l
l
l
l
The oven is indirectly heated from the outside by hot gases from the heat source so that no flame or elements within
the oven means full use can be made of the whole cooking area.
The oven is hotter towards the top than the bottom.
To heat the main oven and increase the hotplate temperature - turn the cooker control knob to desired setting as
required.
There are 5 runners or shelf positions within the oven on which the grid shelves, solid shelf and meat tin fit
directly.
When left on L setting the main oven will maintain a low idling temperature suitable for slow cooking .
As the Rayburn is made of cast iron, the time for the appliance to heat up (30 - 40 mins) and cool down is longer than
with a conventional oven.
Hints
*
Do not forget the thermodial reflects the temperature in the middle of the oven, by moving the food higher
or lower or use of the solid plain shelf a hotter or cooler temperature can be achieved.
*
The main oven has good all round temperature. Joints of meat gain colour more quickly than in a
conventional oven, this is due to the heating from all round the cast iron oven (not just an element or gas
flame). Moisture is quickly sealed in, giving a succulent moist finish.
*
There is so little heat loss when opening the oven door that cakes can be checked without fear of them
sinking.
*
For perfect baking results some baked goods such as trays of biscuits, small cakes or items nearer the top
or on the floor of the oven, may need turning during cooking.
*
One of the many benefits of the cast iron main oven is that when the oven is hot the floor of the oven is
hotter than that of a conventional cooker and can be used directly for cooking.
*
No need to bake quiche pastry cases “blind”, just place the flan dish on the oven floor for “soggy-free”
pastry or finish off the base of fruit pies etc. This position is also useful for shallow frying (a cast iron dish
is recommended) with the added advantage that fat splashes are carbonised so that cleaning is minimal and
cooking smells are taken away through the flue.
11
Cooking with your appliance
Grilling
The top of the oven is where grilling takes place. When the main oven is hot use the meat tin with a grill rack (used on the
highest position) so that the fat can drip into the tray. Position the food on the rack and put into the oven on the highest
runner. The heat from the cast iron roof of the oven will cook and colour the food - turn as necessary.
Turn the grill rack over to the lowest position and it becomes a trivet for roasting meat and poultry. It is also useful as a
cooling rack.
The Hotplate
The rise in temperature of the hotplate corresponds with rise in oven temperature. The higher the main oven temperature
the hotter the hotplate. It is graduated, being hotter on the left side suitable for boiling and cooler on the right side for
simmering and slower cooking.
Hints
*
To get the best results when cooking on the hotplate always use good ground bases. This ensures
maximum contact and heat transfer from the heat source to the food being cooked.
*
The hotplate can be used directly, for making toasted sandwiches, drop scones, etc, see the Rayburn
Cookbook for details.
*
Keeping the hotplate free from crumbs and debris will also maximise efficiency. Even a few small crumbs on
the hotplate will considerably slow down the time it takes for a kettle to boil.
*
Keep the hotplate as hot as possible by always keeping the lids closed when not in use. This also conserves
fuel.
The Lower Oven
*
The temperature of the cast iron lower oven is dependant on the temperature in the main oven
*
As a guide it is around half the temperature of the main oven.
*
This means it can be used as a cooking oven, when the main oven is at a higher temperature, ideally MARK 6 or slightly
higher. Food such as casseroles, meringues and milk puddings can then be cooked satisfactorily.
*
When cooking a casserole or meat dishes in the lower oven always start off by allowing casserole to come to
the boil then cook for 5-10 minutes on the hotplate or in the main oven before being transferred to the lower
oven.
*
Although there are runners on the sides of the oven for the grid shelves/meat tin, dishes may also be cooked on the
floor of the oven.
*
Note that if the appliance is left on high setting or run continuously for a long period of time, the temperature of the
lower oven may climb higher than half that of the main oven temperature.
The Rayburn Cookbook
The cookbook supplied with your Rayburn is general to all Rayburns. When following the recipes consult these operating
instructions to ascertain details relevant to your Rayburn.
12
Cooking with the Rayburn
COOKING CHART (MAIN OVEN)
(PRE-HEAT THE MAIN OVEN FOR 30-40 MINS)
Setting
Shelf
Position
SCONES
7
3
10-15 mins
SMALL CAKES
5
4
20 mins (Turn the tray round halfway
through cooking. For best results place the
solid plain shelf on the top runner.)
VICTORIA SANDWICH
4
3+5
2-3
5
25-35 mins (Move lower the cake up when
top cake is cooked. For best results place
solid plain shelf on top runner)
1 1/2 - 2 hrs
RICH CELEBRATION FRUIT
CAKE
1
5
Depending on size
SHORT CRUST TARTLETS
6
2 or 3
15-20 mins
SHORT CRUST PIE
6
4 or 5
45 mins
QUICHE
6
Floor
35-40 mins
PUFF PASTRY
8
2 or 3
10-15 mins
MERINGUES
L
5
1-2
3, 4 or 5
8
4 or 5
20-30 mins
8-9
5
30-40 mins
BISCUITS
5
2 or 3
10-15 mins
SOUFFLÉ
5
4
30-35 mins
YORKSHIRE PUDDING
7
2 or 3
25-35 mins
SLOW/FAST ROASTING
SEE RAYBURN
COOKBOOK FOR
TIMES
Any
SEMI-RICH FRUIT CAKE
Approximate Time
(Dundee, Cherry Cake, etc)
CASSEROLES
BREAD - ROLLS
BREAD - LOAF
1 1/2 - 2 1/2 hrs
2-3 hrs
Depending on Joint
Shelf Positions are counted downwards ie top shelf is No. 1 position (See Fig. 3A)
The positions are a guide only and can of course be altered
13
Cleaning and caring of your Rayburn
COOKER PART AND FINISH
Enamelled
Hob plate
Doors
Front plate
Door frame
Underside of domes
Door liners
CLEANING METHOD
Clean with a damp cloth and hot soapy water. Wipe off
any condensation streaks on the front plate as they occur,
to prevent any permanent discolouration.
Wipe up any spills as they occur. For stubborn deposits,
localised soaking (not flooding) with hot water and
detergent for about 10 mins, will make them easier to
remove.
Any milk or acid spills should be wiped immediately, or the
vitreous enamel may be permanently discoloured. A well
moistened liberally soaped very fine steel wood pad, may
be used.
Check that the cleaning agent is approved by the Vitreous
Enamel Association (VEA).
VITREOUS
ENAMEL
ASS.
Chromium plated
Spring handles
End caps
Handrail
Door handles
Thermodial trim
Hob plate screws
Plastic and Polyester Finish
Timer facia
Thermostat control knob
Painted
Burner cover plate
Louvered plinth
Side panels
Control panel
Burner cover panel
Stainless steel
Door hinges
Domes
Door trims
Door keep
Cast iron
Ovens
Hotplate
Tested and
recommended
for use on
vitreous
enamel
Wipe with a soapy damp cloth and buff with a clean dry
cloth. A proprietary chrome cleaner may be used.
Wipe with a soapy cloth. A mild cream cleaner may be
used, gently.
Clean with a damp, soapy cloth.
DO NOT USE ABRASIVES.
Use warm soapy water or a proprietary steel or chrome
cleaner.
To remove any burnt on spills, use a wire brush.
Any spillage or fat splashes in the ovens will eventually
carbonise. Occassionally brush out with a wire brush. DO
NOT USE OVEN CLEANERS.
REMEMBER: BE CAREFUL OF THE HOT APPLIANCE.
LOGO BADGE - WIPE WITH SOAPY WATER. DO NOT USE ABRASIVES.
Accessories
l Oven furniture such as meat tins, solid plain shelves, grid shelves and grill racks should be cleaned in hot soapy
water, soaking if necessary. A nylon scouring pad can also be used.
DO NOT PLACE IN THE DISHWASHER OR USE CAUSTIC CLEANERS.
14
Servicing or Fault
BURNER RESET
SEE FIG. 5
If a fault occurs on the burner then it automatically shuts
down and the red button on the front plinth will be
illuminated. This can be re-set, after 1 minute by depressing
the button. The re-set button is located in the lower plinth
panel.
OPERATE BY PRESSING WITH FINGER ONLY
Please wait at least 60 seconds between resetting the
lockout button.
If, after the oil storage tank has been re-filled, the re-set
button does not light the burner immediately, repeat the
sequence.
Continued lockouts indicate that the burner or the oil supply
are not functioning correctly. The fault should be diagnosed
and corrected.
In the event of repeated failure, switch off the oil and
electrical supply to the appliance and contact your
installer/service engineer.
Fig. 7
FLUE SAFETY DEVICE (IF THE BURNER GOES OUT OR
WILL NOT OPERATE)
DESN 514123 B
To avoid breakdown through lack of fuel ensure that a
supply is ordered in plenty of time.
For safety purposes a flue safety device is fitted. This will
only operate under adverse flue conditions. If the switch has
operated, it should be pushed in to re-set. If this problem
persists contact the local engineer to determine and rectify
the cause. It is important not to re-set more than once as
this may indicate a flue blockage.
SERVICING
With normal use the cooker will need an annual flueway
clean and burner maintenance.
OIL LEAK OR FAULT
An additional flue-way clean half-way through the season
may be necessary in some cases - see Servicing
Instructions.
If an oil leak or fault exists or is suspected the unit must be
turned off. The appliance must not be used until the fault
has been rectified.
THE EXTERNAL FLUE
Contact the installer/servicing company.
The extractor fan should be regarded as a consumable item
and replaced every 2 years.
POWER FAILURE
A HOT APPLIANCE CANNOT BE SERVICED.
In the event of a short term power failure the clock display
will disappear and will return when the power supply is
restored.
The cooker thermostat knob should be turned OFF the night
before servicing so that the appliance will have cooled
down.
However if the power supply is interrupted for any length of
time the clock display will be lost. Follow procedure ‘TO
SET TIME’.
FUEL
Please endeavour to see that when the fuel is being
delivered into the storage tank, that the appliance is left off
during delivery, and preferably for a period of 1 hour
afterwards to allow sediment within the tank to settle.
15
For further advice or information contact
your local distributor/stockist
With AGA Rangemaster’s policy of continuous
product improvement, the Company reserves the
right to change specifications and make
modifications to the appliance described at any
time.
Manufactured by
AGA Rangemaster
Station Road
Ketley Telford
Shropshire TF1 5AQ
England
www.rayburn-web.co.uk
www.agacookshop.co.uk
16