1
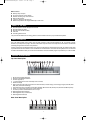
KSPro88-GS-JEFIGS.qxd
4/8/05
2:41 PM
Page 3
English Introduction
Congratulations on your purchase of the Keystation Pro 88, an 88-note, hammer-action, velocity-sensitive USB keyboard. The classcompliant Keystation Pro 88 can easily integrate with PC and Mac computer music environments. It can be used play virtual
instruments, external MIDI hardware synthesizers, sound modules, drum machines and samplers. The Pro 88 offers true plug-andplay functionality via class compliancy in Windows XP and Mac OS X. Simply plug in the USB cable to begin installation—no driver
is required.
Your Keystation Pro 88 is more than just a professional keyboard, it is a MIDI controller that gives you hands-on access for control of
multiple MIDI parameters, such as MIDI Continuous Controller data (or CCs), RPN/NRPN data, MIDI Bank Change LSB and MSB, and
Program Changes on 16 different MIDI channels. You can easily control your studio using only the Keystation Pro 88. To familiarize
yourself with installation and the features of the Keystation Pro 88, please spend a few minutes reviewing the Getting Started Guide
to learn about basic operation. For advanced functions and programmability, please reference the Advanced User Guide.
Features
Ports:
MIDI OUT
MIDI IN
USB port
Power:
USB bus powered
DC IN for external PSU
Keyboard:
88-note hammer-action keyboard
9 velocity curves
Controls:
24 programmable rotary dials
9 full-size programmable faders
22 programmable buttons
MIDI-assignable Pitch Bend and Modulation Wheels
2 MIDI-assignable foot pedal inputs
1 MIDI-assignable expression pedal input
MIDI Data from Controllers:
MIDI control number
RPN/NRPN
Program, Bank LSB, Bank MSB
Pitch Bend
GM/GM2/XG SysEx Messages
MIDI Data from Buttons:
Note On
Note On/Off Toggle
MIDI CC On/Off Toggle
Program, Bank LSB, Bank MSB presets
MIDI Machine Control functions
GM/GM2/XG SysEx Messages
MIDI Controller increment/decrement
Performance Features:
Program and bank changes
Snap Shot sends current status for all controllers
Drawbar Mode for faders
Controller Mute mutes controller output to avoid parameter jumps
3
KSPro88-GS-JEFIGS.qxd
4/8/05
2:41 PM
Page 4
Other Features:
Memory Dump via Sys Ex
10 memory locations store all settings
Selective controller group recall and store
MIDI Out USB interface
4 Zones for dividing up the keyboard
Wheels and pedals can be assigned differently for each Zone
What’s In The Box?
M-Audio Keystation Pro 88 USB keyboard controller
M-Audio Software CD-ROM
M-Audio Driver Installer CD-ROM
USB cable
This Getting Started Guide
If any of the above listed items are missing, please contact the retailer from whom you purchased the keyboard.
About The Manual
This is the Getting Started manual, which covers the basic operation of the M-Audio Keystation Pro 88. You will find a graphic
illustration of your keyboard on page 3. We have numbered the important sections of the keyboard in this illustration and used this
numbering throughout the manual for easy reference.
In-depth programming and advanced features are covered in the Keystation Pro 88 Advanced User Guide. The Advanced User Guide
is provided in electronic documentation on the included Driver CD. This Manual is in the Adobe Acrobat (.pdf) file format. You will need
to install Acrobat Reader to either print or view the documentation. The Acrobat Reader program is provided for you on the CD-ROM.
Controls and Connectors
Top Panel Description:
1.
2.
3.
4.
5.
6.
7.
8.
9.
10.
11.
12.
88-key velocity-sensitive keyboard
Pitch Bend and Modulation Wheels
Numeric keypad (0-9)
+/- Buttons (dual press function sends Snap Shot command)
Backlit LCD display
Nine function keys with single press functions for Global Channel, Channel Assign, Control Assign, Program, Data LSB, Data
MSB, Store, Recall and Zone Range
Dual press functions for Control Mute, Control Select, Drawbar, MIDI Out from USB, Velocity Curve, Device ID and Memory Dump.
Octave +/- buttons (dual press function controls transpose)
Zone/Group buttons enable/disable Zones or Groups
MIDI-assignable 60mm faders (9)
MIDI-assignable rotary controllers (24)
MIDI-assignable buttons (22)
Rear Panel Description:
4
KSPro88-GS-JEFIGS.qxd
4/8/05
2:41 PM
Page 5
13. USB In/Out connects to the USB port of your computer via the included USB cable
14. MIDI Out port connects the keyboard to other MIDI hardware via a standard MIDI 5-Pin DIN plug (not included) and can also
be used as a USB-to-MIDI Out interface
15. MIDI In connects other MIDI equipment to your computer
16. MIDI-assignable sustain pedal inputs (2)
17. MIDI-assignable volume pedal input for connection of an expression pedal (not included)
18. Power On/Off switch
19. DC power input
Connecting Your Keyboard
Before You Connect:
Before you connect your keyboard, please note: While you can power the keyboard via either USB or optional external power
supply, in order to avoid damaging the unit, use only one method at a time.
Power Connection - USB or External Supply
You can power the keyboard either via USB or using an external power supply. To power via USB:
1. Check that the on/off switch (18) on the back of the unit is set to “Off.”
2 Plug the USB cable provided with the Keystation Pro 88 into a free USB port on your computer.
3. Plug the other end of the USB cable into the USB socket on the Keystation Pro 88 (13).
Note: The USB cable not only powers the keyboard, but also sends MIDI data to and from your computer system.
To power using an external supply:
1. Use a power adapter (not included) with the following specifications: 9V DC output, 250-300mA, center positive.
2. Make sure you are not already powering the Keystation Pro 88 via USB, and then simply plug the power supply into the jack
labeled DC 9V (19) and switch the power on (18).
Note: Do not leave the adapter plugged in for long periods of time if the unit is not in use.
MIDI Connection - In and Out Ports
On the rear panel of the keyboard you will find a MIDI Out port (14) that you can connect to an external sound module or MIDI
keyboard. By default (when you switch the unit on), all controller data is sent out via the MIDI Out and the USB Out simultaneously.
If you want the MIDI Out to function as a traditional USB-to-MIDI interface, engage the “MIDI Out from USB” mode by pressing dual
function buttons (PROGRAM and DATA LSB) labeled for this action. This is further explained in Advanced User Guide. The MIDI In port
(15) can be used to connect external MIDI devices to the PC. The MIDI In port acts as a USB-to-MIDI interface.
Both the MIDI In and MIDI Out ports and their functions are further explained in the Advanced User Guide.
Windows XP and Mac OS X
If you are running Windows XP or Mac OS X, connecting the class-compliant Keystation Pro 88 to your computer via USB cable will
cause it to install automatically. You may now move the On/Off Switch on the back of the unit to the “On” position.
Other Operating Systems
Installing Drivers for Windows 98/ME
1. Power up your PC.
2. Insert the Keystation Pro 88 Installer CD into the CD drive of your PC. The installer should open automatically. If not, select
“Run” from the Start Menu, type “d:\setup.exe” (where “d” is your CD-ROM drive), and then press ENTER.
3. Click on “Drivers Installer.”
4. Follow the onscreen instructions.
5. When finished, exit the setup.
6. Switch on the Keystation Pro 88 (18). Windows will now proceed with the installation of both a USB driver and a MIDI driver.
Once this has completed, the unit should be installed. Windows may ask you to restart your computer.
5
KSPro88-GS-JEFIGS.qxd
4/8/05
2:41 PM
Page 6
Installing Drivers for Windows 2000
1. Power up your PC.
2. Insert the Keystation Pro 88 Installer CD-ROM into the CD drive of your PC. The installer should open automatically. If not,
select “Run” from the Start Menu, type “d:\setup.exe” (where “d” is your CD-ROM drive), and then press ENTER.
3. Click on “Drivers Installer.”
4. Follow the onscreen instructions.
5. When finished, exit the setup.
6. Switch on the Keystation Pro 88 (18). Windows will automatically recognize the keyboard and ask for the Keystation Pro 88
Installer CD-ROM.
7. Select the CD-ROM drive and click “OK.” Windows will then ask you to select the CD-ROM drive again for the MIDI driver.
8. If Windows reports the drivers have not been digitally signed, click on “Continue Installation.”
9. Select the drive once more.
10. Click “OK.” You have competed installation of the unit.
Installing Drivers for Apple Mac OS 9.x
If you do not have OMS installed on your computer, please run the OMS installer first, as explained below. If OMS is already installed
on your computer then please continue on to the driver installation instructions, “Installing the Keystation Pro 88 OMS Driver.”
To install OMS:
Make sure that all programs are shut down before you begin the installation. Also, make sure you have removed any dongles (copy
protection devices).
1.
2.
3.
4.
5.
6.
Insert the Drivers Installer CD-ROM.
Double click on the Keystation Pro 88 Installer CD icon on your desktop
Double click on the OS 9 folder.
Double click on “Install OMS 2.3.8.”
Follow the onscreen instructions.
OMS will now take a few moments to install. When it has finished, it will ask you to restart the computer. Click “Restart.”
Installing the Keystation Pro 88 OMS Driver
1.
2.
3.
4.
6.
7.
Click and drag the USB Drivers Installer to the desktop from the OS 9 window it currently resides in.
Double click on the icon. If a window appears, click “Open”.
Double click on the newly created USB Drivers Installer on your desktop.
Click “Install.” The installer automatically places the drivers in the correct system folders.
Once the installer has finished installing the drivers, click “Restart.”
Switch on the Keystation Pro 88 (18).
OMS Setup
You now have to run the OMS Setup program:
1.
2.
3.
4.
5.
Before beginning the setup, ensure that AppleTalk is off. (This option is found in the chooser.)
Open the Hard Drive, then the “Opcode” folder, the “OMS Applications folder,” and then “OMS Setup.”
OMS will inform you that it has not yet been configured. Click “OK.”
The “Create A New Studio Setup” dialog box now appears. Click “OK.”
The “OMS Driver Search” box asks you to choose the port to which you have attached the Keystation Pro 88 (either Modem
or Printer). DO NOT choose a port; simply click “Search,” and OMS will begin searching.
IMPORTANT: If the USB cable is not correctly hooked up to the keyboard, setup will fail.
6. “OMS Driver Setup” shows the Keystation Pro 88 in a list when OMS successfully finds the driver. Click “OK.” OMS will now
define (shows “Identifying”) the Keystation Pro 88 output port.
7. The “OMS MIDI Device Setup” dialog box will appear showing the Keystation Pro 88’s output port with an open check box to
the left of the port. Click on the open box to enable the output port and click on “OK.”
8. Next, the “My Studio Setup” appears with a file save dialog box over it. You must name and save your new Studio Setup (or
use the default name) before you can assign an instrument to the Keystation Pro 88’s output. Assign your instrument (this
step is optional) and you are done.
9. Your Keystation Pro 88 is ready for use.
You can run the OMS Test Studio utility by going to the Studio Menu and releasing the mouse on “Test Studio.” Playing a note on your
keyboard will give you an audio message from your computer, “MIDI received,” while the arrow pointing to the keyboard icon flashes.
Clicking on the keyboard icon with the mouse pointer will send a tone cluster to the Keystation Pro 88’s output port. The LED will light,
and the sound module connected to the Keystation Pro 88’s MIDI Out port should play the chord.
You may now exit OMS Setup by quitting the application. You must complete the configuration process from within your music
software application. This often requires you to select “OMS Compatibility” or “Open Music System” for your MIDI system setup. Also
make sure your Keystation Pro 88 is selected as the MIDI input in your music software.
6
KSPro88-GS-JEFIGS.qxd
4/8/05
2:41 PM
Page 7
The Keystation Pro 88 and Your Software
Most software applications have a MIDI In indicator. Check that MIDI data is being received by the software application by pressing
any key on the keyboard. If the software receives no MIDI data, check that the Keystation Pro 88’s USB driver has been selected as
a MIDI input for your software application. The Keystation Pro 88 will be recognized as a “USB Audio Device” in Windows XP and as
“Keystation Pro 88” in all other operating systems. The procedure to check the MIDI input device in your software will differ from one
program to another, so please refer to the documentation provided with your software.
Setting the Global MIDI Channel
The Keystation Pro 88 can transmit MIDI data on any of the standard 16 MIDI channels. If you are using a computer-based music
system, the software usually controls the routing of MIDI signals and you should not have to configure this manually.
If you are using a MIDI sound module or are connecting to another piece of external MIDI equipment, you will need to verify that
both your Keystation Pro 88 and the receiving external MIDI unit are set to the same MIDI channel. The Global MIDI Channel affects
the keyboard, Program and Bank Changes as well as any other external controllers that have been set to respond to the Global
Channel setting.
To set the Global MIDI Channel:
1.
Press GLOBAL CHANNEL Button (6).
The LCD will display the KEYBOARD and CHAN symbol. The 3-digit display will show the currently selected global channel, preceded
by a “c.”
2.
Type in the MIDI channel number (01-16) using the numeric keypad or the +/- keys.
Setting the Keyboard Velocity Curve
Once you have configured the Keystation Pro 88 with your software application, you may want to adjust the way the keyboard
responds to your individual playing style. The velocity curve determines the relationship between how hard or soft the keys are struck
and the corresponding velocity that the unit transmits.
We have designed nine new velocity curves for the Keystation Pro 88 ranging from the ultra dynamic to more constant velocity values.
To change the velocity curve:
1. Press VELOCITY CURVE (7).
2. Use the numeric keypad or the +/- keys to select a different curve (4).
Recalling Presets
Once you have verified that your software is receiving data from the keyboard, it’s time to begin exploring the keyboard and try some
of the 10 factory-programmed presets.
1.
Press the function key labeled RECALL (6).
7
KSPro88-GS-JEFIGS.qxd
4/8/05
2:41 PM
Page 8
2. Type in the number of the preset you want using the numerical keypad (3).
The following is a list of the presets contained in the 10 memory locations.
To further expand the power of the presets, we have included Evolution Librarian for PC users. This software allows you to save and
load presets into your Keystation Pro 88. For more information on this software, please refer to the Evolution Librarian section in the
Advanced Users Guide and www.m-audio.com or www.evolution.com for future software developments.
Keystation Pro 88 Overview
Keystation Pro 88 is a USB MIDI controller keyboard with 9 faders (10), 24 rotary controls (11), and 22 MIDI buttons (12). It also offers
Pitch Bend and Modulation Wheels (2), two foot pedal inputs (16), and an expression pedal (17), offering a total of 60 assignable
controllers. All of these controllers are MIDI assignable and respond to multiple MIDI messages including CC, RPN/NRPN, Program,
Bank LSB, Bank MSB and GM/GM2/XG SysEx Messages.
There are also 9 function buttons for programming (6, 7), octave/transpose buttons (8), Zone buttons for segmenting the keyboard
(9), and a blue backlit LCD screen (5) that gives you clearly visible information regarding current operations, programming and
controller status.
Octave
You can shift the entire keyboard up or down 3 octaves in either direction with the Octave Up/Down buttons. This will give you access
to a total of 11 octaves on the Keystation Pro 88.
1. Press OCTAVE + (8) for every octave you want to shift the keyboard up.
2. Press OCTAVE – (8) for every octave you want to shift the keyboard down.
Transpose
The Octave Up/Down buttons have a dual function that will allow you to transpose the keyboard. This will let you change the key of
the music you are playing without changing the fingering of the notes.
1. Press TRANSPOSE (OCTAVE + and OCTAVE - at the same time) (8).
2. Press the OCTAVE + or - key (8) for every semi tone you want to transpose up or down.
For example, you may have learned to play a piece of music in the key of C. To play that same piece of music in F you would need
to press the TRANSPOSE buttons followed by 5 presses on the OCTAVE + button or 7 presses on the OCTAVE - button.
Pitch Bend Wheel
The Pitch Bend Wheel (2) is primarily used to “bend” the notes played on the keyboard, up or down (higher or lower). This allows you
to play phrases not normally associated with keyboard playing, including guitar-style riffs.
Your sound source determines how far you can bend the note with the Pitch Bend Wheel. Typically this is set to 2 semitones up or
down, but it can also be set up to 2 octaves up or down.
The Pitch Bend on your Keystation Pro 88 has an even wider scope. Not only is it completely MIDI assignable (as are all the controllers
on your Keystation Pro 88) but it can also have a different MIDI assignment for each zone.
To learn more about this function please read the “Programming and Editing” section in the Advanced User Guide.
Modulation Wheel
This type of real-time controller was originally introduced on electronic keyboards and synthesizers. The Modulation Wheel (2) is
typically used for modulation of the sound you are playing. Modulation provides the means for a performer to add vibrato to the
instrument sound they are playing to mimic the nuances of an acoustic instrument.
As with the Pitch Bend Wheel, the Modulation Wheel is completely MIDI assignable, and can have a different MIDI assignment for each zone.
To learn more about this function please read the “Programming and Editing” section in the Advanced User Guide.
8
KSPro88-GS-JEFIGS.qxd
4/8/05
2:41 PM
Page 9
Sustain and Expression Foot Pedals
You can plug a foot pedal of any polarity (not included) into the two sustain pedal inputs (16) on the back of the Keystation Pro 88.
The foot pedal is normally used for sustaining the sound you are playing while removing your hands from the keys. The keyboard
will automatically detect the correct polarity of the foot pedal upon power up. If you want to reverse the polarity of the foot pedal,
press the pedal as you are turning on your keyboard.
Each sustain foot pedal can be programmed to send out MIDI notes. This will allow you to trigger samples on different MIDI
channels without removing your hands from the keyboard. This also permits program changes or changes to any “Note On” event
MIDI message.
Also located on the back panel of the Keystation Pro 88 is a volume pedal input (17) that allows you to plug in an expression pedal
(not included). The expression pedal is normally used to change the volume of the instrument you are playing.
Similar to the two sustain foot pedals (16), the expression pedal (17) can be assigned to control pan, pitch bend sensitivity, tuning,
portamento, or any other MIDI message that can be sent from the nine assignable faders or 24 rotary dials. The two sustain foot
pedals and the expression pedal can have a different MIDI assignment for each zone.
To learn more about this function please read the “Programming and Editing” section in the Advanced User Guide.
Saving and Organizing Presets
Once you have familiarized yourself with the Keystation Pro 88’s presets, you may want to save and reorganize them. Please note
that the factory presets are stored in ROM within the keyboard and can therefore be restored at any time.
To rearrange the presets use the following procedure:
1.
2.
3.
4.
Press the function button (7) RECALL.
Type the preset number on the numerical keypad (3).
Press the function button (6) STORE.
Using they numerical keypad (3), enter in the preset memory number that you wish to store the preset to.
If you want the Keystation Pro 88 to revert back to the factory defaults, simply hold down the “+/-” buttons while switching the
keyboard on.
Zones
The Zone feature can be used to create up to four keyboards in one by splitting the keyboard into sections. Using Zone Edit Mode,
you can assign each Zone an upper key limit and a lower key limit to specify which section of the keyboard should be assigned to
a specific zone. To learn more about this function please read the “Programming and Editing” section in the Advanced User Guide.
The Channel of a Zone
The Zones of the Keystation Pro 88 can transmit data on different MIDI channels. You may have up to 4 different zones enabled at
a time. Each range can be set to a different MIDI channel. For instance, you can set a two-octave zone at the bottom for bass
transmitting on MIDI channel 1, and a Rhodes keyboard in the upper octaves transmitting on MIDI channel 2.
To assign the channel of a Zone:
1. Press the Global Channel button twice
2. Press the Zone Select button (9), and select a Zone. The LCD will flash the selected zone.
3. Enter the channel number, “00” to “16,” for the Zone you selected by using the numeric keypad.
Zone Range
You can split the Keystation Pro 88 into a maximum of four Zones by limiting the range of each Zone. Zones may be discrete areas
of the keyboard or they can overlap.
To change the range of Zone 1, press the ZONE RANGE button. You will see “ZONE 1” flashing on the LCD display, which indicates
that you are editing Zone 1’s range. Press the lowermost key on the keyboard, followed by the uppermost key. Now Zone 1’s range
covers the entire keyboard. Alternatively, you may select two different keys to demarcate the Zone of your choice.
To learn more about this function please read the “Programming and Editing” section in the Advanced User Guide.
9
KSPro88-GS-JEFIGS.qxd
4/8/05
2:41 PM
Page 10
Sending a Snap Shot
The Snap Shot feature sends out real-time MIDI data for each controller (on whichever MIDI channel the controller is assigned to),
providing a “snap shot” of the settings for each hardware controller to the software parameter it is assigned to.
When you send a Snap Shot, the LCD will display “SNAPSHOT.” The data for each individual controller will then transmit on the channel
that the controller has been assigned to. The parameters of the receiving software should change to mimic the adjustments that
were made on the keyboard. Snap Shot is an excellent way to synchronize the receiving device with the faders and rotary controllers
on your keyboard.
To send a Snap Shot of the current controller assignments and their values, press the +/- buttons (4) together.
When the Snap Shot function is used, the LCD displays a camera symbol.
The Snap Shot function can also be used as a creative tool, with interesting and surprising results. It can also be used in conjunction
with the Control Mute function explained later in this guide.
Draw Bar Mode
When the Keystation Pro 88 is in Draw Bar Mode, the faders of the keyboard reverse so that 0 is at the top of the faders while 127 is
at the bottom. (The default setting of the keyboard is 127 at the top and 0 at the bottom.)
To engage Draw Bar Mode:
1. Press the dual press function buttons (7) (CHANNEL ASSIGN + CONTROLLER ASSIGN) labeled DRAW BAR.
When the Draw Bar mode is engaged, the LCD display displays the below fader symbol.
Press the Channel Assign and Controller Assign buttons to disengage Draw Bar Mode.
Muting Controllers
The Control Mute feature allows you to alter the position of any fader or rotary controller without affecting the settings of your
software. Control Mute does not affect any buttons, the foot switch or the keyboard. When Control Mute is engaged and an
assignable button, a function key or the keyboard is pressed, the controllers are turned back on and Control Mute disengaged. While
Control Mute is engaged, the LCD display reads “Off”.
To mute all faders and rotary controllers, press the dual-press function buttons (DATA LSB + DATA MSB) labeled “CTRL MUTE” (7).
This is a very useful feature if you are switching between presets and the controllers are out of position. This will allow the controller
to be moved to a position relative to the software's controller value, rather than causing the software's controller value to jump.
You can also use this feature for creative mixing. If you use the faders for a conventional volume mixer, try engaging the Controller
Mute function, change the volume up or down on certain channels and press the Snap Shot buttons. This will send your changes, in
real time, to the software. This form of mixing is very dynamic and cannot be accomplished with a conventional mixer.
Program Changes
You can send a Program Change message to your sound card, sound module, instrument or any other device that receives standard
MIDI messages.
To send a Program Change on the Global MIDI Channel:
1. Press the “Program” button (6).
2. Type in the program number you wish to send, using the numerical keypad or the +/- keys (3 or 4).
10
KSPro88-GS-JEFIGS.qxd
4/8/05
2:41 PM
Page 11
For example, the LCD displays the “PROG” symbol in the right hand corner, indicating that the PROGRAM button has been pressed.
The Program value sent on Global MIDI Channel 01 is 00.
You can also program the assignable buttons to send out fixed Program messages to individual MIDI channels.
To learn more about this function, please read the “Programming and Editing” section in the Advanced User Guide.
Bank Changes
If your receiving device has more than 128 programs, you may be able to access the additional banks by sending out Bank Change
LSB (Least Significant Bit) and MSB (Most Significant Bit) Messages.
To send LSB and MSB Messages:
1. Press the DATA LSB or DATA MSB button (6).
2. Type in the Bank Number you wish to send, using the numerical keypad or the +/- keys (3).
Please check the documentation for your receiving device to ensure that it will respond to these messages.
To learn more about this function please read the “Programming and Editing” section in the Advanced User Guide.
Editing MIDI Controllers
Selecting a controller for editing
To select one of the Keystation Pro 88 faders or rotary dials for editing, simply move the controller you wish to select. Initially, the LCD
display will show the positional value for that controller. Once you have stopped moving the controller and approximately three
seconds have passed, the LCD screen will show two numerical values. The small two-digit number in the lower left corner of the LCD
represents the number of the controller you have selected. The large three-digit display will show the controller number that specific
controller is assigned to.
Assigning MIDI CCs to a controller:
1.
Press “Control Assign.” The LCD will flash the CC symbol.
The 3-digit display will indicate the currently assigned MIDI CC number.
2. Enter a new MIDI CC value using the numeric keypad or “+” and “-” buttons.
The MIDI controller number you select will be assigned to the currently selected controller, shown by the number on the small twodigit display.
Please see the “Programming and Editing” section in the Advanced Guide for further information.
11
KSPro88-GS-JEFIGS.qxd
4/8/05
2:41 PM
Page 12
Trouble-Shooting
My M-Audio hardware suddenly stopped working after having performed fine since installation.
Switch off the unit and leave for 10 seconds. Then restart your computer and try again. If the problem persists you may have to reinstall drivers for the unit.
My drivers are listed in the Device Manager and are said to be working, but the keyboard is not recognized in any software.
Windows 2000 and XP have a limitation to how many MIDI device drivers you can have installed at one time. However, the computer
will not give any indication that you are using the maximum number of drivers and the drivers will install as if there is not a problem.
To remedy this, go to the driver download section of our website at http://www.m-audio.com/index.php?do=support.drivers and
download the MIDIFix utility.
I have plugged a sustain pedal into my M-Audio keyboard, but it works the wrong way around.
The polarity of the sustain pedal is calculated by the keyboard when it is powered up. On power up, the sustain pedal is assumed to be
in the off position. If you want the sustain pedal to be off when it is not pressed, make sure the pedal is not pressed when you power up.
When I press a key, there is a delay before I hear any sound.
This delay is known as latency. Latency with MIDI signals occurs as a result of the softsynth you are using. MIDI data is simply control
data that is read by a softsynth, which must complete a large number of complex calculations in order to produce the sound you
hear. This process takes time.
If you are experiencing a noticeable delay between playing a note and hearing it, you are most likely using a software-based
synthesizer and outputting audio through an audio card that is currently running on a less efficient driver. Try switching to the ASIO
driver for your sound card. If your sound card allows you to adjust the buffer settings, lower them until the latency is acceptable.
Caution: Electrostatic Discharge, Electrical Fast Transient and Conducted RF interference may cause the unit to
malfunction. In the case of such an occurrence, unplug the unit and plug in again to restore normal operation.
Keystation Pro 88
Tested to comply with
FCC standards
FOR HOME OR STUDIO USE
Warranty Information
Warranty Terms
M-Audio warrants products to be free from defects in materials and workmanship, under normal use and provided that the product
is owned by the original, registered user. Visit www.m-audio.com/warranty for terms and limitations applying to your specific
product.
Warranty Registration
Thank you for registering your new M-Audio product. Doing so immediately both entitles you to full warranty coverage and helps MAudio develop and manufacture the finest quality products available. Register online at www.m-audio.com/register to receive FREE
product updates and for the chance to win FREE M-Audio gear.
12
KSPro88-GS-JEFIGS.qxd
4/8/05
2:41 PM
Page 13
Contact M-Audio
For additional files, help or drivers for this product, please visit the support section of our main website http://www.m-audio.com.
If you have any questions, comments or suggestions about this product or any other M-Audio products, we invite you to contact us
directly at:
M-AUDIO Deutschland (Germany)
M-AUDIO U.S.
5795 Martin Road, Irwindale, CA 91706-6211, U.S.A.
Kuhallmand 34, D-74613 Ohringen, Germany
Sales Information:
Sales Information (email):
Tech Support:
Tech Support (email):
Fax:
Internet Home Page:
Sales Information:
Sales Information (email):
Technical Support:
Technical Support (email):
Fax:
Internet Home Page:
(626) 633-9050
[email protected]
(626) 633-9055
[email protected]
(626) 633-9060
http://www.m-audio.com
49 7941 98 7000
[email protected]
49 7941 98 70030
[email protected]
07941 98 70070
http://www.m-audio.de
M-AUDIO U.K.
M-AUDIO Canada
Floor 6, Gresham House, 53 Clarendon Road, Watford WD17 1LA
Tel: 01923 204010 • Fax: 01923 204039
1400 St-Jean Baptiste Ave. #150
Quebec City, QC G2E 5B7, Canada
Sales Information (phone):
Sales Information (fax):
Sales Information (email):
Technical Support (PC):
Technical Support (Mac):
Technical Support (email):
Internet Home Page:
Tel:
418-872-0444
Fax:
418-872-0034
Email:
[email protected]
Internet Home Page:
http://www.m-audio.ca
44 (0) 1442 416590
44 (0) 1442 246832
[email protected]
44 (0) 1309 671301
44 (0) 1765 650072
[email protected]
http://www.maudio.co.uk
M-AUDIO France
M-AUDIO Japan
Floor 6, Gresham House, 53 Clarendon Road, Watford WD17 1LA
Tel: 01923 204010 • Fax: 01923 204039
Annex Buliding 6F, 2-18-10 Marunouchi
Naka-Ku, Nagoya 460-0002, Japan
Informations Commerciales:
0810 001 105
Informations Commerciales (email):
[email protected]
Assistance Technique:
0820 000 731 (PC) ou 0820 391 191 (Mac at général)
[email protected] ou [email protected] (email)
Fax:
+44 (0) 1442 246 832
Site Internet:
http://www.m-audio.fr
Tel:
Fax:
Technical Support:
Email:
Internet Home Page:
M71020QS-EN
13
81 52 218 3375
81 52 218 0875
0820 00 731
[email protected]
http://www.m-audio.co.jp