1
Owner's Manual
6.0 HORSEPOWER
21 " MULTI-CUT
ROTARY LAWN MOWER
Model No.
917.389620
•
•
•
•
•
Safety
Assembly
Operation
Maintenance
Espafiol
Repair Parts
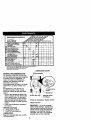
NOTE: Engines which are certified to comply with CalifomJa and U.S. EPA emission regulations
for SORE (Small Off Road Equipment, are certified to operate on regular unleaded gasoline, and
include the following emission centrol systems: Engine Modification (EM), and Three-way
Catalyst (TWC) (if so equipped).
AVISO: Los motores homek>gados para cumplir con le reglamentaci6n sobre emisiones de
California y de la Agencle de Proteccl6n Ambiental estadeunidence (EPA) para equipos
pequefms no circulentes (SORE) funcionan con gasollea normal sin plomo, e incluyen los
siguientss sistemas de control de emisiones: modificaci6n del motor (EM) y catalizador de triple
acci6n (TWC) (en caso de tenerlo).
The D.O.M. decal includes engine life specifications for the emissions-related useful life period of
_our engine. This period relates to the emission compliance life as certified by EPA/CARB. To
find the/ire pedod specification for your engine, please match one of the following letters with the
letter printed on your D.O.M. decal: (C) 125 hours, (B) 250 hours, (A) 500 hours.
La calcemanfa D.O.M. induye espechlcaciones sobre la dura(;ibn del motor para el pedodo de
vida dtil de su motor relaccionade con emisiones. Este perlodo se relaciona con la duracibn en
conformidad con las emislenes segOn Io certificado por EPNCARB. Para hallar la especificacibn
del perfodo de vide de su motor, mire cudl de las siguientes letras viene impresa en su
celcomanfa D.O.M.: (C) 125 horas, (B) 250 horas, (A) 500 horas.
CAUTION:
Read and follow all
Safety Rules and Instructions
before operating this equipment
Seam, Roebuck and Co., Hoffman Estates, IL 60179
Visit our Craftsman website" www.sears,com/craftsman
Warranty
............................................... 2
Safety Rules ......................................... 2
Assembly .............................................. 5
Operation.............................................. 6
Maintenance Schedule ...................... 10
Maintenance....................................... 10
Product Specifications........................ 11
Sewice and Adjustments.................... 13
Storage ............................................... 14
Troubleshooting................................. 16
Repair Parts........................................ 34
Parts Ordering ..................... Back Cover
LIMITED TWO YEAR WARRANTY ON CRAFTSMAN
POWER MOWER
For two years from date of pumhase, when this Craftsman Lawn Mower is maintained,
lubricated, and tuned up according to the operating and maintenance instructions in
the owner's manual, Sears will repair free of charge any defect in material or workmanship.
If this CraftsmanLawn Mower is used for commercialor rentalpurposes,this warranty
appliesfor only90 days from the date of purchase.
This Warranty does not cover:
• Expendable items which become worn during normal use, such as rotary mower
blades, blade adapters, belts, air cleaners and spark plug.
• Repairs necessary because of operator abuse or negligence, including bent
crankshafts and the failure to maintain the equipment according to the instructions
contained in the owner's manual.
Warranty service is available by retuming the Craftsman power mower to the nearest
Sears Service Center/Department in the United States. This warranty applies only
while this product is in use in the United States.
ThisWarranty gives you specificlegal rights,and you may also have otherdghtswhich
varyfrom state to state.
Seam, Roebuckand Co., 1:)/817WA, HoffmanEstates, Illinois60179
IMPORTANT: This cuttingmachineis capable of amputatinghands and feet and
throwing objects. Failure to observe the following safety instructions could result in
serious injury or death.
I.GENERAL OPERATION
• Read, understand, and follow all
instructions on the machine and in the
manual(s) before starting. Be thoroughly familiar with the controls and the
proper use of the machine before
starting.
• Do not put hands or feet near or under
rotating parts, Keep clear of the
discharge opening at all times.
• Only allow responsible individuals, who
are familiar with the instructions, to
operate the machine.
• Clear the area of objects such as rocks,
toys, wire, bones, sticks, etc., which
could be picked up and thrown by the
blade.
2
* Be sure the area is clear of other
people before mowing. Stop machine if
anyone enters the area.
• Do not operate the mower when
barefoot or wearing open sandals.
Always wear substantla"I foot wear.
. Do not pull mower backwards unless
absolutely necessary. Always look
down and behind before and while
moving backwards.
• Do not operate the mower without
proper guards, plates, grass catcher or
other safety protective devices in
,_lace.
ee manufacturer's instructions for
•
proper operation and installation of
accessories. Only use accessories
approved by the manufacturer.
• Stoptheblade(s)
whencmseing
gravel
•
•
=
•
•
ddvas, walks, or roads.
Stop the engine (motor) whenever you
leave the equipment, before cleaning
the mower or unclogging the chute.
Shut the engine (motor) off and wait
until the blade comes to complete stop
before removing grass catcher.
Mow only in d_ight or good artificial
light.
Do not operate the machine while
under the influence of alcohol or drugs.
Never operate machine in wet grass.
Always be sure of your footing: keep a
firm hold on the handle and walk; never
• Keep children out of the trimming area
and under the watchful care of another
responsible adult.
• Be alert and tum machine off if children
enter the area.
• Before and while walking backwards,
It>ok behind and down for small
children.
• Never allow children to operate the
machine,
• Use extra care when approaching blind
comerS, shrubs, trees, or other objects
that may obscure vision.
IV. SERVICE
• Usa extra care in handling gasoline
run.
and other fuels. They are flammable
• Disengage the self-propelled mechaand vapors are explosive.
nism or drive clutch on mowers so
-Use only an approved container.
equipped before starling the engine
- Never remove gas cap or add fuel
(motor).
with the engine running. Allow
• If the equipment should stad to vibrate
engine
to cool before refueling. Do
abnormally, stop the engine (motor)
not smoke.
and check immediately for the cause.
- Never refuel the machine indoors.
Vibration is generally a warning of
-Never store the machine or itJel
trouble.
container inside where there is an
• Always wear safety goggles or safety
open flame, such as a water heater.
glaSSes with side shields when
• Never run a machine inside a closed
operating mower.
area.
II, SLOPE OPERATION
• Never =make adjustments or repairs with
the engine (motor) running. Disconnect
Slopes are a major factor related to slip
the spark plug wire, and keep the wire
and fall accidents which can result in
away trom the plug to prevent accidensevere injury. All slopes require extra
tal starting.
caution. If you feel uneasy on a slope, do
• Keep nuts and bolts, especially blade
r_otmow iL
attachment botts, tight and keep
DO:
equipment in good condition.
• Mow across the face of slopes: never
• Never tamper with safety devices.
up and down. Exercise extreme caution
Check their proper operation regularly.
when changing direction on slopes.
• Keep machine free of grass, leaves, or
• Remove obstacles such as rocks, tree
other debds build-up. Clean 0il or fuel
limbs, etc.
spillage. Allow machine to c001 before
• Watch for holes, ruts, or bumps. Tall
storing.
grass can hide obstacles.
• Stop and inspect the equipment if you
DO NOT:
strike an object. Repair, if necessary,
• Do not trim near drep-offs, ditches or
before restading.
* Never attempt to make wheel height
embankments. The operator could lose
adjustments while the engine (motor) is
footing or balance.
• Do not tdm excessively steep slopes.
running.
• Grass catcher components are subiect
• Do not mow on wet grass. Reduced
to wear, damage, and deterioration,
footing could cause slipping.
which could expose moving parts or
III. CHILDREN
allow objects to be thrown. Frequently
Tragic accidents can occur if the operator
check components and replace with
is not sled to the presence ot children.
manufacturer's recommended parts,
Children are often attracted to the
when necessary,
machine and the mowing activity. Never
• Mower blades are sharp and can cut.
assume that children will remain where
Wrap the blade(s) or wear gloves, and
you last saw them.
use extra caution when servicing them.
• Do not change the engine governor
3
setting or ovarspead the engine.
_,Look for this symbol to point out
important safety precautions. It means
CAUTIONIH BECOMEALERT!H YOUR
SAFETY IS INVOLVED.
A CAUTION: In order to prevent
accidental starting when setting up,
transporting, adjusting or making repairs,
always disconnect spark plug wire and
place wire where it cannot contact spark
plug.
AIWARNING: Engine exhaust, some of its
constituents, and certain vehicle
components contain or emit chemicals
known to the State of California to cause
cancer and birth defects or other
reproductive harm.
AWARNING: Battery posts, terminals end
related accessories contain lead and lead
compounds, chemicals known to the State
of Califomia to cause cancer and birth
defects or other reproductive harm. Wash
hands after handling.
A CAUTION: Muffler and other engine
parts become extremely hot during
operation and remain hot after engine
has stopped. To avoid severe burns on
contact, stay away from these areas.
These accessories were available when this lawn mower was produced. They ere not
shipped with your mower. They are also available at most Sears retail outlets and
service centers. Most Sears stores can also order repair parts for you, when you
provide the model number of your lawn mower. Some of these accessories may not
apply to your lawn mower.
LAWN MOWER PERFORMANCE
J
CLIPPING DEFLECTOR
FOR HEAH DISCHARGE LAWN MOWERS
MULCHER _TS
FOR
REAR DISCHARGE
GRASS
LAWN CATCHERS
MOWERS
STABILIZER
FOR
SIDE DISCHARGE
GRASS
LAWN CATCHERS
MOWERS
GAS CANS
LAWN MOWER MAINTENANCE
MUFFLERS
BELTS
AIR FILTERS
BLADES
BLADE ADAPTERS
4
SPARK PLUGS
WHEELS
ENGINE OIL
Read these instructionsand this manualin
itsentiretybeforeyou attemptto assemble
or operateyour new lawn mower.
IMPORTANT: This lawn moweris shipped
WITHOUT OIL OR GASOLINE inthe
engine.
Yournew lawn mower has been assembledat the factorywith the exception
of those parts left unassembledfor
shippingpurposes.All parts such as nuts,
washers,bolts,etc., necessaryto complete
the assemblyhave been placed in the
parts bag. To ensuresafe and proper
operationof your lawn mower,all parts
_nd hardware you assemble mustbe
tightenedsecurely.Use the correcttoolsas
necessaryto ensure propertightness.
TO REMOVE LAWN MOWER FROM
CARTON
1. Remove loose parts included with
mower.
2. Cut downtwo end comers of carton
and lay end panel down flat.
3. Remove all packingmaterialsexcept
padding between upper and lower
handle end padding holdingoperator
presencecontrolbar to upper handle.
4. Roll lawn mower out of cartonand
checkcarton thorouglyfor additional
looseparts.
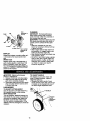
HOWTO SET UPYOUR
MOWER
TO UNFOLD HANDLE
3. Remove any packingmaterialfrom
around control bar.
Your handles may be adjusted for your
mowing comfort. Refer to Service and
Adjustments section of this manual.
controlbar
Upperhandle
Liftup
Mowing
Lower handle
Handle pin
3-Position
handleadjustment
bracket
/
\
LAWN
IMPORTANT: Unfold handle carefully so
as not to pinch or damage control cables.
1. Raise lower handle section to operating position and squeeze the bottom
ends of lower handle towards each
other until the pin in handle can be
inserted into one of the three height
adjustment holes,
2. Remove protective padding, raise
upper handle section into place on
lower handle and tighten both handle
knobs.
TO INSTALL
ATTACHMENTS
Your lawn mower was shipped ready to
be used as a mulcher. To convert to
bagging or discharging, see 'To convert
mower" in the OPERATION section of this
manual.
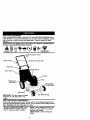
KNOW
YOURLAWNMOWER
READ THIS OWNER'S MANUAL AND SAFETY RULES BEFORE OPERATING YOUR
LAWN MOWER. Compare the illustrations with your lawn mower to familiarize yourself
with the location of various controls and adjustments. Save this manual for future
reference.
These symbols may appear on your lawn mower or In literature supplied with the
product. Learn and understand their meaning.
CAUTION
OR WARNING
ENGINE
ON
ENGINE
OFF
FAST
SLOW
CHOKE
FUEL
OIL
DANGER, KEEP HANDS
AND FEET AWAY
• Operator presence control
bar
Handle knob
Gasoline filler cap
Grass
Engineoilcap
with.dipstick
(on each wheel)
Mulcher
door
IMPORTANT: This lawn mower is shipped
WITHOUT OIL OR GASOLINE in the
engine.
Lawn mower housincJ
MEETS CPSC SAFETY REQUIREMENTS
Sears rotary walk-behind power lawn mowers conform to the safety standards of the
American National Standards Institute and the U.S. Consumer Product Safety Commis*
sion. The blade turns when the engine is running.
i
Operator Presence Control Bar- must
be held down to the handle to start the
engine. Release to stop the engine,
Primer - pumps additional fuel from the
carburetor to the cylinder for use when
starting a cold engine.
Starter Handle - used for starting the
engine•
The operationof any lawn
mower can resultin
foreignobjectsthrowninto
the eyes, whichcan result
in severe eye damage.
Alwayswear safety glassesor eye
shieldswhile operatingyour lawn mower
or performingany adjustmentsor repairs.
We recommenda wide vision safety
mask over spectaclesor standardsafety
glasses, '
HOWTO USEYOUR LAWN MOWER
TO CONVERT MOWER
Your lawn mower was shipped ready to
be used as a mulcher. To convert to
bagging or discharging:
REAR BAGGING
• Lift rear door of the lawn mower and
place the grass catcher frame hooks
onto the door pivot pins.
• To convert to mulching or discharging
operation, remove grass catcher and
close rear door.
ENGINE SPEED
The engine speed was set at the factory
for optimum performance. Speed is not
adjustable.
ENGINE ZONE CONTROL
a_nCAUTION: Federal regulations require
engine control to be installed on this
lawn mower in order to minimize the risk
of blade contact injury. Do not under any
cimumstances attempt to defeat the
function of the operator control. The blade
turns when the engine is running.
• Your lawn mower is equipped with an
operator presence control bar which
requires the operator to be positioned
behind the lawn mower handle to start
and operate the lawn mower.
TO ADJUST CUTTING HEIGHT
Raise wheels for low cut and lower
wheels for high cut, adjust cutting height
to suit your requirements. Medium
position is best for most lawns.
• To change cutting height, squeeze
adjuster lever toward wheel. Move
wheel up or down to suit your requirements. Be sure all wheels are in the
same setting.
NOTE: Adjuster is propedy positioned
when plate tab inserts into hole in lever.
Also, 9*position adjusters (if so equipped)
allow lever to be positioned between the
p_ate tabs.
Lower Wheels for HighCut
Pla_
Pivotpins
"_, _ _
SIDE DISCHARGING
• Rear door must be closed.
• Open mulcher door and install disct'iarge deflector under guard as
shown.
• Mower is now ready for discharging
operation.
• To convert to mulching or bagging
operation, discharge deflector must be
removed and mulcher door must be
closed.
SIMPLE STEPS TO REMEMBER WHEN
CONVERTING YOUR LAWN MOWER
FOR MULCHING1. Rear door closed.
2. Mulcher door closed.
FOR REAR BAGGING 1. Grass catcher installed.
2. Mulcher door closed.
FOR SIDE DISCHARGING 1. Rear door closed.
2. Side discharge deflector installed.
_I_CAUTION: Do not run your lawn
mower without rear door closed or
approved grass catcher in place.
Never attempt to operate the lawn mower
with the rear door removed or propped
open.
RaiseWheels for Low Cut
Mulcher
door
Open
Mulcher Door
Discharge
deflector
AWARNING:
Experience indicates that
alcohol blended fuels (called gasohol or
using ethanol or methanol) can attract
moisture which leads to separation and
formation of acids dudng storage. Acidic
gas can damage the fuel system of an
engine while in storage. To avoid engine
problems, the fuel system should be
emptied before storage of 30 days or
longer. Drain the gas tank, start the
engine and let it run until the fuel lines
and carburetor are empty. Use fresh fuel
next season. See Storage Instructions for
additional information. Never use engine
or carburetor cleaner products in the fuel
tank or permanent damage may occur.
CAUTION: Fill to bottom of gas tank
filler neck. Do not overfill. Wipe off any
spilled oil or fuel. Do not store, spill or
use gasoline near an open flame.
BEFORE STARTING ENGINE
ADD OIL
Yourlawnrnoweris shippedwithoutoil in
the engine. Engineholds 20 oz. of oil.
Engineoil
For type and gradeof oil to use, see
cap
"ENGINE" in Maintenancesectionof this
manual.
1. Be sure lawnmoweris level and area
aroundoil fill is clean.
2. Remove engine oil cap and fill to the
full lineon the dipstick.Pouroil slowly.
Do notover fill.
TO START ENGINE
NOTE: Allowoilto settledown intoengine NOTE: Due to protective coatings on the
for accurate reading.To read properlevel, engine, a small amount of smoke may be
tightenengine oil cap, then remove it to
present during the initial use of the
read the dipstick.
product and should be considered
3. Reinstallengine oil cap and tighten.
normal.
• Check oil level beforeeach use. Add
1, To start a cold engine, push primer
oil if needed. Fill to fullline on dipstick.
three (3) times before trying to start.
• Change the oil after every 25 hoursof
Use a firm push, This step is not
operationor each season. You may
usually necessary when starting an
need to changethe oil more often
engine which has already run for a
under dusty,dirtyconditions.
few minutes.
ADD GASOLINE
2. Hold operator presence control bar
down to the handle and pull starter
• Fillfuel tank. Use fresh, clean, regular
unleadedgasolinewith a minimumof
handle quickly. Do not allow starter
rope to snap back.
87 octane. Do not mix oil withgasoline. Purchasefuel in quantitiesthat
TO STOP ENGINE
can be used within30 daysto assure
• To stop engine, release operator
fuel freshness.
presence control bar.
NOTE: In cooler weether it may be
necessary to repeat priming steps. In
warmer weather over priming may cause
flooding and engine will not start. If you
do flood engine, wait a few minutes
before attempting to start and do not
repeat priming steps.
8
MOWING TIPS
• Under certain conditions, such as very
tall grass, it may be necessary to raise
the height of cut to reduce pushing
effort and to keep from ovedoading the
engine and leaving clumps of grass
clippings. It may also be necessary to
reduce ground speed and/or run the
lawn mower over the area a second
time.
• For extremely heavy cutting, reduce the
width of cut by ovedapping previously
cut path and mow slowly.
• For better grass bagging and most
cutting conditions, the engine speed
should be set in the fast position.
• Pores in cloth grass catchers can
become filled with dirt and dust with use
and catchers will collect less grass. To
prevent this, regularly hose catcher off
with water and let dry before using.
• Keep top of engine around starter clear
and clean of grass clippings and chaff.
This will help engine air flow and
extend engine life,
MULCHING MOWING TIPS
IMPORTANT: Forbest performance,
keep mower housingfree of built-up
grass and trash.Clean UNDERSIDE OF
MOWER HOUSING after each use. See
"Cleaning"in MAINTENANCE sectionof
this manual.
• The special mulchingblade will recut
the grass clippingsmanytimes and
reducethem in size so that as they fall
ontothe lawn they will disperseintothe
grass and not be noticed.Also, the
mulched grass will biodegradequickly
to providenutrientsfor the lawn.
Always mulchwith your highestengine
(blade) speed as this willprovidethe
best recuttingactionof the blades.
• Avoid cuttingyour lawn when it is wet.
Wet grass tendsto form clumpsand
interfereswith the mulching action.The
besttime to mow your lawn is the early
afternoon.At this timethe grasshas
driedand the newly cut area will not be
exposedto the directsun.
• For best results,adjustthe lawn mower
cuttingheight so that the lawn mower
cutsoff onlythe top one-thirdof the
grass blades. If the lawn is overgrownit
will be necessaryto raise the heightof
cut to reducepushingeffort and to keep
from overloadingthe engine and
leavingclumpsof mulchedgrass. For
extremely heavy mulching,reduceyour
widthof cut,
mow slowlyand raise
the rear of the lawn mowerone wheel
adjustersettinghigherthan the front,
• Certain types of grass and grass
conditionsmay requirethat an area be
mulcheda secondtime to completely
hide the clippings.When doinga
secondcut, mow across or perpendicular to thefirstcut path.
• Change yourcuttingpatternfrom week
to week. Mow north to southone week
then changeto east to west the next
week. This will help preventmatting
and grainingof the lawn.
Max 1/3
,
'1
O_ _
_/_
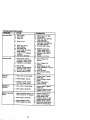
REGULAR SERVICE _
ICE OATES
Check for Loose Fasteners
Claan/Inspact Grass Catcher
(IfE_l.p_)
M
Clean Lawn Mower
O
(Power-PrOpelled
Clean Under DdveMowers)
Cover
_
I/
,/
!/
I_
I_
Check dttve belt/pulleys
_R Power-PrOpelled Mowers)
Check/Sharpen/ReplaCe Blade
LubricationChart
Clean BtatePj/Rechal
Bectdc Start Mowers
E Check En_llneOil Level
a
S
I
li/
I1_ =
I_
ll_
Change EnglneOil
Clean Air Fitter
Inspect
I/'1._
I_ =
Muffler
I_
N
Clean or Replace Spark Plug
E Replace Air Rltar Paper Cartddge
I . Change
more OR_
I/4
ql/
when ¢peraUng
I1_
I_2
under a Ilia W load or in h_gh afnblent
temperatures.
2 "Serv_cl more olten when operatingin dirtyor dusty _ndit_ns.
3 - Replace t>_:1_ more often whe_ r_mWlngin sandy so_l.
4. Charge
48 hours at ee,d of seasor_,
LUBRICATION
GENERAL
BEFORE
_Nheela_u_ers
RECOMMENDATIONS
The warranty on this lawn mower does
not cover items that have been subjected
to operator abuse or negligence. To
receive full value from the warranty,
operator must maintain mower as
instructed in this manual.
Some adjustments will need to be made
periodically to properly maintain your
unit.
All adjustments in the Service and
Adjustments section of this manual
should be checked at least once each
season.
• Once e year,; replace the spark plug,
clean or replace air filter element and
check blade for wear. A new spark
plug and clean/new air filter element
assures proper air-fuel mixture and
helps your engine run better and last
longer.
• Follow the maintenance schedule in
this manual.
EACH USE
1. Check .engine oil bevel,
2. Check'_f0r loose fasteners,
LUBRICATION
Keep unit well lubricated (See "LUBRICATION CHART"),
CHART
Brake Spring
Bracket
_) Engine oil
Rear door hinge
_)Refar
to maintenance
_Sprey
lubricant
_Handle
bracket
mounting pin
"Engine"
section.
IMPORTANT: Do not oilor grease
plasticwheel bearings, viscouslubricants willattractdust end dirtthatwill
shortenthe life of the self-lubricating
bearings, ifyou feel they mustbe
lubricated,use only a dry, powdered
graphitetype lubricantsparingly.
10
PRODUCT
SPECIFICATIONS
SERIAL NUMBER
DATE OF PURCHASE
GASOLINE CAPACITY/TYPE:
1.5 QUARTS
UNLEADED REGULAR
OILTYPE (API-SF-SJ):
SAE 30 (ABQVE 32°F)
SAE 5W-30 (BELOW 32°F)
20 OZS.
OIL CAPACITY:
SPARK PLUG(GAP:
.030")
CHAMPION RESISTOR TYPE RN4C
BLADE BOLT TORQUE:
35-40 FT. LBS.
• The model and serial numbers will be found on a decal attached to the rear of the
lawn mower housing.Record both serial number and date of purchase in space
provided above.
LAWN MOWER
TO REPLACE BLADE
Always observe safety rules when
performing any maintenance.
TIRES
1. Position the blade adapter on the
engine crankshaft. Be sure key in
adapter and crankshaft keyway are
aligned.
2. Position blade on the blade adapter
aligning the two (2) holes in the blade
with the raised lugs on the adapter.
3. Be sure the trailing edge of blade
(opposite sharp edge) is up toward
the engine.
4. Install the blade bolt with the lock
washer and hardened washer into
blade adapter and crankshaft.
5. Use block of wood between blade and
lawn mower housing and tighten the
blade bolt, turning clockwise.
• The recommended tightening torque is
35-40 ft. Ibs.
IMPORTANT: Blade bolt is grade 8 heat
treated.
TO SHARPEN BLADE
NOTE: We do not recommend sharpening blade - but if you do, be sure the
blade is balanced.
Care should be taken to keep the blade
balanced. An unbalanced blade will
cause eventual damage to lawn mower
or engine.
• The blade can be sharpened with a file
or on a grinding wheel. Do not attempt
to sharpen while on the mower.
• Keep tires free of gasoline, oil, or insect
control chemicals which can harm
rubber.
• Avoid stumps, stones, deep ruts, sharp
objects and other hazards that may
cause tire damage.
BLADE CARE
For best results, mower blade must be
kept sharp. Replace bent or damaged
blades.
TO REMOVE BLADE
1. Disconnect spark plug wire from spark
plug and place wire where it cannot
come in contact with spark plug.
2. Tum lawn mower on its side. Make
sure air filter and carburetor are up.
3. Use a wood block between blade and
mower housing to prevent blade from
turning when removing blade bolt.
NOTE: Protect your hands with gloves
and/or wrap blade with heavy cloth.
4. Remove blade bolt by turning counterclockwise.
5. Remove blade and attaching hardware (bolt, lock washer and hardened
washer).
NOTE: Remove the blade adapter and
check the key inside hub of blade
adapter, The key must be in good condition to work properly. Replace adapter if
damaged.
11
Check the crankcase oil level before
starting the engine and after each five (5)
hours of continuous use. Tighten oil plug
securely each time you check the oil
level.
TO CHANGE ENGINE OIL
NOTE: Before tipping lawn mower to
drain oil, drain fuel tank by running
is balanced.
engine until fuel tank is empty.
Blade
1. Disconnect spark plug wire from spark
adapter
plug and place wire where it cannot
Key_
come in contact with spark plug.
2. Remove engine oil cap; lay aside on a
clean surface.
3. Tip lawn mower on its side as shown
and drain oil into a suitable container.
Rock lawn mower back and forth to
remove any oil trapped inside of
engine.
_shaft
4. Wipe off any spilled oil on lawn mower
and on side of engine.
bolt
\
Tr ling
5.
Fill engine with oil. (See "Add Oil" in
Blade adapter
Hardened
edge
the Operecion section of this manual.)
washer
6. Reconnect spark plug wire to spark
GRASS CATCHER
plug.
• The grass catcher may be hosed with
water, but must be dry when used.
• Check your grass catcher often for
damage or deterioration. Through
normal use it will wear. If catcher needs
replacing, replace only with a manufacturer approved replacement catcher.
Give the lawn mower model number
AIR FILTER
when ordering.
Your engine will not run properlyand may
ENGINE
be damaged by usinga dirtyair filter.
LUBRICATION
Replacethe air filter everyyear or after
every 100 hoursof operation,more often
Use only high quality detergent oil rated
with API service classification SF-SJ,
if you mow in very dusty,dirtyconditions.
Do not wash air filter.
Select the oil's SAE viscosity grade
TO CHANGE AIR FILTER
according to your expected operating
temperature.
1. Remove the air filter by turning
• To check bladebalance, drivea nail
intoa beam or wall. Leave aboutone
inchof the straightnailexposed. Place
center hole of blade over the head of
the nail. If blade is balanced,it should
remain in a horizontalposition.If either
end ofthe blade moves downward,
sharpen the heavy end until the blade
/
NOTE: Although multi-viscosity oils
(5W30, 10W30 etc.) improve starting in
cold weather, these multi-visc0sity oils
will result in increased oil consumption
when used above 32°I=. Check your
engine oil level more frequently to avoid
possible engine damage from running
low on oil.
Change the oil after every 25 hours of
operation or at least once a year if the
lawn mower is not used for 25 hours in
one_eer.
2.
3.
4.
5.
6.
12
clockwiseto the stop and pull away
from collar.
Remove filterfrom insideof cover.
Clean the inside ofthe cover and the
collarto remove any dirt accumulation.
Insertnew filterintocover.
Put air filter cover and filter intocollar
aligningthe tab with the slot.
Push in on cover and rum counterclockwiseto tighten.
CLEANING
Turn
Collar
Clip
clockwise
remove
to
Airfilter
Air filtercover Turn counterclockwise to
tighten
MUFFLER
Inspect and replace corroded muffler as it
could create a fire hazard and/or damage.
SPARK PLUG
Replace spark plug at the beginning of
each mowing season or after every 100
hours of operation, which ever occurs
first. Spark plug type and gap setting are,,
shown in PRODUCT SPECIFICATIONS
section of this manual.
.
ACAUTION:
Before performing any
'
service or adjustments:
1. Release control bar and stop engine.
2. Make sure the blade and all moving
parts have completely stopped.
3. Disconnect spark plug wire from spark
plug and place where it cannot come
in contact with plug.
IMPORTANT: For best performance,
keep mower housing free of built-up
grass and trash. Clean the underside of
your mower after each use.
_CAUTION:
Disconnect spark plug wire
from spark plug and place wire where it
cannot come in contact with the spark
plug.
• Clean the underside of your lawn
mower by scraping to remove build-up
of grass and trash.
• Clean engine often to keep trash from
accumulating. A clogged engine runs
hotter and shortens engine life.
• Keep finished surfaces and wheels free
of all gasoline, oil,etc.
• We do not recommend using a garden
hose to clean lawn mower unless the
electrical system, muffler, air filter and
carburetor are covered to keep water
out. Water in engine can result in
shortened engine life.
TO ADJUST HANDLE
The handle on your lawn mower has
three (3) height positions - adjqst to
height that suits you.
• Squeeze the bottom ends of lower
handle towards each other until the pin
in handle can be inserted into one of
the three height adjustment holes.
LAWN MOWER
TO ADJUST cu'n'ING HEIGHT
See 'TO ADJUST CUTTING HEIGHT" in
the Operation section of this manual.
REAR DEFLECTOR
The rear deflector, attached between the
rear wheels of your mower, is provided to
minimize the possibility that objects will
be thrown out of the rear of the mower
intd the operator mowing position. If the
deflector becomes damaged, it should be
replaced.
Lo_
pin
adjustment
bracket
13
TO ASSEMBLE
GRASS CATCHER
ENGINE
ENGINE SPEED
Yourengine speed has been factoryset.
Do not attempt to increase engine speed
or it may resultin personalinjury.If you
believethat the engine is runningtoo fast
or too slow,take yourlawn mowerto a
Sears or other qualifiedservice center for
repair and adjustment.
CARBURETOR
Yourcarburetorhas a non-adjustable
fixedmain jet for mixture control, if your
engine does not operateproperlydue to
suspectedcarburetorproblems,take your
lawn mower to a Sears or other qualified
service center for repair and/oradjustment.
IMPORTANT: Never tamper withthe
engine governor,which is factoryset for
properengine speed. Overspeedingthe
engine above the factory high speed
settingcan be dangerous. If you thinkthe
engine-governedhigh speed needs
adjusting,contact a Sears or other
qualifiedservice center,which has
properequipmentand experienceto
make any necessaryadjustments.
1. Put grass catcher frame into grass bag
with dgid part of bag on the bottom.
Make sure the frame handle is outside
of the bag top.
2. Slip vinyl bindings over frame.
NOTE: If vinyl bindings are too stiff, hold
them in warm water for a few minutes. If
bag gets wet, let it dry before using.
ACAUTION:
Do not run your lawn mower
without clipping deflector or approved
grass catcher in place. Never attempt to
operate the lawn mower with the rear
door removed or propped open.
Catcher
frame
handle
\
Frame
opening
Immediately prepare your lawn mower for
storage at the end of the season or if the
unit will not be used for 30 days or more.
LAWN MOWER
When lawn mower is to be stored for a
period of time, clean it thoroughly, remove
all dirt, grease, leaves, etc. Store in a
clean, dry area.
1. Clean entire lawn mower (See
'CLEANING' in the Maintenance
section of this manual).
2, Lubricate as shown in the Maintenance section of this manual.
3. Be sure that all nuts, bolts, screws,
and pins are securely fastened.
Inspect moving parts for damage,
breakage and wear. Replace if
necessary.
4. Touch up all rusted or chipped paint
surfaces; sand lightly before painting.
HANDLE
2. Squeeze the bottom ends of lower
handle toward each other until pins in
handle clear the brackets and pivot
entire handle assembly forward and
allow it to rest on mower.
• When setting up your handle from the
storage position, the lower handle will
require manually locking into the
mowing position,
IMPORTANT: When folding the handle
for storage or transportation, be sure to
fold the handle as shown or you may
damage the control cables.
Operator presence
Upper handle
controlbar
_ ._/
Fold forwardfor _
_
stroage
.... .._,/%_
You can fold your lawn mower handle for
storage.
1. Loosen the two (2) handle knobs on
sides of the upper handle and allow
handle to fold down to the rear,
=_ -_
.
Lower handle
:. ."Y/'
,"_
J
(_/ _ckward
_
14
_/_)
position
ENGINEOIL
Med
Low.
pin
Drain oil (with engine warm) and replace
with clean engine oil. (See "ENGINE" in
the Maintenance section of this manual).
CYLINDER
1. Remove spark plug.
Pour one ounce (29 ml) of oil through
spark plug hole into cylinder.
Pull starter handle slowly a few times
to distdbute oil.
4. Replace with new spark plug.
3-Position 2.
handle
adjustment3.
bracket
OTHER
ENGINE
FUELSYSTEM
IMPORTANT:
ItisimLoortant
toprevent
gumdeposits
fromforming
inessential
fuel system parts such as carburetor, fuel
filter, fuel hose, or tank during storage.
Also, expedence indicates that alcohol
blended fuels (called gasohol or using
ethanol or methanol) can attract moisture
which leads to separation and formation
of acids during storage. Acidic gas can
damage the fuel system of an engine
while in storage.
1. Drain the fuel tank.
2. Start the engine and let it run until the
fuel lines and carburetor are empty.
• Never use engine or carburetor cleaner
products in the fuel tank or permanent
damage may occur.
• Use fresh fuel next season.
NOTE: Fuel stabilizer is an acceptable
altemative in minimizing the formation of
fuel gum deposits during storage. Add
stabilizer to gasoline in fuel tank or
storage container. Always follow the mix
ratio found on stabilizer container. Run
engine at least 10 minutes after adding
stabilizer to allow the stabilizer to reach
the carburetor. Do not drain the gas tank
and carburetor if using fuel stabilizer,
• Do not store gasoline from one
season to another.
• Replace your gasoline can if your
can starts to rust. Rust and/or dirt in
your gasqline will cause problems.
• If possible, store your unit indoors
and cover it to give protection from
dust and dirt.
• Cover your unit with a suitable
protective cover that does not retain
moisture. Do not use plastic. Plastic
cannot breathe which allows condensation to form and will cause your unit
to rust.
IMPORTANT: Never cover mower while
engone and exhaust areas are still
warm.
A CAUTION:Never store the lawn
mower with gasoline in the tank inside
a building where fumes may reach an
open flame or spark. Allow the engine
to cool before storing in any enclosure.
15
TROUBLESHOOTING
PROBLEM
)oes not start
CHART
CAUSE
CORREC'nON
1. Dirty air filter.
2. Out of fuel.
3. Stale fuel.
4. Water in fuel.
5. Spark plug wire is
disconnected.
6. Bad spark plug.
7. Loose blade or broken
blade adapter.
8. Control bar in released
position.
9. Control bar defective.
.oss of power
1. Rear of lawn mower
housingor cutting blade
dragging in heavy grass.
2. Cutting too much grass.
3. Dirty air filter.
4. Buildup of grass, leaves,
and trash under mower.
5. Too much oil in engine.
6. Walking speed too fast.
Poor cut Jneven
1. Worn, bent or loose blade.
2. Wheel heights uneven.
3. Buildup of grass, leaves
and trash under mower.
Excessive
vibration
1. Worn. bent or loose blade.
2. Bent engine crankshaft.
_oterter rope hard
pull
1. Clean/raplace air filter.
2. Fill fuel tank.
3. Drain tank and refillwith
fresh clean fuel.
4. Drain fuel tank and
carburetorand refilltank
with fresh gasoline.
5. Connect wire to plug.
6. Replace spark plug.
7. Tighten blade bolt or
replace blade adapter.
8. Depress control bar to
handle.
9. Replace control bar.
1. Set to "Higher Cut"
position.
2. Set to "Higher Cut"
position.
3. Clean/replace air filter.
4. Clean underside of mower
housing.
5. Check oil level.
6. Cut at slower walking
rSpeed.
1. Replace blade. Tighten
blade bolt.
2. Set all wheels at same
height
3. Clean undersideof
mower housing.
1. Replace blade. Tighten
blade bolt.
2. Contact a Sears or other
qualified service center.
1. Engine flywheel brake is On 1. Depress control bar to
when control bar is released.
upper handle before
pulling starter rope.
2. Contact a Sears or other
2. Bent engine crankshaft.
qualified service center.
3. Blade adapter broken.
3. Replace blade adapter.
4. Move lawn mower to cut
4. Blade dragging in grass.
grass or to hard surface.
16
TROUBLESHOOTING
CHART
PROBLEM
CAUSE
CORRECTION"'
._msscatcher
iotfilling (ifso
.:lulpped)
1. Cuttingheighttoo low.
2. Lifton bladeworn off.
3. Catcher not ventingair.
1. Raise cuttingheight.
2. Replace blade.
3. Clean grass catcher.
tard to push
1. Grass is too high or wheel
height is too low.
2. Rear of lawn mower
housing or blade dragging
in grass.
3. Grass catcher too full.
4. Handle height position not
right for you,
1. Raise cuttingheight.
17
2. Raise rear of lawn mower
housing one (1) setting
higher.
3. Empty grass catcher.
4. Adjust handle height to
suit,
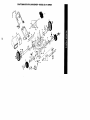
CRAFTSMAN
ROTARY
LAWNMOWER
-- MODELNO.917.389620
j44
49
23
34
68
4O
I i
87
27
2O
4O
CRAFTSMAN ROTARY LAWN MOWER- - MODEL NO. 917.389620
KEY
NO.
PART
NO.
DESCRIPTION
KEY
NO.
PART
NO.
1
2
3
4
5
6
7
8
9
!0
11
12
13
14
15
16
17
18
19
20
21
22
23
24
25
26
27
1316_6
166860X479
161105X479
132001
63601
131969
66426
74780512
154132
165754
156577
_
850733X004
136376
51793
147286
1_5946X479
17600406
167132X004
167133X004
165858
168360X004
166875
751153
16_36X479
1662430(479
851856
ControlBar
Lltof3e¢
_
LowerHandle
RopeGulde
LOCkOUt1/4-20
Handle Belt
Wire 1"el
Hex Bolt 5/16-18 x 3/4
Hinge Bmcket
Melcher Docr
Engine Zone Contro_ Ca_e
Hex W&_ner Head Sorew #10-24 x 1/2
Up-Stop Bracket
Hande Kno_
Helq01nCotter
Hinge Rod
Support Bracket
Screw
A)de Arm Assembly - LF
Axle Arm Assembly - RF
Rear Sldrt
Selector Spdng
Rear Door Assembly Kit (Incl. Spdngs)
Locknut 5/16-18
Hancle Bracket Assembly (LeR)
Haitdle Bracket Assembly (Right)
Screw 1/4-20 x 3_
34
36
36
37
38
39
4O
41
42
43
44
45
46
47
48
49
50
51
52
53
54
55
56
57
58
67
68
28
152124
_ge sprig
70
16_B78
851084
850263
851074
165833
851514
161551
166113
165755
......
29
30
31
33
160835X007
1911 _'1J_
165760
87877
Wha_ Ac!ueling Bracket - Front
Spacer
Cllp on Discharge Guard
Setector Knob
---
161(_8
1774O6
167130X(JO4
166785
160_28
161162
164,362
83923
774OO
88652
165766
165767
165912
150406
85463
63124
167131X004
151161
57143
DESCRIPTION
Axle Arm Assembly - LR
Locknut 5/16-18
Shautder Bolt 5/16-18
WheelAssemely
Shoulder Bdt
Flanged Locknut
Hubcap
Hinge Screw
Spdng(LH)
Sprlng(RH)
Door Bolt
Hex Head Thread Relling Screw 3/8-16 x 1
Danger Decal
Nut
Axle Arm Assembly - RR
Wave Washer
Nut
Houelng As_emi01y (Ind, Ref. #17. 18 & 46)
Hex Head Screw 3/8-24 x 1-3/B Grd. 8
Helical Lockwasher
Hardened Washer
21" Blade
Blade Adapter
Adjustment Bolt
Grass Bag
Catcher Frame
Engine - (See Breakdown)
C_
143.016712
Warning Decal (Not Shown)
Owners ManuaJ
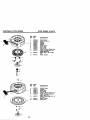
CRAFTSMAN 4-CYCLE ENGINE
MODEL NUMBER
143.016712
_355
103,
130
120
119
195
275.
182216
19
104
_'I_224
223,_=_
_184_80_
174
=2/07
52"
1854
238
250
36
CRAFTSMAN 4-CYCLE ENGINE
KEY
NO:
1
2
6
7
12
12A
PART
NO.
37465
26727
33734
36557
36775
36558
12B
14
15
16
17
18
36694
28277
30589
34839A
31335
651018
19
20
30
40
41
36281
32600
37464
40027
40042
42
43
45
40006
20381
36777
46
48
50
32610A
27241
37460
52
69
70
29914
37609
37608
72
73
75
80
81
82
37615
28833
27897
30574A
30590A
30591
83
86
89
90
92
93
100
101
103
30588A
650488
611004
611112
650815
650816
34443C
610118
651007
104
110
119
120
125
37480
37047
36787
36825
36780
125
37288
126
130
135
37289
6021A
37598
150
151
151A
169
172
31672
31673
40017
36783
36784
DESCRIPTION
Cylinder Incl. 2 & 20)
Dowe Pn
Breather Element
Breather Ass'y. (IncL 6 & 12A)
Breather Tube
Breather Cover & Tube (Incl.
12B)
Breather Tube Elbow
Washer
Governor Rod (Incl. 14)
Govemor Lever
Governor Lever Clamp
Screw, Torx T-15, 8-32 x 19/
64"
Extension Spring
Oit Seal
Crankshaft
Piston, Pin & Ring Set (Std.)
Piston & Pin Ass'y. (Std.)
(Incl. 43)
Ring Set (Std.)
_
Piston Pin Retaining Hing
Connecting Rod Ass'y. (Incr.
46)
Connecting Rod Bolt
Valve Lifter
Camshaft Exhaust(MCR)(Inc.
ref 104)
Oil Pump Ass'y.
Mounting Flange Gasket P
Mounting Flange (Incl. 72
thru 83)
Oil Drain Plug (Incl. 73)
Drain Plug Gasket
Oil Seal
Governor Shaft
Washer
Governor Gear Ass'y. (Incl.
81)
Governor Spool
Screw, 1/4-20 x 1-1/4"
Flywheel Key
Flywheel
Bellevllle Washer
Flywheel Nut
Solid State Ignition
Spark Plug Cover
Screw, Torx T-15, 10-24 x 15/
16"
Cam Bushing
Ground Wire
• Cylinder HeadGasket
Cylinder Head
Exhaust Valve (1/32" OS)
(Incl. 151)
Exhaust Valve (Std.) (Incl.
151
Intake Valve (Std.) (Incl. 151)
Screw, 5/16-18 x 1-I/2"
Resistor Spark Plug
RJ19LM4
Vave Sprng
Valve Spring Cap
Intake Valve Seal
" Valve Cover Gasket
Valve Cover
MODEL
KEY
NO.
174
178
182
184
PART
NO.
30200
29752
6201
26756
NUMBER
143.016712
DESCRIPTION
Screw, 10-24 x 9/16"
Nut & Lock Washer, 1/4-28
Screw, 1/4-28 x 7/8"
• Carburetor To Intake P_pe
Gasket
185 37466
Intake Pips
Governor Link
186 32653
189 650839
Screw, 1/4-20 x 3/8"
191 36559A
S.E. Brake Bracket (Incl. 195)
Terminat
195 610973
207
34336
Throttle Link
216
33086
R.P.M. Adjusting Lever
Screw, 1/4-20 x 1•
223
650451
224
36786
* Intake Pipe Gasket
Screw, 10-32 x 49/64"
238
650932
* Air Cleaner Gasket
239
34338
241
36919
Air Ck)aner Collar
Air Cleaner Filter
245
36905
Air Cleaner Cover
250
37122
260
36980
Blower Housing
Screw, 10-24 x 9/16"
261
30200
262
650831
Screw, 1/4-20 x 1/2"
Starter Gdll
263A 37184
Muffler
275
37462
277
650988
Screw, 1/4-20 x 2-5/16"
285
35000A
Starter Cup
Screw, 8-32 x 21/64"
287 650926
Fuel Line
290 29774
Fuel Line Clamp
292 26460
298 28763
Screw, 10-32 x 35/64"
300
36916
Fuel Tank (Incl. 292 & 301
301
36246
Fuel Cap (Black)
Oil Fill Tube
305
35647
306
37610
* "0"- Ring
307
35499
"O"-Rlng
309
650562
Screw, 10-32 x I/2"
309A 650783
Screw, 10-24 x 3/4"
Dipstick
310
35648
Hold Down Bracket
311A 37611
313
34080
Spacer
Screw, 10-32 x 51164"
347
651038
Starter Handle
355
590701
Lubricetion Decal
370A 36261
370C 37318
Primer Decal (3 X)
370R 37317
Waming Decal
380 640271
Carburetor (Incl. 184)
Rewind Starter
390 590739
400 36792B
Gasket Set (Incl. Items
Marked *)
416 36085
Spark Arrestor Kit (Incl.
417)(Optional)
417 650760
Screw, 8-32 x 3/8" (Optional)
900
Replacement Engine NONE
900
Replacement S/B 750865
Order from 71 -999
RPM High 2900 to 3200
NOTE: This engine could have been built with
590702 starter)
NOTE: All component dimensions given in U.S.
inches 1 inch = 25.4 mm
37
CRAFTSMAN
4-CYCLE
ENGINE
MODEL NUMBER
:7
KEY
NO.
PART
NO.
----
640271
1
31615
2
4
5
6
7
16
17
31767
631184
631183
640070
650506
631807
651025
18
20
20A
830766
640027
640200
25
27
28
29
30
631867
631024
632019
631028
631021
31
35
36
36A
37
40
44
47
48
631022
640259
640080
632766
632547
640030
27110A
630748
631027
60
632760B
DESCRIPTION
*
*
*
*
*
*
*
*
*
*
Carburetor (Incl. 184 of
Engine Parts List)
Throttle Shaft & Lever
Assembly
Throttle Return Spdng
Dust Seal Washer
Dust Seal {Thruttle)
Throttle Shutter
Shutter Screw
Fuel Fitting
Throttle Crack Screw/Idle
Speed Screw
Tension Spring
Idle Restdctor Screw
Idle Restdctor Scrwe Cap
Black
_loat I_owl
Float Shaft
Float
Float Bowl _O" Ring
Inlet Needle, Seat, & Clip
(Incl. 31)
Spring Clip
Primer Bulb/Retainer Ring
Main Nozzle Tube
Carburetor Tube
"O" Ring, Main Nozzle Tube
High Speed Bowl Nut
Bowl Nut Washer
Welch Plug, Idle Mixture Well
Welch Plug, Atmosphadc
Vent
Repair kit (Incl. items Marked
• in Notes)
38
143.016712
CRAFTSMAN
4-CYCLE ENGINE
MODEL
NO.
37_1
_"11
_
11
__8
NUMBER
NO.
DESCRIPTION
590702
590599A
590600
143.016712
_K_Y
590696
PART
590601
_
7
590697
590698
590699
11
590703
12
590535
8
13
590700
590701
Recoil Starter
Spdng Pin (IncL 4)
Washer
Retainer
Washer
Brake Spring
Starter Dog
Dog Spdng
Pulley & Rewind Spdng Ass'y
Starter Housing Ass'y. (40
degree grommet)
Starter Rope ( 98" X 9/64"
dla.)
Starter Handle
KEY
NO,
PART
NO.
DESCRIPTION
---3
6
7
8
11
590739
590740
590616
590617
590618A
590638
12
590535
13
14
590701
590760
7__=
f
B--5
"_-.
39
Rewind Starter
Retainer
Starter Dog
Dog Spring
Pulley & Rewind Spring Ass'y
Starter Housing Ass'y (40
degree grommet)
Starter Rope(Length 98" x 9/
64" dia.)
Starter Handle
Spring Clip
Get it fixed, at your home or ours!
For repair of major brand appliances in your own home...
no matter who made it, no matter who sold it!
1-800-4-MY-HOME
sMAnytime, day or night
(1-800469-4663)
www.seals.com
To bring in products such as vacuums,
lawn equipment and electronics for repair, call for
the location of your nearest Sears Parts & Repair Center.
1-800-488-1222
Anytime,day or night
WWW,Sears,colrrl
For the replacement parts, accessories and owner's manuals
that you need to do-it-yourself, call Seers PartsDIrectSM!
1-800-366-PART 8am- It p.m.
CST,
(1.800.866-7278)
7 days a week
www.sea rs.com/pa rtsdlrect
To purchase or inquire about a Sears Service Agreement:
1-800-827-6655
7 a.m.- 5 p.m.CST,Mon.- Sat.
Pars psdir servicio de reparack_na dom_cllio,
y para ordenar piezas con entmga a domicilio:
1.888-SU-HOGAR
='
(1-688-784-6427)
AuCanada pour service en franP,,als:
1-877-LE-FOYER
_"
(1-877-533-6937)
SF_4RS ]
HomeCentral ®
o se=rs,
Ro_t_ft
177408
_
12.11.00 TR
® egl
._ist
redTrademsrklTMTrader_rkofSeam,
RoeloucksndCo,
fade / TMMama de F_bdca de Sears, Roebuck and Co.
Printed in U.S.A.