1
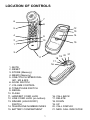
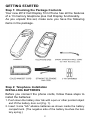
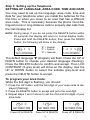
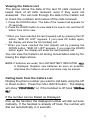
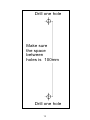
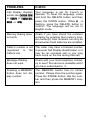
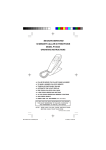
13 MEMORY CALLER DISPLAY TRIM PHONE
MODEL 2012J
OPERATING INSTRUCTIONS
TO USE THE CALL DISPLAY FEATURE OF THIS PHONE, YOU MUST
SUBSCRIBE TO CALL DISPLAY SERVICE, AND REMEMBER TO INSTALL
BATTERIES
NOTE: PLEASE READ AND FOLLOW THESE INSTRUCTIONS BEFORE
USING YOUR TELEPHONE
TABLE OF CONTENTS
LOCATION OF CONTROLS ............................................... 1
GETTING STARTED ........................................................... 2
CHECKING THE PACKAGE CONTENTS .............................. 2
TELEPHONE INSTALLATION ................................................ 2
SETTING UP THE TELEPHONE ........................................... 4
MAKING AND RECEIVING CALLS .................................... 6
MEMORY DIALING ............................................................. 7
CALL DISPLAY FEATURES ............................................... 8
WALL MOUNTING .............................................................12
TROUBLE SHOOTING ......................................................14
BATTERY SAFETY INSTRUCTIONS ................................17
LOCATION OF CONTROLS
7
6
8
12
5
13
4
9
2
10
14
15
1
3
11
18
17
21
19 20
16
1.
2.
3.
4.
5.
MUTE
RESET
STORE (Memory)
MEMO (Memory)
ONE-TOUCH SPEED DIAL
(M1, M2 & M3)
6. HOOK SWITCH
7. VOLUME CONTROL
8. TONE/PULSE SWITCH
9. REDIAL
10. FLASH
11. HANDSET CORD JACK
12. LINE CORD JACK (on bottom)
13. RINGER (HI/LOW/OFF)
SWITCH
14. TELEPHONE NUMBER INDEX
15. BATTERY COMPARTMENT
1
16.
17.
18.
19.
20.
21.
CALL BACK
DELETE
DOWN
UP
CALL DISPLAY
NEW CALL INDICATOR
GETTING STARTED
Step 1: Checking the Package Contents
Your new 2012 Call Display Trim Phone has all the features
of a 13 memory telephone plus Call Display functionality.
As you unpack this set, make sure you have the following
items in the package.
Step 2: Telephone Installation
INSTALLING BATTERIES
Before you connect the phone cords, follow these steps to
install the batteries:
1. Push down the battery door tab with a pen or other pointed object
and lift the battery door out (Fig. 1).
2. Insert 3 size "AA" alkaline batteries as shown inside the battery
compartment. (The negative side of the battery touches the battery spring.)
2
3. Replace the battery door and snap it shut (Fig. 2).
CAUTION
Make sure that the telephone line cord is disconnected
before opening the battery door.
Replace the batteries when the LOW BATTERY INDICATOR
LOW appears in the display or when the display gets dim.
‹ When the batteries are dead, the display will not show. You
can still make or receive calls, but you cannot use the Call
Display or memory dialing.
‹ When the batteries are dead, your call data and memories
could be erased.
CONNECTING THE TELEPHONE
1. Connect the COILED HANDSET CORD
to the bottom of the handset and the bottom of the base.
2. Connect the straight telephone line cord to
the LINE CORD jack and telephone outlet
on the wall .
3. Route the LINE CORD into the channel on
the bottom of the base.
(For instructions on how to mount the telephone on the wall,
see page 12.)
3
Step 3: Setting up the Telephone
SETTING UP LANGUAGE, AREA CODE, TIME AND DATE
You may need to set up the language, area code, time and
date for your telephone when you install the batteries for the
first time or when you move to an area that has a different
area code. This is necessary because the phone must distinguish local or long distance calls to properly dial calls from
the Call Display list.
NOTE: During setup, if you do not press the DELETE button within
20 seconds, the display will return to normal display mode.
Press and hold the DELETE button, then press the DOWN
button, the following will show in the display:
E
F
S
SET LANGUAGE
“E” = English
“F” = French
“S” = Spanish
1 2 3 4 5
LCD CONTRAST
The default language "E" (English) will flash. Press the UP or
DOWN button to choose your desired language (flashing).
Press the DELETE button to confirm and accept. Then LCD
CONTRAST (5-grey level) will show on the display. Use the
UP or DOWN button to select the suitable grey-level and
press the DELETE button to accept.
To program your Area Code:
While the first digit is flashing, you should:
1. Press the UP button until the first digit of your area code is displayed (flashing).
2. Press the DELETE button to accept and go to the next digit.
3. Repeat steps 1 and 2 above to set the 2nd and 3rd digits of your
area code.
7 0 0
7
1 0
7
1 8
SET AREA CODE
SET AREA CODE
SET AREA CODE
Press UP & DELETE
Press UP & DELETE
Press UP & DELETE
4
To program the Time and Date:
Press the UP and DOWN buttons to get to the correct number and the DELETE button to accept.
10:00 - 0/0
10:53 - 0/0
SET HOUR
SET MINUTES
10:53 - 0/18
10:53 - 6/18
SET DATE
SET MONTH
NOTE: You may not have to set up the Time
10:53 - 6/18
and Date manually as it may be automatically updated by Call Display inforTOTAL 00 NEW 00
mation when your phone rings (twice or
(Example: 10:53 a.m.
more). To get back to the standby mode
on June 18th)
(for dialing), press the DELETE button
until the normal display shows (see right for example).
Adjusting the LCD Contrast Level
You can also adjust the grey-level of the display without entering the initial setup mode. Hold the DELETE button, then
press the CALL BACK button to enter the LCD CONTRAST
level setting mode. Use the UP or DOWN button to select the
suitable grey-level and press the DELETE button to accept.
BASICS
Choosing Tone or Pulse Dialing
Select the type of dialing by setting the TONE/PULSE switch.
If you are not sure of your dialing system, make a trial call
with the switch set to TONE. If the call connects, leave the
switch as it is; otherwise, set it to PULSE. Even when your
phone is set to pulse service, this phone can be switched to
temporary tone for access to services that require tone signaling including Telephone Banking. Just press the TONE
button after dialing in pulse and your buttons can now be
used for tone signaling for this call only.
5
MAKING AND RECEIVING CALLS
MAKING A CALL
1. Pick up the handset.
2. Dial the phone number. The dialed number appears in the display.
3. When you finish talking, replace the handset into the base.
RECEIVING A CALL
1. Pick up the handset when the phone rings.
2. When you finish talking, replace the handset into the base.
Volume Control and Ringer Setting
Adjust the handset
volume
Slide the VOLUME control.
Adjust the ringer level
Set the RINGER switch.
HI - loud rings on incoming calls.
LOW - lower rings on incoming calls.
OFF - no ringing on incoming calls.
If you have subscribed to Call Display service, the caller’s
number and/or name will appear in the display when you
receive a call (see page 9).
Last Number Redialing and Pause Function
1. Pick up the handset.
2. Press the REDIAL button. The last dialed number appears in the
display and is automatically dialed.
PAUSE FUNCTION
(Example: In an office where you need to dial a 9 first to get
an outside line), dial the number 9 and press REDIAL button,
and then dial the phone number. You will see a “P” displayed
for PAUSE. You may also store this into memory.
6
MEMORY DIALING
You can quickly dial the numbers you stored into the 3 onetouch speed dial buttons or 10 two-touch speed dial memories.
Storing Phone Number into Memory
1. Press the STORE button. Pro (short for programming) appears on
the display.
2. Dial the phone number you want to store. You can store up to 22
digits, including a TONE ( ) and a PAUSE (REDIAL), each of
which is counted as one digit.
3. For one-touch dialing:
Press one of the 3 onetouch speed dial buttons (M1 to M3).
For two-touch dialing:
Press the MEMO button, and the
press one of the dialing keys (0 to 9)
to store a phone number in.
The stored number and the location will show in the display.
4. Press the STORE button, or wait 3 seconds to resume normal
display.
5. Repeat steps 1-4 to store numbers into other memory locations.
NOTE: When the batteries are dead or removed for more than 5 minTIP:
utes, the stored numbers may be erased.
If you entered a wrong number, you may press the STORE
button, then start from the beginning.
TO STORE A NUMBER TO BE DIALED VIA PRIVATE
BRANCH EXCHANGE (PBX)
Before entering a phone number in Step 2 in Storing phone
number into memory, do as follows:
1. Enter the outside line access digit (e.g., 9).
2. Press the REDIAL button (for a pause).
TO CHANGE A STORED NUMBER
Just store a new number, as described above, the old one
will be erased automatically.
7
Making Calls with One-Touch Speed Dial Buttons
1. Pick up the handset.
2. Press one of the one-touch speed dial buttons (M1 to M3).
3. The phone will dial the number you stored into it.
Making Calls with Two-Touch Speed Dial Locations
1. Pick up the handset.
2. Press the MEMO button first.
3. Press the desired two-touch memory number (0 to 9).
3. The phone will dial the number you stored into it.
CALL DISPLAY FEATURES
Understanding Call Display service
Call Display allows the caller’s phone number to be shown on
the display after the second ring of the call, also in most
cases, the caller’s name, calling time and date. This information will be stored automatically. In order to use this feature,
you must first subscribe to the Call Display service. To use
the call back feature, set the area code (see page 6).
When You Receive a Call
The caller’s phone number and/or name will not appear in the
following cases:
- When the call is made through a telephone company which does
not offer Call Display service (including international calls), the
display will show "UNAVAILABLE".
- When the call is "blocked". For privacy reasons, many locations
allow callers the option to prevent their telephone data from being
displayed on the other party s Call Display display. The display
will show "PRIVATE CALL".
- If the call is from an office which uses multiple lines, the displayed
phone number may not match the number you use to call that
extension.
- If you have picked up the phone before the second ring.
8
Viewing the Callers List
The phone stores the data of the last 70 calls received. It
keeps track of all calls received, even if they were not
answered. You can look through the data in the Callers List
to check the numbers and names of the calls received.
1. Press the DOWN button. The data of the newest call appears for
15 seconds.
2. Press the DOWN button to view data from new to old, and the UP
button from old to new.
* When you have reached the last (newest) call by pressing the UP
button, "END OF LIST" appears. If you press UP button again,
the display will show the first (oldest) call.
* When you have reached the first (oldest) call by pressing the
DOWN button, "END OF LIST" appears. If you press the DOWN
button again, the display will show the last (newest) call.
You can view the Callers List during conversation also by following the steps above.
NOTE: If batteries are weak, the LOW BATTERY INDICATOR
LOW
is displayed. Replace new batteries as soon as possible;
otherwise the Callers List and memories may be erased.
Calling back from the Callers List
Display the phone number you want to call back using the UP
or Down button. Press the CALL BACK button. The display
will show "PICK UP OR ADJ" or, if the handset is off hook "DIALING or
ADJ".
If the number can be Dialed as Displayed:
Pick up the handset, the displayed number will dial out automatically. If the handset is already off hook, the number will
dial out automatically in 2 seconds.
9
If the number cannot be Dialed as Displayed:
Press the CALL BACK button and repeatedly press the button to reformat the displayed number into a dialable number.
Each press of the CALL BACK button displays another available format, cycling back to the original format. You can
choose one of the following formats:
1. 10 digit plus 1
2. 10 digit
3. 7 digit
If the handset is off hook, note that you have 2 seconds to
reformat the number using the CALL BACK button. If you do
not press the CALL BACK number, the telephone will attempt
to dial the number as displayed on the screen.
NOTE: In many locations, the telephone company provides dis-
played telephone numbers in a ready to dial format. These
numbers cannot be altered as they are already in the correct
format to call back.
Storing Phone Numbers from the Callers List
As the phone keeps the data of up to 70 calls, if the 71st call
comes in, the phone deletes the oldest data automatically.
To prevent important calls from being deleted, you can store
them into the 13 speed dial memory (3 one-touch and 10
two-touch).
1. Display the phone number you want to store.
2. Press STORE button. The number is repeated in the display.
Press CALL BACK to select the number you want to store (for
example, 14162353453 or 4162353453 or 2353453).
3. For one-touch memory:
Press a one-touch speed
dial button (M1 to M3).
For two-touch memory:
Press the MEMO button, and then
any speed dial memories (0 to 9)
The phone number is now stored in that memory button.
10
Note: Only the number will be stored, not the name.
Deleting the Data from the Callers List
TO DELETE THE CALL DISPLAY MEMORY ONE BY ONE
1. Display the entry you want to delete.
2. Press the DELETE button twice quickly, the display shows the
next or previous call, and the data is deleted.
TO DELETE ALL CALLERS LIST ENTRIES
1. Make sure that all NEW calls have been reviewed (NEW CALL INDICATOR (at the back of the handset) does not flash).
2. Press the UP or DOWN button to display any call, make sure the
display does not show "END OF LIST".
3. Press and hold DELETE button down for 6 seconds. Display
changes to "NO CALLS", all Callers List Entries are deleted.
NOTE: You cannot delete all the Callers List Entries when there are
any new calls remaining (not viewed yet), or when "END
LIST" is shown on the display.
OF
Using Message Waiting/Mailbox
To use the Message Waiting feature, you must subscribe to
this service if available from your local telephone company.
This phone will only respond to FSK type of message delivery.
1. If the message is sent by the telephone company which is preceded by a ring, the MESSAGE WAITING symbol will appear on
the display, and the NEW CALL INDICATOR will flash after 20
seconds.
2. After you retrieve your message(s), the telephone company will
send a clear signal (by a ring) to your phone. The symbol will
turn off until a new message is received. The NEW CALL INDICATOR will stop flashing. Sometimes the telephone company will
not send a message clear signal to your phone, then you will
have to clear the message waiting symbol manually by holding
the DELETE button, then pressing the UP button.
11
WALL MOUNTING
This phone can be mounted on a wall phone plate. If you do
not have a modular wall phone plate installed, please consult
with your phone company or installer to get one, or see the
following for installation without a wall plate.
1. Use the SHORT STRAIGHT WALL CORD, and plug one end into
the rear of the phone.
2. Plug the other end into the WALL JACK.
3. Put the phone over the WALL PLATE, make sure both posts fit
into slots on the back of the phone. Then slide down to lock the
phone into the WALL PLATE.
WALL MOUNTING WITHOUT A MODULAR WALL PHONE
PLATE
Follow these instructions to mount the
phone on the wall without a wall plate:
1. Locate a wall stud. If it is possible to utilize a wall stud for mounting, dry wall
expanders or a similar type fastener is
recommended. Consult your local hardware store for details.
2. Drill 2 holes 3-15 / 16 " (100 mm) apart.
3. Put a screw into each hole and leave 3/16"
(5mm) of the head exposed to mount the
phone, (screws are not included).
4. Connect the straight long cord to the phone and jack.
5. Place the TELEPHONE BASE on the 2 mounting screws and
gently push down to lock into place.
IMPORTANT
Before mounting the phone onto the wall, select a wall area
with sufficient strength. If mounting on the wallboard or in an
area of questionable strength, locate a stud for maximum
support of your telephone.
12
Drill one hole
Make sure
the space
between
holes is 100mm
Drill one hole
13
TROUBLE SHOOTING
PROBLEMS
CHECK
No dial tone
Is any plug disconnected from the modular phone plug? Is any jack improperly
wired? Use another phone to test the
jack.
Phone does not work
Are all cords connected properly? Are all
3 "AA" batteries installed? Make sure
they are installed according to the polarity shown.
Phone does not ring
RINGER switch may be set to OFF. Slide
switch to HI or LOW position.
Can not dial
Check the TONE/PULSE switch setting.
You may only have PULSE service. Set
the TONE/PULSE switch to PULSE.
Display shows erroneous figure OR No
dial tone or Low dial
tone or cannot dial out
You may have selected the wrong language. Refer to page 7 and reset the language. It may be helpful to remove the batteries and the line cord for 30 seconds first.
Cannot store into
memory
No batteries are installed or batteries are
weak or installed up-side-down.
Call Display does not Make sure the Call Display service is
active.
work
- The phone is connected to a working
wall jack.
- All line cord connections are correct and
secure.
The display gets dim Check if batteries are properly installed,
and if you have received the first Call
or is blank
Display record. If you have, your batteries may be weak. Replace all batteries.
14
PROBLEMS
CHECK
The Call Display display does not show
the caller’s information
The Call Display unit will not function until
you have subscribed to Call Display service from your local telephone company.
Call your local telephone company to have
Call Display service installed on your
phone line. Also, fresh batteries must be
installed. Make sure all your phone line
connections are secure and correct. If it is
a private call or a blocked call, the caller’s
name and/or phone number will not
appear on the display. (You will see time
and date of call plus some dashes or the
words "UNAVAILABLE" or "PRIVATE
CALL".)
Static noise on line,
cannot hear calling
party or calling party
can not hear you
Make sure the HANDSET CORD is connected properly, or replace the COILED
HANDSET CORD. Any phone store has
these cords in different lengths. After
some time the cord may become overstretched or damaged.
Redial does not work
Check if P shows in the display. Since the
REDIAL button has combined function
(pause), the phone may have been
paused. Just press the HOOK switch to
get a new dial tone.
Line error shows in You picked up the phone before the second ring, or your phone received no
the display
information or unclear information. Static
can cause this message. If this condition
persists, contact your local telephone
company to ensure there is no problem
with your phone line.
15
PROBLEMS
CHECK
Call Display displays
words like CHOISIR ZONE
or TIEMPO or CODIGO DEL
AREA or APEL
Your language is set for French or
Spanish. To reset the language, press
and hold the DELETE button and then
press the DOWN button. While E is
flashing, press the DELETE button to
confirm. The language will be set to
English mode.
Memory Dialing does
not work
Check if you have stored the numbers
correctly by pressing that memory location button(s). Also numbers can only be
stored when fresh batteries are installed.
Caller’s number is not The caller may have a blocked number
registered to the to prevent Call Display identification, or it
Callers List
may be an overseas call or you may
have noise on the line during that call.
Message Waiting
does not work
Check with your local telephone company to see if this service is available and if
you have subscribed to it.
Pressing a MEMORY The MEMORY button has no stored
button does not dis- number. Please store the number again.
play number
Press the STORE button, dial the number and then press the MEMORY location.
16
BATTERY SAFETY INSTRUCTIONS
CAUTION: TO REDUCE THE RISK OF FIRE OR PERSONAL
INJURY, READ AND FOLLOW THESE INSTRUCTIONS.
1. Use only the following type and size of batteries: 3 size "AA" alkaline
batteries.
2. Do not dispose the batteries into a fire. The cells may explode. Check
with local codes for possible special disposal instructions.
3. Do not open or mutilate the batteries. Released electrolyte is corrosive
and may cause damage to the eyes or skin. It may be toxic if swallowed.
4. Be careful when handling batteries in order not to short the battery with
conducting materials such as rings, bracelets and keys. The battery or
conductor may over heat and cause burns.
5. Do not attempt to recharge the batteries that are used with this product.
The batteries may leak corrosive electrolyte or explode.
6. Do not attempt to rejuvenate the batteries identified for use with this
product by heating them. Sudden release of the battery electrolyte may
cause burns or irritation to eyes or skin.
7. All batteries should be replaced at the same time. Mixing fresh and discharged batteries could increase internal cell pressure and rupture the
batteries.
8. When inserting batteries into this product, the proper polarity or direction must be observed. Reverse insertion of batteries may result in the
leakage or explosion.
9. Remove the batteries from this product if the product will not be used
for a long period of time (several months or more) since during this time
the batteries could leak, damaging the product.
10. Discard weak or dead batteries as soon as possible since they are
more likely to leak in the product. Batteries should be replaced when
the display gets dim or if the LOW BATTERY INDICATOR shows.
11. Do not store this product in high temperature areas. Batteries that are
stored in a freezer or refrigerator for the purpose of extending shelf life
should be protected from condensation during storage and defrosting.
Batteries should be stabilized at room temperature prior to use after
cold storage.
12. If this product does not operate normally, see TROUBLE SHOOTING
on pages 14 and 16. Opening or removing covers may expose you to
dangerous voltages or other risks. Incorrect reassembly can cause
electric shock when the appliance is subsequently used.
13. Installation of batteries should only done by an adult.
17
Limited Time Offer for
Sprint Canada Local Customers!
Unlimited Internet Access only $ 13.95 per month!
-
Unlimited Internet access
Free 24-hour Technical support
Free Personal Web Page (16Mb)
Free Easy-to-use Web Page building tool
30-day Satisfaction Credit
Instant Messaging
Great Web Content
FOR QUESTIONS RELATED TO THE TELEPHONE SET PLEASE CALL AASTRA
TELECOM INC. CUSTOMER SERVICE AT: 1 866-316-1118
FOR QUESTIONS RELATED TO YOUR LOCAL PHONE SERVICE PLEASE
CALL SPRINT CANADA CUSTOMER CARE AT 1 800-980-5464
© Copyright 2003 Aastra Telecom Inc. All Rights Reserved.