1
Technical Manuals Online! - http://www.tech-man.com
Technical Manuals Online! - http://www.tech-man.com
i
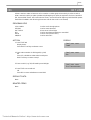
About This Manual
The DCS-816 digital keyphone system can easily change system settings by using the keyset.
An MMC (Man Machine Code) is a program, which sets up the system according to your needs. This
chapter explains how to use a keyphone MMC program. It consists of four parts as follows.
y Introduction to programming
y Precautions before starting programming
y Programming procedure
y Programming using MMCs
Technical Manuals Online! - http://www.tech-man.com
ii
DCS-816 Programming Guide
Table of Contents
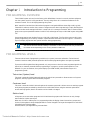
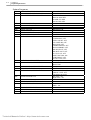
Chapter 1 Introduction to Programming ....................................................................................... 1-1
PROGRAMMING OVERVIEW .................................................................................................................. 1-1
PROGRAMMING LEVELS......................................................................................................................... 1-1
Chapter 2 Programming Procedures............................................................................................. 2-1
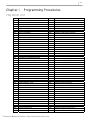
PROGRAM LIST........................................................................................................................................... 2-1
PROGRAM PROCEDURES........................................................................................................................ 2-2
DCS-816 DEFAULT DATA......................................................................................................................... 2-3
SPECIAL APPLICATIONS ......................................................................................................................... 2-8
Chapter 3 Programming Using MMCs............................................................................................. 3-1
Technical Manuals Online! - http://www.tech-man.com
Technical Manuals Online! - http://www.tech-man.com
Technical Manuals Online! - http://www.tech-man.com
1-1
Chapter 1
Introduction to Programming
PROGRAMMING OVERVIEW
The DCS-816 system arrives from the factory with default data. Connect it to trunks, stations and power,
turn the system on and it is fully operational. The only thing left to do is customise the data to fit the
customer’s needs. This is called programming the system.
MMC stands for Man Machine Code and each program is assigned a different three-digit code (e.g. 100).
These MMC codes are used to view, create or change customer data. Programming is simply deciding what
needs to be done and knowing which MMC is used to do it. For example: use MMC 601 to create a station
group; enter system speed dial numbers in MMC 705; and assign soft keys to individual keysets using MMC
722.
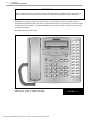
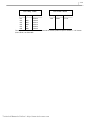
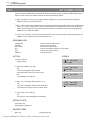
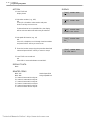
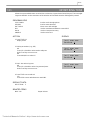
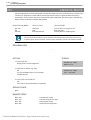
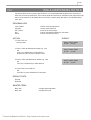
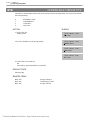
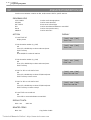
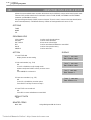
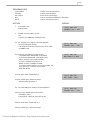
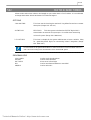
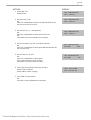
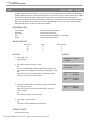
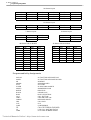
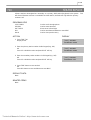
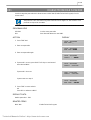
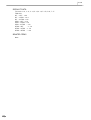
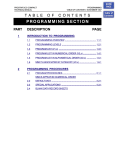
System programming may be done from any LCD 12B or 24B keyset. The first thing you must do is open
system programming. As a security measure, a passcode must be known to do this. Figure 1–1 shows the
keys on a display keyset that have special functions during programming.
CAUTION
This manual describes standard settings. Some MMC codes and default data may be different
from those shown depending on the country selected in MMC 812.
PROGRAMMING LEVELS
There are three levels of programming: technician (or system), customer and station. Technician and
customer levels are under passcode protection while station programming does not require a passcode.
To prevent conflicting data from being entered, only one person at a time can enter programming with the
technician or customer passcode. While programming is in progress, normal system operation is not
affected. For your convenience, the system displays [xxx PGM MODE] when another keyset is in
programming mode.
Technician (System) level
This level is entered via MMC 800 and requires the technician’s passcode. It allows access to all system
programs, station programs and maintenance programs.
Customer level
This level is entered via MMC 200 and requires the customer passcode. It allows access to station programs
and system programs permitted by the technician in MMC 802. When using the customer passcode to
access station programs, data for all stations can be viewed or changed.
Station level
All keysets can access station programs 102–121 without using a passcode. Each user can only change
station data for his/her own keyset.
When an LCD 12B or 24B keyset is in programming mode, the display shows instructions, prompts and
choices. Existing data is always displayed before it can be changed. The keystroke sequence for each MMC
is detailed in the following pages.
However, before you begin entering customer data:
Technical Manuals Online! - http://www.tech-man.com
1-2
Chapter 1
Introduction to Programming
IMPORTANT
When installing this system, and before doing any other programming, use MMC 812 first to select your
country code and to reset and clear memory. This will ensure that you begin with clean, default data.
Remember that to begin programming using an MMC you must press the TRSF key. When you have
finished entering data for an MMC and wish to program another MMC, press the SPK key to store the data
and advance to the next MMC. To end programming you must press the TRSF key again to store the data
and exit programming.
Now begin entering customer data.
LEFT
SOFT
DIAL
SPECIAL KEY FUNCTIONS
Technical Manuals Online! - http://www.tech-man.com
RIGHT
SOFT
1
13
2
14
3
15
4
16
5
17
6
18
7
A
8
B
9
C
10
D
11
E
12
F
FIGURE 1-1
Technical Manuals Online! - http://www.tech-man.com
Technical Manuals Online! - http://www.tech-man.com
2-1
Chapter 2
Programming Procedures
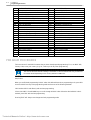
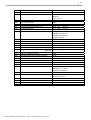
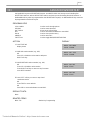
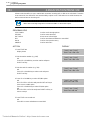
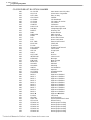
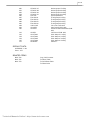
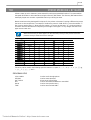
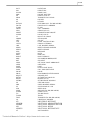
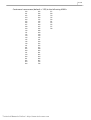
PROGRAM LIST
100:
101:
102:
103:
104:
105:
106:
107:
108:
109:
110:
111:
112:
113:
114:
115:
116:
119:
121:
200:
201
202:
203:
204:
205:
206:
207:
208:
209:
210:
211:
214:
219:
220:
300:
301:
302:
303:
304:
305:
306:
308:
309:
310:
312:
314:
315:
316:
317:
STATION LOCK
CHANGE USER PASSCODE
CALL FORWARD
SET ANSWER MODE
STATION NAME
STATION SPEED DIAL
STATION SPEED DIAL NAME
KEY EXTENDER
STATION STATUS
DATE DISPLAY
STATION ON/OFF
KEYSET RING TONE
ALARM REMINDER
VIEW MEMO NUMBER
KEYSET VOLUME
SET PROGRAMMEDMESSAGE
ALARM AND MESSAGE
SET CLIP DISPLAY
KEYSET LANGUAGE
OPEN CUSTOMER PROGRAMMING
CHANGE CUSTOMERPASSCODE
CHANGE FEATUREPASSCODES
ASSIGN UA DEVICE
COMMON BELL CONTROL
ASSIGN LOUD BELL
BARGE–IN TYPE
ASSIGN VM/AA PORT
ASSIGN RING TYPE
ASSIGN ADD–ON MODULE
CUSTOMER ON/OFF
DOOR RING ASSIGNMENT
DISA ALARM RINGING STATION
COMMON RELAY SERVICE TYPE
ISDN SERVICE TYPE
CUSTOMERON/OFFPERSTATION
ASSIGN STATION COS
PICKUP GROUPS
ASSIGN BOSS/SECRETARY
ASSIGN STATION/TRUNK USE
ASSIGN FORCED CODE
HOT LINE
ASSIGN BACKGROUND MUSIC SOURCE
ASSIGN STATION MUSICONHOLD
LCR CLASS OF SERVICE
ALLOW CLIP
CONFIRM OUTGOING CALL
SET RELOCATION
COPY STATION USABLE
ASSIGN STATION/STATION USE
401:
402:
403:
404:
405:
406:
407:
408:
409:
410:
414:
415:
418:
419:
421:
422:
423:
424:
426:
428:
C.O./PBX LINE
TRUNK DIAL TYPE
TRUNK TOLL CLASS
TRUNK NAME
TRUNK NUMBER
TRUNK RING ASSIGNMENT
FORCED TRUNK RELEASE
ASSIGN TRUNK MUSIC ON HOLD
TRUNK STATUS READ
ASSIGN DISA TRUNK
MPD/PRS SIGNAL
REPORT TRUNK ABANDON DATA
CARD RESTART
BRI OPTION
MSN DIGIT
ASSIGN TRUNK COS
S/T MODE
S0 MAPPING
TRUNK GAIN CONTROL
ASSIGN TRUNK/TRUNK USE
500:
501:
502:
503:
504:
505:
506:
507:
508:
510:
512:
600:
601:
602:
603:
604:
605:
606:
607:
608:
700:
701:
702:
703:
704:
705:
706:
707:
SYSTEM–WIDE COUNTERS
SYSTEM–WIDE TIMERS
STATION–WIDE TIMERS
TRUNK–WIDE TIMERS
PULSE MAKE/BREAK RATIO
ASSIGN DATE AND TIME
TONE CADENCE
ASSIGN AUTO NIGHT TIME
CALL COST
SLI RING CADENCE
HOLIDAY
ASSIGN OPERATOR GROUP
ASSIGN STATION GROUP
STATION GROUP NAME
ASSIGN TRUNK GROUP
ASSIGN INTERNAL PAGE ZONE
ASSIGN EXTERNAL PAGE ZONE
ASSIGN SPEED BLOCK
UCD OPTIONS
ASSIGN CLIP REVIEW BLOCK
COPY COS CONTENTS
ASSIGN COS CONTENTS
TOLL DENY TABLE
TOLL ALLOWANCE TABLE
ASSIGN WILD CHARACTER
ASSIGN SYSTEM SPEED DIAL
SYSTEM SPEED DIAL BY NAME
AUTHORISATION CODE
Technical Manuals Online! - http://www.tech-man.com
2-2
Chapter 2
Programming Procedures
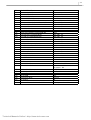
318:
319:
400:
711:
712:
713:
714:
715:
716:
718:
720:
721:
722:
723:
724:
725:
726:
727:
728:
730:
731:
732:
733:
734:
735:
DISTINCTIVE RING
BRANCH GROUP
CUSTOMER ON/OFF PER TRUNK
LCR TIME TABLE
LCR ROUTE TABLE
LCR MODIFY DIGIT TABLE
DID NUMBER & NAME TRANSLATION
PROGRAMMED STATION MESSAGE
UK LCR OPTION
MY AREA CODE
COPY KEY PROGRAMMING
SAVE STATION KEYPROGRAMMING
Station Key Programming
System Key Programming
DIAL NUMBERING PLAN
SMDR Options
VM/AA Options
SYSTEM VERSION DISPLAY
CLIP TRANSLATION TABLE
AA RECORD GAIN
AA RAM CLEAR
AA TRANS TABLE
AA PLAN TABLE
AA MESSAGE MATCH
AA USE TABLE
708:
709:
710:
736:
740:
750:
751:
752:
753:
754:
755:
756:
757
800:
801:
802:
804:
805:
806:
807:
809:
810:
811:
812:
ACCOUNT CODE
TOLL PASS CODE
LCR DIGIT TABLE
ASSIGN AA MOH
STATION PAIR
VMS RESTART
ASSIGN MAILBOX
AUTO RECORD
WARNING DESTINATION
VM HALT
VM ALARM
ASSIGN VM MOH
VM IN/OUT
Enable Technician Program
CHANGE TECHNICIAN PASSCODE
CUSTOMER ACCESS MMC NUMBER
SYSTEM I/O PARAMETER
TX LEVEL & GAIN
CARD PRE–INSTALL
VOLUME CONTROL
SYSTEM MMC LANGUAGE
HALT PROCESSING
RESET SYSTEM
COUNTRY CODE
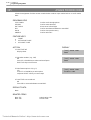
PROGRAM PROCEDURES
The instructions for each MMC assume that you have already opened programming. First, run MMC 812,
Country Code, to set your country (e.g U.K.) before you do any other programming.
CAUTION
This manual describes standard settings. Some MMC codes and default data may be different
from those shown depending on the country selected in MMC 812.
Helpful hint:
When you are finished programming in MMC codes 100–812 and have other programming to do, press SPK
to exit the MMC but stay in the programming mode and use one of the following methods.
1.Dial another MMC code directly and continue programming.
2.Press VOLUME UP and DOWN keys to scroll through all MMC codes. When the desired MMC code is
reached, press SPK and continue programming.
Pressing TRSF will always save changes and exit programming mode.
Technical Manuals Online! - http://www.tech-man.com
2-3
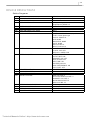
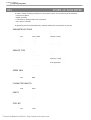
DCS-816 DEFAULT DATA
Station Programs
100:
101:
102:
103:
STATION LOCK
CHANGE USER PASSCODE
CALL FORWARD
SET ANSWER MODE
104:
105:
106:
107:
108:
STATION NAME
STATION SPEED DIAL
STATION SPEED DIAL NAME
KEY EXTENDER
STATION STATUS
109:
DATE DISPLAY
110:
STATION ON/OFF
111:
112:
113:
114:
KEYSET RING TONE
ALARM REMINDER
VIEW MEMO NUMBER
KEYSET VOLUME
115:
116:
119:
121:
SET PROGRAMMEDMESSAGE
ALARM AND MESSAGE
SET CLIP DISPLAY
KEYSET LANGUAGE
Technical Manuals Online! - http://www.tech-man.com
All stations unlocked
All station passcodes = 1234
None
All keysets ring
Ring frequency default is 5
None
None
None
None
PORT NUMBER: Follows H/W position
TYPE: Follows phone type
PICKUP GROUP: 01
SGR: NONE
BOSS’SECR: NONE
PAGE : NONE
DAY COS NO: 01
NIGHT COS NO: 01
COUNTRY: WESTERN
CLOCK: 24 CLOCK
DISPLAY: LOWER CASE
AUTO HOLD: OFF
AUTO TIMER: ON
HEADSET USE: OFF
HOT KEYPAD: ON
KEY TONE: ON
PAGE REJOIN: ON
RING PREFERENCE: ON
CALL COST: OFF
SELECTION 5
Alarms set to NOTSET
No memos entered
RING VOLUME: 4
OFF HOOK RING VOLUME: 4
HANDSET VOLUME: 4
SPEAKER VOLUME: 13
BGM VOLUME: 13
No messages selected
Alarms set to notset
Number first
ENGLISH
2-4
Chapter 2
Programming Procedures
System Programs
200:
201:
202:
OPEN CUSTOMERPROGRAMMING
CHANGE CUSTOMER PASSCODE
CHANGE FEATURE PASSCODES
203:
204:
205:
206:
207:
208:
209:
210:
ASSIGN UA DEVICE
COMMON BELL CONTROL
ASSIGN LOUD BELL
BARGE–IN TYPE
ASSIGN VM/AA PORT
ASSIGN RING TYPE
ASSIGN ADD–ON MODULE
CUSTOMER ON/OFF
211:
214:
DOOR RING ASSIGNMENT
DISA ALARM RINGING STATION
219:
220:
300:
COMMON RELAY SERVICE TYPE
ISDN SERVICE TYPE
CUSTOMER ON/OFF PER STATION
301:
ASSIGN STATION COS
302:
303:
304:
PICKUP GROUPS
ASSIGN BOSS/SECRETARY
ASSIGN STATION/TRUNK USE
305:
306:
308:
ASSIGN FORCED CODE
HOT LINE
ASSIGN BACKGROUND MUSIC SOURCE
Technical Manuals Online! - http://www.tech-man.com
Closed (Disabled)
Passcode = 1234
DAY/NIGHT 0000
DISA ALARM 5678
ALARM CLR 8765
AA RECORD 4321
None
Continuous
Unassigned
NO BARGE–IN
NORMAL PORT
ICM RING
MASTER = NONE
DISA PSWD: ON
LCR ENABLE: OFF
PERI UCD SET: OFF
CID CODE INS: OFF
DISA MOH: OFF
TRANSFER MOH: OFF
DSP SSPDNAME: OFF
DDI BSY ROUT: OFF
DDI NOT ROUT: OFF
ALL PICK UP: OFF
ARD TONE CHK: ON
VPN ENABLE: OFF
IN TOLL CHK: OFF
Station group 500
DAY 500
NIGHT 500
External Page
VOICE
STN CALL PRT : OFF
FWD DLY USE : OFF
The others set to ON
Day class = 01
Night class = 01
All stations 01
None
DIAL = Yes
ANS = Yes
None
None
None
2-5
309:
310:
312:
ASSIGN STATION MUSIC ON HOLD
LCR CLASS OF SERVICE
ALLOW CLIP
314:
315:
316:
317:
318:
319:
400:
CONFIRM OUTGOING CALL
SET RELOCATION
COPY STATION USABLE
ASSIGN STATION/STATION USE
DISTINCTIVE RING
BRANCH GROUP
CUSTOMER ON/OFF PER TRUNK
401:
402:
403:
404:
405:
406:
C.O./PBX LINE
TRUNK DIAL TYPE
TRUNK TOLL CLASS
TRUNK NAME
TRUNK NUMBER
TRUNK RING ASSIGNMENT
407:
408:
409:
410:
414:
415:
418:
419:
FORCED TRUNK RELEASE
ASSIGN TRUNK MUSIC ON HOLD SOURCE
TRUNK STATUS READ
ASSIGN DISA TRUNK
MPD/PRS SIGNAL
REPORT TRK ABANDON DATA
CARD RESTART
BRI OPTION
421:
422:
MSN DIGIT
ASSIGN TRUNK COS
423:
424:
426:
428:
S/T MODE
S0 MAPPING
TRUNK GAIN CONTROL
ASSIGN TRK-TRK USE
night: 500
Technical Manuals Online! - http://www.tech-man.com
Tone
Least Cost Routing COS 1
REV YES
SND YES
INFO C.O Tel.
None
None
None
DIAL=Yes
ANS=Yes
T=F–STN, C=F–STN
None
1A2 EMULATE: Off
TRUNK INC DND: Off
TRUNK FORWARD: On
LCR ALLOW: Off
All Trunks C.O. Line
All Trunks DTMF
All Trunks F–STN day/night
No names entered
No numbers entered
All trunks day : 500
None
Tone
SEE MMC 409
All trunks normal
None
All trunks will report data
None
CHANNEL ANY: YES
BRI MODE: P–P NOR
DLSEND: OVERLAP
NONE
DAY CLASS: 01
NIGHT CLASS: 01
TRUNK
None
RX=0dB, TX=0dB for all trunks
DIAL:Yes
2-6
Chapter 2
Programming Procedures
500:
SYSTEM–WIDE COUNTERS
501:
502:
503:
504:
SYSTEM–WIDE TIMERS
STATION–WIDE TIMERS
TRUNK–WIDE TIMERS
PULSE MAKE/BREAK RATIO
505:
506:
507:
508:
ASSIGN DATE AND TIME
TONE CADENCE
ASSIGN AUTO NIGHT TIME
CALL COST
510:
512:
600:
601:
602:
603:
SLI RING CADENCE
ASSIGN HOLIDAY
ASSIGN OPERATOR GROUP
ASSIGN STATION GROUP
STATION GROUP NAME
ASSIGN TRUNK GROUP
604:
ASSIGN STATION TO PAGE ZONE
605:
606:
ASSIGN EXTERNAL PAGE ZONE
ASSIGN SPEED BLOCK
607:
608:
700:
701:
702:
703:
704:
705:
706:
707:
UCD OPTIONS
ASSIGN CLIP REVIEW BLOCK
COPY COS CONTENTS
ASSIGN COS CONTENTS
TOLL DENY TABLE
TOLL ALLOWANCE TABLE
ASSIGN WILD CHARACTER
ASSIGN SYSTEM SPEED DIAL
SYSTEM SPEED DIAL BY NAME
AUTHORISATION CODE
Technical Manuals Online! - http://www.tech-man.com
Alarm Rem Cntr=5
Auto Rdl Counter=5
DISA Call Cntr=99
DISA Lock Cntr=3
New Call Counter=99
UCD Visual Alarm=0
UCD Audio Alarm=0
UCD CS Level 1=0
UCD CS Level 2=0
SEE MMC 501
SEE MMC 502
SEE MMC 503
Make/Break = 33
Pulses Per Second = 10
Follows software version release data
SEE MMC 506
None
UNIT COST PER MP: 200
PENCE
CALL COST RATE: 100%
SEE MMC 510
None
DAY:500
NIGHT:500
SEE MMC 601
None
All analogue trunks are in group 9
All digital trunks are in group 80
No stations assigned
All zone is set
None
System: 200 entries(20 blocks)
Stations: One bin of 10 entries
(1 block)
SEE MMC 607
One bin of 10 entries
None
SEE MMC 701
All entries are set to 0
All entries are set to 0
All entries are set to 0
None
No names
COS: 01
2-7
708:
709:
710:
711:
712:
713:
714:
715:
716:
718:
720:
721:
722:
723:
724:
725:
726:
727:
728:
730:
731:
732:
733:
734:
735:
736:
740:
750:
751:
ACCOUNT CODE
TOLL PASS CODE
LCR DIGIT TABLE
LCR TIME TABLE
LCR ROUTE TABLE
LCR MODIFY DIGIT TABLE
DID NUMBER AND NAME TRANSLATION
PROGRAMMED STATION MESSAGE
UK LCR OPTION
MY AREA CODE
COPY KEY PROGRAMMING
SAVE STATION KEY PROGRAMMING
STATION KEY PROGRAMMING
SYSTEM KEY PROGRAMMING
DIAL NUMBERING PLAN
SMDR OPTIONS
VM/AA OPTIONS
SYSTEM VERSION DISPLAY
CLIP TRANSLATION TABLE
AA RECORD GAIN
AA RAM CLEAR
AA TRANS TABLE
AA PLAN TABLE
AA MESSAGE MATCH
AA USE TABLE
ASSIGN AA MOH
STATION PAIR
VMS RESTART
ASSIGN MAILBOX
752:
753:
754:
755:
756:
757:
800:
801:
AUTO RECORD
WARNING DESTINATION
VM HALT
VM ALARM
ASSIGN VM MOH
VM IN/OUT
ENABLE TECHNICIAN PROGRAM
CHANGE TECHNICIAN PASSCODE
Technical Manuals Online! - http://www.tech-man.com
None
None
SEE MMC 710
All Day 0000: 1
01: 1 C: 1 G: 9 M: 001
002: I : 132
003: DEL: 03
SEE MMC 714
SEE MMC 715
SEE MMC 716
SEE MMC 718
None
None
SEE MMC 722
SEE MMC 723
SEE MMC 724
SEE MMC 725
SEE MMC 726
SEE MMC 727
None
0dB
None
SEE MMC 732
SEE MMC 733
MSG index number
Plan 01
NOT USE
None
DOWNLOAD = YES
All stations = YES
All groups = NO
NONE
DEST = 500
PROC
80%
Not Use
IN
DISABLE
Default passcode = 4321
2-8
Chapter 2
Programming Procedures
802:
804:
805:
806:
807:
809:
810:
811:
812:
CUSTOMER ACCESS MMC NUMBER
SYSTEM I/O PARAMETER
TX LEVEL AND GAIN
CARD PRE–INSTALL
VOLUME CONTROL
SYSTEM MMC LANGUAGE
HALT PROCESSING
RESET SYSTEM
COUNTRY CODE
SEE MMC 802
SEE MMC 804
SEE MMC 805
None
SEE MMC 807
ENGLISH
None
None
None
SPECIAL APPLICATIONS
This part of the manual is titled “Special Applications” because it provides information about interfacing
with customer–provided equipment (CPE) or using a feature in a different way than it was intended. Perhaps
an application may require a combination of CPE, creative programming, unusual feature operation or all of
the above.
Because these applications require installation instructions and a combination of programming sequences,
there is no obvious place to put this information; therefore, it is placed here. As additional special
applications are reported from the field, they will be included in this section.
Technical Manuals Online! - http://www.tech-man.com
2-9
VOICE MAIL/AUTO ATTENDANT INTEGRATION
This section focuses mainly on in–band integration.
Because of the increased popularity of voice mail and auto attendant use, DCS-816 includes many
programmable options to address this demand. The degree of integration that can be achieved depends on
the abilities of the voice mail/auto attendant (VM/AA) system as well as the telephone system.
This list details the capabilities provided by the DCS-816 for voice mail via in–band integration.
Hardware Provisions
The VM/AA system must be connected to single line circuits on any SLI port.
Each port is equipped with a dedicated DTMF receiver for detecting DTMF signalling from the VM/AA.
These ports also provide an instant break in loop current when the calling party hangs up. This is called a
disconnect signal.
Software Provisions
SCREENED OR UNSCREENED TRANSFER
There are no special codes needed to transfer a call. Simply hookflash, receive transfer dial tone and dial the
destination.
DIRECT IN LINES
Any C.O. call can be assigned to ring at an individual station or a station hunt group assigned to the VM/AA.
CALLS OR RECALLS TO THE OPERATOR
Dialling 0 will always result in a ringback signal. If the operator is busy, the call continues to ring in queue to
the operator. This prevents a caller from dialling 0 and reaching another mailbox because the operator is
busy.
MESSAGE WAITING
A VM/AA port can leave a message at any station or group of stations. The message waiting indication can
be set or cancelled at any station or station group with or without the stations ringing.
IN–BAND SIGNALLING
DCS-816 can be programmed to send the calling station’s extension number after the voice mail system
answers. These DTMF signals may include a leading digit to indicate the type of call and additional
information about the original caller. DTMF signals may also be substituted for call progress tones to speed
up voice mail call processing. This program allows call forwarding to a mailbox and bypassing of the main
greeting for automatic message retrieval. Blind transfers may be performed because the recall will be
correctly identified.
NOTE
The effectiveness of this program depends on the ability of the voice mail system to make use
of this information.
STATION HUNT GROUP WITH OVERFLOW
Each station group can have an individual overflow destination with an individual overflow timer. The
overflow destination will ring whenever a call to the group is not answered. If the voice mail system
becomes inoperative, calls are automatically routed to the overflow destination.
Technical Manuals Online! - http://www.tech-man.com
2-10
Chapter 2
Programming Procedures
INTERNAL CALL FORWARDING TO VOICE MAIL
This option in MMC 300 will allow or deny intercom calls from following call forward to voice mail. This
feature conserves disk drive space by only storing calls originating outside the system.
ONE–TOUCH VOICE MAIL ACCESS
One–touch speed dial keys can be programmed to automatically dial, log into and retrieve messages from
voice mail.
CALL PROGRESS TONES
The only tones sent to a VM/AA port are dial tone, busy and ringback. To eliminate confusion, busy tone is
substituted for DND or error tones on voice mail ports only.
Technical Manuals Online! - http://www.tech-man.com
2-11
INDIVIDUAL STATION PAGE
The system was not designed to permit page announcements to individual keysets. However, a forced auto
answer key (FAUTO) can be used to accomplish this.
1. Program a keyset for RING in MMC 103.
2.
Assign an FAUTO key to each keyset that is allowed to page individual keysets.
3.
Call another station. When you hear ringback tone, press the FAUTO key. The ringing will stop and an
Auto Answer call is set up.
NOTE
To prevent the use of this feature from getting out of control, only assign FAUTO keys to those
keysets needing to page individual keysets.
Technical Manuals Online! - http://www.tech-man.com
2-12
Chapter 2
Programming Procedures
CALLING LINE INDICATION PRESENTATION
(CLIP)
Hardware Provisions
ISDN trunk cards
Software Provisions
The MMCs related to CLIP are listed below with a short description of their use. They are listed in the
recommended order in which they should be programmed. This sequence is suggested so that the installer
gets a better understanding of how the feature works. There is no technical reason to follow this sequence.
zMMC 312 ALLOW CLIP
This MMC is used by the technician to
determine which keysets are allowed to receive
CLIP displays.
zMMCs 722 and 723
These MMCs have had new keys related to
CLIP features added to them. It is strongly
recommended that all keysets allowed CLIP in
MMC 312 are programmed with a CLIP key.
zMMC 728 CLIP TRANSLATION
This MMC allows the technician to create a list
of names that correspond to numbers received
from the Central Office (C.O.). These names will
be displayed when a call rings in that has
NUMBER ONLY data provided by the C.O.
zMMC 725 SMDR OPTIONS
The ability to print CLIP data and abandoned
calls has been added to this MMC
zMMC 119 CLIP DISPLAY
This MMC is used by the end user to determine
which piece of CLIP data is displayed when a
call rings at the user’s station.
zMMC 501 SYSTEM TIMERS
This MMC has two new timers related to CLIP.
The only timer that may need adjustment is the
CLIP DISPLAY TIME. This is the length of
time that CLIP data is displayed after the CLIP
key is pressed.
zMMC 415 TRK ABANDON
This MMC is used by the technician to
determine which trunks will record data in the
Call Abandon list and print with an Abandon “A”
flag on SMDR.
zMMC 608 CLIP BLOCK
This MMC is used by the technician to assign
CLIP Review blocks to keysets to allow the
user to review CLIP data for previous calls.
Technical Manuals Online! - http://www.tech-man.com
2-13
zMMC 701 CLASS OF SERVICE
All of the CLIP features have been added to this
MMC to enable the technician to allow or deny
them.
zMMC 724 NUMBER PLAN
CLIP features have been added to this MMC to
allow a technician to assign an access code
where necessary.
Technical Manuals Online! - http://www.tech-man.com
2-14
Chapter 2
Programming Procedures
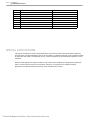
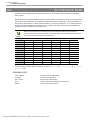
TOLL RESTRICTION (CALL BARRING)
OVERVIEW
DCS-816 allows each station to be assigned a class of service (COS) for use in the day mode and a COS for
use in the night mode. This COS determines the station’s dialling class, which can be set to A through H.
Class A has no general restrictions and is not configurable but it will follow the restrictions set in the Class
of Service table (see MMC 701) and Class H is restricted to internal calls only.
Classes B, C, D, E, F and G are controlled by the entries listed in the deny table in MMC 702, the allow
table in MMC 703 and the wild cards defined in MMC 704.
Toll Restriction (Call Barring) Rules
1.
The deny entries prevent certain numbers from being dialled. The allow entries are the only exceptions
to these deny entries.
2. Listing numbers in the allow tables without any entries in the deny tables is the same as having no
restriction.
3. When changing any entry or BCDEFG status, you must enter all digits.
The system has a Wild Card facility, these wildcards consists of three characters (X, Y or Z), these
characters can be set to equal all DTMF digit from 1~9, 0, ✱ and #.
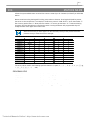
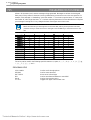
The following examples are provided as an aid to help understand how to use the deny and allow tables.
Example
Customer requirements:
z Phones with dialling class B can only dial local calls (i.e. cannot dial any number starting with 0)
z Classes C and D are restricted (denied) from dialling 0860 and 0850 numbers.
z Classes E and F are restricted from dialling 0891 and 0898 numbers.
z Class G can dial any number.
z All classes except B can dial 192
z All classes can dial 999 calls.
Technical Manuals Online! - http://www.tech-man.com
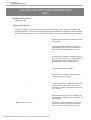
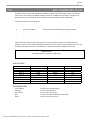
2-15
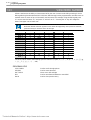
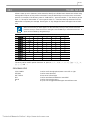
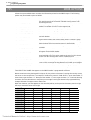
Toll Deny Table
Toll Allow Table
Entry
Digits
BCDEFG
Entry
Digits
BCDEFG
001
002
003
004
005
006
0
0850
0891
0898
192
0860
100000
111000
100110
100110
100000
111000
0001
01865
111111
The entry in the toll allow table is used to override the toll deny table for specific numbers, i.e. all classes
(even class B) can dial 01865.
Technical Manuals Online! - http://www.tech-man.com
2-16
Chapter 2
Programming Procedures
(This page is left blank intentionally.)
Technical Manuals Online! - http://www.tech-man.com
Technical Manuals Online! - http://www.tech-man.com
Technical Manuals Online! - http://www.tech-man.com
3-1
Chapter 3
Programming Using MMCs
This section explains how to1 program using the MMCs. You should read the instructions for each program
carefully before starting the program.
First, decide what changes are required to the system, and therefore which MMCs you need to use. Then,
“ENABLE” the keyset and follow the procedure for your selected program(s).
NOTE
The default data of each MMC may vary according to each country.
Technical Manuals Online! - http://www.tech-man.com
3-2
Chapter 3
Programming Using MMCs
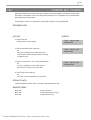
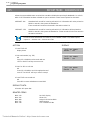
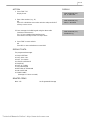
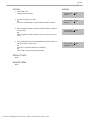
100
STATION LOCK
Allows the system administrator or technician to lock or unlock an individual station or all stations
simultaneously. The three options are as follows:
0
1
2
UNLOCKED
LOCKED
LOCKED
Unlocks a locked station.
OUTNot allowed to access C.O line for dial out
ALLNot allowed to initiate any action with this mode
PROGRAM KEYS
UP & DOWN
KEYPAD
SOFT KEYS
SPK
HOLD
ANS/RLS
Used to scroll through options
Used to enter selections
Move cursor left and right
Used to store data and advance to next MMC
Used to clear previous entry
Used to select ALL
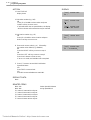
ACTION
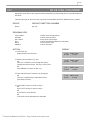
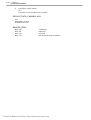
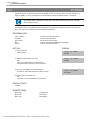
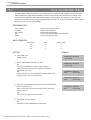
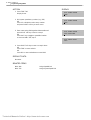
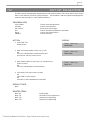
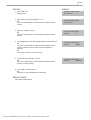
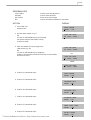
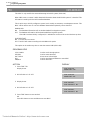
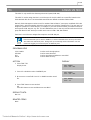
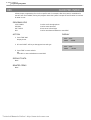
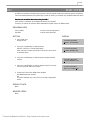
1. Press TRSF 100
Display shows
2. Dial station number (e.g., 205)
OR
Press UP or DOWN to select station and press RIGHT soft key
to move cursor
Press UP or DOWN to select station and use
RIGHT soft key to move cursor
OR
Press ANS/RLS to select all stations
3. Enter 0 to unlock or 1 to lock (e.g. 1)
OR
Press UP or DOWN key to make selection and press
Use UP and DOWN key to make selection and press
RIGHT soft key to return to
4. Press TRSF to save and exit
OR
Press SPK to save and advance to nex
MMC
DEFAULT DATA
All stations unlocked
RELATED ITEMS:
Station user programming
Technical Manuals Online! - http://www.tech-man.com
DISPLAY
[201] STN LOCK
UNLOCKED
[205] STN LOCK
UNLOCKED
[ALL]
??
STN LOCK
[205] STN LOCK
LOCKED OUT
3-3
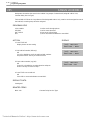
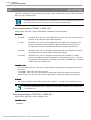
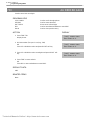
101
CHANGE USER PASSCODE
Allows the system administrator or technician to reset any keyset’s passcode to its default value of “1234.”
This MMC cannot display station passcodes; it can only reset them to default.
Keyset users can set or change their individual passcodes. The passcode is used to lock or unlock the
keyset for toll restriction (call barring) override and to access the DISA feature.
NOTE
Default passcodes cannot be used for toll restriction override or for DISA access.
.
PROGRAM KEYS
UP & DOWN
KEYPAD
SOFT KEYS
SPK
HOLD
ANS/RLS
Used to scroll through options
Used to enter selections
Move cursor left and right
Used to store data and advance to next MMC
Used to clear previous entry
Used to select ALL
ACTION
DISPLAY
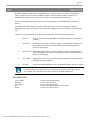
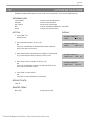
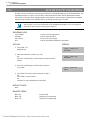
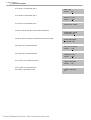
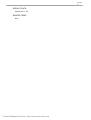
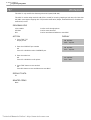
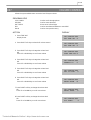
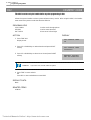
1. Press TRSF 101
[201] PASSCODE
PASSCODE: ✱✱✱✱
Display shows
2. Dial keyset number (e.g., 205)
OR
Use UP or DOWN to scroll through keyset numbers
and press RIGHT soft key to move the cursor right
3. Press HOLD to reset passcode
4.
[205] PASSCODE
PASSCODE : 1234
Press TRSF to store and exit
OR
Press SPK to store and advance to next MMC
DEFAULT DATA
All station passcodes = 1234
RELATED ITEMS
MMC 100
[205] PASSCODE
PASSCODE: ✱✱✱✱
Station Lock
Technical Manuals Online! - http://www.tech-man.com
3-4
Chapter 3
Programming Using MMCs
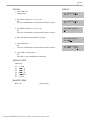
102
CALL FORWARD
Allows the system administrator to program the call forward destinations for other station users. The MMC
also allows call forward to be set after the destination has been entered.
DCS-816 allows five types of call forwarding. FORWARD ALL, FORWARD NO ANSWER, FORWARD
BUSY, FORWARD FOLLOW ME and FORWARD EXTERNAL. There is an additional option, FORWARD
BUSY/NO ANSWER, that allows both of these options to be activated at the same time, provided that
destinations have been entered for both.
0 FORWARD CANCEL
1 ALL CALL
2 BUSY
3 NO ANSWER
4 BUSY/NO ANSWER
5 EXT
PROGRAM KEYS
UP & DOWN
KEYPAD
SOFT KEYS
SPK
HOLD
Used to scroll through options
Used to enter selections
Move cursor left and right
Used to store data and advance to next MMC
Used to clear previous entry
Technical Manuals Online! - http://www.tech-man.com
3-5
ACTION
DISPLAY
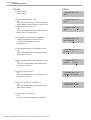
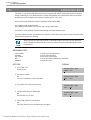
1. Press TRSF 102
Display shows
[201] FORWARD
0:FORWARD CANCEL
2. Dial station number (e.g., 205)
OR
Press UP or DOWN to select station and press RIGHT
soft key to move cursor
3. Dial 0–5 to select forward type (e.g. 1)
OR
Press UP or DOWN to select forward type and press
RIGHT soft key to move cursor
4. Dial destination number (e.g., 201)
OR
Press UP or DOWN to select destination and press
RIGHT soft key to move cursor
5. Dial 1 for YES, 0 for NO
OR
Press UP or DOWN to select YES or NO and press
RIGHT soft key to return to step 2
6. Press TRSF to store and exit
OR
Press SPK to store and advance to next MMC
DEFAULT DATA
None
RELATED ITEMS
MMC 301
MMC 501
MMC 502
MMC 701
MMC 722
MMC 723
Assign Station COS
System-Wide Timers
Station-Wide Timers
Assign COS Contents
Station Key Programming
System Key Programming
Technical Manuals Online! - http://www.tech-man.com
[205] FORWARD
0:FORWARD CANCEL
[205] FORWARD
1:ALL CALL:NONE
[205] FORWARD
1:ALL CALL:201
[205] FORWARD
CURENTLY SET :YES
3-6
Chapter 3
Programming Using MMCs
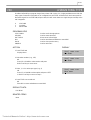
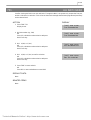
103
SET ANSWER MODE
Allows the system administrator to change the answer mode of any keyset or add–on module (AOM). Each
keyset or AOM can have its answer mode set to one of the following options:
0. RING: The keyset will ring in one of eight custom ring patterns. Calls are answered by pressing the
ANS/RLS key or by lifting the handset.
1. AUTO: After giving a short attention tone, the keyset will automatically answer calls on the speakerphone.
When a C.O. line is transferred to a keyset in Auto Answer, the screened portion of the call will be Auto
Answer, but the keyset or AOM will ring when the transfer is complete if the user has not pressed the
ANS/RLS key or lifted the handset.
2. VOICE: The keyset will not ring. After a short attention tone, callers can make an announcement but the
ANS/RLS key or handset must be used to answer calls.
PROGRAM KEYS
UP&DOWN
KEYPAD
SOFT KEYS
SPK
HOL
ANS/RLS
Used to scroll through options
Used to enter selections
Move cursor left and right
Used to store data and advance to next MMC
Used to clear previous entry
Used to select ALL
ACTION
DISPLAY
1. Press TRSF 103
Display shows
[201] ANS MODE
RING MODE
2. Dial keyset number (e.g., 205)
OR
Press UP or DOWN to select keyset
and press RIGHT soft key to move cursor
OR
Press ANS/RLS to select All
3. Dial 0, 1 or 2 to change answer mode (e.g., 2)
OR
Press UP or DOWN to select answer mode and
press RIGHT soft key to return to step 2 above
4. Press TRSF to store and exit
OR
Press SPK to store and advance to next MMC
DEFAULT DATA
All keysets ring
Ring frequency default is 5
RELATED ITEMS
MMC 111
Keyset Ring Tone
Technical Manuals Online! - http://www.tech-man.com
[205] ANS MODE
RING MODE
[ALL]
?
ANS MODE
[205] ANS MODE
VOICE ANNOUNCE
3-7
104
STATION NAME
Allows the system administrator or technician to enter a name (up to 11 characters) to identify an individual
station.
Names are written using the keypad. Each key press selects a character. Pressing the dial pad key moves
the cursor to the next position. For example, if the directory name is “SAM SMITH,” press the number “7”
four times to get the letter “S.” Now press the number “2” once to get the letter “A.” Continue selecting
characters from the table below to complete the name. Pressing the bottom left programmable key will
change the letter from upper case to lower case.
NOTE
When the character you want appears on the same dial pad key as the previous character,
press the UP key to move the cursor to the right.
COUNT
DIAL 0
DIAL 1
DIAL 2
DIAL 3
DIAL 4
DIAL 5
DIAL 6
DIAL 7
DIAL 8
DIAL 9
DIAL *
1
<
Space
A
D
G
J
M
P
T
W
:
2
>
?
B
E
H
K
N
Q
U
X
=
3
.
,
C
F
I
L
O
R
V
Y
[
4
)
!
@
#
$
%
^
S
Z
]
5
0
1
2
3
4
5
6
7
8
9
The # key can be used for the following special characters: #, space, &, !, :, ?, ., ,, %, $, –, <, >, /, =, [, ], @,
^, (, ), _, +, {, }, |, ;,", →,` , and \.
PROGRAM KEYS
UP & DOWN
KEYPAD
SOFT KEYS
SPK
HOLD
A
Used to scroll through options
Used to enter selections
Move cursor left and right
Used to store data and advance to next MMC
Used to clear previous entry
Key 19: acts as toggle between upper case and lower case
Technical Manuals Online! - http://www.tech-man.com
3-8
Chapter 3
Programming Using MMCs
ACTION
1. Press TRSF 104
Display shows
2. Dial station number (e.g., 205)
OR
Press UP or DOWN to select station and press
RIGHT soft key to move cursor
3. Enter the station name using the procedure described
above and press RIGHT soft key to return to step 2
4. Press TRSF to store and exit
OR
Press SPK to store and advance to next MMC
DEFAULT DATA
None
RELATED ITEMS
“A” button is button #19 on keyset
“B” button is button #20 on keyset
“C” button is button #21 on keyset
“D” button is button #22 on keyset
“E” button is button #23 on keyset
“F” button is button #24 on keyset
Technical Manuals Online! - http://www.tech-man.com
DISPLAY
[201]
STN NAME
[205]
_
STN NAME
[205] STN NAME
SAM SMITH
3-9
105
STATION SPEED DIAL
Allows the system administrator or technician to program the personal speed dial locations assigned to a
station. This must be done for single line telephones because these stations cannot access programming.
Each station may have up to 50 locations or bins assigned to it in MMC 606 Assign Speed Block. The speed
dial bins are numbered 00–49. Each speed dial number consists of a trunk or trunk group access code
followed by a separator and up to 24 digits to be dialled. These dialled digits may consist of 0–9, ✻ and #. If
the system recognises a valid trunk or trunk group access number, it will automatically insert the separator.
PROGRAM KEYS
UP & DOWN
KEYPAD
SOFT KEYS
SPK
HOLD
B
C
D
E
F
Used to scroll through options
Used to enter selections
Move cursor left and right
Used to store data and advance to next MMC
Used to clear previous entry
Used to insert a flash code “F”
Used to insert a pause code “P”
Used to insert a pulse/tone conversion code “C”
Used to mask/unmask following digits (shows as “[” or “]”)
Used to enter name for speed dial bin (see MMC 106)
Technical Manuals Online! - http://www.tech-man.com
3-10
Chapter 3
Programming Using MMCs
ACTION
DISPLAY
1. Press TRSF 105
Display shows
2. Dial station number(e.g., 205)
OR
Press UP or DOWN to select station and press
RIGHT soft key to move cursor
If selected station has no speed dial bins, the display
will be as shown and a new station may be selected
3. Dial location number (e.g., 05)
OR
Press UP or DOWN to select location and press
RIGHT soft key to move cursor
4. Enter trunk access code (e.g., 9) followed by
the number to be dialled (e.g., 4264100)
OR
Press the RIGHT soft key to return to step 2
OR
Press the LEFT soft key to return to step 3
Press HOLD button to clear an entry
If an error is made, use DOWN arrow to step back
5. Press “F” button to access MMC 106 Station
Speed Dial Name
OR
Press TRSF to save and exit
OR
Press SPK to save and advance to next MMC
DEFAULT DATA
None
RELATED ITEMS
MMC 106
MMC 606
“B” button is button #20 on keyset
“C” button is button #21 on keyset
“D” button is button #22 on keyset
“E” button is button #23 on keyset
“F” button is button #24 on keyset
Station Speed Dial Name
Assign Speed Block
Technical Manuals Online! - http://www.tech-man.com
[201]
00 :
SPEED DIAL
[205]
00 :
SPEED DIAL
[205] SPEED DIAL
SPDBLK NOT EXIST
[205]
05: _
SPEED DIAL
[205] SPEED DIAL
05 : 9–4264100_
3-11
106
STATION SPEED DIAL NAME
Allows a name (up to 11 characters) to be entered for each personal speed dial location. This name enables
the speed dial number to be located when the directory dial feature is used. The directory dial feature allows
the display keyset user to select a speed dial location by viewing its name.
Names are written using the keypad. Each press of a key selects a character. Pressing the dial keypad moves
the cursor to the next position. For example, if the directory name is “SAM SMITH,” press the number “7”
four times to get the letter “S.” Now press the number “2” once to get the letter “A.” Continue selecting
characters from the table below to complete your message. Pressing the bottom left programmable key
changes the letter from upper case to lower case.
NOTE
When the character you want appears on the same dial keypad as the previous character,
press the UP key to move the cursor to the right.
COUNT
DIAL 0
DIAL 1
DIAL 2
DIAL 3
DIAL 4
DIAL 5
DIAL 6
DIAL 7
DIAL 8
DIAL 9
DIAL
1
2
<
>
Space
A
D
G
J
M
P
T
W
:
?
B
E
H
K
N
Q
U
X
=
3
.
,
C
F
I
L
O
R
V
Y
[
4
)
!
@
#
$
%
^
S
Z
]
5
0
1
2
3
4
5
6
7
8
9
The # key can be used for the following special characters: #, space, &, !, :, ?, ., ,, %, $, –, <, >, /, =, [, ], @,
^, (, ), _, +, {, }, |, ;,", →,` , and \.
PROGRAM KEYS
UP & DOWN
KEYPAD
SOFT KEYS
SPK
HOLD
A
Used to scroll through options
Used to enter selections
Move cursor left and right
Used to store data and advance to next MMC
Used to clear previous entry
Key 19, acts as toggle between upper case and lower case
Technical Manuals Online! - http://www.tech-man.com
3-12
Chapter 3
Programming Using MMCs
ACTION
DISPLAY
1. Press TRSF 106
Display shows
2. Dial station number (e.g., 205)
OR
Press UP or DOWN to select station and press
RIGHT soft key to move cursor
If selected station has no speed dial bins, the display
will be as shown and a new station may be selected.
3. Dial speed dial location (e.g., 01)
OR
Press UP or DOWN to scroll through location numbers
and press RIGHT soft key to move cursor
5. Enter the location name using the procedure described
above and press RIGHT soft key to return to step 2.
5. Press TRSF to store and exit
OR
Press SPK to store and advance to next MMC
DEFAULT DATA
None
RELATED ITEMS
MMC 105
MMC 606
“A” button is button #19 on keyset
“B” button is button #20 on keyset
“C” button is button #21 on keyset
“D” button is button #22 on keyset
“E” button is button #23 on keyset
“F” button is button #24 on keyset
Station Speed Dial
Assign Speed Block
Technical Manuals Online! - http://www.tech-man.com
[201]
00:
SPEED NAME
[205]
00:
SPEED NAME
[205] SPEED NAME
SPDBLK NOT EXIST
[205]
01:_
SPEED NAME
[205] SPEED NAME
01:SAM SMITH
3-13
107
KEY EXTENDER
Used to view the programmable keys assigned to keyset stations. In addition, it allows the system
administrator to assign key extenders to some keys making a general access feature key more specific.
The feature keys that can have extenders are listed below.
FEATURE KEY
BOSS
DIR
DP
DS
FWRD
GPIK
IOG
MMP
PAGE
SG
SPD
SP
PGM
VT
EXTENDER
Boss and Secretary (1–4)
Directory dial by name type (1–3)
Direct Pick Up (extension or station group number)
Direct Station Select (station number)
Call Forward (0–5)
Group Pick Up (01–08)
In/Out Group (Station Group Number)
Meet Me Page (0–5)
Page (0–5)
Station Group (500–509)
Speed Dial (00–49, 500–799)
UCD Supervisor (UCD/ACD Group Number)
Programmed Station Message (01–20)
VM transfer (VM/AA Group Number)
PROGRAM KEYS
UP & DOWN
KEYPAD
SOFT KEYS
SPK
HOLD
Used to scroll through options
Used to enter selections
Move cursor left and right
Used to store data and advance to next MMC
Used to clear previous entry
Technical Manuals Online! - http://www.tech-man.com
3-14
Chapter 3
Programming Using MMCs
ACTION
DISPLAY
1. Press TRSF 107
Display shows first station
[201] EXT (MAST)
01:CALL1 →
2. Dial station number (e.g., 205)
OR
Use UP or DOWN to scroll through station numbers
and press RIGHT soft key to move the cursor
3. Enter key number (e.g., 18)
OR
Press UP and DOWN to scroll through keys and
use RIGHT soft key to move the cursor
OR
Use above table to select desired extender
System will return to this step
[205] EXT (MAST)
01:CALL1 →
[205]
18:DS
EXT (MAST)
→
[205]
18:DS
EXT (MAST)
→DS207
4. Press TRSF to store and exit
OR
Press SPK to store and advance to the next MMC
NOTE
If the RIGHT soft key will not move the cursor to the right, you are attempting to add an
extender to a key that cannot have one.
DEFAULT DATA
None
RELATED ITEMS
MMC 720
MMC 721
MMC 722
MMC 723
Copy Key Programming
Save Station Key Programming
Station Key Programming
System Key Programming
Technical Manuals Online! - http://www.tech-man.com
3-15
108
STATION STATUS
This is a read–only MMC. Displays the following attributes of a station port:
0
1
2
3
4
5
6
7
PORT NO
TYPE
PICKUP GROUP
SGR
BOSS–SECR
PAGE
DAY COS NO
NIGHT COS NO
Slot (BDLI,BSLI,AA) / Port (1–12)
Type of Phone
None, 01–08
Station Group Number
None, BOSS, SECR
Page Zone (1–4, *)
COS (01–10)
COS (01–10)
PROGRAM KEYS
UP & DOWN
KEYPAD
SOFT KEYS
SPK
Used to scroll through options
Used to enter selections
Move cursor left and right
Used to advance to next MMC
ACTION
DISPLAY
1. Press TRSF 108
Display shows first station
[201] STN STATUS
PORT NO:BASE01
2. Dial station number (e.g., 205)
OR
Press UP or DOWN to select station and press
RIGHT soft key to move cursor
[205] STN STATUS
PORT NO:BASE05
3. Dial 0–7 to select station status type (e.g., 2)
OR
Press UP or DOWN to select status and press RIGHT
soft key to return to step 2
[205] STN STATUS
PICKUP GROUP:01
4. Press TRSF to exit
OR
Press SPK to advance to next MMC
DEFAULT DATA
PORT N0
TYPE
PICKUP GRP
SGR
BOSS–SECR
PAGE
DAY COS NO
NIGHT COS NO
Follows hardware position
Follows phone type
01
None
None
None
01
01
Technical Manuals Online! - http://www.tech-man.com
3-16
Chapter 3
Programming Using MMCs
RELATED ITEMS
MMC 301
MMC 302
MMC 303
MMC 601
MMC 604
Assign Station COS
Pickup Groups
Assign Boss/Secretary
Assign Station Group
Assign Station to Page Zone
Technical Manuals Online! - http://www.tech-man.com
3-17
109
DATE DISPLAY
Allows the system administrator or technician to select the date and time display mode on a per–station
basis or system–wide.
0
COUNTRY
Sets overall display format and has two options:
0 = ORIENTALMM/DD DAYHH:MM
1 = WESTERNDAY DD MONHH:MM
1
CLOCK
Sets format of clock display and has two options:
0 = 12 CLOCKDisplays 1 P.M. as 01:00
1 = 24 CLOCKDisplays 1 P.M. as 13:00
2
DISPLAY
Sets format of DAY and MON display and has two options:
0 = UPPER CASEDisplays Friday as FRI and March as MAR
1 = LOWER CASEDisplays Friday as Fri and March as Mar
PROGRAM KEYS
UP & DOWN
KEYPAD
SOFT KEYS
SPK
HOLD
ANS/RLS
Used to scroll through options
Used to enter selections
Move cursor left and right
Used to store data and advance to next MMC
Used to clear previous entry
Used to select ALL
ACTION
1. Press TRSF 109
Display shows
2. Dial station number (e.g., 205)
OR
Press UP or DOWN to select station and press
RIGHT soft key to move cursor
OR
Press ANS/RLS for all keysets
3. Dial 0–2 to select mode
OR
Press UP or DOWN to scroll through modes and press
RIGHT soft key to move cursor
4. Press UP or DOWN to select format (e.g. 0) and press
RIGHT soft key to return
to step 2
5. Press TRSF to store and exit
OR
Press SPK to store and advance to next MMC
Technical Manuals Online! - http://www.tech-man.com
DISPLAY
[201] DAY FORMAT
COUNTRY:WESTERN
[205] DAY FORMAT
COUNTRY:WESTERN
[ALL] DAY FORMAT
COUNTRY:WESTERN
[205] DAY FORMAT
COUNTRY:ORIENTAL
3-18
Chapter 3
Programming Using MMCs
DEFAULT DATA
COUNTRY:
CLOCK:
DISPLAY:
WESTERN
24 CLOCK
LOWER CASE
RELATED ITEMS
MMC 505
Assign Date and Time
Technical Manuals Online! - http://www.tech-man.com
3-19
110
STATION ON/OFF
Allows the system administrator to set any of the keyset features listed below.
00
AUTO HOLD
Automatically places an existing C.O. call on hold if a CALL button, trunk
key or trunk route key is pressed during that call.
01
AUTO TIMER
Automatically starts the stopwatch timer during a C.O.
call.
02
03
04
HEADSET USE
HOT KEYPAD
KEY TONE
When ON, this feature disables the hookswitch allowing a headset user to
answer all calls by pressing the ANS/RLS button.
When ON, this feature allows the user to dial directory
numbers without having to first lift the handset or press the SPK button.
Allows the user to hear a slight tone when pressing buttons on keyset.
05
PAGE REJOIN
Allows the user to hear the latter part of page announcements if keyset
becomes free during a page.
06
RING PREF.
When OFF, requires the user to press the fast flashing button to answer a
ringing call after lifting the handset.
07
CALL COST
If enabled (ON), LCD shows real–time call cost based on Metering Pulses
arrived.
08
NOT CONT.CID
09
AME BGM
This feature selects whether a station using Answer Machine Emulation
will hear their personal greeting or BGM while callers are listening to the
personal greeting. A BGM source must be selected for this to work.
10
AME PSWD
When ON, station users who have AME set must enter their station
password to listen to messages being left.
When OFF, the Caller ID will be continue display after the keyset user
answered call.
PROGRAM KEYS
UP & DOWN
KEYPAD
SOFT KEYS
SPK
HOLD
ANS/RLS
Used to scroll through options
Used to enter selections
Move cursor left and right
Used to store data and advance to next MMC
Used to clear previous entry
Used to select ALL
Technical Manuals Online! - http://www.tech-man.com
3-20
Chapter 3
Programming Using MMCs
ACTION
DISPLAY
1. Press TRSF 110
Display shows
[201] STN ON/OFF
AUTO HOLD
:OFF
2. Dial keyset number (e.g., 205)
OR
Press UP or DOWN to select keyset and press RIGHT
soft key to move cursor
OR
Press ANS/RLS for ALL
3. Dial option number from above list (00–10, e.g. 03)
OR
Press UP or DOWN to select option and press RIGHT
soft key to move cursor
4. Dial 1 for ON or 0 for OFF
OR
Press UP or DOWN to select ON or OFF and press LEFT
or RIGHT soft key to return to step
5. Press TRSF to store and exit
OR
Press SPK to store and advance to next MMC
DEFAULT DATA
AUTO HOLD OFF
HEADSET USE OFF
KEY TONE ON
RING PREFERENCE
NOT CONT.CID OFF
AME PSWD OFF
AUTO TIMER ON
HOT KEYPAD ON
PAGE REJOIN ON
ONCALL COST OFF
AME BGM OFF
RELATED ITEMS
MMC 301
MMC 701
Assign Station COS
Assign COS Contents
Technical Manuals Online! - http://www.tech-man.com
[205] STN ON/OFF
AUTO HOLD
:OFF
[ALL] STN ON/OFF
AUTO HOLD
:?
[205] STN ON/OFF
AUTO HOLD
:OFF
[205] STN ON/OFF
HOT KEYPAD :ON
[205] STN ON/OFF
HOT KEYPAD :OFF
3-21
111
KEYSET RING TONE
Allows the system administrator or technician to select the ring tone heard at each keyset. There are eight
ring tones available. A short tone burst of the selection will be heard when the dial keypad is pressed.
PROGRAM KEYS
UP & DOWN
KEYPAD
SOFT KEYS
SPK
HOLD
ANS/RLS
Used to scroll through options
Used to enter selections
Move cursor left and right
Used to store data and advance to next MMC
Used to clear previous entry
Used to select ALL
ACTION
DISPLAY
1. Press TRSF 111
Display shows
[201] RING TONE
SELECTION 5
2. Dial keyset number (e.g., 205)
OR
Press UP or DOWN to select station and press
RIGHT soft key to move cursor
OR
Press ANS/RLS to select All
3. Dial 1–8 to select ring tone
OR
Press UP or DOWN to select ring tone and press
RIGHT soft key to move cursor
4. Press TRSF to store and exit
OR
Press SPK to store and advance to next MMC
DEFAULT DATA
SELECTION
5
RELATED ITEMS
MMC 114
Keyset Volume
Technical Manuals Online! - http://www.tech-man.com
[205] RING TONE
SELECTION 5
[ALL] RING TONE
SELECTION ?
[205] RING TONE
SELECTION 5
3-22
Chapter 3
Programming Using MMCs
112
ALARM
REMINDER
Allows the system administrator or technician to set or change the alarm clock/appointment reminder
feature for any station. This must be done for single line telephones, as they cannot access programming.
Two alarms may be set for each station and each alarm may be defined as a one–time or TODAY alarm or as
a DAILY alarm. The TODAY alarm is automatically cancelled after it rings, while the DAILY alarm rings
every day at the same time.
0
1
2
NOTSET
TODAY
DAILY
PROGRAM KEYS
UP & DOWN
KEYPAD
SOFT KEYS
SPK
HOLD
Used to scroll through options
Used to enter selections
Move cursor left and right
Used to store data and advance to next MMC
Used to clear previous entry
ACTION
1. Press TRSF 112
Display shows
2. Dial station number (e.g., 205)
OR
Press UP or DOWN to select station and press
RIGHT soft key
3. Dial 1–2 to select alarm (e.g., 1)
OR
Press UP or DOWN to select alarm and press
RIGHT soft key
4. Enter alarm time in 24–hour clock format
(e.g., 1300 for 1pm)
5.
Dial entry from above list for alarm type
(e.g. 2)
OR
Press UP or DOWN to select alarm type and press
RIGHT soft key to move cursor and return to step 2
6. Press TRSF to store and exit
OR
Press SPK to store and advance to next MMC
Technical Manuals Online! - http://www.tech-man.com
DISPLAY
[201]
HHMM:
ALM CLK(1)
ÎNOTSET
[205]
HHMM:
ALM CLK(1)
ÎNOTSET
[205]
HHMM:
ALM CLK(1)
ÎNOTSET
[205] ALM CLK (1)
HHMM:1300ÎNOTSET
[205] ALM CLK(1)
HHMM:1300ÎDAILY
3-23
DEFAULT DATA
Alarms set to NOTSET
RELATED ITEMS
None
Technical Manuals Online! - http://www.tech-man.com
3-24
Chapter 3
Programming Using MMCs
113
VIEW MEMO NUMBER
Allows a station user the ability to view a memo left by the user. A memo can be left by entering it via the
dial keypad using the table below. MMC 116 (Alarm and Message) can be programmed to remind the user to
read the memo. A memo of up to 13 characters can be entered. For example, using the dial keypad, press
“6” once to enter the letter “M,” and press “3” twice for an “E.” Pressing the “A” key will change the
letters from upper case to lower case.
NOTE
When the desired character appears on the same dial keypad key as the previous character,
press the UP key to move the cursor to the right.
COUNT
DIAL 0
DIAL 1
DIAL 2
DIAL 3
DIAL 4
DIAL 5
DIAL 6
DIAL 7
DIAL 8
DIAL 9
DIAL *
1
0
1
2
3
4
5
6
7
8
9
2
3
4
5
<
>
.
)
Space
A
D
G
J
M
P
T
W
:
?
B
E
H
K
N
Q
U
X
=
,
C
F
I
L
O
R
V
Y
[
!
@
#
$
%
^
S
Z
]
The # key can be used for the following special characters: #, space, &, !, :, ?, ., ,, %, $, –, <, >, /, =, [, ], @,
^, (, ), _, +, {, }, |, ;,", →,` , and \.
PROGRAM KEYS
UP & DOWN
KEYPAD
SOFT KEYS
SPK
HOLD
Used to scroll through options
Used to enter selections
Move cursor left and right
Used to store data and advance to next MMC
Used to clear previous entry
Technical Manuals Online! - http://www.tech-man.com
3-25
ACTION
1. Press TRSF 113
Display shows
2. Press RIGHT soft key to move cursor and add
memo via dial keypad using procedure above
3. Press TRSF
to store and exit
OR
Press SPK to store and advance to next MMC
DEFAULT DATA
No memos entered
RELATED ITEMS
“A” button is button #19 on keyset
“B” button is button #20 on keyset
“C” button is button #21 on keyset
“D” button is button #22 on keyset
“E” button is button #23 on keyset
“F” button is button #24 on keyset
Technical Manuals Online! - http://www.tech-man.com
DISPLAY
[201]
1:
VIEW MEMO
[201] VIEW MEMO
1:NEED BREAD
3-26
Chapter 3
Programming Using MMCs
114
KEYSET VOLUME
Allows the system administrator to set the volume for any or all keysets.
0
RING VOLUME
Set a level for keyset ring volume. There are eight volume levels: level
1 is the lowest and level 8 the highest.
1 OFF–RING VOL
Set a level for keyset off–hook ring volume. There are eight volume
levels: level 1 is the lowest and level 8 the highest.
2
HANDSET VOL
Set a level for keyset heard volume through handset. There are eight
volume levels: level 1 is the lowest and level 8 the highest.
3
SPEAKER VOL
Set a level for keyset heard volume through speaker. There are 16
volume levels: level 1 is the lowest and level 16 the highest.
4 BGM VOLUME
Set a level for keyset background music volume. There are 16 volume
levels: level 1 is the lowest and level 16 the highest.
PROGRAM KEYS
UP & DOWN
KEYPAD
SOFT KEYS
SPK
ANS/RLS
Used to scroll through options
Used to enter selections
Move cursor left and right
Used to store data and advance to next MMC
Used to select ALL
Technical Manuals Online! - http://www.tech-man.com
3-27
ACTION
DISPLAY
1. Press TRSF 114
Display shows
[201] STN VOLUME
RING VOLUME : 4
2. Dial keyset number (e.g. 205)
[205] STN VOLUME
RING VOLUME : 4
3.Press UP or DOWN to select next volume
3.Press UP or DOWN to select next volume
3.Press UP or DOWN to select next volume
3.Press UP or DOWN to select next volume
4. Press TRSF to store and exit
OR
Press SPK to store and advance to next MMC
DEFAULT DATA
RING VOLUME 4
OFF–HOOK RING VOLUME 4
HANDSET VOLUME 4
SPEAKER VOLUME 13
BGM VOLUME 13
RELATED ITEMS
MMC 111
Keyset Ring Tone
Technical Manuals Online! - http://www.tech-man.com
[205] STN VOLUME
OFF–RING VOL: 4
[205] STN VOLUME
HANDSET VOL : 4
[205] STN VOLUME
SPEAKER VOL :13
[205] STN VOLUME
BGM VOLUME :13
3-28
Chapter 3
Programming Using MMCs
115
SET PROGRAMMED MESSAGE
Allows the system administrator to set a programmed message at any or all keysets. There are 20 messages
available: 10 are pre–programmed and 10 can be customised in MMC 715, Programmed Message.
Programmed station messages are numbered 01–20.
PROGRAM KEYS
UP & DOWN
KEYPAD
SOFT KEYS
SPK
HOLD
ANS/RLS
Used to scroll through options
Used to enter selections
Move cursor left and right
Used to store data and advance to next MMC
Used to clear previous entry
Used to select ALL
ACTION
DISPLAY
1. Press TRSF 115
Display shows
[201] PGMMSG(00)
CANCEL PGM MSG
2. Dial station number (e.g., 205)
OR
Press UP or DOWN to select station and press
RIGHT soft key to move cursor
OR
Press ANS/RLS to select All
3. Dial 01–20 to select message number (e.g., 05)
OR
Press UP or DOWN to select message and press
RIGHT soft key to return to step 2
4. Press TRSF to store and exit
OR
Press SPK to store and advance to next MMC
DEFAULT DATA
No messages selected
RELATED ITEMS
MMC 715
MMC 722
MMC 723
Programmed Station Message
Station Key Programming
System Key Programming
Technical Manuals Online! - http://www.tech-man.com
[205] PGMMSG(00)
CANCEL PGM MSG
[ALL]
PGMMSG(??)
[205] PGMMSG(05)
PAGE ME
3-29
116
ALARM AND MESSAGE
Allows the system administrator or technician to set or change the alarm clock/appointment reminder
feature for any station. This must be done for single line telephone because they cannot access
programming. Two alarms may be set for each station and each alarm may be defined as a one–time or
TODAY alarm or as a DAILY alarm. The TODAY alarm is automatically cancelled after it rings, while the
DAILY alarm rings every day at the same time. It is also possible to set a message to display when the alarm
is sounded.
0
1
2
NOTSET
TODAY
DAILY
Messages are written using the keypad. Each press of a key will select a character. Pressing the dial pad key
will move the cursor to the next position. For example, if the directory name is “SAM SMITH,” press the
number “7” four times to get the letter “S.” Now press the number “2” once to get the letter “A.” Continue
selecting characters from the table below to complete your message. Pressing the “A” key will change the
letter from upper case to lower case.
COUNT
DIAL 0
DIAL 1
DIAL 2
DIAL 3
DIAL 4
DIAL 5
DIAL 6
DIAL 7
DIAL 8
DIAL 9
DIAL *
1
<
Space
A
D
G
J
M
P
T
W
:
2
>
?
B
E
H
K
N
Q
U
X
=
3
.
,
C
F
I
L
O
R
V
Y
[
4
)
!
@
#
$
%
^
S
Z
]
5
0
1
2
3
4
5
6
7
8
9
PROGRAM KEYS
UP & DOWN
KEYPAD
SOFT KEYS
SPK
HOLD
A
Used to scroll through options
Used to enter selections
Move cursor left and right
Used to store data and advance to next MMC
Used to clear previous entry
Key 19, acts as toggle between upper case and lower case
Technical Manuals Online! - http://www.tech-man.com
3-30
Chapter 3
Programming Using MMCs
ACTION
1. Press TRSF 116
Display shows
2. Dial station number (e.g., 205)
OR
Press UP or DOWN to select station and press
RIGHT soft key to move cursor
OR
Press ANS/RLS to select all stations
DISPLAY
[201] ALM REM(1)
HHMM: ÎNOTSET
[205] ALM REM(1)
HHMM: ÎNOTSET
[ALL] ALM REM(1)
HHMM: ÎNOTSET
3. Dial 1–2 to select alarm (e.g., 2)
OR
Press UP or DOWN to select alarm and press
RIGHT soft key to move cursor
[205] ALM REM(2)
HHMM: ÎNOTSET
4. Enter alarm time in 24–hour clock format
(e.g., 1300 for 1pm)
Display will automatically advance to step 5
[205] ALM REM(2)
HHMM:1300ÎNOTSET
5. Dial valid entry from above list for alarm type (e.g. 2)
OR
Press UP or DOWN to select alarm type and press
RIGHT soft key to move cursor
[205] ALM REM(2)
HHMM:1300ÎDAILY
6. Enter messages using above table and press RIGHT
soft key to return to step 2
7. Press TRSF to store and exit
OR
Press SPK to store and advance to next MMC
DEFAULT DATA
Alarms set to NOTSET
RELATED ITEMS
None
Technical Manuals Online! - http://www.tech-man.com
[205] ALM REM(2)
Sam SMITH
3-31
119
SET CLIP DISPLAY
Allows the technician to change the order in which the CLIP information is displayed on an LCD set.
display options are as follows:
0
1
NO DISPLAY
NUMBER FIRST
2
NAME FIRST
No CLIP data will be displayed.
The CLIP number received from the central office
will be displayed first.
The CLIP name will be displayed first.
PROGRAM KEYS
UP & DOWN
KEYPAD
SPK
ANS/RLS
Used to scroll through options
Used to enter selections
Save data and advance to next MMC
Used to select ALL
ACTION
1. Press TRSF 119
Display shows
2. Enter station number (e.g., 204)
OR
Press UP or DOWN to scroll through stations and
press RIGHT soft key to select a station
OR
Press ANS/RLS to select ALL
3. Dial display option 0, 1 or 2 (e.g., 2)
OR
Press UP or DOWN to select option and press RIGHT
or LEFT soft key to return to step 2
4. Press TRSF to store and exit
OR
Press SPK to save and advance to next MMC
DEFAULT DATA
Number first
RELATED ITEMS
None
Technical Manuals Online! - http://www.tech-man.com
DISPLAY
[201] CLIP DISP.
NUMBER FIRST
[204] CLIP DISP.
NUMBER FIRST
[ALL] CLIP DISP.
?
[204] CLIP DISP.
NAME FIRST
CLIP
3-32
Chapter 3
Programming Using MMCs
121
KEYSET LANGUAGE
Allows keyset users the ability to assign an LCD display based on user’s own language.
0
1
2
3
4
5
6
7
8
ENGLISH
GERMAN
PORTUGAL
NORSK
DANISH
DUTCH
ITALY
SWEDISH
SPANISH
PROGRAM KEYS
UP & DOWN
KEYPAD
SOFT KEYS
SPK
HOLD
ANS/RLS
Used to scroll through options
Used to enter selections
Move cursor left and right
Used to store data and advance to next MMC
Used to clear previous entry
Used to select ALL
ACTION
1. Press TRSF 121
Display shows
2. Dial keyset number (e.g., 205)
OR
Press UP or DOWN to select keyset and press
RIGHT soft key
OR
Press ANS/RLS to select All
3. Dial number for language required
OR
Press UP or DOWN to select language and press
RIGHT soft key.
4. Press TRSF to store and exit
OR
Press SPK to store and advance to next MMC
Technical Manuals Online! - http://www.tech-man.com
DISPLAY
[201] LANGUAGE
ENGLISH
[205] LANGUAGE
ENGLISH
[ALL]
?
LANGUAGE
[205] LANGUAGE
GERMAN
3-33
DEFAULT DATA
ENGLISH
RELATED ITEMS
Multi–Language
Technical Manuals Online! - http://www.tech-man.com
3-34
Chapter 3
Programming Using MMCs
OPEN CUSTOMER PROGRAMMING
200
Used to open (enable) and close (disable) customer–level programming. If programming is not opened and
an attempt is made to access a system MMC, the error message [NOT PERMIT] will be displayed. A fourdigit passcode is required to access this MMC. Each digit can be 0–9. When opened, this MMC enables
access to all MMCs allowed in MMC 802, Customer Access MMC Number.
PROGRAM KEYS
UP & DOWN
KEYPAD
SPK
TRSF
Select open or closed
Used to enter passcode
Save data and advance to next MMC
Exit programming
ACTION
1. Press TRSF 200
Display shows
2. Enter passcode
Correct code shows
Incorrect code shows
3. Press UP or DOWN arrow key to select ENABLE
or DISABLE and press RIGHT soft key
OR Dial 1 for ENABLE or 0 for DISABLE
4. Press SPK to advance to MMC entry level and
press UP or DOWN key to select MMC (e.g, 212)
OR
Enter MMC number and press RIGHT soft
key to enter MMC
5. Press TRSF key to exit
Technical Manuals Online! - http://www.tech-man.com
DISPLAY
ENABLE CUS.PROG.
PASSCODE:
ENABLE CUS.PROG.
PASSCODE:
ENABLE CUS.PROG.
DISABLE
ENABLE CUS.PROG.
PASSWORD ERROR
ENABLE CUS.PROG.
ENABLE
212:ALARM RING
SELECT PROG. ID
3-35
DEFAULT DATA
Closed (Disabled)
RELATED ITEMS
MMC 201
MMC 501
MMC 802
Change Customer Passcode
System–Wide Timers
Customer Access MMC Number
Technical Manuals Online! - http://www.tech-man.com
3-36
Chapter 3
Programming Using MMCs
CHANGE CUSTOMERPASSCODE
201
Used to change the passcode allowing access to MMC 200 Open Customer Programming from its current
value.
NOTE
The passcode is four digits long. Each digit can be 0–9. The current (old) passcode is required
for this MMC.
PROGRAM KEYS
KEYPAD
SPK
Used to enter passcodes
Save data and advance to next MMC
ACTION
DISPLAY
1. Press TRSF 201
CUST. PASSCODE
NEW CODE:
2. Enter new passcode via dial keypad
(maximum four digits)
CUST. PASSCODE
NEW CODE:
3. Verify new passcode via dial keypad
CUST. PASSCODE
VERIFY :
Passcode verified (go to step 4)
OR
CUST. PASSCODE
VERIFY :SUCCESS
Passcode failure
Return to step 2
CUST. PASSCODE
VERIFY :FAILURE
4. Press TRSF to store and exit
OR
Press SPK to store and advance to next MMC
DEFAULT DATA
Passcode = 1234
RELATED ITEMS
MMC 200
Open Customer Programming
Technical Manuals Online! - http://www.tech-man.com
3-37
202
CHANGE FEATURE PASSCODES
Used to change the passcodes for the following features: DAY/NIGHT, DISA ALARM, ALARM CLR and AA
RECORD.
NOTE
The passcode is four digits long. Each digit can be 0–9. The current (old) passcode is required
for this MMC.
PROGRAM KEYS
KEYPAD
SPK
Used to enter passcodes
Save data and advance to next MMC
ACTION
DISPLAY
1. Press TRSF 202
Display shows
CHANGE PASSCODE
DAY/NIGHT :0000
2. Press UP or DOWN key to make selection
Press RIGHT soft key to move cursor to
passcode entry
CHANGE PASSCODE
DISA ALARM :5678
3. Enter new passcode via dial keypad and
press RIGHT soft key to return to step 2
Continue to change other passcodes
CHANGE PASSCODE
DISA ALARM :9999
4. Press TRSF to store and exit
OR
Press SPK to store and advance to
next MMC
DEFAULT DATA
DAY/NIGHT
DISA ALARM
ALARM CLR
AA RECORD
0000
5678
8765
4321
RELATED ITEMS
MMC 214
MMC 410
MMC 507
DISA Alarm Ringing Station
Assign DISA Trunk
Assign Auto Night Time
Technical Manuals Online! - http://www.tech-man.com
3-38
Chapter 3
Programming Using MMCs
203
ASSIGN UA DEVICE
Assigns ringing device to be accessed when a Universal Answer (UA) key is pressed or the UA pickup code
is dialled. UA assignment is made in MMC 601 Assign Station Group for a group and then the group is
entered here. The UA device may be one of the device types listed below. The device type is automatically
determined by the directory number (DN) entered.
DIRECTORY NUMBER
201–216
361
500–509
NOTE
DEVICE TYPE
DESCRIPTION
STATION
ROP
STATION GROUP
The UA device is a keyset or SLT.
Ring over page.
The UA device is a station group.
Only one of the above options can be selected. If the ability to ring more than one item (e.g.,
an external page zone) is required, a station group containing a zone code must be created.
PROGRAM KEYS
UP & DOWN
KEYPAD
SPK
HOLD
Used to scroll through options
Used to enter DN of selected device
Used to store data and advance to next MMC
Used to clear previous entry
ACTION
DISPLAY
1. Press TRSF 203
Display shows current assignment
ASSIGN UA PORT
NONE–NO UA
2. Dial DN of UA device (e.g., 205)
OR
Use UP and DOWN keys to scroll through
available devices
3. Press TRSF to store and exit
OR
Press SPK to store and advance to next MMC
DEFAULT DATA
None
RELATED ITEMS
MMC 204
MMC 219
MMC 601
MMC 605
Common Bell Control
Common Relay Service Type
Assign Station Group
Assign External Page Zone
Technical Manuals Online! - http://www.tech-man.com
ASSIGN UA PORT
205 –STATION
3-39
204
COMMON BELL CONTROL
Determines whether the common bell relay contacts have an interrupted or continuous closure when
activated. If interrupted is chosen, the relay follows an internal C.O. ring pattern of one second closed
followed by three seconds open.
If assigned dry contact to Common bell, common bell relay pairs are assigned as 362.
PROGRAM KEYS
UP & DOWN
KEYPAD
SOFT KEYS
Used to scroll through options
Used to enter selections
Used to store data and advance to next MMC
ACTION
DISPLAY
1. Press TRSF 204
Display shows current setting
[362] COM/LD BEL
CONTINUOUS
2. Dial common bell number (362 only)
OR
Press UP or DOWN key to make selection of
common bell numbers and press RIGHT soft key
to advance cursor
3. Dial 0 for continuous or 1 for interrupted operation
OR
Use UP or DOWN to scroll through options
Press RIGHT soft key to return to step 2
4. Press TRSF to store and exit
OR
Press SPK to store and advance to next MMC
DEFAULT DATA
Continuous(When Common bell or Loud bell is assigned at MMC 219)
RELATED ITEMS
MMC 203
MMC 219
MMC 601
Assign UA Device
Common Relay Service Type
Assign Station Group
Technical Manuals Online! - http://www.tech-man.com
[362] COM/LD BEL
CONTINUOUS
[362] COM/LD BEL
INTERRUPTED
3-40
Chapter 3
Programming Using MMCs
205
ASSIGN LOUD BELL
Designates the station that controls the loud bell ring output of a base board (assigned in MMC 219,
Common Relay Service Type).
The loud bell will follow the ring cadence of the designated station. Only a station can be assigned to control
the loud bell; a station group cannot be assigned.
PROGRAM KEYS
UP & DOWN
KEYPAD
SOFT KEYS
SPK
HOLD
Used to scroll through options
Used to enter selections
Move cursor left and right
Used to store data and advance to next MMC
Clears previous entry
ACTION
DISPLAY
1. Press TRSF 205
Display shows current setting
[362] LOUD BELL
RING PAIR : NONE
2. Dial loud bell number (362 only)
OR
Use UP or DOWN to scroll through loud bell numbers
and press RIGHT soft key to move the cursor
3. Enter station number (e.g.,201)
OR
Press UP or DOWN key to make selection and press
RIGHT soft key to return to step 2
4. Press TRSF to store and exit
OR
Press SPK to store and advance to next MMC
DEFAULT DATA
Unassigned
RELATED ITEMS
MMC 219
Common Relay Service Type
Technical Manuals Online! - http://www.tech-man.com
[362] LOUD BELL
RING PAIR : NONE
[362] LOUD BELL
RING PAIR :201
3-41
206
BARGE–IN TYPE
Sets the type of barge–in that is permitted.
OPTION
TYPE OF BARGE–IN
DESCRIPTION
0
NO BARGE–IN
Barge–in feature is unavailable regardless of a station’s
barge–in status.
1
BARGE–IN WITH TONE
Barge–in will have an intrusion tone and display at the
barged–in on station.
2
BARGE–IN WITHOUT TONE
Barge–in is allowed. There is no barge–in tone or display
at the barged–in on station and the barging–in station will
be muted.
PROGRAM KEYS
UP & DOWN
KEYPAD
SOFT KEYS
SPK
Used to scroll through options
Used to enter selections
Move cursor left and right
Used to store data and advance to next MMC
ACTION
DISPLAY
1. Press TRSF 206
Display shows
BARGE IN TYPE
NO BARGE IN
2. Dial 0–2 to select barge–in type (e.g., 2)
OR
Press UP or DOWN to select barge–in type
and press RIGHT soft key
3. Press TRSF to store and exit
OR
Press SPK to store and advance to next MMC
DEFAULT DATA
NO BARGE–IN
RELATED ITEMS
MMC 301
MMC 701
Assign Station COS
Assign COS Contents
Technical Manuals Online! - http://www.tech-man.com
BARGE IN TYPE
WITHOUT TONE
3-42
Chapter 3
Programming Using MMCs
207
ASSIGN VM/AA PORT
Enables SLI ports to be designated as NORMAL or VMAA. VMAA ports receive digits designated in MMC
726, VM/AA Options, and also receive a true disconnect signal upon completion of a call. Only SLI cards, not
keyset daughter-boards, support disconnect signal. Do not make VMAA ports data; this will return them to a
single line port and stop voice mail integration. VMAA ports have the equivalent of data protect written in
the program and are protected against tones.
PROGRAM KEYS
UP & DOWN
KEYPAD
SOFT KEYS
SPK
HOLD
ANS/RLS
Used to scroll through options
Used to enter selections
Move cursor left and right
Used to store data and advance to next MMC
Used to clear previous entry
Used to select ALL
ACTION
DISPLAY
1. Press TRSF 207
Display shows
[213] VMAA PORT
NORMAL PORT
2. Dial station number (e.g., 215)
OR
Press UP or DOWN to select station
and press RIGHT soft key to move cursor
3. Dial 1 or 0 to select port type (1=VMAA, 0=NORMAL)
OR
Press UP or DOWN to select option and press
RIGHT soft key
4. Press TRSF to store and exit
OR
Press SPK to store and advance to next MMC
DEFAULT DATA
Normal port
RELATED ITEMS
MMC 726
MMC 601
VM/AA Options
Assign Station Group
Technical Manuals Online! - http://www.tech-man.com
[215] VMAA PORT
NORMAL PORT
[215] VMAA PORT
VMAA PORT
3-43
ASSIGN RING TYPE
208
Provides the flexibility to program single lines to have ICM ringing, C.O. ringing and data secure. With the
many types of external ringing devices, all configurations can be met. All devices will also have a positive
disconnect signal. Do not make VM/AA ports data; this will return them to a single line port and stop voice
mail integration.
0
1
2
ICM RING
CO RING
DATA RING
PROGRAM KEYS
UP & DOWN
KEYPAD
SOFT KEYS
SPK
HOLD
ANS/RLS
Used to scroll through options
Used to enter selections
Move cursor left and right
Used to store data and advance to next MMC
Used to clear previous entry
Used to select ALL
ACTION
1. Press TRSF 208
Display shows
2. Dial station number (e.g., 215)
OR
Press UP or DOWN to select station and press
RIGHT soft key to move cursor
3. Dial 0, 1, or 2 to select port type (e.g., 2)
OR
Press UP or DOWN to select option and press LEFT
or RIGHT soft key to return to step 2
4. Press TRSF to store and exit
OR
Press SPK to store and advance to next MMC
DEFAULT DATA
ICM RING
RELATED ITEMS
None
Technical Manuals Online! - http://www.tech-man.com
DISPLAY
[213] RING TYPE
ICM RING
[215] RING TYPE
ICM RING
[215] RING TYPE
DATA RING
3-44
Chapter 3
Programming Using MMCs
209
ASSIGN ADD–ON MODULE
<Only for Reference>
Designates to which station an add–on module (AOM) is assigned.
PROGRAM KEYS
UP & DOWN
KEYPAD
SOFT KEYS
RELEASE
HOLD
Used to scroll through options
Used to enter selections
Move cursor left and right
Used to store data and advance to next MMC
Clears previous entry
ACTION
1. Press TRSF 209
Display shows first AOM
DISPLAY
[205] AOM MASTER
MASTER:NONE
2. Dial AOM number
OR
Press UP or DOWN to scroll through AOM numbers
and press soft keys to move the cursor
[205] AOM MASTER
MASTER:NONE
3. Enter station number (e.g., 201)
OR
Press UP or DOWN to select station numbers
[205] AOM MASTER
MASTER:201
4. Press TRSF to store and exit
OR
Press SPK to store and advance to next MMC
DEFAULT DATA
MASTER = NONE
RELATED ITEMS
None
Technical Manuals Online! - http://www.tech-man.com
3-45
210
CUSTOMER ON/OFF
Allows the system administrator to set in system features. Each system option has a corresponding dialling
number, as listed below. All options toggle ON/OFF.
0
DISA PSWD
Determine whether outside customers are required to enter DISA
password (Yes=ON, No=OFF).
1
LCR ENABL
EEnables LCR feature in the system.
3
PERI UCD SET
Periodic UCD information provider. Enables UCD statistics data on a per
UCD group basis to print out on the I/O port which has been set as SMDR
or UCD REPT in real time (every 10 seconds). This allows extended
manipulation of the information by an external third–party–
providedsoftware package.
4
CID CODE
INSAllows the digit ‘1’ to be automatically inserted for a toll call.
5
DISA MOH
An additional option that can be presented to outside DISA callers: a
variable indication provided by an MOH source instead of a fixed DISA dial
tone.
6
TRANSFER MOH
Callers who have been transferred from an extension or ACD group or AA
group will hear MOH, until answered by the called extension, instead of
transfer dial tone.
7
DSP SSPDNAME
LCD displays programmed name of SYSTEM SPEED bin (in MMC 706) if
it has been programmed; if not, it shows digits programmed in MMC 705
even if this is set to ON.
8
DID BSY ROUT
Busy DID call can be routed to an assigned destination, in MMC 406,
before the call is dropped out.
9
DID NOT ROUT
Not used DID call can be routed to an assigned destination, in MMC 406,
before the call is dropped out.
12
ALL PICK UP
Independent pick up group, can pick up the all calls.
13
ARD TONE CHK
15
VPN ENABLE
16
IN TOLL CHK
17
ISDN PROGCON
This option is used to determine the call connection when the network
provides 2nd progress in message to our system instead of connect
message.
18
ISDNTRK BUSY
If ON, when the destinations of an incoming ISDN trunk call are all busy,
the call is dropped out and outside caller will hear busy tone. This feature
is only applied to ISDN Trunks when the destination is an Unconditional
Station Group.
When system detects CO BUSY TONE from Centeral Office,
autoredial state.
return to
Allows to use VPN(Virtual Private Network) feature at linked with
network.
Enables toll checking for incoming call.
Technical Manuals Online! - http://www.tech-man.com
3-46
Chapter 3
Programming Using MMCs
19
ISDN KEYFAC
Allows to use ISDN Keypad facility.
20
USE EURO
Allows to use EURO currency for call cost.
PROGRAM KEYS
UP & DOWN
KEYPAD
SOFT KEYS
SPK
Used to scroll through options
Used to enter selections
Move cursor left and right
Used to store data and advance to next MMC
ACTION
DISPLAY
1. Press TRSF 210
Display shows
TEN. ON AND OFF
DISA PSWD :OFF
2. Dial option number (e.g. 0)
Press RIGHT soft key to move cursor
3. Dial 1 for ON or 0 for OFF
OR
Press UP or DOWN to make selection and press
RIGHT soft key
4. Repeat steps 2–3 for other options
OR
Press TRSF to store and exit
OR
Press SPK to store and advance to next MMC
DEFAULT DATA
DISA PSWD On
PERI UCD SET Off
DISA MOH Off
DSP SSPDNAME Off
DID NOT ROUT Off
ARD TONE CHK On
IN TOLL CHK Off
ISDNTRK BUSY Off
USE EURO Off
LCR ENABLE Off
CID CODE INS Off
TRANSFER MOH Off
DID BSY ROUT Off
ALL PICK UP Off
VPN ENABLE Off
ISDN PROGCON Off
ISDN KEYFAC ON
RELATED ITEMS
None
Technical Manuals Online! - http://www.tech-man.com
TEN. ON AND OFF
DISA PSWD :OFF
TEN. ON AND OFF
DISA PSWD :ON
3-47
211
DOOR RING ASSIGNMENT
Designates which devices will ring when a door phone button is pressed and which ring mode the devices
will follow.
There are two types of device that can ring; these are listed below with their default directory numbers.
DEVICE
Station
Station group
DEFAULT DIRECTORY NUMBER
201–212
500–509
PROGRAM KEYS
UP & DOWN
KEYPAD
SOFT KEYS
SPK
HOLD
ANS/RLS
Used to scroll through options
Used to enter selections
Move cursor left and right
Used to store data and advance to next MMC
Clears previous entry
Used to select ALL
ACTION
1. Press TRSF 211
Display shows first door phone
2. Dial door phone number (e.g., 212)
OR
Press UP or DOWN to scroll through door phone
numbers and use the RIGHT soft key to move cursor
OR
Press ANS/RLS to select All door ring
3. Enter new DAY/NIGHT selection via dial keypad
OR
Press UP or DOWN key to make selection and
press RIGHT soft key
4. Press RIGHT soft key to return to step 2
OR
Press LEFT soft key to return to step 3
OR
Press TRSF to store and exit
OR
Press SPK to store and advance to next MMC
Technical Manuals Online! - http://www.tech-man.com
DISPLAY
[211]
D:500
DOOR RING
N:500
[211]
D:500
DOOR RING
N:500
[ALL]
D:500
DOOR RING
N:500
[212]
D:201
DOOR RING
N:500
3-48
Chapter 3
Programming Using MMCs
DEFAULT DATA
Station group 500
RELATED ITEMS
None
Technical Manuals Online! - http://www.tech-man.com
3-49
DISA ALARM RINGING STATION
214
Assigns the DISA alarm to ring at a specific phone. It is recommended that the person who can clear the
alarm also receives the notification. There can be two distinct stations for notification. Both a day and a night
station can be selected. A valid destination can be either a station group (500–509) or an individual station
(201–212).
PROGRAM KEYS
UP & DOWN
KEYPAD
SOFT KEYS
SPK
HOLD
Used to scroll through options
Used to enter selections
Move cursor left and right
Used to store data and advance to next MMC
Used to clear previous entry
ACTION
DISPLAY
1. Press TRSF 214
Display shows
DISA ALARM RING
D:500
N:500
2. Enter in valid day destination number (e.g., 212)
OR
Press UP or DOWN key to make selection
and press RIGHT soft key to advance cursor
DISA ALARM RING
D:212
N:500
3. Enter in valid night destination number (e.g., 205)
OR
Press UP or DOWN key to make selection
DISA ALARM RING
D:212
N:205
4. Press TRSF to store and exit
OR
Press SPK to store and advance to next MMC
DEFAULT DATA
Day 500
Night 500
RELATED ITEMS
MMC 202
MMC 410
Change Feature Passcodes
Assign DISA Trunk
Technical Manuals Online! - http://www.tech-man.com
3-50
Chapter 3
Programming Using MMCs
219
COMMON RELAY SERVICE TYPE
This MMC is used to define the function of the common relay in the base board. The relay can be used for
one of the following:
0
1
2
3
EXTERNAL PAGE
COMMON BELL
LOUD BELL
NOT USE
ACTION
DISPLAY
1. Press TRSF 219
Display shows
[361] RELAY TYPE
NOT USE
2.Use UP or DOWN to scroll through options
[361] RELAY TYPE
COMMON BELL
[361] RELAY TYPE
LOUD BELL
[361] RELAY TYPE
NOT USE
3. Press TRSF to store and exit
OR
Press SPK to store and advance to next MMC
DEFAULT DATA
External Page
RELATED ITEMS
MMC 203
MMC 204
MMC 205
Assign UA Device
Common Bell Control
Assign Loud Bell
Technical Manuals Online! - http://www.tech-man.com
3-51
ISDN SERVICE TYPE
220
Assigns the ISDN service type. Services consist of BC (Bearer Capability) and HLC (High Layer Capability).
0
1
2
3
TYPE
VOICE
FAX 3
AUDIO 3.1
MODEM
DESCRIPTION
Voice service
G3 FAX service
3.1kHz Audio service
MODEM service
BC
Speech
3.1kHz Audio
3.1kHz Audio
3.1kHz Audio
HLC
Telephone
FAX G2/G3
None
Telephony
PROGRAM KEYS
UP & DOWN
KEYPAD
SOFT KEYS
SPK
HOLD
Used to scroll through options
Used to enter selections
Move cursor left and right
Used to store data and advance to next MMC
Used to clear previous entry
ACTION
DISPLAY
1. Press TRSF 220
Display shows
[213] ISDN SVC
VOICE
2. Dial station number (SLT only e.g., 215)
OR
Press UP or DOWN to select station
and press RIGHT soft key to move cursor
[215]
VOICE
3. Select service type 0 - 3 (e.g., 2)
OR
Press UP or DOWN to select option and press
RIGHT soft key
[215] ISDN SVC
AUDIO 3.1
4. Press TRSF to store and exit
OR
Press SPK to store and advance to next MMC
DEFAULT DATA
VOICE
RELATED ITEMS
MMC 430
ISDN Number Type & Plan
Technical Manuals Online! - http://www.tech-man.com
ISDN SVC
3-52
Chapter 3
Programming Using MMCs
300
CUSTOMER ON/OFF PER STATION
Allows the following features to be enabled on a per–station basis.
ACCESS DIAL
Determines whether a user can select a trunk or trunk group by dialling
its directory number (DN). This selection should be turned OFF when
using LCR.
MICROPHONE
Allows all keysets to be used in the speakerphone mode.
OFF–HOOK RING
Allows a short burst of ring tone to indicate another call.
SMDR PRINT
When the station is set for no C.O. calls to and from this station, the
station will not print on SMDR. This includes transferred calls or calls
picked up from hold or park.
TGR ADV.TONE
When this feature is set to ON, a warning tone will be heard each time
LCR advances to the next route.
VMAA FORWARD
When this feature is set to ON, it allows calls to be forwarded to voice
mail.
STN CALL PRT
Allows print out station to station call.
FWD DLY USE
Set FWD No Ans. Destination in MMC 102 but do not enable the feature
(alternatively use code 603 + stn no., then 600 to cancel the feature),
when a call is presented to this station and the Forward no answer timer
expires, the call will overflow to the station set as the Forward no answer
destination.
PROGRAM KEYS
UP & DOWN
KEYPAD
SOFT KEYS
SPK
HOLD
ANS/RLS
Used to scroll through options
Used to enter selections
Move cursor left and right
Used to store data and advance to next MMC
Used to clear previous entry
Used to select ALL
Technical Manuals Online! - http://www.tech-man.com
3-53
ACTION
1. Press TRSF 300
Display shows
2. Dial station number (e.g., 205)
OR
Press UP or DOWN to select station
OR
Press ANS/RLS for all and press RIGHT soft
key to move cursor
2. Press UP or DOWN to select feature and press
RIGHT soft key to move cursor
4. Dial 1 for ON or 0 for OFF
OR
Press UP or DOWN to select and press RIGHT soft key
5. Press LEFT soft key to return to step 2
Press RIGHT soft key to return to step 1
OR
Press TRSF to store and exit
OR
Press SPK to store and advance to next MMC
DEFAULT DATA: STN CALL PRT
STN CALL PRT:
OFF
FWD DLY USE:
OFF
Other features set to ON
RELATED ITEMS
LCR programming
Technical Manuals Online! - http://www.tech-man.com
DISPLAY
[201] CUS.ON/OFF
ACCESS DIAL :ON
[205] CUS.ON/OFF
ACCESS DIAL :ON
[ALL] CUS.ON/OFF
ACCESS DIAL :ON
[ALL] CUS.ON/OFF
ACCESS DIAL :ON
[ALL] CUS.ON/OFF
ACCESS DIAL :OFF
3-54
Chapter 3
Programming Using MMCs
301
ASSIGN STATION COS
Used to assign a day and night class of service to each keyset. There are 10 different classes of service that
are be defined in MMC 701, Assign COS Contents. Classes of service are numbered 01–10.
PROGRAM KEYS
UP & DOWN
KEYPAD
SOFT KEYS
SPK
HOLD
ANS/RLS
Used to scroll through options
Used to enter selections
Move cursor left and right
Used to store data and advance to next MMC
Used to clear previous entry
Used to select ALL
Technical Manuals Online! - http://www.tech-man.com
3-55
ACTION
1. Press TRSF 301
Display shows
2. Dial station number (e.g., 205)
OR
Press UP and DOWN to scroll through stations
and press RIGHT soft key to advance to step 3
to enter Day COS
OR
Press UP and DOWN to scroll through stations
and press LEFT soft key to advance to step 4
to enter Night COS
OR
Press ANS/RLS to select all stations
3. Enter day class of service (e.g., 05)
OR
Press UP and DOWN to scroll through classes of
service and press RIGHT soft key to advance to step 4
to enter Night COS
OR
Press UP and DOWN to scroll through classes of service
and press LEFT soft key to return to step 2
to enter other stations
4. Enter night class of service (e.g., 05)
OR
Press UP and DOWN to scroll through classes of service
and press RIGHT soft key to return to step 2
to enter other stations
OR
Press UP and DOWN to scroll through classes of service
and press LEFT soft key to return to step 3
5. Press TRSF to save and exit
OR
Press SPK to save and advance to next MMC
DEFAULT DATA
Day class= 01
Night class= 01
RELATED ITEMS
MMC 701 Assign COS Contents
Technical Manuals Online! - http://www.tech-man.com
DISPLAY
[201] STN COS
DAY:01 NIGHT:01
[205] STN COS
DAY:01 NIGHT: 01
[ALL] STN COS
DAY:?? NIGHT:??
[205] STN COS
DAY:05 NIGHT:01
[205] STN COS
DAY:05 NIGHT:05
3-56
Chapter 3
Programming Using MMCs
302
PICKUP GROUPS
Allows the assignment of stations into call pickup groups. There are eight pickup groups. An unlimited
number of members can belong to each group. Stations can only be in one pickup group at any given time.
PROGRAM KEYS
UP & DOWN
KEYPAD
SOFT KEYS
SPK
HOLD
ANS/RLS
Used to scroll through options
Used to enter selections
Move cursor left and right
Used to store data and advance to next MMC
Used to clear previous entry
Used to select ALL
ACTION
DISPLAY
1. Press TRSF 302
Display shows
[201] PICKUP GRP
PICKUP GRP :NONE
2. Dial station number ( e.g., 205)
OR
Use UP or DOWN to select station number and
press RIGHT soft key
OR
Press ANS/RLS key to select all
3. Dial pickup group number (e.g. 05)
OR
Press UP or DOWN to select group number
3. Press RIGHT soft key to return to step 2 to enter more stations
OR
Press LEFT soft key to return to step 3
OR
Press TRSF to store and exit
OR
Press SPK to store and advance to next MMC
DEFAULT DATA
All stations 01
RELATED ITEMS
MMC 107
MMC 722
MMC 723
Key Extender
Station Key Programming
System Key Programming
Technical Manuals Online! - http://www.tech-man.com
[205] PICKUP GRP
PICKUP GRP :NONE
[ALL] PICKUP GRP
PICKUP GRP :??
[205] PICKUP GRP
PICKUP GRP :05
3-57
303
ASSIGN BOSS/SECRETARY
Assigns BOSS keysets to SECRETARY keysets. One BOSS station can have up to and including four
SECRETARY stations, and one SECRETARY station can have up to and including four BOSS stations. A
dedicated BOSS key must be programmed on the SECRETARY keyset(s). A dedicated BOSS key must also
be programmed on the BOSS keyset.
PROGRAM KEYS
UP & DOWN
KEYPAD
SOFT KEYS
SPK
HOLD
ANS/RLS
F BUTTON
Used to scroll through options
Used to enter selections
Move cursor left and right
Used to store data and advance to next MMC
Used to clear previous entry
Used to select ALL
Used to toggle BOSS/SECRETARY field
ACTION
DISPLAY
1. Press TRSF 303
Display shows
BOSS STN:NONE
SECR 1:NONE
2. Dial BOSS station number (e.g., 205)
OR
Press UP or DOWN to select station and press
RIGHT soft key
3. Dial SECRETARY station number (e.g., 201)
OR
Press UP or DOWN to select station
Press RIGHT soft key to return to step 3 to enter
more SECR numbers
BOSS STN :205
SECR 1:NONE
BOSS STN:205
SECR 1:201
BOSS STN:205
SECR 2:202
4. Press LEFT soft key to return to step 2 and
continuous entries
OR
Press TRSF to store and exit
OR
Press SPK to store and advance to next MMC
DEFAULT DATA
None
RELATED ITEMS
MMC 722
Station Key Programming
Technical Manuals Online! - http://www.tech-man.com
3-58
Chapter 3
Programming Using MMCs
304
ASSIGN STATION/TRUNK USE
Allows trunks the ability on a per–station basis to answer incoming calls, to dial out or to do both. If a station
is set to NO Dial, the station will not have the ability to place a call. If the station is set to NO Answer, the
station cannot answer an incoming call.
NOTE
MMC 406 Trunk Ring Assignment overrides this MMC for the Answer option.
PROGRAM KEYS
UP & DOWN
KEYPAD
SOFT KEYS
SPK
HOLD
ANS/RLS
Used to scroll through options
Used to enter selections
Move cursor left and right
Used to store data and advance to next MMC
Used to clear previous entry
Used to select ALL
ACTION
1. Press TRSF 304
Display shows
2. Dial the station number (e.g., 205)
OR
Press UP or DOWN key to select station and press
RIGHT soft key
3. Dial the trunk ID number (e.g., 704)
OR
Press UP or DOWN key to select trunk and press
RIGHT soft key
4. Press UP or DOWN key to select YES/NO option
OR
Dial 1 for YES or 0 for NO and press RIGHT soft key to
move cursor to ANS option
Press UP or DOWN key to select YES/NO option
OR
Dial 1 for YES or 0 for NO and press RIGHT soft key to
return to step 2
5. Press TRSF to store and exit
OR
Press SPK to store and advance to next MMC
Technical Manuals Online! - http://www.tech-man.com
DISPLAY
[201] USE [701]
DIAL:YES ANS:YES
[205] USE [701]
DIAL:YES ANS:YES
[205] USE [704]
DIAL:YES ANS:YES
[205] USE [704]
DIAL:NO ANS:YES
[205] USE [704]
DIAL:NO ANS:NO
3-59
DEFAULT DATA
DIAL= Yes
ANS= Yes
RELATED ITEMS
MMC 316
MMC 406
MMC 722
MMC 723
Copy Station Usable
Trunk Ring Assignment
Station Key Programming
System Key Programming
Technical Manuals Online! - http://www.tech-man.com
3-60
Chapter 3
Programming Using MMCs
305
ASSIGN FORCED CODE
Allows the assignment of either account or authorisation codes on a per–station basis or on an all–station
basis.
PROGRAM KEYS
UP & DOWN
KEYPAD
SOFT KEYS
SPK
HOLD
ANS/RLS
Used to scroll through options
Used to enter selections
Move cursor left and right
Used to store data and advance to next MMC
Used to clear previous entry
Used to select ALL
FEATURE KEYS
0
1
2
NONE
AUTHORISE CODE
ACCOUNT CODE
ACTION
DISPLAY
1. Press TRSF 305
Display shows
[201] FORCD CODE
NONE
2. Dial station number ( e.g., 205)
OR
Press UP or DOWN key to select station and press
RIGHT soft key to move cursor
[205] FORCD CODE
NONE
3. Dial a feature option 0-2 (e.g., 2)
OR
Press UP or DOWN key to select option
and press RIGHT soft key to return step 2
[205] FORCD CODE
ACCOUNT CODE
4. Press TRSF to store and exit
OR
Press SPK to store and advance to next MMC
DEFAULT DATA
None
RELATED ITEMS
MMC 707
MMC 708
Authorisation Code
Account Code
Technical Manuals Online! - http://www.tech-man.com
3-61
306
HOT LINE
Allows a station to make an intercom call to a station or station group. Alternatively, it seizes a trunk to
allow a station the ability to make a predetermined outgoing call, upon the expiration of a timer (see MMC
501, System-Wide Timers, Off–Hook Selection Timer). A maximum of 18 digits may be dialled with pauses,
flash and OCC added in the dial string (the access code for the trunk is not counted).
PROGRAM KEYS
UP & DOWN
KEYPAD
SOFT KEYS
SPK
HOLD
ANS/RLS
Used to scroll through options
Used to enter selections
Move cursor left and right
Used to store data and advance to next MMC
Used to clear previous entry
Used to select ALL
ACTION
1. Press TRSF 306
Display shows
Press RIGHT soft key to advance cursor
2. Enter station number via dial keypad (e.g. 202)
OR
Press UP or DOWN to make selection and press
RIGHT soft key to return to step 1
3. Enter trunk ID (e.g. 701) followed by max 18 digits
4. Press TRSF to store and exit
OR
Press SPK to store and advance to next MMC
DEFAULT DATA
None
RELATED ITEMS
None
Technical Manuals Online! - http://www.tech-man.com
DISPLAY
[201] HOT LINE
NONE
[201] HOT LINE
202
[201] HOT LINE
701–1305P4264100
3-62
Chapter 3
Programming Using MMCs
ASSIGN BACKGROUND MUSIC SOURCE
308
Assigns a background music (BGM) source to keysets. There is a music source on the base board (switch
select internal/external). The default directory number of a background music source is 371.
PROGRAM KEYS
UP & DOWN
KEYPAD
SOFT KEYS
SPEAKER
HOLD
ANS/RLS
Used to scroll through options
Used to enter selections
Move cursor left and right
Used to store data and advance to next MMC
Used to clear previous entry
Used to select ALL
ACTION
DISPLAY
1. Press TRSF 308
Display shows current setting
[201] BGM SOURCE
BGM SOURCE:NONE
2. Dial keyset number (e.g., 205)
OR
Use UP or DOWN to scroll through keyset numbers
and press RIGHT soft key to move the cursor
OR
Press ANS/RLS to select all stations
3. Enter source number (e.g., 371)
OR
Press UP or DOWN key to make selection and press
RIGHT soft key to return to step 2
4. Press TRSF to store and exit
OR
Press SPK to store and advance to next MMC
DEFAULT DATA
None
RELATED ITEMS
MMC 309
MMC 408
Assign Station Music On Hold
Assign Trunk Music On Hold Source
Technical Manuals Online! - http://www.tech-man.com
[205] BGM SOURCE
BGM SOURCE:NONE
[ALL] BGM SOURCE
BGM SOURCE:?
[205] BGM SOURCE
BGM SOURCE:371
3-63
309
ASSIGN STATION MUSIC ON HOLD
Allows the system administrator to select which Music On Hold (MOH) source can be heard on each station.
There are four possible selections for each music source: TONE, NONE, INTERNAL and EXTERNAL
(customer–provided MOH source and switch select internal/external).
There is a music source on the base board (switch select internal/external). The default directory number of
a background music source is 371.
PROGRAM KEYS
UP & DOWN
KEYPAD
SOFT KEYS
SPK
HOLD
ANS/RLS
Used to scroll through options
Used to enter selections
Move cursor left and right
Used to store data and advance to next MMC
Used to clear previous entry
Used to select ALL
ACTION
DISPLAY
1. Press TRSF 309
Display shows current setting
[201] STN MOH
MOH SOURCE:NONE
2. Dial keyset number (e.g., 205)
OR
Use UP or DOWN to scroll through keyset numbers
and press RIGHT soft key to move the cursor
OR
Press ANS/RLS to select all stations
3. Enter source number (e.g., 371)
OR
Press UP or DOWN key to make selection and press
RIGHT soft key to return to step 2
4. Press TRSF to store and exit
OR
Press SPK to store and advance to next MMC
DEFAULT DATA
Tone
RELATED ITEMS
MMC 308
MMC 408
Assign Background Music Source
Assign Trunk Music On Hold Source
Technical Manuals Online! - http://www.tech-man.com
[205] STN MOH
MOH SOURCE:NONE
[ALL] STN MOH
MOH SOURCE:?
[205] STN MOH
MOH SOURCE:371
3-64
Chapter 3
Programming Using MMCs
310
LCR CLASS OF SERVICE
Assigns the LCR class of service allowed for a station on a per–station basis. There are eight classes which
may be assigned.
PROGRAM KEYS
UP & DOWN
KEYPAD
SOFT KEYS
SPK
HOLD
ANS/RLS
Used to scroll through options
Used to enter selections
Move cursor left and right
Used to store data and advance to next MMC
Used to clear previous entry
Used to select ALL
ACTION
1. Press TRSF 310
Display shows
2. Dial station number (e.g., 205)
OR
Press UP or DOWN to select station and press
RIGHT soft key to move cursor
OR
Press ANS/RLS to select All stations
3. Dial 1–8 to select class type (e.g., 3)
OR
Press UP or DOWN to select class type and press
RIGHT soft key to return to step 2
4. Press TRSF to store and exit
OR
Press SPK to store and advance to next MMC
DEFAULT DATA
Least Cost Routing COS 1
RELATED ITEMS
LCR programming
Technical Manuals Online! - http://www.tech-man.com
DISPLAY
[201] LCR CLASS
LCR CLASS 1
[205] LCR CLASS
LCR CLASS 1
[ALL] LCR CLASS
LCR CLASS ?
[205] LCR CLASS
LCR CLASS 3
3-65
312
ALLOW CLIP
Allows the system administrator or technician to either:
– allow or prevent receipt of CLIP data from the network
OR
– request or restrict sending of CLIP data to the network.
Each station can have the following options:
SEND:
YES
NO
RCV:
YES
NO
INFO:
request the network to send Caller ID when outgoing call is made.
request the network NOT to send Caller ID when outgoing call is
made.
allow display of CLIP data at LCD 24B and LCD 12B keysets.
prevent display of CLIP data at LCD 24B and LCD 12B keysets.
CLIP data to send to the network.
0. C.O Tel.
1. Ext Number
2. C.O Tel+Ext Number
3. DID Number
Technical Manuals Online! - http://www.tech-man.com
3-66
Chapter 3
Programming Using MMCs
ACTION
DISPLAY
1. Press TRSF 312
Display shows
[201] ALLOW CLIP
RCV:YES SND:YES
2. Dial station number (e.g., 205)
OR
Press UP or DOWN to select station and press right
soft key to move cursor
OR
Press ANS/RLS to select all
3. Dial 0 or 1 to select option
OR
Press UP or DOWN to select option and press right
soft key to move cursor to SND field
[205] ALLOW CLIP
RCV:YES SND:YES
OR
[ALL] ALLOW CLIP
RCV:YES SND:YES
[205] ALLOW CLIP
RCV:YES SND:YES
OR
[ALL] ALLOW CLIP
RCV:YES SND:YES
4. Dial 0 or 1 to select option for SND
OR
Press UP or DOWN to select option and press right
soft key to move cursor to INFO field
[205] ALLOW CLIP
RCV:YES SND:YES
OR
[ALL] ALLOW CLIP
RCV:YES
SND:YES
5. Dial 0 ~ 3 to select option
OR
Press UP or DOWN to select option and press right
soft key to move cursor to step 2
[205] ALLOW CLIP
INFO: C.O Tel.
OR
[ALL] ALLOW CLIP
INFO: C.O Tel.
6. Press TRSF to store and exit
OR
Press SPK to save and advance to next MMC
DEFAULT DATA
RCVYES
SNDYES
INFO C.O Tel.
RELATED ITEMS
MMC 119
Set CLIP Display
Technical Manuals Online! - http://www.tech-man.com
3-67
314
CONFIRM OUTGOING CALL
Allows outgoing call restriction, disconnect or confirm with tone.
PROGRAM KEYS
UP & DOWN
KEYPAD
SOFT KEYS
SPK
HOLD
ANS/RLS
Used to scroll through options
Used to enter selections
Move cursor left and right
Used to store data and advance to next MMC
Used to clear previous entry
Used to select ALL
FEATURE KEYS
0
1
2
NONE
CONFIRM TONE
DISCONNECT
ACTION
DISPLAY
1. Press TRSF 314
Display shows
2. Dial station number ( e.g., 205)
OR
Press UP or DOWN key to select station
and press RIGHT soft key to move cursor
3. Dial a feature option 0-2 (e.g., 1)
OR
Press UP or DOWN key to select option
and press RIGHT soft key to return step 2
4. Press TRSF to store and exit
OR
Press SPK to store and advance to next MMC
DEFAULT DATA
None
RELATED ITEMS
MMC 501
System-Wide Timers
Technical Manuals Online! - http://www.tech-man.com
[201]
NONE
CO CONFIRM
[205]
NONE
CO CONFIRM
[205] CO CONFIRM
CONFIRM TONE
3-68
Chapter 3
Programming Using MMCs
315
SET RELOCATION
Used when a station moves its phone to another location (different port). All the previous data are moved to
the new location automatically.
ACTION
1. Press TRSF 315
Display shows
2. Dial the original station number (e.g., 205)
OR
Press UP or DOWN key to select station
and press RIGHT soft key
3. Dial the new location's station number
(e.g., 210)
4. Press TRSF to store and exit
OR
Press SPK to store and advance to next MMC
DEFAULT DATA
None
RELATED ITEMS
None
Technical Manuals Online! - http://www.tech-man.com
DISPLAY
SET RELOCATION
EXT_
EXT
SET RELOCATION
EXT205 EXT
SET RELOCATION
EXT205 EXT210
3-69
316
COPY STATION USABLE
Copy the condition of station/trunk usability and station/station usability from one station to another station.
PROGRAM KEYS
UP & DOWN
KEYPAD
SOFT KEYS
SPK
HOLD
Used to scroll through options
Used to enter selections
Move cursor left and right
Used to store data and advance to next MMC
Used to clear previous entry
ACTION
DISPLAY
1. Press TRSF 316
Display shows
[201] CPY USABLE
FROM:NONE
2. Enter destination station number (e.g., 205)
OR
Press UP or DOWN key to make selection and
press RIGHT soft key to move cursor
3. Enter the source station number (e.g., 210)
OR
Press UP or DOWN key to make selection and
press RIGHT soft key to move cursor
4. Press TRSF to store and exit
OR
Press SPK to store and advance to next MMC
DEFAULT DATA
None
RELATED ITEMS
MMC 304
MMC 317
Assign Station/Trunk Use
Assign Station/Station Use
Technical Manuals Online! - http://www.tech-man.com
[205] CPY USABLE
FROM:NONE
[205] CPY USABLE
FROM:210
3-70
Chapter 3
Programming Using MMCs
317
ASSIGN STATION/STATION USE
Used to control whether a station can dial, and/or answer calls for, specific stations.
PROGRAM KEYS
UP & DOWN
KEYPAD
SOFT KEYS
SPK
HOLD
ANS/RLS
Used to scroll through options
Used to enter selections
Move cursor left and right
Used to store data and advance to next MMC
Used to clear previous entry
Used to select ALL
ACTION
DISPLAY
1. Press TRSF 317
Display shows
2. Dial the station number (e.g., 205)
OR
Press UP or DOWN key to select station and press
RIGHT soft key
OR
Press ANS/RLS to select all stations
3. Dial the station number (e.g., 204)
OR
Press UP or DOWN key to select station and press
RIGHT soft key
4. Dial 1 for YES or 0 for NO for DIAL
OR
Press UP or DOWN key to select YES/NO and press
RIGHT soft key to move cursor
5. Dial 1 for YES or 0 for NO for ANS
OR
Press UP or DOWN key to select YES/NO and press
RIGHT soft key to return to step 2
6. Press TRSF to store and exit
OR
Press SPK to store and advance to next MMC
DEFAULT DATA
DIAL=Yes
ANS=Yes
RELATED ITEMS
MMC 314
Copy Station Usable
Technical Manuals Online! - http://www.tech-man.com
[201] USE
DIAL:YES
[202]
[205] USE
DIAL:YES
[201]
[205] USE
DIAL:YES
[204]
[205] USE [204]
DIAL:NO ANS:YES
[205] USE [204]
DIAL:NO ANS:NO
3-71
318
DISTINCTIVE RING
Sets a distinctive ring for stations. You can set both tone (T) and cadence (C) to one of eight ring values
(1–8), or to follow the station ring (F–STN).
PROGRAM KEYS
UP & DOWN
KEYPAD
SOFT KEYS
SPK
Used to scroll through options
Used to enter selections
Move cursor left and right
Used to store data and advance to next MMC
ACTION
1. Press TRSF 318
Display shows
2. Dial station number (e.g., 205)
OR
Press UP or DOWN to select station and
press right soft key to move cursor
3. Press UP or DOWN to select T value (e.g., 1) and
press right soft key to move cursor to C field
DISPLAY
[201] DIST.RING
T:F–STN C:F–STN
[205] DIST.RING
T:F–STN C:F–STN
[205]
T:1
DIST.RING
C:F–STN
[205]
T:1
DIST.RING
C:2
4. Press UP or DOWN to select C value(e.g. 2)
5. Press TRSF to store and exit
OR
Press SPK to save and advance to next MMC
DEFAULT DATA
T: F–STN
C: F–STN
RELATED ITEMS
None
Technical Manuals Online! - http://www.tech-man.com
3-72
Chapter 3
Programming Using MMCs
319
BRANCH GROUP
Allows the assignment of stations into branch groups. There is a maximum of eight branch groups. When
CO ring is ringing at station, any station assigned the same branch group can answer the incoming call by
going off hook.
PROGRAM KEYS
UP & DOWN
KEYPAD
SOFT KEYS
SPK
HOLD
ANS/RLS
Used to scroll through options
Used to enter selections
Move cursor left and right
Used to store data and advance to next MMC
Used to clear previous entry
Used to select ALL
ACTION
1. Press TRSF 319
Display shows
2. Dial station number (e.g., 205)
OR
Press UP or DOWN to select station
and press right soft key to move cursor
OR
Press ANS/RLS to select all
3. Dial 0 or 1 to select option
OR
Press UP or DOWN to select group
and press right soft key to save
4. Press TRSF to store and exit
OR
Press SPK to save and advance to next MMC
DEFAULT DATA
None
RELATED ITEMS
None
Technical Manuals Online! - http://www.tech-man.com
DISPLAY
[21] BRANCH GRP
BRANCH GRP : NONE
[24] BRANCH GRP
BRANCH GRP : NONE
OR
[ALL] BRANCH GRP
BRANCH GRP : ??
[24] BRANCH GRP
BRANCH GRP : 04
OR
[ALL] BRANCH GRP
BRANCH GRP : 08
3-73
400
CUSTOMER ON/OFF PER TRUNK
Assigns several options (listed below) on a per–trunk basis.
NOTE
1A2 Emulation means that a third party can be joined on an existing trunk conversation by
pressing the DTS key for the line on their keyset.
OPTIONS
0
1
2
3
1A2 EMULATION
TRK INC DND
TRK FORWARD
LCR ALLOW
Trunk override call (NO PRIVACY)
Allows trunk to override DND (DIL)
Allows trunk to be forwarded
Allows trunk to enable LCR feature
PROGRAM KEYS
UP & DOWN
KEYPAD
SOFT KEYS
SPK
HOLD
ANS/RLS
Used to scroll through options
Used to enter selections
Move cursor left and right
Used to store data and advance to next MMC
Used to clear previous entry
Used to select ALL
ACTION
1. Press TRSF 400
Display show
2. Dial trunk number (e.g., 704)
OR
Press UP or DOWN key to select trunk
OR
Press ANS/RLS for all trunks and press
RIGHT soft key to move cursor to options
3. Dial option number from above list (0–3) (e.g., 2)
OR
Press UP or DOWN key to select option and press
RIGHT soft key to move cursor
4. Dial 1 for ON or 0 for OFF
OR
Press UP or DOWN key to select ON/OFF and press
RIGHT soft key to return to step 2
5. Press TRSF to store and exit
OR
Press SPK to store and advance to next MMC
Technical Manuals Online! - http://www.tech-man.com
DISPLAY
[701] TRK ON/OFF
1A2 EMULATE:OFF
[704] TRK ON/OFF
1A2 EMULATE:OFF
[ALL] TRK ON/OFF
1A2 EMULATE :?
[704] TRK ON/OFF
TRK FORWARD :ON
[704] TRK ON/OFF
TRK FORWARD: OFF
3-74
Chapter 3
Programming Using MMCs
DEFAULT DATA
1A2 EMULATE
TRUNK INC DND
TRUNK FORWARD
LCR ALLOW
Off
Off
On
Off
RELATED ITEMS
None
Technical Manuals Online! - http://www.tech-man.com
3-75
401
C.O./PBX LINE
Used to select the mode of the C.O. line. If the PBX mode is chosen, this allows PBX access codes to be
recognised, thus allowing more complete toll restriction (call barring). This mode is assigned on a per–trunk
basis. If a trunk requires the use of the RECALL key, it must be set to PBX mode.
PROGRAM KEYS
UP & DOWN
KEYPAD
SOFT KEYS
SPK
HOLD
ANS/RLS
Used to scroll through options
Used to enter selections
Move cursor left and right
Used to store data and advance to next MMC
Used to clear previous entry
Used to select ALL
ACTION
1. Press TRSF 401
Display shows
2. Dial trunk number (e.g., 704)
OR
Use UP or DOWN to scroll through trunk numbers
and press RIGHT soft key to move cursor
OR
Press ANS/RLS to select ALL
3. Dial 1 for PBX or 0 for C.O.
OR
Use UP or DOWN to scroll through options
Press RIGHT soft key to return to step 2
4. Press TRSF to store and exit
OR
Press SPK to store and advance to next MMC
DEFAULT DATA
All Trunks C.O. Line
RELATED ITEMS
None
Technical Manuals Online! - http://www.tech-man.com
DISPLAY
[701] PBX LINE
CO LINE
[704] PBX LINE
CO LINE
[ALL]
?
PBX LINE
[704] PBX LINE
PBX LINE
3-76
Chapter 3
Programming Using MMCs
402
TRUNK DIAL TYPE
Used to determine the dialling type of each C.O. line. There are two options: pulse (rotary dial) , dual tone
multi-frequency (DTMF).
PROGRAM KEYS
UP & DOWN
KEYPAD
SOFT KEYS
SPK
HOLD
ANS/RLS
Used to scroll through options
Used to enter selections
Move cursor left and right
Used to store data and advance to next MMC
Used to clear previous entry
Used to select ALL
ACTION
DISPLAY
1. Press TRSF 402
Display shows
[701] DIAL TYPE
DTMF TYPE
2. Dial trunk number (e.g., 704)
OR
Use UP or DOWN to scroll through trunk numbers
and press RIGHT soft key to move the cursor
OR
Press ANS/RLS to select ALL
3. Dial 1 for PULSE , 0 for DTMF
OR
Use UP or DOWN to scroll through options
Press RIGHT soft keys to return to step 2
4. Press TRSF to store and exit
OR
Press SPK to store and advance to next MMC
DEFAULT DATA
All trunks DTMF
RELATED ITEMS
MMC 501
MMC 503
System-Wide Timers
Trunk–Wide Timers
Technical Manuals Online! - http://www.tech-man.com
[704] DIAL TYPE
DTMF TYPE
[ALL]
?
DIAL TYPE
[704] DIAL TYPE
DIAL PULSE TYPE
3-77
403
TRUNK TOLL CLASS
Assigns toll class level assignments on a per–trunk or all–trunk basis in a day or night condition. The
options for toll level will follow either the station class or the class of service defined in MMCs 702, Toll
Deny Table, and 703, Toll Allowance Table. The toll classes that are available are listed below with their
entry numbers.
ENTRY NUMBER
0
1
2
3
4
5
6
7
8
CLASS TYPE
DESCRIPTION
F–STN
CLS–A
CLS–B
CLS–C
CLS–D
CLS–E
CLS–F
CLS–G
CLS–H
Follow station toll restriction
Follow toll class A (Unrestricted)
Follow toll class B
Follow toll class C
Follow toll class D
Follow toll class E
Follow toll class F
Follow toll class G
Follow toll class H (All restricted)
PROGRAM KEYS
UP & DOWN
KEYPAD
SOFT KEYS
SPK
HOLD
ANS/RLS
Used to scroll through options
Used to enter selections
Move cursor left and right
Used to store data and advance to next MMC
Used to clear previous entry
Used to select ALL
Technical Manuals Online! - http://www.tech-man.com
3-78
Chapter 3
Programming Using MMCs
ACTION
DISPLAY
1. Press TRSF 403
Display shows
[701] TOLL CLASS
D:F–STN N:F–STN
2. Dial trunk number (e.g., 704)
OR
Use UP or DOWN to scroll through trunk numbers
and press RIGHT soft key to move the cursor
OR
Press ANS/RLS to select ALL
3. Enter day toll class (e.g., 2 for CLS–B)
OR
Press UP or DOWN to scroll through toll classes
and press RIGHT soft key to move the cursor
4. Enter night toll class (e.g., 2)
OR
Press UP or DOWN to scroll through toll classes
and press RIGHT soft key to return to step 2
5. Press TRSF to store data and exit
OR
Press SPK to store data and advance to next MMC
DEFAULT DATA
All trunks F–STN day/night
RELATED ITEMS
MMC 301
MMC 507
MMC 701
Toll Restriction
Assign Station COS
Assign Auto Night Time
Assign COS Contents
Technical Manuals Online! - http://www.tech-man.com
[704] TOLL CLASS
D:F–STN N:F–STN
[ALL] TOLL CLASS
D:?
N:?
[704] TOLL CLASS
D:CLS–B N:F–STN
[704] TOLL CLASS
D:CLS–B N:CLS–B
3-79
404
TRUNK NAME
Allows a name (up to 11 characters) to be entered to identify an individual trunk. Names are written using
the keypad. Each press of a key selects a character. Press the desired key to move the cursor to the next
position. For example, if the directory name is “SAM SMITH,” press the number “7” four times to get the
letter “S.” Now press the number “2” once to get the letter “A.” Continue selecting characters from the
table below to complete your message. Pressing the “A” key changes the letter from upper case to lower
case.
NOTE
When the character you want appears on the same dial pad key as the previous character,
press the UP key to move the cursor to the right or the DOWN key to move the cursor left. A
space can be entered by using these keys.
COUNT
DIAL0
DIAL1
DIAL2
DIAL3
DIAL4
DIAL5
DIAL6
DIAL7
DIAL8
DIAL9
DIAL
1
<
space
A
D
G
J
M
P
T
W
:
2
>
?
B
E
H
K
N
Q
U
X
=
3
.
,
C
F
I
L
O
R
V
Y
[
4
)
!
@
#
$
%
^
S
*
Z
]
5
0
1
2
3
4
5
6
7
8
9
The # key can be used for special characters: #, space, &, !, :, ?, ., %, $, –, <, >, /, =, [, ], @, ^, (, ), _, +,
{, }, |, ;, \, " and ~.
PROGRAM KEYS
UP & DOWN
KEYPAD
SOFT KEYS
SPK
HOLD
A
Used to scroll through options/move cursor left or right
Used to enter selections
Move cursor left and right
Used to store data and advance to next MMC
Used to clear previous entry
Key 19; acts as toggle between upper case and lower case
Technical Manuals Online! - http://www.tech-man.com
3-80
Chapter 3
Programming Using MMCs
ACTION
DISPLAY
[701] TRUNK NAME
1. Press TRSF 404
Display shows
2. Dial trunk (e.g., 704)
OR
Press UP or DOWN to select trunk and press
RIGHT soft key to move the cursor
3. Enter trunk name using the procedure
described above
Press RIGHT soft key to return to step 2
4. Press TRSF to store and exit
OR
Press SPK to store and advance to next MMC
DEFAULT DATA
No names entered
RELATED ITEMS
MMC 104
MMC 405
"A" key is button #19
Station Name
Trunk Number
Technical Manuals Online! - http://www.tech-man.com
[704] TRUNK NAME
[704] TRUNK NAME
TELECOMS
3-81
405
TRUNK NUMBER
Allows an 11–digit number to be entered to identify an individual trunk.
Numbers are written using the keypad. Each press of a key selects a digit. Pressing the desired key moves
the cursor to the next position. For example, if the directory number is “426–4100,” press the number “4”
five times to get the number “4.” Now press the number “2” five times for number “2.” Continue selecting
characters from the table below to complete your number.
NOTE
When the number you want appears on the same dial pad key as the previous number, press
the UP key to move the cursor to the right or the DOWN key to move the cursor left. A space
can be entered by using these keys.
COUNT
DIAL0
DIAL1
DIAL2
DIAL3
DIAL4
DIAL5
DIAL6
DIAL7
DIAL8
DIAL9
DIAL*
1
0
1
2
3
4
5
6
7
8
9
2
Q
Space
A
D
G
J
M
P
T
W
:
3
Z
?
B
E
H
K
N
Q
U
X
=
4
.
,
C
F
I
L
O
R
V
Y
[
5
)
!
@
#
$
%
^
S
Z
]
THIS TABLE NEEDS TO BE CHECKED CAREFULLY
The # key can be used for special characters: #, space, &, !, :, ?, ., %, $, –, <, >, /, =, [, ], @, ^, (, ), _, +,
{, }, |, ;, \, " and ~.
PROGRAM KEYS
UP & DOWN
KEYPAD
SOFT KEYS
SPK
HOLD
A
Used to scroll through options/move cursor left or right
Used to enter selections
Move cursor left and right
Used to store data and advance to next MMC
Used to clear previous entry
Key 19, acts as toggle between upper case and lower case
Technical Manuals Online! - http://www.tech-man.com
3-82
Chapter 3
Programming Using MMCs
ACTION
DISPLAY
1. Press TRSF 405
Display shows
[701] CO TEL NO.
2. Dial trunk (e.g., 704)
OR
Press UP or DOWN to select trunk and
press RIGHT soft key to move the cursor
3. Enter trunk number using the procedure
described above
4. Press RIGHT soft key to return to step 2
OR
Press TRSF to store and exit
OR
Press SPK to store and advance to next MMC
DEFAULT DATA
No numbers entered
RELATED ITEMS
MMC 404
Trunk Name
Technical Manuals Online! - http://www.tech-man.com
[704] CO TEL NO.
[704] CO TEL NO.
3054264100
3-83
406
TRUNK RING ASSIGNMENT
Enables ringing to a specific station or a group of stations or an auto attendant when incoming calls are
received. This MMC controls both day and night locations.
DEVICE
Station
Station group
AA
DEFAULT DN
201–216
500–509
38x
PROGRAM KEYS
UP & DOWNUsed to scroll through options
KEYPADUsed to enter selections
SOFT KEYSMove cursor left and right
SPKUsed to store data and advance to next MMC
HOLDUsed to clear previous entry
ANS/RLSUsed to select ALL (trunks only)
ACTION
1. Press TRSF 406
Display shows
2. Dial trunk number (e.g., 704)
OR
Use UP or DOWN to scroll through trunk numbers
and press the RIGHT soft key to move the cursor
3. Dial station number or station group number
for day (e.g., 205)
OR
Press UP or DOWN key to select station number
or station group number and press RIGHT
soft key to move cursor
4. Dial station number or station group number
for night (e.g., 501)
OR
Press UP or DOWN key to select station number
or station group number and press RIGHT
soft key to move cursor
5. Press TRSF to store and exit
OR
Press SPK to store and advance to next MMC
Technical Manuals Online! - http://www.tech-man.com
DISPLAY
[701]
D:500
TRK RING
N:500
[704]
D:500
TRK RING
N:500
[704]
D:205
TRK RING
N:500
[704]
D:205
TRK RING
N:501
3-84
Chapter 3
Programming Using MMCs
DEFAULT DATA
All trunks day:500, night:500
RELATED ITEMS
MMC 202
MMC 507
MMC 601
Change Feature Passcode
Assign Auto Night Time
Assign Station Group
Technical Manuals Online! - http://www.tech-man.com
3-85
407
FORCED TRUNK RELEASE
Provides a positive forced trunk release to a specific trunk or all trunks in the event of a trunk lock–up.
PROGRAM KEYS
UP & DOWN
KEYPAD
SOFT KEYS
SPK
HOLD
ANS/RLS
Used to scroll through options
Used to enter selections
Move cursor left and right
Used to store data and advance to next MMC
Used to clear previous entry
Used to select ALL
ACTION
DISPLAY
1. Press TRSF 407
Display shows
[701] TRK RELS
RELEASE?_Y:1,N:0.
2. Dial in trunk number ( e.g., 704)
OR
Press UP or DOWN key selected trunk
and press right soft key
OR
Press ANS/RLS to select all trunks
3. Dial 1 for YES
OR
Dial 0 for NO
(Pressing 1 or 0 will return to step 2)
4. Press TRSF to store and exit
OR
Press SPK to store and advance to next MMC
DEFAULT DATA
None
RELATED ITEMS
MMC 603
Assign Trunk Group
Technical Manuals Online! - http://www.tech-man.com
[704] TRK RELS.
RELEASE?_Y:1,N:0
[ALL] TRK RELS.
RELEASE?_Y:1,N:0
[704] TRK RELS.
RELEASE?1Y:1,N:0
3-86
Chapter 3
Programming Using MMCs
408
ASSIGN TRUNK MUSIC ON HOLD SOURCE
Allows the system administrator to select which Music On Hold (MOH) source can be heard on each trunk.
There are four possible selections for each music source: TONE, NONE, INTERNAL and EXTERNAL
(customer–provided MOH source).
Assigns a background music (BGM) source to keysets. There is a music source on the base board (switch
select internal/external). The default directory number of a background music source is 371.
OPTIONS
TONE
NONE
371
PROGRAM KEYS
UP & DOWN
KEYPAD
SOFT KEYS
SPK
HOLD
ANS/RLS
Used to scroll through options
Used to enter selections
Move cursor left and right
Used to store data and advance to next MMC
Used to clear previous entry
Used to select ALL
ACTION
DISPLAY
1. Press TRSF 408
Display shows current setting
[701 ] TRK MOH
MOH SOURCE:TONE
2. Dial trunk number (e.g., 704)
OR
Use UP or DOWN to scroll through trunk
numbers and press RIGHT soft key to move cursor
OR
Press ANS/RLS to select ALL
3. Enter source number (e.g., 371)
OR
Press UP or DOWN key to select option
Press RIGHT soft key to return to step 2
4. Press TRSF to store and exit
OR
Press SPK to store and advance to next MMC
DEFAULT DATA
Tone
RELATED ITEMS
MMC 308
Assign Background Music Source
Technical Manuals Online! - http://www.tech-man.com
[704 ] TRK MOH
MOH SOURCE:TONE
[ALL] TRK MOH
MOH SOURCE:?
[705 ] TRK MOH
MOH SOURCE:371
3-87
409
TRUNK STATUS READ
This is a read–only MMC. Allows the status of trunks to be read in a format that will enable the servicing
personnel to quickly identify the ownership and position of a trunk.
OPTION TABLE
00
PORT NO (e.g. EXP_01)
01
TYPE: LOOP, BRI, …
02
1A2 Emulation On/Off
03
TRK Forward On/Off
04
LINE Type: CO/PBX
05
DIALType: DTMF/Dial Pulse
06
DAY Toll Restriction
07
NIGHT Toll Restriction
08
DAY Ring Destination
09
NIGHT Ring Destination
10
MOH Source
11
DISA Status
PROGRAM KEYS
UP & DOWN
KEYPAD
SOFT KEYS
SPK
HOLD
Used to scroll through options
Used to enter selections
Move cursor left and right
Used to store data and advance to next MMC
Used to clear previous entry
ACTION
1. Press TRSF 409
Display shows
2. Enter trunk number via dial keypad (e.g., 704)
OR
Press UP or DOWN key to make selection
and press RIGHT soft key to advance cursor
3. Enter in desired option 00–11 (e.g. 01)
OR
Press UP or DOWN key to make selection
4. Press TRSF to store and exit
OR
Press SPK to store and advance to next MMC
Technical Manuals Online! - http://www.tech-man.com
DISPLAY
[701] TRK STATUS
PORT NO:EXP–01
[704] TRK STATUS
PORT NO:EXP–04
[704] TRK STATUS
TYPE:LOOP TRUNK
3-88
Chapter 3
Programming Using MMCs
DEFAULT DATA
See above
RELATED ITEMS
MMC 400
MMC 401
MMC 402
MMC 403
MMC 404
MMC 406
MMC 408
MMC 410
Customer On/Off Per Trunk
C.O./PBX Line
Trunk Dial Type
Trunk Toll Class
Trunk Name
Trunk Ring Assignment
Assign Trunk Music On Hold Source
Assign DISA Trunk
Technical Manuals Online! - http://www.tech-man.com
3-89
410
ASSIGN DISA TRUNK
Allows the system the ability to have Direct Inward System Access (DISA). Because there is a possibility
that unauthorised calls will be made via this feature, several safeguards have been added. The end user
must be informed of these to prevent unnecessary service calls. DISA can lock out when a predetermined
number of invalid consecutive calls are attempted. Callers will then receive error tone until the
programmable timer has expired. The ✻ key may be used to initiate new dial tone while in a station–to–
station call. The # key may be used to terminate the DISA call and disconnect the central office line. Only
one central office call will be allowed per DISA call but multiple intercom calls are possible. A central office
call requires a passcode, but a station call does not.
NOTE
In order to use DISA the caller must first dial a valid trunk number, followed by a four-digit
passcode. This passcode is defined in MMC 101. DISA users MUST change this passcode as
the default number cannot be used.
PROGRAM KEYS
UP & DOWN
KEYPAD
SOFT KEYS
SPK
HOLD
ANS/RLS
Used to scroll through options
Used to enter selections
Move cursor left and right
Used to store data and advance to next MMC
Used to clear previous entry
Used to select ALL (trunks)
FEATURE KEYS
0
1
2
3
NORMAL
DAY
NIGHT
BOTH
No DISA service
In day mode DISA is available
In night mode DISA is available
In both day and night mode DISA is available
Technical Manuals Online! - http://www.tech-man.com
3-90
Chapter 3
Programming Using MMCs
ACTION
DISPLAY
1. Press TRSF 410
Display shows
[701] DISA LINE
NORMAL
2. Dial trunk number ( e.g., 704)
OR
Press UP or DOWN key to select trunk and
press RIGHT soft key
OR
Press ANS/RLS key to select all trunks
3. Dial an option (0–3) from above table (e.g., 2)
OR
Press UP or DOWN key to select trunk and
press RIGHT soft key to return to step 2
4. Press TRSF to store and exit
OR
Press SPK to store and advance to next MMC
DEFAULT DATA
All trunks normal
RELATED ITEMS
MMC 500
MMC 101
System–Wide Counters
Change User Passcode
Technical Manuals Online! - http://www.tech-man.com
[704] DISA LINE
NORMAL
[ALL]
?
DISA LINE
[704]
NIGHT
DISA LINE
3-91
414
MPD/PRS SIGNAL
Used on a per-trunk basis to define if a C.O. line is to be either a Metering Pulse (MPD) or a Polarity
Reversal Signal (PRS) trunk.
A Meter Pulse Trunk will detect a C.O.-provided meter pulse. A Polarity Reversal trunk will detect the line
reversal signal which may be provided by the C.O. when the other party answers the outgoing call or the
outside party clears the call. If the trunk is designated as PRS detection, the call duration timer will be
started and the results printed on the SMDR record. PRS detection is also essential for dropping a trunk-totrunk conversation which is unsupervised by an internal party.
There are three types of PRS mode: PRS1, PRS2 and PRS3.
0.
PRS1:
1.
PRS2:
2.
PRS3:
When first PRS is detected, call duration timer is started.
When second PRS is detected, call duration timer is stopped
The call is not released until hanging on.
When first PRS is detected, call duration timer is started.
When second PRS is detected, call duration timer is stopped
and call is released. (ROA type in Australia)
The call duration timer starts base on the timer.
When first PRS is detected, call duration timer is stopped
and call is released. (ROI type in Australia)
ACTION
DISPLAY
1. Press TRSF 414
Display shows
[701] TRK PRS
MPD
2. Enter desired trunk number (e.g., 705)
OR
Press UP or DOWN key to select trunk and
use LEFT or RIGHT soft key to move cursor
3. Dial 0 for PRS1, 1 for PRS2, 2 for PRS3,
3 for MPD or 4 for NONE
OR
Press UP or DOWN key to scroll through options
and use LEFT or RIGHT soft key to return to step 2
4. Press TRSF to store and exit
OR
Press SPK to store and advance to next MMC
DEFAULT DATA
None
RELATED ITEMS
MMC 508
Call Cost
Technical Manuals Online! - http://www.tech-man.com
[705] TRK PRS
MPD
[705] TRK PRS
PRS1
3-92
Chapter 3
Programming Using MMCs
415
REPORT TRUNK ABANDON DATA
Allows the system administrator or technician to enable or disable the reporting of abandoned C.O. calls for
which CLIP information has been collected on a per–trunk basis. There are two options for this MMC:
0 REPORT : NO
Abandoned call records for incoming calls with CLIP information will not be printed on
SMDR or stored in the system call abandon list.
These records will continue to be stored in the station review list.
1 REPORT : YES
Abandoned call records for incoming calls with CLIP information will be printed on
SMDR or stored in the system call abandon list. These records will also to be stored in
the station review list.
NOTE
In order for these abandoned call records to print on SMDR, in MMC 725, SMDR Options,
Option 11 – Abandon Call – must be set to YES.
ACTION
DISPLAY
1. Press TRSF 415
Display shows
[701] TRK ABNDN
REPORT : YES
2. Dial trunk number (e.g. 705)
OR
Press UP or DOWN to select trunk and use
LEFT or RIGHT soft key to move cursor
3. Dial 1 for YES or 0 for NO
OR
Press UP or DOWN to scroll through options and
use LEFT or RIGHT soft key to return to step 2
4. Press TRSF to store and exit
OR
Press SPK to store and advance to next MMC
DEFAULT DATA
All trunks will report data
RELATED ITEMS
MMC 119
MMC 312
MMC 608
MMC 725
MMC 728
Set CLIP Display
Allow CLIP
Assign CLIP Review Block
SMDR Options
CLIP Translation Table
Technical Manuals Online! - http://www.tech-man.com
[705] TRK ABNDN
REPORT : YES
[705] TRK ABNDN
REPORT : NO
3-93
418
CARD RESTART
Enables any changes you make in MMC 419 (BRI Option) or MMC 423 (S/T Mode) and applies them, as
appropriate, to BRI card that you restart.
PROGRAM KEYS
UP & DOWN
KEYPAD
SOFT KEYS
SPK
HOLD
Used to scroll through options
Used to enter selections
Move cursor left and right
Used to store data and advance to next MMC
Used to clear previous entry
ACTION
DISPLAY
1. Press TRSF 418
Display shows
[701] RESTART
CARD RESTART ? NO
2. Enter first trunk number in ISDN card (e.g., 701)
OR
Press UP or DOWN to select and press RIGHT soft key
[701] RESTART
CARD RESTART ? NO
3. Enter 1 for Yes or 0 for No
OR
Press UP or DOWN to select and press RIGHT
soft key (If you select No, system returns to step 2)
[701] RESTART
CARD RESTART ? NO
4. You are asked for confirmation:
Enter 1 for Yes or 0 for No
OR
Press UP or DOWN to select and press RIGHT
soft key (If you select Yes, the ISDN card is restarted)
5. Press TRSF to store and exit
OR
Press SPK to store and advance to next MMC
DEFAULT DATA
None
RELATED ITEMS
MMC 419
MMC 423
BRI Option
S/T Mode
Technical Manuals Online! - http://www.tech-man.com
[701] RESTART
ARE YOU SURE ? NO
3-94
Chapter 3
Programming Using MMCs
419
BRI OPTION
This MMC comprises two groups of items. One group is for the "TRUNK" ports as set in MMC 423, and the
other is for the "STATION" ports.
NOTE
For each BRI access, two adjacent ports are assigned. You need only change the value for one
of the two ports; the value for the other port will be changed automatically.
Ports programmed as "TRUNK" in MMC 423
Display shows "BRI–TRK". Items are BRI MODE, CHANNEL ANY and DLSEND
BRI MODE
P–P NOR:
When BRI line is point–to–point configuration and is not a DDI line. Incoming calls are
placed as set in MMC 406 (Trunk Ring Assignment).
P–P DDI:
When BRI line is point–to–point configuration and is a DDI line. Incoming calls are
placed as set in MMC 714 (DDI Number & Name Translation). All incoming calls
through the DDI trunk will be placed according to the setting of the DDI table.
P–M NOR:
When BRI line is point–to–multipoint configuration and is not an MSN line. Incoming
calls are placed as set in MMC 406 (Trunk Ring Assignment)
P–M MSN:
When BRI line is point–to–multipoint configuration and is an MSN line. CS-816
system can manage up to eight MSN numbers for each MSN BRI access. Incoming
calls through P–MP MSN ports are handled as set in MMC 421(MSN Digit). This table
is effective only for one BRI access
CHANNEL ANY
This field can be set to YES or NO and is referenced when a user attempts an outgoing call while that
port is busy.
If CHANNEL ANY is NO, user hears busy tone.
If CHANNEL ANY is YES, the system checks if adjacent port (another B channel in the same BRI
access) is free. If it is free, the user can call through that port. Otherwise, the user hears busy tone.
DLSEND
This field is provided to set the dial sending mode to "enblock" or "overlap" on an individual port basis.
NOTE
Any change to BRI MODE option is effective only after restart of the BRI card. Use MMC 418
to restart the card.
Ports programmed as "STATION" in MMC 423
Display shows "BRI–STN". Item is CHANNEL ANY.
CHANNEL ANY
See above.
Technical Manuals Online! - http://www.tech-man.com
3-95
PROGRAM KEYS
UP & DOWN
KEYPAD
SOFT KEYS
SPK
HOLD
Used to scroll through options
Used to enter selections
Move cursor left and right
Used to store data and advance to next MMC
Used to clear previous entry
ACTION
1.
Press TRSF 419
Display shows
2.
Dial BRI trunk number (e.g. 703)
OR
Press UP or DOWN key to select the port
3.a For TRUNK ports, display is as shown opposite
(for STATION ports see 3.b)
Use the RIGHT soft key to position the cursor under
CHANNEL ANY
3.a.1 Press UP or DOWN key to choose item
(CHANNEL ANY, BRI MODE or DLSEND)
If you choose BRI MODE, press RIGHT soft
key to move the cursor under YES/NO
Use UP or DOWN key to select P–P
NOR/P–P DDI/P–M NOR/P–M MSN
If you press RIGHT soft key, cursor moves under 703
If you press LEFT soft key, cursor moves
under BRI MODE
3.a.2 For other items, repeat step 3.a.1
DISPLAY
[701] BRI–TRK
CHANNEL ANY : YES
[703] BRI–TRK
CHANNEL ANY : YES
[703] BRI–TRK
BRI MODE:P–P NOR
[703] BRI–TRK
BRI MODE : MSN
3.a.3 For another port, repeat from step 2
When finished, go to step 4
3.b For STATION ports, display is as shown opposite
3.b.1Press UP or DOWN key to choose item
(CHANNEL ANY)
Press RIGHT soft key to select YES or NO
3.b.2 For other items, repeat step 3.b.1
3.b.3 For another port, repeat from step 2
Technical Manuals Online! - http://www.tech-man.com
[705] BRI–STN
CHANNEL ANY : YES
3-96
Chapter 3
Programming Using MMCs
4.
Press TRSF to store and exit
OR
Press SPK to store and advance to next MMC
DEFAULT DATA: CHANNEL ANY
YES
BRI MODE:P–P NOR
DLSEND:OVERLAP
RELATED ITEMS
MMC 418
MMC 421
MMC 423
MMC 714
Card Restart
MSN Digit
S/T Mode
DDI Number & Name Translation
Technical Manuals Online! - http://www.tech-man.com
3-97
421
MSN DIGIT
Provides a method of assigning an incoming MSN call to a specific station. If any entry in MSN DIGIT
TABLE matches an incoming call's called party number, either the specific station is alerted, if it is
programmed to accept the call, or the call is cleared if it is programmed to reject the call.
If the incoming called party number does not have a matching entry in the MSN table, the operator is
alerted.
You can give each MSN number to a specific station and you can select call waiting option: when a
destination is busy, the incoming call must be cleared or camped–on to the station (which is alerted to the
call).
There is a total of eight entries on a trunk basis and each entry consists of the following fields:
0
DIGITS
Digits to be received. Wild card (✱) is a valid entry and there is a maximum of
10 digits.
1
DAY DEST
Destination in day mode – could be a station or a station group. Repeat (B) will
be acceptable to the system if received digit is within numbering plan for a
station or station group.
2
NIGHT DEST Destination in night mode – could be a station or a station group. Repeat (B)
will be acceptable to the system if received digit is within numbering plan for a
station or station group.
3
CALL WAIT
Toggles YES or NO: if YES then the call will be camped–on at busy destination
while NO gives busy indication.
4
OPTION
Accept: the selected destination party will be alerted. Reject: the call is cleared.
NOTE
For each BRI access, two adjacent ports are assigned. You need only change the value for
one of the two ports; the value for the other port will be changed automatically.
PROGRAM KEYS
UP & DOWN
KEYPAD
SOFT KEYS
SPK
HOLD
Used to scroll through options
Used to enter selections
Move cursor left and right
Used to store data and advance to next MMC
Used to clear previous entry
Technical Manuals Online! - http://www.tech-man.com
3-98
Chapter 3
Programming Using MMCs
ACTION
1. Press TRSF 421
Display shows
2. Enter trunk number (e.g., 704)
OR
Press UP or DOWN key to scroll through ISDN
PORT and press RIGHT soft key to move cursor
3. Enter the location 1–8 (e.g. 4)
OR
Press UP or DOWN to select location and press
RIGHT soft key to move cursor
4. Enter digits to be translated (e.g., 4603881)
via dial keypad and press RIGHT soft key
to move to the destination selection
(Max. digits is 10)
5. Enter day destination via dial keypad (e.g., 204)
OR
Press UP or DOWN key to make selection and
press RIGHT soft key
6. Enter night destination via dial keypad (e.g., 202)
OR
Press UP or DOWN key to make selection and
press RIGHT soft key
7. Enter 1 for Yes or 0 for No
OR
Press UP or DOWN key to make selection and
press RIGHT soft key
8. Enter 1 for ACCEPT or 0 for REJECT
OR
Press UP or DOWN key to make selection and
press RIGHT soft key
9. Press TRSF to store and exit
OR
Press SPK to store and advance to next MMC
Technical Manuals Online! - http://www.tech-man.com
DISPLAY
[701]MSN DGT (1)
DGT:
[704]MSN DGT (1)
DGT:
[704]MSN DGT (4)
DGT:
[704]MSN DGT (4)
DGT:4603881
[704]MSN DGT (4)
D:204
N:
[704]MSN DGT (4)
D:204
N:202
[704]MSN DGT (4)
CW:NO OPT:ACEPT
[704]MSN DGT (4)
CW:NO OPT:ACEPT
3-99
DEFAULT DATA
None
RELATED ITEMS
MMC 419
MMC 714
BRI Option
DDI Number & Name Translation
Technical Manuals Online! - http://www.tech-man.com
3-100 Chapter 3
Programming Using MMCs
422
ASSIGN TRUNK COS
Used to assign a day and night class of service (COS) to each trunk. There are 10 different classes of service
(numbered 01–10) defined in MMC 701 (Assign COS Contents). According to the assigned COS, an outside
caller to the system via a DISA line without a passcode may have restricted access to system features.
PROGRAM KEYS
UP & DOWN
KEYPAD
SOFT KEYS
SPK
HOLD
ANS/RLS
Used to scroll through options
Used to enter selections
Move cursor left and right
Used to store data and advance to next MMC
Used to clear previous entry
Used to select ALL
ACTION
1. Press TRSF 422
Display shows first trunk
2. Dial trunk number (e.g., 705)
OR
Use UP and DOWN to scroll through trunks
and press RIGHT soft key
OR
Press ANS/RLS to select all stations
3. Enter day class of service (e.g., 05)
OR
Use UP and DOWN to scroll through classes
of service and press RIGHT soft key
4. Enter night class of service (e.g., 05)
OR
Use UP and DOWN to scroll through classes
of service and press RIGHT soft key to
return to step 2
5. Press TRSF to save and exit
OR
Press SPK to save and advance to next MMC
Technical Manuals Online! - http://www.tech-man.com
DISPLAY
[701] TRK COS
DAY:01 NIGHT:01
[705] TRK COS
DAY:01 NIGHT: 01
[ALL] TRK COS
DAY:?? NIGHT:??
[705] TRK COS
DAY:05 NIGHT:01
[705] TRK COS
DAY:05 NIGHT:05
3-101
DEFAULT DATA
DAY CLASS: 01
NIGHT CLASS: 01
RELATED ITEMS
MMC 301
MMC 410
MMC 701
Assign Station COS
Assign DISA Trunk
Assign COS Contents
Technical Manuals Online! - http://www.tech-man.com
3-102 Chapter 3
Programming Using MMCs
423
S/T MODE
Allows the system to choose the function of each BRI access. You can set a BRI access as "TRUNK" to
which an ISDN C.O. line is connected, or as "STATION" to which an ISDN terminal is connected.
NOTE
Any change made in this MMC will take effect only after restarting the BRI card. Use MMC
418 to restart the card.
For each BRI access, two adjacent ports are assigned. You need only change the value for one of the two
ports; the value for the other port will be changed automatically.
PROGRAM KEYS
UP & DOWN
KEYPAD
SOFT KEYS
SPK
HOLD
Used to scroll through options
Used to enter selections
Move cursor left and right
Used to store data and advance to next MMC
Used to clear previous entry
ACTION
DISPLAY
1. Press TRSF 423
Display shows
[701] S/T MODE
TRUNK
2. Dial BRI trunk number (e.g., 703)
OR
Press UP or DOWN key to select the port
Press the RIGHT soft key to move the cursor
3. Press UP or DOWN key to make selection
(TRUNK or STATION) and press RIGHT soft key
4. Press TRSF to store and exit
OR
Press SPK to store and advance to next MMC
DEFAULT DATA
TRUNK
RELATED ITEMS
MMC 418
MMC 419
MMC 424
Card Restart
BRI Option
S0 Mapping
Technical Manuals Online! - http://www.tech-man.com
[703]
TRUNK
S/T MODE
[703] S/T MODE
STATION
3-103
424
S0 MAPPING
Generates a table by which an ISDN terminal number is mapped onto a BRI STATION port.
For a detailed description and other MMC–related procedures, refer to the section BRI Related MMC
Procedure in this manual.
NOTE
For each BRI access, two adjacent ports are assigned. You need only map a number onto one
of the two ports. You can map only one port to each number. This means you can't use the
same number in more than one BRI access. However, more than one number can be mapped
onto a port and used in a BRI access.
PROGRAM KEYS
UP & DOWN
KEYPAD
SOFT KEYS
SPK
HOLD
Used to scroll through options
Used to enter selections
Move cursor left and right
Used to store data and advance to next MMC
Used to clear previous entry
ACTION
DISPLAY
1. Press TRSF 424
Display shows
[7801]S0 MAPPING
NONE
2. Dial an ISDN terminal number (e.g., 7803)
OR
Press UP or DOWN key to select the number and
press RIGHT soft key to move cursor
3. Dial an ISDN station number (e.g., 703)
OR
Press UP or DOWN key to select the number and
press RIGHT soft key to move cursor
4. Press TRSF to store and exit
OR
Press SPK to store and advance to next MMC
DEFAULT DATA
None
RELATED ITEMS
MMC 419
MMC 423
BRI Option
S/T Mode
Technical Manuals Online! - http://www.tech-man.com
[7803]S0 MAPPING
NONE
[7803]S0 MAPPING
703
3-104 Chapter 3
Programming Using MMCs
426
UNK GAIN CONTROL
This MMC procedure allows trunk gain control.
PROGRAM KEYS
UP & DOWN
KEYPAD
SOFT KEYS
SPK
HOLD
ANS/RLS
Used to scroll through options
Used to enter selections
Move cursor left and right
Used to store data and advance to next MMC
Used to clear previous entry
Used to select ALL (trunks)
ACTION
1. Press TRSF 426
Display shows
2. Dial trunk number ( e.g., 704)
OR
Press UP or DOWN key to select trunk and
press RIGHT soft key
3. Press UP or DOWN key to select trunk RX
gain and press RIGHT soft key
4. Press UP or DOWN key to select trunk TX
gain and press RIGHT soft key
5. Press TRSF to store and exit
OR
Press SPK to store and advance to next MMC
DEFAULT DATA
RX= 0 dB, TX= 0 dB for all trunks
RELATED ITEMS
None
Technical Manuals Online! - http://www.tech-man.com
DISPLAY
[701] TRUNK GAIN
RX :+0.0 TX :+0.0
[704] TRUNK GAIN
RX :+0.0 TX :+0.0
[704] TRUNK GAIN
RX :+1.9 TX :+0.0
[704] TRUNK GAIN
RX :+1.9 TX :+1.9
3-105
428
ASSIGN TRUNK/TRUNK USE
Used to control whether a incoming trunk can dial calls for specific trunks.
PROGRAM KEYS
UP & DOWN
KEYPAD
SOFT KEYS
SPK
HOLD
ANS/RLS
Used to scroll through options
Used to enter selections
Move cursor left and right
Used to store data and advance to next MMC
Used to clear previous entry
Used to select ALL
ACTION
1. Press TRSF 428
Display shows
2. Dial the trunk number (e.g., 705)
OR
Press UP or DOWN key to select trunk and
press RIGHT soft key
OR
Press ANS/RLS to select all trunks
3. Dial the trunk number (e.g., 708)
OR
Press UP or DOWN key to select trunk and
press RIGHT soft key
4. Dial 1 for YES or 0 for NO
OR
Press UP or DOWN key to select YES/NO and
press RIGHT soft key to move cursor
5. Press TRSF to store and exit
OR
Press SPK to store and advance to next MMC
DEFAULT DATA
DIAL: Yes
RELATED ITEMS
None
Technical Manuals Online! - http://www.tech-man.com
DISPLAY
[701] USE
DIAL:YES
[702]
[705] USE
DIAL:YES
[702]
[705] USE
DIAL:YES
[708]
[705] USE
DIAL:NO
[708]
3-106 Chapter 3
Programming Using MMCs
500
SYSTEM–WIDE COUNTERS
Used to set the values of the system counters. The counters are listed below with a brief description of each.
0 ALARM REM. CNTER:
The number of times that an alarm reminder will ring a station before
cancelling. RANGE = 1–99.
1. AUTO RDL COUNTER:
The number of times the system will redial an outside number after the
auto redial feature has been activated. RANGE = 1–15.
2. DISA CALL CNTER:
Sets the maximum number of intercom calls that can be made after accessing
a DISA line. RANGE = 1–99.
3. DISA LOCK CNTER:
Number of attempts the system will allow to incorrectly access a DISA line
before locking out the DISA line. RANGE = 1–99.
4. NEW CALL COUNTER:
Number of times the system will allow a user to signal New Call on a C.O.
line during one call. RANGE = 1–99.
5. UCD VISUAL ALARM:
Used to set the Visual alarm threshold. It is triggered when the number of
calls waiting to be answered in the UCD group reaches this value. RANGE
= 0–25.
6. UCD AUDIO ALARM:
7. UCD CS LEVEL 1:
8. UCD CS LEVEL 2:
Used to set the Audio alarm threshold. It is triggered when the number of
calls waiting to be answered in the UCD group reaches this value. RANGE
= 0–25.
Provides call wait indication level 1 if number of calls waiting to be answered in
UCD group reaches this value. RANGE = 0–25.
Provides call wait indication level 2 if number of calls waiting to be
answered in UCD group reaches this value. RANGE = 0–25.
PROGRAM KEYS
UP & DOWN
KEYPAD
SOFT KEYS
SPK
HOLD
ANS/RLS
Used to scroll through options
Used to enter selections
Move cursor left and right
Used to store data and advance to next MMC
Used to clear previous entry
Used to select ALL
Technical Manuals Online! - http://www.tech-man.com
3-107
ACTION
DISPLAY
1. Press TRSF 500
Display shows
ALARM REM.CNTER
05→
2. Enter number from above list (e.g., 6)
OR
Press UP or DOWN key to make selection
and press RIGHT soft key to move cursor
UCDS VISUAL ALARM
00→
UCDS VISUAL ALARM
00→02
3. Enter in new value via dial keypad
If entry is valid, system will return to step 2
4. Press TRSF to store and exit
OR
Press SPK to store and advance to next MMC
DEFAULT DATA
Alarm Rem. Cnter
Auto Rdl Counter
DISA Call Cnter
DISA Lock Cnter
New Call Counter
UCD Visual Alarm
UCD Audio Alarm
UCD CS Level
UCD CS Level
5
5
99
3
99
0
0
10
20
RELATED ITEMS
MMC 501
System–Wide Timers
Technical Manuals Online! - http://www.tech-man.com
3-108 Chapter 3
Programming Using MMCs
501
SYSTEM–WIDE TIMERS
Allows the technician to adjust individual timers as necessary.
Any timer can be disabled by setting the time to all zeros (000).
PROGRAM KEYS
UP & DOWN
KEYPAD
SOFT KEYS
SPK
Used to scroll through options
Used to enter selections
Move cursor left and right
Used to store data and advance to next MMC
ACTION
DISPLAY
1. Press TRSF 501
Display shows first timer value
AA INT DGT TIME
05 SEC
2. Press UP or DOWN key to select timer and press
RIGHT soft key to move cursor
KMMC LOCK OUT TM
30 SEC → _
3. Enter new value using keypad; if valid, system
returns to step 2 with new value
4. Press TRSF to store and exit
OR
Press SPK to store and advance to next MMC
DEFAULT DATA
See table of timers and values, below
RELATED ITEMS
None
Technical Manuals Online! - http://www.tech-man.com
KMMC LOCK OUT TM
30 SEC → 255
3-109
TIMER TABLE
TIMER NAME
AA INT DGT TIME
AA NO ACT TIME
ALERT TONE TIME
ALM REM.INTERVAL
ALM REM.RING OFF
ATT.RECALL TIME
AUTO REDIAL INT.
AUTO REDIAL RLS.
BARGE IN TONE INT
CALLBACK NO ANS
CAMP ON RECALL
CLIP DISPLAY TIME
CLIP MSG RECEIVE
CO CLEAR TIME
CO CONFIRM TIME
CO–CO DISCONNECT
CONFER TONE INT
CONFIRM TONE TM
CRD TONE INT TM
DIAL PASS TIME
DISA DISCONNECT
DISA LOCK OUT TM
DISA PASS CHECK
DISPLAY DELAY TM
DOOR LOCK RELES.
DOOR RING DETECT
DOOR RING OFF TM
E–HOLD RECALL TM
EXT.FWD DELAY TM
FIRST DIGIT TIME
HOOK FLASH MAX TM
HOK FLASH MIN TM
HOOK OFF TIME
HOOK ON TIME
INQUIRY RELEASE
INTER DIGIT TIME
KMMC LOCK OUT TM
LCR ADVANCE TIME
LCR INTER DIGIT
MCL DELAY TIME
OFF HOOK RING INT
OFF HOOK SELECT.
OHVA ANSWER TIME
OVERLAP INT DGT
PAGE TIME OUT
PAGE TONE TIME
PARK RCALL TIME
PC–MMC LOCK TIME
POWER DOWN TIME
RECALL DISCONECT
DEFAULT
05 SEC
10 SEC
1000 MS
25 SEC
10 SEC
30 SEC
30 SEC
45 SEC
1300 MS
30 SEC
30 SEC
5 SEC
6 SEC
30 SEC
3 MIN
20 MIN
9900 MS
1000 MS
30 SEC
5 SEC
30 MIN
30 MIN
30 MIN
3 SEC
500 MS
50 MS
30 SEC
45 SEC
10 SEC
10 SEC
180 MS
70 MS
200 MS
1000 MS
30 SEC
10 SEC
30 SEC
5 SEC
5 SEC
4 SEC
15 SEC
5 SEC
10 SEC
7 SEC
20 SEC
500 MS
45 SEC
5 MIN
200 MS
2 MIN
Technical Manuals Online! - http://www.tech-man.com
RANGE
1–25 SEC
1–25 SEC
100–2500 MS
1–255 SEC
1–25 SEC
1–255 SEC
1–255 SEC
1–255 SEC
100–9900 MS
1–255 SEC
1–255 SEC
1–25 SEC
1–25 SEC
0–255 SEC
0-255 MIN
0–255 MIN
100–9900 MS
100–2500 MS
0–255 SEC
1–25 SEC
1–255 MIN
1–255 MIN
1–255 MIN
1–255 SEC
100–2500 MS
10–250 MS
1–255 SEC
0–255 SEC
1–255 SEC
1–255 SEC
20–2500 MS
20–2500 MS
100–2500 MS
20–2500 MS
1–255 SEC
1–255 SEC
10–255 SEC
1–255 SEC
1–255 SEC
1–8 SEC
1–255 SEC
1–255 SEC
1–255 SEC
1 – 15 SEC
1–255 SEC
100–2500 MS
0–255 SEC
1–60 MIN
100–2500 MS
1–255 MIN
3-110 Chapter 3
Programming Using MMCs
RECALL WAIT TIME
SMDR START/DP
SMDR START/DTMF
SYS HOLD RECALL
TRANSFER RECALL
UCDS AUDIO ALARM
UCDS VISUAL ALARM
VMS UCD MSG TIME
PERI UCD REPORT
15 SEC
30 SEC
15 SEC
45 SEC
20 SEC
0 SEC
0 SEC
5 SEC
5 SEC
1–255 SEC
1–255 SEC
1–255 SEC
0–255 SEC
0–255 SEC
0–255 SEC
0–255 SEC
1-99 SEC
3-99 SEC
TIMER DESCRIPTIONS
Technial Manuls Onlie! - htp:/w.ec-mano
AA INT DGT TIME:
This timer controls the grace period between dialling valid digits before
transferring call to INVLID DEST as set in MMC 733 on a per–plan
basis.
AA NO ACT TIME:
If no digits are received by the AA module, this timer expires and
transfers the call to the destination set in MMC 733 NO ACT DEST.
This timer is usually called as first digit timer after entering AA mode.
AA TRANS TIME:
After this time, compare input digit with AA translation table (MMC
732) and transfer to destination
ALERT TONE TIMER:
TIMER:
This timer sets the duration of the attention tone preceding a call to a
keyset in the Voice Announce or Auto Answer mode. This tone also
precedes a forced Auto Answer call.
ALM REM INTERVAL:
This timer controls the time length between ring attempts at a station
when alarm reminder is set.
alarm reminder ring (1st) ÅintervalÆ
intervalÆ alarm reminder ring (2nd )
ALM REM RING OFF:
OFF:
This timer controls the length of the ring cycle when alarm reminder is
set at a station.
ATT RECALL TIME:
This is the length of time a transfer recall will ring at a station before
recalling the operator.
E–hold Åe–hold recl timeÆ
timeÆ recall to Å att recallÆ
recallÆ recall toÅ
toÅrecallÆ
recallÆ
disconnect
originator time
operator
U–hold
sys hold recall
disc. time
transfer transfer recall
AUTO REDIAL INT:
This timer controls the time between attempts after RETRY dialling is
set on a station.
press RETRY
Åauto redialÆ
redialÆ 1st auto Åauto redialÆ
redialÆ 2nd auto
when busy/rback
interval
redial
interval
redial
3-111
Technial Manuls Onlie! - htp:/w.ec-mano
AUTO REDIAL RLS:
This timer controls the duration of a Ring No Answer condition on a
retry number dialled before the auto redial is automatically cancelled.
BARGE–
BARGE–IN TONE INT:
This timer controls the intervals between the tones sent to the person
who is being barged in on.
CALLBACK NO ANS:
This timer controls the time before the callback is automatically
cancelled when a callback detects Ring No Answer.
CAMP ON RECALL:
This timer controls the duration of time a camped–on call will stay at a
destination before recalling to the transferring station.
CLIP DISPLAY TIME:
The amount of time that the Calling Line ID information remains on the
keyset’s display. While on a trunk conversation, users are allowed to
review received CLIP by pressing SCROLL Æ CLIP softkey, but LCD
will automatically go back to trunk conversation status on expiration of
this timer.
CLIP MSG RECEIVE:
The amount of time that the system will allow a valid message from the
C.O.
C.O. CLEAR TIME:
The length of time a DTS key remains busy after cleardown.
CO CONFIRM TIME:
After this time, the outgoing call is disconnected or you can hear the
confirm tone.
C.O. –C.O. DISCONNECT:
This timer monitors the duration of an unsupervised conference; when it
expires, both trunks are disconnected.
CONFIRM TONE TIME:
TIME:
The tone heard when a feature is activated or deactivated.
CONFER TONE INT:
This timer controls the timing of intervals between the tones heard by
the parties in a conference.
CRD TONE INT TM:
This timer controls the timing of intervals between the tone which
indicates the call is recorded by Voice Mail System.
DIAL PASS TIME:
This timer is the wait time for preventing the misdialling of an outgoing
call. After the last digit has been dialled, the voice path is connected.
DISA DISCONNECT:
This timer controls the maximum duration of a DISA call.
DISA LOCK OUT TIMER:
This timer controls the duration of time a DISA call is not allowed to be
made after the DISA error counter has expired (MMC 500).
DISA PASS CHECK:
This timer defines the time period before the system clears the
incorrect passcode counter.
DISPLAY DELAY TIMER:
TIMER:
This timer controls the duration a display is shown in the LCD display.
This timer also controls the duration of time that error tone is heard.
DOOR LOCK RELEASE
RELEASE::
This timer controls the duration of time the door lock relay is activated.
DOOR RING DETECT:
This timer controls the duration of time before a call is answered by the
door phone.
3-112 Chapter 3
Programming Using MMCs
DOOR RING OFF TM:
This timer controls the duration of ringing at the door ring destination
before automatically cancelling.
E–HOLD RECALL TM:
This timer controls the duration of time a call is held exclusively at a
station before recalling. See ATT Recall Time.
EXT. FWD DELAY TM:
This timer controls the External Call Forward feature which allows a
station to ring before the call is placed on external call forwarding.
FIRST DIGIT TIME:
This timer controls how long the system will wait for dialling to begin
before dropping the dial tone and returning the user to error tone.
HOK FLASH MAX TM:
This timer monitors the duration of a hookswitch flash to ensure that the
flash is valid and not a line noise or an accidental hookswitch bounce
(LONGEST DURATION).
HOK FLASH MIN TM:
This timer monitors the duration of a hookswitch flash to ensure that the
flash is valid and not a line noise or an accidental hookswitch bounce
(SHORTEST DURATION).
HOOK OFF TIME:
This timer controls the time before dial tone is sent to a single line
station.
HOOK ON TIME:
This timer sets the minimum amount of time that the system will
recognise as an SLT hang up.
INQUIRY RELEASE:
This timer monitors the duration of the interaction of the soft key to
determine when to return the LCD back to a normal status. This timer
affects only display phones.
This timer controls the grace period between dialling valid digits before
dropping the call and returning the user to error tone.
INTER DIGIT TIME:
Technial Manuls Onlie! - htp:/w.ec-mano
KMMC DIGIT TIME:
This timer controls the grace period between programming actions
while in a programming session (KMMC not PCMMC). The timer
automatically returns the system to secure programming status.
LCR ADVANCE TIME:
This timer controls the duration of time before selecting the next
allowable route when a station is allowed to route advance.
LCR INTER DIGIT:
This timer controls the grace period between dialling valid digits before
dropping the call and returning the user to error tone.
3-113
MCL DELAY TIME:
This timer controls the time when the system should start transmitting
Authorisation code after sending MCL Access code.
OFF HOOK RING:
This timer controls the duration of time between ring bursts to a user
who has a camped–on call.
receive CAMP–
CAMP–ON Åoff hook ringÆ
ringÆ off hook ring interval Åoff
hook ringÆ
ringÆ when busy
OFF HOOK SELECT:
This timer controls the grace period before placing a internal/external
call as programmed in MMC 306.
lift Handset Åoff hook select timeÆ
timeÆ starts placing a call as specified in
MMC 307
OHVA ANSWER TIME:
This timer controls the time duration of an OHVA call before automatic
rejection. When a user receives OHVA with voice interrupt this situation
will last until this timer expires. If LCD phones receive OHVA, REJECT
will appear at righthand side of bottom line while this timer is activated.
OVERLAP INT DGT:
This timer controls the grace period between receiving address
information in overlap receiving mode via BRI/PRI line. After expiration
of this timer the system operator will be alerted.
PAGE TIME OUT:
This timer controls the duration of a page announcement.
PAGE TONE TIME:
This timer controls the duration of tone burst heard over the page prior
to the page announcement.
PARK RECALL TIME:
This timer controls the duration of time a call is parked before recalling
to the call park originator.
PC–
PC–MMC LOCK OUT:
This timer monitors PCMMC activity, drops the link if no action is
created by PCMMC and returns the system to secure program status.
POWER DOWN TIME:
This timer monitors the power down to the SLT line for VM/AA.
RECALL DISCONNECT:
DISCONNECT:
This is the time an attendant recall rings before being disconnected. See
ATT Recall Time.
RECALL WAIT TIME:
This is the time any recall (hold or transfer) continues to recall at your
station before it recalls to the operator.
1) If Originator is idle:
e–hold Åe–hold recall timeÆ
timeÆ recall to Åatt recallÆ
recallÆ recall toÅ
toÅrecallÆ
recallÆ
disconnect
transfer transfer recall time originator time
operator
disc.time
2) If Originator is occupied:
e–hold Åe–hold recall timeÆ
timeÆ recall to originator Årecall Æ recall
toÅ
toÅrecallÆ
recallÆ disconnect
transfer
trsf recall time
with off hook ring
wait time
operator disc.time
SMDR START/DIAL PULSE (ROTARY): This grace period timer starts SMDR recording for rotary dialling.
This timer also controls the LCD duration timer on the keysets. The
duration time displayed and the SMDR time duration will be the same.
Technial Manuls Onlie! - htp:/w.ec-mano
3-114 Chapter 3
Programming Using MMCs
Technial Manuls Onlie! - htp:/w.ec-mano
SMDR START/DTMF:
This grace period timer starts SMDR recording for touchtone dialling.
This timer also controls the LCD duration timer on the keysets. The
duration time displayed and the SMDR time duration will be the same.
SYS HOLD RECALL:
This timer determines the time calls can be left on hold before recalling
the holding station. This is a system–wide timer. Setting timer to 000
means no recalling will take place.
TRANSFER RECALL:
This timer determines the time transferred calls ring before recalling.
This is a system–wide timer. See Recall Wait Time.
UCDS AUDIO ALARM:
This timer determines how long the longest waiting call can be held
before the system gives an audio alarm to the UCD supervisor.
UCDS VISUAL ALARM:
This timer determines how long the longest waiting call can be held
before the system gives a visual alarm to the UCD supervisor.
VMS UCD MSG TIME:
This timer controls the duration of time that VMS gives UCD busy ment
to user.
PERI UCD REPORT:
This is periodic time for printing out UCD data.
3-115
502
STATION–WIDE TIMERS
Allows certain station timer values to be changed on a per–station basis or for all stations. It is not advisable
to change these values without assistance from Technical Support.
OPTIONS
1 NO ANS FWD
This timer controls how long the station will ring before Forward on no answer
takes place. (Range: 001– 255 sec.)
2 DTMF DUR
DTMF DUR.
This timer governs the duration of DTMF digit which is
transmitted to an external VM system port. It is useful when customising
voice mail system. (Range: 100– 9900 msec.)
3 F–DGT DELY
NOTE
This timer is valuable for the system administrator to insert a suitable delay
for generating DTMF digits, for commencing in-band integration. (Range:
100– 9900 msec.)
It is reasonable for the system administrator to use trial and error to find a suitable value for 2
and 3 above according to the characteristics of the selected VM system.
PROGRAM KEYS
UP & DOWN
KEYPAD
SOFT KEYS
SPK
ANS/RLS
Used to scroll through options
Used to enter selections
Move cursor left and right
Used to store data and advance to next MMC
Used to select ALL
Technical Manuals Online! - http://www.tech-man.com
3-116 Chapter 3
Programming Using MMCs
ACTION
DISPLAY
1. Press TRSF 502
Display shows
[201] NO ANS FWD
010 SEC →_
2. Dial station number (e.g., 205)
OR
Press UP or DOWN key to select station and press
RIGHT soft key
OR
Press ANS/RLS to select all stations and press
RIGHT soft key
[ALL] NO ANS FWD
010 SEC →_
3. Enter new value (must be three digits)
via dial keypad (e.g., 020)
System will return to step 2
[205] NO ANS FWD
010 SEC →020
4. Dial timer number from above list (e.g. 2)
OR
Press UP or DOWN key to select and press
RIGHT soft key to move cursor
5. Enter new timer value (must be four digits, e.g. 0200)
System returns back to step 2
6. Press TRSF to store and exit
OR
Press SPK to store and advance to next MMC
DEFAULT DATA
NO ANS FWD
DTMF DUR.
F–DGT DELY
015 SEC
100 MSEC
600 MSEC
RELATED ITEMS
MMC 102
MMC 207
MMC 726
Call Forward
Assign VM/AA Port
VM/AA Options
Technical Manuals Online! - http://www.tech-man.com
[205] NO ANS FWD
010 SEC →_
[205] DTMF DUR.
0100 MS →_
[205] DTMF DUR.
0100 MS →0200
3-117
503
TRUNK–WIDE TIMERS
Allows certain trunk timer values to be changed on a per–trunk basis or for all trunks. It is not advisable to
change these values (with the exception of trunk flash time) without assistance from Technical Support.
DIAL
0
1
2
3
4
5
6
7
8
9
10
11
12
TIMER
RANGE
ANS.BAK TM
CLEARING
CO SUPV TM
DTMF DUR.
F–DGT DELY
FLASH TIME
NO RING TM
PAUSE TIME
PRS DET TM
RNG DET.TM
WINK TIME
MF/DP INT
MFR DLY TM
100–2500 MSEC
01–25 SEC
100–2500 MSEC
100–2500 MSEC
100–2500 MSEC
100–2500 MSEC
001–255 SEC
001–255 SEC
000–2500 MSEC
100–2500 MSEC
100–300 MSEC
100–9900 MSEC
00–25 SEC
PROGRAM KEYS
UP & DOWN
KEYPAD
SOFT KEYS
SPK
ANS/RLS
Used to scroll through options
Used to enter selections
Move cursor left and right
Used to store data and advance to next MMC
Used to select ALL
Technical Manuals Online! - http://www.tech-man.com
3-118 Chapter 3
Programming Using MMCs
ACTION
DISPLAY
1. Press TRSF 503
Display shows
[701] ANS.BAK TM
0600 MS →
2. Dial trunk number (e.g., 704)
OR
Press UP or DOWN key to select trunk and
press RIGHT soft key to move cursor
OR
Press ANS/RLS to select all trunks and press
RIGHT soft key to move cursor
3. Dial timer number from above list
OR
Press UP or DOWN key to select timer and press
RIGHT soft key to move cursor
4. Enter new timer value (must be four digits, e.g., 0700)
System returns to step 2
5. Press TRSF to store and exit
OR
Press SPK to store and advance to next MMC
DEFAULT DATA
ANS.BAK TM
CLEARING
CO SUPV TM
DTMF DUR
F–DGT DLY
FLASH TIME
NO RING TM
PAUSE TIME
PRS DET TM
RNG DET.TM
WINK TIME
MF/DP INT
MFR DLY TM
RELATED ITEMS
None
Technial Manuls Onlie! - htp:/w.ec-mano
600 MSEC
2000 SEC
400 MSEC
100 MSEC
600 MSEC
90 MSEC
004 SEC
003 SEC
0 MSEC
300 MSEC
200 MSEC
800 MSEC
00 SEC
[704] ANS.BAK TM
0600 MS →
[ALL] ANS.BAK TM
0600 MS →
[704] DTMF DUR.
0600 MS →_
[704] DTMF DUR.
0600 MS →0700
3-119
504
PULSE MAKE/BREAK RATIO
Allows the ability to change the value of pulses per second and the duration of the make/break time. This
only affects rotary dial trunks.
FEATURE KEYS
Dial 0
Dial 1
Make/Break ratio (01–99)
Pulse Per Second (10 or 20)
PROGRAM KEYS
UP & DOWN
KEYPAD
SOFT KEYS
SPK
Used to scroll through options
Used to enter selections
Move cursor left and right
Used to store data and advance to next MMC
ACTION
DISPLAY
1. Press TRSF 504
Display shows
MAKE/BREAK RATIO
33 MAKE→
2. Dial 0 or 1 for option (e.g., 1)
OR
Press UP or DOWN key for selection and press
RIGHT soft key to move cursor
3. Dial in new value and system returns to step 2
4. Press TRSF to store and exit
OR
Press SPK to store and advance to next MMC
DEFAULT DATA
Make/Break = 33
Pulses Per Second = 10
RELATED ITEMS
MMC 402
Trunk Dial Type
Technical Manuals Online! - http://www.tech-man.com
PULSE PER SECOND
10 PPS →_
PULSE PER SECOND
10 PPS →20
3-120 Chapter 3
Programming Using MMCs
505
ASSIGN DATE AND TIME
Allows the system date and time to be set. This sets the system–wide clock.
FEATURE KEYS
W
MM
DD
YY
HH
MM
Day
Month
Date
Year
Hour
Minute
0–6 (0:SUN, 1:MON, 2:TUE, 3:WED, 4:THU, 5:FRI, 6:SAT)
01–12
01–31
00–99 (1990–2089)
00–23
00–59
PROGRAM KEYS
KEYPAD
SPK
Used to enter selections
Used to store data and advance to next MMC
ACTION
1. Press TRSF 505
Display shows
2. Enter new time and date using above table
3. Verify time and date
Reenter if necessary
4. Press TRSF to store and exit
OR
Press SPK to store and advance to next MMC
DEFAULT DATA
Follows software version release date
RELATED ITEMS
None
Technical Manuals Online! - http://www.tech-man.com
DISPLAY
OLD:6030197:1147
NEW:WMMDDYY:HHMM
OLD:6030197:1147
NEW:4041097:1445
OLD:4041097:1445
NEW:WMMDDYY:HHMM
3-121
506
TONE CADENCE
Provides the ability to customise the tone cadence on a system–wide basis. There are 14 tone cadences
available. The tone control of the cadence may be changed from interrupt tone to continuous tone. Some
DCS-816 systems may require default settings to comply with local operating companies.
FEATURE KEYS
OPTIONS KEY
0
1
CONTINUOUS TONE
INTERRUPT TONE
PROGRAM KEYS
UP & DOWN
KEYPAD
SOFT KEYS
SPK
Used to scroll through options
Used to enter selections
Move cursor left and right
Used to store data and advance to next MMC
TONES
BUSY TONE
CONFM/BARGE
DIAL TONE
DND/NO MORE
ERROR TONE
HOLD/CAMPON
MSGWAT TONE
RGBACK TONE
RING TONE
TRSFER TONE
DDI RNGBACK
CO BUSY
CO RINGBACK
CO DIAL
Busy tone
Confirm tone and Barge–in tone
Dial tone
DND tone and No More Call button tone
Error tone
Hold tone and Camp–on tone
Message wait tone
Ringback tone
Ring over page tone (to external page port)
Transfer dial tone
DDI ringback tone
CO Busy tone
CO ringback tone
CO Dial tone
Technical Manuals Online! - http://www.tech-man.com
3-122 Chapter 3
Programming Using MMCs
ACTION
DISPLAY
1. Press TRSF 506
Display shows
BUSY TONE
INTERRUPT TONE
2. Press UP or DOWN key to select tone and press
RIGHT soft key
TRSFER TONE
INTERRUPT TONE
3. Press UP or DOWN key to select tone control
Press RIGHT soft key to advance to step 4
OR
Press LEFT soft key to return to step 2
TRSFER TONE:0100
0100 0100 0100
4. Dial in new value for interrupt times
(must be four digits)
Press RIGHT soft key to advance cursor
Press LEFT soft key to retreat cursor
If valid entry, system returns to step 2
TRSFER TONE:0100
0100 0100 0100
5. Press TRSF to store and exit
OR
Press SPK to store and advance to next MMC
DEFAULT DATA
TONE
ON
OFF
BUSY TONE
CONFIRM/BARGE–IN TONE
DIAL TONE
DND/NO MORE TONE
ERROR TONE
HOLD/CAMP–ON TONE
MESSAGE WAIT TONE
RING BACK TONE
RING TONE
TRANSFER TONE
DID RNGBACK
CO BUSY
CO RINGBACK
CO DIAL
350
50
350
350
50
50
CONTINUOUS
250
250
100
100
3500
500
CONTINUOUS
200
400
3000
1000
100
100
3000
1000
350
350
200
400
250
1000
All times are in milliseconds..
NOTE
RELATED ITEMS
None
Technial Manuls Onlie! - htp:/w.ec-mano
250
100
500
400
1000
100
1000
350
400
1000
ON
OFF
350
50
250
100
3500
2000
3000
100
3000
350
2000
250
3-123
507
ASSIGN AUTO NIGHT TIME
Enters the system into night mode automatically by utilising time and day tables. A NIGHT key is not
needed as the system will switch automatically. It is helpful to have a dedicated button so the status can be
manually changed. The start time is the time the system switches from day to night service; the end time is
the next day (e.g., start 1730 WED, end 0800 THUR). This prevents entering of start and stop times.
FEATURE KEYS
0
1
2
3
SUN
MON
TUE
WED
4
5
6
THU
FRI
SAT
PROGRAM KEYS
UP & DOWN
KEYPAD
SOFT KEYS
SPK
HOLD
Used to scroll through options
Used to enter selections
Move cursor left and right
Used to store data and advance to next MMC
Used to clear previous entry
ACTION
DISPLAY
1. Press TRSF 507
Display shows
NIGHT TIME (SUN)
ST:
END:
2. Dial day number (0-6 e.g., 3)
OR
Press UP or DOWN key to select day and press
RIGHT soft key to advance cursor
3. Dial in start time for night (e.g., 1730)
If time entered is valid, cursor moves to end time
Enter end time (e.g., 0800)
If time entered is valid, system returns to step 2
4. Press TRSF to store and exit
OR
Press SPK to store and advance to next MMC
DEFAULT DATA
None
RELATED ITEMS
MMC 722
MMC 723
Station Key Programming
System Key Programming
Technical Manuals Online! - http://www.tech-man.com
NIGHT TIME (WED)
ST:
END:
NIGHT TIME (WED)
ST:1730 END:0800
3-124 Chapter 3
Programming Using MMCs
508
CALL COST
Allows the system administrator to set the Call Cost attributes generated by the system during a call. This
information can be displayed on the keyset LCD during a call or as an SMDR record.
Attributes are as follows:
0 UNIT COST PER MP
When the system is installed to receive MP on a C.O. outgoing call.
It is used for generating total call cost by multiplying it by the
number of pulses. Allows a maximum value of 5000.
1 CALL COST RATE
This generates additional call cost calculated by multiplying this rate
by the original call cost. Ranges from 100 through 255.
WARNING
Changing this value when there is a call in progress may result in an inaccurate call cost.
This MPD facility requires the Meter Pulse Detection version of the trunk card. It is not available on the
standard product.
PROGRAM KEYS
UP & DOWN
KEYPAD
SOFT KEYS
SPK
Used to scroll through options
Used to enter selections
Move cursor left and right
Used to store data and advance to next MMC
ACTION
1. Press TRSF 508
Display shows
2. Dial 0 or 1 (e.g., 1)
OR
Press UP or DOWN key for selection and press
RIGHT soft key to move cursor
3. Enter new value (e.g., 110 for 110 percent)
System returns to step 2
4. Press TRSF to store and exit
OR
Press SPK to store and advance to next MMC
Technical Manuals Online! - http://www.tech-man.com
DISPLAY
UNIT COST PER MP
0200 PENCE→
CALL COST RATE
100% →_
CALL COST RATE
110% →
3-125
DEFAULT DATA
UNIT COST PER MP
CALL COST RATE
200 pence
100 percent
RELATED ITEMS
MMC 110
MMC 414
Station On/Off
MPD/PRS Signal
Technical Manuals Online! - http://www.tech-man.com
3-126 Chapter 3
Programming Using MMCs
510
SLI RING CADENCE
Used to set ring cadence for SLI ports.
Options are:
1. Station ring
2. Trunk ring
3. Door ring
4. Alarm ring
5. Callback ring
PROGRAM KEYS
UP & DOWN
KEYPAD
SOFT KEYS
SPK
Used to scroll through options
Used to enter selections
Move cursor left and right
Used to store data and advance to next MMC
ACTION
DISPLAY
1. Press TRSF 510
Display shows
1: STN RING : 1000
3000 1000 3000
2. Press UP or DOWN key to select option
from above table (e.g., 2)
3. Press TRSF to store and exit
OR
Press SPK to store and advance to next MMC
DEFAULT DATA
1= 1000
2= 0400
3= 0400
4= 0200
5= 0200
3000
0200
0100
0200
0200
1000
0400
0400
0200
0200
3000
3000
2000
2000
4000
RELATED ITEMS
None
Technical Manuals Online! - http://www.tech-man.com
2: TRK RING : 0400
0200 0400 3000
3-127
512
ASSIGN HOLIDAY
Assigns holiday dates to a station for the current year. Station will remain in Night Service for those periods
assigned. Up to 60 dates may be entered.
PROGRAM KEYS
UP & DOWN
KEYPAD
SOFT KEYS
SPK
Used to scroll through options
Used to enter selections
Move cursor left and right
Used to store data and advance to next MMC
ACTION
1. Press TRSF 512
Display shows
2. Press UP or DOWN key to select option 01–60
3. Using keypad, enter date in format MMDD. For
example, 25th December would be 1225
4. Press TRSF to store and exit
OR
Press SPK to store and advance to next MMC
DEFAULT DATA
None
RELATED ITEMS
None
Technical Manuals Online! - http://www.tech-man.com
DISPLAY
ASSIGN HOLIDAY
01:
ASSIGN HOLIDAY
01:
ASSIGN HOLIDAY
01: 1225
3-128 Chapter 3
Programming Using MMCs
600
ASSIGN OPERATOR GROUP
Used to assign operator group for day and night.
PROGRAM KEYS
UP & DOWN
KEYPAD
SOFT KEYS
SPK
HOLD
Used to scroll through options
Used to enter selections
Move cursor left and right
Used to store data and advance to next MMC
Used to clear previous entry
ACTION
DISPLAY
1. Press TRSF 600
Display shows
OPERATOR GROUP
D : 500 N : 500
2. Dial the day operator group (e.g., 501)
3. Dial the night operator group
OPERATOR GROUP
D : 501 N : 500
4. Press TRSF to store and exit
OR
Press SPK to store and advance to next MMC
DEFAULT DATA
DAY : 500
NIGHT : 500
RELATED ITEMS
MMC 211
MMC 406
MMC 601
MMC 602
OPERATOR GROUP
D : 501 N : 500
Door Ring Assignment
Trunk Ring Assignment
Assign Station Group
Station Group Name
Technical Manuals Online! - http://www.tech-man.com
3-129
601
ASSIGN STATION GROUP
The station groups that are available in this MMC provide more flexibility in the usage of Uniform Call
Distribution (UCD/ACD), AA GROUP, VM/AA applications and SVM GROUP. A station, common bell, and
ring page can be in more than one group, but must all be the same ring type. There is a maximum of 16
members per group.
A device for announcement, if used, must provide a hookflash and return the call to
the group. If a station is in more than one group and attempts to use the IG key, it
will be removed from all groups.
NOTE
GROUP TYPE
0.
1.
2.
3.
4.
NORMAL GROUP
VMAA GROUP
UCD GROUP
AA GROUP
SVM GROUP
Can only have distribute or sequential ringing.
Has wrap–up capability
Can only have distribute or sequential ringing.
Voice mail group for the SVM-400. Can only
has distribute or sequential ringing.
FEATURE KEY
0.
1.
2.
3.
4.
5.
TYPE
RING
OVERFLOW
GRP TRSF
NEXT PORT
MEMBER
Group type (Normal, VM/AA, UCD, AA)
Ring mode
Overflow time
Group transfer time
Overflow port
Group member (e.g., station 202)
RING MODE
0.
SEQUENTIAL
The first idle station listed in the group will ring. If the first is busy,
the next idle station will ring.
1.
DISTRIBUTE
The first call will ring the first station listed in the group. The next
call will ring the next station listed in the group.
2.
UNCONDITION
All the stations listed in the group will ring; busy stations will
receive off–hook ring.
PROGRAM KEYS
UP & DOWN
KEYPAD
SOFT KEYS
SPK
HOLD
Used to scroll through options
Used to enter selections
Move cursor left and right
Used to store data and advance to next MMC
Used to clear previous entry
Technical Manuals Online! - http://www.tech-man.com
3-130 Chapter 3
Programming Using MMCs
ACTION
1. Press TRSF 601
Display shows
2. Dial group number (e.g., 505)
OR
Press UP or DOWN key to select group and press
LEFT soft key to move cursor to type of group
Dial group type (0–4, e.g., 1)
OR
Press UP or DOWN key to make selection and press
LEFT soft key to move cursor to TYPE
3. Dial feature option number (0–5, e.g., 0)
OR
Press UP or DOWN key to make selection and press
RIGHT soft key to move cursor to ring value
4. Dial ring option (0–2, e.g., 1)
OR
Press UP or DOWN key to make selection and press
LEFT soft key to move cursor back to RING or press
RIGHT soft key to return to step 2
5. Dial next feature option and continue
OR
Press UP or DOWN key to select option
OR
Press LEFT soft key to return to step 2
6. Press TRSF to store and exit
OR
Press SPK to store and advance to next MMC
Technical Manuals Online! - http://www.tech-man.com
DISPLAY
[500] STN GROUP
TYPE:NORMAL GRP
[505] STN GROUP
TYPE:NORMAL GRP
[505] STN GROUP
TYPE:VMAA
[505] STN GROUP
RING:SEQUENTIAL
[505] STN GROUP
RING:DISTRIBUTE
3-131
DEFAULT DATA
Group Type
Ring Mode
Overflow Time
Grp Trsf Time
Next Port
Normal Group
Sequential
000 Sec
000 Sec
None
Group Member 500
First station
The others: None
RELATED ITEMS
MMC 203
MMC 204
MMC 211
MMC 406
MMC 601
MMC 602
Assign UA Device
Common Bell Control
Door Ring Assignment
Trunk Ringing Assignment
Assign Station Group
Station Group Nam
Technical Manuals Online! - http://www.tech-man.com
3-132 Chapter 3
Programming Using MMCs
602
STATION GROUP NAME
Allows the system administrator or technician to enter an 11–character name to identify an individual
station group.
Names are written using the keypad. Each press of a key selects a character. Pressing the next key moves
the cursor to the next position. For example, if the directory name is “SAMSUNG," press the number “7”
four times to get the letter “S.” Now press the number “2” once to get the letter “A.” Continue selecting
characters from the table below to complete your message. Pressing the bottom left programmable key
changes the letter from upper case to lower case.
NOTE
When the character that you want appears on the same dial pad key as the previous
character, press the UP key to move the cursor to the right or the DOWN key to move cursor
left. A space can be entered by using these keys.
COUNT
DIAL0
DIAL1
DIAL2
DIAL3
DIAL4
DIAL5
DIAL6
DIAL7
DIAL8
DIAL9
DIAL*
1
<
Space
A
D
G
J
M
P
T
W
:
2
>
?
B
E
H
K
N
Q
U
X
=
3
.
,
C
F
I
L
O
R
V
Y
[
4
)
!
@
#
$
%
^
S
Z
]
5
0
1
2
3
4
5
6
7
8
9
6
The # key can be used for special characters: #, space, &, !, :, ?, ., %, $, –, <, >, /, =, [, ], @, ^, (, ), _, +,
{, }, |, ;, \, " and ~.
PROGRAM KEYS
UP & DOWN
KEYPAD
SOFT KEYS
SPK
HOLD
Used to scroll through options
Used to enter selections
Move cursor left and right
Used to store data and advance to next MMC
Used to clear previous entry
Technical Manuals Online! - http://www.tech-man.com
3-133
ACTION
DISPLAY
1. Press TRSF 602
Display shows
[501] SGR NAME
2. Dial group number (e.g., 505)
OR
Press UP or DOWN key to make selection and press
LEFT or RIGHT soft key to move cursor
3. Enter name using above method and table
4. Press LEFT or RIGHT soft key to return to step 2
OR
Press TRSF to store and exit
OR
Press SPK to store and advance to next MMC
DEFAULT DATA
None
RELATED ITEMS
MMC 104
MMC 404
MMC 600
MMC 601
Station Name
Trunk Name
Assign Operator Group
Assign Station Group
Technical Manuals Online! - http://www.tech-man.com
[505] SGR NAME
[505] SGR NAME
TELECOMS
3-134 Chapter 3
Programming Using MMCs
603
ASSIGN TRUNK GROUP
Allows the assignment of trunks to a specific trunk group or to several trunk groups. This is very useful in
the programming of LCR when more than one trunk is to be in several dialling plans. There are two
different modes of operation: (1) sequential and (2) distribute.
WARNING
One trunk can appear in more than one trunk group. If necessary, delete the trunk member
from other groups to prevent accidental access.
PROGRAM KEYS
UP & DOWN
KEYPAD
SOFT KEYS
SPK
HOLD
ANS/RLS
Used to scroll through options
Used to enter selections
Move cursor left and right
Used to store data and advance to next MMC
Used to clear previous entry
Used to select ALL
Technical Manuals Online! - http://www.tech-man.com
3-135
ACTION
1. Press TRSF 603
Display shows
2. Enter in valid trunk group (e.g., 9, 80–82)
OR
Press UP or DOWN key to make selection and press
RIGHT soft key to advance cursor
3. Press RIGHT soft key to change mode
OR
Press UP or DOWN key to change mode to member
4. Press RIGHT soft key to move cursor to number of
member and enter valid member number (01–10, e.g., 05)
via dial keypad
OR
Press UP or DOWN key to make selection and press
RIGHT soft key to move cursor
5. Enter valid trunk number (e.g., 705)
OR
Press UP or DOWN key to make selection and press
RIGHT soft key to return to step 2
6. Repeat steps 1–5 to remove trunk from group 0 if necessary
7. Press TRSF to store and exit
OR
Press SPK to store and advance to next MMC
DEFAULT DATA
All analogue trunks are in trunk group 9
All digital trunks are in trunk group 80
RELATED ITEMS
LCR programming
Technical Manuals Online! - http://www.tech-man.com
DISPLAY
[9]
TRK GROUP
MODE:SEQUENTIAL
[81]
TRK GROUP
MODE:SEQUENTIAL
[81]
TRK GROUP
MEMBER 01:NONE
[81]
TRK GROUP
MEMBER 05:NONE
[81]
TRK GROUP
MEMBER 01:705
3-136 Chapter 3
Programming Using MMCs
604
ASSIGN STATION TO PAGE ZONE
Allows the technician to assign a keyset to any of the four internal paging zones and all page (page plus ∗).
The total number of keysets that can receive a page is limited to 12. A keyset may be assigned to more than
one zone.
The assignment is controlled by the use of class marks. If a keyset is flagged as “1” in a zone column, it will
receive pages for that zone. If the keyset is flagged as “0,” it will not receive pages for that zone. Keysets
can receive pages for more than one zone.
PROGRAM KEYS
UP & DOWN
KEYPAD
SOFT KEYS
SPK
HOLD
Used to scroll through options
Used to enter selections
Move cursor left and right
Used to store data and advance to next MMC
Used to clear entry
ACTION
1. Press TRSF 604
Display shows
2. Enter index number (01–12, e.g., 05)
via dial keypad
OR
Press UP or DOWN key to make selection and press
RIGHT soft key to move cursor
3. Enter station number (e.g., 205) via dial keypad
OR
Press UP or DOWN key to make selection and press
RIGHT soft key to move cursor
4. Move cursor under page zone desired by pressing
UP or DOWN key and enter the digit 1
under zone (e.g. zone 2)
Press RIGHT soft key to return to step 2 to
continue with entries
5. Press TRSF to store and exit
OR
Press SPK to store and advance to next MMC
DEFAULT DATA
No stations assigned
All zone is set
RELATED ITEMS
None
Technical Manuals Online! - http://www.tech-man.com
DISPLAY
ENTRY:STN :1 2 34
01 :NONE:00 0 01
ENTRY:STN :1 2 34
05 :NONE:00 0 01
ENTRY:STN :1234
05 : 205 :00001
ENTRY:STN :123405 :
205 :01001
3-137
605
ASSIGN EXTERNAL PAGE ZONE
Determines which relays will close when external page zone is accessed.
DCS-816 has one external page zone (5).
NOTE
One external page port and one common relay are located on the the base board. The page
relay has default DNs of 361. Optional port is 362(MMC 219)
PROGRAM KEYS
UP & DOWN
KEYPAD
SOFT KEYS
SPK
HOLD
Used to scroll through options
Used to enter selections
Move cursor left and right
Used to store data and advance to next MMC
Used to clear previous entry
ACTION
DISPLAY
1. Press TRSF 605
Display shows first page zone
EXT. PAGE ZONE:(5)
MEMBER 1:361
2. Dial page zone number (e.g., 5)
OR
Use UP or DOWN to select desired page zone numbers
and press RIGHT soft key to move the cursor
3. Dial member number (e.g., 1)
OR
Use UP or DOWN to select member numbers and press
RIGHT soft key to move the cursor
OR
Press LEFT soft key to return to step 2
4. Dial relay number via dial keypad (e.g., 361)
and press RIGHT soft key to return to step 2
OR
Press LEFT soft key to return to step 3 above
5. Press TRSF to store and exit
OR
Press SPK to store and advance to next MMC
DEFAULT DATA
None
RELATED ITEMS
MMC 723
System Key Programming
Technical Manuals Online! - http://www.tech-man.com
EXT. PAGE ZONE:(5)
MEMBER 1:NONE
EXT. PAGE ZONE:(5)
MEMBER 1:
EXT. PAGE ZONE:(5)
MEMBER 1:361
3-138 Chapter 3
Programming Using MMCs
606
ASSIGN SPEED BLOCK
Provides a means of adding or deleting speed dial blocks to the system or an individual keyset. With the
ability to delete a block or blocks of speed dial, it will not be necessary to waste these on such items as
voice mail, DPIMs or stations that do not require the ability to use speed dial.
The Free List shows how many bins are left to be assigned. One block has ten (10) entries. DCS-816 has a
maximum of 500 entries in a system: 300 for System Speed while the rest can be allocated as personal
numbers with a maximum of 50 per–station. For example, if the System Speed block has been assigned as
100 entries then 100 entries can be shared between the extensions.
PROGRAM KEYS
UP & DOWN
KEYPAD
SOFT KEYS
SPEAKER
HOLD
TRSF
Used to scroll through options
Used to enter selections
Move cursor left and right
Used to store data and advance to next MMC
Used to clear entry
To exit programming
ACTION
1. Press TRSF 606
Display shows
2. Press RIGHT soft key to advance cursor to next line
3. Make a selection of SYSTEM or EXT using UP
or DOWN key and press RIGHT soft key to
advance cursor
4. Enter desired EXT number via dial keypad (e.g., 205)
OR
Press UP or DOWN key to make selection and
press RIGHT soft key to advance cursor
5. Enter in valid number for bins (e.g., 0–5 for EXT
or 00–50 for SYSTEM)
OR
Press UP or DOWN key to make selection
OR
Press HOLD key to delete bin(s)
6. Press TRSF to store and exit
OR
Press SPK to store and advance to next MMC
Technical Manuals Online! - http://www.tech-man.com
DISPLAY
FREE LIST:30
SYSTEM:20
FREE LIST:30
SYSTEM:20
FREE LIST:30
EXT201:1
FREE LIST:30
EXT205:1
BUSY LIST:30
EXT205:5
3-139
DEFAULT DATA
System: 200 entries (20 blocks)
Stations: One bin of 10 entries (1 block)
RELATED ITEMS
MMC 705
MMC 706
Assign System Speed Dial
System Speed Dial By Name
Technical Manuals Online! - http://www.tech-man.com
3-140 Chapter 3
Programming Using MMCs
607
UCD OPTIONS
Allows the UCD group assigned in MMC 601 to have more specific values for several attributes. If UCD
GROUP has not been programmed in the system, you may be presented with a warning and not allowed to
enter this MMC.
NOTE
Can be made UCD group no. 507~509.
OPTION
DIAL 0
FIRST MSG on AA card when all agents are unable to answer calls.
DIAL 1
SECOND MSG on AA card when all agents are unable to answer calls.
DIAL 2
EXIT CODE – routes the queued call to the Final Destination assigned in this MMC.
DIAL 3
RETRY COUNT – SECOND MSG will be cycled with MOH till this counter is reached.
DIAL 4
FINAL DESTINATION – if the call is not answered by the time RETRY COUNT is
reached, it will be routed over this destination. If you press the 19th programmable button
on a 24B keyset you can enter an AA Plan number.
DIAL 5
RING NEXT TIME – specifies how long ringing at an agent will last. After this time,
ringing stops, the agent is logged–out from the group and ringing starts at the next idle
agent.
DIAL 6
UCD RECALL TIME – determines length of MOH between MSGs. This is disabled if set
to zero.
DIAL 7
MOH SOURCE – specifies MOH source to be presented to the caller.
DIAL 8
WRAP–UP TIME – no calls are presented during this time.
DIAL 9
AUTO LOGOUT – when no answer, logout automatically and transfer
next member.
RANGE
FIRST MSG:
SECOND MSG:
EXIT CODE:
RETRY COUNT:
FINAL DEST:
RING NEXT TIME:
UCD RECALL TIME:
MOH SOURCE:
WRAP–UP TIME:
AUTO LOGOUT:
01 – 64
01 – 64
NONE, 0–9, *, #
00 – 99
NONE, STATION, STATION GRP, AA PLAN NO(01-12)
00 – 99 sec
00 – 99 sec
TONE, NONE, 371.
000 – 250 sec
YES/NO
Technical Manuals Online! - http://www.tech-man.com
3-141
ACTION
DISPLAY
1. Press TRSF 607
Display shows
[507] UCD GROUP
FIRST MSG : NONE
2. Dial UCD group number
OR
Press UP or DOWN key
Press RIGHT soft key
[507] UCD GROUP
FIRST MSG : NONE
3. Dial UCD OPTION number (e.g. 1 for 2nd MSG)
OR
Press UP or DOWN key
Press RIGHT soft key
4. Dial MSG number
OR
Press UP or DOWN key
Press RIGHT soft key
[507] UCD GROUP
SECOND MSG : 01
5. Press TRSF to store and exit
OR
Press SPK to store and advance to next MMC
DEFAULT DATA
FIRST MSG:
SECOND MSG:
EXIT CODE:
RETRY COUNT:
FINAL DESTINATION:
RING NEXT TIME:
UCD RECALL TIME:
MOH SOURCE:
WRAP–UP TIME:
AUTO LOGOUT:
61
62
None
03
500
30 sec
10 sec
None
10 sec
No
RELATED ITEMS
MMC 601
[507] UCD GROUP
SECOND MSG : NONE
Assign Station Group
Technical Manuals Online! - http://www.tech-man.com
3-142 Chapter 3
Programming Using MMCs
608
ASSIGN CLIP REVIEW BLOCK
Provides a means of adding or deleting CLIP review blocks to an individual keyset. With the ability to delete
a block or blocks of speed dial, it will not be necessary to waste these on such items as voice mail, DPIMs or
keysets that do not have displays. The Free List shows how many bins are left to be assigned. The system
automatically assigns 10 bins to each keyset. Each keyset may be assigned a maximum of 50 bins.
PROGRAM KEYS
UP & DOWN
KEYPAD
SOFT KEYS
SPK
HOLD
Used to scroll through options
Used to enter selections
Move cursor left and right
Used to store data and advance to next MMC
Used to clear previous
ACTION
1. Press TRSF 608
Display shows
2. Dial EXT number (e.g., 205)
OR
Use UP and DOWN to select station and press
RIGHT soft key to move cursor
3. Enter number of entries (e.g., 50)
OR
Press UP or DOWN to select
OR
Press HOLD key to delete bin(s)
4. Press TRSF to store and exit
OR
Press SPK to store and advance to next MMC
DEFAULT DATA
One bin of ten (10) entries
RELATED ITEMS
None
Technical Manuals Online! - http://www.tech-man.com
DISPLAY
[201] REVIEWBLK
10 : 0180 FREE
[205] REVIEW BLK
10 : 200 FREE
[205] REVIEW BLK
50 : 0140 FREE
3-143
700
COPY COS CONTENTS
Provides the flexibility so that the technician can create a copy of a selected class of service or create
another class of service options easily without the interruption of an existing class of service.
PROGRAM KEYS
UP & DOWN
KEYPAD
SOFT KEYS
SPK
“F” KEY
Used to scroll through options
Used to enter selections
Move cursor left and right
Used to store data and advance to next MMC
Used to advance to MMC 701
ACTION
DISPLAY
1. Press TRSF 700
Display shows
COPY COS ITEMS
COS 01→COS 01
2. Dial selected COS to copy (e.g., 05)
OR
Press UP or DOWN key to select COS and press RIGHT soft
key to move cursor and advance to next step
3. Dial target COS (e.g., 06)
OR
Press UP or DOWN key to select COS and press RIGHT soft
key to move cursor back to step 2
4. Press F key to advance to MMC 701 and press
RIGHT soft to advance cursor
5. Press TRSF to store and exit
OR
Press SPK to store and advance to next MMC
DEFAULT DATA
None
RELATED ITEMS
MMC 701
Assign COS Contents
Technical Manuals Online! - http://www.tech-man.com
COPY COS ITEMS
COS 05→COS 01
COPY COS ITEMS
COS 05→COS 06
COS CONTENTS(06)
TOLL LEVEL:A
3-144 Chapter 3
Programming Using MMCs
701
ASSIGN COS CONTENTS
Similar to MMC 700 but does not allow a copy command. This MMC is primarily used for the creation of a
new class of service. If the feature of unsupervised conference is allowed, a programmed CONF key must be
available to allow reentry into conference call.
PROGRAM KEYS
UP & DOWN
KEYPAD
SOFT KEYS
SPK
Used to scroll through options
Used to enter selections
Move cursor left and right
Used to store data and advance to next MMC
TOLL LEVEL OPTIONS
DIAL DIGIT
0
1
2
3
4
5
6
7
Technical Manuals Online! - http://www.tech-man.com
TOLL LEVEL
A
B
C
D
E
F
G
H
3-145
ACTION
1. Press TRSF 701
Display shows
2. Dial in COS (e.g., 06)
OR
Press UP or DOWN key to select COS and press RIGHT soft
key to move cursor to toll level
3. Dial toll level (e.g., 2—see above list)
OR
Press UP or DOWN key to select new level of TOLL
OR
Press RIGHT soft key to advance to COS options
4. Dial in COS option (e.g., 012—see option list below
OR
Press UP or DOWN key to select option and press RIGHT soft
key to move cursor
5. Dial 0 for NO or 1 for YES
OR
Press UP or DOWN key to select option
Press LEFT soft key to return to step 4
Press RIGHT soft key to return to step 2
6. Press F key to enter MMC 700 if copy of COS to
another COS is required
(Refer to MMC 700 for copying)
7. Press TRSF to store and exit
OR
Press SPK to store and advance to next MMC
Technical Manuals Online! - http://www.tech-man.com
DISPLAY
COS CONTENTS(01)
TOLL LEVEL:A
COS CONTENTS(06)
TOLL LEVEL:A
COS CONTENTS(06)
TOLL LEVEL:c
COS CONTENTS(06)
012:DND
:YES
COS CONTENTS(06)
012:DND
: NO
COPY COS ITEMS
COS 05→COS 06
3-146 Chapter 3
Programming Using MMCs
COS FEATURE LIST BY OPTION NUMBER
000
001
002
003
004
005
006
007
008
009
010
012
013
014
015
016
019
020
021
022
023
025
026
027
028
030
031
032
033
034
035
036
037
038
039
040
041
042
039
044
045
046
047
048
049
050
051
052
053
054
055
056
057
058
059
AA CALER
ALM CLR
AUTO RDL
CALLBACK
CLIP ABN
CLIP INQ
CLIP INV
CONFER.
DALM CLR
DAY/NIG.
DIRECT.
DND
DNDOVRD
DOOR
DSS
DTS
EXT FWD
FEATURE
FLASH
FOLLOW-ME
FORWARD
GRP I/O
HOLD
HOT LINE
INTERCOM
MESSAGE
MM PAGE
NEW CALL
OHVAED
OHVAING
ONEA2
OPERATOR
OUT TRSF
OVERRIDE
PAGE 0
PAGE 1
PAGE 2
PAGE 3
PAGE 4
PAGE 5
PAGE 6
PAGE 7
PAGE 8
PAGE 9
PAGE ✱
PICKUP
SECURE
SSPD TOL
STN LOCK
STNGRP 01
STNGRP 02
STNGRP 03
STNGRP 04
STNGRP 05
STNGRP 06
Technical Manuals Online! - http://www.tech-man.com
Auto answer control by caller
Alarm sensor ring answer
Retry on busy
Callback
CID abandoned
CID inquiry for review
CID Invalid
Conference
DISA alarm ring clear
Change day/night mode
Directory dial
Do Not Disturb
DND override
Door ring answer
Direct station select
Direct trunk select
External call forward
FEATURE
Trunk flash
Follow Me call forward
Call forward
Group in/out
Hold
Hot line
Intercom call
Message
Meet me page
New call
OHVAed
OHVAing
1A2 emulation
Operator
Outgoing transfer
Override
Page zone 0 PAGING
Page zone 1 PAGING
Page zone 2 PAGING
Page zone 3 PAGING
Page zone 4 PAGING
Page zone 5 PAGING
Page zone 6 PAGING
Page zone 7 PAGING
Page zone 8 PAGING
Page zone 9 PAGING
Page zone ✱PAGING
Call pickup
Override secure
System speed dial toll check
Station locking
Station group 01 calling
Station group 02 calling
Station group 03 calling
Station group 04 calling
Station group 05 calling
Station group 06 calling
3-147
060
061
062
063
085
087
088
089
090
098
099
100
STNGRP 07
STNGRP 08
STNGRP 09
STNGRP 10
SYS SPD
TRKGRP01
TRKGRP02
TRKGRP03
TRKGRP04
UNCO CNF
VM AREC
VM AME
101
102
103
104
105
112
VM REC
VM STN01
VM STN02
VM STN03
VM STN04
ABSENCE
Station group 07 calling
Station group 08 calling
Station group 09 calling
Station group 10 calling
System speed dial
Trunk group 01 calling
Trunk group 02 calling
Trunk group 03 calling
Trunk group 04 calling
CO to CO Conference
Auto Record (SVM-400)
Answer Machine Emulation(SVM400)
Call Record (SVM-400)
SVM-400 port 1 calling
SVM-400 port 2 calling
SVM-400 port 3 calling
SVM-400 port 4 calling
Absence
DEFAULT DATA
OVERRIDE = NO
Else = YES
RELATED ITEMS
MMC 700
MMC 702
MMC 703
Copy COS Contents
Toll Deny Table
Toll Allowance Table
Toll Restriction
Technical Manuals Online! - http://www.tech-man.com
3-148 Chapter 3
Programming Using MMCs
702
TOLL DENY TABLE
Provides a way to make toll restriction (call barring) very easy and flexible. There are 200 entries allowed in
the deny table and each entry index can be assigned to a class of service. Each index can have up to 12 digits.
With the use of wild cards (MMC 704 Assign Wild Character), more flexibility can be built into toll
restriction. Wild cards can be used repeatedly in the dial string, limited only to what is allowed or denied in
MMC 704. There are six toll levels, B to G, that are programmable. Toll level A is set as unrestricted by
default and toll level H is set as in–house only by default.
PROGRAM KEYS
UP & DOWN
KEYPAD
SOFT KEYS
SPK
HOLD
Used to scroll through options
Used to enter selections
Move cursor left and right
Used to store data and advance to next MMC
Used to clear previous entry
WILD CARD KEY
BUTTON
19
20
21
DIAL
0
1
2
ACTION
1. Press TRSF 702
Display shows
2. Dial index number 001–200 (e.g., 005)
OR
Press UP or DOWN key to select index and press RIGHT soft
key to move cursor and enter toll pattern via dial pad (e.g., 212)
OR
Enter wild card (e.g., 21X) from above list and press RIGHT
soft key to move cursor to COS options
WILD CARD
X
Y
Z
DISPLAY
DENY(001):BCDEFG
:000000
DENY(005):BCDEFG
:0 0 0 0 0 0
DENY(005):BCDEFG
212
:000000
DENY(005):BCDEFG
21X
:000000
3. Press UP or DOWN key to move cursor along line until under
toll class mark (e.g., E)
Enter a 1 for YES or 0 for NO and press RIGHT soft key to
return to step 1
OR
Press LEFT soft key to return to step 2
4. Press TRSF to store and exit
OR
Press SPK to store and advance to next MMC
DEFAULT DATA
All entries are set to 0
Technical Manuals Online! - http://www.tech-man.com
DENY(001):BCDEFG
212
:000100
3-149
RELATED ITEMS
MMC 301
MMC 701
MMC 703
MMC 704
Assign Station COS
Assign COS Contents
Toll Allowance Table
Assign Wild Character
Technical Manuals Online! - http://www.tech-man.com
3-150 Chapter 3
Programming Using MMCs
703
TOLL ALLOWANCE TABLE
Provides a way to make toll restriction very easy and flexible. There are 200 allowable entries in the allow
table and each entry index can be assigned to a class of service. Each index can have up to 12 digits. With
the use of wild cards (MMC 704 Assign Wild Character), more flexibility can be built into toll restriction.
There are six toll levels, B to G, that are programmable. Toll level A is set as unrestricted by default, and toll
level H is set as in–house only by default.
PROGRAM KEYS
UP & DOWN
KEYPAD
SOFT KEYS
SPK
HOLD
Used to scroll through options
Used to enter selections
Move cursor left and right
Used to store data and advance to next MMC
Used to clear previous entry
WILD CARD KEY
BUTTON
19
20
21
DIAL
0
1
2
ACTION
1. Press TRSF 703
Display shows
2. Dial in index number 001–200 (e.g., 005)
OR
Press UP or DOWN key to select index and press
RIGHT soft key to move cursor and enter toll pattern
via dial pad (e.g., 212)
OR
Enter wild card (e.g., 21X) from above list and press RIGHT
soft key to move cursor to COS options.
WILD CARD
X
Y
Z
DISPLAY
ALOW(001):BCDEFG
:0 0 0 0 0 0
ALOW(005):BCDEFG
:0 0 0 0 0 0
ALOW(005):BCDEFG
212
:0 0 0 1 0 0
ALOW(005):BCDEFG
21X
:0 0 0 0 0 0
3. Press UP or DOWN key to move cursor along line until under
toll class mark (e.g., E)
Enter a 1 for YES or 0 for NO and press RIGHT soft key to
return to step 1
OR
Press LEFT soft key to return to step 2
4. Press TRSF to store and exit
OR
Press SPK to store and advance to next MMC
Technical Manuals Online! - http://www.tech-man.com
ALOW(001):BCDEFG
212
:0 0 0 1 0 0
3-151
DEFAULT DATA
All entries are set to 0
RELATED ITEMS
MMC 301
MMC 701
MMC 702
MMC 704
Assign Station COS
Assign COS Contents
Toll Deny Table
Assign Wild Character
Technical Manuals Online! - http://www.tech-man.com
3-152 Chapter 3
Programming Using MMCs
704
ASSIGN WILD CHARACTER
Provides flexibility to toll restriction (call barring) when a specific numbering plan is so desired. There are
only three entry tables but more than one digit can be assigned per table if needed.
PROGRAM KEYS
UP & DOWN
KEYPAD
SOFT KEYS
SPK
HOLD
Used to scroll through options
Used to enter selections
Move cursor left and right
Used to store data and advance to next MMC
Used to clear previous entry
ACTION
DISPLAY
1. Press TRSF 704
Display shows
:0123456789✱#
X:000000000000
2. Press UP or DOWN key to select X, Y, or Z (e.g., Z) and press
RIGHT soft key to advance cursor to option line
3. Press UP or DOWN key to move cursor to option digit desired
(e.g., 5) and enter ‘1’ (put ‘1’ under other digits as required)
Press LEFT soft key to return to step 2
OR
Press RIGHT soft key to return to step 1
4. Press TRSF to store and exit
OR
Press SPK to store and advance to next MMC
DEFAULT DATA
All entries set to 0
RELATED ITEMS
MMC 702
MMC 703
Toll Deny Table
Toll
Technical Manuals Online! - http://www.tech-man.com
:0123456789✱#
Z:000000000000
:0123456789✱#
Z:000001000000
3-153
705
ASSIGN SYSTEM SPEED DIAL
Enables the assignment of system speed dialling numbers. There are 500 entries available for programming
(see MMC 606). Each speed dial number consists of a trunk or trunk group access code followed by a
separator and up to 24 digits to be dialled. These dialled digits may consist of 0–9, ✱and #. If the system
recognises a valid trunk or trunk group access number, it will automatically insert the separator.
PROGRAM KEYS
UP & DOWN
KEYPAD
SOFT KEYS
SPK
HOLD
B
C
D
E
F
Used to scroll through options
Used to enter selections
Move cursor left and right
Used to store data and advance to next MMC
Used to clear previous entry
Used to insert a flash code "F"
Used to insert a pause code "P"
Used to insert a pulse/tone conversion code "C"
Used to mask/unmask following digits – shows as "["or "]"
Used to enter name for speed dial bin (see MMC 706)
ACTION
1. Press TRSF 705
Display shows
2. Dial speed index desired (e.g., 505)
OR
Press UP or DOWN key to make selection and
press RIGHT soft key to move cursor
3. Enter access code (e.g., 9/701) plus the phone
number up to 24 digits (digits will scroll under)
and press RIGHT soft key to return to step 2
4. Press F key to toggle to MMC 706 step 3 to enter name
5. Press TRSF to store and exit
OR
Press SPK to store and advance to next MMC
Technical Manuals Online! - http://www.tech-man.com
DISPLAY
SYS SPEED DIAL
500:
SYS SPEED DIAL
505:
SYS SPEED DIAL
505:9–121223456
SYS SPEED NAME
505:
3-154 Chapter 3
Programming Using MMCs
DEFAULT DATA
None
RELATED ITEMS
MMC 606
MMC 706
Assign Speed Block
System Speed Dial By Name
“A” button is button #19 on keyset
“B” button is button #20 on keyset
“C” button is button #21 on keyset
“D” button is button #22 on keyset
“E” button is button #23 on keyset
“F” button is button #24 on keyset
Technical Manuals Online! - http://www.tech-man.com
3-155
706
SYSTEM SPEED DIAL BY NAME
Allows a name (up to 11 characters) to be entered for each system speed dial location. This name enables
the speed dial number to be located when using the directory dial feature. The directory dial feature allows
the display keyset user to select a speed dial location by scanning its name.
Names are written using the keypad. Each press of a key selects a character. Pressing a different key moves
the cursor to the next position. For example, if the directory name is “SAM SMITH," press the number “7”
four times to get the letter “S.” Now press the number “2” once to get the letter “A.” Continue selecting
characters from the table below to complete your message. Pressing the “A” key changes the letter from
upper case to lower case.
NOTE
When the character you want appears on the same dial pad key as the previous character,
press the UP key to move the cursor to the right.
COUNT
DIAL 0
DIAL 1
DIAL 2
DIAL 3
DIAL 4
DIAL 5
DIAL 6
DIAL 7
DIAL 8
DIAL 9
DIAL
1
<
Space
A
D
G
J
M
P
T
W
:
2
>
?
B
E
H
K
N
Q
U
X
=
3
.
,
C
F
I
L
O
R
V
Y
[
4
)
!
@
#
$
%
^
S
Z
]
5
0
1
2
3
4
5
6
7
8
9
The # key can be used for the following special characters: #, space, &, !, :, ?, ., %, $, –, <, >, /, =, [, ], @,
^, (, ), _, +, {, }, |, ;, \, " and ~.
PROGRAM KEYS
UP & DOWN
KEYPAD
SOFT KEYS
SPK
HOLD
TRSF
Used to scroll through options
Used to enter selections
Move cursor left and right
Used to store data and advance to next MMC
Used to clear previous entry
Used to store and exit MMC
Technical Manuals Online! - http://www.tech-man.com
3-156 Chapter 3
Programming Using MMCs
ACTION
DISPLAY
1. Press TRSF 706
Display shows
SYS SPEED NAME
500:
2. Dial system speed entry number (e.g., 505)
OR
Press UP or DOWN to select entry number
and press RIGHT soft key to move cursor
3. Enter name using dial keypad and above table and
press RIGHT soft key to return to step 2
OR
Press the F key to toggle to speed dial number
to return to MMC 705, step 5
4. Press RIGHT soft key to return to step 2 above
OR
Press TRSF to store and exit
OR
Press SPK to store and advance to next MMC
DEFAULT DATA
No names
RELATED ITEMS
MMC 606
MMC 705
Assign Speed Block
Assign System Speed Dial
Technical Manuals Online! - http://www.tech-man.com
SYS SPEED NAME
505:
SYS SPEED NAME
505:TELECOMS
SYS SPEED DIAL
505:
3-157
707
AUTHORISATION CODE
Enables the authorisation feature on a per–class of service selection. There are 30 available entries.
PROGRAM KEYS
UP & DOWN
KEYPAD
SOFT KEYS
SPK
HOLD
Used to scroll through options
Used to enter selections
Move cursor left and right
Used to store data and advance to next MMC
Used to clear previous entry
ACTION
DISPLAY
1. Press TRSF 707
Display shows
AUTHOR.CODE(01)
CODE:
COS: 01
2. Dial code index number 1–30 (e.g., 05)
OR
Press UP or DOWN key to selected index number and press
RIGHT soft key to move cursor
3. Enter authorisation code (maximum four digits) via dial keypad
(e.g., 1234) and press RIGHT soft key to move cursor
4. Enter class of service number 01–30 (e.g., 05)
OR
Press UP or DOWN key to select COS and press RIGHT soft
key to select and return to step 2
5. Press TRSF to store and exit
OR
Press SPK to store and advance to next MMC
DEFAULT DATA
COS: 01
RELATED ITEMS
MMC 305
Assign Forced Code
Technical Manuals Online! - http://www.tech-man.com
AUTHOR.CODE(05)
CODE:_
COS: 01
AUTHOR.CODE(05)
CODE:1234
COS: 01
AUTHOR.CODE(05)
CODE:1234
COS:05
3-158 Chapter 3
Programming Using MMCs
708
ACCOUNT CODE
Enables the account code entry feature. There are 200 available entries.
PROGRAM KEYS
UP & DOWN
KEYPAD
SOFT KEYS
SPK
HOLD
Used to scroll through options
Used to enter selections
Move cursor left and right
Used to store data and advance to next MMC
Used to clear previous entry
ACTION
DISPLAY
1. Press TRSF 708
Display shows
ACCOUNT CODE
001:
2. Dial code index number 1–200 (e.g., 005)
OR
Press UP or DOWN key to selected index number and press
RIGHT soft key to move cursor
3. Enter account code (maximum 12 digits) via dial keypad (e.g.,
1234) and press RIGHT soft key to move cursor back to step 2
4. Press TRSF to store and exit
OR
Press SPK to store and advance to next MMC
DEFAULT DATA
None
RELATED ITEMS
MMC 305
Assign Forced Code
Technical Manuals Online! - http://www.tech-man.com
ACCOUNT CODE
005 :
ACCOUNT CODE
005:123456789012
3-159
709
TOLL PASS CODE
Provides a way to identify the access codes needed to work toll restriction (call barring) when the system is
used with either a PBX or CENTREX–supplied dial tone (PBX ACCESS CODE); there is a maximum of five
(5) entries allowed. Also provides a way of identifying the access codes needed to work toll restriction when
the user operates special CO–provided functions (SPECIAL CODE); a maximum of ten (10) entries is
allowed.
PROGRAM KEYS
UP & DOWN
KEYPAD
SOFT KEYS
SPK
HOLD
Used to scroll through options
Used to enter selections
Move cursor left and right
Used to store data and advance to next MMC
Used to clear previous entry
ACTION
DISPLAY
1. Press TRSF 709
Display shows
PBX ACCESS CODE
1:
2. Enter 0 for PBX ACCESS CODE or 1 for SPECIAL CODE
OR
Press UP or DOWN key to make selection and press RIGHT
soft key to move cursor
3. Enter index number (e.g., 3)
OR
Press UP or DOWN key to make selection and press RIGHT
soft key to move cursor
4. Enter via dial keypad the desired access/feature
code (e.g., 9) and press RIGHT soft key to enter
and return to step 2
5. Press TRSF to store and exit
OR
Press SPK to store and advance to next MMC
DEFAULT DATA
None
RELATED ITEMS
MMC 702
MMC 703
Toll Deny Table
Toll Allowance Table
Technical Manuals Online! - http://www.tech-man.com
SPECIAL CODE
01:_
PBX ACCESS CODE
3: _
SPECIAL CODE
3: _
PBX ACCESS CODE
3:9
3-160 Chapter 3
Programming Using MMCs
710
LCR DIGIT TABLE
The LCR DIGIT TABLE contains all numerical digits for the completion of outgoing call placement. This
table works in conjunction with LCR ROUTE TABLE, LCR TIME TABLE and LCR MODIFY DIGITS
TABLE. There is a maximum of 300 entries with a digit string length of 10 numerical digits. This system
automatically maintains entered digit strings in numerical order. The characters ✱ and # are also accepted
for use with feature codes.
PROGRAM KEYS
UP & DOWN
KEYPAD
SOFT KEYS
SPK
HOLD
Used to scroll through options
Used to enter selections
Move cursor left and right
Used to store data and advance to next MMC
Used to clear previous entry
ACTION
DISPLAY
1. Press TRSF 710
Display shows
LCR DIGIT
DIGIT:
(001)
2. Dial LCR entry (e.g., 005)
OR
Press UP or DOWN to select entry and press RIGHT soft key
to move cursor
LCR DIGIT
DIGIT: _
(005)
3. Enter LCR digit string via the dial keypad and press RIGHT soft
key
OR
Press LEFT soft key to return to step 1
LCR DIGIT (005)
DIGIT:305426
4. Enter digit length (00–31)
Cursor will move to RT (route selection)
Enter RT (1–16)
OR
Press LEFT soft key to return to length value
Valid entry will return you to step 1
LCR DIGIT (005)
LENGTH:10 RT:01
5. Press TRSF to store and exit
OR
Press SPK to store and advance to next MMC
DEFAULT DATA
001:01426
004:0345
007:1
010~016:3~9
002:01459
005:0800
008:121
RELATED ITEMS
MMC 712
LCR Route Table
Technical Manuals Online! - http://www.tech-man.com
003:01893
006:0941
009:2
3-161
711
LCR TIME TABLE
This table gives the flexibility to the system, through the LCR ROUTES, to allow calls placed at any given
time of day to use the least cost trunk route that is available. When LCR ROUTE ADVANCE is allowed, it is
possible for calls to be placed on more expensive trunks on any given time of day. There are four possible
time entries per day; the start time of the next time period is the end time of the previous time period.
PROGRAM KEYS
UP & DOWN
KEYPAD
SOFT KEYS
SPK
HOLD
Used to scroll through options
Used to enter selections
Move cursor left and right
Used to store data and advance to next MMC
Used to clear previous entry
FEATURE KEYS
DAY
SUN
MON
TUE
WED
THU
FRI
SAT
VALUE
0
1
2
3
4
5
6
TIME
A
B
C
D
BAND
0
1
2
3
Technical Manuals Online! - http://www.tech-man.com
LCRT
LCRRT
LCRRT
LCRRT
LCRRT
1
2
3
4
3-162 Chapter 3
Programming Using MMCs
ACTION
DISPLAY
1. Press TRSF 711
Display shows
LCR TIME (SUN:A)
HHMM:0000
LCRT: 1
2. Dial day of week (SUN–SAT, e.g., WED)
OR
Press UP or DOWN to make day selection and press RIGHT
soft key
LCR TIME (WED:A)
HHMM:0000
LCRT: 1
3. Dial time band (A–D, e.g., B)
OR
Press UP or DOWN to make selection and press RIGHT soft
key
LCR TIME (WED:B)
HHMM:0000
TIME: 1
4. Dial time via keypad (24–hour format, e.g. 0800)
Cursor moves to LCRT (reference MMC 712)
Dial entry 1–4
OR
Press UP or DOWN to select entry and press RIGHT
soft key to make entry and return to step 1
OR
If entry is dialled, return to step 2
5. Press TRSF to store and exit
OR
Press SPK to store and advance to next MMC
DEFAULT DATA
All Day 0000 : 1
RELATED ITEMS
MMC 712
LCR Route Table
Technical Manuals Online! - http://www.tech-man.com
LCR TIME (WED:B)
HHMM:0800 LCRT: 1
LCR TIME (WED:B)
HHMM:0800 LCRT:1
3-163
712
LCR ROUTE TABLE
The LCR ROUTE TABLE is responsible for selecting a specific trunk group in the completion of an outward
bound call. This table works in conjunction with LCR DIGIT TABLE, LCR TIME TABLE, LCR COS
TABLE and LCR MODIFIED DIGITS TABLE. After the user dials a valid digit string, the system uses the
LCR ROUTE TABLE to select a specific predetermined trunk group. There is a maximum number of 16
routes available beginning with ROUTE NUMBER 1. If more than one trunk group is available for call
completion, the system uses the first designated trunk group and then starts to utilise succeeding trunk
groups. If all trunk groups are busy in a selected route, call queue becomes active and allocates trunks as
they become available.
PROGRAM KEYS
UP & DOWN
KEYPAD
SOFT KEYS
SPK
HOLD
Used to scroll through options
Used to enter selections
Move cursor left and right
Used to store data and advance to next MMC
Used to clear previous entry
Technical Manuals Online! - http://www.tech-man.com
3-164 Chapter 3
Programming Using MMCs
ACTION
DISPLAY
1. Press TRSF 712
Display shows
LCR ROUTE (01:1)
C:1 G:NONE M: –––
2. Dial LCR ROUTE index number 1–16 (e.g., 05)
OR
Press UP or DOWN to selected index and press RIGHT soft
key to move cursor
LCR ROUTE (05:1)
C:1 G:NONE M: –––
3. Dial TIME BAND index number 1–4 (e.g., 2)
OR
Press UP or DOWN to selected index and press RIGHT soft
key to move cursor
LCR ROUTE (05:2)
C:1 G:NONE M: –––
4. Dial LCR COS number 1–8 (e.g., 4)
OR
Press UP or DOWN to selected COS and press RIGHT soft key
to move cursor
5. Dial TRUNK GROUP access code 0,80–82 (e.g., 81)
OR
Press UP or DOWN to selected access code
and press RIGHT soft key to move cursor
LCR ROUTE (05:2)
C:4 G:81
M:–––
6. Dial MODIFY DIGITS index number 001–100 (e.g., 50)
OR
Press UP or DOWN to selected index number
and press RIGHT soft key to move cursor
OR
Press RIGHT soft key to enter NO index number
7. Press TRSF to store and exit
OR
Press SPK to store and advance to next MMC
DEFAULT DATA
01:1
C:1
G:9
M:001
RELATED ITEMS
MMC 310
MMC 710
MMC 711
MMC 713
LCR Class Of Service
LCR Digit Table
LCR Time Table
LCR Modify Digit Table
Technical Manuals Online! - http://www.tech-man.com
LCR ROUTE (05:2)
C:4 G:NONE M:–––
LCR ROUTE (05:2)
C:4 G:81
M:050
LCR ROUTE (05:2)
C:4 G:81
M:–––
3-165
713
LCR MODIFY DIGIT TABLE
This program entry, also referred to as Out Dial Rules, gives the system the ability to add or delete a digit
string or single digit, if needed, to complete a call. A good example is adding a digit “1”.
The characters ✱ and # can also be entered.
OPTIONMAXIMUM NUMBER OF DIGIT ENTRIES
Number of digits to delete15
Insert (before dialling string) 14
Append (after dialling string)14
DIGIT STRING KEY
Insert String + Digit String (delete) + Append String
PROGRAM KEYS
UP & DOWN
KEYPAD
SOFT KEYS
SPK
HOLD
Used to scroll through options
Used to enter selections
Move cursor left and right
Used to store data and advance to next MMC
Used to clear previous entry
Technical Manuals Online! - http://www.tech-man.com
3-166 Chapter 3
Programming Using MMCs
ACTION
DISPLAY
1. Press TRSF 713
Display shows
LCR MODIFY (001)
NOF DEL DGT:00
2. Enter index number (e.g., 005)
OR
Press UP or DOWN keys to make selection and
press RIGHT soft key to move cursor
LCR MODIFY (005)
NOF DEL DIGT:00
3. Enter number of digits to delete
OR
Press RIGHT soft key to skip step and move cursor to next step
LCR MODIFY (005)
I:_
4. Enter digits to be inserted (e.g., 10288)
OR
Press RIGHT soft key to skip step or to store information and
advance to next step
5. Enter digits to be appended (e.g., 45678)
OR
Press RIGHT soft key to skip step or to store
information and return to step 2.
6. Press TRSF to store and exit
OR
Press SPK to store and advance to next MMC
DEFAULT DATA
002: I:132
003: DEL:03
RELATED ITEMS
MMC 710
LCR Digit Table
Technical Manuals Online! - http://www.tech-man.com
LCR MODIFY (005)
I:10288_
LCR MODIFY (005)
A:45678_
3-167
714
DID NUMBER AND NAME TRANSLATION
Provides a method of assigning an incoming DDI call through ISDN to a specific station. If you have
specified DDI service with your Network Carrier, you can match each DDI number to specific stations using
this command according to the day or night mode. You also have the option, when the destination station is
busy, of deciding if the call is to be camped on to the destination station or of clearing the call.
There is an extra option to adjust the number of digits to be compared by skipping the programmed counts
from the first digit point provided by the Network. If there is no matching number in DDI NUMBER TABLE,
the system routes this call to the operator group.
There is a total of 50 entries in the system and each entry consists of the following fields:
0
DIGITS
1
DAY DEST
2
NIGHT DEST
3
4
CALL WAIT
NOF DEL DGT
5
NAME
Digits to be received (max. 12 digits). Wild card (✱)
is valid entry.
Destination in day mode. Can be a station, a station
group, a trunk or trunk group. Repeat (B) will be
acceptable to bypass.
Destination in day mode. Can be a station, a station
group, a trunk or a trunk group. Repeat (B) will be
acceptable to bypass.
Toggles YES or NO.
Decides the number of digits not to be translated
from the first digit received. This is useful when
the received digits are prefixed with the same
digit(s).
Gives a name to an individual entry (11 characters
maximum).
Names are written using the keypad in the same manner as SPEED NAME. Refer to table below.
COUNT
DIAL 0
DIAL 1
DIAL 2
DIAL 3
DIAL 4
DIAL 5
DIAL 6
DIAL 7
DIAL 8
DIAL 9
DIAL *
1
<
Space
A
D
G
J
M
P
T
W
:
2
>
?
B
E
H
K
N
Q
U
X
=
3
.
,
C
F
I
L
O
R
V
Y
[
4
)
!
@
#
$
%
^
S
Z
]
5
0
1
2
3
4
5
6
7
8
9
The # key can be used for special characters: #, space, &, !, :, ?, ., %, $, –, <, >, /, =, [, ], @, ^, (, ), _, +,
{, }, |, ;, \, " and ~.
Technical Manuals Online! - http://www.tech-man.com
3-168 Chapter 3
Programming Using MMCs
PROGRAM KEYS
UP & DOWN
KEYPAD
SOFT KEYS
SPK
HOLD
Used to scroll through options
Used to enter selections
Move cursor left and right
Used to store data and advance to next MMC
Used to clear previous entry
ACTION
1. Press TRSF 714
Display shows
2. Enter valid index number (e.g., 05) via dial keypad
OR
Press UP or DOWN key to make selection and press RIGHT
soft key to move cursor
3. Enter the DDI number (e.g., 4603831) via dial keypad and press
RIGHT soft key to move cursor
(Max. digits is 12)
4. Enter day destination via dial keypad (e.g., 204)
OR
Press UP or DOWN key to make selection and press RIGHT
soft key to move cursor
5. Enter night destination via dial keypad (e.g., 204)
OR
Press UP or DOWN key to make selection and press RIGHT
soft key to move cursor
DISPLAY
DID DIGIT (01)
DGT:2✱✱
DID DIGIT (05)
DGT:
DID DIGIT (05)
DGT:4603831
DID DIGIT (05)
→D:204
N:
DID DIGIT (05)
→D:204
N:204
6. Enter 1 for YES (call waiting) or 0 for NO (no call waiting)
OR
Press UP or DOWN key to make selection and press RIGHT
soft key to move cursor
DID DIGIT (05)
CW: NO
DELETE:0
7. Enter digits to be deleted via dial keypad
OR
Press UP or DOWN key to make selection and press RIGHT
soft key to move cursor
DID DIGIT (05)
CW: NO
DELETE:3
8. Enter name using above table and press RIGHT soft key to
return to step 2
9. Press TRSF to store and exit
OR
Press SPK to store and advance to next MMC
Technical Manuals Online! - http://www.tech-man.com
DID DIGIT (05)
NAME:_
3-169
DEFAULT DATA
There are four entries (01, 02, 03 and 04)
DIGITS
DAY DEST
NIGHT DEST
CALL WAIT
NOF DEL DGT
NAME
01
2✱✱
B
B
No
0
NONE
02
3✱✱
B
B
No
0
NONE
RELATED ITEMS
MMC 419
BRI Option
Technical Manuals Online! - http://www.tech-man.com
03
5✱✱
B
B
No
0
NONE
04
7✱✱✱
B
B
No
0
NONE
3-170 Chapter 3
Programming Using MMCs
715
PROGRAMMED STATION MESSAGE
Allows a 16–character (max.) custom message to be programmed. Messages are written via the keypad.
Each press of a key selects a character. Pressing a different key moves the cursor to the next position. For
example, if the message is “Sunbathing,” press the number “7” four times to get the letter “S.” Now press
the number “8” twice to get the letter “U.” Continue selecting characters from the table below to complete
your message. Pressing the “A” key changes the letter from upper case to lower case.
NOTE
When the character you want appears on the same dial pad key as the previous character,
press the UP key to move the cursor to the right or the DOWN key to move the cursor to the
left.
COUNT
DIAL 0
DIAL 1
DIAL 2
DIAL 3
DIAL 4
DIAL 5
DIAL 6
DIAL 7
DIAL 8
DIAL 9
DIAL *
1
<
Space
A
D
G
J
M
P
T
W
:
2
>
?
B
E
H
K
N
Q
U
X
=
3
.
,
C
F
I
L
O
R
V
Y
[
4
)
!
@
#
$
%
^
S
Z
]
5
0
1
2
3
4
5
6
7
8
9
The # key can be used for the following special characters: #, space, &, !, :, ?, ., %, $, –, <, >, /, =, [, ], @,
^, (, ), _, +, {, }, |, ;, \, " and ~.
PROGRAM KEYS
UP & DOWN
KEYPAD
SOFT KEYS
SPK
HOLD
“A” KEY
Used to scroll through options
Used to enter selections
Move cursor left and right
Used to store data and advance to next MMC
Used to clear previous entry
Toggles from upper case to lower case
Technical Manuals Online! - http://www.tech-man.com
3-171
ACTION
DISPLAY
1. Press TRSF 715
Display shows
PGM.MESSAGE(01)
IN A MEETING
2. Enter index number (e.g., 11)
OR
Press UP or DOWN arrow to make selection and press RIGHT
soft key to move cursor
PGM.MESSAGE(11)
EMPTY MESSAGE
3. Enter message via the dial keypad using the above table
(maximum 16 characters)
Use “A” key to toggle uppercase/lowercase
Press RIGHT soft key to return to step 2 above
PGM.MESSAGE(11)
Sunbathing
4. Press TRSF to store and exit
OR
Press SPK to store and advance to next MMC
DEFAULT DATA
Ten programmed messages
01. IN A MEETING
02. OUT ON A CALL
03. OUT TO LUNCH
04. LEAVE A MESSAGE
05. PAGE ME
06. OUT OF TOWN
07. IN TOMORROW
08. RETURN AFTERNOON
09. ON VACATION
10. GONE HOME
(Messages 11–20 are not used)
RELATED ITEMS
MMC 115
Set Programmed Message
Technical Manuals Online! - http://www.tech-man.com
3-172 Chapter 3
Programming Using MMCs
716
UK LCR OPTION
This MMC provides UK LCR options. Before using this MMC, make sure you have successfully run MMC
812 to set the country code.
0 NETWORK CODE
1 PIN CODE
2 CCC OPTION
3 STATION PIN NO
NOTE
Provides secondary network access code when the call is routed to the secondary
network. 16 entries maximum (each 10 digits maximum in length).
Assigns PIN code used when the call is routed to secondary 131 MCL network.
Selects Call Cost Option and is related only to 131 Mercury service.
Assigns individual users to selected PIN codes in the system.
The second entry may be selected as a primary secondary network. By default, this is 132
(MCL Digital Access). If dialled digits are not matched to the entry in the LCR DIGIT TABLE
(MMC 710) and start with 0, the network code in the second entry will be dialled out by the
system prior to transmitting dialled digit.
PROGRAM KEYS
UP & DOWN
KEYPAD
SOFT KEYS
SPK
HOLD
Used to scroll through options
Used to enter selections
Move cursor left and right
Used to store data and advance to next MMC
Used to clear previous entry
Technical Manuals Online! - http://www.tech-man.com
3-173
ACTION
DISPLAY
1. Press TRSF 716
Display shows
NETWORK
1:
2. Enter item number (e.g., 1)
OR
Press UP or DOWN key to make selection and press RIGHT
soft key.
3. Enter index number (e.g., 3)
OR
Press UP or DOWN key to make selection and press RIGHT
soft key
OR
Press LEFT soft key to return to step 2
4. Enter the desired access via dial keypad and press RIGHT soft
key to enter and return to step 3
5. Press TRSF to store and exit
OR
Press SPK to store and advance to next MMC
DEFAULT DATA
NETWORK CODE:
PIN CODE:
CCC OPTION:
STATION PIN NO:
2:132, 4:0000, Others: None
None
None
All stations are 1
RELATED ITEMS
MMC 710
MMC 711
MMC 712
MMC 713
MMC 812
LCR Digit Table
LCR Time Table
LCR Route Table
LCR Modify Digit Table
Country Code
Technical Manuals Online! - http://www.tech-man.com
PIN
1:
CODE
PIN
3:
CODE
CODE
PIN CODE
3:3040506
3-174 Chapter 3
Programming Using MMCs
718
MY AREA CODE
This MMC is used for handling CID received from ISDN line for Memory or CID Review dial use.
In some situation, crude CLI from network is not the type of later dialing purpose. There is a content which
identifying what type of zonal call is being progressed, i.e., Type of Number specified in ETSI.
According to Specification, Types of numbers could be:
COUNTRYCall from International.
AREACall from Intra/Inter Area in a country.
PROGRAM KEYS
UP & DOWN
KEYPAD
SOFT KEYS
SPK
HOLD
ANS/RLS
Used to scroll through options
Used to enter selections
Move cursor left and right
Used to store data and advance to next MMC
Used to clear previous entry
Used to select ALL
ACTION
1. Press TRSF 718
Display shows
2. Enter 0 for COUNTRY or 1 for AREA
OR
Press UP or DOWN keys to make selection and
press RIGHT soft key to move cursor
3. Enter area code (max. 4 digits) via dial keypad(e.g.,2) and
Press RIGHT soft key to move cursor back to step 2.
4. Press TRSF to store and exit
OR
Press SPK to store and advance to next MMC
DEFAULT DATA
COUNTRY: International call code for selected country at MMC 812
RELATED ITEMS
CID REVIEW SAVE/DIAL
CID ABANDONED LIST
Technial Manuls Onlie! - htp:/w.ec-mano
DISPLAY
MY AREA CODE
AREA
:
MY AREA CODE
COUNTRY :
MY AREA CODE
AREA
:2
3-175
720
COPY KEY PROGRAMMING
Provides a tool for duplicating key assignment from one keyset to another. This can be done on a per–station
basis or on all stations, but not on a group of stations. One limitation is that the original and target keysets
must be of the same type (i.e. same number of buttons.)
PROGRAM KEYS
UP & DOWN
KEYPAD
SOFT KEYS
SPK
HOLD
ANS/RLS
Used to scroll through options
Used to enter selections
Move cursor left and right
Used to store data and advance to next MMC
Used to clear previous entry
Used to select ALL
ACTION
DISPLAY
1. Press TRSF 720
Display shows
[201] COPY KEY
FROM:NONE
2. Enter the station number to copy to (e.g., 205)
OR
Press UP or DOWN keys to make selection and
press RIGHT soft key to move cursor
[205] COPY KEY
FROM:NONE
3. Enter station number to copy from (e.g., 203) and cursor
returns to step 2
OR
Press UP or DOWN keys to make selection
[205] COPY KEY
FROM:203
4. Press RIGHT soft key to return to step 2
OR
Press TRSF to store and exit
OR
Press SPK to store and advance to next MMC
DEFAULT DATA
None
RELATED ITEMS
MMC 107
MMC 721
MMC 722
MMC 723
Key Extender
Save Station Key Programming
Station Key Programming
System Key Programming
Technical Manuals Online! - http://www.tech-man.com
3-176 Chapter 3
Programming Using MMCs
721
SAVE STATION KEY PROGRAMMING
Provides a service tool which minimises the accidental loss of programmable keys on DCS-816 keysets. The
method of operation is simple—first the data is saved and then the station can be replaced with another
station type or the keys can be reprogrammed to other features. Once testing or replacement is completed,
the data can be restored to the individual station, providing the same type is in place.
NOTE
This program is not to be confused with AUTO SET RELOCATE. MMC 721 is for saving and
restoring the same electronic device type at that port.
PROGRAM KEYS
UP & DOWN
KEYPAD
SOFT KEYS
SPK
Used to scroll through options
Used to enter selections
Move cursor left and right
Used to store data and advance to next MMC
ACTION
DISPLAY
1. Press TRSF 721
Display shows
[201] SAVE KEY
RESTORE
2. Enter desired station number (e.g., 205)
OR
Press UP or DOWN key to make selection and press RIGHT
soft key
3. Press UP or DOWN key to make function selection
(e.g., SAVE)
4. Press RIGHT soft key to enter and return to step 2
OR
Press TRSF to store and exit
OR
Press SPK to store and advance to next MMC
DEFAULT DATA
None
RELATED ITEMS
MMC 107
MMC 722
MMC 723
Key Extender
Station Key Programming
System Key Programming
Technical Manuals Online! - http://www.tech-man.com
[205] SAVE KEY
RESTORE
[205]
SAVE
SAVE KEY
3-177
722
STATION KEY PROGRAMMING
Allows the customizing of programmable keys on specific electronic keysets on the DCS-816 system.
Buttons 1 and 2 are set as CALL buttons by default. Features are entered via dial pad keys by pressing the
dial pad number the required steps to select the feature. For example, for OHVA, the number 6 is pressed
three times. If the BOSS key is required, press 2 for the first letter B and then use the UP or DOWN key to
change the selection from BARGE to BOSS.
DIAL KEYPAD
COUNT→
DIAL 2
DIAL 3
DIAL 4
DIAL 5
DIAL 6
DIAL 7
DIAL 8
1
AAPLAY
DICT
GPIK
LCR
MMPA
PAGE
TG
2
BARGE
EXTMIC
HDSET
LCR
NEW
PAGE
UA
3
CALL
FAUTO
IG
LCR
OHVA
REJECT
VG
4
SETMG
PROGRAM KEYS
UP & DOWN
KEYPAD
SOFT KEYS
SPK
HOLD
Used to scroll through options
Used to enter selections
Move cursor left and right
Used to store data and advance to next MMC
Used to clear previous entry
Technical Manuals Online! - http://www.tech-man.com
3-178 Chapter 3
Programming Using MMCs
ACTION
1. Press TRSF 722
Display shows
2. Enter station number (e.g., 205)
OR
Press UP or DOWN key to make selection and press RIGHT
soft key
3. Enter key number (e.g., 18)
OR
Press UP or DOWN key to make selection and press RIGHT
soft key
OR
Press programmable button
4. Using table above, press dial key pad number to make selection
OR
Press UP or DOWN key to make selection and press RIGHT
soft key to advance cursor to step 5 to enter extender, if
required, or to return to step 2
5. If required, enter extender (e.g., 03)
OR
Press UP or DOWN key to make selection and press RIGHT
soft key to return to step 2
6. Press TRSF to store and exit
OR
Press SPK to store and advance to next MMC
Technical Manuals Online! - http://www.tech-man.com
DISPLAY
[201]
KEY (MAST)
01:CALL1 →
[205]
KEY (MAST)
01:CALL1 →
[205]
KEY (MAST)
18:NONE →_
[205]
KEY (MAST)
18:NONE →GPIK_
[205]
KEY (MAST)
18:NONE →GPIK03
3-179
DEFAULT DATA: (all blank for Newzealand)
24–Button Keyset
01:CALL1
07:NONE
13:NONE
19:NONE
02:CALL2
08:NONE
14:NONE
20:NONE
03:NONE
09:NONE
15:NONE
21:NONE
04:NONE
10:NONE
16:NONE
22:NONE
05:NONE
11:NONE
17:NONE
23:NONE
06:NONE
12:DIR
18:NONE
24:MSG
12–Button Keyset
01:CALL1
07:NONE
02:CALL2
08:NONE
03:NONE
09:NONE
04:NONE
10:NONE
05:NONE
11:NONE
7–Button Keyset
01:CALL1
04:NONE
02:CALL2
05:NONE
07:MSG
48–Button Add–On Module
01:DS
02:DS
03:DS
04:DS
05:DS
06:DS
07:DS
08:DS
09:DS
10:DS
11:DS
12:DS
13:DS
14:DS
15:DS
16:DS
17:DS
18:DS
19:DS
20:DS
21:DS
22:DS
23:DS
24:DS
25:DS
26:DS
27:DS
28:DS
29:DS
30:DS
31:DS
32:DS
33:DS
34:DS
35:DS
36:DS
06:DIR
12:MSG
6–Button keyset
03:NONE
06:NONE
01:CALL1
03:DT701
05:DT703
02:CALL2
04:DT702
06:SPD
32–Button Add–On Module
37S
38:DS
39:DS
40:DS
41:DS
42:DS
43:DS
44:DS
45:DS
46:DS
47:DS
48:DS
Technical Manuals Online! - http://www.tech-man.com
01:DS
05:DS
09:DS
13:DS
17:DS
21:DS
25:DS
29:DS
02:DS
06:DS
10:DS
14:DS
18:DS
22:DS
26:DS
30:DS
03:DS
07:DS
11:DS
15:DS
19:DS
23:DS
27:DS
31:DS
04:DS
08:DS
12:DS
16:DS
20:DS
24:DS
28:DS
32:DS
3-180 Chapter 3
Programming Using MMCs
Programmable Key Assignments
AAPLAY
AAREC
AB
ABAND
ACCT
ALARM
AN/RLS
BARGE
BLOCK
BOSS
CALL
CAMP
CANMG
CBK
CLIP
CONF
CR
CS
CSNR
DICT
DIR
DLOCK
DND
DP
DROP
DS
DT
EXTMIC
FAUTO
FLASH
FWRD
GPIK
HDSET
HLDPK
IG
INQIRE
ISPY
LCR
LISTN
LNR
MMPA
MMPG
MSG
MUTE
NEW
NIGHT
NND
NXT
OHVA
OPER
PAGE
PAGPK
PARK
PAUSE
AUTO ATTND MESSAGE PLAY
AUTO ATTND MESSAGE RECORD
ABSENCE
ABANDON DATA
ACCOUNT
ALARM RING ANSWER
ANSWER/RELEASE
BARGE–IN
OHVA BLOCK
BOSS / SECRETARY
CALL BUTTON
STATION CAMP ON
MESSAGE CANCEL
CALLBACK
CLIP
CONFERENCE
CALL RECORD (for SVM-400)
UCD CALL WAITING STATUS
CLIP SAVE NUMBER REDIAL
DICTATION
DIRECTORY
DOOR LOCK
DO NOT DISTURB
DIRECT PICK UP
TRANSFER CALL DROP
DSS KEY
DTS KEY
EXTERNAL MIC. (for 28D and 18D)
FORCED AUTO ANSWER
FLASH
CALL FORWARD
GROUP PICK UP
HEADSET MODE ON/OFF
HOLD PICK UP
IN/OUT OF GROUP
CID INQUIRE
CID SPY
LEAST COST ROUTING
GROUP LISTENING
LAST NUMBER REDIAL
MEET ME PAGE ANSWER
MEET ME PAGE
MESSAGE
MUTE
NEW CALL
NIGHT SERVICE
CID NAME/NUMBER/DATE
CID NEXT
OFF HOOK VOICE ANNOUNCE
OPERATOR
PAGE
PICKUP PAGE HOLD
CALL PARK/RETRIEVE
PAUSE
Technical Manuals Online! - http://www.tech-man.com
3-181
PMSG
REJECT
RETRY
REVW
SETMG
SG
SNR
SP
SPD
SPKR
STORE
TG
TIMER
TRSF
UA
VG
VMADM
VMAME
VM
VMMSG
VT
PROGRAMMED STATION MSG
OHVA REJECT
AUTO REDIAL ON BUSY
REVIEW (CLIP)
SET MESSAGE W/O RING
STATION GROUP
SAVED NUMBER REDIAL
SUPERVISOR OF UCD
SPEED DIAL
SPEAKER (for 28D,18D and 8D)
STORE (CLIP)
TRUNK GROUP
TIMER
TRANSFER (for 28D,18D and 8D)
UNIVERSAL ANSWER
VMS GROUP MESSAGE
VM ADMINISTRATION
ANSWER MACHINE EMULATION
VOICE MAIL MEMO
VM MESSAGE KEY
VM TRANSFER
EMS
MMC 107
Key Extender
Technical Manuals Online! - http://www.tech-man.com
3-182 Chapter 3
Programming Using MMCs
723
SYSTEM KEY PROGRAMMING
This MMC is much like MMC 722, Station Key Programming. The main difference is that this MMC is
system–wide rather than on a per–station basis. Features are entered via the dial keypad by pressing
numbers as shown in the table. For example, for OHVA the number 6 is pressed three times. If the BOSS
key is required, press 2 for the first letter B, and then use the UP or DOWN key to change selection from
BARGE to BOSS
DIAL KEYPAD
COUNT
DIAL 2
DIAL 3
DIAL 4
DIAL 5
DIAL 6
DIAL 7
DIAL 8
1
AAPLAY
DICT
GPIK
LCR
MMPA
PAGE
TG
2
BARGE
EXTMIC
HDSET
LCR
NEW
PAGE
UA
3
CALL
FAUTO
IG
LCR
OHVA
SG
VT
24–BTN
12–BTN
not used
6-BTN
not used
5
6
7
8
9
48-BTN AOMs
28–BTN
18–BTN
8-BTN
24B SIMPLE
4
SETMG
TYPE OF SET
0
1
2
3
4
PROGRAM KEYS
UP & DOWN
KEYPAD
SOFT KEYS
SPK
HOLD
Used to scroll through options
Used to enter selections
Move cursor left and right
Used to store data and advance to next MMC
Used to clear previous entry
Technical Manuals Online! - http://www.tech-man.com
3-183
ACTION
1. Press TRSF 723
Display shows
2. Enter type of set via dial keypad ( e.g., 5)
OR
Press UP or DOWN key to make selection and press RIGHT
soft key
3. Enter key number (e.g., 18)
OR
Press UP or DOWN key to make selection and press RIGHT
soft key
4. Using table above, press dial keypad number to make selection
OR
Press UP or DOWN key to make selection and press RIGHT
soft key to advance cursor to step 5 to enter extender, if
required
OR
Press LEFT soft key to return to step 3
5. If required, enter extender (e.g., 03)
OR
Press UP or DOWN key to make selection and press RIGHT
soft key to return to step 2
6. Press TRSF to store and exit
OR
Press SPK to store and advance to next MMC
DEFAULT DATA
(All blank for Newzealand)
Technical Manuals Online! - http://www.tech-man.com
DISPLAY
TYPE:24 BTN SETS
01:CALL1 →
TYPE:24 BTN SETS
01:CALL1 →
TYPE:24 BTN SETS
18:DS
→
TYPE:24 BTN SETS
18:DS
→GPIK
TYPE:24 BTN SETS
18:DS
→GPIK03
3-184 Chapter 3
Programming Using MMCs
24–Button Keyset
01:CALL1
07:NONE
13:NONE
19:NONE
02:CALL2
08:NONE
14:NONE
20:NONE
03:NONE
09:NONE
15:NONE
21:NONE
04:NONE
10:NONE
16:NONE
22:NONE
05:NONE
11:NONE
17:NONE
23:NONE
06:NONE
12:DIR
18:NONE
24:MSG
05:NONE
11:NONE
06:DIR
12:MSG
12–Button Keyset
01:CALL1
07:NONE
02:CALL2
08:NONE
03:NONE
09:NONE
04:NONE
10:NONE
7–Button Keyset
01:CALL1
04:NONE
02:CALL2
05:NONE
07:MSG
6–Button keyset
03:NONE
06:NONE
48–Button Add–On Module
01:DS
02:DS
03:DS
04:DS
05:DS
06:DS
07:DS
08:DS
09:DS
10:DS
11:DS
12:DS
13:DS
14:DS
15:DS
16:DS
17:DS
18:DS
19:DS
20:DS
21:DS
22:DS
23:DS
24:DS
25:DS
26:DS
27:DS
28:DS
29:DS
30:DS
31:DS
32:DS
33:DS
34:DS
35:DS
36:DS
01:CALL1
03:DT701
05:DT703
32–Button Add–On Module
37:DS
38:DS
39:DS
40:DS
41:DS
42:DS
43:DS
44:DS
45:DS
46:DS
47:DS
48:DS
01:DS
05:DS
09:DS
13:DS
17:DS
21:DS
25:DS
29:DS
02:DS
06:DS
10:DS
14:DS
18:DS
22:DS
26:DS
30:DS
Programmable Key Assignments
AAPLAY
AAREC
AB
ABAND
ACCT
ALARM
AN/RLS
BARGE
BLOCK
BOSS
CALL
CAMP
CANMG
CBK
CLIP
CONF
02:CALL2
04:DT702
06:NONE
AUTO ATTND MESSAGE PLAY
AUTO ATTND MESSAGE RECORD
ABSENCE
ABANDON DATA
ACCOUNT
ALARM RING ANSWER
ANSWER/RELEASE
BARGE–IN
OHVA BLOCK
BOSS / SECRETARY
CALL BUTTON
STATION CAMP ON
MESSAGE CANCEL
CALLBACK
CLIP
CONFERENCE
CR
CALL RECORD(for SVM-400)
CS
CSNR
UCD CALL WAITING STATUS
CLIP SAVE NUMBER REDIAL
Technical Manuals Online! - http://www.tech-man.com
03:DS
07:DS
11:DS
15:DS
19:DS
23:DS
27:DS
31:DS
04:DS
08:DS
12:DS
16:DS
20:DS
24:DS
28:DS
32:DS
3-185
DICT
DIR
DLOCK
DND
DP
DROP
DS
DT
EXTMIC
FAUTO
FLASH
FWRD
GPIK
HDSET
HLDPK
IG
INQIRE
ISPY
LCR
LISTN
LNR
MMPA
MMPG
MSG
MUTE
NEW
NIGHT
NND
NXT
OHVA
OPER
PAGE
PAGPK
PARK
PAUSE
PMSG
REJECT
RETRY
REVW
SETMG
SG
SNR
SP
SPD
SPKR
STORE
TG
TIMER
TRSF
UA
DICTATION
DIRECTORY
DOOR LOCK
DO NOT DISTURB
DIRECT PICK UP
TRANSFER CALL DROP
DSS KEY
DTS KEY
EXTERNAL MIC. (for 28D and 18D)
FORCED AUTO ANSWER
FLASH
CALL FORWARD
GROUP PICK UP
HEADSET MODE ON/OFF
HOLD PICK UP
IN/OUT OF GROUP
CID INQUIRE
CID SPY
LEAST COST ROUTING
GROUP LISTENING
LAST NUMBER REDIAL
MEET ME PAGE ANSWER
MEET ME PAGE
MESSAGE
MUTE
NEW CALL
NIGHT SERVICE
CID NAME/NUMBER/DATE
CID NEXT
OFF HOOK VOICE ANNOUNCE
OPERATOR
PAGE
PICKUP PAGE HOLD
CALL PARK/RETRIEVE
PAUSE
PROGRAMMED STATION MSG
OHVA REJECT
AUTO REDIAL ON BUSY
REVIEW (CLIP)
SET MESSAGE W/O RING
STATION GROUP
SAVED NUMBER REDIAL
SUPERVISOR OF UCD
SPEED DIAL
SPEAKER (for 28D,18D and 8D)
STORE (CLIP)
TRUNK GROUP
TIMER
TRANSFER (for 28D,18D and 8D)
UNIVERSAL ANSWER
VG
VMADM
VMAME
VM
VMMSG
VMS GROUP MESSAGE
VOICE MAIL ADMINISTRATION
VOICE MAIL ADMINISTRATION
VOICE MAIL MEMO
VOICE MAIL MESSAGE KEY
VT
VM TRANSFER
Technical Manuals Online! - http://www.tech-man.com
3-186 Chapter 3
Programming Using MMCs
RELATED ITEMS
MMC 107
Key Extender
Technical Manuals Online! - http://www.tech-man.com
3-187
724
DIAL NUMBERING PLAN
Provides the access codes and dialling plan needed for operation of features and programs. The system
comes with a wide range of acceptable numbering plans set as default and the option to customise the
dialling plan. An error message is also provided in case an access/feature code is duplicated.
The following options may be selected:
0
1
2
3
4
5
6
7
STN DIAL NUMBER
TRK DIAL NUMBER
AA DIAL NUMBER
MISC DIAL NUMBER
STNG DIAL NUMBER
TRKG DIAL NUMBER
FEAT DIAL NUMBER
S0 STN DIAL NO.
Determines the station port dialling numbers.
Determines the trunk port dialling numbers.
Determines the auto attendant port dialling numbers.
Determines the miscellaneous port dialling numbers.
Determines the station group dialling numbers.
Determines the trunk group dialling numbers.
Determines the feature codes.
Determines the S0 station dialling number.
Feature codes are entered via the dial keypad, by pressing numbers as shown in the table below. For
example, for OHVA, the number 6 would be pressed three times. If Block Code is required, press 2 for the
first letter B and then use the UP or DOWN key to make the selection from BARGE to BLOCK.
IMPORTANT
Remember that this program is system wide
DIAL KEYPAD
COUNT
DIAL 2
DIAL 3
DIAL 4
DIAL 5
DIAL 6
DIAL 7
DIAL 8
DIAL 9
1
AAPLAY
DICT
GPIK
LCR
MMPA
PAGE
UA
WCOS
2
BARGE
DICT
HDSET
LCR
NEW
REJECT
UA
WCOS
PROGRAM KEYS
UP & DOWN
KEYPAD
SOFT KEYS
SPK
HOLD
Used to scroll through options
Used to enter selections
Move cursor left and right
Used to store data and advance to next MMC
Used to clear previous entry
Technical Manuals Online! - http://www.tech-man.com
3
CAMP
FAUTO
IOG
LCR
OHVA
SETMG
VMSCMT
WCOS
3-188 Chapter 3
Programming Using MMCs
ACTION
DISPLAY
1. Press TRSF 724
Display shows
STN DIAL NUMBER
BDLI01:201 →
2. Enter option number 0–7 (e.g., 4)
OR
Press UP or DOWN key to make selection and press
RIGHT soft key
FEAT DIAL
NUMBER
AAPLAY:NONE →
3. Using table above, press dial keypad number to make selection
OR
Press UP or DOWN key to make selection and press
RIGHT soft key to advance cursor
FEAT DIAL
NUMBER
DICT
:NONE→_
FEAT DIAL
NUMBER
DICT
:NONE→68
4. Enter digits (e.g., 68) via dial keypad
5. Press LEFT soft key to enter change and continue to make
changes
OR
Press RIGHT soft key to enter and return to step 2
If an error message appears indicating duplication of access
code:
Enter 1 for YES for change OR 0 for NO for no change
6. Press TRSF to store and exit
OR
Press SPK to store and advance to next MMC
DEFAULT DATA
STN DIAL NUMBER:
TRK DIAL NUMBER:
AA DIAL NUMBER:
MISC DIAL NUM:
STNG DIAL NUMBER:
TRKG DIAL NUMBER:
FEAT DIAL NUMBER:
ABAND
ABS
ACCT
ALMCLR
AUTH
BARGE
BLOCK
BOSS
CAMP
CANMG
201 ~ 216
701 ~ 708(710: for Australia)
AA : 381 ~ 384
External page: 361
BGM: 371
Common bell : None
Loud bell: None ~
500 ~ 509
0, 80 ~ 82
64
None
47
57
✻
None
None
None
45
42
Technical Manuals Online! - http://www.tech-man.com
SAME DIAL EXIST
CHANGE?
Y:1,N:0
3-189
CBK
CONF
DICT
DIR
DIRPK
DISALM
DLOCK
DND
DNDOVRD
FAUTO
FLASH
FWD
GRPK
HDSET
HLDPK
HOLD
IG
LCR
LISTN
LNR
MMPA
MMPG
MSG
MYGRPK
NEW
NIGHT
OHVA
OPER
PAGE
PAGPK
PARK
PAUSE
PMSG
REJECT
SELF ID
SETMG
SLTMMC
SNR
SPEED
UA
VMADM
VMAME
VMMEMO
VMMSG
WCOS
S0 STN DIAL NO
44
46
None
None
65
58
13
40
None
14
49
60
66
None
12
11
53
None
None
19
56
54
43
#
None
None
None
9
55
10
None
None
48
None
None
41
15
17
16
67
None
None
None
None
59
7801~7816
Technical Manuals Online! - http://www.tech-man.com
3-190 Chapter 3
Programming Using MMCs
725
SMDR OPTIONS
Allows the system administrator to select the information printed on the SMDR report. The following
options may be selected to print on SMDR:
0.
PAGE HEADER
1.
LINE PER PAGE
2.
3.
4.
5.
INCOMING CALL
OUTGOING CALL
AUTHORIZE CODE
SMDR START TIME
6.
IN/OUT GROUP
7.
DND CALL
8.
WAKE–UP CALL
9.
DIRECTORY NAME
10.
CALLER ID DATA
11.
12.
ABANDON CALL
LONG DISTANCE
13.
14.
NO. OF DIAL MASK
DID NUM/NAME
Determines whether a page header prints at the top of each page.
This would normally be turned off if SMDR is being sent to a call
accounting machine.
Selects the length of each page to determine when to print the SMDR
header. The number of lines is in the range 01–99.
Determines whether incoming calls print on SMDR.
Determines whether outgoing calls print on SMDR.
Determines whether authorisation codes print on SMDR.
Determines whether valid calls will include the minimum call time in
total call duration.
Allows a message, IN GROUP or OUT GROUP, to be printed in the
Digits Dialled column each time a station enters or leaves a group.
Allows a message, DND ON or DND OFF, to be printed in the Digits
Dialled column each time a station enters or leaves DND.
Determines whether stations receiving an alarm reminder call print
on SMDR.
Allows the system administrator to enter a 16–character name which
will appear on the SMDR header.
Can be selected to print CLIP data received from the C.O. on
incoming ISDN calls. This option requires the use of a 132–column
printer or an 80–column printer set for condensed print.
If this option is set to YES, unanswered calls will print on SMDR.
Determines whether long distance calls print on SMDR. If this option
is set to YES, can assign the long distance call CODE up to 10 digits.
Determines whether number of masked dial digits print on SMDR.
Determines whether DID number and Name print on SMDR.
The DIRECTORY NAME that appears on the SMDR header is programmed as follows:
Names are written using the keypad. Each press of a key selects a character. Pressing the next key moves
the cursor to the next position. For example, if the directory name is “SAM SMITH,” press the number “7”
three times to get the letter “S.” Now press the number “2” once to get the letter “A.” Continue selecting
characters from the table below to complete your message. Pressing the bottom left programmable key
changes the letter from upper case to lower case.
When the character you want appears on the same dial pad key as the previous character, press the right
soft key to move the cursor to the right.
COUNT
DIAL0
DIAL1
DIAL2
DIAL3
DIAL4
DIAL5
DIAL6
DIAL7
DIAL8
DIAL9
DIAL*
1
<
space
A
D
G
J
M
P
T
W
:
2
>
?
B
E
H
K
N
Q
U
X
=
3
.
,
C
F
I
L
O
R
V
Y
[
Technical Manuals Online! - http://www.tech-man.com
4
)
!
@
#
$
%
^
S
Z
]
5
0
1
2
3
4
5
6
7
8
9
6
3-191
PROGRAM KEYS
UP & DOWN
KEYPAD
SOFT KEYS
SPK
Used to scroll through options
Used to enter selections
Move cursor left and right
Used to store data and advance to next MMC
ACTION
1. Press TRSF 725
Display shows
2. Dial the option number (e.g., 1)
OR
Use the UP and DOWN keys to scroll through
the options and press the RIGHT soft key
to select an option
3. Enter the number of lines per page in the
range 01–99 (e.g., 50)
OR
Use the UP and DOWN keys to change the
number of lines and press the RIGHT soft key to save the data
and return to step 2
DISPLAY
PAGE HEADER
PRINT : YES
LINE PER PAGE
60 LINE / PAGE
LINE PER PAGE
50 LINE / PAGE
OR
LINE PER PAGE
50 LINE / PAGE
THEN
LINE PER PAGE
50 LINE / PAGE
4. If option 0 is selected at step 2
5. If option 2 is selected at step 2
6. If option 3 is selected at step 2
7. If option 4 is selected at step 2
8. If option 5 is selected at step 2
9. If option 6 is selected at step 2
Technical Manuals Online! - http://www.tech-man.com
PAGE HEADER
PRINT : YES
INCOMING CALL
PRINT : NO
OUTGOING CALL
PRINT : YES
AUTHORIZ CODE
PRINT : NO
SMDR START TIME
PRINT : YES
IN/OUT GROUP
PRINT : NO
3-192 Chapter 3
Programming Using MMCs
10. If option 7 is selected at step 2
11. If option 8 is selected at step 2
12. If option 9 is selected at step 2
12 a.Enter the 16–character name as described above
12 b.Press RIGHT soft key to save name and return to step2
13. If option 10 is selected at step 2
14. If option 11 is selected at step 2
15 a. If option 12 is selected at step 2
15 b. If option 12 is selected ‘YES’,
can assign Long Distance Code.
Technical Manuals Online! - http://www.tech-man.com
DND CALL
PRINT : NO
WAKE–UP CALL
PRINT : YES
DIRECTORY NAME
_
DIRECTORY NAME
TELECOMS DCS
DIRECTORYNAME
TELECOMS DCS
CALLER ID DATA
PRINT : YES
ABANDON CALL
PRINT : YES
LONG DISTANCE
PRINT : NO
LONG DISTANCE
00:
3-193
15 c. Select the table number (00-49)
LONG DISTANCE
01:
15 d. Enter the Long Distance Code (max. 10 digits)
16. If option 13 is selected at step 2
NO. OF DIAL ASK
00
17. After all desired options have been selected, press TRSF to exit
OR
Press SPK to exit and advance to next MMC
DEFAULT DATA
Page Header: Yes
Wake–Up Call: Yes
Line Per Page: 66
Directory Name: No default defined
Incoming Call: No
Outgoing Call: Yes
Caller ID Data: Yes
Authorise Code: No
Abandon Call: Yes
SMDR Start Time: Yes
Long Distance: No
In/Out Group: No
No. Of Dial Mask: 00
DND Call:No
DID NUM/NAME: NO
RELATED ITEMS
MMC 300
LONG DISTANCE
01:053
Customer On/Off Per Station
Technical Manuals Online! - http://www.tech-man.com
3-194 Chapter 3
Programming Using MMCs
VM/AA OPTIONS
726
Provides a flexible means of setting in–band signalling for voice mail or auto attendant parameters. There
are eight main options for programming and several sub–options to customise the application. Simple
YES/NO, numeric and alpha characters are required for setting VM/AA.
The following options may be selected for VM/AA operation:
0.
EXT FOR DN1
1.
2.
TRK FOR DN1
EXT FOR DN2
3.
TRK FOR DN2
4.
SEPARATOR
5.
6.
DISCONNECT SIGNAL
CALL TYPE ID
7.
0.
1.
DIRECT CALL
ALL FWD CALL
2.
BSY FWD CALL
3.
NOA FWD CALL
4.
RECALL
5.
DIR TRK CALL
6.
7.
8.
OVERFLOW
DDI CALL
MESSAGE CALL
PROGRESS TONE ID
DTMF information for the station that called the VM/AA port station
that is forwarded to VM/AA port.
DTMF information for the trunk that called the VM/AA port.
DTMF information for the station that originated the call to a station
that is forwarded to a VM/AA port.
DTMF information for the trunk that called a station forwarded to a
VM/AA port.
In cases where DN2 is used, this specific digit is sent between the
DN1 and the DN2 information. Both DN1 and DN2 must be set to
YES for SEPARATOR to be sent.
This signal is sent when the calling station or C.O. line hangs up.
Under this VM/AA option are several customising applications:
A call originating directly from another station in the system.
This indicates that a call was forwarded to the VM/AA port from a
station with CALL FORWARD ALL set.
This indicates that a call was forwarded to the VM/AA port from a
station with CALL FORWARD BUSY set.
This indicates that a call was forwarded to the VM/AA port from a
station with CALL FORWARD NO ANSWER set.
A call is recalling the VM/AA port after being transferred and not
answered.
A C.O. call has gone directly to VM/AA (e.g., trunk 717 DIL to
VM/AA).
A call has OVERFLOWED to the VM/AA port from a station group.
A DDI call has called the VM/AA port.
A message button or message reply feature code has been used to
call the VM/AA port.
DTMF digits can be sent in place of normal system tones. Digits can
be assigned to the following tones:
TONES
0. DIAL TONE
1. BUSY TONE
2. RINGBAK TONE
3. DND NOMORE
4. HDSET ANSWER
5. SPKER ANSWER
Technical Manuals Online! - http://www.tech-man.com
VALUE
NO
NO
NO
NO
NO
NO
3-195
PROGRAM KEYS
UP & DOWN
KEYPAD
SOFT KEYS
SPK
HOLD
A
B
C
Used to scroll through options
Used to enter selections
Move cursor left and right
Used to store data and advance to next MMC
Used in some fields where a value is entered or deleted.
Used to input alpha character "A"
Used to insert alpha character "B"
Used to insert alpha character "C"
ACTION
1. Press TRSF 726
Display shows
DISPLAY
EXT FOR DN1
YES
2. Enter the OPTION number from above list (e.g., 4)
OR
Press UP or DOWN key to make selection
Press LEFT soft key to move cursor
SEPARATOR
NO
3. Enter 1 for YES or 0 for NO
OR
Press UP or DOWN key for selection
Press RIGHT soft key to return to step 2
SEPARATOR
YES
4. If option 0 is selected at step 2
5. If option 1 is selected at step 2
6. If option 2 is selected at step 2
7. If option 3 is selected at step 2
EXT FOR DN1
YES
TRK FOR DN1
YES
EXT FOR DN2
NO
TRK FOR DN2
NO
8. If option 4 is selected at step 2
(A valid entry consists of digits 0–9 or alpha
characters A–C)
SEPARATOR
NO
9. If option 5 is selected at step 2
(A valid entry consists of digits 0–9 or alpha
characters A–C)
DISCONECT SIGNAL
C
Technical Manuals Online! - http://www.tech-man.com
3-196 Chapter 3
Programming Using MMCs
10. If option 6 is selected at step 2
(A valid entry consists of digits 0–9 or alpha
characters A–C)
See above list under CALL TYPE ID options list
CALL TYPE ID
DIRECT CALL : NO
11. If option 7 is selected at step 2
(A valid entry consists of digits 0–9 or alpha
characters A–C)
See above list under CALL PROGRESS TONE
PROGRESS TONE ID
DIAL TONE
:BA
DEFAULT DATA
EXT FOR DN1 = Yes
TRK FOR DN1 = Yes
EXT FOR DN2 = No
TRK FOR DN2 = No
SEPARATOR = No
DISCONNECT SIGNAL = C
CALL TYPE ID
DIRECT CALL:1
ALL FWD CALL:2
BSY FWD CALL:3
NOA FWD CALL:4
RECALL:5
DIR TRK CALL:6
OVERFLOW:7
DDI CALL:8
MESSAGE:9
CALL PROGRESS TONE
DIAL TONE:No
BUSY TONE:No
RINGBACK TONE:No
DND NO MORE:No
HDSET ANSWER:No
SPKER ANSWER:No
RELATED ITEMS
MMC 207
Assign VM/AA Port
Technical Manuals Online! - http://www.tech-man.com
3-197
727
SYSTEM VERSION DISPLAY
Used only for system version display. This is a read–only MMC.
PROGRAM KEYS
SPKUsed to store data and advance to next MMC
ACTION
DISPLAY
1. Press TRSF 727
Display shows
ROM VERSION
’ 98. 07. 16
V1.00
AA VER: AA
’ 97. 02. 10
V3.0
2. Press UP or DOWN key to select card and program version:
AA slot installed card and AA program version.
Expansion slot installed card and program version.
EXP. VER: 4BRI
’ 98. 10. 10. V1.0
If no card is installed, display is NO INSTALL CARD
NOTE
DEFAULT DATA
None
RELATED ITEMS
None
Technical Manuals Online! - http://www.tech-man.com
3-198 Chapter 3
Programming Using MMCs
728
CLIP TRANSLATION TABLE
Allows the system administrator or technician to associate a CLIP number received from the central office
with a name programmed in this translation table. If there is no match between a received number and a
name in this table, “no CLIP name” is displayed.
The translation table consists of 200 entries, each comprising a 16–digit telephone number and a 16–digit
name.
Names are written using the keypad. Each press of a key selects a character. Pressing the dial pad key
moves the cursor to the next position. For example, if the directory name is “SAM SMITH,” press the
number “7” four times to get the letter “S.” Now press the number “2” once to get the letter “A.” Continue
selecting characters from the table below to complete your message.
NOTE
When the character you want appears on the same dial pad key as the previous character,
press the UP key to move the cursor to the right.
COUNT
DIAL0
DIAL1
DIAL2
DIAL3
DIAL4
DIAL5
DIAL6
DIAL7
DIAL8
DIAL9
DIAL✱
1
<
space
A
D
G
J
M
P
T
W
:
2
>
?
B
E
H
K
N
Q
U
X
=
3
.
,
C
F
I
L
O
R
V
Y
[
4
)
!
@
#
$
%
^
S
Z
]
5
0
1
2
3
4
5
6
7
8
9
The # key can be used for the following special characters: #, space, &, !, :, ?, ., %, $, –, <, >, /, =, [, ], @,
^, (, ), _, +, {, }, |, ;, \, " and ~.
PROGRAM KEYS
UP & DOWN
KEYPAD
SOFT KEYS
SPK
HOLD
Used to scroll through options
Used to enter selections
Move cursor left and right
Used to store data and advance to next MMC
Used to clear previous entry
Technical Manuals Online! - http://www.tech-man.com
3-199
ACTION
1. Press TRSF 728
Display shows first entry
2. Dial entry number (e.g., 005)
OR
Press UP or DOWN key to select and press RIGHT soft key
3. Enter telephone number and press RIGHT soft key to advance
to name entry
OR
Enter telephone number and press LEFT soft key to return to
step 2
4. Enter associated name as described above and press RIGHT or
LEFT soft key to return step 2
OR
Press SPK to save and advance to next MMC
OR
Press TRSF to save and exit programming
DEFAULT DATA
None
RELATED ITEMS
None
Technical Manuals Online! - http://www.tech-man.com
DISPLAY
CLIP XLAT (001)
DIGIT:
CLIP XLAT (005)
DIGIT:
CLIP XLAT (005)
825464602834
CLIP XLAT (005)
SAMSUNG CO.
3-200 Chapter 3
Programming Using MMCs
730
AA RECORD GAIN
Used to control AA record gain.
PROGRAM KEYS
UP & DOWN
KEYPAD
SOFT KEYS
SPK
HOLD
Used to scroll through options
Used to enter selections
Move cursor left and right
Used to store data and advance to next MMC
Used to clear previous entry
ACTION
1. Press TRSF 730
Display shows
2. Dial AA number (first port in card, e.g., 381)
OR
Press UP or DOWN to select and press RIGHT soft key
3. Press UP or DOWN to select record gain and press RIGHT soft
key
4. Press TRSF to store and exit
OR
Press SPK to store and advance to next MMC.
DEFAULT DATA
0 dB
RELATED ITEMS
None
Technical Manuals Online! - http://www.tech-man.com
DISPLAY
[381] AAREC.GAIN
REC.GAIN:+0.0
[381] AAREC.GAIN
REC.GAIN:+0.0
[381] AAREC.GAIN
REC.GAIN:+1.9
3-201
731
AA RAM CLEAR
Used for clearing AA RAM on an AA card basis. Through this MMC, the system only accepts the first port,
and the LCD shows its selection. This will erase the whole message that has been programmed previously
on the selected card.
ACTION
1. Press TRSF 731
Display shows
2. Dial AA number (e.g., 381)
OR
Press UP or DOWN to make selection and press
RIGHT soft key
3. Dial 0 (No) or 1 (Yes)
OR
Press UP or DOWN to make selection and press
RIGHT soft key
4. Dial 0 (No) or 1 (Yes) to confirm selection
OR
Press UP or DOWN to make selection and press
RIGHT soft key
5. Press TRSF to store and exit
OR
Press SPK to store and advance to next MMC
DEFAULT DATA
None
RELATED ITEMS
None
Technical Manuals Online! - http://www.tech-man.com
DISPLAY
[381] RAM CLEAR
CLR RECORDED?NO
[381] RAM CLEAR
CLR RECORDED?NO
[381] RAM CLEAR
CLR RECORDED?YES
[381] RAM CLEAR
ARE YOU SURE?NO
3-202 Chapter 3
Programming Using MMCs
732
AA TRANSLATION TABLE
This command gives more flexibility to the system by compiling a digit to Plan or Destination Translation
Table, which performs the translation from dialled digit(s) into destination parts. Destination parts could be
a station number, station group, REPEAT, Change Greeting Message Code or AA Plan Table.
If you selected REPEAT by pressing button B, dialled digits may be bypassed without translating.
AA Trans Tables (01 – 12) can have up to 50 entries each (Plan01~02:50, Plan03~12:25).
DESTINATION
STATION, STATION GROUP, AA TRANS NO., REPEAT and CHANGE GREETING MESSAGE CODE . If
you press the A button in the DESTINATION field, you can enter AA TRANS NUMBER.
You are, however, not allowed to route a table number to the same number being programmed.
For example:
AA TRAN TB(02)
01: →_
If you press the A button the LCD will show P:
AA TRAN TB(02)
01: →P_
If you enter the same table index number 02 as the current table.:
AA TRAN TB(02)
01: →P02
you will hear error tone and the LCD will show:
AA TRAN TB(02)
NOT PERMIT
If you press the B button in DESTINATION field you are able to enter REPEAT.
If you press the C button in DESTINATION field you are able to enter CHANGE GREETING MESSAGE
CODE.
Technical Manuals Online! - http://www.tech-man.com
3-203
ACTION
DISPLAY
1. Press TRSF 732
Display shows
AA TRANS TB(01)
01:0
→ 500
2. Dial TABLE number (01 – 12, e.g., 02)
OR
Press UP or DOWN key to select and press RIGHT soft key
3. Dial ENTRY number (01 – 50, e.g., 02)
OR
Press UP or DOWN key to select and press RIGHT soft key
4. Enter Dial DIGIT and press RIGHT soft key
5. Enter Destination
OR
Press UP or DOWN key to select and press RIGHT soft key
6. Press TRSF to store and exit
OR
Press SPK to store and advance to next MMC
DEFAULT DATA
Table Entry
01 :
02 :
03 :
04 :
05 :
06 :
0 → 500
2✱✱ → B
3✱✱ → B
5✱✱ → B
7✱✱✱ → B
9→ P03
RELATED ITEMS
MMC 733
AA Plan Table
Technical Manuals Online! - http://www.tech-man.com
AA TRANS TB(02)
01:
→
AA TRANS TB(02)
02:
→
AA TRANS TB(02)
02:2✱✱
→
AA TRANS TB(02)
02:2✱✱
→ 201
3-204 Chapter 3
Programming Using MMCs
733
AA PLAN TABLE
Used to call up the customer recorded and pre–recorded messages into plans compiled in MMC 732. Pre–
recorded messages listed below can be applied and destinations can be programmed as required. Specific
ports are programmed by MMC 735, AA Use Table.
There are a total of 64 messages on an AA card:
• 48 messages are to be recorded by the user (01–48),
• 16 messages are pre–recorded in ROM on the card (49–64).
Attributes are as follows:
ATTR
0
TITLE
DAY MSG
DATA
01–64
COMSG
Introduction message during Day Mode
1
2
3
4
NIGHT MSG
ALTER MSG
INVLID MSG
NO ANS MSG
01–64
01–64
01–64
01–64
5
6
7
8
9
10
11
XFER MSG
BUSY MSG
NO STN MSG
NO ACT MSG
CAMP ON
ANS DELAY
RETRY CNT
01–64
01–64
01–64
01–64
Yes/No
01–10
0–5
12
13
14
15
16
TRANS TABLE
BUSY DEST
NO ANS DEST
NO ACT DEST
INVALID DEST
01–12
DEST
DEST
DEST
DEST
Introduction message during Night Mode
Emergency message
Message when an invalid digit is dialled
Message when there is no reply from the
destination
Transfer notifying message
Message on busy reply
Message on retrial
Message on no action
Allow camp–on to busy extension
Answer Delay
No of times the AA will try to connect before
routing to final destination.
Assigning associated TRANS TABLE
Alternative destination on busy
Alternative destination on no answer
Default destination on no action
Default destination on invalid action
There is a total of 12 tables (01–12) in the system, but not all tables have to be used.
DESTINATION
STATION, STATION GROUP, AA PLAN NO.
Technical Manuals Online! - http://www.tech-man.com
3-205
ACTION
DISPLAY
1. Press TRSF 733
Display shows
AA PLAN PROG(01)
DAY MSG : NONE
2. Dial AA PLAN TABLE number (01 – 12, e.g., 02)
OR
Press UP or DOWN to select and press RIGHT
soft key
3. Dial attribute number from above table (e.g., 1)
OR
Press UP or DOWN to select and press RIGHT
soft key
4. Dial value (e.g. 01)
OR
Press UP or DOWN to select and press RIGHT
soft key
5. Press TRSF to store and exit
OR
Press SPK to store and advance to next MMC
DEFAULT DATA
DAY MSG
NIGHT MSG
ALTER MSG
INVLID MSG
NO ANS MSG
XFER MSG
BUSY MSG
NO STN MSG
NO ACT MSG
CAMP ON
ANS DELAY TIME
RETRY CNT
TRANS TABLE
BUSY DEST
NO ANSWER DEST
NO ACT DEST
INVALID DEST
49
NONE
NONE
64
51
53
52
50
59
OFF
01 SEC
3
01
500
500
500
500
RELATED ITEMS
MMC 732
MMC 734
AA Translation Table
AA Message Match
Technical Manuals Online! - http://www.tech-man.com
AA PLAN PROG(02)
DAY MSG : NONE
AA PLAN PROG(02)
NIGHT MSG :NONE
AA PLAN PROG(02)
NIGHT MSG : 01
3-206 Chapter 3
Programming Using MMCs
734
AA MESSAGE MATCH
This MMC allows up to five messages to be grouped together into a single transmission with its own
identification number.
For example, 05+07+13+16+64 = 01 (identification number).
ACTION
1. Press TRSF 734
If an AA card is fitted the following display will appear
2. Dial the desired MSG identification (link) number
(01–64)
OR
Press UP or DOWN to select and press RIGHT
soft key
3. Dial MSG numbers (01 – 64 ) recorded in AA card (up to 5)
OR
Press UP or DOWN to select and press RIGHT
soft key
(MMC will automatically insert ‘+’ as a delimiter)
4. Press TRSF to store and exit
OR
Press SPK to store and advance to next MMC
soft key
DEFAULT DATA
MSG index number
RELATED ITEMS
None
Technical Manuals Online! - http://www.tech-man.com
DISPLAY
AA MSG MATCH(01)
01
AA MSG MATCH(01)
01
AA MSG MATCH(01)
05+07+13+16+64
3-207
735
AA USE TABLE
Assigns an AA PLAN TABLE to either an individual AA port or an AA group.
The AA Plan Numbers are in the range 01 to 12.
PROGRAM KEYS
UP & DOWN
KEYPAD
SOFT KEYS
SPK
HOLD
Used to scroll through options
Used to enter selections
Move cursor left and right
Used to store data and advance to next MMC
Used to clear previous entry
ACTION
1. Press TRSF 735
Display shows
DISPLAY
[381] AA PLAN
PLAN NO : 01
2. Dial AA number or AA group pilot number (e.g., 382)
OR
Press UP or DOWN to select and press RIGHT
soft key
[382] AA PLAN
PLAN NO : 01
3. Dial AA PLAN number (e.g., 02)
OR
Press UP or DOWN to select and press RIGHT
soft key
[382] AA PLAN
PLAN NO : 02
4. Press TRSF to store and exit
OR
Press SPK to store and advance to next MMC.
DEFAULT DATA
Plan 01
RELATED ITEMS
None
Technical Manuals Online! - http://www.tech-man.com
3-208 Chapter 3
Programming Using MMCs
736
ASSIGN AA MOH
Allows an AA MSG to be used as a Music On Hold (MOH) source.
PROGRAM KEYS
UP & DOWN
KEYPAD
SOFT KEYS
SPK
HOLD
Used to scroll through options
Used to enter selections
Move cursor left and right
Used to store data and advance to next MMC
Used to clear previous entry
ACTION
1. Press TRSF 736
Display shows
DISPLAY
[384] SET AAMOH
MOH MSG: Not Use
2. Dial AA number (last port on card, e.g., 384)
OR
Press UP or DOWN to select and press RIGHT
soft key
[384] SET AAMOH
MOH MSG: Not Use
3. Dial AA message number for MOH (01 – 64, e.g., 20)
OR
Press UP or DOWN to select and press RIGHT
soft key
[384] SET AAMOH
MOH MSG: 20
4. Press TRSF to store and exit
OR
Press SPK to store and advance to next MMC
DEFAULT DATA
Not Use
RELATED ITEMS
None
Technical Manuals Online! - http://www.tech-man.com
3-209
STATION PAIR
740
Allows a station to be assigned as a ‘secondary’ to a ‘primary’ DGP station (keyphone) in the system.
will allow all features to be set or cancelled from either station, and both will ring when the ‘primary’
receives a call.
PROGRAM KEYS
UP & DOWN
KEYPAD
SOFT KEYS
SPK
HOLD
Used to scroll through options
Used to enter selections
Move cursor left and right
Used to store data and advance to next MMC
Used to clear previous entry
ACTION
1. Press TRSF 740
Display shows
DISPLAY
[201] PRIMARY
SECONDARY:NONE
2. Enter the primary station number via dial keypad (e.g., 201)
OR
Press UP or DOWN to select and press RGHT soft key
[201] PRIMARY
SECONDARY:NONE
3. Enter the secondary station number via dial keypad (e.g., 205)
OR
Press UP or DOWN to select and press RGHT soft key
[201] PRIMARY
SECONDARY:205
4. Press TRSF button to store and exit
OR
Press SPK button to store and advance to next MMC
DEFAULT DATA
None
RELATED ITEMS
None
Technical Manuals Online! - http://www.tech-man.com
This
3-210 Chapter 3
Programming Using MMCs
750
VMS RESTART
This MMC is only used for the external Samsung Voice Mail system (SVM-400).
When VMS starts or restarts it while download information about the DCS-816 system it is installed. This
information is used by VMS to build a mailbox database.
This is quick way to initially configure a system, but is usually not necessary on subsequent restarts. This
MMC can be used to turn on or off this database download and optionally restart the VMS.
DOWNLOAD
NO
The database information will not be downloaded from keyphone system.
YES The database information will be downloaded from keyphone system.
After VMS has been initially configured, it is advisable to set this to NO to minimize boot up time.
PORT RESTART
NO The VMS will not restart
YES The VMS will restart according to the DOWNLOAD option.
This option can be used at any time to reset the external VMS(SVM-400).
PROGRAM KEYS
UP & DOWN
KEYPAD
SOFT KEYS
SPK
ANS/RLS
Used to scroll through options
Used to enter selections
Move cursor left and right
Used to store data and advance to next MMC
Used to select ALL
ACTION
1. Press TRSF 750
Display shows
2. Dial 0 for NO or 1 for YES
3. Display shows
DISPLAY
SVM RESTART
DOWNLOAD? YES
SVM RESTART
DOWNLOAD? NO
SVM RESTART
SVM RESTART? NO
4. Dial 0 for NO or 1 for YES
SVM RESTART
SVM RESTART? NO
5. Press TRSF button to store and exit
OR
Press SPK button to store and advance to next MMC
Technical Manuals Online! - http://www.tech-man.com
3-211
DEFAULT DATA
DOWNLOAD = YES
RELATED ITEMS
None
Technical Manuals Online! - http://www.tech-man.com
3-212 Chapter 3
Programming Using MMCs
751
ASSIGN MAILBOX
This MMC is only used for the Samsung Voice Mail System(SVM-400). It assigns each station or group as
having a mailbox(yes or no). When stations or groups are flagged as YES, during Voice Mail System power
up mailboxes will be created for each directory number with a “YES” entry.
Once the Voice Mail database has been created new boxes can be added.
a) Through Voice Mail administration,
b) By adding a new mailbox in this system and cycling system power.
If a mailbox is to be removed it must be done through Voice Mail administration.
If a station that do not have an associated voice mailbox, call the Voice Mail system they will be answered by
the Voice Mail system main greeting.
NOTE
The groups that are supported are 500 to 508 (508 being the Voice Mail group). Mailboxes
that are needed for people that do not have an extension must be added through Voice Mail
programming.
PROGRAM KEYS
UP & DOWN
KEYPAD
SOFT KEYS
SPK
ANS/RLS
Used to scroll through options
Used to enter selections
Move cursor left and right
Used to store data and advance to next MMC
Used to select ALL
ACTION
1. Press TRSF 751
Display shows
2. Dial station number
OR
Press UP or DOWN to scroll the number.
3. Press RIGHT soft key to move cursor
4. Change status using UP and DOWN
OR
Dial 0 for NO or 1 for YES.
5. Press TRSF button to store and exit
OR
Press SPK button to store and advance to next MMC
Technical Manuals Online! - http://www.tech-man.com
DISPLAY
ASSIGN MAIL BOX
NONE: YES
ASSIGN MAIL BOX
201 : YES
ASSIGN MAIL BOX
201 : YES
ASSIGN MAIL BOX
201 : NO
3-213
DEFAULT DATA
All stations = YES
All groups = NO
RELATED ITEMS
None
Technical Manuals Online! - http://www.tech-man.com
3-214 Chapter 3
Programming Using MMCs
752
AUTO RECORD
This MMC is only used for the Samsung Voice Mail System(SVM-400).
Some specific station in the phone system can be assigned to automatically record conversations. When this
option is set, all incoming, all outgoing, or all calls(incoming or outgoing) can be recorded.
When this option is selected a specific port can be assigned for each station set to automatic conversation
recording or the effectiveness of this feature cannot be guaranteed.
In this MMC you can assign:
1.Which station uses this feature. – Station number
2.What mailbox the conversations are recorded in. – Mailbox number
3.What type of conversations are recorded, in, out or both. – I, O or B
4.What port is dedicated to the station. – Voice mail port number
A maximum of 4 stations can this feature in the DCS-816.
The same port cannot be assigned to more than one station. Attempts to do this will result in an error
message.
When a Voice Mail port is assigned here, it is automatically removed from the Voice Mail group(508) defined
in MMC 601.
WARNING: Before using this feature make sure that you are not violating any state or federal laws. Some
states require that the recorded party be notified. SAMSUNG is not responsible for any illegal use of this
feature.
PROGRAM KEYS
UP & DOWN
KEYPAD
SOFT KEYS
SPK
HOLD
Used to scroll through options
Used to enter selections
Move cursor left and right
Used to store data and advance to next MMC
Used to delete an entry
Technical Manuals Online! - http://www.tech-man.com
3-215
ACTION
1. Press TRSF 752
Display shows
2. Dial station number
OR
Press UP or DOWN to scroll the number.
Press RIGHT soft key to move cursor
3. Enter mailbox number using number keys. (e.g.,201).
Press right SOFT key to move cursor.
4.
Enter VM port number using keypad or UP or DOWN.
Press right SOFT key to move cursor.
5. Enter call type, I, O or B.
6. Press TRSF button to store and exit
OR
Press SPK button to store and advance to next MMC
DEFAULT DATA
None
RELATED ITEMS
None
Technical Manuals Online! - http://www.tech-man.com
DISPLAY
AUTO RECORD
STN:NONE MB:NONE
AUTO RECORD
STN:201 MB:NONE
AUTO RECORD
STN:201 MB:201
AUTO RECORD
PORT:NONE CALL:I
AUTO RECORD
PORT:209 CALL:B
3-216 Chapter 3
Programming Using MMCs
753
WARNING DESTINATION
This MMC is only used for the Samsung Voice Mail System.
This MMC provides an emergency destination for calls destined for the Voice Mail System, if the Voice Mail
System is removed or is offline.
In addition any calls that are forwarded to the Voice Mail card will not forward, they will remain ringing at
the “fwd from” station until answered.
This destination can be a station number or a group number.
PROGRAM KEYS
UP & DOWN
KEYPAD
SPK
HOLD
Used to scroll through options
Used to enter selections
Used to store data and advance to next MMC
Used to delete an entry
ACTION
1. Press TRSF 753
Display shows
2. Dial station number or group number
OR
Press UP or DOWN to scroll the number.
3. Press TRSF button to store and exit
OR
Press SPK button to store and advance to next MMC
DEFAULT DATA
DEST = 500
RELATED ITEMS
None
Technical Manuals Online! - http://www.tech-man.com
DISPLAY
WARNING DEST.
DEST:500
WARNING DEST.
DEST:501
3-217
754
VM HALT
This MMC is only used for the Samsung Voice Mail System.
This MMC is used to halt the Voice Mail System (take it offline). It ensures that there is no traffic on the
Voice Mail card when it is disconnected from the system.
This operation should be disconnecting the Voice Mail system from the DCS-816 System.
NOTE
PROGRAM KEYS
UP & DOWN
KEYPAD
SPK
Used to scroll through options
Used to enter selections
Used to store data and advance to next MMC
ACTION
1. Press TRSF 754
Display shows
2. Enter 1 to halt or 0 to process
OR
Press UP or DOWN to scroll the selections.
3. When you select 1 to halt, display shows:
Press 1 to confirm.
4. Display shows:
5. Press TRSF button to store and exit
OR
Press SPK button to store and advance to next MMC
DEFAULT DATA
PROC
RELATED ITEMS
None
Technical Manuals Online! - http://www.tech-man.com
DISPLAY
VM HALT
STATUS:PROC
VM HALT
STATUS:PROC
VM HALT
ARE YOU SURE?YES
VM HALT
STATUS:HALT:I
3-218 Chapter 3
Programming Using MMCs
755
VM ALARM
This MMC is only used for the Samsung Voice Mail System(SVM-400).
This MMC will generate an alarm message in the mailbox defined in MMC 751 whenever the Voice Mail
disk drive reaches a threshold.
The threshold is measured in % full. This means that if the MMC is set for 80, the alarm will be generated
when the disk exceeds 80% of the available drive space.
PROGRAM KEYS
UP & DOWN
KEYPAD
SPK
Used to scroll through options
Used to enter selections
Used to store data and advance to next MMC
ACTION
1. Press TRSF 755
Display shows
2. Enter new threshold level.
3. Press TRSF button to store and exit
OR
Press SPK button to store and advance to next MMC
DEFAULT DATA
80%
RELATED ITEMS
None
Technical Manuals Online! - http://www.tech-man.com
DISPLAY
VM ALARM
THRESHOLD:80
VM ALARM
THRESHOLD:75
3-219
756
ASSIGN VM MOH
This MMC is only used for the Samsung Voice Mail System(SVM-400).
This MMC is used to assign the Music on Hold source for the DCS-816 from a sound file located on the
SVM-400 hard disk drive. The 100 available sound files are defined as numbers 5000 to 5099.
Basically SVM-400 supports various music for numbers 5000 to 5099. If you want to use default SVM-400
support music, select the number. Otherwise, make sure you record the sound file first. The next step is to
assign the sound file to a SVM-400 port. For example, if you record sound file 5025 you would associate 25
with a specific SVM-400 port, e.g. 212. This will dedicate the port for use only as MOH and remove it from
group 508. Now 212 will show up as a valid music source in MMC 308, 309 and 408.
Each Music on Hold source assigned here requires one SVM-400 port.
NOTE
If the first SVM-400 port is used for VMMOH, it must be disabled before boot up since SVM400 and the DCS-816 use port 1 during boot up to exchange critical information. For this
reason we suggest you use the last port as VMMOH ports.
PROGRAM KEYS
UP & DOWN
KEYPAD
SPK
HOLD
Used to scroll through options
Used to enter selections
Used to store data and advance to next MMC
Used to delete an entry
ACTION
1. Press TRSF 756
Display shows
2. Press UP or DOWN to select CADENCE port.
3. Move cursor to next field. Press UP or DOWN to select sound
file.
4. Press TRSF button to store and exit
OR
Press SPK button to store and advance to next MMC
DEFAULT DATA
Not Use
RELATED ITEMS
None
Technical Manuals Online! - http://www.tech-man.com
DISPLAY
SET VMMOH
212: Not Use
SET VMMOH
212: Not Use
SET VMMOH
212: 25
3-220 Chapter 3
Programming Using MMCs
757
VM IN/OUT
This MMC is only used for the Samsung Voice Mail System(SVM-400).
This MMC is used to assign each Voice Mail Port as used for incoming, outgoing or both way calls. Note that
this MMC must support outgoing calls if off premises notification (beeper, outbound follow me of outbound
notification) is used.
PROGRAM KEYS
UP & DOWN
KEYPAD
SPK
Used to scroll through options
Used to enter selections
Used to store data and advance to next MMC
ACTION
1. Press TRSF 757
Display shows
DISPLAY
VM IN/OUT
209: IN/OUT
2. Enter the CADENCE port number.
OR
Press UP or DOWN to select CADENCE port.
VM IN/OUT
215: IN/OUT
3. Enter the selections.
OR
Press UP or DOWN to scroll options.
VM IN/OUT
215: MOH
4. Press TRSF button to store and exit
OR
Press SPK button to store and advance to next MMC
DEFAULT DATA
IN
RELATED ITEMS
None
Technical Manuals Online! - http://www.tech-man.com
3-221
800
ENABLE TECHNICIAN PROGRAM
Used to open and close technician–level programming. If programming is not opened and an attempt is made
to access a system MMC, the error message “ACCESS DENIED” will be displayed.
A four digits passcode is required to access this MMC. Each character can be digits 0–9. When opened, this
MMC enables access to all MMCs.
When the system was installed, the Country Code should have been selected using MMC 812 before any
other programming was done. If this is not the case, MMC 800 will require the installer to enter the code
before continuing. After selecting the code, the system restarts and all default data are changed to new data
for the selected country.
PROGRAM KEYS
UP & DOWN
KEYPAD
SOFT KEYS
SPK
Used to scroll through options
Used to enter selections
Move cursor left and right
Used to store data and advance to next MMC
Technical Manuals Online! - http://www.tech-man.com
3-222 Chapter 3
Programming Using MMCs
ACTION
1. Press TRSF 800
Display shows
2. Enter passcode
Correct code shows
DISPLAY
ENABLE TECH.PROG
PASSCODE:
ENABLE TECH.PROG
PASSCODE: ✱✱✱✱
ENABLE TECH.PROG
DISABLE ✱✱✱✱
Incorrect code shows
ENABLE TECH.PROG
PASSCODE ERROR
3. Enter 1 to enable or 0 to disable
OR
Press UP or DOWN to select
If not assigned any data in MMC 812, you have to select your
Country Code
The system is restarted and all MMC data is changed for
selected country
ENABLE TECH.PROG
ENABLE
ENABLE TECH.PROG
SELECT COUNTRY
ENABLE TECH. PROG
NONE
ENABLE TECH. PROG
E.U.
4. Press SPK to advance to MMC entry level
801:TEC.PASSCODE
SELECT PROG.ID
5. Enter the MMC desired (e.g., 210)
801:TEC.PASSCODE
SELECT PROG.ID
6. To log out and return to MMC 800, press UP or DOWN key to
select DISABLE
OR
Press SPK then TRSF to return to normal display
Programming option will time out
DEFAULT DATA
DISABLE
Technical Manuals Online! - http://www.tech-man.com
3-223
801
CHANGE TECHNICIAN PASSCODE
Used to change the passcode which allows access to MMC 800 (Enable Technician Program) from its
current value.
NOTE
The passcode is four characters long. Each character can be digits 0–9. The current or “old”
passcode is required for this MMC.
PROGRAM KEYS
KEYPAD
SPK
Used to enter passcodes
Save data and advance to next MMC
ACTION
DISPLAY
1. Press TRSF 801
TECH. PASSCODE
NEW CODE:_
2. Enter new passcode
TECH. PASSCODE
NEW CODE:✱✱✱✱
3. Enter new passcode again
TECH. PASSCODE
VERIFY : :✱✱✱✱
4. If passcode is correct, press RIGHT soft key to continue and
enter desired MMC
If passcode is incorrect
TECH. PASSCODE
VERIFY :FAILURE
System returns to step 2
TECH. PASSCODE
NEW CODE: :✱✱✱✱
5. Press TRSF to store and exit
OR
Press SPK to advance to MMC
DEFAULT DATA
Default passcode = 4321
RELATED ITEMS
MMC 800
TECH. PASSCODE
VERIFY :SUCCESS
Enable Technician Program
Technical Manuals Online! - http://www.tech-man.com
3-224 Chapter 3
Programming Using MMCs
802
CUSTOMER ACCESS MMC NUMBER
Allows customer to have access to certain MMCs. For example, it is advised that the customer have access
to MMC 102, Call Forward, for call forwarding but it is not advised that the customer have access to MMC
710, LCR Digit Table, for LCR dial plans.
PROGRAM KEYS
UP & DOWN
KEYPAD
SOFT KEYS
SPK
Used to scroll through options
Used to enter selections
Move cursor left and right
Used to store data and advance to next MMC
ACTION
1. Press TRSF 802
Display shows
2. Enter desired MMC number via dial keypad (e.g., 102)
OR
Press UP or DOWN key to make selection and
press RIGHT soft key to move cursor
3. Dial 1 for YES or 0 for NO
OR
Press UP or DOWN key to make selection and press LEFT soft
key to return to step 2 to make additional entries
4. Press TRSF to store and exit
OR
Press SPK to store and advance to next MMC
DEFAULT DATA
See table on next page
RELATED ITEMS
None
Technical Manuals Online! - http://www.tech-man.com
DISPLAY
CUSTOMER ACCESS
100:STN LOCK:YES
CUSTOMER ACCESS
102:CALL FWD:YES
CUSTOMER ACCESS
102:CALL FWD:NO
3-225
Customers have access (default = YES) to the following MMCs:
100
101
102
103
104
105
106
107
108
109
110
111
112
113
114
115
116
119
121
201
202
209
211
214
300
301
302
303
304
305
306
308
309
312
315
317
404
405
406
408
409
410
414
415
421
500
502
505
507
508
600
601
602
604
606
607
705
706
Technical Manuals Online! - http://www.tech-man.com
707
708
714
715
720
721
722
725
727
728
3-226 Chapter 3
Programming Using MMCs
804
SYSTEM I/O PARAMETER
Provides a means of setting parameters for the system I/O ports to work with one of the following:
- A personal computer
- SMDR recording
- UCD statistics report/periodic UCD information
- VM Trace for SVM-400
Programming can be accomplished easily, using the tables below to customise any I/O port.
PARAMETER OPTIONS
Dial 0
Dial 1
Dial 2
Dial 3
Dial 4
Dial 5
Dial 6
Dial 7
Service
Baud Rate
Char Length
Parity
Retry Count
Stop Bit
Wait Time
DSR Check
Type of Service
Speed
Character Length
Parity Bit
Number of Retries
Stop Bit
Message Wait Time
DSR Check on/off
Dial 0
Dial 1
Dial 2
PCMMC
SMDR
UCD REPT
Dial 3
SMDR/UCD
Dial 6
Dial 7
VM TRACE
PCMMC
SMDR
UCD Report on request by the
Supervisor, or daily
Both SMDR and UCD Report
will be generated
Not used
Trace for SVM-400
SERVICE TYPE
SPEED (BPS)
Dial 1
Dial 2
Dial 3
Dial 4
1200
2400
4800
9600
CHARACTER LENGTH
Dial 7
Dial 8
7 bits
8 bits
Dial 0
Dial 1
Dial 2
None
Odd
Even
PARITY
STOP BIT
Dial 1
Dial 2
1 bits
2 bits
Technical Manuals Online! - http://www.tech-man.com
3-227
PROGRAM KEYS
UP & DOWN
KEYPAD
SOFT KEYS
SPK
HOLD
Used to scroll through options
Used to enter selections
Move cursor left and right
Used to store data and advance to next MMC
Used to clear entry (when valid)
ACTION
DISPLAY
1. Press TRSF 804
Display shows
SYS I/O PORT (1)
SERVICE:PC–MMC
2. Enter in desired port via dial keypad (e.g., 2)
OR
Press UP or DOWN key to make selection and press RIGHT
soft key to move cursor
3. Enter parameter option from the above option list via dial
keypad (e.g., 1)
OR
Press UP or DOWN key to make selection and press RIGHT
soft key to move cursor
4. Enter desired value via dial keypad (e.g., 4800 baud)
OR
Press UP or DOWN key to display value and press RIGHT soft
key to return to step 2
5. Press TRSF to store and exit
OR
Press SPK to store and advance to next MMC
DEFAULT DATA
Service
Baud Rate
Char Length
Parity
Retry Count
Stop Bit
Wait Time
DSR Check
Port 1
Port 2
9600 bps
8 bits
None
03
1 bit
3000 msec
Off
PCMMC
SMDR
RELATED ITEMS
PCMMC Section
SMDR
Technical Manuals Online! - http://www.tech-man.com
SYS I/O PORT (2)
SERVICE:SMDR
SYS I/O PORT (2)
BAUD:9600 BPS
SYS I/O PORT (2)
BAUD:4800 BPS
3-228 Chapter 3
Programming Using MMCs
805
TX LEVEL AND GAIN
Allows the system administrator to set the base level of TX volume and the gain control for nine time–
switch connect types.
There are eight (8) volume levels which can be controlled by the VOL UP and DOWN key on the keyset.
However, there are 9 possible levels in the system. With this MMC, users can select the desired eight
levels.
PROGRAM KEYS
UP & DOWN
KEYPAD
SOFT KEYS
SPK
HOLD
ANS/RLS
Used to scroll through options
Used to enter selections
Move cursor left and right
Used to store data and advance to next MMC
Used to clear previous entry
Used to select ALL
ACTION
1. Press TRSF 805
Display shows
DISPLAY
TX LEVEL CONTROL
LEVEL 0 → 1
2. Press UP or DOWN key to select TX LEVEL CONTROL TX
GAIN CONTROL
Press RIGHT soft key to go to the volume level or TSW
option
TX LEVEL CONTROL
LEVEL 0 → 1
3a. Press RIGHT soft key to go to the volume level
OR
Press UP or DOWN key to go to next volume level
TX LEVEL CONTROL
LEVEL 1 → 2
3b. Press RIGHT soft key to go to the TSW type
OR
Press UP or DOWN key to go to next TSW type
TSW GAIN CONTROL
SLT → ATRK:0dB
4a. Enter desired volume data via dial keypad
OR
Use UP or DOWN key to scroll data
4b. Press UP or DOWN key to select TSW gain data and
press RIGHT soft key to go to 3b
5. Press TRSF to store and exit
OR
Press SPK to store and advance to next MMC
Technical Manuals Online! - http://www.tech-man.com
TX LEVEL CONTROL
LEVEL 1 → 3
TSW GAIN CONTROL
SLT → ATRK:+2dB
3-229
DEFAULT DATA
TX Level: 0 →0, 1 →1, 2 →2, 3 →3, 4 →4, 5 →5, 6 →6, 7 →7
TSW Gain:
SLT → SLT : +0.0
SLT → ATRK : +0. 0
SLT → DTRK : +0.0
ATRK→ SLT : +0.0
ATRK→ ATRK: +1.9
ATRK→ DTRK : – 6.0
DTRK→ SLT
: + 1.9
DTRK→ ATRK : + 1.9
DTRK→ DTRK : + 0.0
RELATED ITEMS
None
Technial Manuls Onlie! - htp:/w.ec-mano
3-230 Chapter 3
Programming Using MMCs
806
CARD PRE–INSTALL
Allows the pre–programming of a slot for a specific card. For example, after the system is installed and a
new 8–Trunk card is added, running this program causes the system to accept the card for what it is and not
for what it is not.
PROGRAM KEYS
UP & DOWN
KEYPAD
SOFT KEYS
SPK
Used to scroll through options
Used to enter selections
Move cursor left and right
Used to store data and advance to next MMC
ACTION
1. Press TRSF 806
Display shows
DISPLAY
EXP. SLOT
NONE
→NONE
2. D Press RIGHT soft key to change previous card type
EXP. SLOT
NONE
→8TRK
3. Press TRSF to store and exit
OR
Press SPK to store and advance to next MMC
DEFAULT DATA
None
RELATED ITEMS
None
Technical Manuals Online! - http://www.tech-man.com
3-231
807
VOLUME CONTROL
Allows the system administrator to set the level of keyset volume.
PROGRAM KEYS
UP & DOWN
KEYPAD
SOFT KEYS
SPK
HOLD
Used to scroll through options
Used to enter selections
Move cursor left and right
Used to store data and advance to next MMC
Used to clear previous entry
ACTION
1. Press TRSF 807
Display shows
2. Press RIGHT soft key to select DGP volume control
DISPLAY
VOL.CONTROL:DGP
KEY TONE VOL :1
VOL.CONTROL:DGP
KEY TONE VOL :1
3. Press RIGHT soft key to change the volume level
OR
Press UP or DOWN key to scroll next volume
VOL.CONTROL:DGP
SIDE TONE VOL:1
4. Press RIGHT soft key to change the volume level
OR
Press UP or DOWN key to scroll next volume
VOL.CONTROL:DGP
HANDSET TX
:3
5. Press RIGHT soft key to change the volume level
OR
Press UP or DOWN key to scroll next volume
VOL.CONTROL:DGP
MIC TX LEVEL :3
6. Press RIGHT soft key to change the volume level
OR
Press UP or DOWN key to scroll next volume
VOL.CONTROL:DGP
NOISE GUARD :8
7. Press RIGHT soft key to change the volume level
OR
Press UP or DOWN key to scroll next volume
VOL.CONTROL:DGP
NOISE THRES. :1
8. Press RIGHT soft key to change the volume level
OR
Press UP or DOWN key to scroll next volume
VOL.CONTROL:DGP
ALC THRES.
:7
Technical Manuals Online! - http://www.tech-man.com
3-232 Chapter 3
Programming Using MMCs
9. Press RIGHT soft key to change the volume level
OR
Press UP or DOWN key to scroll next volume
VOL.CONTROL:DGP
TX/RX THRES. :3
10. Press RIGHT soft key to change the volume level
OR
Press UP or DOWN key to scroll next volume
VOL.CONTROL:DGP
TX/RX COMP
:5
11. Press TRSF to store and exit
OR
Press SPK to store and advance to next MMC
DEFAULT DATA
Key tone vol
Sidetone vol
Handset tx
Mic tx level
Noise guard
Noise thres.
Alc thres.
Tx/rx thres.
Tx/rx comp.
1
1
3
3
8
1
7
3
5
RELATED ITEMS
None
Technical Manuals Online! - http://www.tech-man.com
3-233
809
SYSTEM MMC LANGUAGE
Allows system programmer to assign a LCD display based on system programming language.
0
1
2
3
4
5
6
7
8
ENGLISH
GERMAN
PORTUGAL
Not used
DANISH
DUTCH
Not used
SWEDISH
SPANISH
PROGRAM KEYS
UP & DOWN
KEYPAD
SOFT KEYS
SPK
Used to scroll through options
Used to enter selections
Move cursor left and right
Used to store data and advance to next MMC
ACTION
1. Press TRSF 809
Display shows
2. Enter number for language
OR
Press UP or DOWN to make selection and press RIGHT soft
key
3. Press TRSF to store and exit
OR
Press SPK to store and advance to next MMC
DEFAULT DATA
ENGLISH
RELATED ITEMS
Multi–Language
Technical Manuals Online! - http://www.tech-man.com
DISPLAY
SYS.MMC ANGUAGE
ENGLISH
SYS.MMC ANGUAGE
GERMAN
3-234 Chapter 3
Programming Using MMCs
810
HALT PROCESSING
Used only in the event that all data processing is needed to be stopped in either a single slot or the entire
system.
PROGRAM KEYS
UP & DOWN
KEYPAD
SOFT KEYS
SPK
ANS/RLS
Used to scroll through options
Used to enter selections
Move cursor left and right
Used to store data and advance to next MMC
Used to select ALL
ACTION
1. Press TRSF 810
Display shows
2. Enter slot number via dial keypad (e.g., 1)
OR
Press UP or DOWN key to make selection and press RIGHT
soft key to advance cursor
OR
Press ANS/RLS to select all slots
3. Enter in 1 for HALT or 0 to PROC
OR
Press UP or DOWN key to make selection and press RIGHT
soft key to enter data and return to step 2
4. Press TRSF to store and exit
OR
Press SPK to store and advance to next MMC
DEFAULT DATA
None
RELATED ITEMS
None
Technical Manuals Online! - http://www.tech-man.com
DISPLAY
HALT/PROCESSING
SLOT NO:ALL→PROC
HALT/PROCESSING
SLOT NO:1
→PROC
HALT/PROCESSING
SLOT NO:ALL→PROC
HALT/PROCESSING
SLOT NO:1
→HALT
3-235
811
RESET SYSTEM
Provides two methods of restarting the system. The first method restarts the system and clears all memory.
The second method restarts the system only. If clear all memory is selected, only the default data will return.
Extreme care should be taken when using this MMC
If the system is restarted, all voice/data connections are dropped.
If memory is cleared, all customer data is deleted and system returns to default status.
PROGRAM KEYS
UP & DOWN
KEYPAD
Used to scroll through options
Used to enter selections
ACTION
1. Press TRSF 811
Display shows
2. Press UP or DOWN key to make selection
(RESET SYSTEM or CLEAR MEMORY)
After selection is made, press RIGHT soft key to move cursor
to YES/NO option
3. Press UP or DOWN key to make selection and press RIGHT
soft key
4. Press UP or DOWN key to confirm and press RIGHT soft key
This will erase all data in the system
5. System will return with default time and date
and default extension number
OR
If system restarted only, it will return to normal programmed
status
DEFAULT DATA
None
RELATED ITEMS
None
Technical Manuals Online! - http://www.tech-man.com
DISPLAY
SYSTEM RESTART
RESET SYSTEM?NO
SYSTEM RESTART
CLEAR MEMORY?NO
SYSTEM RESTART
CLEAR MEMORY?YES
SYSTEM RESTART
ARE YOU SURE?YES
3-236 Chapter 3
Programming Using MMCs
812
COUNTRY CODE
This MMC must be run by the installer before any other programming is done.
Allows the system installer to select system software country version. After using this MMC, the installer
must restart the system to make the selection effective.
PROGRAM KEYS
UP & DOWN
KEYPAD
SOFT KEYS
Used to scroll through options
Used to enter selections
Move cursor left and right
ACTION
DISPLAY
1. Press TRSF 812
Display shows
2. Press UP or DOWN key to make selection and press RIGHT
soft key
3. Press UP or DOWN key to select Yes or No and press RIGHT
soft key
WARNING: If you select Yes, this will restart the system.
4. Press TRSF to store and exit
OR
Press SPK to store and advance to next MMC
DEFAULT DATA
None
RELATED ITEMS
All MMC
Technical Manuals Online! - http://www.tech-man.com
SET COUNTRY CODE
UK
SET COUNTRY CODE
AUSTRALIA
WARNING! RESTART
ARE YOU SURE?YES