1
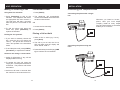
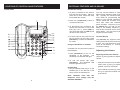
Guarantee
Manufacturers Declaration*
Your Delta 700 telephone is designed
and manufactured to exacting quality
standards. This enables ATL Telecom
Limited to offer a 2-year guarantee from
the date of purchase. This guarantee
protects against faulty material or
workmanship, and applies to the UK
only and is not transferable.
ATL Telecom Limited declares that
this product is in conformity with the
essential requirements of the R & TTE
directive 1999/5/EC.
Delta 700
*A copy of the Declaration of Conformity
is available, upon request, from ATL
Telecom Limited.
Thank you for choosing a Delta 700 2 Line CLI Featurephone. You have selected
a carefully designed telephone that incorporates the latest technology, offering a
unique telephone, and providing years of excellent service.
The terms and conditions under which
the guarantee will be valid are as set
out below.
This user guide will ensure you obtain the best use of your telephone.
Misuse or any modification carried out
to the telephone, or operation other
than in accordance with the instructions
supplied, will invalidate the guarantee.
Damage
arising
from
incorrect
installation, accidental damage or
consequential loss, are not covered
under the guarantee.
In the event of a fault developing during
the period of the guarantee, the complete
telephone should be returned to your
supplier, adequately and safely packed,
together with the proof of purchase.
The liability of ATL telecom Limited
will be limited to the cost of repair or
complete replacement of the same
defective instrument, at the discretion
of the company. In the event that the
same item is not available, a suitable
alternative will be offered.
The terms of this agreement do not
affect your statutory rights.
ATL Telecom Limited,
Lakeside, Fountain Lane
St Mellons,
Cardiff, CF3 0FB
Telephone: 0330 333 8250
Facsimile:
0330 333 8251
www.atltelecom.com
USER GUIDE
1395003610 Issue 4
April 2010
TROUBLESHOOTING AND PRODUCT CARE
No dial tone. The phone will not dial
out.
• Check all telephone cord connections.
• Try another wall jack.
Can’t hear the ring signal
• Ensure the line connectors supplied
with the phone are fully inserted.
While on a call I hear another call on
the line, or interference
• Make sure all wiring is twisted pair.
• Check the wiring for bad connections.
Handset doesn’t appear to be
working
• Make sure the handset cord is solidly
connected at both ends and is plugged
into the handset socket.
Headset not working
• Ensure headset has been activated on
the telephone setup (page 13).
The caller’s name and/or number
don’t appear on the display
• Make sure you have subscribed to
Caller ID name/number service from
the telephone company.
• Caller ID service may not work when
the phone is connected to a Private
Branch Exchange (PBX).
• The call is coming from an area not
supplying Caller ID data. “Unknown
Caller”: will appear on the display.
• The caller has requested that their
phone number be suppressed from
Caller ID service. “Blocked Call” will
appear on the display.
• You answered the call before the
Caller ID data was displayed, which
usually occurs after the second ring.
23
Further concerns may also be
addressed by calling our Technical
Support
Department
on
0845
421 0730 or visiting our website,
www.atltelecom.com/support.
GENERAL PRODUCT CARE
To keep your phone working and looking
good, follow these guidelines:
• Avoid putting near heating appliances
and devices that generate electrical
noise (for example, motors and
fluorescent lamps).
• DO NOT expose to direct sunlight or
moisture.
• Avoid dropping and other rough
treatment of the unit.
• Never use a strong cleaning agent
or abrasive powder because this will
damage the finish.
• Retain the original package in case
you need to ship it at a later date.
TABLE OF CONTENTS
Getting Started...................................4
Package Contents ......................... 4
Features ........................................ 4
Additional Features and Glossary 19
Conference Calling ...................... 19
Using the Handsfree or Headset . 19
Pause .......................................... 19
Time Break Recall (TBR)............. 19
Adjusting the Volume................... 19
Glossary ...................................... 20
Location of Controls and
Features..........................................5-9
Top View.........................................5
Rear View.......................................6
Descriptions and Functions............7
LCD Displays..................................9
Wall Bracket Fitting Template........ 21
Troubleshooting and
Product Care ................................... 23
Installation.......................................10
Installing the Batteries..................10
Selecting a Location.....................10
Connecting Your Telephone
Lines.............................................11
Desk Top Installation.................... 12
Wall Mounting............................... 12
Guarantee & Manufacturers
Declaration ...................................... 24
Telephone Setup ............................. 13
Basic Operation .............................. 14
Making or Answering a Call ......... 14
Last Number Redial..................... 14
Placing a Call on Hold ................. 14
Speed Dial .................................. 15-16
Storing Numbers ......................... 15
Using the Speed Dial Directory ... 15
Using the One-Touch Speed Dial
Memory
15
Editing a Speed Dial Number ...... 16
Cloning a Speed Dial Number ..... 16
Erasing Speed Dial Numbers ...... 16
Caller ID ...................................... 17-18
Reviewing Caller ID Records ...... 17
Caller ID Callback........................ 17
Saving Caller ID to Speed Dial
Memory ....................................... 17
Deleting Caller ID Records .......... 17
22
3
GETTING STARTED
WALL BRACKET FITTING TEMPLATE
FEATURES
Check to be sure that you have all the
following components in the package:
• Up to 2 line capability
• 3 one-touch speed dial memories
• Desk or wall mountable
• Call Line Identity*
• Handsfree
• Up to 32 two-touch speed dial
memories
• Last number redial
• Line Status indication
• Hold
• Conference calling
• Pause
• Time Break Recall (TBR)
• Call timer
• Automatic line selection
• Incoming call list
• Digital speaker volume control
• LCD displays date and time
• Ringer control
• Volume control
• Headset port
• Data port
1.
2.
3.
4.
5.
6.
7.
Telephone Base
Handset
Handset Coiled Cord
Telephone line cord (Qty 2)
4 x AA Batteries
Desk/wall mount bracket
Instruction manual
PACKAGE CONTENTS
*Subject to availability, terms and
conditions from your service provider.
4
21
ADDITIONAL FEATURES AND GLOSSARY
Redial - Performs single button dialing
of last number dialed.
• If the headset is turned on, press [+]
and [-] to adjust the handset volume
up and down.
LOCATIONS OF CONTROLS AND FEATURES
Rear View
Ringer Level Control - Permits
adjustment of the ringer volume level.
Adjusting the Ringer Volume
Use the Ringer switch on the back of
the phone to set the ringer level.
Speed Dialing - Allows programming of
frequently dialled numbers so that they
can be dialled with the two touch speed
dial button.
Useful Features and Terms
Calendar/Clock - Visual display of date
and time.
Volume Level Control - Permits
volume adjustment of the handset,
speakerphone, and headset during a
conversation.
Caller ID Log - Enables users to view
name and number of callers. Contact
your local telephone company to
subscribe to Caller ID Service.
Caller ID Log - Stores up to 64 Caller
ID entries.
Call Time - Allows timing of phone
conversations.
Dial from Display - One-button dialing
from the Caller ID log.
Display - The Liquid Crystal Display
(LCD) shows clock and calendar,
number dialed, low battery indicator,
Caller ID information and call timer.
Flash - A signal sent by the phone to
the local telephone company supporting
services such as call waiting.
Hold - Permits user to place a call on
hold. Allows access by that user or by
any other phone connected to that line.
New Call Indicator - A visual indicator
that new calls have been received.
20
5
LOCATIONS OF CONTROLS AND FEATURES
ADDITIONAL FEATURES AND GLOSSARY
Front View
Conference Calling
Pause
1. To place a conference call, select a
line and dial the number. Place an
active line on hold. Select the other
line and dial the number.
You may use this feature to create a
dialing pause between digits during a
call. Typically, the Pause function is
most useful for programming dialing
delays in long number sequences of
certain speed dial numbers such as
voice mail codes and international
phone numbers. Each time you press
the [Redial] key, you add a 4-second
delay to the dialling sequence (you
may do this more than once to create a
longer delay). You may insert a pause
anywhere in the number.
2. Press the [Conference] button to
connect the two lines.
3. To discontinue the conference but
remain the connection to one of the
lines (eg. Line 1), press [LINE 1].
The phone will switch to [LINE 1] and
disconnect the other line.
PROG
4. To end the phone call, press the Line
key for the line you are using, press
[Handsfree], or return the handset to
its cradle.
Transfer (Recall)
The [Transfer] key supports customer
calling services that you have subscribed
to from your local telephone company
(such as call waiting or three-party
conference calling).
Using the Handsfree or Headset
A headset can only be used in place of
the handsfree.
Adjusting the Volume
1. Press [Handsfree] to turn on the
handsfree or the headset.
The
handsfree LED indicator will light.
Adjusting the Receiver Volume
Use the [+] and [-] buttons to adjust the
volume:
2. To end the phone call, press
[Handsfree]. The handsfree LED
indicator light will turn off.
• If the phone is idle or in the handsfree
mode, press [+] and [-] to adjust the
speaker volume up and down.
Headset Port
1. Plug a headset RJ22 plug in to the
headset port on the left side of the
base, next to the handset port.
• If the handset is picked up, press [+]
and [-] to adjust the handset volume
up and down.
Note: Headsets used with this
telephone must comply with the
Standard EN60950-1
6
19
CALLER ID
LOCATIONS OF CONTROLS AND FEATURES
3. Press [DELETE] to confirm. Tip:
You may wish to review all caller
ID messages before erasing them.
Deleting records from one phone line
1. To erase all Caller ID entries from a
particular telephone line, go to caller
ID review for the desired line (eg. line
1). The display will show “LINE 1
LIST =” and then number of caller ID
entries for line 1.
the line is in use by this phone. The
LED flashes briefly if another phone is
using that line. If the line is on hold, the
LED will flash slowly. When the line is
ringing, it will flash quickly. If there is no
line connected to the phone, when you
press the line key it will light briefly and
then turn off, “NO CONNECTION” will
be indicated on the LCD.
Descriptions and Functions
1. LCD Display
2. Up and Down Keys [▲] [▼]
Used to move up or down through the
caller ID list or the speed dial directory.
3. Dial Key [DIAL/ENTER]
Press to dial a one-touch
number, directory memory
or a caller ID number. Also
accept a change in telephone
2. Press [DELETE]. The display will ask
“ERASE LINE 1?”.
3. Press [DELETE] to confirm.
Deleting all records
memory
number,
used to
settings.
9. Hold Key [Hold]
Press [Hold] to put an active line on
hold.
4. Program Key [PROG]
Press to enter the telephone settings
menu.
10. Conference Key [Conference]
Used to join a line on hold to an active
line to make a conference call.
5. New Call LED
The New Call LED flashes rapidly when
the phone is ringing. It flashes slowly to
indicate there are new calls.
11. Handsfree Key [Handsfree]
The [Handsfree] key is used to
begin or end a call using handsfree or
headset (instead of the handset). The
LED on the [Handsfree] key indicates the
status of the initiated call. If the LED
is off, the handsfree and headset
functions are inactive. If the LED is
steadily lit, either the telephone is in
handsfree or headset mode.
6. Edit Key [Edit]
Used to change one-touch memory, and
directory memory.
1. To erase all caller ID, go to the first
screen of caller ID review which displays the total caller ID messages in
the callers list.
7. Redial/Pause Key [Redial]
The telephone will automatically
redial the last number dialed when this
button is pressed. It can also be used to
program a pause of 4 seconds into a
dialing sequence stored into a speed
dial memory.
12. Dial Pad
Used in the conventional manner for
dialing.
13. Volume Up and Down Keys
[+] [-]
Press to increase or decrease
speakerphone, handset, or headset
volume in 4 steps.
2. Press [DELETE]. The display will ask
“ERASE ALL CALLS?”.
18
8. Line Keys [Line 1] [Line 2]
Press a line key to alternately go on
or off hook. The LEDs next to the line
keys indicate the status of the line. If
the LED is off, the line is on hook and
inactive or the line is not connected to
the phone line. If the LED is lit steadily,
7
LOCATIONS OF CONTROLS AND FEATURES
CALLER ID
14. Directory Key [Directory]
When pressed, reviews a directory
list of speed dial memories. Each
dial memory stores a number (up to 28
digits) plus a name of up to 16
characters.
Reviewing Caller ID Records
1. Press [▲] or [▼]. The LCD displays
“CALLERS LIST =” and the number
of Caller ID entries received.
3. To end the phone call, press the line
key for the line you are using, press
[Handsfree], or return handset to its
cradle.
Saving Caller ID to Speed Dial
Memory
15. Headset Port
Allows using a headset for hands-free
convenience.
2. Press [▲] or [▼] to scroll through the
caller ID list. The call counter will
switch between the call number and
the call line.
16. Store Key [Store]
Used to save a phone number and
name into one-touch memory or the
speed dial directory.
1. During caller ID review, the LCD will
display a caller ID entry.
2. Press [SAVE] when the number
displayed is correct. The display will
ask “SAVE TO?”
#
17. Speaker
18. Transfer Key [Transfer]
The [Transfer] key is used to access
telephone company services like call
waiting.
3. To review caller ID on only one of
the two lines, press dial key [1] or [2]
when the callers list is displayed.
19. Delete Key [DELETE]
Used to erase a caller ID, total caller
ID in a particular line, all caller ID, a
directory memory, or a one-touch
memory.
3. Press either a one-touch memory
location (eg. [M1]) or [Directory],
whichever place you wish to store the
number.
Note: One-touch memory locations
accept duplicate phone numbers, but
the directory does not.
Caller ID Callback
20. One-touch memory keys
[M1] [M2] [M3]
Three keys that automatically dial a
stored number when pressed. Each
key stores a number (up to 28 digits)
plus a name of up to 16 characters.
Deleting Caller ID Records
1. Press [▲] or [▼] to scroll through the
caller ID list. The call counter will
switch between the call number and
the call line.
2. Press [DIAL/ENTER], the phone will
select line 1 and dial. To select line
2, press [Line 2] and scroll to the
required number and press [DIAL/
ENTER] to dial.
8
17
Deleting a single record
1. During caller ID review, press
[DELETE]. The display will ask
“ERASE THIS ITEM?”
2. Press [DELETE] to confirm.
LOCATIONS OF CONTROLS AND FEATURES
SPEED DIAL
4. The LCD will say “EDIT NAME” and
then the current name is displayed.
3. To end the phone call, press the
active line key, press [SPEAKER], or
return the handset to its cradle.
Reviewing one-touch memory
1. Press and hold a one-touch memory
key (eg. [M1]). The display will show
the name and number stored in that
location.
Note: Be careful. Releasing the
button too soon will dial the number.
LCD Displays
5. Press [▼] or [DELETE] to remove an
incorrect letter. Press [▲] to move
the cursor right.
When the telephone is not in use, the
LCD displays the number of new calls
received, if any.
6. Use the dial pad to enter the new
letter(s). Press [SAVE] or [DIAL/
ENTER] when you are satisfied with
the name you are editing.
If a line is put on hold (eg. Line 1), the
display shows the line number and its
status.
Cloning a Speed Dial Number
2. If you wish to dial the number,
either press the same memory key
again, press [DIAL/ENTER], press
[Handsfree], or press an available
line key, or pick up the handset. The
phone will connect the line and dial
out the number.
When the telephone is not in use, if a
line is being used by another phone, the
display shows the line number and its
status.
1. During one-touch or directory
memory review, press [SAVE]. The
display will show “SAVE TO?”.
When the telephone is not in use, if a
line is ringing, the display shows the line
number and its status.
2. Press either a one-touch memory
location (eg. [M1]) or [DIR], which
ever place you wish to store the
number. Note: One-touch memory
locations accept duplicate phone
numbers, but the directory does not.
Editing a Speed Dial Number
1. During one-touch memory or directory
memory review, press [Edit] the LCD
will show “EDIT NUMBER” and then
the current number is displayed.
When a line on this phone is in use, the
LCD display will show momentarily the
line currently in use and which device
(handset, speaker, or headset) is being
used.
Erasing Speed Dial Numbers
1. During one-touch or directory
memory review, press [DELETE].
The LCD will display “ERASE THIS
ITEM?”.
If more than one event is valid, the display will scroll between the messages
2. Press [DELETE] to confirm. “ITEM IS
ERASED” is displayed. This speed
dial location is now available to store
a new number.
2. Press [▼] or [DELETE] to remove an
incorrect digit.
3. Use the dial pad to enter the new
number(s). Press [Store] or [DIAL
ENTER] when you are satisfied with
the number you are editing.
Note: Entries can only be deleted
individually. Group delete is not
available.
16
9
INSTALLATION
SPEED DIAL
Installing the Batteries
Selecting a Location
Storing Numbers
Batteries must be installed to power the
display while the phone is on-hook as
well as to save telephone settings.
The phone may be used on a desk or
mounted on a wall. Select a location
that meets the following requirements:
1. Press [Store]. The display will show
“SAVE TO?”
1. In order to install the batteries,
make sure the desk/wall mount
is not attached to the base of the
telephone.
1. Near a telephone line wall jack.
2. Away from any electrical machinery,
appliances, and metal walls or filing
cabinets.
2. Loosen the screw fastening the
battery compartment cover using a
screwdriver and remove it from the
back of the phone.
3. Use the screwdriver to push at the
base of the cover’s catch and push
up to flip open the compartment
cover.
Note: A maximum of 3 one-touch and
32 speed dial entries can be stored in
the directory.
Using the Speed Dial
Directory
2. Press either a one-touch memory
location (eg. [M1]) or [DIR], which ever
place you wish to store the number.
The memory location is displayed in
the display briefly. Then the LCD will
display “ENTER NUMBER.”
Dialing out with directory memory:
1. Press [Directory]. The LCD will
display “DIR. ITEM” and the number
of memories stored in the directory.
2. Press [▲] or [▼] to move through
the directory list or enter the two digit
memory location using the dial pad.
3. Use the dial pad to enter the phone
number you are storing. Press [▼] or
[DELETE] to remove a wrong digit.
Press [Store] when you are satisfied
with the number you are storing.
4. Insert 4 AA batteries into the
compartment paying close attention
to the labelled polarities.
4. The LCD
NAME.”
5. Close the battery compartment cover
and secure with the screw.
will
display
3. Once you have found the number you
wish to dial, press [DIAL/ENTER],
press [Handsfree], press an unused
line key, or pick up the handset. The
phone will connect the line and dial
out the selected number.
“ENTER
5. Use the dial pad to enter the name
(see chart below). Press [▼] or
DELETE] to remove a wrong letter.
Press [▲] to move the cursor to the
next character or to add a space
Press [Store] when you are satisfied
with the name you are storing.
Low battery:
If the batteries are low, the “Battery
Low” icon will appear in the upper left
corner and flash. If the batteries are not
installed, the “Battery Low” icon will only
appear when the display is active while
the phone is off-hook.
4. To end the phone call, press the
active line key, press [Handsfree],
or return the handset to its cradle.
Using the One-Touch Speed
Dial Memory
Record locations of important speed
dial numbers on the memo log.
Dialing out with one-touch
memory
1. Press a memory key (eg. [M1]).
2. The telephone will connect the line
and dial out the stored number.
10
15
INSTALLATION
BASIC OPERATION
Making or Answering a Call
Last Number Redial
Using auto-line selection:
1. Press [Redial].
1. Press [Handsfree] or pick up the
handset. The telephone will select
an appropriate line and connect it.
The Call timer will start 3 seconds
after the phone is connected to the
line.
2. The telephone will automatically
connect an available line and dial out
the last number dialed.
Connecting your Telephone Lines
Connecting the phone with a single
line.
Wherever you intend to locate your
phone, have your local telephone
company install as many telephone
lines and wall sockets as necessary to
enable you to connect it.
OR
1. Access the line manually.
2. To end the phone call, press the
active line, press [Handsfree] or
replace the handset.
2. Press [Redial].
Placing a Call on Hold
Picking the line yourself:
1. While a line is active (eg. Line 2),
press [Hold].
1. If you want to manually choose the
line, press the line you desire (eg
Line 2). The phone will connect to
Line 2 and operate in the handsfree
mode.
2. The call is put on hold, the Line 2
LED will flash and the display will
show “HOLD: LINE 2.”
2. To end the phone call, press [LINE 2],
[Handsfree], or replace the handset.
Connecting the phone using two
lines.
3. Press the line key for the line (eg. [LINE
2]) to continue the conversation.
Answer a call during a conversation:
1. Caller ID information, if any, will be
displayed after one ring.
RINGER2
RINGER1
HI LO W OFF HI LO W OFF
LINE 2
LINE 1, 2
2. To answer the new call, press the
ringing line. The telephone will switch
to that line. The previous call will be
terminated.
3. Call timer will start 2 seconds after
the machine is connected to the line.
14
11
INSTALLATION
TELEPHONE SETUP
Desktop Installation
Wall Mounting
1. If you desire, you can attach the desk
wall mount to the base to elevate the
angle of view to better see the display
and keys.
The telephone may be installed on the
studs of a standard wall phone plate or
onto two screws (not included) fastened
into the wall (see page 21 for template).
When installing screws into drywall, use
wall anchors (not included) to ensure
that the screws are secure. To install
screws properly, remove the template
(included) and use it to mark the screw
locations on the wall. Insert the screws
into the wall leaving 5mm of each screw
extending out form the wall.
Programming the Telephone
Settings
default setting is 3. The range of
contrast settings is 1-5.
Any time during telephone programming,
press [DIAL/ENTER] to advance to the
next setting, press [DELETE] to go back
to the previous setting, or press [PROG]
to move to the next setting group. Setup
will time out if idle for 30 seconds.
5. Press [DIAL/ENTER] or [PROG] to
advance to next setting. The display
will show “SET TIME/DATE”. The
current time and date setting will
display with the hour flashing. Press
[PROG] to skip setting the time and
date.
1. Press [PROG]. The display will say
“HEADSET OFF”. The current setting
will flash.
1. Connect the telephone lines as
shown in the section “Connecting
your telephone lines.”
2. Pull out and turn the handset catch
180 degrees to the wall mount
position.
3. Attach the desk/wall mount to the
base of the telephone bracket insert
hook first, then lock in the others.
Make sure the cables run through
the cable grooves in the mount so
they do not impede wall mounting.
2. Connect the telephone lines as
shown in the section “Connection
your telephone lines.”
4. Slip the phone onto the wall, lining up
the wall mounting holes over the all
plate posts or screws and then slide
the telephone down so its firmly in
place.
3. Plug one end of the handset coiled
cord into the handset. Plug the other
ends of the cord into the handset port
on the left side of the phone base.
6. Press [▼] to decrease the setting,
[▲] to increase the setting, or use
the dial pad to key in the value (press
[1] for AM and [2] for PM). Press
[DIAL/ENTER] to move between
the different settings. The default
time date setting is 12:00 am 1/01.
The local clock will also be updated
automatically when a caller ID is
received.
2. Press [▼] or [▲] to switch between
Headset On and Headset Off, or
use the dial pad to select (1 = On, 2
=Off).
Note: If the headset is enabled (On),
the handsfree will be disabled.
3. Press [DIAL/ENTER] or [PROG]
to advance to next setting. “SET
CONTRAST” will display with the
current priority flashing.
5. Plug one end of the handset coiled
cord into the handset. Plug the other
end into the handset port located on
the left side of the phonebase.
4. Place the handset in the handset
cradle.
6. Place the handset in the handset
cradle.
12
4. Press [▼] to decrease the setting,
[▲] to increase the setting, or use
the dial pad to key in the value. The
13
INSTALLATION
BASIC OPERATION
Making or Answering a Call
Last Number Redial
Using auto-line selection:
1. Press [Redial].
1. Press [Handsfree] or pick up the
handset. The telephone will select
an appropriate line and connect it.
The Call timer will start 3 seconds
after the phone is connected to the
line.
2. The telephone will automatically
connect an available line and dial out
the last number dialed.
Connecting your Telephone Lines
Connecting the phone with a single
line.
Wherever you intend to locate your
phone, have your local telephone
company install as many telephone
lines and wall sockets as necessary to
enable you to connect it.
OR
1. Access the line manually.
2. To end the phone call, press the
active line, press [Handsfree] or
replace the handset.
2. Press [Redial].
Placing a Call on Hold
Picking the line yourself:
1. While a line is active (eg. Line 2),
press [Hold].
1. If you want to manually choose the
line, press the line you desire (eg
Line 2). The phone will connect to
Line 2 and operate in the handsfree
mode.
2. The call is put on hold, the Line 2
LED will flash and the display will
show “HOLD: LINE 2.”
2. To end the phone call, press [LINE 2],
[Handsfree], or replace the handset.
Connecting the phone using two
lines.
3. Press the line key for the line (eg. [LINE
2]) to continue the conversation.
Answer a call during a conversation:
1. Caller ID information, if any, will be
displayed after one ring.
RINGER2
RINGER1
HI LO W OFF HI LO W OFF
LINE 2
LINE 1, 2
2. To answer the new call, press the
ringing line. The telephone will switch
to that line. The previous call will be
terminated.
3. Call timer will start 2 seconds after
the machine is connected to the line.
14
11
INSTALLATION
SPEED DIAL
Installing the Batteries
Selecting a Location
Storing Numbers
Batteries must be installed to power the
display while the phone is on-hook as
well as to save telephone settings.
The phone may be used on a desk or
mounted on a wall. Select a location
that meets the following requirements:
1. Press [Store]. The display will show
“SAVE TO?”
1. In order to install the batteries,
make sure the desk/wall mount
is not attached to the base of the
telephone.
1. Near a telephone line wall jack.
2. Away from any electrical machinery,
appliances, and metal walls or filing
cabinets.
2. Loosen the screw fastening the
battery compartment cover using a
screwdriver and remove it from the
back of the phone.
3. Use the screwdriver to push at the
base of the cover’s catch and push
up to flip open the compartment
cover.
Note: A maximum of 3 one-touch and
32 speed dial entries can be stored in
the directory.
Using the Speed Dial
Directory
2. Press either a one-touch memory
location (eg. [M1]) or [DIR], which ever
place you wish to store the number.
The memory location is displayed in
the display briefly. Then the LCD will
display “ENTER NUMBER.”
Dialing out with directory memory:
1. Press [Directory]. The LCD will
display “DIR. ITEM” and the number
of memories stored in the directory.
2. Press [▲] or [▼] to move through
the directory list or enter the two digit
memory location using the dial pad.
3. Use the dial pad to enter the phone
number you are storing. Press [▼] or
[DELETE] to remove a wrong digit.
Press [Store] when you are satisfied
with the number you are storing.
4. Insert 4 AA batteries into the
compartment paying close attention
to the labelled polarities.
4. The LCD
NAME.”
5. Close the battery compartment cover
and secure with the screw.
will
display
3. Once you have found the number you
wish to dial, press [DIAL/ENTER],
press [Handsfree], press an unused
line key, or pick up the handset. The
phone will connect the line and dial
out the selected number.
“ENTER
5. Use the dial pad to enter the name
(see chart below). Press [▼] or
DELETE] to remove a wrong letter.
Press [▲] to move the cursor to the
next character or to add a space
Press [Store] when you are satisfied
with the name you are storing.
Low battery:
If the batteries are low, the “Battery
Low” icon will appear in the upper left
corner and flash. If the batteries are not
installed, the “Battery Low” icon will only
appear when the display is active while
the phone is off-hook.
4. To end the phone call, press the
active line key, press [Handsfree],
or return the handset to its cradle.
Using the One-Touch Speed
Dial Memory
Record locations of important speed
dial numbers on the memo log.
Dialing out with one-touch
memory
1. Press a memory key (eg. [M1]).
2. The telephone will connect the line
and dial out the stored number.
10
15
LOCATIONS OF CONTROLS AND FEATURES
SPEED DIAL
4. The LCD will say “EDIT NAME” and
then the current name is displayed.
3. To end the phone call, press the
active line key, press [SPEAKER], or
return the handset to its cradle.
Reviewing one-touch memory
1. Press and hold a one-touch memory
key (eg. [M1]). The display will show
the name and number stored in that
location.
Note: Be careful. Releasing the
button too soon will dial the number.
LCD Displays
5. Press [▼] or [DELETE] to remove an
incorrect letter. Press [▲] to move
the cursor right.
When the telephone is not in use, the
LCD displays the number of new calls
received, if any.
6. Use the dial pad to enter the new
letter(s). Press [SAVE] or [DIAL/
ENTER] when you are satisfied with
the name you are editing.
If a line is put on hold (eg. Line 1), the
display shows the line number and its
status.
Cloning a Speed Dial Number
2. If you wish to dial the number,
either press the same memory key
again, press [DIAL/ENTER], press
[Handsfree], or press an available
line key, or pick up the handset. The
phone will connect the line and dial
out the number.
When the telephone is not in use, if a
line is being used by another phone, the
display shows the line number and its
status.
1. During one-touch or directory
memory review, press [SAVE]. The
display will show “SAVE TO?”.
When the telephone is not in use, if a
line is ringing, the display shows the line
number and its status.
2. Press either a one-touch memory
location (eg. [M1]) or [DIR], which
ever place you wish to store the
number. Note: One-touch memory
locations accept duplicate phone
numbers, but the directory does not.
Editing a Speed Dial Number
1. During one-touch memory or directory
memory review, press [Edit] the LCD
will show “EDIT NUMBER” and then
the current number is displayed.
When a line on this phone is in use, the
LCD display will show momentarily the
line currently in use and which device
(handset, speaker, or headset) is being
used.
Erasing Speed Dial Numbers
1. During one-touch or directory
memory review, press [DELETE].
The LCD will display “ERASE THIS
ITEM?”.
If more than one event is valid, the display will scroll between the messages
2. Press [DELETE] to confirm. “ITEM IS
ERASED” is displayed. This speed
dial location is now available to store
a new number.
2. Press [▼] or [DELETE] to remove an
incorrect digit.
3. Use the dial pad to enter the new
number(s). Press [Store] or [DIAL
ENTER] when you are satisfied with
the number you are editing.
Note: Entries can only be deleted
individually. Group delete is not
available.
16
9
LOCATIONS OF CONTROLS AND FEATURES
CALLER ID
14. Directory Key [Directory]
When pressed, reviews a directory
list of speed dial memories. Each
dial memory stores a number (up to 28
digits) plus a name of up to 16
characters.
Reviewing Caller ID Records
1. Press [▲] or [▼]. The LCD displays
“CALLERS LIST =” and the number
of Caller ID entries received.
3. To end the phone call, press the line
key for the line you are using, press
[Handsfree], or return handset to its
cradle.
Saving Caller ID to Speed Dial
Memory
15. Headset Port
Allows using a headset for hands-free
convenience.
2. Press [▲] or [▼] to scroll through the
caller ID list. The call counter will
switch between the call number and
the call line.
16. Store Key [Store]
Used to save a phone number and
name into one-touch memory or the
speed dial directory.
1. During caller ID review, the LCD will
display a caller ID entry.
2. Press [SAVE] when the number
displayed is correct. The display will
ask “SAVE TO?”
#
17. Speaker
18. Transfer Key [Transfer]
The [Transfer] key is used to access
telephone company services like call
waiting.
3. To review caller ID on only one of
the two lines, press dial key [1] or [2]
when the callers list is displayed.
19. Delete Key [DELETE]
Used to erase a caller ID, total caller
ID in a particular line, all caller ID, a
directory memory, or a one-touch
memory.
3. Press either a one-touch memory
location (eg. [M1]) or [Directory],
whichever place you wish to store the
number.
Note: One-touch memory locations
accept duplicate phone numbers, but
the directory does not.
Caller ID Callback
20. One-touch memory keys
[M1] [M2] [M3]
Three keys that automatically dial a
stored number when pressed. Each
key stores a number (up to 28 digits)
plus a name of up to 16 characters.
Deleting Caller ID Records
1. Press [▲] or [▼] to scroll through the
caller ID list. The call counter will
switch between the call number and
the call line.
2. Press [DIAL/ENTER], the phone will
select line 1 and dial. To select line
2, press [Line 2] and scroll to the
required number and press [DIAL/
ENTER] to dial.
8
17
Deleting a single record
1. During caller ID review, press
[DELETE]. The display will ask
“ERASE THIS ITEM?”
2. Press [DELETE] to confirm.
CALLER ID
LOCATIONS OF CONTROLS AND FEATURES
3. Press [DELETE] to confirm. Tip:
You may wish to review all caller
ID messages before erasing them.
Deleting records from one phone line
1. To erase all Caller ID entries from a
particular telephone line, go to caller
ID review for the desired line (eg. line
1). The display will show “LINE 1
LIST =” and then number of caller ID
entries for line 1.
the line is in use by this phone. The
LED flashes briefly if another phone is
using that line. If the line is on hold, the
LED will flash slowly. When the line is
ringing, it will flash quickly. If there is no
line connected to the phone, when you
press the line key it will light briefly and
then turn off, “NO CONNECTION” will
be indicated on the LCD.
Descriptions and Functions
1. LCD Display
2. Up and Down Keys [▲] [▼]
Used to move up or down through the
caller ID list or the speed dial directory.
3. Dial Key [DIAL/ENTER]
Press to dial a one-touch
number, directory memory
or a caller ID number. Also
accept a change in telephone
2. Press [DELETE]. The display will ask
“ERASE LINE 1?”.
3. Press [DELETE] to confirm.
Deleting all records
memory
number,
used to
settings.
9. Hold Key [Hold]
Press [Hold] to put an active line on
hold.
4. Program Key [PROG]
Press to enter the telephone settings
menu.
10. Conference Key [Conference]
Used to join a line on hold to an active
line to make a conference call.
5. New Call LED
The New Call LED flashes rapidly when
the phone is ringing. It flashes slowly to
indicate there are new calls.
11. Handsfree Key [Handsfree]
The [Handsfree] key is used to
begin or end a call using handsfree or
headset (instead of the handset). The
LED on the [Handsfree] key indicates the
status of the initiated call. If the LED
is off, the handsfree and headset
functions are inactive. If the LED is
steadily lit, either the telephone is in
handsfree or headset mode.
6. Edit Key [Edit]
Used to change one-touch memory, and
directory memory.
1. To erase all caller ID, go to the first
screen of caller ID review which displays the total caller ID messages in
the callers list.
7. Redial/Pause Key [Redial]
The telephone will automatically
redial the last number dialed when this
button is pressed. It can also be used to
program a pause of 4 seconds into a
dialing sequence stored into a speed
dial memory.
12. Dial Pad
Used in the conventional manner for
dialing.
13. Volume Up and Down Keys
[+] [-]
Press to increase or decrease
speakerphone, handset, or headset
volume in 4 steps.
2. Press [DELETE]. The display will ask
“ERASE ALL CALLS?”.
18
8. Line Keys [Line 1] [Line 2]
Press a line key to alternately go on
or off hook. The LEDs next to the line
keys indicate the status of the line. If
the LED is off, the line is on hook and
inactive or the line is not connected to
the phone line. If the LED is lit steadily,
7
LOCATIONS OF CONTROLS AND FEATURES
ADDITIONAL FEATURES AND GLOSSARY
Front View
Conference Calling
Pause
1. To place a conference call, select a
line and dial the number. Place an
active line on hold. Select the other
line and dial the number.
You may use this feature to create a
dialing pause between digits during a
call. Typically, the Pause function is
most useful for programming dialing
delays in long number sequences of
certain speed dial numbers such as
voice mail codes and international
phone numbers. Each time you press
the [Redial] key, you add a 4-second
delay to the dialling sequence (you
may do this more than once to create a
longer delay). You may insert a pause
anywhere in the number.
2. Press the [Conference] button to
connect the two lines.
3. To discontinue the conference but
remain the connection to one of the
lines (eg. Line 1), press [LINE 1].
The phone will switch to [LINE 1] and
disconnect the other line.
PROG
4. To end the phone call, press the Line
key for the line you are using, press
[Handsfree], or return the handset to
its cradle.
Transfer (Recall)
The [Transfer] key supports customer
calling services that you have subscribed
to from your local telephone company
(such as call waiting or three-party
conference calling).
Using the Handsfree or Headset
A headset can only be used in place of
the handsfree.
Adjusting the Volume
1. Press [Handsfree] to turn on the
handsfree or the headset.
The
handsfree LED indicator will light.
Adjusting the Receiver Volume
Use the [+] and [-] buttons to adjust the
volume:
2. To end the phone call, press
[Handsfree]. The handsfree LED
indicator light will turn off.
• If the phone is idle or in the handsfree
mode, press [+] and [-] to adjust the
speaker volume up and down.
Headset Port
1. Plug a headset RJ22 plug in to the
headset port on the left side of the
base, next to the handset port.
• If the handset is picked up, press [+]
and [-] to adjust the handset volume
up and down.
Note: Headsets used with this
telephone must comply with the
Standard EN60950-1
6
19
ADDITIONAL FEATURES AND GLOSSARY
Redial - Performs single button dialing
of last number dialed.
• If the headset is turned on, press [+]
and [-] to adjust the handset volume
up and down.
LOCATIONS OF CONTROLS AND FEATURES
Rear View
Ringer Level Control - Permits
adjustment of the ringer volume level.
Adjusting the Ringer Volume
Use the Ringer switch on the back of
the phone to set the ringer level.
Speed Dialing - Allows programming of
frequently dialled numbers so that they
can be dialled with the two touch speed
dial button.
Useful Features and Terms
Calendar/Clock - Visual display of date
and time.
Volume Level Control - Permits
volume adjustment of the handset,
speakerphone, and headset during a
conversation.
Caller ID Log - Enables users to view
name and number of callers. Contact
your local telephone company to
subscribe to Caller ID Service.
Caller ID Log - Stores up to 64 Caller
ID entries.
Call Time - Allows timing of phone
conversations.
Dial from Display - One-button dialing
from the Caller ID log.
Display - The Liquid Crystal Display
(LCD) shows clock and calendar,
number dialed, low battery indicator,
Caller ID information and call timer.
Flash - A signal sent by the phone to
the local telephone company supporting
services such as call waiting.
Hold - Permits user to place a call on
hold. Allows access by that user or by
any other phone connected to that line.
New Call Indicator - A visual indicator
that new calls have been received.
20
5
GETTING STARTED
WALL BRACKET FITTING TEMPLATE
FEATURES
Check to be sure that you have all the
following components in the package:
• Up to 2 line capability
• 3 one-touch speed dial memories
• Desk or wall mountable
• Call Line Identity*
• Handsfree
• Up to 32 two-touch speed dial
memories
• Last number redial
• Line Status indication
• Hold
• Conference calling
• Pause
• Time Break Recall (TBR)
• Call timer
• Automatic line selection
• Incoming call list
• Digital speaker volume control
• LCD displays date and time
• Ringer control
• Volume control
• Headset port
• Data port
1.
2.
3.
4.
5.
6.
7.
Telephone Base
Handset
Handset Coiled Cord
Telephone line cord (Qty 2)
4 x AA Batteries
Desk/wall mount bracket
Instruction manual
PACKAGE CONTENTS
*Subject to availability, terms and
conditions from your service provider.
4
21
TABLE OF CONTENTS
Getting Started...................................4
Package Contents ......................... 4
Features ........................................ 4
Additional Features and Glossary 19
Conference Calling ...................... 19
Using the Handsfree or Headset . 19
Pause .......................................... 19
Time Break Recall (TBR)............. 19
Adjusting the Volume................... 19
Glossary ...................................... 20
Location of Controls and
Features..........................................5-9
Top View.........................................5
Rear View.......................................6
Descriptions and Functions............7
LCD Displays..................................9
Wall Bracket Fitting Template........ 21
Troubleshooting and
Product Care ................................... 23
Installation.......................................10
Installing the Batteries..................10
Selecting a Location.....................10
Connecting Your Telephone
Lines.............................................11
Desk Top Installation.................... 12
Wall Mounting............................... 12
Guarantee & Manufacturers
Declaration ...................................... 24
Telephone Setup ............................. 13
Basic Operation .............................. 14
Making or Answering a Call ......... 14
Last Number Redial..................... 14
Placing a Call on Hold ................. 14
Speed Dial .................................. 15-16
Storing Numbers ......................... 15
Using the Speed Dial Directory ... 15
Using the One-Touch Speed Dial
Memory
15
Editing a Speed Dial Number ...... 16
Cloning a Speed Dial Number ..... 16
Erasing Speed Dial Numbers ...... 16
Caller ID ...................................... 17-18
Reviewing Caller ID Records ...... 17
Caller ID Callback........................ 17
Saving Caller ID to Speed Dial
Memory ....................................... 17
Deleting Caller ID Records .......... 17
22
3
TROUBLESHOOTING AND PRODUCT CARE
No dial tone. The phone will not dial
out.
• Check all telephone cord connections.
• Try another wall jack.
Can’t hear the ring signal
• Ensure the line connectors supplied
with the phone are fully inserted.
While on a call I hear another call on
the line, or interference
• Make sure all wiring is twisted pair.
• Check the wiring for bad connections.
Handset doesn’t appear to be
working
• Make sure the handset cord is solidly
connected at both ends and is plugged
into the handset socket.
Headset not working
• Ensure headset has been activated on
the telephone setup (page 13).
The caller’s name and/or number
don’t appear on the display
• Make sure you have subscribed to
Caller ID name/number service from
the telephone company.
• Caller ID service may not work when
the phone is connected to a Private
Branch Exchange (PBX).
• The call is coming from an area not
supplying Caller ID data. “Unknown
Caller”: will appear on the display.
• The caller has requested that their
phone number be suppressed from
Caller ID service. “Blocked Call” will
appear on the display.
• You answered the call before the
Caller ID data was displayed, which
usually occurs after the second ring.
23
Further concerns may also be
addressed by calling our Technical
Support
Department
on
0845
421 0730 or visiting our website,
www.atltelecom.com/support.
GENERAL PRODUCT CARE
To keep your phone working and looking
good, follow these guidelines:
• Avoid putting near heating appliances
and devices that generate electrical
noise (for example, motors and
fluorescent lamps).
• DO NOT expose to direct sunlight or
moisture.
• Avoid dropping and other rough
treatment of the unit.
• Never use a strong cleaning agent
or abrasive powder because this will
damage the finish.
• Retain the original package in case
you need to ship it at a later date.
Guarantee
Manufacturers Declaration*
Your Delta 700 telephone is designed
and manufactured to exacting quality
standards. This enables ATL Telecom
Limited to offer a 2-year guarantee from
the date of purchase. This guarantee
protects against faulty material or
workmanship, and applies to the UK
only and is not transferable.
ATL Telecom Limited declares that
this product is in conformity with the
essential requirements of the R & TTE
directive 1999/5/EC.
Delta 700
*A copy of the Declaration of Conformity
is available, upon request, from ATL
Telecom Limited.
Thank you for choosing a Delta 700 2 Line CLI Featurephone. You have selected
a carefully designed telephone that incorporates the latest technology, offering a
unique telephone, and providing years of excellent service.
The terms and conditions under which
the guarantee will be valid are as set
out below.
This user guide will ensure you obtain the best use of your telephone.
Misuse or any modification carried out
to the telephone, or operation other
than in accordance with the instructions
supplied, will invalidate the guarantee.
Damage
arising
from
incorrect
installation, accidental damage or
consequential loss, are not covered
under the guarantee.
In the event of a fault developing during
the period of the guarantee, the complete
telephone should be returned to your
supplier, adequately and safely packed,
together with the proof of purchase.
The liability of ATL telecom Limited
will be limited to the cost of repair or
complete replacement of the same
defective instrument, at the discretion
of the company. In the event that the
same item is not available, a suitable
alternative will be offered.
The terms of this agreement do not
affect your statutory rights.
ATL Telecom Limited,
Lakeside, Fountain Lane
St Mellons,
Cardiff, CF3 0FB
Telephone: 0330 333 8250
Facsimile:
0330 333 8251
www.atltelecom.com
USER GUIDE
1395003610 Issue 4
April 2010