1
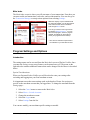
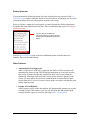
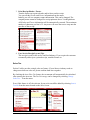
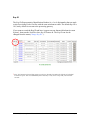
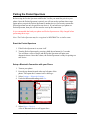
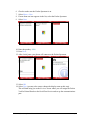
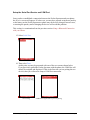
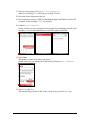
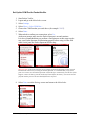
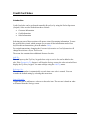
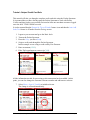
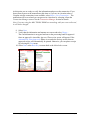
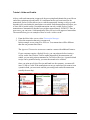
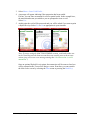
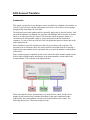
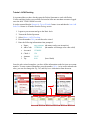
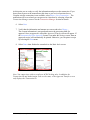
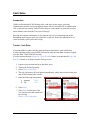
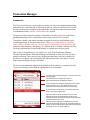
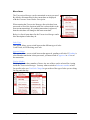
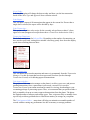
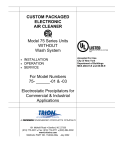
Pocket Verifier™
Smartphone Edition
Release Version 1 for Windows Mobile 5 Smartphone
User Guide and Tutorial
Copyright © 2006, Advanced Merchant Solutions Inc.
All rights reserved.
Table of Contents
Installation
Introduction.................................................................................................................................. 1
Installing Pocket Verifier.............................................................................................................. 2
Locating and Starting Pocket Verifier.......................................................................................... 2
Software Activation, Account Logon, and Main Index
Introduction.................................................................................................................................. 3
Account Activation....................................................................................................................... 3
Account Logon ............................................................................................................................ 4
Main Index................................................................................................................................... 5
Program Settings and Options
Introduction.................................................................................................................................. 5
Pocket Spectrum ......................................................................... Error! Bookmark not defined.
Other Features ............................................................................................................................ 6
Sales Tax .................................................................................................................................... 7
Rep ID ......................................................................................................................................... 8
Pairing the Pocket Spectrum
Reset the Pocket Spectrum ........................................................................................................ 9
Setup a Bluetooth Connection with your Phone ......................................................................... 9
Setup the Serial Port Service and COM Port............................................................................ 11
Set Up the COM Port for Pocket Verifier................................................................................... 13
Credit Card Sales
Introduction................................................................................................................................ 14
Tutorial • Swiped Credit Card Sale............................................................................................ 15
Tutorial • Voids and Credits....................................................................................................... 17
ACH Account Transfers
Introduction................................................................................................................................ 19
Tutorial • ACH/Checking ........................................................................................................... 20
Cash Sales
Introduction................................................................................................................................ 22
Tutorial • Cash Sales................................................................................................................. 22
Transaction Manager
Introduction................................................................................................................................ 23
Menu Items................................................................................................................................ 23
Hints and Tips
Introduction................................................................................................................................ 26
Entering Data ............................................................................................................................ 26
The Back Key ............................................................................................................................ 26
Switching Between Applications / Where did my program go? ................................................ 27
Notes ............................................................................................................................................. 27
Installation
Introduction
Before using Pocket Verifier with your Cingular 2125 Smartphone you will need to
install the main program file and possibly a number of support files. Pocket Verifier was
developed using the lasted development tools in order to provide you with the best
encryption methods for processing secure transactions. As such, you phone may not have
all the files necessary to support these new technologies and you may be required to
install them before starting the Pocket Verifier program.
The Pocket Verifier setup program makes this process straight forward and easy. Simply
select the First Time Installation option from the Choose Installation Options screen.
Once the first time installation is complete, you phone will be updated with the latest
security features and performance enhancements and you will not have to repeat this
procedure again.
You must have Microsoft Activate Sync installed on your computer and connected with
your phone in order to transfer the files from the installation. See the documentation that
came with your phone on how to install Active Sync and setup this connection.
Periodically we will provide additional features for Pocket Verifier in the form of product
updates. You can check for product updates directly from the Pocket Verifier program on
your phone by selecting Check for Updates… from the menu on the Main Index screen. If
a new update is available, it can be installed directly onto your. Updated files will usually
be labeled with the word upgrade in the installation file name (for example
PVP.Smartphone.Upgrade.x.xx.exe or PVP.Smartphone.Upgrade.x.xx.cab where x.xx is
the version number).
Below is a step-by-step approach to (1) Installing the Pocket Verifier software,
(2) locating the software on your phone, and (3) launching it.
Pocket Verifier • Smartphone Edition • User Guide and Tutorial
1 of 27
Installing Pocket Verifier
1. Active Sync the phone to your Windows PC.
2. Locate the installation file on your Windows PC and double-click on it.
3. Follow the directions in the Installation Wizard using the default options.
4. When asked to accept the software from an unknown publisher, select Yes.
5. The software is now successfully installed on your phone.
Locating and Starting Pocket Verifier
1. Tap the Phone Key to display the Today screen.
2. Tap Start to open the Start Menu Programs explorer.
3. Tap More two times to see the Pocket Verifier program icon.
4. Select the Pocket Verifier program icon.
5. Press down on the center toggle (Enter) to start the software.
Pocket Verifier will then load into memory and display either the Account
Activation screen (first time users) or Account Logon screen.
today screen
Note: When Pocket Verifier loads, it will do a number of security checks and set up everything up for you to
process secure mobile transactions. Once everything is set up, the response time to use the various features
in Pocket Verifier will be much faster.
Pocket Verifier • Smartphone Edition • User Guide and Tutorial
2 of 27
Software Activation, Account Logon, and Main Index
Introduction
Before you can use Pocket Verifier you will need to setup a merchant account. This is
done through software activation. To activate an account, you will need to have your
phone on and have your cellular service set up to accept data. If you can use Internet
Explorer on your phone to browse the internet then you already have a data service (see
your local cellular dealer or Pocket Verifier representative about this service for details).
This User Guide and Tutorial will use the MAC TOOLS DEMO account to demonstrate
how to process sales, print receipts, and issue refunds. The MAC TOOLS DEMO account
does not need an Activation Key and you are encouraged to use this account until you
become familiar with the software (See the Hints and Tips section for additional quick
steps on using Pocket Verifier).
If you want to activate your merchant account, you will need to use the activation key
that came with your software. If you did not get an activation key, please contact your
Pocket Verifier representative.
Once one account is added to Pocket Verifier you will automatically be taken to the
Account Logon screen each time you start the software. From the Account Logon screen
you can go to the Main Index screen – this is where you will do most of your actions.
Account Activation
1. If you are in Flight Mode, turn on your phone.
This can be done by pressing the On button quickly.
2. Make sure you have a connection (see the Cingular User Guide for details).
3. Start Pocket Verifier.
If this is the first time you are using the software, the Account Activation screen
will appear. If you have already activated one account, you can activate another
by selecting Menu > Add Merchant… from the Account Logon screen.
4. Enter your Merchant Account, Account Password, and Activation Key.
If you are setting up the MAC TOOLS DEMO account then enter the following
information:
a. Merchant Account: 10600
b. Account Password: 1234 (press and hold the key to display the number)
c. Activation Key:
10600
Pocket Verifier • Smartphone Edition • User Guide and Tutorial
3 of 27
5. Tap on Activate.
A connection to your phone service is started and the activation information is
sent to the processing gateway for validation. If your merchant account and
password are correct, your company information will be retrieved and used for
processing transactions and printing receipts. Once the activation completes you
will be taken to the Account Logon screen.
To exit the Account Activation screen, select Menu > Exit or Menu > Cancel,
depending on what stage of the program you are in. Pressing the Back Key will
also close the Account Activation screen. In most cases the Back Key will return
you to the previous screen.
Account Logon
If you have already setup an account, you will automatically be taken to the Account
Logon screen each time your start the program. If you have more than one account for
Pocket Verifier, you can switch between them on this screen.
•
•
Tap Logon to go to the Main Index screen, or…
To set up a new account select Menu > Add Merchant…
Pocket Verifier • Smartphone Edition • User Guide and Tutorial
4 of 27
Main Index
The Main Index screen is where you will start most of your transactions. From here you
can enter credit card transactions, cash sales, and account transfers. You can also go to
the Transaction Manager or setup various options from selecting Settings.
While the majority of your transactions will
be credit card related, you can also perform
cash sales and ACH account transfers *
from the right Menu screen.
You can go to the Account Logon screen
by selecting Switch Accounts… You can
also exit the program, check for program
updates, and display an About Box (to
check your program version number).
* ACH Account Transfers require ACH to
be activated on your merchant account.
Program Settings and Options
Introduction
The settings menu can be accessed from the Main Index screen of Pocket Verifier. Once
you enter the Settings screen, most features can be turned on or off. The menu on the
right side also contains additional features that can be changed. Each of these is described
below.
Special Considerations:
When you first start Pocket Verifier you will be asked to enter your settings after
activating and logging into your first merchant account.
It is important to note that some settings such as the header of footer for receipts are
specific to the merchant account that you logged into. To change the merchant from the
Settings page…
1.
2.
3.
4.
5.
Select the Cancel menu to return to the Main Index.
Select Menu > Switch Accounts.
Change the merchant account.
Select the Logon menu.
Select Settings from the list.
You can now modify your merchant-specific settings as needed.
Pocket Verifier • Smartphone Edition • User Guide and Tutorial
5 of 27
Pocket Spectrum
If you purchased the Pocket Spectrum with your software then you can turn of the Use
Pocket Spectrum feature. When this feature is on, the software will prompt you to test the
connection and provide you with an option to print a test receipt.
However, before a connection can be tested, you must first pair the Pocket Spectrum to
the phone and setup a Bluetooth COM Port. This is explained in the section: Pairing the
Pocket Spectrum.
You must first setup a Bluetooth
connection between your phone and the
Pocket Spectrum BEFORE selecting this
feature.
Once the Pocket Spectrum item is checked, additional printer-related features are
enabled. These are described below.
Other Features
1. Automatically Print Approvals.
After a credit card or ACH sale is approved, the Pocket Verifier software will
automatically print a receipt. The Pocket Spectrum must be on in order to print
this receipt; so make sure the unit is turned on while you are processing the
transaction. If the unit is off while the Printing Status Indicator appears on the
screen, you may still be able to turn it on and print the receipt before the print
request times out. You can, of course, always print a receipt by selecting the print
feature from the menu.
2. Prompt to Print Refunds.
After issuing a void or credit, the software will automatically prompt you to print
a refund receipt. If this feature is off, you can still print full and partial refund
receipts from the Approval screen be selecting Menu > Print Refund.
Pocket Verifier • Smartphone Edition • User Guide and Tutorial
6 of 27
3. Print Receipt Header / Footer.
Turn the feature on to print a header and/or footer on the receipt.
You can edit the Header and Footer information from the menu.
Initially you will see company contact information. This can be changed. The
company name cannot be changed for receipt printouts due to Visa Regulations.
All Header and Footer information will be automatically centered. The maximum
number of characters per line is 32. Any more will cause the text to wrap onto the
next line of the receipt.
4. User Service Receipt Layout (Tip).
This receipt is used for the service and food industry. If you require the customer
to manually add a tip to a printed receipt, turn this feature on.
Sales Tax
Pocket Verifier provides a single sales tax feature. If your State or industry needs to
charge more than one sales tax, please combine both taxes together.
By checking the Auto Sales Tax feature, the tax amount will automatically be calculated
after entering the item cost. The Tax Percentage can be changed by selecting Change
Sales Tax… from the menu.
Even if this feature is off, the sales tax for any sale can still be added by selecting Item is
Taxable from the menu located on the Sales screen.
Pocket Verifier • Smartphone Edition • User Guide and Tutorial
7 of 27
Rep ID
The Rep ID (Representative Identification Number) is a 1 to 4 digit number that can track
a sales force using Pocket Verifier with the same merchant account. The default Rep ID is
101, but by default is not sent to the processing gateway.
If you want to record the Rep ID and have it appear on your Internet Merchant Account
System*, then turn the Send Merchant Rep ID feature on. The Rep ID can also be
changed from the menu (Change Rep ID…).
* Note: In Transaction Central this appears as the User ID and is located at the left side of a detailed
transaction report. This is an additional feature that may or may not be setup with your merchant
account.
Pocket Verifier • Smartphone Edition • User Guide and Tutorial
8 of 27
Pairing the Pocket Spectrum
Before using the Pocket Spectrum with Pocket Verifier you must first pair it to your
phone. Once the Pocket Spectrum is paired, you will not need to perform these steps
again unless you pair the Pocket Spectrum to another device (for security reasons the
Pocket Spectrum can only be paired to one device). If you hard reset you phone on
Pocket Spectrum, then you will also need to reset up the connection.
It is recommended that both your phone and Pocket Spectrum are fully charged before
performing these steps.
Note: The Pocket Spectrum may be recognized as MPS5B0079 or a similar name.
Reset the Pocket Spectrum
1. If the Pocket Spectrum is on, turn it off.
2. Turn the Pocket Spectrum by pressing a hold the on button for 3 seconds.
You will hear a series of beeps and the Pocket Spectrum will print out a
diagnostic sheets. Once this is done, the Pocket Spectrum is ready for pairing to a
new device.
Setup a Bluetooth Connection with your Phone
1. Turn on your phone
2. Press the top button located at the top left spine of the
phone. This opens the Communications Manager.
3. Select Settings > Bluetooth Settings…
4. Under the Bluetooth heading select On.
5. Select Menu > Devices.
A list of Bluetooth devices will appear here.
Pocket Verifier • Smartphone Edition • User Guide and Tutorial
9 of 27
6.
7.
8.
9.
Check to make sure the Pocket Spectrum is on.
Select Menu > New.
If more than one item appears in the list, select the Pocket Spectrum.
Select Next.
10. Enter the passkey: 1000
11. Press Next.
12. After a brief pause your phone will connect to the Pocket Spectrum.
13. Select OK.
14. Select Next (you may also want to change the display name at this step).
This will then bring you to the Services screen where you will assign the Pocket
Verifier Printer/Reader to the Serial Port Service and set up the communications
port.
Pocket Verifier • Smartphone Edition • User Guide and Tutorial
10 of 27
Setup the Serial Port Service and COM Port
Once you have established a connection between the Pocket Spectrum and your phone,
the Services screen will appear. If it does not, you may have entered an incorrect passkey
or the battery on the Pocket Spectrum or phone may not be fully charged. In most cases,
re-entering the passkey and/or charging the devices will avoid this problem.
This section is a continuation from the previous section: Setup a Bluetooth Connection
with your Phone.
15. Select Serial Port.
16. Then select Done.
At this point you may be presented with one of the two screens shown below.
If you previously paired the Pocket Spectrum with the phone, the COM Port will
already be assigned and displayed. If this is the first time you are pairing the two
devices, then you will need to setup a COM Port connection.
New Pairing
COM Port assigned from a previous pairing
Pocket Verifier • Smartphone Edition • User Guide and Tutorial
11 of 27
17. If this is a new pairing, select Menu > New Outgoing Port.
Otherwise, selecting Done will bring you to Step 21 below.
18. Select the Pocket Spectrum in the list.
19. Next you need to assign a COM Port that both the phone and Pocket Verifier will
recognize. In this example COM7 was selected.
20. Uncheck Secure Connection.
Pocket Verifier uses its own proprietary encryption for transmitting secured credit
card data, so it is recommended that you leave this option unchecked.
21. Select Done.
This brings you back to the Bluetooth screen.
On this screen you can change the COM Port by selecting Menu > COM Ports.
22. Select Done then Exit.
This should bring you back to the Today screen. If not, press the Home key.
Pocket Verifier • Smartphone Edition • User Guide and Tutorial
12 of 27
Set Up the COM Port for Pocket Verifier
1.
2.
3.
4.
5.
6.
7.
Start Pocket Verifier.
Logon and go to the Main Index screen.
Select Settings.
Select Menu > Select COM Port…
Choose the COM Port that you used above (for example COM7).
Select Done.
When asked to confirm your connection, select Yes.
At the next prompt, make sure the Pocket Spectrum is on and continue.
It is also recommended that you perform a small print test at this stage to make
sure your Pocket Spectrum is functioning properly before using it in the field.
After a brief pause the Pocket Spectrum will be setup.
Important Note: If this is the first time you are setting up the Pocket Spectrum or have removed
the Bluetooth connection by resetting the Pocket Spectrum, we recommend that you perform a
print test. In some cases the Pocket Spectrum will feed the paper continuously from the unit. If this
happens, remove the battery from the Pocket Spectrum. Replace the battery, turn on the unit and
perform another print test. The unit should function as expected.
8. Select Done to exit the Settings screen and return to the Main Index.
Pocket Verifier • Smartphone Edition • User Guide and Tutorial
13 of 27
Credit Card Sales
Introduction
Credit Card sales can be performed manually (Keyed) or by using the Pocket Spectrum
(Swiped). Sales are also divided into three sections:
•
Customer Information
•
Card Information
•
Sales Information
Selecting any one of these sections will open a wizard for entering information. To start
the general sales wizard, which prompts you to enter all the information needed for a
keyed credit card transaction, press the number 5 Key.
For swiped transactions, changing the Customer Information or Card Information will
change the sale into a Keyed Transaction.
The menu also contains three additional features for sales.
Add Tip:
This will open up the Tip Entry keypad where a tip or service fee can be added to the
sale. If the Prompt for Tip feature is off from the Settings screen, the sales wizard will not
display the Tip Entry keypad. You must add tips using the Add Tip menu.
Reference No:
The reference number is automatically set each time a new sale is created. You can
override the default setting by selecting this menu item.
Item is Taxable:
Toggle this item to add/remove sales tax to the sales item. The tax rate is based on what
was entered from the Settings screen.
Pocket Verifier • Smartphone Edition • User Guide and Tutorial
14 of 27
Tutorial • Swiped Credit Card Sale
This tutorial will take you though a complete credit card sale using the Pocket Spectrum.
It is assumed that you have already setup the Pocket Spectrum to work with Pocket
Verifier and that you have successfully activated at least one merchant account or logged
on to the MAC TOOLS DEMO account.
It is also assumed that the Prompt for Tip on Wizards feature is on and that the Auto Add
Sales Tax feature is off under from the Settings screen.
1.
2.
3.
4.
Logon to your account and go to the Main Index.
Turn on the Pocket Spectrum.
Press the 1 Key (or select Sales).
Swipe a credit card through the Pocket Spectrum.
In this example we are using a credit card by Pete Peterson.
5. Enter an amount (12.95).
6. If the Tip keypad appears, enter a tip (3.00).
All the information needed for processing a sales transaction has been added. At this
point, you can also change the customer reference number and add/remove sales tax.
7. Select Menu > Item Is Taxable to include sales tax.
The change is reflected immediately.
Pocket Verifier • Smartphone Edition • User Guide and Tutorial
15 of 27
At this point you are ready to verify the information and process the transaction. If you
do not want to process the transaction at this time or if you are in a location where a
Cingular wireless connection is not available, select Menu > Save Transaction… The
transaction will be saved and you can process at a later date by selecting it from the
Transaction Manager screen. See the Transaction Manager section for details.
Note: If you are using the MAC TOOLS DEMO account along with your own credit card,
it will not be charged.
8. Select Next.
9. Verify that the information and amount are correct and select Charge…
The card information is encrypted and sent to the processing bank for approval.
Once an approval is issued the Approved Transaction screen will appear. If the
Automatically Print Approvals feature is on under the Settings screen, then an
approved receipt will automatically be printed. Otherwise, you can print a receipt
by selecting the Print menu.
10. Select Done or the Back Key to return back to the Main Index screen.
Pocket Verifier • Smartphone Edition • User Guide and Tutorial
16 of 27
Tutorial • Voids and Credits
After a credit card transaction is approved, the processing bank submits the record for an
end-of-day settlement (closed batch). If a settlement has not yet been issued for the
transaction, Pocket Verifier allows you to void the transaction. Issuing a void or a credit
depends solely on whether the transaction was settled. Settled transactions will allow you
to issue full or partial credits. Unsettled transaction can only voided. Pocket Verifier
transaction are automatically batched every night at approximately 11PM PST. Thus, in
most cases, you can issue a void immediately after you received an approved transaction.
The tutorial below gives an example of how to issue a void or credit.
1. From the Main Index screen, select Transaction Manager.
2. Select the transaction that was just approved.
In this example we are using Pete Peterson. Your transaction will be different
than the one presented here since.
The Approved Transaction screen now contains a menu with additional features.
If your customer requires a Refund Receipt, you can print one before issuing a
void or credit. Since Pocket Verifier cannot determine if the transaction was
settled, you can only print out amounts for Full Refund Receipts. A partial refund
receipt can be printed whereby you enter the amount to be credited.
Once you print out a Refund Receipt and hand it to the customer, you must still
issue a Void or Credit. If the transaction was not yet settled and you want to issue
a partial refund, you must wait until the processing bank settles the transaction
(usually the next day).
Pocket Verifier • Smartphone Edition • User Guide and Tutorial
17 of 27
3. Select Menu > Issue Void/Credit…
4. A message will appear indicting if the transaction has been settled.
If it has, you can enter an amount for a full or partial credit. In the example here,
the transaction has not yet settled so you are prompted to issue a void.
Select Yes.
5. At this point the void will be processed and you will be asked if you want to print
a Refund Receipt. Select Yes or No as appropriate in your situation.
Note: If you are using the MAC TOOLS DEMO account, voids and credits cannot be issued because the demo account does not actually process these transactions (you will see an error message stating that “the transaction is void is
unmatched”).
Once an optional Refund Receipt prints, the transaction will be removed and you
will be returned to the Transaction Manger screen. From here you can return to
the Main Index screen by selecting the Done menu or pressing the Back Key.
Pocket Verifier • Smartphone Edition • User Guide and Tutorial
18 of 27
ACH Account Transfers
Introduction
This option is primarily so your business can accept checks by telephone, fax machine, or
e-mail. If your customer can physically hand you a check, you are better off accepting it
and physically depositing it at your bank.
The bad check protection statutes and laws generally apply only to physical checks, with
pen-and-ink signature. In addition, the customer can challenge and reverse the electronic
check up to sixty days after it is issued. The electronic check acceptance feature is a
convenience for the reputable vendor to accept non-physical checks from honest
customers. To date, it does not offer all of the safeguards that physical checks and credit
card transactions do.
Please familiarize yourself with the procedures for processing credit card sales. The
procedures for an electronic check are nearly identical except that instead of entering a
credit card account number and an expiration date, you enter the numbers on the bottom
of the check.
There are three groups of numbers on the check. One is the check number, another is the
ABA or bank routing number (also known as the transit number), and the thrid is the
account number. This is shown in the diagram below.
Please note that the relative positions may vary from check to check, but the check
number on the bottom always matches the number in the upper right hand corner.
Additionally, the routing number can always be found between two |: marks. The
following tutorial uses a fictitious savings account.
Pocket Verifier • Smartphone Edition • User Guide and Tutorial
19 of 27
Tutorial • ACH/Checking
It is assumed that you have already setup the Pocket Spectrum to work with Pocket
Verifier and that you have successfully activated at least one merchant account or logged
on to the MAC TOOLS DEMO account.
It is also assumed that the Prompt for Tip on Wizards feature is on and that the Auto Add
Sales Tax feature is off under from the Settings screen.
1.
2.
3.
4.
5.
Logon to your account and go to the Main Index.
Turn on the Pocket Spectrum.
Select Menu > ACH/Checking.
Press the number 5 Key to start the sales wizard.
Enter the following information when prompted:
a. Name:
amy peterson (the name can be case insensitive)
b. ABA Code: 122000001
(the number will change color when valid)
c. Account #
12340001
d. Check #
126
e. Amount:
19.95
f. Tip:
0.00
(leave blank)
Once the sales wizard completes, you have all the information needed to issue an account
transfer. To enter contact information, press the number 1 Key. As in credit card and cash
sales, you can also change the Tip, Tax, and Reference information from the menu.
Pocket Verifier • Smartphone Edition • User Guide and Tutorial
20 of 27
At this point you are ready to verify the information and process the transaction. If you
do not want to process the transaction at this time or you are in a location where a
Cingular wireless connection is not available, select Menu > Save Transaction… The
transaction will be saved and you can process at a later date by selecting it from the
Transaction Manager screen. See the Transaction Manager section for details.
6. Select Next.
7. Verify that the information and amount are correct and select Charge…
The account information is encrypted and sent to the processing bank for
approval. Once an approval is issued the Approved Transfer screen will appear. If
the Automatically Print Approvals feature is on under the Settings screen, then an
approved receipt will automatically be printed. Otherwise, you can print a receipt
by selecting the Print menu.
8. Select Done when finished to return back to the Main Index screen.
Note: You cannot issue voids or credits on ACH/Checking sales. In addition, the
Transaction ID and Authorization Code are the same, so the Approved Transfer screen
only displays the Transaction ID.
Pocket Verifier • Smartphone Edition • User Guide and Tutorial
21 of 27
Cash Sales
Introduction
Unlike credit card and ACH/Checking sales, cash sales do not require a wireless
connection nor do they receive an approval status with a Transaction ID or Authorization
code. Cash sales are used by Pocket Verifier only as a convenience to print cash receipts
and to monitor sales from the Transaction Manager.
Entering the customer information is also optional since it is a consuming task on the
Smartphone and, in most cases, not needed for a cash sale. Follow the tutorial below to
create and print a quick cash sales receipt.
Tutorial • Cash Sales
It is assumed that you have already setup the Pocket Spectrum to work with Pocket
Verifier and that you have successfully activated at least one merchant account or logged
on to the MAC TOOLS DEMO account.
It is also assumed that the Prompt for Tip on Wizards feature is on and that the Auto Add
Sales Tax feature is off under from the Settings screen.
1.
2.
3.
4.
Logon to your account and go to the Main Index.
Turn on the Pocket Spectrum.
Select Menu > Cash Sale.
The Sale Information Wizard appears immediately, unlike the previous credit card
and ACH/Checking sales screens.
5. Enter the following information:
a. Amount:
32.59
b. Tip:
7.50
6. Select Next.
7. Select Print to print the receipt.
You can also save this transaction
by selecting:
Menu > Save Transaction.
Pocket Verifier • Smartphone Edition • User Guide and Tutorial
22 of 27
Transaction Manager
Introduction
The Transaction Manager screen is the area where you can view completed and pending
transactions for credit card and ACH/Checking sales as well as saved cash sales. It is also
the entry point for processing the voids and credits of completed credit card transactions
as demonstrated in the Tutorial • Voids and Credits section.
The purpose of the transaction manger on the phone is to allow you to save and process
pending transactions. Once a transaction is processed, a record of it is saved in
Transaction Central (your online Merchant account) for viewing, downloading to your
accounting package, or for processing reports. Thus, we recommend that you perform
either a daily or monthly clean up to remove approved transactions from the phone. The
phone has limited memory and storage, so a rigorous daily or monthly clean up will help
avoid any problems due to insufficient memory or storage space on your phone.
This section is designed to give you a basic over view of the Transaction Manager.
The data contained in the Transaction Manager will depend on what processes you have
already performed. Thus, in most cases, the data presented here may not be identical to
the data on your phone, since transaction and authorization codes, sales dates, account
holder names and approval types will differ.
The most recent transaction appears at the bottom of the list. Below is a summary for the
Transaction Manager screen with an explanation of its various parts.
The date can be changed using the * and # keys or the left
and right toggle.
This heading can be changed from the Menu.
Approved transactions will display the letter A.
A list of transactions will appear depending on the criteria
selected from the menu. The default display is for all
transactions saved and processed on the current day.
To view details for a transaction, first select it and press
down on the center toggle button.
Approved credit cards can be issued a void or credit.
Pending credit card and ACH/Checking sales can be
approved or edited. A printed receipt can also be issued for
a selected item from the menu.
The total and pending sales are displayed here. In this
example the total sales are $151.55 and pending sales are
$89.95. Thus the total number of sales approved (charged)
for the day are 151.55 - 89.90 = $61.65.
Pocket Verifier • Smartphone Edition • User Guide and Tutorial
23 of 27
Menu Items
The Transaction Manager can be customized to meet your need.
By default, all transactions for the current date are displayed
with the Customer Name Header Description.
When entering the Transaction Manager after sales have been
processed or saved, the last item in the list is selected (this is the
most recent transaction). If a pending transaction is approved,
then the sales date will change to the most recent date.
Below is a list of menu times for the Transaction Manager and a
brief description of what they do.
Sales Type:
This option allows you to switch between the different type of sales:
Credit Cards, ACH/Checking, and Cash.
Approval Status:
This option allows you to switch between the approved, pending or all sales. If Pending is
selected and a transaction is then processed, you must switch to Approved or All to see
the transaction.
Display Header:
The display header has a number of items. Any one of these can be selected for viewing
inside the Transaction Manager. You may want to switch to Reference number to look
for specific sales or to Total Sale Charged to get an idea of the type of sales you are doing
for any particular day.
Pocket Verifier • Smartphone Edition • User Guide and Tutorial
24 of 27
Go to Today:
Selecting this option will change the data to today and show you the last transaction
based on the Sales Type and Approval Status selection criteria.
Print Report…
This will print a report of all transactions that appear in the current list. If more than a
single date is selected, the report will be divided by days.
Print Transaction…
This options will print a sales receipt for the currently selected item weather it’s been
approved or not (unapproved receipts do not have a Trans ID or Authorization Code.)
Transaction Timeframe:
The default setting is set for Selected Day. Depending on the number of transaction you
have saved or processed, setting this to another value may greatly slow down the display
speed when switching between dates.
Delete Transaction
This will delete the selected transaction and remove it permanently from the Transaction
Manager. Use this for items that have been processed elsewhere (such as through
Transaction Central) or for deleting approved transactions.
Trim Approved After…
The purpose of the transaction manger on the phone is to allow you to save and process
pending transactions. Once a transaction is processed, a record of it is saved in
Transaction Central (your online merchant account) for viewing, downloading to your
accounting package or processing reports. Thus, we recommend that you perform either a
daily or monthly clean up to remove approved transactions from the phone. The phone
has limited amount of memory and storage space. Thus, a rigorous daily or monthly clean
up will help avoid any problems due to insufficient memory or storage on your phone.
The Trim Approved After… menu item will help you maintain a reasonable number of
records without causing any performance loss due to memory or storage problems.
Pocket Verifier • Smartphone Edition • User Guide and Tutorial
25 of 27
Hints and Tips
Introduction
The Pocket Verifier software was developed in correspondence to how other applications
behave on your Smartphone. Thus, if you have already mastered other applications on
your phone, then using Pocket Verifier will appear logical and intuitive. For additional
information on how to use your Smartphone, read the Smartphone Quick Start Guide that
came with your phone or visit: http://www.microsoft.com/windowsmobile/smartphone/
Entering Data
Entering text on the phone can be a daunting task. Thus, when ever possible use the
Pocket Spectrum to swipe and process credit cards. When processing cash sales you can
leave out the customer name and only enter the amount.
If you must enter the customer’s name or an address for keyed transactions, remember
the following:
•
•
•
The customer’s name does not have to be case sensitive.
In most cased only the numeric portion of the address is required for the
processing gateway’s Address Verification System (AVS).
To enter a number when in ABC Text mode (such as when entering an address or
your password), press and hold the number key to bypass the letters and display
the number.
The Back Key
Unlike most other Smartphone applications, the Back Key will take you to the previous
screen inside Pocket Verifier, rather than the previous application. The feature allows you
to quickly move between screens and to process transactions.
The exception to this is when you are on the Account Logon screen or the Main Index
screen. Here the Back Key will hide the program and show the Today screen or a
previous opened application. To return to the Pocket Verifier program, press the Home
Key and select the Pocket Verifier icon from the quick launch bar on the top of the
screen. It the quick launch bar is not visible, follow the instructions from the Locating
and Starting Pocket Verifier section in this User Guide and Tutorial.
Pocket Verifier • Smartphone Edition • User Guide and Tutorial
26 of 27
Switching Between Applications / Where did my program go?
If your phone is set to automatically set to display the Today screen after a specified time
Pocket Verifier will disappear. In addition, if you accidentally press the red or green
phone buttons, or even the Home Key, Pocket Verifier will no longer appear on the
screen. To return to the Pocket Verifier program, simply press the Back Key until it
reappears.
Notes
Pocket Verifier • Smartphone Edition • User Guide and Tutorial
27 of 27