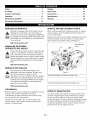
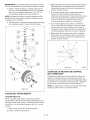
1
TM
ProZoom
Owner/Operator Manual
Manuel Du Propri_taire/Utilisateur
Models
991800 - ProZoom 2352S
991802 - ProZoom 1948S
ENGLISH
FRENCH
03855900 3/09
Printed in USA
Safety ......................................
3
Storage ...................................
30
9
Accessories ................................
33
Controls and Features .......................
11
Service Parts ...............................
33
Operation ..................................
12
Specifications ..............................
34
Maintenance Schedule .......................
17
Warranty
35
Service and Adjustments .....................
19
Assembly ...................................
NON-ENGLISH
MANUALS
..................................
SERVICE
Manuals in languages other than English may be
obtained from your Dealer. Visit your dealer or
www.ariens.com for a list of languages available for
your equipment. Manuals printed in languages other
than English are also available as a free download
on our web site:
AND REPLACEMENT
PARTS
When ordering publications, replacement parts, or making
service inquiries, know the Model and Serial numbers of
your unit and engine.
Numbers are located on the product registration form in the
literature package. They are printed on a serial number
label, located on the frame of your unit (Figure 1).
http://www.ariens.com
Serial Number
Label
MANUALES
EN IDIOMAS
DIFERENTES
DEL INGLES
Puede obtener manuales en idiomas diferentes del
ingl6s en su distribuidor. Visite a su distribuidor o
vaya a www.ariens.com para obtener una lista de
idiomas disponibles para su equipo.Tambi6n puede
imprimir manuales en idiomas diferentes del ingl6s
descarg_ndolos gratuitamente de nuestra pSgina
Web:
http://www.ariens.com
MANUELS
NON ANGLAIS
Des manuels dans diff6rentes langues sont
disponibles chez votre revendeur. Rendez-vous
chez votre revendeur ou allez sur le site
www.ariens.com pour consulter la liste des langues
disponibles pour votre 6quipement. Les manuels
imprim6s dans des langues diff6rentes de I'anglais
sont 6galement disponibles en t616chargement
gratuit sur notre site Web:
Figure 1
Record Unit Model and Serial numbers here.
• Record Engine Model and Serial numbers here.
http://www.ariens.com
THE MANUAL
Before operation of unit, carefully and completely read your
manuals. The contents will provide you with an
understanding of safety instructions and controls during
normal operation and maintenance.
All reference to left, right, front, or rear are given from
operator sitting in the operation position and facing the
direction of forward travel.
PRODUCT
REGISTRATION
The Ariens dealer must register the product at the time of
purchase. Registering the product will help the company
process warranty claims or contact you with the latest
service information. All claims meeting requirements during
the limited warranty period will be honored, whether or not
the product registration card is returned. Keep a proof of
purchase if you do not register your unit.
GB - 2
DEALER
Customer Note: If the Dealer does not register your
product, please fill out, sign and return the product
registration card to Ariens or go to www.ariens.com on the
internet.
UNAUTHORIZED
REPLACEMENT
DELIVERY
Dealer should:
1. Test brakes after unit is assembled to be sure
adjustment has not been disturbed in shipment (see
Parking Brakes on page 13). Brake is properly
adjusted at factory.
PARTS
Use only Ariens replacement parts. The replacement of any
part on this equipment with anything other than an Ariens
authorized replacement part may adversely affect the
performance, durability, and safety of this unit and may void
the warranty. Ariens disclaims liability for any claims or
damages, whether regarding warranty, property damage,
personal injury or death arising out of the use of
unauthorized replacement parts.
2. Check the safety interlock system to make sure that it
is functioning properly. With operator on seat, unit must
not start unless steering levers are in neutral (N) and
Power Takeoff (PTO) is disengaged (Off). Engine must
stop if operator leaves seat when steering levers are in
any drive position or PTO is engaged (On). See Safety
Interlock System on page 12.
NOTE: To locate your nearest Ariens Dealer, go to www.ariens.com.
3. Fill out Original Purchaser Registration Card and
return the card to Ariens.
,
DISCLAIMER
Explain Limited Warranty Policy.
5. Explain recommended lubrication and maintenance.
Advise customer on adjustments. Instruct customer on
controls and operation of unit. Discuss and emphasize
the Safety Precautions. Give customer
Owner/Operator, Parts, and Engine Manuals. Advise
customer to thoroughly read and understand them.
Ariens reserves the right to discontinue, change, and
improve its products at any time without public notice or
obligation to the purchaser. The descriptions and
specifications contained in this manual were in effect at
printing. Equipment described within this manual may be
optional. Some illustrations may not be applicable to your
unit.
SIGNAL
WARNING: This cutting machine is capable of
amputating hands and feet and throwing
objects. Failure to observe the safety
instructions in the manuals and on decals
could result in serious injury or death.
WORDS
The safety alert symbols above and signal words below are
used on decals and in this manual.
Read and understand all safety messages.
Slopes are a major factor related to
loss-of-control and tip-over accidents.
Operation on all slopes requires extra caution.
,_
Tragic accidents can occur if the operator is not
alert to the presence of children. Never
assume that children will remain where you
last saw them.
DANGER:
SITUATION!IMMINENTLY
If not avoided,HAZARDOUS
WILL RESULT in
death or serious injury.
WARNING:
SITUATION! POTENTIALLY
If not avoided, COULD
HAZARDOUS
RESULT
in death or serious injury.
Gasoline is extremely flammable and the
vapors are explosive, handle with care.
CAUTION: POTENTIALLY HAZARDOUS
SITUATION! If not avoided, MAY RESULT in
minor or moderate injury. It may also be used
to alert against unsafe practices.
Disengage attachment, stop unit and engine,
remove key, engage parking brake, and allow
moving parts to stop before leaving operator's
position.
SAFETY
OL1253
ALERT SYMBOL
These are safety alert symbols. They mean:
-ATTENTION!
•PERSONAL SAFETY 18 INVOLVED!
When you see this symbol:
NOTATIONS
NOTE: General reference information for proper operation
and maintenance practices.
IMPORTANT: Specific procedures or information required to
prevent damage to unit or attachment.
•BECOME ALERT!
•OBEY THE MESSAGE!
OL3900
GB - 3
PRACTICES
AND LAWS
2. Danger!
Practice usual and customary safe working precautions, for
the benefit of yourself and others. Understand and follow all
safety messages. Be alert to unsafe conditions and the
possibility of minor, moderate, or serious injury or death.
Learn applicable rules and laws in your area, including those
that may restrict the age of the operator.
REQUIRED
OPERATOR
Avoid injury - Stay clear of rotating parts.
OL1816
3. Warning!
TRAINING
Always stand clear of discharge area.
If unit is to be used by someone other than original
purchaser (loaned, rented or sold), ALWAYS provide this
manual and any needed safety training before operation.
SAFETY
DECALS
OL1814
Do not operate mower unless bagger is attached
or guards are in operating position.
AND LOCATIONS
0L1815
ALWAYS replace missing or damaged Safety Decals. Refer
to Figure 2 for Safety Decal locations.
4. Danger!
_1_
Poisonous battery fluid contains
sulfuric acid and its contact with skin,
eyes or clothing can cause severe
chemical burns.
¸
OL4450
Maintenance-Free Battery. Do not add
water or electrolyte.
OL4450
OL4460
5. Danger!
NO flames, NO sparks, NO smoking
near battery. Explosive Gases from
battery can cause death or serious
injury.
To Avoid Serious
Injury or Death
5
Read the operator's manual.
1
OL3200
Keep children and others away from unit while
operating.
1. Danger!
Never direct discharge toward other people.
Thrown objects can cause injury.
Always keep feet and hands away from rotating
parts.
OL1809
Look down and behind before and while backing.
Always stand clear of discharge area. Do not
direct discharge toward other people.
Keep people away from unit while operating.
Never carry children.
OL1806
Shut off engine, remove key, and read manual
before you adjust or repair unit.
OL1812
Go up and down slopes, not across.
DO NOT operate on slopes over 15 °.
@
OL1808
NO STEP! Always keep feet away from rotating
parts.
•
OL1813
GB -4
If machine stops going uphill, stop blade and back
down slowly.
• Avoidsuddenturns.
• Keepsafetydevices(guards,shields,switches,etc.)
in placeandworking.
• Checkinterlocksystempermanualbeforeuse.
• Understand
locationandfunctionof allcontrols.
• Neverallowoperationbyuntrained
persons.
• Disengage
PTO,stopunitandengine,setparking
brakeandremovekeybeforemakingany
inspections,
repairs,etc.
SAFETY
Training
Read the Operator's Manual and other training material. If
the operator(s) or mechanic(s) cannot read English, it is the
owner's responsibility to explain this material to them.
Become familiar with the safe operation of the equipment,
operator controls, and safety signs.
All operators and mechanics should be trained. The owner is
responsible for training the users.
Never let children or untrained people operate or service the
equipment. Local regulations may restrict the age of the
operator.
The owner/user can prevent and is responsible for accidents
or injuries occurring to themselves, other people or property.
Preparation
Evaluate the terrain to determine what accessories and
attachments are needed to properly and safely perform the
job. Only use accessories and attachments approved by the
manufacturer.
Inspect the area where the equipment is to be used and
remove all objects such as rocks, toys and wire, which can
be thrown by the machine.
Use extra care when handling gasoline and other fuels.
They are flammable and vapors are explosive.
a. Use only an approved container.
b. Never remove gas cap or add fuel with engine
running. Allow engine to cool before refueling. Do
not smoke.
c. Never refuel or drain the machine indoors.
Check that operator's presence controls, safety switches
and shields are attached and functioning properly. Do not
operate unless they are functioning properly.
Operation
can affect the machine's stability. Use caution while
operating near drop-offs.
Slow down and use caution when making turns and when
changing directions on slopes.
Never raise deck with the blades running.
Never operate with the PTO shield, or other guards not
securely in place. Be sure all interlocks are attached,
adjusted properly, and functioning properly.
Never operate with the discharge shield raised, removed or
altered, unless using a grass catcher.
RULES
Wear appropriate clothing including hard hat, safety glasses
and ear protection. Long hair, loose clothing or jewelry may
become tangled in moving parts.
Slow down and use extra care on hillsides. Be sure to travel
in the recommended direction on hillsides. Turf conditions
Do not change the engine governor setting or over speed
the engine.
Stop on level ground, lower implements, disengage drives,
engage parking brake, shut off engine before leaving the
operator's position for any reason including emptying the
catchers or unclogging the chute.
Stop equipment and inspect blades after striking objects or if
an abnormal vibration occurs. Make necessary repairs
before resuming operations.
Keep hands and feet away from the cutting units.
Look behind and down before backing up to be sure of a
clear path.
Never carry passengers and keep pets and bystanders
away.
Slow down and use caution when crossing roads and
sidewalks.
Stop blades if not mowing.
Be aware of the mower discharge direction and do not point
it at anyone.
Do not operate the mower under the influence of alcohol or
drugs.
Use care when loading or unloading the machine into a
trailer or truck.
Use care when approaching blind corners, shrubs, trees, or
other objects that may obscure vision.
MAINTENANCE
AND STORAGE
Disengage drives, lower implement, set parking brake, stop
engine and remove key or disconnect spark plug wire. Wait
for all movement to stop before adjusting, cleaning or
repairing.
Clean grass and debris from cutting units, drives, mufflers,
and engine to help prevent fires. Clean up oil or fuel spillage.
Let engine cool before storing and do not store near flame.
Do not store fuel near flames or drain indoors.
Never run an engine in an enclosed area.
Park the machine on level ground. Never allow untrained
personnel to service machine.
Only operate in good light, keeping away from holes and
hidden hazards.
Use jack stands to support components when required.
Be sure all drives are in neutral and parking brake is
engaged before starting the engine. Only start engine from
the operator's position.
Carefully release pressure from components with stored
energy.
GB - 5
GENERAL
WARNING:
HYDRAULIC
FLUIDcanresultin
severeburns.Fluidin hydraulic
systemcan
penetrate
skinandresultinseriousinjuryor
death.
Besuretostoptheenginebeforedoinganywork
onhydraulicparts.
Keepbodyandhandsawayfrompinholesor
nozzleswhichexpelhydraulic
fluidwhenunder
pressure.
Usepaperor cardboard,
nothands,to
searchforleaks.
Ensureallhydraulic
fluidconnections
aretight
andallhydraulichosesandlinesareingood
conditionbeforeapplyingpressuretosystem.
FOREIGN
FLUIDINJECTED
INTOBODYcan
resultingangrene.Fluidmustbesurgically
removedwithina fewhoursbya doctorfamiliar
withthisformofinjury.
Read this manual carefully and learn how to use the
machine correctly. Become familiar with all machine controls
and how to stop the machine and the implements or
attachments quickly.
Beware of bystanders, particularly children!
Always look around to make sure that it is safe to start the
engine or move the power unit. This is particularly important
with higher noise levels as you may not hear people
shouting.
Keep Off
Only allow the operator on the machine. Do not carry
passengers. This mower is designed for one (1) person, the
driver.
SAFETY
Riders on the machine could be struck by foreign objects or
thrown off the machine causing serious injury.
Riders obstruct the operator's view which results in the
machine being operated in a manner which is unsafe.
DO NOT carry passengers anywhere on the power unit or
on any implement or attachment connected to, or installed
on the power unit.
Before
Operation
Pay special attention to the warning, caution and danger
labels on the machine.
Do not use starting fluid. Use of starting fluid could damage
engine components.
Check the brakes and other mechanical parts for correct
adjustment and wear. Replace worn or damaged parts
promptly. Check the torque on all hardware regularly.
Do not wear headphones or listen to music while operating
the deck. Operating the machinery safely requires your
undivided attention.
This product is capable of amputating hands and feet and
throwing objects. Always follow all safety instructions to
avoid serious injury or death.
Read and understand all precautions found in the operator's
manual before operating the Ariens mower. This equipment
must only be operated by those who have been trained in its
safe use.
In order to provide a better view, certain photographs or
illustrations in this manual may show an assembly with a
safety shield removed. However, a machine should never be
operated without the safety shields installed. Keep all
shields in place. If shield removal becomes necessary for
repairs, replace shield prior to machine operation.
WARNING: DO NOT remove or obscure
DANGER, WARNING, CAUTION or Instruction
Decals. Replace any decals that are not
readable or are missing. Replacement decals
are available from your dealer. The location of
these Safety Decals is illustrated in figure 2.
RULES
This manual must be made available to the operator of the
Ariens mower at all times.
Disconnect
batteryor removesparkplugwirebeforemaking
anyrepairs.Disconnect
the negativeterminalfirstandthe
positivelast.Reconnect
positivefirstandnegativelast.
Usecarewhencheckingblades.Wraptheblade(s)or wear
gloves,andusecautionwhenservicingthem.Onlyreplace
blades.Neverstraighten
or weldthem.
Keephandsandfeetawayfrommovingparts.If possible,
do
notmakeadjustments
withtheenginerunning.
Chargebatteriesin anopenwell-ventilated
area,awayfrom
sparkandflames.Unplugchargerbeforeconnecting
or
disconnecting
frombattery.Wearprotective
clothinganduse
insulated
tools.
Keepallpartsingoodworkingconditionandallhardware
tightened.Replaceallwornor damageddecals.
MOWER
SAFETY
Keep the power unit and attachments clean. Accumulation
of dirt, grease, or grass can lead to fires or personal injury.
Do not modify the power unit or any of its attachments.
Unauthorized modification of the machinery may affect its
functionality, which could lead to personal injury.
Do not wear loose-fitting clothing which could get caught in
moving parts. Do not operate this machine while wearing
shorts. Always be sure to wear adequate protective clothing.
Wearing safety glasses and safety shoes is advisable.
Operator hearing protection is recommended. Extended
exposure to loud noise could lead to hearing loss.
A fire extinguisher and first aid box should be carried with
the power unit or be kept readily available at all times.
Keep emergency numbers for immediate access.
During
Operation
Do not bypass the starting circuit by shorting across the
terminals of the starter motor to start the engine. This may
cause the power unit to move suddenly.
GB - 6
Periodically
checkthestartingcircuittomakesureallsystem
components
operatecorrectly.
If thestartingsystemdoesnotwork,consultyourAriens
Dealerimmediately.
Operatethemoweronlyindaylightorwhentheareato be
mowedis litwellbyartificiallight.
Neverremovethedischarge
shieldfromthemowerbecause
thedischarge
shielddirectsmaterialdowntowardtheturf.If
theshieldis damaged,besureto replaceit immediately.
Nevertrytoclearthedischarge
areaorthe mowerblades
unlessyouhavemovedthesteeringcontrolleverstothe
parkposition,putthePTOswitchinthe"Off"position,
switchedtheignitionkeytothe "Off"position,removedthe
ignitionkeyanddisconnected
thenegativebatterycable.
Donotoperatethepowerunitina confinedor non-ventilated
area.Carbonmonoxide
gasis colorless,odorless,andcan
befatal.
Donotturnsharplywhendrivingathighspeeds.
Parkthemowerona firmlevelsurfacewiththesteering
controlleversintheparkposition.
Whenbacking,besuretoturnaroundandlooktotherear.
Donotmowinreverseunlessit is absolutely
necessary.
Whenworkingingroups,usecautionandwatchoutfor
others.
Alwaysbeawareofmowerdischarge
direction.Makesureit
doesnotpointatanyone.
Besuretheengineandrotatingbladeshavestoppedbefore
puttinghandsorfeetneartheblade.
Disengage
thebladedrivewhentransporting
the machine
acrossdrives,sidewalks,
etc.Neverraisethe mowerdeck
whilethebladesareturning.
Donotputhandsor feetunderor intothemowerwhenit is
running.
Donottouchtheengineor mufflerwhentheengineis
runningor immediately
aftertheenginehasstopped.These
areasmaybehotenoughto causeseriousburns.
Donotdrivethemachineonstreetsor highways.
Watchfor
trafficwhencrossingstreetsorwhilemowingcloseto roads.
Alwaysinspectthemowerfordamageafterstrikingaforeign
object.Alwaysrepairor replacedamaged
partsbefore
restarting
themowerdeck.
Donotoperatethepowerunitwithoutthemowerdeck
attached.
Makesurethemachineandallattachments
cometo a
completestopbeforedismounting.
Beforedismounting,
disengage
thePTO,lowerall
attachments,
placethesteeringcontrolleversinthe park
position,turnofftheengine,andremovethekey.
Operating On Slopes
Avoidstartingor stoppingwhengoingupor downa slope.
Keepallmovements
on a slopegradualandslow.Donot
makesuddenchangesin speedor direction.
If tireslosetractionwhileona slope,disengage
themower
bladesandbackslowlyandgraduallydowntheslope.
Donotturnonslopesunlessnecessary,
andthenturnslowly
andgraduallydownhillifpossible.
Useextracautionwhenmowingonslopes.Ifyouareunable
tobackupontheslope,or ifyoudonotfeelcomfortable
on
it,thendonotmowit.Donotoperatethemachineonslopes
thatexceed15°.
Mowacrossslopes,notupanddown,toavoidmachine
tip-over.Donotmowslopesor hillsthataretoosteepfor
safeoperation.
Donottrytostabilizethemachinebyputtingyourfootonthe
ground.
ROLL OVER PROTECTIVE
STRUCTURE
(ROPS)
Do not weld, drill or alter the ROPS. Damaged ROPS must
not be straightened or used. If damage does occur, consult
your Dealer and replace all damaged parts.
If the ROPS is lowered or removed from the power unit for
any reason, it must be erected and/or refitted immediately.
Original bolts or equivalent replacements must be used and
tightened to the correct torque.
Do not attach chain, ropes, or cables to the ROPS for pulling
purposes as this will cause the mower to tip backwards.
Ariens does not recommend the use of the mower with the
ROPS removed.
If you have a foldable ROPS, it can be folded down for
mower storage. It must be pinned in the upright position prior
to machine operation.
SEAT BELT USAGE
With the ROPS installed, it is imperative that the seat belt be
installed, used, and correctly adjusted at all times. Replace
damaged seat belts immediately.
Do not use a seat belt if operating with ROPS folded down or
removed.
MAINTENANCE
Only qualified, trained adults should service the machine.
Before maintenance is performed, make sure the mower is
parked on a firm flat surface. Remove the key to prevent an
accidental start up.
Never attempt to disconnect any safety devices.
Frequently check for worn or deteriorating components that
could create a hazard.
Use only genuine Ariens replacement parts. Substitute parts
could cause product malfunction or possible injury to the
operator or bystanders.
If it is necessary to have the engine running while making
maintenance adjustments, keep hands, feet, and clothing
away from all moving parts.
When making adjustments while the engine is running such
as carburetor and motion control linkage adjustments, stand
to either side of the tractor and mower and keep clear of
moving or rotating components.
Allow the Ariens mower time to cool before touching the
engine, muffler, or any other part which may be hot.
GB - 7
Alwaysstopthepowerunit,turnoffPTOandallowunitto
coolbeforerefueling.
Keeptheenginefreeofgrass,leaves,greaseandother
debriswhichcouldcatchfire.
Keepallhardwaretighttoensurethemachineis ina safe
workingcondition.
Checktheblademounting
nutsoftento
makesuretheyaretight.
Performonlymaintenance
instructions
describedinthis
manual.Unauthorized
maintenance
operations
or machine
modifications
mayresultinunsafeoperating
conditions.
Forenginemaintenance,
followtheenginemanufacturer's
recommendations
asnotedintheenginemanual.
Escaping hydraulic fluid under pressure can have sufficient
force to penetrate the skin, causing serious injury. Before
applying pressure to the system, make sure all connections
are tightened, and lines, pipes and hoses are not damaged.
Fluid escaping from pinholes may be invisible. Do not use
your hands to search for suspected leaks. Instead, use a
piece of cardboard and wear protective eye wear such as
safety goggles.
If injured by escaping fluid, see a medical doctor at once.
Serious infection or reaction will result if proper medical
treatment is not administered immediately. This fluid can
produce gangrene or severe allergic reaction.
Battery
Fuel System
Handle gasoline with care. Gasoline is extremely flammable
and its vapors can be explosive.
Use a voltmeter to check the state of the charge.
Use an approved fuel container.
If using a battery charger make sure it is unplugged before
connecting or disconnecting the cables to the battery.
Never add fuel to the mower while the engine is running or
while it is hot. Allow the engine to cool for several minutes
before adding fuel.
Batteries contain sulfuric acid electrolyte. Always wear
protective clothing and eye protection when servicing.
Keep matches, cigarettes, cigars, pipes, open flames, or
sparks away from the fuel tank and fuel container.
In case of electrolyte contact, rinse area with plenty of water
and seek medical attention.
Always fill the fuel tanks outside using caution. Fill the tank
until the fuel is about one inch from the top of the tank. Use a
funnel or spout to prevent spilling. When refueling at a gas
pump, always ensure the nozzle contacts the neck of the
tank while filling.
Replace the machine and container caps and clean up any
spilled fuel before starting the engine.
Make sure the battery is charged in a well-ventilated location
so hydrogen gases that are produced while it is charging can
dissipate. Halt charging if battery exceeds 52°C (125°F).
Keep sparks, flames, and smoking material away from the
battery at all times. To avoid sparks, use care when
removing battery cables from their posts.
Disconnect the battery's ground cable before working on or
near any electrical parts.
Keep the mower and all fuel containers in a safe locked
place to keep children from tampering with them.
Tire Maintenance
Fuel system components rely upon clean fuel for lubrication
and optimum performance. Extreme care must be taken to
prevent ingress of dirt and moisture to prevent damage.
CAUTION: Separation of a tire and rim can
cause an explosion that could cause serious
injury or death.
Use only nonmetal portable fuel containers approved by the
Underwriter's Laboratory (U.L.) or the American Society for
Testing and Materials (ASTM). If using a funnel, make sure it
is plastic.
Check the tires for low pressure, cuts, bubbles,
damaged rims, or missing lug bolts and nuts.
Always use a clip-on chuck with an extension
long enough to allow you to stand on one side
of the wheel while inflating the tires. Do not
stand directly in front of the tire while inflating.
When practical, do not fuel the equipment on truck beds or
on trailers. Remove them and fuel on the ground. If this is
not possible, use a portable nonmetal fuel container to fill the
equipment.
Hydraulic
Maintenance
Use caution when charging the battery or performing
maintenance on the battery and electrical system.
Never weld or heat a tire and wheel assembly.
The heat can cause the air inside of the tire to
expand and result in a tire explosion. Welding
also can structurally weaken or deform the
wheel.
System
Make sure all hydraulic fluid, hoses, and lines are in good
condition and all lines and fittings are tight before applying
pressure to the hydraulic system.
Check hydraulic connections frequently. They can leak as a
result of damage, as a result of vibration or because they
have worked loose.
Always ensure the tires are inflated to the correct pressure.
Do not inflate the tires above the recommended pressure.
Relieve all pressures before disconnecting hoses or lines.
Escaping oil under pressure can cause serious injury.
Make sure all hardware, especially the wheel nuts and bolts
have been tightened to the correct torque.
When removing a tire from the power unit, it is necessary to
support it with blocks or stands, not a hydraulic jack.
GB - 8
Donotattemptto servicea tire unlessyouhavetheproper
equipment
andexperience
to performthejob. Ifyouarenot
qualifiedto maketherepairs,taketheunitto yourAriens
dealeror a qualifiedrepairservice.
Whenseatingtirebeadsontherims,neverexceed2,4 bar
(35p.s.i.)orthe maximuminflationspecifiedonyourtires.
Inflationbeyondthismaximumpressuremaybreakthe
bead,or eventherim,withdangerous
explosive
force.
Replacement
Parts
Ariens does not claim responsibility for installation of
unapproved parts and/or accessories or damages as a
result of their use.
TRANSPORTING
Disengage power to the attachments when in transport or
not in use.
Do not tow this machine. Use a truck or trailer to transport on
public roads.
Do not use this machine on public roads.
Where replacement parts are necessary for periodic
maintenance and servicing, genuine Ariens replacements
must be used.
WARNING: AVOID INJURY! Read and
Seat Setup
1. Remove the 5/16" flat washers and lock nuts from the
understand entire Safety Section before
proceeding.
UNPACK
four studs protruding from the bottom of the seat.
2. Route the seat switch connector through the opening
the in the seat plate and plug the connector into the
seat switch.
UNIT
Remove all packing materials and hardware and literature
packages. Discard J hook used with strapping as it is not
needed for mower operation.
,
SETUP INSTRUCTIONS
Install the seat on the seat plate with the 5/16" flat
washers and lock nuts removed in step 1. Secure the
p-clip on the wiring harness to the left front seat stud
so the harness gets routed as shown in Figure 4.
Plug harness into
seat switch.
Ariens mowers are shipped partially assembled. After
uncrating the power unit and mower deck, initial setup is
required.
IMPORTANT: During the unpacking of the crate all goods
should be matched against the packing list and all shortages
or damages should be noted and reported to the carrier
immediately.
Steering
P-Clip
Controls
1. The steering control levers have been lowered for
shipping. Remove the loose 3/8-16 x 1.50" bolts from
the handles and reinstall them in the location shown.
Adjust the handles to fit your comfort area.
Bottom
Install bolt here.
S_at Plate
Figure 4
Battery
The battery supplied with the mower is sealed, it will not be
necessary to activate it.
1. Connect the red positive cable to the positive (+) side
of battery. Use 1/4 x 5/8" bolt and 1/4" Iocknut. Cover
terminal with rubber boot.
2. Connect the black negative cable to Negative ( - ) side
of battery. Use 1/4 x 5/8" bolt and 1/4" Iocknut.
If the engine does not turn over by turning the ignition
switch, it may be necessary to charge the battery, see
Charging the Battery on page 22.
Figure 3
GB - 9
Deck
Lubrication
1. Remove knob from discharge shield.
2. Remove discharge assembly from Transport position.
3. Install discharge assembly in Operating position.
Lubricate all fittings per maintenance label under seat and
check hydraulic oil level. See Lubrication and Maintenance
on page 19.
4. Reinstall knob in discharge assembly and tighten.
Hydraulic
5. Check deck level and pitch. See LEVELING THE
DECK on page 24.
The power unit is shipped with hydraulic oil in the system. If
the tracking is erratic, purge the system. If the oil level is
below the edge of the baffle in the oil reservoir, fill with SAE
20W-50 motor oil. See Hydraufic System Maintenance on
page 20.
Tires
See SPECIFICATIONS
on page 34.
CAUTION: Avoid injury! Explosive separation of
tire and rim parts is possible when they are
serviced incorrectly:
•
•
•
Do not attempt to mount a tire without the
proper equipment and experience to perform
the job.
Do not inflate the tires above the
recommended pressure.
Do not weld or heat a wheel and tire
Engine
Engine has been filled with a break in oil. Change oil and
filter after first 8 hours of use. See Lubrication and
Maintenance on page 19.
Check Function
,t_
Do not stand in front or over the tire
assembly when inflating. Use a clip-on chuck
and extension hose long enough to allow
you to stand to one side.
Hardware
Check for loose hardware.
Check Safety Interlock
System
Check to see that the interlock system operates correctly.
(See Check Safety Interlock System on page 10).
,_
of All Controls
Ensure unit runs and performs properly.
assembly. Heat can cause an increase in air
pressure resulting in an explosion. Welding
can structurally weaken or deform the wheel.
•
Oil Service
WARNING:
INTERLOCK
together
with
improperFAILURE
operationOF
can
result in severe
personal injury.
GB- 10
WARNING:
FAILURE
OF injury.
CONTROLS could
result
in death
or serious
5
2
Figure 5
1. Deck Height Adjustment Dial
2. Steering Control Levers
3. Deck Lift Lever
4. Deck Level Adjust
5. PTO Switch
6. Ignition Switch
7. Choke Control
8. Hour Meter
9. Throttle
GB- 11
OE3241
Steering
WARNING: AVOID INJURY! Read and
understand entire Safety Section before
proceeding.
CONTROLS
Control
Levers
The steering levers control the speed and direction of the
unit. In addition, they will stop the unit.
After starting the power unit, pull the steering control levers
back together out of the lock position and into the neutral
position.
AND FEATURES
See figure 5 on page 1 1 for Controls and Features locations.
Safety Interlock
System
A
WARNING: Safety interlock system failure and
improper operation of unit can result in death
or serious injury. Test this system each time the
unit is operated. If this system does not
function as described, do not operate unit
repairs are made.
D
C
Figure 6
Perform the following tests to ensure the safety interlock
system is working properly. If the unit does not perform as
stated, contact your Dealer for repairs.
A. For reverse travel, pull both steering control levers
backward.
B. For straight forward travel, push both steering control
levers forward.
1. Try to start the power unit when the operator is in the
seat, the mower PTO is off, and the left hand steering
control lever is not in the park position. Try to start the
power unit after switching the RH arm out of the park
position and putting the LH steering control lever into
the park position. Try starting the power unit after
taking both levers out of the park position. The starter
must not crank in any of these instances.
C. To turn left, pull the left back or push the right steering
control lever forward or a combination of both.
D. To turn right, pull the left back or push the left steering
control lever forward or a combination of both.
CAUTION: Use caution when making turns.
Slow the machine down to a manageable
speed before making sharp turns. This mower
can spin very rapidly when pushing forward on
one lever and pulling back on the other.
2. Try to start the power unit when the operator is in the
seat, the mower PTO is on, and the steering control
levers are in the park position. The starter must not
crank in this situation.
,
Try to start the power unit when the operator is not in
the seat and the steering control levers are in the park
position. The starter must not crank in this situation.
Checking
the Engine Shut-Off
Circuits
Check the engine shut-off circuits daily.
1. Run engine at 1/3 throttle, engage the mower PTO and
lift off of the seat. The engine should stop within 3
seconds.
,
Run engine at 1/3 throttle, engage the mower PTO,
move a steering control lever out of the neutral lock
and lift off of the seat. The engine should again stop
within 3 seconds. Repeat for the opposite steering
control lever.
NOTE: Aggressive turning can scuff or damage lawns.
ALWAYS keep both wheels rotating when making sharp
turns. DO NOT make turns with inside wheel completely
stopped. To obtain minimum turning radius, slowly reverse
inside wheel while moving the outside wheel slowly forward.
CONTROL
PANEL
Ignition Switch
PTO
hoke
Engagement
Control
NOTE: If the machine does not pass this test, DO NOT
OPERATE. Take it to your Ariens Dealer.
3. Move the steering lever rearward and release the
steering lever. This steering lever should return to a
position where the steering lever can be swung
outward and lock in the neutral outward position.
Meter
Throttle
..........
Figure 7
GB- 12
0L5020
Ignition
Switch
Cutting
Height
Operate the ignition switch with the removable key. The
switch has three positions: Off (1), Run (2) and Start (3). To
start the engine, turn the key to Start, and then release to
Run. To stop the engine, turn the key to Off.
To change the cutting height, raise the mower deck into the
transport position. Turn the Deck Height Adjust Dial until the
desired cutting height is shown and then lower the deck to
the cutting position.
NOTE: DO NOT operate starter more than 10 seconds at a
time. If the engine does not start after 10 seconds allow the
starter to rest 30 seconds before trying again. If engine will
not start, see Troubleshooting on page 30 or refer to Engine
Manual.
The mower can be adjusted to mow from 1.5" - 5.5"
(38 - 140 mm) height of cut. Grass mowing height should be
determined by encountered conditions and personal
preferences.
Choke
Control
Throttle
OE3250
ON
OFF
are provided as a guide for
Lawns = 1.5 - 3" (38 - 76 mm)
Pull the choke lever out to start a cold engine. Push the
choke lever in once the engine starts and warms.
2
The following recommendations
cutting height selection.
Field Cutting = 3 - 5.5" (76-140 mm)
Lever
\
The throttle lever changes the engine
speed. Move the throttle lever forward
to Fast (1) to increase engine speed.
Move the lever rearward to Slow (2) to
decrease engine speed.
Deck Height
ust Dial
Deck Lift Lever
Power Take Off (PTO) Switch
Power take off (PTO) switch engages and
disengages the mower blades.
Pull the power take off (PTO) switch to "On"
position to engage mower blades.
OE3255
Push the power take off (PTO) switch to "Off"
position to disengage mower blades.
NOTE: The engine will not start unless the steering control
levers are in the neutral position, the PTO switch is in the
"Off" position and parking brake is set.
Parking
Figure 8
Brakes
Seat Adjustments
Place the steering control levers in the
neutral position and push them out into the
slots to engage the parking brake for each
side.
WARNING: Make all seat adjustments with
unit stationary, parking brake on and engine
shut off.
OE3385
Move the steering control levers in towards
the center to release the parking brakes.
The seat is designed for one person. Do not
allow any passengers to ride on this machine.
Deck Lift Lever
Deck lift lever raises and lowers mower deck for mowing or
transport.
To adjust seat forward or backward:
1. While seated, pull seat adjustment lever outward and
slide seat into desired position.
Transport:
2. Release lever and slide seat forward or back to lock
seat into position.
Push deck lift lever all the way forward until lift lock engages.
To release the lock, push the pedal forward, pull back on the
transport lock handle, and slowly release the lift lever.
To adjust the cushion spring for the weight of the operator:
1. Turn the knob clockwise for a heavier operator.
DANGER: Before raising the deck to the
transport position, insure the PTO is
disengaged and the steering control levers are
in the park position.
2. Turn the know counterclockwise
for a lighter operator.
Hour Meter
Records total number of hours the engine has been in
operation.
IMPORTANT: Keep a record of Hour Meter readings for
recommended Lubrication and Maintenance intervals.
NOTE: For accurate readings be sure Ignition Switch is OFF
when unit is not in operation.
GB- 13
OPERATION
Break-in
PRE-START
INSPECTION
Period
CAUTION: Make sure all hardware is tight, all
safety devices are in place and all adjustments
are made correctly.
•
Operation of the mower within the first fifty hours can
be a major factor in determining the performance and
life of the engine and power unit.
•
The engine may be operated at full RPM, but
excessive load should be avoided. If engine begins to
slow, due to excessive load, operate at a slower
ground speed while maintaining the engine speed.
Safe operation is the responsibility of the operator. The
operator MUST be familiar with the mower and power unit
controls, how they work, and all safety precautions BEFORE
starting operation.
•
Check engine, pumps, and motors frequently during
break-in period. Watch for evidence of leakage of
fluids. Replenish levels as required and repair any
leaks that may have formed.
IMPORTANT: Inspect the mowing blade bolts daily, or
whenever a blade has been removed. Torque is
110 - 130 Ibf-ft. (150 - 177 N•m).
•
Locate any nuts, bolts or screws that may have
loosened and tighten them as necessary. This is
especially true of the wheel retaining nuts.
•
During break-in period observe control arm and
parking brake adjustments. Parking brake adjustments
may be necessary after the first few hours of operation.
•
Keep area around the fuel tank filler clean and make
sure the gasoline is of correct octane and free of
contamination.
•
Initial oil and oil filter change is after the first 8 hours of
use and every 100 hours after.
CAUTION: Proper maintenance practices are
required for safe operation. (See Maintenance
Schedule on page 17).
•
Make sure all safety shields are in place and secured
properly.
•
Make sure the operator is instructed on correct and
safe operation of the power unit and related
attachments and implements.
•
Check engine and hydraulic reservoir oil and fill as
necessary.
•
Check the pump belt and drive belt tension and adjust
as necessary.
•
Ensure air intake screens are clear of debris to provide
maximum engine cooling.
•
Inspect tires, tire pressure and wheel bolt torque. Look
for external signs of leakage and correct before
operating the mower. Check steering control levers for
looseness and correct position.
•
Check for adequate fuel supply. It is recommended that
the fuel tank be filled following each day's use to reduce
condensation and provide a full tank for next use.
Fuel
WARNING: AVOID INJURY.
STARTING
AND SHUT OFF
Read and understand entire Safety section
before proceeding.
Add fuel to the Fuel Tank as needed. See your engine
manual for correct type and grade of fuel.
,t_
CAUTION:
entire
Owner/Operator
Manual and Read
Engine
Manual
first. DO NOT
attempt to start the engine at this time.
,i_
CAUTION:
Always start and
operate
the
engine
in a well-ventilated
area.
If in an
enclosed area, vent the exhaust outside.
To add fuel to the fuel tank:
1. Place unit in an open, well-ventilated
area.
2. Stop engine and allow it to cool.
3. Clean the fuel cap and area around the fuel cap to
prevent dirt from entering the tank. Remove the cap
from the fuel tank.
,
To start the engine:
Fill the fuel tank to within 1 in. (25mm) below bottom of
filler neck. Do not overfill.
2. If the engine is cold, move the choke to the On
position. If the engine is warm, do not use choke.
5. Replace fuel cap and tighten.
6. Clean up any spilled fuel.
Mounting
and Dismounting
1. Sit properly in the seat, make sure the steering
controls are in the park position and the PTO is off.
3. Move the throttle to the 3/4 fast position. See Engine
manual for detailed instructions.
Safely
DO NOT step on either side of the mower deck when
mounting or dismounting the power unit. Step over the deck
when mounting or dismounting.
GB- 14
4. Put the key in the ignition switch and turn it to the Start
position. As soon as the engine starts, release the key.
5. Move the choke control to the Off position. Adjust the
choke to keep the engine running smoothly.
6. Allowtheenginetowarmforaboutfiveminutesbefore
operating
theunit.
NOTE:Warmingtimewillvarydepending
ontheambient
temperature.
Fortemperatures
below32° F(0°C),allowten
or moreminutesfortheunittowarm.
7. Usethethrottletoincreaseor decrease
enginespeed.
Setthethrottletothefastpositionto cutgrass.
Tostoptheengine:
1.Bringthesteeringleverstothe neutralpositionand
disengage
thePTO.
2. MovethethrottletotheSlowposition.
3. TurntheignitionkeytotheOffposition.
Cold Weather
3. Set the anti-scalp adjustment to desired height of cut.
4. To adjust the anti-scalp rollers, remove the 5/8-11 x
4.25" bolts and reinstall the bolts in the appropriate
hole for the desired height of cut (see figure 9).
5. Depress the deck lift lever and pull back on the deck
transport lock lever and lower the deck into the cut
position.
NOTE: The anti-scalp wheels should always be at least
1/4-1/2" (6mm - 13mm) offthe ground. They are designed to
keep the deck from scalping the ground in uneven terrain,
they are not to contact the ground all of the time.
Anti-Scalp
Wheel
Starting
Mount Here for
1.5"-
NOTE: When starting in cold weather (below -5 ° C (23 ° F)),
do not run the starter more than 10 seconds at a time. If the
engine does not start after 10 seconds allow the starter to
rest 30 seconds before trying again.
Stopping
2.0" Cut
Mount Here for
2.5"-
6" Cut
The Engine
Move the control levers to the park position, idle the engine
a few moments and turn the ignition switch to the "Off"
position. Remove the key.
Figure 9
CAUTION: ALWAYS remove the ignition key
when the unit is not in use.
Side-Discharge
OM5030
Mowers
DANGER: Without the discharge shield or a
complete grass collector installed, you and
others are exposed to rotating mower blades
and thrown debris. Contact with the mower
blades or flying debris could cause severe injury
or death.
MOWING
WARNING: To avoid damage to the mower,
re-torque all fastening hardware, including
blade and spindle pulley retaining nuts, after
the first hour of mowing operation.
The discharge deflector routes material down
toward the ground. Never remove the discharge
shield or operate the mower with a damaged
discharge deflector.
Operate the unit only when seated in the operator's position.
1. Start the engine. Let the engine idle until it is running
smoothly.
Never put your hands or feet under the mower.
2. Bring the steering control levers to the neutral position.
Do not try to clear the mower discharge area or
mower blades without first turning the mower
PTO to off, turning the ignition key to off,
removing the key and disconnecting the battery
cable.
3. Set the throttle to the 3/4 fast position.
4. Turn on the PTO to engage the mower.
IMPORTANT: Never engage the PTO when the mower is
plugged with grass or other material. This may damage the
clutch.
5. Move the throttle to the fast position.
The mower has a pinned discharge shield that discharges
the clippings out of the side of the deck and onto the ground.
6. Move the steering levers forward to obtain a slow
ground speed.
Uneven
7. To disengage the mower, move the PTO switch to the
OFF position.
8. When you know how to operate the unit, select a
speed appropriate to your mowing conditions.
Anti-Scalp
Wheels
1. Raise the mower by pushing down on the deck lift lever
and lock into transport position.
2. Place the steering control levers in the park position.
GB- 15
Terrain
WARNING: To avoid the loss of control and to
prevent overturning the mower, always across
slopes, never up and down.
Pass diagonally through sharp dips. Avoid sharp
drop offs completely to prevent the mower from
becoming hung up.
Keep the power unit steering control levers
forward when going downhill.
Pre-planmowingoveruneventerrainsothegrasswillbe
dry,minimizing
wheelslippageandspinning,
whichwill
damagetheturf.
Beforemowing,checktheareatodetermine
thebest
procedure.
Consider
thegrasstypeandheight,andthetype
of uneventerrainonwhichthe mowingistotakeplace.
Avoidsuddenstartsandstopswhiletravelingupordown
incline,andslowthegroundspeedwhileturning.
Grass Discharge
PARKING
To park the unit:
1. Bring the steering levers to neutral and then push them
out to the park position.
2. Turn off the PTO, stop the engine, lower the deck to
the ground and remove the ignition key.
IMPORTANT: When parking on any slope, be sure to chock
the wheels on the downhill side to prevent the unit from
sliding.
Moving
WARNING:
the mower
with
the dischargeNEVER
shield operate
in the raised
position.
The mower deck has been designed to provide maximum air
flow for an even discharge of grass clippings. When mowing
tall, or lush grasses, select a lower mower ground speed, or
reduce the width of cut, for the best discharge efficiency.
For the best lawn appearance, do not mow when the grass
is wet or heavy with dew. Wet grass could plug the discharge
area of the mower, create an unnatural load on the blades
and spindles, and damage the mower deck belt. Wet grass
will also leave unsightly clumps on the lawn.
the Unit with the Engine
Off
If the mower engine stalls and will not restart, the unit can be
pushed or towed for short distances with the pump bypass
valves open. Do not exceed 5 m.p.h. (8 kph) when towing.
IMPORTANT: The bypass valves must be opened two full
turns (maximum) before the unit is moved (see figure 10).
Be sure the bypass valves are closed before running the
mower again. Failure to fully close the bypass valves before
operation could result in hydraulic system damage.
If the mower deck becomes clogged, back the unit out of the
uncut grass. If the mower will not clear itself, raise the deck,
shut off the engine, set the brake, remove the ignition key
and clean the bottom of the deck.
In medium and heavy cutting conditions, mow so the
discharged clippings will be AWAY from the uncut grass. In
light cutting, discharged clippings can be directed onto the
uncut grass, allowing them to be recut finer.
Tips For Efficient
Bypass Valves
Mowing
Figure 10
TOWING
CAUTION:
Clear before
the area
of people,
pets, and
all
visible debris
beginning
mowing
operations.
Mowing blades should be checked regularly and kept sharp
to ensure the best lawn appearance.
WARNING: Exercise care when turning the
mower while towing. The mower will turn more
sharply than the towed object.
Best results occur normally when the grass is maintained at
a height of 2-3 inches (50-80mm). It is best to cut the grass
often and not too short. To keep a healthy green lawn, do not
cut more than 1/3 of the overall grass blade height.
IMPORTANT: Attempting to tow more than
200 pounds (90.7 kg) with the Ariens mower
will lead to premature parts failure and void the
warranty.
Mower engine speed while mowing should be at the
maximum rated RPM. This will ensure proper blade speed
for effective cutting and discharge of grass clippings.
The mower is designed for towing in light duty applications
only. Do not attempt to tow more than 200 Ibs. (90.7 kg).
Tongue weight is not to exceed 30 Ibs (13.61 kg).
Travel speed greatly affects mowing performance. Always
use a lower ground speed for slower mowing, rather than
lowering the engine RPM.
Mow often. Do not wait for the grass to get too tall. Short
grass clippings will disperse better and deteriorate faster.
Mowing areas with tall grass or weeds may require cutting at
maximum height of cut. After mowing once, recut the entire
area with the mower reset to the desired final height of cut.
GB- 16
LOADING
THE MOWER
WARNING:
TRANSPORTING
Exercise extreme caution when
THE MOWER
WARNING: When transporting the mower,
make sure the steering control levers are in the
park position, the wheels have been blocked,
the machine has been securely fastened by
cables, chains or ropes, and the trailer has
been secured to the towing vehicle with safety
chains.
loading and unloading the unit from a ramp.
Use only a single, full width ramp. If individual
ramps are necessary, use several to simulate a
single full width ramp. Use enough ramps to
create an unbroken ramp surface wider than
the unit.
Never exceed a 15 degree angle between the
ramps and the truck or trailer when loading the
mower.
Use a heavy duty trailer or truck to transport the mower.
Make sure the trailer or truck has all of the necessary
lighting and markings as required by law.
Avoid sudden acceleration and deceleration of
the unit when loading and unloading the unit to
avoid the mower from tipping backward.
Front Tie Downs
The loading ramp should be long enough that the angles
between the truck or trailer do not exceed 15 degrees. A
steeper angle may cause the mower deck components to
get hung up when moving the mower from ramp to truck or
trailer. If loading on or near a slope, position the truck or
trailer on the down side of the slope and the ramps should
extend up the slope. This will minimize the ramp angle. The
trailer or truck should be parked as level as possible to
facilitate smooth loading of the mower.
Rear Tie Downs
Figure 11
MAINTENANCE
WARNING: AVOID INJURY. Read and
SCHEDULE
IMPORTANT: Some working conditions (heavy loads, high
ambient temperatures, dusty conditions, or airborne debris)
may require more frequent service.
understand entire Safety section before
proceeding.
Ariens Dealers will provide any service, parts or adjustments
which may be required to keep your unit operating at peak
efficiency. Should engine require service, contact an Ariens
or an authorized engine manufacturer's service center.
See engine manual for further maintenance and
troubleshooting information.
NOTE: To have full access to the engine, the seat must be
tipped forward.
GB- 17
Interval
Action
Check Safety Interlock
System
Each Use
25 Hours
or Every
Season
,_
serious
injury.
Test this
system
each failure
time the
unitimproper
is operated.
If thisofsystem
not infunction
WARNING:
Safety
interlock
system
and
operation
unit candoes
result
death oras
described, do not operate until repairs are made (see Safety Interlock System on page 12).
All Controls, Switches
Inspect regularly and repair when necessary.
All Fasteners,
hardware
Inspect regularly and tighten when necessary.
Hoses, fan belt, wiring
Inspect regularly and repair when necessary.
Engine Oil Level
Check regularly and replenish when necessary
(see Engine Oil Level on page 19).
(see Hydraulic System Maintenance
Hydraulic Oil Level
Check regularly and replenish when necessary
Air Screens
Clean off debris regularly.
Air Cleaner Unloader
Valve
Clean regularly.
Air Cleaner Elements
Inspect regularly and clean or replace when necessary.
Fuel Tank Levels
Check regularly and replenish when necessary.
Fuel Filter
Inspect regularly and replace when necessary.
Steering Lever
Adjustment Balance
Check regularly and adjust when necessary.
on page 20).
Check Parking Brake
Engage parking brake and engage transmission bypass lever (see Moving the Unit with the Engine Off on
page 16). Push unit. If unit rolls, contact your Ariens Dealer.
Clean Unit
Clean engine, battery, seat, mower deck, etc. of all dirt and debris. Do not use solvents, high-pressure
sprayer, hard cleaners or abrasives.
NOTE: Protect painted surfaces with automotive type wax.
Check Tire Pressure
and Conditions
See SPECIFICATIONS
Wheel Bolt Torque
Check regularly and tighten when necessary.
Steering Free-Play
Check regularly and repair when necessary.
Grass Build Up
Remove after each use.
Inspect Mower Blades
Check mower blades for wear. Sharpen or replace as needed (see Blade Maintenance
Follow Engine Manual
Maintenance Schedule
Perform scheduled engine maintenance. Refer to Engine Manual for detailed instructions.
NOTE: To drain the oil, use the oil drain petcock supplied with unit, not the drain plug that is shown in the
Engine Manual.
Check Battery
Keep battery and battery terminals clean (see Cleaning the Battery on page 22)_
Air Cleaner Elements
Inspect and clear away debris, replace if necessary.
Lubricate Unit
Apply grease to fitting on each front wheel
Check Fasteners
Check mower blade mounting hardware and all other fasteners.
damaged. Tighten all nuts and bolts to the correct torque value.
Grease Fittings
Lubricate as necessary.
Hydraulic Oil & Filter
Replace.
Battery
Check and clean as necessary (see Battery Maintenance
Check All Belts
Replace worn or deteriorated
• Check drive belt.
Inspect Hydraulic
Hoses
Inspect regularly and repair when necessary (see Checking The Hydraulic Hoses on page 21 ).
Clean engine cooling
system
Check and clean the cooling fins and inside the engine shrouds to remove grass, chaff or dirt clogging the
cooling system and causing overheating.
50 Hours or Every
Season
100 Hours or Every
Season
on page 34 for correct tire pressure.
on page 27).
Replace fasteners that are missing or
on page 21 ).
belts (see Belts on page 28).
• Check deck belt.
GB- 18
WARNING: AVOID INJURY. Read and
understand entire Safety section before
proceeding.
SERVICE
ACCESS
CAUTION: Shut off the engine before servicing
the mower.
Make sure the seat is fully raised and locked
before performing any maintenance on the
mower.
Engine
Dipstick
The seat can come down very quickly once the
seat lock lever is released. Lower the seat
slowly making sure to pay close attention that
everything is clear.
\
OM5035
Figure 12
Raise the seat to access the battery and the hydraulic
reservoir. Use caution while lifting and make sure the seat is
locked in the upright position before beginning service on
the mower.
LUBRICATION
Oil Filter Change
Change the engine oil filter initially after the first 8 hours of
use. Change the engine oil filter every 100 hours of
operation after the initial change.
AND MAINTENANCE
1. Start the engine and run it for five minutes to warm the
engine oil.
Engine Oil Level
2. Drain the engine oil into a suitable container.
IMPORTANT: Failure to check the engine oil level regularly
could lead to serious engine problems if oil is too low.
1. Park the unit on level ground and shut off the engine.
,_
2. Clean the area around the engine dipstick before
removing it.
3. Remove the dipstick and wipe it off.
4. Momentarily reinstall the dipstick in the engine (without
turning it) and check that the oil level is between the
upper and lower limit on the dipstick.
5. Add oil as necessary to achieve required level. DO
NOT overfill.
CAUTION:
the oil filter, place a
suitable
panBefore
under removing
the filter connection.
3. Clean the area around the oil filter to keep dirt and
debris from the engine and rotate the oil filter
counterclockwise to remove it. Wipe off the surface
where the filter mounts.
4. Coat a film of clean engine oil on the seal of the new
filter, see figure 13.
5. Install a new filter rotating it clockwise until the seal
contacts the mounting surface. Rotate the filter an
additional 3/4 of a turn by hand.
6. Reinstall and tighten the dipstick.
7. Clean any spilled oil.
IMPORTANT: Use only the oil specified for use in the engine
manual.
6. Reinstall drain plug and tighten.
7. Refill with engine oil as specified.
8. Run the engine for about 3 minutes, stop engine, and
check for leaks around filter.
GB- 19
HYDRAULIC
Clean
EngineOil
SYSTEM
MAINTENANCE
WARNING: HYDRAULIC FLUID can result in
severe burns. Fluid in hydraulic system can
penetrate skin and result in serious injury or
death.
Be sure to stop the engine before doing any
work on hydraulic parts.
Keep body and hands away from pin holes or
nozzles which expel hydraulic fluid when under
pressure. Use paper or cardboard, not hands,
to search for leaks.
Figure 13
Ensure all hydraulic fluid connections are tight
and all hydraulic hoses and lines are in good
condition before applying pressure to system.
Engine Oil Change
FOREIGN FLUID INJECTED INTO BODY can
result in gangrene. Fluid must be surgically
removed within a few hours by a doctor familiar
with this form of injury.
WARNING: Engine oil is a toxic substance.
Dispose of used oil properly. Contact your local
authorities for approved disposal methods or
possible recycling.
Change the engine oil and filter after the first 8 hours of
operation. Change the oil each subsequent 100 hours of
operation after the initial change.
CAUTION: Be sure the engine has been
stopped, the steering control levers are in the
park position, and the key has been removed
before changing or checking the hydraulic oil in
the mower.
1. Run the engine to warm the oil.
2. Park the mower on level ground.
3. Stop the engine, put the steering control levers in the
park position and remove the key.
4. Remove the oil drain screw, see figure 14, and drain
the oil into a suitable container while the engine is still
warm.
WARNING: Hot engine oil can cause severe
burns. Allow engine oil temperature to drop from
hot to warm before attempting to drain and
handle the oil.
5. Install the oil drain screw.
6. Remove the dipstick and refill with fresh oil.
7. Check the oil level.
Allow the hydraulic fluid to cool. The oil may be
hot and could cause serious burns.
IMPORTANT: Avoid damage to hydraulic components as a
result of contamination. Be sure to wipe around the filler
neck and cap before removal of the hydraulic oil reservoir
cap. Do not open the oil reservoir cap when hot unless it is
absolutely necessary.
Check the reservoir daily for the proper fluid level.
The pump and motor units require fluid changes yearly or
every 250 hours whichever occurs first. The system filter
should be changed initially after the first 50 hours of
operation. The fluid and filter must be changed and the
system cleaned if the fluid would become contaminated with
dirt, water, etc.
NOTE: The integrated pump/motor units are equipped with
bypass valves. See Moving the Unit with the Engine Off on
page 16.
Engine Oil
Filter
Changing
Fluid
CAUTION: Be sure the engine has been
stopped, the steering control levers are in the
park position, and the key has been removed
before changing or checking the hydraulic oil in
the mower.
Oil Drain
Screw
Figure 14
Hydraulic
Allow the hydraulic fluid to cool. The oil may be
hot and could cause serious burns.
OE3290
1. Park the machine on a level surface, stop the engine,
put the steering control levers in the park position and
remove the key.
GB - 20
2. Cleantheareaaroundthereservoirfillercapand
removethefillercapfromthe reservoir.
3. Todrainthehydraulic
fluid,placea suitablecontainer
underthehydraulic
filterandremoveit.
4. Placea thincoatofhydraulic
oilonthegasketonthe
oilfilter.Beforereinstalling,
makesuremountareais
cleanof debris.
5. Installthehydraulicoilfilterontothefilteradapter.
6. Refillthehydraulicreservoirtotherecommended
level.Reinstalltheoilreservoirfillercap.
7. Cleanupanyfluidwhichmayhavespilled.
Bleeding/Purging
the Hydraulic
Check both the hoses and hose clamps to ensure there is no
wear or damage. If either is found worn or damaged, repair
or replace them at once.
BATTERY
Battery
WARNING:
AVOIDSafety
INJURY.
Readbefore
and
understand entire
section
proceeding.
System
WARNING: Battery posts, terminals and
related accessories contain lead and lead
compounds, chemicals known to the State of
California to cause cancer and reproductive
harm. Wash hands after handling.
IMPORTANT: Air in the hydraulic system is the primary
cause of hydraulic pump failures. Following hydraulic
system service or repair, the hydraulic system MUST be
correctly purged of trapped air before placing the mower
back in operation.
Unit comes equipped from the factory with a
maintenance-free battery that requires no regular
maintenance except cleaning the terminals.
1. To bleed the system make sure the oil tank is full, the
oil must barely cover the fill baffle inside of the tank.
2. Raise the rear unit tires off the floor and place it on
suitable jack stands.
Removing
3. Open both pump bypass valves, one on each pump,
two full turns maximum.
4. Sitting in the operator's seat, start the engine and run it
at idle.
5. Slowly cycle the steering control levers full forward and
full reverse for 10 seconds in each direction, 5 or 6
times.
NOTE: The rear tires should rotate, but they'll not be under
load.
6. Shut off the engine, check and add hydraulic oil as
necessary.
8. Sitting in the operator's seat, start the engine and run it
at idle.
9. Slowly cycle the steering control levers full forward and
full reverse, 5 or 6 times.
NOTE: It may be necessary to repeat purging procedures
until all air is vented out of the hydraulic system. When the
Pump moves forward and reverse at normal speed and the
reservoir oil remains at a constant level, purging is complete.
IMPORTANT: The rear tires are now rotating under power.
Do not touch or contact them. If they do not rotate after 2-3
cycles, stop immediately. There may still be air in the
system. Let the pumps cool and try purging again from
Step 1.
10. Shut off the engine, lower the unit back to the floor and
check and add hydraulic oil as necessary.
The Hydraulic
the Battery
WARNING: The battery terminals or metal
tools could short against the metal components
of the mower causing a spark that could ignite
explosive battery gases. When removing the
battery from the mower, do not allow the
battery terminals to touch any part of the
machine. Do not allow metal tools to touch
metal parts of the machine while in contact with
the battery terminals.
Incorrect battery cable routing could damage
the mower or cause a spark that could result in
explosive battery gases being ignited.
7. Close the bypass valves on both pumps. Do not over
tighten.
Checking
MAINTENANCE
Hoses
Inspect the hydraulic hoses every 250 hours to ensure they
are in good working order.
GB-21
Always disconnect the black (negative) battery
cable before disconnecting the red (positive)
battery cable. Always reconnect the red
(positive) battery cable first before
reconnecting the black (negative) battery
cable.
1. Disengage the mower PTO switch, put the steering
control levers in the park position, turn the ignition key
to "Off" and remove the key.
2. Raise the seat and lock it in the upright position.
3. Disconnect the negative battery cable from the battery
terminal.
4. Slide the red boot off of the positive battery terminal
and remove the positive battery cable.
5. Slide the rubber strap out from the battery tray.
Carefully release the strap and slide the opposite end
out of the hooks on the battery tray.
6. Carefully remove the battery. Avoid touching the
terminal posts on any metal parts.
Installing
the Battery
Jump-Starting
1. Insert the battery in the tray with the battery posts
facing to the left.
2. Install the positive battery cable to the positive post on
the battery.
3. Install the negative battery cable to the negative post
on the battery.
Replacing
4. Secure the cables by inserting a 5/16-18 x 5/8"
carriage bolt through the battery post and through the
battery cable. Secure it with a 5/16-18" whiz Iocknut.
5. Install the red terminal boot over both the positive post
and the positive cable.
6. Secure the battery in place by inserting one end of the
hook band into the battery tray and running the other
end over the top of the battery into the slot on the
opposite end of the battery tray.
Cleaning
Ariens does not recommend jump-starting your unit.
Jump-starting can damage engine and electrical system
components. See your engine manual for more detailed
information.
the Battery
There are two fuses on your Ariens mower. They are located
on the frame on the inside. One is close to the front of the
fuel tank. The second is located to the rear of the tank. Both
are 20 amp fuses.
1. Remove the defective fuse from the socket.
2. Check the metal clip in the fuse window and discard
the fuse if it is broken.
3. Install the new fuse in its socket.
CASTERS
Keep battery and its terminals clean. Inspect every 100
operating hours or monthly for best performance.
SERVICING
1. Remove battery from unit. See Removing the Battery on
page 21.
2. Clean terminals and battery cable ends with wire brush.
3. Coat terminals with dielectric grease or petroleum jelly.
Battery
,
THE BATTERY
Electrolyte
PIVOT BEARINGS
Raise the front of the power unit and support it with
jackstands.
3. Remove the cap (2), the 5/8 hex nut (8), the 5/8 spring
lock washer (9), the flat washer (10), the 1.0 x 1.25
wave washer (3), and the front wheel weldment (7).
First Aid
Follow First Aid directions for contact with battery fluid.
•
THE CASTER
See Figure 15.
1. Park the unit on a level surface, put the motion control
arms in the park position, turn off the engine and
remove the key.
4. Replace battery. See Installing the Battery on page 22.
CHARGING
Fuses
IMPORTANT: Avoid damage to the electrical circuit. Use
only the same size fuse as was originally installed.
External Contact: Flush with water.
,
•
Eyes: Flush with water for at least 15 minutes and get
medical attention immediately!
• Internal Contact: Drink large quantities of water. Follow
with Milk of Magnesia, beaten egg or vegetable oil. Get
medical attention immediately!
In case of internal contact, DO NOT induce vomiting!
IMPORTANT: DO NOT fast charge. Charging at a higher
rate will damage or destroy battery. ONLY use an automatic
charger designed for use with your battery.
ALWAYS follow information provided on battery by battery
manufacturer. Contact battery manufacturer for extensive
instructions to charge battery.
1. Remove battery from unit. See Removing the Battery on
page 21.
Remove the upper and the lower bearings (4) and
seals.
5. Clean and inspect the bearings and pack with clean
grease. Replace the bearings if needed.
6. Reinstall the upper and lower bearings.
IMPORTANT: The bearings are a press fit. Press only on the
outer race when installing.
7. Reinstall the cap (2), the 5/8 hex nut (8), the 5/8 spring
lock washer (9), the flat washer (10), the 1.0 x 1.25
wave washer (3), and the front wheel weldment (7).
NOTE: Do not overtighten the 5/8 hex nut. Tighten the nut
only enough to remove any excessive play from the bearings.
2. Place battery on bench or other well-ventilated place.
3. Connect positive (+) lead of charger to positive (+)
terminal, and negative (-) lead to negative (-) terminal.
4. Charge battery according to charger and battery
manufacturer's instructions.
5. Replace battery. See Installing the Battery on page 22.
GB - 22
8. Apply grease to the grease fitting until grease appears
at the top bearing. Reinstall the cap.
,
,
If adjustment is needed, loosen the nut against the
yoke (3) and while applying slight rearward pressure
on the motion control lever, turn the head of the
adjustment bolt (4) in the appropriate direction until the
lever is centered.
Move the control lever reward and release the control
lever. This control lever should return to a position
where the control lever can be swung outward and lock
in the neutral outward position.
Figure 16
STEERING
CONTROL
OM5075
LEVER ADJUSTMENT
When the unit is in motion and one steering lever is more
forward than the other when driving in a straight line, the
steering control levers are out of adjustment. Loosen the
hardware on the handlebars and align the pieces. Tighten
the hardware to hold the adjustment. See Figure 17.
NOTE: The steering control levers need to be even in both
neutral or park.
Figure15
NEUTRAL
ADJUSTMENT
See Figure
16.
Before making any adjustments, be sure to check the tire air
pressure. Incorrect air pressure can cause the unit to pull to
one side. The correct air pressure is 20 p.s.i, in the front
wheels and 12 p.s.i, in the rear.
Adjust handlebars
here.
Stop the engine and remove the ignition key.
2. Tilt the seat forward.
,
3. Move the control lever rearward and release the
control lever. This control lever should return to a
position where the control lever can be swung outward
and lock in the neutral outward position.
,
If adjustment is needed, move the control lever back to
the inward position and begin to pull rearward. At this
beginning rearward motion the clevis pin should begin
to contact the end of the slot (1) and start putting
pressure on the spring (2).
GB - 23
Figure 17
OM5005
LEVELING
THE
DECK
Synchronizing
Height
Of Cut (Figure
20)
CAUTION: Stop the engine, put the steering
control levers in the park position and remove
the key from the ignition before performing any
maintenance or repairs on this unit.
CAUTION: Stop the engine, put the steering
control levers in the park position and remove
the key from the ignition before performing any
maintenance or repairs on this unit.
NOTE: Make sure the deck is level before synchronizing the
height of cut dial with the deck blade height.
1. Set the front tire pressure to 20 p.s.i, and the rear tire
pressure to 12 p.s.i.
1. Raise the mower deck to the transport position. Take
the weight off of the deck lift linkage (1) by inserting
wood blocks under each corner of the deck and slowly
lowering it until it is resting on the blocks.
2. Place the mower on a level surface.
3. Raise the mower deck to the transport lock position
and adjust the cut height to 3 inches.
4. Lower the deck back to cut position.
2. Loosen the 1/2 jam nut (3) from the 1/2" adjustable
yoke (2).
5. Set both of the outside blades to be perpendicular to
the mower as shown in figure 18.
3. Pull the 1/2" clevis spring pin (5) out of the adjustable
yoke and disconnect the yoke from the lift linkage (1).
If the blade height is higher than the height of cut dial,
tighten the yoke onto the 1/2-13 x 4.5" bolt (6) which
runs through the height of cut index arm weldment (4).
If the blade height is lower than the height of cut dial,
then loosen the yoke on the 1/2-13 x 4.5" bolt (6).
NOTE: Set the height of cut on the front tip of the center
blade.
4. Connect the 1/2" adjustable yoke (2) to the lift linkage
(1) with the 1/2" clevis spring pin (5).
Figure 18
OM5045
6. Measure the height of the blade tips on both 1 and 2
and adjust the front adjustment bolts and the rear
U-bolts to ensure the deck is level from left to right.
7. Rotate the mower blades 90 ° so they are parallel to the
mower deck. Use the rear adjustment bolts to adjust
the deck so that the rear blade tip is 1/8" higher than
the front blade tip on the same blade.
5. Tighten the 1/2" jam nut (3) back down to lock the
setting into position.
6. Raise the deck back to the transport height and
remove the blocks from below the deck. Measure the
blade height again to ensure it now matches the height
on the dial. If not, repeat until the two heights are
synchronized.
Measure the blade heights to make sure they match what is
shown on the height of cut dial. The height is measured as
the distance between the ground and the bottom of the
blade. If the blade height does not match the dial height, see
Synchronizing Height Of Cut (Figure 20) below.
4
S"
Figure 19
s
0E3305
Figure 20
GB - 24
DRIVE ADJUSTMENTS
NOTE: If canister gaskets are broken or missing, BOTH air
cleaner elements MUST be replaced.
Inspect and clean the primary air cleaner cartridge (5)
assembly every 25 hours. Replace the paper element yearly
or every 250 hours, whichever comes first.
CAUTION: Stop the engine, put the steering
control levers in the park position and remove
the key from the ignition before performing any
maintenance or repairs on this unit.
The outer cartridge is cleaned by rolling and "tapping" it on a
hard surface. If the paper pleats are punctured or torn, the
element must be replaced.
Steering and motion controls should be uniform during
forward and reverse motions. The steering control levers
should always return to neutral when released from the
reverse position.
Replace the inner cartridge (6) yearly or every 250 hours
whichever comes first.
AIR CLEANER
IMPORTANT: DO NOT attempt to clean the secondary
element. This filter element must be replaced if it is
unusually dirty or damaged.
SERVICE
(FIGURE
21)
NOTE: Operation in dusty conditions may require more frequent maintenance of the primary and secondary air cleaner
cartridges.
CAUTION: Touching hot surfaces can burn
skin. The engine and components will be hot
after the unit has been running. Allow the
engine and components to cool before
servicing the unit.
IMPORTANT: To prevent excessive engine wear, do not run
the engine without the air cleaner installed.
CAUTION: Do not use pressurized air to clean
paper element.
FUEL SYSTEM
IMPORTANT: The engine is air cooled and requires a large
amount of air intake when running. Reduced air intake can
cause overheating. Always keep air intake screen and
cooling fins clean. Always keep the covers and screens in
place.
SERVICE
CAUTION: Fuel vapors are explosive and
flammable. Do not smoke while handling fuel.
Keep fuel away from flames or sparks. Shut off
engine before servicing. Always work in a
well-ventilated area. Clean up spilled fuel
immediately.
NOTE: 19hp Kawasaki engines use only a single-piece
filter (5).
Be sure the engine is stopped, the steering
control levers are in the park position and the
key is removed before making these repairs.
4
5
Be sure to inspect the fuel lines periodically.
The lines are subject to deterioration and wear.
Fuel could leak out onto a running engine and
cause a fire.
6
WARNING: Improper use of solvents can
result in fire or explosion. Do not use gasoline
or low flash point solvents to clean the fuel filter
and/or the fuel pump. Clean only in a
well-ventilated area away from sources of
sparks or flame, including any appliances with
a pilot light.
Figure 21
The Unloader Valve (1)will allow for the removal of fine dirt
and dust from the canister body (3) without disassembly.
While in operation, this valve will suck closed at 1/3 to 1/2
throttle.
•
With the engine shut off, squeeze the valve by hand to
release dust and debris.
•
In very dusty operating conditions, the valve may have
to be opened every 2 to 3 hours.
Remove the air cleaner cover and make a general
inspection of the entire assembly. If it is unusually dirty or if
dirt build-up is easily visible on the inside of the canister
body, the entire assembly, including the inlet hose, must be
removed from the carburetor and engine.
With the air cleaner removed from the engine, and with the
cartridges and gaskets removed, wash the hard parts with
cleaning solvent and blow them dry with compressed air. DO
NOT wash the air cleaner cartridges.
IMPORTANT: Special care should be taken when the fuel
lines are removed for maintenance or repair. Close both
ends of the fuel line with a piece of paper or a clean cloth to
prevent dust or dirt particles from contaminating the fuel.
Even a small amount of dust or dirt can cause premature
wear or failure of fuel components.
The fuel line connections are composed of rubber and they
will age regardless of the service period. If there is any
deterioration of the fuel lines or clamps, replace them.
Check the fuel filter regularly. If it is clogged by debris or
contaminated with water, replace it.
The fuel filter cannot be disassembled. If the fuel filter
becomes clogged, replace it with a new one.
GB - 25
1.Parkthemachinesafelyina well-ventilated
area.
2. Allowto cool.
3. Compress
hosewithclampbetweentankandfilter.
Usecarenotto damageor puncturehose.
4. Disconnect
thehoseclamps(1)fromthefuelfilter,see
figure22.
5. Slidethefuellineoffof bothendsofthefuelfilter(2).
6. Installthenewfuelfilterpayingcloseattentiontothe
flowdirection(3)notedonthefuelfilter.
7. Removeclamp.
Thefuelpumpcannotbedisassembled.
Ifthefuelpump
fails,replaceitwitha newone.
3. Inspect for cracked porcelain or other wear and
damage. If any wear or damage is evident, replace
with a new spark plug.
4. Check the spark plug gap and reset if necessary. The
correct gap should be .75 mm or .030 inches. To
change the gap, bend only the side electrode using a
spark plug tool.
2
1
3
(.75mm)
L.030
in.
LHRearView
Hose
Clamps
-T
FuelFilter
1. Center Electrode Insulator
2. Side Electrode
3. Air Gap (Not to Scale)
Figure 24
OE3335
5. Install and tighten the spark plug to 22 N.m (16 ft. Ibs.).
Reconnect the spark plug wire lead.
Figure22
SPARK
See the engine operator's manual for the recommended
spark plug.
PLUG SERVICE
COOLING
WARNING:
engine
components
severe burns.Hot
Stop
engine
and allow can
it to cause
cool
before checking the spark plug.
SYSTEM
CLEANING
Before each use check to make sure the air intake screen is
free from grass and debris and clean if necessary.
Clean or replace the spark plug and reset the gap every 100
hours of operation.
1. Disconnect the spark plug wire lead and remove the
spark plug.
Every 100 hours of operation, check and clean the cooling
fins and inside the engine shrouds to remove grass, chaff or
dirt clogging the cooling system and causing overheating.
CAUTION:
Do not
thereinstalled
engine before
all the
cooling
system
partsrunare
to keep
cooling and carburetion as intended.
/_
Figure 23
Spark Plug Wire
OE3340
2. Clean the electrodes by scraping with a wire brush to
remove carbon deposits.
GB - 26
TIRE AND WHEEL
SERVICE
CAUTION: Never try to straighten a blade
which has been bent or try to weld a blade that
is cracked. Always replace with a new blade to
ensure safety.
CAUTION: Separation of a tire and rim can
cause an explosion that could cause serious
injury or death.
Check the tires for low pressure, cuts, bubbles,
damaged rims, or missing lug bolts and nuts.
To sharpen the blades, remove the blades by inserting a
block of wood and turning the blade bolt counter clockwise,
see figure 26.
Always use a clip-on chuck with an extension
long enough to allow you to stand on one side
of the wheel while inflating the tires. Do not
stand directly in front of the tire while inflating.
Never weld or heat a tire and wheel assembly.
The heat can cause the air inside of the tire to
expand and result in a tire explosion. Welding
also can structurally weaken or deform the
wheel.
Visually inspect the tires before each use. Do not run the
tires under- or over-inflated which can cause tire damage.
The correct tire pressure for the front tires is 20 p.s.i. (82.7
kpa) and rear wheels is 12 p.s.i. (137.9 kpa) see figure 25.
Stop Block
When reinstalling the wheel after service, be sure to torque
the nuts to 75 ft. Ibs. (101 N-m). Drive 200-250 yards and
then re-torque.
Under Inflated
Normal
Figure 26
OE3356
CAUTION:
Alwaysthe
wear
safety eye protection
when sharpening
blades.
Over Inflated
Be sure to wear a thick glove or wrap the blade in a towel to
protect your hands from being cut. Insert the blades in a vise
and use a mill file or grinder. File the blade along the original
angle until the blade tip is at a 30 ° angle again.
Figure 25
BLADE MAINTENANCE
CAUTION: Before removing the blades, be sure
the engine has stopped and the key has been
removed. The blades may be sharp. Wear
gloves or wrap them in a towel before handling
them.
Inspect the blades daily for straightness, sharpness, and
balance. Replace the blades if they are cracked, worn, bent
or out of balance.
NOTE: Keep blades sharp. Mowing with dull blades will
cause poor cut performance. It will also put additional strain
on the engine by slowing the mower cutting speed.
GB - 27
CLEANING
DONOTSharpentoThisPattern
2
BUILDUP
FROM DECK
CAUTION: Before cleaning grass buildup, be
sure the engine has stopped and the key has
been removed.
Cleaning the underside of the deck regularly will help
maintain deck cutting efficiency. Clean the underside of the
deck as often as possible.
iiiiiiiiiiiiiiiiiiiiiiiiiiiiiiiiiiiiiiiiiiiiiiiiiiiii 1
To gain access to the underside of the deck,
deck lift foot pedal and lock it in the transport
the deck cut height adjustment to the highest
the front of the power unit and support it with
DISCARD if More Than
1/2 in. (1.27 cm)
1
Sharpen to This Pattern
1. Cutting Edge
2. Square Corner
GRASS
Clean out any grass buildup from under the deck and
discharge shield. DO NOT use high pressure washers or
sprayers.
BELTS
Inspect the belt pulley grooves and flanges for wear. A new
belt, or one in good condition, should not contact the bottom
of the pulley groove. Replace the belt when the belt touches
the bottom of the groove otherwise the belt will slip
excessively.
Always use caution when changing a belt. Never pry a belt
on to a pulley.
3. Air Lift Erosion
4. Air Lift
Figure 27
depress the
position. Move
setting. Raise
jackstands.
Always keep oil and grease away from the belts and never
use belt dressings.
OE3361
IMPORTANT: When sharpening blades, be sure to grind the
same amount on each side. Unbalanced blades will cause
excessive vibration and could cause the spindles to wear
prematurely.
Check the blade balance by inserting a horizontal rod
through the center hole of the blade. The heavy side of the
blade will drop down. Sharpen the heavy side of the blade
until the blade is balanced, see figure 28.
After sharpening, install the blades back onto the mower
deck. Make sure the wings are facing up. Reinstall the blade
bolt and Iockwasher.
Belts should be checked regularly, and replaced at
approximately 200 hour intervals. Belts should also be
replaced any time the belt(s) show evidence of cracking,
missing pieces, friction burns from slipping, or other extreme
damage. Small cracks or fabric polishing are normal.
Small branches and other similar debris can get onto the top
of the deck, into the pulleys, which may cause the belt(s) to
break or come off the pulleys. Make sure the area to be
mowed is cleared of this debris, and make sure all belt
guards are in place, before mowing.
To guarantee long belt life, always use genuine Ariens belts.
Drive Belt Removal
and Installation
Blade
WARNING: Most service work requires the
engine to be shut OFR To prevent injury while
working on the mower, remove the ignition key
and disconnect the negative (-) cable from the
battery.
1. With the deck in the transport position, raise the floor
pan.
Balance Rod
2. Loosen the two 3/8-16 nuts on the u-bolt tension arm
to relieve tension on the belt, and then remove the belt
from the idler pulley.
Figure 28
3. Install a new drive belt, making sure it is routed
according to the decal on the bottom of the floor pan,
see figure 29.
GB - 28
4. Tightenthetwo3/8-16nutsontheu-bolttensionarm
untiltheextension
springmeasures
7.7"- 7.8"inside
hookto insidehook.
5. Lowerthefloorpan.
Pump Belt Removal and Installation
1. Make sure the mower is on a firm level surface, the
PTO switch is off, the engine is shut off, the steering
control levers are in the park position, the negative
battery cable is removed, and the lift control lever is
unlocked.
2. Place the deck in the highest position.
Relievetensionhere.p
3. Release the deck belt tension by loosening the tension
spring. Remove the belt from the electric clutch. It is
not necessary to remove the deck belt from any other
pulleys.
IMPORTANT: Use care when releasing belt tension as the
pressure on the arm may cause injury or damage to the unit.
i
4. Release the tension from the pump belt by using a 3/8"
breaker bar in the square hole in the tension arm. Pull
back on the tension arm and pull the belt back behind
the engine pulley.
5. Slide the belt off the pump pulley. Slide the belt above
the pulley to allow the belts to be removed from the
other pulleys.
Deck Drive Belt
Routing
6. Once the belt is removed from the pump pulleys, it
should slide easily off the engine pulley and idler.
7. Install the new belt by sliding it above the pump
pulleys. Route the belt as shown in figure 30.
8. Pull back the idler, move the belt into position and then
slowly release the idler to tension the belt.
9. Reinstall the deck belt on the electric clutch pulley.
10. Properly retension the deck belt idler following
instructions in Drive Belt Removal and Installation on
page 28.
11. Connect the negative battery cable.
Belt Routing - Pumps
Adjust Spring Tension
I
Length to 7.7" - 7.8"
Inside Hook to Inside Hook.
I
Figure 29
Figure 30
GB - 29
Fuel System
NEVER spray unit with high-pressure water or store unit
outdoors.
Gasoline left in the fuel system for extended periods without
a stabilizer will deteriorate, resulting in gum deposits in the
system. These deposits can damage the carburetor and the
fuel hoses, filter and tank. Prevent deposits from forming in
the fuel system during storage by adding a quality fuel
stabilizer to the fuel. Follow the recommended mix ratio
found on the fuel stabilizer container.
Inspect unit for visible signs of wear, breakage or damage.
To treat the fuel system for storage:
WARNING:
AVOIDSafety
INJURY.
Readbefore
and
understand entire
section
proceeding.
SHORT
TERM
Keep all nuts, bolts and screws properly tightened and know
unit is in safe working condition.
1. Add fuel stabilizer according to manufacturers'
instructions.
Store unit in a cool, dry protected area.
2. Run engine for at least 10 minutes after adding
stabilizer to allow it to reach the carburetor.
LONG TERM
Clean unit thoroughly with mild soap and low-pressure water
and lubricate (see Maintenance Schedule on page 17).
Touch up all scratched painted surfaces.
NEVER store the engine with fuel in the fuel tank inside of a
building with potential sources of ignition.
TO TAKE THE UNIT OUT OF STORAGE
1. Refer to the engine service manual to prepare the
engine for service.
Remove weight from wheels by putting blocks under frame
or axle.
Clean and charge the battery. Charge battery every three to
four weeks when storing unit.
2. Put fresh, clean fuel in the fuel tank.
3. Begin the maintenance schedule.
4. Charge the battery.
PROBLEM
Excessive Vibration
Uneven Cutting Height
Blades Wear Too Fast
PROBABLE
CAUSE
CORRECTION
1. Loose spindle/blade fasteners.
2. Blade interference with grass buildup in
deck.
3. Blades out of balance.
1. Retorque or replace as necessary.
2. Clean the underside of the deck.
4. Blade(s) broken or worn badly.
4. Replace blades in set of three.
5. Engine mounting bolts are loose.
5. Tighten the engine mounting bolts.
6. Engine/Idler/Blade
6. Tighten the pulley.
pulley loose.
3. Balance blades. See Blade Maintenance
on page 27.
7. Engine pulley damaged.
7. Contact Dealer.
8. Failed spindle bearing.
8. Contact Dealer.
1. Blades dull.
1. Sharpen or replace blades.
2. Cutting blades bent.
2. Install new blades.
3. Deck not level.
3. Level deck.
4. Anti-scalp not set correctly.
4. Adjust height of anti-scalp wheel.
5. Grass buildup under deck.
5. Clean underside of deck.
6. Incorrect tire pressure.
6. Adjust psi to 12 psi rear and 20 psi front.
7. Blade spindle bent.
7. Contact Dealer.
8. Ground speed too fast.
8. Lower ground speed.
1. Cutting in sandy conditions.
1. Increase deck mowing height.
2. Cutting in rocky conditions.
2. Increase deck mowing height.
3. Heat treat has been removed by
sharpening with grinder.
3. Replace blades in sets of three.
GB - 30
PROBLEM
Not Cutting Clean
Streaking or Windrow
Conditions in Cutting
Swath
PROBABLE
Mower Places Load
on Tractor
Excessive Mower
Deck Noise
Engine Idling Poorly
CORRECTION
1. Blades dull.
1. Sharpen or replace blades.
2. Blades installed upside down.
2. Install blades correctly.
3. Blade RPM too slow.
3. Use full throttle position.
4. Mower deck not level.
4. See Tire and Wheel Service on page 27.
Tires under inflated.
5. Mower tires mashing grass.
5. Too wet or lush to mow. Reverse
directions an re-mow area.
6. Ground speed too fast.
6. Reduce ground speed.
7. Excessive grass buildup under deck.
7. Clean underside of deck.
1. Blades dull.
1. Sharpen or replace blades.
2. Blades installed upside down.
2. Install blades correctly.
3. Conditions too wet for mowing.
3. Allow grass to dry before mowing.
4. Excessive grass buildup under deck.
4. Clean underside of deck.
,
Blades Won't Rotate
CAUSE
Ground speed to fast for conditions.
5. Reduce ground speed.
1. Deck belt worn, loose or broken.
1. Replace deck belt.
2. Deck belt off pulley.
3. Clutch failed.
2. Reinstall deck belt.
3. Contact dealer.
1. Engine RPM too low.
2. Ground speed too fast.
2. Reduce ground speed.
3. Excessive grass buildup under deck.
3. Clean underside of deck.
1. Excessive grass buildup under deck.
1. Clean underside of deck.
,
1. Use full-throttle position.
Carburetor incorrectly adjusted.
1. Contact Dealer.
2. Improper spark plug gap.
2. Check and regap spark plugs.
Engine Backfires
1. Carburetor adjusted incorrectly.
1. Contact Dealer.
Engine Runs But Unit
Won't Move
1. Drive belt loose or broken.
1. Tighten or replace drive belt.
2. Hydraulic reservoir oil low.
2. Refill reservoir.
3. Pump bypass valve open.
3. Close bypass valve.
4. Hydraulic oil filter plugged.
4. Replace hydraulic oil filter.
5. Bad pump or motor.
5. Contact Dealer.
1. Hydraulic oil reserve too low.
2. Hydraulic oil reservoir out of cap.
1. Refill reservoir.
Unit Loses Power or
Hydraulic System
Overheats
Loss of Power or
System Will Not
Operate in Either
Direction
Engine Overheats
Engine Stalling While
Blades Engaged
,
Restrictions in air cleaner.
2. Overfill or water contaminated.
1. Service air cleaner.
2. Poor compression.
3. Steering linkage needs adjustment.
2. Contact Dealer.
3. Contact Dealer.
4. Hydraulic bypass valve open.
4. Close bypass valve.
5. Pump belt broken or worn.
5. Replace belt.
6. Pump belt off of pulley.
6. Reinstall belt on pulley.
1. Air intake screen clogged.
1. Service air intake screen.
2. Cooling fins clogged.
2. Clean fins.
1. Operator not in seat.
1. Sit on seat.
2. Faulty safety system.
2. Contact Dealer.
3. Spindle bearing failure.
3. Contact Dealer.
4. Blades locked by foreign matter.
4. Clean underside of deck.
GB-31
PROBLEM
PROBABLE
CAUSE
CORRECTION
Low Engine Oil
1. Low oil level.
1. Add oil.
Pressure
2. Oil diluted or too light.
2. Change oil and locate source of
contamination.
High Oil Consumption
1. Numerous possibilities.
1. Contact Dealer.
Engine Will Not Turn
Over
1. Dead Battery.
2. Bad ground connection.
1. Charge battery. See Battery Maintenance
on page 21.
2. Correct the connection.
3. Poor terminal connection at battery.
3. Correct the connection.
4. Poor wiring harness connections.
4. Correct the connection.
5. Bad parking brake switch.
6. Bad PTO switch.
5. Contact Dealer.
7. Steering control levers not in park position.
7. Place steering control levers in park
position.
,
6. Contact Dealer.
PTO switch engaged.
8. Disengage switch.
9. Operator not in seat.
10. Blown fuse.
Engine Turns Over But
Doesn't Start - There
Is Spark at Spark Plug.
9. Sit in seat.
10. Replace fuse.
1. No fuel or line plugged.
2. Bad fuel solenoid.
1. Fill tank or replace line.
2. Contact Dealer.
3. Dirt in fuel filter.
4. Dirt or water in fuel or stale fuel.
3. Replace fuel filter.
4. Contact Dealer.
5. Incorrect fuel in fuel system.
6. Choke is not on.
5. Drain tanks and replace with proper fuel.
6. Move choke lever to on position.
1. PTO switch is on.
1. Turn off PTO switch.
2. Steering levers are not in park position.
2. Return levers to park position.
3. No operator in seat.
3. Sit in seat.
4. Bad seat switch.
4. Contact Dealer.
5. Bad parking brake switch.
5. Contact Dealer.
1. Steering control levers need adjustment.
2. Hydraulic pump failure.
1. Contact Dealer.
2. Contact Dealer.
3. Wheel motor failure.
3. Contact Dealer.
4. Bypass valve open.
4. Close bypass valve.
Tractor Creeps When
Steering Levers Are in
Neutral Position.
1. Steering control levers need adjustment.
1. Contact Dealer.
Tractor Circles or
Veers.
1. Steering control levers need adjustment.
1. Contact Dealer.
2. Hydraulic pump failure.
2. Contact Dealer.
3. Wheel motor failure.
3. Contact Dealer.
4. Tires improperly inflated.
4. Adjust tire pressure.
1. Engine mounting bolts loose.
1. Torque engine bolts.
2. Loose engine pulley.
2. Tighten pulley.
3. Engine pulley damaged.
3. Contact Dealer.
Engine Turns Over But
Doesn't Start - There
Is No Spark at Spark
Plug.
Tractor Jerky When
Starting, or Operates
in One Direction Only.
Abnormal Vibration
GB - 32
Part Number
89240500
Description
Part Number
Folding ROPS Kit
Part Number
Description
Description
00181071
1
Air Filter-
00181072
1
Air Filter- Secondary
(23hp Kawasaki)
00191199
1
Belt, Hydraulic Pump Drive
Primary
00180273
1
Choke Cable
00191378
1
Belt, 48" Deck
00181296
1
Throttle Cable
00192015
1
Belt, 52" Deck
00180231
1
Dampener, Steering Control
00191107
3
Blade, 48" Deck
00181073
1
Engine Oil Filter
00191108
3
Blade, 52" Deck
00181060
1
Fuel Filter
03845300
1
Discharge Shield
00181251
1
Fuel Tank Cap
03848859
1
Shield, LH Deck Belt
00180909
1
Hydraulic Oil Filter
03848959
1
Shield, RH Deck Belt
AA191600
1
Hydraulic Oil Reservoir Cap
00191517
2
Spindle Assembly, 48" Decks
00105684
1
Ignition Key
00191500
2
Spindle Assembly, 52" Deck
00191621
1
Pump Cooler Fan
00356473
1
Spring, Extension - Deck
Spindles
03551000
1
Starter Solenoid
00180620
1
Ignition Switch
00191256
1
Safety Switch
00136574
1
PTO Engagement Switch
00181074
1
Seat Switch
03785659
1
Fork Weldment
AA191200
1
Wire Harness
00191201
Wheel, Gauge - 5.0"
GB - 33
Model Number
991800
991802
Model
ProZoom 2352S
ProZoom 1948S
Engine
Kawasaki
Kawasaki
FH680V
FH580V
Engine Model Number
Engine Displacement - Cu. In. (cc)
Maximum Recommended
41.2 (675)
RPM
35.7 (585)
3600
Air
Liquid or Air Cooled
Speed
Forward Maximum - MPH (k/h)
10 (14.5)
Reverse Maximum - MPH (k/h)
4 (6.4)
Turning Radius
Zero
Brakes
Mechanical Shoe Brake Integrated Into Wheel Motors
Electrical
Starter
Electric
Battery
12 Volt DC 245 CCA
Power Take-Off
Electric PTO Clutch/Brake
Fuel
Fuel Type
Unleaded Min. 87 Octane
Fuel Tank Capacity-
Gal. (L)
11.8 (44.8)
Transmission
Type
Hydraulic Drive
Transmission
Hydraulic
Oil
Use 20W-50 engine oil with an SL API classification
Oil Filter
Yes
Size and Weight
Length-
in. (cm)
72.7 (184.7)
Width (With Chute Up) -in.
(cm)
53.6 (136.1)
Height - in. (cm)
Weight
-lb.
48.5 (123.2)
47 (119.3)
(kg)
963 (436.8)
955 (433.2)
Tires
Front Tire SizeRear Tire Size-
in. (cm)
11 x 4.5-6 Caster
in. (cm)
23 x 10.5-12, 4-Ply
Front Tire Pressure - psi (kpa)
Rear Tire Pressure-
20 (137.9)
psi (kpa)
12 (82.7)
Mower Deck
Mower Deck Lift
Foot Operated Spring Assist
Cutting Width - in. (cm)
Cutting
Height - in. (cm)
Cutting
Height Increments
52 (132.0)
48 (121.9)
1.5 - 5.5 (3.8 - 14.0)
- in. (cm)
.25 (.6)
GB - 34
Two-Year Limited Lawn and
Garden Commercial Warranty
Ariens Company (Ariens) warrants to the original purchaser that Ariens and Gravely brand products manufactured by
Ariens, designated or labeled commercial products by Ariens, and sold after December 31, 2007 will be free from defects in
material and workmanship for a period of two years after the date of purchase or 1000 hours of use, whichever comes first.
An authorized Ariens dealer (Ariens brand products) or Gravely dealer (Gravely brand products) will repair any defect in
material or workmanship, and repair or replace any defective part, subject to the conditions, limitations and exclusions set
forth herein. Such repair or replacement will be free of charge to the original purchaser (labor and parts), except as noted
below.
Limited Lifetime Warranty on Mower Deck Shell
The deck shell is warranted to the original purchaser against any defect in material or workmanship for as long as the
original purchaser owns the product. Any defect in material or workmanship of the deck shell will be repaired free of
charge (parts and labor) to the original purchaser for two years or 1000 hours of use, whichever comes first. After two
years or 1000 hours of use, the parts required to repair a defect in material or workmanship of the deck shell, not the
labor, will be provided free of charge for as long as the original purchaser owns the product.
Limited Lifetime Warranty on Main Frame
The main frame is warranted to the original purchaser against any defect in material or workmanship for as long as the
original purchaser owns the product. Any defect in material or workmanship of the main frame will be repaired free of
charge (parts and labor) to the original purchaser for two years or 1000 hours of use, whichever comes first. After two
years or 1000 hours of use, the parts required to repair a defect in material or workmanship of the main frame, not the
labor, will be provided free of charge for as long as the original purchaser owns the product.
Three-Year Limited Warranty on Deck Spindles
Mower deck spindles are warranted to the original purchaser for three years from the date of purchase. Any defect in
material or workmanship of the mower deck spindles will be repaired free of charge (parts and labor) to the original purchaser for two years after the date of purchase. After two years, the parts required to repair a defect in material or workmanship of the deck spindles, not the labor, will be provided free of charge.
One-Year Limited Warranty on 21-inch Walk-Behind
Lawn Mowers
21-inch walk-behind lawn mowers labeled or designated by Ariens as a Professional/Commercial product put to any business use, agricultural, commercial, or industrial, are warranted to the original purchaser to be free from defects in material and workmanship for a period of one year after the date of purchase.
90-Day Limited Warranty on Service Parts and Accessories
Genuine Ariens or Gravely brand service parts and accessories are warranted to be free from defects in material and
workmanship for a period of 90 days after the date of purchase. An authorized Ariens or Gravely dealer will repair or
replace any such part or accessory free of charge, except for labor, during that period.
If any product is rented or leased, then the duration of these warranties shall be 90 days after the date of purchase.
Exceptions,
Limitations,
Exclusions
Customer Responsibilities
Register the product immediately at the time of sale. If the dealer does not register the product, the customer must
complete the product registration card in the literature package and return it to the Ariens Company, or register the unit online
at www.ariens.com or www.gravely.com.
To obtain warranty service, the original purchaser must:
• Perform the maintenance and minor adjustments explained in the owner's manual.
• Promptly notify Ariens or an authorized Ariens or Gravely service representative of the need for warranty service.
• Transport the product to and from the place of warranty service.
• Have the warranty service performed by an authorized Ariens or Gravely service representative.
ARIENS COMPANY
GRAVELY_ I STENS® I LOCKE®I NATIONAL® I BYNORM®I EVERRIDE®I GREAT DANE®
Com Lawn 2008
35
TofindanAriensorGravelyauthorized
servicerepresentative,
contactAriensat:
655 W. Ryan Street
Brillion, Wl 54110
(920) 756 - 2141
www.ariens.com
www.gravely.com
Limitations
Batteries are warranted only for a period of 12 months after date of purchase, on a prorated basis. For the first 90 days of
the warranty period, a defective battery will be replaced free of charge. If the applicable warranty period is more than 90
days, Ariens will cover the prorated cost of any defective battery, for up to 12 months after the date of purchase.
Exclusions
- Items Not Covered
by This Warranty
• Engines and engine accessories are covered only by the engine manufacturer's warranty and are not covered by this
warranty.
• Eye-Q
TM
and Scan-Mate
TM
units are covered by their own warranty and are not covered by this warranty.
• Parts that are not genuine Ariens or Gravely service parts are not covered by this warranty.
• The following maintenance, service and replacement items are not covered by this warranty unless they are noted in the
Limitations section above: lubricants, spark plugs, oil, oil filters, air filters, fuel filters, brake linings, brake arms, shoes,
runners, scraper blades, shear bolts, mower blades, mower vanes, headlights, light bulbs, knives, cutters.
• Mufflers, belts and tires on Ariens and Gravely commercial lawn and garden products are not covered by this warranty.
• Any misuse, alteration, improper assembly, improper adjustment, neglect, or accident which requires repair is not
covered by this warranty.
• This warranty applies only to products purchased in the United States (including Puerto Rico) and Canada. In all other
countries, contact place of purchase for warranty information.
Disclaimer
Ariens may from time to time change the design of its products. Nothing contained in this warranty shall be construed as
obligating Ariens to incorporate such design changes into previously manufactured products, nor shall such changes be
construed as an admission that previous designs were defective.
LIMITATION
OF REMED Y AND DAMA GES
Ariens Company's liability under this warranty, and under any implied warranty that may exist, is limited to repair of any defect
in workmanship, and repair or replacement of any defective part. Ariens shall not be liable for incidental, special, or
consequential damages (including lost profits). Some states do not allow the exclusion of incidental or consequential
damages, so the above limitation or exclusion may not apply to you.
DISCLAIMER
OF FURTHER
WARRANTY
Ariens Company makes no warranty, express or implied, other than what is expressly made in this warranty. If the
law of your state provides that an implied warranty of merchantability, or an implied warranty of fitness for particular
purpose, or any other implied warranty, applies to Ariens Company, then any such implied warranty is limited to the
duration of this warranty. Some states do not allow limitations on how long an implied warranty lasts, so the above
limitation may not apply to you.
This warranty gives you specific legal rights, and you may also have other rights which vary from state to state.
ARIENS
COMPANY
GRAVELY¢ I STENS® I LOCKE® I NATIONAL® I BYNORM® I EVERRIDE® I GREAT DANE ®
Com Lawn 2008
36
Ariens Company
655 West Ryan Street
Brittion, WI 54110-1072
920-756-2141
Fax 920-756-2407
www.ariens.com
& WARNING
&
The engine exhaust from this product
contains chemicals known to the State
of California to cause cancer, birth
defects or other reproductive harm.
TM
ProZoom
Manual del Propietario/Operador
Models
991800 - ProZoom 2352S
991802 - ProZoom 1948S
(_
ESPANOL
03855902 3/09
Printed in USA
Almacenarniento ............................
32
10
Accesorios
36
12
Piezas de repuesto ..........................
36
13
Especificaciones ............................
37
Prograrna de rnantenirniento ..................
19
Garantia ...................................
38
Reparaciones y ajustes ......................
21
Seguridad
..................................
3
Montaje ....................................
Controles y caracteristicas
Funcionarniento
NON-ENGLISH
...................
............................
MANUALS
MANTENIMIENTO
Manuals in languages other than English may
be obtained from your Dealer. Visit your dealer or
www.ariens.com for a list of languages available
for your equipment. Manuals printed in languages
other than English are also available as a free
download on our web site:
EN IDIOMAS
DIFERENTES
Y PIEZAS
DE REPUESTO
AI pedir cat_logos, piezas de repuesto o al hacer preguntas
sobre mantenimiento, tener a mano los nQmeros de modelo
y de serie de la unidad y del motor.
Los nQmeros est_n situados en el formulario de registro
del producto del paquete de documentaci6n. Se hallan
impresos en una etiqueta de nQmero de serie Iocalizada
en la estructura de la unidad (Figura 1).
http://www.ariens.com
MANUALES
INGLES
................................
DEL
Etiqueta del
nt_mero de serie
Puede obtener manuales en idiomas diferentes
del ingl6s en su distribuidor. Visite a su distribuidor
o vaya a www.ariens.com para obtener una lista de
idiomas disponibles para su equipo. Tambi6n puede
imprimir manuales en idiomas diferentes del ingl6s
descarg_ndolos gratuitamente de nuestra pSgina
Web:
http://www.ariens.com
MANUELS
NON ANGLAIS
Des manuels dans diff6rentes langues sont
disponibles chez votre revendeur. Rendez-vous
chez votre revendeur ou allez sur le site
www.ariens.com pour consulter la liste des langues
disponibles pour votre 6quipement. Les manuels
imprim6s dans des langues diff6rentes de I' anglais
sont 6galement disponibles en t616chargement
gratuit sur notre site Web:
Figura 1
Anote aqui los nQmeros de modelo y de serie de la unidad.
• Anote aqui el modelo del motor y los nQmeros de serie.
http://www.ariens.com
EL MANUAL
Antes de hacer funcionar la unidad, lea con atenci6n y en
su totalidad los manuales. El contenido de los manuales le
ayudar8 a entender las instrucciones y los controles durante
el funcionamiento normal y el mantenimiento.
REGISTRO
DEL PRODUCTO
El distribuidor Ariens deber_ registrar el producto en el
momento de la compra. El registro del producto ayudar8 a la
compa_ia a procesar las reclamaciones de garantia, asi
como a ponerse en contacto con usted con la informaci6n de
mantenimiento mAs reciente. Todas las reclamaciones que
cumplan los requisitos durante el periodo de garantia
limitada serSn aceptadas, independientemente de si se
devuelve o no la tarjeta de registro de producto. Guarde una
prueba de su compra si no registra su unidad.
Las referencias a los lados izquierdo, derecho, delantero
y trasero se dan desde el asiento del operador en la posici6n
de funcionamiento y orientado en la direcci6n de
desplazamiento hacia adelante.
E-2
ENTREGA
Nota para el cliente: Si el concesionario no registra
el producto, rellene, firme y devuelva la tarjeta de registro
del producto a Ariens o acceda a www.ariens.com en
Internet.
PIEZAS
DE REPUESTO
El concesionario debe:
1. Probar los frenos despu6s de montar la unidad para
asegurarse de que el envio no ha afectado a su ajuste
(consulte Frenos de estacionamiento en la pSgina 14).
Los frenos se ajustan correctamente en f_brica.
NO AUTORIZADAS
Use Onicamente piezas de repuesto Ariens. La sustituci6n de
cualquier pieza de este equipo por otra que no sea una
pieza de repuesto autorizada por Ariens puede afectar
negativamente al rendimiento, durabilidad o seguridad de la
unidad, y puede Ilegar a anular la garantia. Ariens declina
toda responsabilidad por da_os o reclamaciones, ya sea a
la garantia, da_os materiales, lesiones o incluso la muerte,
provocados por el uso de piezas de repuesto no autorizadas.
2. Compruebe que el sistema de interbloqueo de seguridad
funcione correctamente. Cuando el operador est6
sentado, la unidad s61o debe arrancar si las palancas
de direcci6n est_n en punto muerto (N) y la toma de
fuerza (TDF) est_ desactivada (Off). El motor debe
detenerse si el operador se levanta del asiento cuando
las palancas de direcci6n est_n en la posici6n de
conducci6n o la TDF est_ activada (On). V6ase Sistema
de interbloqueo de seguridad en la p_gina 13.
NOTA: Para Iocalizar a su distribuidor Ariens m_s cercano,
acceda a www.ariens.com.
EXENCION
DEL CONCESIONARIO
3. Rellenar la Tarjeta de registro del comprador original
y enviela de vuelta a Ariens.
DE RESPONSABILIDAD
4. Explicar la p61iza de la garantia limitada.
Ariens se reserva el derecho de abandonar la fabricaci6n,
realizar cambios y mejoras a sus productos en cualquier
momento, sin previo aviso u obligaci6n al comprador. Las
descripciones y especificaciones contenidas en este manual
eran las vigentes en el momento de su publicaci6n. Algunos
equipamientos descritos en este manual pueden ser
opcionales. Algunas ilustraciones pueden no aplicar a su
unidad.
5. Explique los procedimientos de lubricaci6n
y mantenimiento recomendados. Asesore al cliente
sobre los ajustes. Mu6strele los controles y el
funcionamiento de la unidad. Comente y enfatice las
precauciones de seguridad. Proporcione los Manuales
del propietario/operador, piezas de repuesto y del motor.
Acons6jele que los lea atentamente y los entienda.
SJMBOLO DE ALERTA
DE SEGURIDAD
iADVERTENCIA! Esta m&quina de corte
puede amputar manos y pies y lanzar objetos.
Si no observa las instrucciones de seguridad
de los manuales y las calcomanias podrian
producirse lesiones graves o incluso la muerte.
OLI253
Estos son simbolos de alerta de seguridad.
Su significado es:
• iATENCION!
• iAFECTA A LA SEGURIDAD
Cuando vea este simbolo:
Las pendientes son uno de los factores
principales relacionados con la p@dida de
control y los accidentes por vuelco. Preste
especial atenci6n cuando haga funcionar
la unidad en pendientes.
0L3900
PERSONAL!
• iESTI_ ALERTA!
• iOBEDEZCA EL MENSAJE!
Se pueden producir accidentes tr_gicos si el
operador no observa la presencia de menores.
No asuma nunca que los menores permanecerSn
en el Oltimo sitio en el que los vio.
PALABRAS
La gasolina es altamente inflamable y sus
vapores son explosivos; man6jela con cuidado.
Lea y entienda todos los mensajes de seguridad.
DE SEfiALIZACI6N
Los simbolos de alerta de seguridad anteriores y las siguientes
palabras se usan en calcomanias yen este manual.
Desactive el accesorio, detenga la unidad
y el motor, saque la Ilave, active el freno de
estacionamiento y deje que todas las partes
m6viles se detengan antes de abandonar
la posici6n del operador.
,_
INMINENTE! iSITUACION
PELIGRO:
Si no se evita,
DERESULTARA
PELIGRO
en lesiones graves o la muerte.
iADVERTENCIA! iSITUACION
POTENCIALMENTE PELIGROSA! Si no se
evita, PUEDE RESULTAR en lesiones graves
o la muerte.
E-3
1. iPeligro!
PRECAUCION: iSITUACION
POTENCIALMENTE PELIGROSA! Si no se
evita, PUEDE RESULTAR en lesiones leves
o moderadas. Tambi6n puede usarse para
alertar contra prScticas no seguras.
4
Mantener siempre los pies y las manos alejados
de las piezas giratorias.
OL1809
Mant6ngase siempre alejado del 8rea de descarga.
No dirija la descarga hacia otras personas.
ANOTACIONES
NOTA: Informaci6n de referencia general para el
funcionamiento y prScticas de mantenimiento correctos.
IMPORTANTE: Procedimientos o informaci6n especificos
requeridos para evitar dafios a la unidad o al accesorio.
PROCEDIMIENTOS
Y LEYES
Apagar el motor, quitar la Ilave y leer el manual
antes de ajustar o reparar la unidad.
Lleve a cabo con frecuencia y de manera habitual
precauciones de seguridad, por su propio bien y el de otros.
Comprenda y obedezca todos los mensajes de seguridad.
Est6 alerta ante condiciones inseguras y ante la posibilidad
de lesiones leves, moderadas o serias, o incluso la muerte.
Conozca las normas y leyes de aplicaci6n en su regi6n,
incluidas las que limiten la edad del operador.
CAPACITACION
OPERADOR
durante
de la
antenerel afuncionamiento
terceros alejados
de misma.
la unidad
D*_1-tt
REQUERIDA
OL18t2
iPIES FUERA!
siempre
los pies y las
manos
alejados Mantenga
de las piezas
giratorias.
OL1813
2. iPeligro!
POR PARTE DEL
Evite lesiones. Mant6ngase alejado de las piezas
giratorias.
OL1816
Si la unidad va a ser utilizada por un tercero que no sea
el comprador original (si se presta, se arrienda o vende),
proporcionar SIEMPRE este manual y la capacitaci6n
de seguridad necesaria antes de su funcionamiento.
3. iAdvertencia!
Mant6ngase siempre alejado del 8rea de descarga.
ETIQUETAS DE SEGURIDAD
Y SU EMPLAZAMIENTO
OL1814
Sustituya SIEMPRE las calcomanias de seguridad dafiadas
o que se hayan perdido. Consulte Figura 2 para los
emplazamientos de las calcomanias de seguridad.
No operar el cortac6sped si la embolsadora
no est_ conectada o si las guardas no est_n
en posici6n de operaci6n.
OL1815
4. iPeligro!
El liquido venenoso de la bateria
contiene _cido sulfQrico y su contacto
con la piel, los ojos o la ropa puede
ocasionar quemaduras quimicas graves.
OL4450
Bateria que no precisa mantenimiento.
No afiada agua ni electrolito.
OL4450
01_4460
NO acerque llamas, NO acerque
chispas, NO fume cerca de la bateria.
Los gases explosivos de la bateria
pueden provocar heridas graves
o incluso la muerte.
5
5. iPeligro!
la muerte
Para evitar lesiones
OL3200
[_
Lea el Manual del operador.
1
E-4
graves o incluso
Preparaci6n
o
Mantenga
a ni_osy terceras
personasalejados
su funcionamiento.
EvalOe el terreno para determinar los accesorios y elementos
de sujeci6n necesarios para realizar el trabajo de manera
adecuada y segura. Utilice solo accesorios y elementos
de sujeci6n homologados por el fabricante.
de la unidad durante
OL1802
_-_,_,_L No dirija nunca la descarga hacia otras personas,
:[,_'_"
ya que los objetos lanzados podrian causar dal_os
---'_r'_ou80s
personales.
_..>
Lleve ropa adecuada, con casco, galas de seguridad
y protecci6n para los oidos. El pelo largo, la ropa suelta
o la joyeria pueden engancharse en las piezas m6viles.
Mire
hacia abajo y detrSs antes y durante
el
retroceso.
Examine la zona en la que va a utilizar el equipo y retire
todos los elementos presentes que puedan ser arrojados
por la m_quina, como piedras, juguetes y cables.
OL1804
Tenga especial precauci6n al manejar gasolina y otros
combustibles. Son inflamables y los vapores son explosivos.
Nunca Ileve ni_os.
a. Utilice solo un recipiente homologado.
b. Nunca retire la tapa del dep6sito de combustible
ni a_ada combustible con el motor en marcha. Deje
que el motor se enfrie antes de repostar. No fume.
OL1806
En las pendientes, corte el c6sped hacia arriba
y hacia abajo, no transversalmente.
ou808 NO ponga la m_quina en funcionamiento
en pendientes de m_s de 15°.
•
Si la m_quina se para cuesta arriba, detenga
la cuchilla y retroceda lentamente.
•
Evite los giros bruscos.
•
Mantenga los dispositivos de seguridad (guardas,
protectores, interruptores, etc.) en su lugar y en buen
estado de funcionamiento.
•
Antes del uso, revise el sistema de interbloqueo de
acuerdo al manual.
•
Comprenda y conozca la ubicaci6n y funcionamiento
de todos los controles.
c. No reposte ni purgue la m_quina en interiores.
Compruebe que los controles de presencia, interruptores
de seguridad y protecciones del operador est_n instalados
y funcionan correctamente. No los accione a menos que
funcionen correctamente.
Funcionamiento
No ponga nunca en marcha el motor en un 8rea cerrada.
H_galo funcionar solo con buenas condiciones de iluminaci6n,
y alejado de barrancos y peligros ocultos.
AsegQrese de que todas las transmisiones est_n en punto
muerto y de que el freno de estacionamiento est_ accionado
antes de arrancar el motor. Arranque el motor s61o desde
la posici6n del operador.
Reduzca la velocidad y tenga especial cuidado en pendientes.
Avance en la direcci6n recomendada en pendientes. Las
condiciones del c6sped pueden afectar a la estabilidad de
la m_quina. Tenga cuidado al operar cerca de barrancos.
No permita nunca que personas sin formaci6n operen
la m_quina.
Antes de efectuar cualquier tipo de inspecci6n,
reparaciones, etc., desactivar la TDF, detener la
unidad y el motor, activar el freno de estacionamiento
y sacar la Ilave.
NORMAS
Reduzca la velocidad y tenga cuidado al realizar giros
y cambiar de direcci6n en pendientes.
No levante la plataforma mientras las cuchillas est6n girando.
No haga funcionar la m_quina con la protecci6n de la TDF
o cualquier otra protecci6n no ajustada fijamente en su sitio.
AsegQrese de que todas las intertrabas est_n fijadas,
ajustadas y que funcionan correctamente.
DE SEGURIDAD
Formaci6n
Lea el Manual de instrucciones y otros materiales de
formaci6n. Si el operador o el t6cnico no saben ingl6s,
ser8 responsabilidad del propietario explicarles el contenido
de este material.
No la opere nunca con el protector de descarga levantado,
quitado o alterado, a menos que utilice un recolector
de c6sped.
Familiaricese con el funcionamiento seguro del equipo,
los controles del operador y las se_ales de seguridad.
No cambie los ajustes del regulador del motor ni fuerce
la velocidad del motor.
Todos los operadores y t6cnicos deber_n recibir formaci6n.
El propietario ser8 responsable de proporcion_rsela.
Pare la m_quina en terreno horizontal, baje los accesorios,
suelte las transmisiones, accione el freno de estacionamiento
y apague el motor antes de abandonar la posici6n del operador
por cualquier motivo, incluido el vaciado de los recolectores
de c6sped o el desatascado de la tolva.
Nunca permita que los ni_os o personal no formado hagan
funcionar o realicen el mantenimiento del equipo. La normativa
local puede restringir la edad minima del operador.
Detenga el equipo y revise las cuchillas despu6s de golpear
objetos o si detecta una vibraci6n anormal. Realice
las reparaciones necesarias antes de reanudar
el funcionamiento.
El propietario u operador puede yes responsable de evitar
los accidentes o lesiones a si mismo, a los demos o los da_os
a la propiedad.
E-5
Mantenga
lasmanosy lospiesalejadosdelasunidades
decorte.
Mirehaciaatr_sy haciaabajoantesderetrocederpara
asegurarse
dequeelcaminoest_despejado.
NoIlevenuncapasajeros,
y mantenga
lasmascotas
y a los
viandantes
alejadosdelam_quina.
Reduzcalavelocidady tengacuidadocuandocruce
carreteras
y aceras.
Parelascuchillascuandonoest6cortando.
Tengacuidadoconladirecci6n
dedescarga
delcortac6sped
y noapuntehacianadie.
Nohagafuncionarel cortac6sped
si est_bajolosefectos
delalcoholoo lasdrogas.
Tengacuidado
alcargaro descargar
lam_quina
enuncami6n
o remolque.
Tengacuidadoal aproximarse
a esquinasciegas,arbustos,
_rbolesy otrosobjetosquepuedanimpedirlavisi6n.
MANTENIMIENTO
Y ALMACENAMIENTO
Desconecte la bateria o quite el cable de la bujia de encendido
antes de realizar alguna reparaci6n. Desconecte el borne
negativo en primer lugar, seguido del positivo. AI volver a
conectarlos, empiece por el borne positivo y luego el negativo.
Revise las cuchillas con cuidado. Envu61valas o Ileve guantes
y repSrelas con precauci6n. Sustituya las cuchillas, no las
enderece ni las suelde nunca.
Mantenga las manos y los pies alejados de las piezas m6viles.
En la medida de Io posible, no realice ajustes con el motor
en marcha.
Cambie las baterias en una zona abierta, bien ventilada,
lejos de chispas y llamas. Desenchufe el cargador antes
de conectar o desconectar la bateria. Lleve ropa protectora
y utilice herramientas aisladas.
Mantenga todas las piezas en buenas condiciones de
funcionamiento, y toda la tornilleria apretada. Sustituya
las etiquetas adhesivas desgastadas o da_adas.
SEGURIDAD
DEL CORTAC¢:SPED
Este producto puede amputarle las manos y los pies y arrojar
objetos. Respete siempre las instrucciones de seguridad
para evitar accidentes graves o mortales.
Suelte las transmisiones, baje el accesorio, ponga el freno de
estacionamiento, pare el motor y retire la Ilave o desconecte el
cable de la bujia. Espere a que se detenga todo el movimiento
antes de realizar ajustes, reparaciones o limpieza.
Lea atentamente todas las precauciones que figuran en
el manual de instrucciones antes de operar el cortac6sped
Ariens. Este equipo debe ser operado s61o por personal
entrenado en su uso seguro.
Limpie el c6sped y los residuos de las unidades de corte,
transmisiones, silenciadores y motor para ayudar a evitar
fuegos. Limpie los derrames de aceite o combustible.
Para ofrecer una vista mejor, algunas fotografias o ilustraciones
de este manual pueden mostrar la m_quina con un protector
de seguridad desmontado, pero debe saber que no debe
operarse nunca con los protectores de seguridad
desmontados. Mantenga todos los protectores en posici6n.
Si fuera necesario desmontarlos para realizar alguna
reparaci6n, m6ntelos de nuevo antes de operar la m_quina.
Deje que se enfrie el motor antes de almacenarlo, y no Io
almacene cerca de llamas.
No guarde combustible cerca de llamas ni Io drene en interior.
Estacione la m_quina en un terreno nivelado. No deje nunca
que realice el mantenimiento de la m_quina personal no
formado.
Utilice soportes de elevaci6n para soportar los componentes
cuando Io requiera.
iADVERTENCIA! NO quite ni oculte los
adhesivos de PELIGRO, ADVERTENCIA,
PRECAUCION o Instrucciones. Cambie los
Libere con cuidado la presi6n de los componentes con
energia almacenada.
adhesivos que est6n ilegibles o se hayan
desprendido. Su distribuidor puede
proporcionarle adhesivos de repuesto.
La ubicaci6n de estos adhesivos de seguridad
aparece en figura 2.
iADVERTENCIA! El LJQUIDO HIDRAULICO
puede provocar quemaduras graves. El liquido
del sistema hidr_ulico puede penetrar en la piel
y ocasionar lesiones graves o la muerte.
AsegQrese de apagar el motor antes de realizar
ningQn tipo de trabajo en las piezas hidr_ulicas.
Mantenga el cuerpo y las manos alejadas de los
peque_os orificios o boquillas que arrojan liquido
hidrSulico cuando est_n bajo presi6n. Utilice papel
o cart6n y no las manos para buscar fugas.
AsegQrese de que todas las conexiones de liquido
hidrSulico est6n apretadas yen buen estado
antes de aplicar presi6n al sistema.
UN LJQUIDO EXTRANO INYECTADO EN
EL CUERPO puede producir gangrena. Debe
ser extraido quirQrgicamente en un periodo
de pocas horas por un m6dico que est6
familiarizado con tipo de lesi6n.
NORMAS
DE SEGURIDAD
GENERALES
Este manual debe estar disponible para el operador del
cortac6sped Ariens en todo momento.
Lea este manual atentamente y aprenda a usar la m_quina
correctamente. Familiaricese rSpidamente con todos los
controles y con el mecanismo de parada de la m_quina
y sus complementos o accesorios.
iTenga cuidado con los peatones, especialmente con los ni_os!
Mire siempre a su alrededor para ver que es seguro arrancar
el motor o mover la unidad. Esto el especialmente importante
cuando trabaja con mucho ruido, ya que puede que no oiga
las advertencias de la gente.
E-6
Mantenga
alejada
No quite nunca el protector de descarga porque 6ste dirige
el material cortado hacia el suelo. Si el protector est_
da_ado, c_mbielo inmediatamente.
a la gente
$61o el operario de la m_quina puede manejarla. No transporte
pasajeros. Este cortac6sped ha sido dise_ado s61o para una
(1) persona, el conductor.
No intente nunca eliminar los residuos de la zona de
descarga o de las cuchillas del cortac6sped a menos que
las palancas de control de la direcci6n est6n en posici6n
de estacionamiento, el interruptor de la TDF apagado, "Off",
la Ilave de contacto en posici6n "Off" y retirada y desconectado
el cable negativo de la bateria.
Los pasajeros pueden ser golpeados por objetos extra_os
o expulsados de la m_quina, provoc_ndoles lesiones graves.
Los pasajeros pueden adem_s obstruir la visi6n del operador,
Io que provoca un funcionamiento de la m_quina no seguro.
NO transporte pasajeros en ningQn lugar de la unidad
de alimentaci6n ni en un accesorio conectado o instalado
en la misma.
No opere la unidad de alimentaci6n en una zona confinada
y sin ventilaci6n. El mon6xido de carbono es un gas incoloro
e inodoro que puede ser letal.
Antes de la operaci6n
No realice giros bruscos cuando conduzca a velocidades
elevadas.
Preste una atenci6n especial alas etiquetas de advertencia,
precauci6n y peligro en la m_quina.
Estacione el cortac6sped en una superficie firme y nivelada
con las palancas de control de la direcci6n en posici6n de
estacionamiento.
No utilice fluido de arranque. El uso de fluido de arranque
puede da_ar los componentes del motor.
Revise los frenos y otras piezas mec_nicas para ver si est_n
bien ajustadas y para comprobar su desgaste. Cambie las
piezas desgastadas o da_adas tan pronto como se detecten.
Revise regularmente el apriete de toda la tornilleria.
Cuando se mueva marcha atrSs, asegOrese de mirar bien
para evitar obst_culos. No corte marcha atrSs a menos
que sea absolutamente necesario.
Cuando trabaje en grupos, tenga cuidado y est6 atento a los
demos.
No utilice auriculares ni escuche mQsica mientras opera la
plataforma. Para operar la m_quina con total seguridad se
requiere toda su atenci6n.
Tenga cuidado de la direcci6n de descarga del cortac6sped.
AsegQrese de no apuntar hacia nadie.
Mantenga limpios la unidad de alimentaci6n y los accesorios.
La acumulaci6n de suciedad, grasa o hierba puede provocar
un incendio o da_os personales.
Verifique que tanto el motor como las cuchillas se hayan
parado antes de acercar las manos o los pies a la cuchilla.
No modifique la unidad de alimentaci6n ni ninguno de sus
accesorios.
Desactive el accionamiento de las cuchillas cuando transporte
la m_quina por caminos de entrada, aceras, etc. No eleve
nunca la plataforma de corte con las cuchillas girando.
Una modiflcaci6n no autorizada de la m_quina puede afectar
a su funcionalidad, Io que podria provocar da_os personales.
No ponga las manos o los pies bajo el cortac6sped mientras
est_ funcionando.
No utilice prendas de vestir sueltas que podrian engancharse
en las piezas en movimiento. No opere esta m_quina
con pantal6n corto. Utilice siempre prendas de protecci6n
adecuadas. Se aconseja utilizar gafas y calzado de seguridad.
No toque el motor ni el silenciador cuando est_ funcionando
o inmediatamente despu6s de haberlo parado. Estas zonas
pueden estar muy calientes y causarle serias quemaduras.
No conduzca la m_quina por calles o carreteras. Est6 atento
al trSfico cuando cruce calles o corte en bordes de carreteras.
Se recomienda utilizar protecci6n auditiva. Una exposici6n
prolongada a ruidos intensos puede provocar p@dida de
audici6n.
Inspeccione siempre el cortac6sped para ver si se ha da_ado
tras haber golpeado un objeto extra_o. Repare o cambie las
piezas da_adas antes de volver a poner en marcha la
plataforma de corte.
Se debe Ilevar en la unidad de alimentaci6n un extintor
y una caja de primeros auxilios, o tenerlos a mano en todo
momento.
No opere la unidad sin la plataforma de corte montada.
Tenga a mano los nQmeros de urgencias para poder acceder
a ellos inmediatamente.
Durante
AsegQrese de que la m_quina y los accesorios se paren
completamente antes de desmontarlos.
la operaci6n
Antes del desmontaje, desactive la TDF, baje todos los
accesorios, ponga las palancas de control de la direcci6n
en posici6n de estacionamiento, apague el motor y quite
la Ilave.
No anule el circuito de arranque con los terminales del motor
de arranque para arrancar 6ste, ya que puede provocar
el movimiento repentino de la unidad de alimentaci6n.
Compruebe peri6dicamente el circuito de arranque para
asegurarse del buen funcionamiento de todos los
componentes del sistema.
Funcionamiento
en pendientes
Evite arrancar o parar cuando suba o baje una pendiente.
Mantenga todos los movimientos en una pendiente graduales
y lentos. No realice cambios bruscos de direcci6n ni velocidad.
Si no funciona el sistema de arranque, consulte inmediatamente
con su concesionario Ariens.
Si los neum_ticos pierden tracci6n en una pendiente,
desenganche las cuchillas del cortac6sped y avance
lenta y gradualmente hacia abajo.
Opere el cortac6sped s61o durante el dia o cuando est6 bien
iluminada con luz artificial la zona donde se va a cortar.
E-7
Nogireenunapendientea menosqueseanecesario,
yen
estecasogirelentay gradualmente
haciaabajosi puede.
Tengamuchocuidadocuandocorteenpendientes.
Si no
puederetroceder,
o nosesientec6modoy seguroenesta
situaci6n,
notrabajeenunapendiente.
Nooperelam_quina
enpendientes
superiores
a 15.
Corteelc6spedenzigzagenlaspendientes,
noavance
haciaarribay haciaabajo,paraasievitarquevuelquela
m_quina.Paramayorseguridad,
nocorteenpendientes
o colinasdemasiado
pronunciadas.
Nointenteestabilizar
lam_quinaponiendoel piea tierra.
SISTEMA
ROPS (PROTECCION
CONTRA
VUELCOS)
Deje que se enfrie el cortac6sped Ariens antes de tocar el
motor, el silenciador u otras piezas que puedan estar
calientes.
Pare siempre la unidad de alimentaci6n, desconecte la TDF
y deje que se enfrie la unidad antes de repostar.
Mantenga el motor limpio de hierba, hojas, grasa y otra
suciedad que pueda incendiarse.
Mantenga bien apretados todos los tornillos de la m_quina
para garantizar una m_xima seguridad durante el trabajo.
Revise a menudo las tuercas de montaje de las cuchillas
para asegurarse de que est6n bien apretadas.
Realice Qnicamente las instrucciones de mantenimiento
descritas en este manual. La realizaci6n de operaciones
de mantenimiento o modificaciones en la m_quina no
autorizadas puede provocar una situaci6n de peligro.
No suelde, taladre ni altere el sistema ROPS. Un sistema
ROPS da_ado no debe ser enderezado ni usado. Si se da_a,
consulte con el distribuidor y cambie todas las piezas da_adas.
Para el mantenimiento del motor, siga las recomendaciones
del fabricante que se indican en el manual del motor.
Si por cualquier raz6n se baja o se retira el sistema ROPS
de la unidad de alimentaci6n, debe ser elevado y/o montado
de nuevo inmediatamente. Se deben usar los pernos originales
o recambios equivalentes y apretar al par correcto.
Sistema
de combustible
Manipule la gasolina con cuidado. La gasolina es muy
inflamable y sus vapores pueden ser explosivos.
No enganche una cadena, cuerdas o cables al sistema ROPS
para fines de remolque, ya que puede hacer que el
cortac6sped se venza hacia atrSs.
Utilice solamente envases para combustible adecuados.
Ariens recomienda no utilizar el cortac6sped con el sistema
ROPS quitado.
No a_ada nunca combustible al cortac6sped con el motor
en marcha o en caliente. Deje que se enfrie durante algunos
minutos antes de repostar.
Si tiene un sistema ROPS plegable, puede doblarlo cuando
guarde el cortac6sped. Deber_ ser colocado en posici6n
vertical antes de operar de nuevo la m_quina.
Mantenga alejados del dep6sito de combustible o del
recipiente cerillas, cigarrillos, puros, pipas, llamas abiertas
o chispas.
USO DEL CINTURON
Llene siempre con mucho cuidado los dep6sitos de
combustible. Llene el dep6sito hasta que el combustible
quede a una pulgada m_s o menos del borde. Utilice un
embudo o una boquilla para evitar derrames. Cuando se
reposte en una gasolinera, verifique siempre que la boquilla
haga contacto con el borde del dep6sito durante el Ilenado.
DE SEGURIDAD
Con el sistema ROPS instalado, es imperativo que el cintur6n
de seguridad est6 montado, se utilice y se ajuste
correctamente en todo momento. Cambie inmediatamente
un cintur6n de seguridad da_ado.
No utilice cintur6n de seguridad si se opera la m_quina
con el sistema ROPS plegado o desmontado.
Ponga de nuevo las tapas del dep6sito y de la m_quina
y limpie cualquier derrame de combustible antes
de arrancar el motor.
MANTENIMIENTO
Mantenga el cortac6sped y todos los dep6sitos de combustible
en un lugar seguro bajo Ilave para evitar que los ni_os
jueguen con ellos.
El mantenimiento de la m_quina debe ser realizado s61o
por personal adulto cualificado y formado.
Antes de realizar el mantenimiento, asegQrese de que el
cortac6sped est6 aparcado sobre una superficie firme y
nivelada. Quite la Ilave para evitar un arranque accidental.
Los componentes del sistema de combustible se mantienen
limpios usando un combustible limpio para lubricarlos y Iograr
un rendimiento 6ptimo. Se debe tener un cuidado extremo
para evitar que penetre suciedad y humedad que pueden
da_arlos.
No intente nunca desconectar los dispositivos de seguridad.
Revise frecuentemente si hay componentes desgastados o
deteriorados que puedan provocar una situaci6n de peligro.
Utilice s61orecipientes port, tiles para combustible no metSlicos
homologados por Underwriter' s Laboratory (U.L.) o la
Sociedad americana de pruebas y materiales (ASTM).
Si utiliza un embudo, asegQrese de que es de pl_stico.
Utilice Qnicamente repuestos originales Ariens. Las piezas
sustitutorias pueden provocar fallos o posibles accidentes
con da_os al operador o a viandantes.
Si se debe mantener en funcionamiento el motor mientras
se realizan ajustes de mantenimiento, mantenga las manos,
pies y ropa alejados de las piezas en movimiento.
Siempre que pueda, evite repostar el equipo sobre la
plataforma de un cami6n o en un remolque. SSquelos
y reposte sobre el suelo. Si no fuera posible, utilice un
recipiente port_til no met_lico para Ilenar el equipo.
Cuando realice ajustes con el motor en marcha, como ajustes
en el carburador yen el varillaje de control del movimiento,
mant6ngase en uno de los lados del tractor y del cortac6sped,
bien alejado de los componentes en movimiento.
E-8
Sistema
hidr&ulico
Mantenimiento
Verifique que todo el fluido hidr_ulico, las mangueras y los
tubos est6n en buen estado y que todas las tuberias y piezas
de acople est6n bien apretadas antes de aplicar presi6n
al sistema hidr_ulico.
Revise frecuentemente
PRECAUCION: La separaci6n de un
neum_tico y la Ilanta pueden provocar una
explosi6n con resultados de accidentes graves
o incluso la muerte.
las conexiones hidrSulicas. Pueden
Compruebe los neum_ticos para ver si la presi6n
est_ baja, tienen cortes, burbujas, Ilantas
da_adas o faltan pernos y tuercas.
tener fugas por estar da_adas como resultado de la vibraci6n
o porque se hayan aflojado.
Libere toda la presi6n antes de desconectar las mangueras
o tuberias. El escape de aceite sometido a presi6n puede
provocar accidentes graves.
Utilice siempre una mordaza con una extensi6n
Io suficientemente larga como para permitirle
quedarse a un lado del neum_tico cuando se
inflan. No se coloque frente los neum_ticos
al inflarlos.
El fluido hidrSulico sometido a presi6n puede tener una fuerza
suficiente para penetrar la piel, provocando heridas muy
graves. Antes de aplicar presi6n al sistema, verifique que
todas las conexiones est6n bien apretadas, y que las tuberias,
tubos y mangueras no est6n da_ados. El escape de liquido
por agujeros del tama_o de la punta de un alfiler puede ser
invisible. No utilice las manos para buscar posibles fugas,
utilice un trozo de cart6n y Ileve protecci6n ocular, como
gafas de seguridad.
No suelde nunca ni caliente un neum_tico.
El calor puede hacer que se expanda el aire
del interior y explotar. Las operaciones de
soldado pueden tambi6n debilitar o deformar
estructuralmente la rueda.
Verifique que los neum_ticos se inflan siempre a la presi6n
correcta. No los infle por encima de la presi6n recomendada.
Si sufre un accidente por el escape de liquido, consulte
inmediatamente con un m6dico. Si no se administra un
tratamiento m6dico inmediato se producir_ una grave
infecci6n o una reacci6n. Este liquido puede producir
gangrena o una grave reacci6n al6rgica.
Mantenimiento
de los neum&ticos
Verifique que toda la tornilleria, especialmente las tuercas
y pernos de las ruedas, est6 apretada al par correcto.
Cuando se desmonte una rueda de la unidad de alimentaci6n,
se debe sujetar con bloques o calzos, no con un gato
hidrSulico.
de la bateria
Tenga cuidado cuando cargue la bateria o cuando realice
una operaci6n de mantenimiento en la misma yen el
sistema el6ctrico.
No intente reparar un neum_tico a menos que tenga el equipo
y la experiencia adecuados para realizar esta tarea. Si no
est_ cualificado para ello, Ileve la unidad a su concesionario
Ariens o a un servicio de reparaci6n cualificado.
Utilice un voltimetro para comprobar el estado de la carga.
Si utiliza un cargador, asegQrese de que est6 desenchufado
antes de conectar o desconectar los cables a la bateria.
Cuando se monten talones de la cubierta en las Ilantas,
no exceda nunca los 2,4 bar (35 p.s.i.) o el inflado m_ximo
especificado en sus neum_ticos. Si se pasa esta presi6n
m_xima puede romperse el tal6n, o incluso la Ilanta, con una
peligrosa fuerza explosiva.
Las baterias contienen electrolito de _cido sulfQrico. Utilice
siempre ropa de protecci6n y protecci6n ocular cuando
realice el servicio.
En caso de contacto con el electrolito, lave la zona afectada
con abundante agua y solicite atenci6n m6dica.
Piezas de repuesto
Cuando se necesiten repuestos para el servicio y el
mantenimiento peri6dico, se deben utilizar repuestos
originales Ariens.
La bateria debe cargarse en un 8rea bien ventilada para que
los gases de hidr6geno que se producen durante la carga
puedan disiparse. Interrumpa la carga si la bateria excede
los 52°C (125°F).
Ariens no se hace responsable de la instalaci6n de piezas
y/o accesorios no aprobados ni de los da_os que puedan
resultar como consecuencia de su uso.
Mantenga chispas, llamas y material combustible alejados
de la bateria. Tenga cuidado cuando retire los cables de la
bateria de los bornes para evitar la aparici6n de chispas.
TRANSPORTE
Cuando se transporte o no se utilice, desconecte la corriente
de los accesorios.
Desconecte el cable de tierra de la bateria antes de trabajar
en piezas el6ctricas o cerca de elias.
No remolque esta m_quina. Utilice un cami6n o un remolque
para transportarla por carreteras pQblicas.
No utilice esta m_quina por carreteras pQblicas.
E-9
3. Monte el asiento en la placa con las arandelas planas
de 5/16" y las contratuercas desmontadas en paso 1.
Asegure el clip pen los cables al vSstago del asiento
frontal izquierdo de manera que se guien los cables
como se observa en Figura 4.
iADVERTENCIA!
EVITELASLESIONES.
Antesdeproceder,leay comprenda
toda
la secci6nde Seguridad.
DESEMBALAJE
DE LA UNIDAD
Conecte el arn6s en el
Retire todo el material de embalaje, los paquetes con la
tornilleria y la documentaci6n. Deseche el gancho J utilizado
con las correas, no Io necesitar8 para el funcionamiento del
cortac6sped.
INSTRUCCIONES
interru p_r/___
o_
PARA SU MONTAJE
o
o
-o
Los cortac6sped Ariens se expiden parcialmente montados.
Una vez retirada la unidad de alimentaci6n y la plataforma
de corte del caj6n, se requiere un montaje inicial.
Clip P
IMPORTANTE: Durante el desembalaje se debe revisar el
contenido del caj6n comparando su contenido con la lista de
embalaje, y se debe anotar si falta alguna o est_ da_ada
para informar inmediatamente al transportista.
Controles
o
o
o
_c_del asiento
de la direccibn
Figura 4
1. Las palancas de control de la direcci6n pueden haberse
aflojado y movido durante el transporte. Retire los
pernos sueltos de 3/8-16 x 1.50" de los manillares
y vuelva a montarlos en los puntos mostrados.
Ajuste los manillares a su comodidad.
Bateria
La bateria que se suministra con el cortac6sped est_
sellada, no ser8 necesario activarla.
1. Conecte el cable positivo rojo en el lado positivo (+)
de la bateria. Utilice un perno de 1/4 x 5/8" y una
contratuerca de 1/4". Tape el terminal con la cubierta
de goma.
Monte aqui el perno.
2. Conecte el cable negativo negro en el lado negativo ( de la bateria. Utilice un perno de 1/4 x 5/8" y una
contratuerca de 1/4".
Si el motor no se enciende cuando se gira la Ilave de contacto
puede que haya que cargar la bateria, consulte Carga de
la bateria en la pSgina 24.
Plataforma
de corte
1. Quite la perilla del protector de descarga.
2. Saque el conjunto de descarga de la posici6n
de transporte.
3. Monte el conjunto de descarga en posici6n
de funcionamiento.
Figura 3
Montaje
4. Vuelva a instalar la perilla en el conjunto de descarga
y apriete.
del asiento
5. Compruebe el nivel de la plataforma y la inclinaci6n.
V6ase NIVELACION DE LA PLATAFORMA en
1. Quite las arandelas planas de 5/16" y las contratuercas
de los cuatro vSstagos que sobresalen por la base
del asiento.
la pSgina 26.
2. Pase el conector del interruptor del asiento por
la abertura de la placa del asiento y enchOfelo
al interruptor.
E-10
Neum&ticos
Lubricacibn
Consulte ESPECIFICACIONES
en la p_gina 37.
Lubrique todos los puntos de engrase segOn se indica en
la etiqueta de mantenimiento que se encuentra debajo
del asiento, y revise el nivel de aceite hidr_ulico.
Consulte Mantenimiento General en la pSgina 21.
PRECAUCION: lEvite lesiones! Puede darse
la separaci6n explosiva del neum_tico y la Ilanta
si se manipulan incorrectamente durante el
mantenimiento:
•
No intente montar un neum_tico sin el equipo
adecuado o sin la experiencia necesaria
para realizar el trabajo.
•
No infle los neum_ticos por encima de
la presi6n recomendada.
•
No suelde ni caliente un conjunto de Ilanta
y neum_tico. El calor puede provocar un
incremento de la presi6n del aire y, como
consecuencia, una explosi6n. La soldadura
puede debilitar estructuralmente o deformar
la Ilanta.
•
Servicio
La unidad de alimentaci6n se entrega con aceite hidr_ulico
en el sistema. Si la tracci6n es err_tica, purgue el sistema.
Si el nivel de aceite est_ por debajo del borde del deflector
del depsito, rellene con aceite de motor SAE 20W-50.
Consulte Mantenimiento del sistema hidr4ulico en la p_gina
22.
Motor
El motor se ha Ilenado con un aceite de rodaje. Cambie el
aceite y el filtro despu6s de las 8 primeras horas de uso.
Consulte Mantenimiento General en la pSgina 21.
No se coloque frente a o sobre el conjunto
de los neum_ticos al inflarlos. Utilice una
mordaza y un manguito de extensi6n Io
suficientemente largos como para permitirle
quedarse a un lado.
Revise el funcionamiento
,_
Comprobar que la tornilleria no est6 suelta.
el sistema de interbloqueo
de todos
los controles
Aseg@ese de que la unidad funcione correctamente.
Tornilleria
Compruebe
del aceite hidr&ulico
de seguridad
Compruebe que el sistema de intertraba funciona
correctamente. (Consulte Compruebe el sistema de
interbloqueo de seguridad en la pSgina 11).
iADVERTENCIA! Un FALLO DE LA
INTERBLOQUEO junto con un funcionamiento
no apropiado puede resultar en lesiones
personales graves.
E-11
iADVERTENCIA!
EL causar
FALLO la
DEmuerte
LOS
CONTROLES
podria
o lesiones graves.
Figura5
1.Dialdeajustedela alturadela plataforma
2. Palancasdecontroldela direcci6n
3. Palancadeelevaci6ndelaplataforma
4. Ajustedelniveldela plataforma
5. Interruptor
delaTDF
6. Interruptor
deencendido
7. Controldelestrangulador
8. Hor6metro
9. Regulador
E-12
OE3241
2. Haga funcionar el motor a 1/3 de regulaci6n, accione
la TDF del cortac6sped, saque la palanca de control
de la direcci6n del bloqueo en punto muerto y levSntese
del asiento. El motor debe pararse de nuevo en
3 segundos. Repita para la otra palanca de control
de la direcci6n.
iADVERTENCIA!
EVITELASLESIONES.
Antesdeproceder,lea y comprenda toda
la secci6n de Seguridad.
CONTROLES
Y CARACTERiSTICAS
NOTA: Si la m_quina no supera esta prueba, NO LA PONGA
EN MARCA. LI6vela a su distribuidor Ariens.
Consulte en figura 5 en la p_gina 12 las ubicaciones
y caracteristicas de los controles.
Sistema
de interbloqueo
3. Mueva hacia atr_s la palanca de la direcci6n y su61tela.
Esta palanca debe volver a una posici6n donde pueda
sacarse y bloquearse en la posici6n de punto muerto.
de seguridad
iADVERTENCIA! Los fallos en el sistema de
interbloqueo de seguridad y el funcionamiento
incorrecto de la unidad pueden resultar en la
muerte o en lesiones graves. Compruebe este
sistema cada vez que haga funcionar la unidad.
Si el sistema no funciona correctamente, no Io
haga funcionar hasta que se hayan realizado
reparaciones.
Palancas
Despu6s de arrancar la unidad de alimentaci6n, Coloque
juntas las palancas de control de la direcci6n fuera de la
posici6n de bloqueo y en posici6n de punto muerto
A
1. Intente arrancar la unidad de alimentaci6n con
el operador sentado en el asiento, la TDF del
cortac6sped desactivada, y la palanca de control
de la direcci6n izquierda que no est6 en posici6n
de estacionamiento. Intente arrancar la unidad de
alimentaci6n despu6s de quitar el brazo derecho de la
posici6n de estacionamiento y de colocar la palanca
de control izquierdo en posici6n de estacionamiento.
Intente arrancar la unidad de alimentaci6n despu6s
de quitar ambas palancas de la posici6n de
estacionamiento. El motor de arranque no debe
arrancar en ninguno de estos casos.
2. Intente arrancar la unidad de alimentaci6n con
el operador sentado en el asiento, la TDF del
cortac6sped activada, y las palancas de control de la
direcci6n en la posici6n de estacionamiento. El motor
de arranque no debe arrancar en este caso.
D
C
Figura 6
A. Para el desplazamiento en marcha atrSs, tire hacia
atrSs de ambas palancas de control.
B. Para el desplazamiento recto hacia delante, empuje
ambas palancas de control hacia adelante.
C. Para girar a la izquierda, tire hacia atrSs de la palanca
izquierda o empuje hacia delante la palanca derecha
de control de la direcci6n o una combinaci6n de los dos.
D. Para girar a la derecha, tire hacia atr_s o empuje hacia
delante de la palanca de control de la direcci6n izquierda
o aplique una combinaci6n de ambos m6todos.
PRECAUCION: Tenga cuidado cuando realice
giros. Reduzca la velocidad hasta alcanzar una
velocidad manejable antes de tomar curvas
pronunciadas. Este cortac6sped puede girar muy
rSpidamente cuando se empuja hacia delante
una palanca y se tira hacia atrSs de la otra.
3. Intente arrancar la unidad de alimentaci6n sin
el operador sentado en el asiento y las palancas
de control de la direcci6n en la posici6n de
estacionamiento. El motor de arranque no debe
arrancar en este caso.
de los circuitos
de la direcci6n
Las palancas de direcci6n controlan la velocidad y la direcci6n
de la unidad, adem_s de pararla.
Realice las pruebas siguientes para comprobar que el sistema
de interbloqueo de seguridad funciona correctamente. Si la
unidad no funcionara como debe, p6ngase en contacto con
su distribuidor para realizar reparaciones.
Comprobaci6n
de control
de apagado del motor
NOTA: Los giros violentos pueden estropear o da_ar el
c6sped. Mantenga SIEMPRE ambas ruedas en posici6n
de giro cuando haya curvas pronunciadas. NO gire con la
rueda interior parada. Para obtener un radio de giro minimo,
retroceda lentamente con la rueda central mientras mueve
la rueda exterior lentamente hacia delante.
Compruebe diariamente los circuitos de apagado del motor.
1. Haga funcionar el motor a 1/3 de regulaci6n, accione
la TDF del cortac6sped y lev_ntese del asiento. El
motor se debe parar en un tiempo de 3 segundos.
E-13
Frenos
PANEL DE CONTROL
de estacionamiento
Coloque las palancas de control de la direcci6n
en la posici6n de punto muerto y col6quelas
en las ranuras para activar el freno de
estacionamiento para cada lado
Interruptor de encendido
Activaci6! _
OE3385
Mueva las palancas de control de la direcci6n
hacia el centro para soltar los frenos de estacionamiento.
del
de la TDF
Palanca
de elevaci6n
de la plataforma
La palanca de elevaci6n de la plataforma sube y baja la
plataforma de corte para cortar el c6sped y para el transporte.
metro
Regulador
Empuje a fondo la palanca de elevaci6n de la plataforma
hacia delante hasta que se enganche la traba de elevaci6n
...........
Figura 7
Interruptor
Transporte:
Para soltar la traba, pise el pedal, tire del mango de traba
para transporte y suelte lentamente la palanca de elevaci6n.
OL5020
de encendido
PELIGRO: Antes de elevar la plataforma
hasta la posici6n de transporte, verifique que
la TDF est6 desenganchada y las palancas de
control de la direcci6n en la posici6n de
estacionamiento.
Haga funcionar el interruptor de encendido con la Ilave
retirable. El interruptor tiene tres posiciones: Off (Desactivado)
(1), Run (Funcionamiento) (2) y Start (Arranque) (3). Para
arrancar el motor, gire la Ilave a Start (Arranque), y p6ngala
despu6s en posici6n Run. Para detener el motor, gire la
Ilave a Off.
Altura
Para cambiar la altura de corte, eleve la plataforma hasta
la posici6n de transporte. Gire el bot6n de ajuste de altura
de la plataforma hasta que aparezca la altura de corte deseada
y baje despu6s la plataforma hasta la posici6n de corte.
NOTA: NO opere el motor de arranque m_s de 10 segundos
cada vez. Si el motor no arranca despu6s de 10 segundos,
d6jelo en reposo durante 30 segundos antes de intentarlo
de nuevo. Si el motor no arranca, vea LocalizaciOn de averias
en la pSgina 33 o consulte el Manual del motor.
Control
El cortac6sped puede ajustarse para cortar c6sped desde
una altura de corte de 1.5"- 5.5" (38 - 140 mm). La altura
de corte del c6sped debe determinarse en funci6n de las
condiciones del momento y de las preferencias personales.
del estrangulador
Tire de la palanca del estrangulador para arrancar un motor
frio. Presione la palanca del estrangulador una vez que el
motor ha arrancado y se ha calentado.
Palanca
2
ON
OFF
Se proporcionan las siguientes recomendaciones
para la elecci6n de la altura de corte
del acelerador
Corte en campo = 3 - 5,5" (76-140 mm)
(R_pido) (1) para aumentar la velocidad
del motor. Mueva la palanca hacia atrSs
a Slow (Lento) (2) para reducir
la velocidad del motor.
Interruptor
de la toma de fuerza
como guia
C6sped = 1,5 - 3" (38 - 76 mm)
La palanca del acelerador cambia la
velocidad del motor. Mueva la palanca
del acelerador hacia delante a Fast
OE3250
de corte
_X
Palanca de elevaci6n
de la plataforma
(TDF)
El interruptor de la toma de fuerza (TDF) activa
y desactiva las cuchillas del cortac6sped.
Mueva el interruptor de la toma de fuerza
(TDF) a la posici6n "On" (Activada) para
activar el cortac6sped.
OE3255
Mueva el interruptor de la toma de fuerza
(TDF) a la posici6n "Off" (Desactivada)
paradesactivar las cuchillas del cortac6sped.
NOTA: El motor no arrancar8 a menos que las palancas de
control de la direcci6n est6n en la posici6n de punto muerto
y el interruptor de la TDF est6 en la posici6n "Off", y est6
accionado el freno de estacionamiento.
E-14
Figura 8
Dial de ajuste de la
altura de la plataforma
Ajustes
del asiento
•
iADVERTENCIA! Realice todos los ajustes del
asiento con la unidad estacionaria, el freno de
estacionamiento accionado y el motor apagado.
El cambio del aceite y del filtro se deben realizar
despu6s de las 8 primeras horas de uso y despu6s
cada 100 horas de funcionamiento.
El asiento est_ dise_ado para una persona. No
permita que monten pasajeros en esta m_quina.
Para ajustar el asiento hacia adelante o hacia atr_s:
1. Estando sentado, tire hacia fuera de la palanca de
posicionamiento del asiento y deslice el asiento hasta
la posici6n deseada.
,
Mantenga limpia la zona alrededor del tubo de Ilenado
del dep6sito de combustible y asegQrese de que la
gasolina sea del octanaje correcto y que no tenga
contaminantes.
PRECAUCION:
Se deben realizar unas
prScticas de mantenimiento correctas para una
operaci6n segura. (Consulte Programa de
mantenimiento en la pSgina 19).
Suelte la palanca y deslice el asiento hacia adelante
o hacia atr_s para bloquear el asiento en su posici6n.
Combustible
Para ajustar el muelle del asiento al peso del operador:
iADVERTENCIA!
1. Gire el bot6n en sentido horario para un operador
m_s pesado.
,
EVITAR LESIONES.
Antes de proceder, leer y comprender toda
la secci6n de Seguridad.
Gire el bot6n en sentido antihorario para un operador
menos pesado.
A_ada combustible limpio al dep6sito segQn necesidades.
Consulte en el manual del motor el tipo y grado del
combustible.
Hor6metro
Registra el n[3mero total de horas que el motor ha estado
en funcionamiento.
Para agregar
IMPORTANTE: Mantenga un registro de las lecturas
del hor6metro como referencia para los intervalos
recomendados de lubricaci6n y mantenimiento.
combustible
al dep6sito:
1. Coloque la unidad en una zona abierta o bien ventilada.
2. Apague el motor y deje que se enfrie.
3. Limpie la tapa del combustible y el _rea circundante
a la misma para evitar que entre suciedad en el dep6sito.
Quite el tap6n del dep6sito de combustible.
NOTA: Para obtener lecturas exactas, asegQrese de que el
interruptor de encendido est6 APAGADO cuando la unidad
no est6 funcionando.
FUNCIONAMIENTO
4. Llene el dep6sito del combustible con gasolina sin plomo
hasta 25 mm (1 pulg.) por debajo de la parte inferior
del cuello del tubo de Ilenado. No Io Ilene en exceso.
Periodo
5. Vuelva a colocar la tapa del combustible y apri6tela.
•
•
de rodaje
El funcionamiento del cortac6sped durante las cincuenta
primeras horas puede ser un factor importante a la hora
de determinar el rendimiento y la vida Qtil del motor
y de la unidad de alimentaci6n.
6. Limpie el combustible que se haya derramado.
Subida y bajada seguros
El motor puede operarse alas RPM m_ximas, pero se
debe evitar una carga excesiva. Si el motor comienza
a ralentizar debido a una carga excesiva, h_galo
funcionar a una velocidad de avance m_s lenta
manteniendo a la vez la velocidad del motor.
•
Revise frecuentemente el motor, las bombas y los
motores durante el periodo de rodaje. Observe si se
produce alguna fuga de liquidos. Rellene a los niveles
marcados segQn necesidades y repare cualquier fuga
que pueda aparecer.
•
Observe si se ha aflojado alguna tuerca, perno o tornillo
y apri6telos segQn necesidades. Observe esta posibilidad
principalmente en las tuercas de retenci6n de las ruedas.
•
Durante el periodo de rodaje, revise los ajustes del brazo
de control y del freno de estacionamiento. Puede que
haya que ajustar el freno de estacionamiento despu6s
de las primeras horas de funcionamiento.
NO se suba en los lados de la plataforma de corte cuando
monte o desmonte la unidad de alimentaci6n. Salte por
encima cuando monte o desmonte.
INSPECCION
PREVIA AL ARRANQUE
PRECAUCION: AsegQrese de que toda la
tornilleria est6 apretada, todos los dispositivos
de seguridad est6n en su lugar y que se hayan
realizado correctamente todos los ajustes.
El operador es responsable de una operaci6n segura y DEBE
familiarizarse con los mandos del cortac6sped y de la unidad
de alimentaci6n, con su funcionamiento, y con todas las
precauciones de seguridad ANTES de la operaci6n de
arranque.
IMPORTANTE: Inspeccione diariamente los pernos de las
cuchillas, o siempre que se desmonte una cuchilla. El par
de apriete es de 110 - 130 Ibf-ft. (150 - 177 N•m).
•
E-15
Veriflque que todas las protecciones de seguridad
est6n bien montadas y aseguradas adecuadamente.
• Veriflquequeel operadorest6preparado
paraun
funcionamiento
correctoy segurodela unidadde
alimentaci6n
y delosaccesorios
y mejoras.
• Reviseel motory el aceitehidrSulico
y rellenesegQn
necesidades.
• Reviselatensi6ndelacorreade labombaydela
correadetransmisi6n
y ajustesegQnnecesidades.
• Verifiquequelasrejillasdetomadeairenoest6n
demasiado
suciasparaobtenerunarefrigeraci6n
m_ximadelmotor.
• Reviseel estadodelosneum_ticos,
lapresi6nyel
aprietede lospernosdelasruedas.Observesi hay
signosexternosdefugasy corrijaantesdeutilizarel
cortac6sped.
Observesi laspalancasdecontrolde
la direcci6n
est_nflojasy corrijalaposici6n.
• Observesi haysuficientecombustible.
Serecomienda
Ilenarel dep6sitodespu6sdecadausodiariopara
reducirla condensaci6n
y tenereldep6sitopreparado
paraelsiguienteuso.
Para detener el motor:
1. Coloque las palancas de direcci6n en la posici6n
de punto muerto y desactive la TDF.
2. Mueva la palanca del acelerador a la posici6n lenta.
3. Gire la Ilave de contacto a la posici6n apagado.
Arranque
en climas frios
NOTA: Cuando arranque en un clima frio (por debajo de los
5 C bajo cero (23 F)), no opere el motor de arranque m_s
de 10 segundos cada vez. Si el motor no arranca despu6s
de 10 segundos, deje el motor de arranque en reposo
durante 30 segundos antes de intentarlo de nuevo.
Apagado
del motor
Ponga las palancas de control en la posici6n de
estacionamiento, ponga el motor en ralenti durante unos
segundos y gire el interruptor de encendido a la posici6n
"Off". Quite la Ilave.
PRECAUCION: Quite SIEMPRE la Ilave
de contacto cuando no se utilice la unidad.
ARRANQU E Y PARADA
CORTE
PRECAUCION:
Lea primero
todo eldel
Manual
del
propietario/operador
y el Manual
motor.
NO intente arrancar el motor en este momento.
iADVERTENCIA! Apriete de nuevo toda la
tornilleria para evitar da_ar el cortac6sped,
incluyendo las tuercas de retenci6n de las
poleas del vSstago de las cuchillas, despu6s
de la primera hora de funcionamiento del
cortac6sped.
PRECAUCION: Arranque siempre y opere el
motor en una zona bien ventilada. Si est_ un
_rea confinada, saque el tubo de escape al
exterior.
Haga funcionar la unidad solamente sentado en la posici6n
del operador.
Para arrancar el motor:
1. Arranque el motor. Deje el motor en ralenti hasta que
funcione con suavidad.
1. Si6ntese correctamente en el asiento, verifique que
los controles de la direcci6n est6n en la posici6n
de estacionamiento y la TDF desconectada.
2. Ponga las palancas de control de la direcci6n en
la posici6n de punto muerto.
2. Si el motor est_ frio, mueva el control del estrangulador
a la posici6n 'On' (activado). Si el motor est_ templado,
no utilice el estrangulador.
3. Ponga el acelerador en posici6n 3/4 r_pida.
4. Active la TDF para accionar el cortac6sped.
3. Mueva el acelerador a la posici6n 3/4 r_pido. Encontrar8
instrucciones detalladas en el manual del motor.
IMPORTANTE: No engrane nunca la TDF con el cortac6sped
atascado con c6sped u otro material, ya que puede da_ar
el embrague.
4. Ponga la Ilave en el interruptor de encendido y girela
hasta la posici6n de arranque. Cuando arranque el
motor, suelte la Ilave.
Mueva el acelerador a la posici6n r_pida.
6. Mueva las palancas de direcci6n hacia delante para
obtener una velocidad de avance lenta.
,
5. Mueva el control del estrangulador a la posici6n
desactivada (Off). Ajuste el estrangulador para
mantener el motor funcionando con suavidad.
7. Para desactivar el cortac6sped, mueva el interruptor
de la TDF a la posici6n OFF (desactivada).
8. Cuando sepa c6mo operar la unidad, seleccione una
6. Deje que el motor se caliente durante unos cinco
minutos antes de operar la unidad.
velocidad apropiada para las condiciones de corte.
NOTA: El tiempo de calentamiento variar_ segQn la
temperatura ambiente. Para temperaturas por debajo de los
0 C (32 F), deje al menos diez minutos para que se caliente
la unidad.
Ruedas
antidesbroce
1. Eleve el cortac6sped presionando la palanca
de elevaciOn de la plataforma y bloquee en posiciOn
de transporte.
7. Aumente o disminuya la velocidad del motor con el
acelerador. Ajuste el acelerador a la posici6n r_pida
para cortar hierba.
2. Coloque las palancas de control de la direcciOn en la
posiciOn de estacionamiento.
E-16
3. Fijeelajusteantidesbroce
a laalturadecortedeseada.
4. Paraajustar
losrodillos
antidesbroce,
extraiga
lospernos
de5/8-11x 4.25"yvuelvaa montarlos
enelorificio
apropiadoparalaalturadecortedeseada(consulte
figura9).
5. Presione
lapalanca
deelevaci6n
delaplataforma
y tire
dela palancadebloqueoparatransporte,
y bajela
plataforma
hastala posici6ndecorte.
NOTA:Lasruedasantidesbroce
debenestarsiempreal
menosa 6 mm- 13mm(1/4-1/2")delsuelo.Sufunci6nes
impedirquelaplataforma
desbroceelsueloenunterreno
irregular,
quenohagancontactotodoeltiempoconelsuelo.
Rueda
itidesbroce
irregulares
iADVERTENCIA! Para evitar la p@dida de
control e impedir que vuelque el cortac6sped,
avance siempre de lado a lado en pendientes,
nunca hacia arriba o abajo.
Avance en diagonal por pendientes pronunciadas.
Evite en todo momento bajadas muy pronunciadas
para evitar que el cortac6sped vuelque.
Cuando avance cuesta abajo, mantenga las
palancas de control de la direcci6n de la unidad
de alimentaci6n marcha adelante.
Prepare previamente el corte de c6sped en un terreno
irregular y espere a que est6 bien seco para evitar que las
ruedas resbalen y giren en vacio, Io que da_aria el terreno.
Montaraquiparaun
cortede1,5"- 2,0"
Antes de cortar, revise la zona para determinar la mejor
operaci6n. Tenga en cuenta el tipo de c6sped y su altura,
y el tipo de terreno irregular donde se va a realizar el corte.
Montaraquipara
b_
Terrenos
un corte de 2,5" - 6"
Evite arranques y paradas repentinos durante la conducci6n
hacia arriba o hacia abajo de una pendiente, y reduzca
la velocidad de avance guando tenga que girar.
Descarga
Figura 9
Cortacdsped
con descarga
del c_sped
OM5030
iADVERTENCIA! NO opere NUNCA el
cortac6sped con el protector de descarga
en la posici6n elevada.
lateral
PELIGRO: Sin el protector de descarga o un
recolector de hierba completo instalados, el
usuario queda expuesto a la acci6n giratoria de
las cuchillas y de residuos disparados. El contacto
con las cuchillas en movimiento o el disparo de
residuos puede provocar graves da_os o incluso
la muerte.
La plataforma de corte ha sido dise_ada para ofrecer un flujo
de aire m_ximo para una descarga regular de residuos de
c6sped. Cuando se corte c6sped alto o frondoso, seleccione
una velocidad de avance menor, o reduzca el ancho de corte,
para Iograr la m_xima eficiencia en la descarga.
Para Iograr la mejor apariencia del c6sped, no corte cuando
est6 hQmedo o con mucho rocio. La hierba hQmeda puede
atascar la zona de descarga del cortac6sped, crear una carga
excesiva en las cuchillas y los v_stagos, y da_ar la correa de la
plataforma de corte. La hierba hQmeda puede dejar tambi6n
pegotes en el terreno.
El deflector de descarga dirige el material hacia
abajo, hacia el suelo. No desmonte nunca el
protector de descarga ni opere el cortac6sped
con un deflector de descarga da_ado.
No ponga nunca las manos o los pies bajo el
cortac6sped.
Si se atasca la plataforma de corte, haga retroceder la unidad
para sacarla del c6sped no cortado. Si el cortac6sped no
se desatasca asi, levante la plataforma, apague el motor,
ponga el freno, quite la Ilave de contacto y limpie la parte
inferior de la plataforma.
No intente limpiar la zona de descarga o las
cuchillas del cortac6sped sin apagar antes la
TDF, quitar la Ilave de contacto y desconectar
el cable de la bateria.
El cortac6sped tiene un protector de descarga montado que
descarga los recortes por el lateral de la plataforma hasta el
suelo.
En condiciones de corte de medias a intensivas, corte
de forma que los residuos descarguen LEJOS de la hierba aQn
por cortar. En cortes poco intensivos, los residuos descargados
pueden dirigirse hacia el c6sped no cortado, para poder volver
a cortarlo m_s fino.
Sugerencias
,_
para un corte eficiente
PRECAUCION:
Aleje
de residuo
la zona visible
a genteantes de
y mascotas, y retire
todo
comenzar la operaci6n de corte.
Las cuchillas se deben revisar regularmente y mantener
afiladas para garantizar el corte de c6sped m_s id6neo.
E-17
Generalmente
se obtienenlosmejoresresultados
cuando
semantieneelc6speda unaalturade50-80mm
(2-3pulgadas).
Esmejorcortarel c6spedm_sa menudoy
nodemasiado
corto.Paramantenerunc6spedbienverde,
nocortem_sde 1/3delaalturatotal.
Lavelocidaddelmotordelcortac6sped
duranteelcorte
debeestaralas RPMmAximas.
Conellosegarantizauna
velocidadadecuada
delascuchillaspararealizaruncorte
efectivoy unabuenadescarga
delosrecortesdehierba.
Lavelocidad
deavanceafectaengranmedidaalrendimiento
delcorte.Utilicesiempreunavelocidaddeavancem_sbaja
parauncortem_slento,enlugardereducirlasRPMdelmotor.
Cortea menudo.Noesperehastaqueel c6spedest6
demasiado
alto.Losrecortesdehierbacortossedispersan
mejory se deterioran
m_srSpido.
Las_reasdecorteconc6spedaltoo malashierbaspueden
requeriruncortea la alturadecortem_xima.Despu6s
decortarunavez,vuelvaa cortartodalazonacon
elcortac6sped
a laalturadecortefinaldeseada.
ESTACIONAMIENTO
1. Ponga las palancas de direcci6n en punto muerto
y despu6s en posici6n de estacionamiento.
2. Desconecte la TDF, pare el motor, baje la plataforma
hasta el suelo y quite la Ilave de contacto.
IMPORTANTE: Si se intenta remolcar m_s
de 90,7 kg (200 libras) con el cortac6sped
Ariens, provocar_ el fallo prematuro de piezas
y la garantia quedar8 anulada.
El cortac6sped ha sido dise_ado para remolcar Qnicamente
en aplicaciones poco intensivas. No intente remolcar m_s
de 90,7 kg (200 Ibs). El peso de la espiga no debe superar
los 13,61 kg (30 Ibs).
PARA CARGAR
EL CORTACI_SPED
iADVERTENCIA! Tenga mucho cuidado
cuando cargue y descargue la unidad desde
una rampa.
No exceda nunca un _ngulo de 15 grados
entre las rampas y el cami6n o el remolque
cuando cargue el cortac6sped.
IMPORTANTE: Cuando aparque en una pendiente, bloquee
las ruedas en el lado cuesta abajo para evitar que ruede.
de la unidad
iADVERTENCIA! Tenga cuidado cuando
gire el cortac6sped durante el remolque.
El cortac6sped girar_ m_s abruptamente
que el objeto remolcado.
Utilice una rampa individual y de anchura
m_xima. Si necesita rampas individuales, utilice
varias para simular una rampa de anchura
m_xima. Utilice suficientes rampas para crear
una superficie continua m_s ancha que la unidad.
Para estacionar la unidad:
Traslado
REMOLQUE
Evite aceleraciones y desaceleraciones bruscas
de la unidad cuando se cargue o se descargue
para que el cortac6sped no vuelque.
con el motor apagado
Si se para el motor del cortac6sped y no arranca de nuevo,
puede empujar o remolcar la unidad en distancias cortas
con las vSIvulas de desviaci6n de la bomba abiertas.
No exceda los 8 kph (5 m.p.h.) cuando la remolque.
IMPORTANTE: Las v_lvulas de desviaci6n deben estar
abiertas dos giros completos (m_ximo) antes de mover la
unidad (consulte figura 10). Verifique que las vSIvulas de
desviaci6n est6n cerradas antes de trabajar de nuevo con la
m_quina. Si no se cierran a fondo las vSIvulas de desviaci6n
antes de la operaci6n puede da_arse el sistema hidrSulico.
V_lvulas de desviaci6n
Figura 10
E-18
La rampa de carga debe ser Io suficientemente larga para
que los _ngulos entre el cami6n o el remolque no excedan
los 15 grados. Un 8ngulo m_s pronunciado puede hacer que
los componentes de la plataforma de corte queden colgando
cuando se desplace el cortac6sped desde la rampa al cami6n
o remolque. Si se carga en una pendiente, o cerca de una,
coloque el cami6n o remolque en la parte baja de la
pendiente y extienda las rampas por la pendiente para asi
reducir el 8ngulo de la rampa. El remolque o el cami6n
deben aparcarse Io m_s nivelados posible para facilitar
una carga suave del cortac6sped.
TRANSPORTE
DEL CORTACI_SPED
Puntos de amarre delanteros
iADVERTENCIA! Cuando transporte el
cortac6sped, verifique que las palancas de
control de la direcci6n est6n en posici6n de
estacionamiento, las ruedas est6n bloqueadas,
la m_quina bien amarrada con cables, cadenas
o cuerdas, y el remolque est6 bien asegurado
al vehiculo de remolque con cadenas de
seguridad.
Utilice un remolque o un cami6n grandes para transportar
el cortac6sped. AsegOrese de que el remolque o el cami6n
tengan todos los indicadores luminosos necesarios como
exige la ley.
Puntos de amarre traseros
Figura 11
iADVERTENCIA! EVITE LAS LESIONES.
Antes de proceder, lea y comprenda toda
la secci6n de Seguridad.
Los distribuidores de Ariens le ofrecerAn cualquier servicio
de reparaci6n, piezas o ajustes que su unidad necesite para
seguir funcionando con la m_xima eficiencia. En el caso de
necesitar una reparaci6n en el motor, pngase en contacto con
un distribuidor de Ariens o con un centro de mantenimiento
de un fabricante de motores autorizado.
PROGRAMA
DE MANTENIMIENTO
IMPORTANTE: Algunas condiciones de trabajo (cargas
pesadas, temperaturas altas, polvo, o residuos en el aire)
pueden requerir un mantenimiento m_s frecuente.
Consulte el manual del motor para obtener m_s informaci6n
acerca del mantenimiento y resoluci6n de problemas.
NOTA: Para obtener acceso completo al motor, el asiento
debe estar inclinado hacia delante.
E-19
Intervalo!!!
Tarea
Accibn
Revisi6n del sistema
de intertraba de
seguridad
Cada uso
25 horas o cada
estaci6n
50 horas o cada
estaci6n
100 horas o cada
estaci6n
iADVERTENCIA!
Los fallos en el sistema de interbloqueo de seguridad y e funcionamiento
incorrecto de la unidad pueden resultar en la muerte o lesiones graves. Compruebe este sistema
cada vez que haga funcionar la unidad. Si el sistema no funciona correctamente, no Io haga
funcionar hasta que se hayan realizado reparaciones (Vease Sistema de interbloqueo de
seguridaden la pagina 13).
Todos los mandos,
interruptores
Inspeccionar
regularmente
y reparar segt]n necesidades.
Todos los
afianzadores,
tornilleria
Revisar regularmente
Mangueras, correa
del ventilador, cables
Inspeccionar
Nivel de aceite
del motor
Revisar regularmente
y Ilenar cuando sea necesario (Vease Nivel de aceite del motor en la pagina 21 ).
Nivel de aceite
hidraulico
Revisar regularmente
en la pagina 22).
y Ilenar cuando sea necesario (Vease Mantenimiento
y apretar cuando sea necesario.
regularmente
y reparar segt]n necesidades.
Rejillas de aire
Limpiar de residuos regularmente.
Valvula de descarga
del depurador de aire
Limpiar regularmente.
Elementos del filtro
de aire
Revisar regularmente
y limpiar o cambiar cuando sea necesario.
Niveles del dep6sito
del combustible
Revisar regularmente
y Ilenar cuando sea necesario.
Filtro de combustible
Inspeccionar
Equilibrado y ajuste
de la palancas
de direcci6n
Revisar regularmente
regularmente
del sistema hidraufico
y cambiar cuando sea necesario.
y ajustar cuando sea necesario.
Revisar el freno de
estacionamiento
Activar el freno de estacionamiento y la palanca de derivaci6n de la transmisi6n (Vease Traslado de la
unidad con el motor apagado en la pagina 18). Empujar la unidad. Si la unidad rueda, p6ngase en contacto
con su distribuidor Ariens.
Limpieza de la unidad
Limpiar toda la suciedad y los residuos del motor, la bateria, el asiento, la plataforma de corte, etc.
No utilice disolventes, pulverizadores a alta presi6n, limpiadores demasiado potentes o abrasivos.
NOTA: Proteger las superficies pintadas con cera para autom6viles.
Comprobar la presi6n
y el estado de los
neumaticos
Consulte ESPECIFICACIONES
Par de apriete de los
pernos de las ruedas
Revisar regularmente
y apretar cuando sea necesario.
Juego de la direcci6n
Revisar regularmente
y reparar cuando sea necesario.
Acumulaci6n
Retirar despues de cada uso.
de hierba
en la pagina 37 para obtener la presi6n correcta de los neumaticos.
Inspeccionar las
cuchillas del
cortacesped
Comprobar el desgaste de las cuchillas. Afilar o reemplazar cuando sea necesario (Vease Mantenimiento
de las cuchillas en la pagina 29).
Siga el programa de
mantenimiento del
manual del motor
Realice el mantenimiento programado del motor. Encontrara instrucciones detalladas en el Manual del motor.
NOTA: Para drenar el aceite, use la valvula de drenaje manual del aceite suministrada con la unidad,
no el tap6n de drenaje que se muestra en el manual del motor.
Revisar la bateria
Mantener limpios la bateria y sus bornes (Vease Limpieza de la baterfa en la pagina 24),
Elementos del filtro
de aire
Revisar y limpiar los restos de suciedad, cambiar si fuera necesario.
Lubrique la unidad
Aplique grasa al punto de engrase en cada rueda delantera
Revisar los
afianzadores
Compruebe la tornilleria de montaje de las cuchillas y el resto de afianzadores. Reemplace los afianzadores
que falten o esten daSados. Apriete todos los pernos y tuercas al valor de par de torsi6n correcto.
Engrasar los puntos
de lubricaci6n
Lubricar segt]n necesidades.
Filtro de aceite
hidraulico
Recolocaci6n.
Bateria
Comprobar y limpiar segt]n necesidades
Revisar todas
las correas
Cambiar las correas desgastadas o deterioradas
Comprobar la correa de transmisi6n.
Comprobar la correa de la plataforma.
Revisar las mangueras
hidraulicas
Revisar regularmente
en la pagina 23).
Limpieza del sistema
de refrigeraci6n del
motor
Compruebe y limpie las aletas de enfriamiento y el interior de los forros del motor para eliminar restos de
cesped, broza y suciedad que puedan bloquear el sistema de refrigeraci6n y provocar un recalentamiento.
(Vease Mantenimiento
de la baterfa en la pagina 23).
(consultar Correas en la pagina 31).
y reparar cuando sea necesario (Vease ComprobaciSn
E - 20
de las mangueras hidraulicas
iADVERTENCIA!
EVITELASLESIONES.
Antesdeproceder,leay comprenda
toda
la secci6nde Seguridad.
ACCESO
PARA SERVlClO
PRECAUCION:
Pare el motor antes de
realizar el mantenimiento del cortac6sped.
Varilla de
medici6n
del aceite
del motor
El asiento debe estar totalmente elevado y
bloqueado antes de realizar alguna operaci6n
de mantenimiento en el cortac6sped.
El asiento puede bajar muy r_pidamente cuando
se suelta la palanca de bloqueo. Baje el asiento
lentamente prestando atenci6n para que no
quede nada atrapado.
k
Figura 12
Levante el asiento para acceder a la bateria y al dep6sito
hidr_ulico. Tenga mucho cuidado cuando se levante y verifique
que el asiento est6 bloqueado en posici6n elevada antes de
realizar alguna operaci6n de servicio en el cortac6sped.
MANTENIMIENTO
OM5035
GENERAL
Cambio
del filtro del aceite
Cambie el filtro de aceite del motor inicialmente despu6s de
las primeras 8 horas de uso. Cambie despu6s el filtro cada
100 horas de funcionamiento despu6s del cambio inicial.
1. Arranque el motor y d6jelo funcionando durante cinco
minutos para que se caliente el aceite del motor.
Nivel de aceite del motor
2. Drene el aceite del motor en un recipiente adecuado.
IMPORTANTE: Si no comprueba regularmente el nivel
del aceite, el motor puede sufrir da_os graves si dicho
nivel es demasiado bajo.
,_
1. Estacione la m_quina en una superficie nivelada
y apague el motor.
PRECAUCION:
Antesadecuado
de sacar bajo
el filtro
de aceite,
coloque
un recipiente
su conexi6n.
3. Limpie la zona alrededor del flltro de aceite para
eliminar todo resto de suciedad y residuos del motor
y gire el filtro en sentido antihorario para sacarlo.
Limpie la superficie donde se monta el filtro.
2. Limpie la zona alrededor de la varilla medidora
del motor antes de extraerla.
3. Saque la varilla medidora y limpiela.
4. Aplique una capa de aceite de motor limpio a la junta
del nuevo filtro, consulte figura 13.
4. Introduzca de nuevo la varilla medidora en el motor
(sin girarla) y compruebe que el nivel de aceite est6
entre el limite superior y el inferior de la varilla.
5. Monte un nuevo filtro gir_ndolo en sentido horario
hasta que el sello haga contacto con la superficie
de montaje. Gire a mano el filtro otro 3/4 de vuelta.
5. A_ada aceite segOn necesidades hasta alcanzar
el nivel adecuado. NO Io Ilene en exceso.
6. Monte de nuevo el tap6n de drenaje y apriete.
6. Introduzca y apriete la varilla medidora.
7. Llene con aceite de motor segOn especificaciones.
7. Limpie el combustible que se haya derramado.
8. Ponga en marcha el motor y d6jelo funcionando
durante unos 3 minutos, pare el motor y compruebe
si se producen fugas alrededor del filtro.
IMPORTANTE: Utilice Onicamente el aceite especificado
para su uso en el manual del motor.
Aceite de
limpio
/
Figura 13
E-21
Cambio
de aceite del motor
MANTENIMIENTO
SISTEMA
HIDRAULICO
iADVERTENCIA! El LJQUIDO HIDR/kULICO
puede provocar quemaduras graves. El liquido
del sistema hidrSulico puede penetrar en la
piel y ocasionar lesiones graves o la muerte.
iADVERTENCIA! El aceite de motor es
una sustancia t6xica que debe eliminarse
correctamente. P6ngase en contacto con las
autoridades locales para informaci6n sobre
m6todos de eliminaci6n aprobados o su posible
reciclado.
AsegOrese de apagar el motor antes de realizar
ningQn tipo de trabajo en las piezas hidrSulicas.
Mantenga el cuerpo y las manos alejadas de
los peque_os orificios o boquillas que arrojan
liquido hidr_ulico cuando est_n bajo presi6n.
Utilice papel o cart6n y no las manos para
buscar fugas.
Cambie el aceite y el filtro del motor despu6s de las
primeras 8 horas de funcionamiento. Cambie el aceite cada
100 horas de funcionamiento despu6s del cambio inicial.
1. Ponga en marcha el motor para calentar el aceite.
AsegQrese de que todas las conexiones de
liquido hidrSulico est6n apretadas yen buen
estado antes de aplicar presi6n al sistema.
UN LJQUIDO EXTRANO INYECTADO EN
EL CUERPO puede producir gangrena.
Debe ser extraido quirQrgicamente en un
periodo de pocas horas por un m6dico que
est6 familiarizado con tipo de lesi6n.
2. Estacione el cortac6sped en un terreno nivelado.
3. Pare el motor, ponga las palancas de control de la
direcci6n en posici6n de estacionamiento y quite la Ilave.
4. Retire el tornillo de drenaje del aceite, consulte figura 14,
y drene el aceite en un recipiente adecuado con el motor
aOn templado.
iADVERTENCIA! El aceite de motor caliente
puede provocar graves quemaduras. Deje que
se enfrie un poco antes de drenar y manipular
el aceite.
PRECAUCION: El motor debe estar parado,
las palancas de control de la direcci6n en
posici6n de estacionamiento y la Ilave de
contacto retirada antes de cambiar o
comprobar el aceite hidrSulico en el
cortac6sped.
5. Monte el tornillo de drenaje del aceite.
6. Saque la varilla medidora y rellene con aceite nuevo.
7. Compruebe el nivel de aceite.
Filtro de aceite
del motor
DEL
Deje que se enfrie el liquido hidrSulico.
El aceite puede estar caliente y provocar
graves quemaduras.
IMPORTANTE: La contaminaci6n puede da_ar los
componentes del sistema hidrSulico. Limpie a rondo alrededor
del cuello de Ilenado y del tap6n antes de quitar el tap6n del
dep6sito de aceite hidrSulico. No quite el tap6n cuando est_
caliente a menos que sea absolutamente necesario.
Revise diariamente el dep6sito para comprobar el nivel.
drenado de a"oeite
Figura 14
OE3290
Las unidades de la bombay del motor requieren que se
cambie el fluido cada a_o o cada 250 horas, Io que quiera que
ocurra antes. Se debe cambiar el filtro del sistema inicialmente
despu6s de las primeras 50 horas de funcionamiento.
Se deben cambiar el liquido y el filtro y limpiar el sistema
si el liquido se contamina con residuos, agua, etc.
NOTA: Las unidades integradas de bomba/motor est_n
equipadas con vSIvulas de desviaci6n. Consulte Traslado de
la unidad con el motor apagado en la pSgina 18.
Cambio
del liquido
hidr&ulico
PRECAUCION: El motor debe estar parado, las
palancas de control de la direcci6n en posici6n
de estacionamiento y la Ilave de contacto
retirada antes de cambiar o comprobar el aceite
hidrSulico en el cortac6sped.
Deje que se enfrie el liquido hidrSulico. El aceite
puede estar caliente y provocar graves
quemaduras.
E - 22
1. Estacione la m_quina sobre una superficie nivelada, pare
el motor, ponga las palancas de control de la direcci6n
en posici6n de estacionamiento y quite la Ilave.
2. Limpie la zona alrededor del tap6n de Ilenado
del dep6sito y quite el tap6n.
IMPORTANTE: Las ruedas traseras giran ahora bajo
potencia. No las toque ni haga contacto con elias. Si no giran
despu6s de 2-3 ciclos, pare inmediatamente. Puede que
haya aQn aire en el sistema. Deje que se enfrien e intente
purgar de nuevo desde el Punto 1.
10. Apague el motor, baje la unidad hasta el suelo
y compruebe el aceite hidrSulico y afiada segQn
necesidades.
3. Para drenar el liquido hidr_ulico, coloque un recipiente
adecuado bajo el filtro hidrSulico y sSquelo.
4. Aplique una capa fina de aceite hidrSulico en la arandela
del filtro de aceite. Antes de volver a montar, verifique
que la zona de montaje est6 limpia.
Comprobacibn
de las mangueras
hidr&ulicas
Revise las mangueras hidr_ulicas cada 250 horas para
garantizar que est6n en buen estado.
5. Monte el filtro de aceite hidrSulico en el adaptador
del filtro.
Revise ambas mangueras y sus bridas para ver si est_n
desgastadas o dafiadas. Si alguna est_ desgastada
o dafiada, repSrela o c_mbiela inmediatamente.
6. Vuelva a Ilenar el dep6sito del liquido hidr_ulico hasta
el nivel recomendado. Coloque de nuevo el tap6n de
Ilenado del aceite.
MANTENIMIENTO
DE LA BATERJA
7. Limpie cualquier liquido que se haya derramado.
Bateria
Sangrado/purga
del sistema hidr&ulico
IMPORTANTE: La entrada de aire en el sistema hidr_ulico
es la causa principal del fallo de las bombas hidrSulicas.
Despu6s de una operaci6n de servicio o una reparaci6n del
sistema hidrSulico se DEBE purgar adecuadamente el aire
atrapado antes de volver a trabajar con el cortac6sped.
_b,
1. Para purgar el sistema, el dep6sito de aceite deber8
estar Ileno, el aceite debe cubrir apenas la placa
deflectora del interior del dep6sito.
iADVERTENCIA! Los bornes de la bateria,
terminales y accesorios relacionados contienen
plomo y compuestos de plomo, sustancias que
en el estado de California se sabe que causan
c_ncer y dafios al sistema reproductor. L_vese
las manos despu6s de manejarlos.
2. Levante del suelo las ruedas traseras y coloque un
soporte adecuado.
3. Abra las dos v_lvulas de desviaci6n de la bomba, una
en cada bomba, un m_ximo de dos giros completos.
4. Sentado en el asiento, arranque el motor y d6jelo
funcionando en ralenti.
5. Realice un giro lento de las palancas de la direcci6n
hacia delante y hacia atrSs durante 10 segundos en
cada direcci6n, 5 6 6 veces.
iADVERTENCIA!
LAS LESIONES.
Antes
de proceder, EVITE
lea y comprenda
toda
la secci6n de Seguridad.
La unidad viene equipada de fSbrica con una bateria que no
requiere mantenimiento, excepto la limpieza de los bornes.
Extracci6n
de la bateria
iADVERTENCIA! Los terminales de la bateria o
las herramientas metSlicas pueden provocar un
cortocircuito con los componentes metSlicos del
cortac6sped, provocando una chispa que podria
incendiar los gases explosivos de la bateria.
Cuando se desmonte la bateria del cortac6sped,
evite que los terminales toquen alguna parte de
la m_quina. Evite que las herramientas met_licas
toquen las piezas met_licas de la m_quina
mientras est6n en contacto con los terminales de
la bated&
NOTA" Las ruedas traseras deben girar, pero no deben
estar bajo carga.
6. Apague el motor, compruebe el aceite hidrSulico
y afiada si fuera necesario.
7. Cierre las v_lvulas de desviaci6n de ambas bombas.
No las apriete en exceso.
8. Sentado en el asiento, arranque el motor y d6jelo
funcionando en ralenti.
9. Realice un giro lento de las palancas de control de la
direcci6n hacia delante y hacia atrSs, 5 6 6 veces.
Si se guian incorrectamente los cables de
la bated& el cortac6sped puede dafiarse
y provocar una chispa que puede incendiar
los gases explosivos de la bated&
NOTA" Puede que sea necesario repetir las operaciones
de purga hasta eliminar todo el aire atrapado en el sistema
hidrSulico. Cuando la bomba se mueve hacia delante y
hacia atrSs a velocidad normal y el aceite del dep6sito
permanece a un nivel constante, la operaci6n de purga
ha terminado.
Desconecte siempre el cable negro (negativo) de
la bateria antes de desconectar el rojo (positivo).
Conecte de nuevo el cable rojo (positivo) antes
de volver a conectar el cable negro (negativo) de
la bated&
E - 23
1.Desconecte
el interruptor
dela TDFdelcortac6sped,
pongalaspalancasdecontroldela direcci6nenla
posici6n
deestacionamiento,
pongalaIlavedecontacto
enposici6n"Off"y sSquela.
2. Levanteel asientoy bloqu6elo
enlaposici6nelevada.
3. Desconecte
elcablenegativodelabateriadelterminal
dela misma.
4. Quitela cubiertarojadelterminalpositivodelabateria
y saqueel cablepositivo.
5. Quitelacorreadelacubierta
delabandejadelabateria.
Suelteconcuidadolacorreay saqueel extremo
opuestodelosganchosdela bandejadela bateria.
6. Saqueconcuidadola bateria.Evitequelosbornes
hagancontactoconpiezasmet_licas.
Instalaci6n
IMPORTANTE: NO realice una carga rSpida. Si la carga
es demasiado r_pida, la bateria puede resultar da_ada o
destruida. Utilice SOLO un cargador autom_tico dise_ado
para su bateria.
Siga SIEMPRE la informaci6n suministrada por el fabricante
que acompa_a a la bateria. P6ngase en contacto con
el fabricante de la bateria para obtener instrucciones
detalladas sobre c6mo cargar la bateria.
1. Extraiga la bateria de la unidad. V6ase Extracci4n de
la bateria en la pSgina 23.
2. Coloque la bateria en el banco o cualquier otro lugar
bien ventilado.
3. Conecte el terminal positivo (+) del cargador al borne
positivo (+), y el terminal negativo (-) al borne negativo (-).
4. Cargue la bateria de acuerdo con las instrucciones
de los fabricantes del fabricante y de la bateria.
5. Cambie la bateria. V6ase Instalaci4n de la bateria en
la pSgina 24.
de la bateria
1. Inserte la bateria en la bandeja con los bornes
orientados hacia la izquierda.
2. Conecte el cable positivo de la bateria al borne positivo.
3. Conecte el cable negativo de la bateria al borne
negativo de la bateria.
4. Asegure los cables insertando un perno de cabeza
de hongo de 5/16-18 x 5/8" por el borne de la bateria
y por el cable de la misma. AsegQrelo con una
contratuerca de reborde de 5/16-18".
,
Instale la cubierta del borne rojo sobre el borne
positivo y el cable positivo.
6. Coloque en su lugar la bateria insertando un extremo
de la banda de enganche en la bandeja de la bateria
y colocando el otro extremo sobre la parte superior
de la bateria en la ranura del extremo opuesto de
la bandeja de la bateria.
Limpieza
Arranque
Ariens no recomienda el arranque por puente de la unidad
ya que se pueden da_ar los componentes del motor y del
sistema el6ctrico. Consulte el Manual del motor para obtener
informaci6n m_s detallada.
Cambio
Su cortac6sped Ariens Ileva dos fusibles que se encuentran
en el interior del bastidor. Uno est_ cerca de la parte frontal
del dep6sito de combustible, y el segundo se encuentra en
la parte posterior del dep6sito. Ambos son de 20 amperios.
1. Extraiga el fusible defectuoso del recept_culo.
2. Revise la abrazadera de metal del cristal del fusible
Mantenga limpia la bateria y los bornes de la misma. Para
garantizar un buen rendimiento, revisela cada 100 horas
de funcionamiento o una vez al mes.
2. Limpie los bornes y los extremos del cable de la bateria
con un cepillo de alambre.
3. Recubra los bornes con grasa diel6ctrica o vaselina.
4. Cambie la bateria. V6ase Instalaci4n de la bateria en
la pSgina 24.
CARGA
y deseche el fusible si la abrazadera est_ rota.
3. Instale el nuevo fusible en su recept_culo.
RUEDASDELA
ROLDANA
MANTENIMIENTO
DE LOS PIVOTES
DE LOS COJINETES
DE LA ROLDANA
Consulte
Figura
15.
1. Aparque la unidad en una superficie nivelada, ponga
las palancas de control de la direcci6n en la posici6n
de estacionamiento, apague el motor y quite la Ilave.
DE LA BATERJA
Primeros auxilios en caso de contacto
el electrolito de la bateria
de los fusibles
IMPORTANTE: Evite da_ar el circuito el6ctrico. Utilice s61o
el fusible del mismo tama_o que el original.
de la bateria
1. Extraiga la bateria de la unidad. V6ase Extracci4n de
la bateria en la pSgina 23.
por puente
2. Levante la parte frontal de la unidad de alimentaci6n
y suj6tela con un gato.
con
3. Quite la tapa (2), la contratuerca de 5/8" (8), la arandela
Belleville de 5/8" (9), la arandela plana (10), la arandela
ondulada de 1.0 x 1.25" (3), y la estructura soldada
de la rueda frontal (7).
Siga las instrucciones de primeros auxilios despu6s
del contacto con el liquido de la bateria.
•
•
Contacto externo: Enju_guese con agua.
Ojos: iEnju_guese con agua durante por Io menos
15 minutos y Ilame a un m6dico inmediatamente!
• Contacto interno: Beba grandes cantidades de agua.
Siga con leche de Magnesia, huevos batidos o aceite
vegetal, iLlame a un m6dico inmediatamente!
iEn caso de contacto interno, NO induzca el v6mito!
4. Desmonte los cojinetes superior e inferior (4) y las
juntas herm6ticas.
5. Limpie y revise los cojinetes y aplique grasa limpia.
Cambie los cojinetes segQn necesidades.
6. Vuelva a montar los cojinetes superior e inferior.
E - 24
IMPORTANTE: Los cojinetes est_n encastrados a presi6n.
Presione Onicamente en la pista externa cuando los instale.
3. Mueva la palanca de control hacia atrSs para liberarla.
Esta palanca de control debe volver a una posici6n
donde pueda moverse hacia fuera y bloquearse en
posici6n de punto muerto.
7. Vuelva a montar la tapa (2), la tuerca hexagonal de
5/8" (8), la arandela Belleville de 5/8" (9), la arandela
plana (10), la arandela ondulada de 1.0 x 1.25" (3),
y la estructura soldada de la rueda frontal (7).
4. Si se deben realizar ajustes, mueva hacia atrSs la
palanca de control hasta la posici6n interna y
comience a tirar hacia arras. En este movimiento hacia
arras inicial el pasador de horquilla debe comenzar
a hacer contacto con el extremo de la ranura (1)
y comenzar a aplicar presi6n en el resorte (2).
NOTA: No apriete en exceso la tuerca hexagonal de 5/8".
Apri6tela s61o Io suficiente para eliminar cualquier exceso
de holgura de los cojinetes.
8. Aplique grasa en el punto de engrase hasta que salga
por el cojinete superior. Vuelva a montar la tapa.
5. Si se necesita algOn ajuste, afloje la contratuerca
contra la horquilla (3) y mientras se aplica una ligera
presi6n hacia atrSs sobre la palanca de control en
movimiento, gire la cabeza del perno de ajuste (4) en
el sentido apropiado hasta que se centre la palanca.
6. Mueva hacia arras la palanca de control y su61tela.
Esta palanca de control debe volver a una posici6n
donde pueda moverse hacia fuera y bloquearse en
posici6n de punto muerto.
/
/
/
/
/
Figura 16
OM5075
AJUSTE DE LA PALANCA DE CONTROL
DE LA DIRECCl0N
Si durante el movimiento en linea recta de la unidad una
palanca de direcci6n est_ m_s avanzada que la otra, las
palancas de control de la direcci6n est_n desajustadas. Afloje
los tornillos de los manillares y alinee las piezas. Apriete los
tornillos para conservar el ajuste. Consulte Figura 17.
NOTA: Las palancas de control de la direcci6n deben estar
iguales en punto muerto o en estacionamiento.
Figura 15
AJUSTE
DEL PUNTO MUERTO
Consulte
Figura
16.
Antes de realizar algQn ajuste, compruebe la presi6n
del neum_tico. Una presi6n incorrecta puede hacer que la
unidad se incline hacia un lado. La presi6n correcta del aire
es de 20 p.s.i, en las ruedas frontales y de 12 p.s.i, en las
traseras.
1. Pare el motor y quite la Ilave del encendido.
2. Incline el asiento hacia delante.
E - 25
7. Gire 90 las cuchillas del cortac6sped para que queden
paralelas a la plataforma de corte. Ajuste la plataforma
con los pernos de ajuste traseros para que la punta de
la cuchilla trasera quede 118" m_s alta que la punta
frontal en la misma cuchilla.
Mida las alturas de las cuchillas para que coincidan con
Io indicado en la altura de corte por dial. La altura se mide
como la distancia entre el suelo y la parte inferior de la cuchilla.
Si la altura de la cuchilla no coincide con la altura del dial,
consulte Sincronizaci4n de la altura de corte (Figura 20) abajo.
Ajustelos
manillares
aqui.
Figura17
NIVELACIC)N
OM5005
Figura 19
8incronizacibn
DE LA PLATAFORMA
de la altura de corte (Figura
OE3305
20)
PRECAUCION: Pare el motor, coloque las
palancas de control de la direcci6n en posici6n
de estacionamiento y quite la Ilave antes de
realizar alguna operaci6n de mantenimiento
o una reparaci6n en esta unidad.
PRECAUCION: Pare el motor, coloque las
palancas de control de la direcci6n en posici6n
de estacionamiento y quite la Ilave antes de
realizar alguna operaci6n de mantenimiento
o una reparaci6n en esta unidad.
NOTA: Verifique que la plataforma est6 nivelada antes
de sincronizar la altura de corte por dial con la altura de
las cuchillas de la plataforma.
1. Aplique una presi6n de 20 p.s.i, a los neum_ticos
frontales y de 12 p.s.i, a los neum_ticos traseros.
2. Coloque el cortac6sped sobre una superficie nivelada.
1. Eleve la plataforma de corte hasta la posici6n de
transporte. Quite el peso del varillaje de elevaci6n de
la plataforma (1) insertando bloques de madera bajo
cada esquina de la plataforma y baj_ndola lentamente
hasta que descanse sobre los bloques.
3. Levante la plataforma de corte hasta la posici6n de
bloqueo para transporte y ajuste la altura de corte
a 3 pulgadas.
4. Baje la plataforma hasta la posici6n de corte.
2. Afloje la tuerca de seguridad de 1/2" (3) de la horquilla
ajustable de 1/2" (2).
5. Ajuste ambas cuchillas externas para que queden
perpendiculares al cortac6sped como se observa
en figura 18.
3. Saque el pasador de horquilla de 1/2" (5) de la horquilla
ajustable y descon6ctela del varillaje de elevaci6n (1).
Si la altura de la cuchilla es mayor que la del dial de
corte, apriete la horquilla en el perno de 1/2-13 x 4,5"
(6) que pasa por la estructura soldada del brazo de
la altura de corte (4).
Si la altura de la cuchilla es menor que la del dial de
corte, afloje la horquilla del perno de 1/2-13 x 4,5" (6).
NOTA: Ajuste la altura de corte en la punta frontal de la
cuchilla central.
4. Conecte la horquilla ajustable de 1/2" (2) al varillaje de
elevaci6n (1) con el pasador de horquilla de 1/2" (5).
Figura 18
OM5045
6. Mida la altura de las puntas de las cuchillas en 1 y 2 y
ajuste los pernos de ajuste frontales y los pernos en U
traseros para garantizar que la plataforma est6
nivelada de izquierda a derecha.
E - 26
5. Apriete de nuevo la tuerca de seguridad de 1/2" (3)
para bloquear el conjunto en posici6n.
6. Eleve otra vez la plataforma hasta la altura de transporte
y quite los bloques de la base de la plataforma. Mida
otra vez la altura de las cuchillas para que coincida
con la altura en el dial. Si no coincide, repita hasta
sincronizar las dos alturas.
3
4
5
4
6
Figura 21
La v_lvula de descarga (1) permitir8 eliminar la suciedad
y el polvo del cuerpo del recipiente (3) sin necesidad
de desmontar. Durante el funcionamiento, esta vSIvula
se cerrar8 a 1/3 a 1/2 de regulaci6n.
AJUSTES
•
Con el motor apagado, apriete a mano la vSIvula para
eliminar el polvo y los residuos.
•
En condiciones de operaci6n con mucho polvo, puede
que haya que abrir la vSIvula cada 2 a 3 horas.
Quite la tapa del depurador de aire y realice una inspecci6n
general de todo el conjunto. Si est_ especialmente sucio o
si aparece bien visible la suciedad acumulada en el interior
del recipiente, deber8 desmontar todo el conjunto, incluyendo
la manguera de entrada, del carburador y el motor.
DE LA DIRECCION
Con el depurador de aire desmontado del motor y los
cartuchos y juntas desmontados, lave las piezas rigidas con
un disolvente de limpieza y s6quelas con aire comprimido.
NO lave los cartuchos del depurador de aire.
PRECAUCION: Pare el motor, coloque las
palancas de control de la direcci6n en posici6n
de estacionamiento y quite la Ilave antes de
realizar alguna operaci6n de mantenimiento
o una reparaci6n en esta unidad.
NOTA: Si las juntas del recipiente est_n rotas o falta alguna,
habr8 que CAMBIAR AMBOS elementos del depurador
de aire.
Los controles de la direcci6n y del movimiento deben ser
uniformes durante el avance y la marcha atrSs. Las palancas
de control de la direcci6n deben volver siempre a la posici6n
de punto muerto cuando se sueltan desde la posici6n de
marcha atrSs.
Inspeccione y limpie el conjunto del cartucho del depurador
de aire primario (5) cada 25 horas. Cambie el elemento de
papel cada a_o o cada 250 horas, Io que quiera que ocurra
antes.
SERVICIO
El cartucho externo se limpia rod_ndolo y "golpeSndolo"
sobre una superficie dura. Si los pliegues del papel est_n
perforados o rasgados, habr8 que cambiar los elementos.
DEL FILTRO
DE AIRE (FIGURA
21)
Cambie el cartucho interior (6) cada a_o o cada 250 horas,
Io que quiera que ocurra antes.
PRECAUCION: Tocar superficies calientes
puede provocar quemaduras en la piel. El motor
y los componentes estarSn calientes despu6s
de que el motor haya estado funcionando. Deje
que el motor y los componentes se enfrien antes
de realizar el mantenimiento de la unidad.
IMPORTANTE: NO intente limpiar el elemento secundario.
Este elemento del filtro debe ser cambiado si est_
especialmente sucio o da_ado.
NOTA: El funcionamiento en condiciones de mucho polvo
puede requerir un mantenimiento m_s frecuente de los
cartuchos de los depuradores de aire primario y secundario.
IMPORTANTE: Para evitar un desgaste excesivo del motor,
no Io haga funcionar sin el depurador de aire.
IMPORTANTE: El motor se refrigera por aire y requiere una
gran cantidad de admisi6n de aire durante el funcionamiento.
Una admisi6n de aire reducida puede provocar un
sobrecalentamiento. Mantenga siempre limpias la rejilla de
admisi6n de aire y las aletas de refrigeraci6n. Mantenga las
tapas y las rejillas montadas.
NOTA: Los motores Kawasaki de 19hp utilizan s61o un filtro
de una pieza (5).
E - 27
PRECAUCION: No utilice aire a presi6n para
limpiar el elemento de papel.
SERVICIO
DEL SISTEMA
7. Desmonte la brida.
DE COMBUSTIBLE
La bomba de combustible no puede desmontarse.
Si falla, c_mbiela por una nueva.
PRECAUCION: Los vapores del combustible
son explosivos e inflamables. No fume mientras
se manipula el combustible. Mantenga el
combustible alejado de puntos de llama o de
chispas. Apague el motor antes de realizar una
operaciOn de servicio. Trabaje siempre en una
zona bien ventilada. Limpie inmediatamente el
combustible derramado.
Vista posterior Lado izquierdo
Bridas de
El motor debe estar parado, las palancas
de control de la direcciOn en posici6n de
estacionamiento y la Ilave retirada antes
de realizar alguna reparaci6n.
manguera
Filtro de
combustible
No olvide inspeccionar peri6dicamente los tubos
de combustible porque pueden deteriorarse
y desgastarse. El combustible podria gotear
sobre un motor en funcionamiento y provocar
un incendio.
OE3335
Figura 22
iADVERTENCIA! El uso inadecuado de
disolventes puede provocar un incendio o una
explosi6n. No utilice gasolina o disolventes con
un bajo punto de inflamaci6n para limpiar el filtro
de combustible y/o la bomba de combustible.
Limpie s61o en una zona bien ventilada, lejos
de fuentes de chispas o de llamas, incluyendo
electrodom6sticos con un piloto de encendido.
SERVlCIO
DE LA BUJJA
iADVERTENCIA! Los componentes calientes de
un motor pueden provocar serias quemaduras.
Pare el motor y deje que se enfrie antes de
revisar la bujia.
IMPORTANTE: Se debe tener un gran cuidado cuando se
desmontan los tubos de combustible para una operaci6n de
mantenimiento o reparaciOn. Cierre ambos extremos de los
tubos de combustible con un trozo de papel o un trapo limpio
para evitar que las particulas de suciedad o de polvo puedan
contaminar el combustible. Incluso una peque_a cantidad
de polvo o suciedad puede provocar un desgaste prematuro
o el fallo de los componentes del sistema de combustible.
Limpie o cambie la bujia y reponga el espacio entre
electrodos cada 100 horas de funcionamiento.
1. Desconecte el cable de la bujia y saque la bujia.
Las conexiones de los tubos de combustible se componen
de caucho que envejecer_ independientemente del periodo
de servicio. Si observa algOn deterioro de los tubos de
combustible o de las bridas, c_mbielos.
Compruebe regularmente el filtro de combustible. Si est_
atascado con suciedad o contaminado con agua, c_mbielo.
._
El filtro de combustible no puede ser desmontado. Si se
atasca, c_mbielo por uno nuevo.
Figura 23
1. Estacione la m_quina en un 8rea bien ventilada.
Cable de la
ijia
OE3340
2. Limpie los electrodos frot_ndolos con un cepillo de
acero para eliminar los dep6sitos de carb6n.
2. Deje que se enfrie.
3. Comprima la manguera con la brida entre el dep6sito
y el filtro. Tenga cuidado de no da_ar ni pinchar la
manguera.
3. Inspeccione para ver si la porcelana est_ agrietada
o la pieza desgastada y da_ada. En caso afirmativo,
cambie la bujia por una nueva.
4. Desconecte las bridas de la manguera (1 del filtro
de combustible, consulte figura 22.
4. Compruebe el espacio entre electrodos de la bujia y
ajuste si fuera necesario. El espacio entre electrodos
correctos debe ser de 0,75 mm (0,030 pulg). Para
cambiar el espacio, doble s61o el electrodo lateral
con una herramienta para bujias.
5. Saque el tubo de combustible de ambos extremos
del filtro de combustible (2).
6. Instale el nuevo filtro de combustible prestando una
atenci6n especial al sentido del flujo (3) observado
en el filtro del combustible.
E - 28
SERVICIO
DE NEUMATICOS
Y RUEDAS
2
PRECAUCION: La separaciOn de un neum_tico
y la Ilanta pueden provocar una explosion con
resultados de accidentes graves o incluso la
muerte.
3
0,030pulg.
(0,75mm)
Compruebe los neum_ticos para ver si la presi6n
est& baja, tienen cortes, burbujas, Ilantas
da_adas o faltan pernos y tuercas.
)
Utilice siempre una mordaza con una extension
Io suflcientemente larga como para permitirle
quedarse a un lado del neum_tico cuando se
inflan. No se coloque frente los neum_ticos
al inflarlos.
No suelde nunca ni caliente un neum_tico.
El calor puede hacer que se expanda el aire
del interior y explotar. Las operaciones de
soldado pueden tambi6n debilitar o deformar
estructuralmente la rueda.
1. Aislante del electrodo central
2. Electrodo lateral
3. Espacio de aire (no a escala)
Figura 24
5. Instale y apriete la bujia a 22 N.m (16 ft. Ibs.).
Vuelva a conectar el cable de la bujia.
Consulte el manual de instrucciones del motor para
informaci6n sobre la bujia recomendada.
LIMPIEZA
DEL SISTEMA
DE REFRIGERACION
Antes de cada uso, asegQrese de que la rejilla de admisi6n
de aire no tenga hierba y limpie si fuera necesario.
Cada 100 horas de funcionamiento, revise y limpie las aletas
de refrigeraci6n y el interior de los forros del motor para
eliminar la hierba, broza o suciedad que est6n bloqueando
el sistema de refrigeraci6n y puedan causar un
sobrecalentamiento.
Inspeccione visualmente los neum_ticos antes de cada uso.
No haga funcionar la m_quina con los neum_ticos inflados
en exceso o poco inflados porque puede da_arlos. La presi6n
correcta de los neum_ticos frontales es de 20 p.s.i. (82,7 kpa)
y de los neum_ticos traseros de 12 p.s.i. (137,9 kpa) consulte
figura 25.
Cuando vuelva a montar la rueda despu6s de la operaci6n
de servicio, asegQrese de apretar las tuercas a 75 ft. Ibs.
(101 N-m). Conduzca unas 200-250 yardas (183-228 metros)
y vuelva a apretar.
Poco infladas
Normal
Infladas
en exceso
-t
PRECAUCION: No ponga en marcha el motor
antes de haber montado de nuevo todo el sistema
de refrigeraciOn para mantener la refrigeraci6n
y la carburaci6n de la manera m_s Optima.
Figura 25
MANTENIMIENTO
DE LAS CUCHILLAS
PRECAUCION:
Antes de desmontar las
cuchillas, asegQrese de que se haya parado el
motor y quite la Ilave. Las cuchillas pueden estar
muy aflladas. Utilice guantes o envu61valas en una
toalla antes de manejarlas.
Inspeccione diariamente las cuchillas para ver si estSn rectas,
afiladas y equilibradas. CSmbielas si est_n agrietadas,
desgastadas, dobladas o desequilibradas.
NOTA: Mantenga afiladas las cuchillas. Si se corta c6sped
con unas cuchillas romas, los resultados serSn p6simos, y el
motor sufrirA una carga adicional al ralentizarse la velocidad
de corte del cortac6sped.
E - 29
PRECAUCION:
NO afilar de acuerdo a este esquema
No intente nunca enderezar
una cuchilla que est6 doblada ni soldar una
cuchilla agrietada. Cambie siempre por una
nueva para garantizar una mayor seguridad.
2
Para afilar las cuchillas, desm6ntelas insertando un bloque
de madera y girando el perno de la cuchilla en sentido
antihorario, consulte figura 26.
ZZZZZZZZZZZZZI I
DESECHE si mide m_s
de 1,27 cm (1/2 pulg.)
1
Bloque
Figura 26
Afilar de acuerdo a este esquema
OE3356
1. Filo cortante
2. Esquina cuadrada
PRECAUCION:
Lleve
de
seguridad para los
ojossiempre
cuando protecci6n
afile las cuchillas.
Utilice guantes gruesos o envuelva las cuchillas en una
toalla para protegerse las manos contra cortes. Inserte las
cuchillas en un tornillo de banco y utilice una lima de punta
afilada o una rectificadora. Afile la cuchilla a Io largo del
_ngulo original hasta que la punta est6 de nuevo a un
_ngulo de 30.
3. Erosi6n del extractor
de aire
4. Extractor de aire
Figura 27
OE3361
IMPORTANTE: Cuando se afllen cuchillas se debe afilar
la misma cantidad en cada lado. Unas cuchillas desequilibradas
provocarSn unas vibraciones excesivas y pueden hacer que
los ejes se desgasten prematuramente.
Revise el equilibrado de las cuchillas insertando una varilla
horizontal por su orificio central. El lado pesado de la cuchilla
caer& Afile el lado pesado de la cuchilla hasta que 6sta
quede equilibrada, consulte figura 28.
Despu6s de afilarlas, m6ntelas en la plataforma de corte.
Las aletas deben quedar orientadas hacia arriba. Coloque
de nuevo el perno y la arandela de cierre de las cuchillas.
Revisi6n de la cuchilla del cortac6sped
Varilla de
equilibrado
Figura 28
E - 30
LIMPIEZA DE LA HIERBA ACUMULADA
EN LA PLATAFORMA
PRECAUCION:
3. Monte una nueva correa de transmisi6n asegurSndose
de guiarla segL_nel adhesivo de la base del panel del
suelo, consulte figura 29.
4. Apriete las dos tuercas de 3/8-16" del brazo de tensi6n
del perno en U hasta que el resorte de extensi6n mida
7,7"- 7,8" de un extremo a otro del enganche.
Antes de eliminar la hierba
acumulada, no olvide parar el motor y retirar
la Ilave.
5. Baje la base del panel.
Si se limpia regularmente la parte inferior de la plataforma
se Iograr8 una m_xima eficiencia de corte. Limpie la parte
inferior de la plataforma tan a menudo como pueda.
Libere la tensi6n aqui.
Para poder acceder a la parte inferior de la plataforma, pise
el pedal de elevaci6n de la plataforma y bloqu6elo en la
posici6n de transporte. Mueva el ajuste de la altura de corte
de la plataforma al punto m_s elevado. Eleve la parte frontal
de la unidad de alimentaci6n y suj6tela con soportes.
Limpie la hierba acumulada bajo la plataforma y el protector
de descarga. NO use mangueras a alta presi6n ni
pulverizadores.
CORREAS
Inspeccione las ranuras y las bridas de la polea de la correa
para ver si est_n desgastadas. Una correa nueva, o una en
buen estado, no debe hacer contacto con la parte inferior
de la ranura de la polea. Cambie la correa cuando toque la
base de la ranura para evitar que resbale excesivamente.
Guiado de la correa
de transmisi6n de la
plataforma
Tenga cuidado cuando cambie una correa para no pillarla
con la polea.
Mantenga bien alejados el aceite y la grasa de las correas
y no utilice nunca pasta antideslizante para correas.
Se deben revisar regularmente las correas y cambiarse
aproximadamente a intervalos de 200 horas. Las correas
deben cambiarse siempre que muestren agrietamiento,
falten piezas, tengan quemaduras por fricci6n, u otros da_os
externos. Unas grietas peque_as o un pulido de fSbrica son
algo normal.
Las ramas peque_as u otros residuos similares pueden Ilegar
a la parte superior de la plataforma y entrar en las poleas,
rompiendo las correas o sac_ndolas de las poleas.
AsegQrese de que no haya residuos en la zona que se
va a cortar, y que las protecciones de las correas est6n
montadas antes de cortar.
Ajuste la Iongitud
de la tensi6n del resorte
a 7,7"- 7,8"
De un extremo al otro
del enganche.
Para garantizar una larga duraci6n de las correas, utilice
siempre correas originales Ariens.
Extraccibn
e instalacibn
de la correa de transmisibn
Figura 29
iADVERTENCIA! La mayor parte del trabajo
de servicio requiere apagar el motor. Para evitar
accidentes durante el trabajo con el cortac6sped,
quite la Ilave de contacto y desconecte el cable
negativo (-) de la bateria.
Extraccibn
e instalacibn
de la correa de la bomba
1. El cortac6sped debe estar sobre una superficie firme
y nivelada, el interruptor de la TDF desconectado, el
motor apagado, las palancas de control de la direcci6n
en posici6n de estacionamiento, el cable negativo de
la bateria desconectado, y la palanca de control de la
elevaci6n desbloqueada.
1. Con la plataforma en posici6n de transporte, levante
el panel del suelo.
2. Afloje las dos tuercas de 3/8-16" del brazo de tensi6n
con perno en U para liberar tensi6n en la correa
y sSquela de la polea tensora.
2. Coloque la plataforma en su posici6n m_s elevada.
E-31
3. Liberelatensi6ndela correadelaplataforma
desenganchando
el brazodetensi6ndelaplataforma.
Saquelacorreadelembrague
el6ctrico.
Noesnecesario
sacarla correadeningunapolea.
9. Instale la correa de la plataforma en la polea del
embrague el6ctrico.
10. Tense correctamente la polea tensora de la correa
de la plataforma segQn las instrucciones de ExtracciOn
e instalaciOn de la correa de transmisiOn en la pSgina 31.
IMPORTANTE: Tenga cuidado cuando libere la tensi6n
de la correa porque la presi6n del brazo puede provocar
un accidente o da_ar la unidad.
,
11. Conecte el cable negativo de la bateria
Guiado de la correa - Bombas
Libere la tensi6n de la correa de la bomba introduciendo
una barra de casquillo de 3/8" en el agujero cuadrado
del brazo de tensi6n. Tire del brazo de tensi6n y tire de
la correa hasta sacarla de la parte posterior de la polea
del motor.
5. Saque la correa de la polea de la bomba. Pase la correa
por encima de la polea para poder desmontarla de las
otras poleas.
_nsora
6. Una vez que se desmonta la correa de las poleas de la
bomba, deber_ salir f_cilmente de la polea del motor
y de la polea tensora.
7. Monte la nueva correa coloc_ndola por encima de las
poleas de la bomba. Guie la correa como se observa
en figura 30.
Figura 30
8. Tire de la polea tensora, coloque la correa en posici6n
y suelte lentamente la polea tensora para tensar la
correa.
Sistema
_,
La gasolina que permanezca en el sistema de combustible
durante largas temporadas sin un estabilizador se deteriorar8
y generar_ dep6sitos de goma en el sistema. Estos dep6sitos
pueden da_ar el carburador y los manguitos, filtro y dep6sito
de combustible. Evite la formaci6n de dep6sitos en el sistema
de combustible durante el almacenamiento a_adiendo un
estabilizador de calidad al combustible. Utilice la relaci6n
iADVERTENCIA!
LAS LESIONES.
Antes
de proceder, EVITE
lea y comprenda
toda
la secci6n de Seguridad.
A CORTO PLAZO
NUNCA limpie la unidad con agua a alta presi6n ni
la almacene a la intemperie.
de mezcla recomendada que encontrar8 en el recipiente
del estabilizador de combustible.
Revise la unidad en busca de cualquier signo de desgaste,
ruptura o da_o.
Para tratar el sistema de combustible antes
del almacenamiento:
Mantenga todas las tuercas, pernos y tornillos apretados
adecuadamente y asegQrese de que la unidad est_ en
buenas condiciones de funcionamiento.
1. A_ada estabilizador de combustible de acuerdo
con las instrucciones del fabricante.
Almacene la unidad en un 8rea fresca, seca y protegida.
A LARGO
de combustible
2. Ponga el motor en marcha durante al menos 10 minutos
despu6s de haber a_adido estabilizador para permitir
que Ilegue al carburador.
PLAZO
Limpie la unidad a fondo con un jab6n suave y agua a baja
presi6n y lubrique (consulte Programa de mantenimiento en
la p_gina 19). Retoque todas las superficies que presenten
muescas en la pintura.
No almacene nunca el motor con combustible en el dep6sito
dentro de un edificio en el que existan posibles fuentes
de ignici6n.
Quite peso de las ruedas colocando bloques por debajo
de la estructura o el eje.
PARA SACAR LA UNIDAD
DEL ALMACENAMIENTO
Limpie y cargue la bateria. Cargue la bateria cada tres
o cuatro semanas cuando se almacene la unidad.
1. Consulte el manual de mantenimiento del motor
y prepare el motor para su mantenimiento.
2. Ponga combustible nuevo y limpio en el dep6sito
de combustible.
3. Comenzar el programa de mantenimiento.
4. Cargar la bateria.
E - 32
PROBLEMA
Vibraciones excesivas
POSIBLE
CAUSA
CORRECCION
1. Afianzadores del eje/la cuchilla flojos.
2. Interferencia de la cuchilla con la hierba
acumulada en la plataforma.
2. Limpiar la parte inferior de la plataforma.
Cuchillas desequilibradas.
4. Cuchillas rotas o muy desgastadas.
,
5. Los pernos de montaje del motor est_n
sueltos.
,
Altura de corte
irregular
1. Apretar de nuevo o cambiar si es
necesario.
Polea del motor/polea tensora/cuchillas
flojas
3. Equilibrar las cuchillas. Consulte
Mantenimiento de las cuchillas en la
pSgina 29.
4. Cambiar las cuchillas en conjuntos de tres.
5. Apretar los tornillos de montaje del motor.
6. Apretar la polea.
7. Polea del motor da_ada.
7. Contactar con el concesionario.
8. Cojinete del eje estropeado.
8. Contactar con el concesionario.
1. Cuchillas desafiladas.
1. Afilar o cambiar las cuchillas.
2. Cuchillas de corte dobladas.
2. Montar nuevas cuchillas.
3. Plataforma no nivelada.
3. Nivelar plataforma.
4. Ruedas antidesbroce no ajustadas
correctamente.
4. Ajustar altura de ruedas antidesbroce.
5. Limpiar la parte inferior de la plataforma.
6. Ajustar presi6n a 12 psi rueda trasera
Acumulaci6n de hierba bajo la plataforma.
6. Presi6n incorrecta de los neum_ticos.
,
y 20 psi frontal.
7. Eje de la cuchilla doblado.
7. Contactar con el concesionario.
8. Velocidad de avance demasiado rSpida.
8. Reducir la velocidad de desplazamiento.
Las cuchillas se
1. Corte en terrenos con arena.
1. Aumentar altura de corte de la plataforma.
desgastan demasiado
rSpido
2. Corte en terrenos rocosos.
2. Aumentar altura de corte de la plataforma.
3. Cambiar cuchillas en conjuntos de tres.
El corte no es limpio
3. Tratamiento t6rmico eliminado al afilar con
una rectificadora.
,
Cuchillas desafiladas.
1. Afilar o cambiar las cuchillas.
2. Cuchillas montadas al rev6s.
2. Montar las cuchillas correctamente.
3. RPM de las cuchillas demasiado lentas.
3. Utilizar la posici6n de aceleraci6n m_xima.
4. Consultar Servicio de neum4ticos y ruedas
en la pSgina 29. Neum_ticos poco inflados.
4. Plataforma de corte no nivelada.
5. Los neum_ticos del cortac6sped aplastan
la hierba.
6. Velocidad de avance demasiado rSpida.
Corte en lineas
o rastrillado en corte
de andanas
,
,
Demasiada humedad o c6sped muy tupido.
Cambie el sentido y vuelva a cortar.
Disminuir la velocidad de desplazamiento
7. Excesiva acumulaci6n de hierba bajo
la plataforma.
7. Limpiar la parte inferior de la plataforma.
1. Cuchillas desafiladas.
1. Afilar o cambiar las cuchillas.
2. Cuchillas montadas al rev6s.
2. Montar las cuchillas correctamente.
3. Condiciones demasiado hQmedas
para cortar.
3. Deje que se seque el c6sped antes
de cortar.
4. Excesiva acumulaci6n de hierba bajo
la plataforma.
4. Limpiar la parte inferior de la plataforma.
5. Disminuir la velocidad de desplazamiento
5. Velocidad de avance demasiado rSpida
para las condiciones.
Las cuchillas no giran
1. Correa de la plataforma desgastada,
floja o rota.
2. Se ha salido la correa de la plataforma
de la polea.
3. Fallo del embrague.
E - 33
1. Reemplazar la correa de la plataforma.
2. Volver a montar la correa de la plataforma.
3. Ponerse en contacto con el concesionario.
PROBLEMA
El cortac6sped desvia
la carga al tractor
POSIBLE
CAUSA
CORRECCION
1. RPM del motor demasiado bajas.
1. Usar posicidn de aceleraci6n m_xima.
2. Velocidad de avance demasiado rSpida.
2. Disminuir la velocidad de desplazamiento.
3. Excesiva acumulaci6n de hierba bajo
la plataforma.
3. Limpiar la parte inferior de la plataforma.
Ruido excesivo de la
plataforma de corte
1. Acumulaci6n excesiva de hierba bajo
la plataforma.
1. Limpiar la parte inferior de la plataforma.
Ralenti p6simo
del motor
1. Carburador mal ajustado.
2. Separaci6n entre electrodos incorrecta.
1. Contactar con el concesionario.
2. Revisar y reajustar separaci6n entre
electrodos.
El motor petardea
1. Carburador mal ajustado.
El motor funciona,
pero la unidad
no se mueve
1. Correa de transmisi6n floja o da_ada.
,
2. Nivel bajo del dep6sito de aceite hidrSulico.
3. V_lvula de derivaci6n de la bomba abierta.
Contactar con el concesionario.
1. Ajustar o cambiar la correa de
la transmisi6n.
,
Llenar el dep6sito.
4. Filtro de aceite hidrSulico obstruido.
3. V_lvula de derivaci6n cerrada.
5. Bomba o motor en mal estado.
4. Cambiar el filtro de aceite hidrSulico.
5. Contactar con el concesionario.
La unidad pierde
potencia o el sistema
hidr_ulico se calienta
en exceso
P6rdida de potencia o
el sistema no funciona
en ningQn sentido
1. Nivel de aceite hidrSulico demasiado bajo.
2. Falta la tapa del dep6sito de aceite
hidrSulico.
1. Llenar el dep6sito.
2. Lleno en exceso o contaminado con agua.
1. Restricciones en el depurador de aire.
1. Mantenimiento del filtro de aire.
2. P6sima compresi6n.
2. Contactar con el concesionario.
3. Las palancas de direcci6n deben ser
ajustadas.
3. Contactar con el concesionario.
4. V_lvula de derivaci6n hidrSulica abierta.
5. Cambiar la correa.
5. Correa de la bomba rota o desgastada.
6. Colocar la correa en la polea.
4. VSIvula de derivaci6n cerrada.
6. La correa de la bomba se ha salido de
la polea.
El motor se recalienta
El motor se para
durante el
funcionamiento
de las cuchillas
1. Rejilla de admisi6n de aire obstruida.
1. Limpiar rejilla de admisi6n de aire.
2. Aletas de refrigeraci6n atascadas.
2. Limpiar aletas.
1. El operador no est_ sentado en el asiento.
1. Sentarse en el asiento.
2. Sistema de seguridad defectuoso.
2. Contactar con el concesionario.
3. Fallo del cojinete del eje.
3. Contactar con el concesionario.
4. Cuchillas bloqueadas con suciedad.
4. Limpiar la parte inferior de la plataforma.
Baja presi6n del aceite
del motor
1. Nivel de aceite bajo.
1. A_adir aceite.
2. Aceite diluido o demasiado ligero.
2. Cambiar el aceite y Iocalizar la fuente
de contaminaci6n.
Alto consumo de aceite
1. Numerosas posibilidades.
1. Contactar con el concesionario.
E - 34
PROBLEMA
El motor no gira
POSIBLE
,
CAUSA
CORRECCION
La bateria est_ muerta.
1. Cargar bateria. Consultar Mantenimiento
de la bateria en la pSgina 23.
2. P6sima conexi6n a tierra.
2. Corregir conexi6n.
3. Mala conexi6n del terminal a la bateria.
3. Corregir conexi6n.
4. Malas conexiones de los cables.
4. Corregir conexi6n.
5. Interruptor del freno de estacionamiento
roto.
5. Contactar con el concesionario.
6. Interruptor de la TDF roto.
6. Contactar con el concesionario.
7. Las palancas de control de la direcci6n
no est_n en posici6n de estacionamiento.
7. Colocar palancas de control de la
direcci6n en posici6n de estacionamiento.
8. Interruptor de la TDF activado.
8. Desactivar interruptor.
9. El operador no est_ sentado en el asiento.
9. Sentarse en el asiento.
10. Hay un fusible fundido.
El motor gira pero no
arranca - Se produce
chispa en la bujia.
10. Reemplazar fusible.
1. No hay combustible o tuberia atascada.
1. Llenar dep6sito o cambiar tuberia.
2. Solenoide de combustible en mal estado.
2. Contactar con el concesionario.
3. Suciedad en el filtro de combustible.
3. Reemplazar filtro de combustible.
4. Suciedad o agua en el combustible,
o combustible pasado.
4. Contactar con el concesionario.
5. Combustible incorrecto en el sistema.
El motor gira pero no
arranca - No hay
chispa en la bujia.
El tractor tiene un
movimiento brusco
cuando arranca,
o funciona s61o
en un sentido.
5. Drenar dep6sitos y cambiar por
combustible apropiado.
6. El estrangulador no est_ activado.
6. Mover palanca del estrangulador
a la posici6n activada.
1. Interruptor de la TDF activado.
1. Desactivar interruptor de la TDF.
2. Las palancas de la direcci6n no est_n
en posici6n de estacionamiento.
2. Colocar palancas en posici6n
de estacionamiento.
3. El operador no est_ sentado en el asiento.
3. Sentarse en el asiento.
4. Interruptor del asiento defectuoso.
4. Contactar con el concesionario.
5. Interruptor del freno de estacionamiento
roto.
5. Contactar con el concesionario.
1. Contactar con el concesionario.
1. Las palancas de control de la direcci6n
necesitan ser ajustadas.
2. Fallo de la bomba hidrSulica.
2. Contactar con el concesionario.
3. Fallo del motor de las ruedas.
4. V_lvula de derivaci6n cerrada.
3. Contactar con el concesionario.
4. V_lvula de derivaci6n abierta.
El tractor se desplaza
de forma casi
imperceptible cuando
las palancas
direccionales est_n
en punto muerto.
1. Las palancas de control de la direcci6n
necesitan ser ajustadas.
1. Contactar con el concesionario.
El tractor se mueve
en circulos o cambios
bruscos.
1. Las palancas de control de la direcci6n
necesitan ser ajustadas.
2. Fallo de la bomba hidrSulica.
1. Contactar con el concesionario.
2. Contactar con el concesionario.
3. Fallo del motor de las ruedas.
4. Ajustar presi6n de los neum_ticos.
3. Contactar con el concesionario.
4. Neum_ticos a una presi6n incorrecta.
Vibraciones an6malas.
1. Pernos de montaje del motor flojos.
1. Apretar los pernos del motor.
2. Polea del motor floja.
2. Tensar la polea.
3. Polea del motor da_ada.
3. Contactar con el concesionario.
E - 35
Numero
de pieza
89240500
Nurnero
de pieza
Descripcion
Nurnero
de pieza
Juego ROPS (sistema de protecci6n
antivuelco) plegable
Cantidad
Descripcion
Cantidad
Descripcion
00181071
1
Filtro de aire - Primario
00181072
1
Filtro de aire - Secundario
(23hp Kawasaki)
00191199
1
Correa, transmisi6n de
la bomba hidrSulica
00180273
1
Cable del estrangulador
00181296
1
Cable del acelerador
00180231
1
Amortiguador, control
de la direcci6n
00191378
1
Correa, plataforma de 48"
00192015
1
Correa, plataforma de 52"
00181073
1
Filtro de aceite del motor
00191107
3
Cuchilla, plataforma de 48"
00181060
1
Filtro de combustible
00191108
3
Cuchilla, plataforma de 52"
00181251
1
03845300
1
Protector de descarga
Dep6sito del combustible
y tap6n
03848859
1
Protector, correa de la
plataforma lado izquierdo
00180909
1
Filtro de aceite hidrSulico
AA191600
1
03848959
1
Protector, correa de la
plataforma lado derecho
Tap6n del dep6sito
de aceite hidrSulico
00105684
1
Llave de encendido
00191517
2
Conjunto del v_stago,
plataformas de 48"
00191621
1
Ventilador de refrigeraci6n
de la bomba
00191500
2
Conjunto del vSstago,
plataforma de 52"
03551000
1
Solenoide del arranque
00356473
1
Resorte, extensi6nEjes de plataforma
00180620
1
Interruptor de encendido
00191256
1
Interruptor de seguridad
00136574
1
Interruptor de engranaje
de la TDF
00181074
1
Interruptor del asiento
03785659
1
Horquilla soldada
AA191200
1
Arn6s de cableado
00191201
1
Rueda, calibre - 5,0"
E - 36
Numero de modelo
Modelo
991800
991802
ProZoom 2352S
ProZoom 1948S
Kawasaki
Kawasaki
FH680V
FH580V
Motor
Numero del modelo del motor
Desplazamiento
del motor - pulg3 (cc)
41,2 (675)
35,7 (585)
Maximas RPM recomendadas
3600
Refrigeracion
Aire
por aire o por liquido
Velocidad
Maxima hacia delante - MPH (k/h)
10 (14,5)
Maxima hacia atras - MPH (k/h)
4 (6,4)
Cero
Radio de giro
Frenos
Freno mecanico integrado en motores de ruedas
Sistema electrico
Electrico
Motor de arranque
Bateria
12 Voltios CC 245 CCA
Toma de fuerza
Embrague electrico/freno
de la TDF
Combustible
Tipo de combustible
Sin plomo min. 87 octanos
Capacidad del deposito de combustible Gal. (L)
11,8 (44,8)
Transmision
Transmisi6n
Tipo
Aceite de la transmision
hidraulica
Utilice aceite de motor 20W-50 con una clasificaci6n SL API
Filtro de aceite hidraulico
Si
Tama_o y peso
Longitud - pulg. (cm)
Ancho (con la tolva elevada) - pulg. (cm)
72,7 (184,7)
53,6 (136,1)
Altura - pulg. (cm)
Peso - Ib (kg)
48.5 (123,2)
47 (119,3)
963 (436,8)
955 (433,2)
Neumaticos
Tama_o de los neumaticos delanteros pulg. (cm)
Rueda de la roldana de 11 x 4,5-6
Tama_o de neumaticos traseros pulg. (cm)
23 x 10,5-12, 4 capas
Presion de neumaticos delanteros - psi (kPa)
20 (137,9)
Presion de neumaticos traseros - psi (kPa)
12 (82,7)
Plataforma de corte
Elevador de la plataforma de corte
Resorte de ayuda de elevaci6n a pedal
Anchura de corte - pulg. (cm)
52 (132,0)
Altura de corte - pulg. (cm)
Incrementos
pulg. (cm)
48 (121,9)
1,5 - 5,5 (3,8 - 14,0)
de la altura de corte -
0,25 (0,6)
E - 37
Garantia limitada de dos ahos
para clientes comerciales de la gama
C sped y Jardin
Ariens Company (Ariens) garantiza al comprador original que los productos de la marca Ariens y Gravely fabricados por
Ariens, designados o etiquetados como productos comerciales por Ariens, y vendidos despu6s del 31 de diciembre de 2007
se hallar_n libres de defectos de material y de fabricaci6n durante un periodo de dos a_os a partir de la fecha de compra o de
1000 horas de uso, Io que quiera que ocurra antes. Un distribuidor autorizado Ariens (productos de la marca Ariens) o un
distribuidor de Gravely (productos de la marca Gravely) reparar8 cualquier defecto de material o de fabricaci6n, y reparar8 o
cambiar_ cualquier pieza defectuosa, sujeto alas condiciones, limitaciones y exclusiones establecidas aqui. Dicha
reparaci6n o sustituci6n se realizar8 sin cargo alguno al comprador original (mano de obra y piezas), excepto en Io indicado
anteriormente.
Garantia limitada de por vida sobre la carcasa de la plataforma
de corte
La carcasa de la plataforma de los cortac6sped est_ garantizada al comprador original contra cualquier defecto de
material o de fabricaci6n durante todo el tiempo en que el comprador original sea el propietario del producto. Cualquier
defecto de material o de fabricaci6n de la plataforma de corte ser8 reparado sin cargo alguno (piezas y mano de obra) al
comprador original durante un periodo de dos a_os o 1000 horas de uso, Io que quiera que ocurra antes. Despu6s de
estos dos a_os o 1000 horas de uso, se cambiarSn sin cargo alguno las piezas necesarias para reparar cualquier
defecto de material o de mano de obra de la plataforma de corte, no asi la mano de obra, durante todo el tiempo que el
comprador original sea el propietario del producto.
Garantia limitada de por vida sobre el chasis principal
Se garantiza el chasis principal al comprador original contra cualquier defecto de material o de fabricaci6n durante todo
el tiempo que el comprador original sea el propietario del producto. Cualquier defecto de material o de fabricaci6n del
chasis principal ser_ reparado sin cargo alguno (piezas y mano de obra) al comprador original durante dos a_os o 1000
horas de uso, Io que quiera que ocurra antes. Despu6s de estos dos a_os o 1000 horas de uso, se cambiar_n sin cargo
alguno las piezas necesarias para reparar cualquier defecto de material o de mano de obra del chasis principal, no asi la
mano de obra, durante todo el tiempo que el comprador original sea el propietario del producto.
Garantia limitada de tres a_os sobre los ejes de la plataforma
de corte
Los ejes de la plataforma del cortac6sped est_n garantizados al comprador original durante tres a_os a contar desde la
fecha de compra. Cualquier defecto de material o de fabricaci6n en los ejes de la plataforma del cortac6sped ser_
reparado sin cargo alguno (piezas y mano de obra) al comprador original durante un periodo de dos a_os a partir de la
fecha de compra. Despu6s de esos dos a_os, se proporcionarSn las piezas necesarias para reparar cualquier defecto de
material o de fabricaci6n en los ejes de la plataforma de corte de obra sin cargo alguno, pero no la mano de obra.
Garantia limitada de un a_o sobre cortacesped
de empuje manual de 21 pulgadas
Se garantiza que los cortac6sped de empuje manual de 21 pulgadas etiquetados o designados por Ariens como
productos profesionales/comerciales
utilizados para uso profesional, agricola, comercial o industrial al comprador
original se hallarSn libres de defectos de material y de fabricaci6n durante un periodo de un a_o a partir de la fecha de
compra.
Garantia limitada de 90 dias sobre piezas de servicio y accesorios
Se garantiza que las piezas de servicio originales y accesorios de marca Ariens o Gravely est_n libres de defectos de
material y de fabricaci6n durante un periodo de 90 dias a partir de la fecha de compra. Un distribuidor autorizado Ariens
o de Gravely reparar_ o sustituir8 cualquier pieza o accesorio en estos casos sin cargo alguno, excepto mano de obra,
durante dicho periodo.
Si un producto se arrienda o se alquila, la duraci6n de estas garantias ser8 entonces de 90 dias partir de la fecha de compra.
Excepciones,
Limitaciones,
Exclusiones
Responsabilidades
de los clientes
Registrar el producto inmediatarnente
en el momento de la venta. Si el distribuidor no registra el producto, el cliente
debe rellenar la tarjeta de registro del aparato y devolverla a Ariens Company, o deber8 registrarse online en
www.ariens.com o www.gravely.com.
ARIENS
COMPANY
GRAVELY¢ I STENS® I LOCKE® I NATIONAL® I BYNORM® I EVERRIDE® I GREAT DANE ®
Com Lawn 2008
38
Paraconseguir
unserviciobajogarantia,el compradororiginaldebe:
• Llevara caboel mantenimiento
y ajustesmenoressegOnel manualdelpropietario.
• Notificarpuntualmente
a Arienso a unrepresentante
deservicioautorizado
deArienso Gravelydela necesidad
de
reparaci6n
bajogarantia.
• Transportar
delproductoa y desdeel lugardereparaci6n
cubiertoporla garantia.
• Lasreparaciones
bajogarantiadebenserrealizadas
porunrepresentante
deservicioAriens.
Parabuscarunrepresentante
autorizado
deserviciot6cnicoArienso Gravely,
p6ngase
contacto
conAriensen:
655W.RyanStreet
Brillion,WI 54110
(920)756- 2141
www.ariens.com
www.gravely.com
Limitaciones
Las baterias s61o se garantizan por un periodo de 12 meses a partir de la fecha de compra, en base a prorrateo. Durante
los primeros 90 dias del periodo de garantia, se sustituir8 una bateria defectuosa sin cargo alguno. Si el periodo aplicable
de garantia supera los 90 dias, Ariens asumir8 el coste prorrateado de cualquier bateria defectuosa, hasta Ilegar a los 12
meses a partir de la fecha de la compra.
Exclusiones
- Piezas no cubiertas
por esta garantia
• Los motores y accesorios del motor est_n cubiertos s61o por la garantia del fabricante del motor, y no est_n cubiertos por
esta garantia.
• Las unidades Eye-Q
garantia.
TM
y Scan-Mate
TM
est_n cubiertas por su propia garantia, no siendo incluidas en la presente
• Las piezas que no son piezas originales de las marcas Ariens o Gravely no est_n cubiertas por esta garantia.
• Las siguientes piezas de mantenimiento, servicio y recambio no est_n cubiertas por esta garantia a menos que figure en
la seccidn Limitaciones anterior: lubricantes, bujias, aceite, filtros de aceite, filtros de aire, filtros de combustible,
guarniciones de frenos, palancas del freno, zapatas, guias, cuchillas raspadoras, pernos de seguridad, cuchillas del
cortac6sped, aspas del cortac6sped, faros delanteros, bombillas, cuchillos, cuchillas.
• No est_n cubiertos por esta garantia los silenciadores, correas y neum_ticos en productos comerciales para c6sped y
jardin de marca Ariens y Gravely.
• Cualquier defecto que sea resultado del uso indebido, alteraci6n, montaje incorrecto, negligencia o accidente que
requiera reparacidn, no est_ cubierto por esta garantia.
• Esta garantia s61o se aplica a productos adquiridos en Estados Unidos (incluyendo Puerto Rico) y Canad& Para el resto
de paises, p6ngase en contacto con el punto de compra para obtener informaci6n sobre la garantia.
Renuncia
Ariens puede modificar con cierta frecuencia el dise_o de sus productos. Nada incluido en esta garantia se interpretar_ de tal
modo que obligue a Ariens Company a incorporar tales cambios de dise_o en los productos fabricados previamente, ni se
interpretarSn tales cambios como una admisi6n de que tales dise_os eran defectuosos.
LIMITACION
DE REMEDIOS
Y DAKIOS
La responsabilidad de Ariens Company bajo esta garantia y bajo cualquier garantia implicita que pueda existir se limita a la
reparaci6n o sustituci6n de cualquier defecto de fabricaci6n, y a la reparaci6n o sustituci6n de cualquier pieza defectuosa. No
podr8 hacerse responsable a Ariens Company de ningOn da_o fortuito, especial o indirecto (incluyendo la p6rdida de
beneficios). Algunos Estados no permiten la exclusi6n de da_os fortuitos o indirectos, por Io que la anterior limitaci6n podria
no aplicarse a usted.
RENUNCIA
DE GARANTiA ADICIONAL
Ariens Company no proporciona ninguna garantia, expresa o implicita, aparte de la expuesta de manera expresa en
la presente garantia. Si las leyes de su Estado determinan la aplicacion a Ariens de una garantia implicita de aptitud
o de idoneidad para un proposito particular, o de cualquier otro tipo de garantia implicita, dicha garantia implicita
estara limitada a la duracion de la presente garantia. Algunos Estados no permiten limitaciones a la duracion de
dichas garantias implicitas, por Io que la anterior limitacion podria no aplicarse a usted.
Esta garantia le proporciona derechos legales especificos y puede tener
tambi6n otros derechos que varian de Estado a Estado.
ARIENS COMPANY
GRAVELY¢ I STENS® I LOCKE®I NATIONAL® I BYNORM®I EVERRIDE®I GREAT DANE®
Com Lawn 2008
39
Ariens Company
655 West Ryan Street
Brittion, WI 54110-1072
920-756-2141
Fax 920-756-2407
www.ariens.com
& WARNING
&
The engine exhaust from this product
contains chemicals known to the State
of California to cause cancer, birth
defects or other reproductive harm.