1
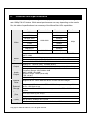
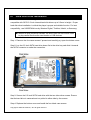
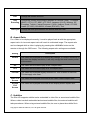
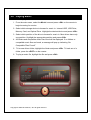
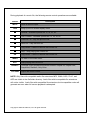
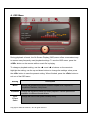
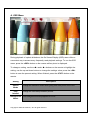
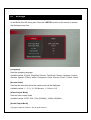
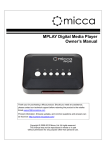
Micca Slim-HD User’s Manual
Thank you for purchasing a Micca product. Should you need any
assistance, please contact our technical support before returning the
product to the retailer. Email [email protected]
Product information, firmware updates, and common questions and
answers can be found at: http://content.miccastore.com/
Copyright © 2009-2012 Micca, Ltd. All rights reserved.
This manual may not be reproduced in whole or in part without
permission for any purpose other than personal use.
Copyright © 2009-2012 Micca, LTD. All rights reserved.
IMPORTANT!
For your personal safety, please read the following instructions carefully.
To reduce the risk of fire, electrical shock or damage to the player, do not expose
this device to humidity, rain, sand or excessive heat (caused by heating equipment
or direct sunlight).
Use the player in a well-ventilated environment to ensure proper cooling.
Do not open the player beyond which is required to install the internal hard disk drive,
as there is risk of electric shock. Contact a professional for repair.
Please follow the instructions enclosed with the player for key operation and
maintenance.
Usage Notice
Before plugging in this device, make sure your power supply voltage matches the
product. The working voltage of this player is marked on the AC power adapter.
Only use the AC power adapter that is supplied with this device.
Do not touch the socket with a wet hand.
Turn off the power when the device will not be used.
Do not place heavy objects on top of the player.
Do not use strong solvents to clean the surface of the player such as alcohol,
benzene, or thinner.
Copyright © 2009-2012 Micca, LTD. All rights reserved.
I.
General Introduction
Thank you for purchasing a Micca product.
The Micca Slim-HD is a portable 1080p Full-HD digital media player. It is capable of
playing digital videos, music and pictures stored on an internal hard drive or from
SD/SDHC flash cards and USB 2.0 compliant storage devices such as USB drives and
portable hard disk drives. The Micca Slim-HD supports a wide range of media file
formats, allowing its users to enjoy digital contents on the go or in the comfort of his or
her living room.
One Device to Store All Your Media Files
The Micca Slim-HD is ideal as the central storage for your media files. With playback
quality as good as that of a computer, you will never need to spend time copying large
files back and forth between computers. Just take the Micca Slim-HD to wherever you
may have a TV or monitor and enjoy!
Perfect For Travel
The Micca Slim-HD is your perfect travel companion. Take your media files with you on
a business trip and playback wherever you can find a TV or computer monitor, from
showing customers a product showcase video, to catching up on missed shows the
comfort of your hotel room. Take the Slim along on a road trip and you’ll never run out
of videos to play back to the kids.
Maximum Versatility
The Micca Slim-HD is also a portable hard disk drive enclosure. Simply install any
SATA 2.5-inch HDD and connect it to your computer’s USB port and read/write to it as
you please. Choose your own storage space, whether it’s a 40GB drive left over from
an upgrade, or a new 1TB drive. The Slim is only slightly larger than a regular portable
hard drive – so if you are going to carry a portable hard drive, why not carry one that
can also play back the media files stored on it.
NOTE: For best compatibility, use 5400RPM drives by Western Digital, Toshiba,
Hitachi, or Samsung.
Copyright © 2009-2012 Micca, LTD. All rights reserved.
II.
Features and Specifications
The Micca Slim-HD is a powerful digital media player, with the ability to decode high bit
rate 1080p Full-HD videos. While actual performance can vary depending on the media
file, this table of specifications is a summary of the Micca Slim-HD’s capabilities.
Codec
100mbps
MPEG2
100mbps
MPEG4-XVID
100mbps
Photo
Video
Output
Audio
Output
Internal
Drive
External
Storage
Product
Size
Weight
Power
Packing List
1920x1080
100mbps
H.264
70mbps
H.263
100mbps
WMV9/VC1
100mbps
RMVB
Music
Max stream
MPEG1
DIVX
Video
Max resolution
1280x720
Max frames
30fps
30mbps
Files: MKV, AVI, TS/TP, MP4/M4V, MOV, VOB, PMP, RM/RMVB, MPG,
M2TS, WMV
Bit rate: 32kbps – 320kbps
Formats: MP3, WMA, OGG, FLAC, APE, AAC, AC3, ATRA, DTS
Formats: JPG, JPEG, BMP, GIF, PNG
Analog AV: 720x576 (PAL), 720x480 (NTSC)
HDMI: 480p, 720p (50Hz/60Hz), 1080i (50Hz/60Hz), 1080p (50Hz/60Hz)
Analog Stereo audio output level: 2.0V ± 0.2Vp
Frequency Range: 20Hz-20KHz ≤2dB
SNR: >80dB (1kHz 0dB)
Dynamic range: >80dB (1kHz 0dB)
THD: ≤0.04%
HDMI PCM Digital Stereo
Supports all 2.5” SATA hard disk drives. 9.5mm max drive height.
Supports all USB drives with NTFS or FAT32 file system, including USB hard
drives, USB flash drives.
Supports all SD and SDHC flash memory cards with NTFS or FAT32 file
system
3.15”(W) x 5.35”(L) x 0.79”(H)
Player without drive: 4 ounce
AC 90-230V, 50/60Hz, DC 5.2V 2A
AC Power Adapter, Remote Control, AV Cable, USB Cable, User’s Manual
Copyright © 2009-2012 Micca, LTD. All rights reserved.
III.
Hard Disk Drive Installation
The Micca Slim-HD has an integrated Serial ATA hard disk drive interface that is
compatible with SATA 2.5-inch internal hard disk drives up to 9.5mm in height. Proper
hard disk drive installation is critical the player’s proper and reliable function. For best
compatibility, use 5400RPM drives by Western Digital, Toshiba, Hitachi, or Samsung.
Without a hard disk drive installed, the Micca Slim-HD can still be used
to play media files from the card reader or USB devices.
Step 1: Remove the four case screws if present and carefully pry open the bottom cover.
Step 2: Lay the 2.5-inch SATA hard drive down flat in the drive bay and slide it towards
the SATA connector to make the connection.
Step 3: Secure the 2.5-inch SATA hard drive with the two silver drive screws. Ensure
that the hard drive is centered and not pulled to either side by the screws.
Step 4: Replace the bottom cover and install the four black case screws.
Copyright © 2009-2012 Micca, LTD. All rights reserved.
IV.
Product Layout and Connections
Copyright © 2009-2012 Micca, LTD. All rights reserved.
A. Power
Only use the supplied AC power adapter to provide 5.0-5.2VDC power to the Micca
Slim-HD. Using a different power adapter may damage the player. Do not cut off power
to the device while the unit is turned on as this may cause serious damage to the hard
drive and result in data loss. Make sure that the player is in standby mode before
disconnecting power. The player consumes a small amount of power in standby and
should be disconnected from power to conserve energy if not planned to use for a while.
The blue light on the player will always be on when power is
connected. It does not indicate whether the player is on or off.
B. USB to Computer
The supplied USB cable can be used to connect the Micca Slim-HD to a computer and
function as an external hard disk drive. No additional software or drivers are needed for
the Micca Slim-HD to be recognized by the computer. Once connected, files can be
copied to and from the Micca Slim-HD as desired using the standard file management
functions of the computer’s operating system.
The Micca Slim-HD will draw power through the USB cable when
connected to the computer and does not need 5.2VDC power.
If the hard disk drive is new, it will need to be partitioned and formatted before it can be
recognized and used by the computer. For directions on how to partition and format a
new hard disk drive within Windows XP/2000, please refer to the following Microsoft
tutorial: http://support.microsoft.com/kb/309000
The process is very similar for Windows Vista/7. The Micca Slim-HD is able to
recognize up to 4 FAT32/NTFS partitions on the hard drive. NTFS partitions are
strongly recommended for maximum efficiency, performance, and compatibility with
large media files.
To prevent data loss and potential hard disk drive damage, do not disconnect the Micca
Slim-HD from the computer until all file copy/move/delete activities have completed and
the blue status light is solid and not blinking.
Copyright © 2009-2012 Micca, LTD. All rights reserved.
C. Analog AV Output
The Micca Slim-HD can be connected to analog TVs and display devices through its AV
Out connector. Only use the supplied 3.5mm-to-RCA cable to ensure correct signal
polarity and avoid damage to the player and TV/display. The RCA cable connectors are
color coded to match the AV input on TVs and display devices as follows:
Red
Right Audio Channel
White
Left Audio Channel
Yellow
Composite Video
The Micca Slim-HD must be set to NTSC or PAL Composite mode for the analog AV
output to function. If there is no picture or the picture is distorted after connecting the
AV Output, press the <AV> button on the remote to toggle between NTSC and PAL.
D. HDMI Output
The Micca Slim-HD can be connected to HDTVs and digital display devices through its
HDMI connector, sending both audio and video signals over one cable. Only use HDMI
cables that have been certified to be v1.3a or higher to ensure signal quality. The Micca
Slim-HD’s HDMI output resolution can be set to 720p (50/60Hz) and 1080i/p (50/60Hz).
Do not plug/unplug the HDMI output with the power connected to the
player. Doing so may damage the player.
The Micca Slim-HD must be set to a valid HDMI output mode for the HDMI connection
to output a correct signal. By default, the Slim-HD will set itself to HDMI output when
powered on if a HDMI cable is detected. If there is no picture or the picture is distorted,
press the <HDMI> button on the remote to set the player’s output mode to 720p. Other
HDMI display modes can then be set through the Setting menu.
Note: The player cannot use both the HDMI and AV output at the same time and
will automatically use HDMI if an HDMI connection is detected on power up. Turn
the “Auto Detect HDMI” setting off in the settings menu to disable this feature.
Copyright © 2009-2012 Micca, LTD. All rights reserved.
V.
Micca Slim-HD Startup
After powering on, the Micca Slim-HD displays the Home screen. The Home screen
presents five icons for access to different types of media files or settings:
Files
Browse and play all compatible file types.
Music
Browse and playback compatible audio files.
Movies
Browse and playback compatible video files.
Photos
Browse and display compatible image files.
Setting
System settings.
Use the <> and <> buttons on the remote to highlight the desired media type and
press the <OK> button to select it. Refer to sections for individual media types for
additional information.
Use the <File>, <Photo>, <Music>, and <Movie> buttons on the
remote to quickly select a browsing method from the home screen.
Copyright © 2009-2012 Micca, LTD. All rights reserved.
VI.
Playing Movies and Videos
To browse and view movies and videos:
1. From the main menu, select the Movies icon and press <OK> on the remote to
begin browsing for movies.
2. Select which storage device to browse for movies in: Internal HDD, USB Drive,
Memory Card, and Optical Drive. Highlight the desired device and press <OK>.
3. Select which partition of the drive to browse for movies in. Most drives have only
one partition. Highlight the appropriate partition and press <OK>.
4. All folders and compatible movie files found will be displayed. If no folders or
compatible movie files are found, a message will pop up indicating “No
Compatible Files Found!”
5. To browse thin a folder, highlight the folder and press <OK>. To back out of a
folder, press the <EXIT> on the remote.
6. To play a movie, highlight the movie and press <OK>.
NOTE: Only files with compatible video file extensions MKV, AVI, TS/TP, MP4/M4V,
MOV, VOB, PMP, RM/RMVB, MPG, M2TS, and WMV are visible in the file/folder
Copyright © 2009-2012 Micca, LTD. All rights reserved.
directory. Video files with incompatible file extensions will not be visible. Video files with
compatible file extensions but incompatible codec will generate an error when played.
During playback of a movie, the following remote control operations are available:
Button
MUTE
OSD
Description
Mute all sound output.
Bring up the on screen display menu.
Rewind - Available speeds are 1x, 2x, 4x, 8x.
Fast Forward - Available speeds are 1x, 2x, 4x, 8x.
Previous File - Play the previous file.
Next File - Play the next file.
Play/Pause - Pause or resume the current file.
Stop - Stop playing the current file.
OK
Play/Pause - Pause or resume the current file.
MENU
Go back to the main menu.
EXIT
Stop playing the current file.
16:09/4:3
Aspect Ratio - Available modes are Default, 4:3, 16:9, Fit View, Video Full
Screen, Screen Full Screen.
GOTO
Jump to a specific time in the video; use the arrow buttons to enter the
time and press <OK> to jump to the entered time.
REPEAT
Changes video playback sequence between Repeat All, Repeat One,
Random.
AUDIO
SUBTITLE
VOLUME
Change the audio track, if multiple audio tracks are available.
Turns subtitles on or off. Use the OSD menu to change subtitle track.
Adjust the audio volume.
Copyright © 2009-2012 Micca, LTD. All rights reserved.
A. OSD Menu
During playback of a movie, the On Screen Display (OSD) menu offers a convenient
way to access many frequently used playback settings. To use the OSD menu, press
the <OSD> button on the remote while a movie is playing.
To change a playback setting, use the <> and <> buttons on the remote to
highlight the setting; use the up and down buttons to change the settings value and
press <OK> to save the present setting. When finished, press the <Exit> button to exit
out of the OSD menu.
Setting
Mode
Description
Change the playback sequence between Repeat One, Repeat All,
Sequential, Random, Only Once.
Sub
Enable
Enable or disable subtitle display.
Subtitle
Change the subtitle track being displayed.
Color
Change the subtitle text color between White, Gray, Red, Green, Cyan,
Magenta, Yellow.
Copyright © 2009-2012 Micca, LTD. All rights reserved.
Size
Text
Encoding
Change the subtitle text size.
Change the subtitle text encoding between S-Chinese (GBK), T-Chinese
(BIG5), UTF-8, UTF-16BE, UTF-16LE, Japanese (S-JIS), Western, SE
European, Turkish, Central European, Cyrillic, Hebrew, Greek, CP1252,
Arabic (CP1256), ISO 8859-6, Korean (EUC-KR), Thai.
Time Sync Change the time sync between the subtitle and the video.
B. Aspect Ratio
For a video to be displayed correctly, it must be played back at with the appropriate
aspect ratio. An incorrect aspect ratio will result in a distorted image. The aspect ratio
can be changed while a video is playing by pressing the <16:9/4:3> button on the
remote or through the OSD menu. The following aspect ratio settings are available.
Setting
Description
Default
The video will be played as-is without any change. If a video’s resolution is
less than the display resolution, it will only occupy the small center portion
of the screen.
4:3
The video will be forced to play at a 4:3 aspect ratio.
16:9
The video will be forced to play at a 16:9 aspect ratio.
Fit View
The video will be played slightly zoomed out. This is useful for use with
TVs that apply over-scan.
Video Full
Screen
The video will be played full screen at the video’s native aspect ratio.
Screen
Full
Screen
The video will be played full screen at the display screen aspect ratio.
C. Subtitles
The Slim-HD supports subtitle tracks embedded in video files or as external subtitle files.
When a video has both embedded and external subtitle files, the external subtitles will
take precedence. When using external subtitle files, be sure to place the subtitle file in
Copyright © 2009-2012 Micca, LTD. All rights reserved.
the same folder and has the same name as the video file. Multiple subtitle files for the
same video can be named as in the following example, where there are two subtitle files
containing English and Spanish:
My.Awesome.Movie.mkv
My.Awesome.Movie.eng.srt
My.Awesome.Movie.es.srt
To toggle subtitles on or off, press the <Subtitle> button while a video is playing. The
first subtitle track available will be displayed. To change to a different subtitle track,
open the OSD menu and change the Subtitle field to the desired track and press <OK>.
If the subtitle language file uses special character encoding, such as GBK for Chinese
subtitles, the subtitle may appear as symbols using the default UTF8 encoding. To
change to a different encoding, open the OSD menu and change the Subtitle codec field
to the desired value and press <OK>.
Copyright © 2009-2012 Micca, LTD. All rights reserved.
VII. Playing Music
To browse and play music:
1. From the main menu, select the Music icon and press <OK> on the remote to
begin browsing for movies.
2. Select which storage device to browse for music in: Internal HDD, USB Drive,
Memory Card, and Optical Drive. Highlight the desired device and press <OK>.
3. Select which partition of the drive to browse for music in. Most drives have only
one partition. Highlight the appropriate partition and press <OK>.
4. All folders and compatible music files found will be displayed. If no folders or
compatible music files are found, a message will pop up indicating “No
Compatible Files Found!”
5. To browse thin a folder, highlight the folder and press <OK>. To back out of a
folder, press the <EXIT> on the remote.
6. To play a music file, highlight the file and press <OK>.
Copyright © 2009-2012 Micca, LTD. All rights reserved.
During playback of a music file, the following remote control operations are available:
Button
MUTE
OSD
Description
Mute all sound output.
Bring up the on screen display menu.
Rewind - Available speeds are 1x, 2x, 4x, 8x.
Fast Forward - Available speeds are 1x, 2x, 4x, 8x.
Previous File - Play the previous file.
Next File - Play the next file.
Play/Pause - Pause or resume the current file.
Stop - Stop playing the current file.
OK
Play/Pause - Pause or resume the current file.
MENU
Go back to the main menu.
EXIT
Stop playing the current file.
REPEAT
Changes music playback sequence between Repeat All, Repeat One,
Sequential, Random, Only Once.
VOLUME
Adjust the audio volume.
NOTE: Only files with compatible audio file extensions MP3, WMA, OGG, FLAC, and
APE are visible in the file/folder directory. Audio files with incompatible file extensions
will not be visible. Audio files with compatible file extensions but incompatible codec will
generate an error when full screen playback is attempted.
Copyright © 2009-2012 Micca, LTD. All rights reserved.
A. OSD Menu
During playback of music, the On Screen Display (OSD) menu offers a convenient way
to access many frequently used playback settings. To use the OSD menu, press the
<OSD> button on the remote while a music file is playing.
To change a playback setting, use the <> and <> buttons on the remote to
highlight the setting; use the up and down buttons to change the settings value; press
the <OK> button to save the present setting. When finished, press the <Exit> button to
exit out of the OSD menu.
Setting
Mode
EQ Mode
Lyric
Focus
Color
Description
Change the playback sequence between Repeat One, Repeat All,
Sequential, Random, Only Once.
Change the equalizer preset for music playback. Various presets are
available for different sound effects.
Change the color of the lyrics currently sung.
Copyright © 2009-2012 Micca, LTD. All rights reserved.
Lyrics
Unfocus
Color
Lyric Play
Mode
Change the color of the lyrics not currently sung.
Change the lyric display stile between Karaoke, or Line Roll.
Copyright © 2009-2012 Micca, LTD. All rights reserved.
VIII. Viewing Photos
To browse and view photos:
1. From the main menu, select the Photo icon and press <OK> on the remote to
begin browsing for photos.
2. Select which storage device to browse for photos in: Internal HDD, USB Drive,
Memory Card, and Optical Drive. Highlight the desired device and press <OK>.
3. Select which partition of the drive to browse for photos in. Most drives have only
one partition. Highlight the appropriate partition and press <OK>.
4. All folders and compatible photos found will be displayed. If no folders or
compatible photos are found, a message will pop up indicating “No Compatible
Files Found!”
5. To browse thin a folder, highlight the folder and press <OK>. To back out of a
folder, press the <EXIT> on the remote.
6. To view a photo full screen, highlight the file and press <OK>.
Copyright © 2009-2012 Micca, LTD. All rights reserved.
While viewing a photo full screen, the following remote control operations are available:
Button
OSD
Description
Bring up the on screen display menu.
Play/Pause - Start slideshow.
Previous File - Previous photo.
Next File - Next photo.
Stop - Stop the slideshow.
OK
Play/Pause - Start slideshow.
MENU
EXIT
ZOOM
ROTATE
Go back to the main menu.
Stop viewing the current photo and show the file list.
Zoom in and out for the current photo.
Rotate the current photo.
NOTE: Only files with compatible photo extensions JPG, BMP, GIF, and PNG are visible
in the file/folder directory. Photos with incompatible file extensions will not be visible.
Copyright © 2009-2012 Micca, LTD. All rights reserved.
A. OSD Menu
During playback of a photo slideshow, the On Screen Display (OSD) menu offers a
convenient way to access many frequently used playback settings. To use the OSD
menu, press the <OSD> button on the remote while a photo is displayed.
To change a setting, use the <> and <> buttons on the remote to highlight the
setting; use the up and down buttons to change the settings value; press the <OK>
button to save the present setting. When finished, press the <EXIT> button on the
remote.
Setting
Description
Switch
Mode
Change the transition effect when going from one photo to the next
Play
Interval
Change the time delay between photos.
Background Turn background music playback on or off.
Music
Copyright © 2009-2012 Micca, LTD. All rights reserved.
IX.
Settings
The setting menu contains numerous configuration parameters that control the behavior
of the Micca Slim-HD during use. Press the <SETUP> button on the remote to access
the Settings at any time.
[Language]
Sets the operating language.
Available values: English, Simplified Chinese, Traditional Chinese, Japanese, Korean,
German, Spanish, French, Italian, Portuguese, Dutch, Russian, Polish, Turkish, Czech.
[Screen Saver]
Sets the idle time after which the screen saver will be displayed.
Available values: 1 / 2 / 3 / 10 / 30 Minutes, 1 / 2 Hours, Off.
[Video Output Mode]
Sets the video output mode
Available values: NTSC, PAL, 720p (50/60Hz), 1080i/p (50/60Hz)
[Audio Output Mode]
Copyright © 2009-2012 Micca, LTD. All rights reserved.
Sets the audio output mode
Available values: Normal, SPDIF LPCM, SPDIF RAWDATA
[Auto Play]
Automatically play media files found on the root directory of the external USB or
Memory Card. Auto play from internal HDD is not supported.
Available values: Off, Movie, Music, Photo.
[Auto Play DVD]
Automatically play DVD disc detected in an attached optical drive. Commercial DVDs
are not supported by the player due to encryption.
Available values: On, Off.
[Auto Detect HDMI]
Automatically detect if a HDMI connection is present when powering on. If detected the
player will automatically switch to HDMI output mode instead of AV output.
Available values: On, Off.
[Restore Default Setting]
When selected, resets all settings back to factory default
[System Information]
When selected, displays the current firmware version
**Firmware Updates – When available, firmware updates will be posted at
http://content.miccastore.com and will include installation instructions.
Copyright © 2009-2012 Micca, LTD. All rights reserved.
X.
Troubleshooting
The following are some common questions and answers. If the following does not
provide the answer you are looking for, please check the FAQ section on
http://content.miccastore.com to see if any updated answers have been posted. You
may also send an email to [email protected] for personalized help.
No video output, or distorted video on screen.
Most likely, the player has not been set to the correct output mode. If connected using
the AV Red/White/Yellow cable to the TV, press the <AV> button on the remote to
toggle the output mode. If connected using the HDMI output to the TV, press the <HDMI>
button on the remote to switch the player to HDMI output mode.
Not detected by computer when connected via USB cable.
Do not connect the power to the player when it is connected to a computer. Ensure that
an internal hard drive is installed in the player. If the internal hard drive is new, it must
be initialized/formatted before it will be detected by the computer (See chapter IV
section B of this manual for instructions). Try connecting the player directly to a USB
port on the computer, instead of through any USB Hubs.
If the drive beeps, it may not be getting enough power from the USB port. It is
recommended to use newer 5400RPM drives made by Western Digital, Toshiba, Hitachi,
or Samsung for best compatibility.
Player will not recognize internal hard drive when playing media files.
If the internal hard drive is new, it must be initialized/formatted before it will be detected
by the computer (See chapter IV section B of this manual for instructions). Be sure that
the drive is initialized using MBR partition table and uses NTFS file system. It is
recommended to use newer 5400RPM drives made by Western Digital, Toshiba, Hitachi,
or Samsung for best compatibility.
Copyright © 2009-2012 Micca, LTD. All rights reserved.
Information in this manual is believed to be accurate and reliable but Micca Ltd assumes no responsibility for its use
nor for any infringement of patents or other rights of third parties which may result from the use of this manual or the
product. Micca reserves the right to change product specifications at any time without notice.
Micca, Slim-HD, and the Micca logo are trademarks of Micca Ltd. Other trademarks referenced in this manual are the
properties of their respective owners.
© 2012 Micca Ltd. All rights reserved.
Copyright © 2009-2012 Micca, LTD. All rights reserved.