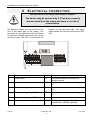
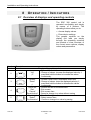
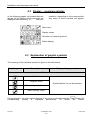
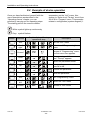
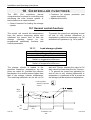
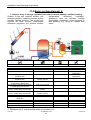
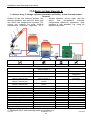
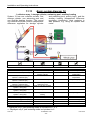
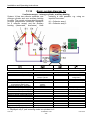
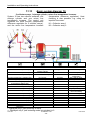
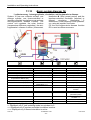
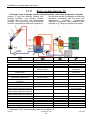
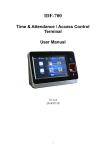
1
SDC 306
Microprocessor-controlled system control unit for solar thermal systems
Installation and Operating Instructions
IMPORTANT
Before installing and using this device, you must read through the
instructions carefully.
Failure to observe the instructions and safety information contained in
these installation and operating instructions will void the guarantee for
the device described/installed.
Store these instructions in a safe place.
15.06.2009
1316BED036-11B-E
Installation and Operating Instructions
Table of contents
1
2
3
SAFETY INSTRUCTIONS
SYMBOLS AND ABBREVIATIONS
DEVICE DESCRIPTION
3.1
3.2
4
5
4
5
6
Usage
Device features
6
6
OVERVIEW OF DEVICE COMPONENTS
DEVICE INSTALLATION
5.1
5.2
6
Opening the device (only by qualified personnel)
Wall-mounted installation
ELECTRICAL CONNECTION
6.1
6.2
7
8
10
Overview: 230 V connections for SDC 306
Attachment of temperature sensor
9
13
14
Overview of displays and operating controls
Display – maximum display
Explanation of graphic symbols
Example of device operation
MENU STRUCTURE
9.1
“Info”
9.2
“Program”
9.3
“Manual operation”
9.4
“Basic settings”
9.4.1
9.4.2
10
10
12
COMMISSIONING
OPERATION / INDICATORS
8.1
8.2
8.3
8.4
7
8
9
230 V connections
6.1.1
6
7
14
15
15
20
21
menu
21
menu
22
menu
23
menu
23
Code entry
Code change
25
25
CONTROLLER FUNCTIONS
26
10.1 General control functions
26
10.1.1
10.1.2
10.1.3
10.1.4
10.1.5
10.1.6
10.1.7
10.1.8
10.1.9
10.1.10
10.1.11
10.1.12
10.1.13
10.1.14
10.1.15
Load storage cylinder
Yield estimation / yield metering
Password
Auxiliary heating
Tolerance for solar yield
Increase in return line temperature
Return line monitor
Thermal transfer
Pump block protection
Solid fuel boiler
Swimming pool heating/secondary storage cylinder
Priority switching
Impulse-controlled circulation
Thermal circulation
Anti-Legionnaire’s disease function
10.2 System monitoring
SDC 306
26
27
27
27
27
27
28
28
28
28
28
29
29
29
29
30
1316BED036-11B-E
-2-
Date 06/09
Installation and Operating Instructions
10.2.1
10.2.2
10.2.3
11
30
30
30
SYSTEM DIAGRAMS
11.1
11.2
11.3
11.4
11.5
11.6
11.7
11.8
11.9
11.10
11.11
11.12
11.13
11.14
11.15
11.16
11.17
11.18
11.19
12
Sensor monitoring
Flow monitoring
System protection function
31
Basic system diagram 1:
Basic system diagram 2:
Basic system diagram 3:
Basic system diagram 4:
Basic system diagram 5:
Basic system diagram 6:
Basic system diagram 7:
Basic system diagram 8:
Basic system diagram 9:
Basic system diagram 10:
Basic system diagram 11:
Basic system diagram 12:
Basic system diagram 13:
Basic system diagram 14:
Basic system diagram 15:
Basic system diagram 16:
Basic system diagram 17:
Basic system diagram 18:
Basic system diagram 19:
32
33
34
35
36
37
38
39
40
41
42
43
44
45
46
47
48
49
50
RECTIFICATION OF FAULTS
52
12.1 Faults with error message
12.2 Faults without error message
52
53
13
14
TECHNICAL DATA SDC 306
RESISTANCE TABLE PT1000
i
SDC 306
54
54
Subject to change without notice
1316BED036-11B-E
-3-
Date 06/09
Installation and Operating Instructions
1
S AF E T Y
INSTRUCTIONS
This control unit must be disconnected from the mains before any
installation and wiring work is carried out.
This device may only be opened, connected and commissioned by trained
personnel. In so doing, the relevant safety regulations, especially VDE 0100
must be adhered to.
•
•
•
Prior to any installation or wiring
work on the electric motors, always
fully disconnect the device from the
operating voltage and ensure that the
mains supply cannot be reactivated.
Never mix up the connections for the
protective safety low voltage area
(sensor, flow meter) with the 230 V
connections. This could result in
damage and hazardous voltages to the
device itself and to the attached sensors
and devices.
Solar thermal systems can become very
hot. There is a risk of being burnt. Take
care when installing the temperature
sensor.
Install the SDC 306 in such a way that
no excessive operating temperatures
(>50°C) result, e.g. as a result of heat
sources.
•
SDC 306 is not protected against
splashing and dripping. You should
therefore install it in a dry location.
•
For safety reasons, the system may be
manually operated only for test
purposes. In this operating mode, there
is
no
monitoring
of
maximum
temperatures or sensor functions.
•
If there are signs of damage to the
control unit, cables or attached pumps
and valves, the systems must not be
operated.
•
Check whether the materials used for
the piping, thermal insulation, pumps
and valves are suitable for the
temperatures that will occur in the
system.
If you have any questions concerning your solar thermal system or your control unit, please
contact your installer or supplier for advice.
SDC 306
1316BED036-11B-E
-4-
Date 06/09
Installation and Operating Instructions
2
SYMBOLS
AN D AB B R E V I AT I O N S
Explanation of symbols used in operating instructions:
Warning!
This symbol indicates potential dangers and errors
Warning: 230 Volts
This symbol indicates risk to life through high voltages.
•
List
i
Information on operation/special features
Instructions/procedure
?
Test/check
Keypad for control unit
Frequently used abbreviations
Abbreviat Meaning
Abbrevia
ion
tion
TColl
Temperature of collector [°C]
Min
TCyl
Temperature of storage cylinder Max.
[°C]
TTh
Temperature for thermostat [°C] C
kWh
start
stop
%
Energy yield in kWh
Start value
Stop value
Percent
°C
Td
RLA
RLW
Meaning
Minimum value
Maximum value
Kelvin unit, corresponds to 1 degree
temperature difference
Degree Celsius unit
Temperature difference
Increase in return line temperature
Return line monitor
Term explanations
Combination
storage cylinders
Unit
Hysteresis
Condenser
Shield
Heat station
SDC 306
Combination storage cylinders consist of two storage cylinders, a buffer
storage cylinder and a hot-water storage cylinder, the latter being
integrated in the upper part of the buffer storage cylinder.
A unit is a component of a system and is responsible for part of its
function.
In control technology, the term hysteresis is used where an upper and
lower threshold value is responsible for switching (see Td Start and Td
Stop).
Electrical component for storage of electrical energy.
Electrical shields reduce the influence of electrical and magnetic fields on
the signals in the cables and wires. Coaxial cables are commonly used
for this purpose.
Place at which energy is stored or transferred. In solar thermal systems,
the storage cylinder is the heat station.
1316BED036-11B-E
-5-
Date 06/09
Installation and Operating Instructions
3
DEVICE
DESCRIPTION
3.1 Usage
The solar thermal controllers SDC 306 are
high-performance,
microprocessorcontrolled control devices used to control
the function of solar thermal systems.
Alternative use or use beyond this remit is
not in accordance with its purpose. Incorrect
usage can result in serious injury or death
to the user or a third party and can harm the
device or system and other material assets.
The manufacturer/supplier shall not be
liable for any damage arising from such
misuse. The risk is borne by the user alone.
The control units are suitable for common
types of solar thermal systems. See system
diagram.
These control units are designed for use in
dry rooms, private homes, business and
commercial premises.
3.2 Device features
The SDC 306 range offers the following features and equipment:
• Self-explanatory, menu-driven
operation
• Storage of all entered values
• Generous amount of space for wiring
• Digitally adjustable control values
• System monitoring
Available accessories:
• Energy yield metering
• Temperature sensor PT1000
4
OVERVIEW
OF DEVICE COMPONENTS
Adapter board:
No.: Function
1
2
3
2
SDC 306
3
Sensor attachment
Attachment of outputs/
mains voltage
Fuse
1
1316BED036-11B-E
-6-
Date 06/09
Installation and Operating Instructions
5
DEVICE
I N S T AL L AT I O N
This control unit may be installed only in dry rooms where there is no risk of
explosion. Installation on a flammable base is not permitted.
5.1 Opening the device (only by qualified personnel)
No tools are required to open the device.
The upper part of the casing is locked to the
lower part at two engagement points. The
locking forces are such as to prevent the
casing from being opened accidentally.
Holding the casing at each side, pull firmly towards you and then raise the top part of the
casing until it engages. You can now install and wire up the control unit.
Prior to switching on or commissioning, you must ensure that the cover is
closed properly such that you feel and hear it click into position on both
sides.
SDC 306
1316BED036-11B-E
-7-
Date 06/09
Installation and Operating Instructions
5.2 Wall-mounted installation
When mounting the device on a wall,
proceed as follows:
• Drill the fixing holes using the drilling
template shown.
•
Screw in the two top screws so that
they protrude by 6 mm.
•
Open the device as described and
hang it on the two screws. You can
now fit the two bottom screws.
•
126mm
84mm
To avoid damage to the lower part
of the casing, do not overtighten
any of the screws.
118mm
You drill into walls at your own risk. Prior to drilling, please check that there
are no cables, pipes or shafts in the wall; contact the property owner if
necessary.
SDC 306
1316BED036-11B-E
-8-
Date 06/09
Installation and Operating Instructions
6
E L E C T R I C AL
CONNECTION
You must observe the safety instructions in chapter 1
The device may be opened only if it has been properly
disconnected from the mains and there is no risk of
reconnection.
All electrical cables are connected to the
unit in the lower part of the casing. The
terminals on the right-hand side are those
for the (low voltage) connections for sensor
and flow meter. The 230 V connections are
located on the left-hand side. The figure
below shows the terminal field for the SDC
306.
PE
Earth wire
E1
Temperature sensor for collector
L
Phase mains
E2
Temperature sensor for bottom of
storage cylinder
N
Neutral cable for mains
E3
Temperature sensor for measuring point
E3
A1
Phase switching output
E4
Temperature sensor for measuring point
E4
A2
Phase switching output (R3)
E5
Temperature sensor for measuring point
E4
A3
Phase switching output (R2)
A4
Potential-free switching output (R2)
SDC 306
WMM Pulse generator for heat quantity
measurement (WMM) (optional)
1316BED036-11B-E
-9-
Date 06/09
Installation and Operating Instructions
General attachment regulations:
•
•
used for the feedthrough on the 230 V
side.
For all attachment wires, cut the wire
sheath to a length of approx. 6 – 8 cm
and unisolate the wires by approx. 10
mm from the ends.
In the case of flexible cables, provision
must be made inside or outside the
device for strain relief. The wire ends
must be fitted with wire-end sleeves. If
necessary, PG9 screw fittings can be
•
The wires are fed into the device
through the designated openings.
•
All earth wires must be fixed in the
terminals indicated with “PE” (Earth
potential).
6.1 230 V connections
The following points must be observed for
the 230 V connections:
• Where there is a fixed mains
connection, it must be possible to
interrupt the mains supply to the control
unit outside the control unit by means of
a
switch.
Where the mains connection is effected
by means of wire and plug with earthing
contact, this switch may be dispensed
with.
•
connected must be designed for this
voltage.
•
The control units are designed for
operation with a 230 V /50 Hz mains
supply. The pumps and valves to be
All earth wires must be connected to the
terminals marked PE.
i
The neutral terminals (N) are electrically
connected and are not switched.
i
The switching output (A4) is potentialfree.
i
The switching outputs (A1/A2/A3) are
230 V closers.
6.1.1 Overview: 230 V connections for SDC 306
The table below shows the allocation of
switching outputs for the different system
types. The fields with a grey background are
Configuration
Type Description
1
1 collector array, 1 storage cylinder
2
1 collector array, 1 storage cylinder,
auxiliary heating, anti-Legionnaire’s
disease
3
1 collector array, 1 storage cylinder,
auxiliary heating, circulation
4
1 collector array, 2 storage cylinders,
thermal transfer, auxiliary heating
SDC 306
essential to the basic functions of the
system. The white fields are designed for
optional additional functions.
Switching outputs
Output
Description
Solar circuit pump
A1
--Solar circuit pump
A1
Anti-Legionnaire’s disease pump
A2
Auxiliary heating
A4
Solar circuit pump
A1
Circulation pump
A2
Auxiliary heating
A4
Solar circuit pump
A1
Transfer pump
A2
Auxiliary heating
A4
1316BED036-11B-E
- 10 -
Date 06/09
Installation and Operating Instructions
5
1 collector array, 1 storage cylinder, solid
fuel boiler, return line monitor
6
1 collector array, 1 storage cylinder,
auxiliary heating, return line temperature
increase
7
1 collector array, 1 storage cylinder,
auxiliary heating, return line monitor
8
9
10
11
1 collector array, 2 storage cylinders (hot
water and buffer), return line temperature
increase
1 collector array, 2 storage cylinders (hot
water and buffer), return line temperature
increase
1 collector array, 1 storage cylinder,
swimming pool, return line temperature
increase
1 collector array, 1 storage cylinder,
swimming pool, return line temperature
increase
12
1 collector array, 1 storage cylinder,
swimming pool, auxiliary heating
13
1 collector array, 1 storage cylinder,
swimming pool, auxiliary heating
14
2 collector array, 1 storage cylinder,
auxiliary heating
15
2 collector arrays, 1 storage cylinder,
increase in return line temperature
16
1 collector array, 1 storage cylinder,
circulation, anti-Legionnaire’s disease
17
1 collector array, 1 storage cylinder,
thermal transfer, return line temperature
increase
18
1 collector array, 1 storage cylinder,
thermal transfer, return line monitor
19
1 collector array, 1 storage cylinder,
thermal transfer, return line monitor (with
solid fuel boiler)
SDC 306
A1
A2
A3
A1
A2
A4
A1
A2
A4
A1
A2
A3
A1
A2
A3
A1
A2
A3
A1
A2
A3
A1
A2
A4
A1
A2
A4
A1
A2
A4
A1
A2
A3
A1
A2
A3
A1
A2
A3
A1
A2
A3
A1
A2
A3
1316BED036-11B-E
- 11 -
Solar circuit pump
3-way valve return line
Solid fuel boiler pump
Solar circuit pump
3-way valve return line
Auxiliary heating
Solar circuit pump
3-way valve return line
Auxiliary heating
Solar circuit pump
3-way valve solar
3-way valve return line
Solar circuit pump
Buffer cylinder solar pump
3-way valve return line
Solar circuit pump
3-way valve solar
3-way valve return line
Solar circuit pump
Solar pump for swimming pool
3-way valve return line
Solar circuit pump
3-way valve solar
Auxiliary heating
Solar circuit pump
Solar pump for swimming pool
Auxiliary heating
Solar circuit pump
Solar pump 2
Auxiliary heating
Solar circuit pump
Solar pump 2
3-way valve return line
Solar circuit pump
Circulation pump
Anti-Legionnaire’s disease pump
Solar circuit pump
3-way valve return line
Transfer pump
Solar circuit pump
3-way valve return line
Transfer pump
Solar circuit pump
3-way valve return line
Transfer pump
Date 06/09
Installation and Operating Instructions
6.2 Attachment of temperature sensor
The SDC 306 devices work with precise platinum temperature sensors of type PT1000.
Between 2 and 5 sensors are required, depending on the scope of function.
Installation/wiring of temperature sensor:
Install the sensors at the requisite places
on the collector and the storage cylinder.
In so doing, ensure good temperature
transmission and, if necessary, use a
thermally conductive paste.
The temperature sensors are connected
in accordance with the system diagram.
In the case of temperature sensors, there
is no need to observe the polarity of the
two wires.
The cables of the temperature sensors
can be extended. For lengths up to 15 m,
a cross-section of 2 x 0.5 mm² is
required; for lengths up to 50 m, a crosssection of 2 x 0.75 mm² is necessary. In
the case of long connections (collector),
shielded extension cables must be used.
Do not attach the shield on the sensor
side; instead cut it to length and insulate
it.
To protect the collector sensor within the
control unit, the use of a lightning
protection
device
(accessories) is
recommended.
Sensor wiring must be laid separately
from 230 V wires.
Prior to switching on or commissioning, you must ensure that the cover is
closed properly such that you feel and hear it click into position on both
sides.
SDC 306
1316BED036-11B-E
- 12 -
Date 06/09
Installation and Operating Instructions
7
COMMISSIONING
Commission your control unit in the following sequence:
? Are the collector and storage cylinder sensors
correctly mounted
? Has the correct sensor type been selected
(PT1000)?
Yes
Select and install the correct sensor
No
? Is the power cable for the pump connected correctly
to the pump and the control unit?
Yes
No
§If the pump is powered directly via a mains cable:
does the pump work?
Yes
No
Unplug the mains plug
Unplug the mains plug
Reconnect the pump to the control unit
Connect the cables correctly
Test the pump cable,
test the pump
? Are the sensor cables for the collector and storage
cylinder sensors correctly connected to the relevant
control unit terminals?
Connect sensors correctly
Yes
No
§With the mains supply switched off, connect the
control unit and then switch on the mains supply (e.g.
via a safety fuse):
? Does data appear on the display
Yes
Test the fuse on the device
Check the fuse protection on the mains
No
Using the programming menu, set the correct time.
On the basic settings menu, enter the activation code
(preset: 0000).
On the basic settings menu, enter your system
diagram.
On the basic settings menu, change the parameters
according to the required function.
Enter the parameters (e.g. time window, hysteresis,
etc.) on the program menu.
?
Does the system run as it should?
Yes
Check the parameters
Rectify fault as described in section 12
No
Control unit is ready for use.
SDC 306
1316BED036-11B-E
- 13 -
Date 06/09
Installation and Operating Instructions
8
O P E R AT I O N / I N D I C AT O R S
8.1 Overview of displays and operating controls
The SDC 306 control unit is
operated comfortably and simply
by means of 4 buttons. The
operating buttons allow you to:
• Access display values
• Enter device settings
The graphic symbols on the
display unit lead you simply
through the operating structure
and provide a clear overview of
the current menu options, display
values and parameters.
Number Description
1
2
3
4
5
SDC 306
Display with graphic symbols
• Upwards menu item
“Up”
• Change of values: increase the displayed value by 1;
press and hold the button to increase the values
„+“
continuously
• Access a main menu, downwards menu item
“Access”
• Change of values: lower the displayed value by 1;
“Down”
press and hold the button to decrease the values
„-“
continuously
“Scroll left“ • Scroll to the left on the main menu
“Exit“
• Exit a menu
“Cancel“
• Exit a menu item
“Reset button” • Cancel a change to a value without saving
“Scroll right“ • Scroll to the right on the main menu
“Select”
• Select a menu item
“Confirmation” • Confirm a change to a value by saving
1316BED036-11B-E
- 14 -
Date 06/09
Installation and Operating Instructions
8.2 Display – maximum display
In the following graphic, all symbols that can
appear on the display during operation are
displayed simultaneously. In
real-time
operation, depending on the menu position,
only some of these symbols will appear..
Main menu
Display values
Allocation of measuring points
Status display
8.3 Explanation of graphic symbols
The meaning of the individual symbols is given in the table below.
Graphic symbol
Description
Display during operation
Main menu
“Info” menu
“Program” menu
Symbol flashes if it can be selected
“Manual operation” menu
“Basic settings” menu
During selection, the active symbol flashes. If the menu is selected using the
corresponding
symbol
is
displayed
permanently.
All
others
SDC 306
1316BED036-11B-E
- 15 -
button, the
are
hidden.
Date 06/09
Installation and Operating Instructions
Graphic symbol
Td
Description
Display values
Temperature difference
Display during operation
start
Start value
Appears when start values are displayed
stop
Stop value
Appears when stop values are displayed
min
Min. value
Appears when minimum values are
displayed
max
Max. value
Appears when maximum values are
displayed
5 x 7 segment display
Display of numbers 00000 to
99999
Display of all numeric values, display
flashes if value is changed
Temperature in degrees Celsius
%
Percentage value
Appears when glycol percentage is
displayed
Temperature difference in Kelvin
h
Operating hours
Display yield in kWh.
Control circuit assignment
Control circuit 2 (switches 3 and
4 parallel)
Sensor number and position of sensors
relate to the control circuit R2.
Time slot for control circuit 2
“Start” und “Stop“ refer to the time slot
for R2.
Control circuit 3 (switches output Sensor number and position of sensors
A2)
relate to the control circuit R3.
Time slot for control circuit 3
“Start” und “Stop“ refer to the time slot
for R3.
Control circuit circulation
(switches output A2)
Sensor number and position of sensors
relate to the control circuit R2.
Both lines rotate.
Timeframe 1 circulation
“Start” und “Stop“ refer to the timeframe1
for circulation.
Both lines rotate.
Timeframe 2 circulation
“Start” und “Stop“ refer to the timeframe
2 for circulation.
Both lines rotate.
Sensor number
SDC 306
1316BED036-11B-E
- 16 -
Date 06/09
Installation and Operating Instructions
Temperature sensor 1
Temperature sensor 2
Temperature sensor 3
Temperature sensor 4
Temperature sensor 5
Position of sensors
Collector array
Is displayed together with the relevant
sensor number. If there are two collector
arrays, a 1 or 2 is displayed on the righthand side of the collector symbol.
Top of storage cylinder
Is displayed together with the relevant
sensor number. If there are two storage
cylinders, a 1 or 2 is displayed on the
right-hand side of the storage cylinder.
Middle of storage cylinder
Is displayed together with the relevant
sensor number. If there are two storage
cylinders, a 1 or 2 is displayed on the
right-hand side of the storage cylinder.
Botton of storage cylinder
Is displayed together with the relevant
sensor number. If there are two storage
cylinders, a 1 or 2 is displayed on the
right-hand side of the storage cylinder.
Centre of transfer storage
cylinder
Is displayed together with the relevant
sensor number.
Swimming pool
Is displayed together with the relevant
sensor number.
Storage cylinder at bottom
(buffer)
Is displayed together with the relevant
sensor number.
Storage cylinder 2 at top (buffer) Is displayed together with the relevant
sensor number.
SDC 306
1316BED036-11B-E
- 17 -
Date 06/09
Installation and Operating Instructions
Position of sensors
Sensor in return line if there is a
return line monitor
Is displayed together with the relevant
sensor number.
Sensor in return line if there is
increase in temperature through
a return line monitor
Is displayed together with the relevant
sensor number.
Solid fuel boiler
Is displayed together with the relevant
sensor number.
Collector supply
Is displayed together with the relevant
sensor number.
Adjustment parameters
Maximum storage cylinder
temperature
max
Td start
Td
stop
Is displayed in the programming menu.
Unit: °C (degrees Celsius)
If there are two storage cylinders, a 1 or
2 is displayed on the right-hand side of
the storage cylinder.
Switch-on hysteresis for the solar Is displayed in the programming menu.
circuit
Unit: K (Kelvin)
If there are two storage cylinders, a 1 or
2 is displayed on the right-hand side of
the storage cylinder.
Switch off hysteresis for the solar Is displayed in the programming menu.
circuit
Unit: K (Kelvin)
If there are two storage cylinders, a 1 or
2 is displayed on the right-hand side of
the storage cylinder.
min
Minimum temperature for
auxiliary heating
max.
Maximum temperature of the
Is displayed in the programming menu.
transfer storage cylinder (sensor Unit: °C (degrees Celsius)
in middle)
Sensor number and control circuit are
also displayed.
Td start
Td
SDC 306
stop
Is displayed in the programming menu.
Unit: °C (degrees Celsius)
Sensor number and control circuit are
also displayed.
Switch on hysteresis for control
circuit 2
Is displayed in the programming menu.
Unit: K (Kelvin)
Reference sensors for source and sink
flash alternately.
Switch off hysteresis for control
circuit 2
Is displayed in the programming menu.
Unit: K (Kelvin)
1316BED036-11B-E
- 18 -
Date 06/09
Installation and Operating Instructions
Reference sensors for source and sink
flash alternately.
System time
Is displayed in the programming menu.
Status display
Solar circuit pump
Symbol rotates when the solar circuit
pump is switched on
Switching output 1 is active
Appears if switching output 1 is active
(on).
Switching output 2 is active
Appears if switching output 2 is active
(on).
Switching outputs 3 and 4 are
active (switched in parallel)
Appears if switching output 3 and 4 are
active (on).
Indicates a system error or
incorrect code entry
Display flashes if an error occurs in the
system.
Lights up if the wrong code is entered.
Safety question for value
changes with save facility
Value input can be
Note on risk from legionella
bacteria
rejected
or
accepted
.
Display flashes together with the warning
symbol. These symbols flash when there
is a fault with the anti-legionella function.
For further information, see section
10.1.15
Other displays
Flow rate
SDC 306
Total yield for storage cylinder
If there are two storage cylinders, a 1 or
2 is displayed on the right-hand side of
the storage cylinder.
Daily yield for storage cylinder
If there are two storage cylinders, a 1 or
2 is displayed on the right-hand side of
the storage cylinder.
1316BED036-11B-E
- 19 -
Date 06/09
Installation and Operating Instructions
8.4 Example of device operation
Once you have familiarised yourself with the
menu descriptions as described in the
“Operating menus“ chapter, you can
practice by carrying out the operating steps.
The starting point is the current collector
temperature on the “Info” menu. Aim:
change to “Solar circuit Td stop” circuit from
3K to 4K in “Program” menu. This example
relates to configuration (system diagram) 1.
White: symbol lights up continuously
Grey: symbol flashes
Button
Function
Description
“Exit“
Exit the “Info” menu
“Scroll
right“
Selection of “Programming”
menu
Access of “Programming” menu;
the first menu item appears
“Access”
start
7:00
“Down”
Td stop
3K
Keep pressing until the menu
item “Td stop” appears
“Select”
Td stop
3K
Select the parameter shown
“Up”
Td stop
4K
Increase the parameter value
from 3K to 4K
“Confirm
”
“Confirm
”
Td stop
4K
ok?
Td stop
4K
Confirm the parameter
Store the parameter
“Exit“
Exit “Programming” menu
“Scroll
left“
Select the “Info” menu
“Access”
SDC 306
Graphic display following
operational step
Access of “Info” menu
60°C
1316BED036-11B-E
- 20 -
Date 06/09
Installation and Operating Instructions
9
MENU
STRUCTURE
To facilitate simple operation of the device, the device, operating and display functions are
combined into 4 groups (= main menu).
The four menus
• Information
• Program
• Manual operation
• Basic setting
Menu
Information
Program
provide information on your solar thermal
system.
The currently active menu is displayed by
means of the relevant graphic symbol in the
top row of the display.
Overview of functions contained
Main menu for the automatic control of the solar system.
• Display of current measured values
• Display of system status
• Display of error messages
• Display of energy yield (if existing)
Change and set the programmable setting values (parameters)
Note: Changes can impede system functions
Manual operation Switching the connected pumps/valves on and off manually
Basic setting
Information on the basic settings for the system function.
Note: Settings and changes may only be carried out by trained personnel.
9.1 “Info”
menu
In this operating mode, all measured values and operating states are displayed.
i
Only the configuration-specific symbols are displayed.
Resettable values such as minimum and maximum temperatures, daily yield and overall yield
can be reset as follows:
Select value using the
and
Reset value using the
button
Confirm “OK?” message with
SDC 306
buttons
= no or
= yes
1316BED036-11B-E
- 21 -
Date 06/09
Installation and Operating Instructions
9.2 “Program”
All changeable parameters can be checked
in this menu and changed if necessary.
Common values are set at the factory,
which will generally ensure that the system
functions correctly.
i
menu
The number of displayed values depends
on the type of controller and the additional
functions set. Only the values required in
each case are displayed.
Only the configuration-specific symbols are displayed!
Parameters
Timeframe R2 start
Timeframe R2 stop
Timeframe R3 start
Timeframe R3 stop
Timeframe 1 circulation start
Timeframe 1 circulation stop
Timeframe 2 circulation start
Timeframe 2 circulation stop
Storage cylinder 1 maximum temperature
Solar circuit Td start
Solar circuit Td stop
Storage cylinder 2 maximum temperature
Maximum temperature of swimming pool
Solar circuit 2 Td start
Solar circuit 2 Td stop
Start temperature, auxiliary heating
Thermal switch-on threshold*
Boiler Td start
Boiler Td stop
RLA/RLM Td start
RLA/RLM Td stop
Maximum temperature for transfer storage cylinder
Transfer Td start
Transfer Td stop
Set the time
Maintenance (or summer/winter)**
Value range
0:00 – 23:59
0:00 – 23:59
0:00 – 23:59
0:00 – 23:59
0:00 – 23:59
0:00 – 23:59
0:00 – 23:59
0:00 – 23:59
5°C – 95°C
3K – 20K
2K – 18K
5°C – 95°C
5°C – 50°C
3K – 20K
2K – 18K
5°C – 90°C
20°C – 55°C
3K – 20K
2K – 18K
3K – 20K
2K – 18K
20°C – 95°C
3K – 20K
2K – 18K
0:00 – 23:59
0–1
Factory setting
7:00 – 22:00
7:00 – 22:00
7:00 – 22:00
7:00 – 22:00
7:00 – 22:00
7:00 – 22:00
7:00 – 22:00
7:00 – 22:00
8 5°C
6K
3K
8 5°C
25°C
6K
3K
60° C
40°C
6K
3K
4K
2K
85°C
6K
3K
12:00
0
* The thermal switching threshold is the temperature that is maintained in the pipes (as a
minimum). To prevent rapid switching on and off, a hysteresis of 5K is used.
** If maintenance is activated or if the system is set to winter (=1), the swimming pool will not
be heated (affects systems 10 and 11). If maintenance is deactivated or switched to summer
(=0), then loading takes place according to the primary/secondary principle.
SDC 306
1316BED036-11B-E
- 22 -
Date 06/09
Installation and Operating Instructions
9.3 “Manual operation”
For the purposes of servicing and testing,
the solar thermal system can be operated
manually. To facilitate this, the 230 V or
switching outputs or the potential-free
output can be switched on and off. During
manual operation, there is no automatic
menu
control of the system. In order to prevent
improper
operating
conditions,
after
approximately 8 hours of this type of
operation,
the
program
switches
automatically to “Display” and automatic
control is reactivated.
Meaning
Display
Value range
Switching the switching output A1 (solar circuit pump) on or
off manually
0 = off
1 = on
Switching the switching output A2 on or off manually
0 = off
1 = on
Switching the switching outputs A3 on or off manually
0 = off
1 = on
Switching the switching outputs A4 on or off manually
0 = off
1 = on
9.4 “Basic settings”
menu
Settings and changes in this menu may only be made by the installer or trained
personnel. Incorrect settings can impair the function of the control unit and the
solar thermal system.
To prevent accidental changes in the “Basic
settings” menu, it cannot be edited under
normal operation; the data can be displayed
only. To be able to carry out changes, the
activation code must be entered. You are
then able to edit data for an unlimited
i
SDC 306
period. This facility to edit is blocked
once you exit the basic settings menu
and can only be reactivated one you
have entered the relevant code.
Only the configuration-specific symbols are displayed!
1316BED036-11B-E
- 23 -
Date 06/09
Installation and Operating Instructions
Display
Parameters Value
C
00
01
10
0000
0
1
120
11
1
20
0
21
22
0.0
0.25
23
1
24
30
40
10
40
1
50
1
51
52
60
61
70
CodE
5
5
60
90
50
----
Meaning
Value range
Code entry to activate facility to edit
Activate factory setting/reset
Select configuration
Maximum collector temperature
Priority storage cylinder
1 – cylinder 1
2 – storage cylinder 2 / swimming pool
Mode yield metering
0 – off
1 – yield estimation
2 – yield metering
Volume flow (internal value)
Flow meter
Glycol type
1 - Tyfocor L5.5
2 - Tyfocor LS, ready mix
3 - Dowcal 10
4 - Dowcal 20
5 - Dowcal N
Glycol percentage
Tolerance for solar yield
Period for anti-Legionnaire’s disease
function
Circulation mode
1 – thermal circulation
2 – impulse-controlled circulation
Power-on time for circulation
Restart interlock for circulation
Minimum temperature for boiler
Maximum temperature for boiler
Maximum temperature for sink
Change to code
0000 - 9999
0-1
1 – 19
90°C – 150°C
The value range “Tolerance for solar yield”
and the lower limit of the value range “Start
temperature for auxiliary heating” are
interdependent. This means that the value
for “Start temperature for auxiliary heating”
cannot be changed so as to be lower than
SDC 306
Factory
setting
0000
0
1
120°C
1–2
1
0-2
0
0.0 – 50.0 l
0.0 –50.0 l/min
0.0 l
0.25 l/min
1–5
1
0% - 100%
0K – 80K
40%
10K
1 or 7 days
1
1–2
2
1 – 15 min
1 – 10 min
15°C – 90°C
30°C – 130°C
30°C – 70 °C
0000 - 9999
5 min
5 min
60°C
90°C
50°C
----
that for “Tolerance for solar yield”. Equally,
the value for “Tolerance for solar yield”
cannot be changed so as to be higher than
that for “Start temperature for auxiliary
heating”.
1316BED036-11B-E
- 24 -
Date 06/09
Installation and Operating Instructions
9.4.1 Code entry
The “C” on the left flashes.
Press the OK key.
Does the first digit after the C flash?
Yes
No
System error
Press the up button, then +1
Press the down button, then -1
Enter the required digit and confirm with OK
? First position entered correctly?
Yes
Press the reset button
No
§Enter the 2nd, 3rd and 4th digits in exactly the
same way as the 1st digit.
§Does the “OK?“ symbol flash?
Yes
Press the OK button until the “OK?”
No
symbol flashes
Check whether the code was entered correctly.
Is the authorisation code correct?
Yes
Press the reset button; code entry
No
starts again from the beginning
Confirm by pressing the OK button.
i The code is checked.
? Was the code correct?
Yes
The warning symbol and “C----“ light
No
up for 2 seconds.
The system once again prompts you
to enter a code by means of a
flashing “C”.
i “OK?” and “C0000” light up for 2 seconds. The
“00” parameter (factory setting) then flashes.
You can make the changes in the basic settings
menu.
9.4.2 Code change
you have entered the code, the “OK?“
symbol and “C0000” light up for approx. 5
seconds. The code has now been stored.
Once the basic settings menu has been
activated, the “CodE” parameter starts to
flash. If you wish to change the password,
confirm with the OK button. The first digit
flashes. Proceed as per code entry. Once
SDC 306
1316BED036-11B-E
- 25 -
Date 06/09
Installation and Operating Instructions
10 C O N T R O L L E R
FUNCTIONS
• Functions for system protection and
system monitoring
• Additional functions
The
SDC
306
controllers
include
comprehensive functions for controlling and
monitoring the solar thermal system. A
basic distinction is made between:
• Control functions for loading the storage
cylinder
10.1 General control functions
The control unit records the temperatures
from the various measuring points and
calculates the correct time to load the
storage
cylinders,
based
on
the
programmed (additional) functions and
control parameters.
10.1.1
To prevent the pump from switching on and
off due to only minimal differences in
temperature, a switch-on hysteresis, e.g. 7K
and switch-off hysteresis, e.g. 3K is preset.
.
Load storage cylinder
Relevant values in menu
“Program”
Maximum temperature
Td start
Switch-on temperature difference
Td stop
Switch-off temperature difference
The storage cylinder is loaded to the
specified maximum temperature via the
pump on output A1, provided the collector
temperature is a certain amount higher than
that of the storage cylinder temperature.
The switching behaviour can be set via Td
T[°C]
Load cylinder
(base of cylinder
unten)
Max
65 °C
TSt
TColl
A1
On
Off
SDC 306
start and Td stop, whereby the value for Td
start cannot be lower than that for Td stop +
1. To prevent the pump from switching on
and off due to only minimal differences in
temperature, a hysteresis of 5K is preset as
the storage cylinder maximum temperature.
dT stop
dT start
Pump on
(A1)
1316BED036-11B-E
- 26 -
Date 06/09
Installation and Operating Instructions
10.1.2
Yield estimation / yield metering
For the purposes of yield estimation (heat
quantity), the collector sensor serves as a
reference sensor for the hot flow, the
storage cylinder sensor at the bottom
serves as a reference sensor for the cool
return line. The volume flow, type of glycol
and glycol concentration are entered in the
control unit. A daily yield value is calculated
from these five values and can be
10.1.3
displayed. Adding together the daily yields,
in each case at 0:00 gives the total amount
which can also be displayed. The yields can
be reset manually.
For the purposes of yield metering, instead
of entering a volume flow, the value
measured by a flow meter is processed as
volume flow.
Password
The parameters contained in the “Basic
settings” menu can be changed only
following entry of a 4-digit numerical
10.1.4
password. Once the password has been
entered, it can also be changed.
Auxiliary heating
For the upper part of the storage cylinder
(standby capacity), a start temperature for
auxiliary heating is preset. Once the
temperature of the water reaches this
temperature, the auxiliary heating is
triggered so that the water cannot fall below
10.1.5
this temperature. A clock timer is available
for this function.
To prevent the pump from switching on and
off due to only minimal differences in
temperature, a hysteresis of 5K is preset.
Tolerance for solar yield
In the case of a solar yield from the
collector, the “Start temperature for auxiliary
heating” (minimum temperature) is reduced
by the amount set for “Tolerance for solar
yield”. In other words, if loading takes place
between the collector array and the storage
10.1.6
cylinder, the auxiliary heating is triggered to
reach a reduced value (e.g. 60°C – 10K =
50°C). If no loading takes place for at least
15 minutes, the reduction is removed again.
This allows the solar thermal system to
provide higher yields.
Increase in return line temperature
In the case of solar thermal systems with
auxiliary heating, the solar energy from the
storage cylinder can be used via a
temperature increase in the boiler return. If
there is a difference in temperature between
the return line of the heating circuit and the
base/centre of the solar storage cylinder, a
SDC 306
3-way valve is activated so that the lower
part of the combination storage cylinder
runs in series to the heating return line.
To prevent the pump from switching on and
off due to only minimal differences in
temperature, a hysteresis is preset.
1316BED036-11B-E
- 27 -
Date 06/09
Installation and Operating Instructions
10.1.7
Return line monitor
In the case of solar thermal systems with
auxiliary heating and where there is a heat
station, the return line of the heating circuit
is layered into the storage cylinder.
Depending on the temperature difference
between the return line and the solar
storage cylinder in the middle, a 3-way
valve is triggered in order to layer the return
10.1.8
line at the bottom or centre of the solar
storage cylinder. The heating flow is
connected to the upper part of the solar
storage cylinder.
To prevent the pump from switching on and
off due to only minimal differences in
temperature, a hysteresis is preset.
Thermal transfer
In the case of systems with a storage
cylinder and an additional solar storage
cylinder, this function transfers the water
heated by solar power from the solar
storage cylinder to the conventionally
10.1.9
heated storage cylinder. To prevent the
pump from switching on and off due to only
minimal differences in temperature, a
hysteresis is preset.
Pump block protection
All pumps that have not run for 24 hours are
switched on for approximately 5 seconds
10.1.10
each
12.00
and
12.01.
Deactivation conditions for the loading
pump are that:
1. the boiler temperature is lower than
the minimum temperature for the
boiler, or
2. the maximum boiler temperature is
reached, or
3. the storage cylinder temperature has
reached the maximum storage
cylinder temperature, or
4. the
difference
between
boiler
temperature and storage cylinder
temperature is less than the switchoff hysteresis.
Swimming pool heating/secondary storage cylinder
The second solar consumer “swimming
pool” is operated as per a standard
system
(storage
cylinder).
The
SDC 306
between
Solid fuel boiler
Activation conditions for the loading pump
are that:
1. the boiler temperature is 5K higher
than the minimum temperature of the
boiler and,
2. the boiler temperature is 5K lower
than the maximum temperature of
the boiler and,
3. the storage cylinder temperature is
5K lower than the storage cylinder
maximum temperature, and
4. the difference between the boiler
temperature and storage cylinder
temperature is higher than the
switch-on hysteresis.
10.1.11
day
difference between this and a buffer
storage cylinder is a lower hysteresis of
1K.
1316BED036-11B-E
- 28 -
Date 06/09
Installation and Operating Instructions
10.1.12
Priority switching
The solar circuit has priority for loading the
storage cylinder. If the temperature in the
solar circuit is too low or if the maximum
temperature of the storage cylinder is
reached, the system switches to the
swimming pool circuit/secondary circuit. An
increase in temperature of the collector is
monitored. If, within 5 minutes, the collector
temperature has risen by more than 1K, the
control unit shuts off the secondary loading
and blocks off the latter for a period of 4
10.1.13
minutes. During this period, the control unit
waits for the switch-on condition for the
priority loading. Once this period has
elapsed or if the control unit has reverted to
priority load status, the block against
secondary loading is lifted. After no longer
than one hour of swimming pool
heating/secondary storage cylinder heating,
this is interrupted and the switch-on
conditions for the priority storage cylinder
are checked for a period of 4 minutes.
Impulse-controlled circulation
The circulation pump can be controlled as
per demand. Shortly before hot water is
removed from the system, a request for
heat is sent to the control unit by means of
a button or by briefly opening the hot water
tap (min. 1 s). The circulation switch is used
10.1.14
to start the circulation pump for an
adjustable time. Once this active period has
elapsed, the pump is then blocked from
being reactivated for a certain (adjustable)
period.
Thermal circulation
In the case of thermal circulation, the
potable water supply is held at a preset
minimum
temperature
(thermostatic
function) within two adjustable timeframes.
10.1.15
To prevent the pump from switching on and
off due to only minimal differences in
temperature, a hysteresis of 5K is preset.
Anti-Legionnaire’s disease function
A check is made at regular intervals (every
day, every week) as to whether the water in
the storage cylinder was at 60°C for at least
one hour in this period. If not, then between
16 and 18:00 hours, the system attempts to
heat the water in the storage cylinder to
65°C and to maintain it at a temperature of
60°C. If the water in the storage cylinder
does not reach this temperature within
these two hours or if, within the space of an
SDC 306
hour, the temperature falls again to below
60°C, an error is reported. However, the
control functions are retained. If the
temperature of 60°C was maintained for at
least one hour, the anti-Legionnaire’s
disease routine is reset and the monitoring
process starts from this time point. This
function is designed to prevent the growth
of legionella bacteria.
1316BED036-11B-E
- 29 -
Date 06/09
Installation and Operating Instructions
10.2 System monitoring
If an error occurs, the
!
symbol will always flash.
10.2.1
Sensor monitoring
The sensors required for the control
functions and their connection cables are
monitored for breakage and short circuit. If
a defective sensor is recognised by the
Important:
The use of incorrect temperature
sensors can therefore also lead to one of
the error messages.
!
symbol is displayed.
software, the
The source of the error can be found by
scrolling.
Display
Meaning
Short circuit of temperature sensor for current measuring point
Break to temperature sensor of current measuring point, circulation
error if energy yield estimation is activated
10.2.2
Flow monitoring
Display
+ !
Meaning
No circulation in solar circuit
In the case of the controller SDC 306, the temperature difference between the collector and the
storage cylinder is checked. If this exceeds the amount of (60K + Td start), this is interpreted
as an error because such large differences should not arise given normal system dimensions
and assuming that the pump is switched on.
In the case of the SDC 306 control unit, the flow quantity is checked when the pump is
switched on. If, for a period of approx. 30 minutes, no flow is detected, this is interpreted as an
error.
The error message is automatically reset once the fault has been removed.
10.2.3
System protection function
The system protection function switches the
system off if the “maximum collector
temperature” is exceeded. As soon as the
SDC 306
temperature drops 15K below this value, the
system is started up again.
1316BED036-11B-E
- 30 -
Date 06/09
Installation and Operating Instructions
11 S Y S T E M
D I AG R AM S
There are 19 main configurations for solar
control unit SDC 306.
Output A1 is switched via the solar control
circuit. The two outputs A3 (230V) and A4
Control circuit
Solar circuit
Control circuit R2
Control circuit R3
i
(potential-free) are switched in parallel via
the control circuit R2. Output A2 is switched
via the control circuit R3.
Outputs
A1
A3 (230V) and A4 (potential-free) parallel
A2
The following system diagrams are not to be understood as complete hydraulic circuit
diagrams.
SDC 306
1316BED036-11B-E
- 31 -
Date 06/09
Installation and Operating Instructions
11.1 Basic system diagram 1:
1 collector array, 1 storage cylinder
System 1 has one collector surface and one
storage cylinder. Heat metering is also
Info
I
Current collector temperature (E1)
Minimum collector temperature (E1)
Maximum collector temperature (E1)
Current storage cylinder temperature
at bottom (E2)
Minimum storage cylinder
temperature at bottom (E2)
Maximum storage cylinder
temperature at bottom (E2)
Current storage cylinder temperature
at top (E3)
Minimum storage cylinder
temperature at top (E3)
Maximum storage cylinder
temperature at top (E3)
Flow rate ∗
Daily yield ∗
possible, e.g. using an impeller flow meter.
Program
I
Timeframe R2 start
Timeframe R2 stop
Maximum temperature of
storage cylinder
Solar circuit Td start
Manual operation
I
Pump A1 off/on
A2 off/on
A3 off/on
Solar circuit Td stop
Start temperature, auxiliary
heating
Set time
A4 off/on
Basic setting
I
Code entry
Reset/factory setting
Select basic configuration
(system diagram)
Maximum collector
temperature
Mode yield metering
Volume flow ∗
DFG/WMM ∗∗
Glycol type ∗
Glycol percentage ∗
Tolerance for solar yield
Period for antiLegionnaire’s function
Code change
Total yield ∗
∗ Displayed only if yield metering is active.
∗∗ Displayed only if yield metering mode is equivalent to 2.
SDC 306
1316BED036-11B-E
- 32 -
Date 06/09
Installation and Operating Instructions
11.2 Basic system diagram 2:
1 collector array, 1 storage cylinder, auxiliary heating, anti-Legionnaire’s disease
System 2 has one collector surface, one
and the anti-Legionnaire’s disease function
storage cylinder, one auxiliary heating
(thermostat, timeframe a preset, fixed
function and one anti-Legionnaire’s disease
period). Heat metering is also possible, e.g.
function. The control unit controls the solar
using an impeller flow meter. For the antifunction (temperature difference regulation),
Legionnaire’s disease function E2 is used
the auxiliary heating (thermostat, timeframe)
as reference sensor.
Info
I
Current collector temperature (E1)
Minimum collector temperature (E1)
Maximum collector temperature (E1)
Current storage cylinder temperature at
bottom (E2)
Minimum storage cylinder temperature
at bottom (E2)
Maximum storage cylinder temperature
at bottom (E2)
Current storage cylinder temperature at
top (E3)
Minimum storage cylinder temperature
at top (E3)
Maximum storage cylinder temperature
at top (E3)
Flow rate ∗
Daily yield ∗
Program
I
Timeframe R2 start
Timeframe R2 stop
Maximum temperature of
storage cylinder
Solar circuit Td start
Manual operation
I
Pump A1 off/on
A2 off/on
A3 off/on
Solar circuit Td stop
Start temperature,
auxiliary heating
Set time
A4 off/on
Basic setting
I
Code entry
Reset/factory setting
Select basic configuration
(system diagram)
Maximum collector
temperature
Mode yield metering
Volume flow ∗
DFG/WMM ∗∗
Glycol type ∗
Glycol percentage ∗
Tolerance for solar yield
Period for antiLegionnaire’s function
Code change
Total yield ∗
∗ Displayed only if yield metering is active.
∗∗ Displayed only if yield metering mode is equivalent to 2.
SDC 306
1316BED036-11B-E
- 33 -
Date 06/09
Installation and Operating Instructions
11.3 Basic system diagram 3:
1 collector array, 1 storage cylinder, auxiliary heating, circulation
System 3 has one collector surface, one
function (thermostat, timeframe) and the
storage cylinder, one auxiliary heating
impulse-controlled circulation (impulse) or
function and one timer-controlled or
thermal
circulation
(thermostat,
2
impulse-controlled circulation. The control
timeframes). Heat metering is also possible,
unit controls the solar function (temperature
e.g. using an impeller flow meter.
difference regulation), auxiliary heating
Info
I
Current collector temperature (E1)
Minimum collector temperature (E1)
Maximum collector temperature (E1)
Current storage temp. at bottom (E2)
Minimum storage temp. - bottom (E2)
Maximum storage temp. - bottom (E2)
Current storage temp. - top (E3)
Minimum storage temp. - top (E3)
Maximum storage temp. - top (E3)
Current circ. temperature (E4) ∗∗∗∗
Minimum circ. temperature (E4) ∗∗∗∗
Maximum circ. temperature (E4) ∗∗∗∗
Program
I
Timeframe R2 start
Timeframe R2 stop
Timeframe 1, circ. start
Timeframe 1, circ. stop
Timeframe 2, circ. start
Timeframe 2, circ. stop
Maximum temperature
of storage cylinder
Solar circuit Td start
Solar circuit Td stop
Start temperature,
auxiliary heating
Thermal switch-on
temperature ∗∗∗∗
Set time
Flow rate ∗
Daily yield ∗
Total yield ∗
Manual operation
I
Pump A1 off/on
A2 off/on
A3 off/on
A4 off/on
Basic setting
I
Code entry
Reset/factory setting
Select basic configuration
Max. collector temperature
Mode yield metering
Volume flow ∗
DFG/WMM ∗∗
Glycol type ∗
Glycol percentage ∗
Tolerance for solar yield
Circulation mode
(thermal/impulse)
Switch-on duration for
circulation ∗∗∗
Re-activation lock ∗∗∗
Code change
∗ Displayed only if yield metering mode is equivalent to 1 or 2.
∗∗ Displayed only if yield metering mode is equivalent to 2.
∗∗∗ Displayed only if impulse-controlled circulation is active.
∗∗∗∗ Displayed only if thermal circulation is active.
SDC 306
1316BED036-11B-E
- 34 -
Date 06/09
Installation and Operating Instructions
11.4 Basic system diagram 4:
1 collector array, 2 storage cylinders (hot water), thermal transfer, auxiliary heating
System 4 has one collector surface, two
(temperature
difference
regulation,
storage cylinders, a transfer function and an
timeframe) and the auxiliary heating
auxiliary heating function. The control unit
(thermostat, timeframe). Heat metering is
controls the solar function (temperature
also possible, e.g. using an impeller flow
difference regulation, the thermal transfer
meter.
Info
I
Current collector temperature (E1)
Minimum collector temperature (E1)
Maximum collector temperature (E1)
Program
I
Timeframe R2 start
Timeframe R2 stop
Timeframe R3 start
Current storage cylinder temperature
Timeframe R3 stop
at bottom (E2)
Minimum storage cylinder temperature Maximum temperature of
at bottom (E2)
storage cylinder
Maximum storage cylinder
Solar circuit Td start
temperature at bottom (E2)
Current thermal transfer storage temp.
Solar circuit Td stop
in middle (E3) for R2 and R3.
Minimum thermal transfer storage
Start temperature, auxiliary
temp. in middle (E3) for R2 and R3.
heating
Minimum thermal transfer storage
Max temp. of transfer
temp. in middle (E3) for R2 and R3.
storage cylinder
Current storage temp. at top (E4)
R3 Td start
Minimum storage cylinder temperature
R3 Td stop
at top (E4)
Maximum storage temp. at top (E4)
Set time
Flow rate ∗
Daily yield ∗
Total yield ∗
Manual operation
I
Pump A1 off/on
A2 off/on
A3 off/on
A4 off/on
Basic setting
I
Code entry
Reset/factory setting
Select basic
configuration
Maximum collector
temperature
Mode yield metering
Volume flow ∗
DFG/WMM ∗∗
Glycol type ∗
Glycol percentage ∗
Tolerance for solar yield
Code change
∗ Displayed only if yield metering mode is equivalent to 1 or 2.
∗∗ Displayed only if yield metering mode is equivalent to 2.
SDC 306
1316BED036-11B-E
- 35 -
Date 06/09
Installation and Operating Instructions
11.5 Basic system diagram 5:
1 collector array, 1 storage cylinder, solid fuel boiler, return line monitor
System 5 has one collector surface, one
thermostat) and the return line temperature
storage cylinder, one solid fuel boiler and
increase
(temperature
difference
one return line monitor. The control unit
regulation). Heat metering is also possible,
controls the solar function (temperature
e.g. using an impeller flow meter.
difference regulation), the solid fuel boiler
(temperature
difference
regulation,
FSK = solid fuel boiler
Info
I
Current collector temperature (E1)
Minimum collector temperature (E1)
Maximum collector temperature (E1)
Current storage temp. at bottom (E2)
Minimum storage temp. - bottom (E2)
Maximum storage cylinder
temperature at bottom (E2)
Current solid fuel boiler temp. (E3)
Minimum solid fuel boiler temp. (E3)
Maximum solid fuel boiler temp. (E3)
Current storage cylinder temperature
at centre (E4)
Minimum storage cylinder temperature
at centre (E4)
Maximum storage cylinder
temperature at centre (E4)
Current return line temperature (E5)
Minimum return line temperature (E5)
Maximum return line temperature (E5)
Flow rate ∗
Daily yield ∗
Total yield ∗
Program
I
Maximum temperature of
storage cylinder
Solar circuit Td start
Solar circuit Td stop
R2 Td start
R2 Td stop
R3 Td start
Manual operation
I
Pump A1 off/on
Basic setting
I
Code entry
A2 off/on
A3 off/on
A4 off/on
Reset/factory setting
Select basic configuration
Max. collector temp.
Mode yield metering
Volume flow ∗
R3 Td Stop
Set time
DFG/WMM ∗∗
Glycol type ∗
Glycol percentage ∗
Min. temperature for boiler
Maximum temperature for
boiler
Maximum temperature for
return line
Code change
∗ Displayed only if yield metering mode is equivalent to 1 or 2.
∗∗ Displayed only if yield metering mode is equivalent to 2.
SDC 306
1316BED036-11B-E
- 36 -
Date 06/09
Installation and Operating Instructions
11.6 Basic system diagram 6:
1 collector array, 1 storage cylinder, auxiliary heating, return line temperature increase
System 6 has one collector surface, one
auxiliary heating (thermostat, timeframe)
storage cylinder, one auxiliary heating
and the return line temperature increase
function (thermostat, timeframe) and one
(temperature difference regulation). Heat
return line temperature increase. The
metering is also possible, e.g. using an
control unit controls the solar function
impeller flow meter.
(temperature difference regulation), the
Info
I
Current collector temperature (E1)
Minimum collector temperature (E1)
Maximum collector temperature (E1)
Current storage temp. at bottom (E2)
Minimum storage temp. - bottom (E2)
Maximum storage cylinder
temperature at bottom (E2)
Current storage temp. at top (E3)
Minimum storage temp. at top (E3)
Maximum storage temp. at top (E3)
Current storage temp. at centre (E4)
Minimum storage cylinder temperature
at centre (E4)
Maximum storage cylinder
temperature at centre (E4)
Current return line temperature (E5)
Minimum return line temperature (E5)
Maximum return line temperature (E5)
Flow rate ∗
Daily yield ∗
Total yield ∗
Program
I
Timeframe R2 start
Timeframe R2 stop
Maximum temperature of
storage cylinder
Solar circuit Td start
Solar circuit Td stop
Start temperature, auxiliary
heating
R3 Td start
R3 Td stop
Set time
Manual operation
I
Pump A1 off/on
A2 off/on
A3 off/on
A4 off/on
Basic setting
I
Code entry
Reset/factory setting
Select basic
configuration
Max. collector temp.
Mode yield metering
Volume flow ∗
DFG/WMM ∗∗
Glycol type ∗
Glycol percentage ∗
Tolerance for solar yield
Maximum temperature
for return line
Code change
∗ Displayed only if yield metering mode is equivalent to 1 or 2.
∗∗ Displayed only if yield metering mode is equivalent to 2.
SDC 306
1316BED036-11B-E
- 37 -
Date 06/09
Installation and Operating Instructions
11.7 Basic system diagram 7:
1 collector array, 1 storage cylinder, auxiliary heating, return line monitor
System 7 has one collector surface, one
auxiliary heating (thermostat, timeframe)
storage cylinder, one auxiliary heating
and the return line monitor (temperature
function and one return line monitor. The
difference regulation). Heat metering is also
control unit controls the solar function
possible, e.g. using an impeller flow meter.
(temperature difference regulation), the
Information
I
Current collector temperature (E1)
Minimum collector temperature (E1)
Maximum collector temperature (E1)
Current storage temp. at bottom (E2)
Minimum storage temp. - bottom (E2)
Maximum storage cylinder
temperature at bottom (E2)
Current storage temp. at top (E4)
Minimum storage temp. at top (E4)
Maximum storage temp. at top (E4)
Current storage temp. at centre (E3)
Minimum storage temp. at centre (E3)
Maximum storage cylinder
temperature at centre (E3)
Current return line temperature (E5)
Minimum return line temperature (E5)
Maximum return line temperature (E5)
Flow rate ∗
Daily yield ∗
Total yield ∗
Program
I
Timeframe R2 start
Timeframe R2 stop
Maximum temperature of
storage cylinder
Solar circuit Td start
Solar circuit Td stop
Start temperature, auxiliary
heating
R3 Td start
R3 Td stop
Set time
Manual operation
I
Pump A1 off/on
A2 off/on
A3 off/on
A4 off/on
Basic setting
I
Code entry
Reset/factory setting
Select basic
configuration
Max. collector temp.
Mode yield metering
Volume flow ∗
DFG/WMM ∗∗
Glycol type ∗
Glycol percentage ∗
Tolerance for solar yield
Code change
∗ Displayed only if yield metering mode is equivalent to 1 or 2.
∗∗ Displayed only if yield metering mode is equivalent to 2.
SDC 306
1316BED036-11B-E
- 38 -
Date 06/09
Installation and Operating Instructions
11.8 Basic system diagram 8:
1 collector array, 2 storage cylinders (hot water and buffer), return line temperature
increase
System 8 has one collector surface, two
storage cylinders, priority logic), and the
storage cylinders, one solid fuel boiler and
return
line
temperature
increase
(temperature difference regulation). Heat
one return line temperature increase. The
control unit controls the solar function
metering is also possible, e.g. using an
(temperature difference regulation for 2
impeller flow meter.
Information
I
Current collector temperature (E1)
Minimum collector temperature (E1)
Maximum collector temperature (E1)
Current temperature of storage
cylinder 1 at bottom (E2)
Minimum temperature of storage
cylinder 1 at bottom (E2)
Maximum temperature of storage
cylinder 1 at bottom (E2)
Current temp. of storage 2 at top (E4)
Min. temp. of storage 2 at top (E4)
Max. temp. of storage 2 at top (E4)
Current return line temperature (E5)
Minimum return line temperature (E5)
Maximum return line temperature (E5)
Current temp. storage 2 - bottom (E3)
Min. temp. storage 2 - bottom (E3)
Max. temp. storage 2 - bottom (E3)
Flow rate ∗
Daily yield 1/2 ∗
Total yield 1/2 ∗
Program
I
Maximum temperature of
storage cylinder 1
Solar circuit storage 1 Td Start
Solar circuit storage 1 Td Stop
Manual operation
I
Pump A1 off/on
Basic setting
I
Code entry
A2 off/on
A3 off/on
Maximum temperature of
storage cylinder 2
Solar circuit storage cylinder 2
Td Start
Solar circuit storage cylinder 2
Td Stop
R2 Td start
R2 Td stop
Set time
A4 off/on
Reset/factory setting
Select basic
configuration
Maximum collector
temperature
Priority storage cylinder
Mode yield metering
Volume flow ∗
DFG/WMM ∗∗
Glycol type ∗
Glycol percentage ∗
Max. temp. for return line
Code change
∗ Displayed only if yield metering mode is equivalent to 1 or 2.
∗∗ Displayed only if yield metering mode is equivalent to 2.
SDC 306
1316BED036-11B-E
- 39 -
Date 06/09
Installation and Operating Instructions
11.9 Basic system diagram 9:
1 collector array, 2 storage cylinders (hot water and buffer), return line temperature
increase
System 9 has one collector surface, two
storage cylinders, priority logic), and the
storage cylinders, one solid fuel boiler and
return
line
temperature
increase
(temperature difference regulation). Heat
one return line temperature increase. The
control unit controls the solar function
metering is also possible, e.g. using an
(temperature difference regulation for 2
impeller flow meter.
Information
I
Current collector temperature (E1)
Minimum collector temperature (E1)
Maximum collector temperature (E1)
Program
Manual operation
I
I
Maximum temperature of
Pump A1 off/on
storage cylinder 1
Solar circuit storage 1 Td Start
A2 off/on
Solar circuit storage 1 Td Stop
A3 off/on
Current temperature of storage cylinder 1
Maximum temperature of
at bottom (E2)
storage 2
Minimum temperature of storage cylinder Solar circuit storage 2 Td Start
1 at bottom (E2)
Max. temp. of storage 1 at bottom (E2) Solar circuit storage 2 Td Stop
Current temp. of storage 2 at top (E4)
R2 Td start
Minimum temp. of storage 2 at top (E4)
R2 Td stop
Maximum temp. of storage 2 at top (E4)
Set time
Current return line temperature (E5)
Minimum return line temperature (E5)
Maximum return line temperature (E5)
Current temp. of storage 2 - bottom (E3)
Min. temp. of storage 2 - bottom (E3)
Max. temp. of storage 2 at bottom (E3)
Flow rate ∗
Daily yield 1/2∗
Total yield 1/2∗
A4 off/on
Basic setting
I
Code entry
Reset/factory setting
Select basic
configuration
Maximum collector
temperature
Priority storage cylinder
Mode yield metering
Volume flow ∗
DFG/WMM ∗∗
Glycol type ∗
Glycol percentage ∗
Maximum temperature
return line heating
Code change
∗ Displayed only if yield metering mode is equivalent to 1 or 2.
∗∗ Displayed only if yield metering mode is equivalent to 2.
SDC 306
1316BED036-11B-E
- 40 -
Date 06/09
Installation and Operating Instructions
11.10
Basic system diagram 10:
1 collector array, 1 storage cylinder, swimming pool, return line temperature increase
System 10 has one collector surface, one
storage cylinder and swimming pool, priority
storage cylinder, one swimming pool and
logic), and the return line temperature
one return line temperature increase. The
increase
(temperature
difference
control unit controls the solar function
regulation). Heat metering is also possible,
(temperature difference regulation for
e.g. using an impeller flow meter.
Information
I
Current collector temperature (E1)
Minimum collector temperature (E1)
Maximum collector temperature (E1)
Current temperature of storage cylinder 1
at bottom (E2)
Min. temp. of storage 1 at bottom (E2)
Max. temp. of storage 1 at bottom (E2)
Current temp. of storage 1 at centre (E4)
Min. temp. of storage 1 at centre (E4)
Max. temp. of storage 1 at centre (E4)
Current return line temperature (E5)
Program
I
Max. temp. of storage 1
Solar circuit storage
cylinder 1 Td Start
Solar circuit storage
cylinder 1 Td Stop
Maximum temperature of
swimming pool
Solar circuit pool Td start
Solar circuit pool Td stop
R2 Td start
R2 Td stop
Set time
Maintenance
(summer/winter)
Manual operation
I
Pump A1 off/on
A2 off/on
Basic setting
I
Code entry
Reset/factory setting
A3 off/on
Select basic
configuration
Maximum collector
temperature
Priority storage cylinder
Mode yield metering
Volume flow ∗
DFG/WMM ∗∗
Glycol type ∗
Glycol percentage ∗
Minimum return line temperature (E5)
A4 off/on
Maximum temperature
for return line
Code change
Maximum return line temperature (E5)
Current swimming pool temperature (E3)
Minimum swimming pool temperature (E3)
Max. swimming pool temperature (E3)
Flow rate ∗
Daily yield 1/2∗
Total yield 1/2∗
∗ Displayed only if yield metering mode is equivalent to 1 or 2.
∗∗ Displayed only if yield metering mode is equivalent to 2.
SDC 306
1316BED036-11B-E
- 41 -
Date 06/09
Installation and Operating Instructions
11.11
Basic system diagram 11:
1 collector array, 1 storage cylinder, swimming pool, return line temperature increase
System 11 has one collector surface, one
storage cylinder and swimming pool, priority
storage cylinder, one swimming pool and
logic), and the return line temperature
one return line temperature increase. The
increase
(temperature
difference
control unit controls the solar function
regulation). Heat metering is also possible,
(temperature difference regulation for
e.g. using an impeller flow meter.
Info
I
Current collector temperature (E1)
Program
I
Maximum temperature of
storage cylinder 1
Minimum collector temperature (E1)
Solar circuit storage cylinder
1 Td Start
Maximum collector temperature (E1)
Solar circuit storage cylinder
1 Td Stop
Current temperature of storage cylinder 1
Maximum temperature of
at bottom (E2)
swimming pool
Min. temp. of storage 1 at bottom (E2)
Solar circuit pool Td start
Max. temp. of storage 1 - bottom (E2)
Solar circuit pool Td stop
Current temp. of storage 1 - centre (E4)
R2 Td start
Minimum temp. of storage 1 - centre (E4)
R2 Td stop
Max. temp. of storage 1 - centre (E4)
Set time
Current return line temperature (E5)
Maintenance
(summer/winter)
Minimum return line temperature (E5)
Maximum return line temperature (E5)
Current swimming pool temp. (E3)
Minimum swimming pool temp. (E3)
Maximum swimming pool temp. (E3)
Flow rate ∗
Daily yield 1/2∗
Total yield 1/2∗
Manual operation
I
Pump A1 off/on
Basic setting
I
Code entry
A2 off/on
Reset/factory setting
A3 off/on
Select basic
configuration
Maximum collector
temperature
Priority storage cylinder
Mode yield metering
Volume flow ∗
DFG/WMM ∗∗
Glycol type ∗
Glycol percentage ∗
A4 off/on
Code change
∗ Displayed only if yield metering mode is equivalent to 1 or 2.
∗∗ Displayed only if yield metering mode is equivalent to 2.
SDC 306
1316BED036-11B-E
- 42 -
Date 06/09
Installation and Operating Instructions
11.12
Basic system diagram 12:
1 collector array, 1 storage cylinder, swimming pool, auxiliary heating
System 12 has one collector surface, one
and swimming pool, priority logic), and the
storage cylinder, one swimming pool and
auxiliary heating function (temperature
one auxiliary heating. The control unit
difference regulation, timeframe). Heat
controls the solar function (temperature
metering is also possible, e.g. using an
difference regulation for storage cylinder
impeller flow meter.
Information
I
Current collector temperature (E1)
Minimum collector temperature (E1)
Maximum collector temperature (E1)
Current temperature of storage
cylinder 1 at bottom (E2)
Minimum temperature of storage
cylinder 1 at bottom (E2)
Maximum temperature of storage
cylinder 1 at bottom (E2)
Current temperature of storage
cylinder 1 at top (E3)
Minimum temperature of storage
cylinder 1 at top (E3)
Maximum temperature of storage
cylinder 1 at top (E3)
Current swimming pool temp. (E4)
Minimum swimming pool temp. (E4)
Maximum swimming pool temp. (E4)
Flow rate ∗
Daily yield 1/2∗
Total yield 1/2∗
Program
I
Timeframe R2 start
Timeframe R2 stop
Maximum temperature of
storage cylinder 1
Solar circuit storage cylinder
1 Td Start
Solar circuit storage cylinder
1 Td Stop
Maximum temperature of
swimming pool
Solar circuit pool Td start
Manual operation
I
Pump A1 off/on
A2 off/on
A3 off/on
A4 off/on
Basic setting
I
Code entry
Reset/factory setting
Select basic
configuration
Maximum collector
temperature
Priority storage cylinder
Mode yield metering
Volume flow ∗
Solar circuit pool Td stop
DFG/WMM ∗∗
Start temperature, auxiliary
heating
Set time
Glycol type ∗
Glycol percentage ∗
Tolerance for solar yield
Code change
∗ Displayed only if yield metering mode is equivalent to 1 or 2.
∗∗ Displayed only if yield metering mode is equivalent to 2.
SDC 306
1316BED036-11B-E
- 43 -
Date 06/09
Installation and Operating Instructions
11.13
Basic system diagram 13:
1 collector array, 1 storage cylinder, swimming pool, auxiliary heating
System 13 has one collector surface, one
and swimming pool, priority logic), and the
storage cylinder, one swimming pool and
auxiliary heating (temperature difference
one auxiliary heating function. The control
regulation, timeframe). Heat metering is
unit controls the solar function (temperature
also possible, e.g. using an impeller flow
difference regulation for storage cylinder
meter.
Info
I
Current collector temperature (E1)
Minimum collector temperature (E1)
Maximum collector temperature (E1)
Current temperature of storage
cylinder 1 at bottom (E2)
Minimum temperature of storage
cylinder 1 at bottom (E2)
Maximum temperature of storage
cylinder 1 at bottom (E2)
Current temperature of storage
cylinder 1 at top (E3)
Minimum temperature of storage
cylinder 1 at top (E3)
Maximum temperature of storage
cylinder 1 at top (E3)
Current swimming pool temp. (E4)
Minimum swimming pool temp. (E4)
Maximum swimming pool temp. (E4)
Flow rate ∗
Daily yield 1/2∗
Total yield 1/2∗
Program
I
Timeframe R2 start
Timeframe R2 stop
Maximum temperature of
storage cylinder
Solar circuit Td start
Manual operation
I
Pump A1 off/on
A2 off/on
A3 off/on
A4 off/on
Solar circuit Td stop
Basic setting
I
Code entry
Reset/factory setting
Select basic
configuration
Maximum collector
temperature
Priority storage cylinder
Maximum temperature
Swimming pool
Solar circuit pool Td start
Mode yield metering
Solar circuit pool Td stop
DFG/WMM ∗∗
Start temperature, auxiliary
heating
Set time
Glycol type ∗
Volume flow ∗
Glycol percentage ∗
Tolerance for solar yield
Code change
∗ Displayed only if yield metering mode is equivalent to 1 or 2.
∗∗ Displayed only if yield metering mode is equivalent to 2.
SDC 306
1316BED036-11B-E
- 44 -
Date 06/09
Installation and Operating Instructions
11.14
Basic system diagram 14:
2 collector arrays, 1 storage cylinder, auxiliary heating
System 14 has two collector surfaces, one
metering is also possible, e.g. using an
storage cylinder and one auxiliary heating
impeller flow meter.
function. The control unit regulates the solar
function (temperature difference regulation
K1 = Collector array 1
for 2 collector arrays) and the auxiliary
K2 = Collector array 2
heating (thermostat, timeframe). Heat
Information
I
Current collector temperature (E1)
Minimum collector temperature (E1)
Maximum collector temperature (E1)
Current storage temp. at bottom (E2)
Minimum storage temp. - bottom (E2)
Maximum storage cylinder
temperature at bottom (E2)
Current storage temp. at top (E3)
Minimum storage temp. at top (E3)
Maximum storage temp. at top (E3)
Current collector 2 temperature (E4)
Minimum collector 2 temperature (E4)
Maximum collector 2 temperature (E4)
Current collector flow temp. (E5)
Minimum collector flow temp. (E5)
Maximum collector flow temp. (E5)
Flow rate ∗
Daily yield ∗
Total yield ∗
Program
I
Timeframe R2 start
Timeframe R2 stop
Maximum temperature of
storage cylinder
Solar circuit Td start
Solar circuit Td stop
Start temperature, auxiliary
heating
Set time
Manual operation
I
Pump A1 off/on
A2 off/on
A3 off/on
A4 off/on
Basic setting
I
Code entry
Reset/factory setting
Select basic
configuration
Max. collector temp.
Mode yield metering
Volume flow ∗
DFG/WMM ∗∗
Glycol type ∗
Glycol percentage ∗
Tolerance for solar yield
Code change
∗ Displayed only if yield metering is active.
∗∗ Displayed only if yield metering mode is equivalent to 2.
SDC 306
1316BED036-11B-E
- 45 -
Date 06/09
Installation and Operating Instructions
11.15
Basic system diagram 15:
2 collector arrays, 1 storage cylinder, return line temperature increase
System 15 has two collector surfaces, one
(temperature difference regulation). Heat
storage cylinder and one return line
metering is also possible, e.g. using an
temperature increase. The control unit
impeller flow meter.
regulates the solar function (temperature
difference regulation for 2 collector arrays),
K1 = Collector array 1
and the return line temperature increase
K2 = Collector array 2
Info
I
Current collector temperature (E1)
Minimum collector temperature (E1)
Maximum collector temperature (E1)
Current storage temp. at bottom (E2)
Min. storage temp. at bottom (E2)
Maximum storage cylinder
temperature at bottom (E2)
Current return line temperature (E3)
Minimum return line temperature (E3)
Maximum return line temperature (E3)
Current collector 2 temperature (E4)
Program
I
Maximum temperature of
storage cylinder
Solar circuit Td start
Solar circuit Td stop
Manual operation
I
Pump A1 off/on
Basic setting
I
Code entry
A2 off/on
A3 off/on
R2 Td start
R2 Td stop
Set time
A4 off/on
Reset/factory setting
Select basic
configuration
Max. collector temp.
Mode yield metering
Volume flow ∗
DFG/WMM ∗∗
Glycol type ∗
Glycol percentage ∗
Maximum temperature
return line heating
Code change
Minimum collector 2 temperature (E4)
Maximum collector 2 temperature (E4)
Current collector flow temp. (E5)
Minimum collector flow temp. (E5)
Maximum collector flow temp. (E5)
Flow rate ∗
Daily yield ∗
Total yield ∗
∗ Displayed only if yield metering is active.
∗∗ Displayed only if yield metering mode is equivalent to 2.
SDC 306
1316BED036-11B-E
- 46 -
Date 06/09
Installation and Operating Instructions
11.16
Basic system diagram 16:
1 collector array, 1 storage cylinder, circulation, anti-Legionnaire’s disease
System 16 has one collector surface, one
timeframe fixed, preset period) and the
impulse-controlled circulation (impulse) or
storage cylinder, one timer-controlled or
impulse-controlled circulation pump and one
thermal
circulation
(thermostat,
2
timeframes). Heat metering is also possible,
Anti-Legionnaire’s disease function. The
control unit regulates the solar function
e.g. using an impeller flow meter.
(temperature difference regulation), the antiFor the anti-Legionnaire’s disease function
E2 is used as reference sensor.
Legionnaire’s disease function (thermostat,
Info
I
Current collector temperature (E1)
Minimum collector temperature (E1)
Maximum collector temperature (E1)
Current storage temp. at bottom (E2)
Minimum storage temp. - bottom (E2)
Maximum storage cylinder
temperature at bottom (E2)
Current circulation temp. (E4) ∗∗∗∗
Minimum circulation temp. (E4) ∗∗∗∗
Maximum circulation temp. (E4) ∗∗∗∗
Flow rate ∗
Program
I
Timeframe 1, circ. start
Timeframe 1, circ. stop
Timeframe 2, circ. start
Timeframe 2, circ. stop
Max. temp. of storage
Solar circuit Td start
Manual operation
I
Pump A1 off/on
A2 off/on
A3 off/on
A4 off/on
Solar circuit Td stop
Thermal switch-on
temperature ∗∗∗∗
Set time
Daily yield ∗
Total yield ∗
Basic setting
I
Code entry
Reset/factory setting
Select basic configuration
Max. collector temperature
Mode yield metering
Volume flow ∗
DFG/WMM ∗∗
Glycol type ∗
Glycol percentage ∗
Period for anti-Legionnaire’s
function
Tolerance for solar yield
Circulation mode
(thermal/impulse)
Switch-on duration for
circulation ∗∗∗
Re-activation lock ∗∗∗
Code change
∗ Displayed only if yield metering is active.
∗∗ Displayed only if yield metering mode is equivalent to 2.
∗∗∗ Displayed only if impulse-controlled circulation is active.
∗∗∗∗ Displayed only if thermal circulation is active.
SDC 306
1316BED036-11B-E
- 47 -
Date 06/09
Installation and Operating Instructions
11.17
Basic system diagram 17:
1 collector array, 2 storage cylinder, thermal transfer, return line temperature increase
System 17 has one collector surface, two
the thermal transfer (temperature difference
storage cylinders, one thermal transfer
regulation, timeframe) and the return line
function and one return line temperature
temperature
increase
(temperature
increase. The control unit controls the solar
difference regulation). Heat metering is also
function (temperature difference regulation),
possible, e.g. using an impeller flow meter.
Information
I
Current collector temperature (E1)
Minimum collector temperature (E1)
Maximum collector temperature (E1)
Current storage cylinder temperature
at bottom (E2)
Minimum storage temp. - bottom (E2)
Maximum storage cylinder
temperature at bottom (E2)
Current storage cylinder temperature
at top (E4)
Min. storage temperature at top (E4)
Max. storage temperature at top (E4)
Current temperature of thermal
transfer storage cylinder at centre (E3)
Minimum temperature of thermal
transfer storage cylinder at centre (E3)
Minimum temperature of thermal
transfer storage cylinder at centre (E3)
Current return line temperature (E5)
Minimum return line temperature (E5)
Maximum return line temperature (E5)
Flow rate ∗
Daily yield ∗
Total yield ∗
Program
I
Timeframe R2 start
Timeframe R2 stop
Maximum temperature of
storage cylinder
Solar circuit Td start
Manual operation
I
Pump A1 off/on
A2 off/on
A3 off/on
Solar circuit Td stop
Max temp. of transfer
storage cylinder
R2 Td start
R2 Td stop
R3 Td start
R3 Td stop
Set time
A4 off/on
Basic setting
I
Code entry
Reset/factory setting
Select basic
configuration
Maximum collector
temperature
Mode yield metering
Volume flow ∗
DFG/WMM ∗∗
Glycol type ∗
Glycol percentage ∗
Maximum temperature
return line heating
Code change
∗ Displayed only if yield metering is active.
∗∗ Displayed only if yield metering mode is equivalent to 2.
SDC 306
1316BED036-11B-E
- 48 -
Date 06/09
Installation and Operating Instructions
11.18
Basic system diagram 18:
1 collector array, 2 storage cylinder, thermal transfer, return line monitor
System 18 has one collector surface, two
thermal transfer (temperature difference
storage cylinders, one thermal transfer
regulation, timeframe) and the return line
function and one return line monitor. The
monitor (temperature difference regulation).
control unit controls the solar function
Heat metering is also possible, e.g. using
(temperature difference regulation), the
an impeller flow meter.
Information
I
Current collector temperature (E1)
Minimum collector temperature (E1)
Maximum collector temperature (E1)
Current storage cylinder temperature
at bottom (E2)
Minimum storage cylinder temperature
at bottom (E2)
Maximum storage cylinder
temperature at bottom (E2)
Current storage cylinder temperature
at top (E4)
Minimum storage temp. at top (E4)
Maximum storage cylinder
temperature at top (E4)
Current temperature of thermal
transfer storage cylinder at centre (E3)
Minimum temperature of thermal
transfer storage cylinder at centre (E3)
Minimum temperature of thermal
transfer storage cylinder at centre (E3)
Current return line temperature (E5)
Minimum return line temperature (E5)
Maximum return line temperature (E5)
Flow rate ∗
Daily yield ∗
Total yield ∗
Program
I
Timeframe R2 start
Timeframe R2 stop
Maximum temperature of
storage cylinder
Solar circuit Td start
Manual operation
I
Pump A1 off/on
A2 off/on
A3 off/on
Solar circuit Td stop
A4 off/on
Basic setting
I
Code entry
Reset/factory setting
Select basic
configuration
Maximum collector
temperature
Mode yield metering
Max temp. of transfer
storage cylinder
R2 Td start
Volume flow ∗
R2 Td stop
R3 Td start
Glycol type ∗
Glycol percentage ∗
R3 Td stop
Code change
DFG/WMM ∗∗
Set time
∗ Displayed only if yield metering is active.
∗∗ Displayed only if yield metering mode is equivalent to 2.
SDC 306
1316BED036-11B-E
- 49 -
Date 06/09
Installation and Operating Instructions
11.19
Basic system diagram 19:
1 collector array, 2 storage cylinder, thermal transfer, return line monitor (with solid fuel
boiler)
System 19 has one collector surface, two
regulation, timeframe) and the return line
storage cylinders, one thermal transfer
monitor (temperature difference regulation).
Heat metering is also possible, e.g. using
function and one return line monitor. The
control unit controls the solar function
an impeller flow meter.
(temperature difference regulation), the
FSK = solid fuel boiler
thermal transfer (temperature difference
SDC 306
1316BED036-11B-E
- 50 -
Date 06/09
Installation and Operating Instructions
Information
I
Current collector temperature (E1)
Minimum collector temperature (E1)
Maximum collector temperature (E1)
Current storage cylinder temperature at
bottom (E2)
Minimum storage cylinder temperature at
bottom (E2)
Maximum storage cylinder temperature at
bottom (E2)
Current storage cylinder temperature at top
(E4)
Minimum storage cylinder temperature at
top (E4)
Maximum storage cylinder temperature at
top (E4)
Current temperature of thermal transfer
storage cylinder at centre (E3)
Minimum temperature of thermal transfer
storage cylinder at centre (E3)
Minimum temperature of thermal transfer
storage cylinder at centre (E3)
Current return line temperature (E5)
Minimum return line temperature (E5)
Maximum return line temperature (E5)
Flow rate ∗
Daily yield ∗
Total yield ∗
Program
I
Timeframe R2 start
Timeframe R2 stop
Maximum temperature of
storage cylinder
Solar circuit Td start
Solar circuit Td stop
Manual operation
I
Pump A1 off/on
A2 off/on
A3 off/on
A4 off/on
Basic setting
I
Code entry
Reset/factory setting
Select basic
configuration
Maximum collector
temperature
Mode yield metering
Max temp. of transfer
storage cylinder
R2 Td start
Volume flow ∗
R2 Td stop
Glycol type ∗
R3 Td start
Glycol percentage ∗
R3 Td stop
Code change
DFG/WMM ∗∗
Set time
∗ Displayed only if yield metering is active.
∗∗ Displayed only if yield metering mode is equivalent to 2.
SDC 306
1316BED036-11B-E
- 51 -
Date 06/09
Installation and Operating Instructions
12 R E C T I F I C AT I O N
O F F AU L T S
There are basically two kinds of system fault:
• Faults that are recognised by the control unit and which it can therefore indicate
• Faults that cannot be indicated by the control unit
12.1 Faults with error message
Error display
!
Possible causes
• Sensor cable
interrupted
• Sensor defective
Action
Check cables
• Short circuit in sensor
wiring
• Sensor defective
Check cables
• Error in pump
connection
• Pump defective
• Air in the system
• Flow rate counter
defective
Check cabling
• Sensor cable
interrupted
• Sensor defective
Check cables
Check sensor resistance value,
replace sensor if necessary
Flashing
!
Flashing
Circulation error:
no flow rate
Check sensor resistance value,
replace if necessary
Replace pump
Bleed system
Check whether, when the system is
running, the impeller wheel of the
Flashing
meter moves (if visible)
Additionally in the case of • Connection to flow rate Check cables
meter defective
energy yield metering:
+ !
• Error executing antilegionella function
Legionella error:
no flow rate
+
Check sensor resistance value,
replace sensor if necessary
Contact your fitter or supplier
!
flashing
SDC 306
1316BED036-11B-E
- 52 -
Date 06/09
Installation and Operating Instructions
12.2 Faults without error message
Faults and errors that are not displayed can
be checked against the following table and
possible causes and sources of error
identified. If, based on the description, fault
rectification is not possible, you will need to
contact the supplier or installer of the
system.
Errors relating to the 230 V AC voltage supply may only be rectified by
trained personnel
Error
No display function
Possible causes
Action
• No 230 V power supply Switch on or connect the control unit
Check domestic fuse box for
connection
• Fuse within device is
defective
Control unit does not
work
“Pump” symbol rotates,
but pump does not work
Displayed temperature
fluctuates strongly at
rapid intervals
SDC 306
• Device defective
• Control unit is in
manual mode
• Switch-on condition not
met
• Connection to pump
interrupted.
• Pump has seized.
• No power to switching
output.
• Sensor wires are
positioned close to 230
V cables
• Long sensor wires
extended without
shielding
• Device defective
1316BED036-11B-E
- 53 -
Test fuse, replace with new, type
2A/T fuse if necessary.
Test 230 V components for short
circuit
Contact the supplier
Exit “manual” menu
Wait until the switch-on condition is
met
Test cable to pump
Ensure the pump is running
Contact supplier
Lay sensor wires in a different way
shield sensor wires
Shield sensor wires
Contact the supplier
Date 06/09
Installation and Operating Instructions
13
T E C H N I C AL
D AT A
SDC 306
Housing
Material
100% recyclable ABS casing for wall-mounted installation
Dimensions (H x W x D) in mm, 175 x 134 x 56; approx. 360 g
weight
Protection class
IP20 in accordance with VDE 0470
Electrical values
Operating voltage
AC 230 Volt, 50 Hz, -10...+15%
Internal device fuse
Micro-fuse 5 x 20mm 2 A/surge-proof
Radio interference level
N in accordance with VDE 0875
Maximum cable cross-section
230 V connections
2.5 mm² fine-strand/single-strand
Temperature sensor /
temperature range
PTF6 - 25°C - 200°C
PT1000, 1.000 kΩ at 0°C
Testing voltage
4 kV 1 min in accordance with VDE 0631
Switching output
Output depending on switching
output
Total output for all outputs
230 V∼ /
1 A / approx. 230 VA for cos ϕ = 0.7-1.0
2A/ approx. 460 VA
Fuse protection
Micro-fuse 5 x 20 mm, 2 A/T (2 amp, fine-wire)
Other
Recommended flow meter
PVM 1.5/90 1500l/h, Tmax >=90°C, 10l/impulse
Operating temperature
0 ... + 50°C
Storage temperature
-10 ... + 65°C
14 R E S I S T AN C E
T AB L E
PT1000
The correct function of the temperature sensor can be checked against the following
temperature resistance table, using a resistance measurement device:
Temperature
Resistance (Ohms)
Temperature
Resistance (Ohms)
in °C
in °C
-30
882
60
1232
-20
921
70
1271
-10
960
80
1309
0
1000
90
1347
10
1039
100
1385
20
1077
120
1461
30
1116
140
1535
40
1155
200
1758
50
1194
Manufacturer of SDC 306 control unit devices: PROZEDA GmbH
SDC 306
1316BED036-11B-E
- 54 -
Date 06/09