1
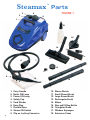
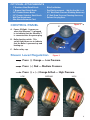
Steamax
TM
OPERATING INSTRUCTIONS
Steam Vapor Cleaning System
For Safely Cleaning and Sanitizing . . .
Without Chemicals
AmeriVap® Systems, Inc. | 31 Successful Way, Dawsonville, GA 30534
Ph: 404.350.0239 | F a x: 404.350.9214 | Email: [email protected]
www.amerivap.com
IMPORTANT - READ FIRST!
OPERATING INSTRUCTIONS
2
1
Use 110V - 115V power outlet only.
2
When using the Steamax™, like any electrical appliance,
the following rules should always be observed:
• Do not use the Steamax™ bare-footed.
• Do not use an extension cord in the bathroom or
shower areas without taking special precautions.
• Do not pull the cord or Steamax™ in a way that
would cause the Steamax™ to unplug.
• Do not move the Steamax™ by pulling or lifting it
by its cord.
• Protect the Steamax™ from the weather
(rain, direct sunlight, etc.).
• Do not clean the Steamax™ base unit with steam from
the Steamax™ and always store it in a dry place.
• Do not allow children or inexperienced people to use
the Steamax™ without supervision.
3
Always unplug the Steamax™ from the 110/115V plug:
• Before filling or emptying the tank.
• When the Steamax™ is not being used, even for a
short time.
• Before cleaning or servicing.
4
When plugging in or unplugging the power cord from
the electrical outlet, make sure your hands are dry.
5
In the case of breakdown and/or malfuction, switch off
the Steamax™ and do not tamper with it. Only
AmeriVap® Systems technicians should service it.
6
To prevent the cord from overheating, fully unwind the
cord before use.
OPERATING INSTRUCTIONS (cont.)
7
The boiler is fitted with a safety cap which prevents the tank
from being opened while there is still pressure inside.
8
Do not plug in the Steamax™ or operate it if any of its
components are damaged or if the Steamax™ leaks.
9
The Steamax™ can reach very high temperatures during use.
Be careful not to touch certain parts (i.e. end of nozzles) as
you could be scalded.
10
When using an extension cord, make sure it is rated for 15A or
higher. (Using lower rated extension cord will void the warranty.)
11
Only use tap water in the Steamax™. Do not add chemical,
detergent, or any other chemical additive. Filling the
Steamax™ with anything other than tap water will void the
warranty. Do not use DI (Deionized) water.
12
Do not spray steam at people, animals or plants at close
distance. When cleaning silk plants, keep a safe distance
from them to avoid damaging them.
13
When using accessories, use each one for the appropriate
surfaces.6
More Important Notes
• Condensation may leave water drops in the hose and accessories since
the last use or during idle time. Therefore, before you start cleaning, it
is advisable to adjust the steam level to its maximum and let the steam
escape for a few seconds to clear the condensed water drops from the
hose and attachments.
• Do not use the Steamax™ to clean non-heat resistant materials.
• Do not leave the steam level at its maximum for too long: a medium level
is usually enough, and less energy and water are required.
• When doing the initial cleaning with steam, especially for ground-in dirt,
longer steaming time than usual may be required to get the best results.
3
Steamax
3
TM
Parts
FIGURE 1
4
2
5
1
15
16
14
6
13
7
17
12
11
8
10
18
9
1.
2.
3.
4.
5.
6.
7.
8.
9.
4
Carry Handle
Boiler ON Lamp
Power ON Lamp
Safety Cap
Cord Winder
Hose Plug
Flexible Hose
Steam ON Switch
Clip on Locking Connector
10.
11.
12.
13.
14.
15.
16.
17.
18.
Steam Nozzle
Small Round Brush
Large Round Brush
Rectangular Brush
Elbow
Non-spill Filling Bottle
Triangular Brush
Window Squeegee
Extension Tubes
OPTIONAL ATTACHMENTS
•
•
•
•
•
•
1" Stainless Steel Detail Brush
1" Bronze Steel Detail Brush
2.5" Circular Bronze Brush
2.5" Circular Stainless Steel Brush
Wall Tool Attachment
Slim Nozzle Extension Tool
•
•
•
•
•
Blitz Pad Holder
Pad Pak Assortment. - Wh/Gry/Brn/Blk (1 ea)
2.5" Sink Drain Pressure Cleaning Accessory
5" Sink Drain Pressure Cleaning Accessory
Deluxe Carrying Case
Figure 2
CONTROL PANEL
C
A. Power ON light. It comes on
when the Steamax™ is plugged
in to indicate that the Steamax™
is connected into the power plug.
B. Boiler heating switch. This
switch light comes on to indicate
that the boiler is powered up and
heating up.
B
A
C. Boiler safety cap.
Steam Level Regulation
Figure 3
Press (•) Orange — Low Pressure
Press (••) Red — Medium Pressure
Press (•) + (••) Orange & Red — High Pressure
LOW
MEDIUM
HIGH
5
Using the
Steamax
BOILER FILLING
TM
unit
Figure 4
• Fill with tap water only.
• Make sure that the Steamax™ is not
plugged into an electrical outlet.
• Place the Steamax™ on a flat surface.
• Unscrew the boiler cap. (C in Figure 2).
The boiler has maximum capacity of
2.4 quarts.
• Insert the tip of the filler bottle filled
with tap water and push down. When
the boiler is full, filler bottle will stop
automatically.
• Close the boiler cap again.
Important: Do not over fill. Use only tap
water; do not add chemical
detergents or any other
chemical additive.
CONNECT TO 110/115V POWER
Figure 5
E
D
• Unwind the cord completely and plug
into a 110-115V electrical outlet.
• The green power Light (A, Figure 2)
will come on indicating that the
Steamax™ has been connected and is
being powered up.
• Press the lower boiler-heating switch
(B, Figure 2). The light in this switch
will come on indicating that the water
in the boiler is being heated.
(This will take approx. 10 minutes.)
• Wait until the control light (E, Figure 5)
comes on to indicate that the pressure
of the water in the boiler has reached
its operation level and the Steamax™
is ready for use.
Important: The Steamax™ unit requires power sockets and extension cords
(if used) that are rated at 15A or higher. Insufficient voltage and
current may damage the product.
6
FITTING ACCESSORIES
Before fitting the accessories, turn off
the steam switch located on the handle
(N, Figure 6).
Figure 6
N
Steam hose with grip
Figure 6
J
• Slide Up the safety panel (on the front) of
the Steamax™.
• Insert the supply plug (H, Figure 6) into the
socket under the safety panel. Make sure
that the safety panel fits into the slot on
the topside of the panel.
H
• Check, by pulling slightly, that the supply
plug is correctly fixed into the Steamax™
socket.
Steam nozzle
(fit directly into grip)
• Insert the steam nozzle into the grip
(J, Figure 6) until it clicks into place,
making sure that the locking tab is in
line with the hole.
Figure 7
Small round brush
(fit directly onto the steam nozzle)
Figure 7
• Press slightly to fix the brush onto the steam
nozzle.
Large Rectangular cleaning brush
Figure 8
• Slide the flexible universal
fitting (P, Figure 8) into the
brush.
• Move the catch on the brush
(K, Figure 8) to the "movable"
position if you want the
fitting to have 180 degree
movement, or to the "fixed"
position if you want to keep
the brush fixed.
P
K
Figure 8
7
FITTING ACCESSORIES
Extension Tubes
(cont.)
Figure 9
• Slide the end of the extension tube on with the holes aligned until it
clicks into place (Figure 9) onto the tool you will be using, making
sure that the locking tab is in line with the hole.
Figure 9
Figure 10
Floor cloth
Figure 10
• Place the floor cloth on the floor with the clean side facing the floor.
• Place the brush in the center of the floor cloth.
• While pressing one of the black clips on the brush, slide the ends of the floor cloth
under the raised black clips.
• Repeat the last step with the other clip and the other end of the cloth.
Attention:
For Safety reasons, do not use the steam floor brush to
clean electrical appliances and installations.
To clean delicate carpet or uphostery, please check with the
manufacturer's instructions.
8
APPLICATIONS
The rectangular brush is ideal for cleaning floors and walls without the need for
detergents or chemical products. The following are some other Steamax™
uses.
• Cleaning ceramic tile floors, carpets and tiled walls
• Cleaning windows, mirrors, glass cabinets and other glass surfaces
• Removing stains in carpets, furniture, uphostery and clothes
• Removing grease and dirt and sanitizing kitchen units, such as
cupboards, sinks, ovens, refrigerators, tables, etc.
• Cleaning shutters, blinds, corners and angles that are particularly
difficult to reach
• Sanitizing and cleaning sinks, bathtubs, showers, etc.
• Cleaning garden furniture and tools
How to Clean with the Accessories
Cleaning with the Steam Nozzle
The steam nozzle is for cleaning areas which are difficult to reach. Follow these
steps to use steam to eliminate dirt and germs from corners and angles, cracks
and gaps:
• Press the steam switch to loosen the dirt with the steam jet.
• Remove the dirt with the supplied absorbent floor cloth.
• To eliminate ground-in dirt, we recommend the use of small round brush,
fitted to the steam nozzle.
Important: The steam from the Steamax™ nozzle reaches a temperature of 220°F at
the tip. When cleaning heat sensitive materials, hold the steam nozzle at
least 4-5 inches from the surface.
Cleaning Floors
(Figures 8 and 10)
Clip on a clean, absorbent cloth to the rectangle brush (Figure 10).
HINT: For best result, wash and dry cloth prior to its first use after purchase.
• Press the steam switch. ( Figure 3)
• Clean the floor without rubbing too hard.
• To clean particularly dirty floors, first use a large brush without the floor cloth
to allow more steam to loosen dirt (no need to apply pressure). Once the dirt
is loosened, fix the clean cloth to the brush and remove the dirt.
• As the cloth picks up dirt, you can flip the cloth over to use the clean size to
minimize dirty cloths.
Important: Be particularly careful when cleaning heat-sensitive materials. On
hardwood floors, keep the brush moving at a steady pace. Do not over
wet the surface.
9
How to Clean with the Accessories
Figure 11
Cleaning Glass Surfaces
(cont.)
Figure 11
To clean glass, use the window squeegee as
follows:
• Press the steam switch.
• Gently slide the squeegee over the glass with brush
and its steam holes facing towards the surface.
• Remove stubborn dirt with the ribbed edge of the
rubber on the upper part of the accessory.
• Switch the steam off.
• Remove the dirty water from the glass using the
ribbed edge of the rubber on the upper part of the
accessory.
• Dry carefully with an absorbent cloth, such as the
one supplied.
Important: It is always necessary, especially in winter, to pre-heat the window panes
before cleaning them. To do this, pass the large brush with the steam
engaged over the window at a distance of about 4 inches from the surface.
Cleaning Carpets
To clean the entire carpet surface, follow these steps:
• Attach the floor cloth to the brush (rectangular or triangular). (Figure 9)
• Press the steam switch. (Figure 3)
• Slowly move the brush without applying any pressure.
• Wrap the floor cloth around the brush again with a clean part facing the carpet.
Important: As a general rule, when cleaning delicate materials, adjust the steam level
to its minimum setting. Before starting, check the quality of the carpet
(color fastness and heat resistance) by directing a jet of steam in a hidden
corner. Be particularly careful when cleaning velvets.
To Remove Stains from Carpet
• Fit the steam nozzle onto the grip. (Figure 6)
• Press the steam switch. (Figure 3)
• Direct a jet of steam across the stained surface of the carpet.
• Have a clean cloth ready to remove the dirt as it gets loosened away from the surface
of the material.
Attention: Egg white stains can, under the effect of the steam, become fixed
onto the fabric.
10
STEAMAX™ RUNS OUT OF WATER
DURING OPERATION
A light (D, Figure 4) comes on to indicate that there is no water left in the tank.
When this happens, the Steamax™ stops, and the boiler stops. To refill the boiler
and continue cleaning, follow these steps:
1
Press the upper boiler switch (B, Figure 2). The light on this switch
goes off, indicating that the boiler is no longer powered up.
2
Continue working to use up any remaining steam in the boiler. This
is extremely important as it allows you to open the safety cap
(C, Figure 2).
3
Once you have checked that all the steam is used up, unplug the
Steamax™.
4
Press the top of the safety cap in its center (hole) with thumb and
turn the cap like a prescription bottle.
5
Slowly unscrew the safety cap (C, Figure 2) and let any
remaining steam escape. Be careful not to let any hot steam or
hot water come into contact with your skin or any person or
animal near the unit.
6
Refill: First fill with 5 short presses down on the bottle to limit
the initial amount of water while the boiler is cooling off. Then,
press down on the filler bottle fully to fill the boiler.6
CLEANING AND MAINTENANCE
Cleaning the Base Unit
Clean the Steamax™ and accessories with a damp cloth and dry them. Do not
immerse the Steamax™ in water or use steam. Drain regularly (after 5-10 uses).
Mineral Deposits Removal
1. Always unplug from the electrical outlet and check that the Steamax™
has cooled down completely.
2. Add 2 to 5 oz. of WHITE vinegar, Lime Away™, C.L.R™. or other
commercial coffee maker or humidifier cleaner to 32 oz. of water and
pour into the stainless steel tank.
3. Allow the mixture to sit in the tank for several hours.
4. Using the metal end inside the safety cap, open the drain plug at the
bottom of the boiler (Figure 12) and empty the tank.
5. Fill and drain the tank 3 times with clean water to totally flush out the
cleaning solution. Replace the drain plug. Your system in now ready to
be filled with clean water and restarted.
IMPORTANT: Never try to remove mineral deposits if the appliance is still warm or plugged in.
11
Storing the
Steamax™ After Use
If you intend to use the Steamax™ again within a few days, follow the
steps below:
1. Press the upper boiler switch (B, Figure 2). The light on this switch goes
off, indicating that the boiler is no longer powered up.
2. Unplug from the electrical outlet.
3. Before storing, wait until the Steamax™ cools down completely.
If you do not intend to use the Steamax™ again within a few days, follow
the steps below:
1. Press the upper boiler switch (B, Figure 2). The light on this switch goes
off, indicating that the boiler is no longer powered up.
2. Continue working to use up any remaining steam in the boiler. This is
extremely important as it allows you to open the safety cap (C, Figure 2).
3. Once you have checked that no more steam is delivered, unplug from
the electrical outlet.
4. Leave the Steamax™ for 2-3 hours to fully cool off before proceeding to
the next step.
5. Press down on the top (hole) of the
safety cap with thumb and turn like
a prescription bottle.
Figure 12
6. Slowly unscrew the safety cap (C,
Figure 2) and let any remaining
pressure escape.
7. Using the metal end of the safety
cap, open the drain plug at the
bottom of the boiler (Figure 12)
and empty the tank.
Please visit www.amerivap to
• Find cleaning hints
• Learn about using the right accessories
• Buy supplies
• Learn more about what Amerivap®'s Dry Steam
Vapor Technology can do for your family and
business
12
SOME CLEANING SUGGESTIONS
BATHROOMS
• Tile & Grout Detail Cleaning
• Porcelain Fixtures, Toilets
• Chrome and Brass Surfaces
• Sinks and Fixtures
• Doors, Corners & Door Jambs
• Mirrors and Glass
• Shower Doors, Tracks & Stalls
• Bathtubs, Jacuzzi Jet Nozzles
KITCHEN and DINING AREAS
• Clean, Sanitize and Defrost
Freezers and Refrigerators
without removing food
• Sanitize Counter Tops, Cutting
Surfaces and Sinks
• Clean Linoleum, Tile, Hardwood
Floors
• Clean Grease Buildup on Walls,
Cabinet Surfaces, Appliances
• Clean Oven Hoods
• Sanitize all Stainless Steel
Surfaces
• Sanitize & Deodorize Trash Cans
AUTO / RV
• Clean Uphostery, Dash, Carpet
and Windows
• Carpet/Uphostery Stain Removal
• Clean Wheels
• Clean and Remove Tar
HOUSEHOLD
• Clean Metal Door Thresholds and
Door Tracks
• Remove Gum from Floors, Walls,
etc.
• Clean Plants, Real & Artificial
• Clean and Sanitize Toys
• Clean Windows
• Spot Clean Carpet Stains
• Clean all Floor Surfaces including
Marble and Hardwood
• Clean and Sanitize MattressesRemove Odors and Stains
• Clean Sliding Glass Doors and
Window Tracks
• Kill and Remove Odors from
Mold and Mildew
MISC.:
• Clean Tools and Equipment
• Clean Filters & Air Return Vents
• Remove Glue and Adhesive
• Removing Wallpaper
• Remove Nicotine & Tar Residue
• Clean and Sanitize Pools, Decks,
and Spas
• Clean and Sanitize Health Fitness
Equipment
• Clean Patio Furniture
• Spot Clean Draperies
• Kill Bed Bugs and Their Eggs
• Kill Fleas and Their Eggs
• Clean Bird Cages
Steamax™ makes cleaning more friendly for the environment and
for you while saving time, energy and money!
13
Clean Beyond . . .
The Naked Eye!
Steamax . . .
Dry Steam Vapor with
TM
• Saves time and energy
• Saves Money
• Makes homes safer from chemicals,
germs and allergens
• Makes homes cleaner
• Makes cleaning more environmentally
friendly
The new revolution in cleaning and sanitizing!
AmeriVap® Systems, Inc. | 31 Successful Way, Dawsonville, GA 30534
Ph: 404.350.0239 | F a x: 404.350.9214 | Email: [email protected]
www.amerivap.com