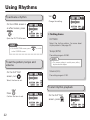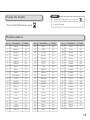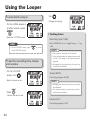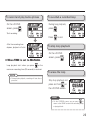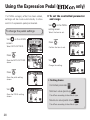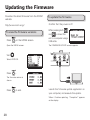
1
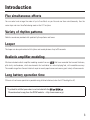
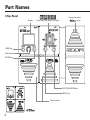
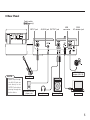
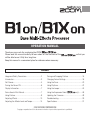
OPERATION MANUAL
Thank you very much for purchasing the ZOOM
.
Please read this manual carefully to learn about all the functions of the
will be able to use it fully for a long time.
Keep this manual in a convenient place for reference when necessary.
so that you
Contents
Usage and Safety Precautions ..................................2
Introduction ..............................................................3
Part Names ...............................................................4
Turning the Power ON ..............................................6
Display Information ...................................................7
Terms Used in This Manual .......................................7
Using Patches ...........................................................8
Adjusting Effects..................................................... 10
Adjusting the Master Level and Tempo...................14
Saving and Swapping Patches ................................15
Changing Various Settings ......................................16
Using the Tuner .......................................................20
Using Rhythms .......................................................22
Using the Looper ....................................................24
only) ........26
Using the Expression Pedal (
Updating the Firmware ...........................................28
Troubleshooting ......................................................30
Specifications .........................................................31
© 2013 ZOOM CORPORATION
Copying or reproduction of this document in whole or in part without permission is prohibited.
Usage and Safety Precautions
SAFETY PRECAUTIONS
In this manual, symbols are used to highlight warnings and cautions
that you must read to prevent accidents. The meanings of these
symbols are as follows:
AC adapter handling
When disconnecting the AC adapter from an outlet, always pull the body of
the adapter itself.
During lightning storms or when not using the unit for a long time,
disconnect the power plug from the AC outlet.
Battery handling
Warning
Something that could cause serious injury or death.
Something that could cause injury or damage to the
Caution equipment.
Other symbols
Required (mandatory) actions.
Use a specified battery type. Do not mix new and old batteries or different
brands or types at the same time. When not using the unit for an extended
period of time, remove the batteries from the unit.
If a battery leak should occur, wipe the battery compartment and the battery
terminals carefully to remove all battery residue.
Connecting cables with input and output jacks
Always turn the power OFF for all equipment before connecting any cables.
Prohibited actions.
Always disconnect all connection cables and the AC adapter before moving
the unit.
Warning
Operation using an AC adapter
Use only a ZOOM AD-16 AC adapter with this unit.
Do not use do anything that could exceed the ratings of outlets and other
electrical wiring equipment. Before using the equipment in a foreign country
or other region where the electrical voltage differs from that indicated on
the AC adapter, always consult with a shop that carries ZOOM products
beforehand and use the appropriate AC adapter.
Operation using batteries
Use 4 conventional 1.5-volt AA batteries (alkaline or nickel-metal hydride).
Read battery warning labels carefully.
Always close the battery compartment cover when using the unit.
Alterations
Never open the case or attempt to modify the product.
Caution
Product handling
Do not drop, bump or apply excessive force to the unit.
Be careful not to allow foreign objects or liquids to enter the unit.
Operating environment
Do not use in extremely high or low temperatures.
Do not use near heaters, stoves and other heat sources.
Do not use in very high humidity or near splashing water.
Do not use in places with excessive vibrations.
Do not use in places with excessive dust or sand.
2
Install the batteries with the correct +/- orientation.
Volume
Do not use the product at a loud volume for a long time.
Usage Precautions
Interference with other electrical equipment
In consideration of safety, the
has been designed to
minimize the emission of electromagnetic radiation from the device and to
minimize external electromagnetic interference. However, equipment that
is very susceptible to interference or that emits powerful electromagnetic
waves could result in interference if placed nearby. If this occurs, place the
and the other device farther apart. With any type of
electronic device that uses digital control, including the
,
electromagnetic interference could cause malfunction, corrupt or destroy data
and result in other unexpected trouble. Always use caution.
Cleaning
Use a soft cloth to clean the panels of the unit if they become dirty. If
necessary, use a damp cloth that has been wrung out well. Never use abrasive
cleansers, wax or solvents, including alcohol, benzene and paint thinner.
Malfunction
If the unit becomes broken or malfunctions, immediately disconnect the AC
adapter, turn the power OFF and disconnect other cables. Contact the store
where you bought the unit or ZOOM service with the following information:
product model, serial number and specific symptoms of failure or malfunction,
along with your name, address and telephone number.
Copyrights
t"MM USBEFNBSLT QSPEVDU OBNFT BOE DPNQBOZ OBNFT NFOUJPOFE JO UIJT
documentation are the property of their respective owners.
Note: All trademarks and registered trademarks mentioned in this manual are
for identification purposes only and are not intended to infringe on the
copyrights of their respective owners.
Introduction
Five simultaneous effects
You can select and arrange the order of up to five effects as you like and use them simultaneously. Use the
cursor keys and view the effects being used on the LCD anytime.
Variety of rhythm patterns
Realistic sounds are provided with updated rhythm patterns and tones.
Looper
The looper can be synchronized with rhythms and record phrases of up to 30 seconds.
Realistic amplifier modeling
We have included realistic amplifier modeling sounds from our
. We have recreated the low-end thickness,
pitch clarity and loudness, which are elements that contribute to a natural playing feel, with incredible accuracy.
The models range from famous historical amps to recent popular ones and cover a great variety of bass sounds.
Long battery operation time
20 hours of continuous operation is possible using alkaline batteries (when the LCD backlight is off).
* A printed list of effect parameters is not included with the
.
Please download a copy from the ZOOM website. ĺ http://www.zoom.co.jp/
3
Part Names
O Top Panel
Display
Cursor keys (up, down, left, right)
Expression pedal
(
only)
HOME key
Parameter knob
ENTER key
RHYTHM/LOOPER key
MENU key
Foot switches
4
O Rear Panel
(
Pedal switch
only)
INPUT jack
NOTE
t Signals input through
the AUX IN jack are
sent directly to the
OUTPUT jack without
passing through the
built-in effects.
AUX IN jack OUTPUT jack
DC9V
AC adapter jack
ZOOM AC
adapter (AD-16)
Bass guitar
Portable audio
player, etc.
USB
connector
Headphones
Bass amplifier
Computer
5
Turning the Power ON
Lower the amplifier's volume all the way.
O When using batteries
Insert batteries into the battery compartment.
Plug a guitar cable into the INPUT jack.
(Doing so turns the unit on.)
O When using an adapter
Connect an AD-16 adapter.
Turn the amplifier's power on and raise its
volume.
NOTE
t USB bus power operation is possible.
eco mode
If the eco mode setting is ON and it is left unused for
10 hours, it turns off automatically. (See page 16.)
6
Display Information
O HOME Screen
Bank name
Patch number
Remaining power display
Status icon (ĺP18)
This shows that the patch
contents have been changed.
This shows that the patch
contents have been saved.
Patch settings (ĺP9)
Reorder effects (ĺP13)
Delete effects (ĺP12)
Add effects (ĺP12)
Effect
Patch names
HINT
t Press
to return to the HOME screen from any other screen.
t Effects that are OFF appear gray.
Terms Used in This Manual
Patch
The ON/OFF status and the parameter settings of each effect are stored as "patches".
Use patches to recall and save effects. The
can store 100 patches.
Bank
A set of 10 patches is called a "bank".
The
has 10 banks labeled A–J.
7
Using Patches
To change the patch
To change the bank
Use
Use
and
.
HINT
t For details about using the preselect function to
change directly to patches that are not next in
order, see page 19.
t Press and hold
continuously.
8
or
to change patches
and
.
O To adjust the patch level (LVL)
To change settings for individual
patches
Turn
Turn
.
Select LEVEL.
on the HOME
screen.
Press
Select PATCH SETTINGS.
Turn
Press
.
.
Set between 0 and 120.
.
The PATCH SETTINGS
screen appears.
O To change the patch name
(NAME)
Press
.
The patch editing screen
appears.
only
Turn
.
Move the cursor.
Press
.
Confirm the character to change.
Turn
.
Open the page you want.
Turn
.
Change the character.
HINT
t You can use
and
character/symbol.
to change the type of
9
Adjusting Effects
To select an effect
To select an effect type
Turn
Use
on the HOME
screen.
and
.
Select the effect.
Press
Virtual knob
.
Show the top screen of the
selected effect.
M Effect processing capacity
Graphic for selected effect
HINT
t The virtual knobs are shown with the current
parameter values.
To turn an effect ON or OFF
Press
or
Effect ON
10
.
Effect OFF
The
allows
you to combine five effects
as you like. However, if you
combine effect types that
require great amounts of
processing power (amp models, for example),
the available processing capacity might not be
enough. If this occurs, "PROCESSING LIMIT"
will appear, and the effect will be bypassed.
You can avoid this by changing some of the
effect types.
O To select from a category
Press and hold
or
.
To adjust parameters
Press
.
The editing screen appears.
The categories appear.
Turn
Turn
.
Select the category.
Press
.
Press
NOTE
t The
.
Select the parameter to
adjust.
includes a PEDAL effects category.
To scroll through the effects shown
.
Confirm the parameter to
adjust.
Turn
.
Adjust the parameter value.
When using multiple effects, scroll to switch the
effect shown.
Use
and
.
HINT
t When shipped from the factory, the auto save
function is active. As soon as a parameter is adjusted
this change is automatically saved. (See page 18.)
NEXT
11
Adjusting Effects
To add an effect
Press
.
Add the effect.
Turn
on the HOME
screen.
Turn
Select ADD EFFECT.
Select EXIT.
Press
.
to end.
Press
Open the category
selection screen.
.
HINT
t On the effect screen, you can also press and
hold
Turn
.
Select the category.
.
to add an effect.
To remove an effect
Turn
Press
or
on the HOME
screen.
Select DELETE EFFECT.
Open the added effect
placement screen.
Press
Turn
.
Select where to add the
effect.
12
.
Open the effect deletion
screen.
Turn
.
Press
.
Select the effect to delete.
Open the EFFECT CHAIN
screen.
Press
Turn
.
.
Open the confirmation
screen.
Select the effect to move.
Press
Press
.
Delete the effect.
Turn
.
Confirm the effect to move.
to end.
Select EXIT.
Turn
Press
.
.
Select the new position for
the effect.
To change the order of effects
Turn
on the HOME
screen.
Press
.
Confirm the new position.
Select EFFECT CHAIN.
Press
to end.
13
Adjusting the Master Level and Tempo
To adjust the master level
To adjust the master tempo (BPM)
Press
Press
on the
on the
HOME screen.
HOME screen.
Open the MENU screen.
Open the MENU screen.
Turn
Turn
.
Select MASTER LVL.
.
Select BPM.
Press
Press
.
.
Turn
.
Set between 40 and 250.
Turn
.
Set between 0 and 120.
NOTE
t This tempo setting is shared by all effects, rhythms
and the looper.
Press
to end.
Press
14
to end.
Saving and Swapping Patches
To save the current patch
To swap the current patch
Press
Press
on the
on the
HOME screen.
HOME screen.
Open the MENU screen.
Open the MENU screen.
Turn
Turn
.
Select SAVE.
Press
.
Select SWAP.
.
Press
.
Open the patch SAVE
screen.
Open the patch SWAP
screen.
Turn
Turn
.
.
Select where to save the patch.
Select the other patch to swap.
Press
Press
.
.
Open the confirmation
screen.
Open the confirmation
screen.
Turn
Turn
.
.
Select "YES" to execute.
Select "YES" to execute.
NOTE
Select "NO" to cancel.
Select "NO" to cancel.
t Patches cannot be swapped
if the current patch has not
been saved.
Press
Press
.
.
15
Changing Various Settings
Press
on the
HOME screen.
Open the MENU screen.
Turn
Turn
.
Select ALKALI (alkaline) or Ni-MH (nickel-metal
hydride).
To set the eco mode
.
Select SETTINGS.
Turn
on the
SETTINGS screen.
Press
.
Open the SETTINGS
screen.
To select the battery type
Turn
on the
SETTINGS screen.
Select BATTERY.
Select eco.
Press
Turn
.
.
Select ON or OFF.
HINT
t ON: eco mode is active. If left unused for 10
hours, the power turns off automatically.
t OFF: eco mode is not active.
Press
16
.
To adjust the backlight time
To adjust the display contrast
Turn
Turn
on the
on the
SETTINGS screen.
SETTINGS screen.
Select LCD LIGHT.
Select LCD CNTRST.
Press
Press
Turn
.
.
Select OFF, ON, 15sec or 30sec.
Turn
.
.
Set between 1 and 13.
NEXT
17
Changing Various Settings
To set the auto save function
Turn
Patch changes will not be saved until they are
saved manually.
on the
If a patch has been
changed, a confirmation
screen will appear when
you try to open another
patch.
SETTINGS screen.
Select AUTO SAVE.
Press
O When AUTO SAVE is OFF
.
Turn
Turn
.
Select "YES" to save.
.
Select "NO" to not save.
Select ON or OFF.
O When AUTO SAVE is ON
Press
Patch changes will be saved automatically.
This shows that the
patch has been changed.
.
NOTE
This shows that the
patch has been saved.
t If you select "NO", the patch setting changes will
not be saved and the other patch will open.
Turn
.
Select where to save the
patch.
18
Press
.
Press
.
Open the confirmation
screen.
.
Turn
Turn
Select ON or OFF.
.
Select "YES" to save.
HINT
Select "NO" to cancel.
t ON: The preselect function is active. You can
select the next patch before changing to it.
Press
t OFF: The preselect function is inactive.
.
The patch changes are saved.
HINT
O When PRESELECT is ON
t You can also save from the MENU screen.
On the HOME screen,
t See "To save the current patch". (See page 15.)
use
NOTE
t If a patch has not been saved, patches cannot be
swapped. (See page 15.)
and
.
Select the next patch.
Press
and
at
the same time.
To use the preselect function
Turn
Change to the selected
patch.
on the
SETTINGS screen.
Select PRESELECT.
19
Using the Tuner
To activate the tuner
Press
or
to end.
On the HOME screen
To change tuner settings
or an effect screen,
press
and
On the tuner screen,
at
.
the same time.
press
Open the tuner screen.
Open the TUNER settings
screen.
To tune the bass guitar
Turn
You can play each open string and tune it.
.
Select the item to set.
O CHROMATIC TUNER
Press
(Flat)
(Correct pitch)
(Sharp)
.
Confirm the item to set.
The name of the nearest note and the pitch
accuracy are shown.
Turn
O BASS TUNER
Press
(Flat)
20
(Correct pitch)
.
Change the setting.
(Sharp)
to end.
M Setting items
OUTPUT
Drop tuning (FLAT)
Select BYPASS or MUTE.
Set to
Standard pitch (CALIBRATION)
The standard pitch for middle A can be set from
435-445 Hz.
× 0,
× 1,
× 2 or
× 3.
NOTE
t Drop tuning is not possible when the TYPE is
set to CHROMA.
Tuner types (TYPE)
Select CHROMA (chromatic) or BASS. See the
table below for more about the bass tuner.
Tuner types
Display
BASS
String number/Note name
Meaning
Standard tuning for bass guitars, including those with 5 or 6 strings
LB
4
3
2
1
HC
B
E
A
D
G
C
HINT
t ”LB” is the low B string and ”HC” is the high C
string.
21
Using Rhythms
Turn
To activate a rhythm
.
Change the setting.
On the HOME screen or
an effect screen, press
M Setting items
.
Open the RHYTHM screen.
PATTERN
Select the rhythm pattern. For more about
rhythm patterns. (See page 23.)
HINT
t On the RHYTHM screen, press
to the LOOPER screen.
to switch
Tempo (BPM)
The setting range is 40-250.
To set the pattern, tempo and
volume
t This tempo setting is used by every effect,
rhythms and the looper.
Volume (LVL)
On the RHYTHM
screen, turn
NOTE
.
The setting range is 0-100.
Select the item to set.
To start rhythm playback
Press
.
Confirm the item to set.
On the RHYTHM
screen, press
22
.
HINT
To stop the rhythm
On the RHYTHM screen, press
t On the RHYTHM screen, you can press
to
return to the HOME screen while the rhythm
continues playing.
.
Rhythm patterns
No.
PatternName
TimSig
No.
PatternName
TimSig
No.
PatternName
TimSig
1
GUIDE
4/4
24
R&B1
4/4
47
Jazz2
4/4
2
8Beats1
4/4
25
R&B2
4/4
48
Fusion
4/4
3
8Beats2
4/4
26
70s Soul
4/4
49
Swing1
4/4
4
8Beats3
4/4
27
90s Soul
4/4
50
Swing2
4/4
5
16Beats1
4/4
28
Motown
4/4
51
Bossa1
4/4
6
16Beats2
4/4
29
HipHop
4/4
52
Bossa2
4/4
7
16Beats3
4/4
30
Disco
4/4
53
Samba1
4/4
8
Rock1
4/4
31
Pop
4/4
54
Samba2
4/4
9
Rock2
4/4
32
PopRock
4/4
55
Breaks1
4/4
10
Rock3
4/4
33
IndiePop
4/4
56
Breaks2
4/4
11
ROCKABLY
4/4
34
EuroPop
4/4
57
Breaks3
4/4
12
R'n'R
4/4
35
NewWave
4/4
58
12/8 Grv
12/8
13
HardRock
4/4
36
OneDrop
4/4
59
Waltz
3/4
14
HeavyMtl
4/4
37
Steppers
4/4
60
JzWaltz1
3/4
15
MtlCore
4/4
38
Rockers
4/4
61
JzWaltz2
3/4
16
Punk
4/4
39
Ska
4/4
62
CtWaltz1
3/4
17
FastPunk
4/4
40
2nd Line
4/4
63
CtWaltz2
3/4
18
Emo
4/4
41
Country
4/4
64
5/4 Grv
5/4
19
TomTomBt
4/4
42
Shuffle1
4/4
65
Metro3
3/4
20
Funk1
4/4
43
Shuffle2
4/4
66
Metro4
4/4
21
Funk2
4/4
44
Blues1
4/4
67
Metro5
5/4
22
FunkRock
4/4
45
Blues2
4/4
68
Metro
23
JazzFunk
4/4
46
Jazz1
4/4
23
Using the Looper
Turn
To activate the looper
.
Change the setting.
On the HOME screen or
an effect screen, press
.
M Setting items
Open the LOOPER screen.
Recording time (TIME)
HINT
t On the LOOPER screen, press
to the RHYTHM screen.
to switch
Set to MANUAL or in a range from × 1 to
× 64.
NOTE
t The looper can record up to 30 seconds.
To set the recording time, tempo
and volume
On the LOOPER
screen, turn
.
Select the item to set.
t If the setting (number of quarter notes) would
not fall in this range, it will automatically be
adjusted.
t Changing the recording time will erase the
currently recorded loop.
Tempo (BPM)
The setting range is 40-250.
NOTE
t Changing the tempo will erase the currently
recorded loop.
Press
.
t This tempo setting is used by every effect,
rhythms and the looper.
Confirm the item to set.
Volume (LVL)
The setting range is 0-100.
24
To record and play back a phrase
To overdub a recorded loop
On the LOOPER
During loop playback,
screen, press
.
press
.
Press
to end.
Start recording.
After the recording time
elapses, playback will start.
To stop loop playback
On the LOOPER
O When TIME is set to MANUAL
Loop playback start when you press
screen, press
.
or the
maximum recording time (30 seconds) is reached.
NOTE
t During rhythm playback, recording will start after a
pre-count.
To erase the loop
Stop loop playback and
press and hold
on
the LOOPER screen.
HINT
t On the LOOPER screen, you can press
to
return to the HOME screen while recording a loop
or playing it back.
25
Using the Expression Pedal (
If a PEDAL category effect has been added,
settings will be made automatically to allow
control of expression pedal parameters.
To change the pedal settings
Turn
only)
O To set the controlled parameter
and range
Turn
on the PEDAL
setting screen.
Select the item to set.
on the HOME
screen.
Press
Select PATCH SETTINGS.
Confirm the item to set.
Press
.
.
Open the PATCH SETTINGS
screen.
Press
Turn
.
Change the setting.
.
Open the patch editing
screen.
M Setting items
Controlled parameter
Turn
.
Open the PEDAL setting
screen.
Minimum value (pedal up)
This differs according to the effects type.
Maximum value (pedal down)
This differs according to the effects type.
26
HINT
NOTE
t NO ASSIGN: No function is assigned to the expression
pedal.
t If "Error!" appears, restart calibration from the
beginning.
t AUTO ASSIGN: When using a PEDAL category
effect, a parameter will be assigned to the pedal
automatically.
If multiple PEDAL category effects are used, their
corresponding parameters will all be assigned to
the expression pedal.
To adjust the torque
t INPUT VOL: Controls the input level.
Insert the hex key into the torque adjustment
t OUTPUT VOL: Controls the output level. (Does
not affect the volume of the rhythm or looper.)
screw on the side of the pedal.
t The pedal switch can be used to turn ON/OFF
effects that are assigned to the expression
pedal. (The ON/OFF setting made by the pedal
switch is not saved.)
Turn it clockwise to tighten the pedal, and turn it
counterclockwise to loosen the pedal.
To calibrate its sensitivity
While pressing
, turn
Loosen
Tighten
the unit on. (See page 6.)
Operate the pedal as
the instructions show
and press
each
NOTE
t Be careful when loosening the screw. Loosening
it too much could cause it to come off inside the
unit.
time.
"Complete!" appears when calibration is finished.
27
Updating the Firmware
Download the latest firmware from the ZOOM
website.
http://www.zoom.co.jp/
To view the firmware versions
Press
on the HOME screen.
Open the MENU screen.
Turn
To update the firmware
Confirm that the power is off.
While pressing both
and
, connect the
unit to a computer using a
USB cable.
The FIRMWARE UPDATE screen appears.
.
Select VERSION.
Press
.
The firmware version is
shown.
Press
to end.
Launch the firmware update application on
your computer, and execute the update.
When it finishes updating, ”Complete!” appears
on the display.
28
Disconnect the USB cable.
HINT
To restore the
its factory default settings
to
t Updating the firmware will not erase saved patches.
While pressing
,
NOTE
turn the power ON.
t Do not disconnect the USB cable while the firmware
is being updated.
(See page 6.)
The All INITIALIZE screen
appears.
Turn
.
Select "YES" to execute.
Select "NO" to cancel.
Press
.
NOTE
t Be careful because this will restore all defaults to
their factory settings. Be sure that you want to do
this.
29
Troubleshooting
The unit will not turn ON
t If operating on battery power, connect a cable
to the INPUT jack.
No sound or very low volume
t Check the connections (ĺP5).
t Adjust the levels of the effects being used
(ĺP11).
t Adjust the master level (ĺP14).
t When adjusting the volume with an expression
pedal, make sure that a suitable volume setting
has been set with the pedal.
t Confirm that the TUNER OUTPUT is not set to
"MUTE" (ĺP20).
There is a lot of noise
t Check shielded cables for defects.
t Use only a genuine ZOOM AC adapter (ĺP6).
An effect is not working
t If the effect processing capacity is exceeded,
”PROCESSING LIMIT” appears on the effect
graphic. In this case, the effect is bypassed
(ĺP10).
Batteries lose their charge quickly
t Confirm that you are not using manganese
batteries. Alkaline batteries should provide
about 20 hours of continuous operation.
t Check the battery setting.
Set the type of battery being used to enable the
remaining charge to be shown more accurately
(ĺP16).
t Due to the characteristics of the batteries, they
might be used more quickly in cold.
The expression pedal is not working
well
t Check the expression pedal settings (ĺP26).
t Adjust the expression pedal (ĺP27).
30
Specifications
Effect types
75 types
80 types
Number of simultaneous effects 5
Number of user banks/patches
10 patches x 10 banks
Sampling frequency
44.1kHz
A/D conversion
24-bit with 128x oversampling
D/A conversion
24-bit with 128x oversampling
Signal processing
32-bit floating point & 32-bit fixed point
Display
LCD
Input
Output
INPUT
Standard monaural phone jack
Rated input level:
-20dBm
Input impedance (Line): 470k Ω
AUX IN
Stereo mini jack
Rated input level:
-10dBm
Input impedance (Line): 1k Ω
OUTPUT
Standard stereo phone jack
Maximum output level:
Line
+ 2dBm
(with output load impedance of 10 kΩ or more)
Headphones 17mW + 17mW (into 32 Ω load)
S/N (equivalent input noise)
119dB
Noise floor (residual noise)
-97dBm
Power
AC adapter DC9V (center minus plug), 500 mA (ZOOM AD-16)
20 hours of continuous operation using 4 alkaline AA batteries (with LCD
backlight off)
USB
Firmware update
Dimensions
154.8mm(D) x 146.0mm(W) x 43.0mm (H)
154.8mm(D) x 237.0mm(W) x 50.0mm (H)
Weight
380g (Not including batteries)
640g (Not including batteries)
*0dBm = 0.775Vrms
31
FCC regulation warning (for U.S.A.)
This equipment has been tested and found to comply with the limits for a Class B digital device, pursuant
to Part 15 of the FCC Rules. These limits are designed to provide reasonable protection against harmful
interference in a residential installation. This equipment generates, uses, and can radiate radio frequency
energy and, if not installed and used in accordance with the instructions, may cause harmful interference
to radio communications. However, there is no guarantee that interference will not occur in a particular
installation. If this equipment does cause harmful interference to radio or television reception, which can be
determined by turning the equipment off and on, the user is encouraged to try to correct the interference by
one or more of the following measures:
t3FPSJFOUPSSFMPDBUFUIFSFDFJWJOHBOUFOOB
t*ODSFBTFUIFTFQBSBUJPOCFUXFFOUIFFRVJQNFOUBOESFDFJWFS
tConnect the equipment to an outlet on a circuit different from that to which the receiver is connected.
t$POTVMUUIFEFBMFSPSBOFYQFSJFODFESBEJP57UFDIOJDJBOGPSIFMQ
For EU Countries
Declaration of Conformity:
This product complies with the requirements of
EMC Directive 2004/108/EC and
ErP Directive 2009/125/EC and
RoHS Directive 2011/65/EU
Disposal of Old Electrical & Electronic Equipment
(Applicable in European countries with separate collection systems)
This symbol on the product or on its packaging indicates that this product shall not be treated as household
waste. Instead it shall be handed over to the applicable collection point for the recycling of electrical and
electronic equipment. By ensuring this product is disposed of correctly, you will help prevent potential
negative consequences for the environment and human health, which could otherwise be caused by
inappropriate waste handling of this product. The recycling of materials will help to conserve natural
resources. For more detailed information about recycling of this product, please contact your local city
office, your household waste disposal service or the shop where you purchased the product.
ZOOM CORPORATION
4-4-3 Kanda-surugadai, Chiyoda-ku, Tokyo 101-0062, Japan
http://www.zoom.co.jp
Z2I-1995-01
Manufacturer names and product names mentioned in this patch list are trademarks or registered trademarks of their respective owners and
do not indicate any affiliation with ZOOM CORPORATION.
All product and artist names are intended only to illustrate sonic characteristics that were used as reference in the development of this product.
COMMENT
CATEGORY BANK / PATCH PATCH NAME
UK Groove
This warm distorted bass sound is perfect for UK rock style music.
0
TREMO
1
SLAP
Cut through even a loud orchestra with this rock slap setting.
1
Mean Green
2
Fonk
This envelope filter sounds uses M-Filter and DuoPhase.
2
CHO&REV
3
REC FAT CL
When you want to record a clean sound that is a little fat, this sound that uses HRT3500 is the one.
3
Ice
4
ruff
4
Listen Up
5
Tight
6
REC SLAP
7
PULL MELO
6
FAT Syn
7
AttackBass
8
Fracture
Big heavy rock tone with added distortion in the style of King Crimson's John Wetton.
9
FRETLESS
With a smooth attack like a fretless bass, this setting is great for playing melodies.
This synth bass sound shows its power in the low range.
This aggressive bass sound with a distinct edge even works well with slapping.
0
SolidState
1
RockSteady
A combination of classic rock bass heads and cabinets give you the power and tone to hold down the bottom no matter how hard you are rocking.
2
LowOctave
Starting with a clean solid-state sound, this patch adds an octave below. Great for soloing or laying down phat bass lines.
3
A-Remark
Uses the Defret and G-Krueger for a recreation of Jaco's tone on “A Remark You Made.”
4
Reach4It!
This funky synth sound is based on the intro from George Duke’s “Reach For It.”
5
Recreates the tone and attack of a classic solid-state amp and cabinet.
HammOnTap A slight early reflection delay on top of an ultra-clean tone make this an ideal patch for music using tapping techniques.
6
Chordal
7
SoloDlaVrb
8
SpaceMan
9
FrippOut
0
A clean setting with a subtle chorus and reverb perfect for chordal playing.
8
Distortion
This distortion sound is good for playing with a pick.
CLEAN&ECHO This clean sound with a prominent echo can be used during quiet sections of songs.
Professional Settings
5
Clean
0
COMMENT
This is a sound in the style of Chris Squire from Yes. It re-creates the rapidly sawing tremolo sound that he used in “Starship Trooper.”
A tribute to Anthony Jackson on the O'Jays hit song, “For the Love of Money.”
This patch is effective at making the most of the tails of long notes when, for example, playing whole notes with bright round strings.
ModReverb gives this setting a nice modulation.
SlowATTCK, OptComp, Delay, and ModReverb make a very somber sound. GREAT for ballads.
This Marcus Miller style tone uses 160 Comp and SMR.
This setting uses Mark B and is designed to record metal-style slapping. Mixing this with the direct sound when recording is ideal.
This setting allows the melody to be heard effectively when using only slap pull-offs.
ChokePHASE 160 Comp and Phaser FULL sound to cut through ANYTHING.
9
SLAPBACK
Enjoy ethereal slap playing with this setting that uses a short delay.
0
HYBRID DIS
This distortion sound keeps notes distinct and is designed for quick playing and bassists who have fast right hands.
1
JB Dis
This sticky distorted bass sound in the style of Jack Bruce sounds like the rough distortion of a humbucker pickup.
2
ExtraExtra
3
KingSal
This boomy sound uses the Heaven and Limiter effects.
4
boozer
D.I Plus and Bass BB combine to make this rough distorted sound.
5
Aggression
6
REC SOLO_D This setting for recording rapid solo playing uses D.I Plus and DI5.
Ba Dist 1 and Ba Boost make this a fun sound to have!! Harmonics and Melodies really come alive.
Strong, in-your-face Muff. The Ag Amp made it BIG sounding.
7
DIS SOLO
The StereoDly added to a sweet harmonics setting for an out-of-this-world sound.
8
PHASER
In the style of Robert Fripp’s “Frippertronics,” this patch will let you create long and surreal soundscapes.
9
aMUSE me
A tribute to the band Muse and their song “Stockholm Syndrome.”
NW AUTO
This auto-wah sound, which uses BaAutoWah, is great for playing funky bass lines.
0
AUTO-FUNK
This auto-wah sound uses BaAutoWah for great expressiveness.
1
NW FUZZ
This is an extremely distorted fuzz sound and uses Ba Metal.
1
Talkin'
The bottom is emphasized in this filter sound that seems to talk.
2
NW VERB
This setting, which uses the Plate reverb effect, is great for solo bass.
2
kick it
The Ba Octave effect is used for an octave filter sound.
3
NW ENS
The Mark B and Ba Ensmbl effects are used to create this thick chorus sound.
3
Energy
A tribute to Alphonso Johnson. Limiter gives it that punch and the Exciter gives an edge 70's Fusion.
4
NW VIB
This uses the Flip Top and Vibrato effects for a sound with a strong sense of modulation.
4
G-Boogie
A combination of SVT and M-Filter effects creates this sound that evokes the atmosphere of a Moog synthesizer with its rich low frequencies.
5
NW SATK
5
Star Bass
This patch was made to fall between the sound of a synth bass and an envelope filter effect.
6
NW DLY
This delay sound uses the G-Krueger and Delay effects to repeat the original sound with little alteration. This is a perfect delay sound for playing solos with a mysterious feeling.
6
SYNBASS
This synth bass sound is extreme. It's perfect for phrases with long notes using sustain.
7
NW DBL
This setting uses Ba Octave to increase the thickness of the low frequencies.
7
BassickSyn
8
NW CHOR
This uses the acoustic and Ba Chorus effects for a clear modulation sound.
8
Boogie
9
NW SYN
This synth bass sound uses StdSyn and is good for funky phrases.
9
SFX SYNTH
0
Studio
This setting is based on the sound of line recording.
0
Synthy
1
Fat Man
The fleshy sound of fingerpicking is the image behind this setting.
1
chill
This clean sound uses a compressor setting that is good for playing with multiple fingers, including three-finger, four-finger and sweep.
2
Ice Cold
Defret with Ba Pitch set an octave below and Vibrato make this extremely funky and unique sound.
3
Drowned
This setting, which uses FilterDly with ModReverb, is inspired by the image of a sunken ruin at the bottom of the ocean.
4
Warp
5
JustNasty
6
Krush
7
Copycat
8
Murda Fuzz
2
TC CLEAN
3
The Gospel
This gospel bass sound uses the SMR effect.
4
REC CLEAN
This clean sound for fast playing uses HRT3500 and is good for recording.
5
Solid Bass
This is a bass sound with a quick attack. Since the middle frequencies are also brought out significantly, the outlines of the tones are not lost, making this patch great for fast playing.
6
Big Willie
Smooth and strong fingerpicking is the inspiration for this patch.
7
Low Fi
8
PickHeavy
This lo-fi sound uses the AC Bs Pre with bold equalization.
Tweak Freak
This patch uses Ag Amp and SlowATTCK to create a sound with a nice slow attack. This is perfect for playing chords.
Filter/Synth
A subtle delay for solo bass playing with an added reverb.
A slightly compressed rock tone on the verge of distortion that will enhance playing with a pick.
This solo sound designed for fast playing and tapping will let you play your heart out during bass solos.
Add color to songs with this phaser sound.
This keyboard bass setting evokes the 1970s, but has a modern touch.
This synth bass tone has a talking feel.
This synth bass sound is effective when sustaining long heavy low notes.
Slight compression and ParticleR give a synthy pad sound when played legato.
This synthesizer pad sound can be used with chord playing.
SeqFLTR, ReverseDL and other effects combine for an electronica sound. This one is perfect for playing harmonics and chords.
With a 5th added, I was hearing the 70's fusion of George Duke/Frank Zappa.
This synth bass sound uses BitCrush for a tone inspired by dubstep and similar genres.
This long delay sound uses modulation that generates feelings of comfort.
SVT amp with StdSyn and SeqFLTR. Big Fuzz and Synth sound.
9
ReggaeBASS With its low range brought to the front, this bold sound is perfect for dub reggae.
9
Genesis
0
Cappn Hook
A tribute to James Jamerson. SVT and Ba Boost with heavy low end like Mr. Jamerson.
0
MillerTime
1
REC SOLO_C
Using G-Krueger, this is a clean sound for recording technical solos.
1
WARM TONE This orthodox bass sound is warm and relaxed, making it perfect for accompanying singing, for example.
2
FUSION CH
2
EarthyRock
3
Remote
4
1981
5
TM FUZZ
6
Smoke
The emphasis on the low frequencies is like old-fashioned reggae bass.
7
Magic
80's Pop Tone. Not too “chorus” driven, but just enough rate from Ba Ensmbl.
jackko
This simulates the sound of a fretless bass. A sense of vibration and width are realized by combining multiple effects.
SpaceFONK
3
4
CHORD
Ideal for playing harmonics, for example, this setting makes use of the rear pickup of a jazz bass.
Good for playing chords, this sound maintains the distinctness of the notes.
HARMONICS This setting evokes the sound of Jaco Pastorius and is ideal for playing chords using natural harmonics.
5
CUTTING
This setting makes the most of repeated rhythmic playing using the nails of the right hand.
6
TAPPING
Use this floating sound to maximize the chord feeling and crisp staccato of tapping.
7
CLEAN SOLO While being a clean sound, this lyrical patch also suits bold fast play.
Legendary Tone
Clean
Professional Settings
Nate Watts
Stu Hamm
Demo
CATEGORY BANK / PATCH PATCH NAME
8
DUB BASS
This dub sound is crafted with reverb and has great depth. Lowering the tone on the bass itself might add interest.
8
9
Orpheum
Was thinking of Victor Wooten's “Show of Hands” record.
9
ReverseDL, HD Hall and Ba Boost for spacy new age bass.
This setting is good for modern slap playing techniques. It uses M Comp and Mark B effects.
With a fat sound, this setting is ideal for earthy rock played by fingerpicking.
AC Bs Pre and Flip Top for 1960's Motown sound.
This traditional slap sound is in the style of Louis Johnson.
Powerfully boosting the midrange, this distorted bass sound is in the style of Tim Bogert.
D Comp, Vibrato and Z-Syn A tribute to Bootsy Collins.
©2014 ZOOM CORPORATION Z2I-2011-01
Manufacturer names and product names mentioned in this patch list are trademarks or registered trademarks of their respective owners and
do not indicate any affiliation with ZOOM CORPORATION.
All product and artist names are intended only to illustrate sonic characteristics that were used as reference in the development of this product.
SLAP
2
Fonk
3
REC FAT CL
4
ruff
0
TREMO
Cut through even a loud orchestra with this rock slap setting.
1
Mean Green
This envelope filter sounds uses M-Filter and DuoPhase.
2
CHO&REV
When you want to record a clean sound that is a little fat, this sound that uses HRT3500 is the one.
3
Ice
4
Listen Up
5
Tight
6
SLAP&WAH
This slap sound uses a funk metal style pedal wah.
7
PULL MELO
This setting allows the melody to be heard effectively when using only slap pull-offs.
This distortion sound is good for playing with a pick.
CLEAN&ECHO This clean sound with a prominent echo can be used during quiet sections of songs.
6
FAT Syn
7
AttackBass
This synth bass sound shows its power in the low range.
This aggressive bass sound with a distinct edge even works well with slapping.
8
Fracture
Big heavy rock tone with added distortion in the style of King Crimson's John Wetton.
9
FRETLESS
With a smooth attack like a fretless bass, this setting is great for playing melodies.
0
SolidState
1
RockSteady
A combination of classic rock bass heads and cabinets give you the power and tone to hold down the bottom no matter how hard you are rocking.
2
LowOctave
Starting with a clean solid-state sound, this patch adds an octave below. Great for soloing or laying down phat bass lines.
3
A-Remark
Uses the Defret and G-Krueger for a recreation of Jaco's tone on “A Remark You Made.”
4
Reach4It!
This funky synth sound is based on the intro from George Duke’s “Reach For It.”
5
COMMENT
This warm distorted bass sound is perfect for UK rock style music.
Recreates the tone and attack of a classic solid-state amp and cabinet.
HammOnTap A slight early reflection delay on top of an ultra-clean tone make this an ideal patch for music using tapping techniques.
Professional Settings
5
CATEGORY BANK / PATCH PATCH NAME
Clean
UK Groove
1
COMMENT
8
Distortion
0
This is a sound in the style of Chris Squire from Yes. It re-creates the rapidly sawing tremolo sound that he used in “Starship Trooper.”
A tribute to Anthony Jackson on the O'Jays hit song, “For the Love of Money.”
This patch is effective at making the most of the tails of long notes when, for example, playing whole notes with bright round strings.
ModReverb gives this setting a nice modulation.
SlowATTCK, OptComp, Delay, and ModReverb make a very somber sound. GREAT for ballads.
This Marcus Miller style tone uses 160 Comp and SMR.
ChokePHASE 160 Comp and Phaser FULL sound to cut through ANYTHING.
9
SLAPBACK
Enjoy ethereal slap playing with this setting that uses a short delay.
0
HYBRID DIS
This distortion sound keeps notes distinct and is designed for quick playing and bassists who have fast right hands.
1
JB Dis
This sticky distorted bass sound in the style of Jack Bruce sounds like the rough distortion of a humbucker pickup.
2
ExtraExtra
3
KingSal
This boomy sound uses the Heaven and Limiter effects. Do not forget that you can use BassPedalMonoPitch to change the pitch.
4
boozer
D.I Plus and Bass BB combine to make this rough distorted sound.
5
Aggression
Ba Dist 1 and Ba Boost make this a fun sound to have!! Harmonics and Melodies really come alive.
Strong, in-your-face Muff. The Ag Amp made it BIG sounding.
6
Chordal
6
REC SOLO_D This setting for recording rapid solo playing uses D.I Plus and DI5.
7
SoloDlaVrb
A subtle delay for solo bass playing with an added reverb.
7
SOLO&WAH
8
SpaceMan
The StereoDly added to a sweet harmonics setting for an out-of-this-world sound.
8
PHASER
A clean setting with a subtle chorus and reverb perfect for chordal playing.
Use the pedal wah aggressively during solos with this setting.
Add color to songs with this phaser sound.
FrippOut
In the style of Robert Fripp’s “Frippertronics,” this patch will let you create long and surreal soundscapes.
9
aMUSE me
A tribute to the band Muse and their song “Stockholm Syndrome.”
0
NW AUTO
This auto-wah sound, which uses BaAutoWah, is great for playing funky bass lines.
0
Go Ahead
A-Filter is combined with BassPedalMonoPitch in this filter sound. Use the pedal like a tremolo arm for an extreme sound!
1
NW FUZZ
This is an extremely distorted fuzz sound and uses Ba Metal.
1
Talkin'
The bottom is emphasized in this filter sound that seems to talk.
2
NW VERB
This setting, which uses the Plate reverb effect, is great for solo bass.
2
kick it
The Ba Octave effect is used for an octave filter sound.
3
NW ENS
The Mark B and Ba Ensmbl effects are used to create this thick chorus sound.
3
Energy
A tribute to Alphonso Johnson. Limiter gives it that punch and the Exciter gives an edge 70's Fusion.
4
NW VIB
4
G-Boogie
A combination of SVT and M-Filter effects creates this sound that evokes the atmosphere of a Moog synthesizer with its rich low frequencies.
5
NW SATK
This patch uses Ag Amp and SlowATTCK to create a sound with a nice slow attack. This is perfect for playing chords.
5
Star Bass
This patch was made to fall between the sound of a synth bass and an envelope filter effect.
6
NW DLY
This delay sound uses the G-Krueger and Delay effects to repeat the original sound with little alteration. This is a perfect delay sound for playing solos with a mysterious feeling.
6
SYNBASS
This synth bass sound is extreme. It's perfect for phrases with long notes using sustain.
7
NW DBL
This setting uses Ba Octave to increase the thickness of the low frequencies.
7
BassickSyn
8
NW CHOR
This uses the acoustic and Ba Chorus effects for a clear modulation sound.
8
Boogie
9
NW SYN
This synth bass sound uses StdSyn and is good for funky phrases.
9
SFX SYNTH
This setting is based on the sound of line recording.
0
Synthy
The fleshy sound of fingerpicking is the image behind this setting.
1
chill
This clean sound uses a compressor setting that is good for playing with multiple fingers, including three-finger, four-finger and sweep.
2
Ice Cold
Defret with Ba Pitch set an octave below and Vibrato make this extremely funky and unique sound.
3
Drowned
This setting, which uses FilterDly with ModReverb, is inspired by the image of a sunken ruin at the bottom of the ocean.
4
Warp
5
JustNasty
6
Krush
7
Copycat
0
Studio
1
Fat Man
2
TC CLEAN
3
The Gospel
This gospel bass sound uses the SMR effect.
4
REC CLEAN
This clean sound for fast playing uses HRT3500 and is good for recording.
5
Solid Bass
This is a bass sound with a quick attack. Since the middle frequencies are also brought out significantly, the outlines of the tones are not lost, making this patch great for fast playing.
6
Big Willie
Smooth and strong fingerpicking is the inspiration for this patch.
7
Low Fi
This lo-fi sound uses the AC Bs Pre with bold equalization.
Tweak Freak
This uses the Flip Top and Vibrato effects for a sound with a strong sense of modulation.
Filter/Synth
9
This keyboard bass setting evokes the 1970s, but has a modern touch.
This synth bass tone has a talking feel.
This synth bass sound is effective when sustaining long heavy low notes.
Slight compression and ParticleR give a synthy pad sound when played legato.
This synthesizer pad sound can be used with chord playing.
SeqFLTR, ReverseDL and other effects combine for an electronica sound. This one is perfect for playing harmonics and chords.
With a 5th added, I was hearing the 70's fusion of George Duke/Frank Zappa.
This synth bass sound uses BitCrush for a tone inspired by dubstep and similar genres.
This long delay sound uses modulation that generates feelings of comfort.
8
Murda Fuzz
9
ReggaeBASS With its low range brought to the front, this bold sound is perfect for dub reggae.
9
Genesis
0
Cappn Hook
A tribute to James Jamerson. SVT and Ba Boost with heavy low end like Mr. Jamerson.
0
MillerTime
1
REC SOLO_C
Using G-Krueger, this is a clean sound for recording technical solos.
1
WARM TONE This orthodox bass sound is warm and relaxed, making it perfect for accompanying singing, for example.
2
FUSION CH
2
EarthyRock
3
CHORD
3
Remote
4
1981
5
TM FUZZ
6
Smoke
The emphasis on the low frequencies is like old-fashioned reggae bass.
7
Magic
80's Pop Tone. Not too “chorus” driven, but just enough rate from Ba Ensmbl.
This simulates the sound of a fretless bass. A sense of vibration and width are realized by combining multiple effects.
4
PickHeavy
Ideal for playing harmonics, for example, this setting makes use of the rear pickup of a jazz bass.
Good for playing chords, this sound maintains the distinctness of the notes.
HARMONICS This setting evokes the sound of Jaco Pastorius and is ideal for playing chords using natural harmonics.
5
CUT&WAH
6
TAPPING
7
A slightly compressed rock tone on the verge of distortion that will enhance playing with a pick.
This funky setting creates a guitar-like backing sound with the addition of pedal wah for rhythm playing.
Use this floating sound to maximize the chord feeling and crisp staccato of tapping.
CLEAN SOLO While being a clean sound, this lyrical patch also suits bold fast play.
Legendary Tone
8
Clean
Professional Settings
Nate Watts
Stu Hamm
Demo
CATEGORY BANK / PATCH PATCH NAME
8
DUB BASS
This dub sound is crafted with reverb and has great depth. Lowering the tone on the bass itself might add interest.
8
jackko
9
Orpheum
Was thinking of Victor Wooten's “Show of Hands” record.
9
SpaceFONK
SVT amp with StdSyn and SeqFLTR. Big Fuzz and Synth sound.
ReverseDL, HD Hall and Ba Boost for spacy new age bass.
This setting is good for modern slap playing techniques. It uses M Comp and Mark B effects.
With a fat sound, this setting is ideal for earthy rock played by fingerpicking.
AC Bs Pre and Flip Top for 1960's Motown sound.
This traditional slap sound is in the style of Louis Johnson.
Powerfully boosting the midrange, this distorted bass sound is in the style of Tim Bogert.
D Comp, Vibrato and Z-Syn A tribute to Bootsy Collins.
©2014 ZOOM CORPORATION Z2I-2012-01