1
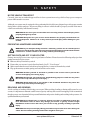
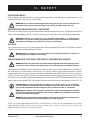
Owner’s Manual The Ultimate In Style & Performance® 21 Healey Road Dandenong, 3175 Victoria, Australia ACN # 088 609 661 www.pridemobility.com SAFETY GUIDELINES The symbols below are used throughout this owner's manual and on the scooter to identify warnings and important information. It is very important for you to read them and understand them completely. WARNING! Indicates a potentially hazardous condition/situation that can cause personal injury, equipment and/or property damage. (Black symbol on yellow triangle with black border). MANDATORY! These actions should be perfor med as specified. Failure to perform mandatory actions can cause injury to personnel and/or damage to equipment (white symbol on blue dot). PROHIBITED! These actions are prohibited; do not perform at any time or in any situation. Performing a prohibited action can cause personal injury and/or equipment damage (black symbol with red circle and red slash). Please fill out the following information for quick reference: Pride Provider:______________________________________________________________________ Purchase Date:______________________________________________________________________ Address:___________________________________________________________________________ Phone Number:______________________________________________________________________ Serial Number:_______________________________________________________________________ NOTE: This owners manual is compiled from the latest specifications and product information available at the time of publication. We reserve the right to make changes as they become necessary. Any changes to our products may cause slight variations between the illustrations and explanations in this manual and the product you have purchased. 088 609 661 Copyright © 2005 Pride Mobility Products Australia Pty. Ltd. INFMANU2408/REV DMarch 2005 CONTENTS I. INTRODUCTION ......................................................................................................................... 4 II. SAFETY ......................................................................................................................................... 5 III. SPECIFICATIONS ................................................................................................................... 16 IV. YOUR SCOOTER ...................................................................................................................... 18 V. BATTERIES AND CHARGING ............................................................................................ 22 VI. OPERATION ............................................................................................................................... 26 VII. COMFORT ADJUSTMENTS................................................................................................ 28 VIII. DISASSEMBLY AND ASSEMBLY ..................................................................................... 31 IX. BASIC TROUBLESHOOTING ............................................................................................. 33 X. CARE AND MAINTENANCE ................................................................................................ 35 XI. WARRANTY................................................................................................................................ 37 Ultimate-4 XL www.pridemobility.com 3 I. INTRODUCTION SAFETY Welcome to Pride Mobility Products Australia Pty. Ltd. (Pride). The product you have purchased combines stateof-the-art components with safety, comfort, and styling in mind. We are confident the design features will provide you with the conveniences you expect during your daily activities. Understanding how to safely operate and care for this product should bring you years of trouble free operations and service. Read and follow all instructions, warnings, and notes in this manual and all other accompanying literature before attempting to operate this product for the first time. In addition, your safety depends upon you, as well as your provider, caretaker, or healthcare professional in using good judgement. If there is any information in this manual which you do not understand, or if you require additional assistance for setup or operation, please contact your authorised Pride Provider. Failure to follow the instructions, warnings, and notes in this manual and those located on your Pride product can result in personal injury or product damage and will void Prides product warranty. PURCHASER’S AGREEMENT By accepting delivery of this product, you promise that you will not change, alter, or modify this product or remove or render inoperable or unsafe any guards, shields, or other safety features of this product; fail, refuse, or neglect to install any retrofit kits from time to time provided by Pride to enhance or preserve the safe use of this product. INFORMATION EXCHANGE We want to hear your questions, comments, and suggestions about this manual. We would also like to hear about the safety and reliability of your new scooter, and about the service you received from your authorised Pride Provider. Please notify us of any change of address, so we can keep you apprised of important information about safety, new products, and new options that can increase your ability to use and enjoy your scooter. Please feel free to contact us at the address below: Pride Mobility Products Australia Pty. Ltd. 21 Healey Road Dandenong, 3175 Victoria, Australia NOTE: If you ever lose or misplace your product registration card or your copy of this manual, contact us and we will be glad to send you a new one immediately. 4 www.pridemobility.com Ultimate-4 XL II. SAFETY PRODUCT SAFETY SYMBOLS The symbols below are used on the scooter to identify warnings, mandatory actions, and prohibited actions. It is very important for you to read and understand them completely. Pinch/Crush points created during assembly. Corrosive chemicals contained in battery. Use only AGM or Gel-Cell batteries to reduce the risk of leakage or explosive conditions. Read and follow the information in the owners manual. Maximum seating weight. Unlocked and in freewheel mode. Place unit on level ground and stand behind or to one side when changing from drive mode to freewheel mode or freewheel mode to drive mode. Locked and in drive mode. EMI-RFI- This product has been tested and passed at an immunity level of 20 V/m. Ultimate-4 XL www.pridemobility.com 5 II. SAFETY Front-to-rear plug orientation. Do not raise or lower the power seat while the scooter is in motion. Do not remove anti-tip wheels. Do not use a cell phone, walkie/talkie, laptop, or other radio transmitter while operating. Avoid exposure to rain, snow, ice, salt, or standing water whenever possible. Maintain and store in a clean and dry condition. Removal of grounding prong can create electrical hazard. If necessary, properly install an approved 3-pronged adapter to an electrical outlet having 2-pronged plug access. Failure to heed could result in personal injury and/or property damage. Prevent personal injury and equipment damage. Do not connect an extension lead to the AC/DC converter or the battery charger. 6 www.pridemobility.com Ultimate-4 XL II. SAFETY GENERAL MANDATORY! Do not operate your new scooter for the first time without completely reading and understanding this owners manual. Your scooter is a state-of-the-art life-enhancement device designed to increase mobility. Pride provides an extensive variety of products to best fit the individual needs of the scooter user. Please be aware that the final selection and purchasing decision regarding the type of scooter to be used is the responsibility of the scooter user who is capable of making such a decision and his/her healthcare professional (i.e., medical doctor, physical therapist, etc.). The contents of this manual are based on the expectation that a mobility device expert has properly fitted the scooter to the user and has assisted the prescribing healthcare professional and/or the authorised Pride Provider in the instruction process for the use of the product. There are certain situations, including some medical conditions, where the scooter user will need to practice operating the scooter in the presence of a trained attendant. A trained attendant can be defined as a family member or care professional specially trained in assisting a scooter user in various daily living activities. As you begin using your scooter during daily activities, you will probably encounter situations in which you will need some practice. Simply take your time and you will soon be in full and confident control as you maneuver through doorways, on and off lifts, up and down ramps, and over moderate terrain. Below are some precautions, tips, and other safety considerations that will help the user become accustomed to operating the scooter safely. MODIFICATIONS Pride has designed and engineered your scooter to provide maximum mobility and utility. A wide range of accessories is available from your authorised Pride Provider to further customise your scooter to better suit your needs and/or preferences. However, under no circumstances should you modify, add, remove, or disable any feature, part, or function of your scooter. WARNING! Do not modify your scooter in any way not authorised by Pride. Unauthorised modifications may result in personal injury and/or damage to your scooter. REMOVABLE PARTS WARNING! Do not attempt to lift or move your scooter by any of its removable parts. Personal injury and damage to the scooter may result. Ultimate-4 XL www.pridemobility.com 7 II. SAFETY PRE-RIDE SAFETY CHECK Get to know the feel of your scooter and its capabilities. Pride recommends that you perform a safety check before each use to make sure your scooter operates smoothly and safely. For details on how to perform these necessary inspections, see X. Care and Maintenance. Perform the following inspections prior to using your scooter: n Check for proper tyre inflation (if equipped with pneumatic tyres). n Check all electrical connections. Make sure they are tight and not corroded. n Check all harness connections. Make sure they are secured properly. n Check the brakes. n Check battery charge. TYRE INFLATION If your scooter is equipped with pneumatic tyres, you should check or have the air pressure checked at least once a week. Proper inflation pressures will prolong the life of your tyres and help ensure the smooth operation of your scooter. WARNING! It is critically important that 2-2.4 bar (30-35 psi) tyre pressure be maintained in pneumatic tyres at all times. Do not underinflate or overinflate your tyres. Low pressure may result in loss of control, and overinflated tyres may burst. Failure to maintain 2-2.4 bar (30-35 psi) tyre pressure in pneumatic tyres at all times may result in tyre and/or wheel failure, causing serious personal injury and/or damage to your scooter. WARNING! Inflate your scooter tyres from a regulated air source with an available pressure gauge. Inflating your tyres from an unregulated air source could overinflate them, resulting in a burst tyre and/or personal injury. WEIGHT LIMITATIONS Your scooter is rated for a maximum weight capacity. Refer to the specifications table for information. WARNING! Exceeding the weight capacity voids your warranty and may result in personal injury and damage to your scooter. Pride will not be held responsible for injuries and/or property damage resulting from failure to observe weight limitations. WARNING! Do not carry passengers on your scooter. Carrying passengers may result in personal injury and/or property damage. INCLINE INFORMATION More and more buildings have ramps with specified degrees of inclination, designed for easy and safe access. Some ramps may have turning switchbacks (180-degree turns) that require you to have good cornering skills on your scooter. n Proceed with extreme caution as you approach the downgrade of a ramp or other incline. n Take wide swings with your scooter around any tight corners. If you do that, the scooters rear wheels will follow a wide arc, not cut the corner short, and not bump into or get hung up on any railing corners. n When driving down a ramp, keep the scooters speed adjustment set to the slowest speed setting to ensure a safely controlled descent. n Avoid sudden stops and starts. 8 www.pridemobility.com Ultimate-4 XL II. SAFETY When climbing an incline, try to keep your scooter moving. If you must stop, start up again slowly, and then accelerate cautiously. When driving down an incline, do so by setting the speed adjustment dial to the slowest setting and driving in the forward direction only. If your scooter starts to move down the incline faster than you anticipated or desired, allow it to come to a complete stop by releasing the throttle control lever. Then push the throttle control lever forward slightly to ensure a safely controlled descent. WARNING! When climbing an incline, do not zigzag or drive at an angle up the face of the incline. Drive your scooter straight up the incline. This greatly reduces the possibility of a tip or a fall. Always exercise extreme caution when negotiating an incline. WARNING! Do not drive your scooter across the side of an incline or diagonally up or down an incline; do not stop, if possible, while driving up or down an incline. WARNING! You should not travel up or down a potentially hazardous incline (i.e., areas covered with snow, ice, cut grass, or wet leaves). WARNING! When on any sort of an incline or decline, never place the scooter in freewheel mode while seated on it or standing next to it. WARNING! Even though your scooter is capable of climbing slopes greater than those illustrated in figure 1, do not, under any circumstances, exceed the incline guidelines or any other specifications presented in this manual. Doing so could cause instability in your scooter, resulting in personal injury and/or damage to your scooter. Handicap public access ramps are not subject to government regulation in all countries, and therefore do not necessarily share the same standard percent of slope. Other inclines may be natural or, if man-made, not designed specifically for scooters. Figure 1 illustrates your scooters stability and its ability to climb grades under various weight loads and under controlled testing conditions. These tests were conducted with the scooters seat in the highest position and adjusted rearward on the seat base to its farthest rearward position. Use this information as a guideline. Your scooters ability to travel up inclines is affected by your weight, your scooters speed, your angle of approach to the incline, and your scooter setup. 68 kg 113 kg 136-181 kg 90 kg 14.1% (8˚) 12.3% (7˚) 10.5% (6˚) 8.7% (5˚) Figure 1. Maximum Recommended Incline Angles WARNING! Any attempt to climb or descend a slope steeper than what is shown in figure 1 may put your scooter in an unstable position and cause it to tip, resulting in personal injury. WARNING! Never carry an oxygen tank weighing more than 7 kg. Never fill the rear basket with contents exceeding 7 kg. Ultimate-4 XL www.pridemobility.com 9 II. SAFETY When you approach an incline, it is best to lean forward. See figures 2 and 2A. This shifts the center of gravity of you and your scooter toward the front of the scooter for improved stability. NOTE: When negotiating ramps, if the throttle control lever is released while moving forward, the powered scooter may "rollback" approximately 30.5 cm before the brake engages. If the throttle control lever is released while moving in reverse, the powered scooter may "rollback" approximately one metre before the brake engages. Figure 2. Normal Driving Position Figure 2A. Increased Stability Driving Position CORNERING INFORMATION Excessively high cornering speeds can create the possibility of tipping. Factors which affect the possibility of tipping include, but are not limited to, cornering speed, steering angle (how sharply you are turning), uneven road surfaces, inclined road surfaces, riding from an area of low traction to an area of high traction (such as passing from a grassy area to a paved area especially at high speed while turning) and abrupt directional changes. High cornering speeds are not recommended. If you feel that you may tip over in a corner, reduce your speed and steering angle (i.e., lessen the sharpness of the turn) to prevent your scooter from tipping. WARNING! When cornering sharply, reduce your speed. When using your scooter at higher speeds, do not corner sharply. This greatly reduces the possibility of a tip or fall. To avoid personal injury or property damage, always exercise common sense when cornering. BRAKING INFORMATION Your scooter is equipped with these powerful brake systems: n Regenerative: Uses electricity to rapidly slow the vehicle when the throttle control lever returns to the center/ stop position. n Disc Parking Brake: Activates mechanically after regenerative braking slows the vehicle to near stop or when power is removed from the system for any reason. n Optional Handbrake: Gives you additional stopping power when you squeeze it. 10 www.pridemobility.com Ultimate-4 XL II. SAFETY OUTDOOR DRIVING SURFACES Your scooter is designed to provide optimum stability under normal driving conditionsdry, level surfaces composed of concrete, blacktop, or asphalt. However, Pride recognises that there will be times when you will encounter other surface types. For this reason, your scooter is designed to perform admirably on packed soil, grass, and gravel. Feel free to use your scooter safely on lawns and in park areas. n Reduce your scooters speed when driving on uneven terrain and/or soft surfaces. n Avoid tall grass that can become tangled in the running gear. n Avoid loosely packed gravel and sand. n If you feel unsure about a driving surface, avoid that surface. STREETS AND ROADS WARNING! Exercise extreme caution when operating the scooter on footpaths, pavements, bridleways, pedestrian areas, and roads. Failure to heed could result in serious injury and/ or damage to your scooter. STATIONARY OBSTACLES (STEPS, KERBS etc.) WARNING! Do not drive near raised surfaces, unprotected ledges, and/or drop-offs (kerbs, porches, stairs, etc.). WARNING! Do not attempt to have your scooter climb or descend an obstacle that is inordinately high. Serious personal injury and/or damage may result. WARNING! Do not attempt to have your scooter proceed rearward down any step, kerb or other obstacle. The scooter may tip and cause personal injury. WARNING! Be sure your scooter is travelling perpendicular to any kerb you may be required to ascend or descend. See figures 3 and 3A. WARNING! Do not attempt to negotiate a kerb that has a height greater than 5 cm. KERB KERB Figure 3. Correct Kerb Approach Ultimate-4 XL Figure 3A. Incorrect Kerb Approach www.pridemobility.com 11 II. SAFETY INCLEMENT WEATHER PRECAUTIONS Exposure of your scooter to inclement weather conditions should be avoided whenever possible. If suddenly caught up in rain, snow, severe cold, or heat while operating your scooter proceed to shelter at the earliest opportunity. Thoroughly dry your scooter before storing, charging or operating your scooter. WARNING! Operating in rain, snow, salt, mist/spray conditions, and on icy/slippery surfaces can cause personal injury and/or damage to the scooter and electrical system. Maintain and store your scooter in a dry and clean condition. FREEWHEEL MODE Your scooter is equipped with a manual freewheel lever that, when disengaged, allows the scooter to be pushed. For more information about how to place your scooter into and out of freewheel mode, see IV. Your Scooter. WARNING! When your scooter is in freewheel mode, the braking system is disengaged. n Disengage the drive motors only on a level surface. n Ensure the key is removed from the key switch. n Stand behind the scooter to engage or disengage freewheel mode. Never sit on a scooter to do this. n After you have finished pushing your scooter, always return it to the drive mode to lock the brakes. Failure to heed the above could result in personal injury and/or damage to your scooter. An added feature built into the scooter is push-too-fast protection which safeguards the scooter against gaining excessive speed while in freewheel mode. Push-too-fast operates differently depending on which of two conditions exists: n If the key is switched off while in freewheel mode, the scooters controller activates regenerative braking when the scooter is pushed faster than a maximum threshold which has been preprogrammed. In this case, the controller is acting as a speed governor. n If the key is switched on while in freewheel mode, you will encounter considerable resistance at any speed. This prevents the scooter from gaining unwanted momentum should the manual freewheel lever inadvertently be released while driving the scooter. NOTE: If the scooter is placed in freewheel mode (manual freewheel lever forward) while the key is in the on position, the scooter will not run until the manual freewheel lever is pushed rearward and the key is turned to the off position, then back to the on position. STAIRS AND ESCALATORS Scooters are not designed to travel up or down stairs or escalators. Always use a lift. WARNING! Do not use your scooter to negotiate steps or escalators. You may cause injury to yourself and to others and/or damage your scooter. 12 www.pridemobility.com Ultimate-4 XL II. SAFETY DOORS n Determine if the door opens toward or away from you. n Use your hand to turn the knob or push the handle or push-bar. n Drive your scooter gently and slowly forward to push the door open. Or drive your scooter gently and slowly rearwards to pull the door open. LIFTS Modern lifts have a door edge safety mechanism that, when pushed, reopens the door(s). n If you are in the doorway of a lift when the door(s) begin to close, push on the rubber door edge or allow the rubber door edge to contact the scooter and the door will reopen. n Use care that handbags, packages, or scooter accessories do not become caught in lift doors. NOTE: If your scooters turning radius is greater than 1500 mm, it may be difficult to maneuver in lifts and building entrances. Use caution when attempting to turn or maneuver your scooter in small spaces and avoid areas that might pose a problem. LIFT/ELEVATION PRODUCTS If you will be travelling with your scooter, you may find it necessary to use a lift/elevation product to aid in transportation. Pride recommends that you closely review the instructions, specifications, and safety information set forth by the manufacturer of the lift/elevation product before using that product. BATTERIES In addition to following the warnings below, be sure to comply with all other battery handling information. WARNING! Scooter batteries are heavy (refer to specifications table). Lifting weight beyond your capacity could result in personal injury. If necessary, get someone physically able to lift the scooter batteries for you. WARNING! Battery posts, terminals and related accessories contain lead and lead compounds. Wash hands after handling. WARNING! Always protect the batteries from freezing and never charge a frozen battery. Charging a frozen battery may result in personal injury and/or damage to the battery. WARNING! RED (+) cables must be connected to positive (+) battery terminals/posts. BLACK (-) cables must be connected to negative (-) battery terminals/posts. Failure to connect your battery harnesses in the proper manner may result in personal injury and/or damage to your scooter. REPLACE cables immediately if damaged. BATTERY DISPOSAL AND RECYCLING If you encounter a damaged or cracked battery, immediately enclose it in a plastic bag and call your authorised Pride Provider for instructions on disposal. Pride will also have the necessary information on battery recycling, which is our recommended course of action. Ultimate-4 XL www.pridemobility.com 13 II. SAFETY MOTOR VEHICLE TRANSPORT Currently, there are no standards approved for tie-down systems in a moving vehicle of any type to transport a person while seated in a scooter. Although your scooter may be equipped with a positioning belt, this belt is not designed to provide proper restraint during motor vehicle transport. Anyone travelling in a motor vehicle should be properly secured in the motor vehicle seat with safety belts fastened securely. WARNING! Do not sit on your scooter while it is in a moving vehicle. Personal injury and/or property damage may result. WARNING! Always be sure your scooter and its batteries are properly secured when it is being transported. Failure to do so may result in personal injury and/or damage to your scooter. PREVENTING UNINTENDED MOVEMENT WARNING! If you anticipate being seated in a stationary position for an extended period of time, turn off the power. This will prevent unexpected motion from inadvertent throttle control lever contact. Failure to do so may result in personal injury. GETTING ONTO AND OFF YOUR SCOOTER Getting onto and off your scooter requires a good sense of balance. Please observe the following safety tips when getting onto and off your scooter: n Remove the key from the key switch. n Ensure that your scooter is not in freewheel mode. See IV. Your Scooter. n Make certain that the seat is locked into place and the key is removed from the key switch. n Flip up the armrests to make getting onto and off the scooter easier. WARNING! Position yourself as far back as possible in the scooter seat to prevent the scooter from tipping and causing injury. WARNING! Avoid using your armrests for weight bearing purposes. Such use may cause the scooter to tip and cause personal injury. WARNING! Avoid putting all of your weight on the floorboard. Such use may cause the scooter to tip and cause personal injury. REACHING AND BENDING Avoid reaching or bending while driving your scooter. When reaching, bending or leaning while seated on your scooter, it is important to maintain a stable center of gravity and keep the scooter from tipping. Pride recommends that the scooter user determine his/her personal limitations and practice bending and reaching in the presence of a qualified healthcare professional. WARNING! Do not bend, lean, or reach for objects if you have to pick them up from the floor. Movements such as these may change your center of gravity and the weight distribution of the scooter and cause your scooter to tip, possibly resulting in personal injury. WARNING! Prevent personal injury! Keep your hands away from the tires when driving. Be aware that loose fitting clothing can become caught in drive tyres. 14 www.pridemobility.com Ultimate-4 XL II. SAFETY POSITIONING BELTS Pride, therapist(s) and other healthcare professionals are responsible for determining your requirement for a positioning belt in order to operate your scooter safely. WARNING! If you require a positioning belt to safely operate your scooter, make sure it is fastened securely. Serious personal injury may result if you fall from the scooter. PRESCRIPTION DRUGS/PHYSICAL LIMITATIONS The scooter user must exercise care and common sense when operating his/her scooter. This includes awareness of safety issues when taking prescribed or over-the-counter drugs or when the user has specific physical limitations. WARNING! Consult your physician if you are taking prescribed or over-the-counter medication or if you have certain physical limitations. Some medications and limitations may impair your ability to operate your scooter in a safe manner. ALCOHOL The scooter user must exercise care and common sense when operating his/her scooter. This includes awareness of safety issues while under the influence of alcohol. WARNING! Do not operate your scooter while you are under the influence of alcohol, as this may impair your ability to drive safely. ELECTROMAGNETIC AND RADIO FREQUENCY INTERFERENCE (EMI/RFI) WARNING! Laboratory tests have shown that electromagnetic and radio frequency waves can have an adverse affect on the performance of electrically-powered mobility vehicles. Electromagnetic and Radio Frequency Interference can come from sources such as cellular phones, mobile twoway radios (such as walkie-talkies), radio stations, TV stations, amateur radio (HAM) transmitters, wireless computer links, microwave signals, paging transmitters, and medium-range mobile transceivers used by emergency vehicles. In some cases, these waves can cause unintended movement or damage to the control system. Every electrically-powered mobility vehicle has an immunity (or resistance) to EMI. The higher the immunity level, the greater the protection against EMI. This product has been tested and has passed at an immunity level of 20 V/M. PROHIBITED! To prevent unintended movement, turn off the power to the electricallypowered mobility vehicle before using a cell phone, two-way radio, lap-top, or any other type of radio transmitter. Avoid coming into close proximity of radio or TV stations. WARNING! The addition of accessories or components to the electrically-powered mobility vehicle can increase the susceptibility of the vehicle to EMI. Do not modify your scooter in any way not authorised by Pride. WARNING! The electrically-powered mobility vehicle itself can disturb the performance of other electrical devices located nearby, such as alarm systems. NOTE: For further information on EMI/RFI, visit the Resource Center on www.pridemobility.com. If unintended motion or brake release occurs, turn your scooter off as soon as it is safe to do so. Contact your authorised Pride Provider to report the incident. Ultimate-4 XL www.pridemobility.com 15 III. SPECIFICATIONS 38 cm 104 cm - 113 cm 42 cm - 49.5 cm 10 cm REV ERS FO E RW AR D 45 cm 132 cm 45 cm 45 cm-58.5 cm 165 cm TURNING RADIUS 61 cm Figure 4. Scooter Dimensions 10 cm 33 cm Figure 4A. Tyre Dimensions (Front And Rear) 16 www.pridemobility.com Ultimate-4 XL III. SPECIFICATIONS SPECIFICATIONS SC3450AUS Model Number C Class Of Use See figure 1 Maximum Safe Slope See figure 1 Maximum Climbing Ability Maximum Obstacle Climbing Ability 5 cm Red, Blue, Champagne, Silver, Green Colours 132 cm Overall Length 61 cm Overall Width 128 kg Total Weight 94 kg Total Weight Without Batteries 17 kg each Battery Weight (NF-22) Heaviest Piece When Disassembled Rear section: 37 kg 165 cm Turning Radius Up to 15 km/h Speed (Maximum) (With NF-22 batteries) Up to 48 km Range Per Charge* 10 cm Ground Clearance 181 kg Weight Capacity Type: foldable Standard Seating Weight: 19 kg Material: Grey vinyl Dimensions: 45 cm width 45 cm depth (usable) 38 cm height (usable), 56-66 cm with headrest Rear-wheel drive, sealed mini transaxle, 24 volt DC motor Drive System Electronic, regenerative, electromechanical, (optional) handbrake Dual Braking System Type: pneumatic: front and rear: 10 cm x 33 cm Tyres Type: Two 12 volt, deep-cycle (AGM or Gel-Cell type recommended) Battery Requirements Size: 55 AH, NF-22 Off-board charger Battery Charger * Varies with user weight, terrain type, battery charge, battery condition, and tyre condition. Ultimate-4 XL www.pridemobility.com 17 I V. Y O U R S C O O T E R TILLER CONSOLE The tiller console houses all of the controls needed to drive your scooter, including the speed adjustment dial, throttle control lever, battery condition meter, lights switch, hazard lights switch, turn indicator buttons, status LED, and horn buttons. See figure 5. WARNING! Do not expose the tiller console to moisture. In the event that the tiller console does become exposed to moisture, do not attempt to operate your scooter until the tiller console has dried thoroughly. KEY SWITCH BATTERY CONDITION METER STATUS LED SPEED ADJUSTMENT DIAL POWER SEAT SWITCH (OPTIONAL) LIGHTS SWITCH HORN BUTTON HAZARD LIGHTS SWITCH HI/LOW SPEED SWITCH HORN BUTTON 400/181 RIGHT TURN INDICATOR BUTTON LEFT TURN INDICATOR BUTTON THROTTLE CONTROL LEVER PUSH TO GO FORWARD PUSH TO GO REARWARD PULL TO GO FORWARD PULL TO GO REARWARD Figure 5. Tiller Console Battery Condition Meter When the key is fully inserted and turned clockwise to power up your scooter, this meter indicates the approximate battery voltage strength. For further information on battery charging, see V. Batteries and Charging. Turn Indicator Buttons n Press the appropriate turn indicator button once to activate it. n Your scooters turn indicators are timed to shut off automatically. Hazard Lights Switch This switch activates the 4-way flashers on your scooter. n Toggle the switch forward to turn on the flashers. n Toggle the switch rearward to turn off the flashers. Horn Buttons Your scooter must be turned on for the horn to be operational. n These buttons activate a warning horn. n Do not hesitate to use the warning horn when doing so may prevent accident or injury. 18 www.pridemobility.com Ultimate-4 XL I V. Y O U R S C O O T E R Hi-Low Speed Switch n Toggle the switch forward (HI) and your scooters maximum speed is 15 km/h. The 15km/h setting should be used for outdoor use only. n Toggle the switch rearward (LOW) and your scooters maximum speed is 7.5 km/h. Key Switch WARNING! If the key is moved to the off position while your scooter is in motion, the electronic brakes engage and your scooter will come to an abrupt stop! n Insert the key into the key switch and turn it clockwise to power up (turn on) your scooter. n Turn the key anticlockwise to power down (turn off) your scooter. Status LED The status LED alerts you to electrical problems that may occur with the scooter. The LED remains constantly lit while your scooter is on. If your scooter develops an electrical problem, the status LED will flash a code. See IX. Basic Troubleshooting for flash codes. Lights Switch This switch controls your scooters lights. n Toggle the switch forward to turn on your scooters rear running lights and front (upper) light. n Toggle the switch to the middle to turn off the scooters lights. n Toggle the switch rearward to turn on your scooters rear running lights, front (upper), and front (lower) lights. WARNING! Scooter users are required to use their lights when visibility is restrictedday or night. Failure to use the lighting system in periods of poor visibility may result in personal injury. Throttle Control Lever This lever allows you to control the forward speed and the reverse speed of your scooter up to the maximum speed you preset with the speed adjustment dial. To Move Forward use either of the following: n Use your left thumb to push the left side of the throttle control lever to move forward. n Use your right hand fingers to pull back on the right side of the throttle control lever to move the scooter forward. To Move Rearward use either of the following: n Use your right thumb to push the right side of the throttle control lever to move rearward. n Use your left hand fingers to pull back on the left side of the throttle control lever to move rearward. Release the throttle control lever and allow your scooter to come to a complete stop before engaging the other side of the lever. When the throttle control lever is completely released, it automatically returns to the center stop position and engages your scooters brakes. Ultimate-4 XL www.pridemobility.com 19 I V. Y O U R S C O O T E R Speed Adjustment Dial This dial allows you to preselect and limit your scooters top speed. n The image of the tortoise represents the slowest speed setting. n The image of the hare represents the fastest speed setting. Tiller Console Fuses These fuses help protect your scooters front lighting, turn indicators, and key switch console systems from receiving an overload of electrical current. The fuses used in your scooter are the same type used in automobiles. See figure 5A. See X. Care and Maintenance for fuse replacement. 5 1 1 1 1 B+ RIGHT RUNNING LIGHT LEFT RUNNING LIGHT LEFT TURN INDICATOR RIGHT TURN INDICATOR Figure 5A. Tiller Console Fuses REAR SECTION The batteries (not shown), the main circuit breaker (reset button), the manual freewheel lever, the anti-tip wheels, and the motor/transaxle assembly (not shown) are located on the rear section of your scooter. See figure 6. MANUAL FREEWHEEL LEVER MAIN CIRCUIT BREAKER (RESET BUTTON) ANTI-TIP WHEELS Figure 6. Rear Section Anti-Tip Wheels The anti-tip wheels are an integral and important safety feature of your scooter. Do not, under any circumstances, remove the anti-tip wheels from your scooter. WARNING! Do not remove the anti-tip wheels or modify your scooter in any way that is not authorised by Pride. WARNING! The anti-tip wheels are bolted to the scooter frame and may interfere with the smooth transition of your scooter when ascending or descending a kerb. Batteries (Not Shown) The batteries store electrical energy that powers your scooter. See V. Batteries and Charging for information on how to charge your scooter batteries. 20 www.pridemobility.com Ultimate-4 XL I V. Y O U R S C O O T E R Motor/Transaxle Assembly (Not Shown) The motor/transaxle assembly is an electromechanical unit that converts electrical energy from your scooters batteries into the controlled mechanical energy that drives the scooters wheels. Manual Freewheel Lever Whenever you need or want to push your scooter for short distances, you can put it in freewheel mode. n Remove the key from the key switch. n Push forward on the manual freewheel lever to disable the drive system and the brake system. n You may now push your scooter. n Pull back on the manual freewheel lever to reengage the drive and the brake systems and take your scooter out of freewheel mode. WARNING! When your scooter is in freewheel mode, the braking system is disengaged. n Disengage the drive motors only on a level surface. n Ensure the key is removed from the key switch. n Stand behind the scooter to engage or disengage freewheel mode. Never sit on a scooter to do this. n After you have finished pushing your scooter, always return it to the drive mode to lock the brakes. Failure to heed the above could result in personal injury and/or damage to your scooter. NOTE: If the scooter is placed in freewheel mode (manual freewheel lever forward) while the key is in the on position, the scooter will not run until the manual freewheel lever is pushed rearward and the key is turned to the off position, then back to the on position. Main Circuit Breaker (Reset Button) When the voltage in the batteries becomes low or your scooter is heavily strained because of excessive loads, the main circuit breaker may trip to protect the motor and electronics from damage. When the breaker trips, the entire electrical system shuts down. n The reset button pops out when the breaker trips. n Allow a minute or so for the electronics to rest. n Push in the reset button to reactivate the main circuit breaker. See figure 6. n If the main circuit breaker trips frequently, you may need to charge your batteries more often. You may also need to have a load test performed on your scooters batteries n If the main circuit breaker trips repeatedly, please contact your authorised Pride Provider. Ultimate-4 XL www.pridemobility.com 21 V. B AT T E R I E S A N D C H A R G I N G Your scooter requires two long-lasting, 12-volt, deep-cycle batteries that are sealed and maintenance free. They are recharged by an off-board charging system. n Charge your scooters batteries prior to using it for the first time. n Keep the batteries fully charged to keep your scooter running smoothly. READING YOUR BATTERY VOLTAGE The battery condition meter on the tiller console indicates the approximate strength of your batteries using a colour code. See figure 7. Green indicates fully charged batteries, yellow a draining charge, and red indicates that an immediate recharge is necessary. NOTE: To ensure the highest accuracy, the battery condition meter should be checked while operating your scooter at full speed on a dry, level surface. RED YELLOW GREEN Figure 7. Battery Condition Meter OFF ON VOLTAGE SWITCH Figure 8. Charger On/Off and Voltage Switches The off-board charger supplied with your scooter is equipped with a 115/230 voltage switch. Confirm that this switch is in the proper position for your locality. If you are not sure what the voltage is in your country, contact your local electricity provider before connecting the charger power lead to an electrical outlet. If the setting is incorrect, the charger will not function properly. Slide the voltage switch to the appropriate position. See figure 8. The LED lights on the charger indicate different charger conditions at various times: charger power on, charging in progress, charging complete. Refer to the label on the charger for a complete explanation of these indicators. CHARGING YOUR BATTERIES Follow these easy steps to charge your batteries safely: PROHIBITED! Never use an extension lead to plug in your battery charger. Plug the charger directly into a properly wired standard wall outlet. PROHIBITED! Removal of the grounding prong can create an electrical hazard. If necessary, properly install an approved 3-pronged adapter to an electrical outlet having 2pronged plug access. Failure to heed could result in personal injury and/or property damage. NOTE: Ensure that both ends of the charger power lead are clean and dry before plugging the charger power lead into the off-board charger port or the wall outlet. 1. Position your scooter close to a standard wall outlet. 2. Remove the key from the key switch. 22 www.pridemobility.com Ultimate-4 XL V. B AT T E R I E S A N D C H A R G I N G 3. Make certain that the manual freewheel lever is in the drive position. 4. Plug the 3-pin charger power lead into the off-board charger port. See figures 9 and 10. 5. Extend the charger power lead and plug it into the wall outlet. 6. Turn the charger on. See figure 8. 7. When the batteries are fully charged, turn the charger off and unplug the charger power lead from the wall outlet and then from the off-board charger port. PLUGS INTO THE OFF-BOARD CHARGER PORT ON/OFF SWITCH PLUGS INTO WALL OUTLET I O Figure 9. Off-Board Charger NOTE: There is a charger inhibit function on your scooter. The scooter will not run and the battery condition meter will not operate while the batteries are charging. FREQUENTLY ASKED QUESTIONS (FAQS) How does the charger work? When your scooters battery voltage is low, the charger works harder, sending more electrical current to the batteries to bring up their charge. As the batteries approach a full charge, the charger sends less and less electrical current. When the batteries are fully charged, the current sent from the charger is at nearly zero amperage. Therefore, when the charger is plugged in, it maintains the charge on your scooters batteries, but does not overcharge them. We do not recommend that you charge your scooters batteries for more than 24 consecutive hours. OFF-BOARD CHARGER PORT Figure 10 . Off-Board Charger Port What if my scooters batteries wont charge? n Ensure the red (+) and black (-) battery cables are connected properly to the battery terminals. n Ensure both battery harnesses that extend from the batteries are plugged into their mating harness leading to the charger. n Ensure both ends of the charger power lead are inserted fully. Can I use a different charger? For the safest, most efficient, and balanced charging of your scooters batteries, we prefer and highly recommend simultaneous charging of both batteries with the supplied off-board battery charger. How often must I charge the batteries? Two major factors must be considered when deciding how often to charge your scooters batteries: n All day scooter use on a daily basis. n Infrequent or sporadic scooter use. Ultimate-4 XL www.pridemobility.com 23 V. B AT T E R I E S A N D C H A R G I N G With these considerations in mind, you can determine how often and for how long you should charge your scooters batteries. The battery charger is designed so that it will not overcharge your scooters batteries. However, you may encounter some problems if you do not charge your batteries often enough and if you do not charge them on a regular basis. Following the guidelines below will provide safe and reliable battery operation and charging. n If you use your scooter daily, charge its batteries as soon as you finish using it for the day. Your scooter will be ready each morning to give you a full day of service. We recommend that you charge your scooters batteries for 8 to 14 hours after daily use. n If you use your scooter once a week or less, charge its batteries at least once a week for 12 to 14 hours at a time. n Keep your scooters batteries fully charged. n Avoid deeply discharging your scooters batteries. How can I ensure maximum battery life? Fully charged deep-cycle batteries provide reliable performance and extended battery life. Keep your scooters batteries fully charged whenever possible. Batteries that are regularly and deeply discharged, infrequently charged, or stored without a full charge may be permanently damaged, causing unreliable performance and limited service life. How can I get maximum range or distance per charge? Rarely will you have ideal driving conditionssmooth, flat, hard driving surfaces with no wind or curves. Often, you will face hills, pavement cracks, uneven and loosely packed surfaces, curves, and wind, all of which affect the distance or running time per battery charge. Below are a few suggestions for obtaining the maximum range per battery charge. n Always fully charge your scooters batteries prior to daily use. n Maintain 2-2.4 bar (30-35 psi) in each tyre. n Plan your route ahead to avoid as many hills, cracked, broken, or soft surfaces as possible. n Limit your baggage weight to essential items. n Try to maintain an even speed while your scooter is in motion. n Avoid stop-and-go driving. What type and size of battery should I use? We recommend deep-cycle batteries that are sealed and maintenance free. Both AGM and Gel Cell are deep-cycle batteries that are similar in performance. Do not use wet-cell batteries, which have removable caps. WARNING! Corrosive chemicals are contained in batteries. Use only AGM or Gel-Cell batteries to reduce the risk of leakage or explosive conditions. NOTE: Sealed batteries are not serviceable. Do not remove the caps. To change a battery in your scooter: WARNING! Battery posts, terminals, and related accessories contain lead and lead compounds. Wash hands after handling. 1. 2. 3. 4. 24 Remove the seat and rear shroud. Disconnect the battery tie-down strap. Disconnect the T-handle battery harness. Disconnect the battery cables from the battery terminals. www.pridemobility.com Ultimate-4 XL V. B AT T E R I E S A N D C H A R G I N G 5. Remove the old battery. 6. Place a new battery in the battery well. 7. Connect the red battery cable to the positive (+) battery terminal. 8. Connect the black battery cable to the negative (-) battery terminal. 9. Reconnect the T-handle battery harness. 10. Reconnect the battery tie-down strap. 11. Reinstall the rear shroud and seat. NOTE: If you encounter a damaged or cracked battery, immediately enclose it in a plastic bag and call your authorised Pride Provider for instructions on disposal. Your authorised Pride Provider will also have the necessary information on battery recycling, which is our recommended course of action. Why do my new batteries seem weak? Deep-cycle batteries employ a different chemical technology than that used in car batteries, nickel-cadmium batteries (nicads), and other common battery types. Deep-cycle batteries are specifically designed to provide power, drain down their charge, and then accept a relatively quick recharge. We work closely with our battery manufacturer to provide batteries that best suit your scooters specific electrical demands. Fresh batteries arrive daily at Pride and are shipped fully charged to our customers. During shipping, the batteries may encounter temperature extremes that can influence their initial performance. Heat diminishes the charge on the battery; cold slows the available power and extends the time needed to recharge the battery. It may take a few days for the temperature of your scooters batteries to stabilise and adjust to their new room or ambient temperature. More importantly, it takes a few charging cycles (partial draining followed by full recharging) to establish the critical chemical balance that is essential to a deep-cycle batterys peak performance and long life. Follow these steps to properly break in your scooters new batteries for maximum efficiency and service life. 1. Fully recharge any new battery prior to its initial use. This charging cycle brings the battery up to about 88% of its peak performance level. 2. Operate your new scooter in familiar and safe areas. Drive slowly at first, and do not travel too far from your home or familiar surroundings until you have become accustomed to your scooters controls and have properly broken in your scooters batteries. 3. Fully recharge the batteries. They should be at over 90% of their peak performance level. 4. Operate your scooter again. 5. Fully recharge the batteries again. 6. After four or five charging cycles, the batteries are able to receive a charge of 100% of their peak performance level and are able to last for an extended period of time. What about public transportation? If you intend to use public transportation with your scooter, you must contact the transportation provider in advance to determine their specific requirements. Ultimate-4 XL www.pridemobility.com 25 VI. OPERATION BEFORE GETTING ON YOUR SCOOTER n Have you fully charged the batteries? See V. Batteries and Charging. n Is the manual freewheel lever in the drive (rearward) position? Never leave the manual freewheel lever in the forward position unless you are manually pushing your scooter. GETTING ONTO YOUR SCOOTER 1. Make certain that the key is removed from the key switch. WARNING! Never attempt to get onto or off your scooter without first removing the key from the key switch. This will prevent the scooter from moving if accidental throttle control lever contact is made. 2. 3. 4. 5. 6. 7. 8. Stand at the side of your scooter. Disengage the seat lock lever and rotate the seat until it is facing you. Make certain that the seat is locked securely in position. Position yourself comfortably and securely in the seat. Disengage the seat lock lever and rotate the seat until you are facing forward. Make certain that the seat is locked securely in position. Make certain that your feet are safely on the floorboard. PRE-RIDE ADJUSTMENTS AND CHECKS n Are you positioned comfortably in the seat? See Getting Onto Your Scooter, above. n Is the seat at the proper height? See VII. Comfort Adjustments. n Is the seat locked securely in place? See VII. Comfort Adjustments. n Is the tiller at a comfortable setting and locked securely in place? See VII. Comfort Adjustments. n Is the key fully inserted into the key switch and turned clockwise to the on position? See IV. Your Scooter. n Does the scooters horn work properly? n Is your proposed path clear of people, pets, and obstacles? n Have you planned your route to avoid adverse terrain and as many inclines as possible? OPERATING YOUR SCOOTER Keep both hands on the tiller and your feet on the floorboard at all times while operating your scooter. This driving position gives you the most control over your vehicle. WARNING! The following can adversely affect steering and stability while operating your scooter: n Holding onto or attaching a leash to walk your pet. n Carrying passengers (including pets). n Hanging any article from the tiller. n Towing or being pushed by another motorised vehicle. Such practices could cause loss of control and/or tipping, resulting in personal injury and/ or damage to your scooter. n Set the speed adjustment dial to your desired speed. n Press or pull the appropriate side of the throttle control lever to move forward. n The electromechanical disc parking brake automatically disengages and the scooter accelerates smoothly to the speed you preselected with the speed adjustment dial. 26 www.pridemobility.com Ultimate-4 XL VI. n n n n OPERATION Pull on the left handgrip to steer your scooter to the left. Pull on the right handgrip to steer your scooter to the right. Move the tiller to the center position to drive straight ahead. To stop, slowly release the throttle control lever. After you release the throttle control lever, gently squeeze the handbrake (if equipped) to come to a complete stop. The electronic brake will automatically engage when your scooter comes to a stop. NOTE: Your scooters reverse speed is slower than that of the forward speed you preset with the speed adjustment dial. GETTING OFF YOUR SCOOTER 1. Bring your scooter to a complete stop. 2. Remove the key from the key switch. 3. Disengage the seat lock lever and rotate the seat until you are facing toward the side of your scooter. 4. Make certain that the seat is locked securely in position. 5. Carefully and safely get out of the seat and stand to the side of your scooter. 6. You can leave the seat facing to the side to facilitate boarding your scooter next time. POWER DOWN TIMER FEATURE Your scooter is equipped with an energy saving automatic power down timer feature designed to preserve your scooters battery life. If you mistakenly leave the key in the key switch and in the on position but do not use your scooter for approximately 20 minutes, the scooters controller shuts down automatically. Although the controller is shut down, power will still be supplied to the scooters lighting system. If the power down timer feature takes effect, perform the following steps to resume normal operation. 1. Turn the key to the off position. 2. Turn the key back to the on position. Ultimate-4 XL www.pridemobility.com 27 VII. COMFORT ADJUSTMENTS WARNING! Remove the key from the key switch before adjusting the tiller or the seat. Never attempt to adjust the tiller or the seat while the scooter is in motion. TILLER ANGLE ADJUSTMENT Your scooter is equipped with a pivoting tiller that allows adjustment to several positions from the scooter deck to the farthest forward stop. 1. Lift the tiller adjustment lever. See figure 11. 2. Move the tiller to a comfortable position. 3. Release the tiller adjustment lever to secure the tiller in position. SEAT ROTATION The seat lock lever will lock the seat into several positions. 1. Push forward on the seat lock lever to unlock the seat. See figure 12. 2. Rotate the seat to the desired position. 3. Release the lever to lock the seat into place. FRONT-TO-BACK SEAT ADJUSTMENT You can reposition the scooters seat forward or rearward to adjust the distance between the seat and the tiller. See figure 12. 1. Move the seat sliding lever outward. 2. While holding the lever out, slide the seat forward or rearward. 3. Release the seat sliding lever once the seat is in the desired position. ARMREST ANGLE ADJUSTMENT The armrest angle of your scooter can be adjusted upward or downward by turning the adjustment dial. See figure 12A. REVERSE F TILLER ADJUSTMENT LEVER 5 1 1 1 1 Figure 11. Tiller Adjustment SEAT LOCK LEVER SEAT SLIDING LEVER Figure 12. Seat Adjustment NOTE: Pivot the armrests upward to make getting onto and off of your scooter easier. ADJUSTMENT DIAL Figure 12A. Armrest Angle Adjustment 28 www.pridemobility.com Ultimate-4 XL VII. COMFORT ADJUSTMENTS SEATBACK ANGLE ADJUSTMENT WARNING! Do not operate your scooter with the seatback in a reclined position. WARNING! Keep your back pressed firmly against the seatback while adjusting the angle. To adjust your scooter's reclining seat, perform these steps. See figure 12B. 1. With your back pressed up against the seatback, lift up on the seatback adjustment lever and lean forward or rearward to adjust the seatback angle. 2. Release the seatback adjustment lever once the seat is in a comfortable riding position. SEATBACK ADJUSTMENT LEVER Figure 12B. Seatback Angle Adjustment SEAT HEIGHT ADJUSTMENT You can change the seat height to one of three positions. See figure 13 Changing the seat height: 1. Turn the scooter off and place the manual freewheel lever in drive mode. 2. Remove the seat and rear shroud. See VIII. Disassembly and Assembly. 3. Loosen and remove the seat height adjustment bolt, nut, and washers. 4. Slide the upper seat post up or down in the lower seat post and align the adjustment holes on both posts. 5. With one washer on the seat height adjustment bolt insert it through the adjustment holes of both the upper and lower seat posts. Reinstall the other washer and nut and tighten. 6. Reinstall the shroud. 7. Reinstall and lock the seat into place. Ultimate-4 XL UPPER SEAT POST WASHER WASHER NUT SEAT HEIGHT ADJUSTMENT BOLT LOWER SEAT POST Figure 13. Seat Height Adjustment www.pridemobility.com 29 VII. COMFORT ADJUSTMENTS POWER SEAT (OPTIONAL) Your scooter may be equipped with a power seat. The power seat actuator is designed to raise or lower the seat automatically with minimal effort on the part of the operator. The power seat switch is located on the tiller console. Operating your power seat: 1. Release the throttle control lever. 2. Ensure your scooter is level and stationary. 3. Set the speed adjustment dial to the slowest setting 4. Toggle the power seat switch located on the tiller console to the on position. 5. To raise the power seat, operate your throttle control lever in the forward direction. 6. Release the throttle control lever when you have attained your desired height. 7. To lower the power seat, operate your throttle control lever in the reverse direction. 8. Ensure your seat is in the lowest position and that you have fully released the throttle control lever. 9. Toggle off the power seat switch before you attempt to drive your scooter again. WARNING! The power seat is intended for operation only while your scooter is stationary and on a level surface. Its purpose is to aid you in reaching objects. Strict adherence to the following safety rules is vital to your safety: n Operate the power seat only on level ground. n n n n Do not attempt to operate the power seat switch with the throttle control lever depressed. Do not attempt to raise or lower the seat while in motion! Do not drive your scooter unless the power seat is fully retracted (in lowest position). It is recommended that the scooter be driven only with the seat in the lowest position. Failure to comply with the above instructions, warnings and safety rules for power seat use could result in serious personal injury and damage to your mobility device. 30 www.pridemobility.com Ultimate-4 XL VIII. D I S A S S E M B LY AND A S S E M B LY DISASSEMBLY You can disassemble the scooter into seven pieces: the seat, the front section, the rear section, the rear shroud, the basket, and the batteries. See figure 14. No tools are required to disassemble or assemble your scooter. Since the disassembled sections of the scooter take up more floor space than the assembled unit, place the scooter on a level, dry surface with sufficient room to move the parts around. Keep in mind that you may need assistance to lift some of the scooter components. WARNING! Lifting weight beyond your physical capability may result in personal injury. Ask for assistance when necessary while disassembling or assembling your scooter. SEAT REAR SECTION REAR SHROUD FRONT SECTION BATTERIES BASKET Figure 14. The Scooter Disassembled 1. Place the manual freewheel lever in the drive position. 2. Lift the seat up and off the scooter. 3. Gently pull the shroud up and off of the rear section of the scooter. 4. Disconnect the battery strap. 5. Unplug both T-handle battery harnesses. See figure 15. 6. Remove the batteries. 7. Unplug the front-to-rear harness. See figure 15. WARNING! Failure to unplug both Thandle battery harnesses and the fr ont-to-r ear har ness prior to separating the front and rear sections could result in permanent damage to the scooter. Ultimate-4 XL T-HANDLE BATTERY HARNESS FRONT-TO-REAR HARNESS T-HANDLE BATTERY HARNESS Figure 15. Harness Connections www.pridemobility.com 31 VIII. D I S A S S E M B LY Toggle Latch Release 1. Push in the toggle latch release button while pulling back the toggle latch. See figures 16 and 16A. 2. Position the toggle latch buckle over the top of the toggle latch. See figure 16B. Frame Separation 1. Lower the tiller to its lowest position. 2. Push back on the seat post to pivot the scooters rear section rearwards until the rear section is standing vertically on its bumper. See figure 17. 3. Lift the front section up until the lower pegs are no longer in the slots. See figure 18. 4. Carefully move the front section away from the rear section. AND A S S E M B LY TOGGLE TOGGLE LATCH RELEASE LATCH BUTTON Figure 16. Toggle Latch (Latched) TOGGLE LATCH BUCKLE Figure 16A. Toggle Latch (Unlatched) Figure 16B. Buckle Secured SLOT PEG Figure 17. Frame Positioning Figure 18. Separating The Frame Sections ASSEMBLY 1. Position the front and rear sections of your scooter as shown in figure 19. 2. Align the lower slots of the front section with the corresponding pegs on the front of the rear section. See figure 19. WARNING! Position the front-to-rear harness so it wont become pinched between the frame halves when pivoting the rear section forward. See figure 19. 3. Holding the seat post, slowly pivot the rear section forward until the curved locking brackets are fully connected onto the top rear pegs. See figure 17. 4. Raise the tiller. PEG CURVED LOCKING BRACKET 5. Latch the toggle latch. See figure 16A. n Lower the toggle latch buckle. n Push back on the toggle latch so it locks into place. 6. Reinstall the batteries into the battery wells and reconnect the battery strap. 7. Connect the front-to-rear harness and both T-handle battery FRONT-TO-REAR HARNESS harnesses. 8. Reinstall the shroud. Figure 19. Frame Sections 9. Reinstall the seat, and lock it into place. 32 www.pridemobility.com Ultimate-4 XL IX. BASIC TROUBLESHOOTING Any electromechanical device occasionally requires some troubleshooting. However, most of the problems that may arise can usually be solved with a bit of thought and common sense. Many of these problems occur because the batteries are not fully charged or because the batteries are worn down and can no longer hold a charge. DIAGNOSTIC FLASH CODES The diagnostic flash codes for your scooter are designed to help you perform basic troubleshooting quickly and easily. A diagnostic flash code will flash from the status LED in the event one of the conditions listed below develops. NOTE: Your scooter will not run unless the flash code condition is resolved and the scooter has been turned off, then turned back on. FLASH CODE (1) (2) (3) (6) (7) (8) (9) (10) CONDITION Battery voltage is too low to operate the scooter. Motor disconnected. Motor wiring fault. Scooter won’t operate because the charger is attached. Throttle potentiometer fault. Internal controller fault. Brake fault—your scooter was left in freewheel mode. Excess voltage to controller. SOLUTION Check connections between batteries and controller. Check all connections to the motor. Call your authorised Pride Provider for assistance. Unplug the charger power lead from the off-board charger port. Call your authorised Pride Provider for assistance. Call your authorised Pride Provider for assistance. Turn the scooter key to the “off” position, then push the manual freewheel lever to the drive position, and restart your scooter. Check all connections between the batteries and the controller. If condition persists, contact your authorised Pride Provider for assistance. What if all the systems on my scooter seem to be dead? n Make certain that the key is in the on position. n Check that the batteries are fully charged. n Push in the main circuit breaker reset button. See IV. Your Scooter. n Make certain that both T-handle battery harnesses are firmly connected to the rear section and to the battery terminals. See VIII. Disassembly and Assembly. n Make sure that the front-to-rear harness is firmly connected to the rear section. See VIII. Disassembly and Assembly. n Be sure the power down timer feature hasnt been activated. See VI. Operation. n Check the 3-amp fuse located on the lower portion of the tiller console. See X. Care and Maintenance for fuse replacement. What if my scooter does not move when I engage the throttle control lever? n When the manual freewheel lever is pushed forward, the brakes are disengaged and all power to the motor/ transaxle assembly is cut. n Pull back on the manual freewheel lever, turn the scooter off, then back on to return to normal operation. Ultimate-4 XL www.pridemobility.com 33 IX. BASIC TROUBLESHOOTING What if the main circuit breaker repeatedly trips? n Charge the scooters batteries more frequently. See V. Batteries and Charging. n If the problem continues, have both of your scooters batteries load tested by your authorised Pride Provider. n You may also perform the load test yourself. Battery load testers are available at most automotive parts stores. n Follow the directions supplied with the load tester. n See III. Specifications for information about your scooters battery type. n Contact your authorised Pride Provider for assistance. What if the battery condition meter dips way down and the motor surges or hesitates when I engage the throttle control lever? n Fully charge your scooters batteries. See V. Batteries and Charging. n Have your authorised Pride Provider load test each battery. n Or, see the previous troubleshooting question for load testing the batteries yourself. If you experience any problems with your scooter that you are not able to solve, immediately contact your authorised Pride Provider for information, maintenance, and service. 34 www.pridemobility.com Ultimate-4 XL X. CARE AND MAINTENANCE Your scooter requires a minimal amount of care and maintenance. If you do not feel confident in your ability to perform the maintenance listed below, you may schedule inspection and maintenance at your authorised Pride Provider. The following areas require periodic inspection and/or care and maintenance. TYRE PRESSURE n If equipped with pneumatic tyres, always maintain a proper 2-2.4 bar (30-35 psi) tyre pressure. WARNING! It is important that 2-2.4 bar (30-35 psi) tyre pressure be maintained in pneumatic tyres at all times. Do not underinflate or overinflate your tyres. Low pressure may result in loss of control, and overinflated tyres may burst. Failure to maintain 2-2.4 bar (30-35 psi) tyre pressure in pneumatic tyres at all times may result in tyre and/or wheel failure, causing serious personal injury and/or damage to your scooter. n Regularly inspect your scooters tyres for signs of wear. EXTERIOR SURFACES Bumpers, tyres, trim, and the tiller boot can benefit from an occasional application of rubber or vinyl conditioner. WARNING! Do not use a rubber or vinyl conditioner on the scooters vinyl seat or tyre tread. They will become dangerously slippery and result in personal injury and/or damage to your scooter. BATTERY TERMINAL CONNECTIONS n Make certain that the terminal connections remain tight and are not corroded. n The batteries must sit flat in the battery wells. n The battery terminals should face the rear of the scooter. WIRING HARNESSES n Regularly check all wiring connections. n Regularly check all wiring insulation, including the charger power lead, for wear or damage. n Have your authorised Pride Provider repair or replace any damaged connector, connection, or insulation that you find before using your scooter again. ABS PLASTIC SHROUDS n The front tiller shroud, front shroud, and the rear shroud are formed from durable ABS plastic and are coated with an advanced formula urethane paint. n A light application of car wax will help the shrouds retain their high gloss. AXLE BEARINGS AND THE MOTOR/TRANSAXLE ASSEMBLY These items are all prelubricated, sealed, and require no subsequent lubrication. MOTOR BRUSHES The motor brushes are housed inside of the motor transaxle/assembly. They should be inspected periodically for wear by your authorised Pride Provider. Ultimate-4 XL www.pridemobility.com 35 X. CARE AND MAINTENANCE CONSOLE, CHARGER, AND REAR ELECTRONICS n Keep these areas free of moisture. n Allow these areas to dry thoroughly if they have been exposed to moisture before operating your scooter again. FUSE REPLACEMENT In the event a fuse should cease to work: n Remove the fuse by pulling it out of its slot. n Examine the fuse to be sure it is blown. See figures 20 and 21. n Insert a new fuse of the proper rating. Figure 20. Working Fuse Figure 21. Blown Fuse (Replace) WARNING! The new fuse must match the rating of the fuse being replaced. Failure to use properly rated fuses may cause damage to the electrical system and may result in personal injury. LIGHT BULB REPLACEMENT The scooters light bulbs are easily replaceable. Do not use regular automotive-type 12-volt light bulbs; your scooter is equipped with a 24-volt electrical system. Replacement light bulbs can be purchased from your authorised Pride Provider. NOTE: Use only 24-volt light bulbs. 1. Remove the light cover. 2. Gently remove the bulb by pulling it straight out. 3. Insert a new bulb of the same wattage. 4. Replace the light cover. STORING YOUR SCOOTER If you plan on not using your scooter for an extended period of time, it is best to: n Fully charge its batteries prior to storage. n Disconnect the batteries from the scooter. n Store your scooter in a warm, dry environment. n Avoid storing your scooter where it will be exposed to temperature extremes. WARNING! Always protect batteries from freezing temperatures and never charge a frozen battery. This damages the battery and can cause personal injury. For prolonged storage, you may wish to place several boards under the frame of your scooter to raise it off of the ground. This takes the weight off the tyres and reduces the possibility of flat spots developing on the areas of the tyres contacting the ground. 36 www.pridemobility.com Ultimate-4 XL XI. WARRANTY TWO-YEAR LIMITED WARRANTY Structural frame components, including: platform, fork, seat post, and frame welds. Drivetrain, including: differential, motor, and brake. ONE-YEAR LIMITED WARRANTY Your Pride Scooter is fully guaranteed for twelve (12) months from the date of purchase against faults arising due to defects in manufacture or materials. This warranty does not detract from, but is in addition to your legal rights. All electronic parts, including controllers and battery chargers, have a one (1) year warranty. Servicing to the controller or battery charger must be carried out by your authorised Pride Provider. Any attempt to open or dismantle these items renders the guarantee void on that item. NOT COVERED UNDER WARRANTY This guarantee does not extend to those items which may need replacement due to normal wear and tear (tyres, belts, bulbs, upholstery, plastic shrouds, motor brushes, fuses, and batteries), or damage to the product caused by misuse or accident for which Pride or its agent cannot be held responsible. This warranty does not include labor or service calls. BATTERIES Batteries are covered by a six (6) month warranty from the original manufacturer. Gradual deterioration in performance due to being left in a discharged state, left in cold conditions for long periods of time, or worn out through heavy use is not covered. SERVICE CHECKS AND WARRANTY SERVICE Warranty service can be performed by an authorised Pride Provider. Please contact your authorised Pride Provider for advice on the current cost affecting the service visit. REPLACEMENT UNITS The availability of replacement units is subject to the discretion of the provider, not the manufacturer. For more information regarding replacement units, contact your authorised Pride Provider. Ultimate-4 XL www.pridemobility.com 37 21 Healey Road Dandenong, 3175 Victoria, Australia www.pridemobility.com