1
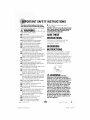
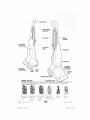
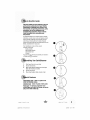
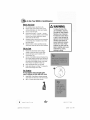
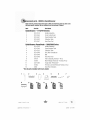
1770/1970 SERIESQUICKSTEAMER
2080 SERIESQUICKSTEAMER
POWERBRUSH
2090 SERIESQUICKSTEAMER
MULTISURFACE
SafetyInstructions
ProductView
Operations
Me
Maintenance
Troubleshooting
ConsumerServices
Replacement
Parts
ug603-5603
1770
206Jndd
1
2/28/06
4:26:45
PM
for buyinga BISSELLQuickSteamer
®
We're glad you purchased
er. Everything
tion of this complete,
Your QuickSteamer
year warranty.
Consumer
receive
high-tech
My great-grandfather
homecare
clean-
system.
it with a knowledgeable,
so, should
deep
and construc-
onededicated
you ever have a problem,
you'll
assistance.
invented
in the design,
products
Lightweight
into the design
home cleaning
We also stand behind
Services department,
leader
floor care went
is well made, and we back it with a limited
fast, considerate
a global
a BISSELL QuickSteamer
we know about
the floor sweeper
manufacture,
like your QuickSteamer
in 1876. Today, BISSELL is
and service of high quality
.
Thanks again, from all of us at BISSELL.
Mark J. Bissell
President and Chief Executive Officer
¸¸¸¸¸2 wwwbi sell00m
ii
800.237.7691
iii i_
ug603-5603
1770
206.indd
2
2/28/06
4:26:51
PM
IMPORTANTSAFETYINSTRUCTIONS
Whenus_ganeleckical
appliance,
basicprecau• Closeattentionis necessary
whenusedby
or nearchildren.
tionsshouldbeobserved,
including
thefollowing:
ThePowerCordonthisproductcontains
Readall_
instructions
beforeusingyourQUICKSTEAMER
c_ WARNING:
lead,achemicalknowntothe StateofCalifornia
to
causebirthdefectsor otherreproductive
harm.
WASHHANDSAFTERHANDLING.
of fire, electricshock, or injury:
• Donotimmerse.
• Useonlyonsurfacesmoistened
bycleaningprocess.
• Alwaysconnect
to aproperlygrounded
outlet.
SeeGrounding
Instructions.
THISMODELISFORHOUSEHOLD
USEONLY.
• Unplug
fromoutletwhennotinuseandbefore
conducting
maintenance
ortroubleshooting.
Commercialuse of this unit voidsthe
• Donot leavemachinewhenit is pluggedin.
manufacturer'swarranty.
• Donotservice
machine
whenit isplugged
in.
• Donotusewithdamagedcordor plug.
• Ifappliance
isnotworkingasit should,hasbeen
dropped,
damaged,
leftoutdoors,
or dropped
intowater,
haveit repaired
atanauthorized
Service
Center.
• Donotexposeto rain.Storeindoors.
This appliancemustbeconnectedto a grounded
wiringsystem.If it shouldmalfunctionor break
• Donotpullorcarrybycord,usecordasahandle,
close
dooroncord,pullcordaround
sharpcorners
oredges,
run down,groundingprovidesa safe pathof least
appliance
overcord,orexpose
cordtoheated
surfaces.
resistancefor electricalcurrent,reducingthe riskof
• Donotcarrythe appliancewhilein use.
electricalshock.Thecordfor thisappliancehasan
conductoranda grounding
• Donotunplugbypullingon cord.Unplug
bygrasping equipment-grounding
theplug,notthecord.
plug.It mustonlybe pluggedinto an outletthat is
• Donothandle
plugorappliance
withwethands.
properlyinstalledandgroundedin accordancewith
all local codes and ordinances.
• Donotputanyobjectintoappliance
openings,
usewith
blocked
opening,
or restictairflow.
Grounded
• Donotexposehair,looseclothing,fingersor body
Outlets
partsto openingsor movingparts.
• Donotpickup hotor burningobjects.
• Donotpickupflammableor combustiblematerials
(lighterfluid,gasoline,kerosene,
etc.)or useinthe
presenceof explosiveliquidsor vapor.
• Donotuseappliancein anenclosedspacefilled
Improper
withvaporsgivenoff byoil basepaint,paintthinconnectionof the equipment-grounding
ner,somemothproofingsubstances,
flammable
conductor can result in a risk of electrical
dust,or otherexplosiveor toxicvapors.
shock. Check with a qualified electrician or
• Donotpickuptoxicmaterial
(chlorine
bleach,
ammonia,
service person if you aren't sure if the
draincleaner,
gasoline,
etc.).
outlet is properly grounded.DO NOTMODIFY
• Donotmodifythe 3-pronggroundedplug.
THE PLUG.If it will not fit the outlet, have
• Donotallowto beusedasa toy.
a proper outlet installed by a qualified
• Donotuseforanypurposeotherthandescribedin
electrician. This appliance is designed for
thisUser'sGuide.
use on a nominal 120-volt circuit, and has
• Useonlymanufacturer's
recommended
attachments.
a groundingattachment plug that looks
• Useonlycleaningproductsformulatedby
like the plug in the drawing above. Make
BISSELL
for useinthisapplianceto prevent
certain that the appliance is connected to
internalcomponentdamage.Seethe Cleaning
Fluidsectionof thisguide.
an outlet having the same configuration as
the plug. No plug adapter shouldbe used
• Keepopeningsfree of dust,lint,hair,etc.
with this appliance.
• Keepapplianceon a levelsurface.
• Turnoff all controlsbeforeunplugging.
• Beextracarefulwhencleaningstairs.
www.bisseJJ.com
800.237.7691
WARNING:Toreduce
the
risk
SAVETHESE
INSTRUCTIONS.
GROUNDING
INSTRUCTIONS
WARNING:
ug603-5603
1770
206.indd
3
2/28/06
4:26:52
PM
Quick Release--____
Cord Wrap TM
PowerCord-----___
--Handle
Assembly
CleanWater/
SolutionTank
LowerCord
Wrap
UpperBody
-_--Lower Body
VentCover
LargeEasy
RollingWheels
Power
Switch
FoamFilter)
Detent
Lever
Tank
CollectionTankLatch-/
BISSELLFormulas:
Removable
Nozzle
Theseitems are availablefor purchasewith your model. To order replacementparts or additional tools or
formulas, pleaserefer to page 11.
48 oz.Fiber
C4eansng
Formula
withScotohgard
Protector
TM
TM
48 oz,Multi
Allergen
Removal
Formulawith
Scotohgard
Protector
TM
TM
TM
www.bissell.com
ug603-5603
1770
206Jndd
4
48 oz.PetOdor
and%ilRemoval
Formulawith
Scotohgard
Protector
TM
TM
48 oz,BISSELL
22 oz,
Natural
Orange
ToughStain
Extract
Formula
w_th
PreCleaner
Sootc/TgardProtector
TM
32 oz,
HardFloor
Solutions
TM
TM
800.237.7691
2/28/06
4:26:54
PM
to Use this Guide
This User's Guide has been designed to help you
get the utmost satisfaction from your BISSELL
QuickSteamer Lightweight Deep Cleaner. You'll
find assembly and operating instructions, safety
precautions, as well as maintenance and
troubleshooting instructions. Please read this
Guide thoroughly before assembling your
Deep Cleaner.
Payparticularattentionto the productdiagram,assembly
instructions,andpart names.Locateand organizeall parts
beforeassembly.Familiarizeyourselfwith the partsand
wherethey go. Followingthis User's6uidewill greatly
enhanceyourability to get the mostperformancefrom your
BISSELLQuickSteamerfor manyyears.
Your QuickSteamercomesin three, easyto
assemblecomponents:
Handleassembly
UpperHandleassembly
Clean/Solution
Tank
3 Screws
The only thing you will need to assemble your cleaner is
a Phillips head_
screwdriver.
g YourQuickSteamer
1.
2.
3.
4.
5.
SlideUpperBodyintoLowerBody.
Securewith Screws.
SlideStrainRelieverHandledowninto Upper
Bodyuntil it will go nofurther.
Securewith Screw.
PlaceClean/Solution
Tankon backof unit.
0
Features
Clean/SoluUon
Tank- holds1/2-gallonof hot
water andcleaningsolution.
CollectionTank- holds1/2-gallonofdirtywater.
Power Cord- for storage,wrap Power Cord
aroundUpperand Lower CordWraps,andsecure
plugto Cordwith moldedclip.
800.237.7691
www.bissell,c0m
ug603-5603
1770
206.indd
5
2/28/06
4:27:17
PM
to UseYourBISSELLQuickSteamer
BeforeYou Clean
1.
Planactivities to give carpettime to dry.
2.
Removeeasily moved furniture (chairs, lamps,
coffee/cocktailtables, etc.) from room if needed.
Vacuumcarpet thoroughly.
3.
4.
Decidewhere to begin -- and end -- your job.
Clean in 3' X 4' sections,starting in areasfarthest
from exit. Plan to leavea path open to empty
soiled water and refill cleaner.
5.
Carpetingwill dry in three to four hours,depending
on carpetstyleand air circulationin room.A floor
fan speedsdrying.
6.
Replacefurnitureon damp carpetingby placing
waxed paperunder legs until floor dries completely.
Fill the Tank
1.
Removethe Clean/SolutionTank by lifting it
straight up,then away from the Lower Body.
2.
Unscrewthe black cap at the bottom of the
Clean/SolutionTank.
3.
Addone of the BISSELLAdvancedCleaningformulas for DeepCleaningmachinesto the formula fill
line on the Clean/Solutiontank. Fill the rest of the
4.
5.
WARNING:
Toreducethe risk d fire.
useonlyBISSELL
Cleaning
Formulasfor DeepCleaning
Machines.Useof cleaning
formulasthat containlemon
or pineoil maydamagethis
applianceandvoidwarranty.
Chemicalspot cleanersor
solvent-basedsoil removers
shouldnot be used.These
productsmay reactwith the
plasticmaterialsusedin your
QuickSteamer,
causing
crackingor pitting.
tank with hot (not boiling)tap water to the water
fill line. Replaceand tighten the black cap.
PlaceClean/SolutionTankon Lower Body.
RotateQuick ReleaseCord WrapTM to release the
PowerCord and plug into an outlet.
Pre-treat stubborn stains and highly soiled
carpet in hallways and other high-traffic areas.
:
6
ii
1.
UsingBISSELL
ToughStain pre-cleaner,generously
sprayevenlyoversoiledarea,do not overwetcarpet.
2.
Wait 3 -5 minutesbefore deep cleaning.
www bissellcom
800.237.7691
iii i_
ug603-5603
1770
206Jndd
6
2/28/06
4:27:21
PM
_g
1.
2.
With your foot, press the red PowerSwitch
[located in foot of unit] ON.
With foot, press the Detent Leveron right side of
Lower Body.
3.
DepressSpray Triggerto spray cleaning solution.
Do not overwet.
4.
To suction u _ water, repeat motion over same
area without depressingTrigger.
5.
RepeatSteps 3 and4 until no more dirt can
be removed.
6.
Continueto clean entire carpet,working in
3' x 4' sections.
7.
Emptythe CollectionTankwhen dirty water reaches
the full line, or when the Clean/Solution
Tank is
empty.Seepage8 for instructions.
If Floor Nozzlestops spraying,turn Power Switch
OFFand check water and cleaning solution levels.
Refill if needed.
8.
1.
Attach Hard FloorToolto Unit.
2.
Removethe CollectionTank(refer to #3a and b in
the RoutineMaintenancesection on page 8)
A. For 1770/1970 series it is necessaryto
removethe CrossAction Brushfirst.
Usingyour thumbs squeezethe 2 grey tabs
towards the outside of the unit. Push down
at the same time and releasethe Cross
Action Brush.
3.
4.
Attach the Hard FloorToolby hooking it into the
front of the removablenozzle and swinging it
down until the tabs pop into place.
Replacethe CollectionTank. Besure to attach the
2 latches.
5.
Fill Clean/SolutionTankwith BISSELLHard Floor
SolutionsTM to FORMULAfill line.
6.
Fill Clean/SolutionTankwith hot (not boiling)tap
water to the WATERfill line.
7.
Follow steps 1-8 in Deep Cleaningsection above.
2080/2090 series
1770/1790 series
www.bissell.com
ug603-5603
1770
206.indd
800.237.7691
7
2/28/06
4:27:25
PM
A WARNING:
ianing Fluid Section
KeepplentyofgenuineBISSELLFiberCleansing
Formula
TM on handsoyoucancleanandprotect
wheneverit fitsyourschedule.Alwaysuse
genuineBISSELL
deepcleaningformulas.
ToReducethe Risk of Fire
and ElectricShockdue to
internalcomponentdamage,
useonly BISSELLcleaning
fluids intendedfor use with
the deep cleaner. NonBISSELLcleaningsolutions
may harm the machineand
voidthe warranty.
48 oz,BBSELL
48 oz,BBSELL
48 oz BBSELL
48 oz.BBSELL
FiberGeansing
Formula with
Scotchgard
Protector
item# 0710A
MultiAllergen
Removal Formula
wiX Scotchgard
Protector
item # 0720A
PetOdorandSoil
Removal Formula
withScotchgard
Protector
item # 0730A
NaturalOrange
HardFloorSolutions
ExtractFormulawith
item # 0484
Scotchgard Protector
item# 0740
TM
TM
TM
TM
TM
TM
Maintenance
WhenYou're Done
_F.
2.
3.
Unplug PowerCord from outlet.
Removeand empty CollectionTank.
a. ReleaseCollectionTanklatches [1 eachside] by
pullingup from bottomof latchandthenout.
32 oz,BBSELL
TM
WARNING:
Toreducethe riskof injury
from movingparts and/or
electricalshock,turnPower
Switch OFFand disconnect
plug from electricaloutlet
boforeperformingmaintenance
or troubleshooting
checks.
em
ok
of
T
ouroutconten
nkusin
oenin
t
b. Carefullylift CollectionTankfrom Lower Body.
c. CarryCollectionTankto a toilet or sink.To
by handb
d. RinseCollectionTankthoroughly.
e. Removelint and hairfrom RedGasketin base
of unit. (Donot removegasket)
4.
5.
Clean
Nozzle
Window
by
lifting
latch
and
from machine.Rinseunder running water. When
finished replace Nozzleand securewith latch.
ReplaceCollectionTankon Lower Body and
securewith latches.
6.
Wrap PowerCord around Quick ReleaseCord
Wrap on side of QUICKSTEAMER
®.
7.
Wipeall surfaceswith a soft cloth. Store cleaner
upright in a protected,dry area.
NOTE:You may have cleaning solution
remaining in the Clean/Solution Tank. You
may store your QuickSteamer this way
for the next cleaning task, but never keep
soiled solution in the Collection Tank.
TM
8
ug603-5603
www,bissell,com
1770
206.indd
8
A CAUTION:
Do not store unit
where freezing may
occur. Damage to
internal components
may result.
800.237.7691
2/28/06
4:27:26
PM
To Install the Re lacement Brush Belt
*QuickSteamer PowerBrush models only
|.
2.
TLrnthe machineoff and unplug from wall outlet.
RemoveClean/Solutionand CollectionTanks.
3.
Lie machinedown to access the bottomof
the machine.
4.
With a Phillips head screwdriver,(_ unscrew the
Brush Coverand remove.
5.
Removethe Brush EndCap and removebelt
from brush.
6.
Brush can now be removed.
7.
Belt can be removedby slidingoff the Motor Pulley.
8.
Clean or replace belt. Attach belt to Motor pulley
and brush, insert brushinto right side EndCap.
Reattachthe left End Capand slide brush back
into place.
9.
10.
Replacethe brush cover and screw into place.
_t
0
@
0
BrushCover
0
0
fJ
0
0
www.bissell,com
ug603-5603
1770
206.indd
L
li
_
G
800.237.7691
9
2/28/06
4:27:44
PM
iubleshooting
Reduced Spray Or No Spray.
PossibleCauses
Remedies
1. RefillTankwithwater
and formula
1. CleanTankempty
Deep Cleaner Not Picking Up Cleaning Solution.
PossibleCauses
Remedies
1. CollectionTanknot aligned/secured
1. CheckTankproper alignment
and secure with side latches
2. DirtyTankfull
3. RemoveableNozzleinstalledimproperly
2. EmptyTank
3. Align four "hooks" into bottom
first, then snap into place on top
Thankyoufor selectinga BISSELLproduct.
If youshouldhappento needassistanceduringassemblyor operations,
call1-800-237-7691
Pleasedo notreturnthis productto the store
;SELLConsumerServices
For information about repairs or replacement parts, or questions about your warranty, call:
BISSELLConsumerServices
1-800-237-7691
Monday - Friday
8 a.m.-
10 p.m. EST
Saturday
9 a.m.-
8 p.m. EST
Or write:
BISSELLHOMECARE,
INC
POBox3606
GrandRapidsMI 49501
ATrN: ConsumerServices
Or visitthe BISSELLwebsite- www,bissell,com
WhencontactingBISSELL,havemodelnumberof unit available.
Pleaserecordyour ModelNumber:
Pleaserecordyour PurchaseDate:
NOTE:Pleasekeepyouroriginalsalesreceipt.It providesproofof dateof purchasein the event
ofa warrantyclaim.See"Warranty" on page12 for details.
10
ug603-5603
www.bissell.com
1770
206.indd
800.237.7691
10
2/28/06
4:27:48
PM
RB placement parts - BISSELL QuickSteamer
Belowislistofcommon
replacement
parts*.Whilenotallofthesepartsmayhavecome
withyourspecific
machine,
allareavailable
toyouforpurchase,
ifdesired.
Item
PartNo.
PartName
QuickSteamer - 1770/1970 Series
1
2
203-5519
203-5545
HandleAssembly
CrossAction Brush
3
4
203-5537
203-5522
Clean/SolutionTank
CollectionTank
5
203-5547
HardFloorTool
QuickSteamer PowerBrush - 2080/2090 Series
1
3
203-5520
203-5540
HandleAssembly
Clean/SolutionTank
4
6
203-5523
203-5546
CollectionTank
Dirt Lifter PowerBrush
7
8
203-5549
203-5548
Belt
HardFloorTool
9
0710A
FiberCleansingFormula 48 oz
10
11
12
0720A
222-0400
0730A
Multi-AllergenRemoval Formula48 oz
ToughStainPreCleaner
Pet Odorand Soil RemovalFormula48 oz.
13
0484
HardFloorSolutions
TM
TM
TM
* Not all parts includedwith every model.
www.bissell.com
ug603-5603
1770
206.indd
3
4
1C
11
12
800.237.7691
11
2/28/06
4:27:49
PM
- BISSELL QuickSteamer
This warranty givesyou specific legal rights, and you may also have otner rtcqts wntcn may vary from state
to state. If you need additional instruction regarding this warranty or nave auesttonsregardingwhat it may
cover, pleasecontact BISSELLConsumer Servicesby E-mail,telephone, or regular mal as describec below.
LimitedOne YearWarranty
Subjectto the *EXCEPTIONSAND EXCLUSIONSidentified below, upon receipt of the product BISSELL
Homecare, Inc. will repair or replace (with new or remanufacturedcomponents or products), at BISSELL's
option, free of charge from the date of purchase by the original purchaser,for one year any defective or
malfunctioning part.
See information below on "If your BISSELLproduct should require service".
This warrantyappliesto productusedfor personal,and not commercialor rentalservice.This warrantydoes not
applyto fans or routinemaintenancecomponentssuch asfilters, belts,or brushes.Damageor malfunctioncaused
by negligence,abuse,neglect,unauthorizedrepair,or any other use not in accordancewith the User'sGuideis not
covered.
If yourBISSELL
productshouldrequireservice:
Contact BISSELLConsumer Services to locate a BISSELLAuthorized Service Center in your area.
If you need informationabout repairs or replacement parts, or if you have questions about your warranty,
contact BISSELLConsumer Services.
Website or E-mail:
www.bissell.com
Usethe "Customer Services" tab.
Or Call:
BISSELLConsumer Services
1-800-237-7691
Monday - Friday8 a.rn. - 10 p.m. ET
Saturday 9 a.rn. - 8 p.m. ET
Or write:
BlSSELLHomecare Inc.
PO Box 3606
Grand Rapids M149501
ATTN:Consumer Services
BISSELLHOMECARE,
INC,IS NOTLIABLEFORINCIDENTAL
OR
CONSEQUENTIAL
DAMAGESOFANYNATURE
ASSOCIATED
WITHTHE
USEOFTHISPRODUCT,
BISSELL'SLIABILITY
WILLNOTEXCEED
THE
PURCHASE
PRICEOFTHEPRODUCT,
Some states do not allow the exclusionor limitation of incidentalor consequentialdamages, so the above
limitation or exclusionmay not apply to you.
*EXCEPTIONS
AND EXCLUSIONS
FROMTHETERMSOFTHE LIMITEDWARRANTY
THISWARRANTY
ISEXCLUSIVE
ANDIN LIEUOFANYOTHERWARRANTIES
EITHER
ORALORWRITTEN,
ANYIMPLIEDWARRANTIES
WHICHMAYARISEBYOPERATION
OFLAW,INCLUDING
THEIMPLIEDWARRANTIES
OFMERCHANTABILITY
AND
FITNESS
FORA PARTICULAR
PURPOSE,
ARELIMITED
TOTHEONEYEARDURATION
FROMTHEDATEOFPURCHASE
ASDESCRIBED
ABOVE,
@2006 BISSELLHomecare, Inc
Somestatesdo not allow limitationson how long an impliedwarrantylasts,
so the abovelimitationmay not applyto you,
NOTE:Pleasekeep your originalsales receipt.
It is your warranty.
Grand Rapids,Michigan
All rights reserved.Printedin China
Part Number 603-5603
Rev 02/06
Visit our website at:
www.bisselLcom
Scotchgard is a trademark of 3M
12
www.bissell,com
ug603-5603
1770
206.indd
800,237.7691
12
2/28/06
4:27:56
PM